Multak Technology DUAL-STAR Wireless Microphone User Manual MS61 USER MENUL
Shanghai Multak Technology Co., LTD. Wireless Microphone MS61 USER MENUL
Users Manual

Basic Operation
1.Connect A/V cable to TV and receiver.
2.Connect Power to the receiver.
3.Turn on TV and set the channel to Video (External A/V port).
4.Press the power button to switch the receiver on.
5.Turn the Microphone’s power button on.
6.Select the song.
7.Press the play/stop button to start and stop the music.
8.Please read the Microphone operation for more information.
Receiver operation
Power On / Off
1. Press to turn on the system. “Song List” menu will be displayed. (It will take around 15
senconds for loading).
2. After turning on the system, hold by 2 seconds, to switch system off.
Microphone operation
1. Power On / Off
1.1 Press to turn on the microphone.
1.2 After turning on the microphone, hold by 2 seconds, to switch it off.
2. Song List
On the “Song List” screen, use to select a song.
Press to navigate to the previous/next page.
Press to play music.
On the “Song List” screen, hold or by 3 seconds, to browse the song list quickly.
On the “Song List” screen, double click to enter “Record List”. Double click to return to
“Song List”.
3. Playing
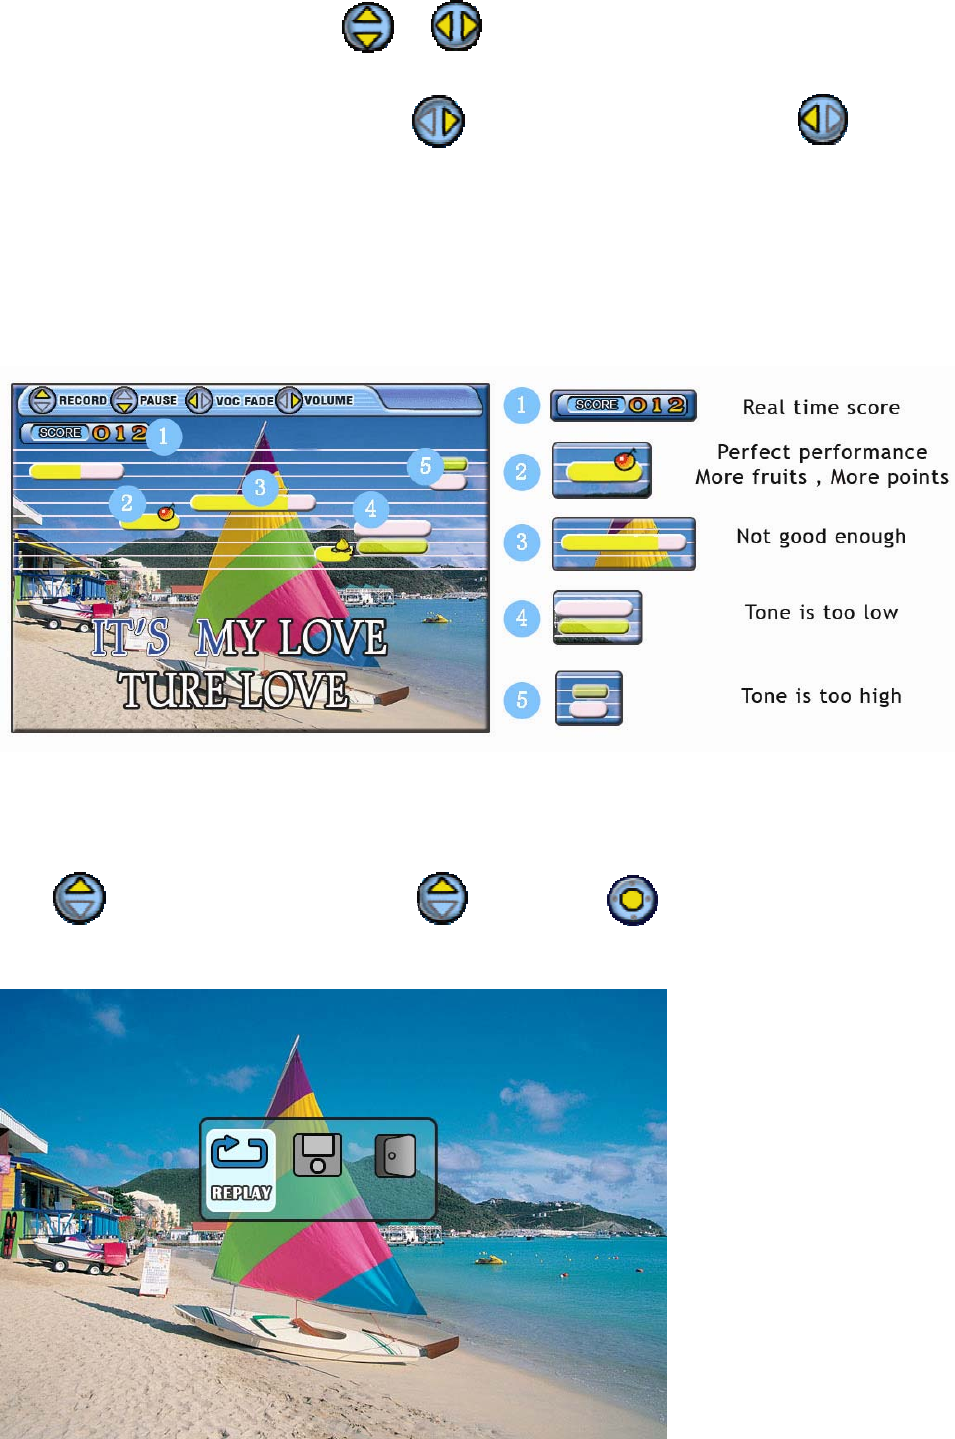
iFUN Function
iFUN is a powerful scoring system. Find the score at the top left corner and real time pitch display on the
playing screen.
When playing a karaoke song, you can perform the following actions.
Record
Press to enter “Record” function, press again or press to exit.
After recording, you can choose “Replay”, “Save”, or “Exit”.

Replay: Play back the recorded song.
Save: Save into the “Record List” in SD card (default path). Remained space must be over 5MByte.
Totally can accept 20pcs.
Exit: Return to “Song List” without saving the recorded song.
Note
: If there is no SD card inserted, the recorded songs can be saved in internal flash and added to
record list automatically. The internal flash can hold 5pcs.
If SD card is inserted, the recorded songs in SD card and internal flash will be all displayed in
“Record List”. The songs saved in internal flash can not be accessed by computer.
Pause
Press to pause the song and press again to resume.
Vocal fade
Press to switch on/off the vocal fade function.
Adjust Volume
Press to enter volume adjust menu.
Press to select “MIC VOL”, “MUSIC VOL”, “ECHO”, or “KEY”.
MIC VOL: Volume of microphone.
MUSIC VOL: Volume of music.
ECHO: Volume of echo.
KEY: Key or pitch of the music.

Press to adjust.
It will auto exit after 5 seconds without any operation or press to exit immediately.
4. Record list
On the “Song list” screen, double click to enter “Record List”.
Press to select the recorded song and press to play.
Press to enter “Record Menu”.
Press to select “Delete”, “Delete All”, or “Exit”.
Delete: Delete selected song.
Delete All: Delete all recorded songs.
Exit: Return to “Record List”.
Press to confirm.
5. Setup
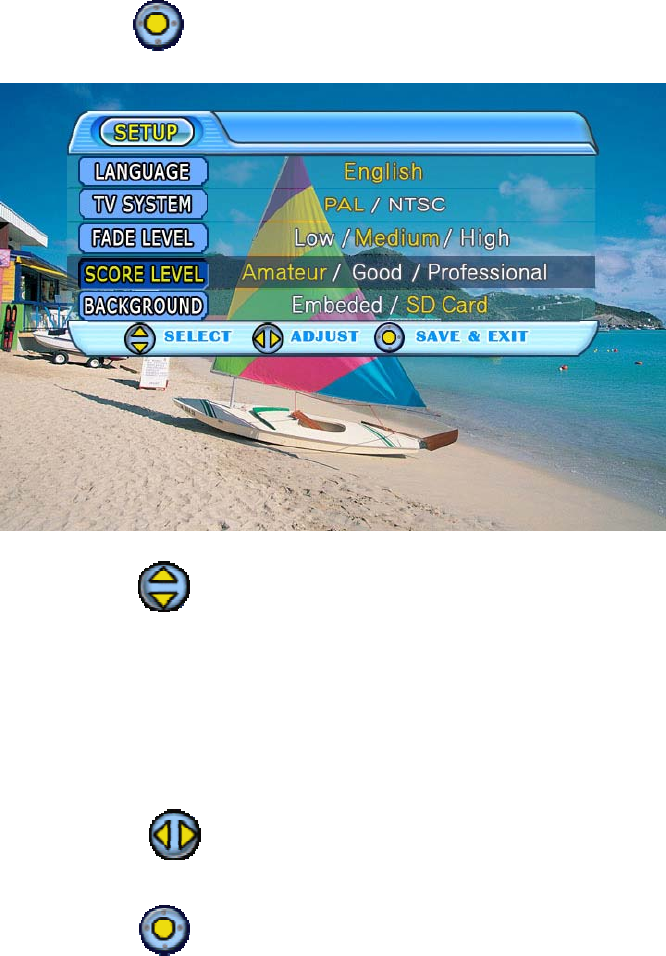
Hold by 3 seconds to enter “Setup” menu.
Press to select setup item.
LANGUAGE: Choose different menu language.
TV SYSTEM: Choose PAL or NTSC.
FADE LEVEL: Change the level of vocal fade.
SCORE LEVEL: Change score level.
BACKGROUND: Choose background from SD card or embedded pictures.
Press to adjust.
Press to return to “Song List” screen.
6. Download
Miic Star Karaoke Microphone supports songs, still pictures and upgrade software download. All
downloaded files can only be saved in SD card.
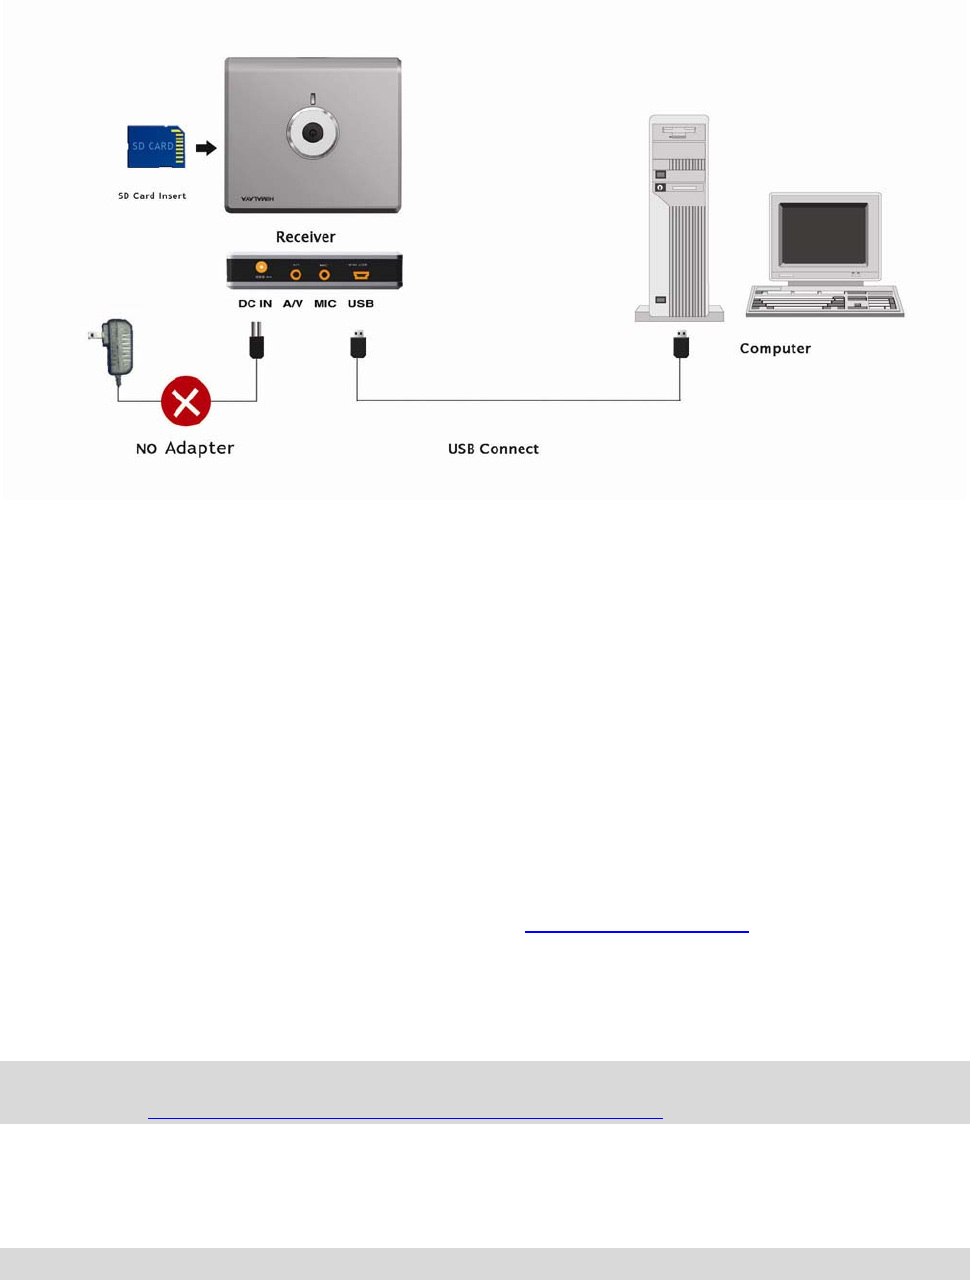
Under the root directory of SD card, it will create a directory "KARAOKE" with four subdirectories:
“UPDATE”,”SONG”,”BGV”, and ”REC”.
\\KARAOKE\
UPDATE: Downloaded update file.
SONG: Downloaded song list.
Three formats are supported.
z MUK: Proprietary format for karaoke songs.
z MP3: MP3 files (Bit rate < 192K).
z AVI: MPEG4 (Video format: DIVX, XVID; Audio format: PCM, ADPCM, MP3).
BGV: Downloaded background images. (JPEG format, maximum resolution: 1280x1024)
REC: Recorded song list.
7. Software Upgrade
Save upgrade software file “UPGRADE.IMG” to \\KARAOKE\UPDATE on SD card.
Restart the microphone. When the system detects the upgrade file, it will prompt and upgrade
automatically if confirmed.
Requires switching off when upgrade finished.
NOTE:
The “Miic Star ***” software requires a Window-XP or Vista PC.
Download link: http://www.multak.com/KaraokeDownloader/index.htm
8. Pairing Code
Pairing code is used to create a unique match between microphone and receiver from the same set
NOTE:
The default pairing code has been set during manufacturing.
When to do pairing?
When microphone can not be connected to the receiver, it needs to be paired.
How to do pairing?
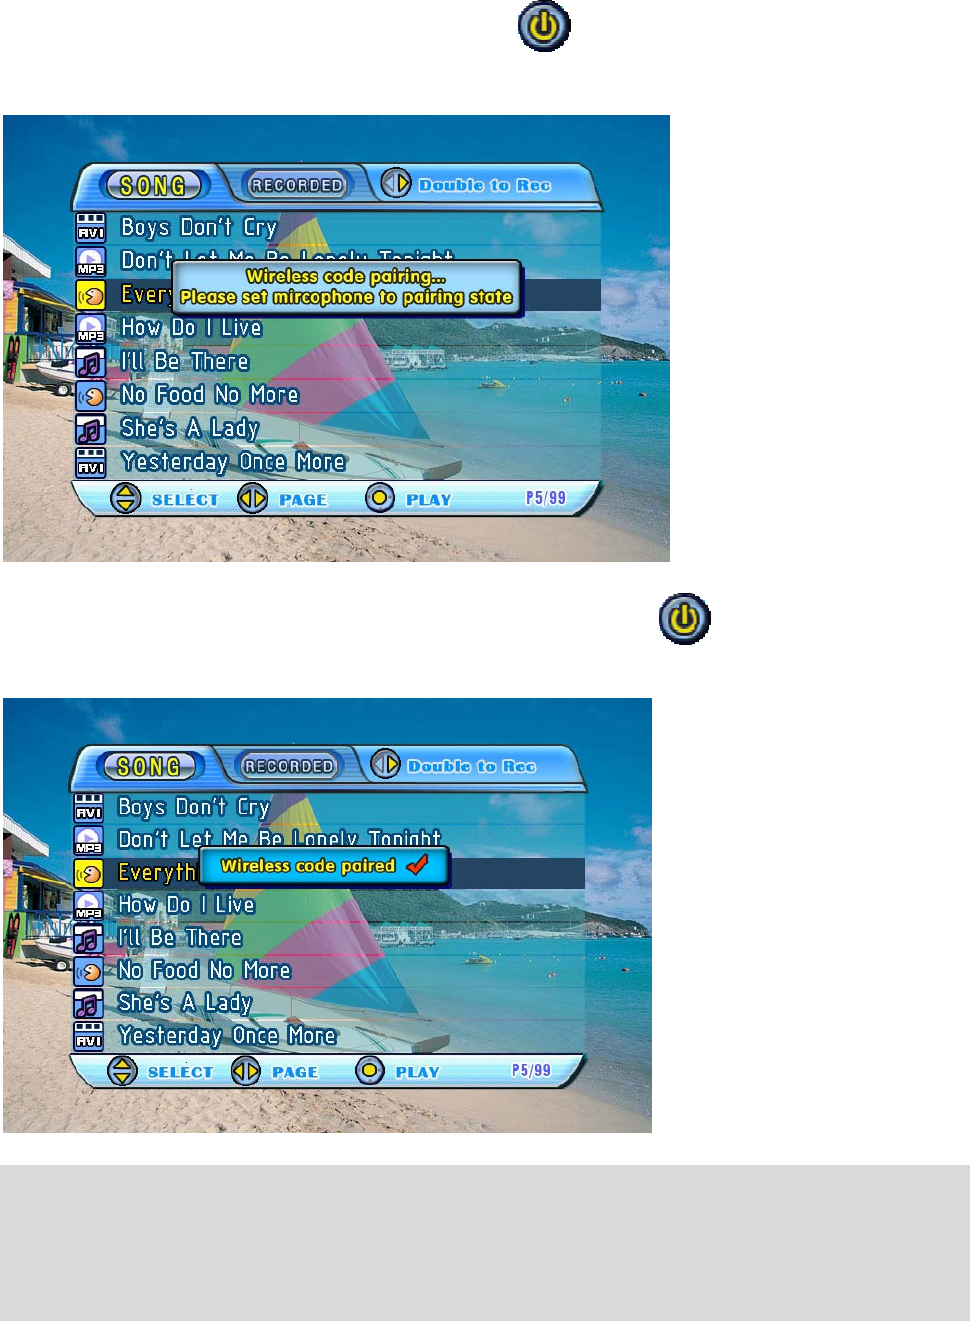
Receiver: When receiver is shutting down, hold on until pairing code prompt shown on “Song
List” screen, it enters the pairing state.
Microphone: When microphone is shutting down, hold by 5 seconds to enter the
pairing state.
NOTE:
If the microphone’s pairing function was turned on first, you will not see any prompt on the
screen as receiver is still switched off. The LED on the microphone will keep flashing. When you turn on
the receiver’s pairing function, “wireless code paired” will be displayed on the screen.
Trouble shooting
●NO POWER:
-Make sure that your local AC power source is within the
operating voltage range of the AC adaptor.
-Check the power cable connector.
-Reconnect the AC adaptor.
●USING BATTERIES:
-Make sure that (+-) of AA batteries in the correct direction.
-Check for battery wear.
NO SOUND:
-Check the cable connectors if connected properly.
-Check the volume controls on the Mic and TV set.
-Check if the TV is already in the video mode
NO PICTURE:
-Check the AV cable connectors if connected properly.
-Check if the TV set is in A/V mode.
-Check for power adapter.
WIRELESS MICROPHONE NO SOUND:
-Check the batteries. If the batteries will run out of power, the LED under the power button will blink.
-Set the pairing code again.
Maintenance
1.Do not store in a very high temperature or humid place.
2.Do not drop or apply heavy impact on it.
3.Do not use strong solvents or chemicals when cleaning.
4.Do not use sharp object on the keypad.
5.Do not disassemble the product.
6.Remove the batteries inside the battery compartment (if any) when not in use for a long period of
time.
Notice For User
This device complies with part 15 of the FCC Rules. Operation is subject to the following two
conditions:
1. This device may not cause harmful interference.
2. This device must accept any interference received including interference that may cause undesired
operation.
●FCC Warning
This equipment generates or uses radio frequency energy. Changes or modifications to this equipment
may cause harmful interference unless the modifications are expressly approved in the instruction
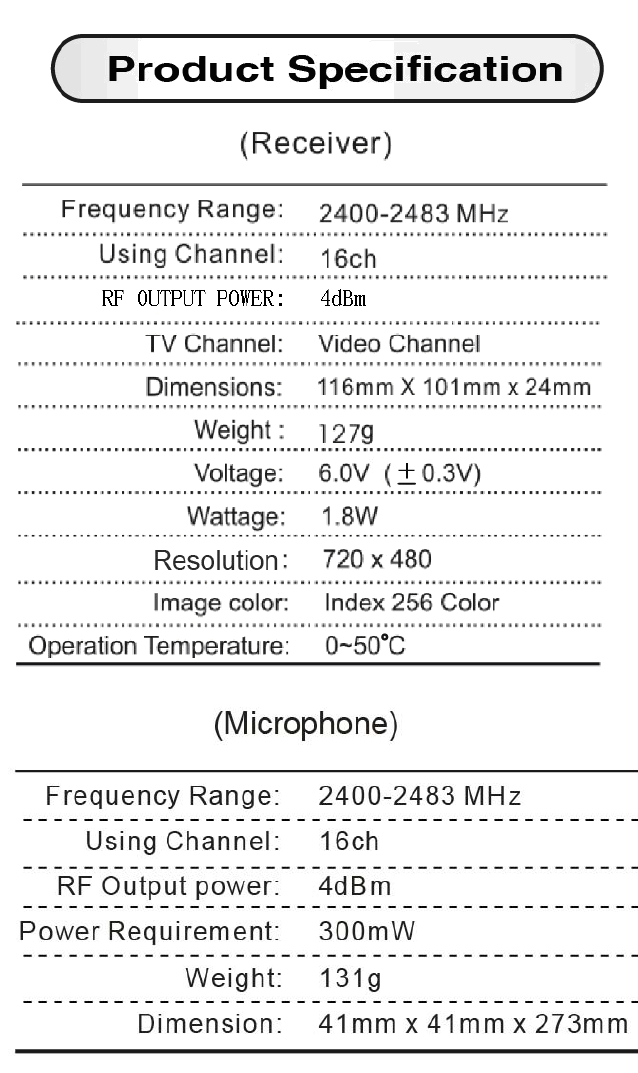
2405~2480MHz
2405~2480MHz

manual. The user could lose the authority to operate this equipment if an unauthorized change or
modification is made.
Product Disposal Instructions
The symbol shown here and on the product means that the product is class as Electrical
Equipment and should not be disposed with other household or commercial waste at the end
of its working life.
The Waste of Electrical and Electronic Equipment (WEEE) Directive (2002/96/EC) has been
put in place to recycle products using best available recovery and recycling techniques to
minimize the impact on the environment, treat any hazardous substances and avoid the
increasing landfill.
Product disposal instructions for residential users
When you have no further use for it, please remove any batteries and dispose of them and the product as per you
local authority’s recycling process. For more information please contact you local authority or the retailer where
the product was purchased.