Muratec F 520 Users Manual Quick Reference Version2
f520 72b2425e-4abf-4dcf-a620-d65df5768363 Muratec Fax Machine F-520 User Guide |
2015-02-09
: Muratec Muratec-F-520-Users-Manual-558818 muratec-f-520-users-manual-558818 muratec pdf
Open the PDF directly: View PDF ![]() .
.
Page Count: 28
Canceling the transmission .................................................1
Sending a Fax using the Address Book ...............................2
Sending to an e-mail address using the Address Book ......4
Basic copy .............................................................................6
Scan to an e-mail address ....................................................7
Scan to a network folder ......................................................9
Scan to an FTP server .......................................................12
How to register new destinations ......................................15
PC faxing ............................................................................21
PC printing .........................................................................22
Clearing a paper jam .........................................................23
Clearing a document jam ...................................................25
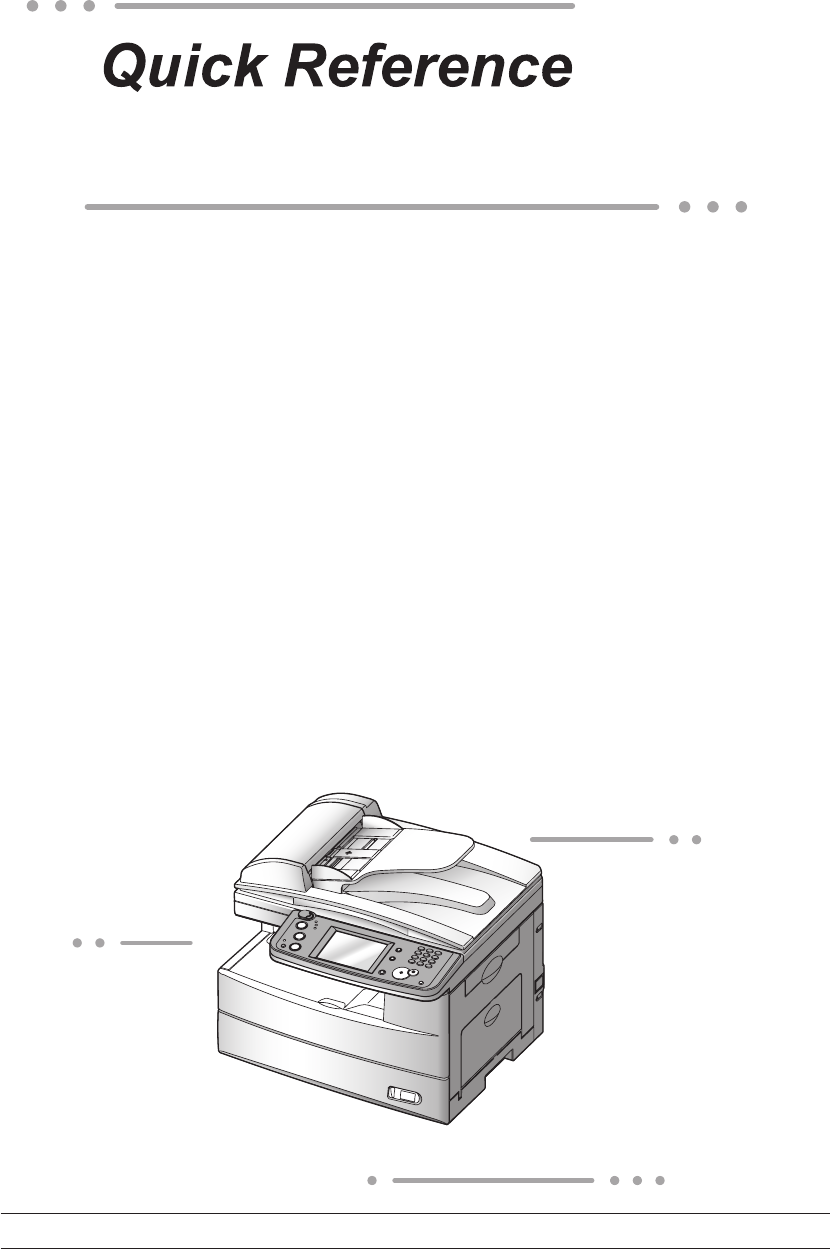
For MFX-2030/1430 F-560/520
NOTE: MFX-1430 and F-520 are sold in North America market only.
1
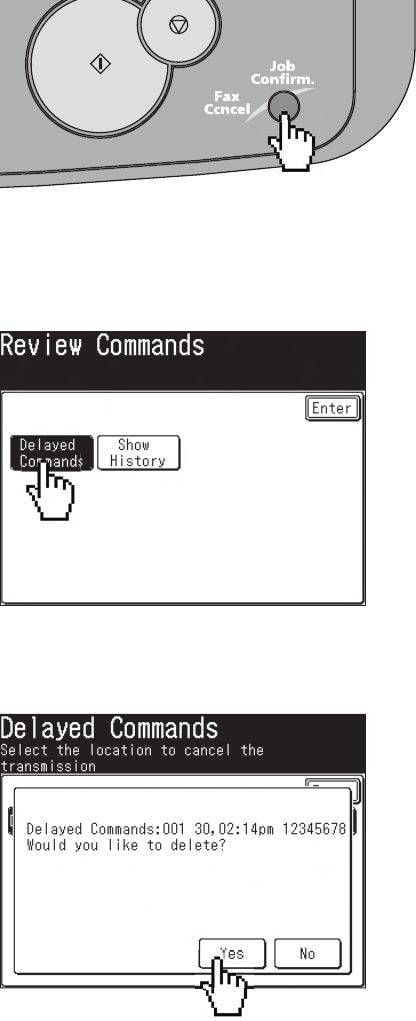
Canceling the transmission
1
Press [Fax Cancel /Job Confi rm.].
2
If your machine is currently transmitting, skip to step 5.
To cancel a scheduled job, proceed to the next step.
3
Press [Delayed Commands].
4
Select the command to be canceled.
5
Press [Yes].
2
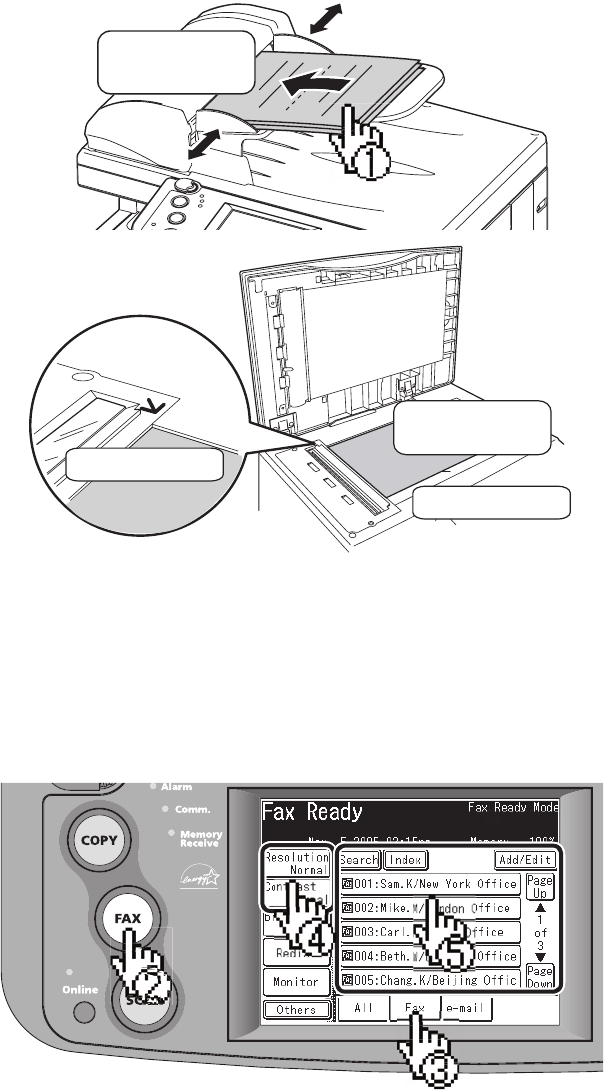
Sending a Fax using the Address Book
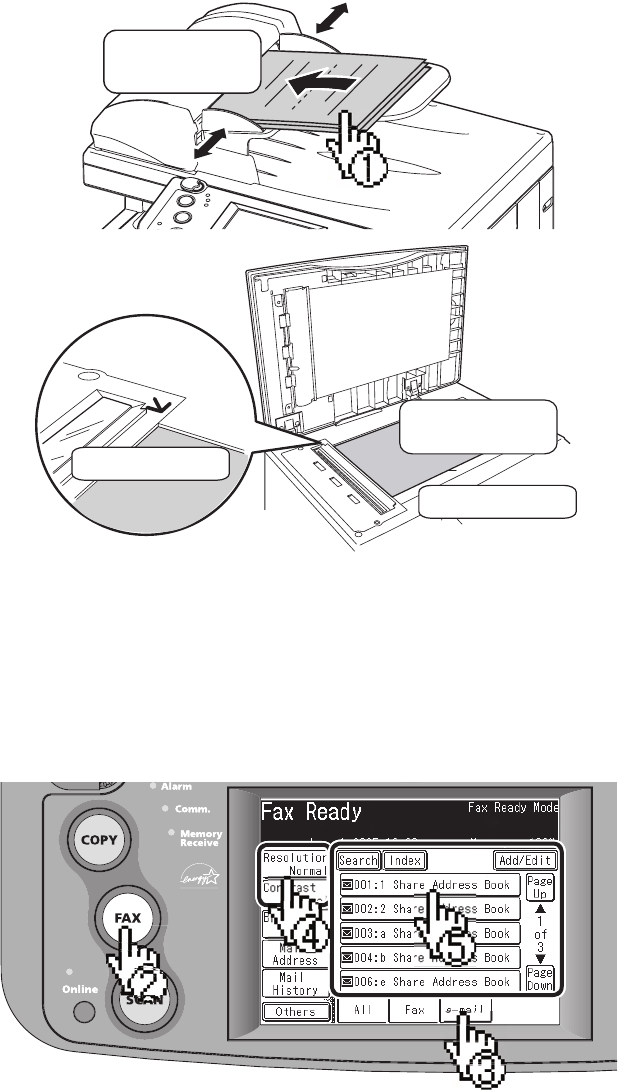
1
Set the document.
F
ace up
Face down
Align to the corner
Close the cover
2
Press [Fax] on the control panel.
3
Select the “Fax” tab at the bottom of the display.
4
Adjust any additional fax settings (ex. Resolution, Contrast).
5
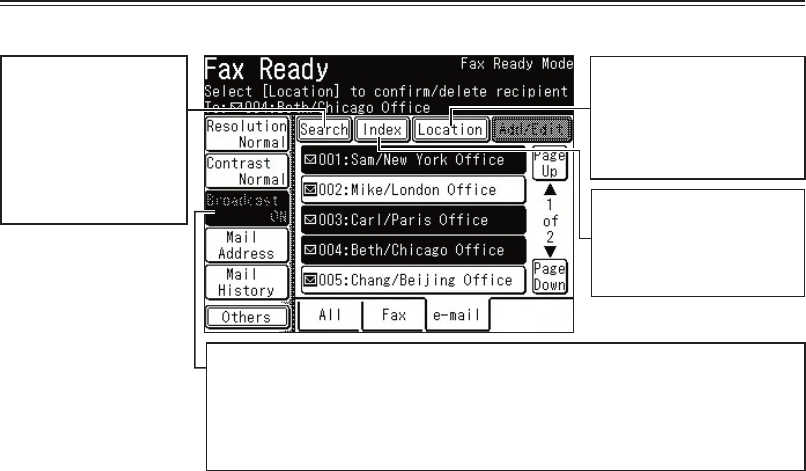
Select the destination.
3
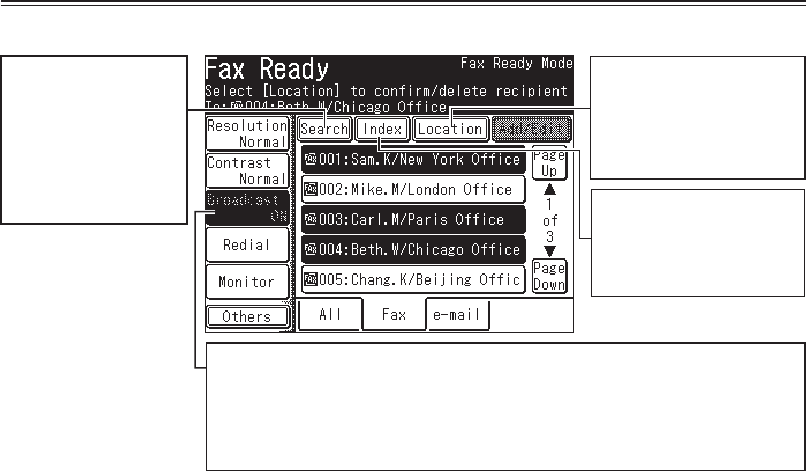
Operating Tip
Location
You can review or delete
your selected destination
by press this.
Broadcast
You can send a fax or e-mail to multiple destinations, press [Broadcast]:
1 Press [Broadcast] and toggle this button to [ON].
2 Select multiple locations by simply touching them.
3 Press [Start] on the control panel to begin the transmission.
Search
You can search a fax
number or an e-mail
address by entering
the contact name or
part of the contact
name. Index
Displays the destination
in alphabetical, group or
numeric order.
4
Sending to an e-mail address using
the Address Book
1
Set the document.
F
ace up
Face down
Align to the corner
Close the cover
2
Press [FAX] on the control panel.
3
Select the “e-mail” tab at the bottom of the display.
4
Adjust any additional settings (ex. Resolution, Contrast).
5
Select the destination.
5
Operating Tip
Location
You can review or delete
your selected destination
by press this.
Broadcast
You can send a fax or e-mail to multiple destinations, press [Broadcast]:
1 Press [Broadcast] and toggle this button to [ON].
2 Select multiple locations by simply touching them.
3 Press [Start] on the control panel to begin the transmission.
Search
You can search a fax
number or an e-mail
address by entering
the contact name or
part of the contact
name. Index
Displays the destination
in alphabetical, group or
numeric order.
6
Basic copy
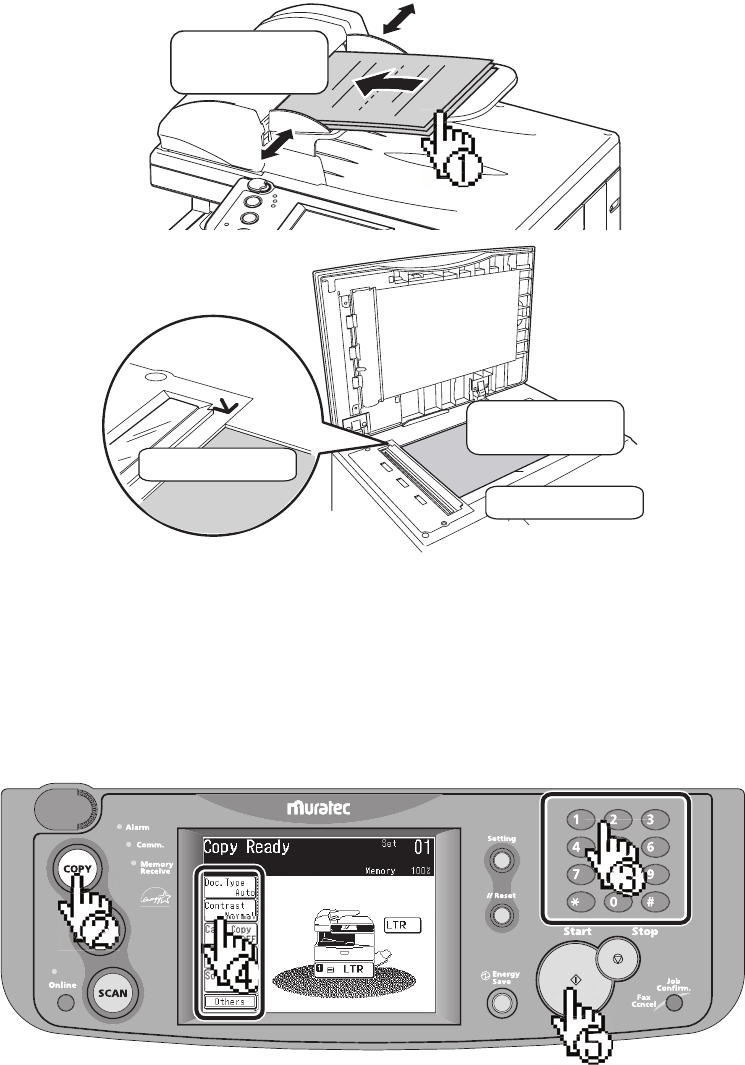
1
Set the document.
F
ace up
Face down
Align to the corner
Close the cover
2
Press [COPY] on the control panel.
3
Enter the number of copies using the numeric keys.
4
Adjust any additional settings (ex. Resolution, Contrast).
5
Press [Start].
7
Scan to an e-mail address
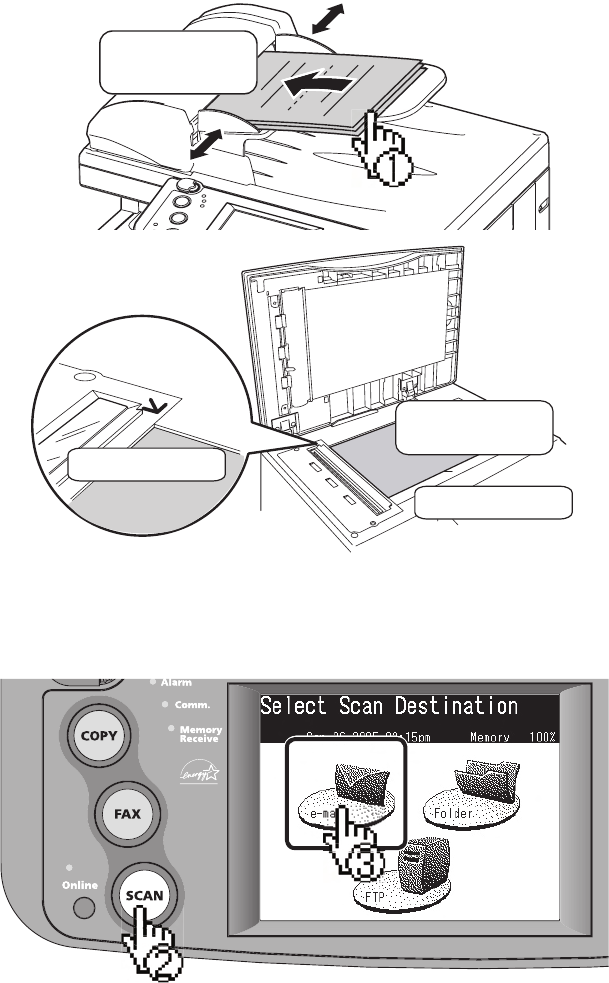
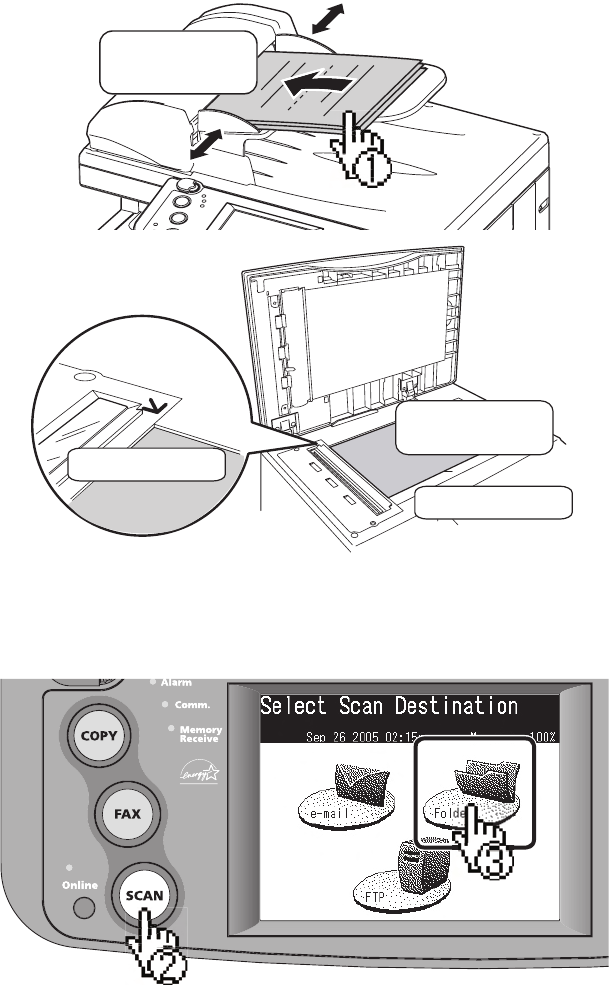
1
Set the document.
F
ace up
Face down
Align to the corner
Close the cover
2
Press [SCAN] on the control panel.
3
Press [e-mail].
8
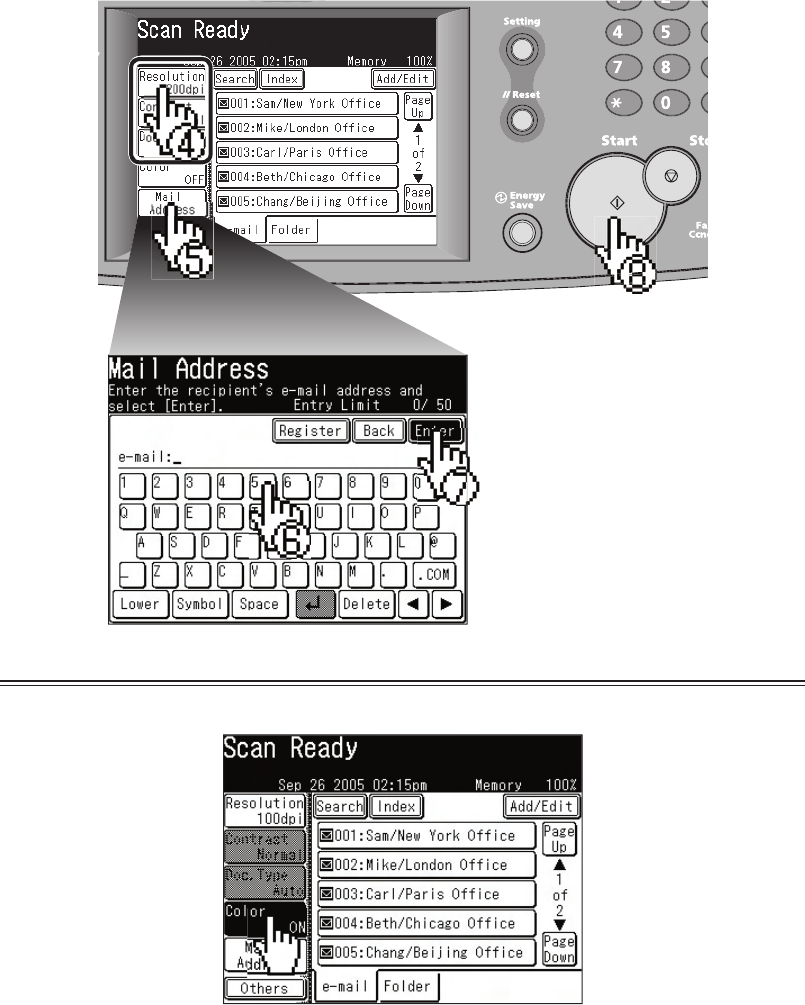
4
Adjust any additional settings (ex. Resolution, Contrast).
5
Press [Mail Address].
6
Enter the desired e-mail address.
7
Press [Enter].
8
Press [Start].
Operating Tip
By pressing [Color], you can scan color images.
9
Scan to a network folder
1
Set the document.
F
ace up
Face down
Align to the corner
Close the cover
2
Press [SCAN] on the control panel.
3
Press [Folder].

10
4
Adjust any additional settings (ex. Resolution, Contrast).
5
Press [Browse].
6
Select the network directory that contains your desired folder.
• To scroll, use [Page Up] and [Page Down].
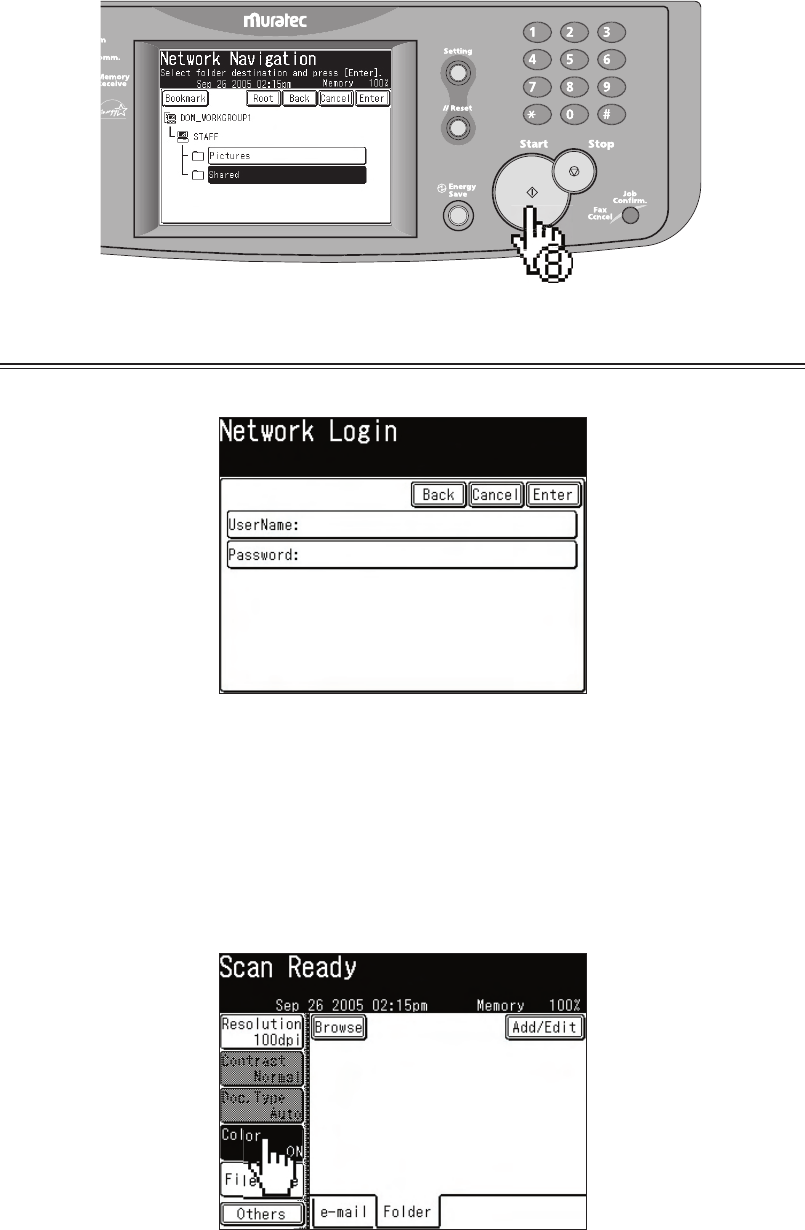
7
Select the folder you wish to scan to.
NOTE:
The folder that is highlighted is the folder the machine
will scan to.
• To go up one step, press [Back].
• To return to the fi rst screen, press [Root].
11
8
Press [Start].
Operating Tip
A user name and password may be required to login folders.
• Select [User Name] and enter the user name. Press [Enter].
• If your machine is on a windows domain controlled network,
add the domain name after the user name by attaching an
“@”, like “sam@dom.muratec.com”.
• Select [Password] and enter the password. Press [Enter].
By pressing [Color], you can scan color images.
12
Scan to an FTP server
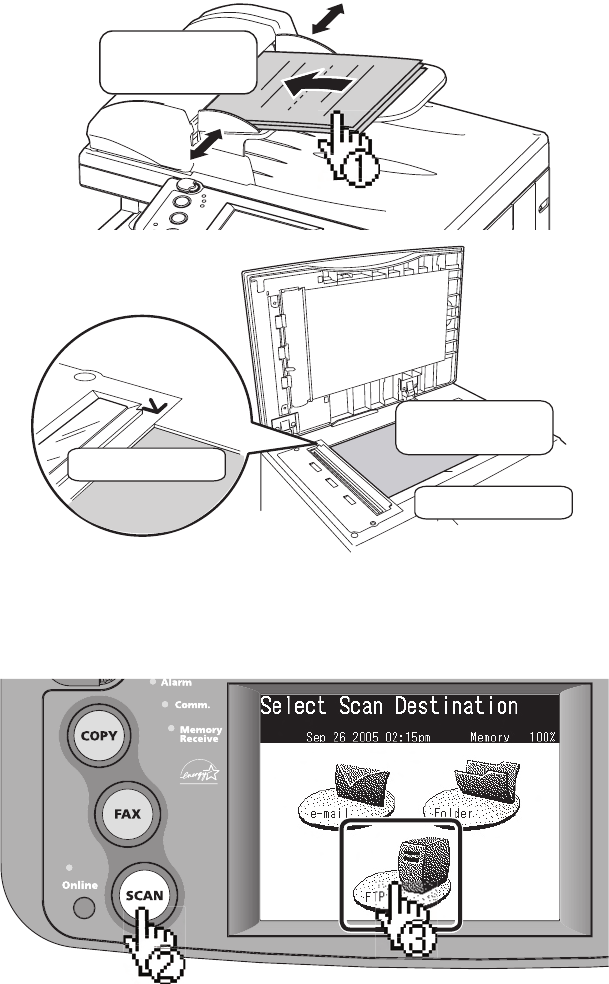
1
Set the document.
F
ace up
Face down
Align to the corner
Close the cover
2
Press [SCAN] on the control panel.
3
Press [FTP].
13
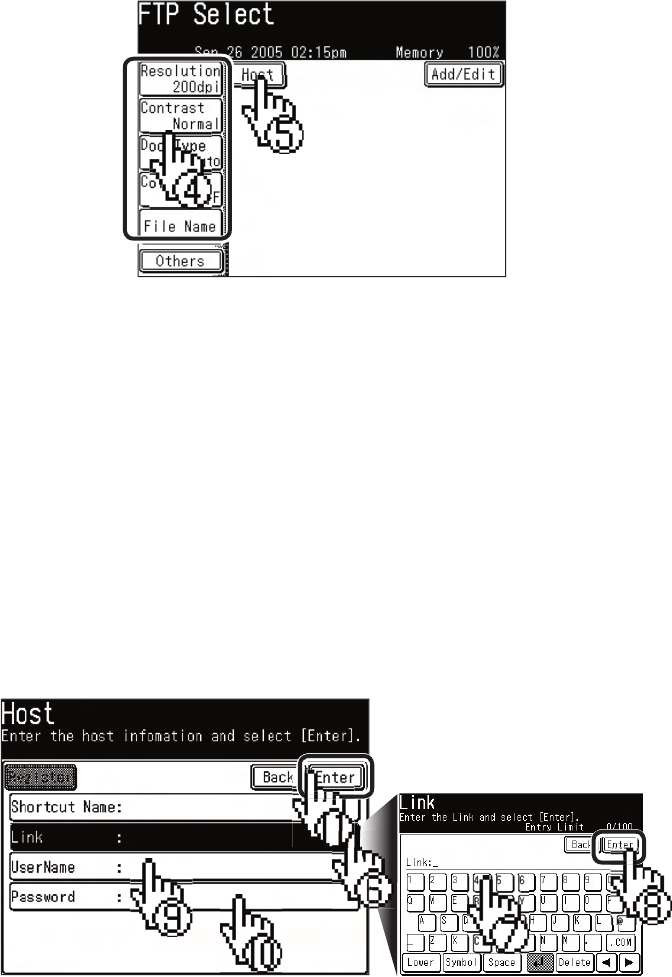
4
Adjust any additional settings (ex. Resolution, Contrast).
5
Press [Host].
6
Press [Link].
7
Enter the link to the FTP server.
• Begin your entry with “//”.
• The “/(slash)” is found in the [Symbol] menu. To switch back to
alpha characters, press [Alpha].
8
Press [Enter].
9
Press [User name]. Enter the user name and press [Enter].
10
Press [Password]. Enter the password and press [Enter].
11
Press [Enter].
14
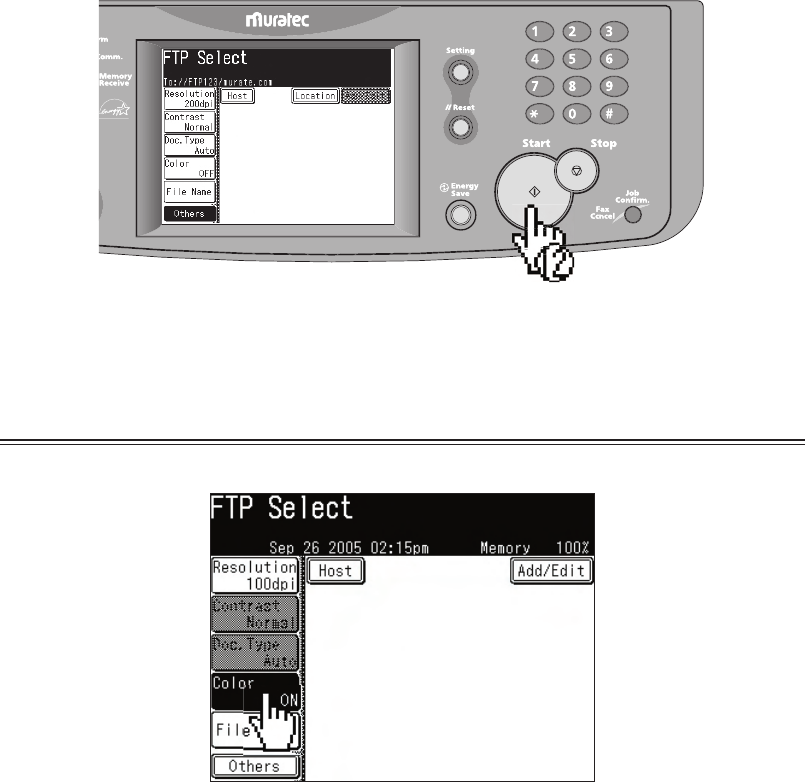
12
Press [Start].
Operating Tip
By pressing [Color], you can scan color images.
15
How to register new destinations
Your address book holds up to 300 destinations.
Register the following fi elds to have a quick access to frequently
using destinations:
• Three-digit address book number
• Name (Mandatory fi eld)
• Fax number and/or e-mail address (Mandatory fi eld)
• Call group
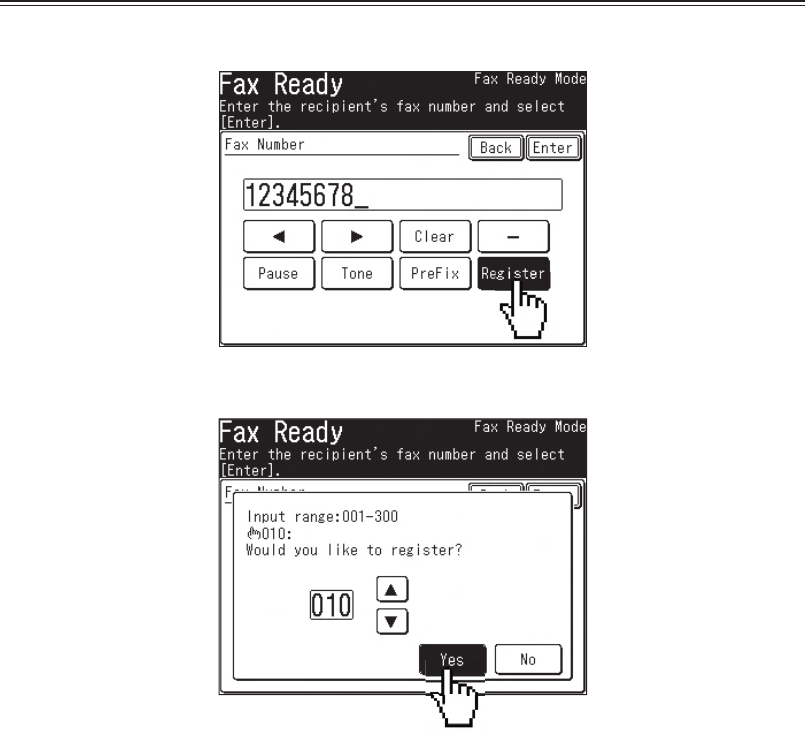
Quick address book register (Fax numbers)
1
After you have entered a fax number, press [Register].
2
Select a new address book number and press [Yes].
16
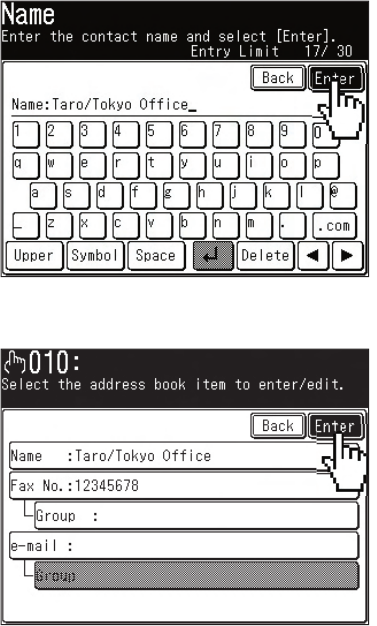
3
Enter the name fi eld and press [Enter].
4
Enter other fi elds if needed and press [Enter].
• To enter call groups, they must be registered in advance.
Refer to the User Guide Chapter 2 “Call group dialing” for
more information about call groups.
17
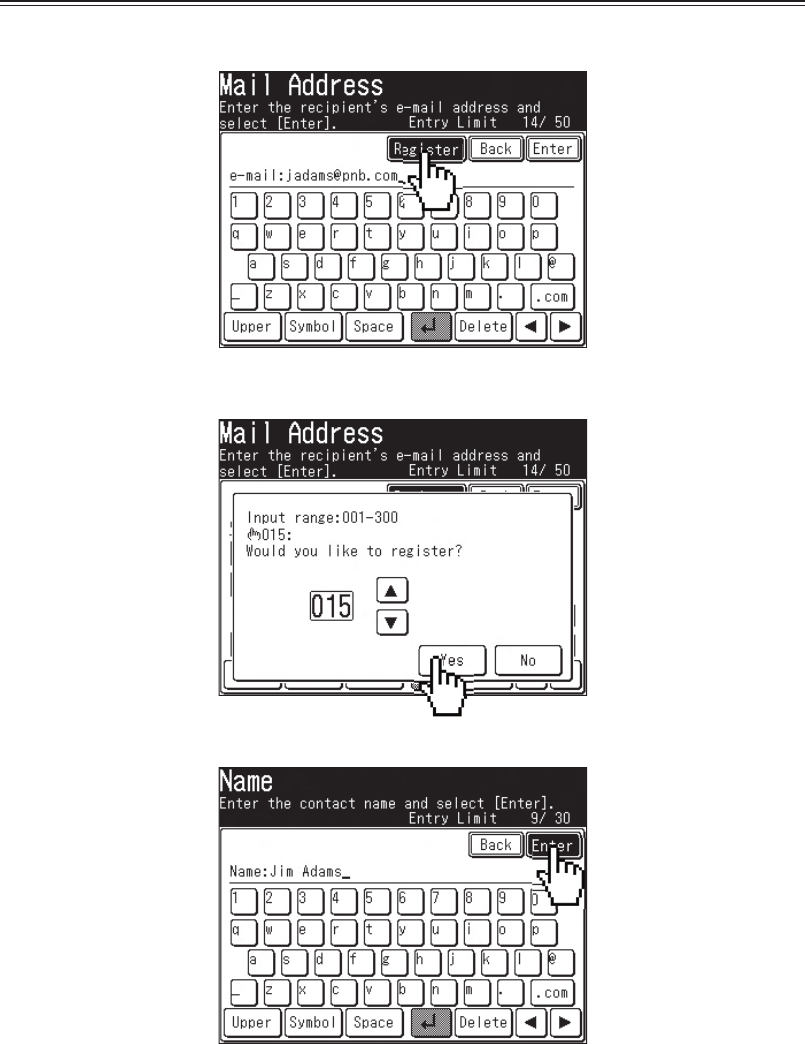
Quick address book register (e-mail address )
1
After you entered an e-mail address, press [Register].
2
Select a new address book number and press [Yes].
3
Enter the name fi eld and press [Enter].
4
Enter other fi elds if needed and press [Enter].
• To enter call groups, they must be registered in advance.
Refer to the User Guide Chapter 2 “Call group dialing” for
more information about call groups.
18
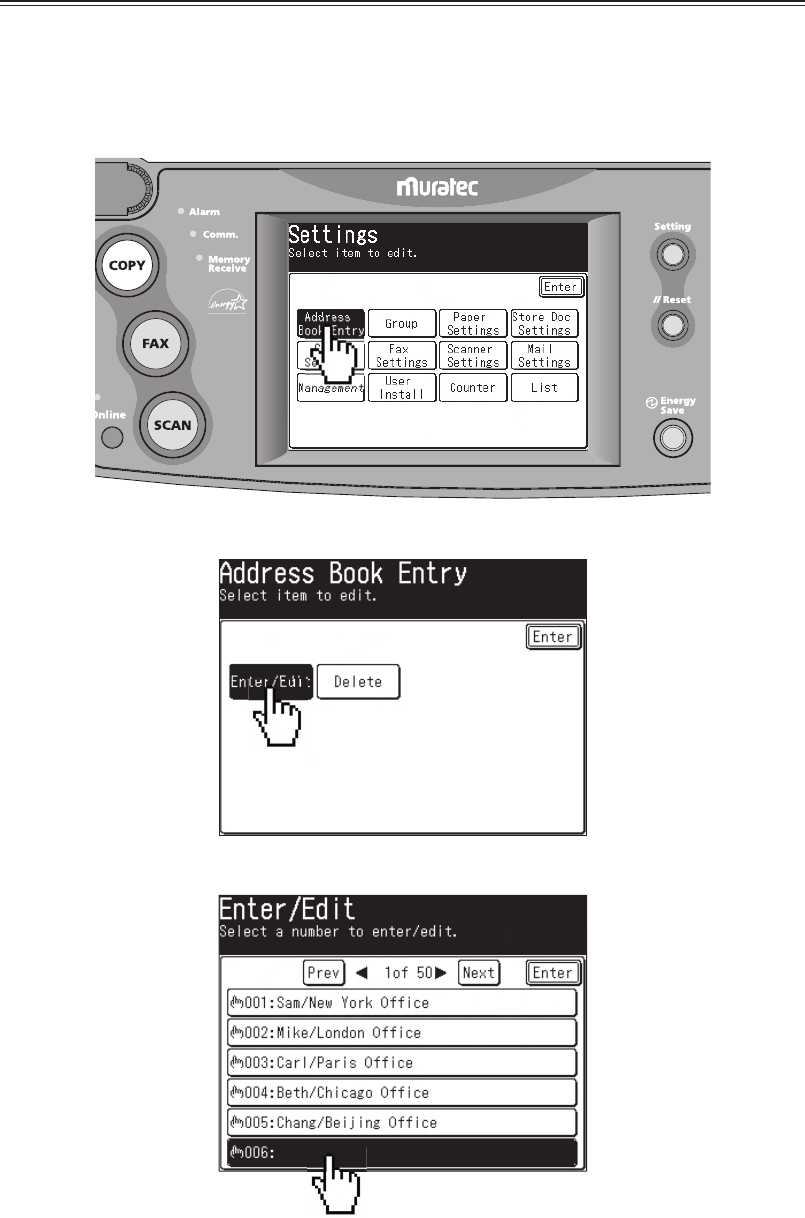
Register, edit or delete destinations from the address book
To register:
1
Press [Setting].
2
Press [Address Book Entry].
3
Press [Enter/Edit].
4
Press a new address book number.
19
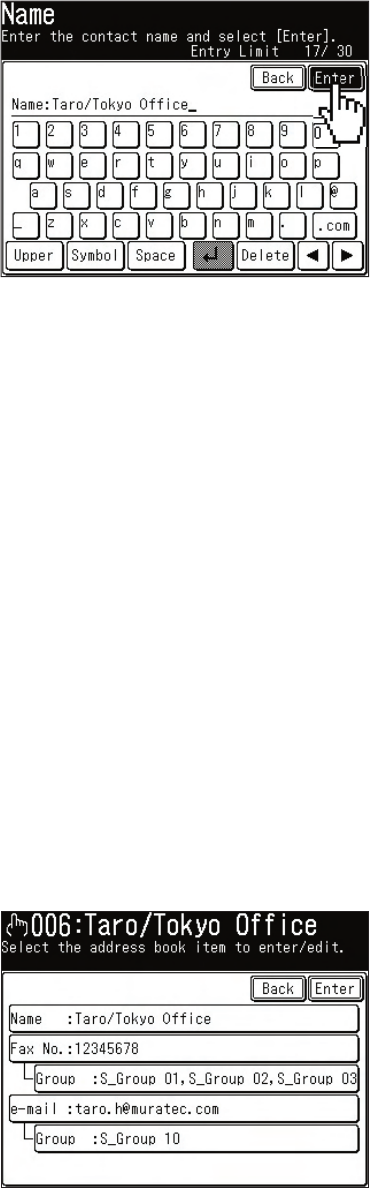
5
Enter the destination’s name and press [Enter].
• Up to 30 characters can be entered.
• Press [Lower] to enter lower case characters.
• Press [Symbol] to enter symbols and special characters.
• Use the numeric key to enter numbers.
6
Enter fax number and/or e-mail address.
7
Register the call group if needed.
• To enter call groups, they must be registered in advance.
Refer to the User Guide Chapter 2 “Call group dialing” for
more information about call groups.
To edit:
1
Press [Setting].
2
Press [Address Book Entry].
3
Press [Enter/Edit].
4
Select the address book number you want to edit.
5
Select the fi eld you want to edit.
6
Edit the fi eld and press [Enter].
20
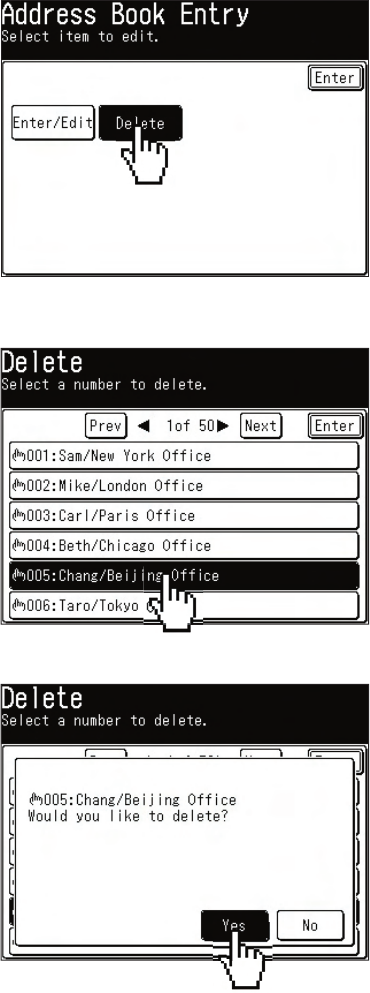
To delete:
1
Press [Setting].
2
Press [Address Book Entry].
3
Press [Delete].
4
Select the address book number you want to edit.
5
Press [Yes].
21
PC faxing
NOTE: In order to PC fax, you must have the driver installed
on your PC prior to attempting this function.
1
Open the document you want to send.
2
Select [Print] from the File menu.
3
Select “Muratec ***** Fax” as the printer.
(*****: Your machine model such as F-520)
4
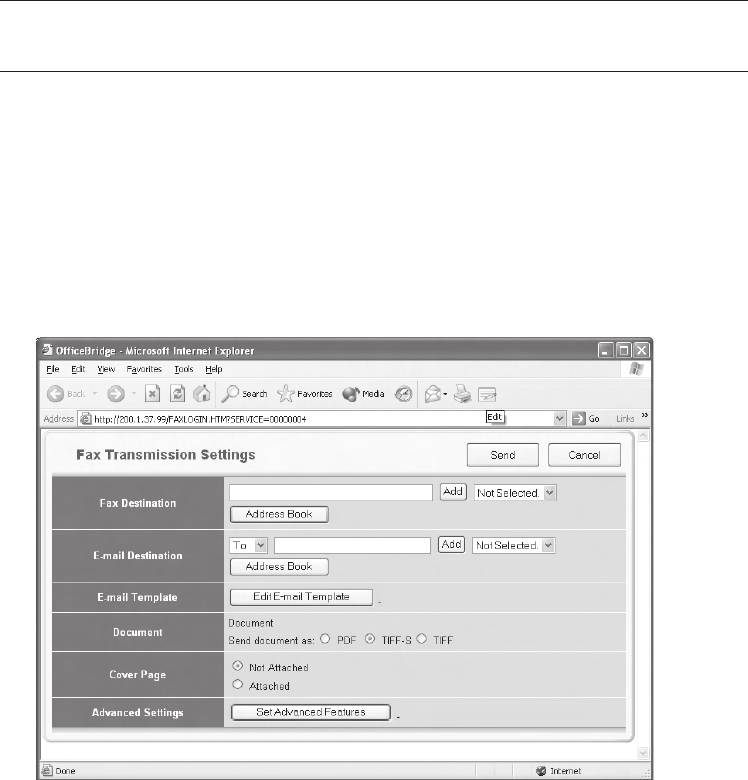
Click [Print].
The “Fax Transmission Settings” dialog appears.
5
Enter the destinations fax number or e-mail address and click
[Add].
6
Click [Send].

22
PC printing
NOTE: In order to PC print, you must have the driver installed
on your PC prior to attempting this function.
1
Open the document you want to send.
2
Select [Print] from the File menu.
3
Select “Muratec *****” as the printer.
(*****: Your machine model such as F-520)
4
Click [Print].
23
Clearing a paper jam
CAUTION: When you open the side cover to remove the paper,
DO NOT touch the fuser roller. The fuser unit is very
hot.
IMPORTANT: Do not touch the drum cartridge surface. Scratches
or smudges will result in poor print quality.
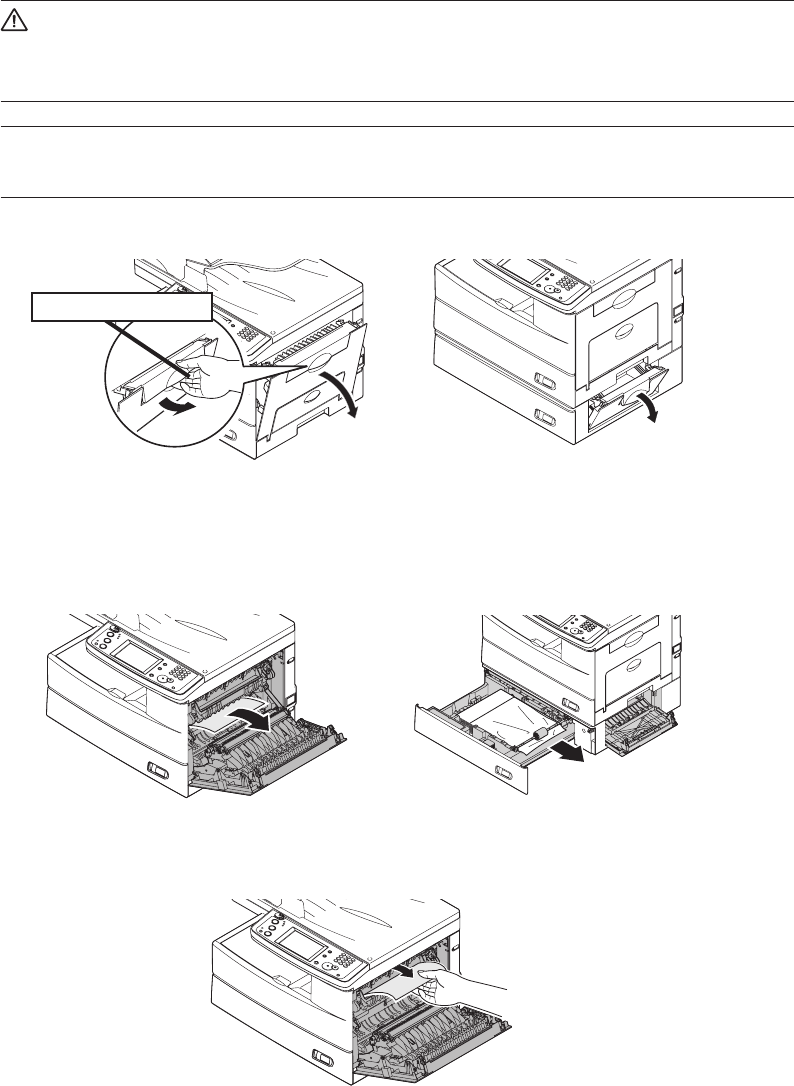
1
Open the side cover.
2
Carefully remove the jammed paper.
Jammed in the feed area
Jammed in the fuser area
When the second cassette has jammed
Release the lever
24
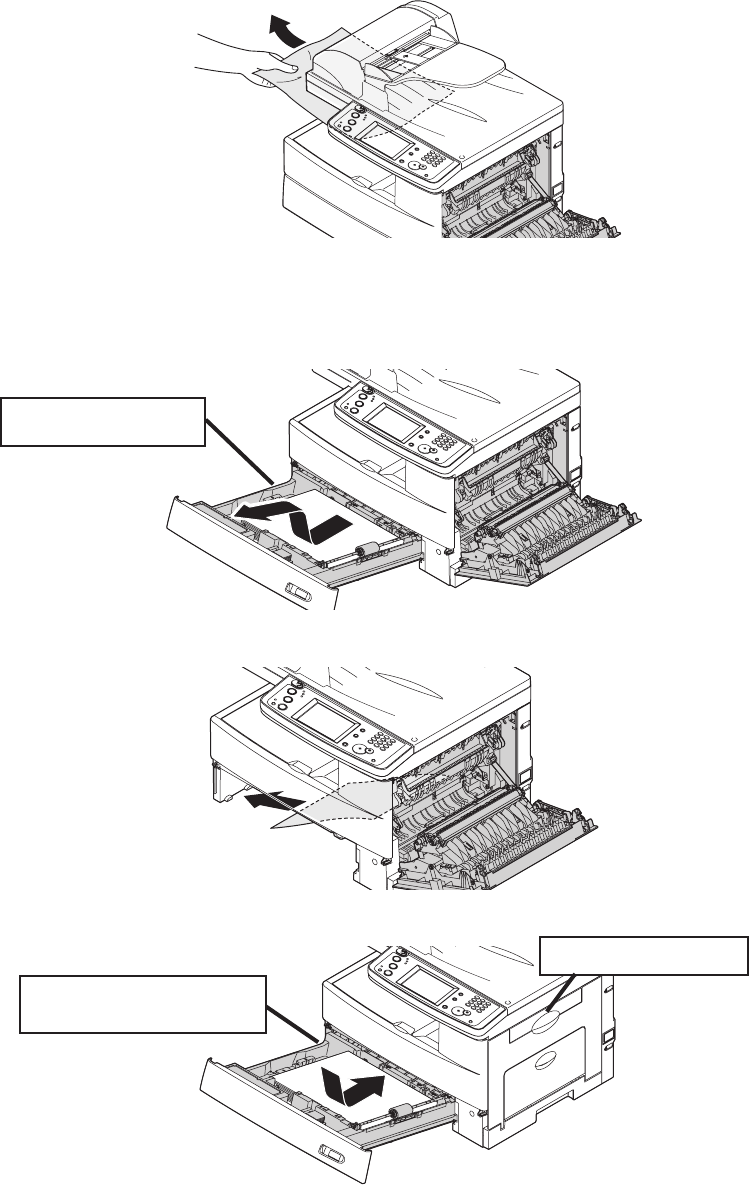
Jammed in the paper exit area
If you cannot reach the jammed paper:
3
Remove the cassette from the machine.
4
Remove the paper.
5
Re-insert the paper cassette.
Pull the cassette out,
and lift
Close the side cover
Align the cassette to the
guides, and push it back
25
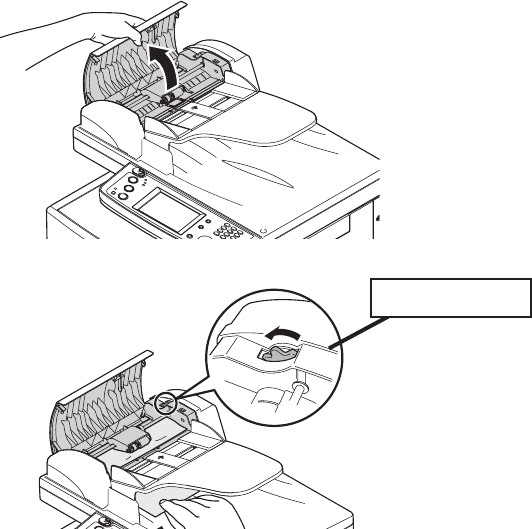
Clearing a document jam
1
Open the ADF cover.
2
Remove the document.
3
Close the ADF cover.
• If a “Check Message” page prints out, re-send the document
beginning with the noted page.
• When the display asks you whether to continue, select [Yes] or
[No]. If you select [Yes], the display will indicate from which
page you should execute the job.
Turn the knob

Muratec America, Inc.
3301 East Plano Parkway, Suite 100
Plano, Texas 75074
www.muratec.com
multifunction made easy
Muratec (UK), Ltd.
Unit 23, Hewitts Industrial Estate
Elmbridge Road
Cranleigh, SURREY GU6 8LW
www.muratec.co.uk
OMF520QRG
DA7-90410-61
03 1 9 8 1 9 2 6 3 0 0
