Music Tribe Commercial MY Sdn Bhd
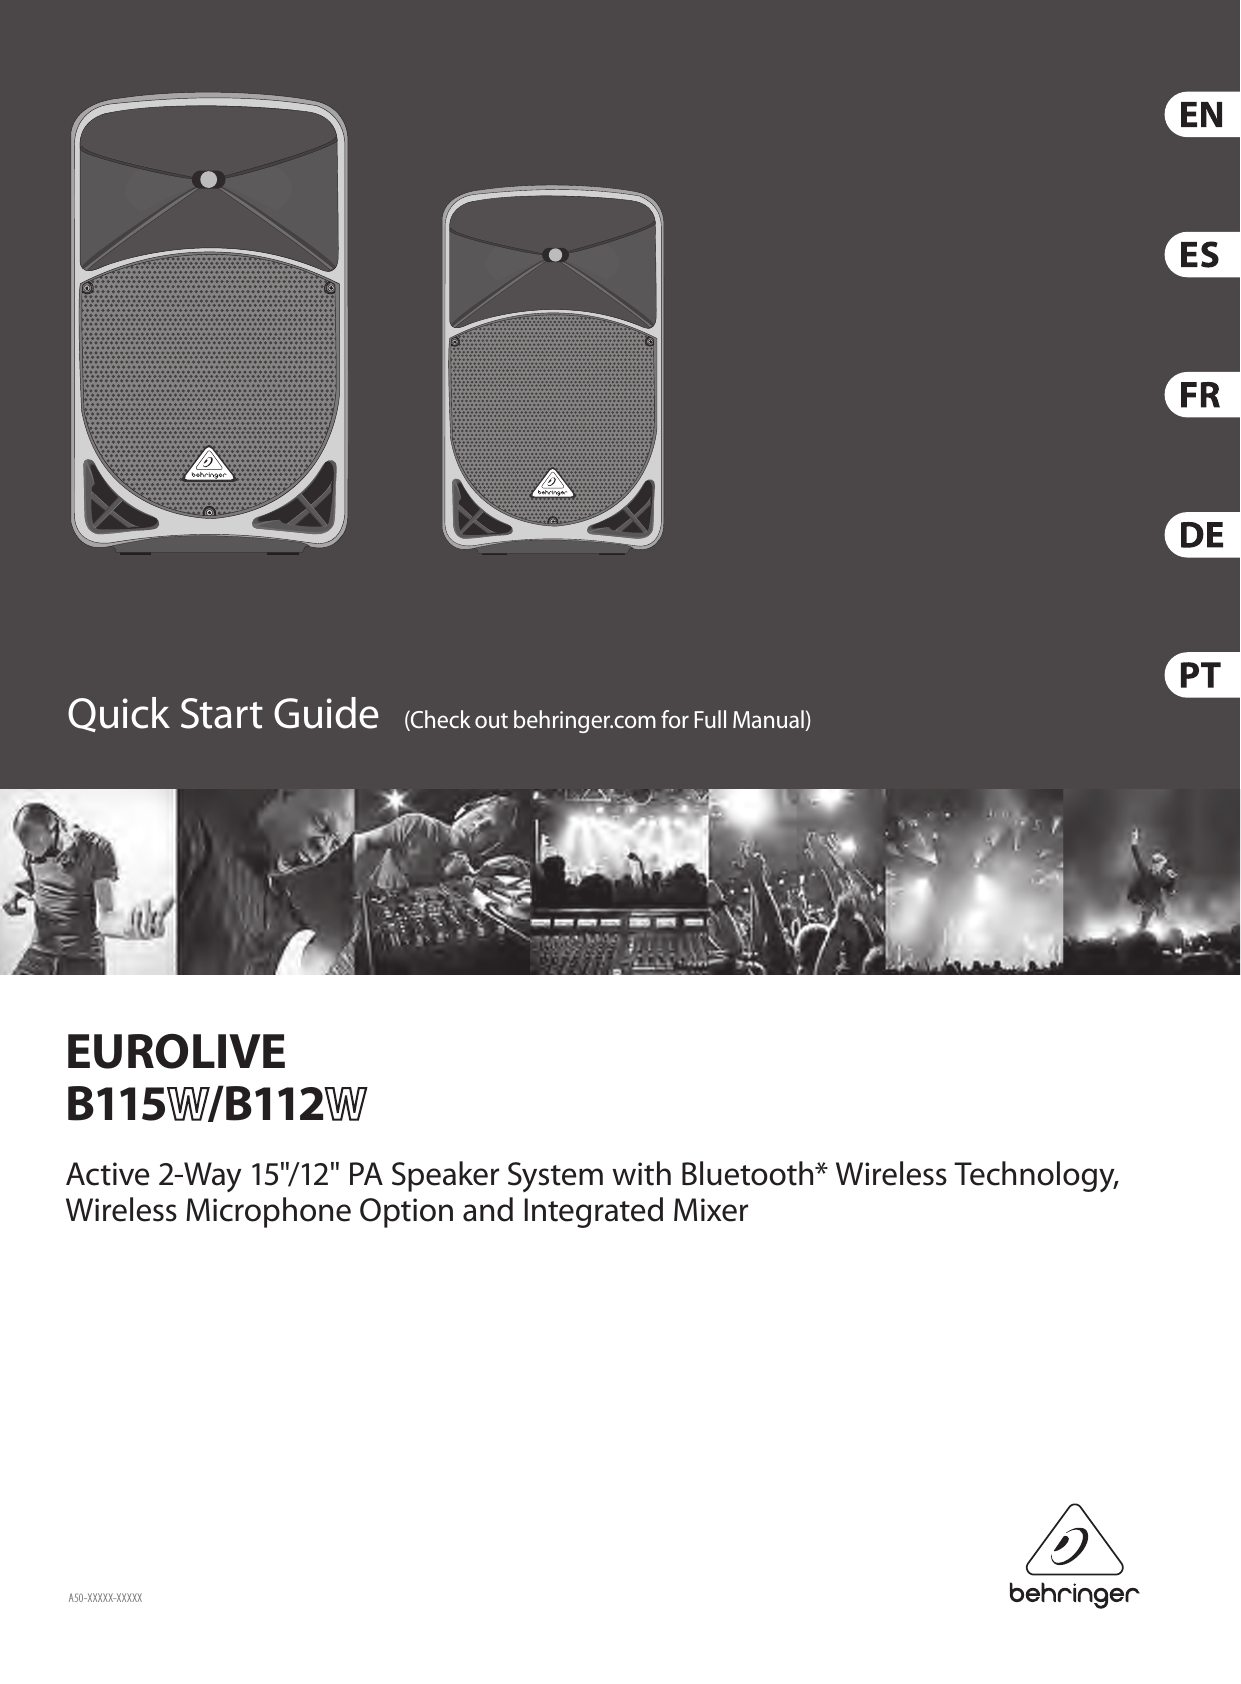
 B112W-B115W PA Speaker System User Manual

MUSIC Group Services PH Corp PA Speaker System

User Manual

(Check out behringer.com for Full Manual)Quick Start GuideEUROLIVE  B115 /B112Active 2-Way 15"/12" PA Speaker System with Bluetooth* Wireless Technology, Wireless Microphone Option and Integrated MixerA50-XXXXX-XXXXX
2EUR O L I V E  B115 W/ B112 WImportant Safety InstructionsLEGAL DISCLAIMERLIMITED WARRANTYTerminals marked with this symbol carry electrical current of su  cient magnitude to constitute risk of electric shock. Use only high-quality professional speaker cables with ¼" TS or twist-locking plugs pre-installed. Allother installation or modi cation should be performed only by quali edpersonnel.This symbol, wherever it appears, alertsyou to the presence of uninsulated dangerous voltage inside the enclosure-voltage that may be su  cient to constitute a risk ofshock.This symbol, wherever it appears, alertsyou to important operating and maintenance instructions in the accompanying literature. Please read the manual.CautionTo reduce the risk of electric shock, donot remove the top cover (or the rear section). No user serviceable parts inside. Refer servicing to quali ed personnel.CautionTo reduce the risk of  re or electric shock, do not expose this appliance to rain and moisture. The apparatus shall not be exposed to dripping or splashing liquids and no objects  lled with liquids, suchas vases, shall be placed on the apparatus.CautionThese service instructions are for use by quali ed service personnel only. Toreduce the risk of electric shock do not perform any servicing other than that contained in the operation instructions. Repairs have to be performed by quali ed servicepersonnel.1.  Read these instructions.2.  Keep these instructions.3.  Heed all warnings.4.  Follow all instructions.5.  Do not use this apparatus near water.6.  Clean only with dry cloth.7.  Do not block any ventilation openings. Install in accordance with the manufacturer’s instructions.8.  Do not install near any heat sources such as radiators, heat registers, stoves, or other apparatus (including ampli ers) that produce heat.9.  Do not defeat the safety purpose of the polarized or grounding-type plug. A polarized plug has two blades with one wider than the other. A grounding-type plug has two blades and a third grounding prong. The wide blade or the third prong are provided for your safety. Ifthe provided plug does not  t into your outlet, consult an electrician for replacement of the obsolete outlet.10.  Protect the power cord from being walked on or pinched particularly at plugs, convenience receptacles, and the point where they exit from the apparatus.11.  Use only attachments/accessories speci ed by themanufacturer.12.  Use only with the cart, stand, tripod, bracket, or table speci ed by the manufacturer, orsold with the apparatus. When a cart is used, use caution when moving the cart/apparatus combination to avoid injury from tip-over.13.  Unplug this apparatus during lightning storms or when unused for long periods of time. 14.  Refer all servicing to quali ed service personnel. Servicing is required when the apparatus has been damaged in any way, such as power supply cord or plug is damaged, liquid has been spilled or objects have fallen into the apparatus, the apparatus has been exposed to rain or moisture, does not operate normally, or has beendropped.15.  The apparatus shall be connected to a MAINS socket outlet with a protective earthing connection.16.  Where the MAINS plug or an appliance coupler is used as the disconnect device, the disconnect device shall remain readily operable.TECHNICAL SPECIFICATIONS AND APPEARANCES ARE SUBJECT TO CHANGE WITHOUT NOTICE AND ACCURACY IS NOT GUARANTEED. BEHRINGER, KLARKTEKNIK, MIDAS, BUGERA, AND TURBOSOUND ARE PART OF THE MUSIC GROUP MUSICGROUP.COM. ALL TRADEMARKS ARE THE PROPERTY OF THEIR RESPECTIVE OWNERS. MUSICGROUP ACCEPTS NO LIABILITY FOR ANY LOSS WHICH MAY BE SUFFERED BY ANY PERSON WHO RELIES EITHER WHOLLY OR IN PART UPON ANY DESCRIPTION, PHOTOGRAPH OR STATEMENT CONTAINED HEREIN. COLORS AND SPECIFICATIONS MAY VARY FROM ACTUAL PRODUCT. MUSIC GROUP PRODUCTS ARE SOLD THROUGH AUTHORIZED FULLFILLERS AND RESELLERS ONLY. FULLFILLERSAND RESELLERS  ARE NOT AGENTS OF MUSICGROUP AND HAVE ABSOLUTELY NO AUTHORITY TO BIND MUSICGROUP BY ANY EXPRESS OR IMPLIED UNDERTAKING OR REPRESENTATION. THIS MANUAL IS COPYRIGHTED. NO PART OF THIS MANUAL MAY BE REPRODUCED OR TRANSMITTED IN ANY FORM OR BY ANY MEANS, ELECTRONIC OR MECHANICAL, INCLUDING PHOTOCOPYING AND RECORDING OF ANY KIND, FOR ANY PURPOSE, WITHOUT THE EXPRESS WRITTEN PERMISSION OF MUSICGROUPIPLTD.ALL RIGHTS RESERVED. © 2013 MUSICGroupIPLtd.Trident Chambers, Wickhams Cay, P.O. Box 146,Road Town, Tortola, British Virgin IslandsFor the applicable warranty terms and conditions and additional information regarding MUSIC Group’s Limited Warranty, please see complete details online at www.music-group.com/warranty.
Quick Start Guide 3Instrucciones de seguridadNEGACIÓN LEGALGARANTÍA LIMITADALas terminales marcadas con este símbolo transportan corriente eléctrica de magnitud su ciente como para constituir un riesgo de descarga eléctrica. Utilice solo cables de altavoz profesionales y de alta calidad con conectores TS de 6,3 mm o de bayoneta pre jados. Cualquier otra instalación o modi cación debe ser realizada únicamente por un técnico cuali cado.Este símbolo, siempre que aparece, leadvierte de la presencia de voltaje peligroso sin aislar dentro de la caja; estevoltaje puede ser su ciente para constituir un riesgo dedescarga.Este símbolo, siempre que aparece, leadvierte sobre instrucciones operativas y de mantenimiento que aparecen en la documentación adjunta. Por favor, lea el manual.AtenciónPara reducir el riesgo de descarga eléctrica, no quite la tapa (o la parte posterior). No hay piezas en el interior del equipo que puedan ser reparadas por el usuario. Si es necesario, póngase en contacto con personal cuali cado.AtenciónPara reducir el riesgo de incendio o descarga eléctrica, no exponga este aparato a la lluvia, humedad o alguna otra fuente que pueda salpicar o derramar algún líquido sobre el aparato. Nocoloque ningún tipo de recipiente para líquidos sobre el aparato.AtenciónLas instrucciones de servicio deben llevarlas a cabo exclusivamente personal cuali cado. Para evitar el riesgo de una descarga eléctrica, no realice reparaciones que no se encuentren descritas en el manual de operaciones. Lasreparaciones deben ser realizadas exclusivamente por personalcuali cado.1.  Lea las instrucciones.2.  Conserve estas instrucciones.3.  Preste atención a todas las advertencias.4.  Siga todas las instrucciones.5.  No use este aparato cerca del agua.6.  Limpie este aparato con un paño seco.7.  No bloquee las aberturas de ventilación. Instale el equipo de acuerdo con las instrucciones del fabricante.8.  No instale este equipo cerca de fuentes de calor tales como radiadores, acumuladores de calor, estufas u otros aparatos (incluyendo ampli cadores) que puedan producir calor.9.  No elimine o deshabilite nunca la conexión a tierra del aparato o del cable de alimentación de corriente. Unenchufe polarizado tiene dos polos, uno de los cuales tiene un contacto más ancho que el otro. Una clavija con puesta a tierra dispone de tres contactos: dos polos y la puesta a tierra. El contacto ancho y el tercer contacto, respectivamente, son los que garantizan una mayor seguridad. Si el enchufe suministrado con el equipo no concuerda con la toma de corriente, consulte con un electricista para cambiar la toma de corriente obsoleta.10.  Coloque el cable de suministro de energía de manera que no pueda ser pisado y que esté protegido de objetos a lados. Asegúrese de que el cable de suministro de energía esté protegido, especialmente en la zona de la clavija y en el punto donde sale del aparato.11.  Use únicamente los dispositivos o accesorios especi cados por el fabricante.12.  Use únicamente la carretilla, plataforma, trípode, soporte o mesa especi cados por el fabricante o suministrados junto con el equipo. Altransportar el equipo, tenga cuidado para evitar daños y caídas al tropezar con algún obstáculo.13.  Desenchufe el equipo durante tormentas o si no va a utilizarlo durante un periodo largo.14.  Confíe las reparaciones únicamente a servicios técnicos cuali cados. La unidad requiere mantenimiento siempre que haya sufrido algún daño, si el cable de suministro de energía o el enchufe presentaran daños, sehubiera derramado un líquido o hubieran caído objetos dentro del equipo, si el aparato hubiera estado expuesto a la humedad o la lluvia, si ha dejado de funcionar de manera normal o si ha sufrido algún golpe o caída.15.  Al conectar la unidad a la toma de corriente eléctrica asegúrese de que la conexión disponga de una unión atierra.16.  Si el enchufe o conector de red sirve como único medio de desconexión, éste debe ser accesiblefácilmente.LAS ESPECIFICACIONES TÉCNICAS Y LA APARIENCIA EXTERIOR ESTÁN SUJETAS A CAMBIOS SIN PREVIO AVISO Y NO PODEMOS GARANTIZAR LA TOTAL EXACTITUD DE TODO LO QUE APARECE AQUÍ. BEHRINGER, KLARK TEKNIK, MIDAS, BUGERA, Y TURBOSOUND SON PARTE DEL GRUPO MUSICGROUP MUSICGROUP.COM. TODAS LAS MARCAS REGISTRADAS SON PROPIEDAD DE SUS RESPECTIVOS DUEÑOS. MUSICGROUP NO ACEPTA NINGÚN TIPO DE RESPONSABILIDAD POR POSIBLES DAÑOS Y PERJUICIOS SUFRIDOS POR CUALQUIER PERSONA QUE SE HAYA BASADO COMPLETAMENTE O EN PARTE EN LAS DESCRIPCIONES, FOTOGRAFÍAS O EXPLICACIONES QUE APARECEN EN ESTE DOCUMENTO. LOS COLORES Y ESPECIFICACIONES TÉCNICAS PUEDEN VARIAR LIGERAMENTE DE UN PRODUCTO A OTRO. LOSPRODUCTOS MUSICGROUP SON COMERCIALIZADOS ÚNICAMENTE A TRAVÉS DE DISTRIBUIDORES OFICIALES. LOS DISTRIBUIDORES Y MAYORISTAS NO SON AGENTES DE MUSICGROUP, POR LO QUE NO ESTÁN AUTORIZADOS A CONCEDER NINGÚN TIPO DE CONTRATO O GARANTÍA QUE OBLIGUE A MUSICGROUP DE FORMA EXPRESA O IMPLÍCITA. ESTE MANUAL ESTÁ PROTEGIDO POR LAS LEYES DEL COPYRIGHT. ESTE MANUAL NO PUEDE SER REPRODUCIDO O TRANSMITIDO, NI COMPLETO NI EN PARTE, PORNINGÚN TIPO DE MEDIO, TANTO SI ES ELECTRÓNICO COMO MECÁNICO, INCLUYENDOEL FOTOCOPIADO O REGISTRO DE CUALQUIER TIPO Y PARA CUALQUIER FIN, SIN LA AUTORIZACIÓN EXPRESA Y POR ESCRITO DE MUSICGROUPIPLTD.RESERVADOS TODOS LOS DERECHOS. © 2013 MUSICGroupIPLtd.Trident Chambers, Wickhams Cay, P.O. Box 146,Road Town, Tortola, British Virgin IslandsSi quiere conocer los detalles y condiciones aplicables de la garantía así como información adicional sobre la Garantía limitada de MUSIC group, consulte online toda la información en la web www.music-group.com/warranty.
4EUR O L I V E  B115 W/ B112 WConsignes de sécurité DÉNI LÉGALGARANTIE LIMITÉELes points repérés par ce symbole portent une tension électrique su  sante pour constituer un risque d’électrocution. Utilisez uniquement des câbles d’enceintes professionnels de haute qualité avec  ches Jack mono 6,35 mm ou  ches à verrouillages déjà installées. Touteautre installation ou modi cation doit être e ectuée uniquement par un personnel quali é.Ce symbole avertit de la présence d’une tension dangereuse et non isolée à l’intérieur de l’appareil - elle peut provoquer des chocs électriques.AttentionCe symbol signale les consignes d’utilisation et d’entre ! Tien importantes dans la documentation fournie. Lisez les consignes de sécurité du manuel d’utilisation de l’appareil.AttentionPour éviter tout risque de choc électrique, ne pas ouvrir le capot de l’appareil ni démonter le panneau arrière. L’intérieur de l’appareil ne possède aucun élément réparable par l’utilisateur. Laissertoute réparation à un professionnel quali é.AttentionPour réduire les risques de feu et de choc électrique, n’exposez pas cet appareil à la pluie, à la moisissure, aux gouttes ou aux éclaboussures. Ne posez pas de récipient contenant un liquide sur l’appareil (un vase par exemple).AttentionCes consignes de sécurité et d’entretien sont destinées à un personnel quali é. Pouréviter tout risque de choc électrique, n’e ectuez aucune réparation sur l’appareil qui ne soit décrite par le manuel d’utilisation. Les éventuelles réparations doivent être e ectuées uniquement par un technicien spécialisé.1.  Lisez ces consignes.2.  Conservez ces consignes.3.  Respectez tous les avertissements.4.  Respectez toutes les consignes d’utilisation.5.  N’utilisez jamais l’appareil à proximité d’un liquide.6.  Nettoyez l’appareil avec un chi on sec.7.  Veillez à ne pas empêcher la bonne ventilation de l’appareil via ses ouïes de ventilation. Respectezles consignes du fabricant concernant l’installation del’appareil.8.  Ne placez pas l’appareil à proximité d’une source de chaleur telle qu’un chau age, une cuisinière ou tout appareil dégageant de la chaleur (y compris un ampli depuissance).9.  Ne supprimez jamais la sécurité des prises bipolaires ou des prises terre. Les prises bipolaires possèdent deux contacts de largeur di érente. Leplus large est le contact de sécurité. Les prises terre possèdent deux contacts plus une mise à la terre servant de sécurité. Si la prise du bloc d’alimentation ou du cordon d’ali-mentation fourni ne correspond pas à celles de votre installation électrique, faites appel à un électricien pour e ectuer le changement de prise.10.  Installez le cordon d’alimentation de telle façon que personne ne puisse marcher dessus et qu’il soit protégé d’arêtes coupantes. Assurez-vous que le cordon d’alimentation est sufsamment protégé, notamment au niveau de sa prise électrique et de l’endroit où il est relié à l’appareil; cela est également valable pour une éventuelle rallonge électrique.11.  Utilisez exclusivement des accessoires et des appareils supplémentaires recommandés par lefabricant.12.  Utilisez exclusivement des chariots, des diables, desprésentoirs, despieds et des surfaces de travail recommandés par le fabricant ou livrés avec le produit. Déplacezprécautionneusement tout chariot ou diable chargé pour éviter d’éventuelles blessures en cas dechute.13.  Débranchez l’appareil de la tension secteur en cas d’orage ou si l’appareil reste inutilisé pendant une longue période de temps. 14.  Les travaux d’entretien de l’appareil doivent être e ectués uniquement par du personnel qualié. Aucunentretien n’est nécessaire sauf si l’appareil est endommagé de quelque façon que ce soit (dommagessur le cordon d’alimentation ou la prise par exemple), siun liquide ou un objet a pénétré à l’intérieur du châssis, si l’appareil a été exposé à la pluie ou à l’humidité, s’il ne fonctionne pas correctement ou à la suite d’une chute.15.  L’appareil doit être connecté à une prise secteur dotée d’une protection par mise à la terre. 16.  La prise électrique ou la prise IEC de tout appareil dénué de bouton marche/arrêt doit rester accessible enpermanence.CARACTÉRISTIQUES TECHNIQUES ET APPARENCE SUJETTES À MODIFICATIONS SANS PRÉAVIS. PRÉCISION NON GARANTIE. BEHRINGER, KLARK TEKNIK, MIDAS, BUGERA, ET TURBOSOUND FONT PARTIE DU MUSIC GROUP MUSICGROUP.COM. TOUTES LES MARQUES DÉPOSÉES SONT LA PROPRIÉTÉ DE LEURS PROPRIÉTAIRES RESPECTIFS. LA SOCIÉTÉ MUSICGROUP N’ACCEPTE AUCUNE RESPONSABILITÉ DANS LES ÉVENTUELS DOMMAGES OU PERTES SUBIS PAR UN TIERS EN SE BASANT EN ENTIER OU EN PARTIE SUR LES DESCRIPTIONS, PHOTOGRAPHIES OU DÉCLARATIONS CONTENUES DANS CE DOCUMENT. LESCOULEURS ET CARACTÉRISTIQUES PEUVENT VARIER LÉGÈREMENT DE CELLES DU PRODUIT. LESPRODUITS MUSICGROUP NE SONT VENDUS QUE PAR LE BIAIS DE REVENDEURS AGRÉÉS. LESDISTRIBUTEURS ET LES REVENDEURS NE SONT PAS AGENTS DE MUSICGROUP ET N’ONT ABSOLUMENT AUCUNE AUTORITÉ POUR ENGAGER OU REPRÉSENTER LA SOCIÉTÉ MUSICGROUP DE FAÇON IMPLICITE, EXPLICITE OU INDIRECTE. CE MODE D’EMPLOI EST PROTÉGÉ PAR DROITS D’AUTEURS. IL EST INTERDIT DE TRANSMETTRE OU DE COPIER CE MODE D’EMPLOI SOUS QUELLE FORME QUE CE SOIT, PAR QUEL MOYEN QUE CE SOIT, ÉLECTRONIQUE OU MÉCANIQUE, CEQUI COMPREND LES MOYENS DE PHOTOCOPIE ET D’ENREGISTREMENT DE QUELLE FAÇON QUE CE SOIT, QUEL QUE SOIT LE BUT, SANS LA PERMISSION ÉCRITE EXPRESSE DE MUSICGROUPIPLTD.TOUS DROITS RÉSERVÉS. © 2013 MUSICGroupIPLtd.Trident Chambers, Wickhams Cay, P.O. Box 146, Road Town, Tortola, Iles Vierges BritanniquesPour connaître les termes et conditions de garantie applicables, ainsi que les informations supplémentaires et détaillées sur la Garantie Limitée de MUSIC Group, consultez le site Internet www.music-group.com/warranty.
Quick Start Guide 5Wichtige SicherhteitshinweiseHAFTUNGSAUSSCHLUSSBESCHRÄNKTE GARANTIEVorsichtDie mit dem Symbol markierten Anschlüsse führen so viel Spannung, dassdie Gefahr eines Stromschlags besteht.Verwenden Sie nur hochwertige, professionelle Lautsprecherkabel mit vorinstallierten 6,35 mm MONO-Klinkensteckern oder Lautsprecherstecker mit Drehverriegelung. Alle anderen Installationen oder Modi kationen sollten nur von quali ziertem Fachpersonal ausgeführt werden.AchtungUm eine Gefährdung durch Stromschlag auszuschließen, darf die Geräteabdeckung bzw. Geräterückwand nicht abgenommen werden. ImInnern des Geräts be nden sich keine vom Benutzer reparierbaren Teile. Reparaturarbeiten dürfen nur von quali ziertem Personal ausgeführt werden.AchtungUm eine Gefährdung durch Feuer bzw. Stromschlag auszuschließen, darf dieses Gerät weder Regen oder Feuchtigkeit ausgesetzt werden noch sollten Spritzwasser oder tropfende Flüssigkeiten in das Gerät gelangen können. Stellen Sie keine mit Flüssigkeit gefüllten Gegenstände, wie z. B. Vasen, aufdasGerät.AchtungDie Service-Hinweise sind nur durch quali ziertes Personal zu befolgen. Umeine Gefährdung durch Stromschlag zu vermeiden, führen Sie bitte keinerlei Reparaturen an dem Gerät durch, die nicht in der Bedienungsanleitung beschrieben sind. Reparaturen sind nur von quali ziertem Fachpersonaldurchzuführen.1.  Lesen Sie diese Hinweise.2.  Bewahren Sie diese Hinweise auf.3.  Beachten Sie alle Warnhinweise.4.  Befolgen Sie alle Bedienungshinweise.5.  Betreiben Sie das Gerät nicht in der Nähe vonWasser.6.  Reinigen Sie das Gerät mit einem trockenen Tuch.7.  Blockieren Sie nicht die Belüftungsschlitze. Beachten Sie beim Einbau des Gerätes die Herstellerhinweise.8.  Stellen Sie das Gerät nicht in der Nähe von Wärmequellen auf. Solche Wärmequellen sind z. B. Heizkörper, Herde oder andere Wärme erzeugende Geräte (auch Verstärker).9.  Entfernen Sie in keinem Fall die Sicherheitsvorrichtung von Zweipol- oder geerdeten Steckern. Ein Zweipolstecker hat zwei unterschiedlich breite Steckkontakte. Ein geerdeter Stecker hat zwei Steckkontakte und einen dritten Erdungskontakt. Derbreitere Steckkontakt oder der zusätzliche Erdungskontakt dient Ihrer Sicherheit. Falls das mitgelieferte Steckerformat nicht zu Ihrer Steckdose passt, wenden Sie sich bitte an einen Elektriker, damit die Steckdose entsprechend ausgetauscht wird.10.  Verlegen Sie das Netzkabel so, dass es vor Tritten und scharfen Kanten geschützt ist und nicht beschädigt werden kann. Achten Sie bitte insbesondere im Bereich der Stecker, Verlängerungskabel und an der Stelle, an der das Netzkabel das Gerät verlässt, aufausreichendenSchutz.11.  Das Gerät muss jederzeit mit intaktem Schutzleiter an das Stromnetz angeschlossen sein.12.  Sollte der Hauptnetzstecker oder eine Gerätesteckdose die Funktionseinheit zum Abschalten sein, muss diese immer zugänglich sein.13.  Verwenden Sie nur Zusatzgeräte/Zubehörteile, dielaut Hersteller geeignet sind.14.  Verwenden Sie nur Wagen, Standvorrichtungen, Stative, Halter oder Tische, die vom Hersteller benannt oder im Lieferumfang des Geräts enthalten sind. Falls Sie einen Wagen benutzen, seien Sie vorsichtig beim Bewegen der Wagen- Gerätkombination, umVerletzungen durch Stolpern zuvermeiden.15.  Ziehen Sie den Netzstecker bei Gewitter oder wenn Sie das Gerät längere Zeit nicht benutzen.16.  Lassen Sie alle Wartungsarbeiten nur von quali ziertem Service-Personal ausführen. EineWartung ist notwendig, wenn das Gerät in irgendeiner Weise beschädigt wurde (z. B. Beschädigung des Netzkabels oder Steckers), Gegenstände oder Flüssigkeit in das Geräteinnere gelangt sind, das Gerät Regen oder Feuchtigkeit ausgesetzt wurde, das Gerät nicht ordnungsgemäß funktioniert oder auf den Boden gefallen ist.17.  Korrekte Entsorgung dieses Produkts: Dieses Symbol weist darauf hin, das Produkt entsprechend der WEEE Direktive (2002/96/EC) und der jeweiligen nationalen Gesetze nicht zusammen mit Ihren Haushaltsabfällen zu entsorgen. DiesesProdukt sollte bei einer autorisierten Sammelstelle für Recycling elektrischer und elektronischer Geräte (EEE) abgegeben werden. Wegen bedenklicher Substanzen, diegenerell mit elektrischen und elektronischen Geräten in Verbindung stehen, könnte eine unsachgemäße Behandlung dieser Abfallart eine negative Auswirkung auf Umwelt und Gesundheit haben. Gleichzeitig gewährleistet Ihr Beitrag zur richtigen Entsorgung dieses Produkts die e ektive Nutzung natürlicher Ressourcen. Fürweitere Informationen zur Entsorgung Ihrer Geräte bei einer Recycling-Stelle nehmen Sie bitte Kontakt zum zuständigen städtischen Büro, Entsorgungsamt oder zu Ihrem Haushaltsabfallentsorgerauf.TECHNISCHE DATEN UND ERSCHEINUNGSBILD KÖNNEN UNANGEKÜNDIGT GEÄNDERT WERDEN. IRRTÜMER BLEIBEN VORBEHALTEN. BEHRINGER, KLARK TEKNIK, MIDAS, BUGERA UND TURBOSOUND SIND TEIL DER MUSIC GROUP MUSICGROUP.COM. ALLEWARENZEICHEN SIND DAS EIGENTUM IHRER JEWEILIGEN BESITZER. MUSICGROUP ÜBERNIMMT KEINE HAFTUNG FÜR VERLUSTE, DIE PERSONEN ENTSTEHEN, DIE SICH GANZ ODER TEILWEISE AUF HIER ENTHALTENE BESCHREIBUNGEN, FOTOS ODER AUSSAGEN VERLASSEN. ABGEBILDETE FARBEN UND SPEZIFIKATIONEN KÖNNEN GERINGFÜGIG VOM PRODUKT ABWEICHEN. MUSICGROUP PRODUKTE WERDEN NUR ÜBER AUTORISIERTE FACHHÄNDLER VERKAUFT. DIE VERTRIEBSPARTNER UND HÄNDLER SIND KEINE VERTRETER VON MUSICGROUP UND SIND NICHT BERECHTIGT, MUSICGROUP DURCH AUSDRÜCKLICHE ODER STILLSCHWEIGENDE HANDLUNGEN ODER REPRÄSENTANZEN ZU VERPFLICHTEN. DIESE BEDIENUNGSANLEITUNG IST URHEBERRECHTLICH GESCHÜTZT. KEIN TEIL DIESES HANDBUCHS DARF IN IRGENDEINER FORM ODER MIT IRGENDWELCHEN MITTELN ELEKTRONISCH ODER MECHANISCH, INKLUSIVE FOTOKOPIE ODER AUFNAHME, ZU IRGENDEINEM ZWECK OHNE DIE SCHRIFTLICHE ZUSTIMMUNG DER FIRMA MUSICGROUPIPLTD. VERVIELFÄLTIGT ODER ÜBERTRAGEN WERDEN.ALLE RECHTE VORBEHALTEN. © 2013 MUSICGroupIPLtd.Trident Chambers, Wickhams Cay, P.O. Box 146, Road Town, Tortola, British Virgin IslandsDie geltenden Garantiebedingungen und zusätzliche Informationen bezüglich der von MUSIC Group gewährten beschränkten Garantie  nden Sie online unter www. music-group.com/warranty.
6EUR O L I V E  B115 W/ B112 WInstruções de Segurança ImportantesLEGAL RENUNCIANTEGARANTIA LIMITADAAviso!Terminais marcados com o símbolo carregam corrente elétrica de magnitude su ciente para constituir um risco de choque elétrico. Use apenas cabos de alto-falantes de alta qualidade com plugues TS de ¼" ou plugues com trava de torção pré-instalados. Todas as outras instalações e modi cações devem ser efetuadas por pessoasquali cadas.Este símbolo, onde quer que o encontre, alerta-o para a leitura das instruções de manuseamento que acompanham o equipamento. Por favor leia o manual de instruções.AtençãoDe forma a diminuir o risco de choque eléctrico, não remover a cobertura (ouasecção de trás). Não existem peças substituíveis por parte do utilizador no seu interior. Para esse efeito recorrer a um técnico quali cado.AtençãoPara reduzir o risco de incêndios ou choques eléctricos o aparelho não deve ser exposto à chuva nem à humidade. Além disso, não deve ser sujeito a salpicos, nem devem ser colocados em cima do aparelho objectos contendo líquidos, tais como jarras.AtençãoEstas instruções de operação devem ser utilizadas, em exclusivo, por técnicos de assistência quali cados. Para evitar choques eléctricos não proceda a reparações ou intervenções, que não as indicadas nas instruções de operação, salvo se possuir as quali -cações necessárias. Para evitar choques eléctricos não proceda a reparações ou intervenções, que não as indicadas nas instruções de operação. Só o deverá fazer se possuir as quali cações necessárias.1.  Leia estas instruções.2.  Guarde estas instruções.3.  Preste atenção a todos os avisos.4.  Siga todas as instruções.5.  Não utilize este dispositivo perto de água.6.  Limpe apenas com um pano seco.7.  Não obstrua as entradas de ventilação. Instale de acordo com as instruções do fabricante.8.  Não instale perto de quaisquer fontes de calor tais como radiadores, bocas de ar quente, fogões de sala ou outros aparelhos (incluindo ampli cadores) que produzam calor.9.  Não anule o objectivo de segurança das  chas polarizadas ou do tipo de ligação à terra. Uma  cha polarizada dispõe de duas palhetas sendo uma mais larga do que a outra. Uma  cha do tipo ligação à terra dispõe de duas palhetas e um terceiro dente de ligação à terra. A palheta larga ou o terceiro dente são fornecidos para sua segurança. Se a  cha fornecida não encaixar na sua tomada, consulte um electricista para a substituição da tomada obsoleta.10.  Proteja o cabo de alimentação de pisadelas ou apertos, especialmente nas  chas, extensões, e no local de saída da unidade. Certi que-se de que o cabo eléctrico está protegido. Veri que particularmente nas  chas, nos receptáculos e no ponto em que o cabo sai doaparelho.11.  O aparelho tem de estar sempre conectado à rede eléctrica com o condutor de protecção intacto.12.  Se utilizar uma  cha de rede principal ou uma tomada de aparelhos para desligar a unidade de funcionamento, esta deve estar sempre acessível.13.  Utilize apenas ligações/acessórios especi cados pelofabricante.14.  Utilize apenas com o carrinho, estrutura, tripé, suporte, ou mesa especi cados pelo fabricante ou vendidos com o dispositivo. Quandoutilizar um carrinho, tenha cuidado ao mover o conjunto carrinho/dispositivo para evitar danos provocados pela terpidação. 15.  Desligue este dispositivo durante as trovoadas ou quando não for utilizado durante longos períodos detempo.16.  Qualquer tipo de reparação deve ser sempre efectuado por pessoal quali cado. É necessária uma reparação sempre que a unidade tiver sido de alguma forma dani cada, como por exemplo: no caso do cabo de alimentação ou  cha se encontrarem dani cados; naeventualidade de líquido ter sido derramado ou objectos terem caído para dentro do dispositivo; no caso da unidade ter estado exposta à chuva ou à humidade; seesta não funcionar normalmente, ou se tiver caído.17.  Correcta eliminação deste produto: este símbolo indica que o produto não deve ser eliminado juntamente com os resíduos domésticos, segundo a Directiva REEE (2002/96/CE) e a legislação nacional. Este produto deverá ser levado para um centro de recolha licenciado para a reciclagem de resíduos de equipamentos eléctricos e electrónicos (EEE). O tratamento incorrecto deste tipo de resíduos pode ter um eventual impacto negativo no ambiente e na saúde humana devido a substâncias potencialmente perigosas que estão geralmente associadas aos EEE. Ao mesmo tempo, a sua colaboração para a eliminação correcta deste produto irá contribuir para a utilização e ciente dos recursos naturais. Paramais informação acerca dos locais onde poderá deixar o seu equipamento usado para reciclagem, é favor contactar os serviços municipais locais, a entidade de gestão de resíduos ou os serviços de recolha de resíduosdomésticos.ESPECIFICAÇÕES TÉCNICAS E APARÊNCIA ESTÃO SUJEITAS A MUDANÇAS SEM AVISO PRÉVIO E NÃO HÁ GARANTIA DE PRECISÃO . BEHRINGER, KLARKTEKNIK, MIDAS, BUGERA, ETURBOSOUND FAZEM PARTE DO MUSIC GROUP MUSICGROUP.COM. TODAS AS MARCAS REGISTADAS SÃO PROPRIEDADE DOS SEUS RESPECTIVOS PROPRIETÁRIOS. MUSICGROUP NÃO SE RESPONSABILIZA POR QUALQUER PERDA QUE POSSA TER SIDO SOFRIDA POR QUALQUER PESSOA QUE ACREDITA TANTO COMPLETA QUANTO PARCIALMENTE EM QUALQUER DESCRIÇÃO, FOTO OU AFIRMAÇÃO AQUI CONTIDA. CORES E ESPECIFICAÇÕES PODEM VARIAR UM POUCO DO PRODUTO. OSPRODUTOS DA MUSICGROUP SÃO VENDIDOS ATRAVÉS DE DISTRIBUIDORES AUTORIZADOS APENAS. DISTRIBUIDORES E REVENDEDORES NÃO SÃO AGENTES DA MUSICGROUP E NÃO TÊM AUTORIDADE ALGUMA PARA OBRIGAR A MUSICGROUP A QUALQUER TAREFA OU REPRESENTAÇÃO EXPRESSA OU IMPLÍCITA. ESTEMANUAL TEM DIREITOS AUTORAIS. PARTEALGUMA DESTE MANUAL PODE SER REPRODUZIDA OU TRANSMITIDA DE QUALQUER FORMA OU MEIO, ELETRÔNICO OU MECÂNICO, INCLUINDO FOTOCÓPIA E GRAVAÇÃO DE QUALQUER TIPO, PARA QUALQUER INTENÇÃO, SEM A PERMISSÃO ESCRITA EXPRESSA DE MUSICGROUPIPLTD.TODOS DIREITOS RESERVADOS. © 2013 MUSICGroupIPLtd.Trident Chambers, Wickhams Cay, P.O. Box 146,Road Town, Tortola, Ilhas Virgens BritânicasPara obter os termos de garantia aplicáveis e condições e informações adicionais a respeito da garantia limitada do MUSIC group, favor veri car detalhes na íntegra através do website www.music-group.com/warranty.
8EUR O L I V E  B115 W/ B112 WEUROLIVE B115W/B112W Hook-up(EN)  Step 1: Hook-Up(ES)  Paso 1: Conexión(FR)  Etape 1 : Connexions(DE) Schritt 1: Verkabelung(PT)  Passo 1: ConexõesWireless connection with Bluetooth smartphone streaming
9Quick Start GuideEUROLIVE B115W/B112W Hook-upXM8500PA/musician/conference hookup
10 EUR O L I V E  B115 W/ B112 WEUROLIVE B115W/B112W Hook-up(EN)  Step 1: Hook-Up(ES)  Paso 1: Conexión(FR)  Etape 1 : Connexions(DE) Schritt 1: Verkabelung(PT)  Passo 1: Conexões
11 Quick Start GuideEUROLIVE B115W/B112W Hook-upXM8500XENYX QX2442USBSinger-songwriter hookup with mixer and analog connection
12 EUR O L I V E  B115 W/ B112 WEUROLIVE B 115W/B112W Controls(5)(6)(10)(8)(7)(11)(13)(2)(4)(3)(1)(12)(14)(15)(9)
13 Quick Start GuideEUROLIVE B 115W/B112W Controls(EN) Step 2: Controls (1) The POWER switch turns the speaker on.(2) Plug the included IEC power cable into thisjack.(3) Replace a blown fuse here.(4) STEP 1 / PAIR button and indicator connect your Bluetooth device. Press and release theSTEP 1 button.(5) STEP 2 / STEREO LINK button and indicator link the B115W/B112W to another similar speaker. Press and release the STEP 2 button. The LED will ash while linking, and then light solid when the other speaker successfullylinks.(6) BLUETOOTH VOLUME button controls the relative volume of the Bluetooth sound in the overall mix.(7) MIX OUTPUT sends a copy of the source signal to another speaker using an XLR cable.(8) Connect a microphone, balanced mixer output, or the MIX OUTPUT from another speaker using a balanced cable with a male XLR plug. Connect a ¼" mixer output or other line level signal into the center of the XLR/TRS combination jack.(9) INPUT 1 and INPUT 2 knobs adjust the input sensitivity (gain) for the XLR/TRS combinationjacks.(10) CLIP LED lights when the input signal begins to overload.(11) HIGH EQUALIZER cuts or boosts treble frequencies by ±15 dB.(12) CLIP LED lights when the main output signal begins to overload.(13) LOW EQUALIZER cuts or boosts bass frequencies by ±15 dB.(14) Connect optional Behringer wireless microphone receiver here.(15) LEDs indicate wireless microphone signalinput.(ES) Paso 2: Controles (1) El interruptor POWER enciende el altavoz.(2) Conecte el cable IEC incluido en esta entrada.(3) Acceda desde aquí al fusible en caso de que tenga que sustituirlo.(4) STEP 1 / PAIR button and indicator connect your Bluetooth device. Press and release theSTEP 1 button.(5) STEP 2 / STEREO LINK button and indicator link the B115W/B112W to another similar speaker. Press and release the STEP 2 button. The LED will ash while linking, and then light solid when the other speaker successfullylinks.(6) BLUETOOTH VOLUME button controls the relative volume of the Bluetooth sound in the overall mix.(7) La salida MIX OUTPUT envía una copia de la señal fuente a otro altavoz usando un cableXLR.(8) Conecte un micrófono, la salida balanceada de una mesa de mezclas o la señal de la salida MIX OUTPUT de otro altavoz a través de un cable balanceado con una clavija XLR hembra. Conecte la salida de 6,3 mm de una mesa de mezclas u otra señal con nivel de línea en la parte central de esta toma combo XLR/TRS.(9) Los mandos INPUT 1 y INPUT 2 le permiten ajustar la sensibilidad de entrada (ganancia) de las tomas combo XLR/TRS.(10) El piloto CLIP se ilumina cuando la señal de entrada empieza a sobrecargarse (saturar).(11) HIGH EQUALIZER corta o realza las frecuencias agudas en ±15 dB.(12) El piloto CLIP se ilumina cuando la señal de salida principal comience a estar sobrecargada(saturada).(13) LOW EQUALIZER corta o realza las frecuencias graves en ±15 dB.(14) Conecte aquí un receptor de micrófono inalámbrico opcional de BEHRINGER.(15) Los pilotos LED indican la entrada de señal del micrófono inalámbrico.
14 EUR O L I V E  B115 W/ B112 WEUROLIVE B 115W/B112W Controls(FR) Etape 2 : Réglages (1) L’interrupteur POWER place l'enceinte soustension.(2) Reliez le cordon secteur à cette embase.(3) Le fusible (remplaçable) est situé à cet endroit.(4) STEP 1 / PAIR button and indicator connect your Bluetooth device. Press and release theSTEP 1 button.(5) STEP 2 / STEREO LINK button and indicator link the B115W/B112W to another similar speaker. Press and release the STEP 2 button. The LED will ash while linking, and then light solid when the other speaker successfullylinks.(6) BLUETOOTH VOLUME button controls the relative volume of the Bluetooth sound in the overall mix.(7) La sortie MIX OUTPUT transmet une copie du signal source à une autre enceinte par liaisonXLR.(8) Reliez un micro, une sortie de console de mixage symétrique ou la sortie MIX OUTPUT d’une autre enceinte à l’aide d’un cordon XLR symétrique avec che XLR femelle. Siles sorties de votre console (ou de tout autre équipement à niveau ligne) sont en Jacks 6,35mm,utilisez le centre de l’embase combinée Jack/XLR.(9) Les boutons INPUT 1 et INPUT 2 déterminent la sensibilité d’entrée (gain) des embases combinées Jack6,35mm/XLR.(10) La Led CLIP s’allume lorsque le signal d’entrée est en surcharge.(11) Le bouton HIGH EQUALIZER atténue ou accentue les hautes fréquences de ±15 dB.(12) La Led CLIP s’allume lorsuq ele signal des sorties générales commence à écrêter.(13) Le bouton LOW EQUALIZER atténue ou accentue les basses fréquences de ±15 dB.(14) Insérez la cartouche réceptrice des micros sans l optionnels BEHRINGER à cette entrée.(15) Les Leds indiquent le signal d'entrée du micro sans l.(DE)  Schritt 2: Regler (1) Der POWER-Schalter schaltet den Lautsprecher ein.(2) Schließen Sie das mitgelieferte IEC-Netzkabel an diese Buchse an.(3) Hier können Sie eine durchgebrannte Sicherung ersetzen.(4) STEP 1 / PAIR button and indicator connect your Bluetooth device. Press and release theSTEP 1 button.(5) STEP 2 / STEREO LINK button and indicator link the B115W/B112W to another similar speaker. Press and release the STEP 2 button. The LED will ash while linking, and then light solid when the other speaker successfullylinks.(6) BLUETOOTH VOLUME button controls the relative volume of the Bluetooth sound in the overall mix.(7) MIX OUTPUT leitet eine Kopie des Quellensignals über ein XLR-Kabel zu einem anderen Lautsprecher.(8) Hier schließen Sie ein Mikrofon, einensymmetrischen Mischerausgang oder den MIX OUTPUT eines anderen Lautsprechers über ein symmetrisches Kabel mit XLR-Stecker an. Schließen Sie einen Mischerausgang oder ein anderes Line-Pegel-Signal mit 6,35 mm Stecker in der Mitte der XLR/TRS-Kombibuchse an.(9) Die INPUT 1- und INPUT 2-Regler steuerndie Eingangsempndlichkeit (Gain) derXLR/TRS-Kombibuchsen.(10) Die CLIP LED leuchtet, sobald das Eingangssignal zu übersteuern beginnt.(11) Der HIGH EQUALIZER bedämpft oder verstärkt die Höhen um ±15 dB.(12) Die CLIP LED leuchtet, wenn das Hauptausgangssignal zu übersteuern beginnt.(13) Der LOW EQUALIZER bedämpft oder verstärkt die Bässe um ±15 dB.(14) Schließen Sie hier den optionalen BEHRINGER Drahtlosmikrofon-Empfänger an.(15) Die LED zeigt die Konnektivität des Drahtlosmikrofonsignals an.
15 Quick Start GuideEUROLIVE B 115W/B112W Controls(PT)  Passo 2: Controles (1) O botão POWER liga o alto-falante.(2) Conecte o cabo de alimentação IEC incluso nesta tomada.(3) Substitua um fusível queimado aqui. (4) STEP 1 / PAIR button and indicator connect your Bluetooth device. Press and release theSTEP 1 button.(5) STEP 2 / STEREO LINK button and indicator link the B115W/B112W to another similar speaker. Press and release the STEP 2 button. The LED will ash while linking, and then light solid when the other speaker successfullylinks.(6) BLUETOOTH VOLUME button controls the relative volume of the Bluetooth sound in the overall mix.(7) A saída MIX OUTPUT envia uma cópia do sinal fonte a outro alto-falante, usando o XLR.(8) Conecte um microfone, saída de mixer balanceado, ou saída MIX OUTPUT proveniente de outro alto-falante usando um cabo balanceado com plugue fêmea XLR. Conecte uma saída de mixer de ¼" ou outro sinal de nível de linha ao centro do conjunto de tomadas XLR/TRS.(9) Os botões de entrada INPUT 1 e INPUT 2 ajustam a sensibilidade de entrada (ganho) doconjunto de tomadas XLR/TRS.(10) O LED CLIP ilumina-se quando o sinal de entrada começa a car sobrecarregado.(11) O equalizador HIGH EQUALIZER corta ou aumenta as frequências agudas em ±15 dB.(12) O LED CLIP ilumina-se quando o sinal de saída principal começa a car sobrecarregado.(13) O equalizador LOW EQUALIZER corta ou aumenta as frequências graves em ±15 dB.(14) Conecte um receptor de microfone sem o BEHRINGER opcional aqui.(15) Os LEDs indicam entrada de sinal de microfone sem o.
16 EUR O L I V E  B115 W/ B112 WEUROLIVE B115W/B112W Getting started(EN)  Step 3: Getting startedPlace the speaker(s) in desired locations, either on stands or as wedge monitors onthe oor.Make all necessary connections. DONOTturn on the power yet. Turn on your audio source (mixer,microphone). Turn on your speaker(s) by pressing the POWER SWITCH. The POWER LED will light up.Play your audio source or speak into your microphone at a normal to loud level. Adjust the LEVEL knob to the desired volume. If the CLIP LED ashes, turntheLEVEL knob down. If using multiple speakers, the LEVEL knob must be adjustedon eachspeaker.If necessary, adjust the HIGH and LOWEQUALIZER knobs on each speaker toboost or cut treble and bass frequencies to taste. Optional wireless microphone set-upOnly insert the optional BEHRINGER DIGITAL WIRELESS microphone receiverinto the input.Turn the ON/OFF switches on the microphones to the “ON” position. During the pairing process, the LED on the dongle will ash. Once the connection between the wireless microphone and the receiver is achieved, the LED will remain on (solid).Speak into the wireless microphones andadjust the volume using the volume buttons on the individual microphones. Press the volume down button for two seconds to mute the microphone signal. Press the volume up button to unmute the microphone.Bluetooth connection procedureMake sure Bluetooth is enabled on your Bluetooth device. Turn the BLUETOOTH VOLUME knob all the way down to the MIN setting. Press and release the STEP 1 button to pair the speaker with your Bluetooth device. The PAIR LED will ash while connecting to your Bluetooth device. When Bluetooth has successfully paired with your device, thePAIR LED will light solid.Press and release the STEP 2 button to link your B115W/B112W speaker with another similar speaker. The STEREO LINK LED will ash while connecting to your Bluetooth device. When Bluetooth has successfully paired with your device, the STEREO LINK LED will light solid.Begin playback on your Bluetooth device.  Slowly turn the BLUETOOTH VOLUME clockwise until you nd a comfortable listening level.
17 Quick Start GuideEUROLIVE B115W/B112W Getting started(ES)  Paso 3: Puesta en marchaColoque los altavoces en las posiciones que quiera, sobre un soporte o sobre el suelo como monitores de tipo cuña.Realice todas las conexiones necesarias. NO ENCIENDA todavía las unidades. Encienda su fuente de señal audio (mesade mezclas, micrófono). Encienda los altavoces pulsando su interruptor POWER. El piloto POWER se iluminará en cuanto haga esto. Toque o active la reproducción en su fuente audio o hable o cante en el micrófono a un nivel entre normal yalto.Ajuste el mando LEVEL hasta conseguir el volumen que quiera. Si parpadea el piloto CLIP, reduzca el ajuste del mando LEVEL. Si usa varios altavoces, deberá ajustar el mando LEVEL en cada uno de ellos.Si es necesario, ajuste los mandos EQUALIZER HIGH y LOW de cada altavoz para realzar o cortar las frecuencias agudas y graves de acuerdo a sus gustos.Conguración de micro inalámbrico opcionalSolo inserte el receptor de microfono digital opcional inalambrico, BEHRINGER DIGITAL WIRELESS,  en la entrada.Coloque los interruptores ON/OFF de los micrófonos a la posición “ON”. Durante el proceso de sincronización, elpiloto de la “mochila” parpadeará. Unavez que se haya establecido la conexión entre el micro inalámbrico y el receptor, elpiloto quedará iluminado jo. Cante o hable en los micros inalámbricos y ajuste el volumen usando los botones de volumen de cada uno de los micrófonos. Pulse durante dos segundos el botón de volumen abajo para anular la señal del micro. Pulseel botón de volumen arriba para anular dicha anulación y volver a activar la señal del micro.
18 EUR O L I V E  B115 W/ B112 W(FR)  Etape 3 : Mise en oeuvrePlacez les enceintes où vous le souhaitez, sur pied ou au sol en bains de pieds. Réalisez les connexions. NE PLACEZ PAS sous tension — attendez. Activez la source audio (console de mixage, micro, etc.). Placez les enceintes sous tension à l’aide de l’INTERRUPTEUR POWER. La Led POWER s’allume.Activez la source audio ou parlez dans lemicro avec un niveau allant de normalàfort.Réglez le bouton LEVEL pour obtenir le niveau souhaité. Si la Led CLIP s’allume, baissez le réglage LEVEL. Si vous utilisez plusieurs enceintes, le bouton LEVEL doit être réglé sur chaque enceinte.Si nécessaire, réglez les boutons d’égalisation HIGH et LOW de chaque enceinte pour atténuer ou accentuer les basses et hautes fréquences en fonction de la réponse souhaitée.Mise en œuvre du micro sans l optionnelSeul le récepteur optionnel du micro SANS FIL NUMERIQUE BEHRINGER doit être inséré dans l'entrée. Placez les sélecteurs ON/OFF des micros sur “ON”. Lors de la période de synchronisation, laLed de la cartouche réceptrice clignote. Une fois les micros émetteurs synchronisés avec leurs récepteurs, la Led resteallumée. Parlez dans les micros sans l et réglez le volume à l’aide des boutons sur les micros. Enfoncez le bouton de volume pendant deux secondes pour couper le signal du micro. Appuyez à nouveau sur le bouton de volume pour réactiver le signal.EUROLIVE B115W/B112W Getting started
19 Quick Start GuideEUROLIVE B115W/B112W Getting started(DE)  Schritt 3: Erste SchrittePlatzieren Sie die Lautsprecher an der vorgesehenen Stelle, entweder auf Ständern oder als Bodenmonitore.Stellen Sie alle notwendigen Anschlüsseher. Schalten Sie das GerätNOCHNICHTein.Schalten Sie Ihre Audioquelle (Mischer,Mikrofon) ein. Schalten Sie Ihre Lautsprecher mit einem Druck auf den POWER-SCHALTER ein. DiePOWER LED leuchtet. Spielen Sie Ihre Audioquelle ab oder sprechen Sie mit normaler bis hoher Lautstärke in Ihr Mikrofon.Drehen Sie den LEVEL-Regler auf die gewünschte Lautstärke auf. Wenn die CLIP LED blinkt, drehen Sie den LEVEL-Regler zurück. Beim Einsatz mehrerer Lautsprecher müssen Sie den LEVEL-Regler an jeder Box zurückdrehen.Stellen Sie nötigenfalls die HIGH- und LOW EQUALIZER-Regler jedes Lautsprechers ein, um die Höhen und Bässe wunschgemäß zu verstärken/bedämpfen. Einrichten eines optionalen DrahtlosmikrofonsStecken Sie den BEHRINGER DIGITAL WIRELESS Empfänger in den Eingang. Stellen Sie die ON/OFF-Schalter der Mikrofone auf “ON”. Während die doppelte Verbindung hergestellt wird, blinkt die LED des Dongles. Sobald die Verbindung zwischen Drahtlosmikrofonen und Empfänger steht, leuchtet die LED dauerhaft (konstant). Sprechen Sie ins Drahtlosmikrofon undstellen Sie die Lautstärke mit denVolume-Tasten der einzelnen Mikrofoneein. Halten Sie die Volume-Down-Tastezwei Sekunden gedrückt, um das Mikrofonsignalstummzuschalten.
20 EUR O L I V E  B115 W/ B112 W(PT)  Passo 3: Primeiros PassosPosicione o(s) alto-falante(s) nos locais desejados, em estantes, ou como monitores de palco no chão.Faça todas as conexões necessárias. NÃOligue-os ainda. Ligue sua fonte de áudio (mixer,microfone). Ligue o(s) alto-falante(s) pressionando o BOTÃO POWER. O botão POWER LED seacenderá.Toque a fonte de áudio ou fale no microfone em um nível de som normal. Ajuste o botão de nível LEVEL ao volume desejado. Se o LED CLIP piscar, abaixe o nível do botão LEVEL. Se estiver utilizando vários alto-falantes, o botão de nível LEVEL deve ser ajustado em cada alto-falante.Se for necessário, ajuste os botões equalizadores HIGH (alto) e LOW (baixo) em cada alto-falante para aumentar ou cortar frequências agudas e graves de acordo com seu gosto pessoal.Conguração opcional de microfone sem oInsira apenas o receptor opcional de microfone SEM FIO DIGITAL BEHRINGER na entrada.Coloque os botões ON/OFF dos microfones na posição ligada “ON”. Durante o processo de emparelhamento, o LED no dongle piscará. Quando a conexão entre o microfone sem o eoreceptor for realizada, o LED permanecerá ligado(sólido). Fale nos microfones sem o e ajuste o volume usando os botões de volume encontrados em cada microfone.  Pressione o botão de abaixar o volume durante dois segundos para colocar o sinal de microfone em modo mute. Pressione o botão de aumentar o volume para retirar o microfone do modo mute.EUROLIVE B115W/B112W Getting started
22 EUR O L I V E  B115 W/ B112 WSpecicationsB115W B112WAmplierLow-Frequency RangeMax. output power 700 W* 700 W*High-Frequency RangeMax. output power 300 W* 300 W*Audio InputsXLR (Servo-Balanced)Sensitivity -36 dBu to 0 dBu -36 dBu to 0 dBuInput impedance 24 kΩ 24 kΩ¼" TRS Jack (Servo-Balanced)Sensitivity -36 dBu to 0 dBu -36 dBu to 0 dBuInput impedance 24 kΩ 24 kΩWireless SystemUSB dongle (not included) USB socket accepts signals from 2 independent BEHRINGER ULM micsSignal indicator LED 2 (green)Bluetooth**Frequency range 2402 MHz ~ 2480 MHzChannel number 79Version Bluetooth spec V2.1+EDR compliantOutput power class Class 2 type output powerCompatibility Supports A2DP 1.2 prolesAudio OutputsMix OutputConnector XLR, balanced XLR, balancedLevel ControlInput trim -∞ to +36 dB  -∞ to +36 dB Max. input level 18 dBu 18 dBuLoudspeaker System DataFrequency response 45 Hz to 20 kHz 50 Hz to 20 kHzCrossover frequency 2.2 kHz 2.8 kHzLimiter Optical OpticalEqualizerHigh  ±15 dB @ 12 kHz ±15 dB @ 12 kHzLow  ±15 dB @ 80 Hz ±15 dB @ 80 HzPower Supply / Voltage (Fuses)USA / Canada 120 V~, 60 Hz (T  6.3 A H 250 V) 120 V~, 60 Hz (T  6.3 A H 250 V)UK / Australia 240 V~, 50 Hz (T  3.15 A H 250 V) 240 V~, 50 Hz (T  3.15 A H 250 V)Europe 230 V~, 50 Hz (T  3.15 A H 250 V) 230 V~, 50 Hz (T  3.15 A H 250 V)Japan 100 V~, 50-60 Hz (T  6.3 A H 250 V) 100 V~, 50-60 Hz (T  6.3 A H 250 V)Mains connection 110 W 110 WDimensions / WeightDimensions (H x W x D) 28.1 x 16.8 x 12.3" / 713 x 427 x 313 mm 22.4 x 13.5 x 10.6" / 568 x 342 x 270 mmWeight 38.9 lbs / 17.7 kg 27.5 lbs / 12.5 kg*Independent of limiters and driver protection circuits **The Bluetooth® word mark and logos are owned by the Bluetooth SIG, Inc. and any use of such marks by MUSIC Group is under license.
Quick Start Guide 27Other important information1. Register online. Please register your new MUSIC Group equipment right after you purchase it by visiting behringer. com. Registering your purchase using our simple online form helps us to process your repair claims more quickly and eciently. Also, read the terms and conditions of our warranty, ifapplicable.2. Malfunction. Should your MUSICGroup Authorized Reseller not be located in your vicinity, you may contact the MUSIC Group Authorized Fulller for your country listed under “Support” at behringer. com. Shouldyour country not be listed, please check if your problem can be dealt with by our “OnlineSupport” which may also be found under “Support” at behringer. com. Alternatively, please submit an online warranty claim at behringer. com BEFORE returning theproduct.3. Power Connections. Before plugging the unit into a power socket, please make sure you are using the correct mains voltage for your particular model. Faultyfuses must be replaced with fuses of the same typeand rating without exception.1. Registro online. Le recomendamos que registre su nuevo aparato MUSIC Group justo después de su compra accediendo a la página web behringer. com. Elregistro de su compra a través de nuestro sencillo sistema online nos ayudará a resolver cualquier incidencia que se presente a la mayor brevedad posible. Además,aproveche para leer los términos y condiciones de nuestra garantía, si es aplicable en sucaso.2. Averías. En el caso de que no exista un distribuidor MUSIC Group en las inmediaciones, puede ponerse en contacto con el distribuidor MUSIC Group de su país, queencontrará dentro del apartado “Support” de nuestra página web behringer. com. En caso de que su país no aparezca en ese listado, acceda a la sección “Online Support” (quetambiénencontrará dentro del apartado “Support” de nuestra páginaweb) y compruebe si su problema aparece descrito y solucionado allí. De forma alternativa, envíenos a través de la página web una solicitud online de soporte en periodo de garantía ANTES de devolvernos el aparato.3. Conexiones de corriente. Antes de enchufar este aparato a una salida de corriente, asegúrese de que dicha salida sea del voltaje adecuado para su modelo concreto. En caso de que deba sustituir un fusible quemado, deberá hacerlo por otro de idénticas especicaciones, sinexcepción.1. Enregistrez-vous en ligne. Prenez le temps d’enregistrer votre produit MUSIC Group aussi vite que possible sur le site Internet behringer. com. Le fait d’enregistrer le produit en ligne nous permet de gérer les réparations plus rapidement et plus ecacement. Prenezégalement le temps de lire les termes et conditions de notre garantie.2. Dysfonctionnement. Si vous n’avez pas de revendeur MUSIC Group près de chez vous, contactez le distributeur MUSIC Group de votre pays: consultez la liste des distributeurs de votre pays dans la page “Support” de notre site Internet behringer. com. Si votre pays n’est pas dans la liste, essayez de résoudre votre problème avec notre “aideen ligne” que vous trouverez également dans la section “Support” du site behringer. com. Vous pouvez également nous faire parvenir directement votre demande de réparation sous garantie par Internet sur le site behringer. com AVANT de nous renvoyer le produit.3. Raccordement au secteur. Avant de relier cet équipement au secteur, assurez-vous que la tension secteur de votre région soit compatible avec l’appareil. Veillez à remplacer les fusibles uniquement par des modèles exactement de même taille et de même valeur électrique — sans aucune exception.1. Online registrieren. Bitte registrieren Sie Ihr neues MUSIC Group-Gerät direkt nach dem Kauf auf der Website  behringer. com. Wenn Sie Ihren Kauf mit unserem einfachen online Formular registrieren, können wir Ihre Reparaturansprüche schneller und ezienter bearbeiten. Lesen Sie bitte auch unsere Garantiebedingungen, fallszutreend.2. Funktionsfehler. Sollte sich kein MUSICGroup Händler in Ihrer Nähe benden, können Sie den MUSICGroup Vertrieb Ihres Landes kontaktieren, derauf behringer. com unter „Support“ aufgeführt ist. Sollte Ihr Land nicht aufgelistet sein, prüfen Sie bitte, ob Ihr Problem von unserem „Online Support“ gelöst werden kann, den Sie ebenfalls auf  behringer. com unter „Support“ nden. Alternativ reichen Sie bitte Ihren Garantieanspruch online auf behringer. com ein, BEVOR Sie das Produktzurücksenden.3. Stromanschluss. Bevor Sie das Gerät an eine Netzsteckdose anschließen, prüfen Sie bitte, obSie die korrekte Netzspannung für Ihr spezielles Modell verwenden. Fehlerhafte Sicherungen müssen ausnahmslos durch Sicherungen des gleichen Typs und Nennwerts ersetztwerden.1. Registre-se online. Por favor, registre seu novo equipamento MUSIC Group logo após a compra visitando o site behringer. com Registrar sua compra usando nosso simples formulário online nos ajuda a processar seus pedidos de reparos com maior rapidez e eciência. Além disso, leia nossos termos e condições de garantia, caso seja necessário.2. Funcionamento Defeituoso. Casoseufornecedor MUSIC Group não esteja localizado nas proximidades, você pode contatar um distribuidor MUSIC Group para o seu país listado abaixo de “Suporte” embehringer. com. Se seu país não estiver na lista, favorchecar se seu problema pode ser resolvido com o nosso “Suporte Online” que também pode ser achado abaixo de “Suporte”em behringer. com. Alternativamente, favor enviar uma solicitação de garantia online em behringer. com ANTES da devolução do produto.3. Ligações. Antes de ligar a unidade à tomada, assegure-se de que está a utilizar a voltagem correcta para o modelo em questão. Os fusíveis com defeito terão de ser substituídos, sem qualquer excepção, por fusíveis do mesmo tipo e corrente nominal.Important informationAspectos importantesInformations importantesWeitere wichtige InformationenOutras Informações Importantes
28 EUR O L I V E  B115 W/ B112 WThis product complies with the requirement of the 1999/5/EC directive.Made in ChinaFEDERAL COMMUNICATIONS COMMISSION COMPLIANCE INFORMATIONResponsible Party Name: MUSIC Group Services US Inc.Address: 18912 North Creek Parkway, Suite 200 Bothell, WA 98011, USAPhone/Fax No.: Phone: +1 425 672 0816 Fax: +1 425 673 7647EUROLIVE B115W/B112Wcomplies with the FCC rules as mentioned in the followingparagraph:This equipment has been tested and found to comply with the limits for a Class B digital device, pursuant to part 15 of the FCC Rules. These limits are designed to provide reasonable protection against harmful interference in a residential installation. This equipment generates, uses and can radiate radio frequency energy and, if not installed and used in accordance with the instructions, may cause harmful interference to radio communications. However, there is no guarantee that interference will not occur in a particular installation. If this equipment does cause harmful interference to radio or television reception, which can be determined by turning the equipment o and on, the user is encouraged to try to correct the interference by one or more of the following measures:• Reorient or relocate the receiving antenna.• Increase the separation between the equipment and receiver.• Connect the equipment into an outlet on a circuit dierent from that to which the receiver is connected.• Consult the dealer or an experienced radio/TV technician for help.This equipment complies with Part 15 of the FCC Rules. Operation is subject to the following two conditions:(1) This device may not cause harmful interference, and (2) This device must accept any interference received, including interference that may cause undesired operation.Caution!The manufacturer is not responsible for any radio or TV interference caused by unauthorized changes or modications to this equipment. Any changes or  modications could void the user authority to operate the equipment. EUROLIVE B115W/B112WFCC ID: QWHB112W-B115W
We Hear You

Navigation menu