Musical Electronics CI320 Bluetooth Speaker with Clock User Manual
Musical Electronics Ltd Bluetooth Speaker with Clock
User Manual
User Guide
Bluetooth Speaker with Clock Ci320
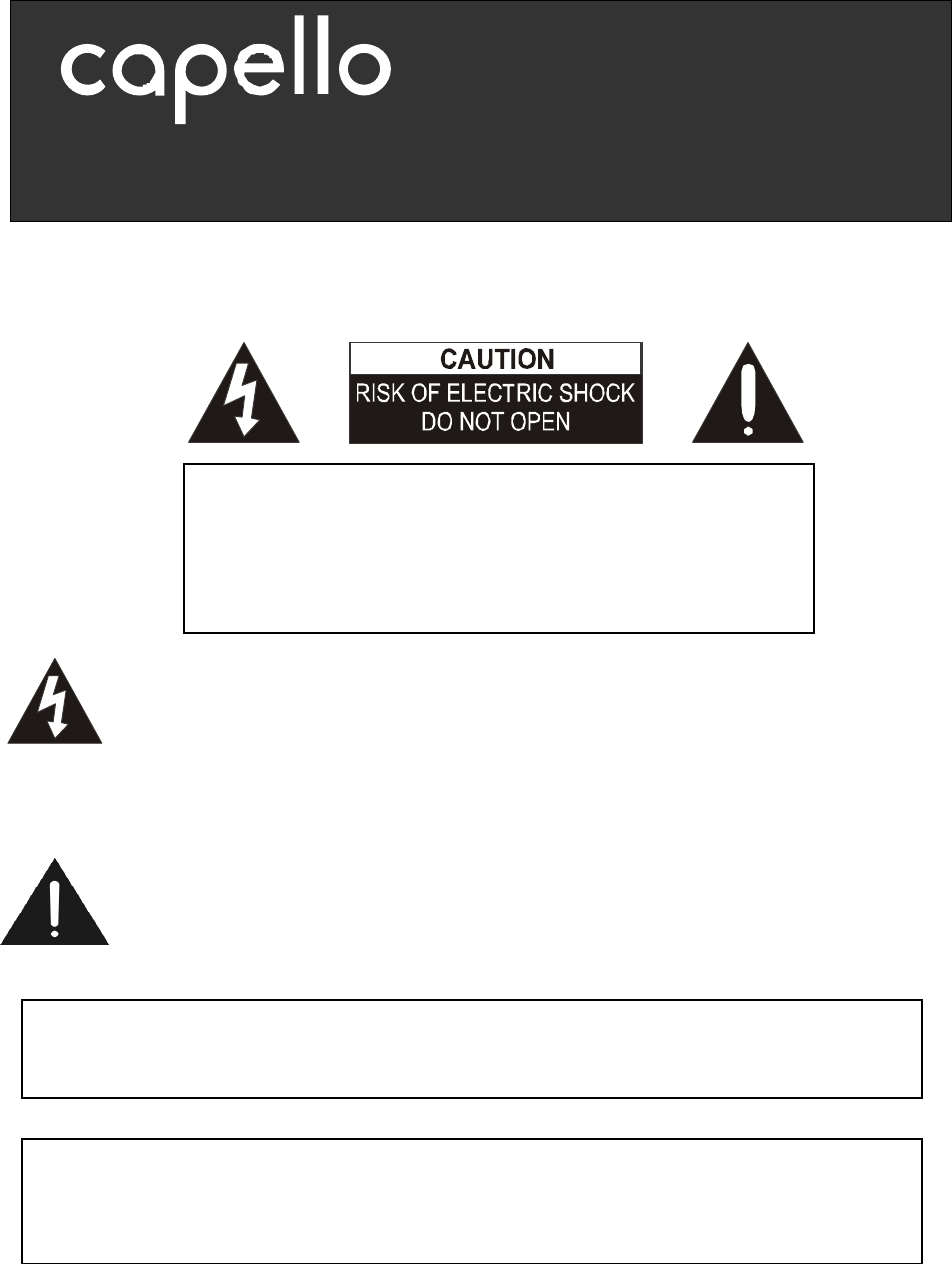
IMPORTANT SAFETY NOTIFICATIONS
ATTENTION:P
CAUTION: TO REDUCE THE RISK OF ELECTRIC SHOCK,
DO NOT REMOVE COVER (OR BACK). NO
USER-SERVICEABLE PARTS INSIDE. REFER SERVICING
TO QUALIFIED SERVICE PERSONNEL.
ATTENTION: The exclamation point within an equilateral triangle is
intended to alert the user to the presence of important operating and
maintenance (servicing) instructions in the literature accompanying
the appliance.
DANGEROUS VOLTAGE: The lightning flash with arrowhead
symbol, within an equilateral triangle is intended to alert the user to
the presence of uninsulated dangerous voltage within the product’s
enclosure that may be of sufficient magnitude to constitute a risk of
electric shock
to persons.
WARNING:
Changes or modifications to this unit not expressly approved by the
party responsible for compliance could void the user’s authority to operate the
equipment.
ATTENTION: POUR ÉVITER LES CHOC ÉLECTRIQUES, INTRODUIRE LA
LAME LA PLUS LARGE DE LA FICHE DANS LA BORNE CORRESPONDANTE
DE LA PRISES ET POUSSER JUSQU’AU FOND.

Compliance information: This device complies with Part 15 of the FCC Rules.
Operation is subject to the following two conditions: (1) this device may not cause
harmful interference, and (2) this device must accept any interference received,
including interference that may cause undesired operation.
WARNING: The batteries shall not be exposed to excessive heat such as sunshine, fire
or the like.
WARNING: The mains plug is used as a disconnect device, the disconnect device shall
remain readily operable.
NOTE: This equipment has been tested and found to comply with the limits for
a Class B digital device, pursuant to Part 15 of the FCC Rules. These limits
are designed to provide reasonable protection against harmful interference in
a residential installation. This equipment generates, uses and can radiate
radio frequency energy and, if not installed and used in accordance with the
instructions, may cause harmful interference to radio communications.
However, there is no guarantee that interference will not occur in a particular
installation. If this equipment does cause harmful interference to radio or
television reception, which can be determined by turning the equipment off
and on, the user is encouraged to try to correct the interference by one or
more of the following measures:
• Reorient or relocate the receiving antenna.
• Increase the separation between the equipment and receiver.
• Connect the equipment into an outlet on a circuit different from that to
which the receiver is connected.
• Consult the dealer or an experienced radio/TV technician for help.
WARNING:
TO PREVENT FIRE OR SHOCK HA
ZARD,
DO NOT EXPOSE THIS
UNIT TO RAIN OR MOISTURE.
SURGE PROTECTORS:
It is recommended to use a surge protector for AC connection. Lightning and
power surges ARE NOT covered under warranty for this product.
FCC RF Radiation Exposure Statement Caution: To maintain compliance with the FCC’s RF exposure guidelines,
place the product at least 20cm from nearby persons.
The device must not be co-located or operating in conjunction with any other antenna or transmitter.

IMPORTANT SAFETY INSTRUCTIONS
Some of the following information may not apply to your particular product; however, as
with any electronic product, precautions should be observed during handling and use.
1. Read these instructions.
2. Keep these instructions.
3. Heed all warnings.
4. Follow all instructions.
5. Do not use this apparatus near water.
6. Clean only with a dry cloth.
7. Do not block any of the ventilation openings. Install in accordance with the
manufacturer’s instructions.
8. Do not install near any heat sources such as radiators, heat registers, stoves, or
other apparatus (including amplifiers) that produce heat.
9. Do not defeat the safety purpose of the polarized or ground-type plug. A polarized
plug has two blades with one wider than the other. A grounding type plug has two
blades and a third grounding prong. The wide blade or the third prong are provided
for your safety. When the provided plug does not fit into your outlet, consult an
electrician for replacement of the obsolete outlet.
10. Protect the power cord from being walked on or pinched particularly at plugs,
convenience receptacles, and the point where they exit from the apparatus.
11. Only use attachments/accessories specified by the manufacturer.
12. Use only with the cart, stand, tripod, bracket, or table specified by the
manufacturer, or sold with the apparatus. When a cart is used, use caution when
moving the cart/apparatus combination to avoid injury from tip-over.
13. Unplug this apparatus during lightning storms or when unused for long periods of
time.
14. Refer all servicing to qualified service personnel. Servicing is required when the
apparatus has been damaged in any way, such as power-supply cord or plug is
damaged, liquid has been spilled or objects have fallen into the apparatus, the
apparatus has been exposed to rain or moisture, does not operate normally, or has
been dropped.
ADDITIONAL SAFETY PRECAUTIONS
a. Do not expose this unit or the AC/DC adaptor to dripping or splashing water. Keep
liquid-filled objects, such as vases, away from this unit and AC/AC adaptor.
b. To ensure that this unit is completely disconnected, unplug it from the wall.
c. Ensure that the AC/DC adaptor is easily accessible.
d. Please note the information printed underneath the unit.
e. Batteries should not be exposed to excessive heat such as direct sunshine, fire,
etc.
f. Do not impede the ventilation of this unit by covering the ventilation openings with
items such as newspapers, table-cloths, curtains, etc.
g. Keep open flames, such as lighted candles, away from this unit.
h. Do not place this unit in closed bookcases, racks, or other spaces without proper
ventilation.
i. Use only the same or equivalent type batteries as there is a danger of explosion if
the incorrect batteries are used or they are installed incorrectly.
j. Dispose of batteries properly according to environmental regulations.
Inside the box
Ci320 Bluetooth Speaker with Clock, AC power adapter and user guide.
AC power source
Insert the small end of the AC adaptor into the DC In Jack (located on the rear of the
unit). Connect the other end to a wall outlet providing 100-240V AC, 50/60Hz.
The output of the provided AC/DC Adaptor is DC 5V 2.5A.
Notes: Disconnect both ends of the power cord when not in use. Use only the
supplied AC adaptor with the following spec.:
AC In – 100-240V AC, 50/60Hz / DC Out – 5V 2.5A
Backup battery
To keep accurate time, this unit uses (2) “AAA batteries” (sold separately) for clock
backup. These batteries keep the clock operating in the event of a power interruption.
Backup battery installation
1. Open the battery door by pushing in on the tabs, then removing the door.
2. Insert two (2) “AAA” batteries following the correct polarity indicated in the battery
compartment.
3. Replace the battery door back on the compartment.
Notes: The batteries are used to backup the clock and alarm times when the AC
adaptor is disconnected or there is a power failure. Alkaline batteries are

recommended for the longest backup time.
When replacing the battery, do not disconnect the AC power adapter otherwise
the current time, alarm, and station presets will be erased.
When to replace the battery
The red LED of battery indicator will light up when there are no batteries or when the
batteries are low.
1. Warning – Danger of explosion if batteries are incorrectly replaced. Replace only with the same or
equivalent type.
2. Use only the size and type of batteries specified.
3 .Be sure to follow the correct polarity when installing the batteries as indicated in the Battery
Compartment. A reversed battery may cause damage to the device.
4. If the device is not to be used for a long period of time, remove the batteries to prevent damage or
injury from possible battery leakage.
5. Do not try to recharge a battery not intended to be recharged - it can overheat and rupture (Follow
battery manufacturer’s directions.)
6. Do not mix different types of batteries together (e.g. Alkaline, Rechargeable and Carbon-zinc) or old
batteries with fresh ones.
battery precautions:
Follow these precautions when using batteries in this device:
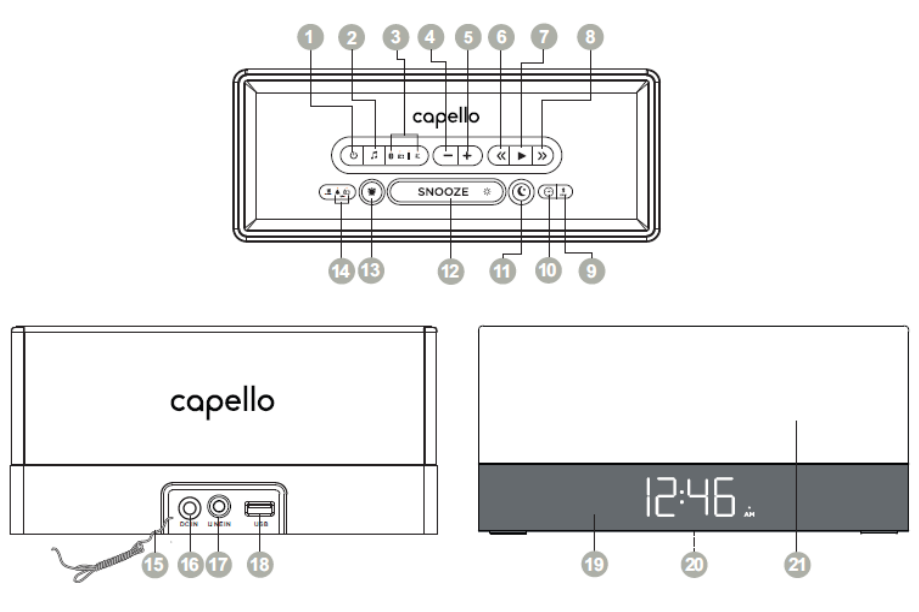
Location of controls
1. POWER ON / OFF
2. SOURCE
3. BLUETOOTH / FM RADIO / AUX IN / SLEEP LED (amber)
4. VOLUME -
5. VOLUME +
6. TUNE DOWN / HOUR
7. PLAY / RADIO PRESET
8. TUNE UP / MIN
9. BLUETOOTH PAIR
10. TIME SET
11. SLEEP
12. SNOOZE / BRIGHTNESS
13. ALARM
14. ALARM BUZZER / ALARM RADIO LED (amber)
LOW BATTERY LED (red)
15. FM ANTENNA WIRE
16. DC IN JACK
17. LINE IN JACK
18. USB CHARGING PORT
19. LED DISPLAY
20. BATTERY COMPARTMENT
(bottom of unit)
21. SPEAKERS
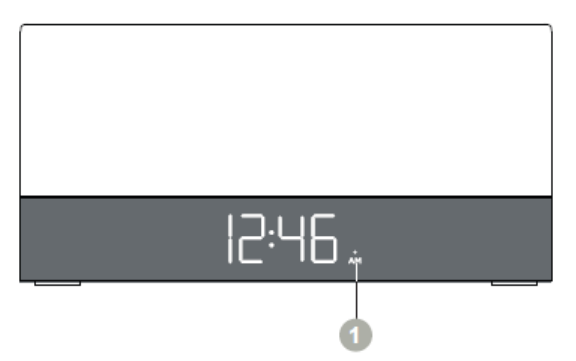
LED display indicator
1. AM
Setting the clock
1. Plug in the Ci320 but leave the power “OFF”.
2. Press and hold the TIME SET button until the clock flashes in the display.
3. Press the TUNE DOWN / HOUR button repeatedly to set the hour and press the
TUNE UP / MIN button repeatedly to set the minute.
4. Press the TIME SET button again to store the new clock setting.
Note: If you do not press any button for about 10 seconds while setting the clock, the
clock setting will be canceled.
Setting the alarm

1. In standby mode, press and hold the ALARM button and the display will begin
flashing.
2. Press the TUNE DOWN / HOUR or TUNE UP / MIN button to set the desired alarm
time.
3. Press ALARM button to confirm the alarm time set.
4. Amber LED of alarm source indicator (default as alarm radio) will blink. Press
TUNE DOWN / HOUR or TUNE UP / MIN button to set the desired alarm source
(Buzzer or Radio). Amber LED of the selected alarm source indicator will light up.
5. Press ALARM button to confirm the alarm source set, the volume level will blink on
the display (there is no volume setting if alarm source is set to Buzzer).
6. Press TUNE DOWN / HOUR or TUNE UP / MIN button to set the maximum alarm
volume.
7. Press ALARM button to confirm the alarm set.
Notes: To deactivate the alarm, press ALARM button, the amber LED of alarm source
indicator will turn off.
Before setting the alarm, make sure that the clock time is set correctly (see “Setting the
clock”).
Silencing the alarm
When the alarm sounds, press ALARM or POWER ON / OFF button to silence the
alarm.
Snooze
1. When alarm sounds, pressing the SNOOZE / BRIGHTNESS button will temporarily
silence the alarm. The alarm will sound again after approximately 10 minutes.
2. To extend the snooze duration, repeatedly press the SNOOZE / BRIGHTNESS
button to cycle through and select one of the snooze presets.
Notes: Once the snooze function has been activated, press the SNOOZE /
BRIGHTNESS button anytime and the display will show the remaining time.
Repeatedly press the SNOOZE / BRIGHTNESS button to adjust or modify the current
snooze time setting.

Setting the sleep timer
The Ci320 features a sleep timer to allow you to fall asleep while listening to the unit.
After the preset time duration ends, the unit will automatically shut off.
1. When the unit powered ‘ON’, press the SLEEP button. The amber LED of SLEEP
indicator will light up and “15” will appear on the display briefly indicating the unit will
turn off after 15 minutes.
2. To increase the sleep time duration, up to a maximum of 90 minutes, repeatedly
press the SLEEP button to select one of the following sleep time presets.
3. With the sleep timer active, press the SLEEP button once to view the remaining
sleep time.
4. To cancel the sleep timer function, repeatedly press the SLEEP button until “OFF”
appears in the display.
Setting the display brightness
There are three levels of display brightness available (the default setting is high).
Press the SNOOZE / BRIGHTNESS button to cycle through and select the desired
setting.
Note: Make sure that the unit is not in alarm sound status.
Changing the input source
With the Ci320 powered “ON”, repeatedly press the SOURCE button to change the
input source to cycle between FM Radio, Bluetooth or AUX IN.
Playing the radio
1. With the Ci320 plugged in and powered “ON”, repeatedly press the SOURCE
button until the amber LED of FM Radio indicator lights up.
2. Repeatedly press the TUNE UP / MIN or TUNE DOWN / HOUR button to manually
adjust the tuning on the display until the desired station appears.
3. For auto tuning, press and hold the TUNE UP / MIN or TUNE DOWN / HOUR
button until the display starts to scan, then release the button. The tuner will
search and stop on the next strongest station it finds. Repeat this process until the
desired station appears on the display.
Notes: Fully extend the FM antenna wire to increase reception sensitivity.
Keep digital music players or mobile phones away from the FM antenna as this may
cause interference. Do not place the FM antenna near the AC power adaptor as this
may lead to reception interference.
Setting radio presets
1. To preset a radio station to memory, first follow the steps above to tune in the
desired station.
2. Press and hold the PLAY / RADIO PRESET button to create a preset for the current
station. “P” will appear and “##” (the preset number) will blink on the display.
3. Press the TUNE UP / MIN or TUNE DOWN / HOUR button to select a preset
number (01- 10). Press the PLAY / RADIO PRESET button again to confirm the
setting and the station will be saved into memory.
4. Repeat these steps for up to 10 presets, as desired.
5. To recall a preset station, repeatedly press the PLAY / RADIO PRESET button until
the desired preset number appears in the display and the station tunes in.
Note: Saving a new station preset in the same position as a previously saved station
will replace the previously stored station for that preset number.
Bluetooth Operation
You can stream audio wirelessly to Ci320 from up to 33’ away using your iPhone, iPad,
iPod, Android, laptop, or other A2DP Bluetooth enabled device.
1. Press the POWER ON/OFF button to turn on Ci320.
2. Then press the SOURCE or BLUETOOTH PAIR button. The amber LED of
Bluetooth indicator will flash.
3. Turn on your A2DP Bluetooth device and enable Bluetooth.
4. Search for Bluetooth devices and select “Ci320”.
5. The amber LED of Bluetooth indicator will change from flashing to solid indicating
that your Bluetooth device is connected to Ci320.
Notes:
- Press and hold the BLUETOOTH PAIR button for 3 seconds to disconnect the
Bluetooth connection.
- The unit will return to pairing mode and the amber LED of Bluetooth indicator will
flash.
- If asked for a password, enter “0000”.
Reconnecting your Bluetooth devices
Once your Bluetooth device has been paired with Ci320, it is simple to reconnect them.
1. Make sure that Ci320 is powered on and within range.
2. Select “Ci320” from the list on your Bluetooth device.
3. The amber LED of Bluetooth indicator will change from flashing to solid, indicating
that your Bluetooth device is reconnected to Ci320.
Notes: For the best audio performance, turn the volume on your Bluetooth source
device all the way up. Ci320 can only play audio from one source at a time. If Ci320 is
connected to Line-In source, the Bluetooth will not function. Simply unplug the 3.5mm
Line-In audio cable and press the SOURCE or BLUETOOTH PAIR button to switch to
Bluetooth.
USB charging port
The Ci320 features one (1) USB port located on the rear of the unit (see “location of
controls”). The USB port support powering and charging most devices including
iPhones, iPads, iPods, E-readers, digital cameras and more. (USB cable sold
separately).
Aux-in connection
You can also play audio from other Line-In digital sources using a standard 3.5mm Line
In audio cable (sold separately).
1. Press the POWER ON/OFF button to turn on Ci320.
2. Insert one end of the 3.5mm audio cable into the Line-In jack on the rear of Ci320
and the other end into the Line-Out or headphone jack of your external audio device
(e.g. iPad, mobile phone, MP3 player, digital media player, etc.)
3. Repeatedly press the SOURCE button to switch the input source to AUX IN mode.
The amber LED of AUX IN indicator will light up.
4. Select the music you wish to listen to on your external audio device then press play
and sound will be projected through Ci320 speakers.
Specifications
General:
Power Source………………..................DC 5V 2.5A Adapter (Center Positive)
AC Power Supply……………………………………..100-240V ~ 50/60Hz 0.8A
Class 2 Bluetooth Ranges ……………………………………………..33ft (10m)
Supported Bluetooth Profile………………………………………………….A2DP
Battery Backup……………………………………..2 x 1.5V “AAA” size batteries
Speaker………………………………………………………………….2 x 4 ohms
Output Power.........................................................................................3W x 2
USB Jack DC Power Output……………………………………………..…5V 2A
Radio section:
Frequency Range (FM)………………………….………………..87.5—108 MHz
Specifications are subject to change without notice.
For further assistance, please visit our website at hellocapello.com or contact
customer service at support@capelloproducts.com or 1-855-896-1795
Life Lab International Ltd.
The Bluetooth ® word mark and logos are registered trademarks owned by Bluetooth
SIG, Inc. and any use of such marks by Life Lab International LTD. is under license.
Other trademarks and trade names are those of their respective owners.