Mustek Systems S400W Scanner User Manual S400W User Guide EN indd
Mustek Systems Inc Scanner S400W User Guide EN indd
manual

For mobile devices, and computers
Wireless Scanner
Wireless Scanner
U
s
e
r
G
u
i
d
e
Works with
Scanner App
iScan Air
All trademarks are the property of their respective owners and all rights are
acknowledged.
Compatible with iOS, Mac OS X,
Android OS, and Windows 8
POWER
A8
A6
A4
POWER
A8
A6
A4
V1.3
Wi-Fi
®
802.11g/n
Supported
S400W

2
Safety and Precautions
Discarded electrical and electronic appliance are recyclable and should separate from the household waste. Please actively
support in conserving resources and protecting the environment by returning this appliance to the collection centers (if available).
•Never store the unit in hot, or very cold, or humid or dusty places.
•For an extended storage period, we recommend storing the unit in a cool and dry place.
•To help keep the scanning area clean, store the unit in a proper case when not in use.
•If the unit is left in extreme cold or hot conditions, allow to adjust to normal room temperatures before use.
•Only use accessories included with the unit.
•When left unused for a long period of time, the unit should be disconnected from the power supply.
•Always handle the unit with care. Avoid dropping and strong impact.
•Keep the lens and roller clean and free from scratches.
•Do not scan sharp objects or hard abrasive surfaces to avoid damage to the lens and other parts
•Operate the unit on a level, well-grounded work surface, and free of excessive vibration.
•Don’t open the unit. Risk of electric shock.
•Use only a soft damp cloth to clean the exterior areas of the unit.
•Do not leave the unit within the reach of children.

3
Safety and Precautions ...........................................2
Contents ....................................................................3
Supported Devices .................................................4
Unpack .......................................................................5
Scanner Parts ...........................................................6
Charge the Battery ...................................................7
Download and Install iScan Air ..............................8
From iPad, iPhone, and iPod touch ......................................8
From Android mobile devices ...............................................9
From Mac computers ............................................................9
From Windows 8 devices ....................................................10
Connect via Wi-Fi Network ................................... 11
Scan and Save ........................................................13
From iPad, iPhone, and iPod touch ....................................13
From Android mobile devices .............................................14
From Mac computers ..........................................................15
From Windows 8 devices ....................................................16
Use the Photo Sleeve ............................................17
Calibrate ..................................................................18
From iPad, iPhone, and iPod touch ....................................18
Contents
From Android mobile devices .............................................19
From Mac computers ..........................................................20
From Windows 8 devices ....................................................21
Clean Rollers ...........................................................22
From iPad, iPhone, and iPod touch ....................................22
From Android mobile devices .............................................23
From Mac computers ..........................................................24
From Windows 8 devices ....................................................25
Clean Lens ............................................................. 26
Helpful Hints ...........................................................27
Specifications .........................................................28

4
Supported Devices
Wireless Scanner is compatible with following devices:
iPad (3rd generation), iPad 2, iPad, iPad mini with iOS 5.0 or later.
iPhone 5, iPhone 4S, iPhone 4, iPod touch with iOS 5.0 or later.
Android mobile devices (including tablets and smartphones) with OS 4.0 or later.
Mac computers with OS X 10.7 or later.
Windows 8 devices (including computers, tablets and smartphones).
5
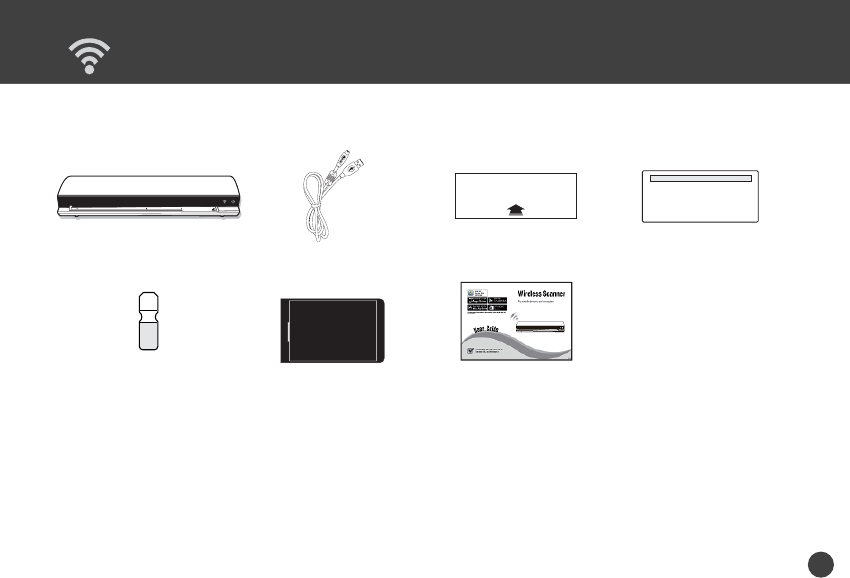
Unpack
Make sure following items are included.
POWER
A8
A6
A4
POWER
A8
A6
A4
Wireless Scanner USB Cable Calibration Card Cleaning Board
Cleaning Strip Photo Sleeve User Guide
6
RESET
POWER
A8
A6
A4
POWER
A8
A6
A4
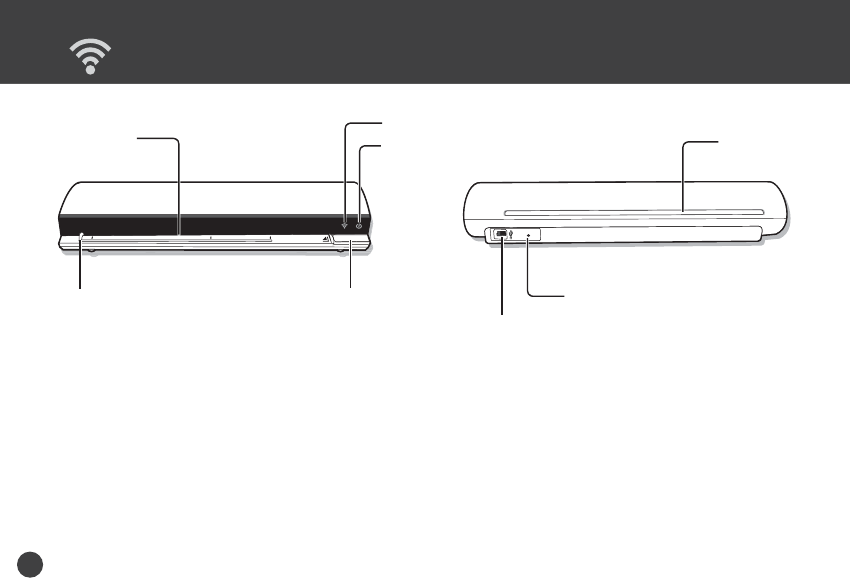
Scanner Parts
Feed Slot Exit Slot
Reset Pin-hole
(System Shutdown)
Mini USB Port
(Charge Only)
Paper Guide
Power LED Indicator
POWER Button
Wi-Fi LED Indicator
7
NOTE: USB power
adapter not included. Use
the USB power adapter
provided with your mobile
device to connect a
power socket.
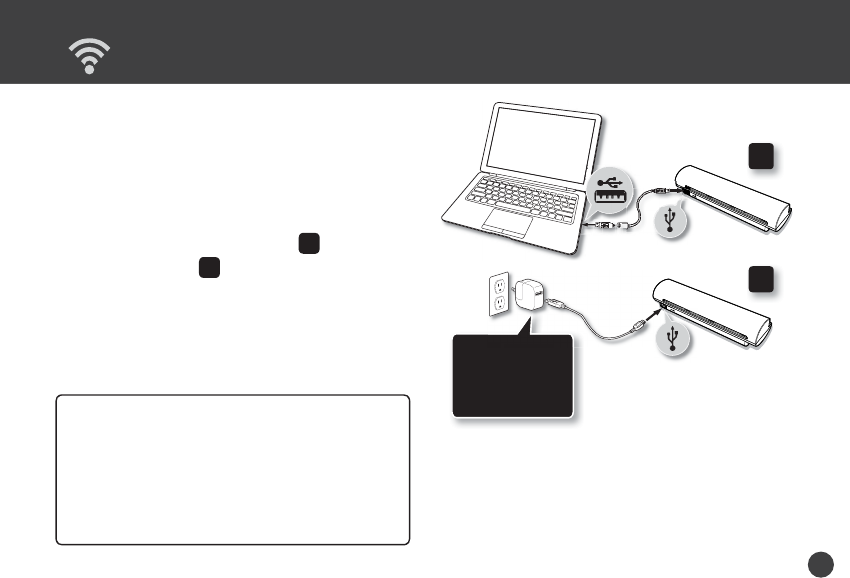
Charge the Battery
Wireless Scanner has a built-in rechargeable
battery to provide power, make sure it has been
fully charged before use.
1. Press POWER button to turn Off the Scanner.
* The Power LED indicator shall turn off.
2. Connect the USB cable to the Scanner at
small end and to a computer ( A) or to USB
power adapter ( B) at the other end.
* The Power LED indicator shall emit red light to
indicate the battery is charging.
3. Once the battery is fully charged, the Power
LED shall turn off, then disconnect the USB
cable from the Scanner.
E
:
USB
powe
r
A
B
•Charge the Scanner for approximately 4 hours or
until the Power LED indicator turns off.
•When a low battery alerts (a green Power LED
blinks), charge the Scanner immediately.
•Scanner will not charge while operating. Ensure
Scanner’s power is off when charging battery.
•The rechargeable battery is consumable. The
battery capacity will decreased gradually.
NOTES
NOTES
8
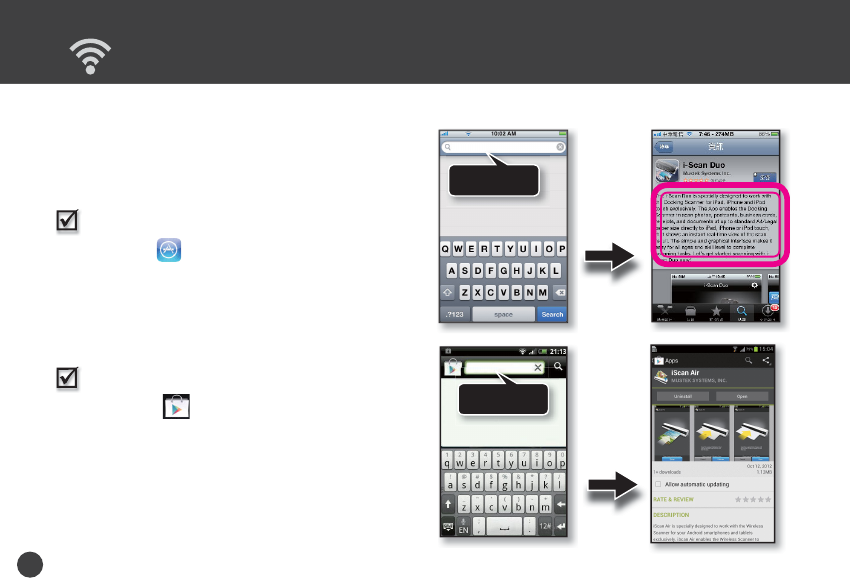
Download and Install iScan Air
Wireless Scanner includes free iScan Air apps to
work on iPad, iPhone, iPod touch, Android mobile
devices, Windows 8 devices, and Mac computers.
You need to download and install iScan Air from
Internet on your device before use.
From iPad, iPhone, and iPod touch
1. Open the App Store from your mobile
device.
2. Type ‘iScan Air’ in the search field.
3. Select iScan Air and follow on-screen
instruction to download and install it to your
device.
From Android mobile devices
1. Open the Play Store from your mobile
device.
2. Type ‘iScan Air’ in the search field.
3. Select iScan Air and download it to your
device.
iScan Air
iScan Air
TBD
iScan
Air
Search ‘iScan Air’
in the App Store.
i
iScan
i
Air
Search ‘iScan Air’
in the Play Store.
9
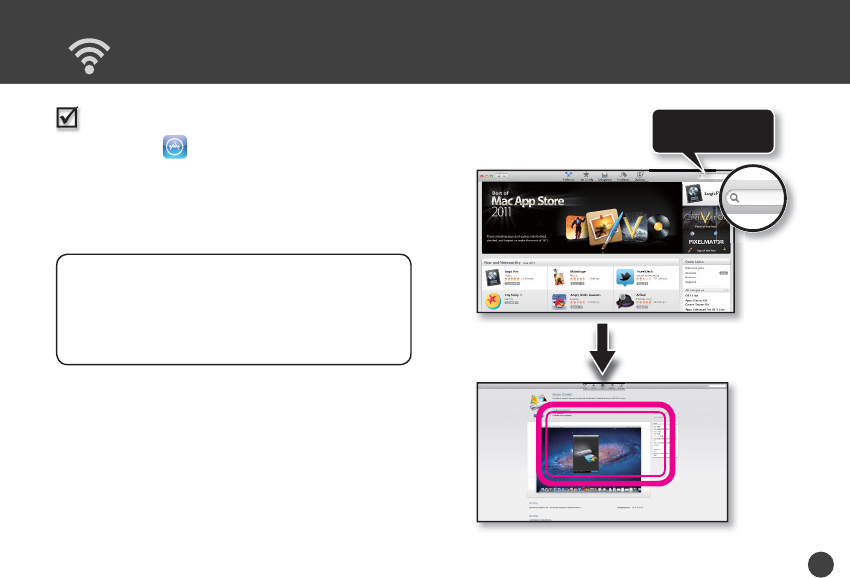
Download and Install iScan Air (Continued)
From Mac computers
1. Open the App Store from your Mac.
2. Type ‘iScan Air’ in the search field.
3. Select iScan Air and follow on-screen
instruction to download and install it to Mac.
TBD
iScan Air
iScan Air
• Ensure that your device has Internet
access via your service provider or wireless
connection.
• Do not perform other activities on your device
while downloading
iScan Air
app.
NOTES
NOTES
Search ‘iScan Air’ in
the Mac’s App Store.
iScan Air
10
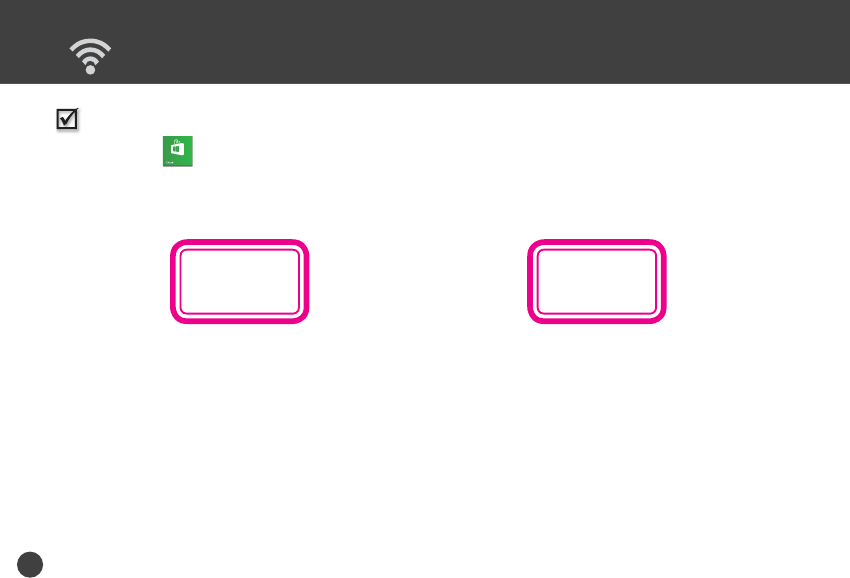
From Windows 8 devices
1. Open the Windows Store from your
devices.
2.
TBD TBD
Download and Install iScan Air (Continued)
11
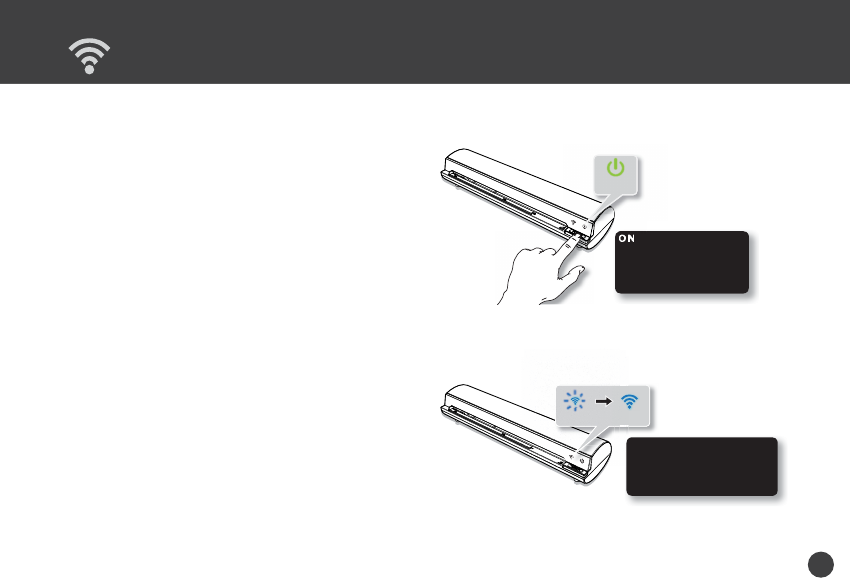
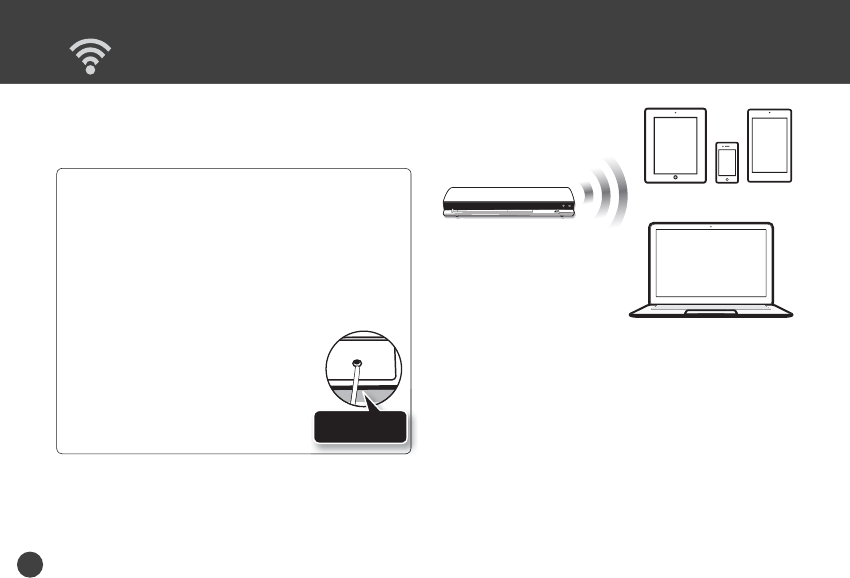
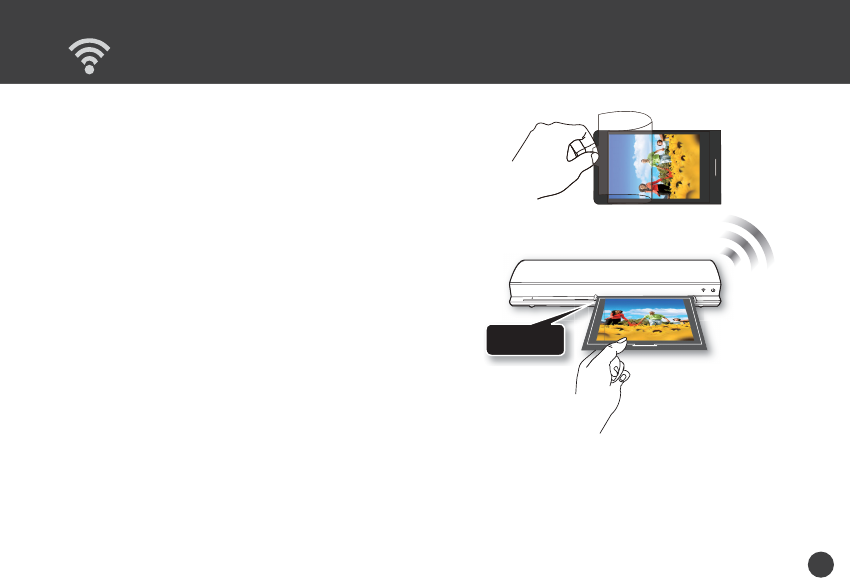
Connect via Wi-Fi Network
Wireless Scanner incorporates Wi-Fi capabilities
with soft AP (access point) function which enables
to share it to multiple devices. Follow below steps
to connect Wireless Scanner to your iPad, iPhone,
iPod touch, Android mobile devices, Windows 8
devices, and Mac computers via an existing Wi-Fi
network in your location.
1. Press and hold POWER button for 2 seconds
to turn Wireless Scanner on.
* The Power LED indicator shall emit green. Wait
approximately 20 seconds for Wireless Scanner to
initialize, and then the Wi-Fi LED indicator shall blink
blue light to indicate Wi-Fi function is enabled.
2. Enable the Wi-Fi mode on your device, and
search for available wireless networks. Find the
network name “DIRECT-xxxxxx_iScanAir”
for Wireless Scanner.
* The "xxxxxx" in the network name is a 6-digit code
randomly assigned for your Wireless Scanner.
3. Input 8-digit password “12345678” to
connect to Wireless Scanner.
* The Wi-Fi indicator shall stop blinking and remain a
steady blue light after connected.
- Press POWER 2 secs,
the Power LED will emit a
steady green light.
OFF - Press POWER 4 secs,
the Power LED will turn off.
ON
ConnectedWi-Fi On
Blinking Blue LED - Wi-Fi
function is enabled.
Steady Blue LED - Wireless
Scanner is connected to a device.
12
•Connection and communication errors may occur
during operations due to unexpected factors. If you
encounter an error, restart Wireless Scanner and
reconnect it via your device again.
•The signal strength, network traffic, network
environments and other conditions may affect Wireless
transmission performance. If you find your Wireless
Scanner is behaving abnormally we recommend that
you shutdown Wireless Scanner by placing a pin into
the RESET pin-hole located on
the back of Wireless Scanner, and
gently push until you feel a soft click.
Wireless Scanner shall perform a
system shutdown. Please turn it on
and try your connection again.
NOTES
NOTES
4. Now, Wireless Scanner has been connected to
your device successfully and is ready for use.
Connect via Wi-Fi Network (Continued)
POWER
A8
A6
A4
POWER
A8
A6
A4
RESET
Place a pin into the
RESET pin-hole.
13
Scan and Save
Ensure Wi-Fi function is enabled on Wireless Scanner and
connected to your device prior to use.
NOTES
NOTES
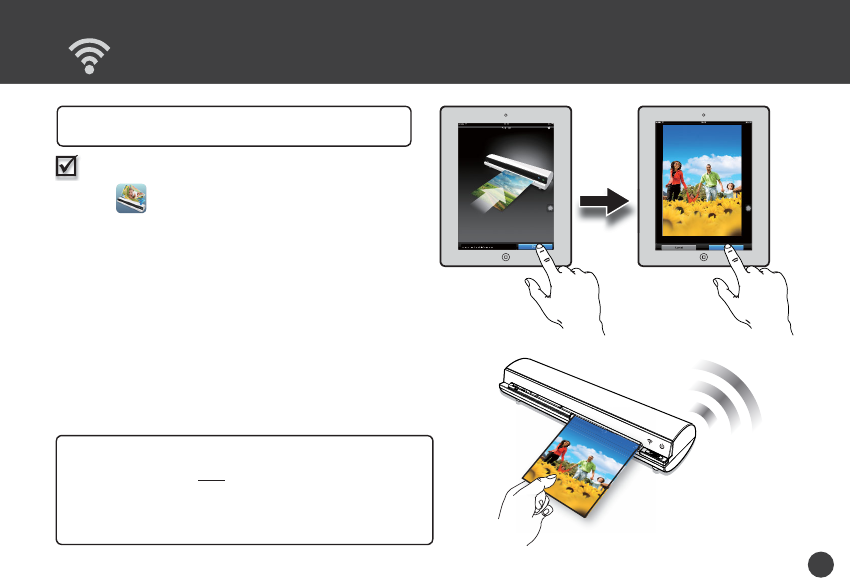
From iPad, iPhone and iPod touch
1. Tap iScan Air on your device to open it.
2. Place a photo/document facing up, adjust the
Paper Guide, slightly push photo/document in
until it is gripped by the rollers and pulled into
the Feed Slot.
3. Tap the Scan button. The device’s screen
shall show a real-time preview while scanning.
4. Tap the Save button to save the scan result
to the device’s photo library.
* If you want to scan it again press Cancel button and
repeat the above steps.
When using Scanner the first time with devices running on iOS 6 or later,
a message ‘iScan Air Would Like to Access Your Photos’ shall appear after
pressing SAVE button. You must tap ‘OK’ in order to save image to your
Photos library. If you select ‘Don’t Allow’, no image will be saved in your
device, and you will get an Error message for next scan. Please follow on-
screen message to solve the problem by selecting Settings > Privacy >
Photos > iScan Air > "ON" to allow the iScan Air app to access your photos.
IMPORTANT
IMPORTANT
14
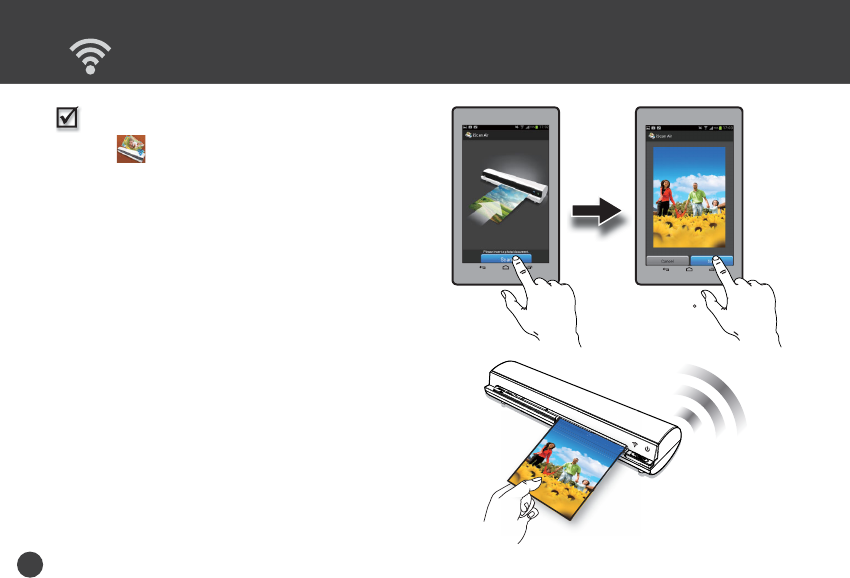
From Android mobile devices
1. Tap iScan Air on your device to open it.
2. Place a photo/document facing up, adjust the
Paper Guide, slightly push photo/document in
until it is gripped by the rollers and pulled into
the Feed Slot.
3. Tap the Scan button. The device’s shall show
a real-time preview while scanning.
4. Tap the Save button to save the scan result
to the device’s gallery.
* If you want to scan it again press Cancel button and
repeat the above steps.
Scan and Save (Continued)
15
Scan and Save (Continued)
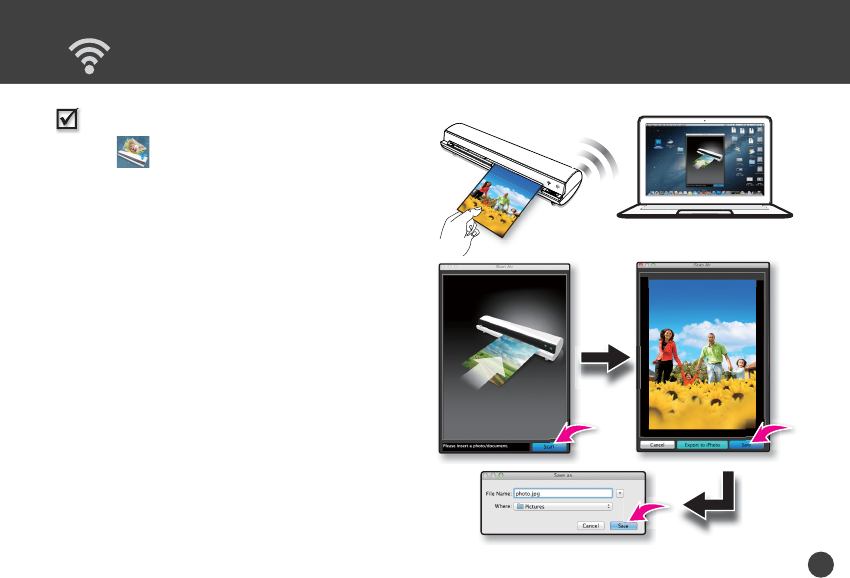
From Mac computers
1. Tap iScan Air on your device to open it.
2. Place a photo/document facing up, adjust the
Paper Guide, slightly push photo/document in
until it is gripped by the rollers and pulled into
the Feed Slot.
3. Press the Scan button. The device’s shall
show a real-time preview while scanning.
4. Press the Save button to bring up a 'Save
as' dialog box, save the scan result with a
chosen file name and directory, or press the
Export to iPhoto to export it to the iPhoto.
* If you want to scan it again press Cancel button and
repeat the above steps.
16
From Windows 8 devices
1. Press on your device to open it.
2. Place a photo/document facing up, adjust the
Paper Guide, slightly push photo/document in
until it is gripped by the rollers and pulled into
the Feed Slot.
3. Tap the Scan button. The device’s shall show
a real-time preview while scanning.
4. Tap the Save button to save the scan result
to the device’s gallery.
* If you want to scan it again press Cancel button and
repeat the above steps.
Scan and Save (Continued)
TBD TBD
17
Use the Photo Sleeve
POWER
A8
A6
A4
POWER
P
The sealed end
goes in first.
Use the Photo Sleeve when photos are fragile or
small to avoid damage or jams, and get the best
result.
1. Remove the plastic foil on the Sleeve, place
the photo inside of it, insert the tongue into
the slot at the open end.
2. Insert the sealed end of the Sleeve facing up
into the Feed Slot, adjust the Paper Guide,
then follow the 'Scan and Save' procedures
to start scanning to a device.
18
Calibrate
If dark lines or stripes appeared on the scanned
image, please perform the calibration of Wireless
Scanner.
•To get the best scan quality, perform the calibration
periodically.
•Make sure the Calibration Card is clean and free of dust
before use.
NOTES
NOTES
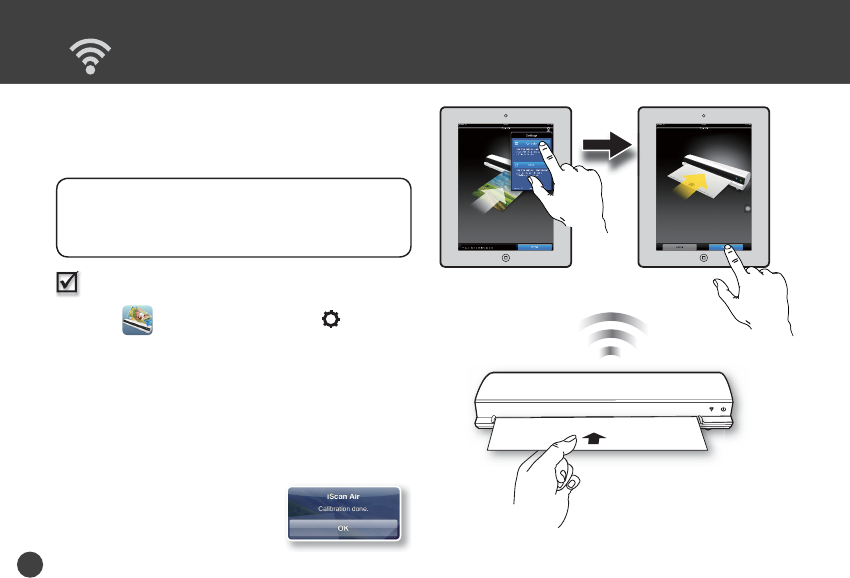
From iPad, iPhone and iPod touch
1. Tap iScan Air app. Tap the (Settings)
at the top-right corner of the app to bring up
the menu, then select the Calibrate setting.
2. Remove the plastic foil on the Calibration
Card, insert it in the Feed Slot with the arrow
mark facing up and pointing to the Scanner.
3. Tap the Calibrate button.
* The Calibration Card will be automatically pulled into
Wireless Scanner, wait until
the Card is ejected with a
'Calibration done.' message.
Tap the OK button.
POWER
A8
A6
A4
POWER
A8
A6
A4
19
Calibrate
(Continued)
From
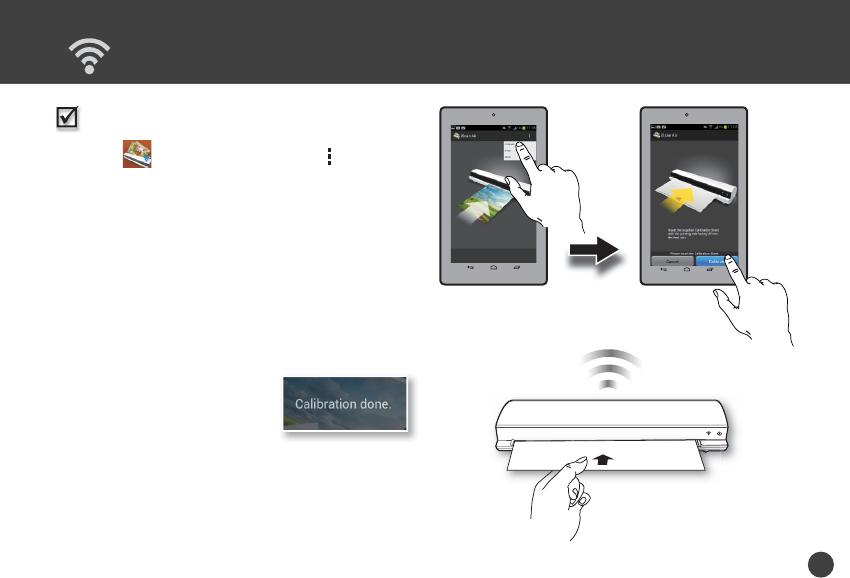
Android mobile devices
1. Tap iScan Air app. Tap the (Settings)
at the top-right corner of the app to bring up
the menu, then select the Calibrate setting.
* If your Android device has a 'Menu' button press it to
bring up the menu.
2. Remove the plastic foil on the Calibration
Card, insert it in the Feed Slot with the arrow
mark facing up and pointing to Wireless
Scanner.
3. Tap the Calibrate button.
* The Calibration Card will
be automatically pulled into
Wireless Scanner, wait until
the Card is ejected with a
'Calibration done.' message.
POWER
A8
A6
A4
POWER
A8
A6
A4
20
Calibrate
(Continued)
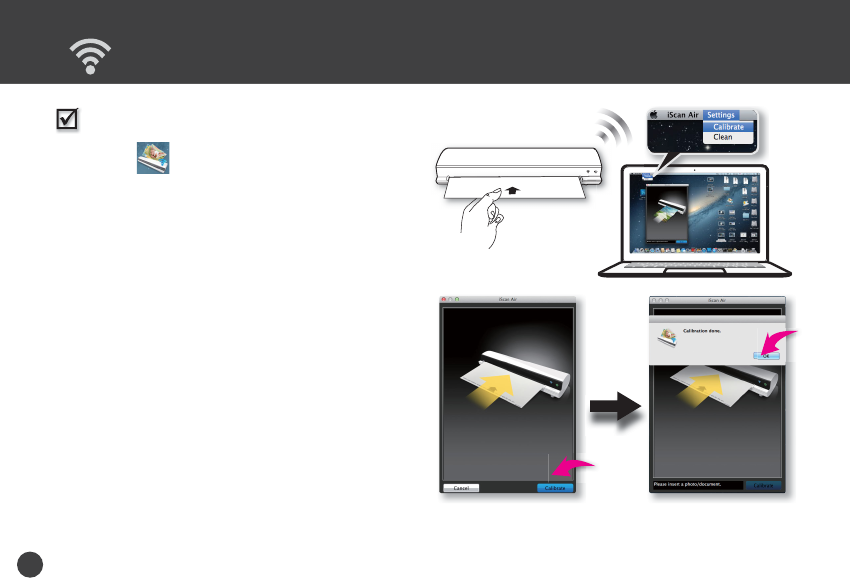
From Mac computers
1. Press iScan Air app. Press the
Settings at the top-left corner of the Mac's
screen, select the Calibrate setting.
2. Remove the plastic foil on the Calibration
Card, insert it in the Feed Slot with the arrow
mark facing up and pointing to Wireless
Scanner.
3. Tap the Calibrate button.
* The Calibration Card will be automatically pulled into
Wireless Scanner, wait until the Card is ejected with
a 'Calibration done.' message. Tap the OK button.
POWER
A8
A6
A4
POWER
A8
A6
A4
21
Calibrate
(Continued)
From Windows 8 devices
1. Press on your device to open it.
2. Press the XXX on the device. Tap XXX at
the top-right corner of the app to bring up
the menu, and then select the Calibrate
setting.
3. Remove the plastic foil on the Calibration
Card, insert it in the Feed Slot with the arrow
mark facing up and pointing to Wireless
Scanner.
4. Tap the Calibrate button.
* The Calibration Card will be automatically pulled into
Wireless Scanner, wait until the Card is ejected.
TBD TBD
22
Dirt and dust can build up inside Wireless Scanner
and affect image quality, please clean Wireless
Scanner periodically to get the best result. Use the
Cleaning Board included with Wireless Scanner to
clean rollers.
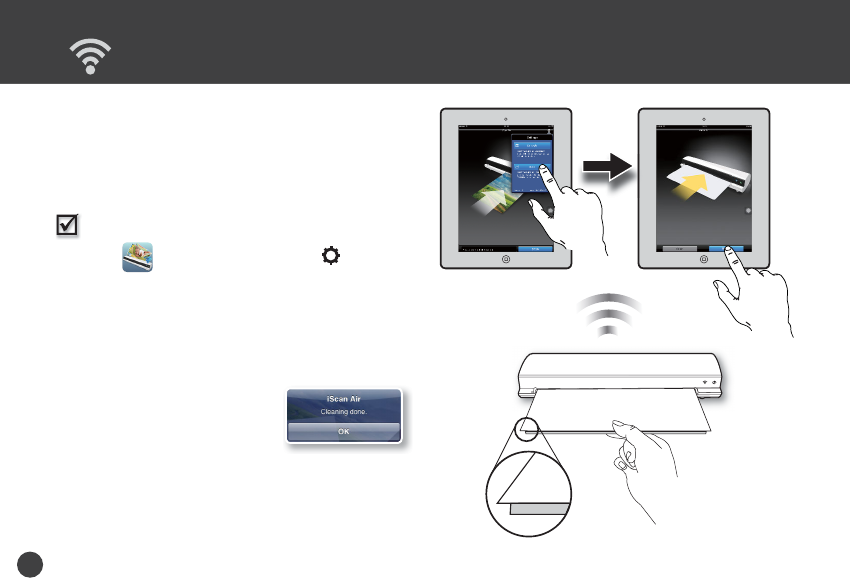
From iPad, iPhone and iPod touch
1. Tap iScan Air app. Tap the (Settings)
at the top-right corner of the app to bring up
the menu, then select
the Clean setting.
2. Hold the Cleaning Board with the sponge
stopper strip facing down towards you.
3. Tap the Clean button.
* The Cleaning Board will be
automatically pulled into
Wireless Scanner, wait until
the Board is ejected with a
'Cleaning done.' message.
Tap the OK button.
Clean Rollers
POWER
A8
A6
A4
23
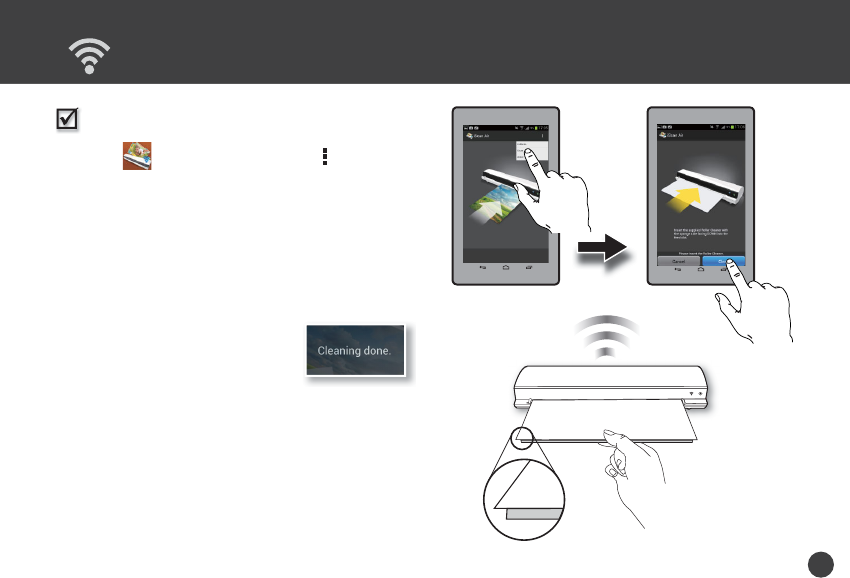
From
Android mobile devices
1. Tap iScan Air app. Tap the (Settings)
at the top-right corner of the app to bring up
the menu, then select the Clean setting.
* If your Android device has a 'Menu' button press it to
bring up the menu.
2. Hold the Cleaning Board with the sponge
stopper strip facing down towards you.
3. Tap the Clean button.
* The Cleaning Board will be
automatically pulled into Wireless
Scanner, wait until the Board is
ejected with a 'Cleaning done'
message.
Clean Rollers
(Continued)
POWER
A8
A6
A4
24
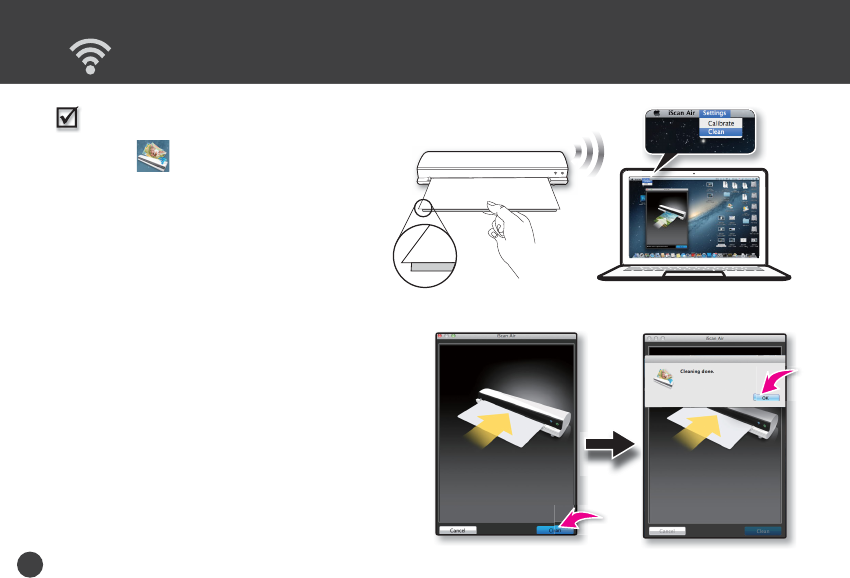
From Mac computers
1. Press iScan Air app. Tap the
Settings at the top-left corner of the
device's screen, select the Clean setting.
2. Hold the Cleaning Board with the sponge
stopper strip facing down towards you.
3. Tap the Clean button.
* The Cleaning Board will be automatically pulled
into Wireless Scanner, wait until the Board is
ejected with a 'Cleaning done.' message. Tap the
OK button.
Clean Rollers
(Continued)
POWER
A8
A6
A4

25
From Windows 8 devices
1. Press on your device to open it.
2. Press the XXX on the device. Tap XXX at the
top-right corner of the app to bring up the
menu, and then select the Clean setting.
3. Hold the Cleaning Board with the sponge
stopper strip facing down towards you.
4. Tap the Clean button.
* The Cleaning Board will be automatically pulled into
Wireless Scanner, wait until the Board is ejected with
a success message.
Clean Rollers
(Continued)
TBD TBD
26
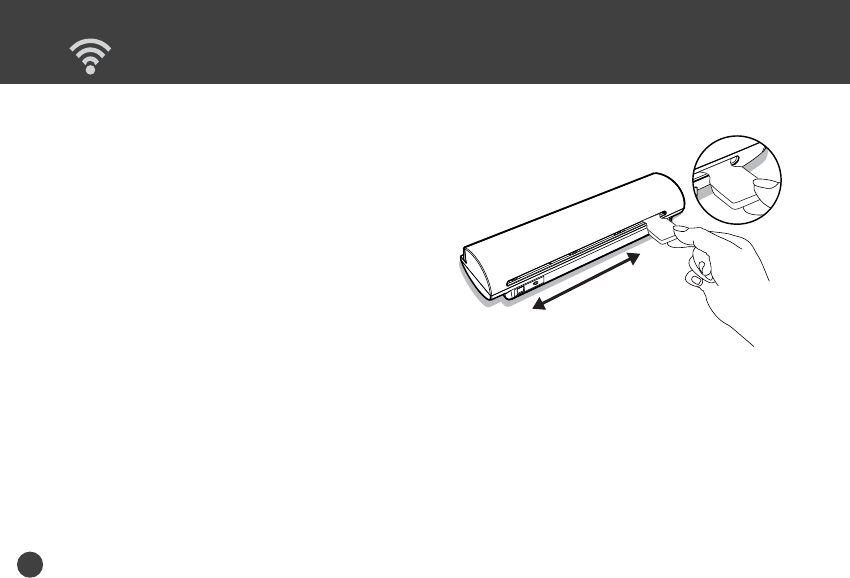
Dirt and dust can build up inside Wireless Scanner
and affect image quality, please clean Wireless
Scanner periodically to get the best result. Please
use the Cleaning Strip included with Wireless
Scanner to clean the lens.
1. Turn off Wireless Scanner.
2. Hold the Cleaning Strip with the sponge grip
handle facing down.
3. Insert the thinner end into the Exit Slot at the
rear of Wireless Scanner.
4. Move the Strip from side to side few times,
then remove it.
Clean Lens

27
Helpful Hints
Scanner does not turn on.
•Check if the POWER button is pressed on.
•Check if Wireless Scanner is charged.
Scanner cannot connect to a mobile device or computer.
•Check if the Wi-Fi signal strength is sufficient. Try moving closer to the Wi-Fi router or base station.
•Make sure the Wi-Fi LED indicator of Wireless Scanner is flashing blue.
•Check that the network settings on your device is matched to Wireless Scanner.
•Check if Wireless Scanner is being used by another user, please wait and try again later.
No output from Scanner.
•Check if the Wi-Fi connection is disconnected. Re-connect it and try again.
•Check if connection and/or communication errors occurred while scanning. Restart your Scanner and re-connect it.
•Reset Wireless Scanner, then turn power back on and try again.
Scanner behaves abnormally
•Place a pin into the RESET pin-hole located on the back of the Scanner to shutdown system, then restart the
Scanner.
Cannot save scan results to a mobile device or computer.
•Check if the storage memory of the device or computer is full.
•Check if Wireless Scanner and the mobile device has a low power. Charge them to a full power capacity.
Scan result is poor.
•Calibrate and clean Wireless Scanner when the scan result is poor.
•Do not use the Photo Sleeve when the photo is laminated.
Cannot feed the paper.
•Make sure the photo/document is gripped and slightly pulled into the feed slot prior to scanning.
•Remove the photo/document from the feed slot and insert it again.
•Check if the paper thickness is exceeded the limit. Acceptable paper thickness is 0.08mm ~ 0.6mm.
•Do not scan more than one page at a time; otherwise the extra pages may not feed properly.
FCC Notices
This device complies with Part 15 of the FCC Rules. Operation is subject to the following
two conditions: (1) this device may not cause harmful interference, and (2) this device
must accept any interference received, including interference that may cause undesired
operation.
CAUTION: Change or modification not expressly approved by the party responsible
for compliance could void the user’s authority to operate this equipment.
This equipment has been tested and found to comply with the limits for a Class B
digital device, pursuant to Part 15 of the FCC Rules. These limits are designed to provide
reasonable protection against harmful interference in a residential installation. This
equipment generates, uses and can radiate radio frequency energy and, if not installed
and used in accordance with the instructions, may cause harmful interference to radio
communications. However, there is no guarantee that interference will not occur in a
particular installation. If this equipment does cause harmful interference to radio or
television reception, which can be determined by turning the equipment off and on, the
user is encouraged to try to correct the interference by one or more of the following
measures:
--Reorient or relocate the receiving antenna.
--Increase the separation between the equipment and receiver.
--Connect the equipment into an outlet on a circuit different from that to which the receiver
is connected.
--Consult the dealer or an experienced radio/TV technician for help.
CAUTION:
Any changes or modifications not expressly approved by the grantee of this device could
void the user's authority to operate the equipment.
RF exposure warning
This equipment must be installed and operated in accordance with provided instructions
and the antenna(s) used for this transmitter must be installed to provide a separation
distance of at least 20 cm from all persons and must not be co-located or operating in
conjunction with any other antenna or transmitter. End-users and installers must be
provide with antenna installation instructions and transmitter operating conditions for
satisfying RF exposure compliance."

28
Specifications
Scanner Type A4 color sheetfed scanner
Image Sensor Color CIS (Contact Image Sensor)
Light Source LED (R, G, B)
Scan Size (Max.) W 216mm x L 356 mm (W 8.5" x L 14")
Scan Thickness 0.08mm ~ 0.6mm
Scan Resolution 300 dpi
Scan Speed 12 seconds per page (A4 color) at 300 dpi
Interface USB mini-B port (charge only); Reset pin-hole (system shutdown)
File Format JPEG
Power
5Vdc
Power Consumption 4.2W (Max.)
Battery Lithium polymer battery 1500mAh (built-in)
Battery Capacity Approx. 1.5 hours of continuous use after fully charged.
Scans per Charge Approx. 300 pages of continuous use after fully charged.
Power Saving Auto power off in 5 minutes when not in use.
Charge Time Approx. 4 hours.
Wi-Fi Capability
Radio Frequency 2.4GHz~2.472GHz compliant 802.11g/n protocol
Configuration Soft AP (access point) supported
Security WPA2
Dimensions 273 x 70 x 50 mm (10.6" x 2.8" x 2") (W x D x H)
Weight 574g (1.27lbs)
Operating Conditions 5°C ~ 35°C (41°F ~ 95°F), humidity range 35% ~ 80% RH; Non-condensing