MyBinding Martin Yale 1701 Operation Instructions User Manual
2013-06-04
User Manual: MyBinding Martin-Yale-1701-Operation-Instructions
Open the PDF directly: View PDF ![]() .
.
Page Count: 9

R
MODEL 1701
ELECTRONIC AUTOFOLDER
Specifications
Functional
Paper Weight . . . . . . .16# to 28# Bond Stock (60g-105g)
Form Width . . . . . . . . . . . . . . . . . . .3.5” min. to 8.5” max.
Form Length . . . . . . . . . . . . . . . . . . . .5” min. to 14” max.
Feed Table Capacity . . . . . . . . . . . . . .150 Sheets of 20#
Speed . . . . . . . . . . . . .9000 Sheets per hour (8.5” X 11”)
Fold Styles . . . . . . . . . . . .Letter, Half, Z, Double Parallel,
. . . . . . . . . . . . . . . . . . . . . . . . . . . . . . . . . and Brochure
Stapled Documents . . . . . . . .5 20# sheets max, hand fed
Physical
Dimensions . . . . . . . .20.6”Wide X 15.3”Deep X 17.5”High
Machine Weight . . . . . . . . . . . . . . . . . . . . . . . . . . .39 lbs.
Shipping Weight . . . . . . . . . . . . . . . . . . . . . . . . . . .44 lbs.
Electrical
Power . . .115 V.A.C., 1.3 Amp, Thermal Overload Protected
Table of Contents
1.0 Nomenclature . . . . . . . . . . . . . . . . . . . . . . . . Page 2
2.0 Installation . . . . . . . . . . . . . . . . . . . . . . . . . . Page 2
2.1 Unpacking . . . . . . . . . . . . . . . . . . . . . . . . . . Page 2
2.2 Feed Table. . . . . . . . . . . . . . . . . . . . . . . . . . Page 2
2.3 Paper Guide Adjustment. . . . . . . . . . . . . . . . Page 3
2.4 Exit Ramp Set-up. . . . . . . . . . . . . . . . . . . . . Page 3
2.5 Stacking Wheel Set-up . . . . . . . . . . . . . . . . . Page 3
3.0 Display and Fold Set-up. . . . . . . . . . . . . . . . Page 4
3.1 Fold Styles . . . . . . . . . . . . . . . . . . . . . . . . . . Page 4
3.2 Selecting Pre-set Folds . . . . . . . . . . . . . . . . . Page 5
3.3 Selecting Custom Folds . . . . . . . . . . . . . . . . Page 5
4.0 Operation . . . . . . . . . . . . . . . . . . . . . . . . . . . Page 5
4.1 Automatic Feed Operation . . . . . . . . . . . . . . Page 5
4.2 Manual Feed Operation of Multiple Sets . . . . . . Page 6
4.3 Folding Stapled Multiple Sets . . . . . . . . . . . . . . . Page 6
5.0 Maintenance . . . . . . . . . . . . . . . . . . . . . . . . Page 6
5.1 Fold Roller Removal and Cleaning . . . . . . . . Page 6
5.2 Clearing Paper Jams . . . . . . . . . . . . . . . . . . Page 7
5.3 Feed Wheel Cleaning. . . . . . . . . . . . . . . . . . Page 7
5.4 Bushings and Folding Rollers . . . . . . . . . . . . Page 7
6.0 Troubleshooting Guide . . . . . . . . . . . . . . . . Page 8
6.1 Machine will not run . . . . . . . . . . . . . . . . . . . Page 8
6.2 Paper will not feed . . . . . . . . . . . . . . . . . . . . Page 8
6.3 Crooked folds. . . . . . . . . . . . . . . . . . . . . . . . Page 8
6.4 Ink smudges on paper . . . . . . . . . . . . . . . . . Page 8
6.5 Wrinkled paper. . . . . . . . . . . . . . . . . . . . . . . Page 8
Serial No.
Introduction
Thank you for selecting the Martin Yale Model 1701 Autofolder. We recommend that you familiar-
ize yourself with the Model 1701 Autofolder by carefully reading these instructions. Thorough
understanding of the information contained within this instruction manual will help to eliminate most
operator-associated errors and ensure years of trouble-free performance.
WARNING! Never connect power to the machine until you are ready to set up and operate
the folder. During set up, operation, and maintenance keep hands, hair, loose clothing, and
jewelry away from all moving parts. Serious bodily injury could result. Service or disas-
sembly of the folder should only be attempted with the power disconnected and locked out.
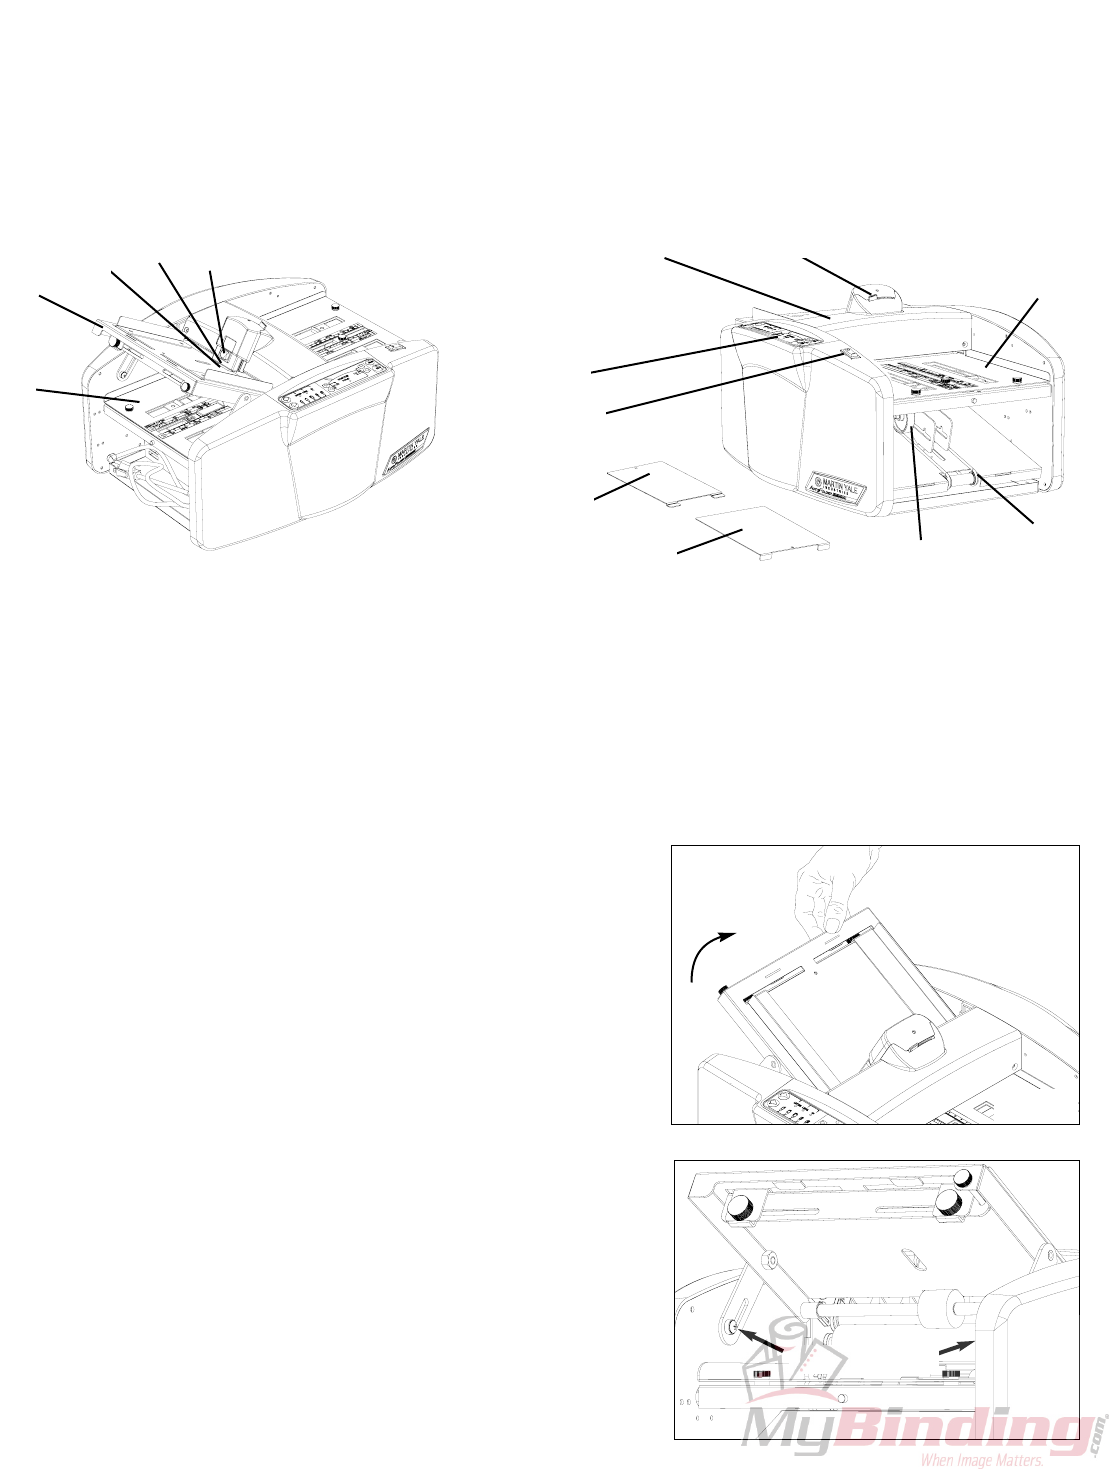
1.0 Nomenclature
2.0 Installation
2.1 Unpacking
Carefully unpack the Model 1701 letter folder and accessories. Place the Model 1701 on a flat, level surface where
it will be used. It is necessary to have a clear area at the exit end of the folder to place the exit ramp. Place all of
the packing material back in the shipping box and store the box for any future shipment of the Model 1701. Inspect
the Model 1701 and all accessories for shipping damage. If any dam-
age is found, contact the carrier immediately. Note: Always pick up
the Model 1701 by its sides, never attempt to lift it by grasping
the roller cover or tables.
2.2 Feed Table
The Model 1701 is equipped with a two position non-removable feed
table. The Model 1701 comes packaged with the feed table in the
down position for shipment and storage. Before the Model 1701 is
used, the feed table will need to be tilted up into the operating posi-
tion. Grasp the rear edge of the feed table and pull up (Fig. 3). The
feed table legs will automatically swing down into position. Lock the
feed table into place by insuring the leg shoulder nut slips securely
into the slot in the feed table leg (Fig. 4). To put the feed table back
down for shipping purposes, simply pull the feed table legs away from
the folder and let the feed table down.
After the feed table is in position, the feed table extension may be put
into place. First locate the feed table extension in the accessory
package. Install by lining its 2 protrusions with the corresponding
slots on the feed table and inserting the protrusions into the slots.
When it is correctly installed in position, it will lay flat on the feed table
(Fig. 5 & 6).
Fig. 3
Fig. 4
1. Feed table
2. Exit ramp
3. Retarder
4. Manual/automatic feed lever
5. Paper pusher
6. Feed wheel
7. Power switch
8. Electronic display
9. First fold table
10. Second fold table
11. Exit conveyor
12. Stacking wheels
13. Top cover
14. Paper support
Fig. 1 Entry View Fig. 2 Exit View
1
2
34
5
6
8
7
10
9
11
12
13
14
(2)
leg shoulder nut
2.3 Paper Guide Adjustment
Note: the folder is factory adjusted for standard 8.5" paper.
The paper guides feature a dual-purpose adjustment; paper width and skew. These are accomplished with thumb-
screws (Fig. 7). Skew adjustment is factory set to be square with the rollers and should not need adjusting. Skew
adjustment is only necessary when the paper is not cut squarely or has irregular edges.
To adjust the paper guide width and/or skew, follow these steps:
1. Loosen both paper guide thumbscrews slightly and slide the
guides outward.
2. Lift the retarder assembly with the single sheet lever (Fig. 14)
and slide a single sheet of the desired paper size under it.
While holding the retarder assembly up, nestle the sheet gen-
tly into the rollers until it is in the center of the feed table and
square with the rollers. Lower the retarder assembly to hold
the sheet in place.
3. Slide the paper guides up to the edges of the sheet a lock
securely in place with the thumbscrews. Leave a small gap
(1/64" or .4mm) along the edges of the sheet and guides as
crowded paper will not feed correctly.
4. If the guides are not parallel with the paper edges, correct by turning the skew adjustment thumbscrew slight-
ly. Be aware that skew adjustment is best accomplished after setting the fold tables and running the folder (refer
to section 4.1 for further instructions).
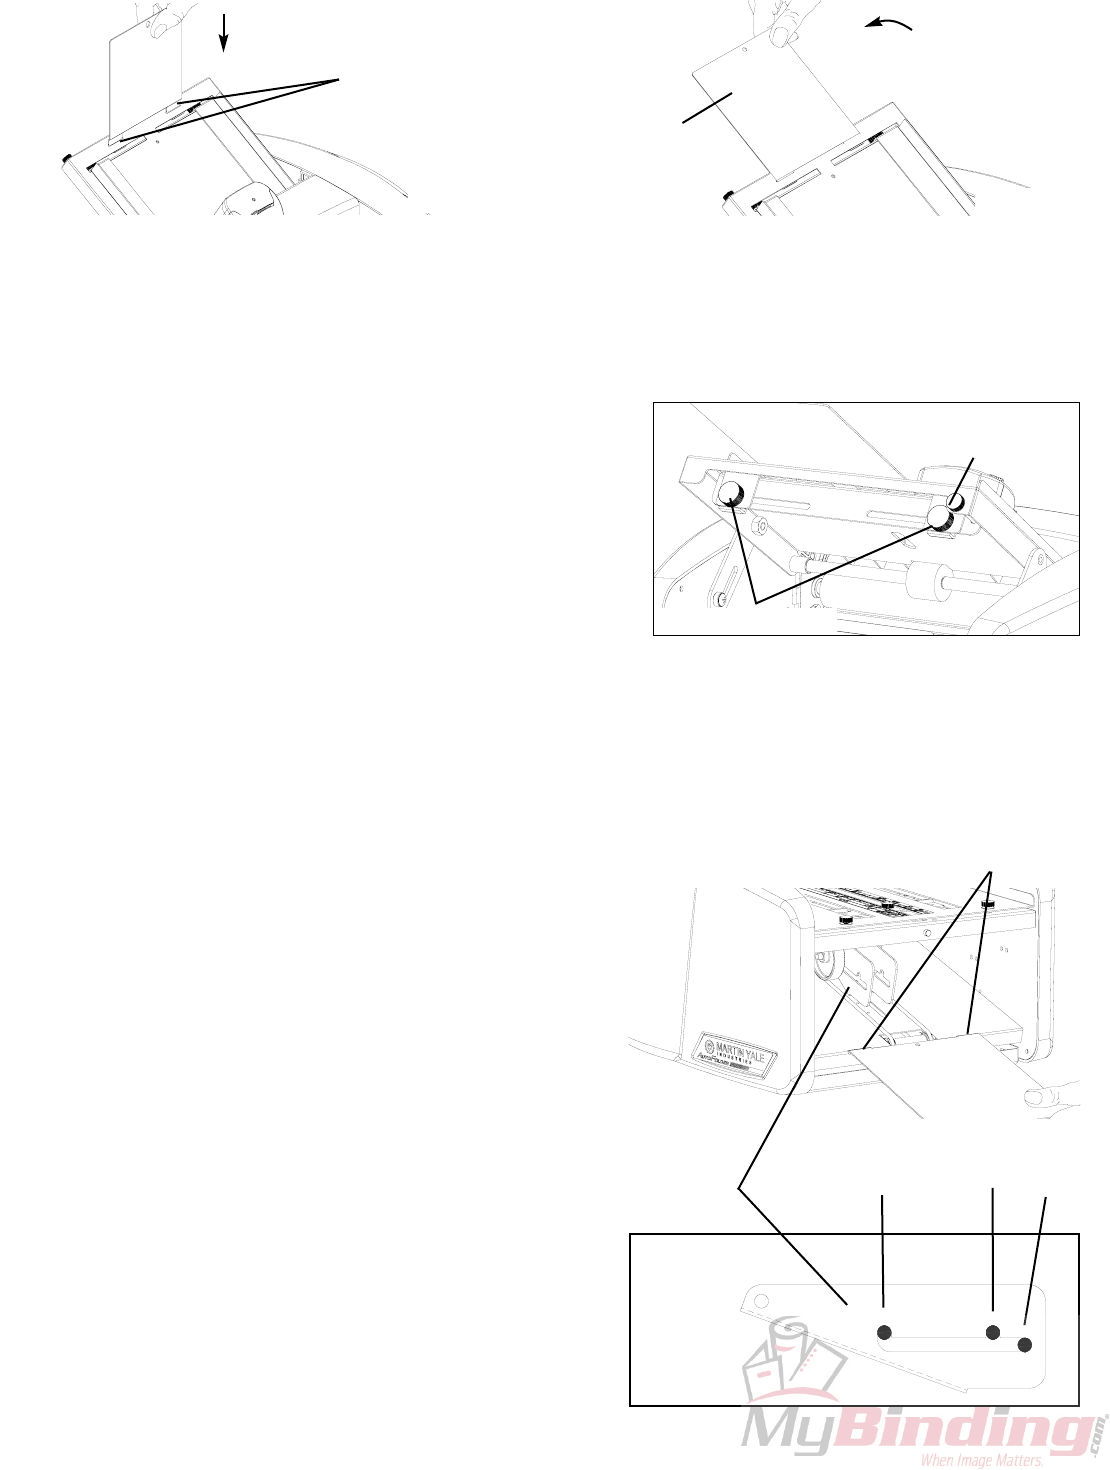
2.4 Exit ramp set-up
Align the tabs on the exit ramp with the corresponding slots on the
conveyor and drop the exit ramp into place (Fig. 8).
2.5 Stacking wheel set-up
The Model 1701 is equipped with a conveyor table and stack-
ing wheels for trouble free document stacking. The stacking
wheel assembly offers three separate positions for the stack-
ing wheels (Fig. 9).The stacking wheels must be in the cor-
rect position for the paper type and fold in order for the paper
to stack correctly. Please refer to the chart with correct stack-
ing wheel placement for various paper sizes and folds on page
4. To move the stacking wheels, lift up on the metal stacking
wheel holder and slide the stacking wheels in to the correct
position as indicated in the chart. Please note that the stack-
ing wheels are not spring loaded, the weight of the stacking
wheel holder simply holds it in place. To determine the cor-
rect stacking wheel position for custom folds, begin with the
stacking wheels in position ‘B’ and move them to positions ‘A’
or ‘C’ if stack problems are encountered.
Fig. 5 Fig. 6
Align tabs on
the paper sup-
port with the
slots in the
feed table Lower the
paper support
into position
Fig. 7
Paper guide knobs
Skew adjust-
ment knob
Fig. 8
Align exit ramp tabs
with slots in convey-
or table and drop into
place
(3) Fig. 9
ABC
Stacking wheel
bracket
Side View

3.0 Display
Before attempting set-up of the Model 1701 folder, take a few moments to review the buttons on the Model 1701
touch pad display and their functions. The Model 1701 touch pad buttons are indicated below along with their func-
tion (Fig. 10).
(A)-Paper Size Select Key - Press this key to select the appropriate paper size. The selected paper size will be indi-
cated by a lit LED.
(B)-Fold Style Select Key - Press this key to select the fold style desired. Press the button until the desired fold is
indicated by its LED.
(C)-2nd Fold Table Paper Stop Keys - Allows the user to move the 2nd fold table paper stop either direction. This
function is used to obtain fold styles that are not one of the (5) factory pre-set folds. When either of these keys are
pressed, the folder automatically switches to ‘custom fold’ mode. These keys work on a 2-speed system. When the
key is pressed for a short time, the paper stop moves at a slower speed for fine tuning. When a key is pressed and
held in place, the paper stop moves at a faster speed.
(D)-1st Fold Table Paper Stop Keys - Same function as (c) but for the 1st fold table.
(E)-Pulse Key - Makes the folder run while the button is pushed and held in place. Useful for purposes such as mul-
tiple sheet sets where the manual feed feature is being utilized.
(F)-Run Key - Makes the folder start running if at rest, or will stop the folder if it is running. The Model 1701 is
equipped with an auto-off feature making manual shut down at the end of a run unnecessary. Once all the paper
clears the folding rollers, the folder will run for a few moments to clear the exit conveyor then automatically shut off.
3.1 Fold Styles
Before attempting to set-up a fold, the operator should familiarize themselves with the five designated fold style icons
provided on the rulers located on each fold table (Fig. 11). These icons are arranged in columns on the feed table
A4
FOLD
CUSTOM
A
B
CDE
F
Stacking Wheel Placement Chart
Fold Type
Paper Size
8.5" X 11"
Letter
8.5" X 14"
Legal A4
297mm X 210mm
Z-Fold
Letter Fold
Half Fold
Double Parallel Fold
Gate Fold
B
A or B
B
A
B-
B
C
-
B
B
A or B
B
A or B
B
Fig. 10
(4)
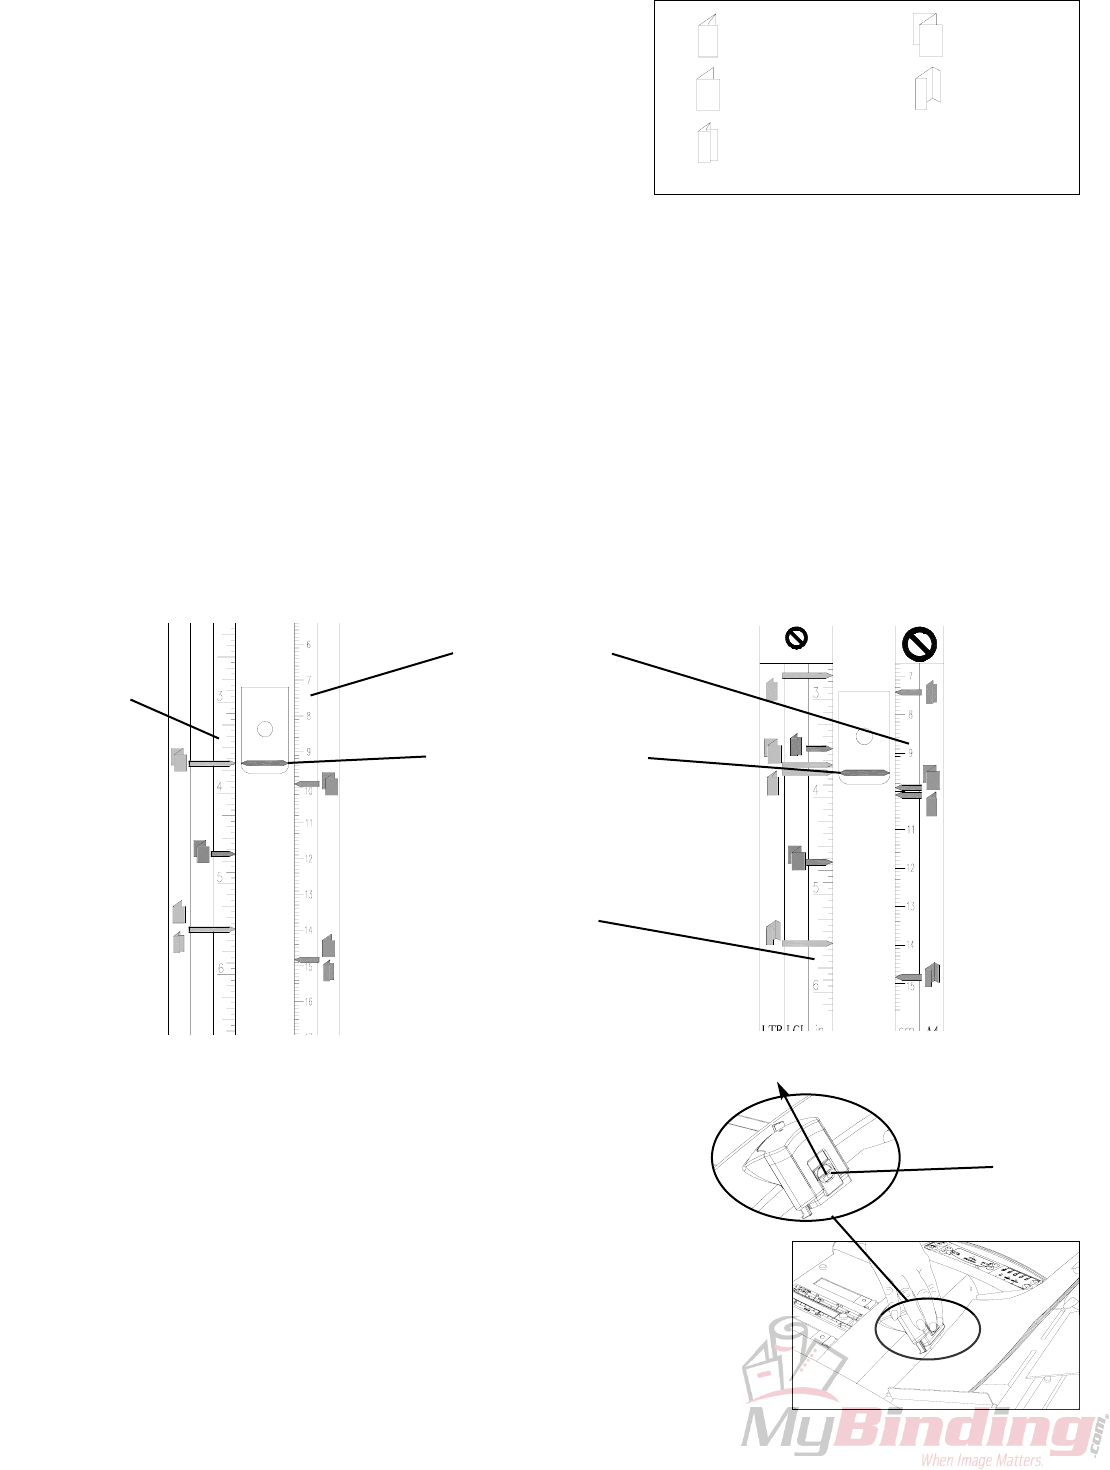
rulers that represent the three common paper sizes (Fig. 12). The
Electronic Display makes setting up folds a simple matter of choos-
ing the paper size (key A) and the fold style (key B).
3.2 Selecting Pre-set Folds
To select one of the pre-set fold styles, proceed as follows:
Turn on the power with the power switch. First select the appropriate
paper size (8.5 x 11, 8.5 x 14 or A4) by pressing key Arepeatedly
until the green LED lights up under the desired paper size. Second,
select the fold style by pressing key B in the same manner until the LED lights up under the desired fold style icon.
After a slight pause, the paper stops will automatically move to the correct position. Proceed to section 4.0 to oper-
ate.
3.3 Selecting Custom Folds
If the user wishes to make a fold other than the pre-set selections or to modify a pre-set style, proceed as follows:
(1) Turn on the power with the power switch. If modifying a pre-set fold, first select that style as described in sec-
tion 3.2. To modify or choose a custom fold, press the 1st and 2nd paper stop arrow keys (C & D, Fig. 10) to
move the stops in the desired direction. Note: Immediately upon pressing one of the Custom Fold keys,
the pre-set paper size and fold style icon LED's will go off and the Custom Fold LED's will come on,
indicating the machine is in the Custom Fold mode.
(2) Using the fold table rulers for reference (Fig. 12), move the paper stop in or out with the corresponding arrow
key. Please note that the arrow keys work the paper stops at two-speeds. If the key is pressed momentarily or
jogged repeatedly, the paper stop moves at the slower speed. If the key is held longer, the paper stop will shift
into the faster speed. This is helpful when moving the stops longer distances.
4.0 Operation
4.1 Automatic Feed Operation
Set up the folder as described in sections 2 & 3 of these instructions.
Square the stack of paper to be folded by using a Martin Yale Model 400
Jogger or by tapping 2 sides of the paper stack against a table or other hard
object. Now, while holding the red paper pusher up, place the stack of paper
between the paper pusher and the feed wheel (Fig. 13). The paper stack should
now be straight and resting squarely on the roller cover. Release the paper push-
er and let it come down and rest on the paper edge. Press the Run Key to initiate
folding (Fig. 10). The folder will now start running and process the stack of paper.
The folder will automatically turn off when the paper runs out. After the folder has
M
FOLD
AVOID
8 1/2" x 11"
8 1/2" x 14"
METRIC
FOLD
Fig. 12
Rulers - 2nd Fold Table
Inch fold
ruler
Metric fold ruler
Paper stop indicator,
Align orange arrow
with desired fold
arrow on fold ruler
Inch fold
ruler
Fig. 13
(5)
Rulers - 1st Fold Table
Letter
Half
Double Parallel
Z
Brochure
Fig. 11
Push Up
Red Paper
Pusher
Only
shut off, the folded paper may be removed from the exit ramp and conveyor. NOTE: The user may find it easier
to run only a few sheets before running an entire stack. This way any adjustments can be made before run-
ning a large quantity of paper. If hesitation occurs in the paper feeding, review machine set-up as described in
section 2.0 of this manual. Pay particular attention to paper guide placement. If the edges of the folded paper do
not line up, adjust the skew by turning the skew thumbscrew slightly. Retest with a few sheets and adjust as nec-
essary to square up the fold.
4.2 Manual Feed Operation of Multiple Sets
The Model 1701 is capable of folding single sheets or sets of
sheets up to 5 pages of #20 bond manually (one at a time).
To do so, set up the machine as described earlier in section
2.0. With one hand, push the manual feed lever on the top
cover to raise the entire retarder and paper pusher assembly.
While holding the lever, insert the paper all the way under the
retarder until it stops, using the paper guides to keep it
square (Fig. 14). The lever then can be lowered onto the
paper. Press the Pulse Key and hold until the folded paper
exits the conveyor.
4.3 Folding Stapled Sets of Paper
The Model 1701 is capable of folding stapled sets of paper up
to 5 sheets of #20 bond in the manual method described in
section 4.2. However, a few simple rules must be followed to
prevent jams or roller damage. Always attach the staple par-
allel to the fold rollers. Always feed the stapled set in with the
stapled edge first (Fig. 15). Avoid using loose fitting staples
or inserting them too close to the edge (less than 5/16",
8mm).
5.0 Maintenance
5.1 Fold Roller Removal and Cleaning
During normal operation, the fold rollers will become con-
taminated with paper dust, ink, copy toner and other per-
formance-inhibiting materials. At some point this will cause problems such as wrinkling or marking the paper and
even miss-folds or paper jams. At this time, cleaning the rollers will be necessary. Follow these steps to remove
the roller assembly:
1. Before turning the power off, use the custom fold button (key C) to move the 2nd fold paper stop out to its
longest position.
2. Turn off the power and disconnect the power cord from the outlet.
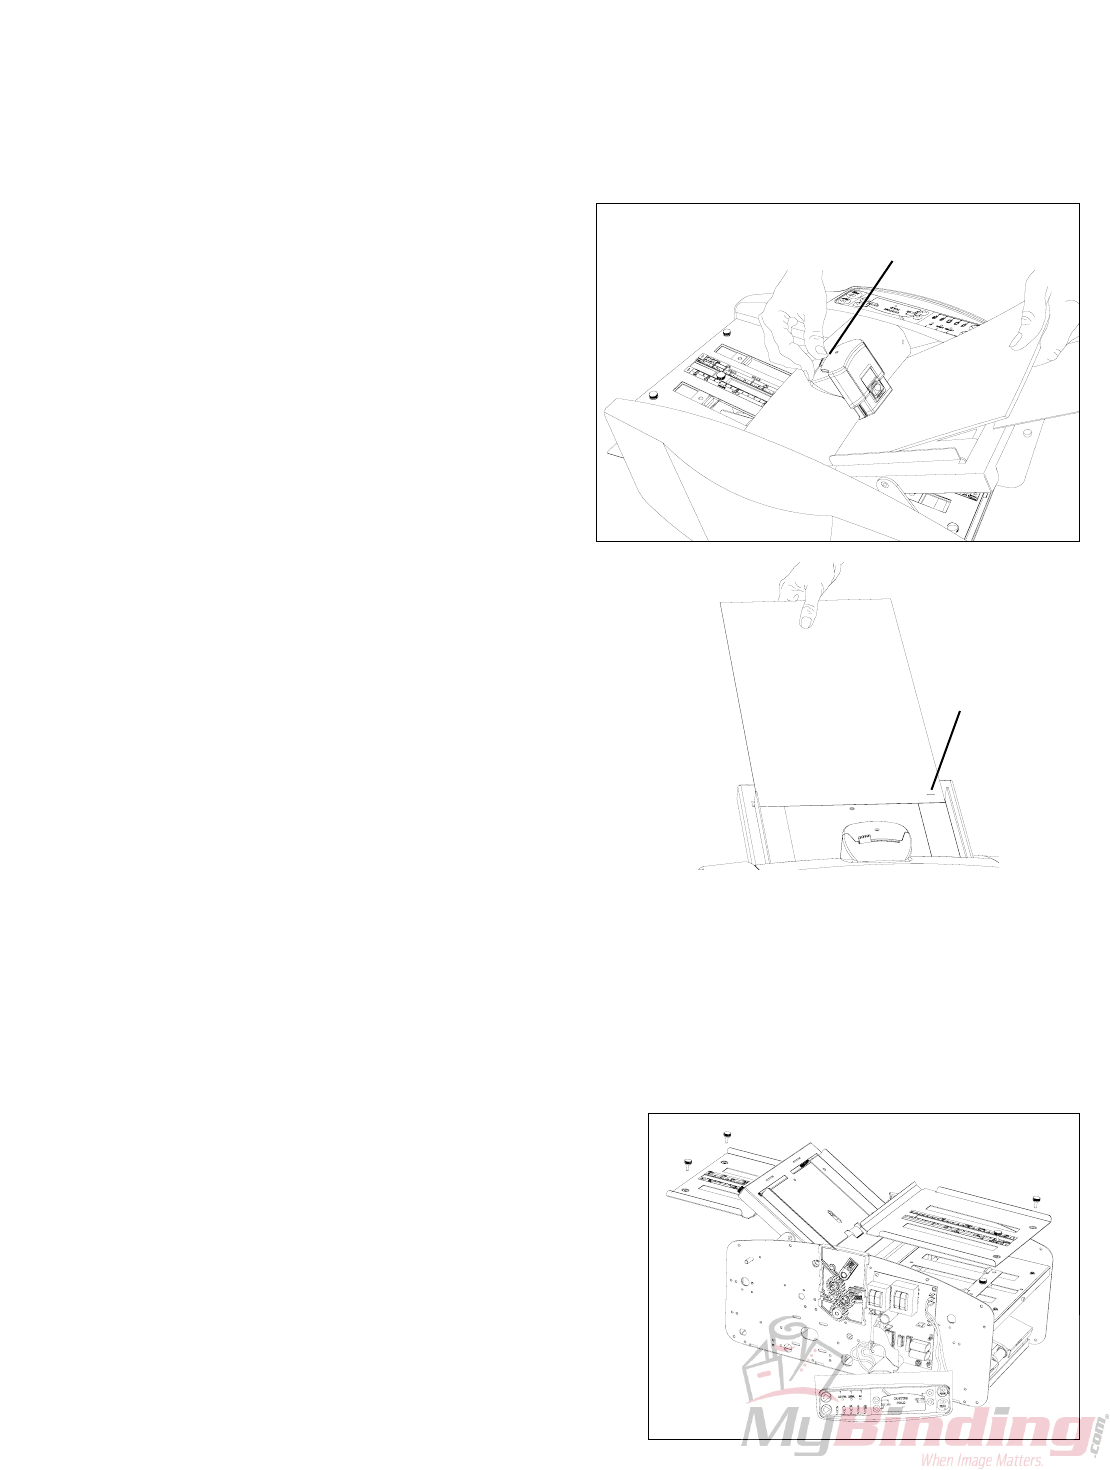
3. Remove (6) Philips pan head screws from each of the side covers. Remove the side covers by leaning them
out at the top and sliding outward at the bottom. Be careful with the electronic control display and switch wires
on the right cover.
4.
Remove the drive belt by loosening (do not remove) the four
nuts on the motor and sliding the motor to the left. Slip the
belt off the top edge of the large pulley, then the motor pul-
ley. Do not over tighten the belt tension during re-installation.
5. Remove the four thumbscrews securing the 1st and 2nd
upper fold tables. Pull the upper fold tables straight out a
few inches to disengage the bearing blocks. The upper
tables can then be lifted out of the way (Fig. 16).
6. Lower the feed table by pulling the feed table legs away
from the folder and letting the feed table down.
7. Remove the top cover assembly via the four Philips flat
head screws. Be careful not to damage the exposed paper
pusher spring or retarder during handling.
Fig. 15
Always feed the
stapled set in
with the stapled
edge first and
parallel to the
fold rollers
Fig. 14
Push spring loaded lever away from operator
and insert paper into the folding rollers
Fig. 16
(6)
8. Remove (2) Philips pan head screws from the bearing blocks. Grasp each bearing block at the top edge and
lift it straight up from the machine (Fig. 18).
9. Clean the exposed rollers by spraying Martin Yale Roller Cleaner and
Rejuvenator onto a clean cloth and wiping until all contaminates are
removed. Turn the rollers with the large pulley to get all the roller surfaces
(Fig. 19). Alcohol or a mild soap and water solution may also be used.
Avoid getting cleaning solutions into the bearing surfaces. If the fold
rollers become glazed or shiny, it may be necessary to return them to a
dull luster by using a lightly abrasive non-metallic scouring pad. Never
use metal pads such as steel wool or sand paper, as the shavings
or grit will damage the roller and bearing surfaces.
10. If needed, apply a single drop of light machine oil to the inside of the
roller shafts next to the bearing block. Avoid over-oiling as it will seep
onto the roller surface and transfer to your paper.
Reassemble the folder by reversing steps 1 through 8. Care must be taken when re-installing the right cover and
control panel. Make certain the wires and ribbon cable are not pinched in the cover and are routed away
from the roller gears and paper stop drive belt!
5.2 Clearing Paper Jams
Use the following steps to clear a paper jam:
1. Disconnect power to the folder.
2. Remove the 1st and 2nd upper fold tables as described in section 4.1, step 4.
3. Pull the jammed paper out from any area where it is accessible. The paper may be pulled from either
fold table or exit conveyor
4. If the jam cannot be cleared using the above technique, the fold rollers will need to be removed as
described in section 4.1. Once the fold rollers are removed, clearing the jam is a simple matter of pulling
the paper from the rollers.
5.3 Feed Wheel Cleaning
As with the fold rollers, contamination of the feed wheel will result in poor performance. When feeding becomes
inconsistent, clean only the outer surface of the feed wheel with a clean dry cloth and alcohol or a mild soap and
water solution. Avoid getting cleaning solutions into the bearing surfaces. Do not use Martin Yale Roller Cleaner
and Rejuvenator or other solvent-based cleaner on the feed wheel, as damage to the rubber and bearing will
result. Never lubricate the feed wheel as it is permanently lubricated!
5.4 Bushings a Folding Rollers
After extended heavy use, the folding rollers and the bushing plates may become worn. In this case a replacement
cartridge is available.
(7)
Fig. 18
Fig. 17
Lower feed
table before
removing
bearing blocks
Fig. 19

6.0 Troubleshooting
251 Wedcor Avenue
Wabash, Indiana 46992
Phone: (260)-563-0641 Fax: (260)-563-4575
Email: info@martinyale.com Website: www.martinyale.com
M-S027102 Made in the U.S.A. Rev. 3 9/12/05
6.1 Machine
will not run
6.2 Paper will
not feed
6.3 Crooked
Folds
6.4 Ink
smudges
on paper
6.5 Wrinkled
paper
Circuit Breaker has
tripped
Dead receptacle
Electrical Malfunction
Paper guides are to tight
Paper stack is not
square
Feed wheel is contami-
nated
Static electricity buildup
Retarder roller has
developed a flat wear
area
Paper has a curl in it
Excessive paper guide
side play
Paper guide skew
adjustment off
Ink not dry
Excessive toner on pho-
tocopied stock
Feed table paper guide
skew adjustment off
Feed table paper guides
too tight
Dirty Rollers
If the folder has jammed while folding, turn it off for about 20 minutes to allow the thermal
breaker to cool and reset. WARNING! Motor will start automatically once it cools.
Always turn machine off to allow cooling so as to avoid automatic starts.
Try folder in known good receptacle.
Have the Model 1701 serviced by a qualified technician. Call Martin Yale customer serv-
ice at (260)-563-0641 if further assistance is needed.
Adjust the paper guides so that the paper slides freely between them. Review section 2.3.
Make sure the paper stack is square with respect to the folding rollers. Paper must enter
the folder squarely to ensure a straight fold.
Clean the feed wheel as outlined in section 5.3. of this manual.
Fan or jog the paper to loosen the stack. Martin Yale Static Eliminator Spray may be used.
Liberally spray over paper edges, feed tables, fold tables, and exit ramp.
Replace retarder
Paper will sometimes develop a curl that makes automatic feeding difficult. This is espe-
cially common in paper just printed from a laser jet printer. Stacking it and placing a large
heavy object such as a large book on it for a couple hours can straighten paper. Another
option is to place the paper on the Model 1701 feed table with the curl down.
Readjust the paper guides to eliminate excessive side play between guides and paper
edges, per section 2.3 of these instructions.
Readjust paper guide skew adjustment as outlined in section 2.3 of these instructions.
Paper must enter the folding rollers straight, or a crooked fold will result.
Allow additional ink drying time before folding. Some inks do not dry, they only set (dry to
the touch). Because of the physical nature of friction feeding, you may notice a mark on
the leading edge of the paper.
Check copy machine
Align the paper guides with the skew adjustment so the paper feeds straight into the fold-
er. Review section 2.3.
Set guides so that sheets slide freely down between the guides without excessive side
play. Review section 2.3.
Dirty rollers can cause wrinkled paper. Clean rollers as described in section 5.1.
