MyBinding Powis Photopress Manual User
2013-06-04
User Manual: MyBinding Powis-Photopress-Manual
Open the PDF directly: View PDF ![]() .
.
Page Count: 30


FASTBACK PHOTOPRESS USER’S MANUAL 1
I SAFETY & COMFORT ...................... 2
II INTRODUCTION ........................... 3
III MACHINE SETUP .......................... 4
IV CONTROL PANEL .......................... 5
V IMPORTANT - BEFORE YOU START ........ 6
VI CONTENT ASSEMBLY - DOUBLE SIG. ...... 7
VII CONTENT ASSEMBLY - PANORAMIC .....13
VIII APPLYING SPINE TAPE ...................17
IX APPLYING HEADBANDS ..................18
X ADDING THE COVER .....................19
XI CONTENT ASSEMBLY - FLATBOOK .......20
XII CONTENT ASSEMBLY -ACCORDION ......24
XIII TIPS AND TECHNIQUES ..................27
XIV SPECIFICATIONS ..........................28
XV FCC NOTICE ..............................29
Information for Your Reference:
Serial Number:
Purchase Date:
C O N T E N T S

2FASTBACK PHOTOPRESS USER’S MANUAL
SAFETY & COMFORT
I
Please read through this manual before setting up and using
your PhotoPress.
• Connectallequipmenttoproperlygroundedpower
outlets.
• Donotallowanythingtorestonthepowercord.Donot
locatethePhotoPresswherepersonswillsteponthecord.
• PlacethePhotoPressonaatsurface.ThePhotoPressmay
not operate properly if it is tilted or at an angle.
• Donotpushanyobjectsintotheinteriorofthe
PhotoPress.
• Useonlythetypeofpowersourceindicatedonthelabel
on the rear of the machine.
• Donotuseadamagedorfrayedpowercord.
• UnplugthePhotoPressbeforecleaning,andcleanitwitha
damp cloth only.
• DonotspillfoodorliquidonthePhotoPress.
• DonotputanythingintothePhotoPressotherthana
properly prepared and assembled book block.
• Exceptasspecicallyexplainedinthisguide,donot
attempt to service the PhotoPress yourself.
• KeepyourPhotoPressawayfromradiatorsandheat
sources.
• Useofanextensioncordwiththismachineisnot
recommended or authorized. Users should check building
codesandinsurancerequirementsifanextensioncordis
to be used. Make sure that the total of the ampere ratings
oftheproductspluggedintotheextensioncorddoesnot
exceedtheextensioncordampererating,andthatthe
totalamperageofallproductspluggedintothewalloutlet
doesnotexceedtheoutletrating.
C A U T I O N : Do not attempt to lift
the PhotoPress alone. See First Time Setup
instructions.
!
FASTBACK PHOTOPRESS USER’S MANUAL 3
INTRODUCTION
II
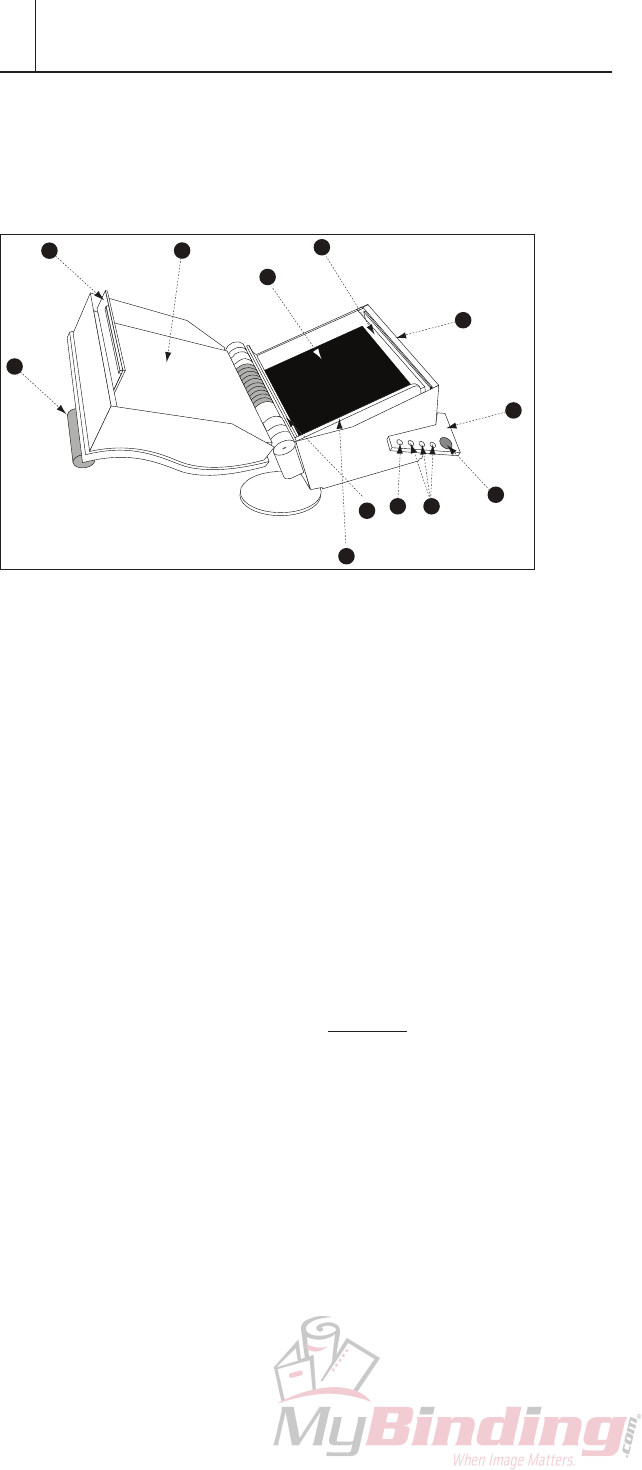
CongratulationsonthepurchaseofyournewPowisModel88
PhotoPress™binder.Aswithallourmachines,ThePhotoPress
wascarefullyassembledandtestedpriortopacking.Yo u will
nditfastandeasytouse.
A Handle
B Upper latch
C Upper Platen
D LowerPlaten
E Latch Hook
F Control Panel
G BIND Button
H Book size buttons
I Unlock/Move plate button
J Pressure Pad
K Left Alignment Edge
L Bottom Alignment Edge
Note: Thepressurepad(itemJ)hasausefullifeofapproximately5to
10 thousand binds. Rotating the pad 180˚ every 500 to 1000
bindswillincreaseitslife.Replacementpadsareavailablefrom
your local distributor. Part# K-205905.
CD
A
B
E
F
G
H
I
J
L
K
4FASTBACK PHOTOPRESS USER’S MANUAL
MACHINE SETUP
III
A. What’s Included Inside the Box
• ThePhotoPress™ binder
• PhotoPressManual
• PowerCord
Ifanyitemsaredamagedormissing,contactPowiscustomer
service immediately.
NOTE: Fastback Hardcover Guide ships separately.
B. Setting Up
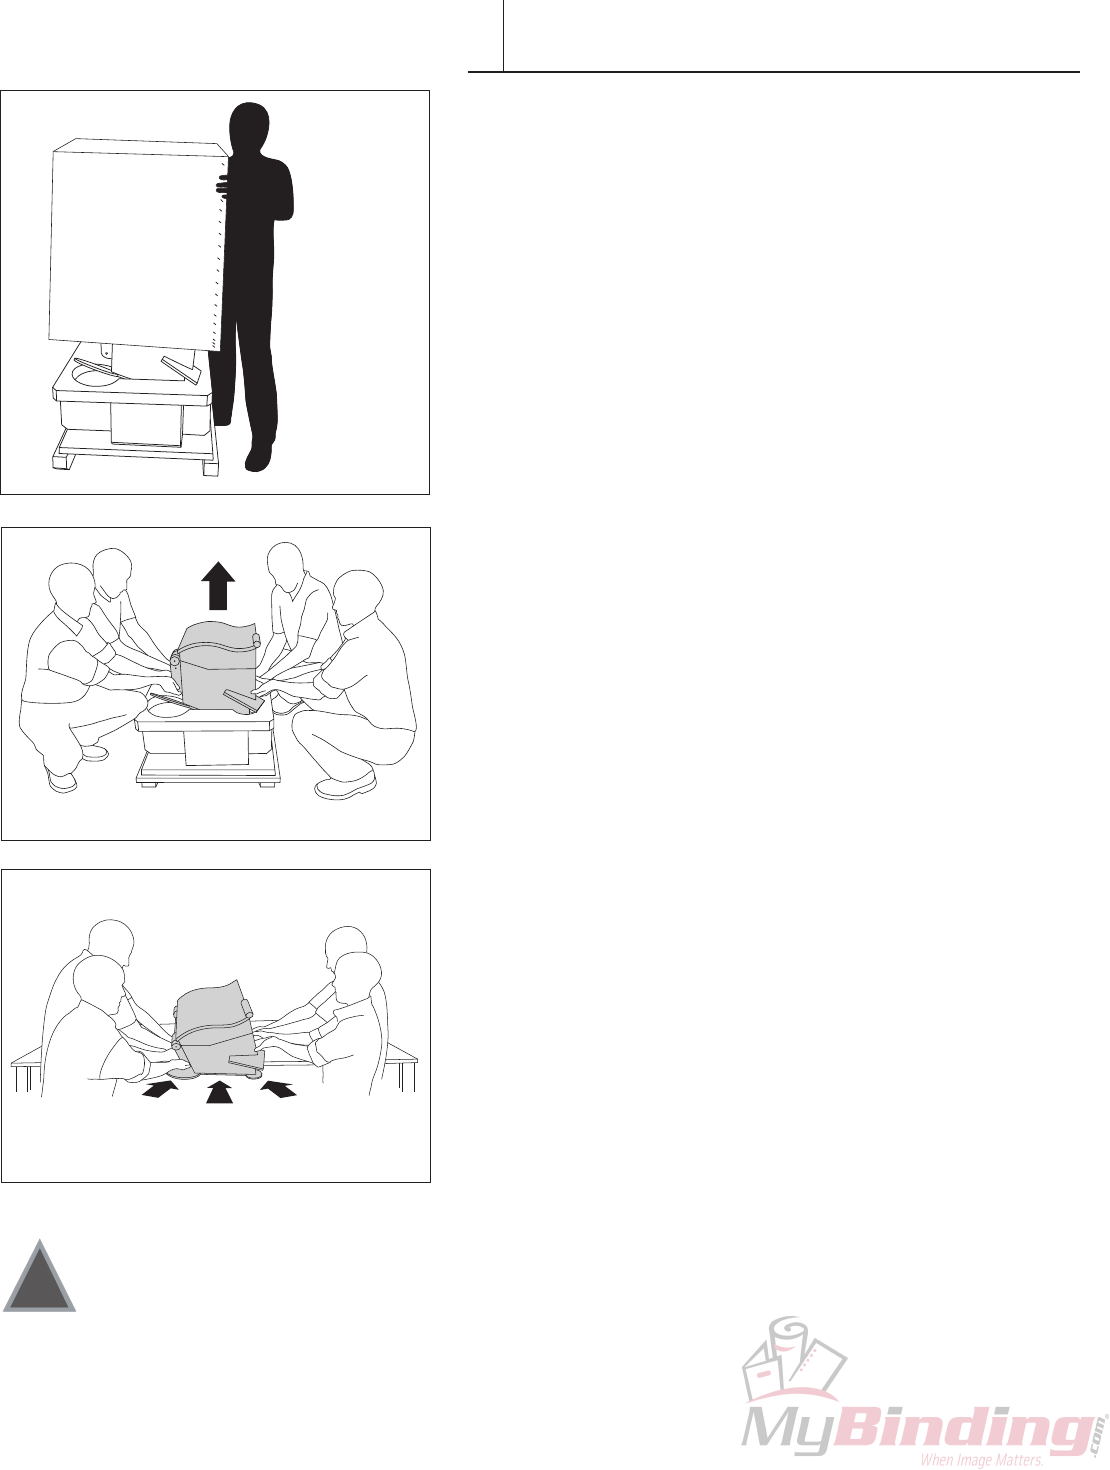
1. Cutstrapsonthebox.
2. Liftcardboardcoveroff,exposingtheStyrofoam-encased
machine (Figure 1).
3. Remove the top Styrofoam piece from the PhotoPress.
4. Withfourpeople(twooneachside),grabthePhotoPress
by the lifting handles located on the undercarriage of the
PhotoPress body (Figure 2).
5. Place the PhotoPress onto the table and slide it into
position(Figure3).Makesurethatthetableonwhichthe
PhotoPresswillsitcansafelyholdatleast250lbs(133Kg.).
6. Forregionspronetoearthquakes,werecommendbolting
thePhotoPresstothetable.Tw o mountingtabsare
provided on back of machine.
IMPORTANT: If possible please save all the packing materials
for future shipping.
C. Plugging In
1. Thepowerswitchislocatedonthebacklowerrightsideof
themachine.BeforeplugginginthePhotoPress,makesure
thepowerswitchisoffbydepressingthe“O”sideofthe
powerswitch.
2. Plugthepowercordintotheoutletonthebackofthe
machine.Thenconnectittoastandard,groundedelectrical
outlet.
D. Power On
Tu r n thepowerswitchonbydepressingthe“1”sideofthe
powerswitch.
E. Ready To Go
Wait for the machine to go through the start up cycle.
Attheendofwhich,thelockunlatchesandthedooropens.
The machine is ready to use.
Themachineisshippedwithafoampad.Makesurethefoam
pad has the black side facing up.
HINT: ThePhotoPressconsumesrelativelylittlepowerwhen
itisnotbinding.However,ifthemachinewillnotbeusedfor
severalhours,savepowerbyturningitoff.
C A U T I O N : Do not attempt to lift the
PhotoPress by yourself!
!
F I G U R E 1
F I G U R E 2
F I G U R E 3
FASTBACK PHOTOPRESS USER’S MANUAL 5
CONTROL PANEL
IV
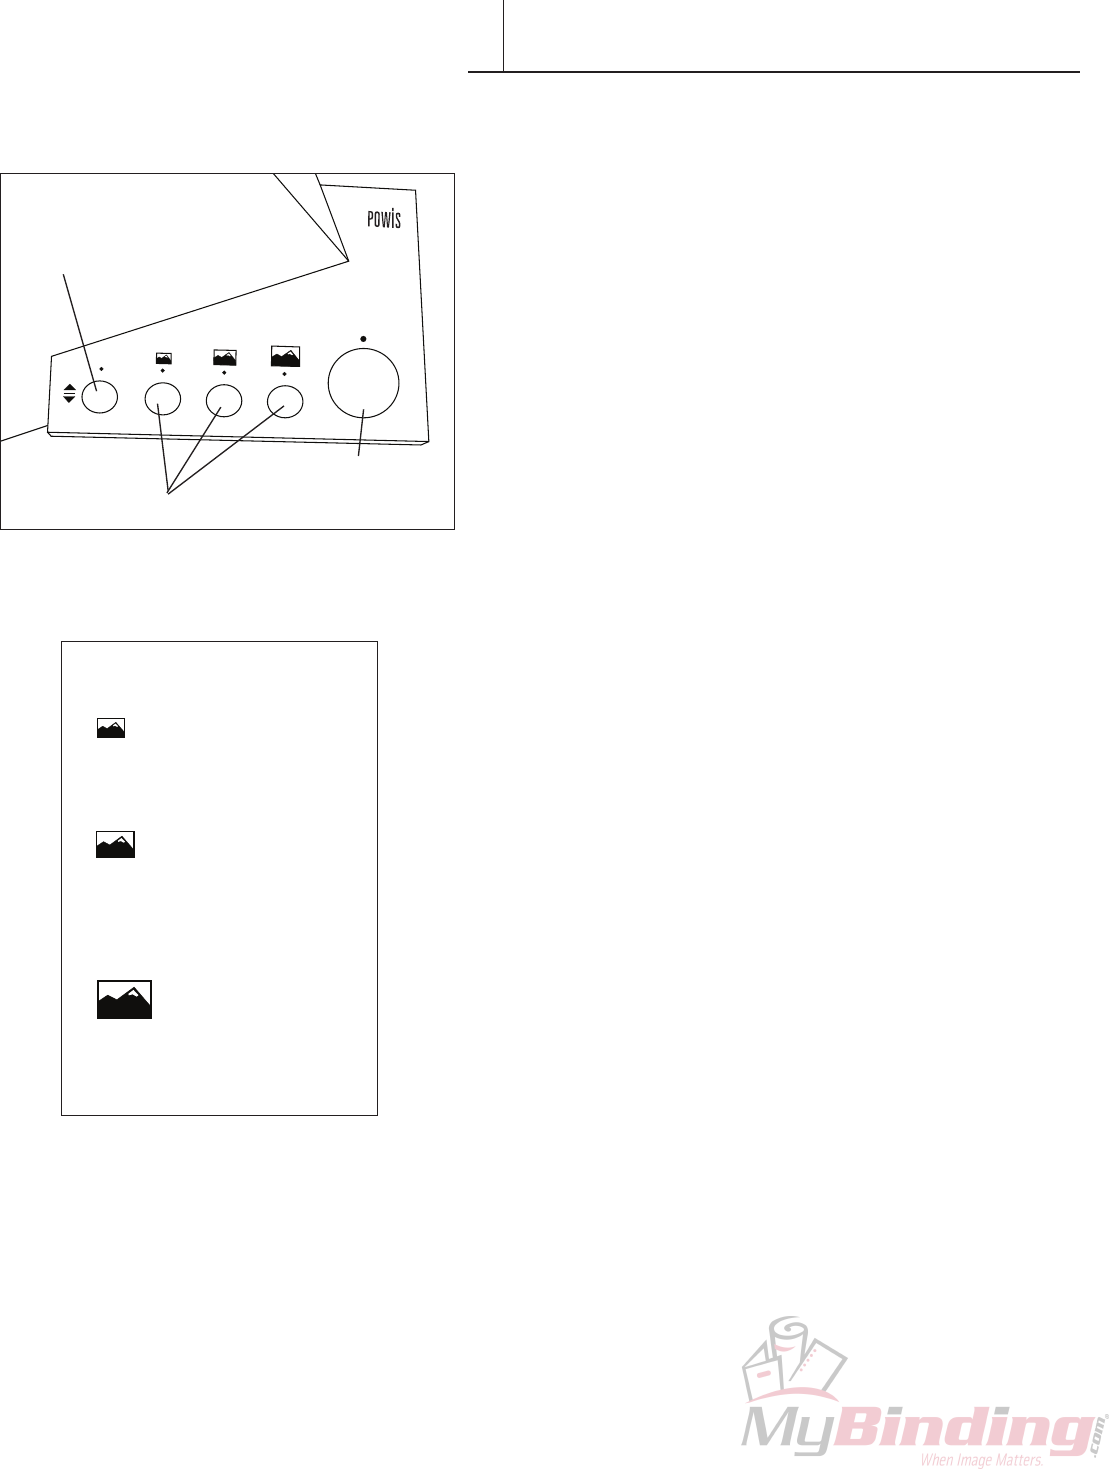
TheControlPanelbuttonscontrolthelengthofthebindcycle,
the locking mechanism on the PhotoPress and the beginning of
thebindcycle.Yo u canalsoadjusttheplatelevelsifdesired.
BIND Button
The BIND button starts the binding cycle. When the light above
theBINDbuttonisblinking,theplatensaremovingandyou
cannot open the PhotoPress.
SIZE Buttons
The SIZE buttons control the length of time that the
PhotoPress compresses the book block. They also control the
compressioncongurations,whichvary(asshownbelowleft)
accordingtobooksize.Werecommendthefollowingsettings
according to book size and thickness.
UNLOCK/MOVE Button
Ifthebinderisclosed,theUNLOCK/MOVEButtonopensthe
machine.Ifthebinderisopen,itmovesthelowerplatenupand
down.
Locking
Theclamplocksautomaticallywhenthebinderhasbeenidle
formorethanafewminutes.To unlock,presstheUNLOCK/
MOVEButtononce.
Moving the Platen
Whenthebinderlidisopen,theUNLOCK/MOVEButton
allowsyoutoadjustthestartinglevelheightofthelowerplaten.
Normallytheplatenwillalwaysreturntoitslastpoint.For
bindingthickbook,theplatenshouldbelowerthanthestarting
position.Forthinbooks,itmaybedesirabletohavetheplaten
higherthannormal.To adjusttheheightofthelowerplaten,
pressandholdtheUNLOCK/MOVEButtonuntiltheplaten
reachesthedesiredlevel,thenrelease.
BIND button
UNLOCK/MOVE button
SIZE buttons
BINDING CHART
Small button
4" × 6"
5"x7"
Medium Button
6"x8"
8"x8"
8"x10"
10"x10"
Large Button
8"x12"
12"x12"
6FASTBACK PHOTOPRESS USER’S MANUAL
Photographs
(In order from
the top down)
Signature Sheets;
shiny (non-adhesive)
side up.
SPINE EDGE
(fold)
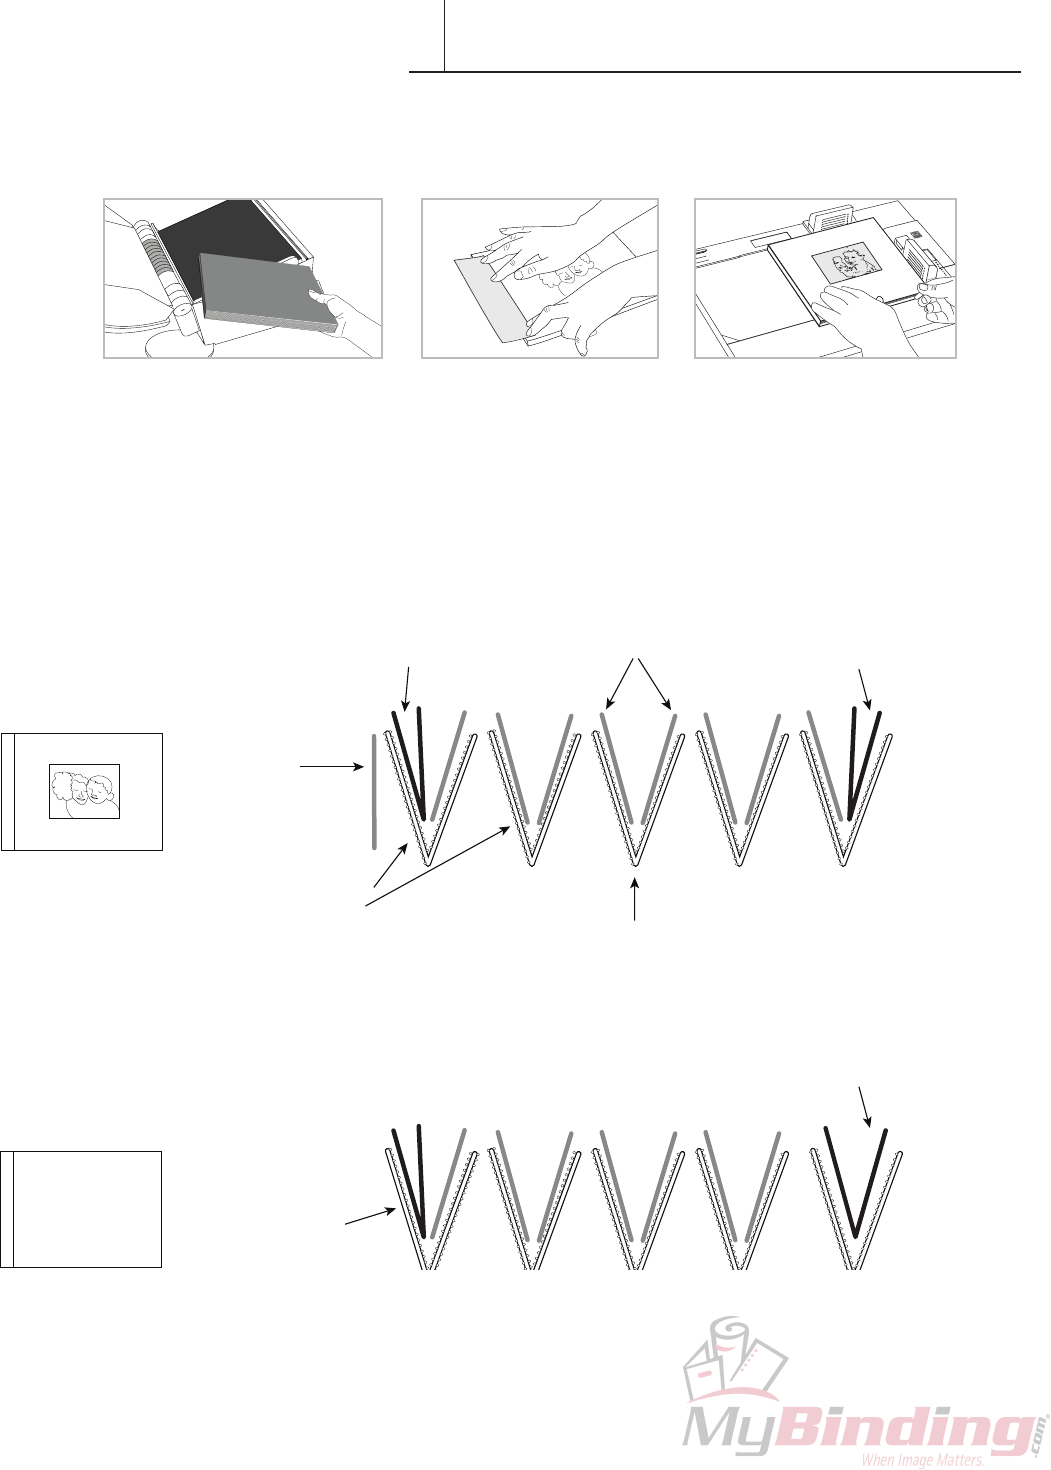
IMPORTANT - BEFORE YOU START
V
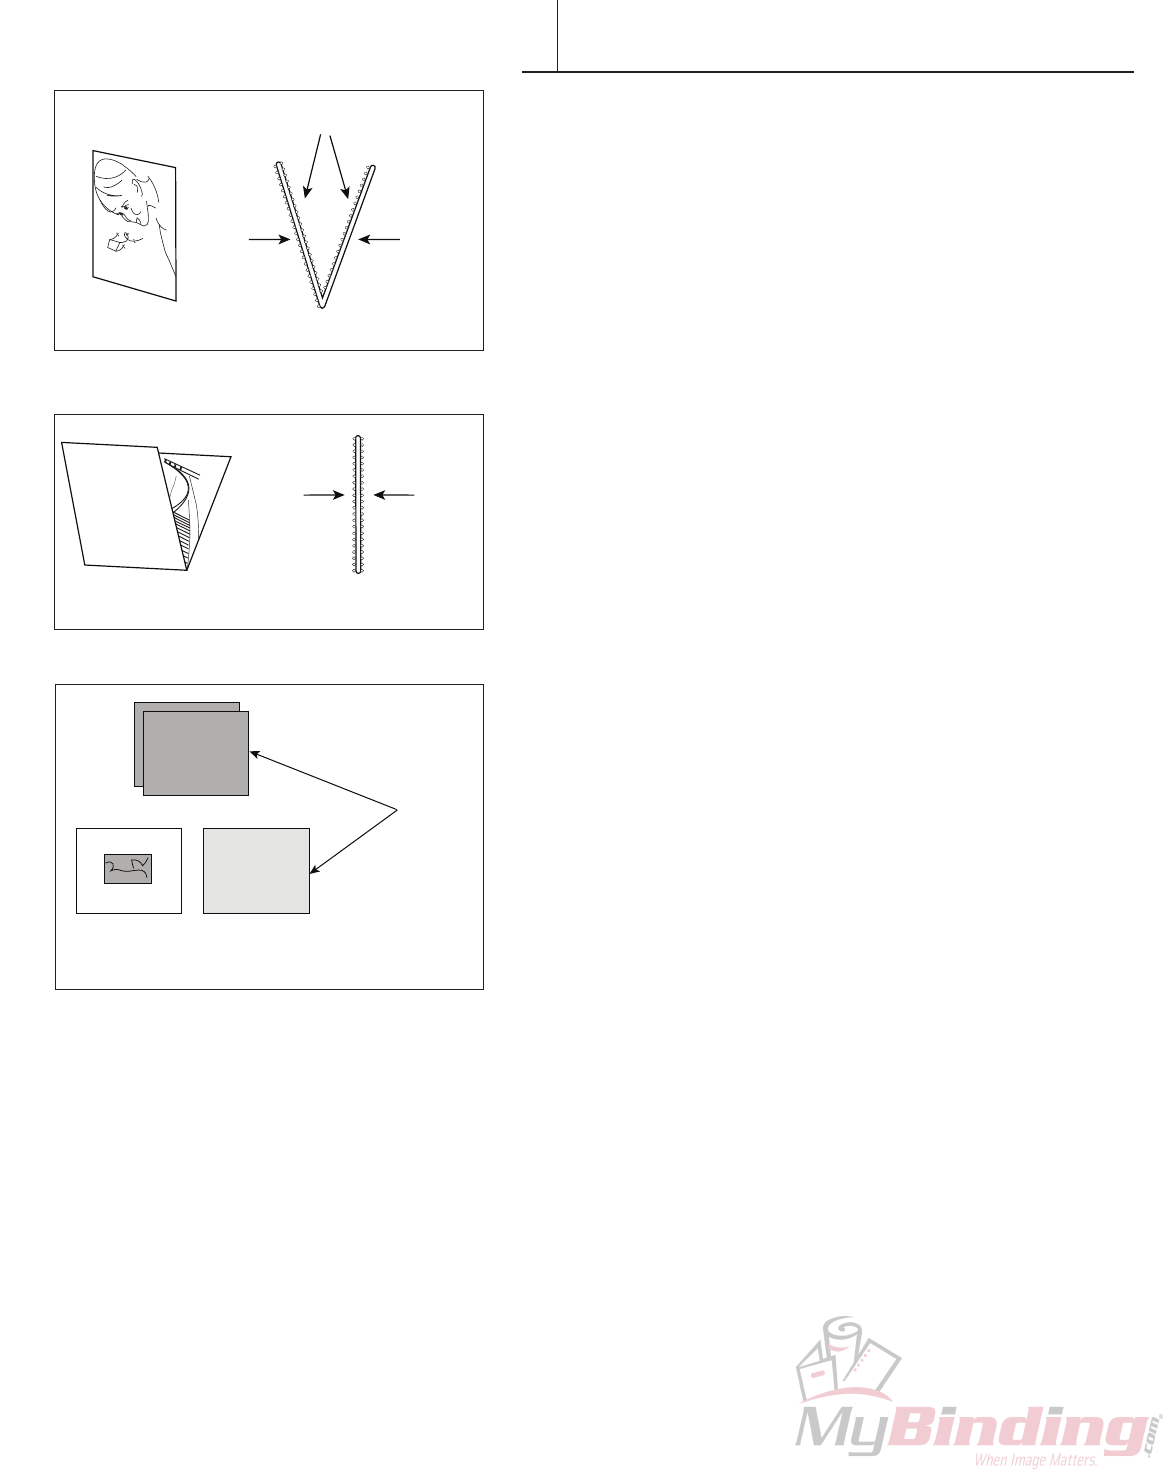
Key components of PhotoPress book assembly are the
SignatureSheets,whichfeatureadhesivelayersthatactivate
underpressure.Thismakesiteasytoassembleabookwithout
photosprematurelyadheringtothesignatures.Therearetwo
typesofPhotoPressSignatures:DoubleSheets,andSingle
Sheets.
Photopress Double Signature Sheets are used to bind single
pages. The Double Signature Sheets are folded and have three
adhesive sides and one side that has no adhesive (Figure 1).
Theshinysidewithoutadhesiveiseasilydistinguishedfromthe
softeradhesivesides.BooksmadewithDoubleSignatureSheets
generally need no trimming after pressing.
The PhotoPress Single Signatures are used to bind folded pages.
Forthesebooks,thefoldsinthephotopagesformthebook’s
hinge parts. Single Signature Sheets have adhesive on both sides
(Figure2).BooksmadewithSingleSignatureSheetsnormally
needtobetrimmedafterpressingduetolimitationsonhow
accurately photos can be folded.
Beforeyoubegintheassemblyprocess--hereareafew
important tips for making great books:
• Cleanthesurfaceofyourworktable.Yo u don’twantforeign
materials picked up and trapped under photos.
• Organizeyourwork.Arrangeyourphotos,endleavesand
SignatureSheetsasshowinFigure3.Thiswillmakeitfaster
andeasiertoassembleyournishedbooks.Thephotosshould
bearrangedfromrsttolast.Forawindowedphotobook,the
topphotoshouldbethephotothatwillshowthroughthe
windowonthecoverofthebook.TheSignatureSheetsshould
beplacedwiththenon-adhesivesidefacingup,andthefolded
edgetotheright.Endleavesalsoshouldbearrangedwiththeir
fold to the right.
• Checkthatphotosarecorrectlysized.Forbestresults,photo
pagesshouldbewithin1/32(.8mm)ofthestandardnominal
dimensions.Example:foralandscape8x10(203x254mm)book,
the10inch(254mm)lengthshouldbe10inches(254mm),
preferablywithinapproximately1/32 (.8mm) of an inch. Smaller
photoswillleavealargerthannormalgapatthespine.Larger
photoswillshowsomewhitepasttheendleafedges.
•Photoprintersareoftenoutofadjustmentandcutshort.This
is not desirable for Photopress books. If your printer is cutting
short,pleasehaveitadjustedtocuttothecorrectnominal
dimensions.
•Ifyourphotosarealreadyprintedtoosmall,itisstillpossible
to use them but endleaves should be trimmed to match the
photo size.
Adhesive Panels
No
Adhesive
Adhesive
Panel
F I G U R E 1
Adhesive
Panel
Adhesive
Panel
P
PHO
PHOTO P
PHOTO PAPER
PHOTO PAPER
PHOTO PAPER
O PAPER
PHOTO PAPER
TO PAPER
PAPER
ER
PHOTO PAPER
PHOTO PAPER
PHOTO PA
PHO
PHOTO PAPER
PHOTO PAPER
PHOTO PAPER
PHOTO PAPER
PHOTO
PER
F I G U R E 2
F I G U R E 3
Double Signature
Single Signature
FASTBACK PHOTOPRESS USER’S MANUAL 7
CONTENT ASSEMBLY-DOUBLE SIGNATURE
VI
Photos
PhotoPress™Double Signature Sheets
Endleaf
Front Photo
(appears in
cover window)
Non-windowed
Hardcover
Endleaf
Endleaf
Adhesive
Side
Non-Adhesive
Side
Structure of a book containing eight single-page interior photos and one front window photo.
Structure of a book containing seven single-page interior photos and no front window photo.
2. Apply spine tape 3. Apply hardcover
MakingaPhotopressbookwithDoubleSignaturesisa3-stepprocess.
1. Assemble and press the content.
8 FASTBACK PHOTOPRESS USER’S MANUAL
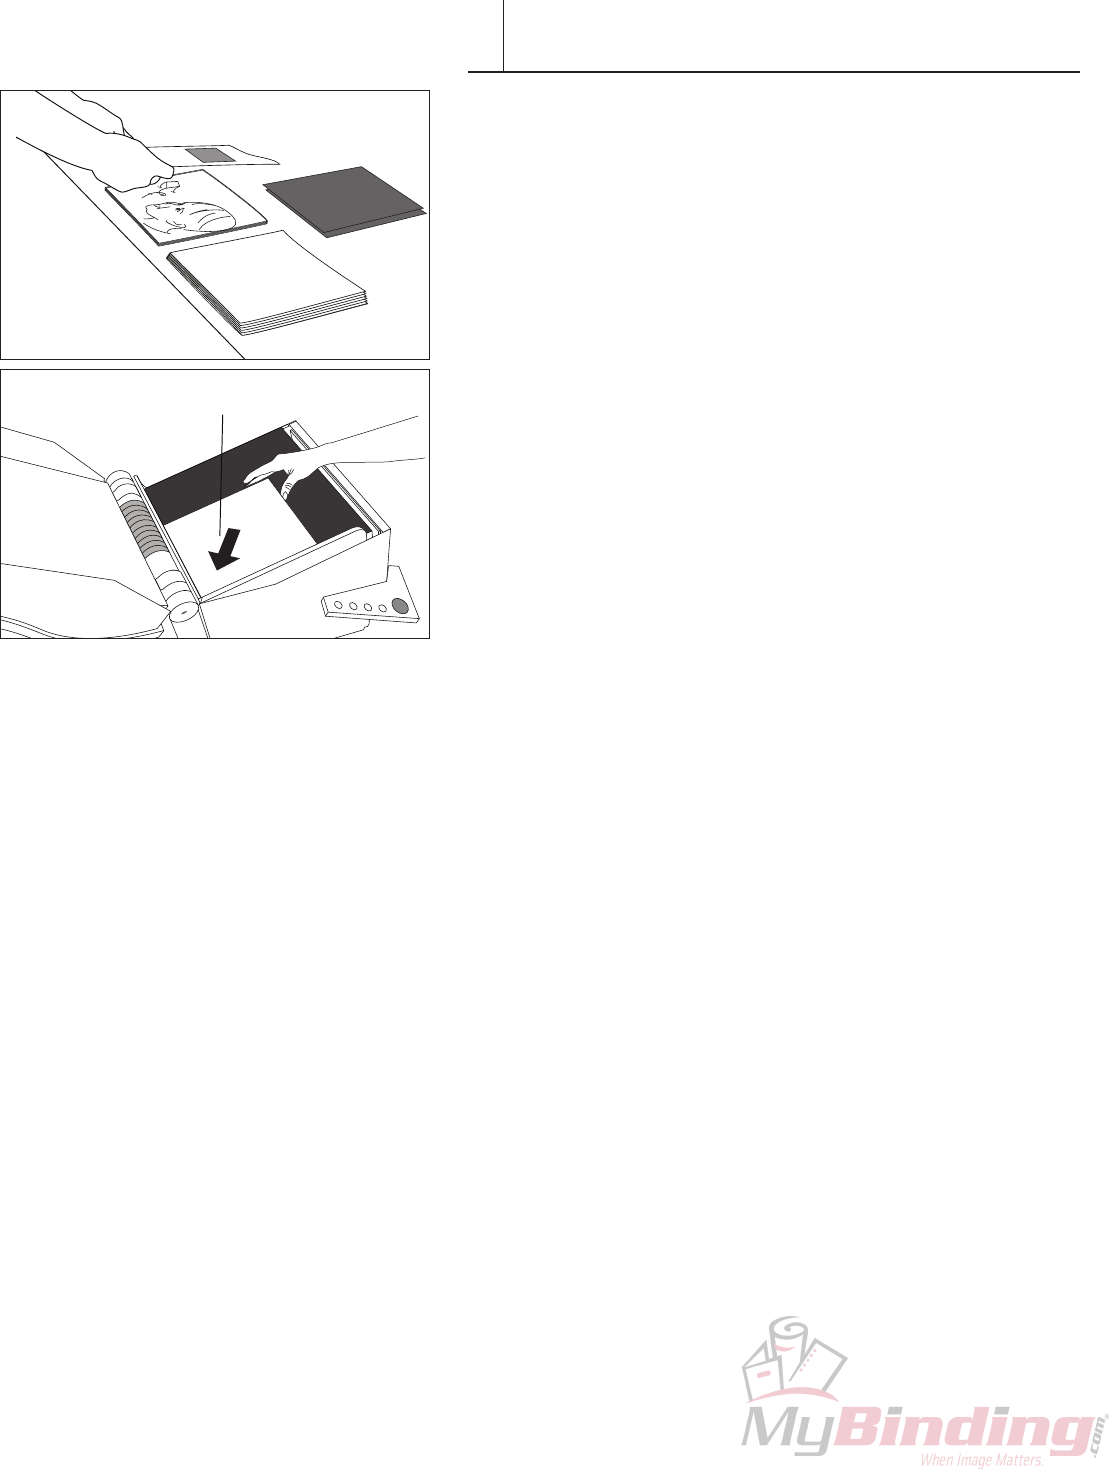
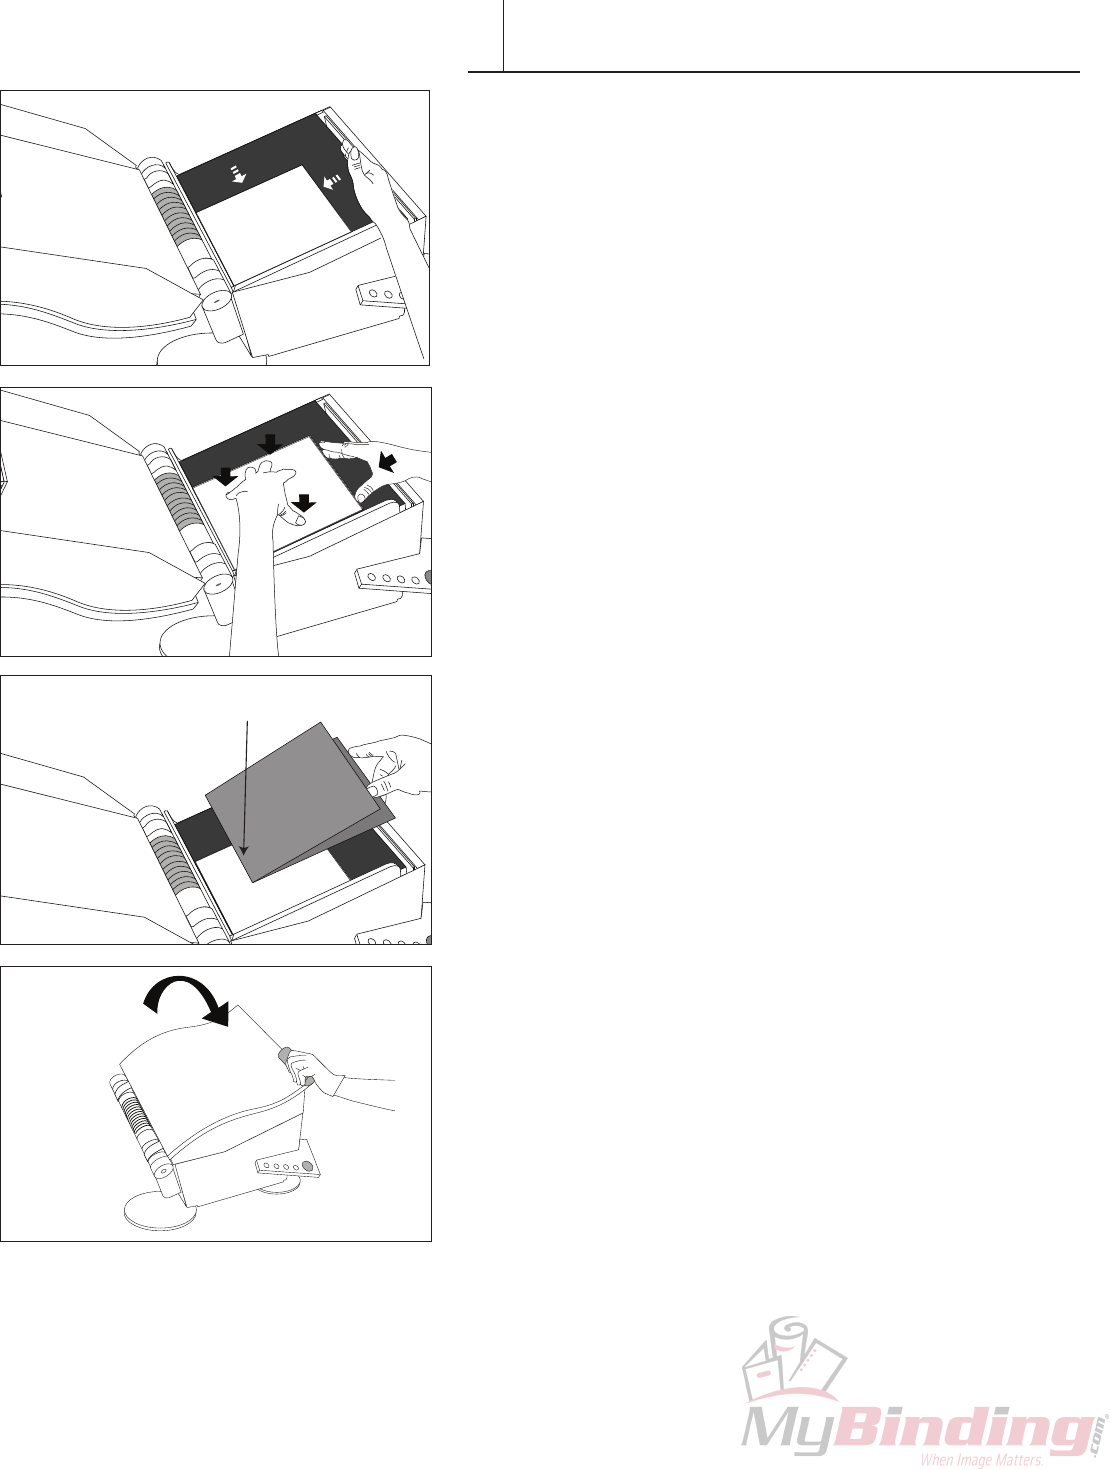
With Window:
1. Taketherstphotofromthetopofthestackofphotos.
2PlaceitfacedowninthePhotoPress,justifyittotheleftcorner.
Skipthisstepifbindinganon-windowedbook.
Notethattherstsignatureinthesequenceinstep5(opposite
page)isreversedsothattheadhesivesideisfacetofacewiththe
signatureandnottheplaten,otherwise your book block will
became stuck to the platen during binding!
PHOTO PAPER
PHOTO PAPER
APER
PHOTO PAPER
HOTO PAPER
PHOTO PAPER
PHOTO PAPE
PHO
O PAPER
PHOTO PAPER
PHOTO PAPER
PHOTO PAPER
ER
R
PHOTO PA
HOTO PAPER
O PAPER
PHOTO
PHO
PHOTO PAP
PHOTO P
FIRST PHOTO
(face down, top up)
CONTENT ASSEMBLY-DOUBLE SIGNATURE
VI
FASTBACK PHOTOPRESS USER’S MANUAL 9
3.Orienttherstphotoandendleafasshown.Makingsurewhen
insertingtheendleaves,thatthefoldsoftheendleavesarealongthe
bindingedge(i.e.,thescorededgeoftheSignatureSheets).
4. Insertthephotoandendleafintoasignaturesheetwiththeshiny
non-adhesive side of the signature facing up. If you are making a non-
windowedphotobook,theshinynon-adhesivesideshouldbefacing
down.Seediagramatthebeginningofthissection.
HINT: DonotopentheSignaturesheetsfullywhenyouare
insertingthephotographsandendleaves.Thiswillhelpyouproduce
better results.
5. Place the Signature in the Photopress. Check that the shiny (non-
adhesive)sideofthesignaturesheetisfacingup,withthefoldtothe
right.
6. Place your loosely assembled signature and photos into the
machine,tapthephotosandsignaturesquarelyagainsttheleftand
bottom alignment edges of the machine. The goal is to seat photos
completelyintothesignaturefold.Visuallycheckthatthealignment
ofthephotosandsignatureisgoodbeforeplacingthenextone.The
shiny(non-adhesive)sideofthesignaturesheetshouldbefacingup,
withthefoldtotheright.
P OTO PAPER
PHOTO PAPER
PHOTO PAPER
PHOTO P
PHOTO PA
PHOTO PAPER
PHOTO PAPER
ER
PAPER
HOTO PAPER
OTO PAPER
PHOTO PAPER
PHOTO PAPER
PAPER
R
O PAPER
PHOTO PAPER
PHOTO PAPER
PHOTO P
PHOTO PAPER
PHOTO PAPER
ER
APER
PHOTO PAPER
PHOTO
PH
PHOTO P
PHOTO PAP
PHOTO P
PHOTO P
PHOTO PA
PHOTO PAPER
PHOTO PAPER
O PAPER
O PAPER
PHOTO PAPER
PHOTO PAPER
PHOTO PAPER
PHOTO PAPER
PHOTO PAPER
PHOTO PAPER
PHOTO PAPER
PHOTO PAPER
PHOTO
Endleaf
Photo Facing Down
CONTENT ASSEMBLY-DOUBLE SIGNATURE
VI
PHOTO PAPER
O PAPER
PHOTO PAPER
PHOTO PAPER
P OTO PAPER
PHOTO PAPER
PHOTO PAPER
TO PAPER
PHOTO PAPER
PHOTO PAPER
PHOTO PA
PHOTO PAPER
HOTO PAPER
PHO
P
PHOTO
PHOTO PAPE
PHOTO
PHOTO PAPER
O PAPER
O PAPER
O PAPER
PHOTO PAPER
PHOTO PAPER
P OTO PAPER
PHOTO PAPER
PHOTO PAPER
PHOTO PAPER
TO PAPER
TO PAPER
PHOTO PAPER
PHOTO PAPER
PHOTO PA
PHOTO PAPER
HOTO PAPER
PHO
PHO
PHO
P
P
P
PHOTO
PHOTO
PHOTO
PHOTO PAPE
PHOTO PAPE
PHOTO PAPE
PHOTO
PHOTO
PHOTO PAPER
HOTO PAPER
PHOTO PAPER
PHOTO
PHOTO PAPER
PHOTO PAPER
PAPER
PHOTO PAPER
PHOTO PAPER
PHOTO PAPER
PHOTO PAPER
PHOT
O PAPER
PHOTO PAPER
PHOTO PAPER
PHOTO PAPER
ER
ER
PHOTO PAPER
OTO PAPER
OTO PAPER
PHOTO
PHO
P
PHOTO PAP
PHOTO P
shiny
non-adhesive
side up
10 FASTBACK PHOTOPRESS USER’S MANUAL
OTO PAPER
PHOTO PAPER
PHOTO PAPER
PHOTO P
PHOTO PA
PHOTO PAPER
PHOTO PAPER
ER
O PAPER
R
HOTO PAPER
HOTO PAPER
PHOTO PAPER
PHOTO PAPER
PAPER
R
O PAPER
PHOTO PAPER
PHOTO PAPER
PHOTO
PHOTO PAPER
PHOTO PAPER
ER
PAPER
PHOTO PAPER
PHOT
PH
PHOTO P
PHOTO PAPER
PHOTO P
PHOTO P
PHOTO PA
PHOTO PAPER
PHOTO PAPER
O PAPER
O PAPER
PHOTO PAPER
PHOTO PAPER
PHOTO PAPER
PHOTO PAPER
PHOTO PAPER
PHOTO PAPER
PHOTO PAPER
PHOTO PAPER
PHOT
Photo Facing Up
Photo Facing Down
7. Checkorientation,orderofphotosandfacephotostogether.
8. Insert photos face-to-face inside signature sheet. Note the photo
fromthetopofyourstackshouldbetheonefacingupandthenext
photointhesequenceshouldbefacingdown,assumingthatyour
bookisorganizedfromrsttolastphoto.
9. Placeyourlooselyassembledsignatureandphotosintothemachine,
tapthephotosandsignaturesquarelyagainsttheleftandbottom
alignment edges of the machine to seat photos completely into the
signature fold.
10. Visuallycheckthatthealignmentofthephotosandsignatureisgood
beforeplacingthenextone.Theshiny(non-adhesive)sideofthe
signaturesheetshouldbefacingup,withthefoldtotheright.
PHOTO PAPER
PHOTO PAPER
O PAPER
PHOTO PAPER
PHOTO PAPER
PHOTO PAPER
PHOTO PAPER
PHOT
O PAPER
PHOTO PAPER
PHOTO PAPER
PHOTO PAPER
PER
ER
PHOTO PAPER
HOTO PAPER
OTO PAPER
PHOTO
PHO
PHOTO PAP
PHOTO P
shiny
non-adhesive
side up
PHOTO PAPER
PHOTO PAPER
PAPER
PHOTO PAPER
PHOTO PAPER
PHOTO PAPER
PHOTO PAPE
PHO
O PAPER
PHOTO PAPER
PHOTO PAPER
PHOTO PAPER
PER
ER
PHOTO PAPER
HOTO PAPER
OTO PAPER
PHOTO
PHO
P
PHOTO PAP
PHOTO P
CONTENT ASSEMBLY-DOUBLE SIGNATURE
VI
FASTBACK PHOTOPRESS USER’S MANUAL 11
Photo
Facing Up
Endleaf
13. Orientlastphotoandendleafasshown.Ifyouhaveanoddnumber
ofphotographs(notincludingawindowphoto)therewilbeno
nalphotointheposition.Theendleafwillbindtobothfacesofthe
signature sheet. See diagram at beginning of section.
14. SlidethenalpictureintotheSignatureSheetfaceup.Slidean
endleaf into the Signature Sheet on top of the photo and place the
assembled Signature into the PhotoPress.
PHOTO PAPE
O PAPER
PAPER
TO PAPER
O PAPER
OT ER
TO PAPER
O PA
PHOTO
PHOTO
PHOTO PA
PHOTO PAP
HOTO PAP
HO
P O
PHOTO PAP
PHOTO
PHOTO PAPE
O PAPER
O PAPER
PAPER
TO PAPER
O PAPER
O PAPER
O PAPER
OT ER
TO PAPER
TO PAPER
O PA
PHOTO
PHOTO
PHOTO PA
PHOTO PAP
PHOTO PAP
HOTO PAP
HOTO PAP
HOTO PAP
HO
HO
P O
P O
PHOTO PAP
PHOTO
PHOTO
O PAPER
O PAPER
O PAPER
TO PAPER
TO PAPER
PHOTO PAP
HOTO PAP
HOTO PAP
HO
P O
PHOTO PAPER
O PAPER
PAPER
TO PAPER
O P R
HOT ER
HOTO PAPER
O PA
PHOTO
PHOTO
PHOTO
PHOTO
OTO
PHO
P
PHOTO
PHOTO PAP
PHOTO
PHOTO PAPER
O PAPER
PAPER
TO PAPER
O P R
HOT ER
HOTO PAPER
HOTO PAPER
HOTO PAPER
O PA
PHOTO
PHOTO
PHOTO
PHOTO
PHOTO
OTO
OTO
PHO
P
PHOTO
PHOTO PAP
PHOTO
PHOTO
PHOTO
O PAPER
HOTO PAPER
HOTO PAPER
HOTO PAPER
HOTO PAPER
PHO
P
PHOTO
PHOTO PAP
PHOTO
PHOTO
PHOTO
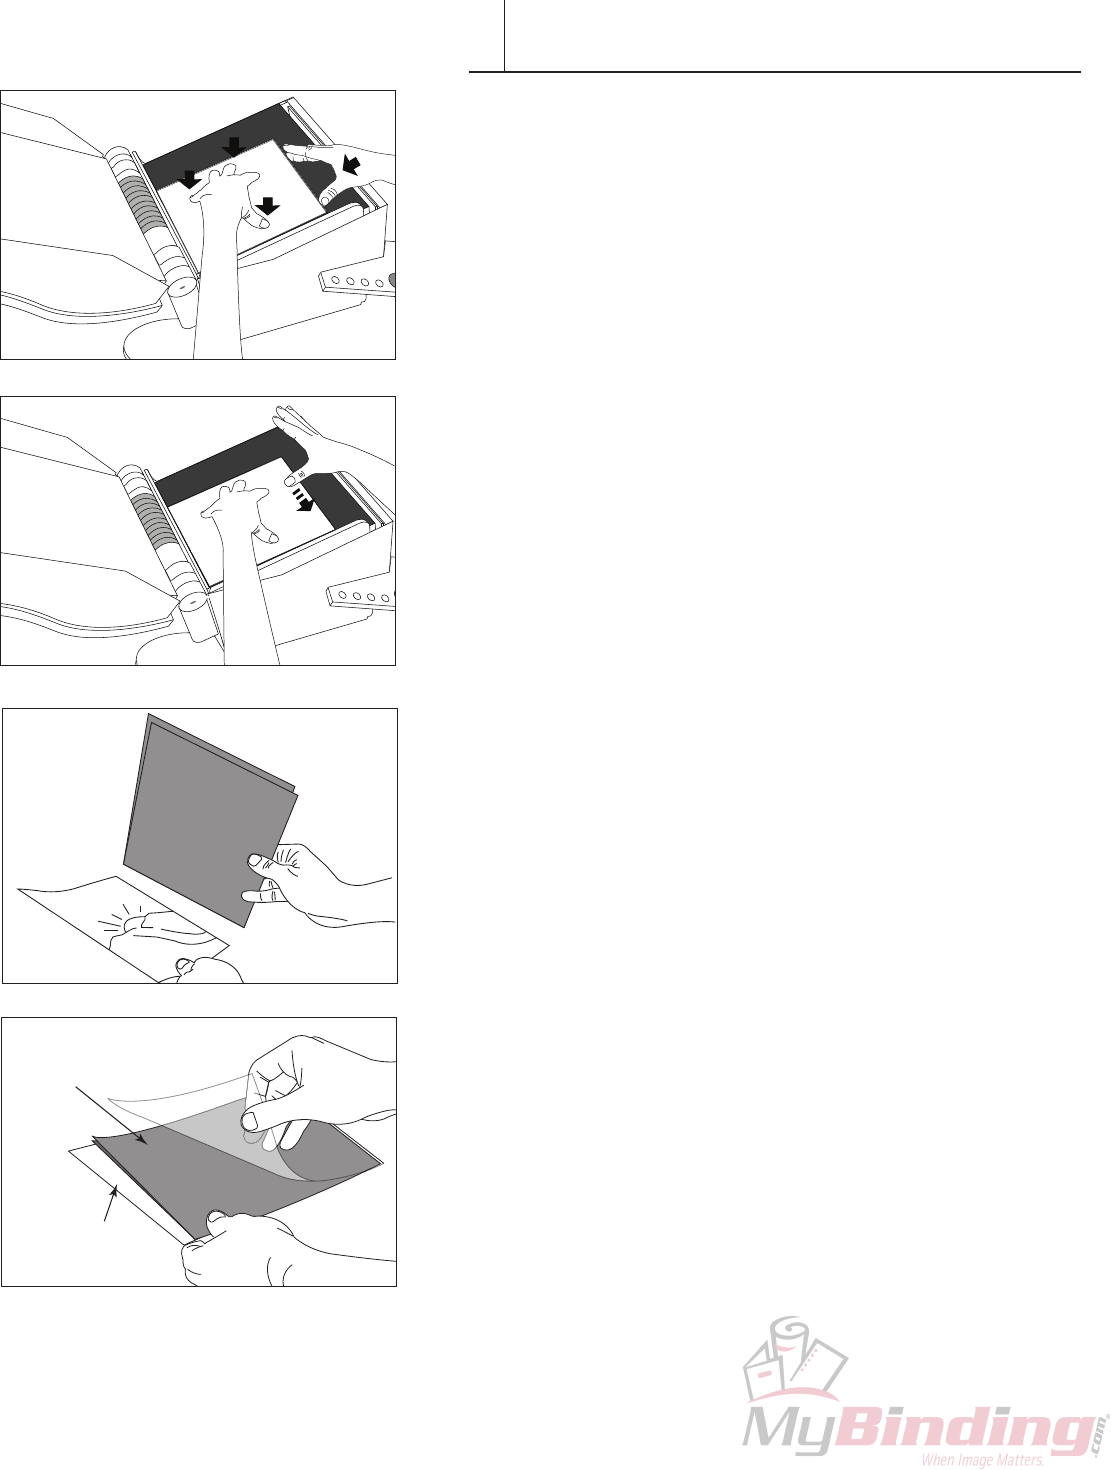
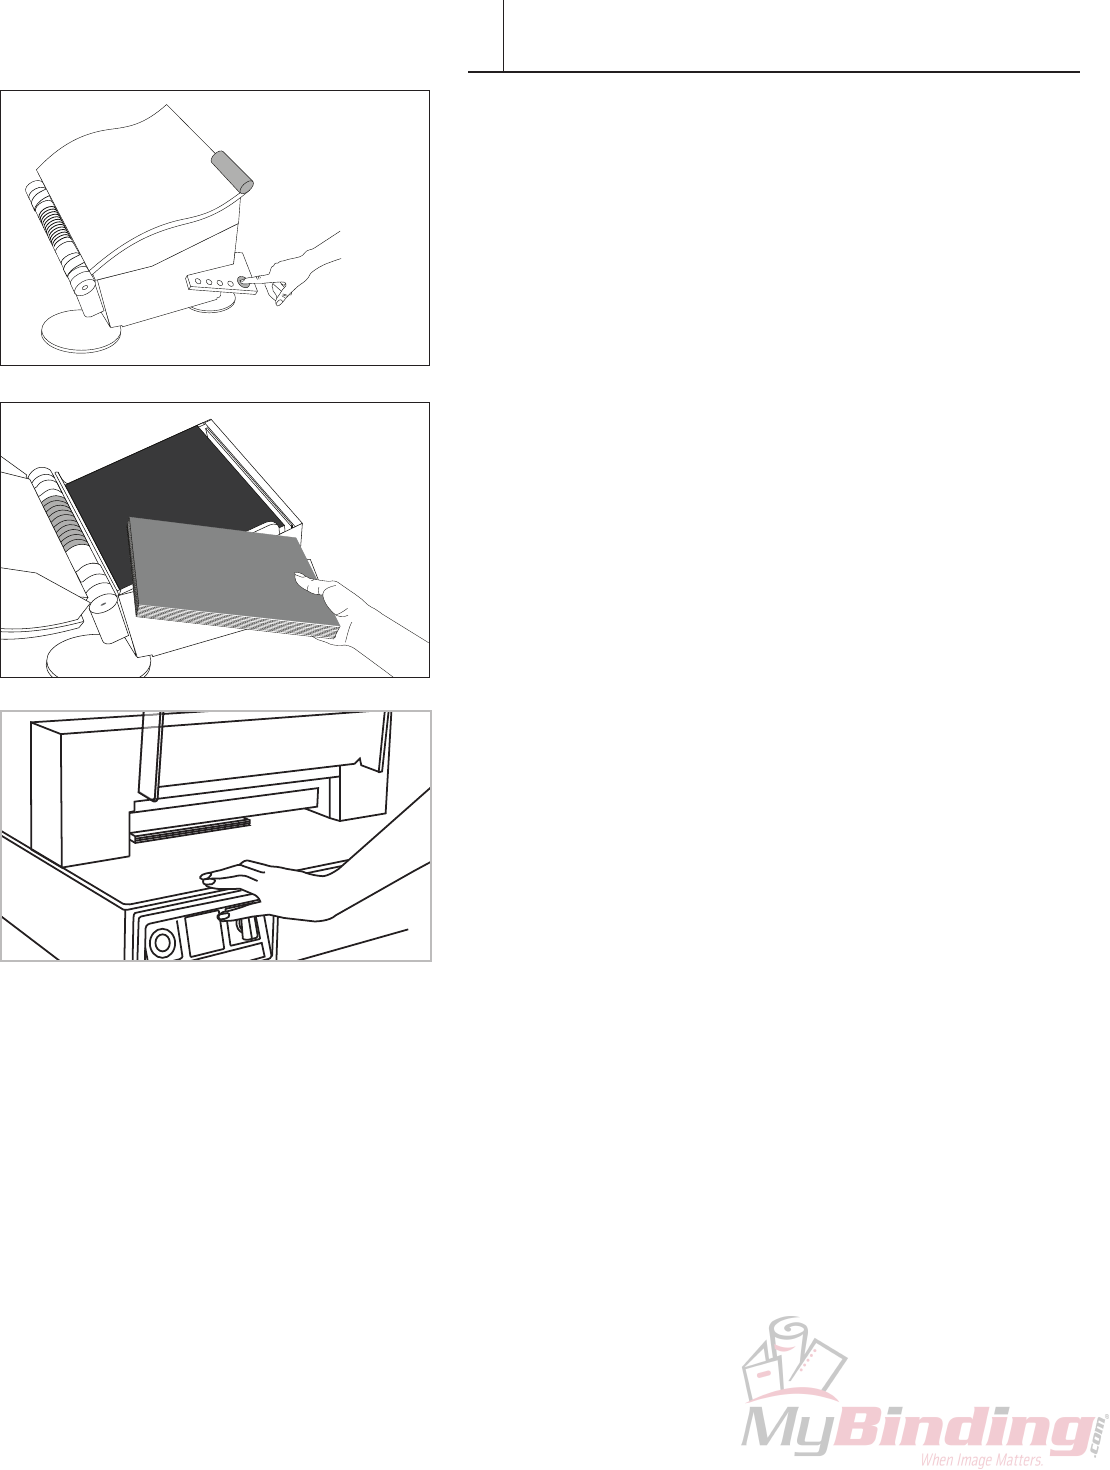
11.Applylightpressurewithyourrighthandagainstthefoldand
pressrmlywithyoulefthandngertipstotemporarilytackinplace.
Thiswillensurethebookwillnotlosealignmentduringbinding.
12.Pressdownonthebookblockandapplypressurealongthe
spinewithonenger.
Repeatsteps6and11Visuallycheckthatthealignmentofthe
photosandsignatureisgoodbeforeplacingthenextone.Theshiny
(non-adhesive)sideofthesignaturesheetshouldbefacingup,with
thefoldtotheright.untilallexceptthe
last photo and endleaf are assembled and placed in the PhotoPress.
CONTENT ASSEMBLY-DOUBLE SIGNATURE
VI
12 FASTBACK PHOTOPRESS USER’S MANUAL
14. Checksignatureandendleafalignment.Applylightpressurewith
yourrighthandagainstthefoldandpressrmlywithyoulefthand
ngertips.
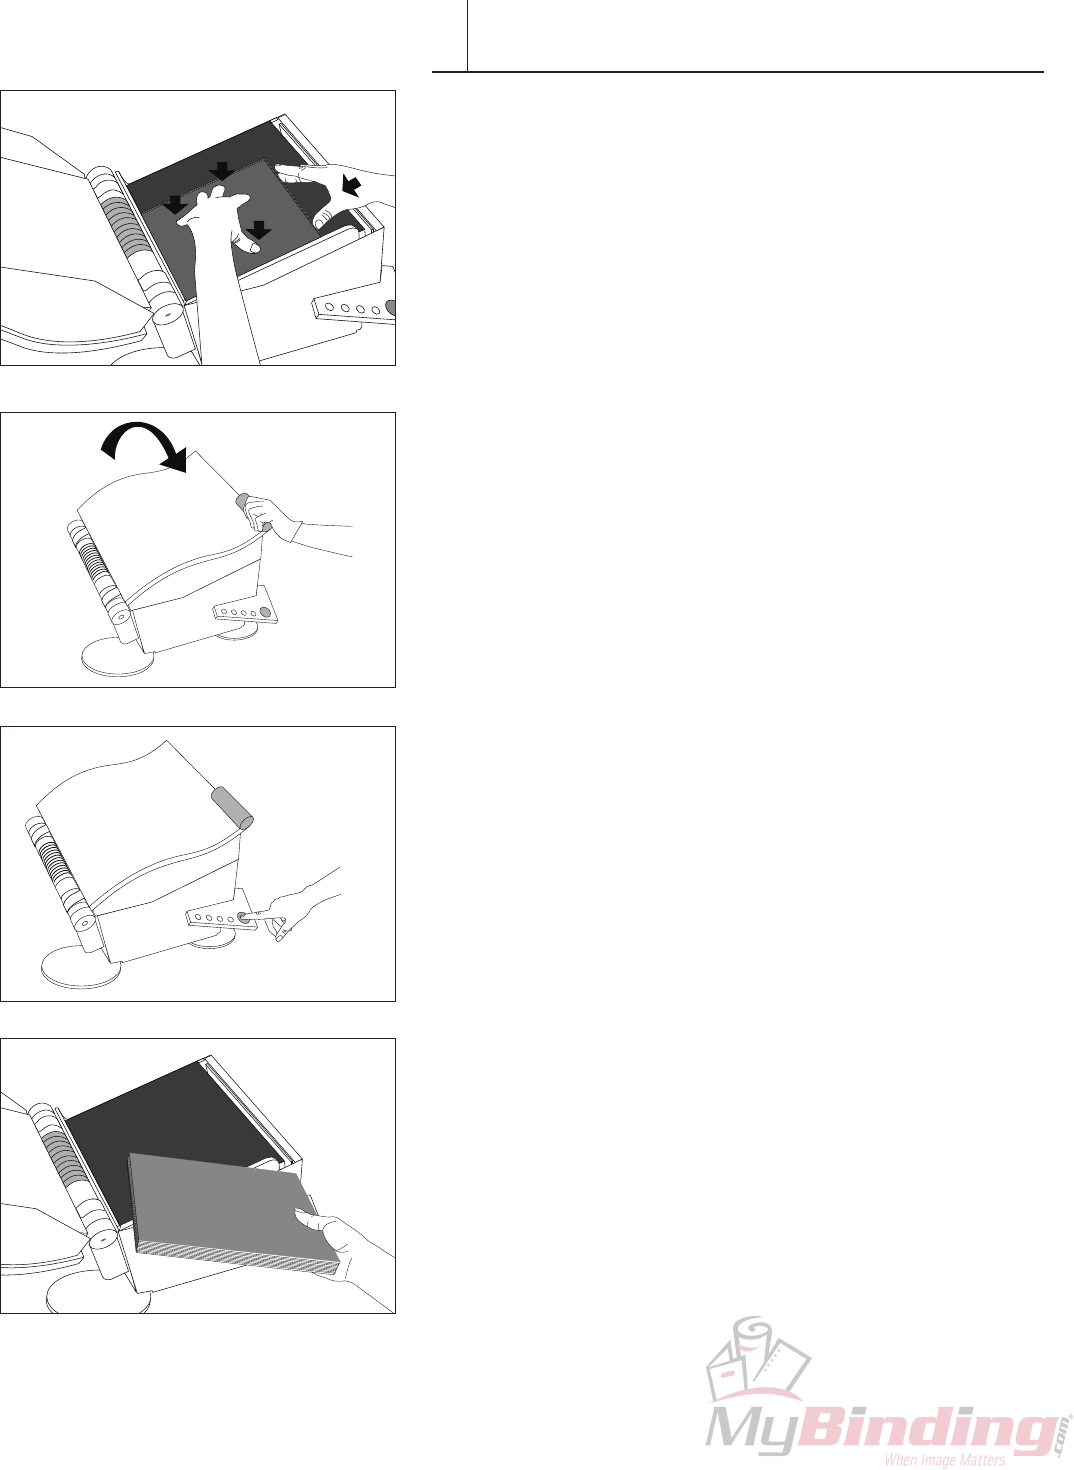
15. Close the PhotoPress and select a size. See page 5.
16. Press the green button to begin the binding process.
Whenthebindingcycleiscomplete,themachinewillbeepandthe
latchwillrelease.
Note: Put unused signatures back in bag for storage. It’s important
they don’t collect dirt or other foreign materials.
17.Openthemachineandremovethebook.Thebookisnowready
forspinetape,andahardcover.
CONTENT ASSEMBLY-DOUBLE SIGNATURE
VI
FASTBACK PHOTOPRESS USER’S MANUAL 13
VII
Panoramic Book Assembly
MakingaPhotopressbookwithDoubleSignaturesisa5-stepprocess.
IMPORTANT: Beforeassemblingabookwithpanoramicsheets,the
photosorpages,mustrstbescoredandfolded.Werecommendusing
thePowisScoringMachine.
Stackthephotoswiththelastpageontop(inthereverseorderfrom
Double Signature book assembly).
1. PlacetheendleafintothelowerleftcornerofthePhotoPresswith
the fold against the left edge of the machine.
CONTENT ASSEMBLY-PANORAMIC
Folded Side
Against Left Edge
Scored PhotoEndleaf
Optional
Windowed
Photo
PhotoPress™Single
Signature Sheets
2. Assemble and press
content
3. Apply spine tape
1. Fold the content
PH
PHO
P
PHOTO PAPER
PHOTO PAPER
HOTO PAPER
O PAPER
ER
PHOTO PAPER
PHOTO PAPER
PHOTO PAPER
PHOTO PAPER
PHOTO PAPER
OTO PAPER
O PAPER
PHOTO PAPER
PHOTO PAPER
PHOTO PAP
PHOTO PA
PHOTO
PHOTO PAPER
PHOTO PAPER
PHOTO PAPER
PHOTO PAPER
PHOTO PAPER
PHOTO P
ER
PER
R
4. Trim leading edge 5. Applying hardcover
14 FASTBACK PHOTOPRESS USER’S MANUAL
PHOTO PAPER
PHOTO PAPER
PAPER
PHOTO PAPER
PHOTO PAPER
PHOTO PAPER
PHOTO PAPE
PHO
O PAPER
PHOTO PAPER
PHOTO PAPER
PHOTO PAPER
ER
R
PHOTO PAPER
HOTO PAPER
TO PAPER
PHOTO
PHO
PHOTO PAP
PHOTO P
Folded Side
Against Left Edge
2. Place a PhotoPress Single Signature sheet on top of the Endleaf
3. Place a scored and folded panoramic photo in the machine on top
of the Single Signature sheet.
4. Make sure the fold is against the left edge of the machine.
5. Place another PhotoPress Single Signature sheet in the PhotoPress
on top of the scored and folded panoramic photo.
VII CONTENT ASSEMBLY-PANORAMIC
PH
PHO
P
PHOTO PAPER
PHOTO PAPER
HOTO PAPER
O PAPER
ER
PHOTO PAPER
PHOTO PAPER
PHOTO PAPER
PHOTO PAPER
HOTO PAPER
OTO PAPER
O PAPER
PHOTO PAPER
PHOTO PAPER
PHOTO PAP
PHOTO P
PHOT
PHOTO PAPER
PHOTO PAPER
PHOTO PAPER
PHOTO PAPER
PHOTO PAPER
PHOTO P
ER
PER
ER
PHOTO PAPER
PHOTO PAPER
PAPER
PHOTO PAPER
PHOTO PAPER
PHOTO PAPER
PHOTO PAPER
PHO
O PAPER
PHOTO PAPER
PHOTO PAPER
PHOTO PAPER
PER
ER
PHOTO PAPER
HOTO PAPER
TO PAPER
PHOTO
PHO
PHOTO PAP
PHOTO P
PHOTO PAPER
PHOTO PAPER
PAPER
PHOTO PAPER
PHOTO PAPER
PHOTO PAPER
PHOTO PAPER
O PAPER
PHOTO PAPER
PHOTO PAPER
PHOTO PAPER
PHOTO PAPER
HOTO PAPER
PHOTO
PHO
PHOTO PAP
PHOTO P
PHOTO PAPER
PHOTO PAPER
PHOTO PAPER
PHOTO PAPER
PHOTO PAPER
HOTO PAPER
PHOTO PAP
PHOTO P
Single
Signature
FASTBACK PHOTOPRESS USER’S MANUAL 15
PHOTO PAPER
PHOTO PAPER
APER
PHOTO PAPER
PHOTO PAPER
PHOTO PAPER
PHOTO PAPE
PHO
APER
PHOTO PAPER
PHOTO PAPER
PHOTO PAPER
ER
R
PHOTO PAPER
OTO PAPER
TO PAPE
PHOTO
PH
PHOTO PA
PHOTO P
PHOTO PAPER
PHOTO PAPER
APER
PHOTO PAPER
PHOTO PAPER
PHOTO PAPER
PHOTO PAPE
PHO
APER
PHOTO PAPER
PHOTO PAPER
PHOTO PAPER
ER
R
PHOTO PAPER
OTO PAPER
TO PAPE
PHOTO
PH
PHOTO PA
PHOTO P
ER
R
PHOTO PAPER
OTO PAPER
PHOTO PAPE
PHO
TO PAPE
PHOTO P
PHOTO PAPER
O PAPER
PAPER
TO PAPER
O P R
HOT ER
HOTO PAPER
TO P
PHOTO
PHOTO
PHOTO
HOTO
OTO
PHO
P
PHOTO
PHOTO PAPE
PHOTO P
PHOTO PAPER
O PAPER
PAPER
TO PAPER
O P R
HOT ER
HOTO PAPER
HOTO PAPER
HOTO PAPER
TO P
PHOTO
PHOTO
PHOTO
HOTO
HOTO
OTO
OTO
PHO
P
PHOTO
PHOTO PAPE
PHOTO P
PHOTO P
PHOTO P
O PAPER
HOTO PAPER
HOTO PAPER
HOTO PAPER
HOTO PAPER
PHO
P
PHOTO
PHOTO PAPE
PHOTO P
PHOTO P
PHOTO P
R
OTO PAPER
PHOTO PAPER
PHOTO PAPER
PHO
PHOTO
PHOTO PA
PHOTO PAPER
R
R
PHOTO PAPER
OTO PAPER
O PAPE
PHOTO
PHOTO PA
PHOTO P
R
OTO PAPER
PHOTO PAPER
PHOTO PAPER
PHO
PHOTO
PHOTO PA
PHOTO PAPER
R
R
PHOTO PAPER
OTO PAPER
O PAPE
PHOTO
PHOTO PA
PHOTO P
PHOTO PAPER
PHO
R
R
R
R
OTO PAPER
OTO PAPER
O PAPE
O PAPE
PHOTO PA
PHOTO P
Folded Side
Against Left Edge
6. Placeyourlooselyassembledsignatureandphotosintothemachine,
tapthephotosandsignaturesquarelyagainsttheleftandbottom
alignmentedgesofthemachine.Visuallycheckthatthealignmentof
thephotosandsignatureisgoodbeforeplacingthenextone.
7. Checktomakesurethebookblockissquarebypushingyour
ngersagainstthespineedgeandtopedgeofbook.RepeatStep
4-7 until the last photo is placed.
8. Place the last endleaf on top of the single Signature sheet.
Optional for making a windowed photobook:Placeafrontwindow
photo on top of an additional single Signature sheet.
9. Close the PhotoPress. Check to see the correct size book is
selected.
VII CONTENT ASSEMBLY-PANORAMIC
16 FASTBACK PHOTOPRESS USER’S MANUAL
10. Press the green button to begin the binding process.
Whenthebindingcycleiscomplete,themachinewillbeepquietly
andthelatchwillrelease.Openthemachineandremovethe
bookblock.Thebookisnowreadyforspinetape,andahardcover.
Note: Put unused signatures back in bag for storage. It’s important
they don’t collect dirt or other foreign materials.
11. Open cover and remove the book block. The book block is
bound and ready for spine tape and trimming.
12. WithPanoramicbooks,itistypicallynecessaryonlytotrimthe
leadingedge.Trimonlywhatisnecessarytogetacleanedgeso
thatthebooksizeisretainedasmuchaspossibletomatchwith
the hardcover.
Note: Adhesive from the signature may leave some residue
onthecutterblade.Thebladewillneedtobecleanedperiodically.
We recommend using a natural citrus based solvent for this
purpose. Be careful cleaning the cutter blade as it may be
extremelysharp.
VII CONTENT ASSEMBLY-PANORAMIC
FASTBACK PHOTOPRESS USER’S MANUAL 17
APPLYING SPINE TAPE
VIII
BeforeabookblockiscasedintoaHardcover,aSpineTapeis
addedtostrengthenthebindandextendthebook’slife.
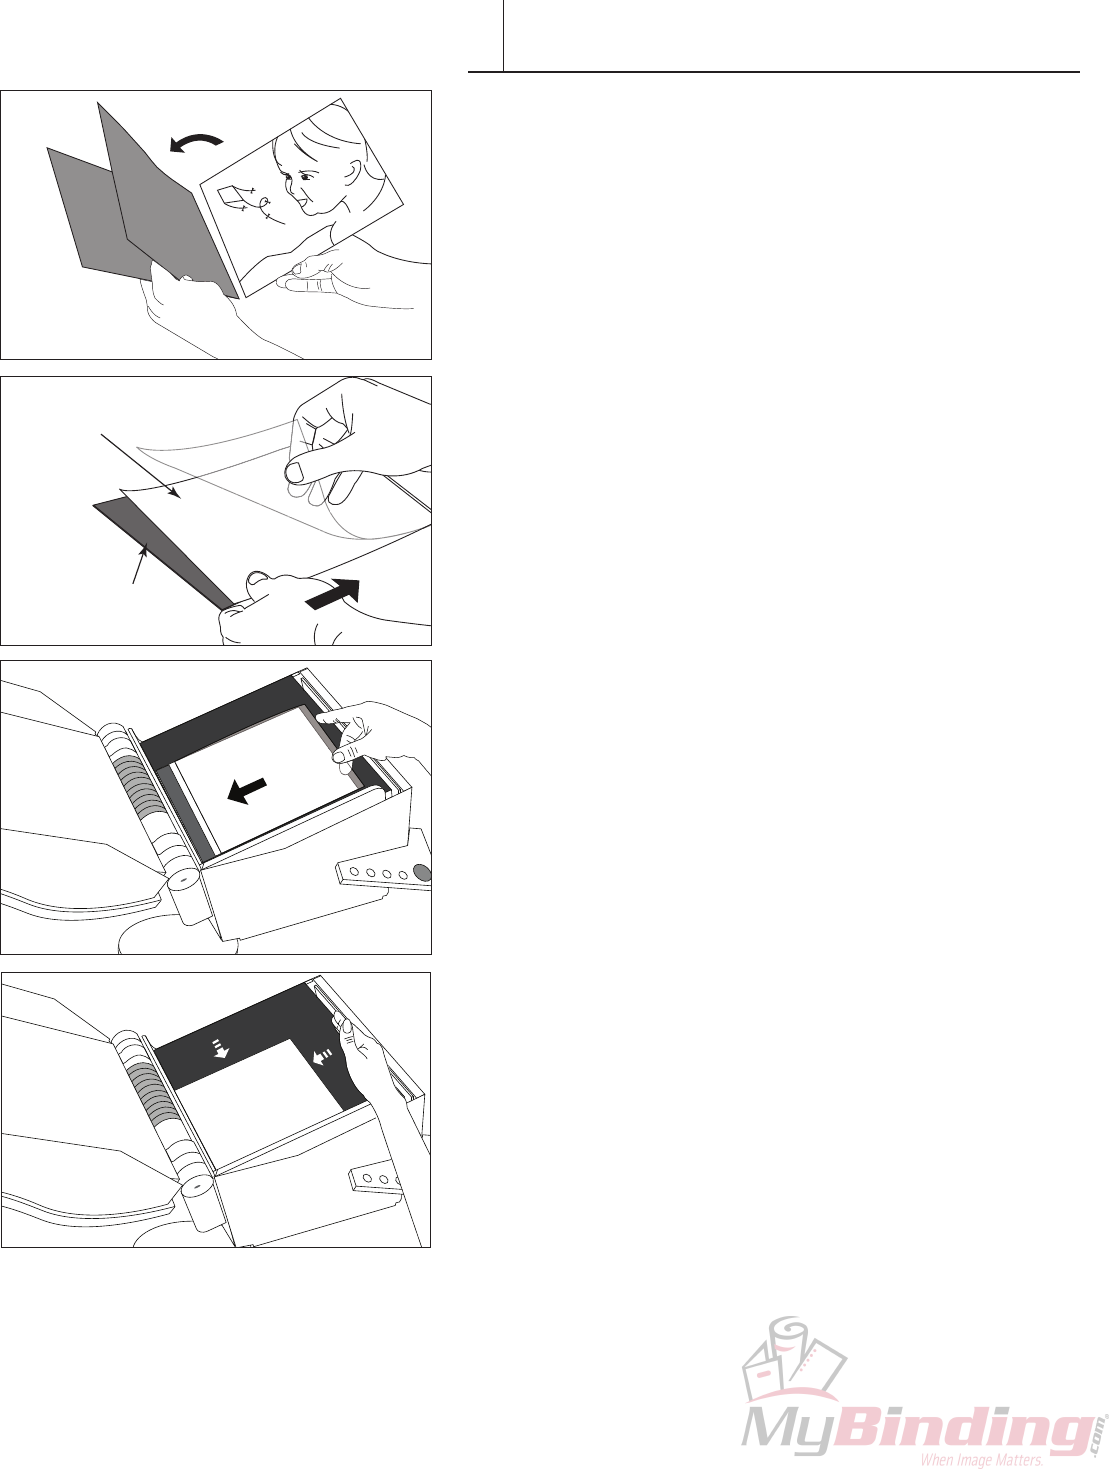
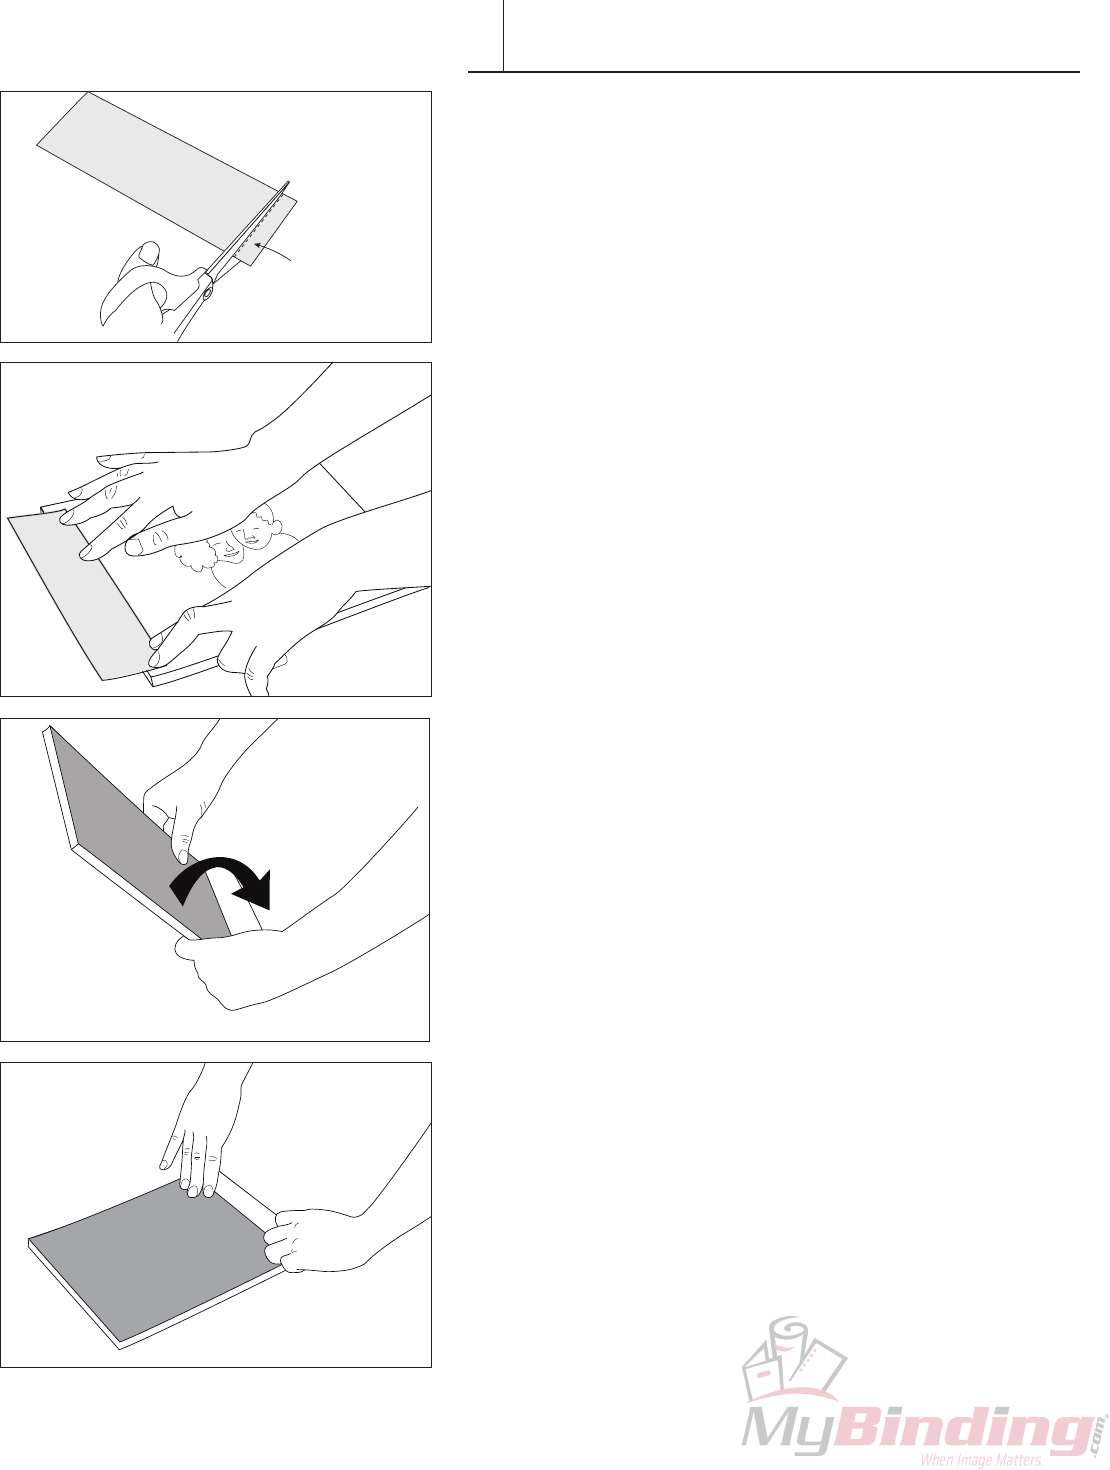
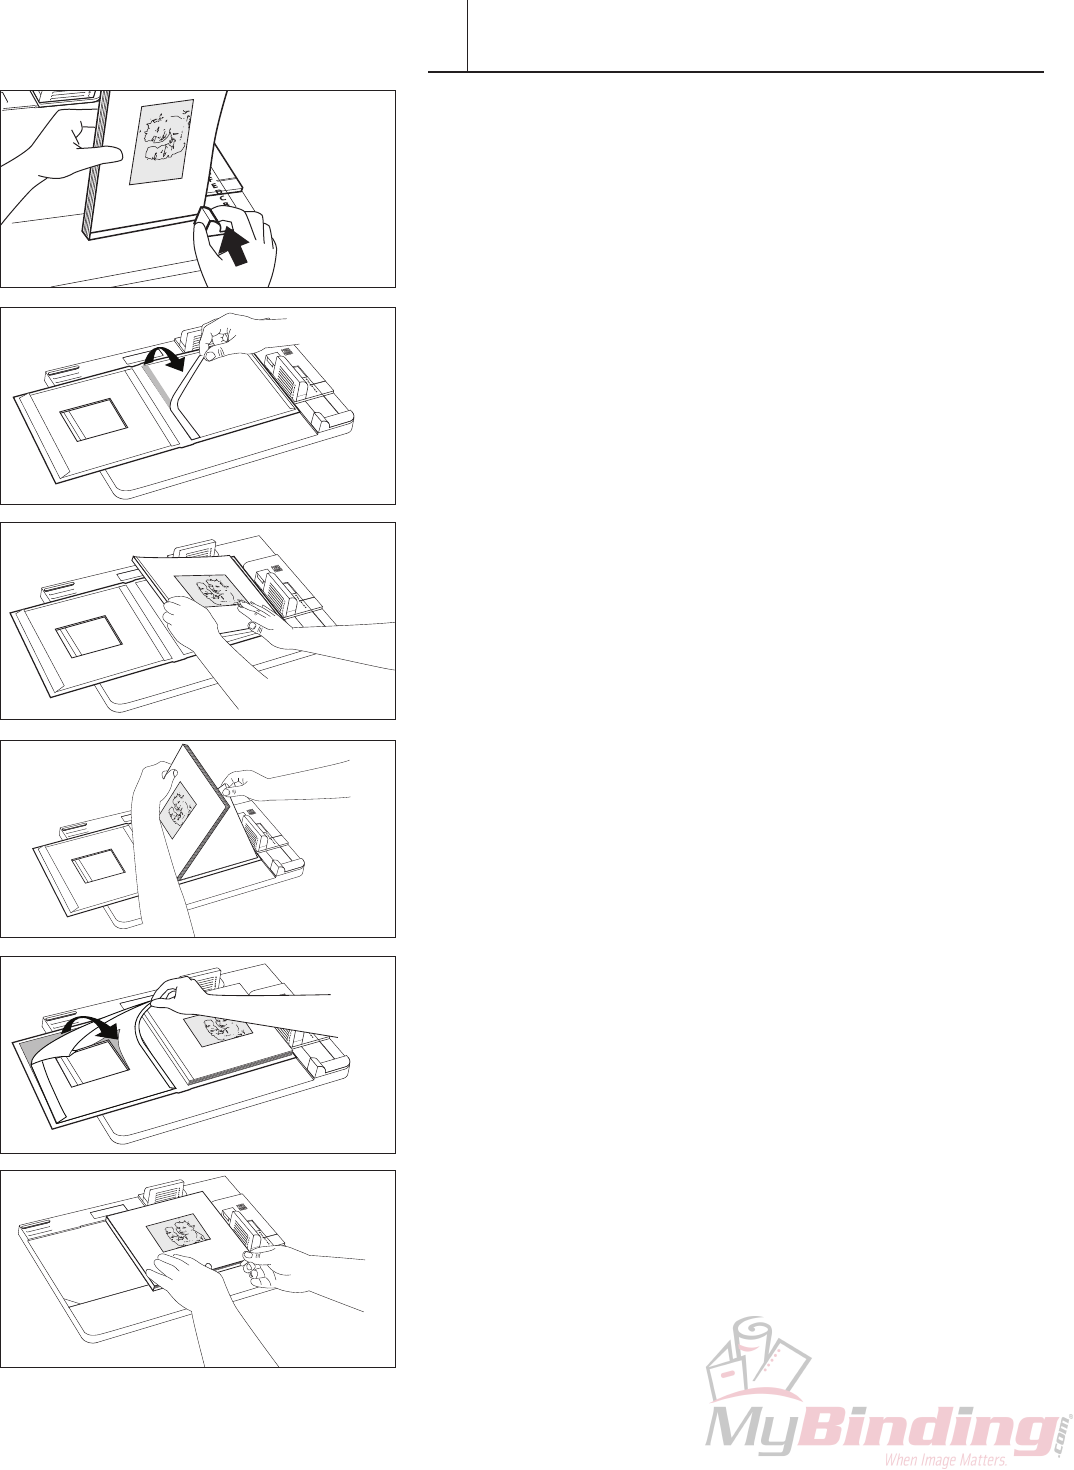
Applying the Spine Tape
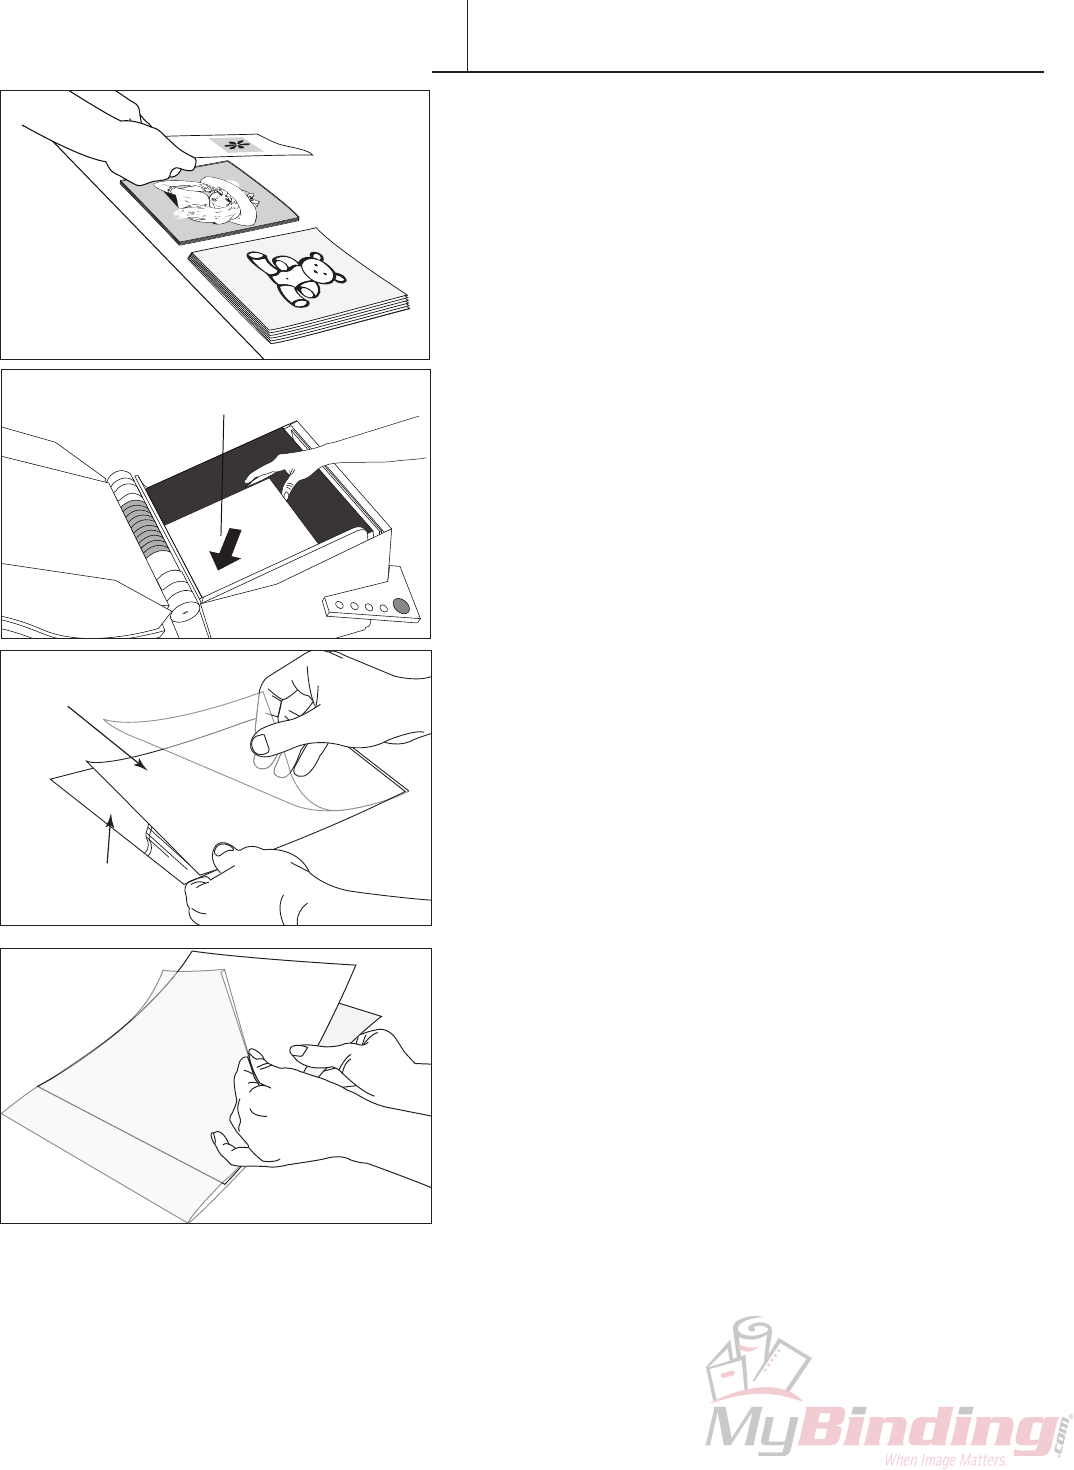
1. Cutapproximately1/2”offoneendoftheSpineTape.
Skipthisstepifthebookwillbewithoutheadbands —
(seenextsection).
2. Peel off the release paper from the back of the Spine Tape.
Place the Spine Tape along one edge of the book so that
whenthetapeiscompletelyattached,itwillwrapevenly
aroundthespineandpressdown.TheTapeisoffsetby
about1/4”(12mm)fromedgesofbook.
3. Turnthebookover,sothattheSpineTapeisonthetable,
withtheadhesivesidefacingup.Tiltthebookupwhile
applyingdownwardpressureonthespineedge.
4. Carefully press the rest of the Spine Tape to the back panel
of the book.
1/2”
(headbands only)
(6mm)
18 FASTBACK PHOTOPRESS USER’S MANUAL
APPLYING HEADBANDS
IX
BeforeabookblockiscasedintoaHardcover,aheadbandisaddedto
eachendforabeautifulnishingtouch
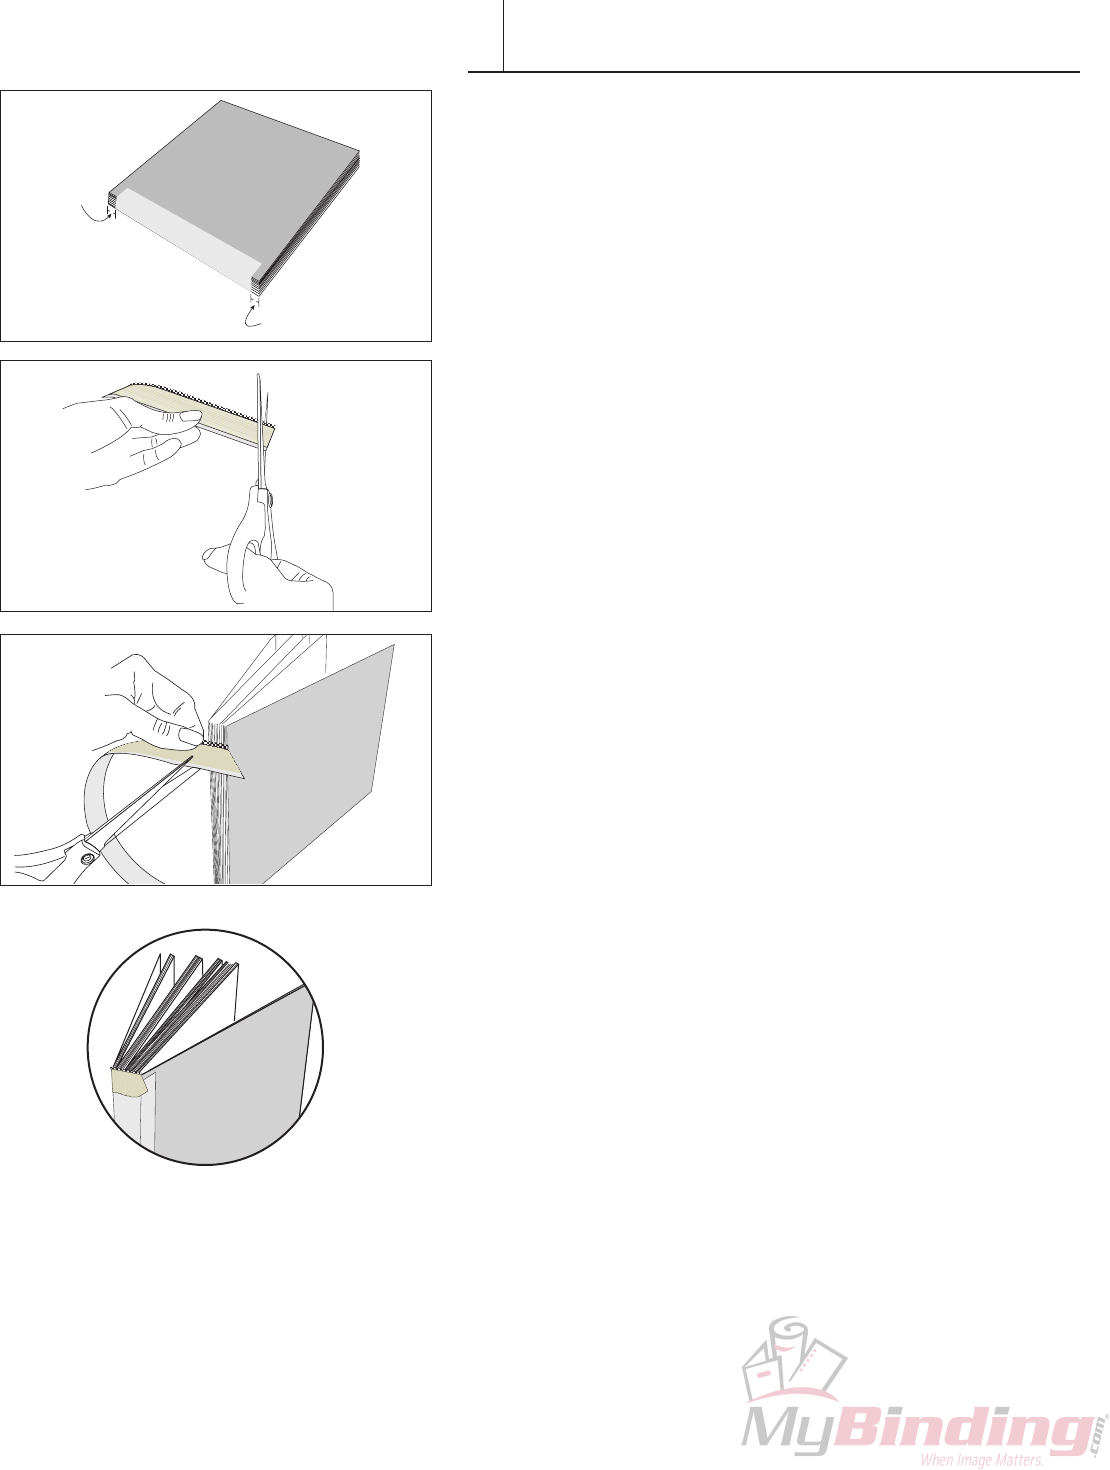
Applying Headbands
1. Forbookswithheadbands,itispreferablethatthespinetapeis1/4”
(6mm)offsetfromtheedges.Inthiswayaportionoftheheadband
contactsdirectlywiththeedgesofthesignaturesheets.Thiswill
ensureasmoothhingingactionforthenishedbook.
2. Cuttheselfadhesiveheadbandatanapproximate45˚angle.
3. Placeitagainstthebookblocktomeasureanddeterminewidthof
headband before cutting the other side at an angle.
4. Peelbackthereleaselinerandapply.Rubrmlyintoplace.
Note: Use“Photopressheadbands”.Regularheadbandsaretoothick
tousewithPhotopressbooks.Photopressheadbandsarespecically
madewithalightweightandstrongweavewhichwillnotinterferewith
the book’s hinging action.
1/4”
1/4”
(6mm)
(6mm)
FASTBACK PHOTOPRESS USER’S MANUAL 19
ADDING THE COVER
X
PowisParkeroffersPhotoPress™Photobookcoversinawiderange
ofsizes,colorsandnishes.ContactyourPowissalesrepformore
information.WiththeadditionofourFoilfastprinter,youcanapply
colorfulfoilprintedtitlesandartworktoyourcoversandspines.
PhotoPressPhotobookHardcovers™comeintwostyles:windowed
andwindowless.Thewindowallowsthepictureontherstpageofthe
book block to act as a design element for the cover. For more detailed
informationonusingtheFastbackHardcoverGuide,seetheFastback
Hardcover™ Guide User’s Manual.
Oncethebookblockisbound,assemblingyourhardcoverbookcanbe
donequicklyandaccurately:
1. MeasuretheboundbookblockwiththeBookWidthGaugeonthe
lowerrightsideoftheHardcoverGuidetodeterminetheproper
coverwidth.IfthebookwidthisCorgreater,youmayusethegreen
plastic inserts to ensure that the book block does not shift during
binding (Figure 01).
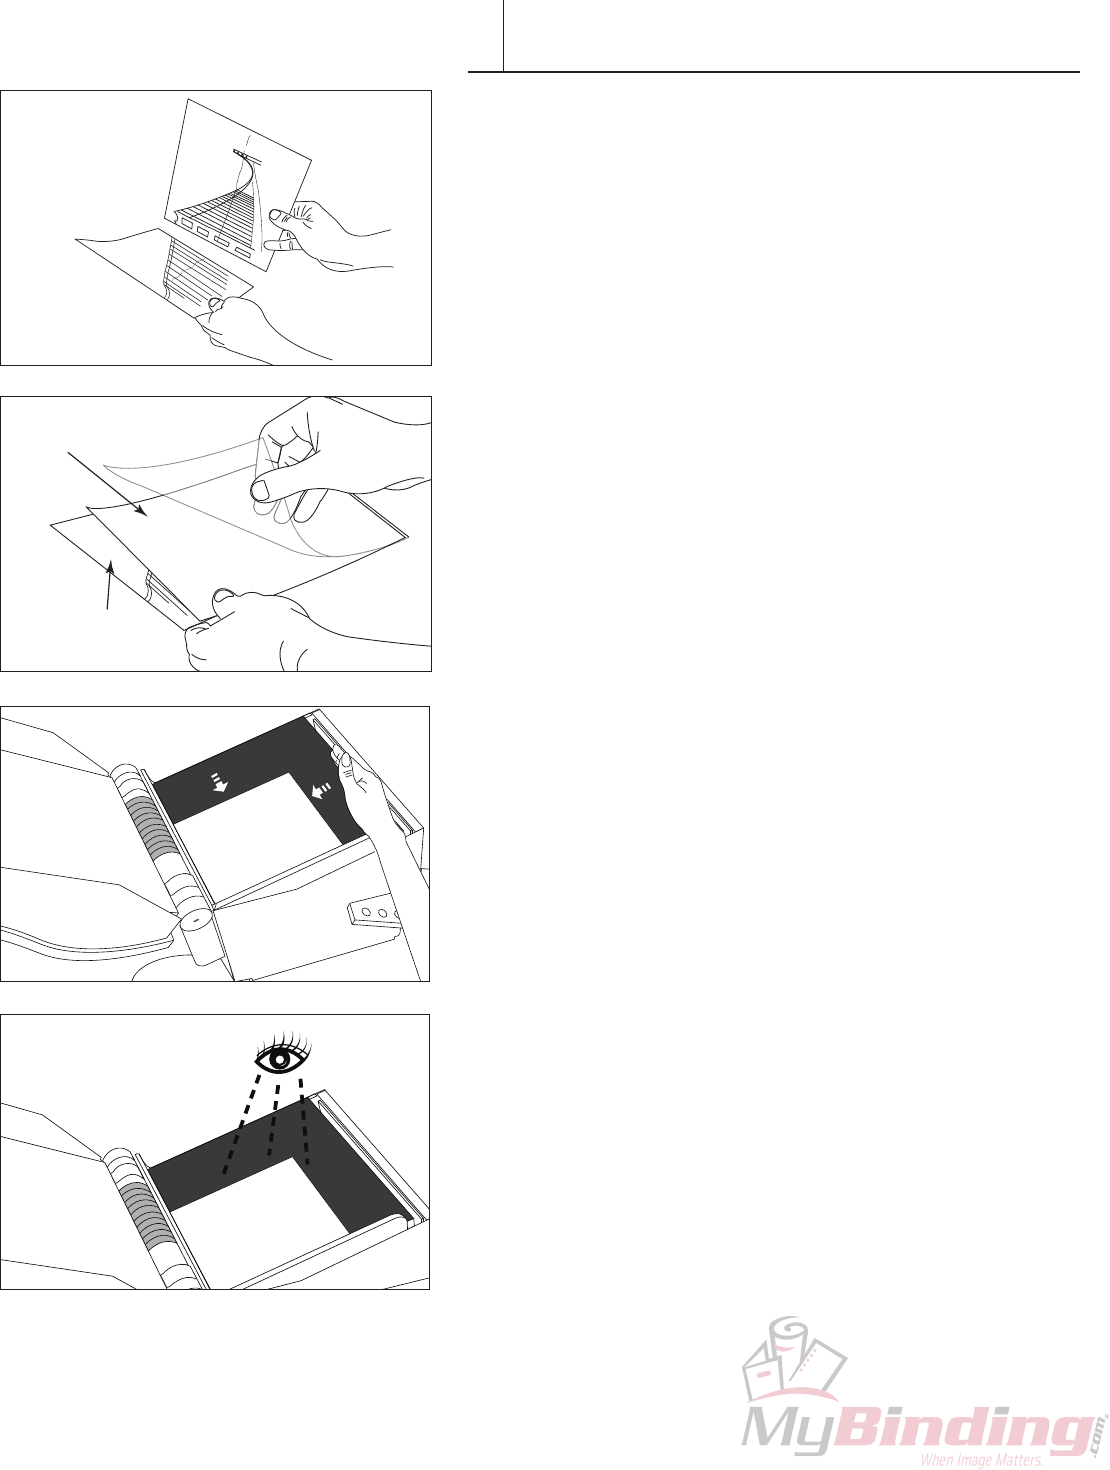
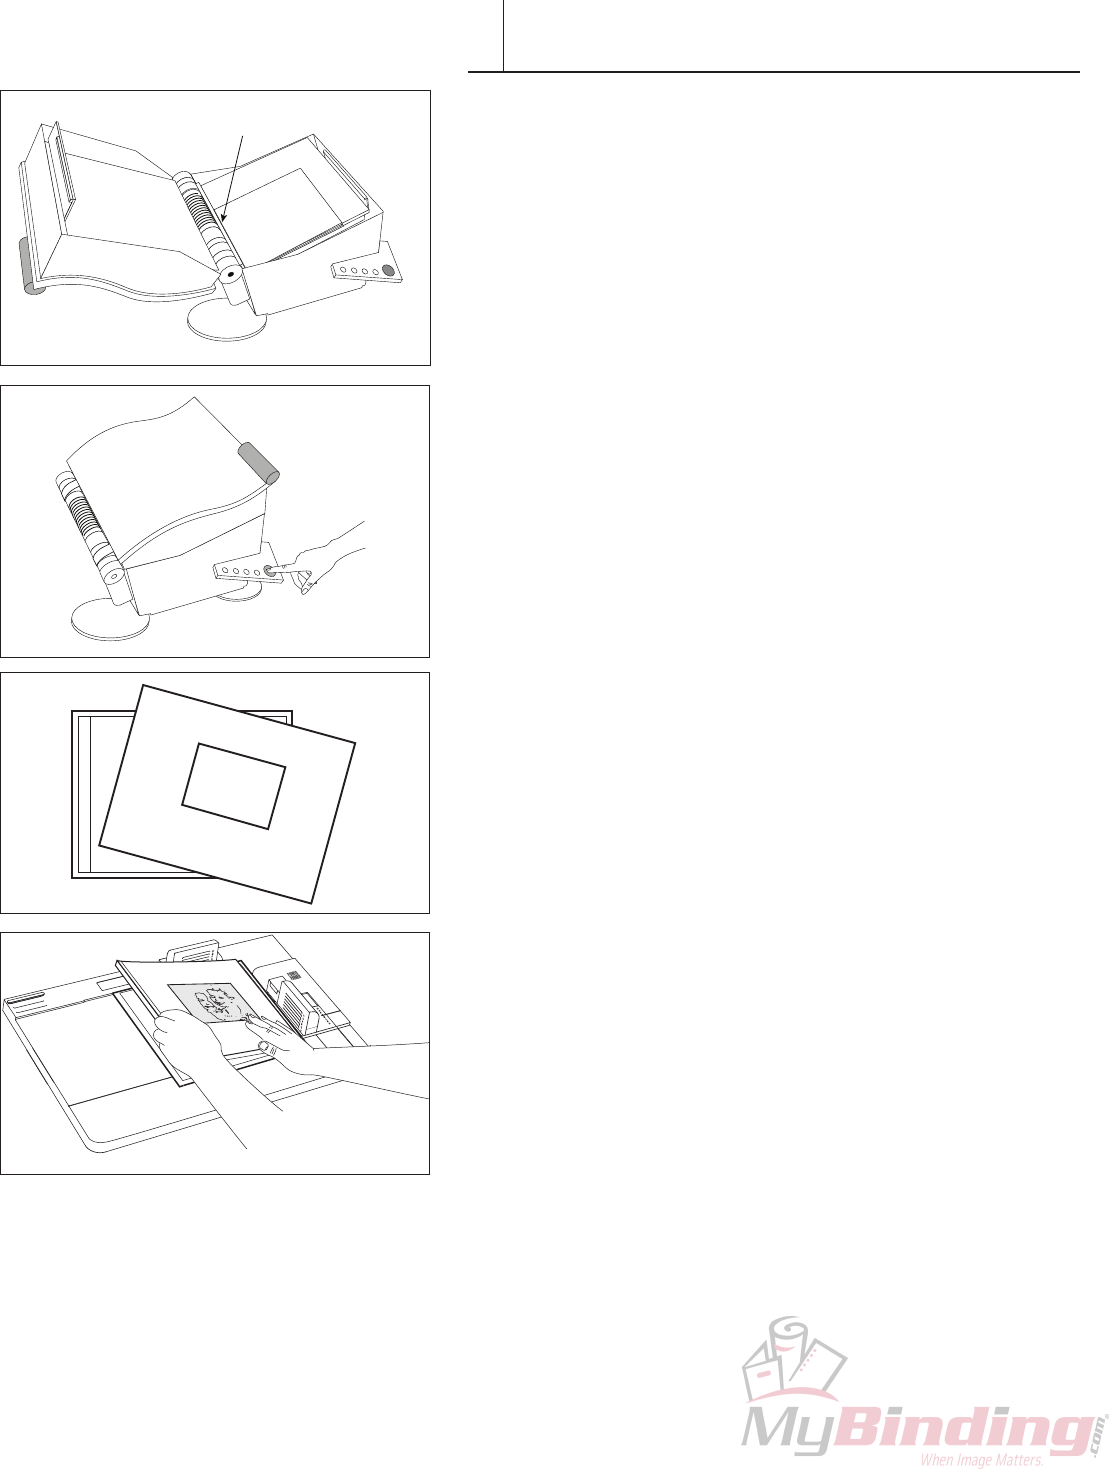
2. PlaceanemptyPhotoPressPhotobookHardcover,adhesiveside
up,intheHardcoverGuidewiththewindowontheleft,andclamp
in place. The top and right edges of the cover should be under the
translucentgreenstops.Removethenarrowreleasepaperfrom
therightpanel(back)oftheFastbackHardcover,exposingasmall
portion of the super-strong binding adhesive that coats the interior
hard covers. (Figure 02).
3. Set your bound book block in place against the Guide’s translucent
greenstopsandpressdowntofastenthebookblocktothenarrow
adhesivearea(Figure03).Thewindowonthebookblockandthe
windowonthecovershouldbealignedandevenlypositionedwithin
the cover.
4. Carefully lift the right side of the book block and remove the large
release paper from the right panel of the cover (Figure 04). Roll
andlowerthebookblockontothepanelandpressitagainstthe
panel to secure it.
5. Removetheremainingreleasepapersfromtheleftside,(Figure
05),andbringtheleftpaneloftheHardcoveroverthebookblock
andalign,withthetopandrightedgesofthecoverabuttingthe
purplestops(Figure06).Pressstraightdownontothetextblock
and smooth the cover to the spine. Remove the book from Guide.
Open and rub the endleaves to ensure that they are securely
fastened.
TIP: Somepeoplendthattheygetbetterregistrationiftheyclamp
thewindowedpaneloftheHardcoverontheright,andthenbuildthe
bookfacedown.
F I G U R E 01
F I G U R E 02
F I G U R E 03
F I G U R E 05
F I G U R E 06
F I G U R E 04
20 FASTBACK PHOTOPRESS USER’S MANUAL
XI
A Flatbook resembles the stiff-paged board books that are
popular for children’s books and cookbooks. Making Flatbooks
is a 4-step process.
IMPORTANT: BeforeassemblingaFlatbook,thepagesrst
mustbefolded.Scoringthepagespriortofoldingwillgivethe
bestresults.WerecommendusingthePowisScoringMachine.
Foldandscoreyoursheetsasrmlyandevenlyaspossible.
A folding bone is a helpful tool for doing this and can be
purchased at any graphic arts supplies store.
Flatbook Contents Assembly
AssemblethebookblockthesamewayasthePanoramic
Photobook.Coverboardmaybeaddedtotherstandlast
positionsofthebooktogivethenishedbookcoveradded
stiffness. See diagram above.
Note:PowisCompCovermaterialisagoodchoicefora
makingabookwithmediumstiffness.
CONTENT ASSEMBLY-FLATBOOK
Folded PagesEndleaf
Cover Board
PhotoPress™Single
Signature Sheets
1. A book block is made
in the same way as the
Panoramic photobook.
2. A cover is scored
an folded
3. Pressing the cover to the
book block
4. Trim the Book

FASTBACK PHOTOPRESS USER’S MANUAL 21
XI CONTENT ASSEMBLY-FLATBOOK
Scoring Flatbook Cover
Flatbook pages must be scored before binding. We recommend using the
PowisScoringMachineforthispurpose,whichwillhelpyouscoreyour
pageseasilyandaccurately.TheScoringMachinecomeswitheithera
singlescoredie,oradoublescoredie.ForFlatbookpagescoring,youwill
need the single score die.
Threescoresarenecessaryforaatbookcover.Tw o forthespineand
the third for a hinge.
1. PlaceyourboundbookblockbetweentheBookThicknessRings.
Pushthetworingstogether(A)andtightentheBookThickness
Locking Knob (B). Remove your book block.
SlideaFlatbookCoverundertheclearscoringdie.Lookingdown
throughthetopofthecleardie,alignthespinetitleorcentermarks
withthescoringbladeinthecenterofthedie.Onceitiscentered,
push the Lever to the right to clamp the cover in postion. Move
the Paper Alignment Guide under the cover so that the orange ‘X’
on the Alignment Guide is bisected by the edge of the cover and
tightentheAlignmentStopscrew.
2. ReleasetheLeverandmovethecovertotherststop(marked‘1’
ontheGuide).PushtheLevertothelefttomaketherstscore.
3. Move the cover to the second stop on the Guide (marked ‘2’ on the
Guide),andagainpushtheLevertothelefttoscore.
4. Move the cover to the third stop on the Guide (marked ‘3’ on the
Guide),andagainpushtheLevertothelefttoscore.
Third Fold
Second Fold First Fold
22 FASTBACK PHOTOPRESS USER’S MANUAL
XI CONTENT ASSEMBLY-FLATBOOK
Second Fold
(Back of Spine)
Third Fold
[3/8” (9.53mm) From Back of Spine]
First Fold
(Front of Spine)
Single Signature
Third Fold
Second Fold First Fold
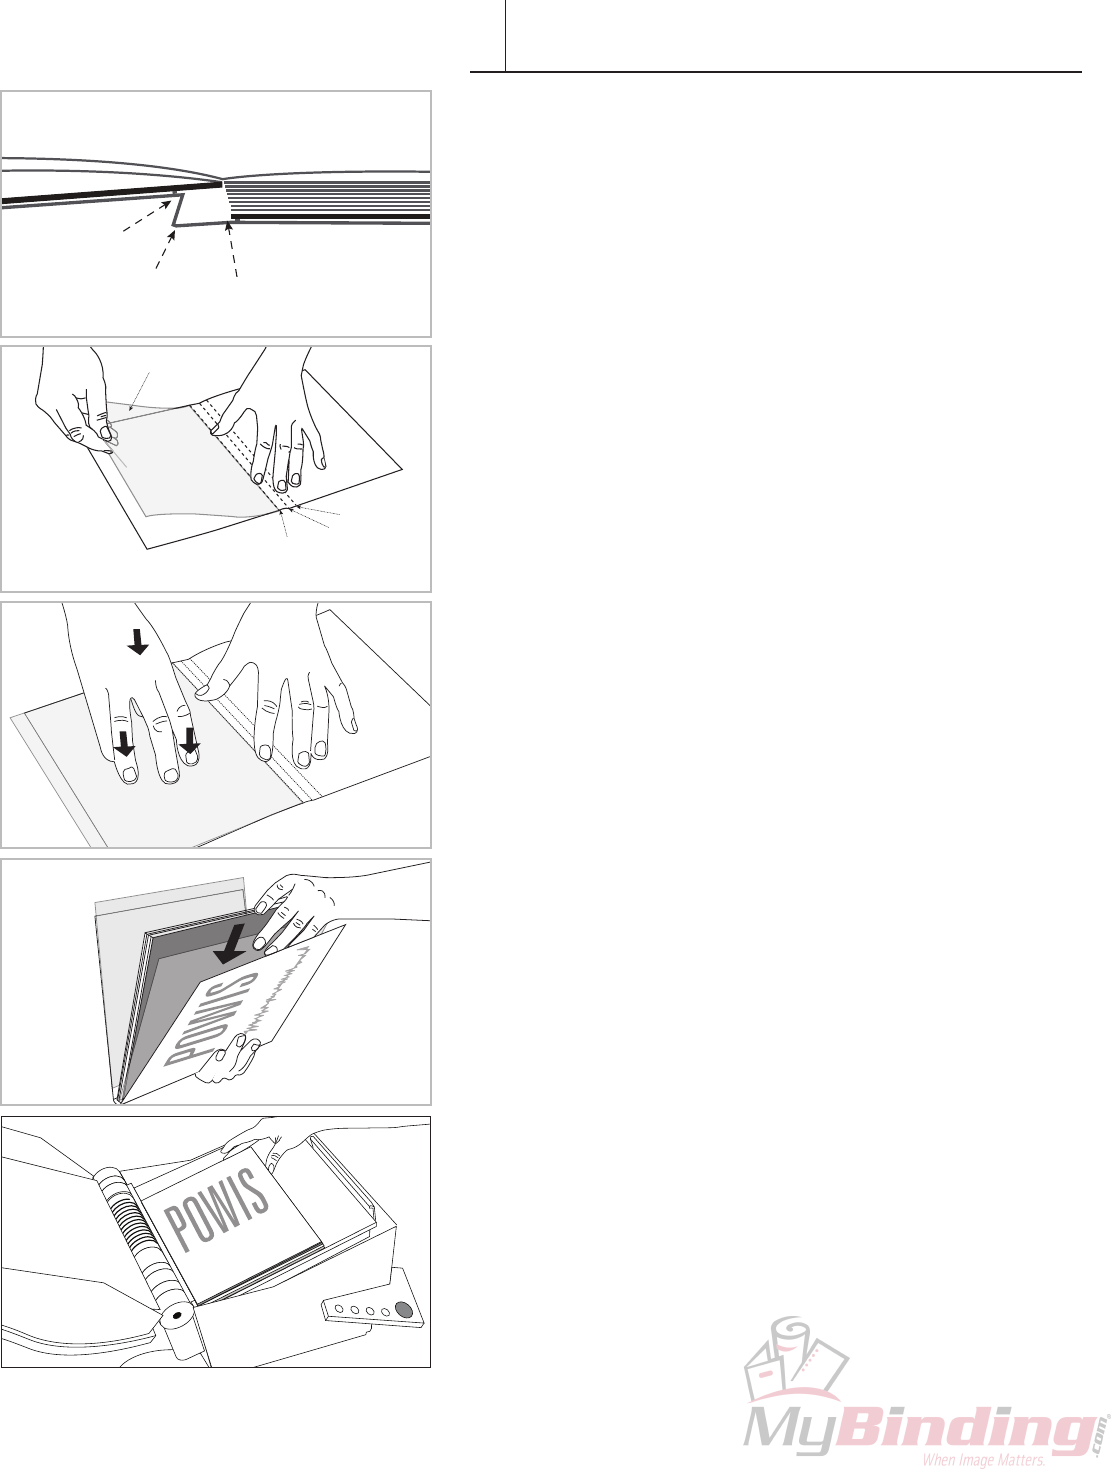
Pressing the Cover to the Book Block
BookcoverisattachedtothebookblockbytwoSingleSignatureSheets
to the front and the back. Note that the Signature attaching the back
portion of the cover needs to be offset from the spine to provide relief
forwhenthebookisopened.
Place a Sheet of Single Signature to the back of the back cover 1.
aligning it to the third fold.
Pressdowntotemporarilyholdinposition.2.
Insert the book block into the scored cover. Insert an additional 3.
Signature for the front.
Place into machine and bind.4.
FASTBACK PHOTOPRESS USER’S MANUAL 23
XI CONTENT ASSEMBLY-FLATBOOK
Trim Book and Round Corners
5. Trimthenishedbooktothedesiredsize.
Note: Adhesive from the signature may leave some residue on
thecutterblade.Thebladewillneedtobecleanedperiodically.We
recommend using natural citrus based solvent for this purpose. Be careful
cleaningthebladesastheyaretypicallyextremelysharp.
HINT: SharpcornersonaFlatbookareeasilydamaged.Forthisreason,
werecommendroundingthecornersonthenishedFlatbookafter
trimming(seebelow).Inexpensivecornerroundersareavailableatmost
stationery stores.
24 FASTBACK PHOTOPRESS USER’S MANUAL
XII CONTENT ASSEMBLY-ACCORDION
Accordion books have no spine and open up in concertina fashion. They
are popular items for displaying several pictures at the same time. They
arenomoredifcult,technically,tomakethanstandardphotobooks,but
theydorequirealittlemorecareandattentionduringassembly.Before
youbegin,familiarizeyourselfwiththediagramsbelowtomakesurethat
you understand the assembly pattern that you’ll need to use to create
youraccordionbook.Itmaylookconfusingatrst,butonceyoustart
makingthem,you’llndthatitisnotthatdifcult.
Making an accordian book is a 2 step process.
1. Assemble and press the content. 2. Apply Hardcovers
Front
Window
Photo
PhotoPress™
Signature Sheets
(Double)
Photos
Accordion Cover Front
(with window)
Accordion
Cover Back
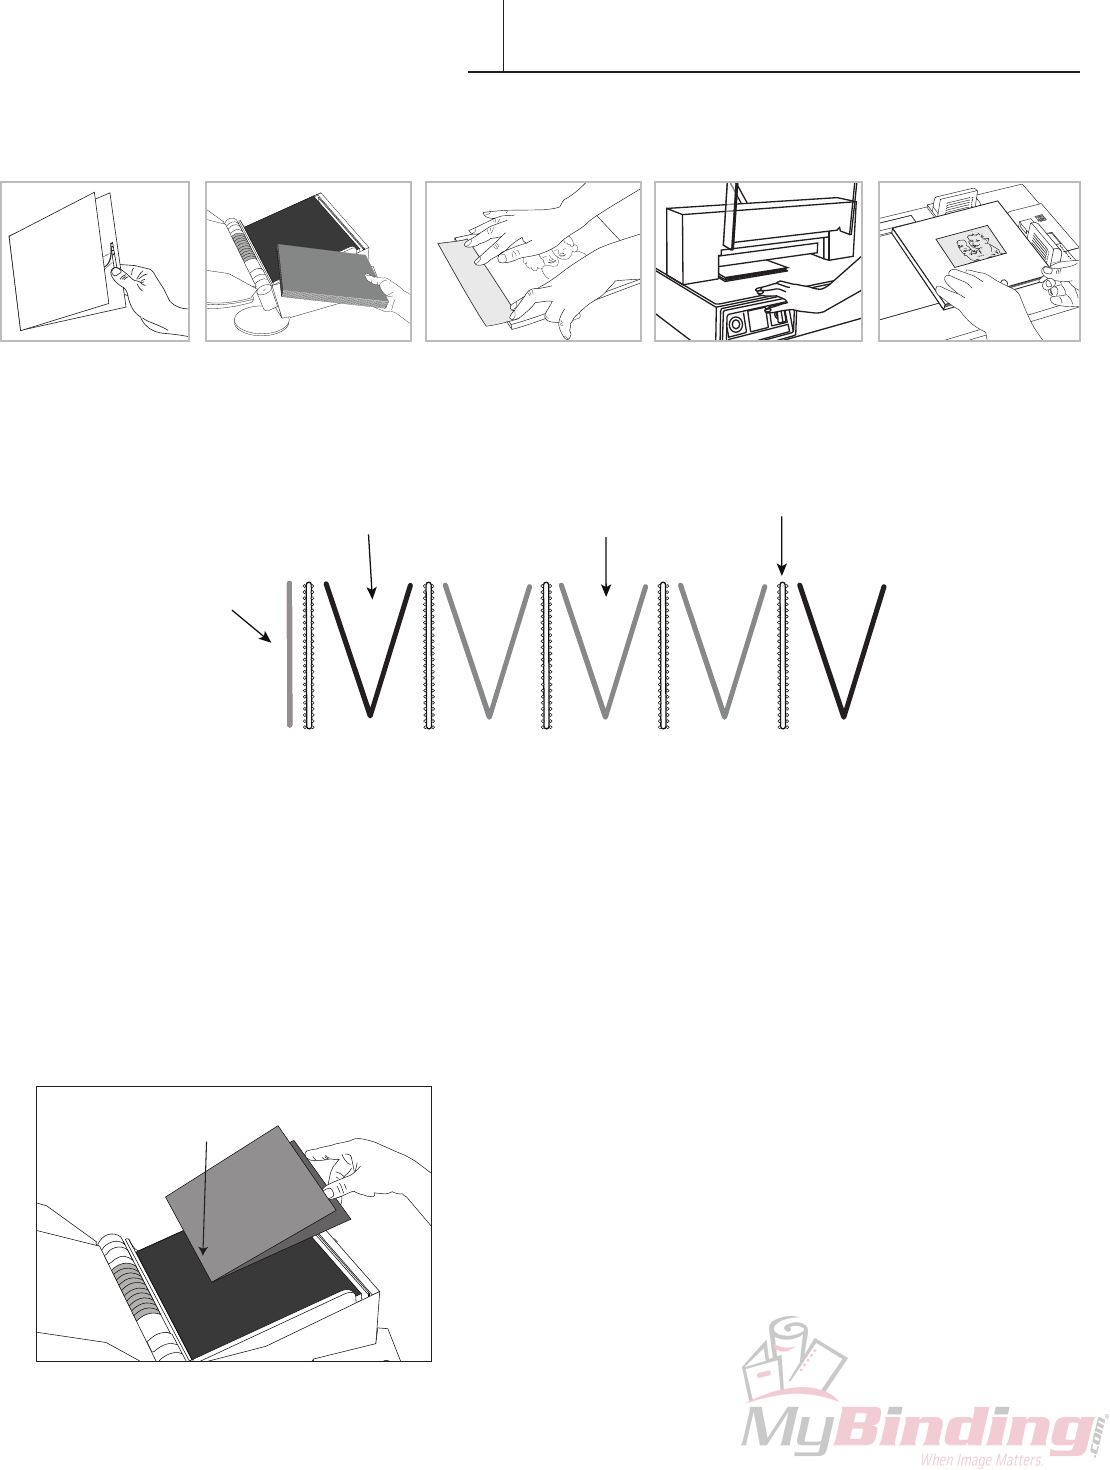
Accordion Book Assembly Pattern,
with windowed front cover.
Accordion Book Assembly Pattern,
no window.
PhotoPress™Signature Sheet
(Double) non-adhesive side to the left.
PhotoPress™Signature Sheet
(Double) non-adhesive side to the left.
Photos
Accordion Cover Front
(no window) Accordion
Cover Back
FASTBACK PHOTOPRESS USER’S MANUAL 25
XII CONTENT ASSEMBLY-ACCORDION
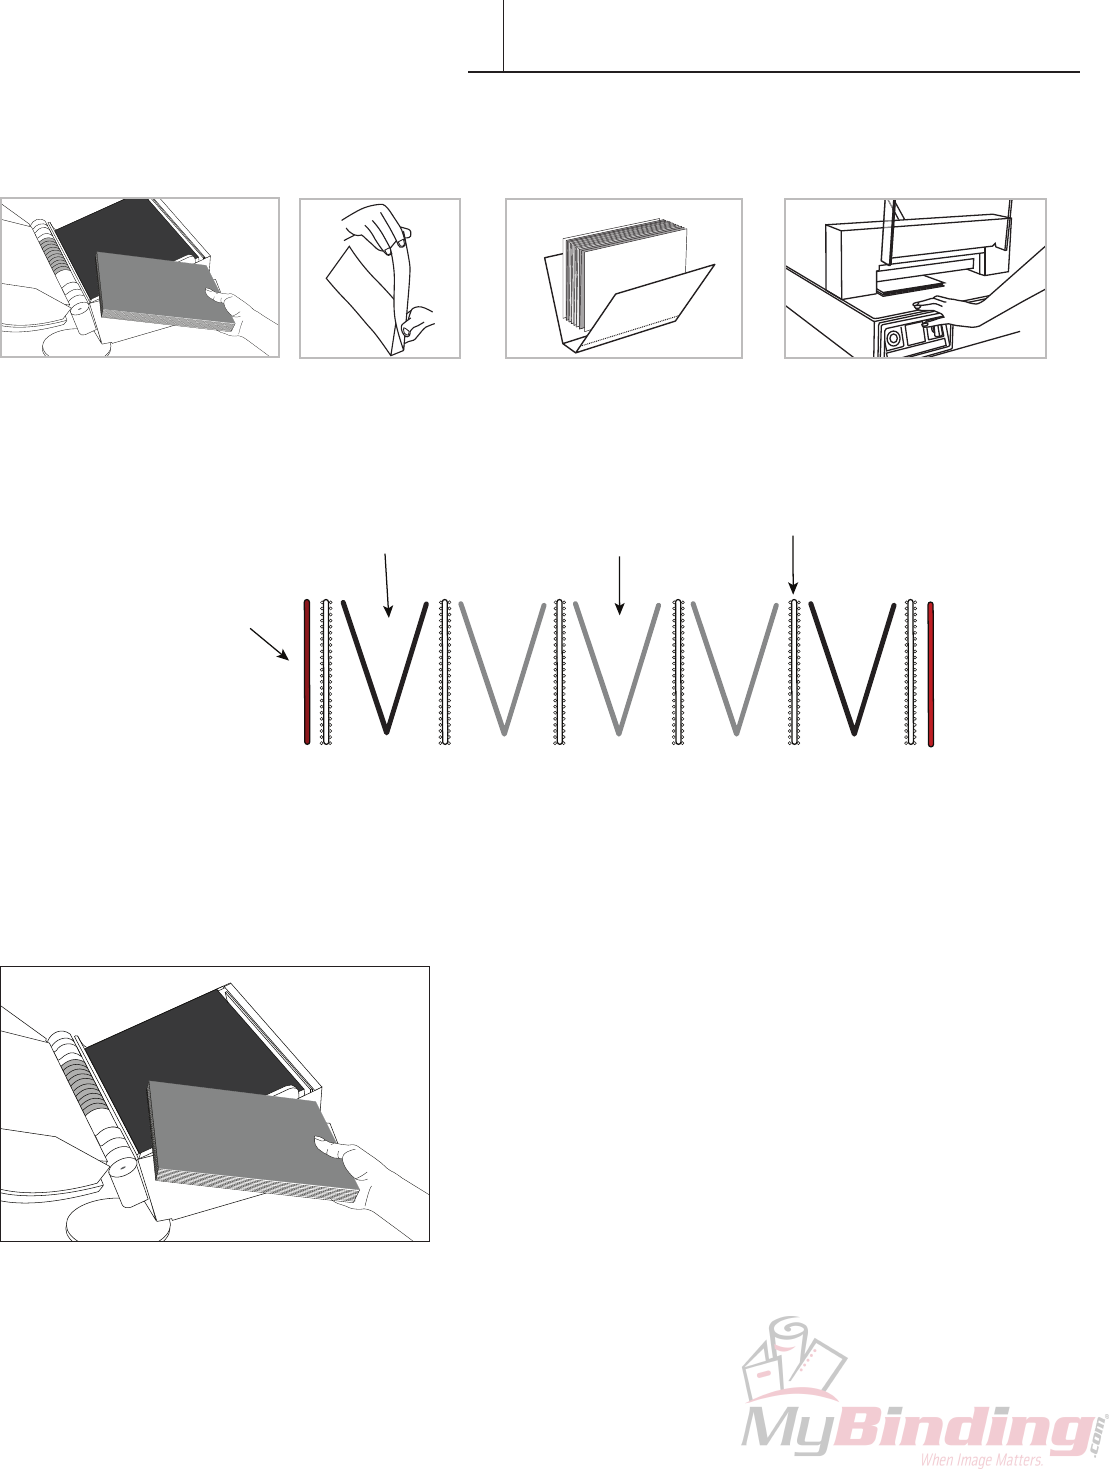
Accordion Book Assembly
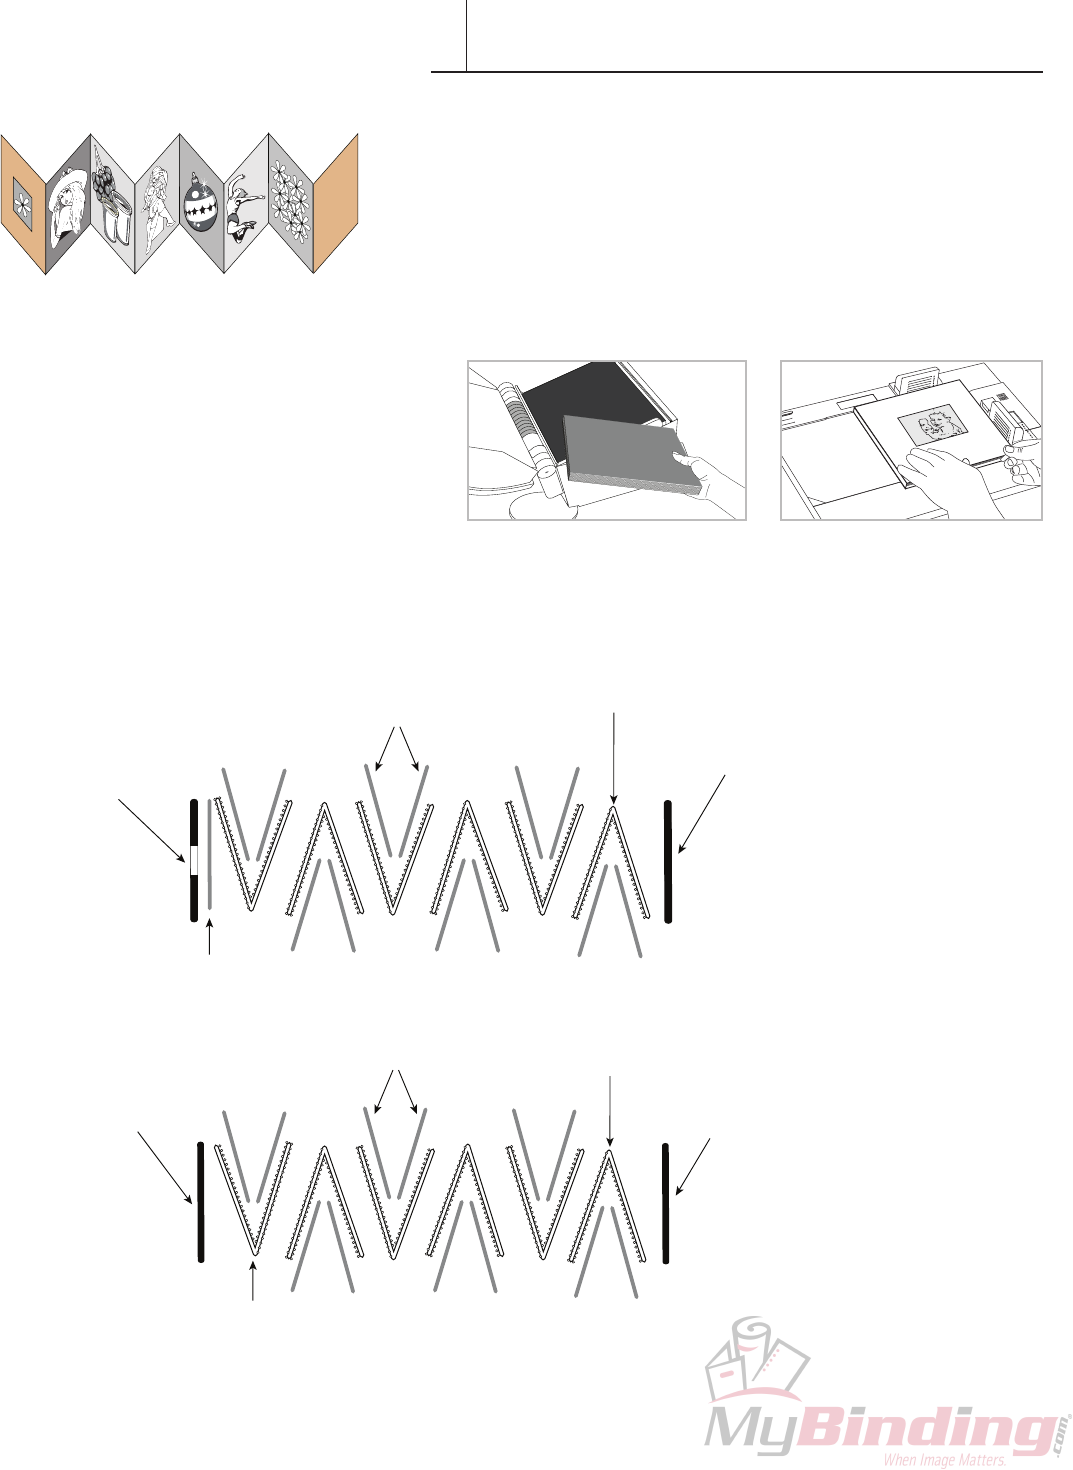
1. Arrangethephotographsintheorderthatyouwantthemto
appear.Youshouldhavetwopiles.Onesetofphotographs(Set#1)
willappearononesideoftheAccordionBookandtheothersetof
photographs(Set#2)willappearontheoppositesideofthebook.
IMPORTANT: Beforestarting,makesurethatyouhavethecorrect
numberofphotographsneededtonishabook.Forawindowedcover,
youwillneedanoddnumberofphotos.Foranon-windowedcover,you
willneedaneven number of photos.
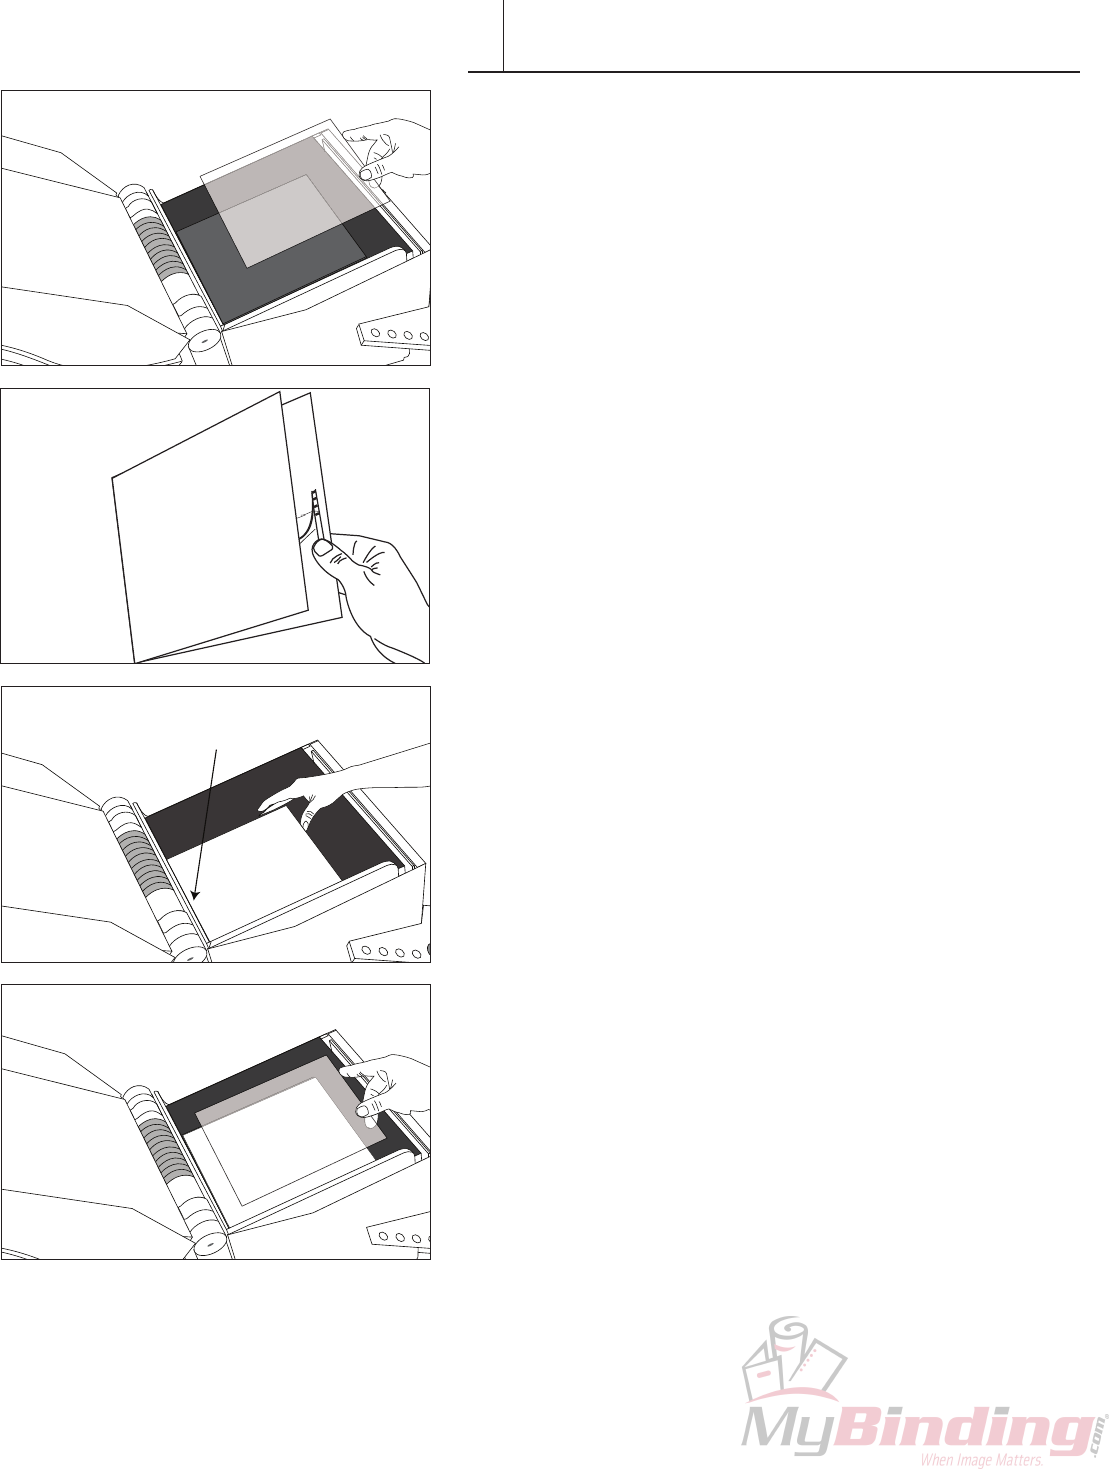
2. PlacerstpicturefacedowninthePhotoPress.Thisisthephoto
thatwillappearinthewindowonthefrontofthebook.
NOTE: Ifthereisnofrontpictureonyourbook(i.e.,non-windowed
cover),thenplacetherstSignaturesheetinthePhotoPresswiththe
non-adhesivepanelfacingdown.Ifthereisafrontpicture,thenplace
theSignaturesheetontopoftherstphotowiththenon-adhesiveside
facingup.Inbothcases,allfollowingSignaturesheetsshouldbeplaced
non-adhesive side face up.
3. SlidethersttwophotosfromSet#1facingeachotherintothe
rstSignaturesheet.PlacetheSignaturesheetinthePhotoPress
(see Note). The folded edge of this Signature sheet should be on the
right. Tap the Signature on the right and top edges to ensure that it is
completely seated in the PhotoPress.
4. PlacethenextSignaturesheetinthePhotoPress,with the folded
edge on the left.SlidetwophotosfromSet#2facingeachotherinto
the Signature sheet. Tap the Signature on the right and top edges to
ensure that it is completely seated in the PhotoPress.
PHOTO PAPER
PHOTO PAPER
APER
PHOTO PAPER
OTO PAPER
PHOTO PAPER
PHOTO PAPER
PHO
PAPER
PHOTO PAPER
PHOTO PAPER
PHOTO PAPE
ER
ER
PHOTO PAP
HOTO PAPER
TO PAPER
PHOTO
PHO
PHOTO PAP
PHOTO
FIRST PHOTO
(face down, top up)
OTO PAPER
PHOTO PAPER
PHOTO PAPER
PHOTO P
PHOTO PA
PHOTO PAPER
PHOTO PAPER
ER
O PAPER
R
HOTO PAPER
HOTO PAPER
PHOTO PAPER
PHOTO PAPER
PAPER
R
O PAPER
PHOTO PAPER
PHOTO PAPER
PHOTO
PHOTO PAPER
PHOTO PAPER
ER
PAPER
PHOTO PAPER
PHOT
PH
PHOTO P
PHOTO PAPER
PHOTO P
PHOTO P
PHOTO PA
PHOTO PAPER
PHOTO PAPER
O PAPER
O PAPER
PHOTO PAPER
PHOTO PAPER
PHOTO PAPER
PHOTO PAPER
PHOTO PAPER
PHOTO PAPER
PHOTO PAPER
PHOTO PAPER
PHOT
Photo Facing Up
Photo Facing Down
PHOT
PHOTO
PHOTO PAPER
PH
PH
R
H TO PAPER
PHOTO PAPER
PHOTO PAPER
PHOTO PAPER
PHOTO PAPER
PER
PAPER
PHOTO PAPER
TO PAPER
PHOTO PAPER
PHOTO PAPER
PHOTO PAPER
HOTO PAPER
TO PAPER
APER
ER
PHOTO PAPER
PHOTO PAPER
PHOTO PAPER
HOTO
PHOTO PAPER
PHOTO PAPER
PHOTO
PHOTO PAPER
PHOTO PAPER
PHOTO PAPER
PHO
P
PHOTO P
PHOTO PA
PHOT
PHOTO
PHOTO PAPER
PH
PH
H TO PAPER
PHOTO PAPER
PHOTO PAPER
PHOTO PAPER
PHOTO PAPER
PER
PAPER
PHOTO PAPER
TO PAPER
PHOTO PAPER
PHOTO PAPER
PHOTO PAPER
HOTO PAPER
TO PAPER
APER
ER
PHOTO PAPER
PHOTO PAPER
PHOTO PAPER
PHOTO
PHOTO PAPER
H TO PAPER
PHOTO
PHOT
PHOTO
PH
PH
26 FASTBACK PHOTOPRESS USER’S MANUAL
XII CONTENT ASSEMBLY-ACCORDION
5. Continuewithsteps#3untilallthephotosareinserted
intoSignaturesheets.EverySignaturesheetshouldhavetwo
photos in it. The final Signature Sheet must be non-adhesive side
facing up.
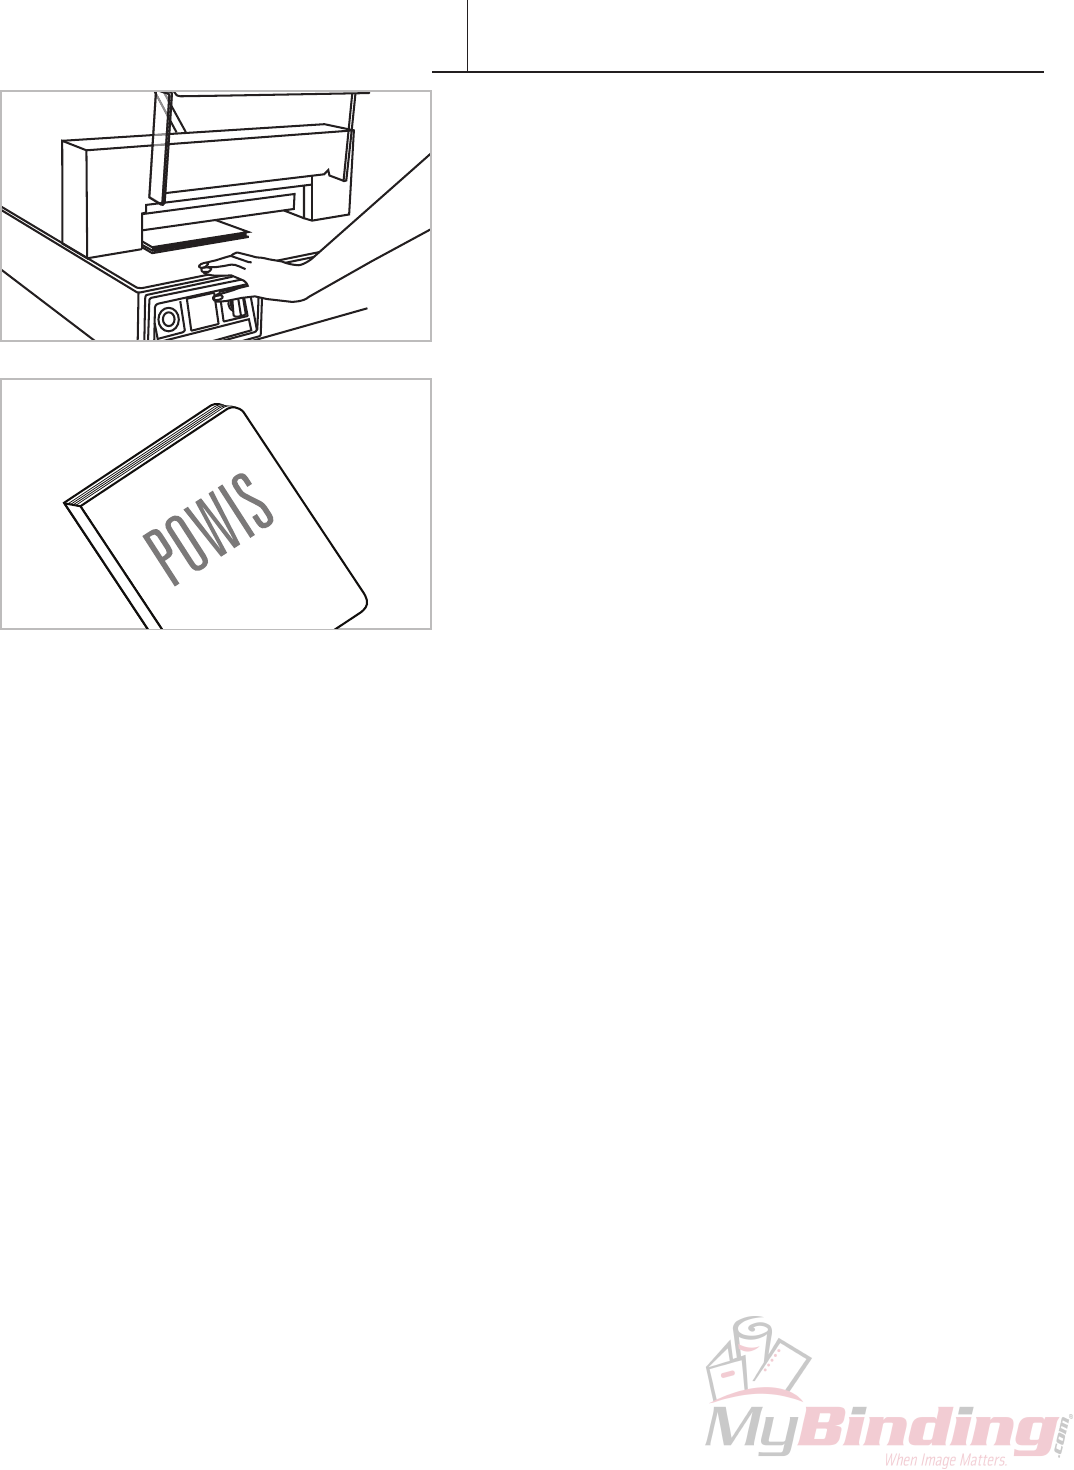
6. Close the PhotoPress and press the green button to begin the
binding process.
Applying Book Block to Front and Back Hardcover
Accordionhardcovercomesin2pieces—frontandback.
7. UsingthePowisHardcoverGuide.Applythefrontandback
hardcoverssametechniqueasinChapterX(page19).
PhotoPress™ Signature Sheet
Scored edge on the left.

FASTBACK PHOTOPRESS USER’S MANUAL 27
PhotoPress binder
• Ifyouarebindingthickorthinbooks,youmaywantto
adjusttheplatenheight.To settheplatenheight,open
thePhotoPress,thenpressandholdtheUNLOCK/MOVE
button.Whentheplatenreachesthedesiredheight,release
the button.
Photo Prints
• Humidity,light,andheataretheenemiesofallphotographs.
Wheneverpossible,keepyourphotoalbumsinacooland
dryenvironment.75ºF(24ºC)orbelowwitharelative
humiditybetween30–50%isrecommended.
• Inhumidenvironments,thepagesofthephotoalbumsmay
developwaviness.Thiswilldisappearwhenthehumidity
fallsbelow50%.
• Inveryhumidenvironments,aswithmanyphoto
albums,photosmaysticktogetherduringstorage.Itis
recommended that you separate the photos by interleaving
thepageswithsheetsofpaper.
TIPS & TECHNIQUES
XIII

28 FASTBACK PHOTOPRESS USER’S MANUAL
SPECIFICATIONS
XIV
Power Requirements: PHP:120V(110-125VAC)50-60Hz,2.5A
PHPE:230V(220-240VAC)50-60Hz,2.5A
PHPJ:100V(90-110VAC)50-60Hz,2.5A
Recommended Operating
Temperature and
Humidity:
15to35degrees(C),59to95degrees(F)
HumidityRange:5to80%RHnoncondensing
Maximum Weight: <198 lbs. ( 90 kg)
Dimensions: 23.5”Wx22.5”Hx19.6”D(597mmx572mmx498mm)
Bind Capacity: upto1.00”(upto25.4mm)
Bind Time: 45-90 seconds
Regulatory Approvals UL,CUL,CE
COPYRIGHT INFORMATION
Copyright ©Powis Parker Incorporated 2009
All Rights Reserved.
WARRANTY
One (1) Year from date of purchase.
Theinformationcontainedinthisdocumentissubjecttochangewithoutnotice.
PPImakesnowarrantyofanykindwithrespecttothisinformation.PPIspecificallydisclaimstheimplied
warrantyofmerchantabilityandfitnessforaparticularpurpose.
PPIshallnotbeliableforanydirect,indirect,incidental,consequential,orotherdamageallegedin
connectionwiththefurnishingoruseofthisinformation.
NOTICE
Changesareperiodicallymadetothisdocument.Revisions,changes,anytechnicalinaccuracies,and
typographicalerrorswillbecorrectedinanysubsequenteditions.

FASTBACK PHOTOPRESS USER’S MANUAL 29
FCC NOTICE
XV
• Modificationsmadetotheproduct,unlessexpresslyapprovedbyPowisParker,couldvoidthe
user’sauthoritytooperatetheequipment.
Note:ThisequipmenthasbeentestedandfoundtocomplywiththelimitsforaClassBdigital
device,pursuanttoPart15oftheFCCRules.Theselimitsaredesignedtoprovidereasonable
protectionagainstharmfulinterferenceinaresidentialinstallation.Thisequipmentgenerates,
uses,andcanradiateradiofrequencyenergyand,ifnotinstalledandusedinaccordancewith
theinstruction,maycauseharmfulinterferencetoradiocommunications.However,thereisno
guaranteethatinterferencewillnotoccurinaparticularinstallation.Ifthisequipmentdoescause
harmfulinterferencetoradioortelevisionreception,whichcanbedeterminedbyturningthe
equipmentoffandon,theuserisencouragedtotryandcorrectthe interferencebyoneormoreof
thefollowingmeasures:
• Reorient or locate the receiving antenna.
• Increasetheseparationbetweentheequipmentandreceiver.
• Connecttheequipmentintoanoutletonacircuitfromthattowhichthereceiverisconnected.
• Consultthedealeroranexperiencedradio/TVtechnicianforhelp.
• Binderdoesnotcontainanyuserserviceableparts.ReturnunittoanauthorizedPowisParker
representative for repair or service.
FASTBACK PHOTOPRESS USER’S MANUAL
POWER CORD (DOMESTIC)
POWER CORD (INTERNATIONAL)
ASSEMBLY STAND
POWIS PARKER PART NUMBERS FOR YOUR REFERENCE:
DECLARATION OF CONFORMITY
We,PowisParker,Incorporated
775 Heinz Avenue
Berkeley,CA94710U.S.A
1-800-321-2463
declare under our sole responsibility that the product
Fastback® PhotoPress
complieswithPar t15ofFCCRules.
Operationissubjecttothefollowingtwoconditions:(1)thisdevicemaynotcauseharmful
interference,and(2)thisdevicemustacceptanyinterferencereceived,includinginterferencethat
may cause undesired operation.
