N and W Global Technology RFID-IDENT600 Coffee Dispenser with RFID User Manual Operator manual
N&W; Global Technology Coffee Dispenser with RFID Operator manual
User Manual
35278100 - 2007/01
Cafitesse 600
Operator manual
01.2007 3
Index
Introduction ............................................................................................................ 4
About the dispenser ............................................................................................................... 4
About this document .............................................................................................................. 4
Dispenser components .......................................................................................................... 5
Safety instructions ................................................................................................. 6
Food safety instructions (HACCP) ......................................................................................... 8
Operation .............................................................................................................. 11
Drink delivery ........................................................................................................................ 11
Placing cups and pots correctly ........................................................................................... 12
(Re)place ingredient packs .................................................................................................. 14
Cleaning the dispenser ........................................................................................................ 15
Status and error messages .................................................................................................. 20
Switch the dispenser off or on .............................................................................................. 20
Program the dispenser ........................................................................................ 22
Start the operator mode ....................................................................................................... 23
Navigate the operator menu ................................................................................................ 24
Technical specifications ...................................................................................... 25
Options.................................................................................................................. 26
Trouble shooting .................................................................................................. 28
Copyright © 2006 DECS International BV - all rights reserved
Douwe Egberts Coffee Systems International is a Sara Lee Corporation.
Cafitesse, Douwe Egberts, Merrild, Marcilla, Maison du Café are trademarks or registered trademarks of Sara Lee Corporation.

401.2007
Introduction
About the dispenser
The Cafitesse 600 is a dispenser for the delivery of drinks in commercial applications.
The dispenser works with special disposable ingredient packs. These patented "Bag-in-Box" (BIB)
ingredient packs contain high quality liquid drink concentrates.
The dispenser can contain two ingredient packs. According to the ingredient packs that you choose, the
dispenser can deliver:
• coffee and espresso
• decaf coffee and decaf espresso
• milk containing drink
• cocoa containing drink
• tea
• drinks from 2 ingredients such as cappuccino, café au lait, or tea with milk.
The dispenser is equipped with two mixers and three drink outlets to allow quick and easy delivery of
high quality drinks.
The dispenser can deliver drinks in cups and pots of various sizes.
Special dispenser versions provide also:
• delivery into larger pots or pump-action thermos flasks (see „Options“).
• delivery of cold drinks (see „Options“).
Optionally you can request your Cafitesse system supplier to:
• equip your dispenser with a payment system (see „Options“).
• enable/disable specific dispenser versions (see „Options“).
About this document
This document describes the main features and functions of the dispenser. Before you start using the
dispenser, read this document to ensure you understand the operation of the dispenser and the
mandatory safety instructions that apply.
Throughout this document you may see the following symbols that require your attention:
Note:
Additional information that may be helpful for you during operation of the dispenser.
Caution:
Information that requires special attention to ensure food safety, avoid personal injury or
damage to the dispenser.
Warning:
Hazards that could lead to severe personal injury, death or severe damage to the
dispenser.
Danger:
HAZARDS THAT WILL LEAD TO SEVERE PERSONAL INJURY OR DEATH.
11.2006 5
Introduction
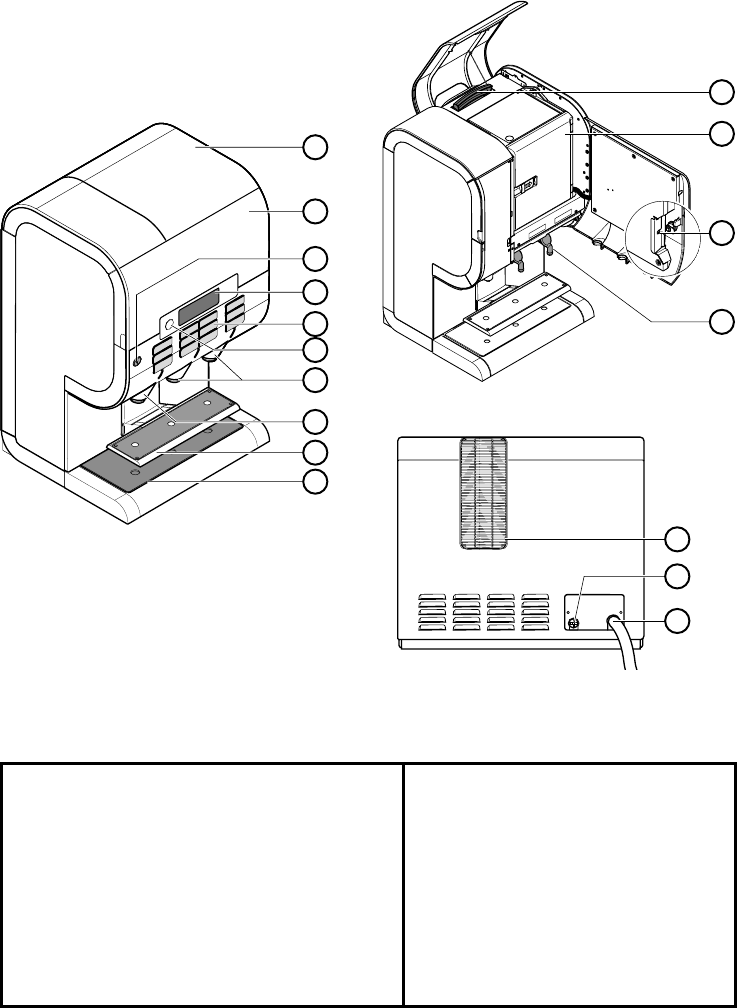
Dispenser Components
a Housing cover
b Dispenser door
c Mechanical lock
d Touch screen
e Drink selection buttons
f Stop button
g Drink outlets
h Hot water outlet
i Cup tray
j Drip tray with drip grid
k Air filter
l Ingredient storage
m Switch - ON/STANDBY/RESET
n Outlet trough
Rear side of the dispenser:
o Ventilation ingredient storage
p Water connection
q Mains cable connection
Rear side
a
b
c
d
e
f
g
h
i
j
o
q
p
k
l
m
n

601.2007
Safety Instructions
Before you operate, fill, clean or move the dispenser, carefully read the instructions in this manual.
Take special care that you and anyone else that needs to operate, clean or move the dispenser
understands the safety and hygiene aspects of the dispenser and acts accordingly.
You may only use the dispenser for the delivery of drinks according the instructions in this manual. The
manufacturer is not liable for any damage or injury if you use the dispenser for other purposes, or if you
do not follow the procedures described in this manual.
• Installation, service, repair and programming of the dispenser is restricted to authorised and trained
service technicians as assigned by your Cafitesse system supplier.
• Use only original spare parts for the operation of the dispenser.
• Operation, filling and cleaning of the dispenser must be restricted to authorised and trained
personnel.
• Place the dispenser on a location where authorised and trained personnel can look after safe and
hygienic operation of the dispenser.
Warning:
The liquids delivered by the dispenser are hot! Avoid scalding!
Keep hands and other body parts away from the dispenser during delivery of drinks.
Keep hands and other body parts away from the dispenser during the flush program.
Never leave children unattended near the dispenser.
Installation
Installation and programming of the dispenser is restricted to authorised and trained service technicians
as assigned by your Cafitesse system supplier.
The dispenser is designed for indoor installation on a stable flat surface such as a table or a counter.
• Shield the dispenser from frost, rain and direct sunlight.
• Shield the dispenser from running water, splashes, spray or steam, heat or heavy dust.
• Make sure that there is sufficient space around the dispenser for ventilation.
• Keep the front and back accessible for cleaning and service.
• Connect the dispenser to the drinking water line in compliance with local regulations.
Caution:
If you plan to use the dispenser for the delivery of cold drinks, test the quality of the water
supply to ensure delivery of safe cold drinks according to local regulations.
• Connect the dispenser to a secured electric circuit in compliance with local regulations.

Safety Instructions
11.2006 7
If you connect the dispenser to a wall outlet power supply:
• Use a grounded safety plug socket complying with local regulations.
• Ensure the electric circuit is secured by means of a fault current safety switch.
• Take care that the power supply plug remains accessible after installation.
Warning:
Never touch the power supply or power supply plug when your hands or the power cord
or plug are wet.
If you connect the dispenser with a permanently wired power supply (without mains plug) ensure the
electric circuit is equipped with a circuit breaker with a contact opening of at least 3 mm that controls all
poles.
Transport, storage and operation
Always store and transport the dispenser in its original packaging.
Before you store or transport the dispenser:
• Store the ingredient packs in a refrigerator.
• Clean the dispenser.
• Contact your Cafitesse system supplier and request an authorised and trained service technician to
drain the boiler and prepare the dispenser to prevent damage due to frost.
Warning:
The dispenser may not be subject to frost during operation, storage and transport.
• If you suspect damage due to frost after storage or transport request your Cafitesse system
supplier to check the dispenser and perform a functional test.
Service the dispenser
Service, repair and programming of the dispenser is restricted to authorised and trained service
technicians as assigned by your Cafitesse system supplier.
Warning:
If the power supply cable of the dispenser is damaged, switch off the dispenser and
contact your Cafitesse system supplier to replace the cord.
Safety Instructions
811.2006
Food Safety Instructions (HACCP)
As operator of the dispenser you are responsible for safe and hygienic
operation. Follow the instructions in this section to comply with food safety
standards.
Storage of ingredient packs
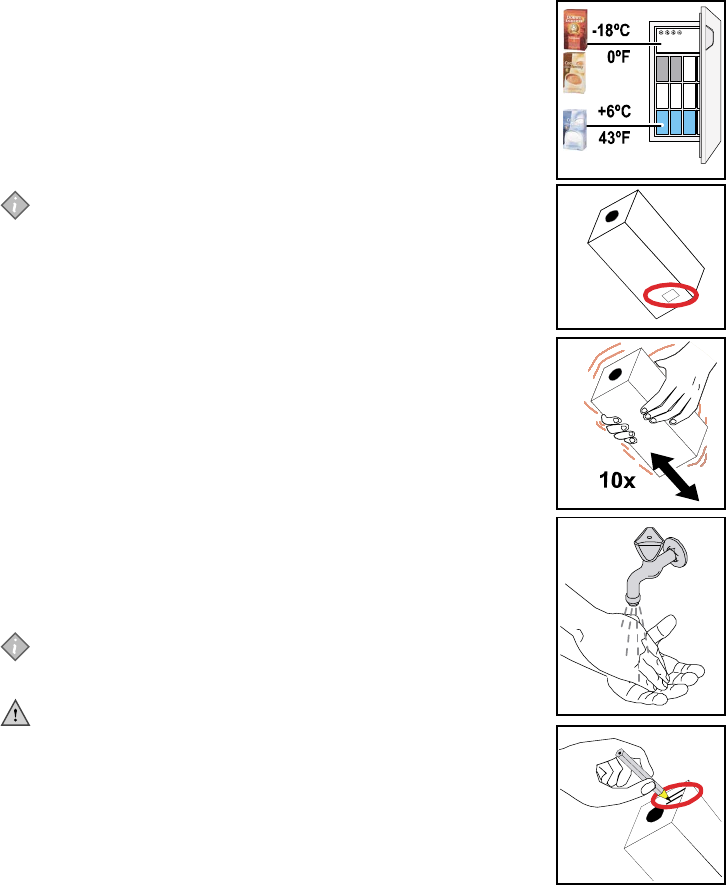
• Store ingredient packs for coffee, tea or cocoa containing drink in a
freezer at -18°C (0°F).
• Store ingredient packs for milk containing drink in a refrigerator at
+6 °C/43 °F. (Fig. 1)
Note:
To use packs for coffee, tea or cocoa containing drink, you must thaw
the packs in a refrigerator at +6°C (43°F). This may take
approximately 3 days.
Before you thaw a pack, read the "Best before" date on the label of
the pack. (Fig. 2)
• Thaw packs according to the "first-in-first-out" principle.
• Do not use packs for which the "Best before" date has expired.
• Shake thawed packs at least 10 times before placement in the
dispenser. (Fig. 3)
Handling of ingredient packs
1. Wash your hands before you touch ingredient packs. (Fig. 4)
2. Read the instructions on the rear of the ingredient pack.
3. Check ingredient packs for damage.
Do not use damaged ingredient packs.
4. Read the date on the "Best before" label on the pack.
If the "Best before" date has passed, do not use the pack.
5. Consult the ingredient pack for instructions.
Write the "Expiry Date" on the pack. (Fig. 5)
Note:
When you handle open ingredient packs, avoid spills of ingredient on
clothes, floor, or equipment.
Caution:
Do not touch the tips of the dosing tubes with your hands or cloth you
use for cleaning.
If the dosing tubes need cleaning, rinse them with clean water only.
1
2
3
4
5
Safety Instructions
11.2006 9
If you plan not to use the dispenser for a short period of time (e.g. over the
weekend), use the ON/STANDBY/RESET-switch to set the dispenser in
STANDBY mode.
• This will switch off the boiler and drink delivery to save energy
• This will keep the cooling of the ingredient storage unit operational to
preserve the quality of the ingredient packs.
If you plan not to use the dispenser for a long period of time (e.g. during
works holidays) follow the instructions as described in ‚Switch the dispenser
off or on‘.

Safety Instructions
10 11.2006
Cleaning of the dispenser
Clean your dispenser at regular intervals.
1. Clean the surface around the dispenser.
2. Wash your hands before you touch the dispenser or ingredient packs.
(Fig. 6)
3. Clean the dispenser according to the instructions in the operator manual
(see „Cleaning the dispenser“).
4. During cleaning, always check the ‚Best before‘ and ‚Expiry date‘ of the
ingredient packs in the dispenser. Replace ingredient packs, for which
the ‚Best before‘ or ‚Expiry date‘ has passed.
5. Schedule, record and file cleaning activities. (Fig. 7)
Caution:
Clean dispenser parts which are in contact with the ingredients with a
cleaning agent.
Use cleaning agents that are approved by the food industry and
recommended by your Cafitesse system supplier.
For safe handling, dosing and use of cleaning agents, follow the
instructions on the label of the cleaning agent. (Fig. 8)
Danger:
DO NOT SPRAY OR SPLASH THE DISPENSER WITH WATER.
DO NOT USE A WATER JET TO CLEAN THE DISPENSER.
NEVER SUBMERGE THE DISPENSER IN WATER.
Danger:
NEVER TILT THE DISPENSER TO CLEAN BEHIND OR
UNDERNEATH THE DISPENSER. AVOID SCALDING! THE
BOILER OF THE DISPENSER CONTAINS VERY HOT WATER
THAT MAY FLOW OUT OF THE BOILER WHEN YOU MOVE OR
TILT THE DISPENSER.
Training
Train new staff regarding the food safety instructions (HACCP). (Fig. 9)
• Train new staff on cleaning schedules and cleaning activities.
• Take care that new staff reads the operator manual before they operate
the dispenser.
Keep the manual close to the dispenser for future reference.
If there are any further questions please contact your Cafitesse system
supplier.
7
6
8
9
01.2007 11
Operation
Drink Delivery
To take a drink from the dispenser:
1. Place a cup on the cup tray. (Fig. 10)
2. Select a drink button. (Fig. 10)
The dispenser will dispense the drink via the corresponding outlet.
Warning:
The liquids delivered by the dispenser are hot! Avoid scalding!
Keep hands and other body parts away from the dispenser.
Never leave children unattended near the dispenser.
To abort drink delivery, press the STOP button.
Portion controlled or continuous delivery
Upon installation, the service technician has set the dispenser to operate with one of the delivery
options listed below.
• Portion controlled delivery Single press delivery. The dispenser automatically stops after delivery
of one portion (typically one cup).
• Continuous delivery Keep the drink button pressed until the cup or pot is full. The dispenser
stops when you release the drink button.
Note:
In self-service situations where consumers may not be familiar with the operation of the
dispenser, we recommend portion delivery with fixed cup sizes.
Consult your Cafitesse system supplier if you would like to change the portion size or type of drink
delivery.
Drink delivery with preset drink delivery options
Your dispenser supports preset drink delivery options. Upon installation, the
service technician may have programmed the touch screen of your dispenser
to show one of the presets listed below:
• drink size (small - medium - large) (Fig. 11)
• drink strength (mild- normal-strong) (Fig. 12)
To use the preset drink delivery options:
1. Place a cup on the cup tray
2. Select a preset drink delivery option on the touch screen display.
3. Select a drink button.
The dispenser will dispense the drink via the corresponding outlet.
Warning:
The liquids delivered by the dispenser are hot! Avoid scalding!
Keep hands and other body parts away from the dispenser.
Note:
If you select a preset option but do not select a drink button, the
dispenser will return to default state after a few seconds.
To abort drink delivery, press the STOP button.
10
11
12
small medium large
mild
normal
strong
Operation
12 11.2006
Placing cups and pots correctly
The dispenser has three product outlets.
• The left outlet is for hot water
• The middle and the right outlet are for coffee, tea or cocoa containing
drink.
Note:
Place your cup or pot underneath the outlet of the drink button of your
choice.
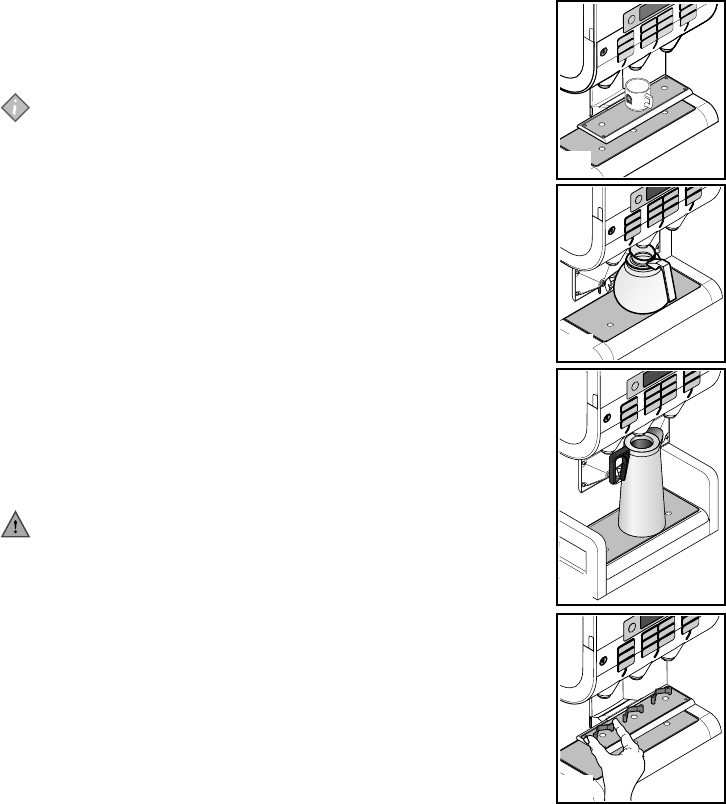
• Place your cup on the cup tray. (Fig. 13)
• Place your pot on the drip tray (tilt the cup tray upwards to make room
for the pot). (Fig. 14)
• For large pots, you may need a special dispenser foot (see „Options“).
(Fig. 15)
Adjusting the cup stop
For accurate cup placement, the cup tray has special cup stops.
For safe operation the cup stop position should match the size of the cup.
This means that when a consumer places the cup on the drip tray the centre
of the cup will be exactly underneath the outlet.
To adjust the cup stop position: (Fig. 16)
1. Squeeze both ends of the cup stop to release it from the cup tray grid.
2. Place the cup stop onto the desired position.
3. Place a cup.
4. Select a drink to verify the correct position.
Warning:
The liquids delivered by the dispenser are hot! Avoid scalding!
Keep hands and other body parts away from the dispenser.
5. Repeat steps 1-4 for each product outlet.
13
14
15
16

Operation
11.2006 13
Adjusting the cup tray position
At installation your Cafitesse system supplier will install the cup tray at a
specific height. If you would like to use different cups, you can change the
vertical position of the cup tray:
1. Open the dispenser door.
2. Press the ON/STANDBY/RESET switch to set the dispenser to
STANDBY mode.
3. Tilt the cup tray upwards and lift it from the cup tray support. (Fig. 17)
4. Move the cup tray position as follows:
a. Use a screw driver to loosen the 2 screws of the cup tray support.
(Fig. 18)
b. To move the cup tray upwards, hold the support on both sides and
push it upwards. (Fig. 19)
c. To move the cup tray downwards (fig. 20):
a. Use one hand to press the notch in the recess of the cup carrier.
This will unlock the current carrier position.
b. Use the other hand to push the support downwards.
d. Use a screwdriver to fasten the 2 screws to secure the cup tray
position. (Fig. 21)
5. Place the cup tray on the support and verify correct position.
Caution:
Do not fasten the screws too tightly.
6. Press the ON/STANDBY/RESET switch again to reactivate the
dispenser.
18
19
20
21
17
Operation
14 11.2006
(Re)place ingredient packs
Detect an empty ingredient pack
When an ingredient pack is empty, the symbol will appear on the display.
(Fig. 22)
• When you touch the i symbol on the display, the dispenser will indicate:
xxxx is empty, please call the operator.
(where xxxx indicates the empty ingredient pack).
• When a user selects a drink and a required ingredient pack is empty, the
dispenser will display the message: Sorry this selection is not available.
Please make another selection and call the operator. xxxx is empty
(where xxxx indicates the empty ingredient pack).
Note:
You can customise part of this message using the operator menu
(see „Program the dispenser“).
Replace an empty ingredient pack
Caution:
Please follow the „Food Safety Instructions (HACCP)“ when you thaw
ingredient packs.
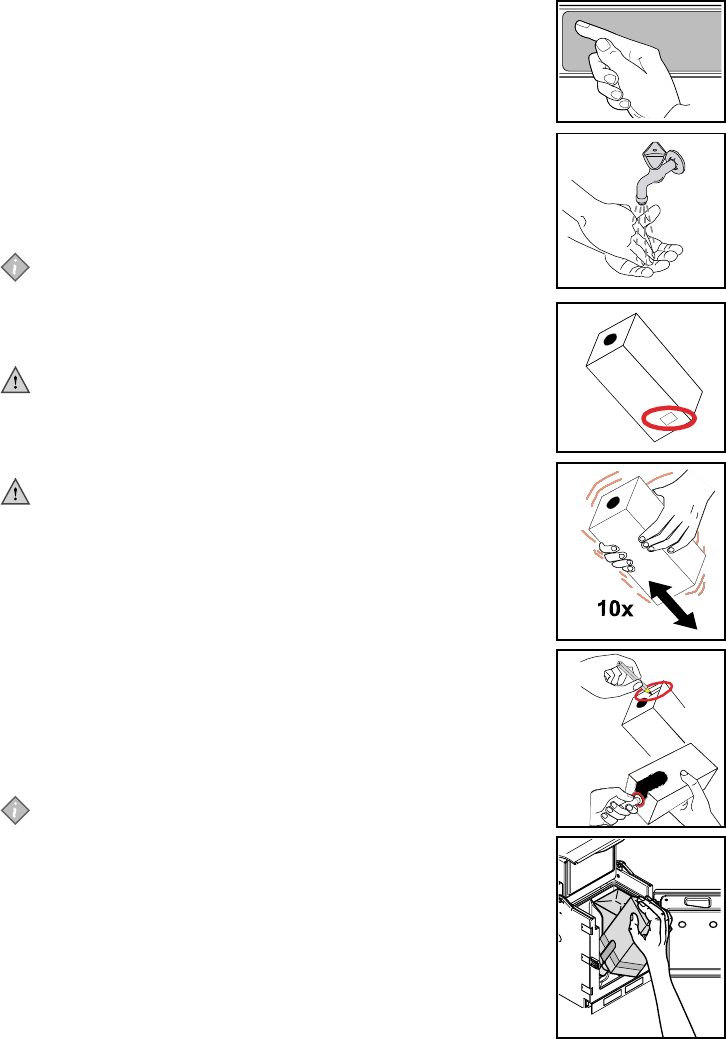
1. Wash your hands before you tough the ingredient packs. (Fig. 23)
2. Take a thawed ingredient pack.
Caution:
Read the instructions on the back side of the ingredien pack.
Do not use damaged ingredient packs.
Do not use ingredient packs, if the „Best before“ date has passed.
(Fig. 24)
3. Shake the pack at least 10 times (Fg. 25)
4. Remove the plastic wrapper and write the „Expiry date“ on the pack.
(Fig. 26)
5. Follow the instructions on the pack to unfold the dosing tube.
Check that the dosing tube is positioned straight and that the colored
ring on the tube covers the corresponding circle on the pack. (Fig. 26)
6. Open the dispenser and ingredient storage door.
7. Place the pack in the dispenser. (Fig. 27)
8. Close the ingredient storage and dispenser door.
9. Dispense a drink and check color, aroma and taste.
Note:
If your dispenser uses two identical ingredient packs (for example
coffee-coffee) your Cafitesse system supplier can enable an
automatic pack switch-over mode. In this mode, the dispenser will
automatically start dispensing from the second ingredient pack after it
detects the first pack is empty.
If this applies to your situation, always switch the dispenser off with
the ON/STANDBY/RESET button and again on after replacing a
ingredient pack to reset the switch-over sensor.
22
23
24
25
26
27
Operation
11.2006 15
Cleaning the dispenser
You must clean your dispenser at regular intervals. The dispenser has a built-in timer that will prompt
you when cleaning is due. The cleaning interval may differ according to the type of dispenser.
Note:
For dispenser models that only deliver hot drinks
you must carry out each of the cleaning procedures „Flushing“ and „Cleaning & Flushing“ once a
week.
There may not pass more than 3 days between two cleaning procedures.
When you set weekday and time of the cleaning procedures via touch screen, you can only
choose respective combinations.
When is cleaning required?
• You can clean the dispenser at any time you like.
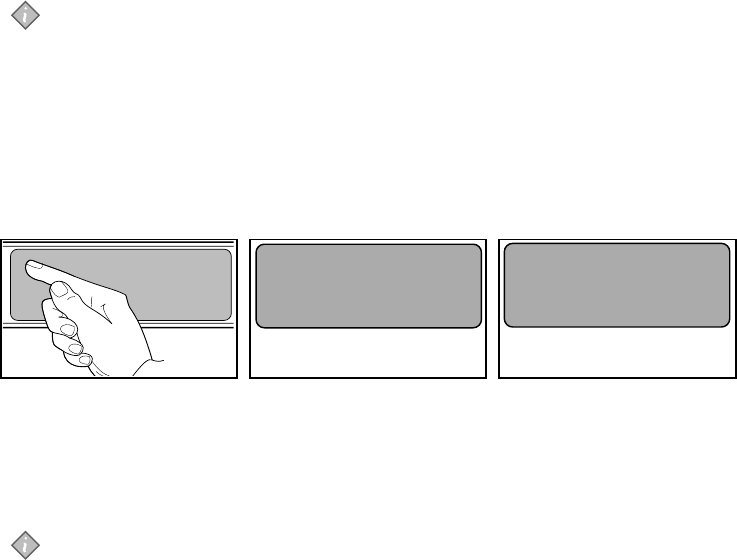
• You must clean the dispenser when the display indicates that cleaning is required.
When the symbol appears on the display, touch it to read the required cleaning procedure. (Fig. 28)
• When cleaning is due, the display will show the remaining time before the dispenser will block
delivery of drinks. (Fig. 29)
• When cleaning is overdue, the dispenser will block the delivery of all drinks except water. (Fig. 30)
Note:
Your Cafitesse system supplier can customize the weekday and time when the dispenser will
prompt you to clean the dispenser. For food safety regulations, it is not possible to disable the
cleaning timer.
Cleaning and flushing is required
within 3 hours and 57 minutes.
Sorry, only hot water is available
Please call the operator
72: Cleaning & flushing is required
28 29 30
Operation
16 11.2006
The dispenser supports two cleaning procedures, „Flushing“ and „Cleaning & Flushing“. The display will
indicate which procedure is required, and will provide step-by-step instructions to guide you through the
procedure.
•Flushing is an automatic program of the dispenser that takes approximately one minute. Flushing
is required at least once a week. During flushing the dispenser will flush all parts that come into
contact with liquid ingredients with hot water.
Caution:
Dispenser models that also deliver cold drinks (café cool) require flushing 6 times a week.
For hygienic reasons these dispenser models will also dose small amounts of liquid ingredient
during the cold water flushing procedure. Therefore there will always be hints of ingredient
concentrate in the flush water.
•Cleaning and flushing is an intensive cleaning procedure that takes approximately 3-15 minutes.
Cleaning and flushing is required at least once a week.
During the program „Cleaning & Flushing“ you must:
• remove the ingredient packs from the ingredient storage
• clean the ingredient storage and re-insert the ingredient packs into the ingredient storage
• Remove all parts that come in contact with liquid ingredients from the dispenser.
• Clean these parts outside the dispenser with a special cleaning agent.
• Re-insert the parts into the dispenser
• Start the automatic flushing program.
Note:
To reduce cleaning time at the dispenser to 3 minutes, we recommend the use of trough
exchange kits, existing of a clean trough and lid.
Without exchange kit the cleaning time is determined by the time for soaking the trough and lid
in cleaning agent.
Warning:
The liquids delivered by the dispenser are hot! Avoid scalding!
Keep hands and other body parts away from the dispenser during the automatic flush
program.
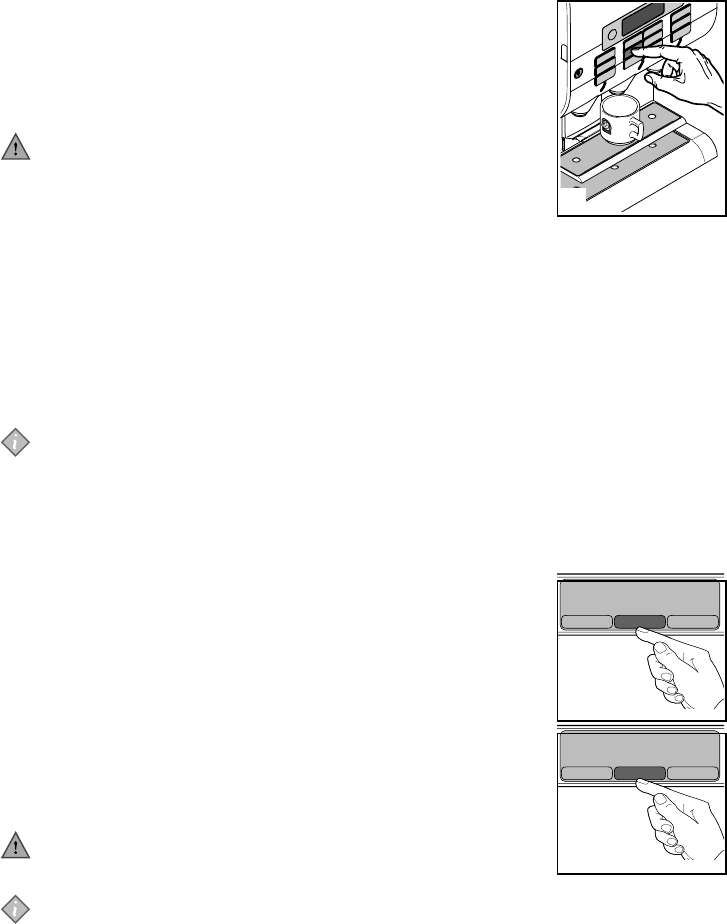
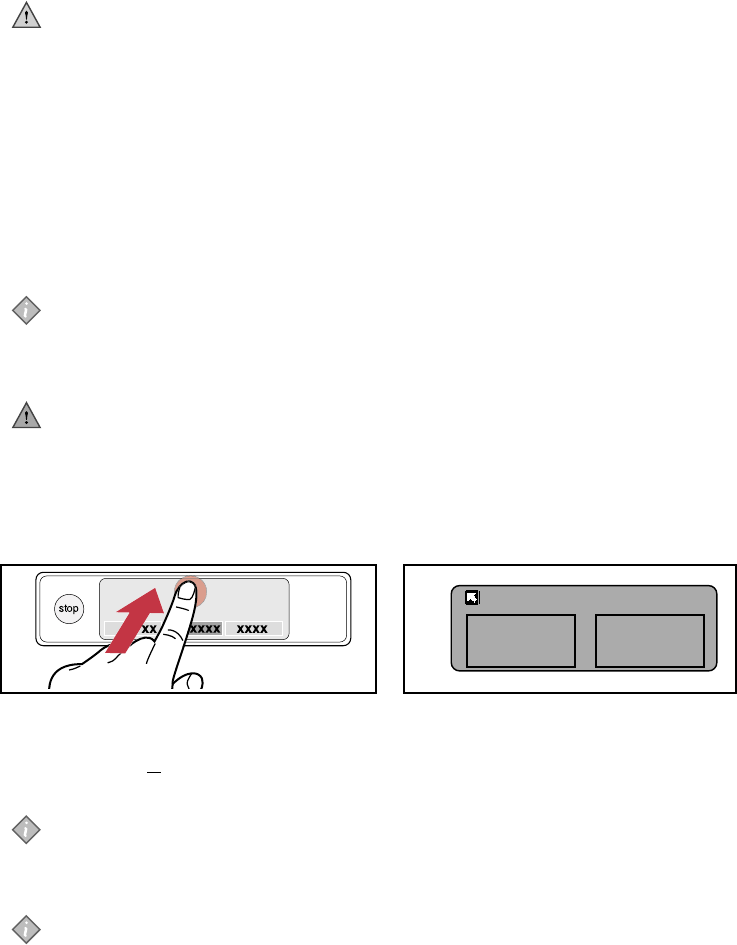
Start the cleaning procedure
1. Touch and hold the top centre of the touch screen display for 3 seconds. (Fig. 31)
2. Touch the display to select the cleaning procedure:
• ‚FLUSHING‘ or
• ‚CLEANING & FLUSHING‘
Note:
If a cleaning procedure is due or overdue, the dispenser will automatically start the required
procedure.
3. Proceed as described in the corresponding section below.
Note:
To cancel the cleaning program, touch the small arrow in the upper left corner. (Fig. 32)
31 32
FLUSHING CLEANING
&
FLUSHING
CLEANING

Operation
11.2006 17
Flushing
When you start the program „Flushing“ you can select:
• FLUSH WATER SIDE to flush the hot water outlet,
or
• FLUSH PRODUCT SIDE to flush the drink outlets.
Note:
You may skip the hot water flush. This will not block the delivery of
drinks by the dispenser. We recommend however to flush the hot
water outlet after long periods of inactivity, for example after the
weekend.
To flush the water outlet
1. Place an empty container of 3 litre (3/4 gal) underneath the hot water
outlet. (Fig. 33)
2. Touch the field 'FLUSH WATER SIDE'.
The dispenser will flush the outlet for approximately 5 seconds.
Warning:
The liquids delivered by the dispenser are hot! Avoid scalding!
Keep hands and other body parts away from the dispenser
during the automatic flush program.
To flush the product outlets
1. Place an empty container of 3 litre (3/4 gal) underneath both product
outlets. (Fig. 34)
2. Touch the field 'FLUSH PRODUCT SIDE'.
The dispenser will flush the outlet for approximately 45 seconds.
Warning:
The liquids delivered by the dispenser are hot! Avoid scalding!
Keep hands and other body parts away from the dispenser
during the automatic flush program.
After the flushing procedure, the dispenser will automatically return to normal
delivery mode.
3. Select a drink button to test delivery for each hot drink
4. Check color, aroma and taste of each drink.
• If the drink quality is not ok, perform the
„Cleaning & „Flushing procedure.
If the problem persists, consult your Cafitesse system supplier.
• If the drink quality is ok, this will complete the flushing procedure.
33
34
Operation
18 11.2006
Cleaning & flushing
Clean the dispenser with a clean, damp cloth. Do not use abrasive cleaning
agents.
Caution:
Clean dispenser parts which are in contact with the ingredients with a
cleaning agent.
Use cleaning agents that are approved by the food industry and
recommended by your Cafitesse system supplier.
For safe handling, dosing and use of cleaning agents, follow the
instructions on the label of the cleaning agent.
Warning:
Do not spray or splash the equipment with water, or clean it
under a water jet.
Never submerge the dispenser in water.
When you start the „Cleaning & Flushing“ program, follow the instructions on
the display of the dispenser.
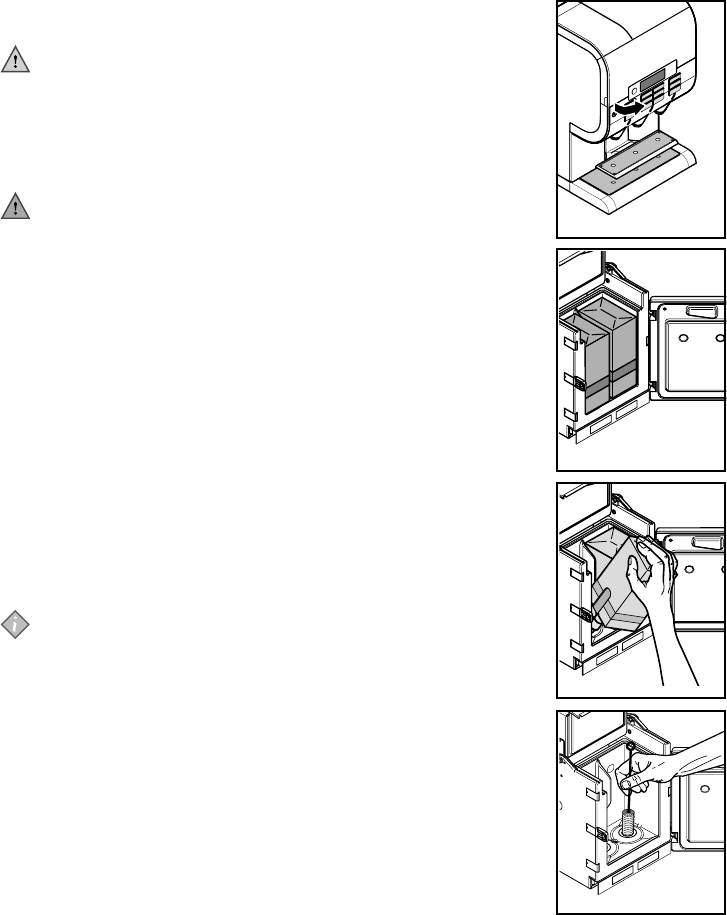
1. Remove the ingredient packs.
a. Open the door of the dispenser. (Fig. 35)
b. Open the ingredient storage door. (Fig. 36)
c. Remove all ingredient packs and place them on a clean surface.
(Fig. 37)
d. Check the „Expiry date“ of all ingredient packs.
If the „Expiry date“ of an ingredient pack has passed, replace it by a
new ingredient pack.
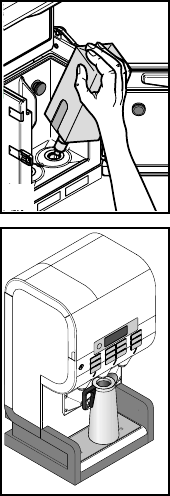
2. Clean the ingredient storage:
a. Clean the doser holes in the bottom of the ingredient storage with a
clean moist brush (supplied with the dispenser). (Fig. 38)
b. Clean the ingredient storage with a clean moist cloth.
c. Dry the ingredient storage with a clean dry cloth.
d. Re-insert the ingredient packs.
Note:
Take care that you re-insert the packs on the correct position,
corresponding to the product placement stickers on the dispenser.
e. Close the ingredient storage door and the dispenser door.
35
36
37
38
Operation
11.2006 19
3. Clean the trough and lid:
Note:
To reduce cleaning time at the dispenser to 3 minutes, we
recommend the use of trough exchange kits, existing of a clean
trough and lid.
Without exchange kit the cleaning time is determined by the time for
soaking the trough and lid in cleaning agent.
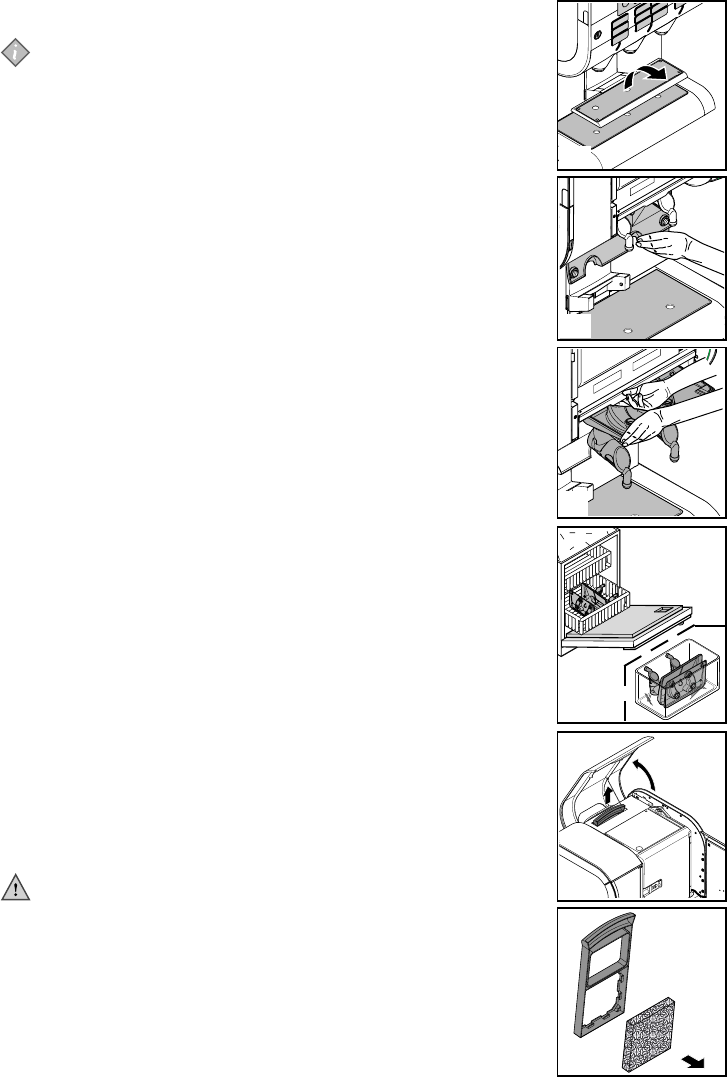
a. Remove the cup tray. (Fig. 39)
b. Pull the outlet cover down. (Fig. 40)
c. Pull the red bar with yellow sticker to release the trough.
d. With your other hand, tilt the trough downwards. (Fig. 41)
e. Remove trough and lid from the dispenser.
f. Clean the trough and lid: (Fig. 42)
• Clean the trough and lid in a dishwasher, or
• Soak the trough and lid in warm water with cleaning agent for 15
minutes.
g. Flush the trough and lid with clean water and dry them with a clean
paper cloth.
4. Re-insert the trough and lid. Press trough and lid upwards until you hear
a clic.
5. Close the door of the dispenser and clean the trays:
a. Clean the cup and drip tray grids
b. Empty and clean the drip tray.
c. Re-insert the cup and the drip tray.
6. Continue with flushing the dispenser.
Cleaning of the air filter
Clean the air filter of the dispenser in regular intervals depending on the
ambient conditions to enable a constant cooling of the ingredient storage.
1. Open the dispenser door.
2. Tilt the housing cover upwards. (Fig. 43)
3. Pull the air filter and the support out of its position behind the ingredient
storage. (Fig. 43)
4. Remove the air filter from its support. (Fig. 44)
5. Wash the air filter with water and some cleaning agent, and soak at with
clear water.
6. Insert the dry air filter into the support, and insert both parts into the
dispenser.
Caution:
Take care, that the designation ‚FRONT‘ on the air filter support
shows to the ingredient storage.
41
39
40
42
44
43
Operation
20 11.2006
Status and error messages
When the symbol appears on the screen, touch the symbol to display the active status message.
In most cases the message will indicate an empty ingredient pack or a reminder to clean the dispenser.
Follow the instructions on the display to resolve the error.
Alternatively you can set the dispenser in operator mode to display all active status and error messages.
Note:
To reset error messages, start the operator mode. Press the ON/STANDBY/RESET switch to
reset the messages.
Switch the dispenser off or on
Switch off the dispenser
If you plan not to use the dispenser for a short period of time (e.g. over the weekend), use the ON/
STANDBY/RESET switch to set the dispenser in STANDBY mode.
• This will switch off the boiler and drink delivery to save energy.
• This will keep the cooling of the ingredient storage unit operational to preserve the quality of the
ingredient packs.
If you plan not to use the dispenser for a long period of time (e.g. during works holidays):
1. Remove the ingredient packs and read the written "Expiry Date" on the packs.
• If the expiration date is before you plan to use the dispenser again, dispose the ingredient
packs.
• If the expiration date is after you plan to use the dispenser again, store the ingredient packs in a
refrigerator until you switch on the dispenser again.
Warning:
Do not freeze thawed ingredient packs again.
2. Clean and flush the dispenser.
3. Unplug the power cord from the wall outlet.
4. Close the water tap.
45

Operation
11.2006 21
Putting into operation
If the dispenser is in standby mode:
1. Open the door of the dispenser.
2. Press the button ON/STANDBY/RESET to activate the dispenser.
The dispenser will re-activate the boiler. Delivery of drinks will remain blocked until the boiler has
reached the correct temperature.
3. Wait until the message "boiler is heaing up, please wait" has disappeared (10-30 minutes).
4. Flush both hot water and product outlets of the dispenser.
5. Select a drink button to test delivery for each drink.
6. Check color, aroma and taste of the drink.
If the dispenser was switched off:
1. Open the water tap.
2. Plug in the mains plug power cord.
The dispenser will start heating the boiler water and cooling the ingredient storage compartent.
Note:
Subject to the electrical specifications of the dispenser (see „Technical specifications“) and the
ambient temperature, heating the boiler may take 30-120 minutes. Cooling the ingredient
storage may take 24 hours or more.
3. Wait until the dispenser display indicates the ingredient storage has reached the correct
temperature.
4. Insert the ingredient packs.
a. Read the "Best before" and "Expiry Date" on the pack.
Do not use packs for which the "Best before" or "Expiry Date" has passed.
b. Mark the product placement stickers on the dispenser and insert the packs on the corresponding
position.
5. Clean and flush the dispenser to ensure safe and hygienic operation.
Caution:
If the dispenser has been out of operation for a very long time (for example during the holidays),
repeat the flushing procedure for hot water at least 4 times.
6. Select a drink button to test delivery for each drink.
7. Check color, aroma and taste of the drink.
22 01.2007
Program the dispenser
The dispenser has a special operator menu mode, that allows you to view/modify settings using the
touch screen display of the dispenser. The menus of the operator mode will guide you through the
options listed below.
Note:
Possibly not all of the below mentioned options are available for your dispenser.
In case of questions please consult your Cafitesse system supplier.
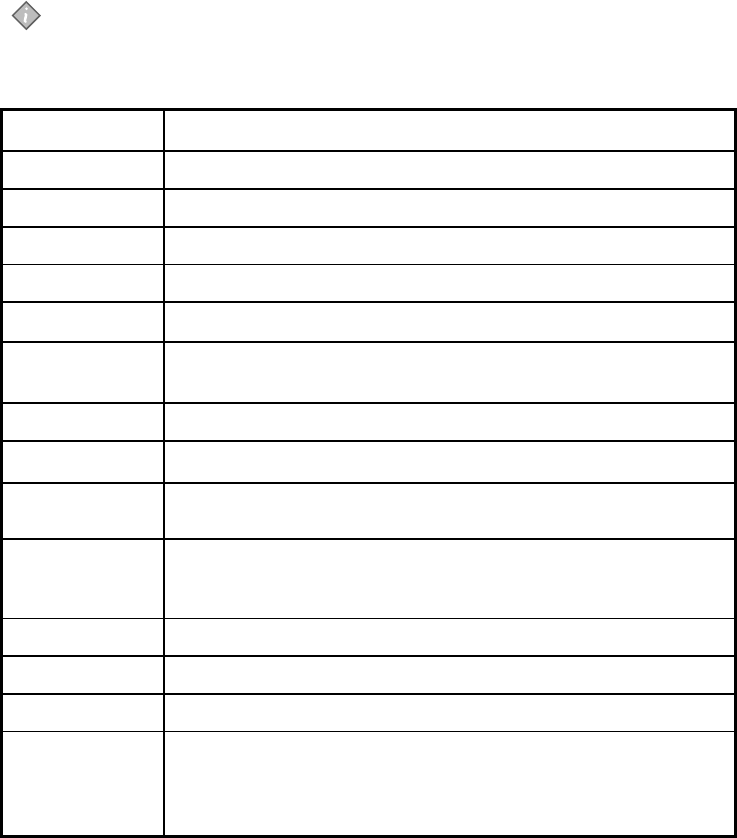
CLEANING Start the cleaning programmes 'Flushing' and 'Cleaning and Flushing'
DRINK CNTRS View the counter values of individual drinks and the total counter value
DRNK PRICES Set the drink prices for sales, and Happy Hour 1, 2, 3
BLOCK KEYS Lock and unlock the delivery buttons
STRENGTH Set the drink strength for individual drinks
DATE&TIME Set the date and time
HAPPY HOUR Set the day of the week, the starting and ending times for up to 3 HAPPY
HOUR intervals•
ENERGY SVNG Set the starting and ending conditions for energy saving intervals
CLEAN.MMNTS Customise the schedule timer for the two cleaning programmes.
TEMPERATURS View temperature values of hot water (boiler) and ingredients (cooling
compartment).
MESSAGES Customise dispenser messages such as:
• The name and telephone number of the operator.
• Commercial welcome messages on the display
WATERFILTR View the water filter: water quantity flown through or time period used
MACHINE NR Input an operator-internal machine number for the dispenser
AUDIT DATA Exchange data with an accounting system, if applicable.
PAYMENT Customise the options if the dispenser is equipped with a payment system:
• Enable/disable payment
• Drink prices
• Happy Hour
Program the dispenser
11.2006 23
Start the operator mode
Your dispenser type will work with one of the two methods listed below to access the operator mode:
• Access the operator mode with the operator tag.
• Access the operator mode with the access code.
Note:
To avoid unauthorised access to the operator mode, we recommend you keep the operator tag
or access code in a safe place.
Access the operator mode with the operator tag
Use this method if your dispenser was delivered with operator tag.
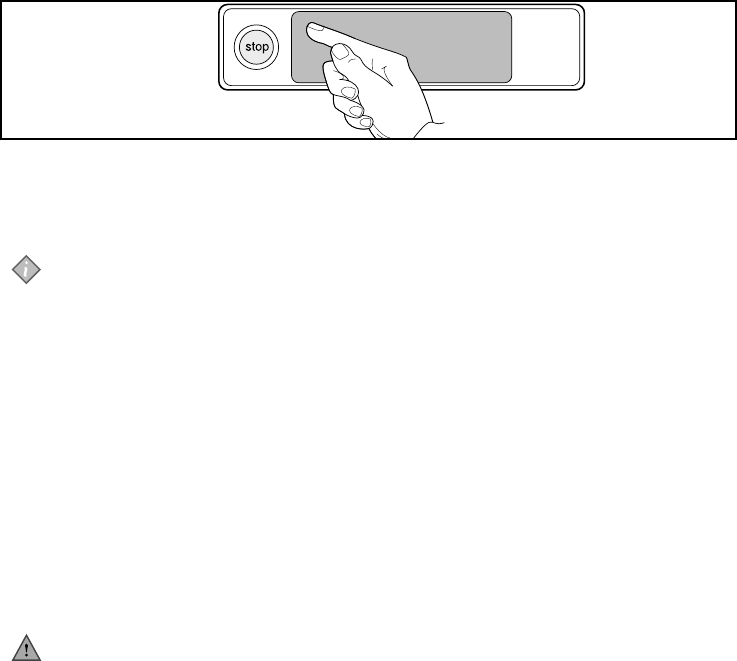
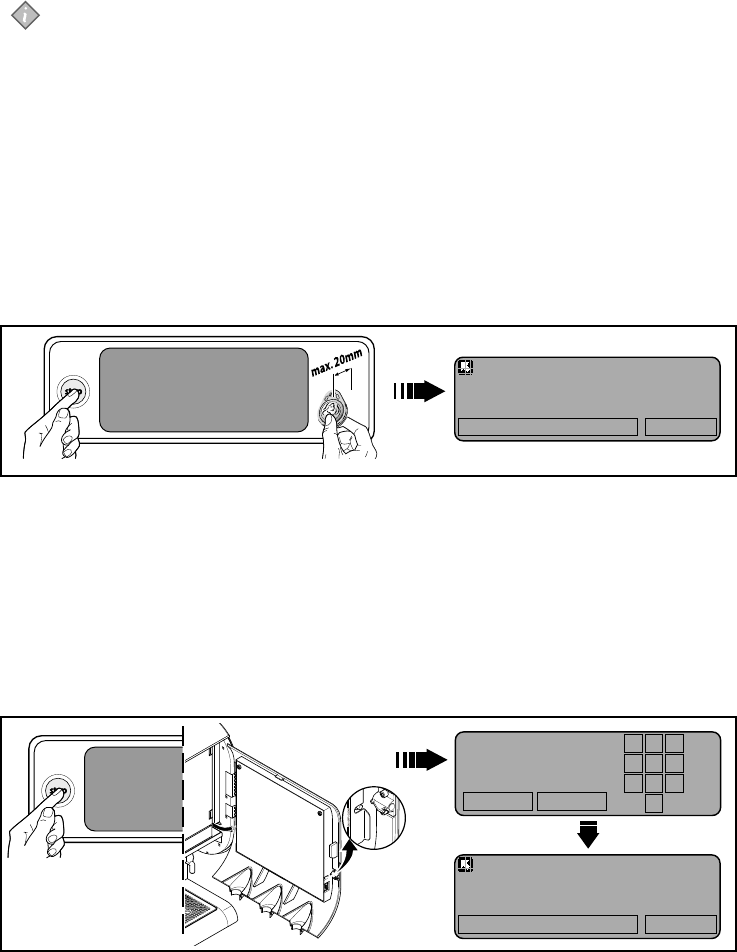
1. Press and hold the stop button. (Fig. 46)
2. Hold the operator tag in front of the area to the right of the touch screen until the dispenser will
display the access screen for the operator mode. (Fig. 46)
• The dispenser will display:
• software version of the dispenser
• Active error code (if applicable)
• Next day and time when you will need to flush or clean and flush the dispenser.
3. Press the field CONTINUE to see the operator mode.
4. Navigate the operator menu to select the option you wish to view or change.
Access the operator mode with the access code
Use this method if your dispenser was delivered without operator tag.
The access code for the operator mode is printed on the last page of this document.
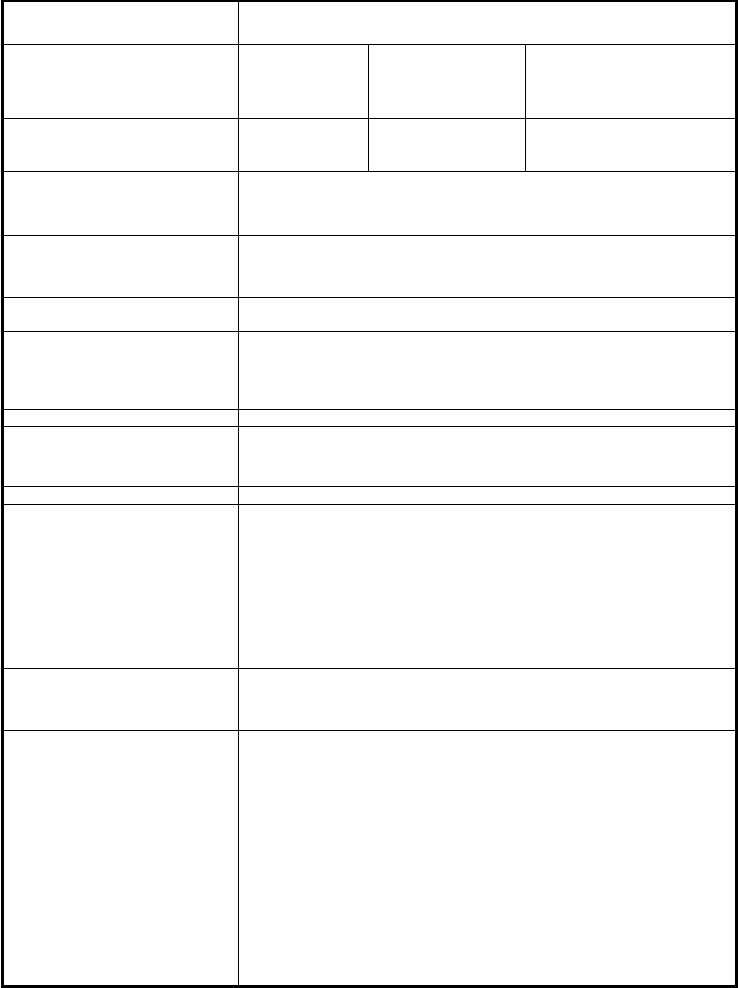
1. Open the door of the dispenser.
2. Press and hold the STOP button. (Fig. 47)
3. Press and hold the ON/STANDBY/RESET switch until the dispenser will display the access screen
for the operator mode.
46
47
CANCEL CLEAR
123
456
789
0
OPERATOR MODE (v X.xx) Tu 11:10
Active error code: 30
Next flushing: Fr 10:30
Next cleaning & flushing: Mo 10:30
MORE ERROR INFORMATION CONTINUE
OPERATOR MODE (v X.xx) Tu 11:10
Active error code: 30
Next flushing: Fr 10:30
Next cleaning & flushing: Mo 10:30
MORE ERROR INFORMATION CONTINUE

Program the dispenser
24 11.2006
Navigate the operator menu
The operator mode has more options than can fit in the touch screen display of the dispenser. To scroll
through all options use the navigation controls to display all options (fig. 48):
a. Touch the top left arrow icon to exit operator mode.
b. Touch a menu button to enter a dialog or program screen.
c. Touch the arrow icons on the right to scroll for more items in the operator mode.
In some of the dialog screens, you will also find left and right arrow icons (fig. 49):
a. Touch the top left arrow icon to return to the main menu of the operator mode.
b. Touch the arrow icons on the right to select the different items of the dialog screen.
4. Close the door of the dispenser and use the numeric fields to enter the 4-digit access code.
• When you enter the wrong code, the "Enter Access Code" screen will remain on the display.
a. Select the field CLEAR to clear the input.
b. Enter the correct access code and try again.
• When you enter the correct code, dispenser will display:
• software version of the dispenser
• Active error code (if applicable)
• Next day and time when you will need to flush or clean and flush the dispenser.
5. Press the field CONTINUE to see the operator mode.
6. Navigate the operator menu to select the option you wish to view or change.
xxxxxxxx xxxxxxxx xxxxxxxx
xxxxxxxx xxxxxxxx xxxxxxxx
xxxxxxxx xxxxxxxx xxxxxxxx
XXXXXXX XXXXXXXX (v X.xx)
a
b c
48
xxxxxxxxxxxxxx: xxxxxxxx
xxxxxxxxxxx : xxxxxxxx
xxxxxxxxxxxxx : xxxxxxxx
XXXXX XXXXXXXXXXX
a
b
49
XXXXXX XXXXXX
01.2007 25
Technical specifications
The features and options listed in this section may not apply in each country. Please consult your
Cafitesse system supplier for more information.
Dispenser versions • Standard version hot drinks - cup & pot delivery.
• Café Cool version hot and cold drinks - cup & pot delivery.
Dimensions cup and pot cup and large pot NSF version
• Height 806 mm/31.7 in 915 mm/36.0 in 812 mm (32.0 in)
• Width 506 mm/19.9 in 506 mm/19.9 in 506 mm (19.9 in.)
• Depth 450 mm/17.7 in 450 mm/17.7 in 450 mm (17.7 in.)
Weight
• empty 50 kg/110.2 lbs 52 kg/114.6 lbs
• filled 65 kg/143.3 lbs 67 kg/147.7 lbs
Maximum cup/pot height: • Cups: 9-16 cm (3,5-6,3 in) using the cup tray
• Pots: 22 cm (8,8 in.) with cup tray folded
• Air pots: 33 cm (13,4 in.) when using the optional air pot extension.
(„Options“)
Ingredient capacity: 2 disposable Bag-in-Box (BIB) ingredient packs with a capacity of:
• 2 litre/0.53 gal, or
• 1.25 litre/0.33 gal. (Use the small optional adapters for ingredient
packs („Options“))
Drink capacity: 100 cups at 100 cc (3.3 fl. oz. USA) per hour per kW heating capacity
(see electrical specifications below)
Standard water connection: • 1/2'' or 3/8'' supply line with 3/4'' BSP connecting piece.
• Drinking water line with stop valve.
• max. water inlet temperature 60ºC/140°F
• Dynamic pressure : min. 0.8 bar at 10 l/min.
• Static pressure : max. 10 bar
• Boiler capacity: 10 litre/2,6 gal
Hot water connection: • Via copper pipes only.
(with a pre-heater • only with a special inlet valve
see „options“) (please consult your Cafitesse system supplier)
• max. water inlet temperature 75 °C/167 °F
Connection water cooling unit: Dynamic pressure: min. 0.8 bar at 1.2 l/min.
Electrical Specifications • By power cord and plug (1.80 m/70.9 in.)
• Direct power connection according to the Safety Instructions
For the connected loads refer to the rating plate.
1-phase operation Europe: max. 3.5 kW at AC 230V-240V
3-phase operation Europe: max. 8.1 kW at 3N AC 400V
1-phase operation USA: max. 1.71 kW at AC 120V
2-phase operation USA: • max. 2.77/3.65 kW at AC 208/240 V
• max. 4.30/5.70 kW at AC 208/240 V
• max. 6.42/8.62 kW at AC 208/240 V
Consult your Cafitesse system supplier for alternative settings.
Environmental specifications
• Acoustic Emission The A-weighted sound pressure level of the dispenser is below 70 dB.
• Ambient Temperature
for installation & operation Between 5 °C/41 °F and 32 °C/90 °F.
Compliancy European market: CE label (Directive about electrical equipment of
low voltage, directive about electromagnetic
compatibility, EC machine directive)
USA and canadian market: UL/cUL label
FCC Statements (for USA):
Labeling Requirements (FCC 15.19)
This device complies with Part 15 of FCC rules. Operation is
subject to the following two conditions: (1) this device may not
cause harmful interference, and (2) this device must accept any
interference received, including interference that may cause
undesired operation.
Modifications (FCC 15.21)
Changes or modifications to this equipment not expressly
approved by the manufacturer may void the user's authority to
operate this equipment.
The manufacturer reserves the right to change specifications without prior notice.
26 01.2007
Options
The features and options listed in this section may not apply in each country.
Please consult your Cafitesse system supplier for more information.
Software options
On customer demand the service technician can enable or disable specific
functions of your dispenser. For example:
* Dual language support for the touch screen (like English and French)
* Acoustic signals for special events such as drink delivery completed,
ingredient pack empty, dispenser errors or confirmation of touch screen
selection.
* Alternative settings for drink recipes, varieties, strength or cup volume.
* Enable/disable preset selections such as drink strength (mild, normal,
strong) or cup size (small, medium, large).
* Portioned or continuous delivery.
* Single or double drink dispensing.
* Automatic ingredient pack switch (when using 2 equal ingredient packs).
* Custom energy saving moments.
* Custom cleaning moments according to your preference.
Hardware accessories
Adapters for small ingredient packs
To use the dispenser with 1.25 litre/0.33 gal ingredient packs, your Cafitesse
system supplier can provide special magnetic adapters for the ingredient
storage to secure the packs into their position. (Fig. 50)
Dispenser feet
To allow easy cleaning underneath the dispenser, the service technician can
install special dispenser feet to raise the position of the dispenser with
approximately 4.5 cm (1.77 in.) from the counter surface.
Air pot Extension
To allow the use of large pots like pump-action pots, the service technician
can install a special dispenser foot to increase the delivery height of the
dispenser outlets to 33 cm (13.4 in.). (Fig. 51)
50
51

Options
11.2006 27
Drainage foot
To minimize the need for emptying the drip tray the service technician can
install a special drainage foot to connect the drip tray directly to a sewer or
drain tank.
Water cooling unit
For the additional delivery of cold water, the service technician can equip your
dispenser with a special water cooling unit.
Caution:
Test the quality of the water supply to ensure delivery of safe cold
drinks according to local regulations.
Hot water valve
If you would like to operate your dispenser with a pre-heater, the service
technician must equip your dispenser with a special hot water valve.
Water tank
In situations where there is no water supply available near the dispenser, or
water supply does not supply water of drinking quality the service technician
can equip the dispenser with a water tank. (Fig. 52)
A dispenser with water tank requires you to (re)fill the tank with fresh drinking
water at regular intervals. If the tank is empty, the dispenser will automatically
display an error message.
Caution:
A dispenser with water tank requires you to renew the water in the
tank every day.
Payment system
If you would like to enable your dispenser for vending of drinks, the service
technician can extend your dispenser with various payment systems. At your
request the service technician can program specific prices per drink and
schedule "happy hour" moments for vending at reduced prices.
52

28 01.2007
Trouble shooting
Symptom
An symbol appears in the
upper left corner of the display
One of the messages
‚Flushing is required‘
or
‚Cleaning and flushing is
required‘
appears on the display.
Error 30 is shown on the
display.
Milk leaks from the product
outlet.
Water leaks from the hot water
outlet or a product outlet.
The dispenser does not
respond to pressing a button
or touch screen input.
Cause
The dispenser indicates that
user intervention is required.
The respective cleaning
program must be performed.
The temperature inside the
ingredient storage is too high.
Incorrectly installed ingredient
(milk) pack.
Scale particles block the
respective outlet valve, it
cannot close completely.
A software jam has occured.
Possible solution
Touch the symbol and follow the
instuctions on pages 15 and 20 of
this manual.
Press the upper center of the touch
screen and follow the instructions,
see page 16 of this manual.
Check / clean the air filter
(see page 19).
If the problem persists contact your
Cafitesse-system-supplier.
Check if the red ring of the dosing
tube is turned completely (see the
instructions on the package).
Perform the program ‚Flushing‘.
If the problem persists contact your
Cafitesse-system-supplier.
Reset the dispenser:
Disconnect the power supply and
connect again after 5 seconds.
If the problem persists contact your
Cafitesse-system-supplier.