User Manual
Instruction Manual
Aurora

Congratulations on becoming an
ocial owner of the Nanoleaf Aurora,
a product that will let you create
incredible lighting displays by
snapping together panels with ease.
Remember, you can purchase
expansion packs to grow the Aurora,
and unleash your creativity to the
fullest! Without further ado, let the
excitement begin!
WELCOME
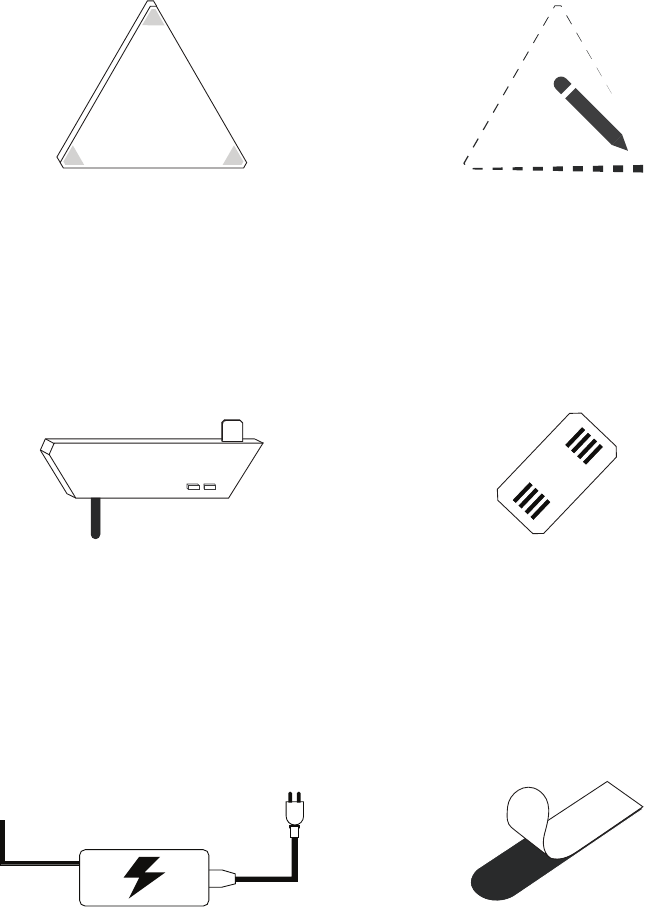
WHAT’S IN THE BOX?
x28
x9
x1
x9 x9
x1
Linkers
Panels Stencil Paper
Controller
Mounting TapePower Supply
HARDWARE SET-UP
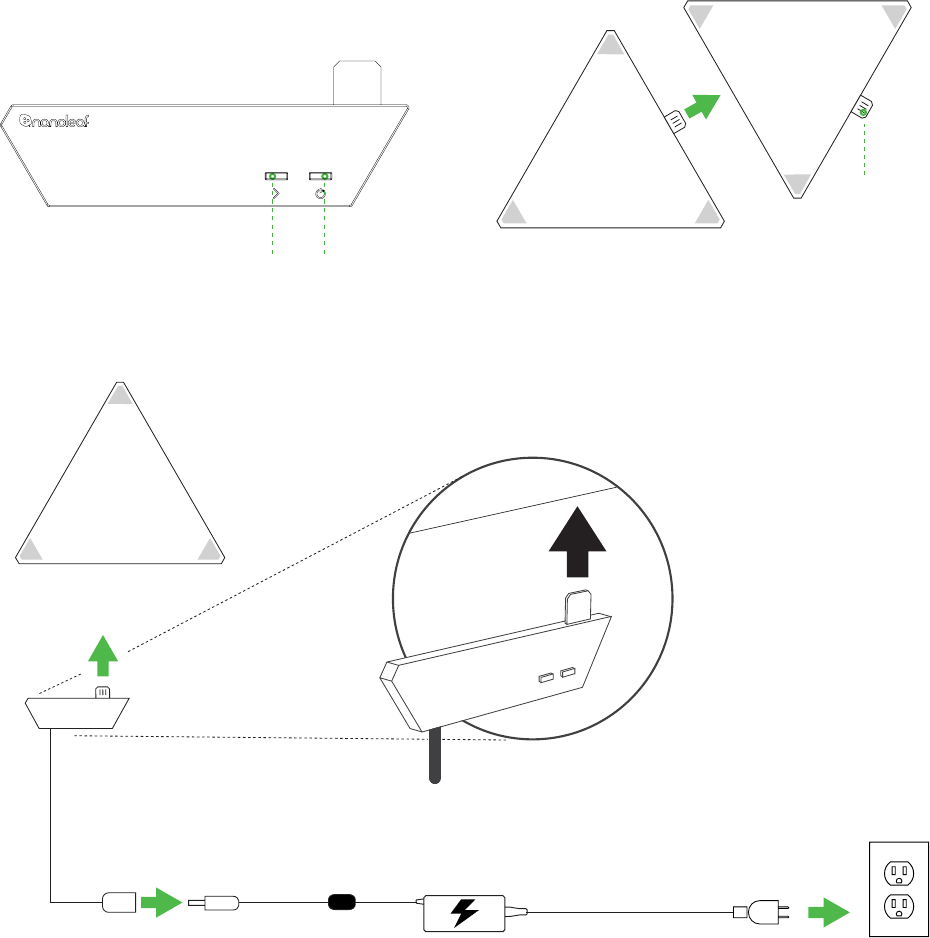
To connect the panels together, insert a linker into the linker port on
the reverse of the Aurora panels. Ensure that the metal contacts are
aligned, and gently snap the panels together.
Slow down tiger! Before you stick the panels onto the wall, be sure to plug it in and try
it out on a table rst.
Recommended Installation Requirements
This device should only be installed in an indoor environment on a at surface that can withstand the weight of the panels. Make sure that the
surface is dry and clean from any dust or oil. For optimal performance it is recommended that Nanoleaf Aurora be installed in a location that pro-
vides sucient airow around the panels. It is recommended that the Nanoleaf Aurora be installed away from other devices designed to receive or
transmit radio signals. Locate your Aurora within 20 meters from your home wireless (Wi) router with at most one wall between them.
Connect the controller to any free edge on any panel. Then connect the power supply to the wire coming out of the controller. Use the included
mounting tape to securely attach the panels and controller to your desired at surface. Click here to watch an instructional video on how to install
the panels using the provided mounting tape. Once everything is set up. Connect the power cable to an AC outlet in order to power up your Aurora.
Toggle Button:
cycle through existing
scenes/animations
Power Button:
Turn the Aurora
panels on or o
Linker
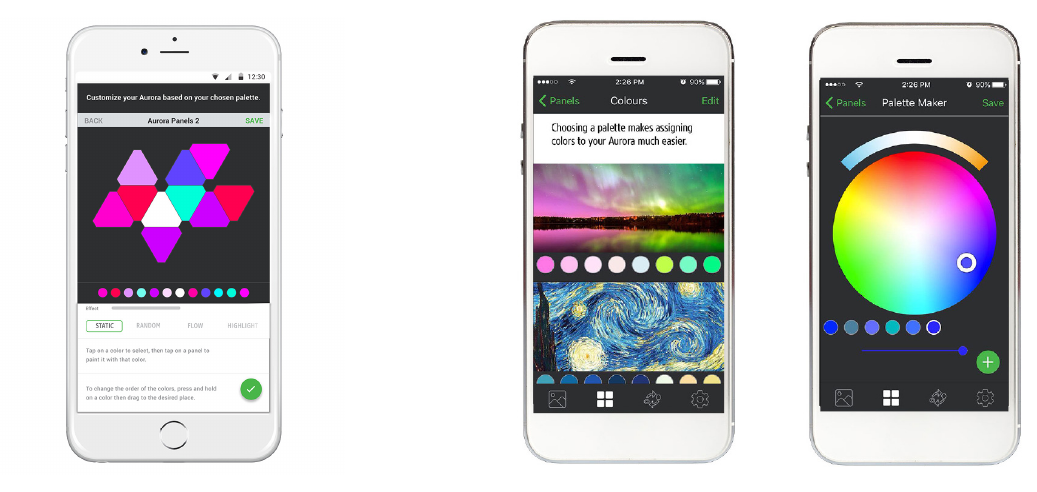
1. Layout: The conguration of the
Aurora panels is automatically de-
tected and shown in the App. With
two ngers, you can pinch to zoom
and rotate the Aurora so it matches
the panels’ physical orientation.
SOFTWARE SET-UP
CONTROL VIA APP
The software setup will be easiest if your Aurora is powered on and you see colors moving
across it. Boot up time for your Aurora is about 1 minute.
1. Download the “Nanoleaf Smarter Series” app from the Apple App Store or Google Play
Store and launch it.
2. Go through the setup steps in the App to connect your Aurora to your home network
and pair with your device.
Animations make up the core of the Aurora software experience. Animations are saved
settings for your Aurora to display. There are 3 main components to an Animation:
2. Palette: this is a set of colors you use to
create your animation. We’ve included a few in
the App, but you can create as many Palettes as
you like. You can use up to 20 colors in a Pal-
ette.
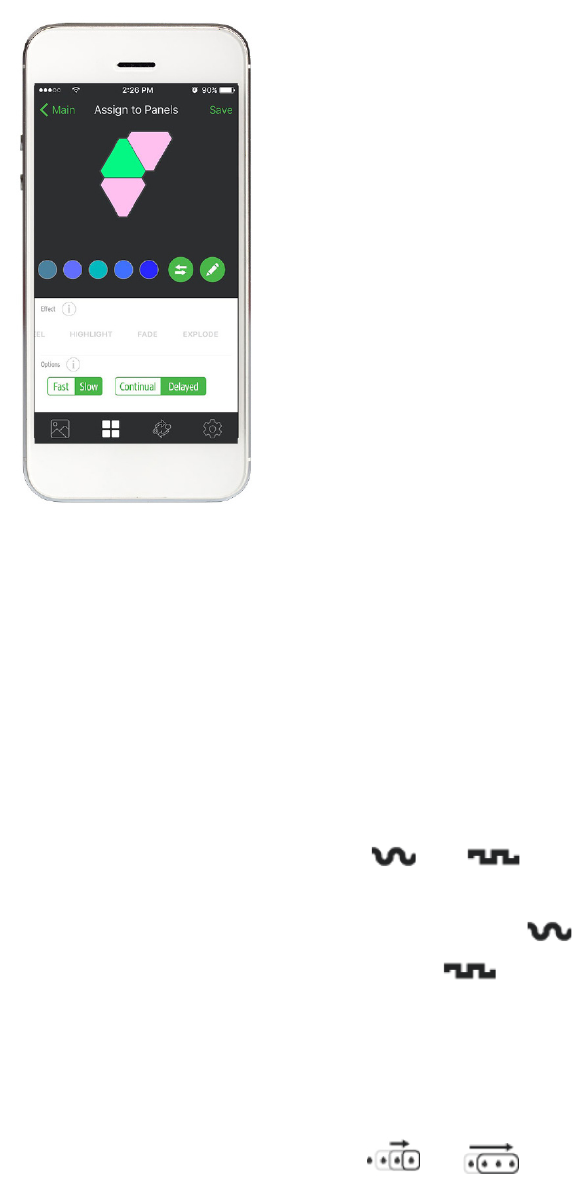
3. Eect: this is how the Aurora will display your color palette.
a. Static: Tap a Palette color and tap a panel to paint it.
Hold your nger over a panel to change the brightness
of that individual panel.
b. Random: This will take your Palette colors and randomly
animate them across your panels.
c. Flow: Imagine pouring each Palette color onto your
panels. Watch the color ow in a direction of your
choosing.
d. Wheel: Provides a continuous moving gradient of color
created from your Palette.
e. Highlight: Just like random, but you will mostly see the
color on the left of your Palette. The other colors fade in
periodically.
f. Fade: The aurora cycles through your Palette colors all
together.
g. Burst: Your Palette colors radiate out from the center of
the Aurora panels.
4. Options: these modify how an Eect Type works.
a. Speed: How quickly do you want your Animations to go?
This acts a bit dierently depending on the Eect type.
b. OR : For the Random, Highlight, 12 and Fade
Eects, this changes how long the Aurora panels stay at
a given color. moves from color to color without
delay, will pause at each color before moving to the
next.
c. Direction: This tells the Aurora which way to direct your
color in Flow and Wheel. This direction depends on the
rotation you’ve selected for the panels.
d. OR : This changes how many palette colors are
shown on the Aurora at once. The higher the number, the
more of your Palette is painted across your Aurora!
CONTROL VIA APP
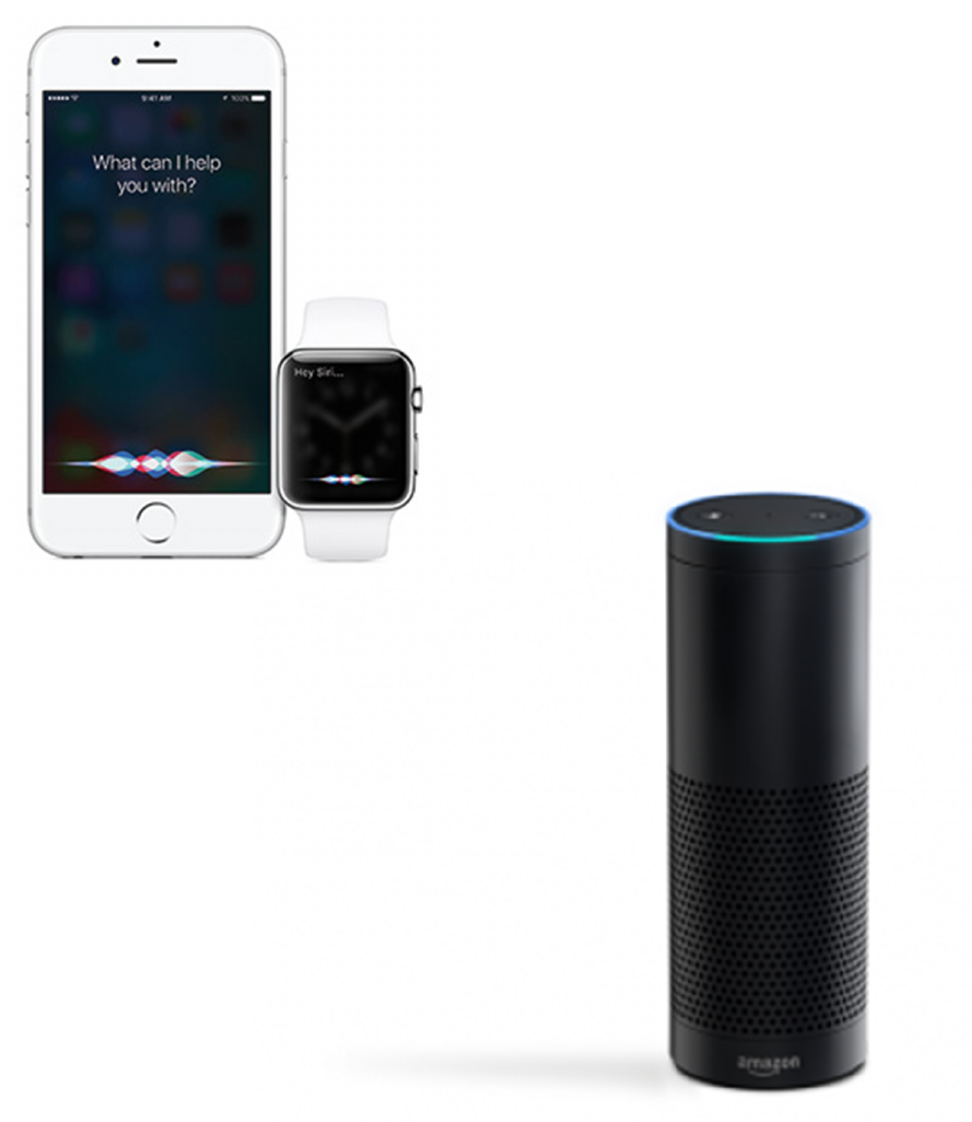
Siri
“Turn [My Aurora] on/o.”
“Set [My Aurora] to 10% brightness.”
“Dim [My Aurora].”
“Set [Animation Name]”
“Set [My Aurora] to Green”
Amazon Echo
Planned support for Q4 2016 with
commands to be announced.
VOICE CONTROL
You can easily control your Aurora by voice in a few dierent ways. In the App, make
sure to name your Aurora something easy to say.
The following recommendations can help your Nanoleaf Aurora achieve the best wireless range &
network reception.
Best Locations for Nanoleaf Aurora:
▪ Place your Aurora in an open area where there are few obstructions, such as large pieces of
furniture or walls. Place it away from metallic surfaces.
▪ Avoid placing your Aurora behind furniture or inside cabinets.
▪ Don‘t place your Aurora in areas surrounded by metal surfaces on three or more sides. This can
cause signal issues.
▪ Try to place your Aurora at least 25 feet (8 meters) away from any microwave oven, 2.4 GHz
cordless phone, Wi devices, or other source of interference.
▪ Place your Aurora as close to your Wi home router as possible. For best performance, keep
the distance below 65 feet (20 meters) and have no more than one wall in between.
PROBLEMS & SOLUTIONS
Wi-Fi Troubleshooting
1. Wi Status Indicator. After the 1 minute bootup, the Wi Status indicator will show wi status.
a. Solid: Your Aurora is ready to be connected to your home network.
b. Flashing (1s interval): Wi conguration has timed out. Power cycle or hold the on button
and animation select button together for 5 seconds.
c. Unlit: Wi is congured and connected to your router.
d. Flashing (4s interval): Wi is congured, but the Aurora cannot connect to the target
network. It will continue trying unless you reset the Wi by holding the on button and
animation select button together for 5 seconds.
TIPS &
TROUBLESHOOTING

I can’t see my Aurora in the App for setup:
1. If the Wi status indicator is lit:
a. Make sure your mobile device wi is on.
b. Try moving your mobile device closer to your Aurora. The App connects directly to the
Aurora in order to setup wi.
c. Try turning your mobile device wi o and back on
2. If the Wi status indicator is not lit, your Aurora is already on a wi network.
a. Make sure your mobile device is on the same network
b. Try turning your mobile device wi o and back on.
3. If the Wi status indicator is ashing:
a. See Wi troubleshooting section for more details.
Resetting the Aurora
1. Resetting Wi settings. This will allow you to connect your Aurora to a new network.
▪ While the software is running (after 1-2 minute bootup sequence) press the Toggle
and Power buttons together and hold for 5 seconds. The wi status LED will light up.
Once the LED lights up, release the buttons.
2. Soft Reset. This will reset wi and all pairing information, although will keep your saved
animations.
▪ While the software is running (after 1-2 minute bootup sequence) press the Toggle and
Power buttons together and hold for 15 seconds. The wi status LED will light up after 5
seconds and start ashing after 15 seconds.
3. Hard Reset. This will reset your Aurora to factory settings, deleting wi settings, pairing
information, and saved animations. Factory animations will be restored.
▪ Disconnect power to the Aurora. Then hold the Toggle and Power buttons together and
reconnect the power without releasing the buttons. After about 7 seconds, the wi
status LED will start to ash rapidly. Once the ashing begins, you can release the buttons.
You must then wait 3 minutes for the Aurora to reset itself to factory defaults and boot up.
My beautiful Aurora masterpiece with 50 panels is not functioning correctly:
We are afraid that only 30 panels are supported by a single controller and power supply. If you are
inspired to go big, you will need to have separate controllers and power supplies each handling at
most 30 panels. You can pair more than one Aurora system with your smartphone.
Check out helpdesk.nanoleaf.me for further troubleshooting and hardware reset instructions.

For technical support and assistance for your Nanoleaf Aurora,
Please go to helpdesk.nanoleaf.me.
Please visit our online user manual page for a complete list of frequently asked questions
and answers: www.nanoleaf.me/myaurora
WARRANTY
Nanoleaf Aurora is protected under a 3 year limited warranty.
Please visit www.nanoleaf.me/myaurora to register for and download the warranty.
SUPPORT
FAQ

Nanoleaf Aurora adheres to the certication requirements for various regions around the world.
To see a full list of Nanoleaf Aurora certications and to ensure Nanoleaf Aurora complies with the
certication requirements in your region, please go to www.nanoleaf.me/legals.
This device complies with part 15 of the FCC Rules. Operation is subject to the following two con-
ditions: (1) This device may not cause harmful interference, and (2) this device must accept any in-
terference received, including interference that may cause undesired operation. This Class B digital
apparatus complies with CAN ICES3 (B)/NMB3 (B) This digital apparatus does not exceed the Class
B limits for radio noise emissions from digital apparatus as set out in the Radio Interference Regu-
lations of the Canadian Department of Communications. This device has been tested and found to
comply with the limits for a Class B digital device pursuant to Part 15 of the FCC rules.
Any Changes or modications not expressly approved by the party responsible for compliance
could void the user’s authority to operate the equipment.
This equipment complies with FCC radiation exposure limits set forth for an uncontrolled
environment.
This device complies with ISEDC licence-exempt RSS standard(s). Operation is subject
to the following two conditions:
(1) this device may not cause interference, and
(2) this device must accept any interference, including interference that may cause undesired oper-
ation of the device.
Le présent appareil est conforme aux CNR d’ISEDCapplicables aux appareils radio exempts de li-
cence. L’exploitation est autorisée aux deux conditions suivantes :
(1) l’appareil nedoit pas produire de brouillage, et
(2) l’utilisateur de l’appareil doit accepter tout brouillage radioélectrique subi, même si le brouillage
est susceptible d’en compromettre le fonctionnement.
HARDWARE COMPLIANCE
& CERTIFICATIONS
This equipment should be installed and operated with minimum distance 20cm between the radiator& your body.
CHANGES & MODIFICATION
Changes or modications made to this device may void certication of the device. Changes or
modications made to this unit not expressly approved by the party responsible for compli-
ance could void the user‘s authority to operate the equipment.
INTERFERENCE
Nanoleaf Aurora has been designed to minimise interference with other radio, broadcast or
receiving devices. The manufacturer is not responsible for any interference caused as a result
of modications to the product or by failure to adhere to the “Warnings and Cautions” section
of this document.
This device generates radio frequency energy and, if not installed in accordance with the
“recommended installation requirements” may cause harmful interference to radio communi-
cation devices. If the device is causing radio interference, it is recommended that the user try:
a) relocating the device to a dierent place; b) adjust the antenna on the receiving device; c)
consult a technician experienced in radio interference.
WARNINGS &
CAUTIONS
Nanoleaf Aurora is not designed for use in:
▪ Enclosed locations that limit the ow of air and/or trap excessive amounts of heat
▪ Emergency exits or emergency lights
▪ Conjunction with 3rd party sensors/timing devices that are not approved by Nanoleaf®
▪ Places where there is a risk of electric shock
▪ Outdoor areas
▪ Wet or damp conditions
▪ Excessively hot environments (e.g. close to ovens, radiators, heaters, etc.)
▪ Regions or countries other than that in which the product was intended for.
When using Nanoleaf Aurora:
▪ Do not open the device, as this will void the warranty.
▪ Do not place any metallic or conductive objects near the exposed contacts on the
Aurora controller, power supply, linkers, or back of the Aurora panels.
▪ Do not allow small children to operate this device unsupervised. This device contains
small parts that may be a choking hazard to small children.
▪ Do not clean the device when it is on and or connected to power.
▪ Clean the panels with a soft dry cloth, do not use cleaning agents.
▪ Do not bend the panels with the linker still attached.
▪ Do not attach the panels together with anything other than its original panel linkers.
▪ Do not puncture the panels with any nails or screws during installation.
▪ Do not attach the panels to a ceiling without extra adhesives to secure the panels
from falling.
▪ Do not attach the panels to the oor where it may get stepped on.
▪ Do not place the panels in water, or expose the panels to water.
Please read this safety information carefully and keep this user manual for later reference.
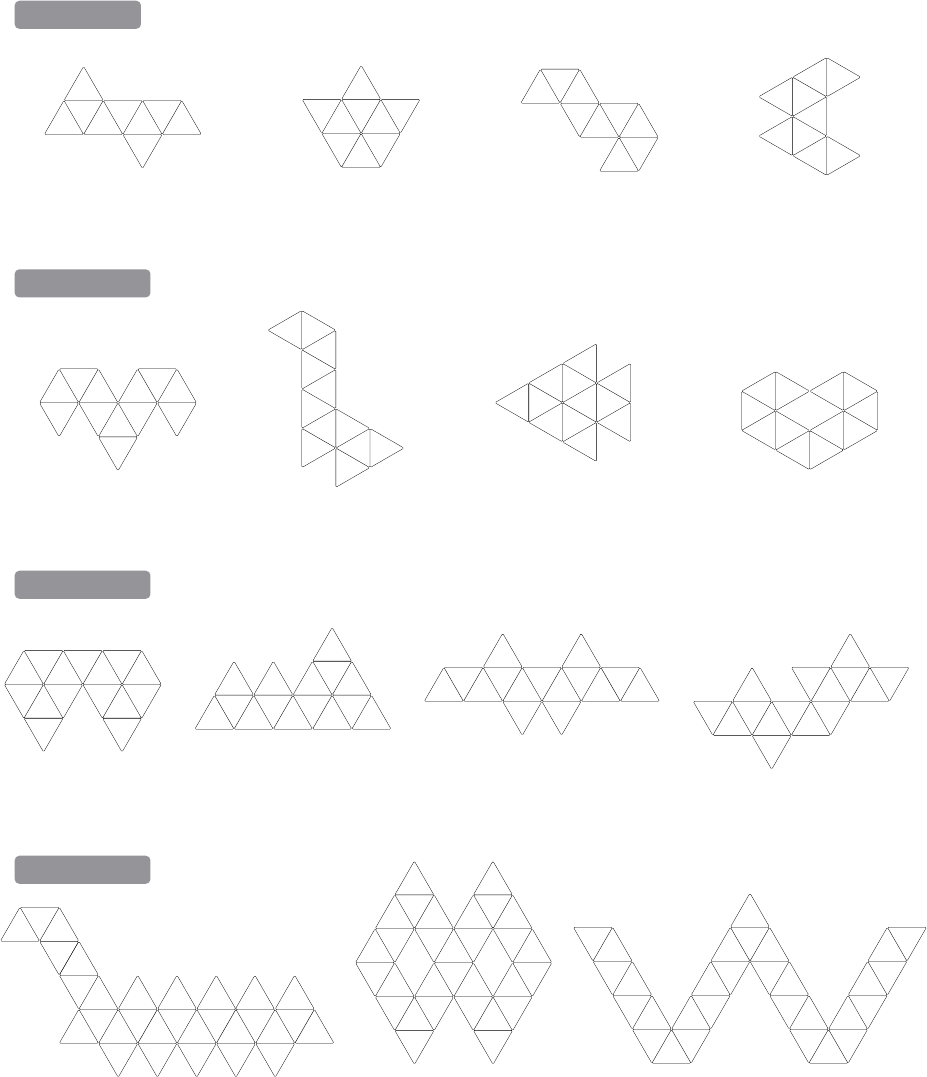
DESIGN IDEAS
The more the merrier! Here are just a few examples of what you can create with more
Aurora panels:
with 9 Panels
with 12 Panels
with 15 Panels
with 30 Panels
The Napping Unicorn
The Dodgy Ram
The Siamese Diamond
The Slurpasaurus Rex
The Matrix Crown
The Cuddly Girae
The Homely Mountains
The Free Bird
The Sparkly Nemo
The Huggable Sloth
The Divine Innity
The Swanky Pacman
The Lovey Dovey
The Snuggling Kittens
The Wiggly Worm

nanoleaf.me/aurora
GET SOCIAL
Share your masterpiece with us!
Let your voice be heard!
Leave a review for this product by visiting: