NCR RSD Atlanta 7777-01XX 7777-01XX User Manual 02
NCR Corporation, RSD - Atlanta 7777-01XX 02
Contents
- 1. User Manual
- 2. User Manual 01
- 3. User Manual 02
- 4. User Manual_02
User Manual 02

NCR ©2014 All rights reserved.
User Manual
NCR Orderman7 Version 01.02

NCR Orderman7 General information
Orderman GmbH 2 V 01.02
© 2014 by
Orderman GmbH
Bachstrasse 59
5023 Salzburg – Austria
www.orderman.com
We accept no liability for errors or misprints.
Copying, even excerpts hereof, is prohibited without the written consent of Orderman GmbH.
User Manual
NCR Orderman7
Published November 2014
Version 01.02
Orderman accepts no responsibility for any damage or losses that arise from the use of this manual.
Orderman accepts no responsibility for any losses or claims by third parties that arise through the
use of Orderman devices.
The contents of this guide are subject to change without prior notice.
This guide does not constitute part of a contract.
Trademark: All brand and product names are trademarks or registered trademarks of their
corresponding companies.
Note: For further questions about operating the device, contact your Orderman
partner.

NCR Orderman7 General information
Orderman GmbH 3 V 01.02
Contents
1 General information ......................................................................................................... 5
1.1 Warranty _________________________________________________________________________ 5
1.2 Labeling __________________________________________________________________________ 5
1.2.1 Labeling on the unit 5
1.2.2 Serial number 6
1.3 Safety notices _____________________________________________________________________ 8
1.3.1 Explanation of symbols 8
1.3.2 General information 9
1.3.3 Safety information for battery pack 9
1.3.4 Safety information for barcode reader (laser) 9
2 NCR Orderman7 handhelds ........................................................................................... 11
2.1 Overview ________________________________________________________________________ 11
2.2 NCR Orderman7 handheld features __________________________________________________ 12
3 NCR Orderman7 ............................................................................................................. 13
3.1 Product description _______________________________________________________________ 13
3.2 Overview ________________________________________________________________________ 13
4 NCR Orderman7+ ............................................................................................................ 15
4.1 Product description _______________________________________________________________ 15
4.2 Overview ________________________________________________________________________ 15
5 NCR Orderman7MSR ........................................................................................................ 17
5.1 Product description _______________________________________________________________ 17
5.2 Overview ________________________________________________________________________ 17
6 NCR Orderman7SC .......................................................................................................... 19
6.1 Product description _______________________________________________________________ 19
6.2 Overview ________________________________________________________________________ 20
7 Service station and multi service station ..................................................................... 22
7.1 Overview of the service station _____________________________________________________ 22
7.2 Starting up the service station ______________________________________________________ 23
7.3 Overview of the multi service station _________________________________________________ 25
7.4 Starting up the multi service station _________________________________________________ 26
8 Remove/replace battery pack ........................................................................................ 27
9 Safety Cord ..................................................................................................................... 28
10 Operating the service station and multi service station .............................................. 29
10.1 Charging in the service station and multi service station ________________________________ 29
10.1.1 Charging the handheld 30
10.1.2 Charging the battery pack without handheld 31

NCR Orderman7 General information
Orderman GmbH 4 V 01.02
10.2 Charging status LED for service station ______________________________________________ 31
10.3 Network Status LED for service station _______________________________________________ 32
10.4 Power LED for service station ______________________________________________________ 32
11 Operation ........................................................................................................................ 33
11.1 Operating conditions of the handhelds _______________________________________________ 33
11.1.1 Handheld On/Off 33
11.1.2 Standby 33
11.2 Acceleration sensor _______________________________________________________________ 33
11.2.1 Flip-View 33
11.2.2 Sleep mode 33
11.3 Status bar _______________________________________________________________________ 34
11.4 Configuration menu _______________________________________________________________ 34
11.5 Configure handheld _______________________________________________________________ 34
11.5.1 Display settings 35
11.5.2 Connecting the belt printer (Bluetooth pairing) 36
11.5.3 Miscellaneous 37
11.6 Use the magnetic strip reader _______________________________________________________ 38
11.7 Use the barcode reader ____________________________________________________________ 39
12 Testing the unit .............................................................................................................. 40
12.1 Ordercard test ____________________________________________________________________ 40
12.2 ISO/NFC test _____________________________________________________________________ 41
12.3 Barcode test (imager) _____________________________________________________________ 42
13 Accessories .................................................................................................................... 43
13.1 Orderman touch pen ______________________________________________________________ 43
13.2 Orderman pouch _________________________________________________________________ 43
14 Cleaning instructions ..................................................................................................... 44
15 Technical specifications ................................................................................................ 45
16 Troubleshooting ............................................................................................................. 47
17 Index ............................................................................................................................... 49
18 Glossary .......................................................................................................................... 50

NCR Orderman7 General information
Orderman GmbH 5 V 01.02
1 General information
This manual applies to Orderman handhelds and Orderman accessories.
It covers the following Orderman handhelds:
NCR Orderman7
NCR Orderman7+
NCR Orderman7MSR
NCR Orderman7SC
The different versions are described in the following chapters.
1.1 Warranty
All warranty claims must be addressed to your local Orderman contractual partners.
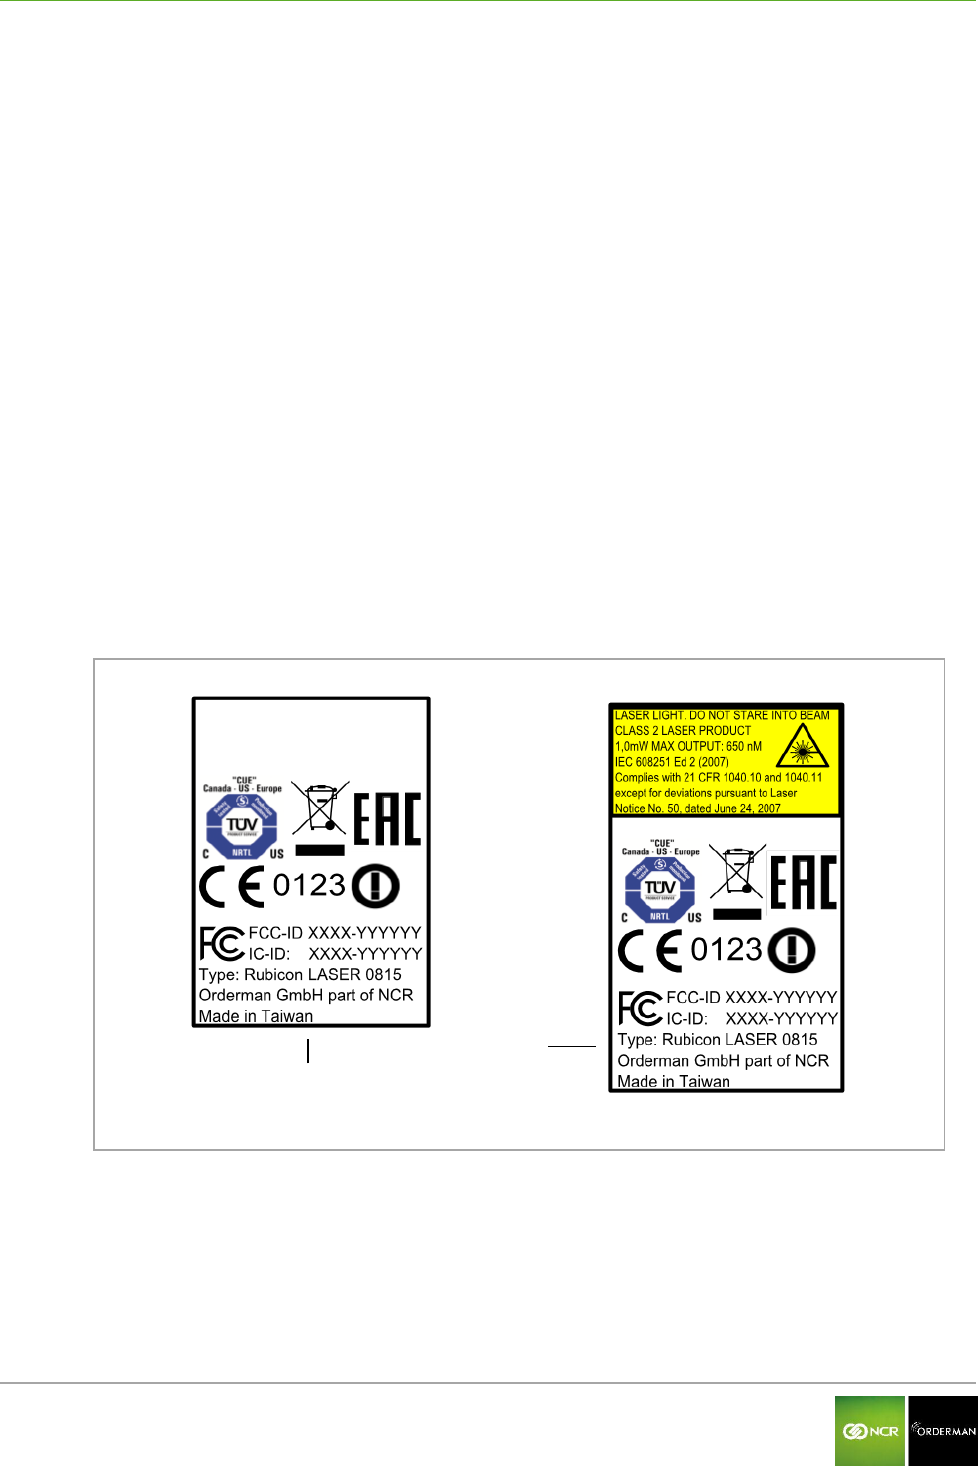
1.2 Labeling
The labeling provides information on certifications, standards, product descriptions and
manufacturer specifications.
1.2.1 Labeling on the unit
The labeling (model plate) is located on back of the unit.
Fig. 1: Labeling
NCR Orderman/NCR Orderman+/
NCR OrdermanMSR
NCR Orderman7SC
NCR Orderman7 General information
Orderman GmbH 6 V 01.02
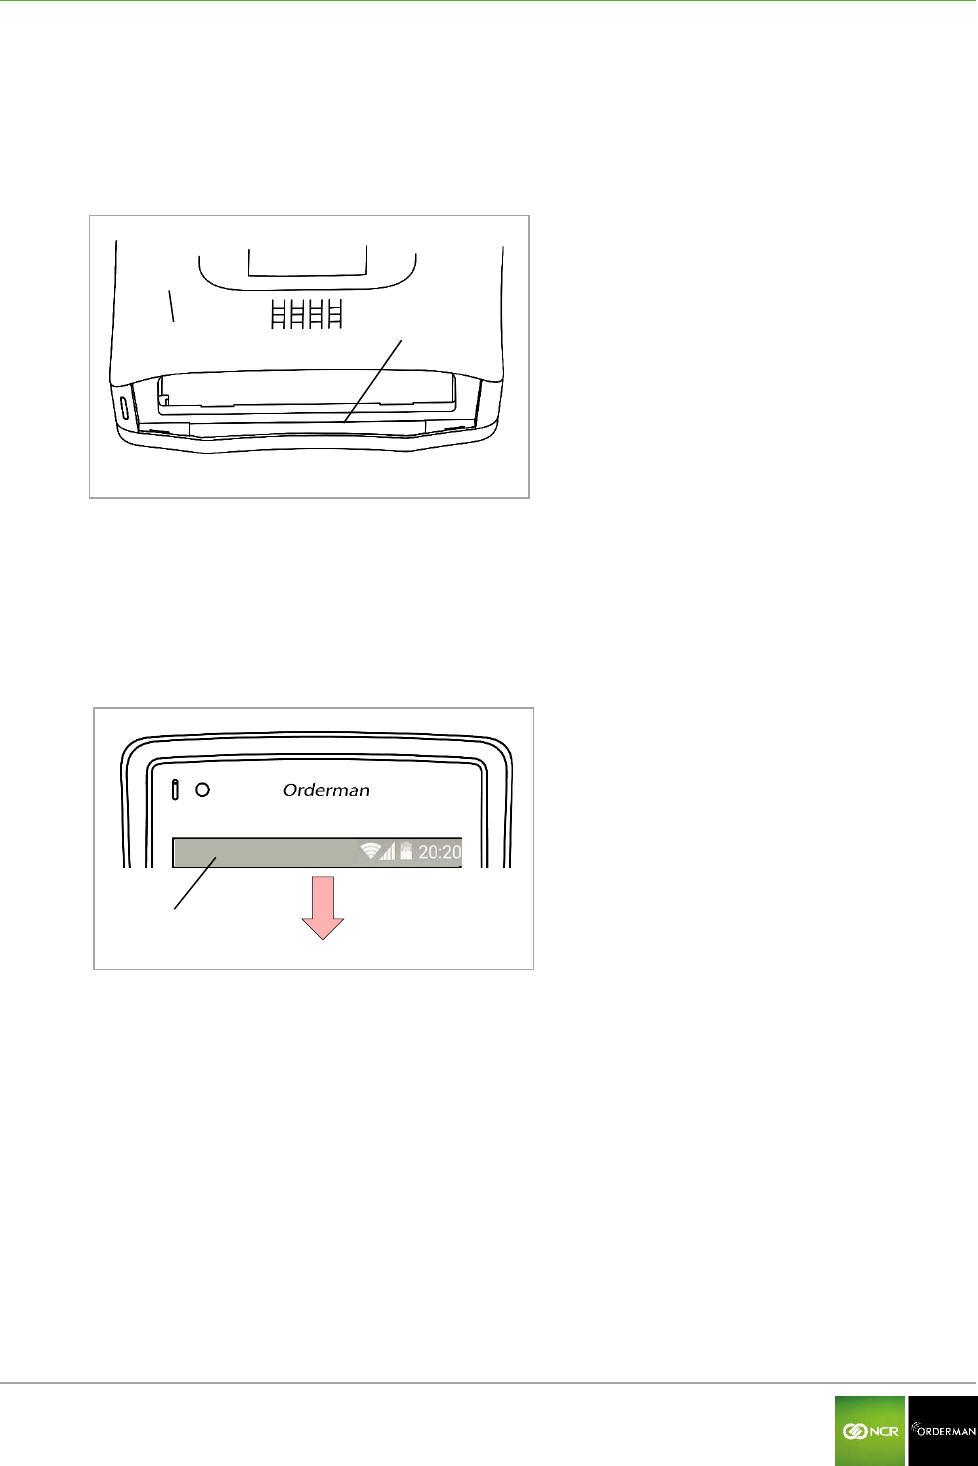
1.2.2 Serial number
The serial number is used to uniquely identify the unit.
You will find the serial number in the unit's battery slot.
Fig. 2: Serial number in the battery slot
Back of the Orderman handheld
Serial number in the battery slot
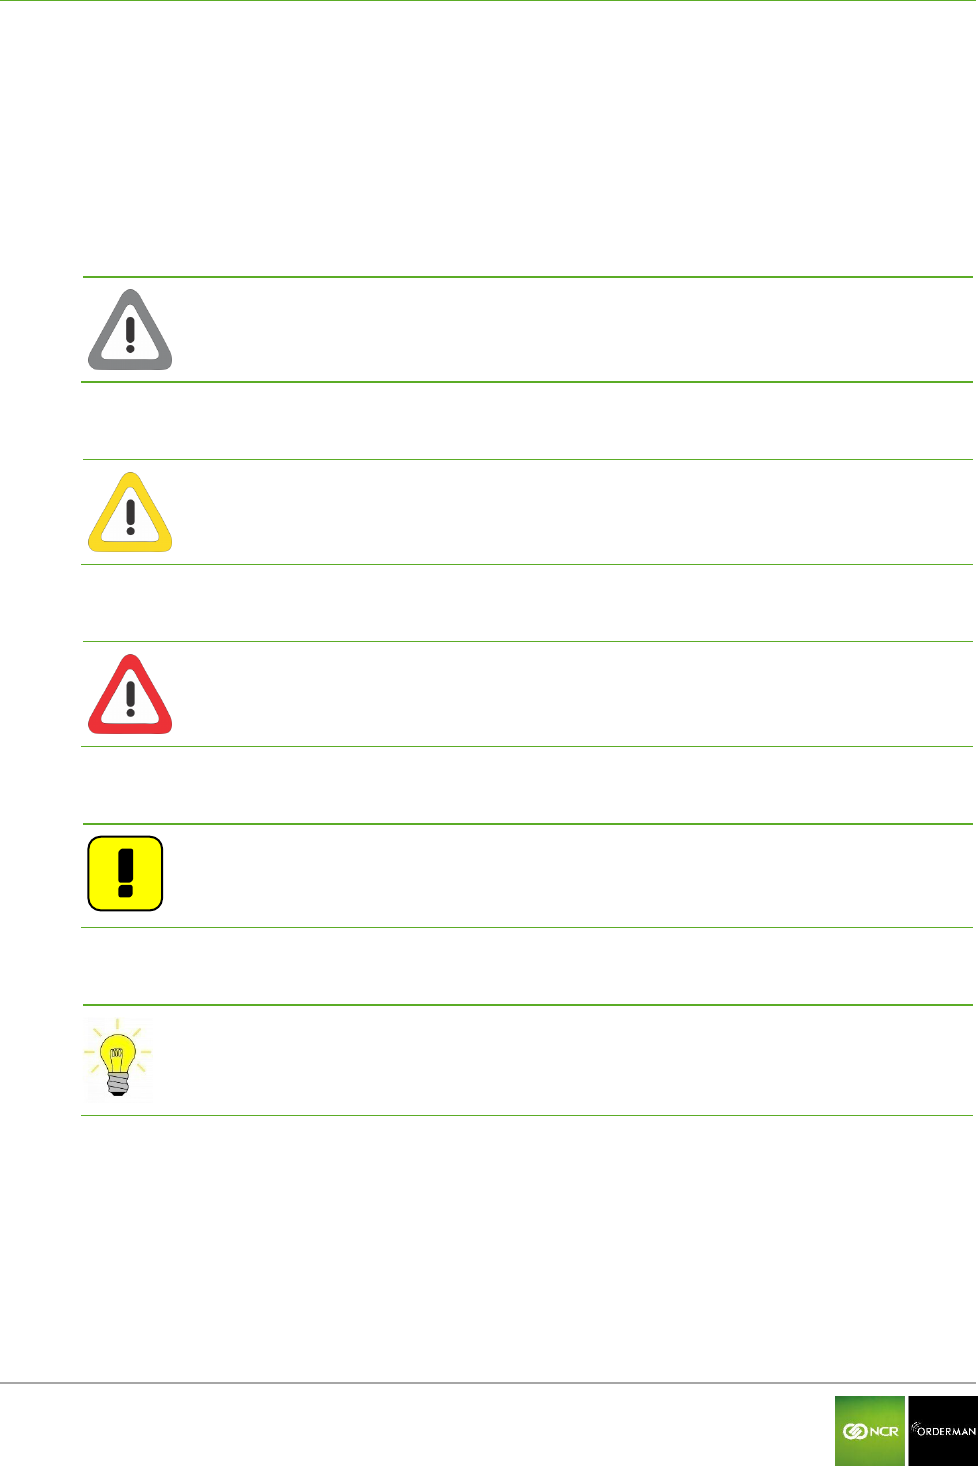
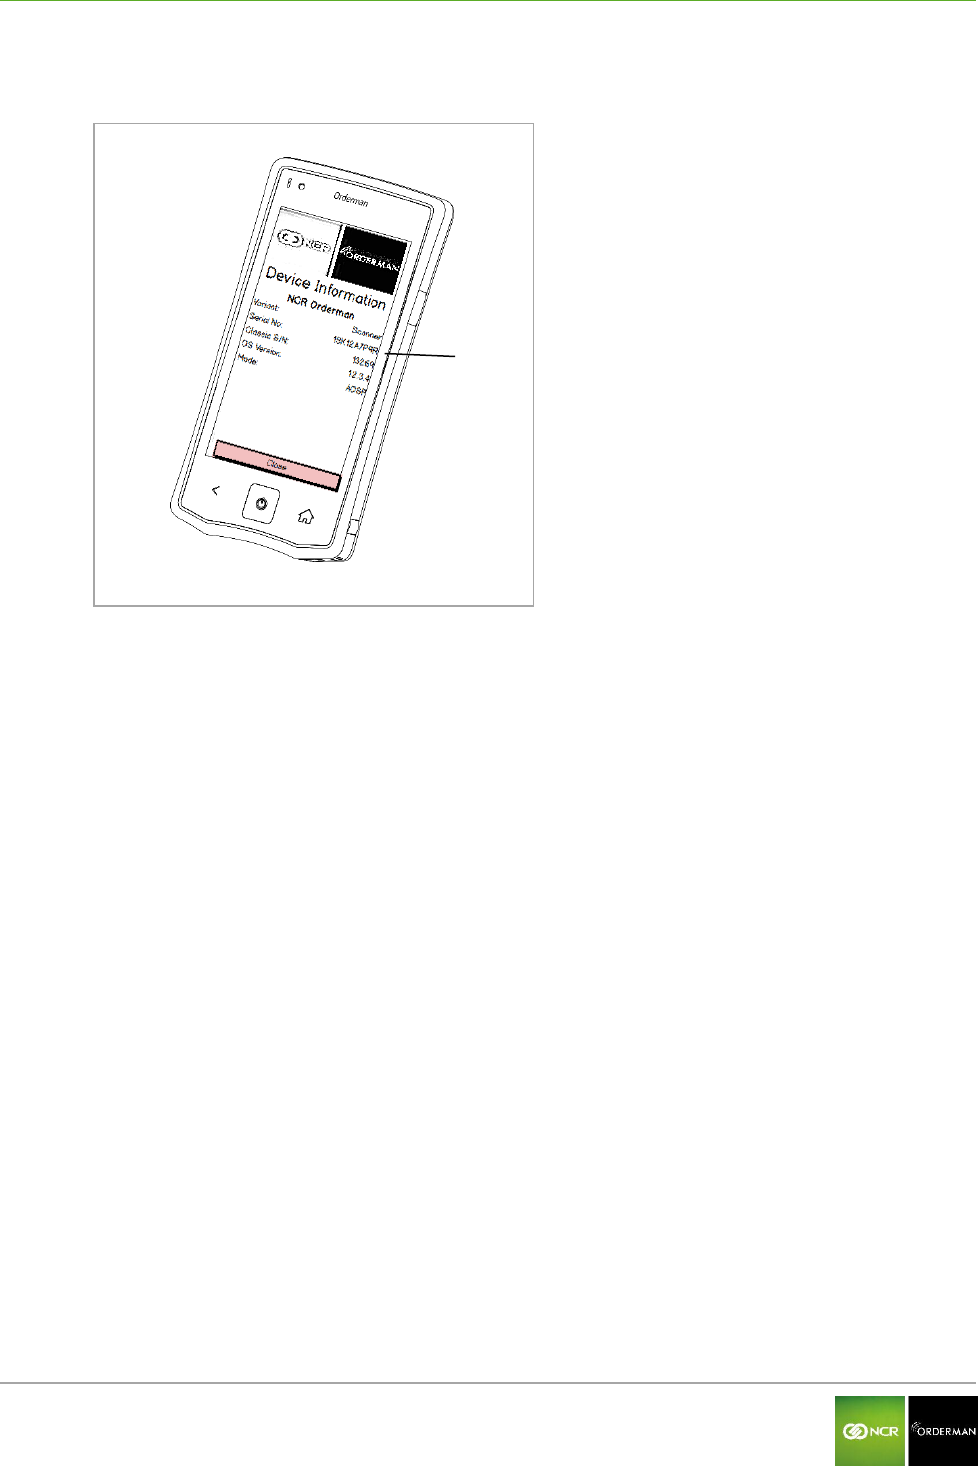
You can also display the serial number in the application (handheld must be ready for operation!)
To do so, perform the following step(s):
Drag the status bar down.
Fig. 3: Status bar
Status bar
Tap the "Settings" box.
Tap the "About" box.

NCR Orderman7 General information
Orderman GmbH 7 V 01.02
The serial number appears on the display.
Fig. 4: Read serial number
Serial number
NCR Orderman7 General information
Orderman GmbH 8 V 01.02
1.3 Safety notices
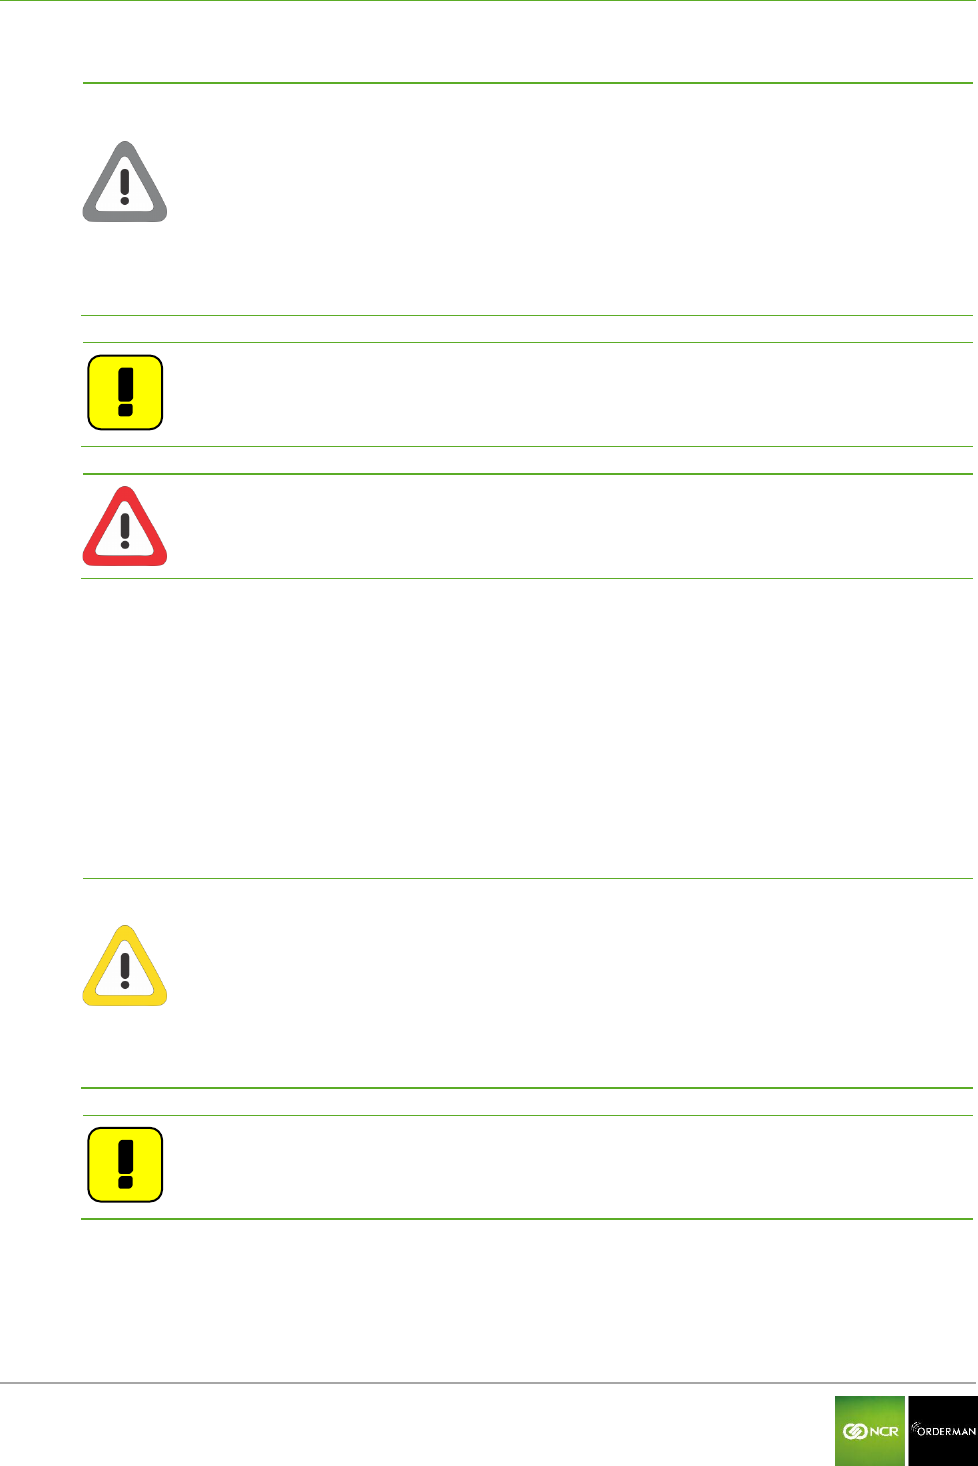
1.3.1 Explanation of symbols
Icons and signal words indicate the degree of danger that will result, unless actions to reduce
damage are taken.
Caution
Caution means that minor property damage can occur. Caution is highlighted by
horizontal lines above and below the text.
Warning
Warning means that minor personal injury or serious damage to property can occur.
Warnings are highlighted by horizontal lines above and below the text.
Danger
Danger means that serious personal injury can occur.
In particularly serious cases, there is danger to life. Danger is highlighted by horizontal
lines above and below the text.
Notes
Notes are indicated in the text by the adjoining icon. In cases in which there are no
imminent dangers for personnel or equipment, notes contain important information.
Notes are highlighted by horizontal lines above and below the text.
Tips
Tips describe non-binding recommendations. Tips are highlighted by horizontal lines
above and below the text.

NCR Orderman7 General information
Orderman GmbH 9 V 01.02
1.3.2 General information
Caution
Never expose the unit to extreme weather conditions such as hail or strong
sunlight. In the event of damage the unit must be examined by the after-sales
service for possible faults.
To operate the handheld, use only a finger or a capacitive touch pen. Pencils,
ballpoint pens or other pointed objects will damage the device's touch screen.
The device could be damaged by a heavy mechanical load such as twisting or
falling from an excessive height or onto sharp objects.
Do not, under any circumstances, short-circuit the charging contacts of the
handheld unit.
Note: The handheld unit does not comprise any parts that have to be serviced by
the user, and the user is therefore not allowed to open it.
If opened, the warranty is rendered null and void.
Danger: The handheld is equipped with a Bluetooth interface for wireless
communication. Never use the handheld in environments where Bluetooth
could cause interference (airplanes, hospitals, etc.).
1.3.3 Safety information for battery pack
The handheld runs on a lithium ion battery. Observe the following instructions for safe handling:
Improper use of lithium ion batteries (cutting, breaking, overheating) can cause the batteries
to explode or start fires.
Lithium ion batteries contain flammable and/or corrosive solutions and lithium salts. In the
event of leakage, this can lead to irritation of the skin, eyes and mucous membranes.
If lithium ion batteries vent, the escaping vapors may pose a risk to health.
Warning
Use only an original Orderman battery pack.
Charge the battery only in the Orderman service station provided.
Use only the original Orderman power supply for the service station or multi
service station.
In case of significant damage to the battery, replace it immediately.
Do not expose the battery to excessive heat, open flame or corrosive liquids.
Never short-circuit the contacts since there is an explosion hazard.
Charging temperature 0-35° C (ambient temperature)
Note: Lithium ion batteries must be disposed of in line with valid disposal
guidelines. If a lithium ion battery to mechanical damage (breakage,
cracking, etc.), this be disposed of as hazardous waste (local guidelines).
1.3.4 Safety information for barcode reader (laser)
The NCR Orderman7SC unit is equipped with a laser. The laser meets the specifications for a class 2
laser (DIN EN 60825-1 or IEC 60825-1/01.2001).

NCR Orderman7 General information
Orderman GmbH 10 V 01.02
Laser class 2
Class 2 includes lasers in the visible range for which an irradiation of less than 0.25ms
to the eye is not harmful. 0.25ms corresponds to a natural eyelid reflex that can
automatically protect the eye sufficiently against prolonged irradiation. These devices
are considered safe as long as medication does not increase the response time of the
eye significantly, and users do not intentionally look into the laser beam (suppressing
the eyelid reflex).
Warning
Never aim the laser beam at another person's eyes!
Never intentionally stare directly into the beam!
If the laser beam hits the eye, quickly close your eyes and immediately move your
head away from the beam.
Avoid reflections from reflective surfaces (reflections can amplify the laser light).
Note
The reading window (where the laser beam is emitted) should be cleaned
regularly. A dirty reading window may lead to uncontrolled activation of the laser
beam.
Repairs to the laser may be performed only by authorized service technicians.
NCR Orderman7 NCR Orderman7 handhelds
Orderman GmbH 11 V 01.02
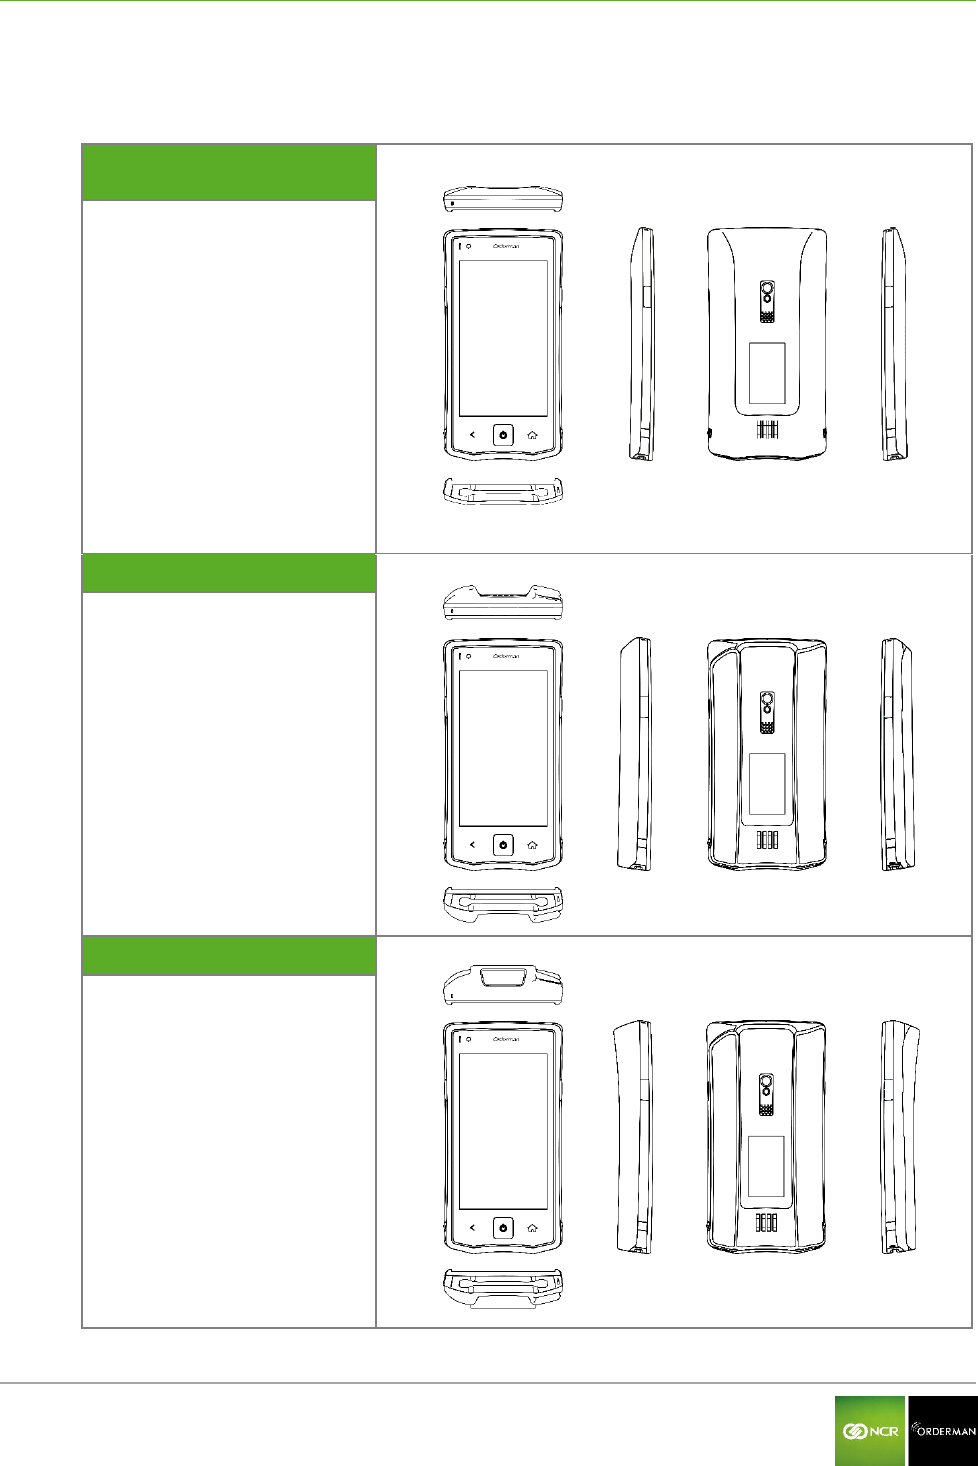
2 NCR Orderman7 handhelds
2.1 Overview
NCR Orderman7/
NCR Orderman7+
NCR Orderman7MSR
NCR Orderman7SC

NCR Orderman7 NCR Orderman7 handhelds
Orderman GmbH 12 V 01.02
2.2 NCR Orderman7 handheld features
Feature
NCR
Orderman7
NCR
Orderman7+
NCR
Orderman7MSR
NCR
Orderman7SC
Orderman radio network
Bluetooth
-
Wireless LAN
-
NFC
-
125kHz RFID reader
-
Magnetic strip reader (MSR)
-
Barcode reader
-
-
Camera
Ambient light sensor
Hardware buttons
Capacitive home buttons
Ambient light sensor
Vibration
LEDs
Intercom
Real time clock
Flashlight
NCR Orderman7 NCR Orderman7
Orderman GmbH 13 V 01.02
3 NCR Orderman7
3.1 Product description
The Orderman unit is specially designed to connect to an Orderman radio network (OSR =
Orderman Secure Radio). Data is entered only through the input on the touchscreen display.
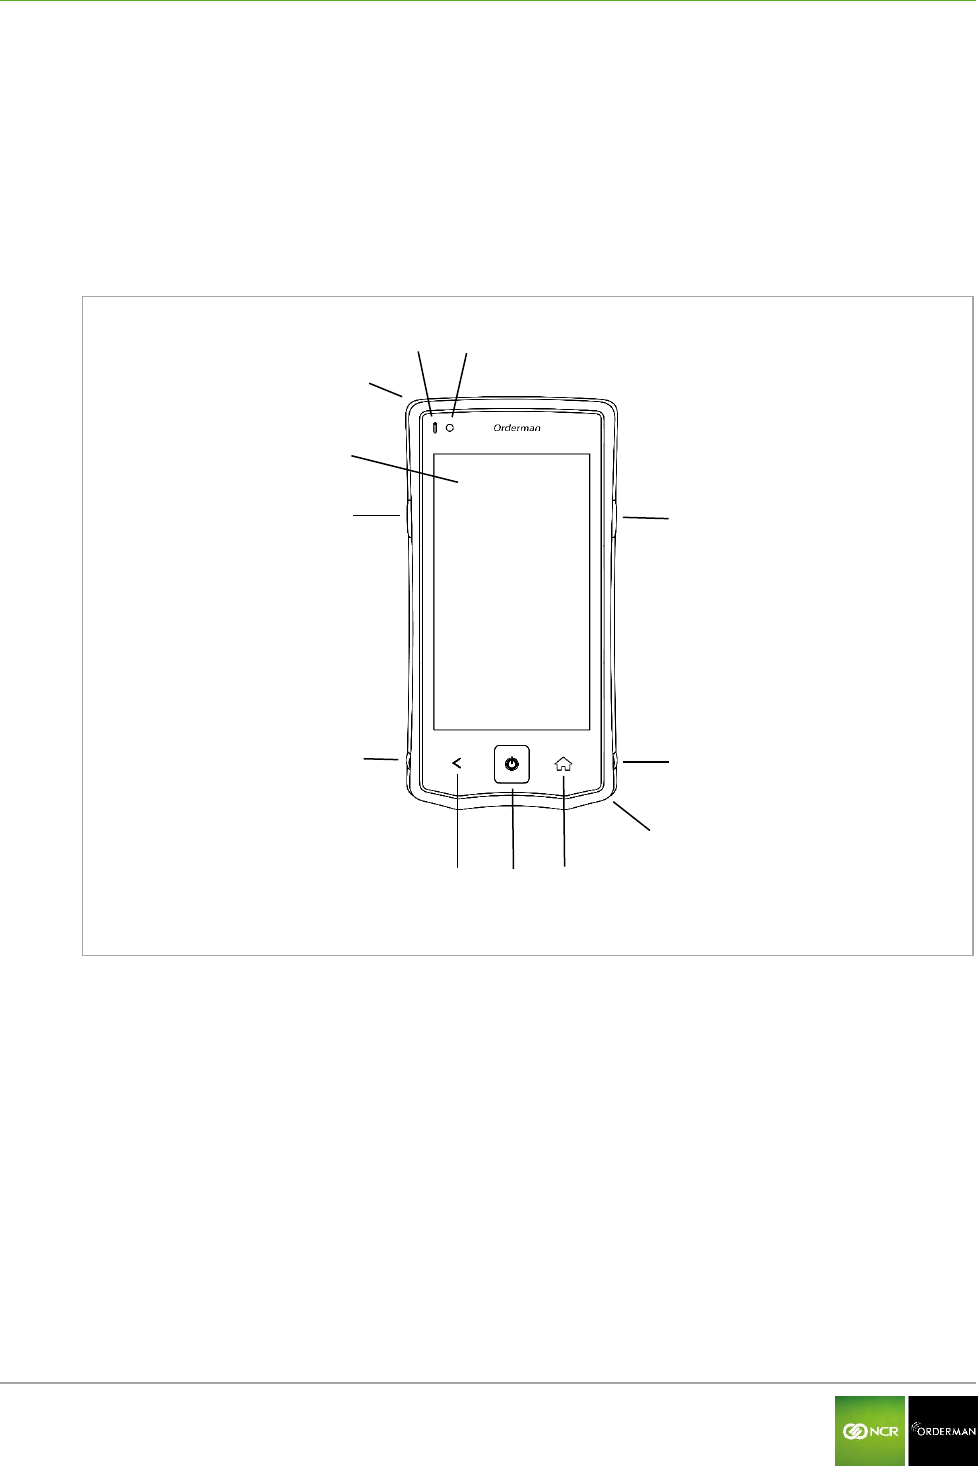
3.2 Overview
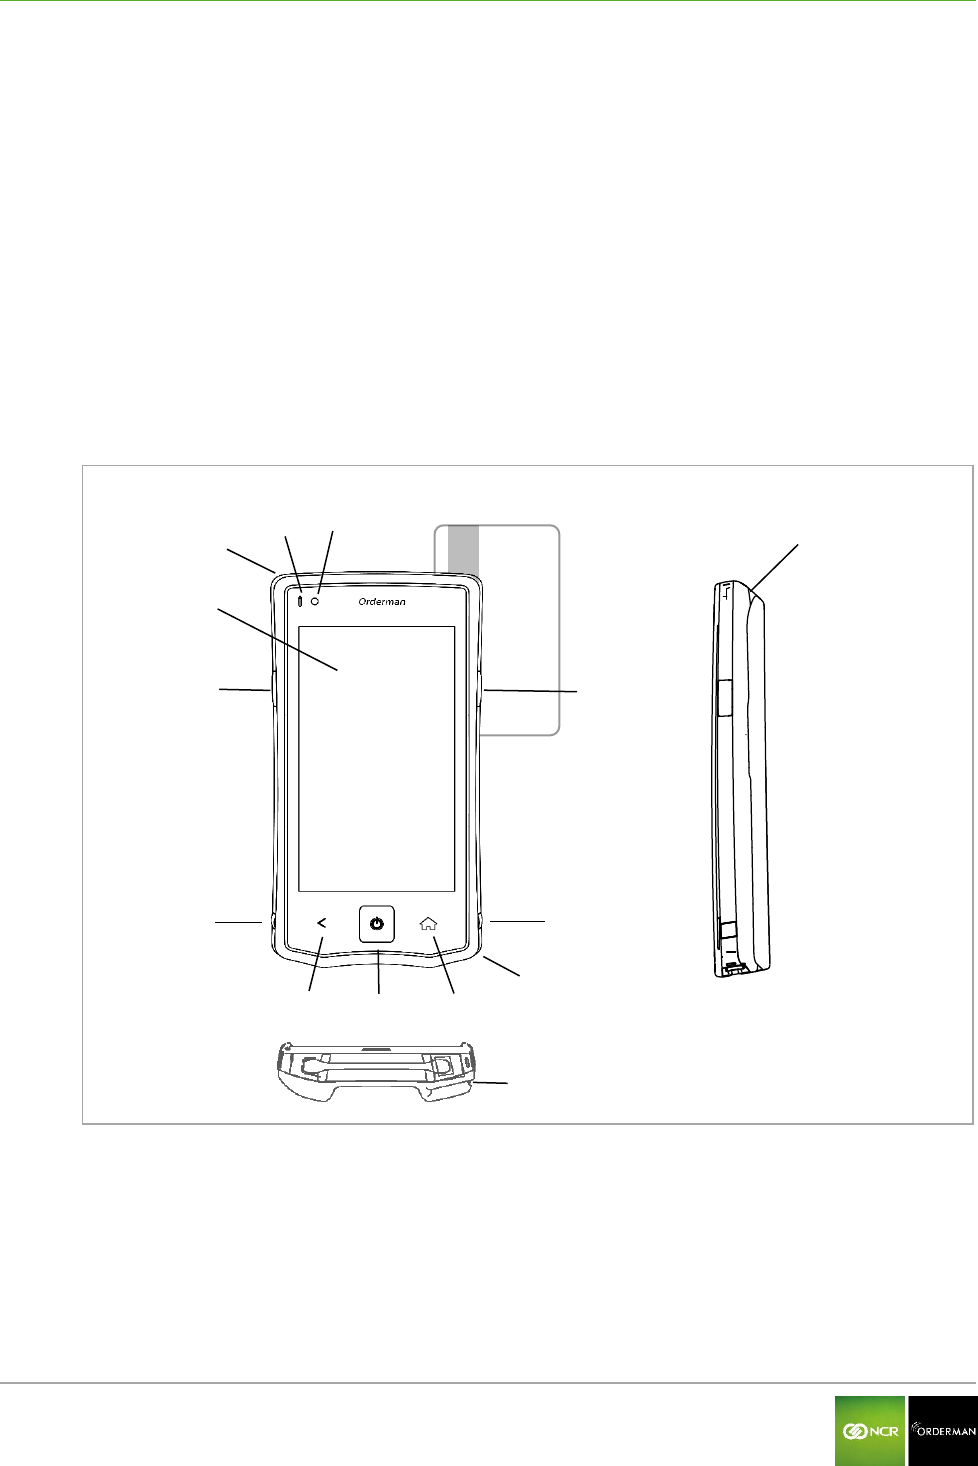
Fig. 5: NCR Orderman7 handheld, front
Ambient light sensor
Status LED
Notification (message) LED (freely assignable)
Touchscreen display
Hardware button (freely assignable)
Lock for battery slot
Capacitive Back button
Hardware Power button
Capacitive home button (freely assignable)

NCR Orderman7 NCR Orderman7
Orderman GmbH 14 V 01.02
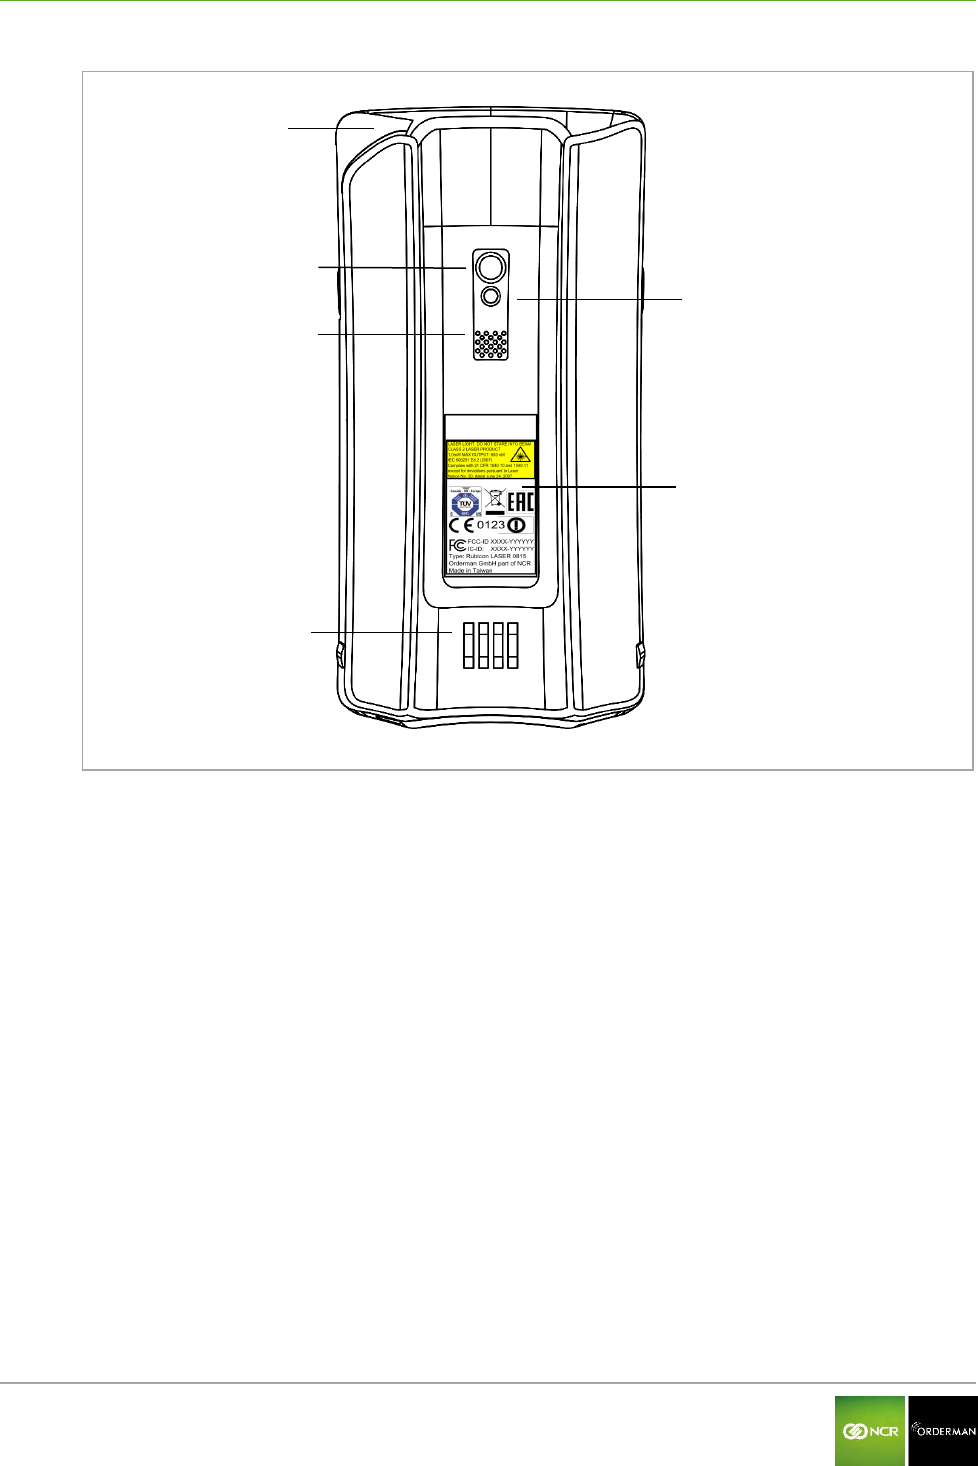
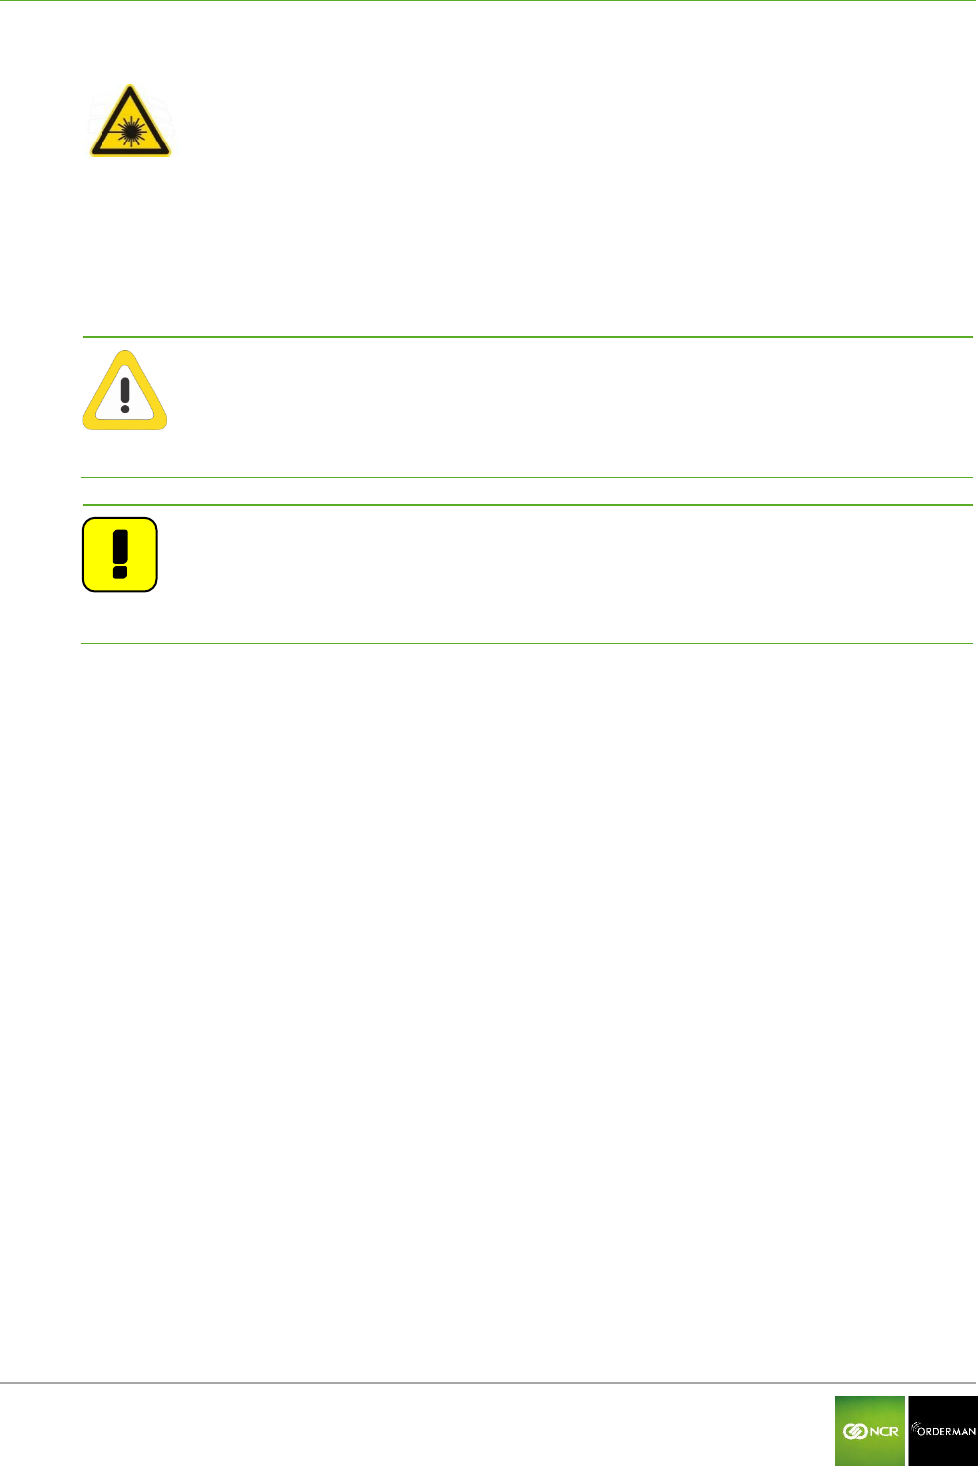
Fig. 6: NCR Orderman7 handheld, back
Camera
LED flash and flashlight
Intercom
Model plate
Charging contacts and communication
interface

NCR Orderman7 NCR Orderman7+
Orderman GmbH 15 V 01.02
4 NCR Orderman7+
4.1 Product description
The NCR Orderman7+ unit was designed specifically for the use of various types of connections.
The NCR Orderman7+ unit supports connectivity through Bluetooth, RFID, wireless LAN and Near
Field Communication (NFC). Data is input through the input on the touchscreen panel.
Bluetooth
Wireless LAN
RFID
NFC
4.2 Overview
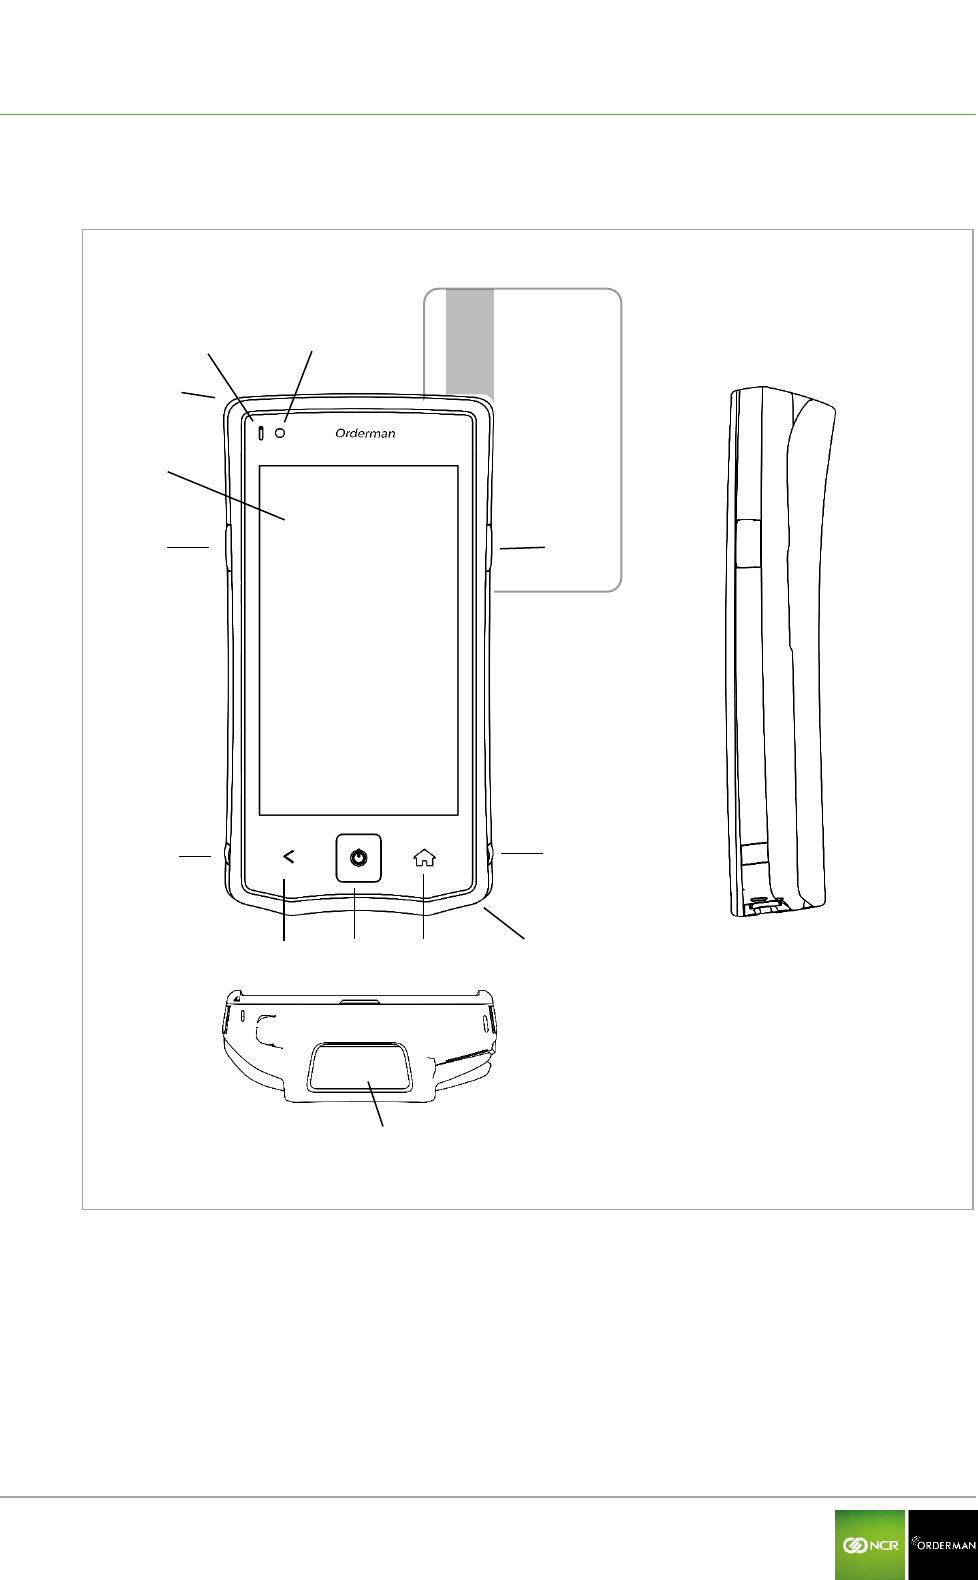
Fig. 7: NCR Orderman7+ handheld, front
Ambient light sensor
Status LED
Notification (message) LED (freely
assignable)
Touchscreen display
Hardware button (freely assignable)
Lock for battery slot
Capacitive Back button
Hardware Power button
Capacitive home button (freely assignable)

NCR Orderman7 NCR Orderman7+
Orderman GmbH 16 V 01.02
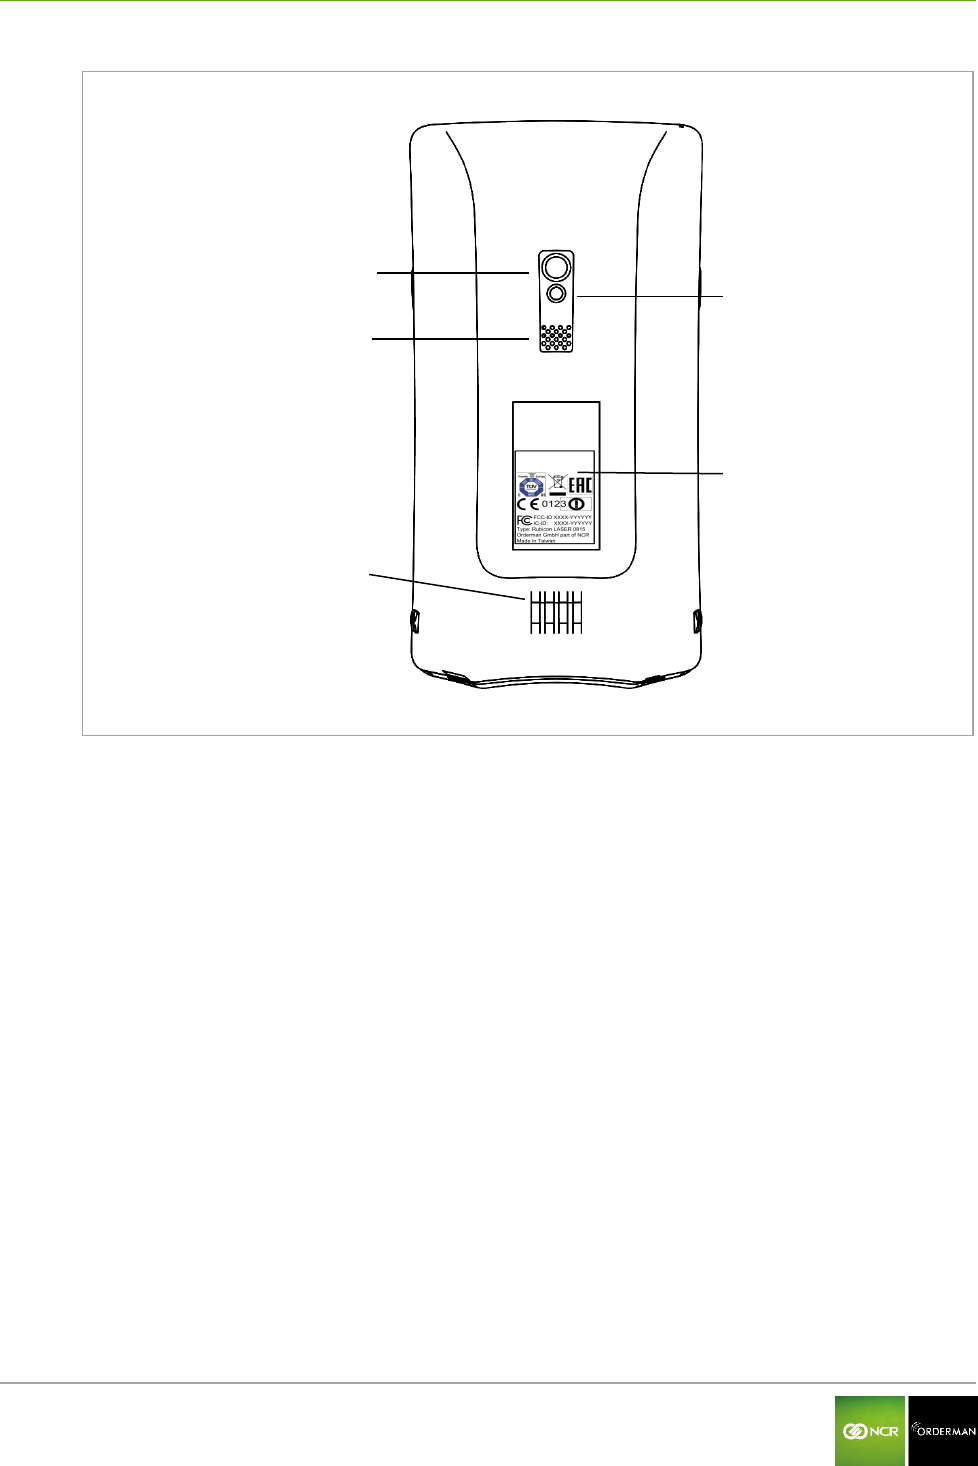
Fig. 8: NCR Orderman7+ handheld, back
Camera
LED flash and flashlight
Intercom
Model plate
Charging contacts and communication
interface
NCR Orderman7 NCR Orderman7MSR
Orderman GmbH 17 V 01.02
5 NCR Orderman7MSR
5.1 Product description
The NCR Orderman7MSR unit is specially designed for use with different types of connections, as
well as magnetic cards. The NCR Orderman7MSR unit supports connectivity through Bluetooth, RFID,
wireless LAN and Near Field Communication (NFC). Data is input by tapping the touchscreen
display.
Magnetic strip reader
Bluetooth
Wireless LAN
RFID reader
NFC
5.2 Overview
Fig. 9: NCR Orderman7MSR handheld
Ambient light sensor
Status LED
Notification (message) LED (freely
assignable)
Touchscreen display
Hardware button (freely assignable)
Lock for battery slot
Capacitive Back button
Hardware Power button
Capacitive home button (freely assignable)
Magnetic card slot

NCR Orderman7 NCR Orderman7MSR
Orderman GmbH 18 V 01.02
Fig. 10: NCR Orderman7MSR, back
Camera
LED flash and flashlight
Intercom
Model plate
Charging contacts and communication
interface
Magnetic card slot

NCR Orderman7 NCR Orderman7SC
Orderman GmbH 19 V 01.02
6 NCR Orderman7SC
6.1 Product description
The NCR Orderman7SC unit is designed especially for use with different types of connections, as
well as magnetic cards and barcodes. The NCR Orderman7SC unit supports connectivity through
Bluetooth, RFID, wireless LAN and Near Field Communication (NFC). Data is input by tapping the
touchscreen display.
Magnetic strip reader
Barcode reader
Bluetooth
Wireless LAN
RFID reader
NFC
NCR Orderman7 NCR Orderman7SC
Orderman GmbH 20 V 01.02
6.2 Overview
Fig. 11: NCR Orderman7SC handheld
Ambient light sensor
Status LED
Touchscreen display
Hardware button (freely assignable)
Lock for battery slot
Magnetic card slot
Capacitive Back button
Hardware Power button
Capacitive home button (freely
assignable)
Barcode reading window
NCR Orderman7 NCR Orderman7SC
Orderman GmbH 21 V 01.02
Fig. 12: NCR Orderman7SC, back
Camera
LED flash and flashlight
Intercom
Model plate
Charging contacts
Magnetic card slot

NCR Orderman7 Service station and multi service station
Orderman GmbH 22 V 01.02
7 Service station and multi service station
The service station and multi service station are designed to charge your handheld(s), as well as
providing an IP-based Ethernet connection to the host system.
The service station and multi service station also have a quick-charge function (quick recharging slot
for battery packs).
Note: The service station/multi service station is required to update the firmware. In
the multi service station, up to five handhelds can be updated at the same
time.
7.1 Overview of the service station
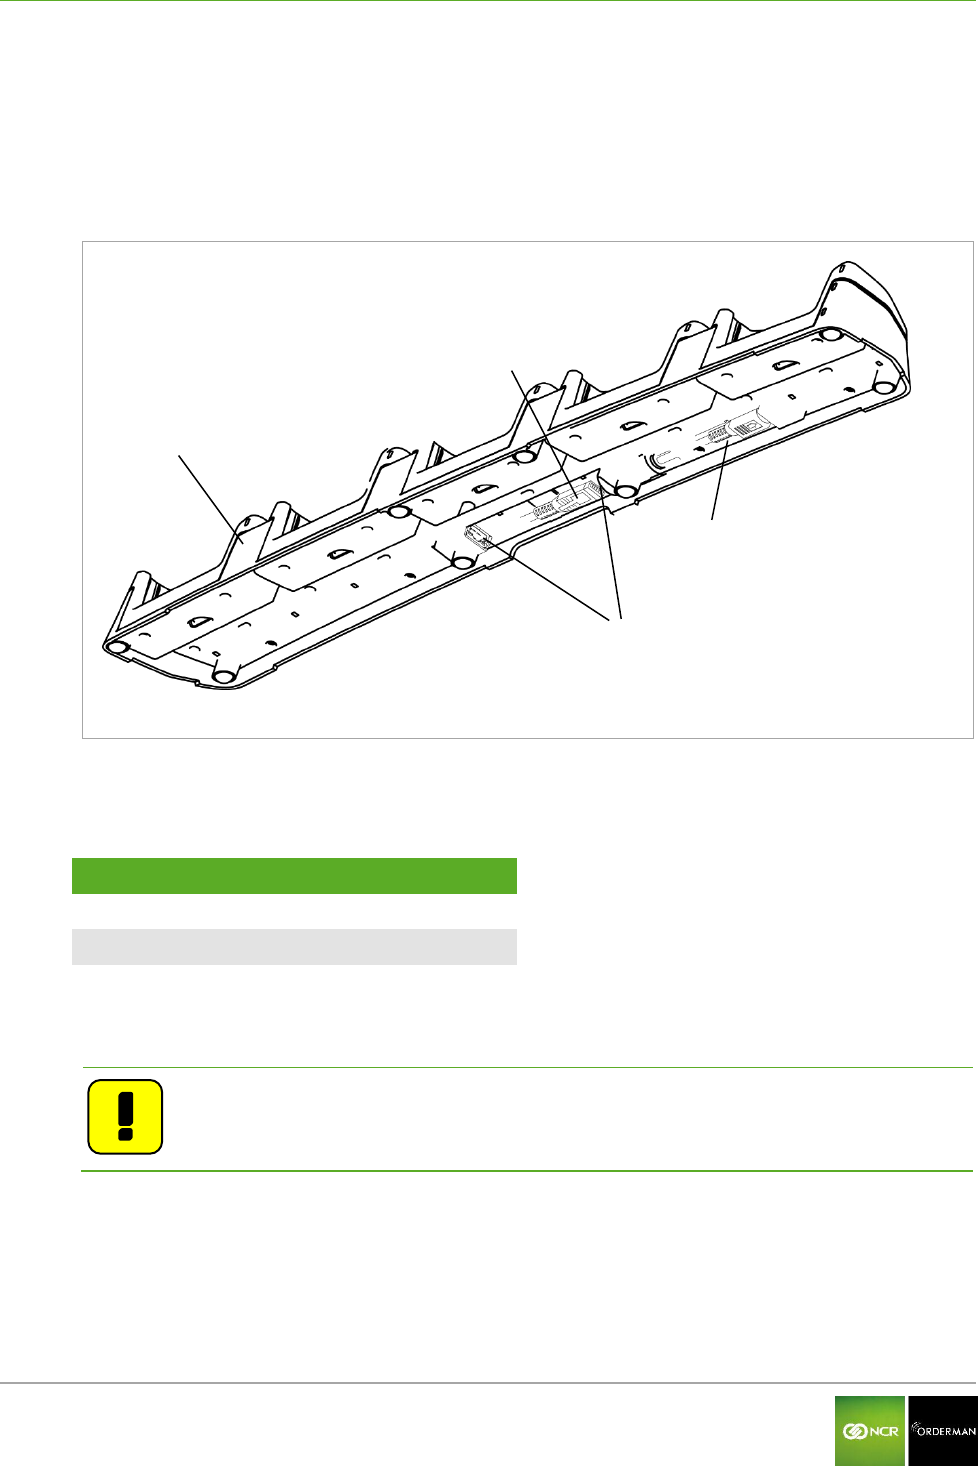
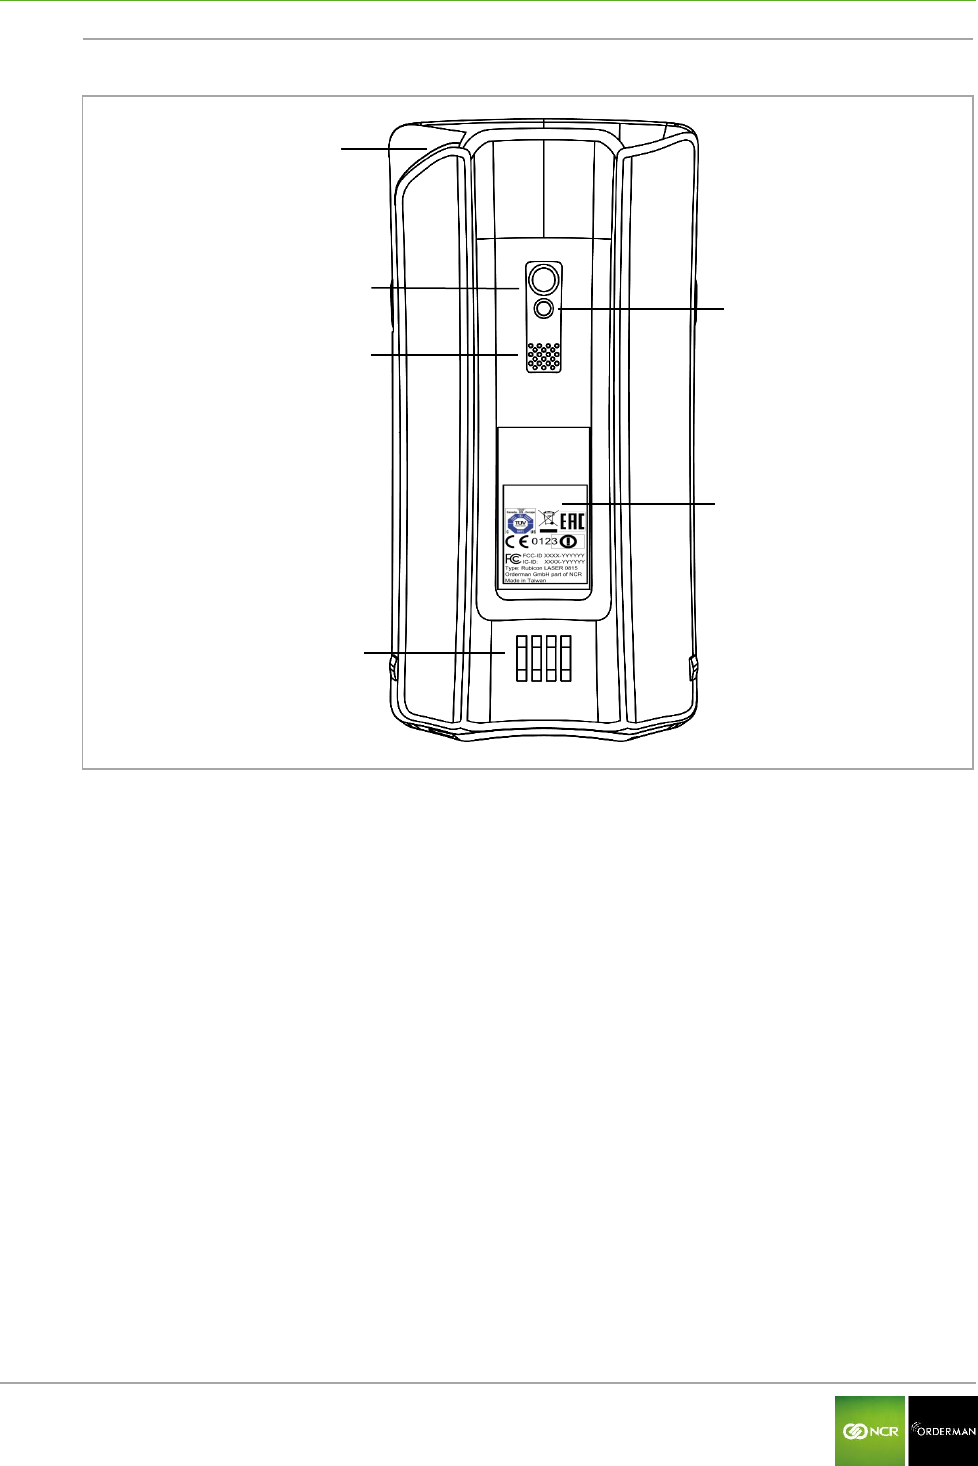
Fig. 13: Service station
Service station
Charging contacts handheld charging slot
Charging status LED
Fast-charging slot
Network status LED
Power LED
Protective cover for charging contacts on the
quick-charging slot
Connection for Orderman power supply
RJ45 Ethernet network port
Front
Back

NCR Orderman7 Service station and multi service station
Orderman GmbH 23 V 01.02
7.2 Starting up the service station
Connect the cables for the service station as shown in the following figure.
Plug in the Orderman power supply.
Plug in the Ethernet network cable.
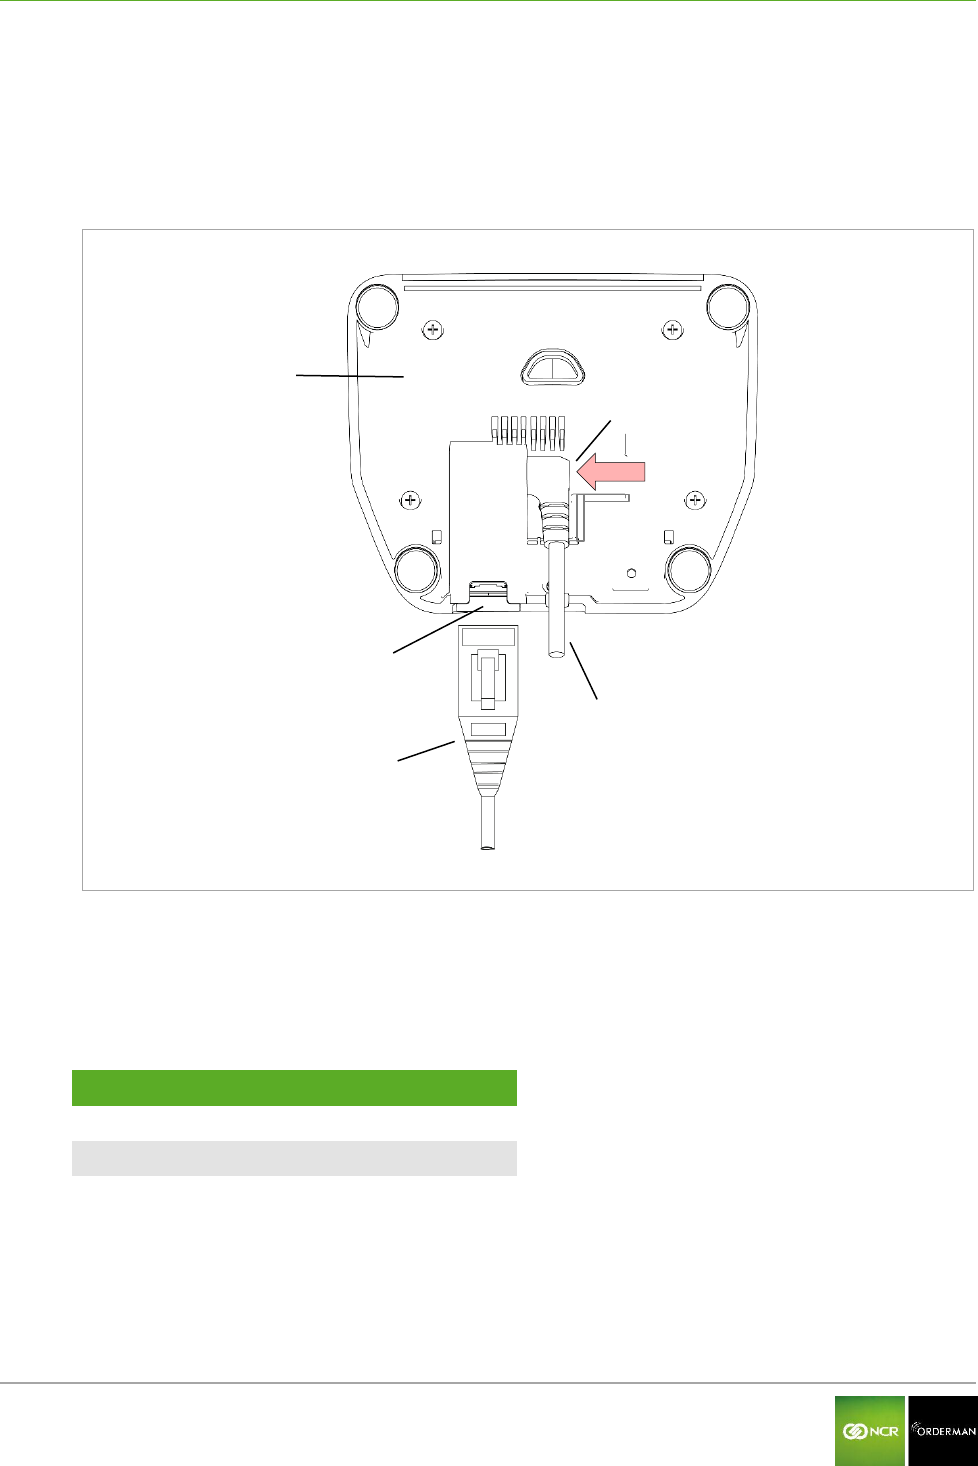
Fig. 14: Connections for the service station
Service station
RJ45 Ethernet port
Ethernet cable
Plug for Orderman power supply
Power supply cable
Data transmission
Cable category
100Mbit
Cat5 or higher
1Gbit
Cat5e or higher
Ensure the power supply cable is correctly routed. Insert the plug fully into the socket and
press the cable to the bottom of the housing.
Plug the network cable into the socket until it clicks. If the cable is plugged in correctly and the
network is active, the LEDs will flash on the socket and the "Network status LED" lights up.

NCR Orderman7 Service station and multi service station
Orderman GmbH 24 V 01.02
Note: Avoid direct sunlight or heat sources in the immediate vicinity of the service
station.
Once you place the handheld unit in the service station, the unit will start to charge. The charging
status is displayed via the "Status LED" on the handheld.
In addition to the handheld, another battery pack can be charged simultaneously in the fast-charging
slot.
Fig. 15: Service Station with handheld and additional battery pack
Orderman Handheld
Service station
Additional battery pack

NCR Orderman7 Service station and multi service station
Orderman GmbH 25 V 01.02
7.3 Overview of the multi service station
The multi service station is designed to charge up to five handhelds and up to five battery packs.
The service station and multi service station also provide an IP-based Ethernet connection to the
host system.
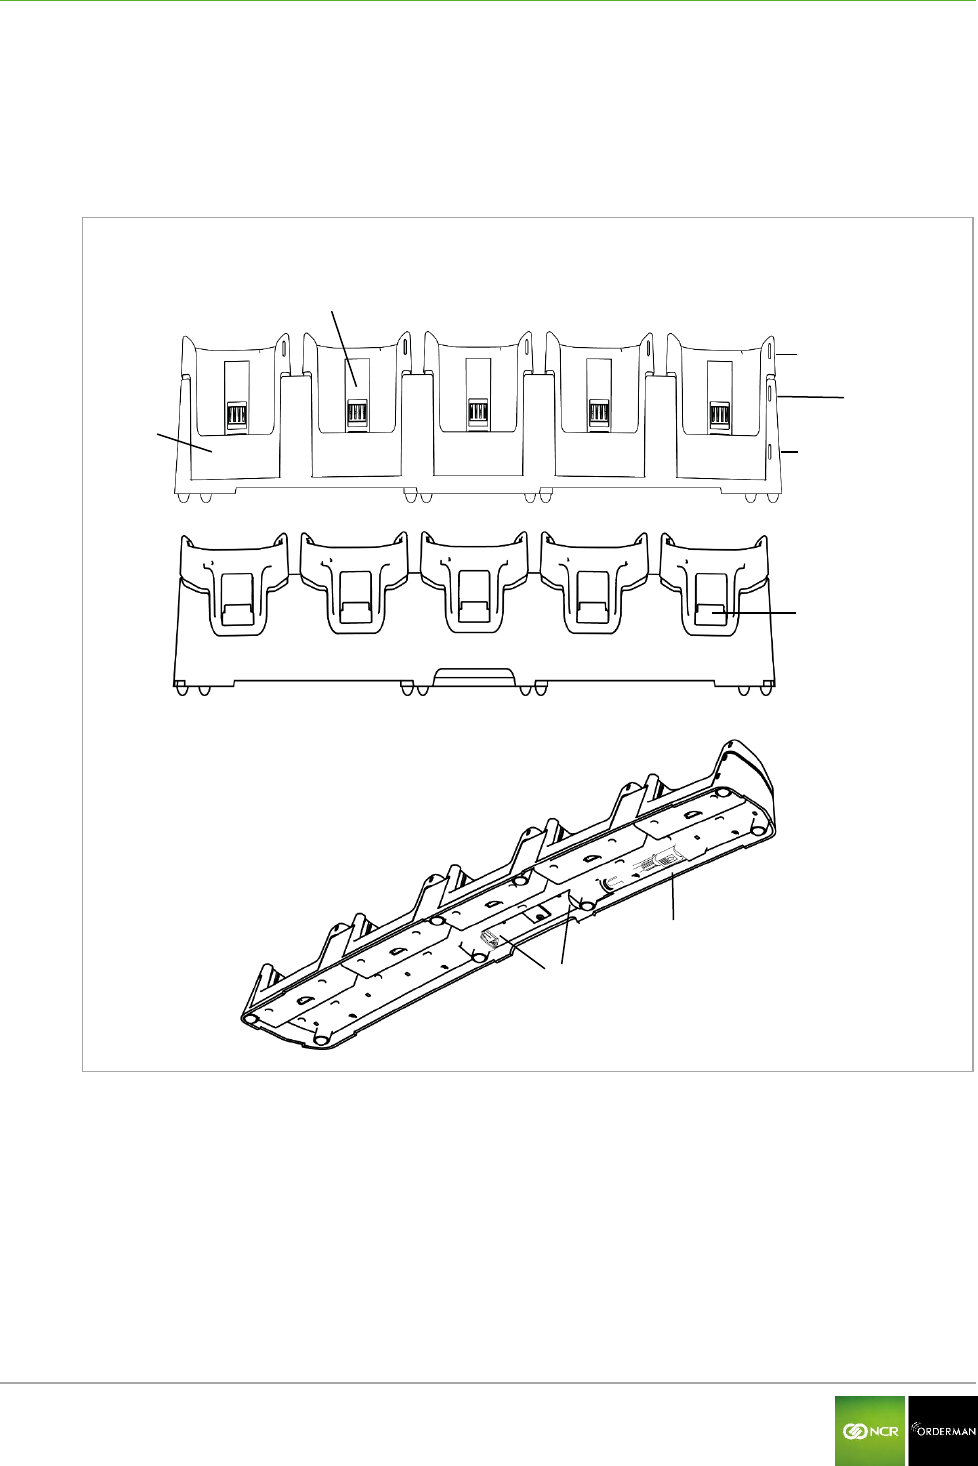
Fig. 16: Multi service station
Multi service station
Charging contacts, handheld charging slot
Chargeing status LED
Fast-charging slot
Network status LED
Power LED
Protective cover for charging contacts on the
quick-charging slot
Connection for Orderman power supply
2x RJ45 Ethernet network port*
* One of the two Ethernet ports can be used as a network connection for another Ethernet device.
Front
Back
NCR Orderman7 Service station and multi service station
Orderman GmbH 26 V 01.02
7.4 Starting up the multi service station
Connect the cables for the multi service station as shown in the following figure.
Plug in the Orderman power supply.
Plug in the Ethernet network cable.
Fig. 17: Ports for the multi service station
Multi service station
2x RJ45 Ethernet port
Ethernet cable
Power supply
Data transmission
Cable category
100Mbit
Cat5 or higher
1Gbit
Cat5e or higher
Plug the network cable into the socket until it clicks. If the cable is plugged in correctly and the
network is active, the LEDs will flash on the socket and the "Network status LED" will light up.
Note: Avoid direct sunlight or heat sources close to the multi service station.
Once you place the handheld unit in the service station, the unit will start to charge. The charging
status is displayed via the "Status LED" on the handheld.

NCR Orderman7 Remove/replace battery pack
Orderman GmbH 27 V 01.02
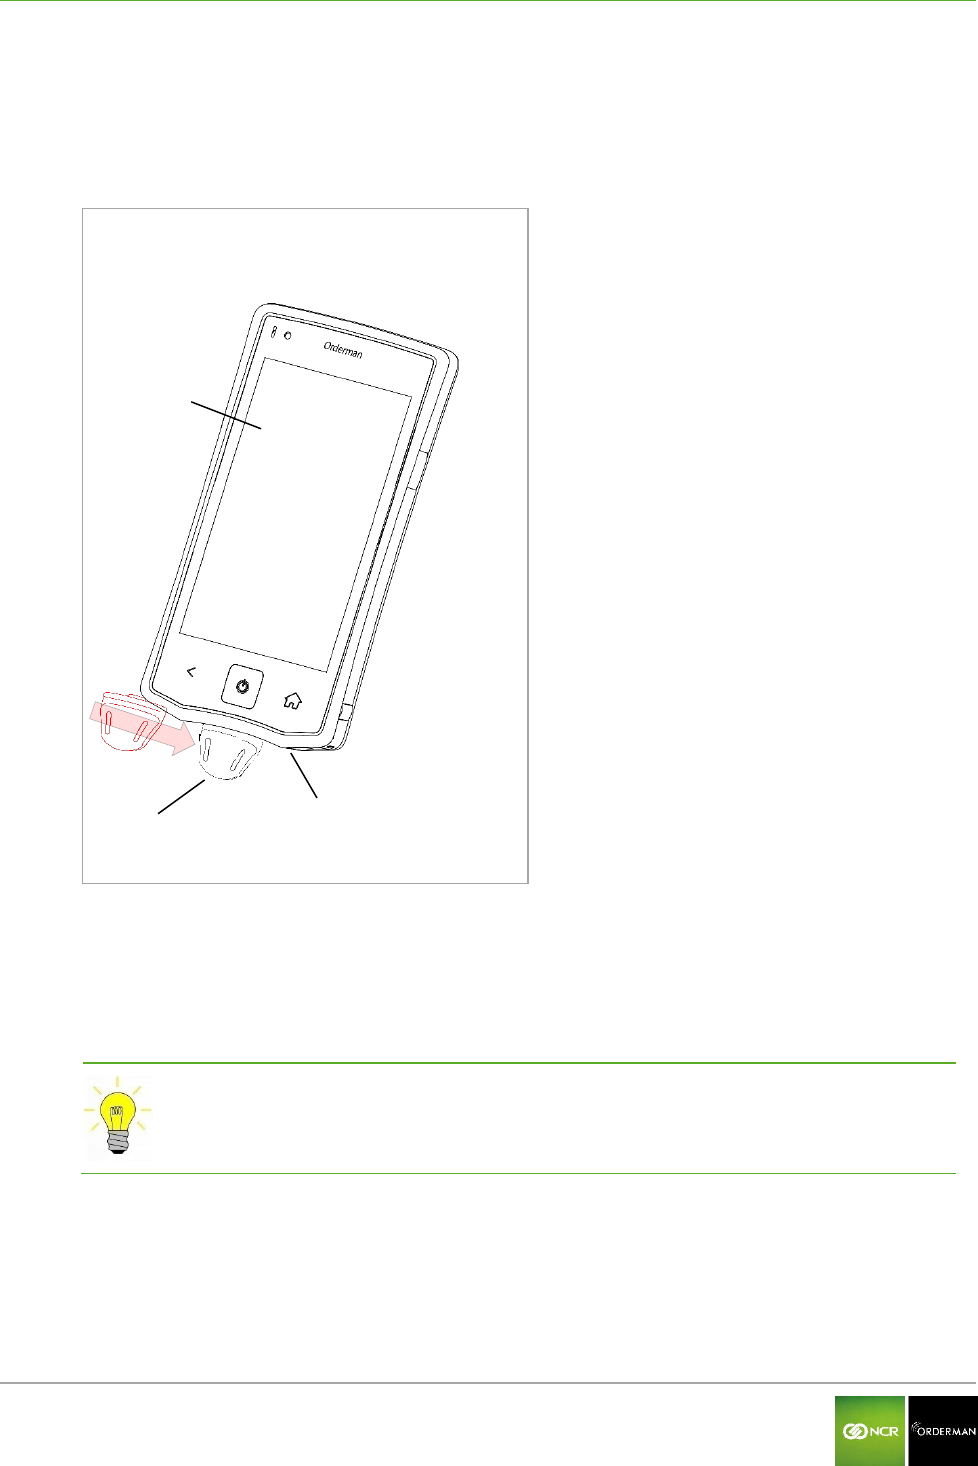
8 Remove/replace battery pack
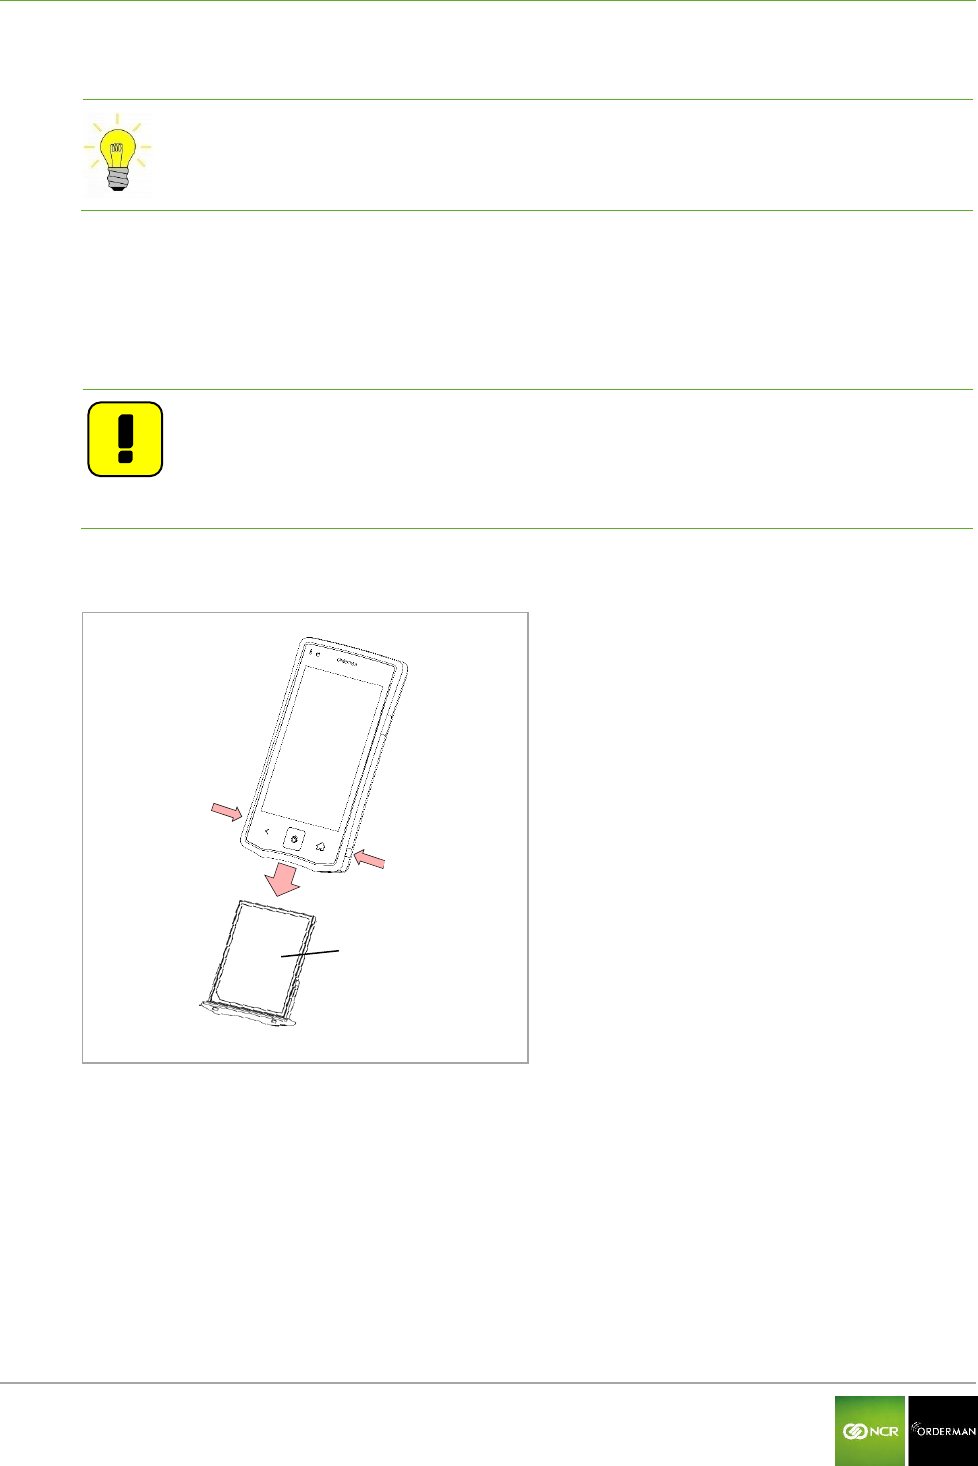
Tip: Remove the safety cord before changing the battery.
To remove the battery pack, simultaneously press the locking button located on both sides of the
handheld unit. By pressing the lock buttons, the battery pack is released slightly from the handheld.
When inserting the pack, press on it until you feel it engage (click) in the battery lock in the battery
slot. If the battery pack is correctly engaged, the handheld turns on automatically.
Note
If the battery pack is not latched properly,
the handheld does not start, and
the handheld is not sealed.
Fig. 18: Replace battery pack
Locking buttons on battery pack
Battery pack
NCR Orderman7 Safety Cord
Orderman GmbH 28 V 01.02
9 Safety Cord
The safety cord is attached to the underside of the handheld. Proceed as shown in the figure below
steps:
Fig. 19: Safety Cord
Handheld
Safety Cord
Leadership
Pull the safety cord in in the guide provided by the handheld until it clicks. You can push the
safety cord from both sides into the guide.
By applying lateral pressure, the safety cord can be moved in the guide and separated from
the handheld.
Tip: Use the safety cord to protect the handheld against being dropped.

NCR Orderman7 Operating the service station and multi service station
Orderman GmbH 29 V 01.02
10 Operating the service station and multi service station
10.1 Charging in the service station and multi service station
Note
Fully charge the battery initially before using the unit (i.e. until a solid green
charging status LED appears).
The optimum charging power is set automatically. If the battery pack is fully
charged, the handheld unit or battery pack may remain in the service station or
multi service station.
The service station and multi service station offer different charging options:
Charge the battery pack in the handheld
Charge a battery pack in the fast-charging slot
Charge the battery pack in the handheld and an additional battery pack in the fast-
charging slot
Caution: The permissible operating temperature (ambient temperature) for the
service station and multi service station is 0 to 35⁰ C.
Note: If a charged handheld or battery pack remains in the service station for a
longer period (or in a charged state in the service station or multi service
station), the solid green "Charging status LED" may start flashing again
(charging).
Cause:
The charge control ensures the battery is kept at an optimum charge level.

NCR Orderman7 Operating the service station and multi service station
Orderman GmbH 30 V 01.02
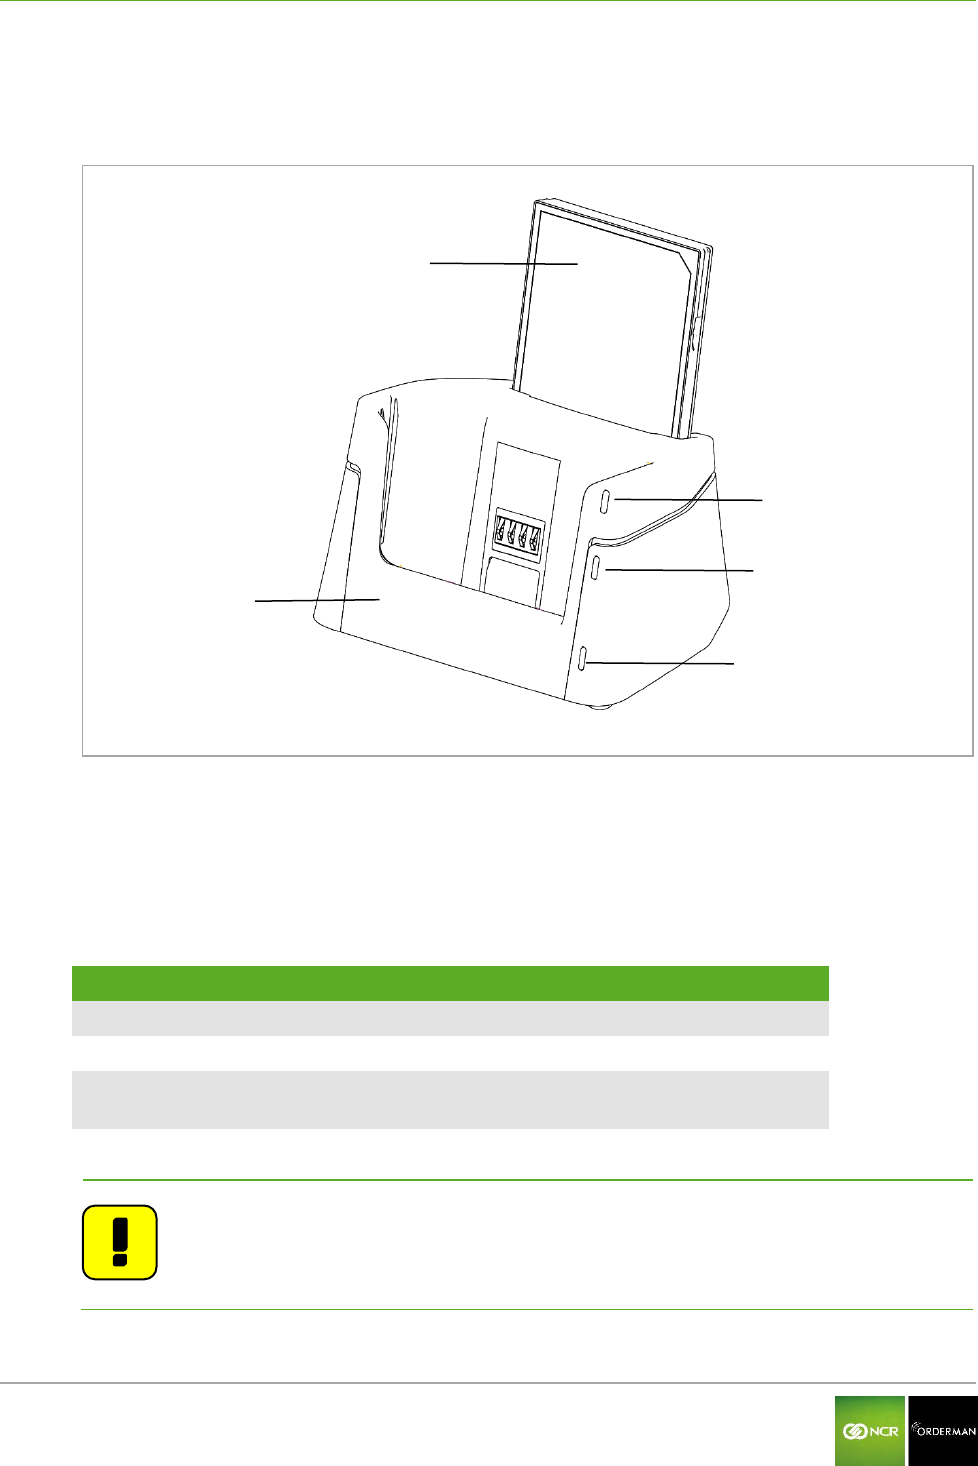
10.1.1 Charging the handheld
The handheld unit can be charged by plugging it into the service station or multi service station.
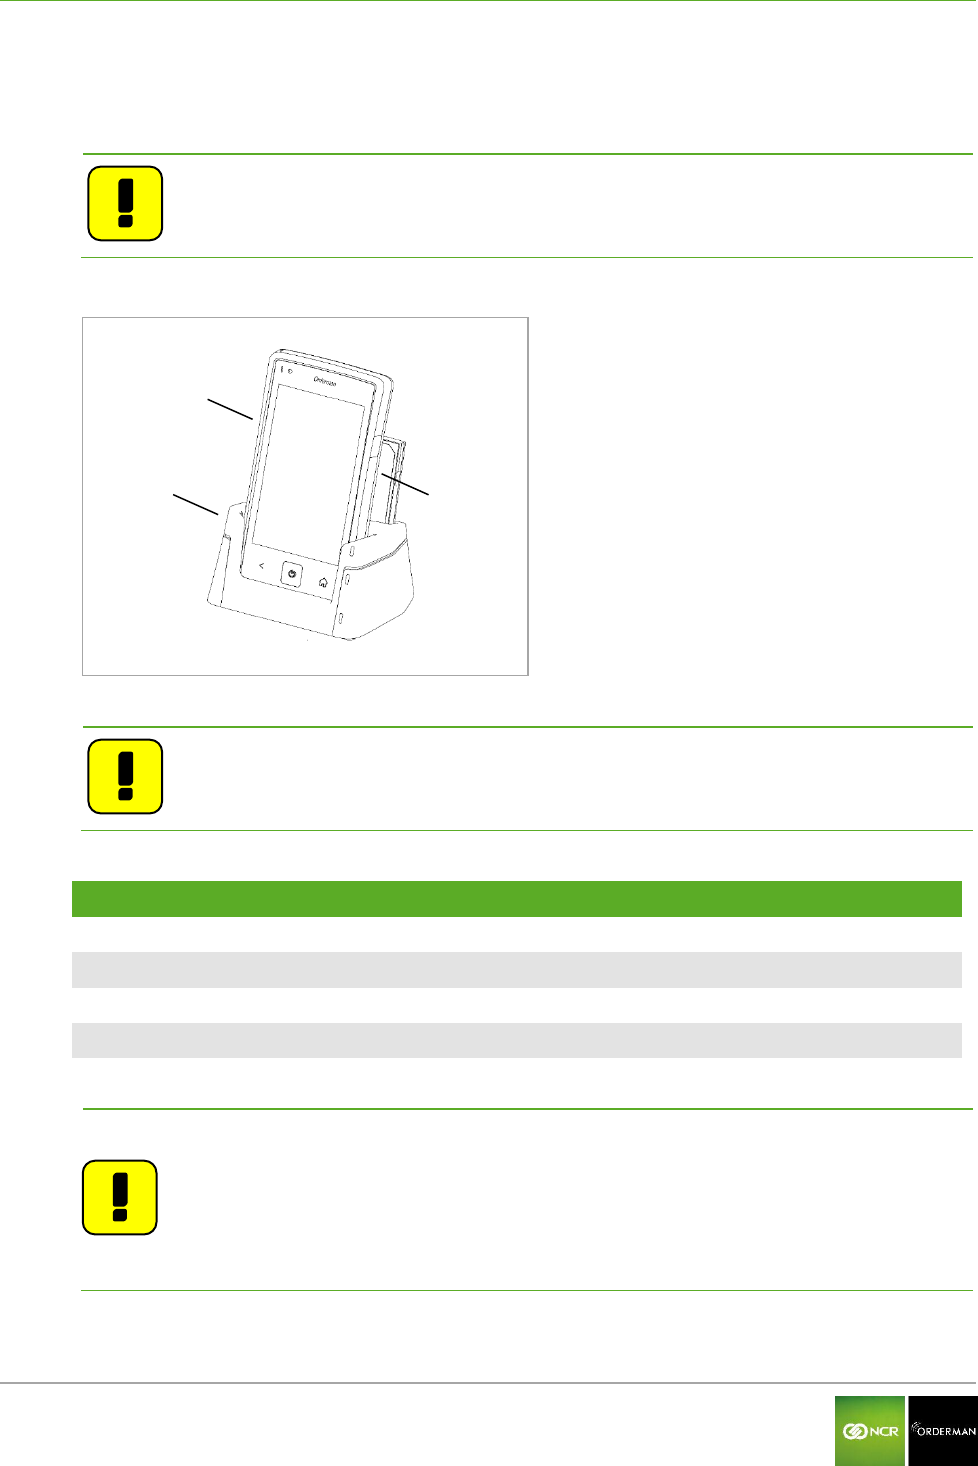
Note: To place the handheld unit in the service station or multi service station, you
must first remove the safety cord!
Fig.20: Handheld in service station
Handheld
Service station
Additional battery pack
Note: In addition to the handheld unit, an additional battery pack can also be
charged in the fast-charging slot.
Handheld status LED
Status
LED blue
Handheld is in boot process (startup)
LED flashes green
Battery is charging
LED green
Battery is charged
LED red
Battery is not charging (see Troubleshooting section)
Note: If a charged handheld or battery pack remains in the service station for a
longer period (or in a charged state in the service station or multi service
station), the solid green "Charging status LED" may start flashing again
(charging).
Cause:
The charge control ensures the battery is kept at an optimum charge level.

NCR Orderman7 Operating the service station and multi service station
Orderman GmbH 31 V 01.02
10.1.2 Charging the battery pack without handheld
You can remove the battery pack from the handheld, and plug directly into the service station.
Fig. 21: Battery pack in the service station
Battery pack
Service station
Charging status LED
Network status LED
Power LED
10.2 Charging status LED for service station
Charging status LED
Status
Green, flashing
Battery is charging
Green
Battery is charged
Red
Battery is not charging (see Troubleshooting
section)
Note: The Charging status LED on the service station only indicates the charge
state of a battery pack in the fast-loading slot.
If a handheld is plugged into the service station, the Status LED on the
handheld shows the charge status.

NCR Orderman7 Operating the service station and multi service station
Orderman GmbH 32 V 01.02
10.3 Network Status LED for service station
The Network status LED indicates whether the service station or multi service station is connected to
an active Ethernet network.
10.4 Power LED for service station
The Power LED indicates whether the service station or multi service station is powered on.

NCR Orderman7 Operation
Orderman GmbH 33 V 01.02
11 Operation
Note: This manual describes the basic functions of Orderman handhelds. All other
functions are controlled by your partner's POS system application.
11.1 Operating conditions of the handhelds
11.1.1 Handheld On/Off
You can turn on the handheld by pressing the On/Off button.
Note: If the handheld does not turn on, the battery level may be too low (see
Troubleshooting section).
You can turn off the handheld by pressing and holding the On/Off button.
11.1.2 Standby
When the handheld is in ready mode, briefly press the On/Off button to switch the unit to standby
mode (display off).
11.2 Acceleration sensor
11.2.1 Flip-View
The handheld is equipped with a tilt sensor. This sensor allows the display to rotate 180 degrees
automatically, depending on the position of the unit (to allow customers to read the display).
11.2.2 Sleep mode
If the handheld is placed top-down in the leather pouch, the unit switches directly to sleep mode. If
the handheld is removed and placed in operating position, the unit will turn on automatically.

NCR Orderman7 Operation
Orderman GmbH 34 V 01.02
11.3 Status bar
After the startup sequence, the Status bar appears at the top display screen.
By pulling down the Status bar to open the Configuration Menu.
Fig. 22: Status bar
Status bar
11.4 Configuration menu
In the Configuration menu you'll find all the available settings.
11.5 Configure handheld
You can configure the settings described below on the handheld:
Display settings
Connect belt printer
Miscellaneous
- Switch left to right buttons (left and right keys reverse)
- Logging on/off
- Flashlight On/Off
NCR Orderman7 Operation
Orderman GmbH 35 V 01.02
11.5.1 Display settings
Pull down the Status bar to open the Configuration menu.
Tap "Settings".
Tap "Screen".
The following settings are available:
Function
Value
Effect
"Control automatically"
☑
Enabled
The brightness setting is automatically
controlled by the ambient light sensor.
"Control automatically"
□
Not activated
The brightness setting can be adjusted
manually using a slider shown in the display.
"Screen timer"
in seconds
5 to 60
Defines the time after which the display dims
when it is not in use.
"Sleep timer"
in seconds
30 to 180
Defines the time after which the display turns
off when not in use.
Note: The display settings contribute significantly to the power used by the
handheld. Reduce the brightness for a longer operating time.

NCR Orderman7 Operation
Orderman GmbH 36 V 01.02
11.5.2 Connecting the belt printer (Bluetooth pairing)
To connect the belt printer to the handheld, proceed as follows:
Switch on the belt printer.
Drag the Status bar down.
On the handheld, tap the Pairing function in the Settings menu.
Tap the Pair Printer function.
Hold the printer close to the handheld (see figure below)
The antenna used for detecting the printer is located in the upper right corner of the handheld.
The antenna for the printer is located approximately in the center and at the front of the
printer.
Start the scan by tapping Pair Printer.
If the printer is detected, the message "State: Paired" is displayed and a test printout is
automatically created.
Fig. 23: Connecting the belt printer
Belt printer
Orderman Handheld
Printer, front
11.5.2.1 Testing the belt printer
To test the belt printer, proceed as follows:
Drag the Status bar down to open the Configuration menu.
Tap the Settings field.
Tap the Pairing field.
Tap the Test Print (test printout).
Check the test printout on the belt printer.
NCR Orderman7 Operation
Orderman GmbH 37 V 01.02
11.5.3 Miscellaneous
11.5.3.1 Switch left and right buttons
You can reverse the function of the two freely assignable hardware buttons, on the left and right side
of the handheld by selecting the "flip buttons" function.
In the Settings/Miscellaneous menu, the switch left and right buttons can be enabled or disabled (on
/ off).
11.5.3.2 Logging
By activating the Logging function, all debug messages from the handheld are logged.
To better evaluate the log file, a marker can be set at any given time. This marker can be easily
identified during the analysis by the service technician.
The log files can only be read by trained service technicians.
Note: Activate the Logging function only for error analysis.
11.5.3.3 Flashlight
By activating the Torch function, you can use the LED flashlight on the back of the handheld.
Note: Frequent use of the flashlight uses a lot of power and reduces the operating
life of the handhelds.
NCR Orderman7 Operation
Orderman GmbH 38 V 01.02
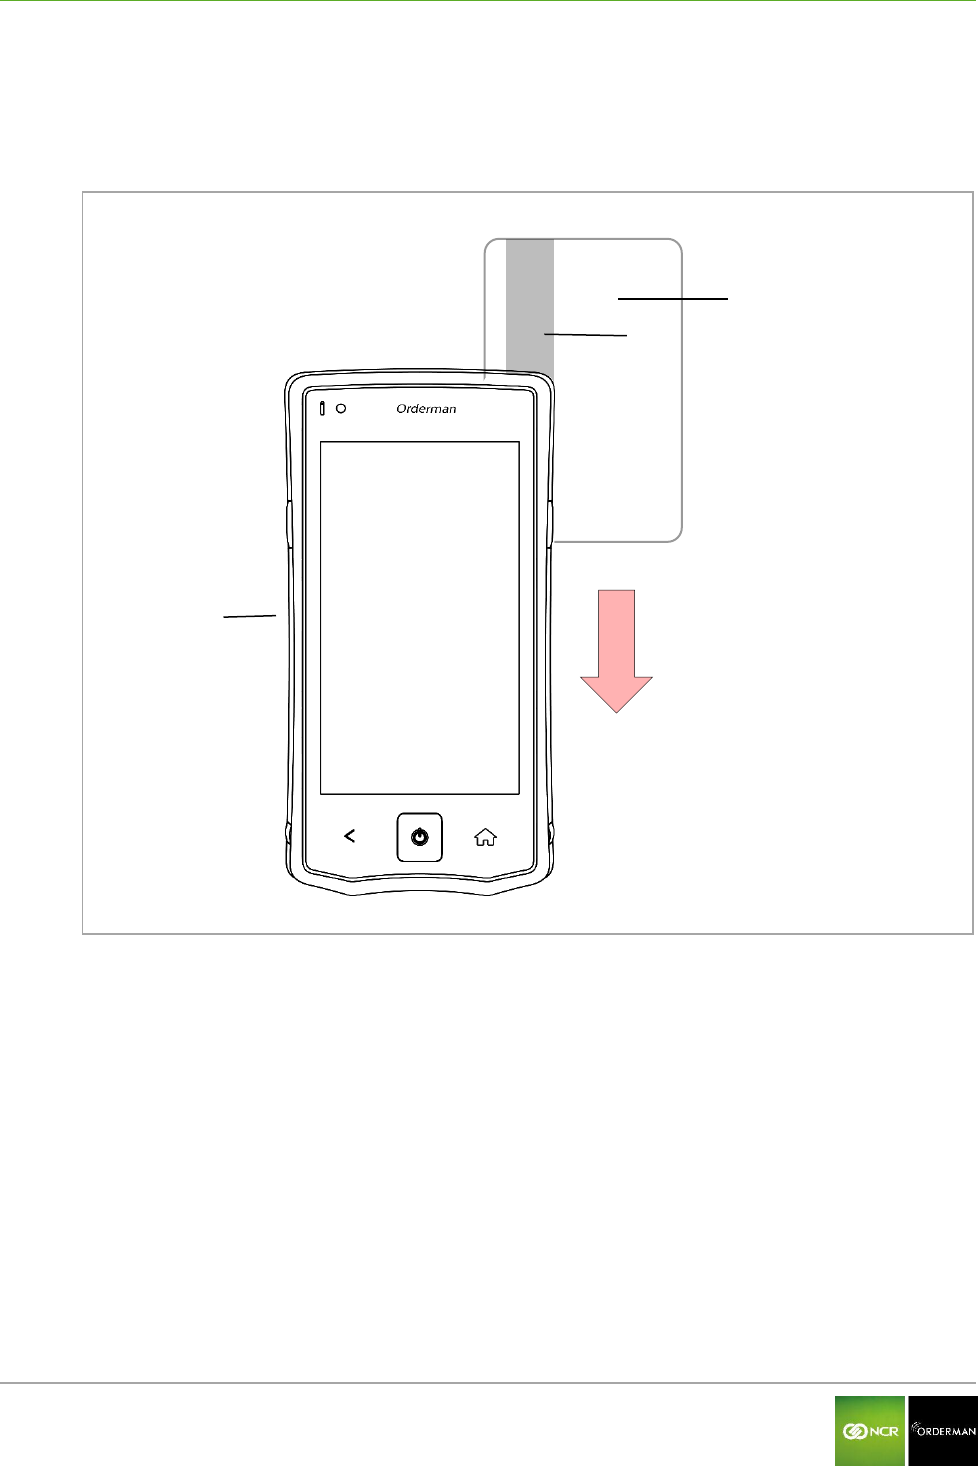
11.6 Use the magnetic strip reader
Drag the magnetic card with the magnetic strip forward (see figure below) from top to bottom quickly
and along its entire length through the magnetic card slot.
. Fig. 24: NCR Orderman7MSR
NCR Orderman7MSR
Magnetic card
Magnetic strip

NCR Orderman7 Operation
Orderman GmbH 39 V 01.02
11.7 Use the barcode reader
The barcode reader is used to read 1D and 2D barcodes. Hold the barcode as centrally as possible
in the laser aimer.
Fig. 25: Handheld, back
NCR Orderman7SC
Laser beam
1D barcode
Laser aimer
2D QR code **
Reading window
*1D barcode Barcode
**2D QR code: Data Matrix Code

NCR Orderman7 Testing the unit
Orderman GmbH 40 V 01.02
12 Testing the unit
12.1 Ordercard test
Drag the Status bar down to open the Configuration menu.
Tap the Test field in the Settings menu.
Hold the Ordercard to the handheld as shown in the figure below (upper right corner of the
handheld).
The results of the test are displayed (according to the device setup).
Fig. 26: Ordercard test
Orderman Ordercard
Handheld
Test result

NCR Orderman7 Testing the unit
Orderman GmbH 41 V 01.02
12.2 ISO/NFC test
Drag the Status bar down to open the Configuration menu.
Tap the Test field in the Settings menu.
Hold the active NFC transponder close to the back of the handheld (near camera/intercom) as
shown in the following figure.
The result of test is shown on the display (according to the device setup)
Fig. 27: NFC test
NFC data media
Handheld
Test result
NFC

NCR Orderman7 Testing the unit
Orderman GmbH 42 V 01.02
12.3 Barcode test (imager)
Drag the Status bar down to open the Configuration menu.
Tap the Test field in the Settings menu.
Hold the barcode/QR code to your handheld as shown in the figure below. The laser aimer
should be positioned as centrally as possible on the code.
The result of test is shown on the display (according to the device setup)
Fig. 28: Imager test
QR code
Laser aimer
Handheld
Test result

NCR Orderman7 Accessories
Orderman GmbH 43 V 01.02
13 Accessories
13.1 Orderman touch pen
The capacitive Orderman touch pen is specially designed to provide an optimal response when
working with the touchscreen display.
Note: To avoid damage to the touchscreen display, use only the
Orderman touch pen or an equivalent capacitive touch pen.
13.2 Orderman pouch

NCR Orderman7 Cleaning instructions
Orderman GmbH 44 V 01.02
14 Cleaning instructions
Note: Never open the housing of the Orderman handheld. Opening the housing
renders the warranty claim null and void.
Read the following care tips and you'll enjoy your Orderman unit for many years:
Clean the contacts before placing a unit in the charging station. Damp contacts can corrode
the charging contacts over time. Use a dry and clean cloth or cotton swab to wipe clean the
contacts.
Periodically clean the contacts of the dirty contacts of the rechargeable batteries with a dry,
clean cloth.
Wipe the touchscreen display with a damp, soft cloth. Do not use abrasive agents or cloths
with a rough surface.
Cleaning the power supply socket: Never clean the power supply socket with compressed air
or pointed objects! It is sufficient to blow lightly into the socket on occasion.
Note: Never use alcohol or corrosive liquids to clean the Orderman units.

NCR Orderman7 Technical specifications
Orderman GmbH 45 V 01.02
15 Technical specifications
Function
NCR
Orderman7
NCR
Orderman7+
NCR
Orderman7MSR
NCR
Orderman7SC
Radio frequency
Dual band 433/915 MHz
Frequency band
433MHz
433.050MHz – 434.790MHz, channel spacing 25kHz
915MHz
902MHz to 928MHz, channel spacing 50kHz
Data transmission
Bidirectional
Transmitting power
less than 1 mW ERP
Battery
Li-ion Polymer 3.7V 3150 mAh
Leak tightness
IP67
Dimensions H / W / D mm
165/ 84/ 18
165/ 84/ 24.6
165/ 84/ 27
Weight handheld without
battery (g)
191g
214g
228g
Battery weight (g)
76g
Bluetooth IEEE 802.15
V2.1 and V4.0 ready
No
Yes
Yes
Yes
WLAN 802.11 a/b/g/n
(2,4Ghz and 5GHz)
No
Yes
Yes
Yes
NFC 13.56MHz
Peer to peer
ISO18092, ISO1443A/B and
ISO15693;
No
Yes
Yes
Yes
Ordercard 125kHz, EM4001,
EM4200 or compatible, UID
only, ISO7816
No
Yes
Yes
Yes
Magnetic strip reader 3 track
LoCo, HiCo Cards
No
No
Yes
Yes
Barcode reader 1D
ISO/IEC 15420
No
No
No
Yes

NCR Orderman7 Technical specifications
Orderman GmbH 46 V 01.02
Function
NCR
Orderman7
NCR
Orderman7+
NCR
Orderman7MSR
NCR
Orderman7SC
Data matrix camera 2D
ISO/IEC TR 24720:2008
No
No
No
Yes
Operating life
Average shift (10h)
Handheld charging time
on average 3 hours
Battery pack charging time
in fast-charging station
1,5 hours
Storage temperature
(ambient)
-20⁰ to +60⁰ C
Storage temperature
battery
-20⁰ to +45⁰ C
Operating temperature
(ambient)
-10 to +50⁰ C
Charging temperature
(ambient)
0 to +35⁰ C
Camera
5 Mp, autofocus, flash
flash can be used as flashlight
Display
Size: 5 inch, resolution: 1280x720 (HD); color: 24-bit; brightness:
max.450cd/m2
Touch Screen
PCAP touch panel, 4 fingers
Processor
Texas Instruments OMAP 4470 GP
RAM
1GB
Function
NCR
Orderman7
NCR
Orderman7+
NCR
Orderman7MSR
NCR
Orderman7SC
Flash
4GB
Sensors
Ambient light sensor, accelerometer
Keys
2 keys, freely assignable
Intercom
Vibration motor

NCR Orderman7 Troubleshooting
Orderman GmbH 47 V 01.02
16 Troubleshooting
Error
Possible cause
Possible solution
Handheld does not charge
Oxidized charging contacts
Handheld needs to be repaired*
Dirty charging contacts
Clean with a dry cloth.
No power supply
Check the power supply to the
service station or multi service station
and power pack
Battery is defective
Battery needs to be replaced
Battery not charging
(In the fast-charging slot)
Oxidized charging contacts
Handheld needs to be repaired*
Dirty charging contacts
Clean with a dry cloth.
No power supply
Check the power supply to the
service station or multi service station
and power pack
Battery lock dirty
Clean the lock
Battery lock is defective
Handheld needs to be repaired*
Spring contacts are defective
Handheld needs to be repaired*
Battery is defective
Battery needs to be replaced
Handheld does not start
Batteries are empty
Charge the battery
Battery is not inserted correctly
Insert the battery correctly
Battery is defective
Replace battery
Handheld defective
Handheld needs to be repaired*
POS application does not start
No connection to the host
system
Check network connection
Process (application) hangs up
Shut down and restart your handheld
Automatic backlight too dark/light
Dirty lens on the ambient light
sensor
Clean the display with a soft cloth.
No network connection to
service station or multi service
station
(Network status LED on the
service station or multi service
station does not light up)
Network cable not plugged in
Insert the network cable
No power to the service station
or multi service station
Connect the power.
(Power LED on the service station or
multi service station has to light up)
Network components (switch) is
not turned on
Switch on network components
*The handheld may only be repaired by trained service technicians.

NCR Orderman7 Troubleshooting
Orderman GmbH 48 V 01.02
Error
Possible cause
Possible solution
Cannot connect to Orderman
radio network
No network connection from
radio base station to host
system
Check network cable and power
supply to the radio base station
Range exceeded
Change position of the radio base
station accordingly
Radio interference (other
Orderman radio network)
Change radio channel
Network configuration was
changed
Check/change network configuration
No WIFI (Wireless LAN)
connection
WIFI disabled on your handheld
Activate WIFI on your handheld
Access point has no power
supply
Reconnect the power
Range exceeded
Change position of the access points
accordingly
WIFI settings have been
changed (encryption, etc.)
Check/change WIFI settings

NCR Orderman7 Index
Orderman GmbH 49 V 01.02
17 Index
125kHz RFID reader 12
Ambient light sensor 12
Barcode reader 12
Battery is defective 48
Battery lock 27, 48
Belt printer 36
Bluetooth 12
Bluetooth interface 9
Capacitive touch pen 9
Care tips 44
Certifications 5
Charging status LED 22, 25, 29, 30,
31
Configuration menu 34
Disposal guidelines 9
Firmware 22
Labeling 5
Laser class 2 9
Lithium ion battery 9
Log file 37
Magnetic strip 38
Magnetic strip reader 12
Manufacturer information 5
Model plate 5
Network status LED 22, 23, 25, 26,
31, 32, 48
NFC 12
On/Off button 13, 17, 20, 33
Orderman contractual partners 5
Orderman partner 2
Orderman radio network 12
Orderman Secure Radio (OSR) 13
Power LED 22, 25, 31, 32, 48
Product name 5
QR code 39, 42
Radio base station 49
RFID storage media 40
Serial number 6
Setup bar 36, 40, 41, 42
Standards 5
Status bar 6, 34, 36
Status LED 13, 15, 17, 20, 31
Taskbar 36, 40, 41, 42
Test printout 36
Torch (flashlight) 12, 14, 16, 18, 21,
34, 37
Touchscreen display 13, 15, 17, 19,
20, 43
Update 22
Warranty claims 5
Wireless LAN 12

NCR Orderman7 Glossary
Orderman GmbH 50 V 01.02
18 Glossary
B
Barcode
A barcode is an opto-electronically readable font that consists of different widths, parallel lines and
spaces. The data in a bar code can be read by optical readers such as, for example, barcode
readers (scanners) or cameras, and is processed further electronically.
Battery pack
A battery pack is the battery together with the integrated electronics.
Bluetooth
Transfer of data between devices over short distances via radio technology (IEEE 802.15.1)
F
Firmware
As firmware refers to the operating software (Operating System) of the electronic devices.
H
Handheld
A handheld in this manual refers to all the versions of Orderman handhelds.
L
Laser class
In order to classify laser devices according to their danger, they are divided into laser classes (1,
1C, 1M, 2, 2M, 3R, 3B, 4) (DIN EN 60825-1 or IEC 60825-1/01.2001).
LED (Light-Emitting Diode)
LEDs convert electrical energy into very energy-efficient light. LEDs have a very long life.
LoCo/HiCo
For magnetic strips there are two different versions. These are designated with HiCo (high
coercivity) and LoCo (low coercivity). They differ in the magnetic flux density, with which they can
be described:
LoCo: 30 mT (standard, due to external magnetic field effects, data can be deleted)
HiCo: 275-400 mT (accidental deletion virtually eliminated)
Log file
A log file (also known as event log file) includes the automatically logged protocol of all or any
actions of processes on a computer system.

NCR Orderman7 Glossary
Orderman GmbH 51 V 01.02
N
NFC
NFC (Near Field Communication) is an international broadcast standard for contactless exchange
of data via radio technology over a distance of a few centimeters and a data transmission rate of
max. 424 kbit/s.
O
Orderman Secure Radio (OSR)
The Orderman Secure Radio (= OSR) uses the 433/915 MHz bandwidth. The ability to penetrate
solid objects, the large range, the minimal power consumption, the interference resistant and
hacker-proof design are considerably better than other radio networks.
Q
QR code (Quick Response Code)
The QR code (2D code) is a square matrix of black and white dots, representing the binary encoded
data. The data is read by optical readers, such as QR-code reading devices (scanner) or cameras,
and is processed further electronically.
R
Radio base station (OMB)
The radio base station allows users to connect Orderman devices to the host system and an
extension of the radio range.
RFID (Radio Frequency Identification)
RFID is a technology for transmitter-receiver systems for contactless reading and storing of data
through radio waves.
T
Touchscreen display
The touchscreen display allows a unit to be operated directly by touching the display (with a finger
or a touch pen).
W
Wireless LAN (Wireless Local Area Network)
Wireless LAN is the term used for local radio networks.
User Manual_02

NCR ©2014 All rights reserved.
User Manual
NCR Orderman7 Version 01.02
NCR Orderman7 General information
Orderman GmbH 2 V 01.02
© 2014 by
Orderman GmbH
Bachstrasse 59
5023 Salzburg – Austria
www.orderman.com
We accept no liability for errors or misprints.
Copying, even excerpts hereof, is prohibited without the written consent of Orderman GmbH.
User Manual
NCR Orderman7
Published November 2014
Version 01.02
Orderman accepts no responsibility for any damage or losses that arise from the use of this manual.
Orderman accepts no responsibility for any losses or claims by third parties that arise through the
use of Orderman devices.
The contents of this guide are subject to change without prior notice.
This guide does not constitute part of a contract.
Trademark: All brand and product names are trademarks or registered trademarks of their
corresponding companies.
Note: For further questions about operating the device, contact your Orderman
partner.

NCR Orderman7 General information
Orderman GmbH 3 V 01.02
Contents
1 General information ......................................................................................................... 5
1.1 Warranty _________________________________________________________________________ 5
1.2 Labeling __________________________________________________________________________ 5
1.2.1 Labeling on the unit 5
1.2.2 Serial number 6
1.3 Safety notices _____________________________________________________________________ 8
1.3.1 Explanation of symbols 8
1.3.2 General information 9
1.3.3 Safety information for battery pack 9
1.3.4 Safety information for barcode reader (laser) 9
2 NCR Orderman7 handhelds ........................................................................................... 11
2.1 Overview ________________________________________________________________________ 11
2.2 NCR Orderman7 handheld features __________________________________________________ 12
3 NCR Orderman7 ............................................................................................................. 13
3.1 Product description _______________________________________________________________ 13
3.2 Overview ________________________________________________________________________ 13
4 NCR Orderman7+ ............................................................................................................ 15
4.1 Product description _______________________________________________________________ 15
4.2 Overview ________________________________________________________________________ 15
5 NCR Orderman7MSR ........................................................................................................ 17
5.1 Product description _______________________________________________________________ 17
5.2 Overview ________________________________________________________________________ 17
6 NCR Orderman7SC .......................................................................................................... 19
6.1 Product description _______________________________________________________________ 19
6.2 Overview ________________________________________________________________________ 20
7 Service station and multi service station ..................................................................... 22
7.1 Overview of the service station _____________________________________________________ 22
7.2 Starting up the service station ______________________________________________________ 23
7.3 Overview of the multi service station _________________________________________________ 25
7.4 Starting up the multi service station _________________________________________________ 26
8 Remove/replace battery pack ........................................................................................ 27
9 Safety Cord ..................................................................................................................... 28
10 Operating the service station and multi service station .............................................. 29
10.1 Charging in the service station and multi service station ________________________________ 29
10.1.1 Charging the handheld 30
10.1.2 Charging the battery pack without handheld 31

NCR Orderman7 General information
Orderman GmbH 4 V 01.02
10.2 Charging status LED for service station ______________________________________________ 31
10.3 Network Status LED for service station _______________________________________________ 32
10.4 Power LED for service station ______________________________________________________ 32
11 Operation ........................................................................................................................ 33
11.1 Operating conditions of the handhelds _______________________________________________ 33
11.1.1 Handheld On/Off 33
11.1.2 Standby 33
11.2 Acceleration sensor _______________________________________________________________ 33
11.2.1 Flip-View 33
11.2.2 Sleep mode 33
11.3 Status bar _______________________________________________________________________ 34
11.4 Configuration menu _______________________________________________________________ 34
11.5 Configure handheld _______________________________________________________________ 34
11.5.1 Display settings 35
11.5.2 Connecting the belt printer (Bluetooth pairing) 36
11.5.3 Miscellaneous 37
11.6 Use the magnetic strip reader _______________________________________________________ 38
11.7 Use the barcode reader ____________________________________________________________ 39
12 Testing the unit .............................................................................................................. 40
12.1 Ordercard test ____________________________________________________________________ 40
12.2 ISO/NFC test _____________________________________________________________________ 41
12.3 Barcode test (imager) _____________________________________________________________ 42
13 Accessories .................................................................................................................... 43
13.1 Orderman touch pen ______________________________________________________________ 43
13.2 Orderman pouch _________________________________________________________________ 43
14 Cleaning instructions ..................................................................................................... 44
15 Technical specifications ................................................................................................ 45
16 Troubleshooting ............................................................................................................. 47
17 Index ............................................................................................................................... 49
18 Glossary .......................................................................................................................... 50
NCR Orderman7 General information
Orderman GmbH 5 V 01.02
1 General information
This manual applies to Orderman handhelds and Orderman accessories.
It covers the following Orderman handhelds:
NCR Orderman7
NCR Orderman7+
NCR Orderman7MSR
NCR Orderman7SC
The different versions are described in the following chapters.
1.1 Warranty
All warranty claims must be addressed to your local Orderman contractual partners.
1.2 Labeling
The labeling provides information on certifications, standards, product descriptions and
manufacturer specifications.
1.2.1 Labeling on the unit
The labeling (model plate) is located on back of the unit.
Fig. 1: Labeling
NCR Orderman/NCR Orderman+/
NCR OrdermanMSR
NCR Orderman7SC

NCR Orderman7 General information
Orderman GmbH 6 V 01.02
1.2.2 Serial number
The serial number is used to uniquely identify the unit.
You will find the serial number in the unit's battery slot.
Fig. 2: Serial number in the battery slot
Back of the Orderman handheld
Serial number in the battery slot
You can also display the serial number in the application (handheld must be ready for operation!)
To do so, perform the following step(s):
Drag the status bar down.
Fig. 3: Status bar
Status bar
Tap the "Settings" box.
Tap the "About" box.
NCR Orderman7 General information
Orderman GmbH 7 V 01.02
The serial number appears on the display.
Fig. 4: Read serial number
Serial number

NCR Orderman7 General information
Orderman GmbH 8 V 01.02
1.3 Safety notices
1.3.1 Explanation of symbols
Icons and signal words indicate the degree of danger that will result, unless actions to reduce
damage are taken.
Caution
Caution means that minor property damage can occur. Caution is highlighted by
horizontal lines above and below the text.
Warning
Warning means that minor personal injury or serious damage to property can occur.
Warnings are highlighted by horizontal lines above and below the text.
Danger
Danger means that serious personal injury can occur.
In particularly serious cases, there is danger to life. Danger is highlighted by horizontal
lines above and below the text.
Notes
Notes are indicated in the text by the adjoining icon. In cases in which there are no
imminent dangers for personnel or equipment, notes contain important information.
Notes are highlighted by horizontal lines above and below the text.
Tips
Tips describe non-binding recommendations. Tips are highlighted by horizontal lines
above and below the text.
NCR Orderman7 General information
Orderman GmbH 9 V 01.02
1.3.2 General information
Caution
Never expose the unit to extreme weather conditions such as hail or strong
sunlight. In the event of damage the unit must be examined by the after-sales
service for possible faults.
To operate the handheld, use only a finger or a capacitive touch pen. Pencils,
ballpoint pens or other pointed objects will damage the device's touch screen.
The device could be damaged by a heavy mechanical load such as twisting or
falling from an excessive height or onto sharp objects.
Do not, under any circumstances, short-circuit the charging contacts of the
handheld unit.
Note: The handheld unit does not comprise any parts that have to be serviced by
the user, and the user is therefore not allowed to open it.
If opened, the warranty is rendered null and void.
Danger: The handheld is equipped with a Bluetooth interface for wireless
communication. Never use the handheld in environments where Bluetooth
could cause interference (airplanes, hospitals, etc.).
1.3.3 Safety information for battery pack
The handheld runs on a lithium ion battery. Observe the following instructions for safe handling:
Improper use of lithium ion batteries (cutting, breaking, overheating) can cause the batteries
to explode or start fires.
Lithium ion batteries contain flammable and/or corrosive solutions and lithium salts. In the
event of leakage, this can lead to irritation of the skin, eyes and mucous membranes.
If lithium ion batteries vent, the escaping vapors may pose a risk to health.
Warning
Use only an original Orderman battery pack.
Charge the battery only in the Orderman service station provided.
Use only the original Orderman power supply for the service station or multi
service station.
In case of significant damage to the battery, replace it immediately.
Do not expose the battery to excessive heat, open flame or corrosive liquids.
Never short-circuit the contacts since there is an explosion hazard.
Charging temperature 0-35° C (ambient temperature)
Note: Lithium ion batteries must be disposed of in line with valid disposal
guidelines. If a lithium ion battery to mechanical damage (breakage,
cracking, etc.), this be disposed of as hazardous waste (local guidelines).
1.3.4 Safety information for barcode reader (laser)
The NCR Orderman7SC unit is equipped with a laser. The laser meets the specifications for a class 2
laser (DIN EN 60825-1 or IEC 60825-1/01.2001).
NCR Orderman7 General information
Orderman GmbH 10 V 01.02
Laser class 2
Class 2 includes lasers in the visible range for which an irradiation of less than 0.25ms
to the eye is not harmful. 0.25ms corresponds to a natural eyelid reflex that can
automatically protect the eye sufficiently against prolonged irradiation. These devices
are considered safe as long as medication does not increase the response time of the
eye significantly, and users do not intentionally look into the laser beam (suppressing
the eyelid reflex).
Warning
Never aim the laser beam at another person's eyes!
Never intentionally stare directly into the beam!
If the laser beam hits the eye, quickly close your eyes and immediately move your
head away from the beam.
Avoid reflections from reflective surfaces (reflections can amplify the laser light).
Note
The reading window (where the laser beam is emitted) should be cleaned
regularly. A dirty reading window may lead to uncontrolled activation of the laser
beam.
Repairs to the laser may be performed only by authorized service technicians.

NCR Orderman7 NCR Orderman7 handhelds
Orderman GmbH 11 V 01.02
2 NCR Orderman7 handhelds
2.1 Overview
NCR Orderman7/
NCR Orderman7+
NCR Orderman7MSR
NCR Orderman7SC

NCR Orderman7 NCR Orderman7 handhelds
Orderman GmbH 12 V 01.02
2.2 NCR Orderman7 handheld features
Feature
NCR
Orderman7
NCR
Orderman7+
NCR
Orderman7MSR
NCR
Orderman7SC
Orderman radio network
Bluetooth
-
Wireless LAN
-
NFC
-
125kHz RFID reader
-
Magnetic strip reader (MSR)
-
Barcode reader
-
-
Camera
Ambient light sensor
Hardware buttons
Capacitive home buttons
Ambient light sensor
Vibration
LEDs
Intercom
Real time clock
Flashlight

NCR Orderman7 NCR Orderman7
Orderman GmbH 13 V 01.02
3 NCR Orderman7
3.1 Product description
The Orderman unit is specially designed to connect to an Orderman radio network (OSR =
Orderman Secure Radio). Data is entered only through the input on the touchscreen display.
3.2 Overview
Fig. 5: NCR Orderman7 handheld, front
Ambient light sensor
Status LED
Notification (message) LED (freely assignable)
Touchscreen display
Hardware button (freely assignable)
Lock for battery slot
Capacitive Back button
Hardware Power button
Capacitive home button (freely assignable)
NCR Orderman7 NCR Orderman7
Orderman GmbH 14 V 01.02
Fig. 6: NCR Orderman7 handheld, back
Camera
LED flash and flashlight
Intercom
Model plate
Charging contacts and communication
interface

NCR Orderman7 NCR Orderman7+
Orderman GmbH 15 V 01.02
4 NCR Orderman7+
4.1 Product description
The NCR Orderman7+ unit was designed specifically for the use of various types of connections.
The NCR Orderman7+ unit supports connectivity through Bluetooth, RFID, wireless LAN and Near
Field Communication (NFC). Data is input through the input on the touchscreen panel.
Bluetooth
Wireless LAN
RFID
NFC
4.2 Overview
Fig. 7: NCR Orderman7+ handheld, front
Ambient light sensor
Status LED
Notification (message) LED (freely
assignable)
Touchscreen display
Hardware button (freely assignable)
Lock for battery slot
Capacitive Back button
Hardware Power button
Capacitive home button (freely assignable)

NCR Orderman7 NCR Orderman7+
Orderman GmbH 16 V 01.02
Fig. 8: NCR Orderman7+ handheld, back
Camera
LED flash and flashlight
Intercom
Model plate
Charging contacts and communication
interface

NCR Orderman7 NCR Orderman7MSR
Orderman GmbH 17 V 01.02
5 NCR Orderman7MSR
5.1 Product description
The NCR Orderman7MSR unit is specially designed for use with different types of connections, as
well as magnetic cards. The NCR Orderman7MSR unit supports connectivity through Bluetooth, RFID,
wireless LAN and Near Field Communication (NFC). Data is input by tapping the touchscreen
display.
Magnetic strip reader
Bluetooth
Wireless LAN
RFID reader
NFC
5.2 Overview
Fig. 9: NCR Orderman7MSR handheld
Ambient light sensor
Status LED
Notification (message) LED (freely
assignable)
Touchscreen display
Hardware button (freely assignable)
Lock for battery slot
Capacitive Back button
Hardware Power button
Capacitive home button (freely assignable)
Magnetic card slot
NCR Orderman7 NCR Orderman7MSR
Orderman GmbH 18 V 01.02
Fig. 10: NCR Orderman7MSR, back
Camera
LED flash and flashlight
Intercom
Model plate
Charging contacts and communication
interface
Magnetic card slot

NCR Orderman7 NCR Orderman7SC
Orderman GmbH 19 V 01.02
6 NCR Orderman7SC
6.1 Product description
The NCR Orderman7SC unit is designed especially for use with different types of connections, as
well as magnetic cards and barcodes. The NCR Orderman7SC unit supports connectivity through
Bluetooth, RFID, wireless LAN and Near Field Communication (NFC). Data is input by tapping the
touchscreen display.
Magnetic strip reader
Barcode reader
Bluetooth
Wireless LAN
RFID reader
NFC

NCR Orderman7 NCR Orderman7SC
Orderman GmbH 20 V 01.02
6.2 Overview
Fig. 11: NCR Orderman7SC handheld
Ambient light sensor
Status LED
Touchscreen display
Hardware button (freely assignable)
Lock for battery slot
Magnetic card slot
Capacitive Back button
Hardware Power button
Capacitive home button (freely
assignable)
Barcode reading window

NCR Orderman7 NCR Orderman7SC
Orderman GmbH 21 V 01.02
Fig. 12: NCR Orderman7SC, back
Camera
LED flash and flashlight
Intercom
Model plate
Charging contacts
Magnetic card slot
NCR Orderman7 Service station and multi service station
Orderman GmbH 22 V 01.02
7 Service station and multi service station
The service station and multi service station are designed to charge your handheld(s), as well as
providing an IP-based Ethernet connection to the host system.
The service station and multi service station also have a quick-charge function (quick recharging slot
for battery packs).
Note: The service station/multi service station is required to update the firmware. In
the multi service station, up to five handhelds can be updated at the same
time.
7.1 Overview of the service station
Fig. 13: Service station
Service station
Charging contacts handheld charging slot
Charging status LED
Fast-charging slot
Network status LED
Power LED
Protective cover for charging contacts on the
quick-charging slot
Connection for Orderman power supply
RJ45 Ethernet network port
Front
Back
NCR Orderman7 Service station and multi service station
Orderman GmbH 23 V 01.02
7.2 Starting up the service station
Connect the cables for the service station as shown in the following figure.
Plug in the Orderman power supply.
Plug in the Ethernet network cable.
Fig. 14: Connections for the service station
Service station
RJ45 Ethernet port
Ethernet cable
Plug for Orderman power supply
Power supply cable
Data transmission
Cable category
100Mbit
Cat5 or higher
1Gbit
Cat5e or higher
Ensure the power supply cable is correctly routed. Insert the plug fully into the socket and
press the cable to the bottom of the housing.
Plug the network cable into the socket until it clicks. If the cable is plugged in correctly and the
network is active, the LEDs will flash on the socket and the "Network status LED" lights up.

NCR Orderman7 Service station and multi service station
Orderman GmbH 24 V 01.02
Note: Avoid direct sunlight or heat sources in the immediate vicinity of the service
station.
Once you place the handheld unit in the service station, the unit will start to charge. The charging
status is displayed via the "Status LED" on the handheld.
In addition to the handheld, another battery pack can be charged simultaneously in the fast-charging
slot.
Fig. 15: Service Station with handheld and additional battery pack
Orderman Handheld
Service station
Additional battery pack
NCR Orderman7 Service station and multi service station
Orderman GmbH 25 V 01.02
7.3 Overview of the multi service station
The multi service station is designed to charge up to five handhelds and up to five battery packs.
The service station and multi service station also provide an IP-based Ethernet connection to the
host system.
Fig. 16: Multi service station
Multi service station
Charging contacts, handheld charging slot
Chargeing status LED
Fast-charging slot
Network status LED
Power LED
Protective cover for charging contacts on the
quick-charging slot
Connection for Orderman power supply
2x RJ45 Ethernet network port*
* One of the two Ethernet ports can be used as a network connection for another Ethernet device.
Front
Back

NCR Orderman7 Service station and multi service station
Orderman GmbH 26 V 01.02
7.4 Starting up the multi service station
Connect the cables for the multi service station as shown in the following figure.
Plug in the Orderman power supply.
Plug in the Ethernet network cable.
Fig. 17: Ports for the multi service station
Multi service station
2x RJ45 Ethernet port
Ethernet cable
Power supply
Data transmission
Cable category
100Mbit
Cat5 or higher
1Gbit
Cat5e or higher
Plug the network cable into the socket until it clicks. If the cable is plugged in correctly and the
network is active, the LEDs will flash on the socket and the "Network status LED" will light up.
Note: Avoid direct sunlight or heat sources close to the multi service station.
Once you place the handheld unit in the service station, the unit will start to charge. The charging
status is displayed via the "Status LED" on the handheld.
NCR Orderman7 Remove/replace battery pack
Orderman GmbH 27 V 01.02
8 Remove/replace battery pack
Tip: Remove the safety cord before changing the battery.
To remove the battery pack, simultaneously press the locking button located on both sides of the
handheld unit. By pressing the lock buttons, the battery pack is released slightly from the handheld.
When inserting the pack, press on it until you feel it engage (click) in the battery lock in the battery
slot. If the battery pack is correctly engaged, the handheld turns on automatically.
Note
If the battery pack is not latched properly,
the handheld does not start, and
the handheld is not sealed.
Fig. 18: Replace battery pack
Locking buttons on battery pack
Battery pack

NCR Orderman7 Safety Cord
Orderman GmbH 28 V 01.02
9 Safety Cord
The safety cord is attached to the underside of the handheld. Proceed as shown in the figure below
steps:
Fig. 19: Safety Cord
Handheld
Safety Cord
Leadership
Pull the safety cord in in the guide provided by the handheld until it clicks. You can push the
safety cord from both sides into the guide.
By applying lateral pressure, the safety cord can be moved in the guide and separated from
the handheld.
Tip: Use the safety cord to protect the handheld against being dropped.

NCR Orderman7 Operating the service station and multi service station
Orderman GmbH 29 V 01.02
10 Operating the service station and multi service station
10.1 Charging in the service station and multi service station
Note
Fully charge the battery initially before using the unit (i.e. until a solid green
charging status LED appears).
The optimum charging power is set automatically. If the battery pack is fully
charged, the handheld unit or battery pack may remain in the service station or
multi service station.
The service station and multi service station offer different charging options:
Charge the battery pack in the handheld
Charge a battery pack in the fast-charging slot
Charge the battery pack in the handheld and an additional battery pack in the fast-
charging slot
Caution: The permissible operating temperature (ambient temperature) for the
service station and multi service station is 0 to 35⁰ C.
Note: If a charged handheld or battery pack remains in the service station for a
longer period (or in a charged state in the service station or multi service
station), the solid green "Charging status LED" may start flashing again
(charging).
Cause:
The charge control ensures the battery is kept at an optimum charge level.
NCR Orderman7 Operating the service station and multi service station
Orderman GmbH 30 V 01.02
10.1.1 Charging the handheld
The handheld unit can be charged by plugging it into the service station or multi service station.
Note: To place the handheld unit in the service station or multi service station, you
must first remove the safety cord!
Fig.20: Handheld in service station
Handheld
Service station
Additional battery pack
Note: In addition to the handheld unit, an additional battery pack can also be
charged in the fast-charging slot.
Handheld status LED
Status
LED blue
Handheld is in boot process (startup)
LED flashes green
Battery is charging
LED green
Battery is charged
LED red
Battery is not charging (see Troubleshooting section)
Note: If a charged handheld or battery pack remains in the service station for a
longer period (or in a charged state in the service station or multi service
station), the solid green "Charging status LED" may start flashing again
(charging).
Cause:
The charge control ensures the battery is kept at an optimum charge level.
NCR Orderman7 Operating the service station and multi service station
Orderman GmbH 31 V 01.02
10.1.2 Charging the battery pack without handheld
You can remove the battery pack from the handheld, and plug directly into the service station.
Fig. 21: Battery pack in the service station
Battery pack
Service station
Charging status LED
Network status LED
Power LED
10.2 Charging status LED for service station
Charging status LED
Status
Green, flashing
Battery is charging
Green
Battery is charged
Red
Battery is not charging (see Troubleshooting
section)
Note: The Charging status LED on the service station only indicates the charge
state of a battery pack in the fast-loading slot.
If a handheld is plugged into the service station, the Status LED on the
handheld shows the charge status.

NCR Orderman7 Operating the service station and multi service station
Orderman GmbH 32 V 01.02
10.3 Network Status LED for service station
The Network status LED indicates whether the service station or multi service station is connected to
an active Ethernet network.
10.4 Power LED for service station
The Power LED indicates whether the service station or multi service station is powered on.

NCR Orderman7 Operation
Orderman GmbH 33 V 01.02
11 Operation
Note: This manual describes the basic functions of Orderman handhelds. All other
functions are controlled by your partner's POS system application.
11.1 Operating conditions of the handhelds
11.1.1 Handheld On/Off
You can turn on the handheld by pressing the On/Off button.
Note: If the handheld does not turn on, the battery level may be too low (see
Troubleshooting section).
You can turn off the handheld by pressing and holding the On/Off button.
11.1.2 Standby
When the handheld is in ready mode, briefly press the On/Off button to switch the unit to standby
mode (display off).
11.2 Acceleration sensor
11.2.1 Flip-View
The handheld is equipped with a tilt sensor. This sensor allows the display to rotate 180 degrees
automatically, depending on the position of the unit (to allow customers to read the display).
11.2.2 Sleep mode
If the handheld is placed top-down in the leather pouch, the unit switches directly to sleep mode. If
the handheld is removed and placed in operating position, the unit will turn on automatically.
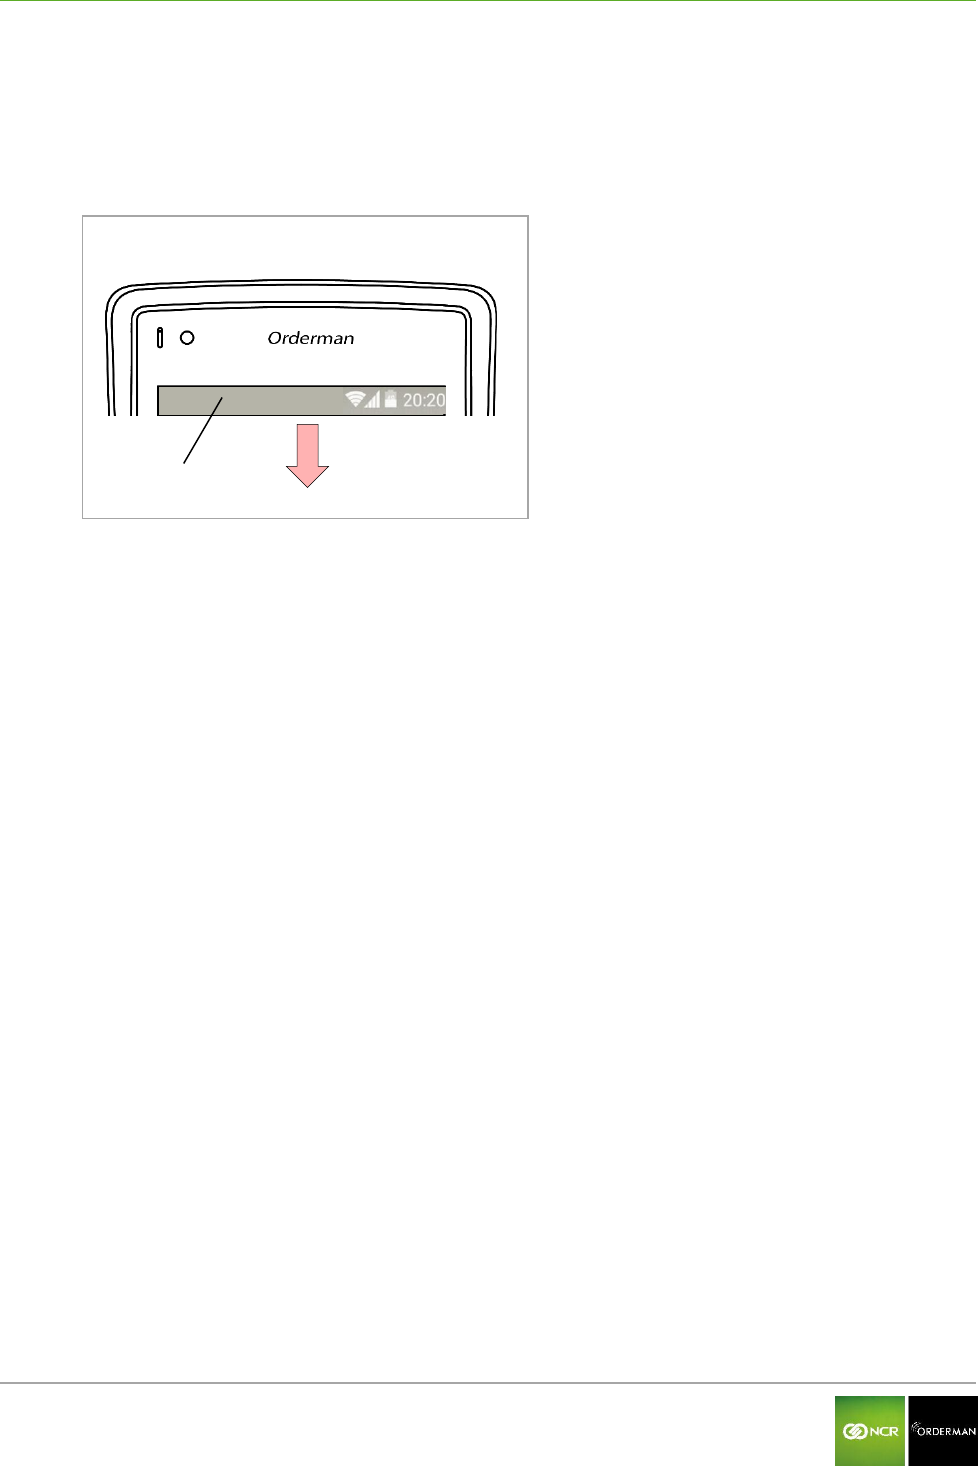
NCR Orderman7 Operation
Orderman GmbH 34 V 01.02
11.3 Status bar
After the startup sequence, the Status bar appears at the top display screen.
By pulling down the Status bar to open the Configuration Menu.
Fig. 22: Status bar
Status bar
11.4 Configuration menu
In the Configuration menu you'll find all the available settings.
11.5 Configure handheld
You can configure the settings described below on the handheld:
Display settings
Connect belt printer
Miscellaneous
- Switch left to right buttons (left and right keys reverse)
- Logging on/off
- Flashlight On/Off

NCR Orderman7 Operation
Orderman GmbH 35 V 01.02
11.5.1 Display settings
Pull down the Status bar to open the Configuration menu.
Tap "Settings".
Tap "Screen".
The following settings are available:
Function
Value
Effect
"Control automatically"
☑
Enabled
The brightness setting is automatically
controlled by the ambient light sensor.
"Control automatically"
□
Not activated
The brightness setting can be adjusted
manually using a slider shown in the display.
"Screen timer"
in seconds
5 to 60
Defines the time after which the display dims
when it is not in use.
"Sleep timer"
in seconds
30 to 180
Defines the time after which the display turns
off when not in use.
Note: The display settings contribute significantly to the power used by the
handheld. Reduce the brightness for a longer operating time.
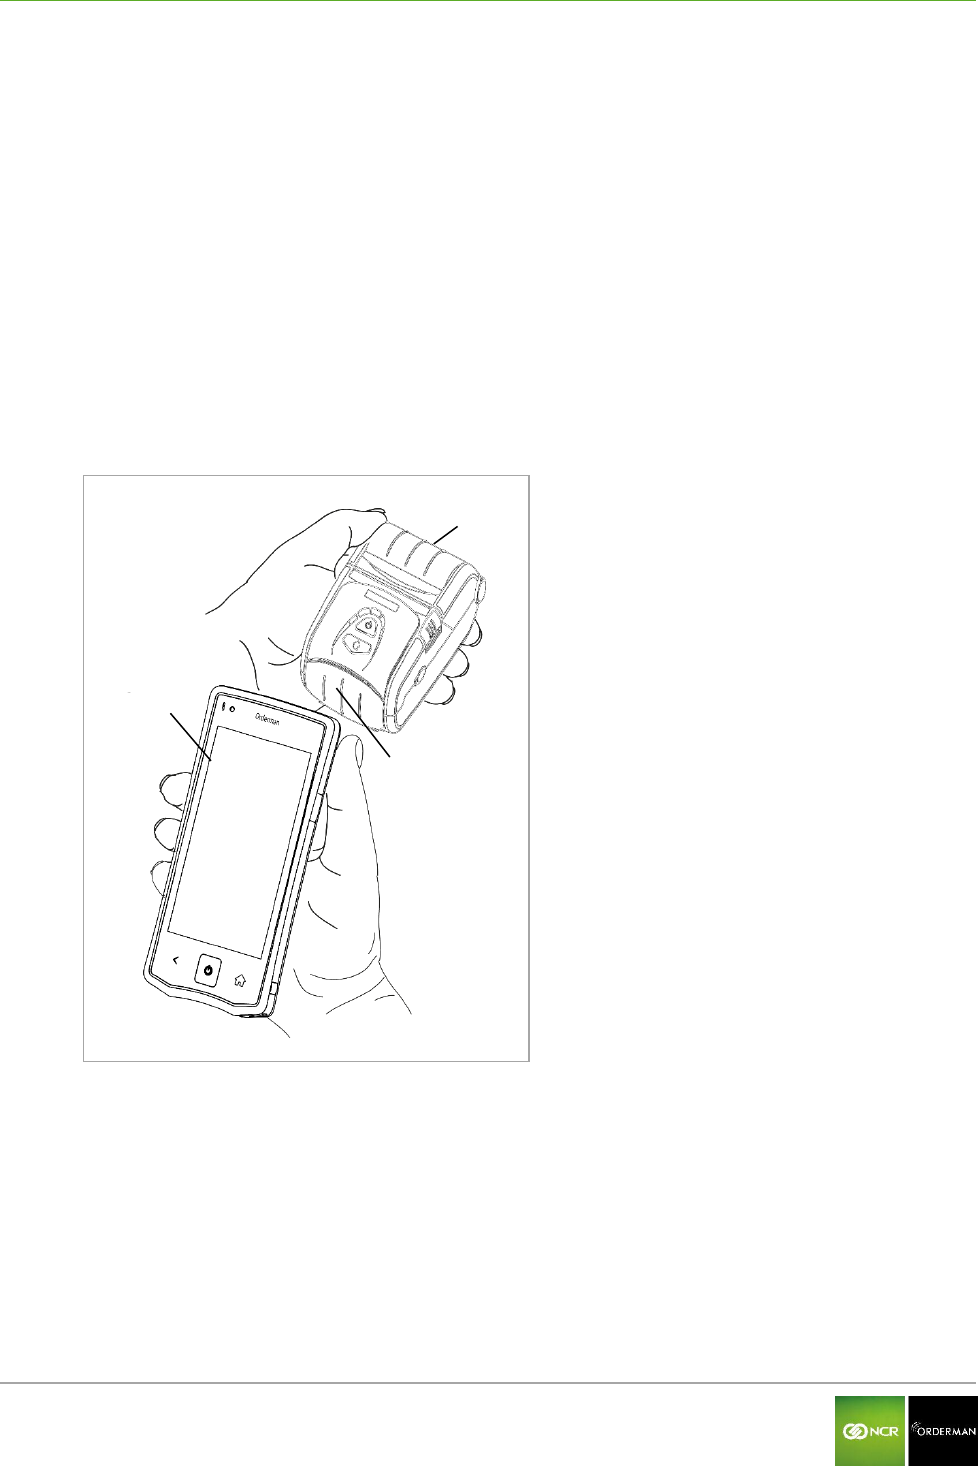
NCR Orderman7 Operation
Orderman GmbH 36 V 01.02
11.5.2 Connecting the belt printer (Bluetooth pairing)
To connect the belt printer to the handheld, proceed as follows:
Switch on the belt printer.
Drag the Status bar down.
On the handheld, tap the Pairing function in the Settings menu.
Tap the Pair Printer function.
Hold the printer close to the handheld (see figure below)
The antenna used for detecting the printer is located in the upper right corner of the handheld.
The antenna for the printer is located approximately in the center and at the front of the
printer.
Start the scan by tapping Pair Printer.
If the printer is detected, the message "State: Paired" is displayed and a test printout is
automatically created.
Fig. 23: Connecting the belt printer
Belt printer
Orderman Handheld
Printer, front
11.5.2.1 Testing the belt printer
To test the belt printer, proceed as follows:
Drag the Status bar down to open the Configuration menu.
Tap the Settings field.
Tap the Pairing field.
Tap the Test Print (test printout).
Check the test printout on the belt printer.

NCR Orderman7 Operation
Orderman GmbH 37 V 01.02
11.5.3 Miscellaneous
11.5.3.1 Switch left and right buttons
You can reverse the function of the two freely assignable hardware buttons, on the left and right side
of the handheld by selecting the "flip buttons" function.
In the Settings/Miscellaneous menu, the switch left and right buttons can be enabled or disabled (on
/ off).
11.5.3.2 Logging
By activating the Logging function, all debug messages from the handheld are logged.
To better evaluate the log file, a marker can be set at any given time. This marker can be easily
identified during the analysis by the service technician.
The log files can only be read by trained service technicians.
Note: Activate the Logging function only for error analysis.
11.5.3.3 Flashlight
By activating the Torch function, you can use the LED flashlight on the back of the handheld.
Note: Frequent use of the flashlight uses a lot of power and reduces the operating
life of the handhelds.

NCR Orderman7 Operation
Orderman GmbH 38 V 01.02
11.6 Use the magnetic strip reader
Drag the magnetic card with the magnetic strip forward (see figure below) from top to bottom quickly
and along its entire length through the magnetic card slot.
. Fig. 24: NCR Orderman7MSR
NCR Orderman7MSR
Magnetic card
Magnetic strip

NCR Orderman7 Operation
Orderman GmbH 39 V 01.02
11.7 Use the barcode reader
The barcode reader is used to read 1D and 2D barcodes. Hold the barcode as centrally as possible
in the laser aimer.
Fig. 25: Handheld, back
NCR Orderman7SC
Laser beam
1D barcode
Laser aimer
2D QR code **
Reading window
*1D barcode Barcode
**2D QR code: Data Matrix Code
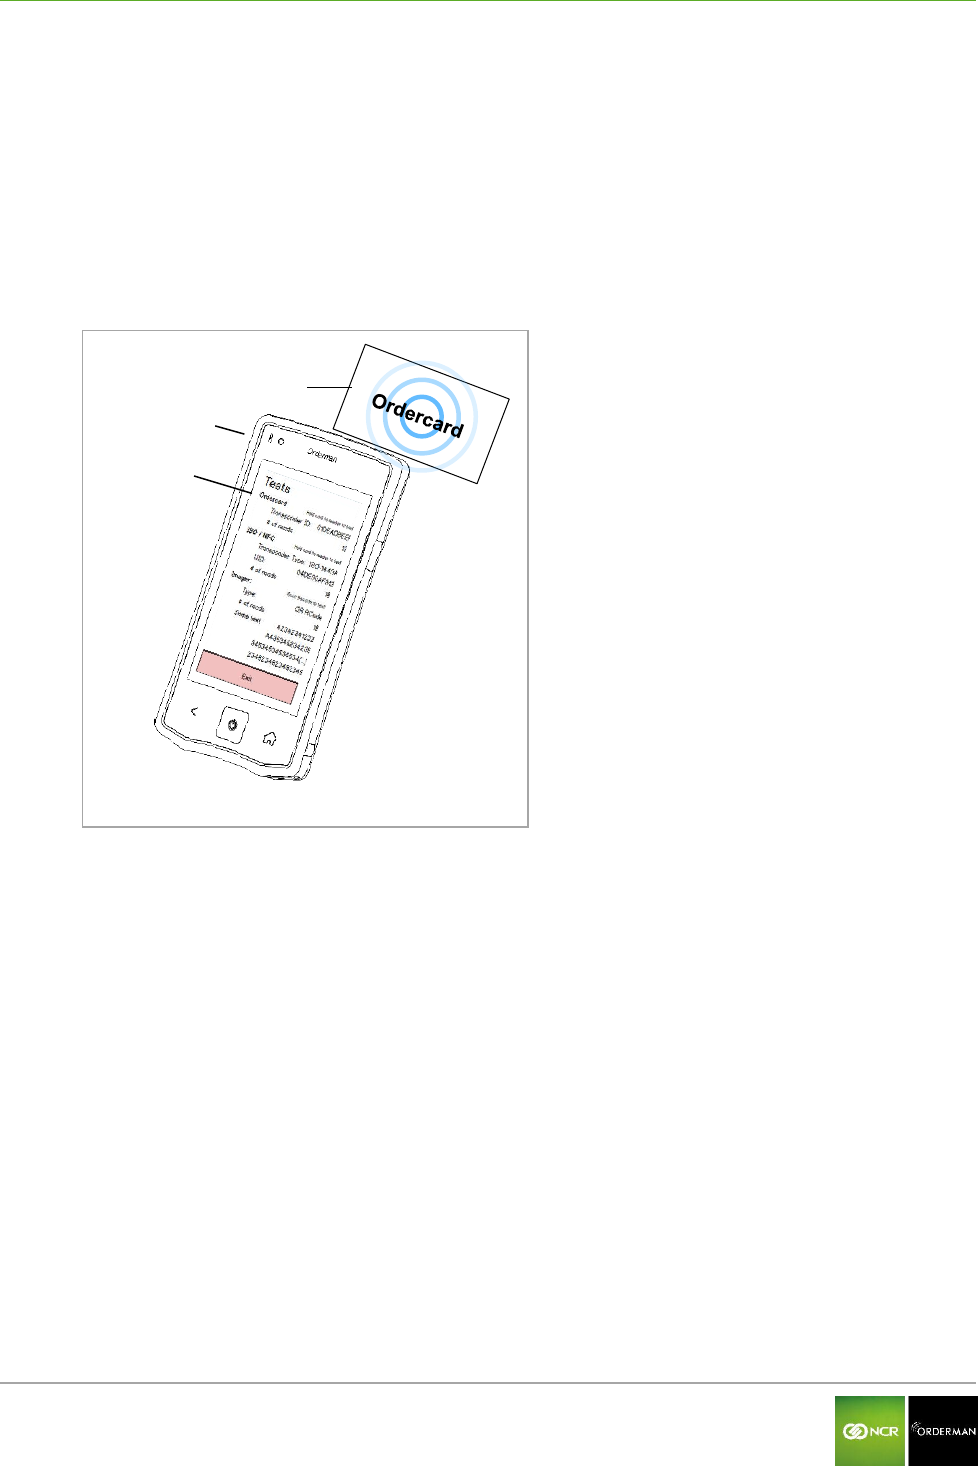
NCR Orderman7 Testing the unit
Orderman GmbH 40 V 01.02
12 Testing the unit
12.1 Ordercard test
Drag the Status bar down to open the Configuration menu.
Tap the Test field in the Settings menu.
Hold the Ordercard to the handheld as shown in the figure below (upper right corner of the
handheld).
The results of the test are displayed (according to the device setup).
Fig. 26: Ordercard test
Orderman Ordercard
Handheld
Test result
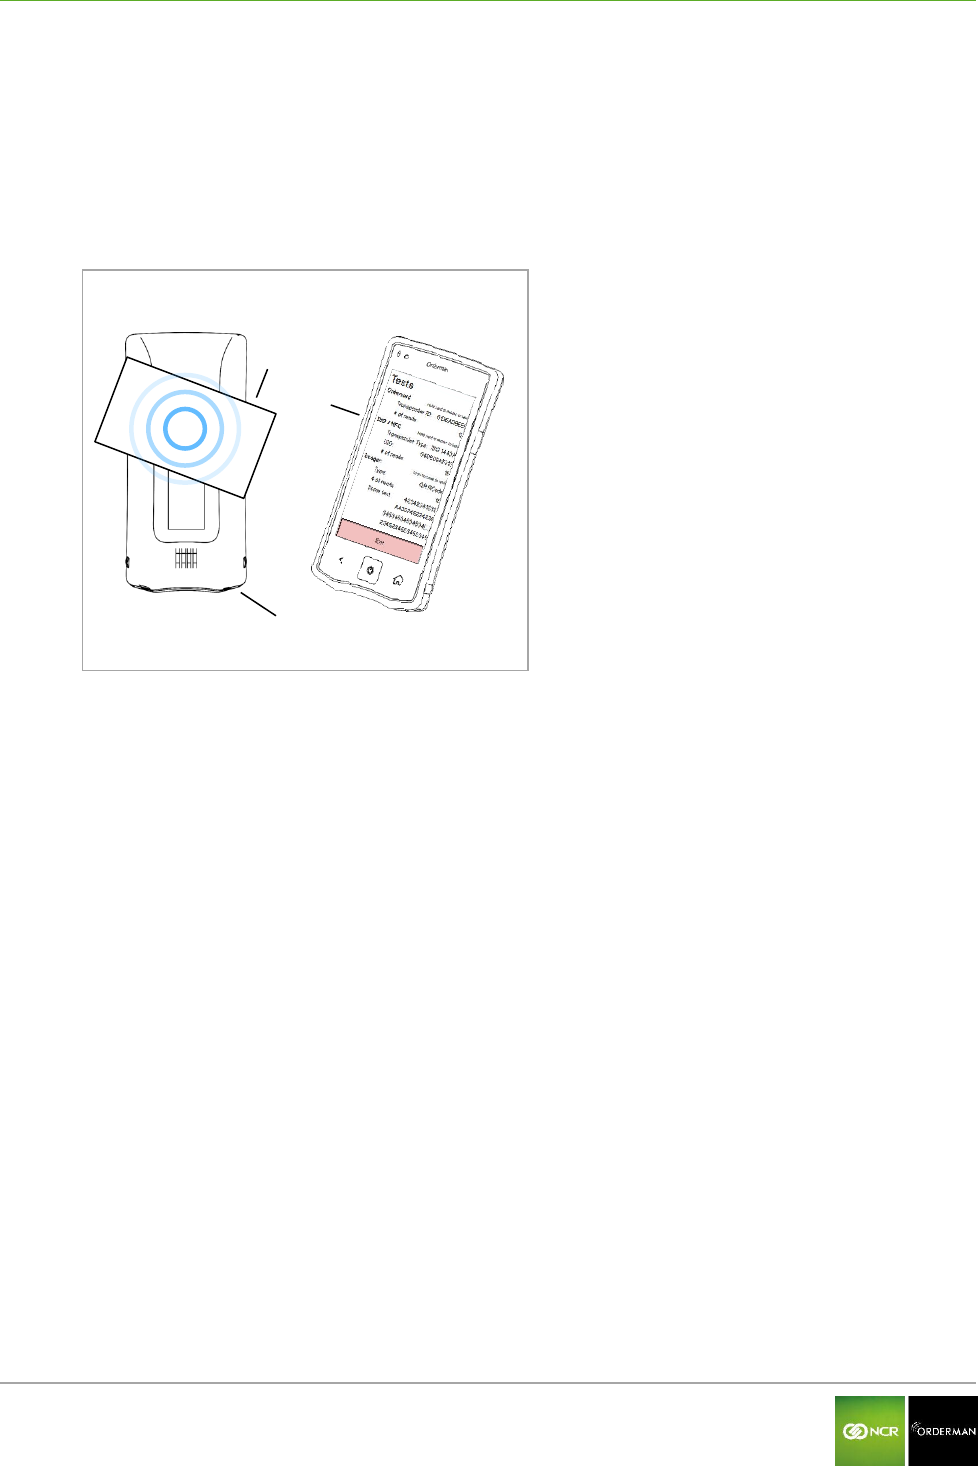
NCR Orderman7 Testing the unit
Orderman GmbH 41 V 01.02
12.2 ISO/NFC test
Drag the Status bar down to open the Configuration menu.
Tap the Test field in the Settings menu.
Hold the active NFC transponder close to the back of the handheld (near camera/intercom) as
shown in the following figure.
The result of test is shown on the display (according to the device setup)
Fig. 27: NFC test
NFC data media
Handheld
Test result
NFC
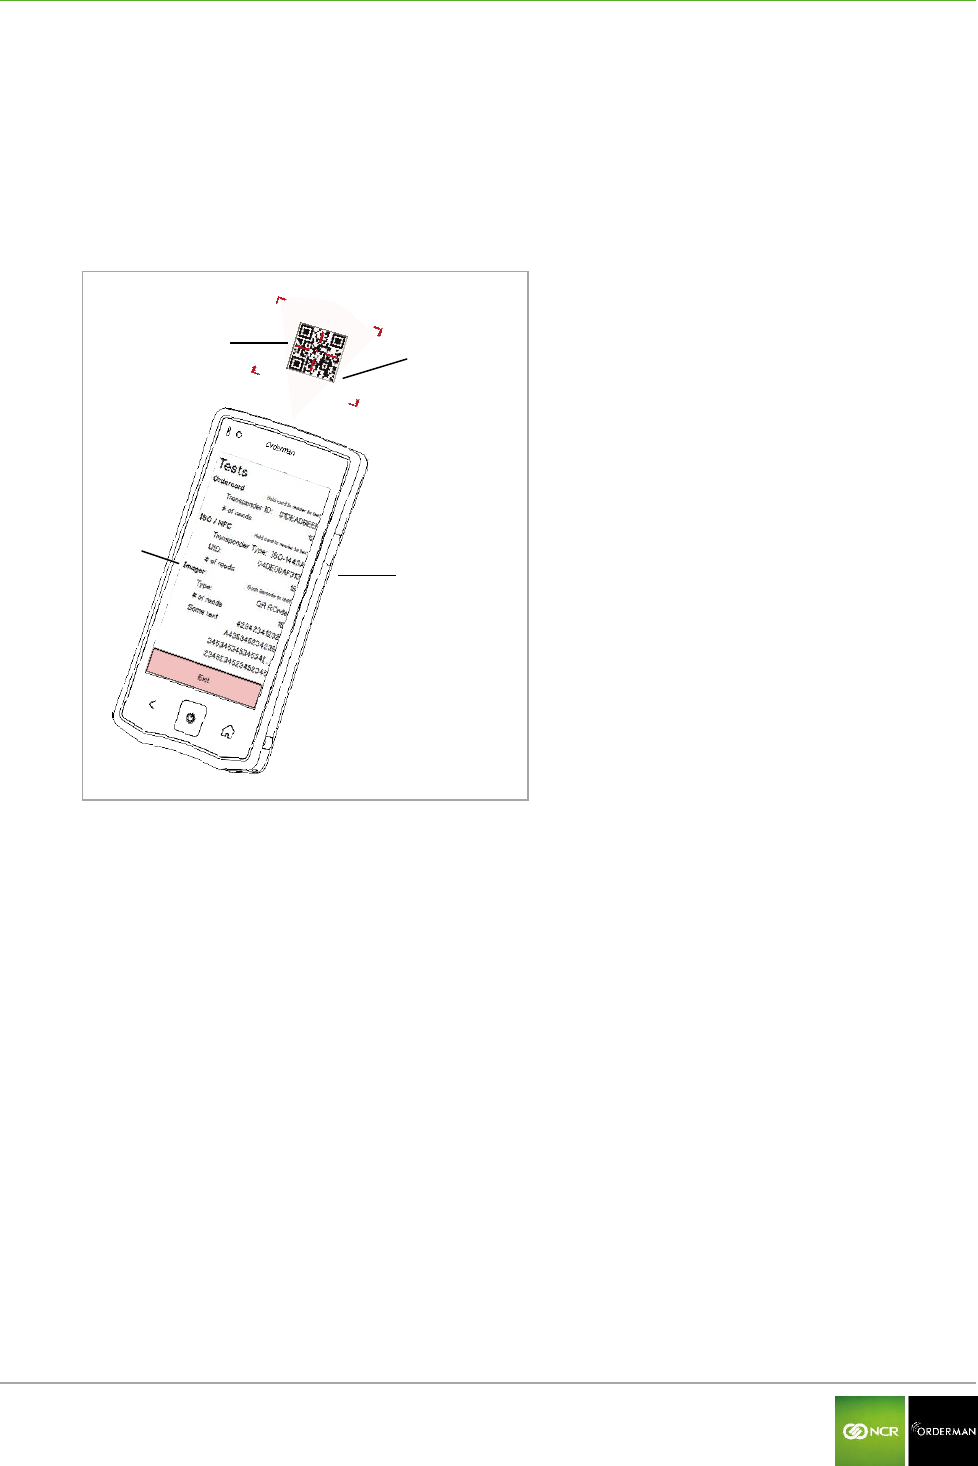
NCR Orderman7 Testing the unit
Orderman GmbH 42 V 01.02
12.3 Barcode test (imager)
Drag the Status bar down to open the Configuration menu.
Tap the Test field in the Settings menu.
Hold the barcode/QR code to your handheld as shown in the figure below. The laser aimer
should be positioned as centrally as possible on the code.
The result of test is shown on the display (according to the device setup)
Fig. 28: Imager test
QR code
Laser aimer
Handheld
Test result

NCR Orderman7 Accessories
Orderman GmbH 43 V 01.02
13 Accessories
13.1 Orderman touch pen
The capacitive Orderman touch pen is specially designed to provide an optimal response when
working with the touchscreen display.
Note: To avoid damage to the touchscreen display, use only the
Orderman touch pen or an equivalent capacitive touch pen.
13.2 Orderman pouch
NCR Orderman7 Cleaning instructions
Orderman GmbH 44 V 01.02
14 Cleaning instructions
Note: Never open the housing of the Orderman handheld. Opening the housing
renders the warranty claim null and void.
Read the following care tips and you'll enjoy your Orderman unit for many years:
Clean the contacts before placing a unit in the charging station. Damp contacts can corrode
the charging contacts over time. Use a dry and clean cloth or cotton swab to wipe clean the
contacts.
Periodically clean the contacts of the dirty contacts of the rechargeable batteries with a dry,
clean cloth.
Wipe the touchscreen display with a damp, soft cloth. Do not use abrasive agents or cloths
with a rough surface.
Cleaning the power supply socket: Never clean the power supply socket with compressed air
or pointed objects! It is sufficient to blow lightly into the socket on occasion.
Note: Never use alcohol or corrosive liquids to clean the Orderman units.

NCR Orderman7 Technical specifications
Orderman GmbH 45 V 01.02
15 Technical specifications
Function
NCR
Orderman7
NCR
Orderman7+
NCR
Orderman7MSR
NCR
Orderman7SC
Radio frequency
Dual band 433/915 MHz
Frequency band
433MHz
433.050MHz – 434.790MHz, channel spacing 25kHz
915MHz
902MHz to 928MHz, channel spacing 50kHz
Data transmission
Bidirectional
Transmitting power
less than 1 mW ERP
Battery
Li-ion Polymer 3.7V 3150 mAh
Leak tightness
IP67
Dimensions H / W / D mm
165/ 84/ 18
165/ 84/ 24.6
165/ 84/ 27
Weight handheld without
battery (g)
191g
214g
228g
Battery weight (g)
76g
Bluetooth IEEE 802.15
V2.1 and V4.0 ready
No
Yes
Yes
Yes
WLAN 802.11 a/b/g/n
(2,4Ghz and 5GHz)
No
Yes
Yes
Yes
NFC 13.56MHz
Peer to peer
ISO18092, ISO1443A/B and
ISO15693;
No
Yes
Yes
Yes
Ordercard 125kHz, EM4001,
EM4200 or compatible, UID
only, ISO7816
No
Yes
Yes
Yes
Magnetic strip reader 3 track
LoCo, HiCo Cards
No
No
Yes
Yes
Barcode reader 1D
ISO/IEC 15420
No
No
No
Yes

NCR Orderman7 Technical specifications
Orderman GmbH 46 V 01.02
Function
NCR
Orderman7
NCR
Orderman7+
NCR
Orderman7MSR
NCR
Orderman7SC
Data matrix camera 2D
ISO/IEC TR 24720:2008
No
No
No
Yes
Operating life
Average shift (10h)
Handheld charging time
on average 3 hours
Battery pack charging time
in fast-charging station
1,5 hours
Storage temperature
(ambient)
-20⁰ to +60⁰ C
Storage temperature
battery
-20⁰ to +45⁰ C
Operating temperature
(ambient)
-10 to +50⁰ C
Charging temperature
(ambient)
0 to +35⁰ C
Camera
5 Mp, autofocus, flash
flash can be used as flashlight
Display
Size: 5 inch, resolution: 1280x720 (HD); color: 24-bit; brightness:
max.450cd/m2
Touch Screen
PCAP touch panel, 4 fingers
Processor
Texas Instruments OMAP 4470 GP
RAM
1GB
Function
NCR
Orderman7
NCR
Orderman7+
NCR
Orderman7MSR
NCR
Orderman7SC
Flash
4GB
Sensors
Ambient light sensor, accelerometer
Keys
2 keys, freely assignable
Intercom
Vibration motor

NCR Orderman7 Troubleshooting
Orderman GmbH 47 V 01.02
16 Troubleshooting
Error
Possible cause
Possible solution
Handheld does not charge
Oxidized charging contacts
Handheld needs to be repaired*
Dirty charging contacts
Clean with a dry cloth.
No power supply
Check the power supply to the
service station or multi service station
and power pack
Battery is defective
Battery needs to be replaced
Battery not charging
(In the fast-charging slot)
Oxidized charging contacts
Handheld needs to be repaired*
Dirty charging contacts
Clean with a dry cloth.
No power supply
Check the power supply to the
service station or multi service station
and power pack
Battery lock dirty
Clean the lock
Battery lock is defective
Handheld needs to be repaired*
Spring contacts are defective
Handheld needs to be repaired*
Battery is defective
Battery needs to be replaced
Handheld does not start
Batteries are empty
Charge the battery
Battery is not inserted correctly
Insert the battery correctly
Battery is defective
Replace battery
Handheld defective
Handheld needs to be repaired*
POS application does not start
No connection to the host
system
Check network connection
Process (application) hangs up
Shut down and restart your handheld
Automatic backlight too dark/light
Dirty lens on the ambient light
sensor
Clean the display with a soft cloth.
No network connection to
service station or multi service
station
(Network status LED on the
service station or multi service
station does not light up)
Network cable not plugged in
Insert the network cable
No power to the service station
or multi service station
Connect the power.
(Power LED on the service station or
multi service station has to light up)
Network components (switch) is
not turned on
Switch on network components
*The handheld may only be repaired by trained service technicians.

NCR Orderman7 Troubleshooting
Orderman GmbH 48 V 01.02
Error
Possible cause
Possible solution
Cannot connect to Orderman
radio network
No network connection from
radio base station to host
system
Check network cable and power
supply to the radio base station
Range exceeded
Change position of the radio base
station accordingly
Radio interference (other
Orderman radio network)
Change radio channel
Network configuration was
changed
Check/change network configuration
No WIFI (Wireless LAN)
connection
WIFI disabled on your handheld
Activate WIFI on your handheld
Access point has no power
supply
Reconnect the power
Range exceeded
Change position of the access points
accordingly
WIFI settings have been
changed (encryption, etc.)
Check/change WIFI settings

NCR Orderman7 Index
Orderman GmbH 49 V 01.02
17 Index
125kHz RFID reader 12
Ambient light sensor 12
Barcode reader 12
Battery is defective 48
Battery lock 27, 48
Belt printer 36
Bluetooth 12
Bluetooth interface 9
Capacitive touch pen 9
Care tips 44
Certifications 5
Charging status LED 22, 25, 29, 30,
31
Configuration menu 34
Disposal guidelines 9
Firmware 22
Labeling 5
Laser class 2 9
Lithium ion battery 9
Log file 37
Magnetic strip 38
Magnetic strip reader 12
Manufacturer information 5
Model plate 5
Network status LED 22, 23, 25, 26,
31, 32, 48
NFC 12
On/Off button 13, 17, 20, 33
Orderman contractual partners 5
Orderman partner 2
Orderman radio network 12
Orderman Secure Radio (OSR) 13
Power LED 22, 25, 31, 32, 48
Product name 5
QR code 39, 42
Radio base station 49
RFID storage media 40
Serial number 6
Setup bar 36, 40, 41, 42
Standards 5
Status bar 6, 34, 36
Status LED 13, 15, 17, 20, 31
Taskbar 36, 40, 41, 42
Test printout 36
Torch (flashlight) 12, 14, 16, 18, 21,
34, 37
Touchscreen display 13, 15, 17, 19,
20, 43
Update 22
Warranty claims 5
Wireless LAN 12

NCR Orderman7 Glossary
Orderman GmbH 50 V 01.02
18 Glossary
B
Barcode
A barcode is an opto-electronically readable font that consists of different widths, parallel lines and
spaces. The data in a bar code can be read by optical readers such as, for example, barcode
readers (scanners) or cameras, and is processed further electronically.
Battery pack
A battery pack is the battery together with the integrated electronics.
Bluetooth
Transfer of data between devices over short distances via radio technology (IEEE 802.15.1)
F
Firmware
As firmware refers to the operating software (Operating System) of the electronic devices.
H
Handheld
A handheld in this manual refers to all the versions of Orderman handhelds.
L
Laser class
In order to classify laser devices according to their danger, they are divided into laser classes (1,
1C, 1M, 2, 2M, 3R, 3B, 4) (DIN EN 60825-1 or IEC 60825-1/01.2001).
LED (Light-Emitting Diode)
LEDs convert electrical energy into very energy-efficient light. LEDs have a very long life.
LoCo/HiCo
For magnetic strips there are two different versions. These are designated with HiCo (high
coercivity) and LoCo (low coercivity). They differ in the magnetic flux density, with which they can
be described:
LoCo: 30 mT (standard, due to external magnetic field effects, data can be deleted)
HiCo: 275-400 mT (accidental deletion virtually eliminated)
Log file
A log file (also known as event log file) includes the automatically logged protocol of all or any
actions of processes on a computer system.

NCR Orderman7 Glossary
Orderman GmbH 51 V 01.02
N
NFC
NFC (Near Field Communication) is an international broadcast standard for contactless exchange
of data via radio technology over a distance of a few centimeters and a data transmission rate of
max. 424 kbit/s.
O
Orderman Secure Radio (OSR)
The Orderman Secure Radio (= OSR) uses the 433/915 MHz bandwidth. The ability to penetrate
solid objects, the large range, the minimal power consumption, the interference resistant and
hacker-proof design are considerably better than other radio networks.
Q
QR code (Quick Response Code)
The QR code (2D code) is a square matrix of black and white dots, representing the binary encoded
data. The data is read by optical readers, such as QR-code reading devices (scanner) or cameras,
and is processed further electronically.
R
Radio base station (OMB)
The radio base station allows users to connect Orderman devices to the host system and an
extension of the radio range.
RFID (Radio Frequency Identification)
RFID is a technology for transmitter-receiver systems for contactless reading and storing of data
through radio waves.
T
Touchscreen display
The touchscreen display allows a unit to be operated directly by touching the display (with a finger
or a touch pen).
W
Wireless LAN (Wireless Local Area Network)
Wireless LAN is the term used for local radio networks.