NCR Voyix 7730GAI Electronic Pricing Transmitter User Manual Manual Chapter 6
NCR Corporation, RSD - Atlanta Electronic Pricing Transmitter Manual Chapter 6
Contents
Manual Chapter 6

Chapter 6: Configuring the DecisioNet System
Environment
Overview
This chapter describes how to configure the DecisioNet System
environment after the software is installed. Configuration is
accomplished using an ASCII editor, such as Windows Notepad, and
editing the parameters in the configuration files listed below. All of
these files are located in the /dnet/data directory following
installation.
• DecisioNet CBS Configuration files (dncbsconfig.xml)
• DecisioNet Configuration File (dnconfig.xml)
• DecisioNet Host Bridge Conguration file (dnhostbridge.xml)
• DecisioNet Task Manager Configuration file (taskman.cfg)
Three of these files are in XML format. XML is a mark-up language that
enables different programs to understand the structure of a file. This
facilitates the exchange of information between programs. When
editing these XML format files, care must be taken to only modify the
parameter or option setting.
The fourth file listed is the Task Manager file. This is not an XML
format file, but still may be modified using an ASCII editor. Details are
provided in the following sections on how to access and change
parameters in these files.
6

6-2 Chapter 6: Configuring the DecisioNet System Environment
XML File Format
XML files use element tags to identify the specific entries or sections
within the file. It is very important that the element tags not be
modified. When changing parameters with an ASCII editor, you need
to locate the parameter in the file and change the parameter setting to
one specific to your site. The following shows the first part of the
DecisioNet Configuration file (dnconfig.xml). The shaded areas
identify the formatting information that should not be changed.
<?xml version="1.0"?>
<!DOCTYPE config SYSTEM "dnconfig.dtd">
<config>
<section name="Ipc">
<!-- <param name="ServerIP">127.0.0.1</param> -->
<param name="TraceLevel">0</param>
</section>
<!-- ************************************************************ -->
<!-- * LogTally Manager Configuration parameters * -->
<!-- ************************************************************ -->
<section name="LogTally Manager">
<!-- Section: LogTally Manager -->
<!-- -->
<!-- SystemLogging -->
<!-- -->
<!-- Specifies whether or not to log to the OS system log. d -->
<!-- -->
<!-- Values: Y(yes) or N(no) -->
<!-- -->
<!-- Default = Y (yes) -->
<param name="SystemLogging">Y</param>
Identifying a Parameter in an XML Format File
All information inside of a greater than (<) and less than (>) symbol is
part of the mark-up language and should not be changed. Only the
parameter entry can be changed and still have the file function
properly. A parameter entry is identified as follows:
<param name="SystemLogging">Y</param>

Chapter 6: Configuring the DecisioNet System Environment 6-3
Notice the parameter that may be changed is pointed to by the ending
less than symbol (>) of the parameter name tag and the beginning
greater than symbol (<) or the parameter close tag (</param>). In this
example, the parameter that can be changed is the bolded Y character .
Commented Information
Comments are identified with comment tags, <!-- at the start of a
line and --!> at the end of the line. Some parameters are
commented out as is shown in for the ServerIP parameter in the
previous example. Before you can use a commented out parameter,
you must remove the comment tags at both ends of the line.
Using an Editor to Locate a Parameter
This section described how to use Notepad to open the DecisioNet
Configuration file (dnconfig.xml) and use the search option to locate
and change a specific parameter.
1. Click the Start icon at the bottom left of the screen.
2. Select Programs > Accessories > Notepad.
3. In Notepad, select File > Open…
4. Use the Open dialog to locate the dnet/data directory.
5. Use the drop down arrow and change the Files of Type: selection
to All Files (*.*).
6. Select the dnconfig.xml file and click Open.
7. Select Search > Find… and then enter the parameter name you
want to locate and change in the Search dialog Find What: entry
box.
8. Click the Find Next button.
If you locate the parameter name in the comments area of the
parameter you are looking for, click the Find Button again. For
example, if you searched for MaxNumberUpdateRetries, the
parameter name entry that you are looking for would look as
follows:

6-4 Chapter 6: Configuring the DecisioNet System Environment
<param name="MaxNumberUpdateRetries">10</param>
9. Edit the parameter as needed and click File > Save to save the
change.
Configuration File Comments
Configuration files contains comments to describe each parameter. The
following example shows the "Maximum Number of Bedcheck Retries"
parameter from the ESL Manager section of the DecisioNet
Configuration file.
<!-- Section: ESL Manager -->
<!-- -->
<!-- MaxNumberBedcheckRetries -->
<!-- -->
<!-- Maximum number of times an Bedcheck request is retried -->
<!-- at the ESL Manager level when errors occur. After -->
<!-- retries are exhausted, spool record is marked with last -->
<!-- error received. The record is always retried so that -->
<!-- both the minimum number of retries have been done and so -->
<!-- that the minimum retry period has elapsed, but retrying -->
<!-- stops when either the maximum number of retries have -->
<!-- have been done or the maximum retry period has elapsed, -->
<!-- whichever comes first. -->
<!-- -->
<!-- Values: non negative integer -->
<!-- -->
<!-- default = 10 -->
<param name="MaxNumberBedcheckRetries">10</param>
All of the configuration file parameters and their defaults are listed in
this chapter to assist you to search, locate and change site-specific
parameters.
Refer to Appendix B: DecisioNet Configuration Files and read the specific
parameter comment section for details about each parameter.

Chapter 6: Configuring the DecisioNet System Environment 6-5
Setting Performance Boost in Windows NT 4.0
Following installation, set the foreground and background applications
to get equal time.
1. Select the Control Panel from the Settings menu from the Start
icon.
2. Choose the System icon.
3. Click on the Performance tab.
4. Slide the Boost Selector to “None” to indicate “No Performance
Boost.”
5. Click on Apply to accept these changes.
6. Click on OK in the Performance Dialog Box.
7. Close the Control Panel.
Configure the system as described in this chapter, beginning with the
section “Configuring the CBS Communications.”

6-6 Chapter 6: Configuring the DecisioNet System Environment
Configuring the DecisioNet System
After installing new software, you must configure the following
DecisioNet System parameters for your store's environment:
• CBS address configuration
• Site-specific DecisioNet software application configuration
CBS Configuration
DecisioNet 3.0 uses Ethernet to communicate with CBSs installed at
your site. Each CBS must have a unique number and host name or IP
address specified in the DecisioNet CBS Configuration file
(dncbsconfig.xml). Refer to the "CBS Hardware Configuration"
section in Chapter 3, Installing the Hardware Infrastructure for details
about setting IP addresses and host names.
Hostname
The hostname format is as follows:
ncrdnetnnnnnn.<domain>
where:
nnnnnn is the last 6 digits of the MAC address that is listed on the
serial number label of the CBS.
IP Address
The IP address format is as follows:
xxx.xxx.yyy.z
where, depending on the type of IP adressing:
xxx represents network IDs
yyy is the subnet ID
z is the host ID

Chapter 6: Configuring the DecisioNet System Environment 6-7
A unique number (1-99) is assigned to the CBS during RF
infrastructure installation as described in the CBS Installation section of
Chapter 3 in this guide. Whether you use a hostname or IP address is
determined by the type of Ethernet environment in your store.
Static IP Addressing
For stores that use static IP addressing, a block of addresses are
assigned to the site. Check with the local IT Administrator concerning
the network addressing scheme used in the store. Unique IP address
are selected from the site block to identify each CBS used at the site.
Dynamic IP Adressing
For sites that use a DHCP Server and use Auto DNS to dynamically
assign IP addresses, hostnames would be used to identify the CBSs
used at the site.
Setting CBS Parameters
Use an ASCII text editor as described earlier in this chapter to open the
DecisioNet CBS Configuation File (dncbsconfig.xml). The default
file looks as follows:
<?xml version="1.0"?>
<!DOCTYPE cbsconfig SYSTEM "dncbsconfig.dtd">
<cbsconfig>
<cbs>
<id>1</id>
<hostname>ncrdnetnnnnnn.atlantaga.ncr.com</hostname>
</cbs>
</cbsconfig>
1. Depending on the number of CBSs that you have at your site, copy
and paste the outlined section of the file to create a <cbs> section for
each CBS.
6-8 Chapter 6: Configuring the DecisioNet System Environment
2. Edit the <id> parameter to identify a unique number (1-99) for each
CBS.
3. Edit the <hostname> parameter to identify the IP address and
domain name, or a host name and domain name for each CBS.
4. Save the file.
CBS Number CBS MAC Address
1 08000E382EE7
11 08000E383B45
12 08000E39412E
13 08000E39C245
For example, if your site had a domain name of STORENET and CBSs
installed as shown in the table above, the DNCBSCONFIG.XML file
would be as follows:
<?xml version="1.0"?>
<!DOCTYPE cbsconfig SYSTEM "dncbsconfig.dtd">
<cbsconfig>
<cbs>
<id>1</id>
<hostname>ncrdnet382EE7.STORENET</hostname>
</cbs>
<cbs>
<id>11</id>
<hostname>ncrdnet383B45.STORENET</hostname>
</cbs>
<cbs>
<id>12</id>
<hostname>ncrdnet39412E.STORENET</hostname>
</cbs>
<cbs>
<id>13</id>
<hostname>ncrdnet39C245.STORENET</hostname>
</cbs>
</cbsconfig>

Chapter 6: Configuring the DecisioNet System Environment 6-9
Application Configuration
Site-specific application parameters are defined in the following three
files:
• DecisioNet Configuration file (dnconfig.xml)
• DecisioNet Task Manager configuration file (taskman.cfg)
• Decisionet Host Bridge Configuration file (dnhostbridge.xml)
Note: This section identifies the parameters in the first two files.
Changes to the Host Bridge Configuration file are typically done by the
programming team to match the site-specific requirements of the
Custom Data Reader. Details about changing the Host Bridge
Configuration file are included in the "Host Bridge Utility Guide" on
the DecisioNet Implementation Guide (B005-0000-1250).
DecisioNet Configuration file (dnconfig.xml)
The DecisioNet Configuration contains the following sections with
parameters specific to the individual DecisioNet software module.
• Inter-Process Communication (IPC)
• Log and Tally Manager
• CBS Manager
• ESL Manager
• DecisioNet Console
• Data Reader
The following tables show each parameter and the default value
following software installation.
IPC Section
Parameter Default
ServerIP 127.0.0.1
TraceLevel 0

6-10 Chapter 6: Configuring the DecisioNet System Environment
Log and Tally Manager Section
Parameter Default
SystemLogging Y
CheckAction Y
MaxTallies 50
TallyUpdateFrequency 10
TraceLevel 0
TraceFile dnltmanager.trc
EventsMax 10000
EventsNumberToRemove 1000
EventsDaysToRemove 30
HandleEmail Y
HandleAlarm Y
HandleConsole Y
HandleSystemTray Y
HandleExecProcess Y
HandlePager Y
HandleEslTag Y
HandleThirdParty N
HandleSnmpTrap N
ManualTagLinkID MANUAL
ManualTagLinkType 99
PagerTagLinkID PAGER
PagerTagLinkType 98
CBS Manager Section
Parameter Default
MaxWorkerThreads 20
MaxConnectionsPerCBS 10
TODUpdateFrequency 60
NumberCBSAttempts 3
NumberESLAttempts 5
BroadcastSends 5
Chapter 6: Configuring the DecisioNet System Environment 6-11
Parameter Default
ConnectTimeout 10
ResponseTimeout 15
MaxFailureFrequency 15
TallyUpdateFrequency 60
ResultTableExpirationTime 60
BufferFullAttempts 20
BufferFullPause 2
CBSBusyAttempts 20
CBSBusyPause 2
QuickFind 1
SimulationMode 0
StoreID 255
TraceLevel 0
TraceFile cbsmanager.trc
ESL Manager Section
For all recurrence or lifetime settings:
P=period xY=year xM=month xD=day
T=time xH=hour xM=minutes xS=seconds
where x = length of time
For all start date settings, format is YYYYMMDDhhmmss
Parameter Default
PeriodicVerify 0
VerificationRecurrence P0Y0M0DT1H0M0S
VerificationStartDate 20000101000000
PeriodicExistenceBedcheck 0
ExistenceBedcheckRecurrence P0Y0M7DT0H0M0S
ExistenceBedcheckStartDate 20000101000000
PeriodicHardwareBedcheck 0
HardwareBedcheckRecurrence P0Y1M0DT0H0M0S
HardwareBedcheckStartDate 20000101000000

6-12 Chapter 6: Configuring the DecisioNet System Environment
Parameter Default
PeriodicSumcheckBedcheck 0
SumcheckBedcheckRecurrence P0Y0M1DT0H0M0S
SumcheckBedcheckStartDate 20000101000000
TransactionRecordLifetime P0Y0M0DT2H0M0S
SuccessfulSpoolRecordLifetime P0Y0M0DT0H1M0S
ErroredSpoolRecordLifetime P0Y0M3DT0H0M0S
MaxNumberUpdateRetries 10
MaxUpdateRetryPeriod PT10M
MinNumberUpdateRetries 2
MinUpdateRetryPeriod PT1S
MaxNumberBedcheckRetries 10
MaxBedcheckRetryPeriod PT10M
MinNumberBedcheckRetries 2
MinBedcheckRetryPeriod PT1S
MaxNumberFindRetries 2
MaxFindRetryPeriod PT5M
MinNumberFindRetries 0
MinFindRetryPeriod PT1S
MaxNumberAssignRetries 10
MaxAssignRetryPeriod PT10M
MinNumberAssignRetries 2
MinAssignRetryPeriod PT1S
MaxNumberForceSearchModeRetries 10
MaxForceSerchModeRetryPeriod PT10M
MinNumberForceSearchModeRetries 2
MinForceSerchModeRetryPeriod PT1S
MaxCBSUpdateResponseWait PT5M
SumcheckCorrectiveAction 1
PingUnresponsiveTags 1
IgnoreUnresponsiveTags 1
AutoFindAfterNoResponse 1
SearchModeAfterNotFound 1
AutoAssignAfterFind 1
ForceSearchModeAfterFindFail 1
UnresponseTagRecurrence P0Y0M1DTH0M0S

Chapter 6: Configuring the DecisioNet System Environment 6-13
Parameter Default
UnresponsiveTagStartDate 20000101000000
PriceChecking 1
DefaultUpdatePriority 3
DefaultBedcheckPriority 5
DefaultVerifyPriority 7
DefaultFindPriority 10
DefaultAssignTimeslotPriority 3
DefaultForceSearchModePriority 3
TransactionResolveSleepTime 50
TransactionThreadSleepTime 500
SpoolLogThreadSleepTime 200
ProcessingThreadSleepTime 0
MaxHistoryDepth 10
MaxAutofindSequence 1
MaxPricecheckCorrectiveDepth 3
MaxTransactionRecordBlock 128
MaxESLTransactionRecordBlock 128
MaxESLRecordBlock 128
MaxUpdateImageBeforeRefresh P0Y0M7DTH0M0S
OperatingMode NORMAL
DecisioNet Console Section
Parameter Default
TraceFileName dnConsoleTrace.trc
TraceLevel 0
PrintOverlaysEnabled 1
ForcePrintEnabled 0
PriceLevelPresent 1
ProductUnitPresent 1
ESLDefaultToProduct 1
ReportSQL1 (Details for Report 1)
ReportSQL1SelectColumn 1
ReportSQL1KeyColumn 3

6-14 Chapter 6: Configuring the DecisioNet System Environment
Parameter Default
ReportSQL1Button 1
ReportSQL2 (Details for Report 2)
ReportSQL2SelectColumn 1
ReportSQL2KeyColumn 4
ReportSQL2Button 1
ReportSQL3 (Details for Report 3)
ReportSQL3SelectColumn 0
ReportSQL3KeyColumn 2
ReportSQL3Button 0
ReportSQL4 (Details for Report 4)
ReportSQL4SelectColumn 0
ReportSQL4KeyColumn 3
ReportSQL4Button 0
ReportSQL5 (Details for Report 5)
ReportSQL5SelectColumn 0
ReportSQL5KeyColumn 3
ReportSQL5Button 0
Data Reader Section
Parameter Default
PriceDecimalPosition 2
UnitPriceDecimalPosition 2
DebugFilename DataReaderServer.log
DebugLevel 2
PriceLessThanDollar CentSign
UnitPriceLessThanDollar LeadingZero
DecimalSymbol Comma
RoundingType Normal

Chapter 6: Configuring the DecisioNet System Environment 6-15
DecisioNet Task Manager (taskman.cfg)
The DecisioNet Task Manager starts as a service and automatically
starts DecisioNet applications as tasks. The Task Manager
configuration file (taskman.cfg) specifies how to manage the
DecisioNet tasks. The table lists each parameter and the installed
default.
This is not an XML format file. You can still use an ASCII editor to
search for the parameter and then change the default. The format of the
parameter setting is:
<PARAMETER>=<SETTING>
For example:
KILLINTERVAL=15
Parameter Default Setting
FREQUENCY 1
KILLINTERVAL 15
DEADCHECK 3
EXCEPTION excphdlr.exe -v
CONTEXT DNET
TFILES dnet.tm\*.inf
CONTEXT TASK_MANAGER
TFILES taskman.tm\*.inf
Starting a Windows NT DecisioNet System
DecisioNet Release 3.0 software is configured to start as an automatic
service when you re-boot your system. When you have finished setting
configuration parameters, re-boot the system so all DecisioNet
environment variables and system options at set.
After the system re-boots, use the following procedure to start the
DecisioNet Console.
1. Click on the Start icon.
2. Select Programs > DecisioNet > DecisioNet Console.

6-16 Chapter 6: Configuring the DecisioNet System Environment
Chapter 6: Configuring the DecisioNet System Environment 6-17
About Passwords
You must enter a Username and Password to access the DecisioNet
Console. The default Username is system and the default password is
manager. To protect the DecisioNet System from unauthorized access,
it is recommended that you change the password on the system
Username to a password other than manager once you have installed
the system.
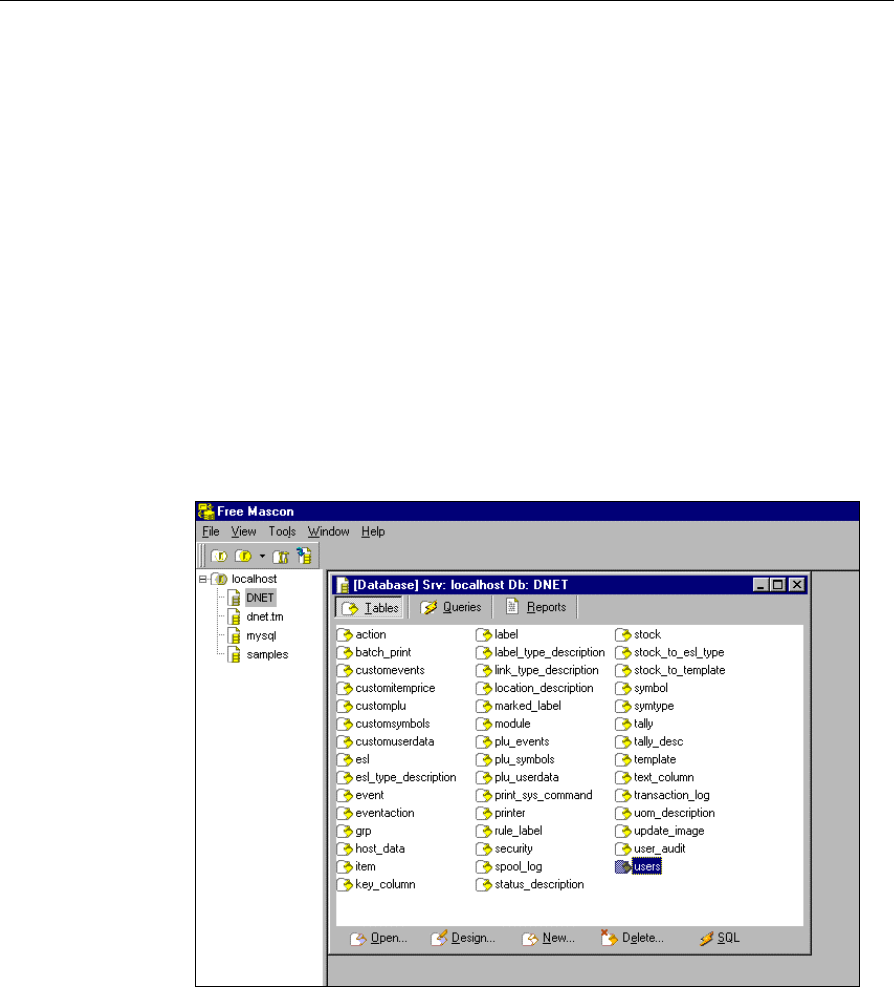
Maintaining Username/ Password
You can add, change, or delete a Username and Password by using a
MySQL database editor and editing the User table in the DNET
database. The following example shows how to use the FreeMascon
database editor to add a new user.
1. Start the FreeMascon database editor.
2. Select localhost to display the available databases.
6-18 Chapter 6: Configuring the DecisioNet System Environment
3. Select DNET to display the DecisioNet database tables.
4. Do one of the following to open the DecisioNet users table:
• Double-click on the users table icon, or
• Click the users table icon to highlight it and then click Open…
at the lower left corner of the screen.
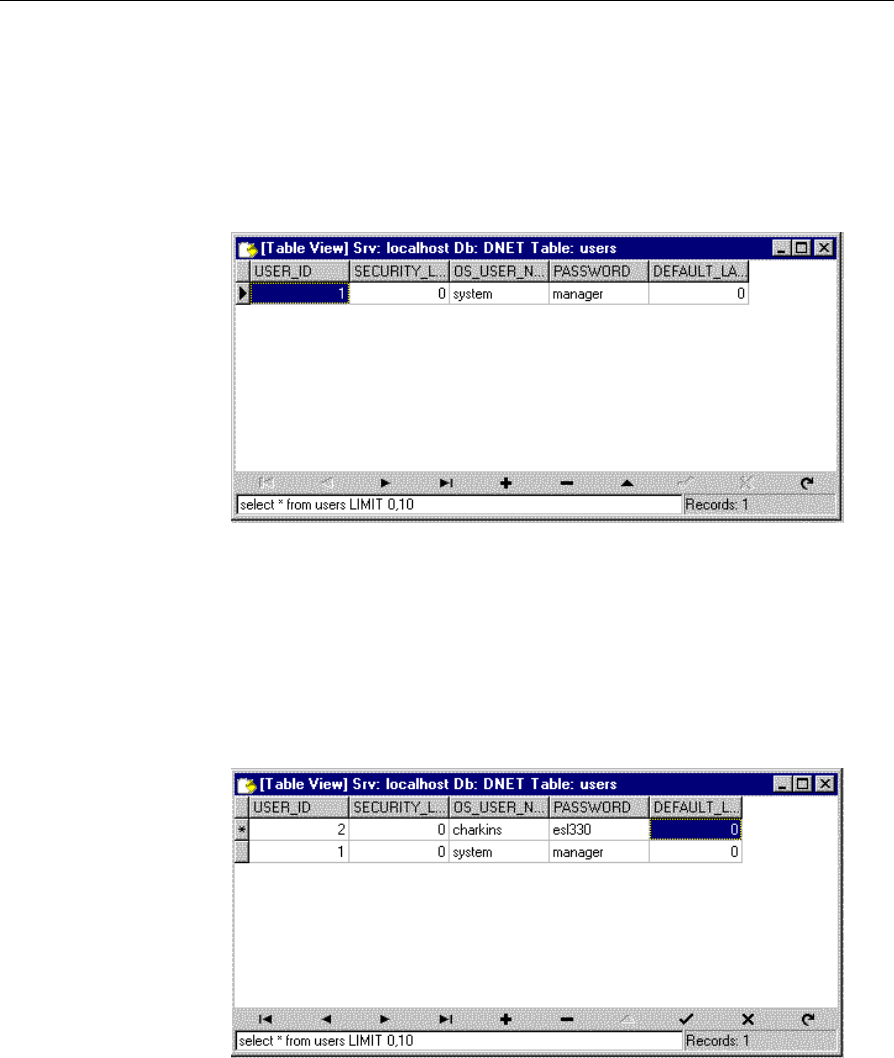
The initial entry in the table is the default Username
(OS_USER_NAME), system, and the default Password (PASSWORD),
manager.
5. Click the + (plus) icon on the bottom of the screen to add a new
record.
6. Enter the new user information. The maximum length of each field
is 25 characters.

Chapter 6: Configuring the DecisioNet System Environment 6-19
7. Enter other users as needed.
8. Close the FreeMascon editor when finished.