NEC of America 7N2S12A Cellular WCDMA/ PCS GSM Phone with Bluetooth and RFID User Manual
NEC Corporation of America Cellular WCDMA/ PCS GSM Phone with Bluetooth and RFID Users Manual
Contents
- 1. Users Manual
- 2. Users Manual RF Warning Insert
Users Manual

1
Voice/Videophone Calls
■ Making a voice/videophone call
Making a Voice/Videophone Call .................................................................................... 2
Switching a Voice/Videophone Call during a Call........................................................... 5
Making an International Call ...................................................................... 6
Using Handsfree during a Call......................................................................... 7
Using the Redial/Dialed Calls/Received Calls History ..... 8
Using Chaku-moji .......................................................................................... 10
Showing/Hiding Caller ID When Making a Call............................................................... 12
Sending Push Signals Quickly......................................................................... 12
Using the Prefix Function................................................................................................ 13
Setting Sub-Address When Making a Call......................................... 13
Setting the Alarm for Reconnection ....................................................... 14
Making the Earpiece Sounds Clear ...................................................... 14
Blocking Out Ambient Noise .................................................................... 14
Making a Handsfree Call While Driving ................................................. 14
■ Receiving a voice/videophone call
Receiving a Voice/Videophone Call................................................................................ 15
When the Other Party Switches a Voice/Videophone Call ............................................. 16
Using the Dial Keys to Answer a Call......................................................... 16
Folding the FOMA Terminal to End/Hold Calls ................................... 17
Adjusting the Earpiece Volume............................................................................ 17
Adjusting the Ring Volume............................................................................ 17
■ When you cannot answer calls
Holding Incoming/Current Calls ............................................................... 18
Using the Public Mode.................................................................................................... 18
When You Cannot Answer an Incoming Call .................................................. 20
Having the Caller Leave a Message ....................................................... 21
Having the Caller Leave a Message for an Incoming Call ........................ 22
Playing/Erasing Recorded Messages, Voice Memos or VP Memos............................... 22
■ Setting the Videophone
Using Chara-den............................................................................................................. 23
Setting Videophone Functions........................................................................................ 23
Using Videophone Connected to External Devices ........................................................ 26
Remote Monitoring .............................................................................. 26
WORLD CALL
Handsfree
Redial/Dialed calls/Received calls
Chaku-moji
Pause dial
Sub-address setting
Reconnect signal
Hyper Clear Voice
Noise reduction
In-car hands-free
Answer setting
Setting when folded
Volume
Ring volume
On hold/Holding
Missed call
Record message
Quick message
Remote monitoring

2
Voice/Videophone Calls
Making a Voice/Videophone
Call
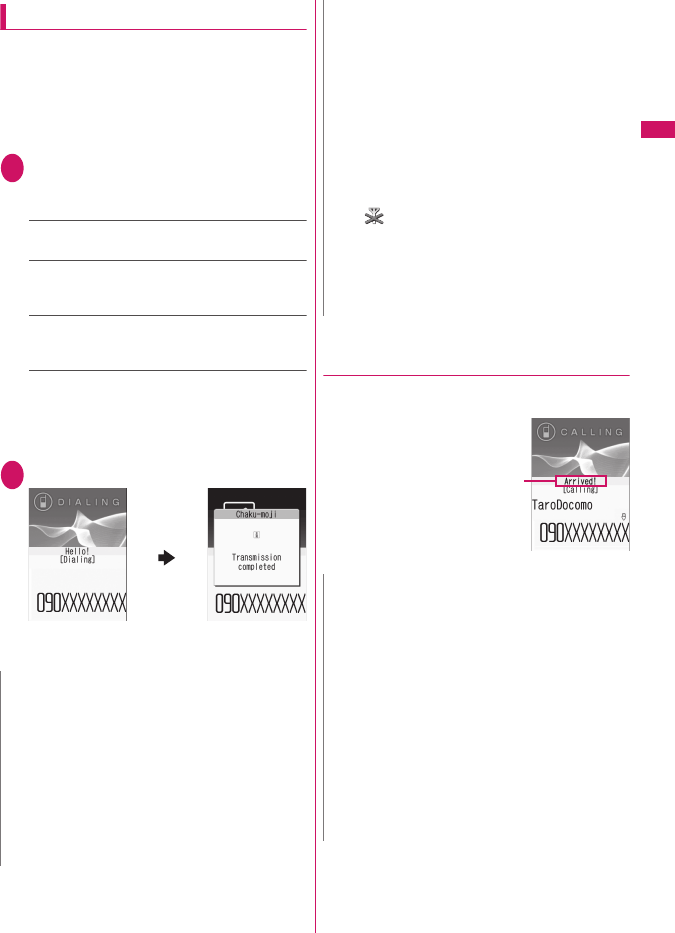
1Enter the phone number of the
other party
Always start with the area
code, even for a call within
the same area.
You can enter up to 80 digits
for the phone number.
However, only the last 26
digits are displayed.
<When you enter a wrong number>
■To insert a number
Press v to move the cursor to the number to
the left of the position where you want to insert
the number, then enter the number.
■To delete a number
Press v to move the cursor to the number you
want to delete, then press t.
Press t for 1 second or longer to delete all
the numbers to the left of the cursor and the
number at the cursor position.
■To re-enter the number
Move the cursor to the beginning or end of the
number and press t for 1 second or longer to
return to the standby screen.
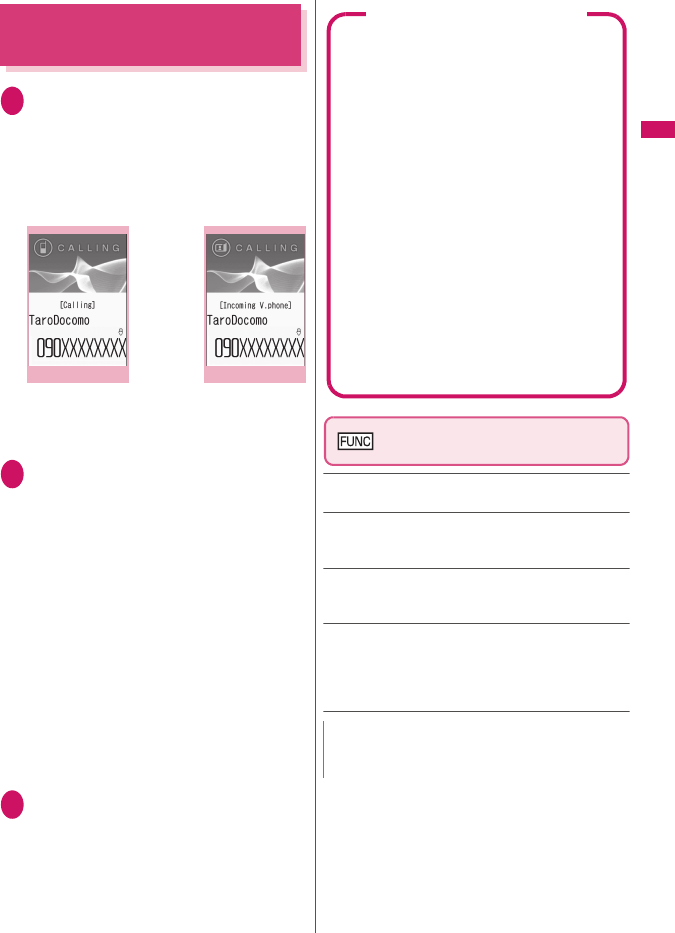
2r (voice call), o (V.phone)
<Videophone>
■To make a videophone call with Chara-
den
XUu (FUNC)X“Select image”X
“Chara-den”XSelect Chara-den
Enter phone number
Function menu
¨
p.4
<Voice call>
“ ” flashes while dialing
and lights up during the
call.
■If you hear the busy
tone
The line is busy. Call again
after a while.
■If you hear a message
that the other party
cannot be reached
The other party’s mobile
phone is not turned on or is out of signal
range. Call again after a while.
■If you hear a message requesting your
caller ID
Call again with Caller ID Notification enabled.
→p.12
<Videophone>
“ ” flashes while dialing
a videophone call and
lights up during the call.
■If a videophone call is
not connected→p.5
■To switch between
camera image and
substitute image
XUu (FUNC)X
“Substitute image”⇔“My
side”
■To switch the main screen
XXd (Change)
“Change main disp.” →p.4
■To enlarge a camera image to be sent
XUse Xv to adjust zoom
■To mute the voice to send
XYa (マナー ) (1 second or longer)
“ ” appears.
To cancel muting, press Ya (マナー ) for 1
second or longer again.
In-call
Function menu
¨
p.4
Videophone in-call
Function menu
¨
p.4
3
Continued on next page
Voice/Videophone Calls
■To set Hyper Clear Voice→p.14
■To switch a voice/videophone call during a
call→p.5
■To put the current voice/videophone call
on hold→p.18
■To switch between the FOMA terminal and
Bluetooth device
Xr (1 second or longer)
■When 2in1 is in Dual mode
The Outgoing number selection screen appears.
Select a phone number.
3To end the call, press y
N
<Voice call>
zThe Power saver mode is activated if you do not
execute key operations for 15 seconds during a
call.
<Videophone>
zVideophone using the rear camera is not
available.
zIf you make a videophone call to an emergency
number (110, 119 or 118) from the FOMA
terminal, the call automatically changes to a voice
call.
zYou cannot receive i-mode mail or MessageR/F
during a videophone call (you can receive SMS).
Received mail is stored at the i-mode center and
can be retrieved using “Check new messages”
after the videophone call.
zDuring battery charge, if the videophone call and
1Seg recording are running simultaneously, the
camera-off message may appear and the Camera
may be turned off automatically depending on the
FOMA terminal temperature. The substitute image
appears on the other party’s screen.
zDigital communications charges apply when the
substitute image is displayed during a videophone
call.
Videophone
You can use the videophone call function
between terminals that support the DOCOMO
videophone system.
zDOCOMO’s Videophone is compliant with the
3G-324M*2 international standard established
by the 3GPP*1 (the 3rd Generation Partnership
Project that sets standards for 3rd generation
mobile communications systems). Connections
with videophones using different standards
cannot be made.
*1: 3GPP (3rd Generation Partnership Project)
A regional standardization body established to
develop commonly applied technical
specifications for 3rd-generation mobile
communications systems (IMT-2000).
*2: 3G-324M
An international standard for 3rd-generation
mobile videophones.
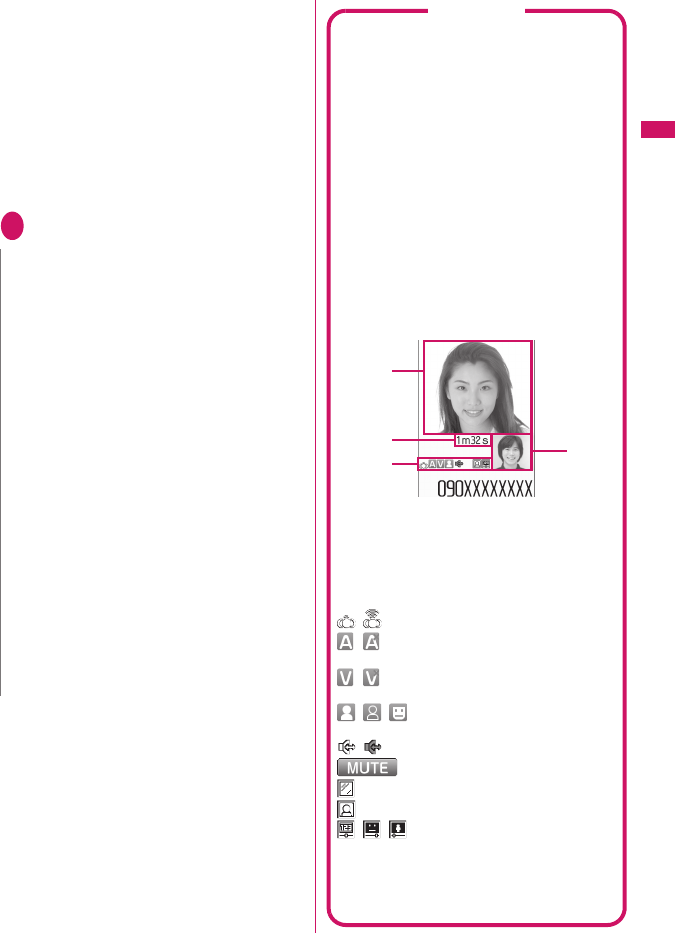
■Guide to the videophone screen
①Main screen (Camera image of the other party
is displayed by default)
②Sub-screen (Your own camera image is
displayed by default)
③Last call duration
④Settings
: Hyper Clear Voice (Low/High)
: Voice being transmitted/Transmission
error
: Video being transmitted/Transmission
error
: Camera image/Substitute image/
Chara-den being transmitted
: Handsfree ON/OFF
: Muting
: Visual check in progress
: Photo mode (Portrait)*1
: Key operation mode (DTMF
mode*2/Whole action mode*3/Part
action mode*3)
*1 : You cannot change the Photo mode.
*2 : “Send DTMF tone/DTMF tone OFF”→p.4
*3 : “Using Chara-den”→p.23
1
3
4
2
4
Voice/Videophone Calls
Enter phone number screen
(p.2)
Notify Caller ID→p.12
Prefix numbers →p.13
Chaku-moji→p.11
Int’l call→p.7
Multi Number
Add to phonebook
Compose message*
Select image……Select Me/Chara-den as an image
used during a videophone call.
Select “Release settings” to release the setting.
*: This function is unavailable when 2in1 mode is in B
mode.
In-call screen (p.2)
Bluetooth/Phone……Switch between the FOMA
terminal and Bluetooth device.
Videophone in-call screen (p.2)
Petit message→p.25
Decoration→p.25
Off decoration……Delete the displayed message or
stamp.
Substitute image ⇔My side……Switch between the
camera image and substitute image.
Change main disp.……Change the main display.
The screen changes in the following order: “Displaying the
image from the other party’s camera on your main screen”
→“Displaying the image from your own camera on your
main screen”→“Displaying only the image from the other
party’s camera”→“Displaying only the image from your
own camera”.
Bluetooth/Phone……Switch between the FOMA
terminal and Bluetooth device.
Visual check ⇔Visual check off……View yourself with
the front camera during a videophone call. Otherwise, end
checking. “ ” appears and the substitute image is sent
to the other party during visual check.
V.phone settings……Set the screen for videophone
calls.
Visual prefer.……Select Normal/Prefer img qual/
Prefer motion spd for an image sent to and received
from the other party.
This setting is only retained during the call.
Brightness……Adjust the brightness between five
levels (–2 to 0 to +2).
White balance……Set image color tones.
This setting is also applied to the equivalent camera
functions.
Color mode set……Select Normal/Sepia/
Monochrome as an image effect.
This setting is only retained during the call.
Chara-den set.……Set the following when Chara-den is
used. This setting cannot be set for the camera images.
Switch Chara-den
Action List
Change Action
Switch image……Display an image selected in
“Substitute image” (p.24) on the other party’s display.
Display light……Set the backlight.
All time ON
Same as backlight……Turn on the backlight
according to “Lighting” under “Backlight”.
FrontCamera Rev.……Set whether to display your
camera image as a mirror image (ON) or normal image
(OFF) on your FOMA terminal during a call.
Own number……Display your phone number during a
videophone call.
Send DTMF tone⇔DTMF tone OFF……Set/Release
push signal transmission mode during Chara-den.
Videophone calls other than Chara-den are always in
push signal transmission mode.
Change to voice→p.5
Loc. notification
5
Continued on next page
Voice/Videophone Calls
●
If a videophone call is not connected
When a videophone call is not connected, the cause
of the failure appears.
zThe cause may not appear depending on the
situation.
zDepending on the type of the other party’s phone or
network service subscription, the reason may not
accurately reflect the other party’s actual status.
zIf the videophone call is not supported, your call is
automatically switched to a voice call when you set
“Auto redial as voice” to “ON”. However, the
videophone may not work properly if you call an
ISDN synchronous 64K access point, 3G-324M-
incompatible ISDN videophone (as of October,
2008) or if you dial a wrong number. Call charges
may apply.
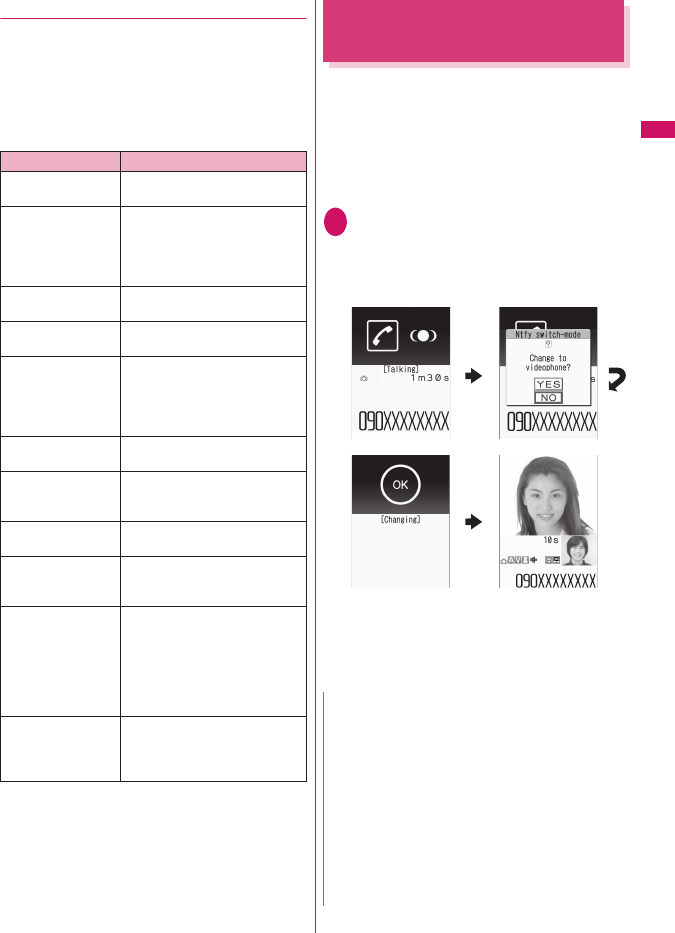
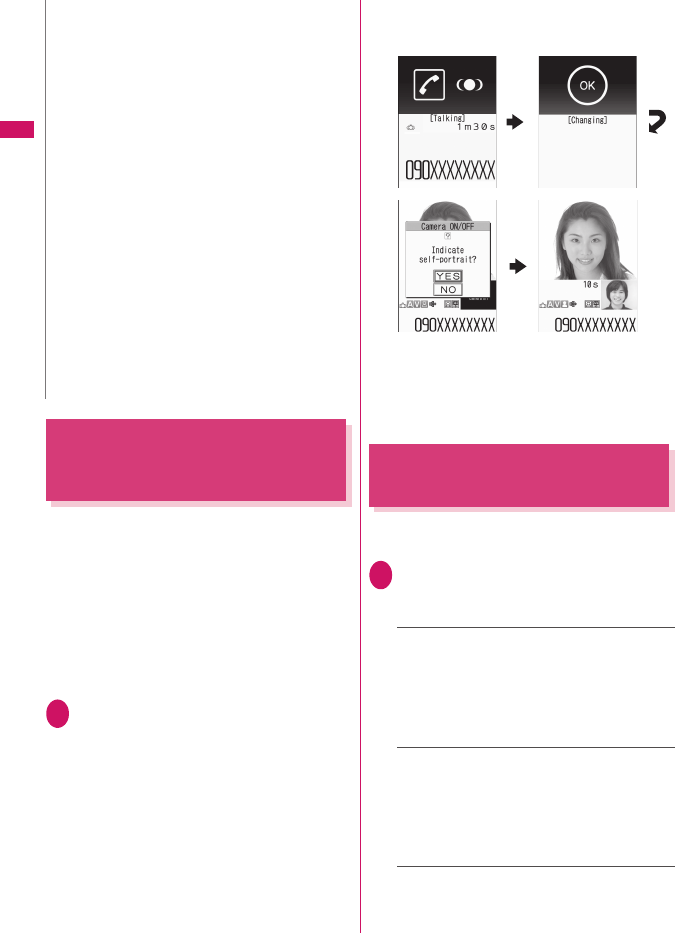
Switching a Voice/Videophone
Call during a Call
zYou can use this function with terminals compatible
with voice call/videophone call switch.
zYou can switch calls only when you are the caller.
zTo switch calls, the receiver needs to set “Ntfy
switch-mode” beforehand. →p.24
<Example: To switch a voice call to a videophone
call>
1In-call screen (p.2)Xd (V.phone)
X“YES”
During switching, a screen appears indicating
that the calls are being switched, and voice
announcement is played.
■To switch a videophone call to a voice call
XVideophone in-call screen (p.2)X
u (FUNC)X“Change to voice”
Display Cause
Check number then
redial
The dialed phone number is not
in use
Busy The line is busy
• This message may also appear
during packet communication,
depending on the other party’s
terminal.
Busy with packet
transmission
The other party is using packet
communication
Out of service area/
power off
The other party is out of service
area or the phone is turned off
Your call is being
forwarded
The call is being forwarded (a
videophone call is made when
the forwarding number is for a
3G-324M-compatible
videophone)
Redial using voice
call
The forwarding phone is not
compatible with videophone
Please activate
caller ID before
dialing again
The other party has set the
Caller ID request service
This number is not
available
The other party has set the
Nuisance call blocking service
Upper limit has
been exceeded
Connection failed
The upper limit set for a Limit
billing plan (Type Limit or Family
Wide Limit) is exceeded
Connection failed You attempted to connect
without notifying your caller ID
(when dialing into visualnet, etc.)
• This message may also appear
in other situations.
Set Caller ID Notification to “ON”
and retry.
Please make your
call from the i-mode
web page
You attempted to make a
videophone call to watch V-live
without browsing the i-mode
official site
N
zIt takes about 5 seconds to switch the calls. Note
that the signal quality may affect the switching
time.
zYou cannot switch calls in the following cases:
• When the other party is holding the call
• When the other party activates Record
message
zThe displayed call duration is reset to 0 second
each time the calls are switched. However, the
total time of the voice and videophone calls is
displayed after the call ends.
Digital communications
charges apply after this
screen appears.
6
Voice/Videophone Calls
Making an International Call
<WORLD CALL>
WORLD CALL is a service where you can use your
DOCOMO mobile phone to call overseas.
You applied for “WORLD CALL” when you started to
use FOMA services. (Except if you did not wish to
apply for it.)
zYou can make a call to approximately 240 countries
and regions worldwide.
z“WORLD CALL” charges are billed with your
monthly FOMA call charges.
zIn addition to directly dialing a phone number, you
can make an international call by adding “+” or
selecting “Int’l call” or “Prefix numbers” from the
function menu of the enter phone number screen or
Phonebook/Redial/Dialed calls/Received calls
detail screen.
zServices are not available in some billing plans.
Dialing a phone number to make an
international call
1Dial the phone number in the
following order: 010→Country
code→Area code (City code)→
Other party’s phone number
Dial the other party’s phone number excluding
“0” at the beginning of the mobile phone number
or area code (city code). However, to call to Italy,
etc., “0” is required.
You can also make an international call by
dialing the phone number in the following order:
009130→010→Country code→Area code (City
code)→Other party’s phone number.
2r
The international call is made.
Simple procedures for making
international calls
zYou can store country codes and international call
access codes in “Int’l dial assistance”.
●
Using “+” to make an international
call
“+” changes to “IDD prefix code” set in “Auto int’l call
set”, and you can make an international call without
dialing the IDD prefix code.
zSince “Auto int’l call set” under “Int’l dial assistance”
is set to “ON” (automatically added) by default, the
IDD prefix code is automatically dialed.
1On the standby screen, dial the
following: + (0 (1 second or
longer)) →Country code→Area
code (City code)→Other party’s
phone number
Dial the other party’s phone number excluding
“0” at the beginning of the mobile phone number
or area code (city code). However, to call to Italy,
etc., “0” is required.
2r
X
“Dial”
The international call is made.
■To make a call without converting “+” into
the IDD prefix code
X“Original Phone No.”
■To cancel calling
X“Cancel”
zDepending on the other party’s communication
conditions or signal quality, you may not be able to
switch the calls and the call may be disconnected.
zWhen the call is switched, the first dialed or
received call is stored in the Redial/Dialed calls or
Received calls.
<When switching from voice call to videophone
call>
zIf the caller is using i-mode, i-mode is
disconnected and the call is switched to
videophone.
zIf the other party is using packet communication
(including i-mode), the message “No Switch”
appears and the calls cannot be switched.
zYou cannot switch the calls when “Call Waiting” is
active.
For WORLD CALL, call at general inquiries
provided on the back of the manual.
International videophone calls can be made to 3G
area-compatible overseas handsets by pressing
o (V.phone) after following the dialing procedure
below.
zVisit the NTT DOCOMO website for countries
and operators.
zIn some types of the other party, international
videophone is not available or the other party’s
picture on FOMA is distorted.
N
7
Voice/Videophone Calls
●
Making an international call from the
function menu
Open the function menu and add the country code
and IDD prefix code to make an international call.
zYou can use the international dialing function on
the Enter phone number screen or Phonebook/
Received calls/Dialed calls/Redial detail screen.
<Example: To use the international dial function on
the enter phone number screen>
1Enter the phone number of the
other party
2u (FUNC)X“Int’l call”XSelect a
country codeXSelect an IDD
Prefix code
The selected country code and IDD prefix code
are added. “0” at the beginning of the mobile
phone number or area code (city code) is
automatically deleted (except when “Italy” is
selected for the country code).
3r
The international call is made.
Setting international calls
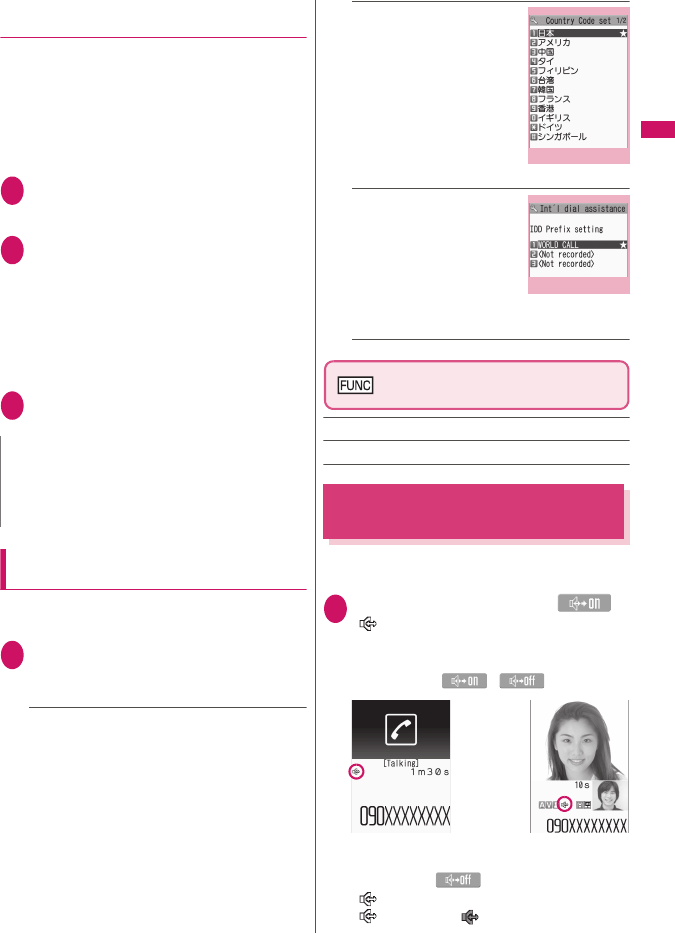
<Int’l dial assistance>
Set the auto conversion of “+”, and edit or store
country codes and IDD prefix codes.
1iX“Settings/Service”X
“Dialing”X“Int’l dial assistance”X
Select any item:
Auto int’l call set.……Set the auto conversion of “+”
used when making an international call.
X“ON”XSelect a country codeXSelect an
IDD Prefix code
■To disable auto conversion
X“OFF”
Country Code setting……
Store up to 22 country names
and country codes to use
when making international
calls. Visit the NTT DOCOMO
website for country codes.
XHighlight an itemX
o (Edit)XEnter a country
nameXEnter a country code
IDD Prefix setting……Store
the IDD prefix name and IDD
prefix code to use when
making an international call.
Up to 3 entries can be added.
XHighlight an item to store
or editXo (Edit) XEnter
an IDD prefix nameXEnter
an IDD prefix code
Country Code setting screen
(p.7)
Edit
Delete……Select Delete this/Delete selected/Delete all.
Using Handsfree during a Call
<Handsfree>
The other party’s voice comes from the speaker
during a call.
1In-call screen (p.2)Xo ()
“ ” appears and the other party’s voice comes
from the speaker during a handsfree call.
While ringing, you can switch to handsfree by
pressing o (/).
■To release handsfree
XPress o ( ) during a handsfree call
“ ” disappears for voice call or PushTalk.
“ ” changes to “ ” for videophone.
N
zEven if Caller ID Notification is active, the caller ID
may not appear properly depending on the
operator. In this case, calls cannot be made from
the Received calls screen.
Country Code setting
Function menu
¨
p.7
IDD Prefix setting
Function menu
¨
p.13
Voice call Videophone call
8
Voice/Videophone Calls
●
Notes on use
It is recommended that you keep a distance of about
30 cm from the FOMA terminal during a handsfree
call. If it is too close or too far, the other party may find
it difficult to hear you or your voice may sound
differently.
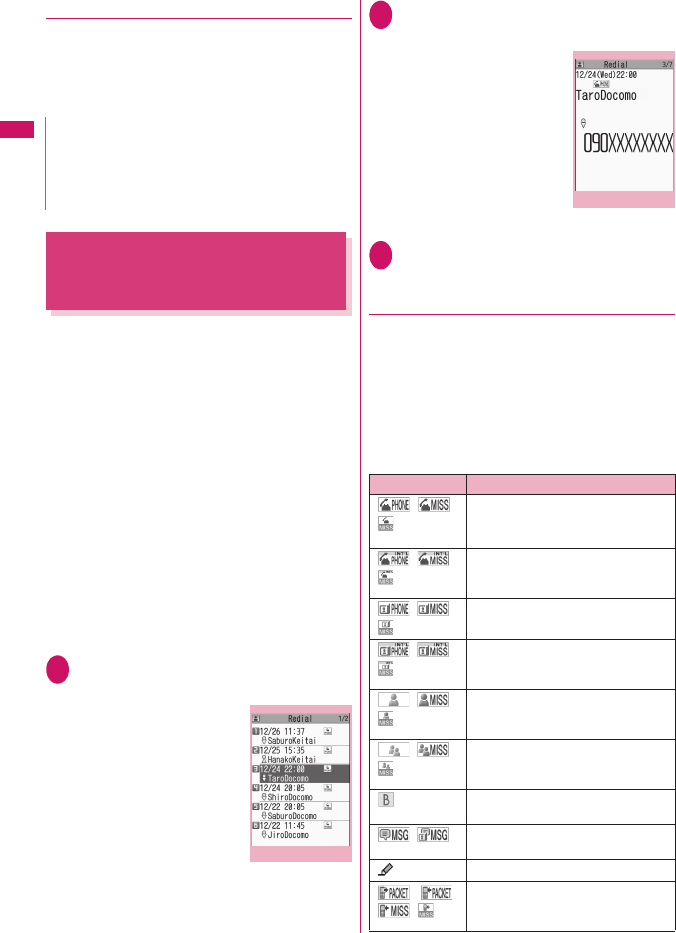
Using the Redial/Dialed Calls/
Received Calls History
<Redial/Dialed calls/Received calls>
Information on the other party’s phone number and
the date and time is stored in the Redial/Dialed calls/
Received calls. You can make a call to the other party
quickly by using these records.
zWhen you make calls to the same phone number
repeatedly, the latest entry is saved to Redial and
separate entries are saved to Dialed calls.
zUp to 30 phone numbers for voice calls,
videophone calls, and PushTalk calls can be stored
in Redial.
zUp to 30 voice call, videophone call, and PushTalk
call entries and 30 packet communication and 64K
data communication entries can be stored in Dialed
calls/Received calls.
zIf the maximum number of entries is exceeded,
older entries are overwritten.
zRedial/Dialed calls/Received calls of PushTalk
<Example: To make a call from the Redial/Received
calls list screen>
1On the standby screenX
j (Redial) or h (Received calls)
■To check Dialed calls
XiX“Own data”X“Dialed
calls”
2Highlight a Redial/Received calls
entry
■To make a call after
checking the details of
the Redial/Received
calls entry
XSelect a Redial/Received
calls entry
3r (voice call), o (V.phone),
@(PushTalk)
●
Checking the number of missed calls
■To check only missed calls in Received calls
XiX“Own data”X“Received calls”
The total number of received calls, the number of
missed calls and the number of unconfirmed missed
calls appear.
When you select “Missed calls”, only the missed calls
appear.
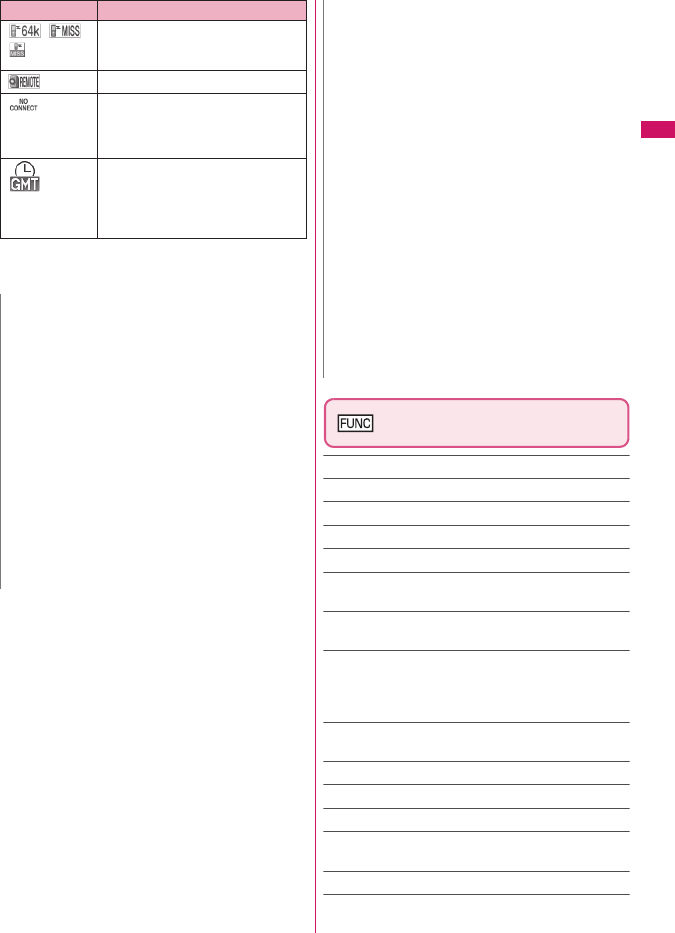
■Redial/Dialed calls/Received calls icons
N
zBefore switching to a handsfree call, move to an
area where your call will not disturb other people.
zWhen a call is finished, the handsfree setting is
released.
Ex. Redial (list)
Function menu
¨
p.9
Icon*1 Description
/ / Incoming and Outgoing/Missed/
Unconfirmed missed voice calls
/ / Incoming and Outgoing/Missed/
Unconfirmed missed international
voice calls
/ / Incoming and Outgoing/Missed/
Unconfirmed missed videophone calls
/ / Incoming and Outgoing/Missed/
Unconfirmed missed international
videophone calls
/ / Incoming and Outgoing/Missed/
Unconfirmed missed PushTalk calls
(one-to-one communication)
/ / Incoming and Outgoing/Missed/
Unconfirmed missed PushTalk calls
(group communication)
*2 Incoming and Outgoing calls in B
mode of 2in1
/ Record message/Record VP
message
Received calls with Chaku-moji
・/
/
Incoming and Outgoing/Missed/
Unconfirmed missed packet
communication
Ex. Redial (detail)
Function menu
¨
p.9
9
Continued on next page
Voice/Videophone Calls
*1 : Some icons look different between the detail screen
and list screen.
*2 : Displayed only when 2in1 is in Dual mode.
Redial/Dialed calls/Received
calls screen (p.8)
Notify Caller ID*1 →p.12
Prefix numbers*1*2 →p.13
Chaku-moji*1*2 →p.11
Int’l call*1*2 →p.7
2in1/Multi Num.*1*2*3
Select PushTalk*4*5……“Redial/Dialed calls/Received
calls of PushTalk”
Ring time*6*7……Display missed call entries with ringing
times.
Add to phonebook……Select Add to phonebook/Add to
PushTalk*5/Add to PushTalk Gr.*5 for the registration
destination. “Adding entries to the phonebook from
Redial, Dialed calls, etc.”
Look-up phonebook*2……“Accessing the phonebook
from Redial, Dialed calls, etc.”
Add desktop icon
Compose message*2*5
Compose SMS*2*5
Search location*2……Access the i-mode site and
execute imadoco kantan search using the phone number.
Sent address*8*9
Received address*6
/ / Incoming and Outgoing/Missed/
Unconfirmed missed 64K data
communication
Incoming remote monitoring
Incoming packet communication or
64K data communication that is
received without an external device
connected
Incoming and Outgoing calls when
the Time zone is not “GMT+09”
regardless of the “Auto time adjust”
setting (the summer time is displayed
when you set the summer time)
N
zWhen you use 2in1, up to 30 entries can be stored
for each phone number. Also, when set to Dual
mode, up to 30 Redial/Dialed calls/Received calls
entries for both phone numbers and a total of the
60 entries are displayed.
<Redial/Dialed calls>
zActivating “Restrict dialing” deletes all Redial/
Dialed calls entries.
zWhen you make a call by selecting Multi number
from the function menu, the registered name and
number of the additional number are displayed
under the phone number on the Redial screen
(detail)/Dialed calls screen (detail). When you
make a call without using the function menu,
nothing is displayed even when “Set Multi
Number” is set to additional number.
Icon*1 Description
<Received calls>
zWhen “Missed calls display” under “Ring time
(sec.)” is set to “Not display” and you receive a call
of which ring tone sounded for a shorter time than
the time set in “Set mute seconds”, the call is not
displayed in Received calls.
zIf the caller is using “Dial-in”, a number different
from the “Dial-in” number may be displayed.
zIf the same phone number is registered in multiple
phonebook entries with different names, the
names appear in reading order on the Received
calls screen.
zWhen you have subscribed to Multi number and
make a call from the Received calls screen, the
phone call is made from the number that received
the call regardless of the “Set Multi Number”
setting.
zWhen you receive a call for the additional number
of Multi number, the registered name of the
additional number is displayed under the phone
number on the Received calls screen (detail).
N
10
Voice/Videophone Calls
Select image*2……Select My side/Chara-den for an
image used during a videophone call.
Select “Release settings” to release the setting.
Big font⇔Standard font*7……Change the font size of
the displayed name.
Delete……Select Delete this/Delete selected/Delete all.
*1 : Available only on the detail screen.
*2 : Not available for PushTalk (group communication)
history screen.
*3 : When the 2in1 setting is set to ON and in Dual mode,
select “Number A”/“Number B”/“Cancel number”
(unavailable in A mode or B mode).
When the 2in1 setting is set OFF, select Basic
Number/Additional Number 1/Additional Number 2/
Cancel number.
*4 : Available only for PushTalk (group communication)
history screen.
*5 : Available only when 2in1 is in A mode or Dual mode,
and a record of A mode is selected.
*6 : Available only on the Received calls screen.
*7 : Available only on the list screen.
*8 : Available only on the Redial or Dialed calls screen.
*9 : Not available when 2in1 is in B mode.
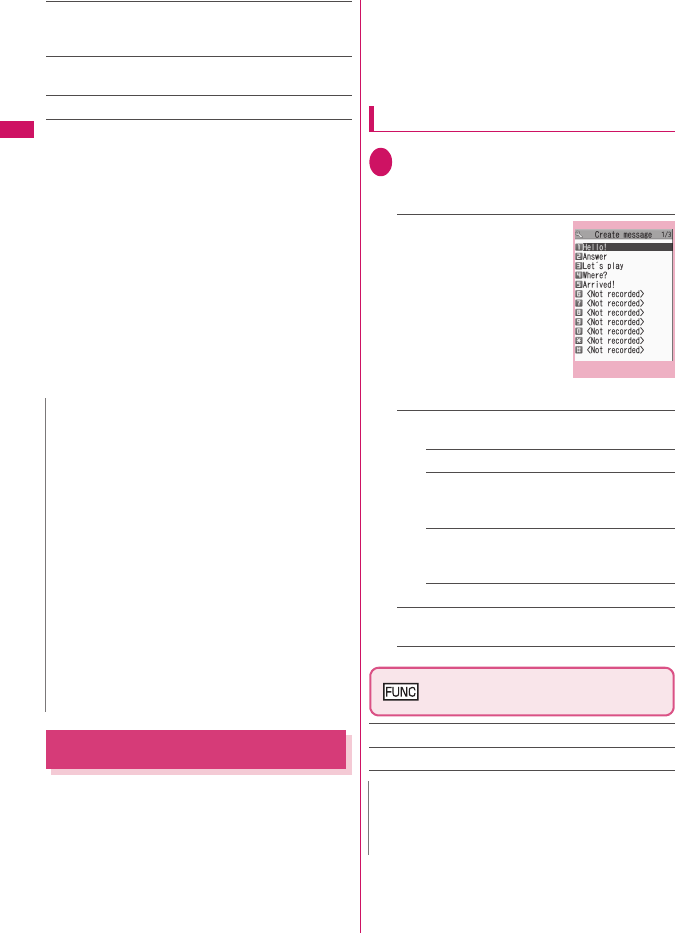
Using Chaku-moji
<Chaku-moji>
When making a voice call or videophone call, send a
message (Chaku-moji) to the other party to show a
summary of the call, etc. beforehand.
z5 Chaku-moji messages are stored at the time of
purchase. You can change the pre-installed Chaku-
moji messages.
zYou can include pictograms or face marks in
Chaku-moji, and you can send a message of up to
10 characters including pictograms/symbols/
double-byte characters/single-byte characters.
zFor details on Chaku-moji and the compatible
models, refer to the NTT DOCOMO website or
“Mobile Phone User’s Guide [Network Services]”.
zChaku-moji is not compatible with PushTalk.
Adding, editing and setting messages
1iX“Settings/Service”X
“Network service”X“Chaku-moji”
XSelect any item:
Create message……Store or
edit frequently used Chaku-
moji. Up to 30 Chaku-moji
messages (including 5 pre-
installed) can be stored.
XHighlight an item to store
or editXo (Edit)XEnter
Chaku-moji
MSG display settings……Set the Chaku-moji
display setting for an incoming call with Chaku-moji.
Display all messages
Only number in PH-book……Display only
Chaku-moji messages from senders stored in
the phonebook.
Calls with Caller ID……Display only Chaku-
moji messages from senders providing the
caller ID.
Hide all messages
3D message display……Set whether to display
Chaku-moji in 3D animation.
Create message list screen
(p.10)
Edit
Delete……Select Delete this/Delete selected/Delete all.
N
zSelecting “Delete all” on the Redial/Dialed calls
deletes all Redial and Dialed calls entries. Note
that selecting “Delete this” or “Delete selected” for
a Redial entry does not delete the entry from
Dialed calls, and selecting “Delete this” or “Delete
selected” for a Dialed calls entry does not delete
the entry from Redial.
zWhen 2in1 is set to ON, selecting “Delete all” on
the Redial/Dialed calls/Received calls screen
deletes all Redial/Dialed calls/Received calls
entries in A or B mode regardless of the 2in1 mode.
<Compose message>
zCompose mail with a mail address specified as
the recipient when the mail address is stored in
the phonebook together with the phone number. If
multiple mail addresses are stored, the first
address is used.
N
zYou cannot delete the pre-installed Chaku-moji.
Even when you change a pre-installed Chaku-moji
and delete the Chaku-moji, it is restored to default.
Create message list
Function menu
¨
p.10
11
Voice/Videophone Calls
Making a call with a message
You can add Chaku-moji when making a voice or
videophone call from the “Enter phone number”
screen and the detail screen of the “Phonebook”,
“Redial”, “Dialed calls” or “Received calls”.
<Example: To make a call with Chaku-moji from the
enter phone number screen>
1Enter phone number screen (p.2)
Xu (FUNC)X“Chaku-moji”X
Select any item:
Create message……Enter Chaku-moji. Up to 10
characters can be entered.
Select message……Select a stored Chaku-moji.
You can edit Chaku-moji by pressing o (Edit) on
the message selection screen.
Sent messages……Select a previously sent
Chaku-moji. You can edit Chaku-moji by pressing
o (Edit) on the sent message screen.
■To delete the entered Chaku-moji (to make
a call without Chaku-moji)
Xu (FUNC)X“Chaku-moji”X“Create
message”XClear the entered text
2r (voice call), o (V.phone)
●
When you receive a voice or
videophone call with a message
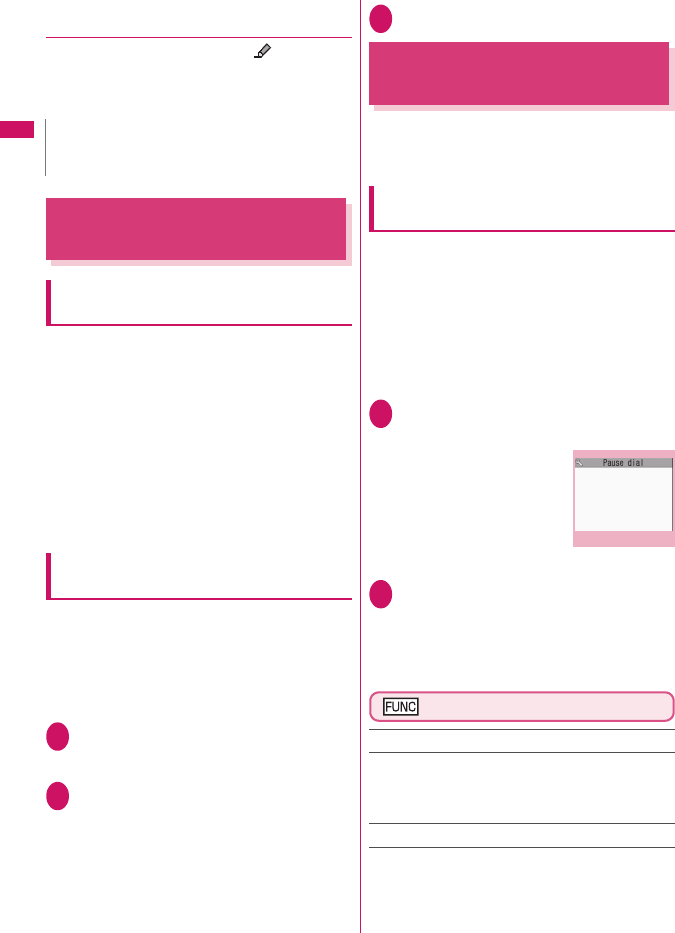
The Chaku-moji appears on the ringing screen. The
Chaku-moji disappears when you answer the call.
zThe received Chaku-
moji is displayed in 3D
animation.
N
zCharges apply to send Chaku-moji. Charges do
not apply to receive Chaku-moji.
zYou can store up to 30 Chaku-moji in Sent
messages (when 2in1 is active, up to 30 sent
messages in each mode, and in Dual mode, up to
30 in each mode and a total of up to 60 sent
messages are stored). When you send the same
Chaku-moji repeatedly, only the latest one is
recorded. When the number of entries exceeds
the maximum, older entries are overwritten.
When the other party’s terminal receives Chaku-
moji, “Transmission completed” appears.
zIf the receiver’s terminal is under the following
conditions, Chaku-moji cannot be sent. In this
case, no sending charges apply.
• The terminal does not support Chaku-moji
(“Transmission failed” appears)
• Chaku-moji does not appear on the receiver
display due to the “MSG display settings” on the
receiver terminal (“Transmission failed” appears)
• Public mode (Driving mode) is set
• The ringing time for Record message is set to 0
second
• “ ” is displayed or the power is off
zDepending on the signal quality, the transmission
result may not appear on the sender terminal even
when the receiver terminal receives Chaku-moji.
In this case, sending charges apply.
zYou cannot send or receive Chaku-moji overseas.
N
zEven when you receive a call whose ring tone
sounded for a shorter time than the time set in
“Set mute seconds” under “Ring time (sec.)”,
Chaku-moji is displayed and recorded in Received
calls.
zSome pictograms are not displayed in 3D
animation.
zDepending on the status of the sender or receiver,
Chaku-moji may not be displayed even when you
receive a call with Chaku-moji.
zWhen the Original lock is set on “Chaku-moji”,
Chaku-moji is not displayed even if you receive a
call with Chaku-moji. You can view the Chaku-moji
in Received calls after releasing the lock.
N
Ex. Voice call
Chaku-
moji
12
Voice/Videophone Calls
●
Displaying a message from Received
calls
When you receive Chaku-moji, the “ ” icon
appears on the Received calls entry, and you can
check the Chaku-moji on the “Received calls” screen
(detail).
Showing/Hiding Caller ID
When Making a Call
Adding the “186”/“184” prefix to the
other party’s phone number
To show your caller ID, add the “186” prefix when you
dial the phone number. To hide your caller ID, add the
“184” prefix.
zAdding the “186” or “184” prefix to phone numbers
is not valid when making PushTalk calls.
■To show your phone number
186 - (The other party’s phone number)X
r (voice call) or o (V.phone)
■To hide your phone number
184 - (The other party’s phone number)X
r (voice call) or o (V.phone)
Showing/Hiding your caller ID from the
function menu
Show/Hide your caller ID using the function menu of a
detail screen such as “Enter phone number” screen,
“Phonebook”, “Received calls”, “Dialed calls” or
“Redial”.
<Example: To make a voice call from the Enter phone
number screen>
1Enter the phone number of the
other party
2u (FUNC)X“Notify Caller ID”X
“OFF” or “ON”
■To release the “Notify Caller ID” setting
X“Cancel prefix”
When “Cancel prefix” is selected, the “Caller ID
Notification” setting applies.
3r (voice call), o (V.phone)
Sending Push Signals
Quickly
<Pause dial>
Use services such as ticket ordering or checking
bank balances by sending push signals from the
FOMA terminal.
Storing dialing data as pause dial
record entries
Register dialing data used as push signals to Pause
dial beforehand. Inserting p (pause) into the dialing
data allows you to send data with a separation where
a pause lies.
zOnly a single entry can be saved.
zYou can enter characters from 0 to 9, #, *, and p
(pause) for dialing data.
zYou cannot enter p (pause) in succession or at the
beginning of the dialing data.
1iX“Settings/Service”X
“Dialing”X“Pause dial”
■If there is dialing data
already stored
The stored dialing data
appears.
2o (Edit)
X
Enter dialing data
Press 0 to 9, q or w to enter dialing
data.
■To enter p (pause)
Xw (1 second or longer)
Pause dial screen (p.12)
Edit
Send pause dial……Enter the phone number of the other
party and send the dialing data.
Each time you press r, the dialing data up to p (pause)
is transmitted.
Delete
N
zEven when you make a call using the Received
calls entry, the Chaku-moji in the entry is not sent.
Pause dial
Function menu
¨
p.12
13
Voice/Videophone Calls
Transmitting dialing data as pause dial
1iX“Settings/Service”X
“Dialing”X“Pause dial”d (Send)
2Dial the phone number of the
destination
X
r
A call is made to the entered phone number and
the dialing data up to the first p (pause) is
displayed while the dialed phone is ringing. p
(pause) is not displayed.
3r
Each time you press r, the dialing data up to
p (pause) is transmitted. When the last number
is sent, the in-call screen reappears.
■To transmit all dialing data at once
Xj (1 second or longer)
X
“Send at one time”
It may not be possible to send all the data at
once to some recipients.
Using the Prefix Function
Store prefix numbers such as IDD Prefix code and
186/184 for showing/hiding your caller ID beforehand
and add these prefix numbers when you make calls.
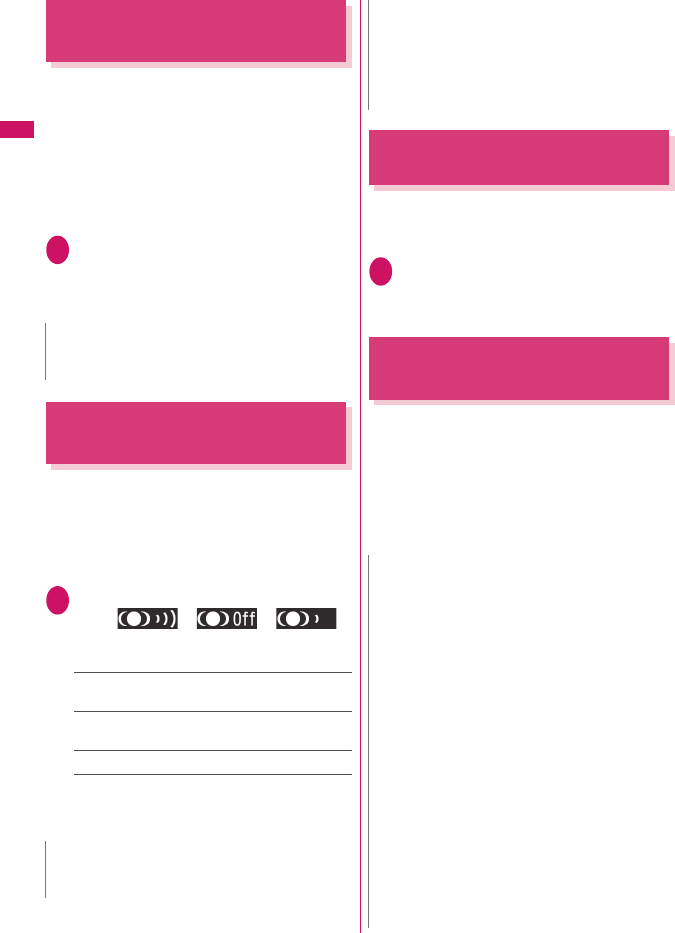
Storing prefix numbers
<Prefix setting>
zUp to 7 prefix numbers can be stored.
zYou can enter characters from 0 to 9, #, * and +.
1i
X
“Settings/Service”
X
“Dialing”
X
“Prefix setting”
2Highlight an item to store or
change
X
o (Edit)
3Enter a name
4Enter a number (prefix)
You can enter up to 10 digits.
Prefix setting screen (p.13)/IDD
Prefix setting screen (p.7)
Edit, Delete this/Delete*, Delete all……Select an option.
*: “Delete” appears on the IDD Prefix setting screen.
Making a call with a prefix number
<Prefix numbers>
zYou can add prefix numbers on the “Enter phone
number” screen and the detail screen of
“Phonebook”, “Received calls”, “Dialed calls” or
“Redial”.
<Example: To make a voice call by adding a prefix
number on the enter phone number screen>
1Enter the phone number of the
other party
2u (FUNC)X“Prefix numbers”X
Select a stored nameXr
Setting Sub-Address When
Making a Call
<Sub-address setting>
Set whether to specify “*” in the phone number as a
separator so that the digits following “*” are
recognized as a sub-address (ON or OFF).
zSub-addresses are used in ISDN to identify calls
made from specific communications devices and to
select content in “V-live”.
1i
X
“Settings/Service”
X
“Dialing”
X
“Sub-address setting”
X
“ON” or “OFF”
N
zSome phones may be unable to receive push
signals.
Prefix setting
Function menu
¨
p.13
N
zIn the following cases, “*” does not function as a
sub-address separator. The number including “*”
is recognized as an ordinary phone number.
• When “*” is entered at the beginning of a phone
number
• When “*” immediately follows “186” or “184” at
the beginning of a phone number
• When “*” immediately follows a number
entered using “Prefix numbers”
• When the phone number contains “*590#”,
“*591#” or “*592#”
14
Voice/Videophone Calls
Setting the Alarm for
Reconnection
<Reconnect signal>
When the signal quality deteriorates during a voice/
videophone call or PushTalk communication and the
call disconnects, the FOMA terminal will
automatically reconnect the call if the signal quality
quickly improves. Set the type of alarm when a call is
reconnected.
zThe time required for reconnection varies
depending on communication conditions or the
signal quality. It takes about 10 seconds.
1i
X
“Settings/Service”
X
“Talk”
X
“Reconnect signal”
X
Select an
alarm tone
Select “No tone”, “High tone” or “Low tone”.
Making the Earpiece Sounds
Clear
<Hyper Clear Voice>
This function detects ambient noise and makes the
other party’s voice clear during a voice or videophone
call.
zWhen handsfree is on or an external device such
as flat-plug earphone/microphone with switch
(optional) is connected, this function is disabled.
1In-call screen (p.2)
X
p ( →→)
Pressing p switches the setting in the
following order: “High” →“OFF”→“Low”.
High……Activate the function even when quiet,
regardless of the ambient noise.
Low……Activate the function only when the ambient
noise is high.
OFF……Deactivate the function.
■To set from the main menu
XiX“Settings/Service”X“Talk”X“Hyper Clear
Voice”X“High”, “Low” or “OFF”
Blocking Out Ambient Noise
<Noise reduction>
This function suppresses ambient noise and makes it
easier for the other party to hear you during a voice/
videophone call or PushTalk call.
1i
X
“Settings/Service”
X
“Talk”
X
“Noise reduction”
X
“ON” or
“OFF”
Making a Handsfree Call
While Driving
<In-car hands-free>
You can make or receive voice calls with handsfree
devices by connecting the FOMA terminal to
handsfree devices such as In-Car Hands-Free Kit 01
(optional) or a car navigation system.
For information on how to use the handsfree device,
refer to the manual provided with the device. The
FOMA In-Car Hands-Free Cable 01 (optional) is
required to use the In-Car Hands-Free Kit 01.
N
zCall charges also apply until reconnected (up to
about 10 seconds).
N
zThis function changes the sound quality or
volume. Change the setting if necessary.
zThe effect may vary depending on the other
party’s voice, etc.
zThe ambient noise detected via the microphone
activates this function. It may be activated by your
voice.
N
zTo operate from the handsfree device, set the
USB mode to “Communication mode”.
zThe display and ring tones used for incoming calls
and mail follow the FOMA terminal settings.
zWhen the handsfree device is set to emit sounds,
the ring tone comes from the handsfree device
even when in Manner mode or the Ring volume is
set to “Silent”.
zWhen the Public mode (Driving mode) is set,
operation for incoming calls and mail follows the
“Public mode (Driving mode)” settings.
zWhen Record message is set, operation for
incoming calls follows the “Record message”
settings.
zWhen the FOMA terminal is set to emit sounds,
operation when the FOMA terminal is folded
during a call follows “Setting when folded”. When
the handsfree device is set to emit sounds, folding
the FOMA terminal does not affect the call status
regardless of the “Setting when folded” setting.
N
15
Continued on next page
Voice/Videophone Calls
Receiving a Voice/
Videophone Call
1Receive a voice or videophone
call
The ring tone sounds and the illumination
flashes.
■When you receive a call with Chaku-moji
The Chaku-moji appears on the ringing screen
or videophone ringing screen. →p.11
■To put a voice/videophone call on hold
while ringing→p.18
2r
■To answer a videophone call with the
substitute image
Xd (Subst.)
■Operations during a videophone call
You can perform various operations such as
changing the camera image to the substitute
image and muting sounds during a videophone
call.→p.2
■To set Hyper Clear Voice→p.14
■When the other party switches a voice/
videophone call during a call→p.16
■To put the current voice/videophone call
on hold→p.18
■To switch between the FOMA terminal and
Bluetooth device
Xr (1 second or longer)
3To end the call, press y
Ringing screen/Videophone
ringing screen (p.15)
Call Rejection……Terminate the incoming call without
answering it.
Call Forwarding……Forward the call to the forwarding
number regardless of the Activate/Deactivate setting of
Call Forwarding.
Voice Mail……Connect the call to the voice mail service
center regardless of the Activate/Deactivate setting of
Voice Mail.
Change Display……Switch the display from the
additional number 1 or 2 to the number from which the call
is forwarded. This can be selected when the received
multi number call (for additional number 1 or 2) was
forwarded.
Ringing
Function menu
¨
p.15
Videophone ringing
Function menu
¨
p.15
N
zYou can answer a call using a flat-plug earphone/
microphone with switch (optional).
Display while receiving a call
■When the other party’s phone number is
notified
The other party’s phone number appears on the
screen. When the caller is stored in the
phonebook, the name stored in the phonebook
appears (only the name is displayed while
Keypad lock is set).
zIf the same phone number is registered in
multiple phonebook entries with different
names, the first name retrieved by Search
reading appears.
zIf the caller is stored as secret data, the name,
etc. do not appear but only the phone number
appears.
zWhen you receive a call for the additional
number of Multi number, the registered name
of the additional number is displayed on the
ringing screen.
■When the other party’s phone number is
not notified
The reason appears.
16
Voice/Videophone Calls
When the Other Party
Switches a Voice/Videophone
Call
When you receive a voice/videophone call, the other
party can switch between voice call and videophone
call.
zThe receiver cannot switch the call.
zTo switch calls, the receiver needs to set “Ntfy
switch-mode” beforehand. →p.24
zYou can use this function with terminals compatible
with voice call/videophone call switch.
<Example: When the other party switched a voice call
to a videophone call>
1In-call screen (p.2)XThe other
party switches to a videophone
callX“YES”
During switching, a screen appears indicating
that the calls are being switched, and voice
announcement is played.
When a voice call is switched to a videophone
call, the camera image is sent to the other party.
■To send substitute image to the other
party
X“NO”
■When the other party switches a
videophone call to a voice call
XVideophone in-call screen (p.2)XThe other
party switches to a voice call
The videophone call is switched to the voice call.
Using the Dial Keys to
Answer a Call
<Answer setting>
Turn off the ring tone or answer an incoming call
quickly.
1i
X
“Settings/Service”
X
“Incoming call”
X
“Answer setting”
X
Select any item:
Any key answer……Press any of the following keys
to answer voice calls or PushTalk:
r, d (Talk), 0 to 9, w, t, o, p,
a (マナー ), b (voice calls), @ (PushTalk)
* You can answer a videophone call only by normal
key operations (r, d (Subst.) or
o (V.phone)).
Quick silent……Stop the ring tone while the caller
continues to hear the ringback tone by opening the
FOMA terminal or pressing any of the following keys:
0 to 9, w, t, b, p, a (マナー ) or
o (voice calls or PushTalk)
To answer the call, press r, d (Answer/Subst.)
o (V.phone) (videophone), or @ (PushTalk).
OFF……Answer a call only by normal key
operations.
zIf you have subscribed to the Call waiting, Voice
mail or Call forwarding service and you activate
“Set in-call arrival” and set “Incoming Call Mng” to
“Answer”, you will hear a short double beep
(“bibip”) when you receive a call during a call.
• If you subscribe to the Voice Mail or Call
Forwarding service, you can answer a call after
ending the current call.
• If you subscribe to the Call Waiting service, you
can answer a voice call after putting the current
call on hold, and you can answer a videophone
call after ending the current call.
zYou can set the operation for calls from callers not
stored in the phonebook.
zYou can set restrictions for each phone number
stored in the phonebook.
<Videophone>
zYou can also answer a call by pressing
o(V.phone).
zIt may take a few seconds to switch from the
camera image to the substitute image (Chara-
den) depending on the Chara-den.
N
17
Continued on next page
Voice/Videophone Calls
r, d (Answer/Subst.),
o (V.phone) (videophone), @ (PushTalk)
Folding the FOMA Terminal to
End/Hold Calls
<Setting when folded>
Set the operation to be performed when the FOMA
terminal is folded during a voice or videophone call.
1i
X
“Settings/Service”
X
“Talk”
X
“Setting when folded”
X
Select any
item:
Continue talking……Continue talking. For
videophone calls, “Substitute image” is sent to the
other party.
No tone……Mute the sound. For videophone calls,
“Substitute image” is sent to the other party. The
other party does not hear the hold tone.
Tone on……Put the call on hold (holding). While the
terminal is folded, the other party hears the hold
tone. For videophone calls, the call hold image is
sent to the other party.
End the call……End the call. This is the same
operation as pressing y.
Adjusting the Earpiece
Volume
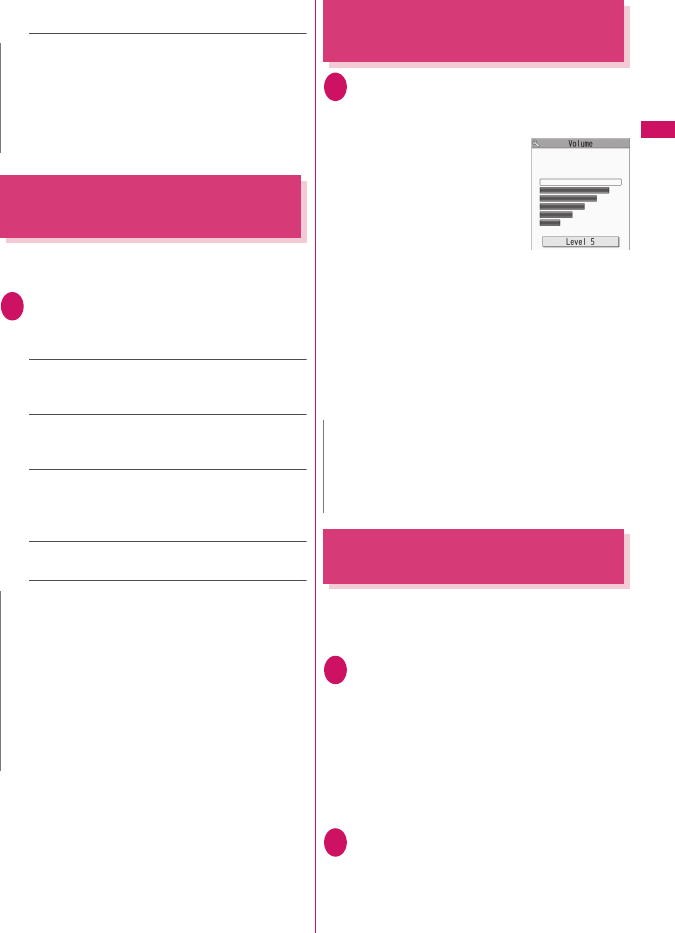
<Volume>
1On the standby screenX
c (1 second or longer)XUse c
to adjust volume
Pressing c (1 second or
longer) displays the earpiece
volume screen. If no
operation is performed for 2
seconds or longer while the
earpiece volume screen is
displayed, earpiece volume
adjustment ends.
Adjust the volume between 6 steps from
“Level 1” (quietest) to “Level 6” (loudest).
■To adjust the earpiece volume during a
call
During a voice call: c (1 second or longer)
During a videophone call: c
•a (マナー) or s (C) is also available to adjust
volume.
Adjusting the Ring Volume
<Ring volume>
Adjust the ring tone volume for incoming call, mail,
MessageR/F or i-concier information between 6 steps.
You can also mute or gradually increase volume.
1i
X
“Settings/Service”
X
“Incoming call”
X
“Ring volume”
X
Select an item to adjust the
volume
Select “Phone” to adjust ring tone volume for
voice calls and 64K data communication.
Select “Mail”to adjust the ring tone volume for
i-mode mail, Area Mail, SMS and packet
communication.
2Use c to adjust volumeXd (Set)
■To increase volume gradually
XPress f at “Level 6”
When set to “Step”, the ring volume increases
every 3 seconds.
N
zEven when set to “Quick silent”, “Any key answer”
is active in Manner mode.
z“Any key answer” or “Quick silent” does not work if
you press 5 (ECO mode ON/OFF) or 8
(Privacy angle ON/OFF) for 1 second or longer.
N
zWhen a flat-plug earphone/microphone with
switch (optional) is connected, this function is
disabled.
zEven if set to “Tone on”, folding the FOMA
terminal activates “No tone” when “Call Waiting” is
switched on.
zThis setting does not work during PushTalk
communication. The operation follows “Setting
when folded” of the PushTalk settings.
N
zThe volume setting adjusted during a call is
retained after you end the call.
zYou can also adjust volume during PushTalk or
handsfree call.
18
Voice/Videophone Calls
■To mute the ring tone
XPress g at “Level 1”
The icon on the standby screen indicates which
items are set to “Silent”.
: “Silent” is set for “Phone”, “Videophone”
and/or “PushTalk”
: “Silent” is set for “Mail”, “MessageR” and/or
“MessageF”
: Both “ ” and “ ” are set
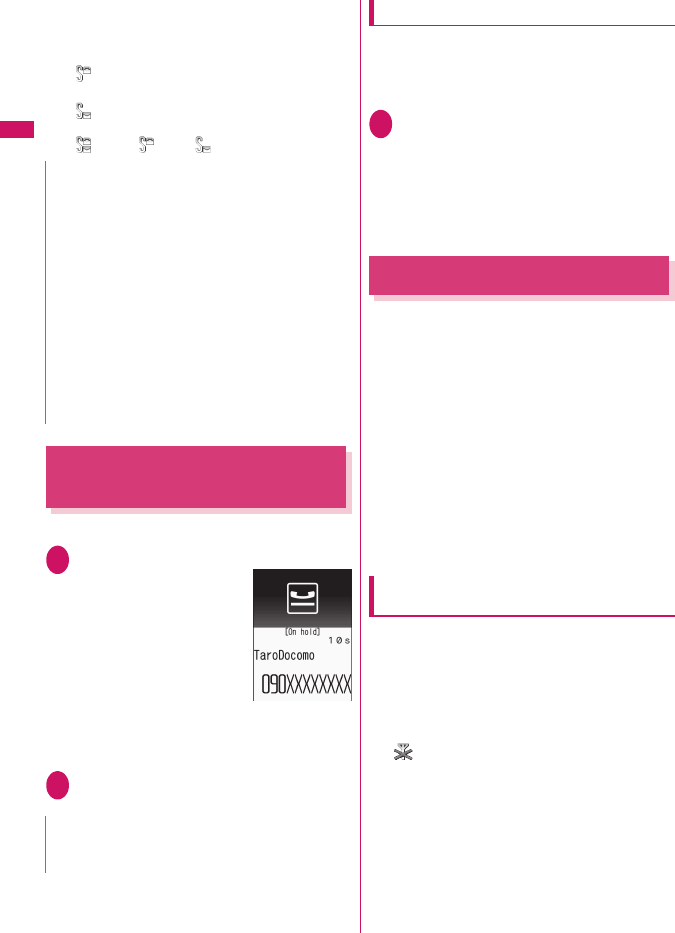
Holding Incoming/Current
Calls
<On hold/Holding>
<Example: To put an incoming call on hold>
1While ringingXy
Three short beeps sound
and the call is put on hold.
The caller hears an
announcement that you
cannot answer now, and the
call is put on hold.
■To put the current call
on hold
XDuring a callXt
■To end the call during on hold/call hold
Xy
2Press r to resume the call
You can also press t to resume the held call.
Setting the hold tone
<Hold tone setting>
Set the announcement to be played to the caller
during on hold.
zYou cannot change the hold tone played during a
call.
1i
X
“Settings/Service”
X
“Talk”
X
“Hold tone setting”
X
“On hold
tone”
X
Select a tone
Select “Tone 1”, “Tone 2”, “Voice announce 1*” or
“Voice announce 2*”.
*: Not available when no voice announcement is
recorded.
Using the Public Mode
Public mode (Driving mode/Power OFF) is an
automatic answering service provided for public
places and circumstances in which mobile phones
should not be used.
zWhen Public mode and network services are set
concurrently, Voice Mail service*1, Call Forwarding
service*1 and Caller ID Request service*2 take
precedence over Public mode.
*1: For a voice call whose ring time is not “0 second”, a
service activates after the Public mode
announcement is played.
*2: When the caller notifies the caller ID, Public mode
activates.
zPublic mode does not work for a call from a phone
number registered for Nuisance Call Blocking.
Using Public Mode (Driving Mode)
<Public mode (Driving mode)>
When Public mode is set, a caller hears a message
that you cannot answer the call because you are
driving or in a place where you have to refrain from
using a mobile phone (on a train or bus, in a theater,
etc.), then the call ends.
zPublic mode can only be set or released from the
standby screen (can also be set or released when
“ ” is displayed.).
zYou can make calls when Public mode is set.
zThis function is not available during data
communication.
zWhen you receive a call with no caller ID while
Caller ID Request service is set to “Activate”, the
caller ID request announcement is played (Public
mode announcement is not played.)
N
zThe ring volume setting specified for “Phone” in
this function is also applied to the “Select ring
tone” setting for a voice call, and the alarm tones
for “Schedule” and “To Do list”.
zEven if the Ring volume is set to “Level 3” - “Level
6” or “Step”, the ring tone is played at “Level 2” in
the following cases:
• Immediately after a voice call/videophone call
ends
• Immediately after a PushTalk call ends
• Immediately after a Record message/Voice
memo recording ends or during playback
• During/immediately after “Voice announce”
recording
N
zCall charges apply while an incoming call or
current call is put on hold.
19
Voice/Videophone Calls
1On the standby screenX
w (1 second or longer)
Public mode is set and “ ”
appears.
When you receive a call, the
caller hears the message “I can’t answer the call
because I am driving or I have to refrain from
using a mobile phone now. Please call back later”.
■To release Public mode (Driving mode)
XOn the standby screenXw (1 second or
longer)
Public mode is released and “ ” disappears.
●
When Public mode (Driving mode) is
set
The ring tone does not sound when a voice call,
videophone call or PushTalk call arrives. Calls are
logged as “Missed calls” in “Received calls”, and the
“Missed call” desktop icon appears on the standby
screen.
zA voice caller hears a message that you cannot
answer the call because you are driving or in the
place where you have to refrain from using a
mobile phone, and then the call ends.
zA videophone caller sees the Public mode video
message on his or her display, and then the call
ends.
zAn incoming PushTalk call is not answered.
A PushTalk caller sees the “Connection failed”
message on his or her display. In a conversation
between three or more people, the participating
members will know that you are driving.
zWhen you receive mail, the ring tone does not
sound and the “New mail” desktop icon appears on
the standby screen.
Using Public Mode (Power OFF)
<Public mode (Power OFF)>
When Public mode (Power OFF) is set, a caller who
made a call while the power is off hears a message
that you cannot answer the call because you are in a
place where you have to turn off the mobile phone (in
a hospital, on an airplane, around a priority seat on a
train, etc.), then the call ends.
1On the standby screenX
w25251Xr
Public mode (Power OFF) is set (Nothing
changes on the standby screen).
When you receive a call after setting Public
mode (Power OFF) and turning off the power,
the caller hears the message “The person you
are calling is in an area where mobile phones
should not be used. Please call back later”.
■To release Public mode (Power OFF)
XOn the standby screenX
w25250Xr
■To check the Public mode (Power OFF)
setting
XOn the standby screenX
w25259Xr
●
When Public mode (Power OFF) is set
The setting is valid until “*25250” is dialed to release
Public mode (Power OFF). The setting is not released
by simply turning on the power.
The Public mode (Power OFF) announcement is
played even when you are out of service area or
where the reception is very poor.
zA voice caller hears a message that you cannot
answer the call because you are in a place where
you have to turn off the mobile phone, and then the
call ends.
zA videophone caller sees the Public mode (Power
OFF) video message on his or her display, and
then the call ends.
zAn incoming PushTalk call is not answered. A
PushTalk caller sees the “Connection failed”
message on his or her display. In a conversation
between 3 or more people, the participating
members will know that you are not participating.
N
zThe Public mode setting takes priority even when
“Record message” is “ON”.
zThe Public mode setting takes priority when
Manner mode is set at the same time.
zIf you make an emergency call (110, 119 or 118)
while Public mode is set, Public mode is released.
zThe following tones do not sound in Public mode:
• Ring tone for voice call/videophone/PushTalk
• Ring tone for mail and message
• Various alarm tones
• Wake-up tone
• Open-Close sound
• Charge sound
• Software tone for i-αppli
• Ring tone for packet communication/64k data
communication
• Search request notification tone for GPS
N
zIf the power is off or “ ” is displayed, the
announcement for “ ” is played instead of the
Public mode message even when Public mode is
set. However, in case of PushTalk, “Disconnected”
appears on the members’ displays.
20
Voice/Videophone Calls
When You Cannot Answer an
Incoming Call
<Missed call>
When you could not answer an incoming call,
appears on the standby screen. When you select ,
you can check the date, time and caller’s name of the
call.
1On the standby screenXdX
Select “ ”
The “Missed call list” screen appears.
To check information with the FOMA
terminal folded
When there is a missed call or new mail (i-mode mail,
Area Mail, SMS), the incoming call lamp keeps
flashing. Press s (C) to sound the short tone.
1Press s (C) with the FOMA
terminal folded
A short tone notifies you of the information in
accordance with “Info notice setting”.
●
Flashing of the Incoming call lamp
When there is a missed call, new mail or other
information, the incoming call lamp keeps flashing in
the respective color set in “Illumination”.
zPhone/Videophone: Color set for “Phone”
zNew mail: Color set for “Mail”
■Flashing colors and conditions
zThe lamp does not flash when “Missed info” under
“Illumination” is set to “OFF”.
zWhen “Gradation” under “Illumination” is set, the
lamp flashes in the default color.
zYou can configure individual illumination settings in
the phonebook.
zThe lamp does not flash in Public mode (Driving
mode).
■To turn off the lamp
zSelect the icon for “Missed call”or “New mail” on the
display to check information, or press t (1
second or longer).
Setting the notification method for
missed calls
<Info notice setting>
Set the notification method to be performed when
s(C) is pressed with the FOMA terminal folded.
zThe setting items and notification methods using
s(C) are as follows:
■When there is a missed call, new mail, etc.
■When there is no missed call, new mail, etc.
*1 : Vibration works when “Phone” of “Vibrator” is not set
to “OFF”.
*2 : When the color of “Illumination” is set to “Gradation”,
the lamp flashes in the default color.
1iX“Settings/Service”X
“Incoming call”X“Info notice
setting”XSelect “ON” or “OFF”
Setting
item
Tone and
vibration*1 Illumination
ON The “Pipip, pipip”
tone plays.
The incoming call lamp
lights for about 6 seconds
in the color set for
“Illumination”.
If there are different types
of information such as
call and mail, the lamp
changes to each of the
corresponding color at
1-second intervals.*2
Setting
item
Tone and
vibration*1 Illumination
ON The “pipipip”
tone plays.
The lamp flashes in
“Color 12” for about 6
seconds.
N
zThis function alerts you using a “YES” indication
when a desktop icon such as “Missed call” or
“New mail” is displayed on the standby screen.
zYou cannot use s (C) to check for missed calls or
new mail in the following cases:
• When Side key guard is set to “ON”
• When playing music with Music Player/
Music&Video Channel
zThe volume is determined by “Phone” under “Ring
volume” (if set to “Silent” or “Step”, the volume will
be “Level 2”).
zOpening the FOMA terminal during notification
stops the notification.
21
Voice/Videophone Calls
Having the Caller Leave a
Message
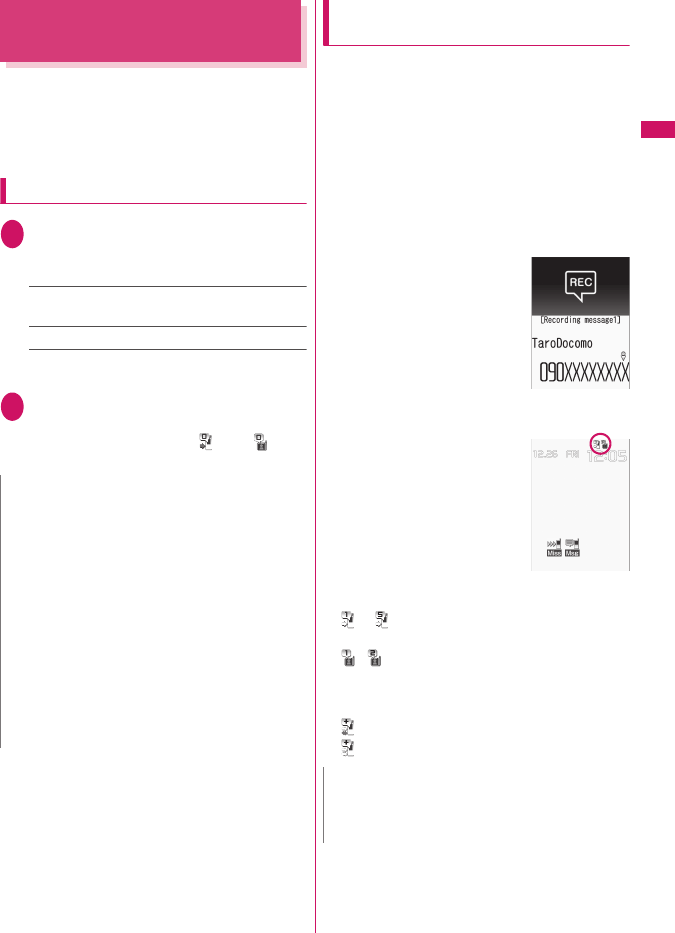
<Record message>
Have the caller leave a message on your FOMA
terminal when you cannot answer a voice or
videophone call.
zEach message can be up to 20 seconds long, and
5 messages can be recorded for voice calls and 2
messages can be recorded for videophone calls.
Setting Record message
1i
X
“Settings/Service”
X
“Incoming call”
X
“Record
message”
X
Select any item:
ON……Select Japanese 1/Japanese 2/English/
Voice announce 1*/Voice announce 2*.
OFF……Release the Record message setting.
*: Not available when no voice announcement is
recorded.
2Enter the ringing time (000 to
120 seconds in 3 digits)
Record message is set, and “ ” and “ ”
appear on the standby screen.
When “Record message” is set to
“ON” and you receive a call
Record message activates when the set time has
elapsed.
zThe voice caller hears the answer message, and
recording starts.
zTo a videophone caller, the “伝言メモ準備中
Preparing” image is sent, the answer message is
played, the “ 伝言メモ録画中 Recording” image is
sent, then recording starts.
■When message recording starts
zThe recording screen appears. The caller’s voice
can be heard through the FOMA terminal earpiece
during recording.
■To answer a voice call during
recording
Xr
■To answer a videophone call
during recording
XPress r to answer with the
camera image or d (Subst.) to
answer with the substitute image
■When message recording ends
zThe previous screen reappears
and the “Missed call” desktop
icon and “Record message”/
“Record VP message” desktop
icon appear on the standby
screen. You can check the
content by selecting one of the
desktop icons.→p.22
zThe number of recordings is indicated by icons in
the icon display area at the top of the screen.
- : Record message (the number indicates
the number of messages)
/ : Record VP message (the number
indicates the number of messages)
* When Auto voice memo is set to ON, the following
icons appear but the number of messages does not:
: Record message
: Record message and Auto voice memo
N
zTo give priority to the “Record message” function
when “Voice Mail”, “Call Forwarding” and “Record
message” are set simultaneously, set the ringing
time of Record message shorter than that of Voice
Mail and Call Forwarding.
zIf the mute time set for “Ring time (sec.)” is longer
than the ringing time set for Record message,
Record message activates without ringing. To
activate Record message after ringing, set the
Record message ringing time longer than the
mute time.
zYou can use “Ring tone/Image” (individual) to set
an answer message for each phone number and
“Ring tone/Image” (group) to set an answer
message for each group.
N
zWhen Manner mode is set, you cannot hear the
caller’s voice during recording.
zYou cannot answer another call during recording.
Ex. Voice call
22
Voice/Videophone Calls
Having the Caller Leave a
Message for an Incoming Call
<Quick message>
Even when “Record message” is not set to “ON”, you
can record a message while receiving a call by
pressing a key.
1While ringingXs (C)
Message recording starts.
■To set Manner mode when recording
starts
XWhile ringingXq
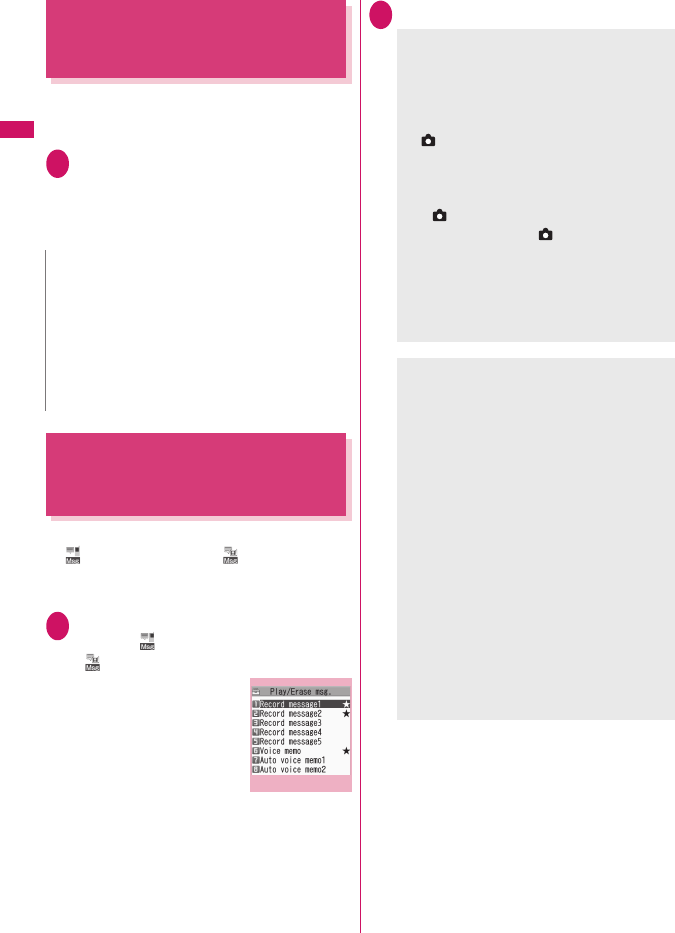
Playing/Erasing Recorded
Messages, Voice Memos or
VP Memos
zWhen there is an unplayed recorded message,
“ ” (Record message) or “ ” (Record VP
message) appears on the standby screen.
<Example: To check an unplayed recorded message>
1On the standby screenXdX
Select “ ” (Record message) or
“ ” (Record VP message)
“★” appears for the
recorded item.
■To play a message with
a menu operation
XiX“LifeKit”X“Play/
Erase msg.” or “Play/Erase
VP msg.”
2Select an item to play
■To make a voice call, videophone call, or
PushTalk call to the displayed phone
number during playback
Xr (voice call), o (V.phone), @ (PushTalk)
Only one-to-one communication is possible for
PushTalk.
■To erase a message being played
Xu (FUNC)X“Erase”X“YES”
N
zYou cannot set “Record message” to “ON” with
this operation.
zWhen the messages are full and you receive a
voice or videophone call, Record message does
not activate and the FOMA terminal keeps on
ringing (when q is pressed, the ringing
continues in accordance with the “Manner mode
set” setting).
Play/Erase msg.
Function menu
¨
p.23
<Record message/Voice memo/Auto voice
memo>
A beep sounds and playback starts. When the
playback ends, two short beeps sound and the
“Play/Erase msg.” screen reappears.
You can also play a message by pressing
Ss ( ) on the standby screen with the FOMA
terminal folded.
■To play the next message while playing
a message
XSs ()
Each time you press Ss ( ), the messages are
played in the following order: Record message
→Voice memo→Auto voice memo.
■To stop playback
XXd (Stop) or Wt
The “Play/Erase msg.” screen reappears.
<Record VP message>
Playback starts. When the playback ends, the
“Play/Erase VP msg.” screen reappears.
■To play another message while playing a
message
XXv
■To adjust volume while playing a
message
XXc
■To switch the speaker on/off while
playing a message
XUu (FUNC)X“Speaker ON” or “Speaker
OFF”
■To pause playback
XXd (Stop)
To resume playback, press Xd (Play)
■To stop playback
XWt
The “Play/Erase VP msg.” screen reappears.
23
Voice/Videophone Calls
Play/Erase msg. screen (voice/
video) (p.22)
Play, Delete this, Delete rec. msg.*, Delete all……
Select an option.
*: Available only on the Play/Erase msg. screen.
Using Chara-den
Send a cartoon character instead of your own image
when you make a videophone call. “Chara-den”
zYou can display your favorite Chara-den if you set
“Substitute image” under “Select image” to “Chara-
den” beforehand.
You can also use Chara-den by setting Chara-den
in a phonebook entry or as Ring tone/Image.
zTo switch from the camera image to Chara-den
during a videophone call, select “Substitute image”
from the function menu.
1When you receive a videophone
call, press d (Subst.)
2Control your character by
pressing dial keys
Pressing a dial key makes the character perform
the action assigned to the key.
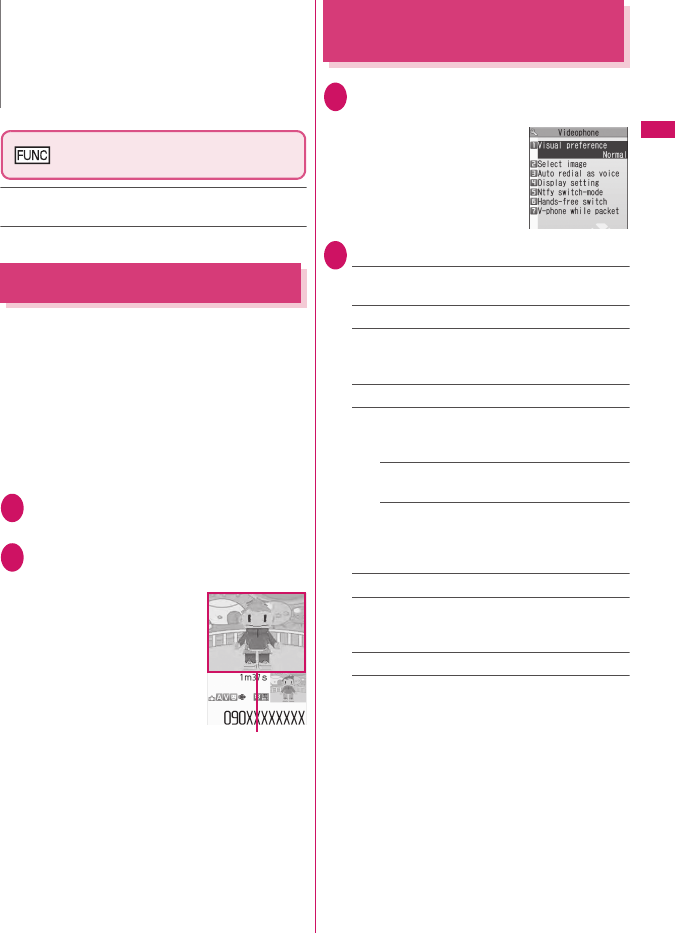
Setting Videophone
Functions
1i
X
“Settings/Service”
X
“Videophone”
2Select any item:
Visual preference……Select Normal/Prefer img
qual/Prefer motion spd.
Select image→p.24
Auto redial as voice……Set whether to switch to a
voice call when a videophone call cannot be made
(ON or OFF).
Remote monitoring→p.26
Display setting……Set an image to display on the
main display or how to display your own camera
image.
Main display……Select Other side/My side as
an image to display on the main display.
Front camera Reverse……Set whether to
display your camera image as a mirror image
(ON) or normal image (OFF) on your FOMA
terminal.
Ntfy switch-mode→p.24
Hands-free switch……Set whether to switch to
handsfree automatically when starting a videophone
call (ON or OFF).
V-phone while packet→p.24
N
zWhen 2in1 is in A mode or B mode, “★” does not
appear for a message recorded under the unused
phone number. When set to “Dual mode”, “★”
appears for messages recorded under both phone
numbers.
Chara-den
Videophone settings
24
Voice/Videophone Calls
Setting an image to send during
videophone calls
<Select image>
Set an image to send instead of the camera image.
zYou can set a JPEG image whose file size is 100K
bytes or less and not larger than 854 dots wide ×
854 dots high, or a GIF image whose file size is
100K bytes or less and not larger than 854 dots
wide x 480 dots high or 480 dots wide × 854 dots
high (except file-restricted images).
1Videophone settings screen (p.23)
X
“Select image”
X
Select any item:
On hold, Holding, Substitute image, Record
message, Preparing, Voice memo
2Select an image to send
Pre-installed……Send only a message.
Original……Send an image and message. To
change the image, select “Change setting” from the
function menu then select an image from My picture.
Chara-den*……Send the image selected as
“Substitute image”.
To change the Chara-den, select “Change setting”
from the function menu then select Chara-den from
the Chara-den list.
*: Available only when “Substitute image” is
selected.
Setting switch between voice call and
videophone call
<Ntfy switch-mode>
Set whether to let the other party know that your
FOMA terminal supports switching between voice call
and videophone call.
zCalls cannot be switched when set to “Indication
OFF”.
zYou cannot set this function during a call or while
“ ” is displayed.
1Videophone settings screen (p.23)
X
“Ntfy switch-mode”
X
Select any
item:
Indication ON, Indication OFF……Activate/
Deactivate Ntfy switch-mode.
Check Indication……Display the “Ntfy switch-
mode” setting status.
Setting the answer mode for a
videophone call incoming during
i-mode
<V-phone while packet>
zAs the multi access function cannot be used for
videophone, incoming videophone calls during
i-mode communication or while sending or
receiving mail are handled according to this setting.
1Videophone settings screen (p.23)
X“V-phone while packet”XSelect
any item:
V-phone priority……Switch to the videophone
ringing screen. When you answer the incoming
videophone call, i-mode communication is
disconnected.
Packet downld priority……Reject the incoming
videophone call.
V-phone answerphone……Connect the call to the
Voice Mail service center if you have subscribed to
the Voice Mail Service, regardless of the Activate/
Deactivate setting of Voice Mail. If you have not
subscribed to this service, “Packet downld priority”
applies.
Call forwarding……Forward the call to the
forwarding number if you have subscribed to the Call
Forwarding Service, regardless of the Activate/
Deactivate setting of Call Forwarding. If you have not
set a forwarding number or subscribed to this
service, “Packet downld priority” applies.
N
<Visual preference>
zIf the signal quality deteriorates during a
videophone call, the image may become grainy or
patchy regardless of the settings in “Visual
preference”.
<Select image>
zIf you delete the original still image, the “Pre-
installed” image is displayed (sent).
zWhen the Chara-den character set as the
substitute image is deleted and the “Chara-den”
substitute image cannot be displayed, the pre-
installed “ビーンズ (Beans)” is sent. If you delete
the pre-installed “ビーンズ (Beans)”, the “Pre-
installed” substitute still image is sent.
25
Voice/Videophone Calls
To enlarge an image to be sent
Enlarge your image and send it to the other party
during a videophone call.
zThe zoom can be adjusted between 2 steps, 1×
and approximately 2×. If you end the videophone
call, the zoom ratio returns to 1× (standard).
zThe substitute image being sent cannot be
enlarged.
1During a videophone callXUse v
to adjust the ratio
Decorating the videophone call screen
<Decoration>
Decorate your videophone call screen (your camera
image) with a stamp and frame.
1Videophone in-call screen (p.2)X
u (FUNC)X“Decoration”X
Select any item:
Frame……Select a frame from the Frame selection
screen.
Stamp……Select a stamp from the Stamp selection
screen and decide the paste position.
■To erase a frame or stamp
Select “Off decoration” from the function menu of the
videophone in-call screen.
Sending a message during a
videophone call (sending camera
image)
<Petit message>
1Videophone in-call screen (p.2)X
u (FUNC)X“Petit message”X
Enter a message
The message is displayed. The message
disappears automatically in approximately
15 seconds.
■To cancel entering a message in text entry
XErase the messageXt
■To erase the message manually after it is
displayed
Xt (1 second or longer)
You can also erase a message by selecting “Off
decoration” from the function menu.
<Auto redial as voice>
zWhen a videophone call is switched and redialed
as a voice call, not digital communications
charges but voice call charges apply.
zWhen a call is redialed, only the voice call is
logged in “Redial”/“Dialed calls”.
zEven if “Auto redial as voice” is set to “ON”, dialing
may not be possible depending on the network or
other party, e.g. the line is busy.
<Hands-free switch>
zEven when “Hands-free switch” is set to “ON”,
handsfree does not activate automatically in the
following cases:
• While Manner mode is set
• When a flat-plug earphone/microphone with
switch (optional) is connected (the microphone
operation is in accordance with “Headset mic.
setting”)
• When holding a call or Record message is
activated for an incoming call
<V-phone while packet>
zEven when “V-phone priority” is set, you cannot
answer a videophone call if you are using multi
access such as i-mode communication during a
voice call.
zWhen set to “Packet downld priority”, “V-phone
answerphone” or “Call forwarding”, received
videophone calls are recorded as “Missed calls” in
“Received calls”.
zEven when set to “V-phone priority” or “Packet
downld priority”, the “Voice Mail” or “Call
Forwarding” service is activated if the ring time for
the “Voice Mail” or “Call Forwarding” service is set
to 0 second.
N
N
zIf “Front camera Reverse” is set to “OFF” for your
camera image, the decoration is displayed
normally, and a stamp with text can be read
correctly.
N
zIf “Front camera Reverse” is set to “OFF” for your
camera image, the decoration is displayed
normally, and text can be read correctly.
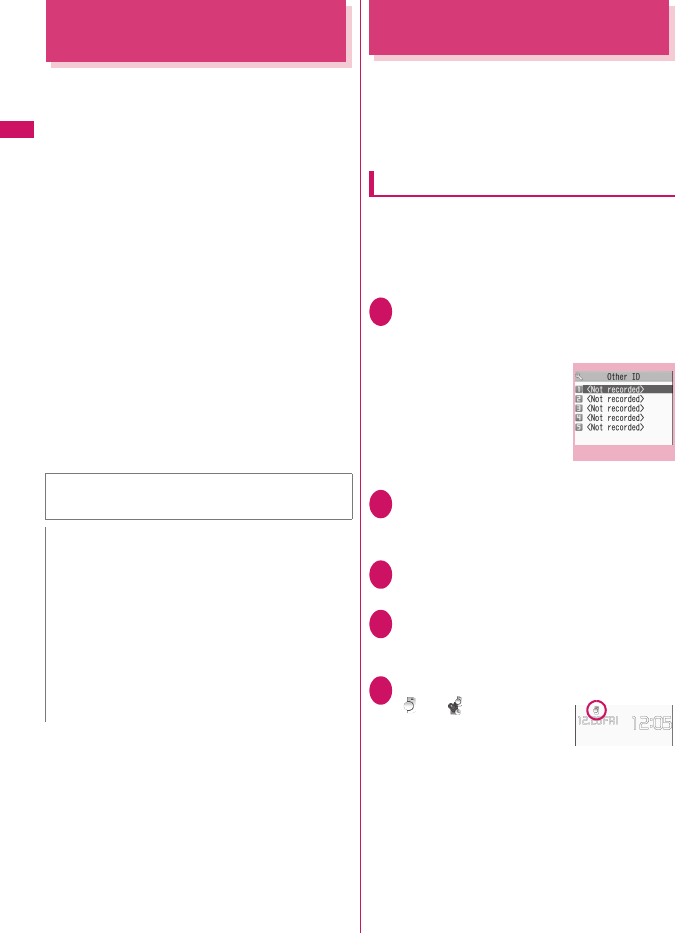
26
Voice/Videophone Calls
Using Videophone Connected
to External Devices
You can make or receive videophone calls from
external devices such as a PC by connecting the
FOMA terminal to the device using the FOMA USB
Cable with Charge Function 01/02 (Optional).
To use this function, you have to install a videophone
application on the dedicated external device or PC
and prepare commercially available devices such as
an earphone/microphone and USB compatible Web
camera.
zSet USB mode to “Communication mode”. No
specific settings are required to connect external
devices.
zFor details on the operating environment, settings,
operating procedure of the videophone application,
refer to the manuals supplied with the external
devices.
z“ドコモテレビ電話ソフト” (DOCOMO Videophone
Software) (Japanese) is compatible with this
function.
Download the software from the website
(Japanese).
(For details on the PC operating environment, etc.
refer to the support website.)
Remote Monitoring
<Remote monitoring>
Remote monitoring is only available between FOMA
terminals or between a FOMA terminal and a phone
equipped with a 3G-324M-compatible videophone
function. The FOMA terminal can be used as the
dialing or receiving phone for remote monitoring.
Preparing the receiving phone
Set the phone number of the dialing phone (Other ID)
and the delay until remote monitoring begins (Ringing
time) on the phone performing remote monitoring
(receiving phone).
zUp to 5 other IDs can be stored.
1Videophone settings screen (p.23)
X“Remote monitoring”XEnter
your security codeX“Other ID”
2Highlight an item to be stored or
changedXEnter the phone
number to accept monitoring
3Press t to return to the remote
monitoring screen
4“Ringing time”XEnter ring time
(003 to 120 seconds in 3 digits)
The ringing time is set.
5“Set”X“ON”
“ ” or “ ” appears on the
standby screen.
■To turn remote
monitoring off
X“OFF”
http://videophonesoft.nttdocomo.co.jp/
(Japanese)
N
zYou cannot make a videophone call from the
external device during a voice call.
zWhen you have subscribed to Call Waiting, Voice
Mail or Call Forwarding and you receive a
videophone call from an external device during a
voice call, you can answer the call after ending the
current call. When you receive a voice call,
videophone call or 64K data communication
during a videophone call from the external device,
you can answer the call in the same way.
Other ID
Function menu
¨
p.27
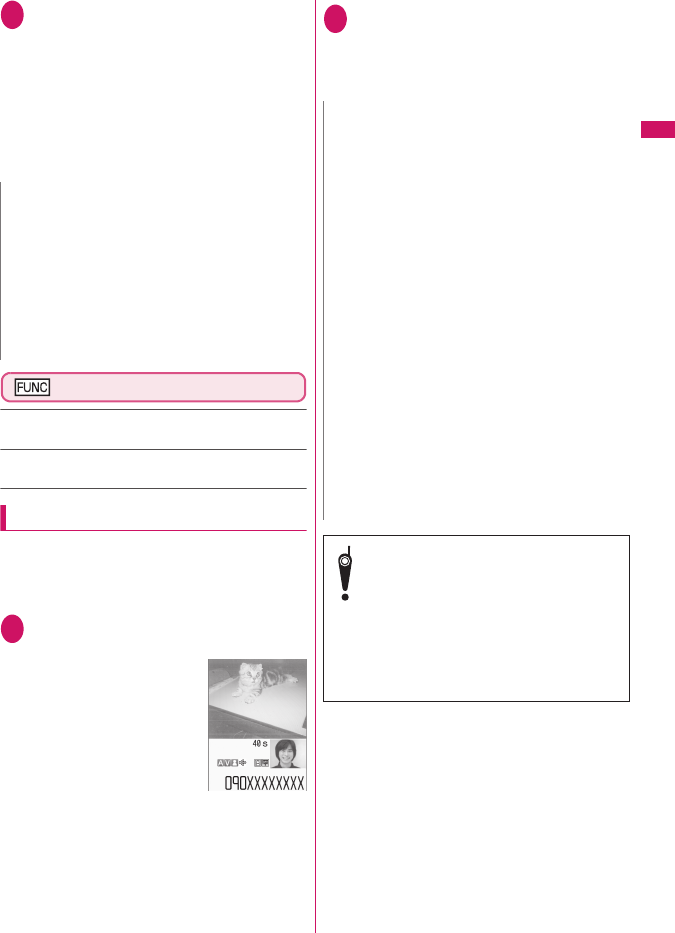
27
Voice/Videophone Calls
6Position the FOMA terminal
During remote monitoring, the image captured
with the front camera is sent to the dialing phone.
Place the receiving FOMA terminal in the
monitoring position, and make sure it is switched
on and open.
If the FOMA terminal is left open, only the voice
is sent and the camera image is not sent. The
substitute image is sent with “カメラオフ
Camera Off” displayed on the image.
Other ID screen (p.26)
Look-up address……Look up an address in Phonebook,
Dialed calls or Received calls, and enter the address.
Delete this, Delete all……If all IDs are deleted, the “Set”
setting is set to “OFF”.
Starting/Ending remote monitoring
zTo perform remote monitoring, make a videophone
call with caller ID (phone number) notified from the
FOMA terminal registered as the other ID on the
receiving phone.
1Make a videophone call to the
receiving phone
After the ringing time set on
the receiving phone has
elapsed, remote monitoring
begins.
The video image from the
receiving phone is displayed
and sound comes from the
speaker on the dialing
phone.
■To answer a videophone
call on the receiving phone without
accepting remote monitoring
XPress r before the ringing time elapses
To answer with a substitute image, press
d (Subst.).
2To end the call, press y
The call duration is displayed and remote
monitoring ends. You can also end remote
monitoring by pressing y on the receiving
phone.
N
zWhen positioning the FOMA terminal, set
“Videophone” under “Vibrator” to “OFF” to prevent
the FOMA terminal from moving when calls are
received.
zIf the ringing time set for “Voice Mail Service” and
“Call Forwarding” on the receiver side is shorter
than the ringing time set for remote monitoring,
“Voice Mail Service” and “Call forwarding” take
priority.
Dialing phone
N
zA call can be received as a remote monitoring call
even when Dial lock or Omakase Lock is set.
zRemote monitoring is not available when the
following functions are set:
• Public mode (Driving mode)
• Manner mode
• Call rejection/acceptation*
• Reject unknown*
*: When “Call acceptation” is set for a phone number
other than the other ID phone number or “Call
rejection” is set for the other ID phone number, or
when “Reject unknown” is set and the other ID
phone number is not stored in the phonebook
zThe specific ring tone is used for remote
monitoring and cannot be changed.
zThe ring tone is played at the volume set in
“Videophone” under “Ring volume” (if set to
“Silent”, “Level 1” or “Step”, the volume will be
“Level 2”).
zYou cannot put a call on hold when a remote
monitoring call arrives. Press y to end the call.
zYou cannot switch cameras from the receiver
during remote monitoring.
Please be considerate of the privacy of
individuals around you when taking and
sending photos using camera-equipped
mobile phones. Actions that infringe on the
rights of others, or involve the taking and
sending of pictures that are malicious or
against public standards of morality, etc.
may be punishable by law or subject to
claims for damages.