NEC of America 8WV WLAN Phone User Manual 1
NEC Corporation of America WLAN Phone Users Manual 1
Contents
- 1. Users Manual 1
- 2. Users Manual 2
Users Manual 1

NEC Infrontia Confidential
MH240 Wireless IP Telephone
SETUP GUIDE
Preliminary Issue, January 2008
NEC Infrontia Confidential
NEC Infrontia Confidential
LIABILITY DISCLAIMER
NEC Infrontia Corporation reserves the right to change the specifications,
functions, or features, at any time, without notice.
NEC Infrontia Corporation has prepared this document for use by its
employees and customers. The information contained herein is the property
of NEC Infrontia Corporation and shall not be reproduced without prior
written approval from NEC Infrontia Corporation. All brand names and
product names on this document are trademarks or registered trademarks of
their respective companies.
Copyright 2008
NEC Infrontia Corporation
NEC Infrontia Confidential

NEC Infrontia Confidential
i
TABLE OF CONTENTS
1 SETUP OF THE PHONE
• MH240 SETUP PROCEDURE.................................................................1
• SETUP FROM MH240 ..............................................................................2
• POWER ON MH240 ..................................................................................3
• INITIALIZE MH240.................................................................................... 4
• PLACE THE PHONE IN CONFIG MODE ..............................................5
• WIRELESS SETTINGS.............................................................................6
Set the Profile Name:.............................................................................................................6
Set the ESSID (Manual):........................................................................................................7
Set the ESSID (AP Scan):......................................................................................................8
Set the Security (OPEN):.......................................................................................................9
Set the Security (WEP):.......................................................................................................10
Set the Security (WPA-PSK):..............................................................................................11
Set the Security (WPA2-PSK): ...........................................................................................12
Set the Security (WPA):.......................................................................................................13
Set the Security (WPA2):.....................................................................................................15
Set the DHCP (IP):................................................................................................................17
Set the IP Address: ..............................................................................................................17
Set the Net Mask: .................................................................................................................18
Set the Gateway:...................................................................................................................19
Set the DNS Primary:...........................................................................................................20
Set the DNS Secondary:......................................................................................................21
Set the Handover List:.........................................................................................................22
• SIP SETTINGS......................................................................................... 23
Set the DHCP (SIP):..............................................................................................................23
Set the SIP Proxy: ................................................................................................................23
Set the SIP Port: ...................................................................................................................24
Set the Register:...................................................................................................................24
Set the Register Port: ..........................................................................................................24
Set the User ID:.....................................................................................................................25
Set the User Password:.......................................................................................................25
Set the Phone No.: ...............................................................................................................26
• CONFIG PASSWORD SETTINGS........................................................ 27
Set the New Config Password: ..........................................................................................27
Change the Config Password:...........................................................................................27
2.MENU LIST
• CONFIG MENU LIST .............................................................................. 29
3.TROUBLE SHOOTING
• MESSAGE MEANINGS AND SUGGESTIONS................................... 33
• TROUBLES AND SUGGESTIONS....................................................... 34
4.SPECIFICATIONS
• TECHNICAL SPECIFICATIONS ........................................................... 35

NEC Infrontia Confidential
ii
This page is for your notes.

NEC Infrontia Confidential
1
1 SETUP OF THE PHONE
• MH240 SETUP PROCEDURE
MH240 can be setup by one of the following procedures.
1. From MH240 main unit Note
2. Using IP Phone Manager for MH240 via USB cable
3. Using IP Phone Manager for MH240 via WLAN connection
Note: To set certificate for WLAN authentication, be sure to use IP Phone Manager for MH240. The
data can not be set from MH240.
NEC Infrontia Confidential
2
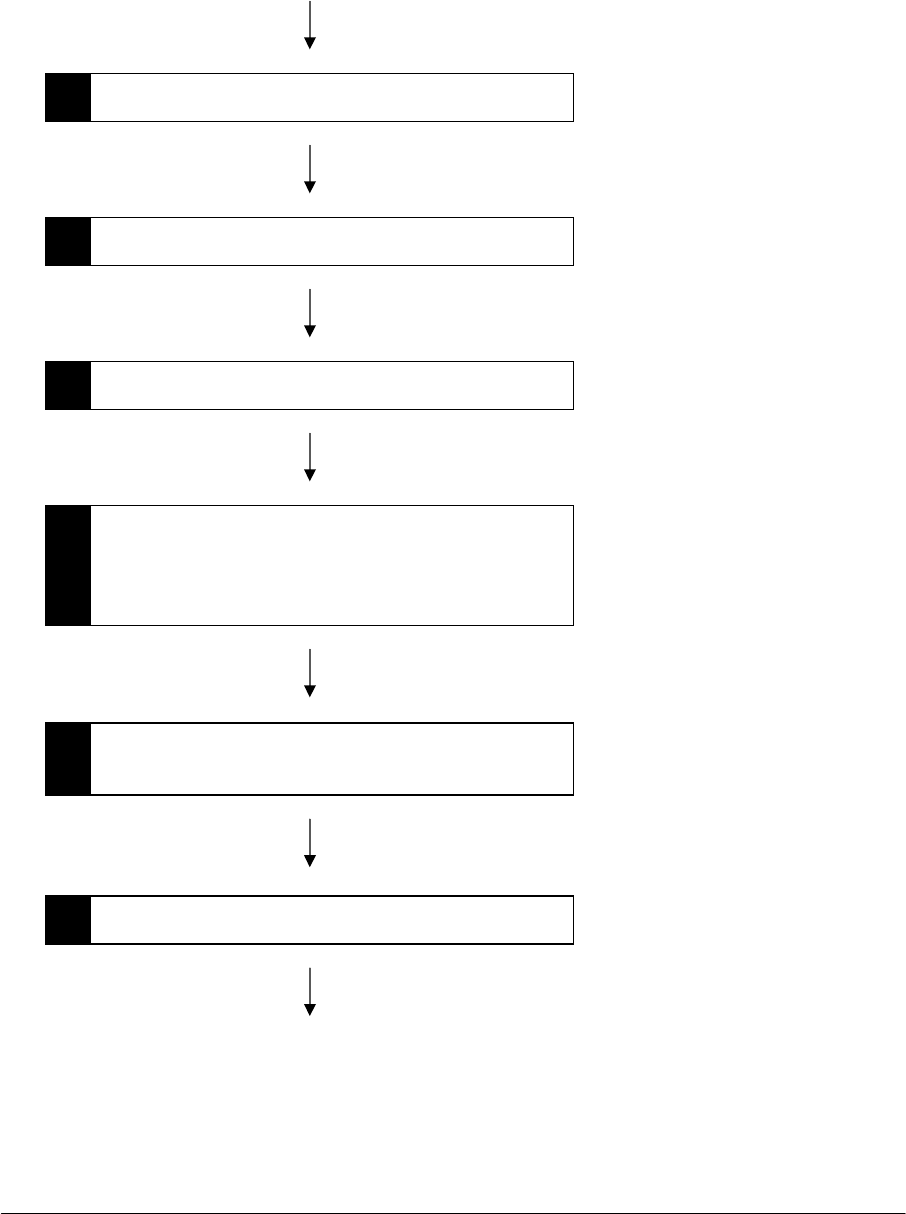
• SETUP FROM MH240
Follow the procedure below to setup MH240 from the phone. Be sure to change the battery before
this setup procedure.
START
1
Power on MH240.
2
Initialize MH240 data as required.
3
Place MH240 in configuration mode.
4
Setup the config data.
WLAN authentication related certificate copy
is not available. Use IP Phone Manager for
MH240.
5
Make sure that the assigned data has been
reflected on the MH240.
END
6
Post Installation Test
NEC Infrontia Confidential
3
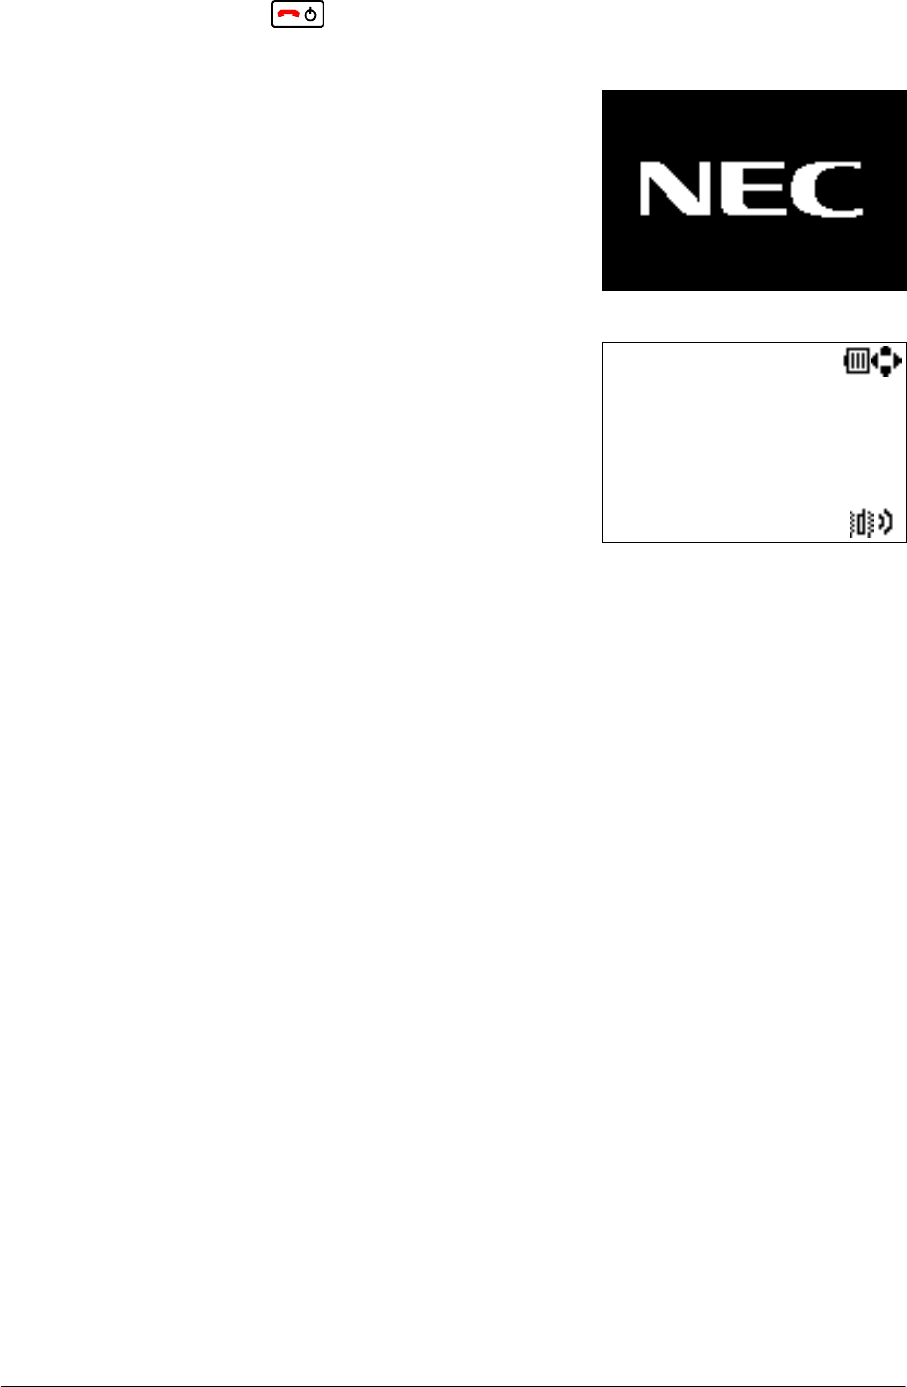
• POWER ON MH240
STEP1: Press and hold key for 2 seconds or more. The start screen appears as follow.
Note: About 30 seconds will be required for displaying the start screen.
STEP2: The screen is placed in Standby mode.
1/ 1 Tue 12:00AM
240
NEC Infrontia Confidential
4
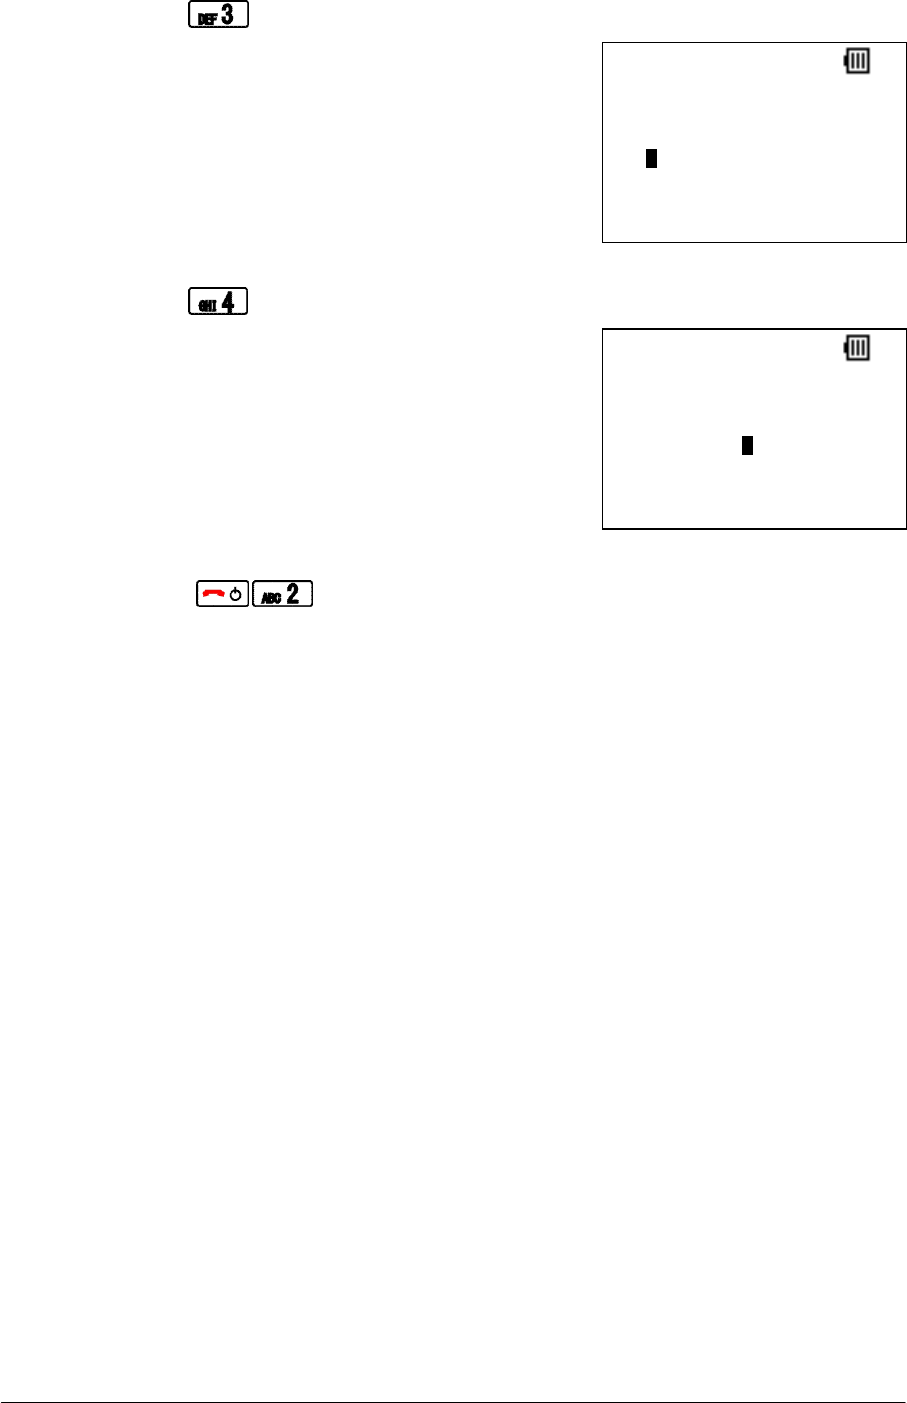
• INITIALIZE MH240
Initialize MH240 as required. By doing this procedure, the following data will be initialized.
Config (configuration data)
Directory
Call History
Speed Dial / Preset Dial
Date & Time
Password
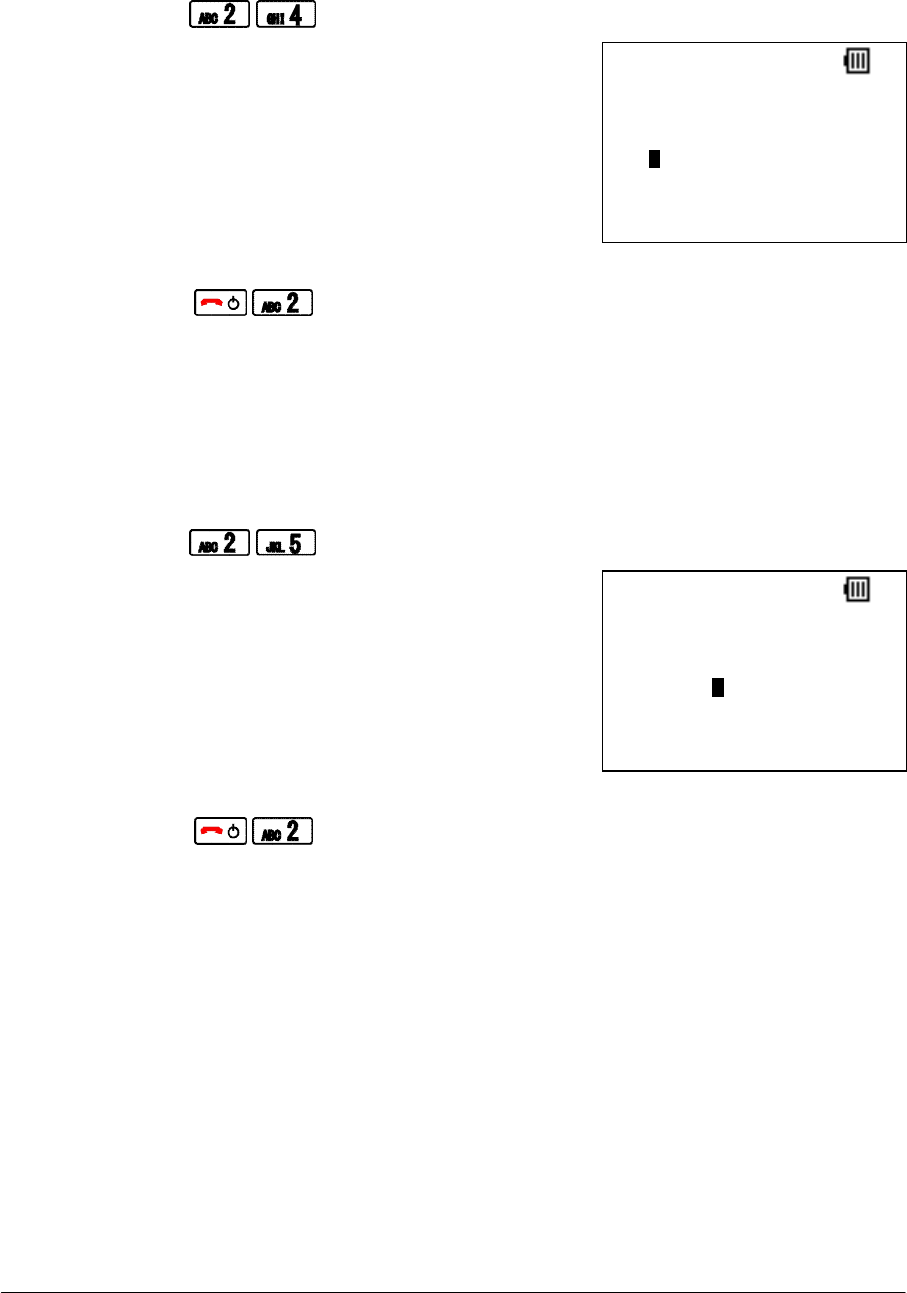
STEP1: Press key in Standby mode to display the main menu.
STEP2: Press to go to “1.Config” menu.
STEP3: Press and hold for 1 second or more about each key.
STEP4: Press to initialize the phone.
Note: The phone will automatically reboot.
1/ 1 Tue 12:00AM
240
Password
12 OK Clear
Password:
****
Debug Menu
1.Version
2.Syslog
3.Telnet
4.g-serial
5.Debug Monitor Mode
NEC Infrontia Confidential
5
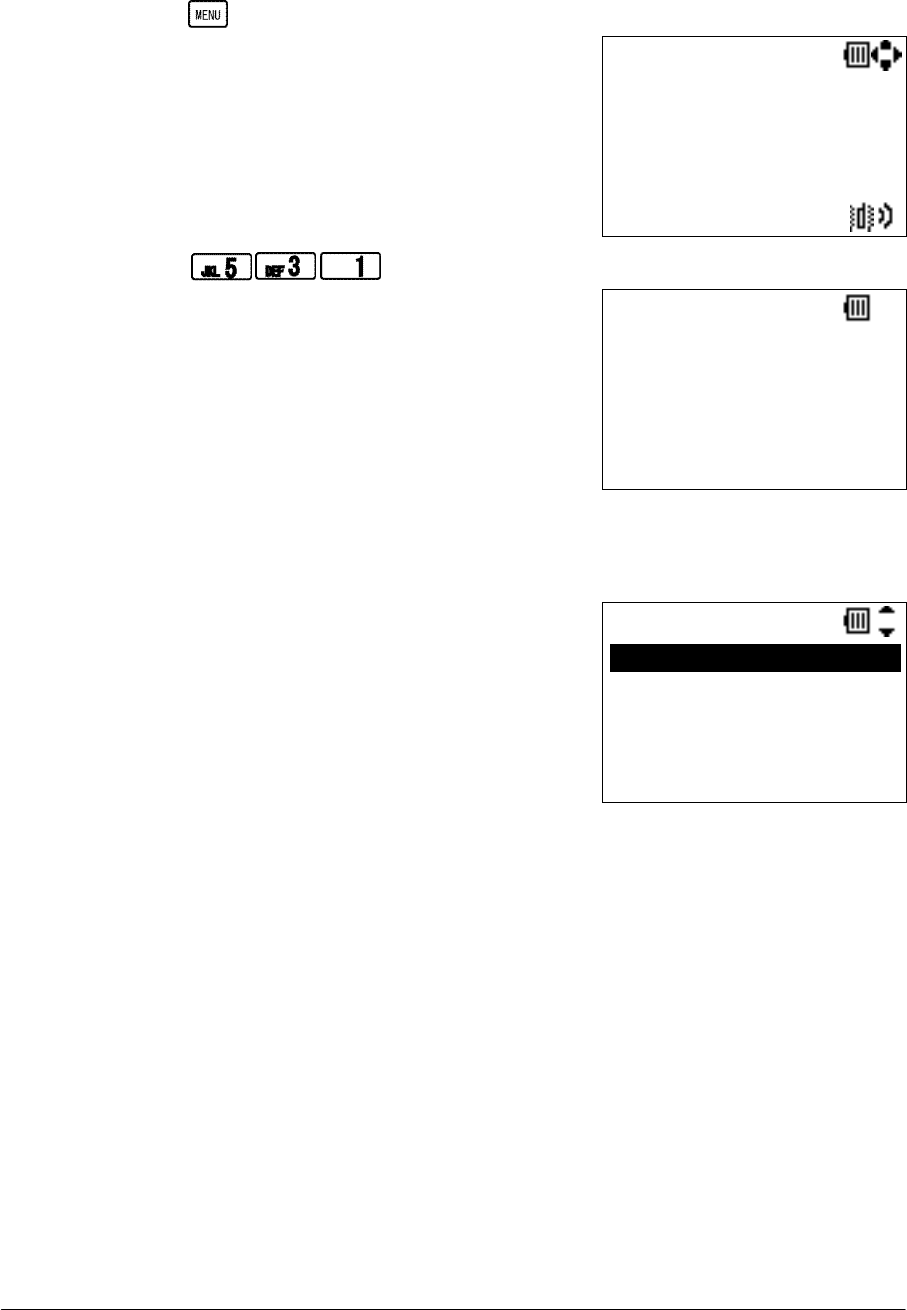
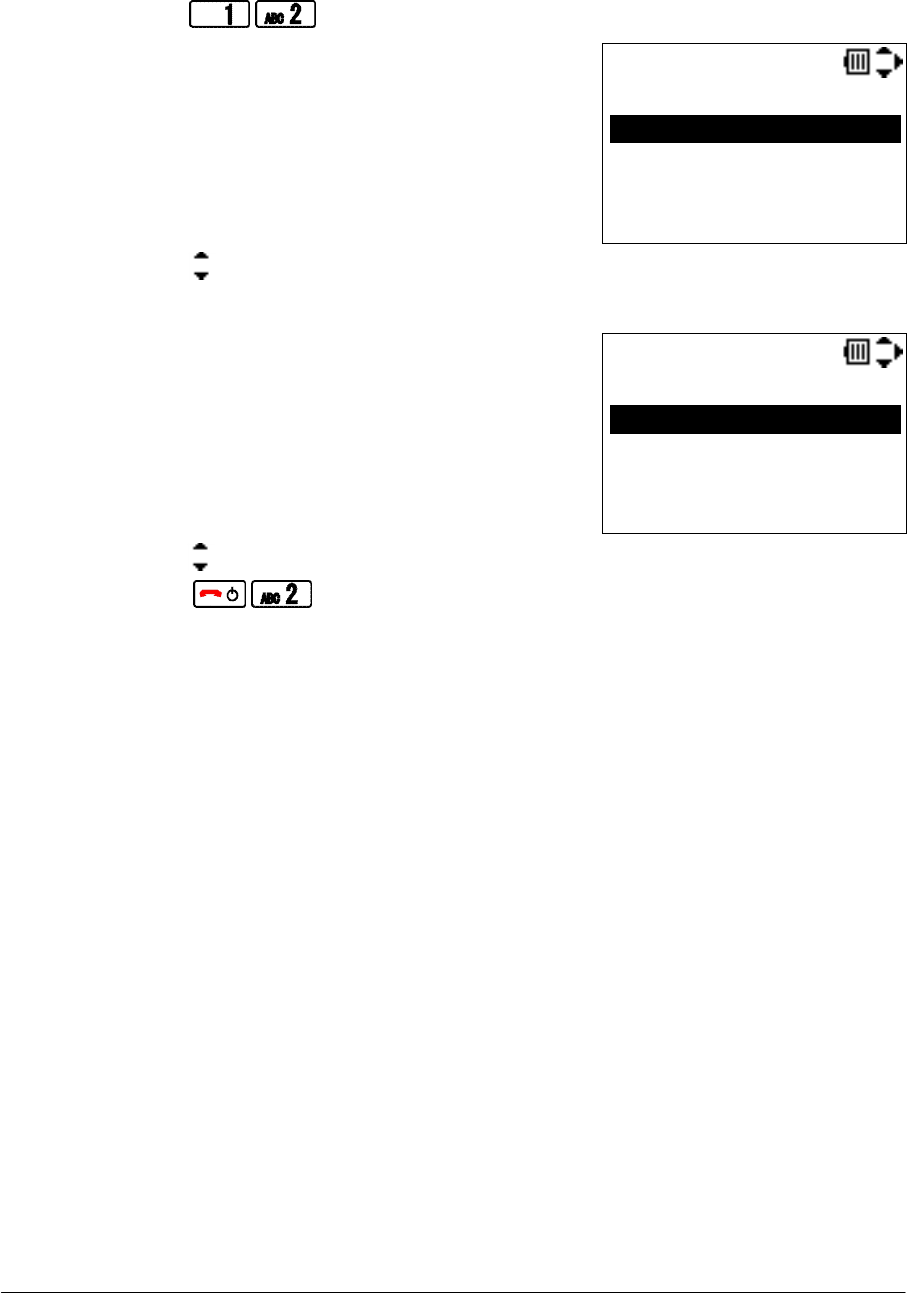
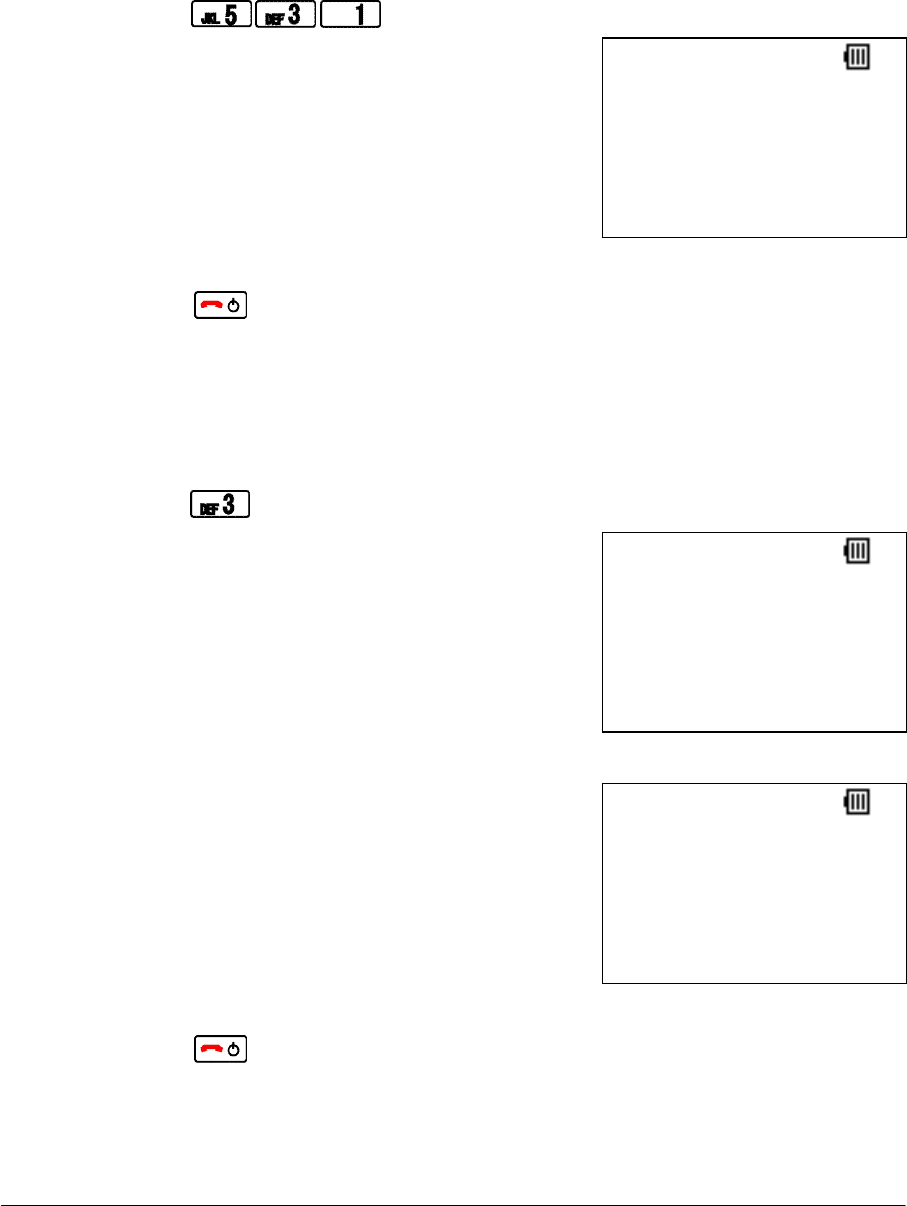
• PLACE THE PHONE IN CONFIG MODE
To set administrator-related data such as Network, WLAN and SIP data, place the phone in Config
mode. Config Password entry is required to do this.
STEP1: Press key in Standby mode to display the main menu.
STEP2: Press to go to “1.Config” menu.
STEP3: Enter Config Password (4 digits) to view “1.Config” menu.
Note: When the phone has been initialized, please enter new Config Password.
1/ 1 Tue 12:00AM
240
Password
12 OK Clear
Password:
****
Config
1.Wireless
2.SIP Setteings
3.Config Password
NEC Infrontia Confidential
6
• WIRELESS SETTINGS
This section explains the wireless data for the phone. The following items are covered here.
Set the Profile Name
Set the ESSID (Manual)
Set the ESSID (AP Scan)
Set the Security (OPEN)
Set the Security (WEP)
Set the Security (WPA-PSK)
Set the Security (WPA2-PSK)
Set the Security (WPA)
Set the Security (WPA2)
Set the DHCP (IP)
Set the IP Address (Required when Selecting Fixed IP)
Set the Net Mask (Required when Selecting Fixed IP)
Set the Gateway (Required when Selecting Fixed IP)
Set the DNS Primary (Required when Selecting Fixed IP)
Set the DNS Secondary (Required when Selecting Fixed IP)
Set the Handover List
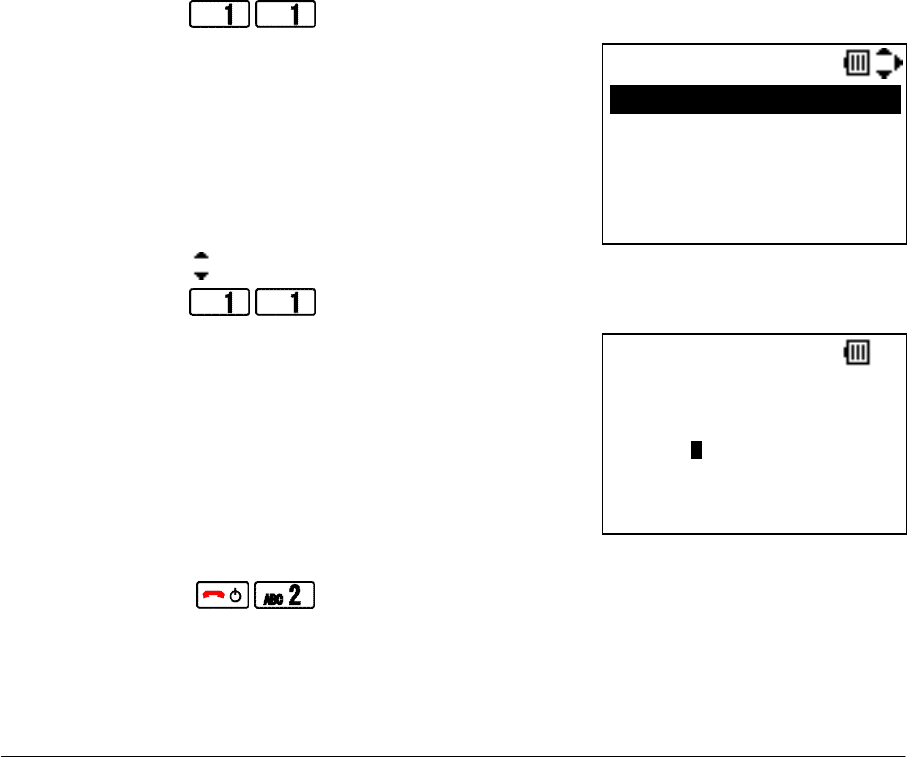
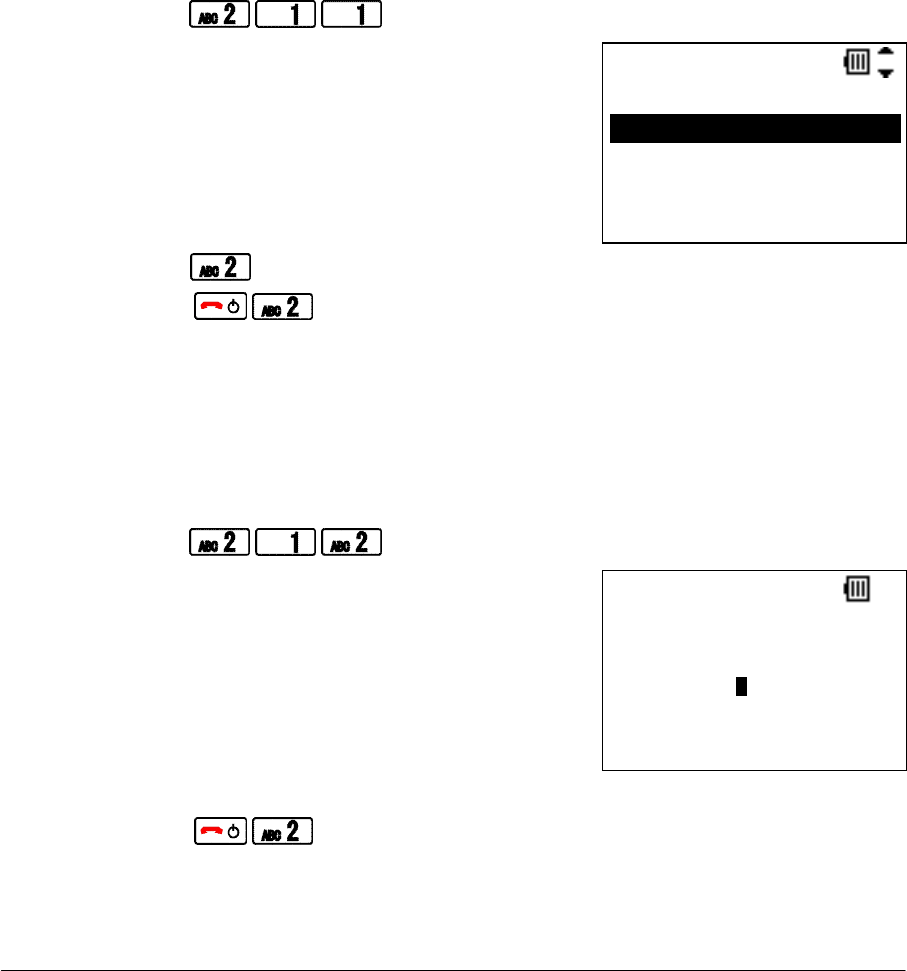
Set the Profile Name:
Factory Default: 1.DEFAULT (2 to 9 are blank)
STEP1: Go to “Config” menu. (See “PLACE THE PHONE IN CONFIG MODE”)
STEP2: Press to view Profile Select menu.
STEP3: Press key to select a profile you want to edit and then press “OK” soft key.
STEP4: Press to go to Profile Name edit screen.
STEP5: Edit Profile Name you want and then press “OK” soft key.
STEP6: Press to save.
Prof. Select
Delete OK Back
1.DEFAULT
2.<Profile2>
3.<Profile3>
4.<Profile4>
Prof. Name
Office1
12 OK Clear
NEC Infrontia Confidential
7
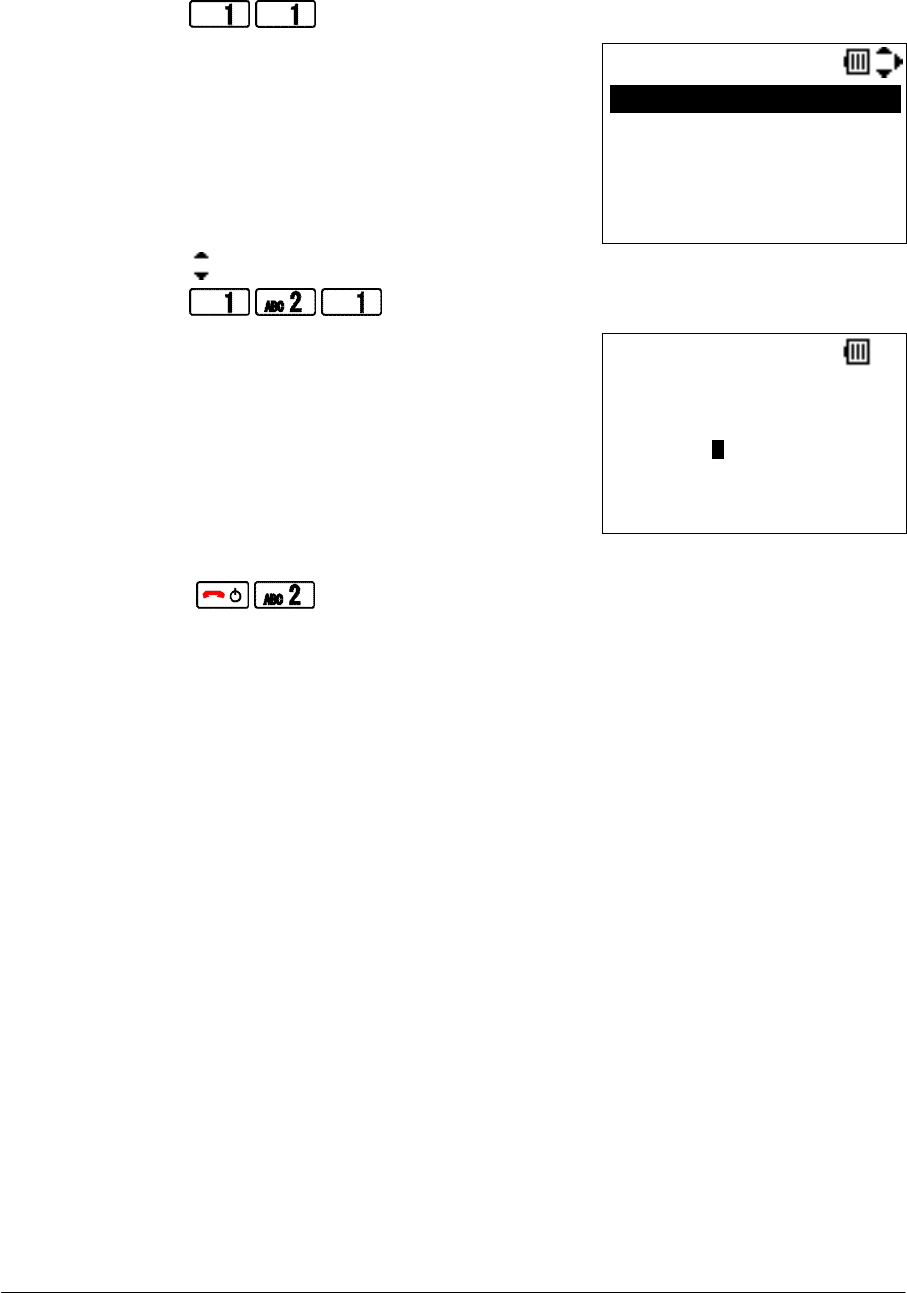
Set the ESSID (Manual):
Factory Default: default (1.DEFAULT)
STEP1: Go to “Config” menu. (See “PLACE THE PHONE IN CONFIG MODE”)
STEP2: Press to view Profile Select menu.
STEP3: Press key to select a profile you want to edit and then press “OK” soft key.
STEP4: Press to go to ESSID edit screen.
STEP5: Edit ESSID you want to connect and then press “OK” soft key.
STEP6: Press to save.
Prof. Select
Delete OK Back
1.DEFAULT
2.<Profile2>
3.<Profile3>
4.<Profile4>
ESSID
wireless1
ab OK Clear
NEC Infrontia Confidential
8
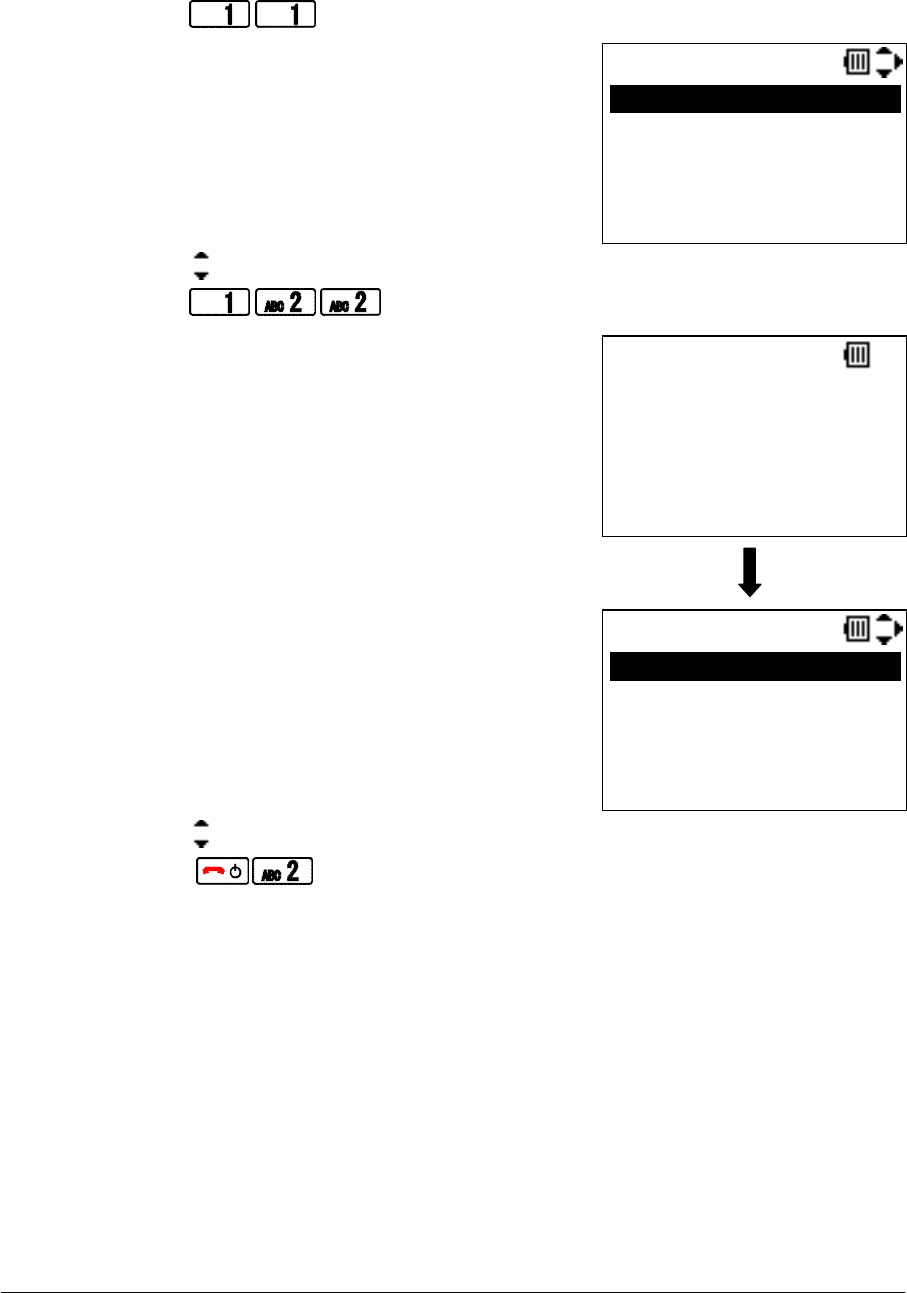
Set the ESSID (AP Scan):
Factory Default: default (1.DEFAULT)
STEP1: Go to “Config” menu. (See “PLACE THE PHONE IN CONFIG MODE”)
STEP2: Press to view Profile Select menu.
STEP3: Press key to select a profile you want to edit and then press “OK” soft key.
STEP4: Press to scan AP and then view Scanned ESSID list.
STEP5: Press key to select ESSID you want to connect and then press “OK” soft key.
STEP6: Press to save.
Prof. Select
Delete OK Back
1.DEFAULT
2.<Profile2>
3.<Profile3>
4.<Profile4>
AP Scan
OK Back
wireless1
wireless2
default
hogehoge
AP Scan
AP Scanning
NEC Infrontia Confidential
9
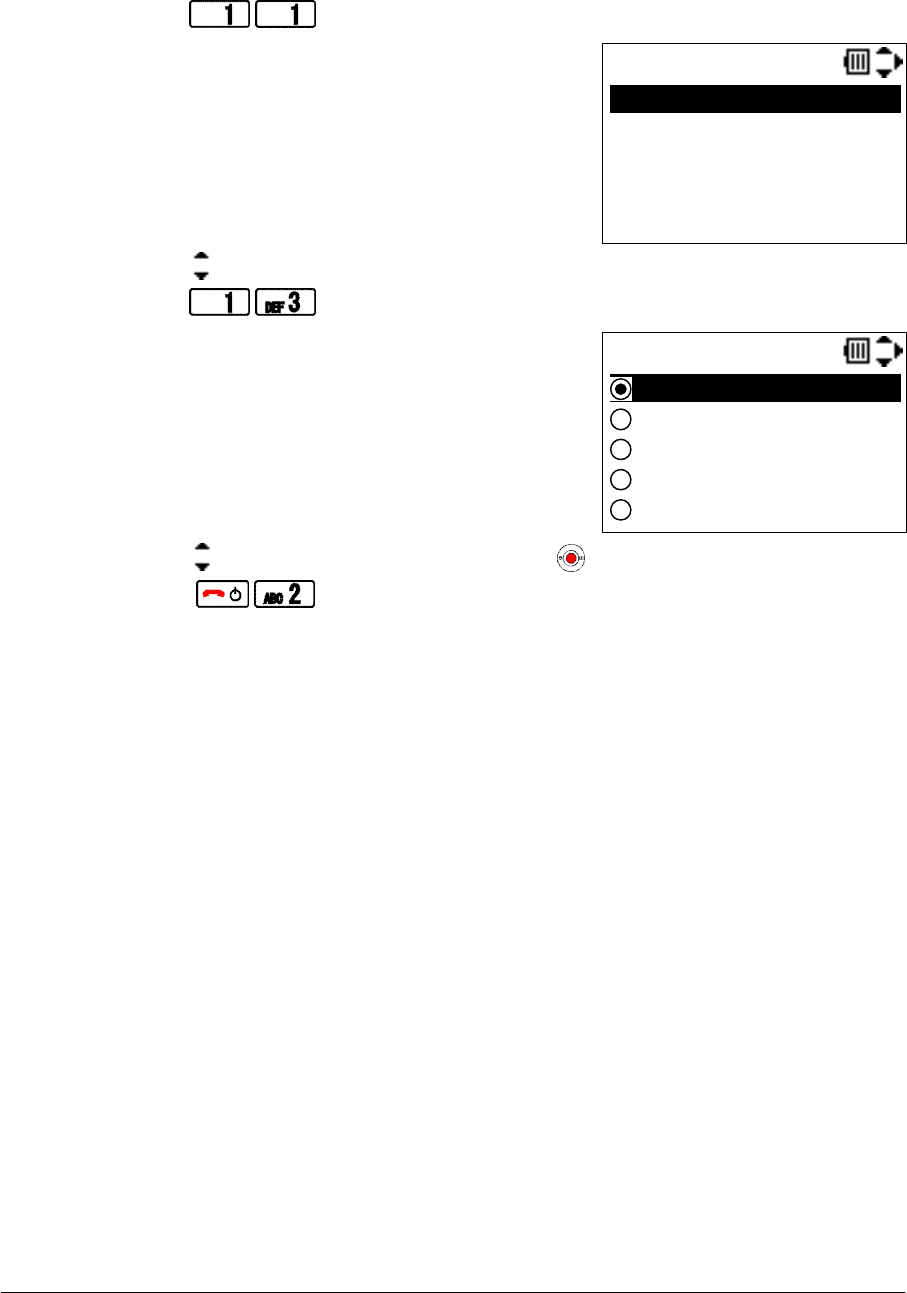
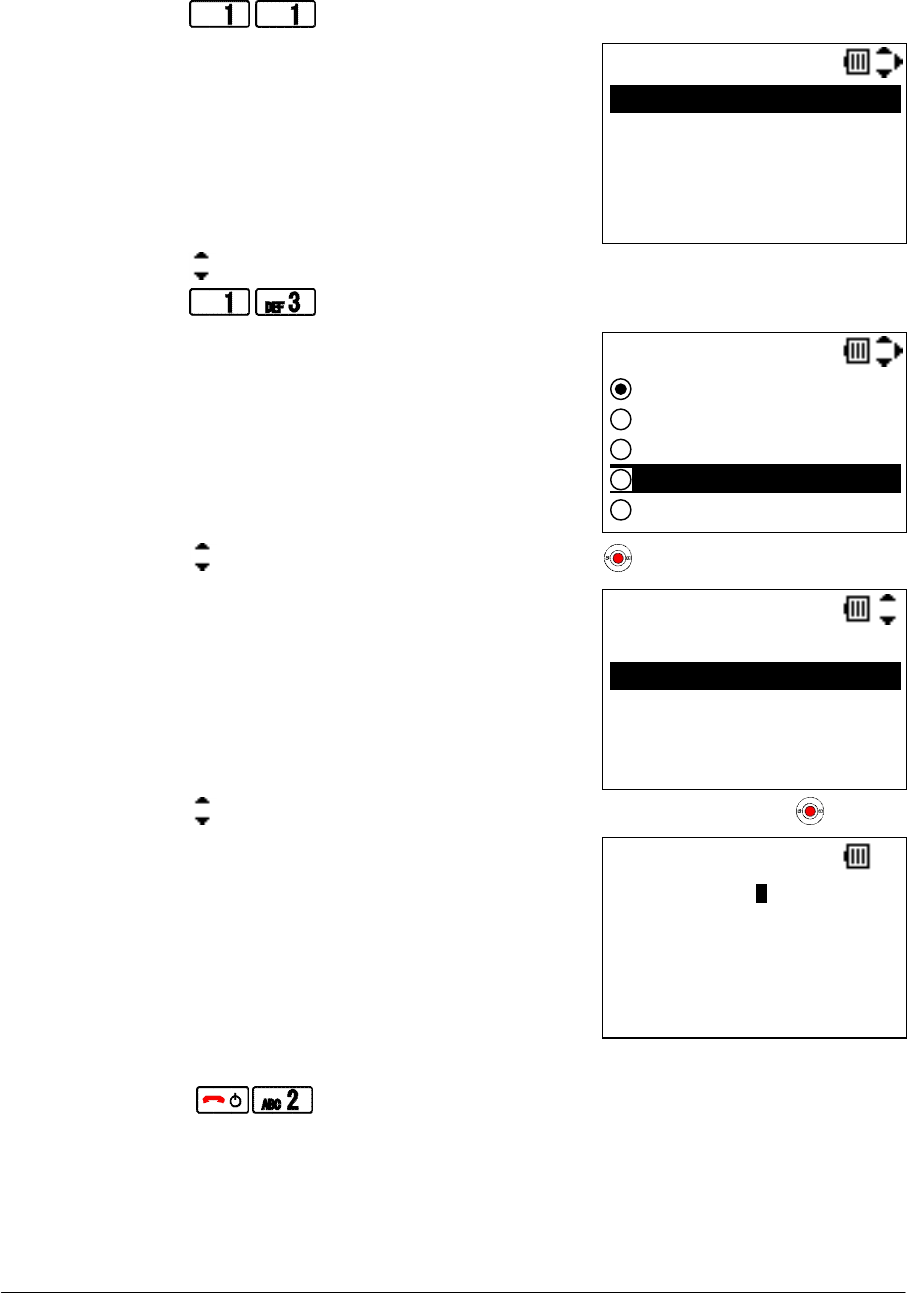
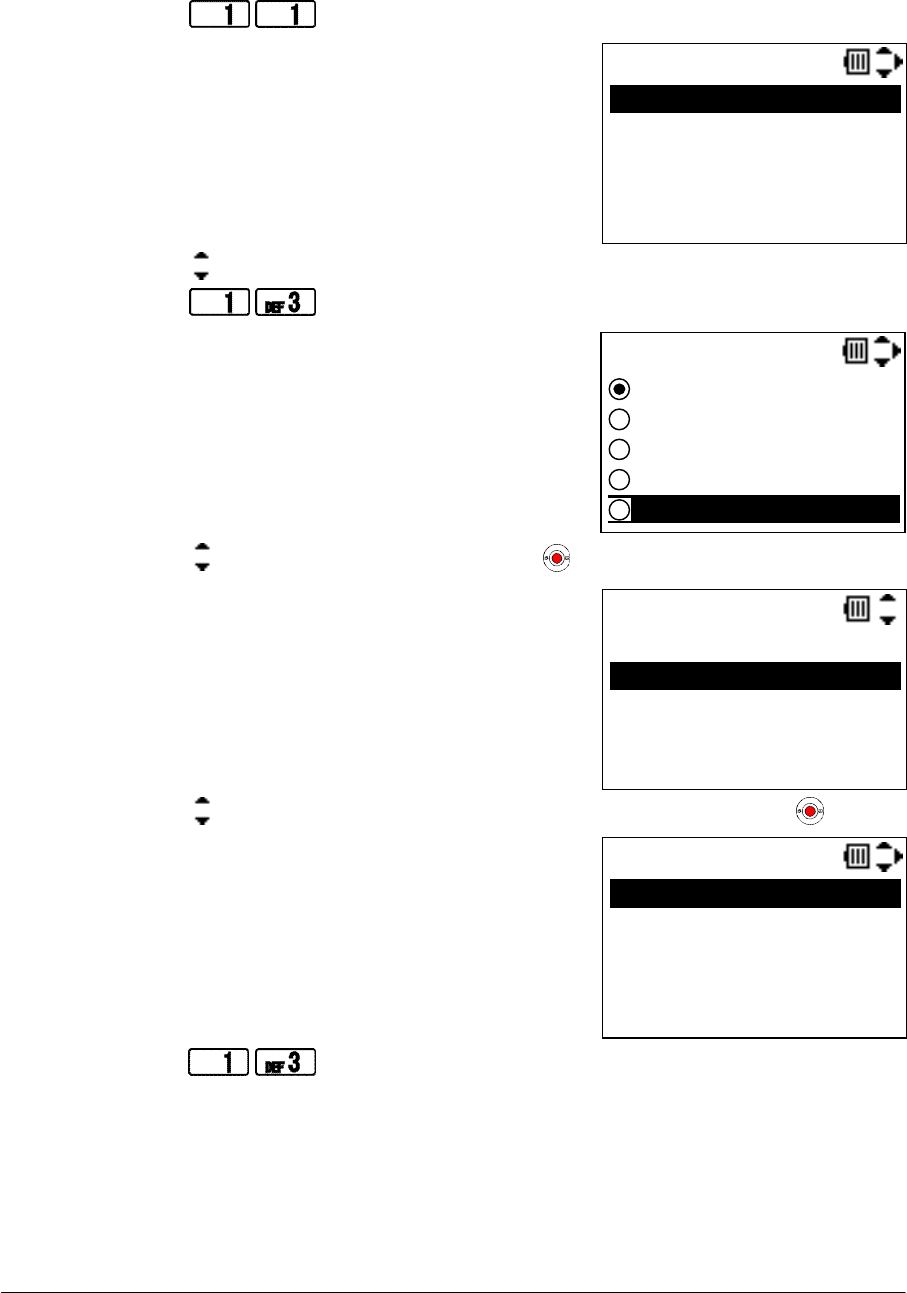
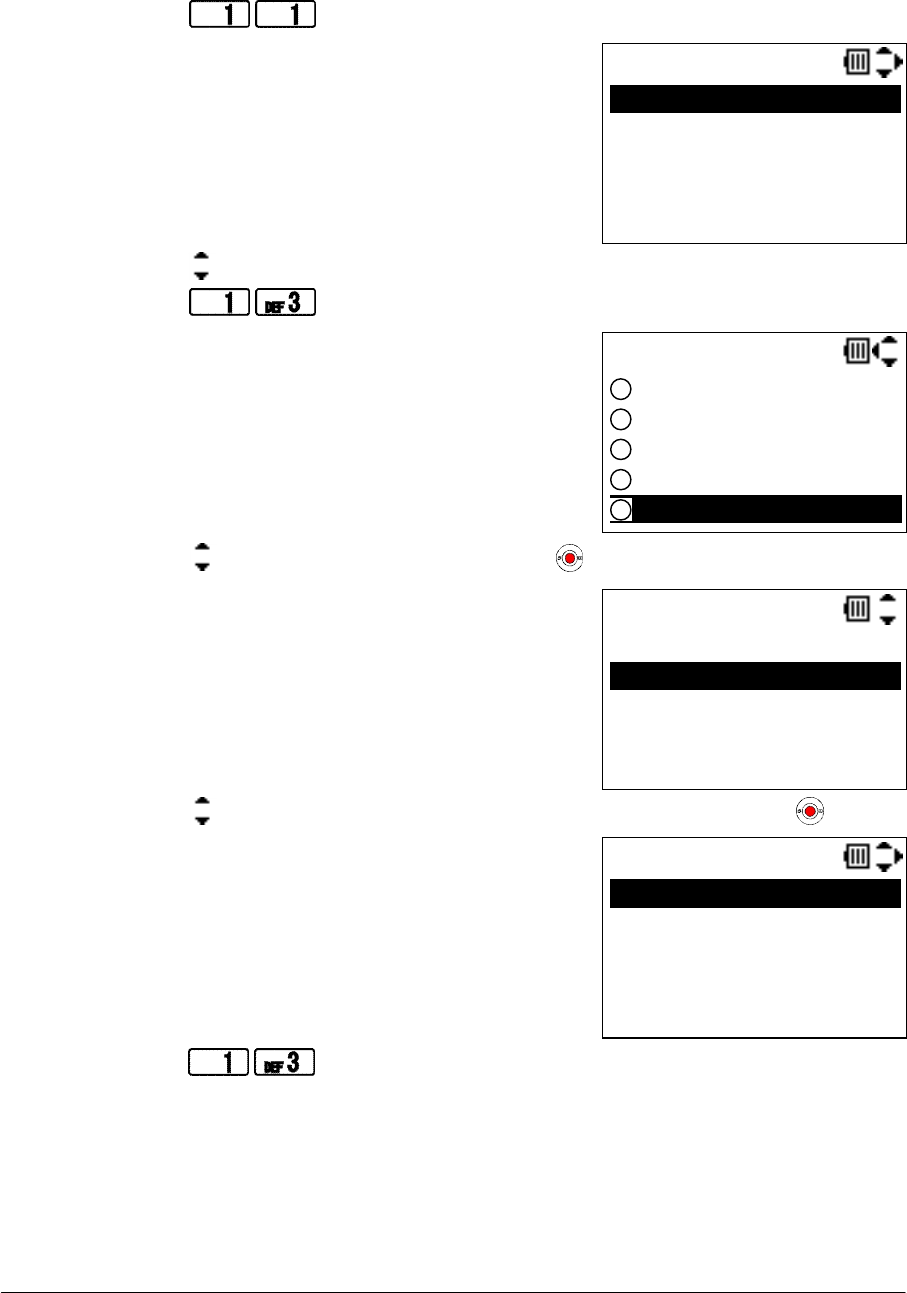
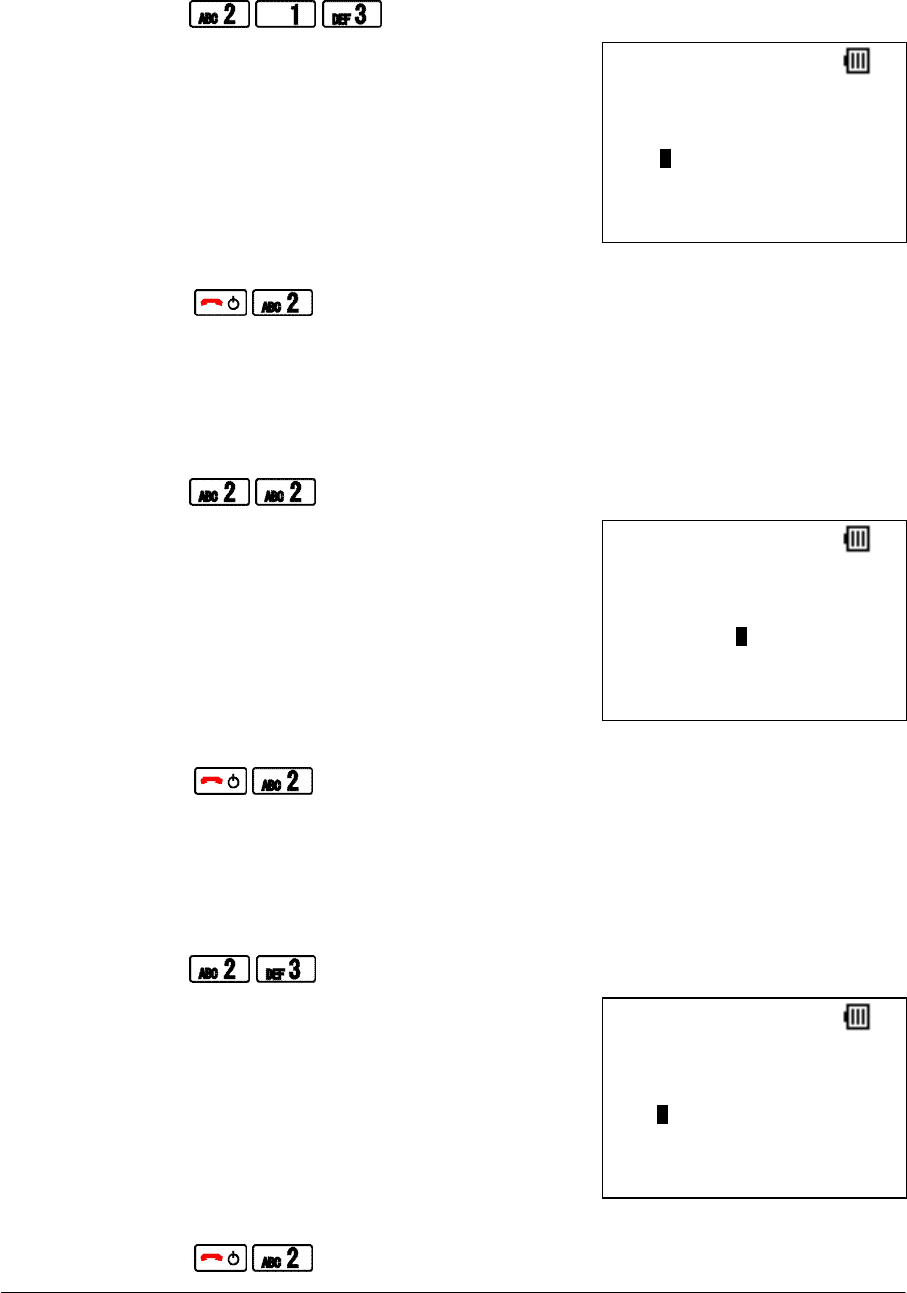
Set the Security (OPEN):
Factory Default: OPEN
STEP1: Go to “Config” menu. (See “PLACE THE PHONE IN CONFIG MODE”)
STEP2: Press to view Profile Select menu.
STEP3: Press key to select a profile you want to set security and then press “OK” soft key.
STEP4: Press to go to Security setting screen.
STEP5: Press key to select “OPEN” and then press key.
STEP6: Press to save.
Prof. Select
Delete OK Back
1.DEFAULT
2.<Profile2>
3.<Profile3>
4.<Profile4>
Security
WPA
OPEN
WEP
WPA-PSK
WPA2-PSK
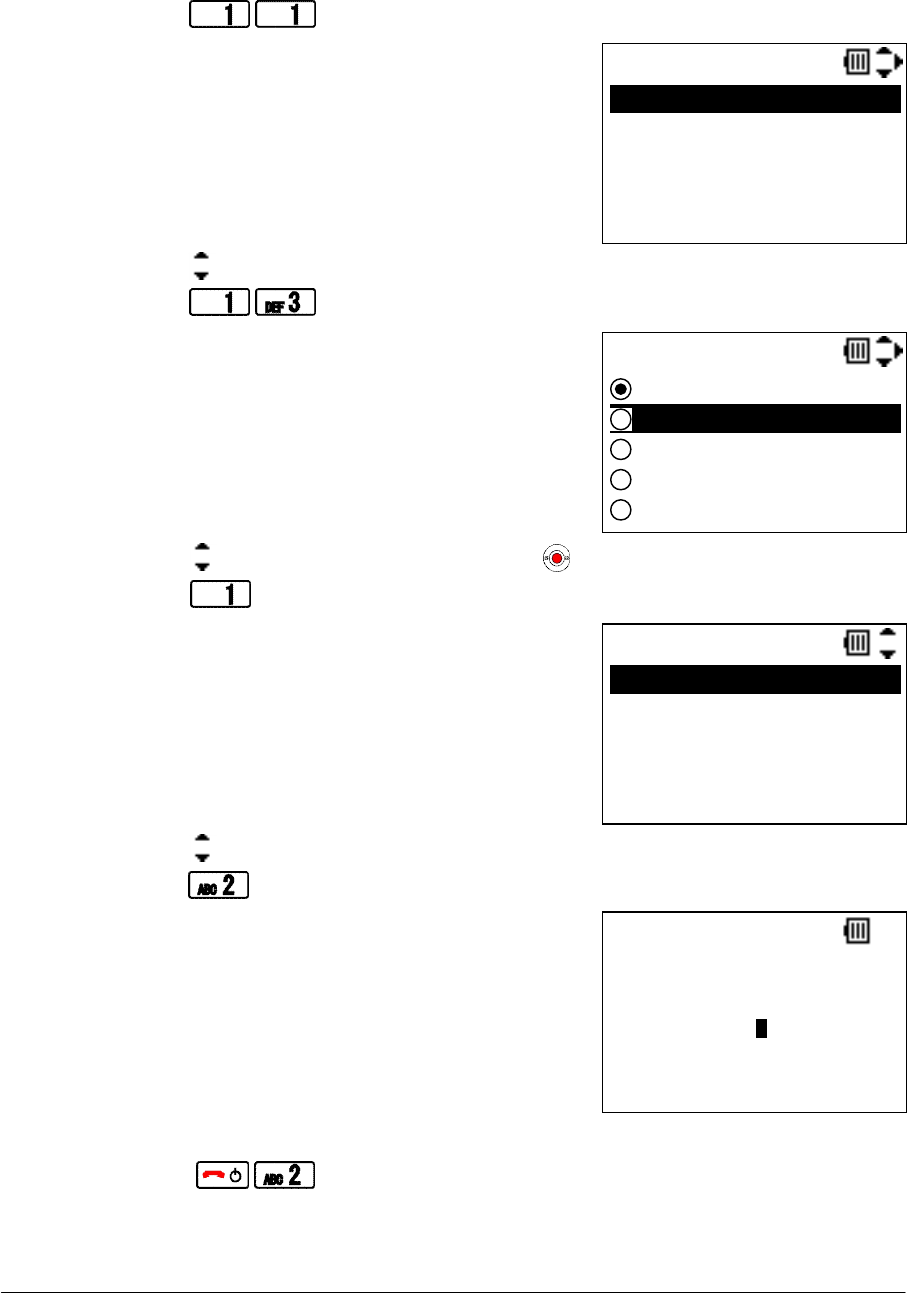
NEC Infrontia Confidential
10
Set the Security (WEP):
Factory Default: OPEN
STEP1: Go to “Config” menu. (See “PLACE THE PHONE IN CONFIG MODE”)
STEP2: Press to view Profile Select menu.
STEP3: Press key to select a profile you want to set security and then press “OK” soft key.
STEP4: Press to go to Security setting screen.
STEP5: Press key to select “WEP” and then press key.
STEP6: Press to go to Key Index setting screen.
STEP7: Press key to select a Key Index and then press “OK” soft key.
STEP8: Press to go to WEP Key edit screen.
STEP9: Edit WEP Key (HEX or ASCII) and then press “OK” soft key.
STEP10: Press to save.
Prof. Select
Delete OK Back
1.DEFAULT
2.<Profile2>
3.<Profile3>
4.<Profile4>
Security
WPA
OPEN
WEP
WPA-PSK
WPA2-PSK
Key Index
OK Back
1.Index 1
2.Index 2
3.Index 3
4.Index 4
Key
abcdefghij123
12 OK Clear

NEC Infrontia Confidential
11
Set the Security (WPA-PSK):
Factory Default: OPEN
STEP1: Go to “Config” menu. (See “PLACE THE PHONE IN CONFIG MODE”)
STEP2: Press to view Profile Select menu.
STEP3: Press key to select a profile you want to set security and then press “OK” soft key.
STEP4: Press to go to Security setting screen.
STEP5: Press key to select “WPA-PSK” and then press key.
STEP6: Press key to select an encryption “1.TKIP” or “2.AES” and then press key.
STEP7: Edit TKIP or AES Key (ASCII) and then press “OK” soft key.
STEP8: Press to save.
Prof. Select
Delete OK Back
1.DEFAULT
2.<Profile2>
3.<Profile3>
4.<Profile4>
Security
WPA
OPEN
WEP
WPA-PSK
WPA2-PSK
WPA-PSK
1.TKIP
2.AES
AES
abcdefghij123
12 OK Clear
NEC Infrontia Confidential
12
Set the Security (WPA2-PSK):
Factory Default: OPEN
STEP1: Go to “Config” menu. (See “PLACE THE PHONE IN CONFIG MODE”)
STEP2: Press to view Profile Select menu.
STEP3: Press key to select a profile you want to set security and then press “OK” soft key.
STEP4: Press to go to Security setting screen.
STEP5: Press key to select “WPA2-PSK” and then press key.
STEP6: Press key to select an encryption “1.TKIP” or “2.AES” and then press key.
STEP7: Edit TKIP or AES Key (ASCII) and then press “OK” soft key.
STEP8: Press to save.
Prof. Select
Delete OK Back
1.DEFAULT
2.<Profile2>
3.<Profile3>
4.<Profile4>
Security
WPA
OPEN
WEP
WPA-PSK
WPA2-PSK
WPA2-PSK
1.TKIP
2.AES
AES
abcdefghij123
12 OK Clear
NEC Infrontia Confidential
13
Set the Security (WPA):
Factory Default: OPEN
STEP1: Go to “Config” menu. (See “PLACE THE PHONE IN CONFIG MODE”)
STEP2: Press to view Profile Select menu.
STEP3: Press key to select a profile you want to set security and then press “OK” soft key.
STEP4: Press to go to Security setting screen.
STEP5: Press key to select “WPA” and then press key.
STEP6: Press key to select an encryption “1.TKIP” or “2.AES” and then press key.
STEP7: Press to set EAP type to PEAP.
Prof. Select
Delete OK Back
1.DEFAULT
2.<Profile2>
3.<Profile3>
4.<Profile4>
Security
WPA
OPEN
WEP
WPA-PSK
WPA2-PSK
WPA
1.TKIP
2.AES
AES
5.CA Cert.
1.EAP
2.Identity
3.User Name
4.Password

NEC Infrontia Confidential
14
STEP8: Press to go to User Name edit screen.
STEP9: Edit User Name and then press “OK” soft key.
STEP10: Press to go Password edit screen.
STEP11: Edit Password and then press “OK” soft key.
STEP12: Press to save.
NOTE: If you want to set TLS as EAP type, please use IP Phone Manager for MH240.
User Name
Ken
ab OK Clear
Password
aaabbbccc111
12 OK Clear
NEC Infrontia Confidential
15
Set the Security (WPA2):
Factory Default: OPEN
STEP1: Go to “Config” menu. (See “PLACE THE PHONE IN CONFIG MODE”)
STEP2: Press to view Profile Select menu.
STEP3: Press key to select a profile you want to set security and then press “OK” soft key.
STEP4: Press to go to Security setting screen.
STEP5: Press key to select “WPA2” and then press key.
STEP6: Press key to select an encryption “1.TKIP” or “2.AES” and then press key.
STEP7: Press to set EAP type to PEAP.
Prof. Select
Delete OK Back
1.DEFAULT
2.<Profile2>
3.<Profile3>
4.<Profile4>
WPA2
1.TKIP
2.AES
AES
5.CA Cert.
1.EAP
2.Identity
3.User Name
4.Password
Security
WPA2
WEP
WPA-PSK
WPA2-PSK
WPA
NEC Infrontia Confidential
16
STEP8: Press to go to User Name edit screen.
STEP9: Edit User Name and then press “OK” soft key.
STEP10: Press to go Password edit screen.
STEP11: Edit Password and then press “OK” soft key.
STEP12: Press to save.
NOTE: If you want to set TLS as EAP type, please use IP Phone Manager for MH240.
User Name
Ken
ab OK Clear
Password
aaabbbccc111
12 OK Clear

NEC Infrontia Confidential
17
Set the DHCP (IP):
Factory Default: Fixed IP
STEP1: Go to “Config” menu. (See “PLACE THE PHONE IN CONFIG MODE”)
STEP2: Press to view Profile Select menu.
STEP3: Press key to select a profile you want to edit and then press “OK” soft key.
STEP4: Press to enable DHCP.
STEP5: Press to save.
STEP6: Press to return to Standby mode.
Set the IP Address:
Factory Default: 172.16.1.240 (1.DEFAULT)
STEP1: Go to “Config” menu. (See “PLACE THE PHONE IN CONFIG MODE”)
STEP2: Press to view Profile Select menu.
STEP3: Press key to select a profile you want to edit and then press “OK” soft key.
STEP4: Press to go to IP Address edit screen.
STEP5: Edit IP Address you want and then press “OK” soft key.
STEP6: Press to save.
Prof. Select
Delete OK Back
1.DEFAULT
2.<Profile2>
3.<Profile3>
4.<Profile4>
Prof. Select
Delete OK Back
1.DEFAULT
2.<Profile2>
3.<Profile3>
4.<Profile4>
IP Address
172 . 16 . 1 . 200
12 OK Clear

NEC Infrontia Confidential
18
Set the Net Mask:
Factory Default: 255.255.0.0 (1.DEFAULT)
STEP1: Go to “Config” menu. (See “PLACE THE PHONE IN CONFIG MODE”)
STEP2: Press to view Profile Select menu.
STEP3: Press key to select a profile you want to edit and then press “OK” soft key.
STEP4: Press to go to Net Mask edit screen.
STEP5: Edit Net Mask you want and then press “OK” soft key.
STEP6: Press to save.
Prof. Select
Delete OK Back
1.DEFAULT
2.<Profile2>
3.<Profile3>
4.<Profile4>
255 . 255 . 0 . 0
Net Mask
12 OK Clear

NEC Infrontia Confidential
19
Set the Gateway:
Factory Default: -
STEP1: Go to “Config” menu. (See “PLACE THE PHONE IN CONFIG MODE”)
STEP2: Press to view Profile Select menu.
STEP3: Press key to select a profile you want to edit and then press “OK” soft key.
STEP4: Press to go to Gateway edit screen.
STEP5: Edit Gateway you want and then press “OK” soft key.
STEP6: Press to save.
Prof. Select
Delete OK Back
1.DEFAULT
2.<Profile2>
3.<Profile3>
4.<Profile4>
172 . 16 . 0 . 1
Gateway
12 OK Clear

NEC Infrontia Confidential
20
Set the DNS Primary:
Factory Default: -
STEP1: Go to “Config” menu. (See “PLACE THE PHONE IN CONFIG MODE”)
STEP2: Press to view Profile Select menu.
STEP3: Press key to select a profile you want to edit and then press “OK” soft key.
STEP4: Press to go to DNS Primary edit screen.
STEP5: Edit DNS Primary you want and then press “OK” soft key.
STEP6: Press to save.
Prof. Select
Delete OK Back
1.DEFAULT
2.<Profile2>
3.<Profile3>
4.<Profile4>
172 . 16 . 0 . 2
DNS Pri
12 OK Clear

NEC Infrontia Confidential
21
Set the DNS Secondary:
Factory Default: -
STEP1: Go to “Config” menu. (See “PLACE THE PHONE IN CONFIG MODE”)
STEP2: Press to view Profile Select menu.
STEP3: Press key to select a profile you want to edit and then press “OK” soft key.
STEP4: Press to go to DNS Secondary edit screen.
STEP5: Edit DNS Secondary you want and then press “OK” soft key.
STEP6: Press to save.
Prof. Select
Delete OK Back
1.DEFAULT
2.<Profile2>
3.<Profile3>
4.<Profile4>
172 . 16 . 0 . 3
DNS Sec
12 OK Clear
NEC Infrontia Confidential
22
Set the Handover List:
Factory Default: DEFAULT
STEP1: Go to “Config” menu. (See “PLACE THE PHONE IN CONFIG MODE”)
STEP2: Press to view Handover List.
STEP3: Press key to select a profile area you want and then press “OK” soft key.
STEP4: Press “OK” soft key to view profile list.
STEP5: Press key to select a profile you want to add and then press “Save” soft key.
STEP6: Press to save.
HandoverList
OK Back
1.DEFAULT
2.<Profile2>
3.<Profile3>
4.<Profile4>
Prof. Select
Save Back
Office1
Office2
Office3
Office4
NEC Infrontia Confidential
23
• SIP SETTINGS
This section explains the SIP data for the phone. The following items are covered here.
Set the DHCP (SIP)
Set the SIP Proxy
Set the SIP Port
Set the Register
Set the Register Port
Set the User ID
Set the User Password
Set the Phone No.
Set the DHCP (SIP):
Factory Default: Disable
STEP1: Go to “Config” menu. (See “PLACE THE PHONE IN CONFIG MODE”)
STEP2: Press to go to DHCP (SIP) menu.
STEP3: Press to enable DHCP (SIP).
STEP4: Press to save.
NOTE: This feature will not work well without DHCP Server supporting SIP option.
Set the SIP Proxy:
Factory Default: 172.16.0.10 (SIP Proxy1)
STEP1: Go to “Config” menu. (See “PLACE THE PHONE IN CONFIG MODE”)
STEP2: Press to go to SIP Proxy1 edit screen.
STEP3: Edit SIP Proxy (IP Address or FQDN) and then press “OK” soft key.
STEP4: Press to save.
Auto(DHCP)
OK Back
1.Disable
2.Enable
SIP Proxy1
12 OK Clear
172.16.0.10
NEC Infrontia Confidential
24
Set the SIP Port:
Factory Default: 5070 (SIP Port1)
STEP1: Go to “Config” menu. (See “PLACE THE PHONE IN CONFIG MODE”)
STEP2: Press to go to SIP Port1 edit screen.
STEP3: Edit SIP Prort and then press “OK” soft key.
STEP4: Press to save.
Set the Register:
Factory Default: 172.16.0.10
STEP1: Go to “Config” menu. (See “PLACE THE PHONE IN CONFIG MODE”)
STEP2: Press to go to Register edit screen.
STEP3: Edit Register (IP Address or FQDN) and then press “OK” soft key.
STEP4: Press to save.
Set the Register Port:
Factory Default: 5070
STEP1: Go to “Config” menu. (See “PLACE THE PHONE IN CONFIG MODE”)
STEP2: Press to go to Register Port edit screen.
STEP3: Edit Register Port and then press “OK” soft key.
STEP4: Press to save.
SIP Port1
12 OK Clear
5070
Register
12 OK Clear
172.16.0.10
RegisterPort
12 OK Clear
5070
NEC Infrontia Confidential
25
Set the User ID:
Factory Default: 240
STEP1: Go to “Config” menu. (See “PLACE THE PHONE IN CONFIG MODE”)
STEP2: Press to go to User ID edit screen.
STEP3: Edit User ID and then press “OK” soft key.
STEP4: Press to save.
NOTE: User ID you set will be copied to Phone No automatically.
Set the User Password:
Factory Default: -
STEP1: Go to “Config” menu. (See “PLACE THE PHONE IN CONFIG MODE”)
STEP2: Press to go to User Password edit screen.
STEP3: Edit User Password and then press “OK” soft key.
STEP4: Press to save.
User ID
12 OK Clear
240
User Passwd
12 OK Clear
cccaaa222

NEC Infrontia Confidential
26
Set the Phone No.:
Factory Default: 240
STEP1: Go to “Config” menu. (See “PLACE THE PHONE IN CONFIG MODE”)
STEP2: Press to go to Phone No. edit screen.
STEP3: Edit Phone No. and then press “OK” soft key.
STEP4: Press to save.
NOTE: Phone No. you set will be displayed in Standby mode screen.
Phone No.
12 OK Clear
240
NEC Infrontia Confidential
27
• CONFIG PASSWORD SETTINGS
This section explains the Config Password for the phone. The following items are covered here.
Set the New Config Password
Change the Config Password
Set the New Config Password:
STEP1: Press to go to New Config Password edit screen.
STEP2: Edit New Config Password (4 digits) and then press “OK” soft key.
STEP3: Press to return to Standby mode.
NOTE: This procedure is available only when MH240 has been initialized.
Change the Config Password:
STEP1: Go to “Config” menu. (See “PLACE THE PHONE IN CONFIG MODE”)
STEP2: Press to go to Old Password confirmation screen.
STEP3: Enter current Config Password and then press “OK” soft key.
STEP4: Enter New Config Password and then Press “OK” soft key.
STEP5: Press to return to Standby mode.
Password
12 OK Clear
New Password:
0000
Password
12 OK Clear
Old Password:
****
Password
12 OK Clear
New Password:
9999

NEC Infrontia Confidential
28
This page is for your notes.

NEC Infrontia Confidential
29
2.MENU LIST
• CONFIG MENU LIST
The following shows Config menu list of MH240 with the default values and remarks as required.
Category Menu Default Remarks
Config [MENU-5-3-1] 1.Wireless
2.SIP Settings
3.Config Password
Need Config Password
NEC Infrontia Confidential
30
Category Menu Default Remarks
1.Wireless
1.Profile
1.Wireless
1.Profile Name (alphanumeric characters)
18bytes
2.ESSID
1.Manual (alphanumeric characters)
default 32bytes
2.AP Scan
3.Secrity
OPEN
WEP
1.Key Index 1.Index 1
2.Index 2
3.Index 3
4.Index 4
1.Index 1
2.Key (alphanumeric characters)
[64bit]
5 characters (ASCII)
10 characters (HEX)
[128bit]
13 characters (ASCII)
26 characters (HEX)
WPA-PSK
1.TKIP (alphanumeric characters)
8 to 64 bytes
2.AES (alphanumeric characters)
8 to 63 bytes
WPA2-PSK
1.TKIP (alphanumeric characters)
8 to 64 bytes
2.AES (alphanumeric characters)
8 to 63 bytes
WPA 1.EAP 1.MD5
2.TLS
3.PEAP
2.Identity (alphanumeric characters) 32bytes
3.User Name
(alphanumeric characters) 40bytes
4.Password (alphanumeric characters) 40bytes
5.CA Cert. N/A
6.User Cert. N/A
1.TKIP
2.AES
7.Private Key
N/A
WPA2 1.EAP 1.MD5
2.TLS
3.PEAP
2.Identity (alphanumeric characters) 32bytes
3.User Name
(alphanumeric characters) 40bytes
4.Password (alphanumeric characters) 40bytes
5.CA Cert. N/A
6.User Cert. N/A
1.TKIP
2.AES
7.Private Key
N/A
4.Advanced
01.Channel (Channel 1 to 11)
02.Data Rate 01.Auto
02.1Mbps
03.2Mbps
04.5.5Mbps
05.6Mbps
06.9Mbps
07.11Mbps
08.12Mbps
09.18Mbps
10.24Mbps
11.36Mbps
12.48Mbps
13.54Mbps
01.Auto
03.TX Power 01.High
02.Middle
03.Low
01.High
04.Roam Threshold (-90 to -40)
05.Roam Delta (0 to 40)
06.Nprobes (0 to 10)
07.Scan Threshold (-90 to -40)
08.Packet Los Count (0 to 50)
09.Active Time (0 to 100)
1.DEFAULT
2.<Profile2>
3.<Profile3>
4.<Profile4>
5.<Profile5>
6.<Profile6>
7.<Profile7>
8.<Profile8>
9.<Profile9>
10.Home Time (0 to 100)
NEC Infrontia Confidential
31
Category Menu Default Remarks
2.IP Setting
1.Fixed IP
1.IP Address (numeric characters) 172.16.1.240
2.Net Mask (numeric characters) 255.255.255.0
3.Gateway (numeric characters)
4.DNS Primary (numeric characters)
5.DNS Secondary (numeric characters)
2.DHCP
2.Handover List 1.DEFAULT
2.<Profile2>
3.<Profile3>
4.<Profile4>
5.<Profile5>
2.SIP Settings
1.SIP Proxy
1.Auto(DHCP)
2.SIP Proxy1 (numeric characters) 172.16.0.10 FQDN also available
3.SIP Port1 (numeric characters) 5070 1024 to 65535
4.SIP Proxy2 (numeric characters) FQDN also available
5.SIP Port2 (numeric characters) 1024 to 65535
6.SIP Proxy3 (numeric characters) FQDN also available
7.SIP Port3 (numeric characters) 1024 to 65535
8.SIP Proxy4 (numeric characters) FQDN also available
9.SIP Port4 (numeric characters) 1024 to 65535
2.Register (numeric characters) FQDN also available
3.Regster Port (numeric characters) 1024 to 65535
4.User ID (numeric characters) 240 32bytes
alphanumeric
characters also
available
5.Use Password (alphanumeric characters)
40bytes
numeric characters
also available
6.Phone No. (numeric characters) 240 32bytes
alphanumeric
characters also
available
7.Advanced
1.Resister Timer (0 to 3600 sec) 1800sec
2.Codec 1.Auto
2.G.711u
3.G.711a
4.G.729A
2.G.711u
3.Payload Size 20/30/40/50/60/70/80 ms 30ms
4.DTMF Mode 1.Inband
2.Outband(RFC2833) 1.Inband
5.Jitter Buffer (numeric characters)
6.VM Number (numeric characters) *8 40bytes
7.Prefix Number
1.<Prefix1>
2.<Prefix2>
3.<Prefix3>
4.<Prefix4>
(numeric characters) 32bytes
3.Config Password
Old Password (4 digits)
New Password (4 digits)
NEC Infrontia Confidential
32
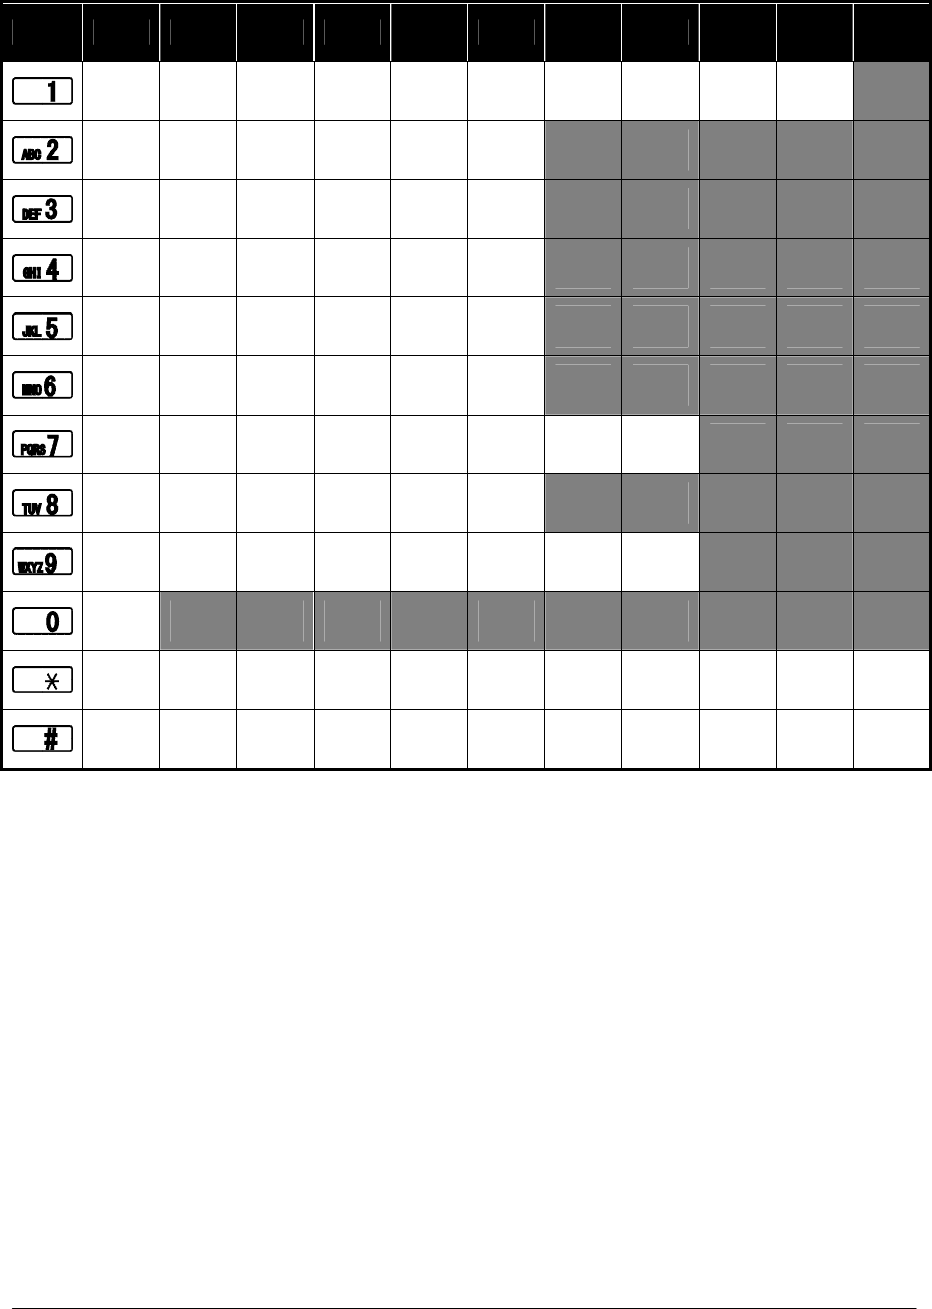
• CHARACTER CODE LIST
The following shows character code list when your phone is in edit mode.
Character Code List
1st 2nd 3rd 4th 5th 6th 7th 8th 9th 10th
11th
” ’ [ ] < > ( ) { }
A B C a b c
D E F d e f
G H I g h i
J K L j k l
M N O m n o
P Q R S p q r s
T U V t u v
W X Y Z w x y z
[space]
* . + - / , : ; = ? !
# @ $ % & ¥ ^ _ ` | ~

NEC Infrontia Confidential
33
3.TROUBLE SHOOTING
• MESSAGE MEANINGS AND SUGGESTIONS
The following shows the meanings and suggestions of messages that may be displayed on your phone.
Message Meaning & Suggestion
[Password]
UnAuthorized! The entered password is not correct. Enter the correct
password.
[Low Battery]
Please charge it Battery charge level is low. Charge the battery.
[Directory]
No Input Name You do not edit Name of Directory. Edit Name.
[Directory]
Directory is Full The number of entries reaches the maximum. To add new
entry, delete some entries in advance.
[Handy KeyLock]
Handy KeyLock Enabled Displayed when your phone is locked.
[Handy KeyLock]
Handy KeyLock Disabled Displayed when your phone is unlocked.
[Password Lock]
PASSWORD Lock Enabled
Displayed when your phone is locked with password.
[Setting]
X to Y is input Entered value is out of range. Enter the value of X to Y.
NEC Infrontia Confidential
34
• TROUBLES AND SUGGESTIONS
The following shows suggestions on how to resolve MH240 operation problems. Confirm the
following before making a call:
Is power ON?
Is battery charged?
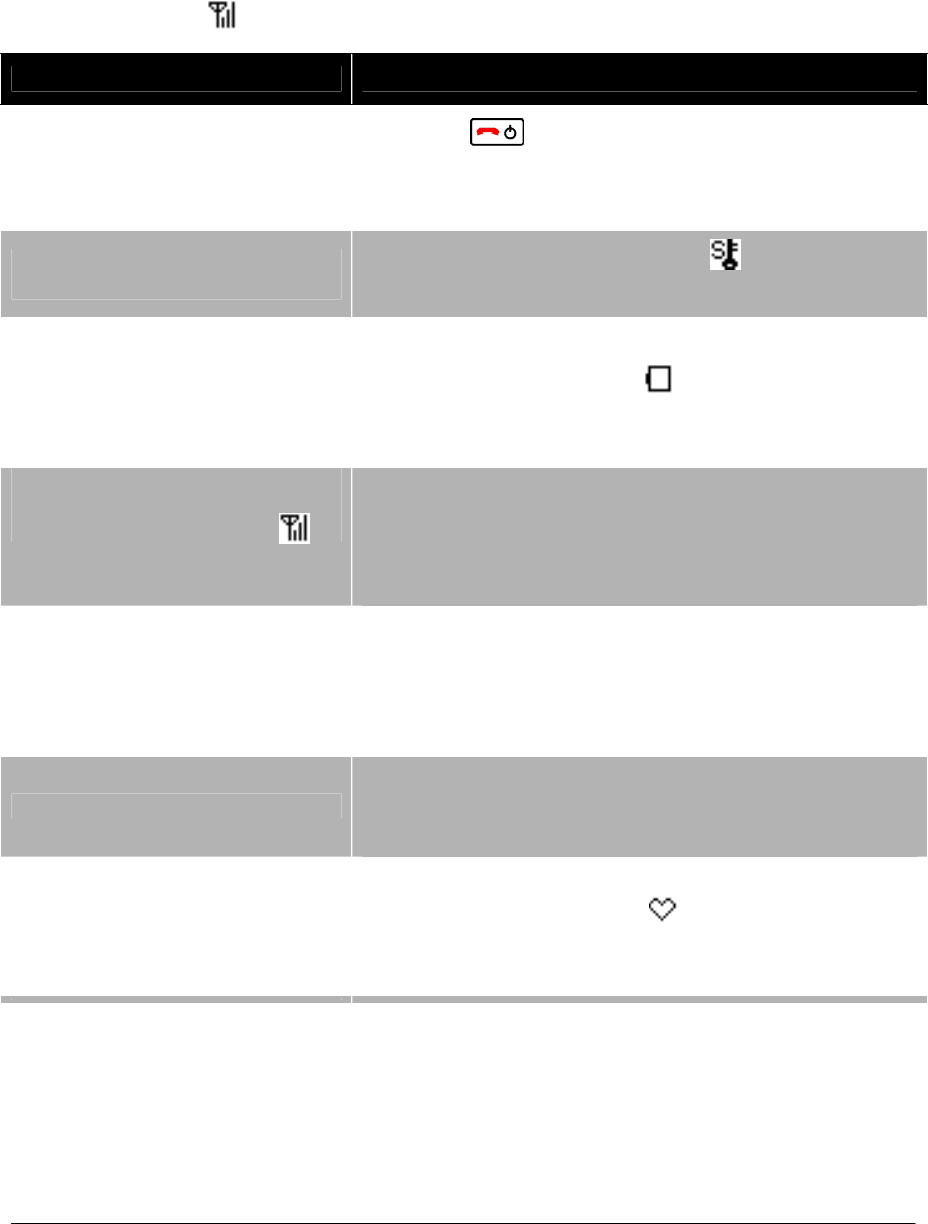
Is Antenna icon ( ) displayed?
Symptom Suggestion
Can not power on the phone…
- Press key and hold more than 2 seconds.
- Insert the battery to your phone properly.
- Charge the battery.
Can not operate keys on the
phone…
- Unlock your phone if lock icon ( ) is displayed.
- Unlock your phone if “Handy KeyLock” is displayed.
Communication is lost, audio
break-up occurs…
- Check the receiving signal strength.
- Check the battery when is indicated.
- Apart your phone more than 50cm from Access
Point.
Can not see Antenna Icon ( )…
- When you are in area where sufficient signal can not
be obtain, move to other area.
- SIP server registration is uncompleted. If this
occurs, please contact your network administrator.
Can not sustain battery power…
- Insert the battery to your phone properly.
- Place the battery on the proper position of your
cradle.
- Replace the battery.
Can not make or receive a call… - Make sure that phone number of your phone. To
change the phone number, please contact your
network administrator.
The phone does not ring…
- When your phone is placed in courtesy mode,
cancel it. Courtesy icon ( ) appears when your
phone is in this mode.
- Check ring volume and adjust except “Off”.

NEC Infrontia Confidential
35
4.SPECIFICATIONS
• TECHNICAL SPECIFICATIONS
The following shows the technical specifications of MH240.
Item Specifications
Wireless Interface IEEE802.11b/g
Codec G.711, G.729a, Payload Size: 20 to 80 ms
Control Protocol SIP (RFC3261), NEC Enhanced SIP
Authentication IEEE802.1x (EAP-TLS, PEAP)
Encryption WEP (64 bit / 128 bit), TKIP, AES
LCD Monochrome LCD, 120 × 90 pixels
Main Feature Call History, Directory, Speed Dial, Courtesy Mode
Ringer Ring Tone : selectable from 16 kinds
Ring Volume : selectable from 5 levels
Battery Lithium Ion Battery, 3.7 V - 850 mAh
Battery Life Talk Time : up to 3 hours
Standby Time : up to 90 hours
AC Adapter INPUT : AC 100 V to 120 V, 50/60 Hz, 0.3 A
OUTPUT : DC 5 V, 1 A
DC Plug : miniUSB (typeB) plug
Operation Temperature 0 to 35 °C
Operating Humidity 10 to 90 %
Dimension 135.0 × 48.0 × 17.6 mm
Weight 94.36 g
Certification and
Compliance CSA60950-1
FCC Part 15 Class B
RSS-210
HAC

NEC Infrontia Confidential
36
This page is for your notes.

NEC Infrontia Confidential

NEC Infrontia Confidential
Manufacture:
2-3, Kandatsukasa-cho, Chiyoda-ku, Tokyo 101-8532, Japan