NEC of America KEG4809 Cellular WCDMA Phone with RFID User Manual
NEC Corporation of America Cellular WCDMA Phone with RFID Users Manual
UserManual.wiki
>
NEC of America
>
KEG4809 User Manual
Users Manual
Navigation menu
Upload a User Manual
Namespaces
Wiki Guide
HTML
PDF
Info
Views
User Manual
Discussion / Help
Navigation

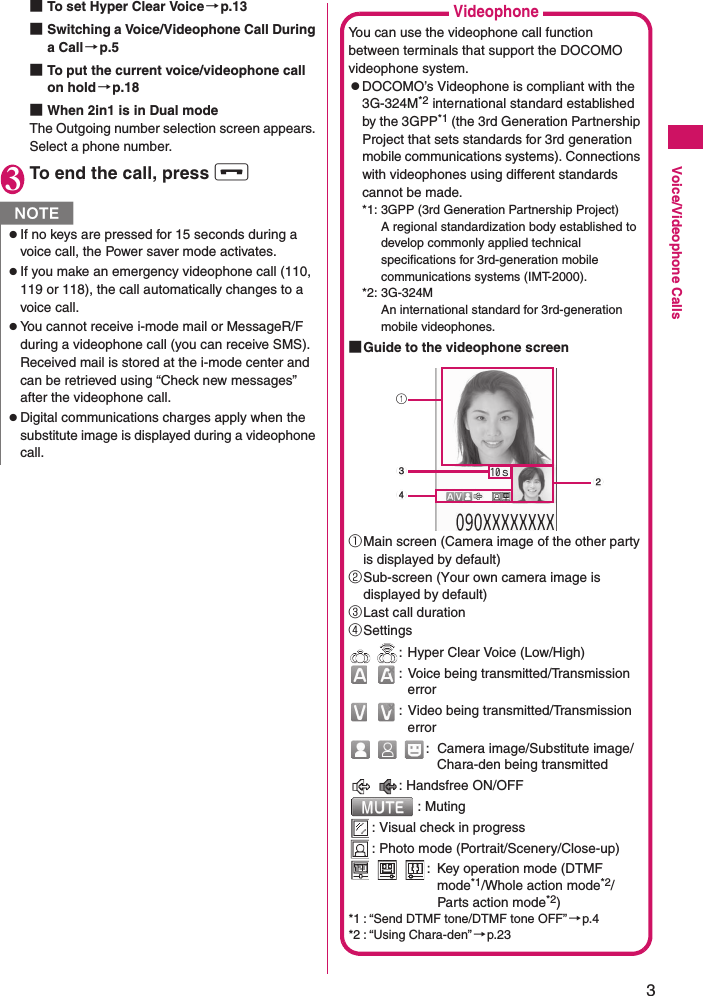
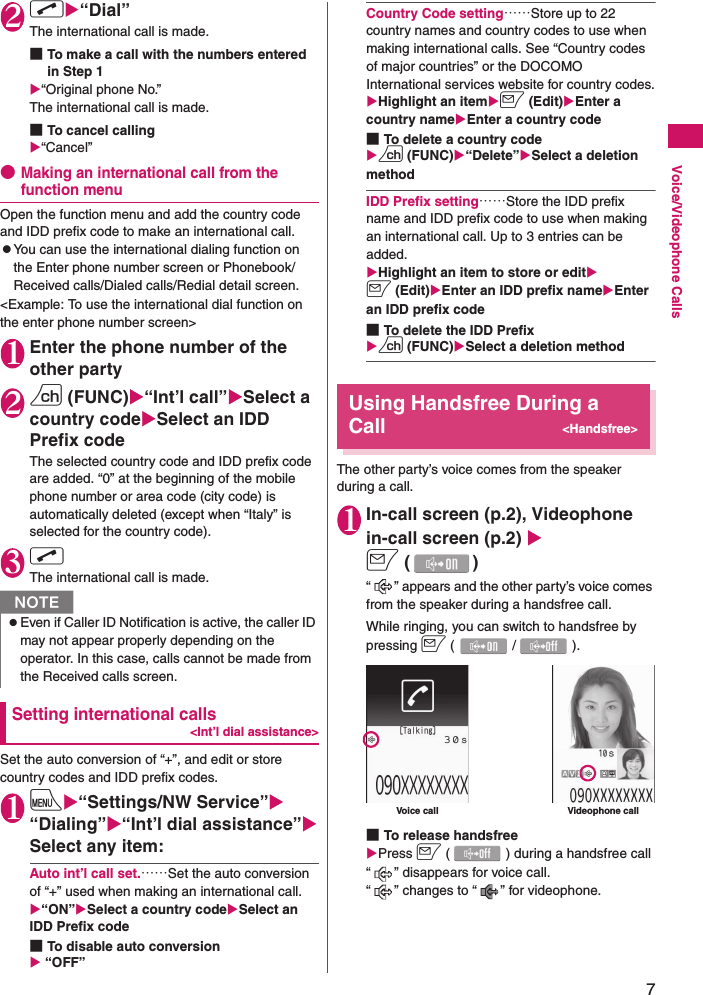
![6Voice/Videophone CallsMaking International Calls<WORLD CALL>WORLD CALL is a service where you can use your DOCOMO mobile phone to call overseas.You applied for “WORLD CALL” when you started to use FOMA services. (Except if you did not wish to apply for it.)zYou can make a call to approximately 240 countries and regions worldwide.z“WORLD CALL” charges are billed with your monthly FOMA call charges.zIn addition to directly dialing a phone number, you can make an international call by adding “+” or selecting “Int’l call” or “Prefix numbers” from the function menu of the enter phone number screen or Phonebook/Redial/Dialed calls/Received calls detail screen.zServices are not available in some billing plans.Dialing a phone number to make an international call1Dial the phone number in the following order: 010→Country code→Area code (City code)→Other party’s phone numberDial the other party’s phone number excluding “0” at the beginning of the mobile phone number or area code (city code). However, to call to some countries/areas, such as in Italy, “0” is required.You can also make an international call by dialing the phone number in the following order: 009130→010→Country code→Area code (City code)→Other party’s phone number.2r The international call is made.Simple procedures for making international callszYou can store country codes and international call access codes in “Int’l dial assistance”.●Using “+” to make an international call“+” changes to “IDD prefix code” set in “Auto int’l call set.”, and you can make an international call without dialing the IDD prefix code.zSince “Auto int’l call set.” under “Int’l dial assistance” is set to “ON” (automatically added) by default, the IDD prefix code is automatically dialed.1On the standby screen, dial the following: + (0 (1 second or longer)) →Country code→Area code (City code)→Other party’s phone numberDial the other party’s phone number excluding “0” at the beginning of the mobile phone number or area code (city code). However, to call to some countries/areas, such as in Italy, “0” is required.zYou cannot switch calls in the following cases:• When the other party is holding the call• When the other party activates Record messagezThe displayed call duration is reset to 0 second each time the calls are switched. However, the total time of the voice and videophone calls is displayed after the call ends.zDepending on the other party’s communication conditions or signal quality, you may not be able to switch the calls and the call may be disconnected.zWhen the call is switched, the first dialed or received call is stored in the Redial/Dialed calls or Received calls.<When switching from voice call to videophone call>zIf the caller is using i-mode, i-mode is disconnected and the call is switched to videophone.zIf the other party is using packet communication (including i-mode), the message “No Switch” appears and the calls cannot be switched.zYou cannot switch the calls when “Call Waiting” is active.For WORLD CALL, call at general inquiries provided on the back of the manual.NInternational videophone calls are available with users of specific roaming operators overseas or FOMA terminals in Japan.zSee “Mobile Phone User’s Guide [International Services]” or the DOCOMO International services website for countries and operators.zIn some types of the other party, international videophone is not available or the other party’s picture on FOMA is distorted.](https://usermanual.wiki/NEC-of-America/KEG4809/User-Guide-1188183-Page-6.png)
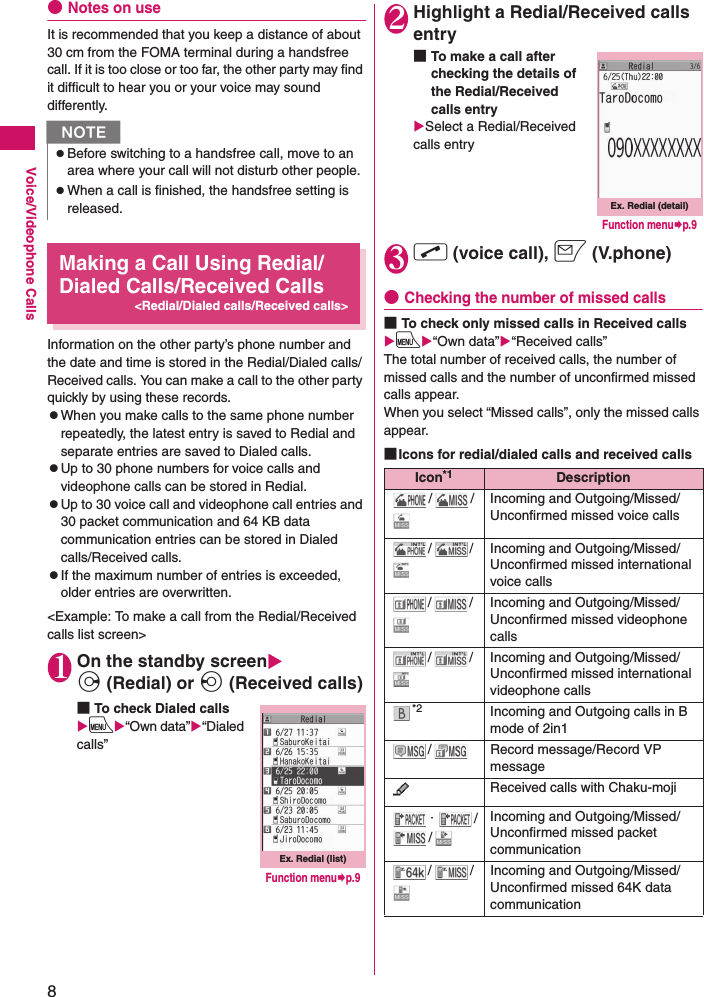

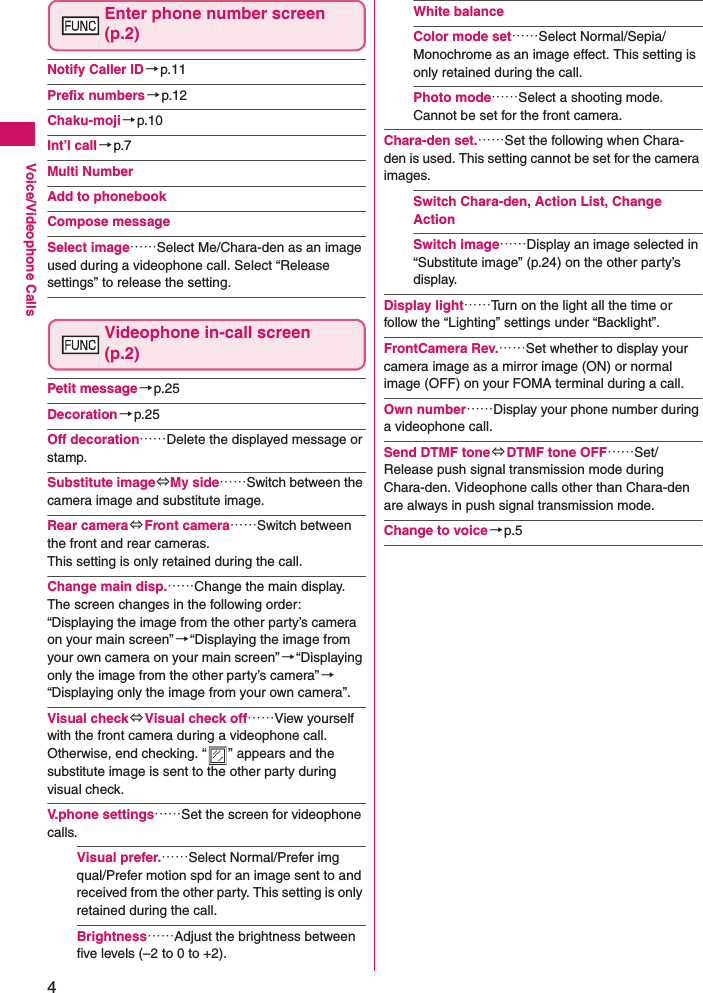
![10Voice/Videophone CallsUsing Chaku-moji<Chaku-moji>When making a voice call or videophone call, send a message (Chaku-moji) to the other party to show a summary of the call, etc. beforehand.z5 Chaku-moji messages are stored at the time of purchase. You can change the pre-installed Chaku-moji messages.zYou can include pictograms or face marks in Chaku-moji, and you can send a message of up to 10 characters including pictograms/symbols/double-byte characters/single-byte characters.zFor details on Chaku-moji and the compatible models, refer to the NTT DOCOMO website or “Mobile Phone User’s Guide [Network Services]”.Adding, editing and setting messages1iX“Settings/NW Service”X“Network service”X“Chaku-moji”XSelect any item:Create message……Store or edit frequently used Chaku-moji. Up to 30 Chaku-moji messages (including 5 pre-installed) can be stored.XHighlight an item to store or editXo (Edit)XEnter Chaku-moji■To delete a messageXu (FUNC)X “Delete”XSelect a deletion methodMSG display settings……Select Display all messages/Only number in PH-book/Calls with Caller ID/Hide all messages as the Chaku-moji display setting for an incoming call with Chaku-moji.3D message display……Set whether to display Chaku-moji in 3D animation.Making a call with a messageYou can add Chaku-moji when making a voice or videophone call from the “Enter phone number” screen and the detail screen of the “Phonebook”, “Redial”, “Dialed calls” or “Received calls”.<Example: To make a voice call with Chaku-moji from the enter phone number screen>1Enter phone number screen (p.2)Xu (FUNC)X“Chaku-moji”XSelect any item:Create message……Enter Chaku-moji. Up to 10 characters can be entered.Select message……Select a stored Chaku-moji. You can edit Chaku-moji by pressing o (Edit) on the message selection screen.Sent messages……Select a previously sent Chaku-moji. You can edit Chaku-moji by pressing o (Edit) on the sent message screen.■To delete the entered Chaku-moji (to make a call without Chaku-moji)Xu (FUNC)X“Chaku-moji”X“Create message”XClear the entered text2r (voice call), o (V.phone)When the other party’s terminal receives Chaku-moji, “Transmission completed” appears.zWhen 2in1 is set to ON, selecting “Delete all” on the Redial/Dialed calls/Received calls screen deletes all Redial/Dialed calls/Received calls entries in A or B mode regardless of the 2in1 mode.<Compose message>zCompose mail with a mail address specified as the recipient when the mail address is stored in the phonebook together with the phone number. If multiple mail addresses are stored, the first address is used.NNzYou cannot delete the pre-installed Chaku-moji. Even when you change a pre-installed Chaku-moji and delete the Chaku-moji, it is restored to default.](https://usermanual.wiki/NEC-of-America/KEG4809/User-Guide-1188183-Page-10.png)