NEC of America LOBTH Bluetooth Handset User Manual BT TEL E
NEC Corporation of America Bluetooth Handset BT TEL E
Users Manual
Cordless Terminal Users Guide
DTL-12BT-1(BK) TEL
ITL-12BT-1(BK) TEL
BCH-L(BK) UNIT
- Before using your product, read this Users Guide thoroughly to ensure
correct handling.
- After reading the Users Guide, keep it in a place that is accessible for
read reference.
LIABILITY DISCLAIMER
NEC Infrontia Corporation reserves the right to change the specifications, functions, or fea-
tures, at any time, without notice.
NEC Infrontia Corporation has prepared this document for use by its employees and custom-
ers. The information contained herein is the property of NEC Infrontia Corporation and shall
not be reproduced without prior written approval from NEC Infrontia Corporation. All brand
names and product names on this document are trademarks or registered trademarks of their
respective companies.
Copyright 2007
NEC Infrontia Corporation

i
Warning
◆Do not use the unit when you notice smoke, strange smell or other unusual happenings. It
may cause fire if you continuously use them. Turn off the power switch of the phone sys-
tem immediately. For the recharger, disconnect the power plug immediately. Confirm that
smoke is ceased, and then contact the nearest NEC service office.
Never attempt to repair those units by yourself.
◆If you had an accident such as dropping the phone and broke the unit, turn off the power of
the phone system immediately. For the recharger, disconnect the power plug immediately.
Contact the nearest NEC service office.
If you keep using those units, they may cause fire or electrical shock.
◆If water smeared into the unit, turn off the power of the phone system immediately. For the
recharger, disconnect the power plug immediately. Contact with the nearest NEC service
office. If you keep using those units, they may cause fire or electrical shock.
◆Do not insert flammable or metal objects into the units. If a foreign object were acciden-
tally placed into the units, turn off the power of the phone system and plug out the power
adapter. Contact the nearest NEC service office. If you keep using those units, they may
cause fire or electrical shock. Pay special attention to children to prevent from similar
accidents.
◆Do not attempt to disassemble nor modify the units. It may cause fire, electrical shock, or
system malfunciton.
Modification by a user is prohibited by law.
◆Do not open the units intentionally. It may cause electrical shock or system malfunction.
Ask test adjustment, and repair of the units for the nearest NEC service office.
◆Do not twist, put a heavy object, and push the phone system. Such actions may cause dam-
age, fire, or injuries.
◆Do not place a container with water such as a vase, a plant pot, a cup, cosmetics, chemi-
cals, nor a small metal object. Splashing water over the units and foreign metal object
inserted into the units may cause fire or electrical shock.
◆Do not use the unit in a high humid area such as a bathroom or near a humidifier. They
may cause fire, electrical shock, or system malfunction.
◆Use the specified power adapter, which is attached to the unit. Other adapters may cause
fire or system malfunction.

ii
◆Do not damage, or modify the power adapter cord. Do not kink, pull, twist, or bundle it.
Do not put a heavy object or heat it. They may cause fire, electrical shock, or system mal-
function. Contact the nearest NEC service office for a damaged adapter cord.
◆Do not touch the power plug with a wet hand. It may cause electrical shock or system mal-
function.
◆Do not touch the units or replace a battery with a wet hand. It may cause electrical shock
or system malfunction.
◆When you hear thunder during using the phone system outside, immediately stop using it
and move to a safe place.
◆Do not use multiple plugs to a single outlet. It may cause fire or electrical shock.
◆Follow the instruction below when you use a battery pack. They may cause heating, explo-
sion, and fire;
・Do not put the battery pack into a microwave oven or a pressure chamber.
・Do not use other batteries with this battery pack.
◆If the internal battery liquid clung to your skin or clothes, immediately rinse it with clean
water to prevent chemical damage to your skin and clothes.
◆Do not use the phone or recharge the battery in a place where fire or explosion may occur.
・This phone system does not have explosion protection. Do not use it where a flamma-
ble gas such as propane and gasoline are stored. Turn off the power of the phone imme-
diately. Do not recharge the battery in such a place.
◆Do not use near microwave ovens, medical equipment and industrial equipment.

iii
User Safety Protocol
Important:Read this information before using your DTL-12BT-1(BK) TEL, ITL-12BT-
1(BK) TEL and BCH-L(BK) UNIT Handset.
Observe the following instructions to use this product safely, prevent you and other people
from possible injury, and protect properties. Improper handling may cause heat, explosion,
and fire.
Danger
◆Recharge the battery with the matching battery charger (see battery label description).
◆Use the battery only for this DTL-12BT-1(BK) TEL, ITL-12BT-1(BK) TEL and BCH-
L(BK) UNIT handset system. Do not use it with other electrical devices.
◆Keep the following warnings to prevent the battery pack from heating, explosion, and fire.
・Do not throw the battery pack into fire.
・Do not solder the battery pack directly.
・Do not short the positive (+) and negative (-) terminal of the battery pack with metal.
・Do not poke the battery nor smash it with hammer.
◆Do not disassemble nor modify the battery pack. It has a safety circuit and a damaged cir-
cuit may cause heat, explosion, and fire.
◆The internal liquid of the battery pack has strong acid. If the battery liquid gets into your
eye, rinse your eye well with water and consult with a doctor.
◆Do not use, leave, nor recharge the battery pack near fire or under the direct sunlight. High
temperature may damage the internal safety circuit and may cause malfunction of the
recharge, heat, explosion, or fire.

iv
FCC portion
This equipment has been tested and found to comply with the limits for a Class B digital
device, pursuant to Part 15 of the FCC rules. These limits are designed to provide reasonable
protection against harmful interference in a residential installation. This equipment generates,
uses, and can radiate radio frequency energy and, if not installed and used in accordance with
the instructions, may cause harmful interference to radio communications. However, there is
no guarantee that interference will not occur in a particular installation. If this equipment
does cause harmful interference to radio or television reception, which can be determined by
turning the equipment off and on, the user is encouraged to try to correct the interference by
one or more of the following measures:
・Reorient or relocate the receiving antenna.
・Increase the separation between the equipment and receiver.
・Connect the equipment into an outlet on a circuit different from that to which the
receiver is connected.
・Consult the dealer or an experienced radio/TV technician for help.
This device complies with Part 15 of the FCC Rules. Operation is subject to the following
two conditions: (1) This device may not cause harmful interference, and (2) This device must
accept any interference received, including interference that may cause undesired operation.
Caution:
Any changes or modifications not expressly approved by the party responsible for product
compliance could void the user’s authority to operate the equipment.
To comply with FCC RF exposure compliance requirements, this device must not be co-
located or operating in conjunction with any other antenna or transmitter.
LO(BTC)B / LO(BTC)U
To comply with FCC RF exposure compliance requirements, a separation distance of at least
20 cm must be maintained between the antenna of this device and all persons. This device
must not be co-located or operating in conjunction with any other antenna or transmitter.
LO(BTH)B / LO(BTH)U
To comply with FCC RF exposure compliance requirements, this device must not be
colocated or operating in conjunction with any other antenna or transmitter.
LO(BTH)B or LO(BTH)U was tested with BELTCLIP(BTH)(BK).Use only
this beltclip to ensure FCC Compliance. The use of third-party beltclips may not comply with
FCC RF exposure compliance requirements, and should be avoided.
RF Exposure Guidelines

v
Industry Canada Portion
Canada Regulatory Compliance Statement
This Class B digital apparatus complies with Canadian ICES-003.
Cet appareil numériqué de la classe B est conformé à la norme NMB-003 du Canada.
For Customers in Canada
This device complies with RSS 210 of Industry Canada (IC).
Operation is subject to the following two conditions:
・this device may not cause interference, and
・this device must accept any interference, including interference that may cause undes-
ired operation of this device.
L’utilisation de ce dispositif est autorisée seulement aux conditions suivantes:
・il ne doit pas produire de brouillage et
・I'utilisateur du dispositif doit étre prêt a accepter tout brouillage radioélectrique reçu,
même si ce brouillage est susceptible de compromettre le fonctionnement du dispositif.
Exposure to radio frequency radiation
The installer of this radio equipment must ensure that the antenna is located or pointed such
that it does not emit RF field in excess of Health Canada limits for the general population;
consult Safety Code 6, obtainable from Health Canada’s website at www.hc-sc.gc.ca/rpb.

vi
Introduction
Introduction
Thank you very much for purchasing our cordless terminal.
< Devices covered >
・DtermX Cordless Terminal DTL-12BT-1(BK) TEL
・IPtermX Cordless Terminal ITL-12BT-1(BK) TEL
・Bluetooth® Handset Cradle BCH-L(BK) UNIT
A cordless terminal is a multifunctional telephone with a portable handset that lets you origi-
nate calls and answer terminating calls from within a certain talking range.
A standard multifunctional telephone may have its handset replaced with a BCH-L UNIT to
transform into a cordless terminal.
Each cordless terminal consists of the following devices:
・Bluetooth® Cradle : A multifunctional telephone unit to which a BTC is connected.
・Bluetooth® Handset : BTH
Instructions in this User’s Guide focus on Bluetooth® handset operations. For instructions
about handling the Bluetooth® cradle, refer to the user documentation that comes with your
system.
How This Guide Is Organized
Before Using the
Product
Provides tips and hints on using the product safely and properly,
and topics of prerequisite importance to using the cordless termi-
nal.
Bluetooth® Handset
Operations
Explains operating tips and the handset functions of the cordless
terminal.
Troubleshooting Explains how to deal with troubles that may occur while you use
the cordless terminal and interpret the error messages that may be
displayed in the Bluetooth® handset LCD.

vii
Table of Contents
Introduction ..................................................................................... vi
How This Guide Is Organized .............................................................................. vi
Table of Contents ........................................................................... vii
Before Using the Product ............................................... 1-1
About Cordless Terminals ............................................................ 1-2
Bluetooth® Cradle and Bluetooth® Handset ..................................................... 1-2
Key Functions ................................................................................................... 1-2
Talking Range ................................................................................................... 1-4
Charging ........................................................................................................... 1-5
Replacing the Battery ....................................................................................... 1-6
In the Event of a Power Failure ........................................................................ 1-7
If Security Features Are Used ........................................................................... 1-7
Primary Specifications ...................................................................................... 1-8
Safety Precautions ..................................................................... 1-10
Operating Instructions and Maintenance ................................... 1-14
Locating the Bluetooth® Cradle ...................................................................... 1-14
Antenna .......................................................................................................... 1-15
Radio Transmission ........................................................................................ 1-15
Radio Interference .......................................................................................... 1-16
Maintenance ................................................................................................... 1-16
Charging Terminals ........................................................................................ 1-17
Operation Following Power Feeding to the Bluetooth® Cradle ....................... 1-17
Component Names and Functions ............................................ 1-18
Bluetooth® Cradle (BTC) ................................................................................ 1-18
Bluetooth® Handset (BTH) ............................................................................. 1-19
Bluetooth® Handset LCD Screen ............................................... 1-20
Displayed Information ..................................................................................... 1-20
Explanations of Icons ...................................................................................... 1-22
Table of Contents

viii
Table of Contents
Adjusting the Bluetooth® Handset .............................................. 1-24
Configuring the Cordless Terminal ............................................ 1-25
Configuring the Bluetooth® Cradle (BTC) ....................................................... 1-25
Configuring the Bluetooth® Handset (BTH) .................................................... 1-27
Transforming the Standard Handset into a BCH-L(BK) UNIT .... 1-29
Wall-Mounting the Bluetooth® Cradle ........................................ 1-35
Connecting a Headset ............................................................... 1-38
Pairing with a Bluetooth® Headset ................................................................. 1-38
Connecting a Wire Headset ............................................................................ 1-40
Bluetooth® Handset Operations ..................................... 2-1
Caution ......................................................................................... 2-2
Bluetooth® Handset Functions ..................................................... 2-3
Key Lock ........................................................................................................... 2-3
Troubleshooting ............................................................. 3-1
Troubleshooting Tips ................................................................... 3-2
1 - 1
Before Using the Product
About Cordless Terminals ............................................... 1-2
Safety Precautions ......................................................... 1-10
Operating Instructions and Maintenance ....................... 1-14
Component Names and Functions ................................. 1-18
Bluetooth® Handset LCD Screen .................................. 1-20
Adjusting the Bluetooth® Handset ................................ 1-24
Configuring the Cordless Terminal ............................... 1-25
Transforming the Standard Handset into
a BCH-L(BK) UNIT ................................................ 1-29
Wall-Mounting the Bluetooth® Cradle ......................... 1-35
Connecting a Headset .................................................... 1-38
1 - 2
About Cordless Terminals
A cordless terminal is a multifunctional telephone that interconnects its Bluetooth® cradle
and Bluetooth® handset with each other using Bluetooth® wireless technology to maintain
calls or perform other operations between them.
・The Bluetooth® cradle of a cordless terminal can be handled the same way as a telephone.
Its Bluetooth® handset can be handled likewise, except for some of its features. If a partic-
ular feature of a Bluetooth® cordless terminal does not work, use the Bluetooth® cradle to
enable it.
・If the Bluetooth® handset of a cordless terminal is out of service, return it to the Blue-
tooth® cradle to keep it charged at all times.
・Ere multiple cordless terminals are set up, be careful to retain the pairing between the
Bluetooth® cradle and Bluetooth® handset.
The table below summarizes the key functions of a cordless terminal. For information about
the functions of the multifunctional telephone itself, refer to the user documentation that
comes with your system.
About Cordless Terminals
Bluetooth® Cradle and Bluetooth® Handset
Key Functions
The ways you originate calls from the Bluetooth® headset and answer terminat-
ing calls may vary depending on the type of device you use.
Function Description
Blue-
tooth®
Cradle
(BTC)
Bluetooth® headset
call You can register a Bluetooth® headset with the Bluetooth®
cradle and use it.
• Originating calls to an extension or central office line
Press the headset call (call control) key twice briefly and
perform a dialing operation from the telephone.
• Answering terminating calls
Press the headset call (call control) key while a call ter-
minates with a ring tone.
Caution

1 - 3
About Cordless Terminals
Function Description
Blue-
tooth®
Cradle
(BTC)
Bluetooth® headset
call * For latest recommended product information, browse
the following Web site:
http://www.necinfrontia.co.jp/
* Try to use a headset of the recommended type to ensure
that it connects to the cradle successfully and with the
correctly matched sound volume.
* The Bluetooth® handset cannot be used while you are
talking with the Bluetooth® headset on. You cannot
switch to the Bluetooth® headset to use while you are
using the Bluetooth® handset, either.
* The headset call control key allows you to only origi-
nate calls from the headset and answer terminating
calls.
Any other headset-specific functions are not supported.
Blue-
tooth®
Handset
(BTH)
LCD display A 20-position-by-2-line LCD screen displays the date,
time, phone number and more.
Icons, such as those designating the status of radio and the
remaining battery voltage, appear on the first line.
* LCD displays may not be produced depending on your
system.
Line keys Allow the functions preprogrammed on line keys 1 to 8 in
the Bluetooth® cradle to be used.
* For the functions that are available with the Bluetooth®
handset, refer to the user documentation that comes
with your system.
Incoming call/
charging lamp Lights or blinks en calls terminate or the handset is
charged.
Key touch tone Provides an audible verification of each click on a dial key.
Tone type En calls terminate, a ring tone sounds from the speaker in
the cordless terminal. The ring tone sounds in different
ways depending on the status of the Bluetooth® handset:
• Charging (handset returned to the cradle)
Sounding from the speaker in the cradle only
• Standby (handset removed from the cradle)
Sounding from both the cradle and handset speakers
Volume/density
control Allows you to use the cursor keys and to adjust the
receiver and ring tone volumes and the LCD contrast.
1 - 4
About Cordless Terminals
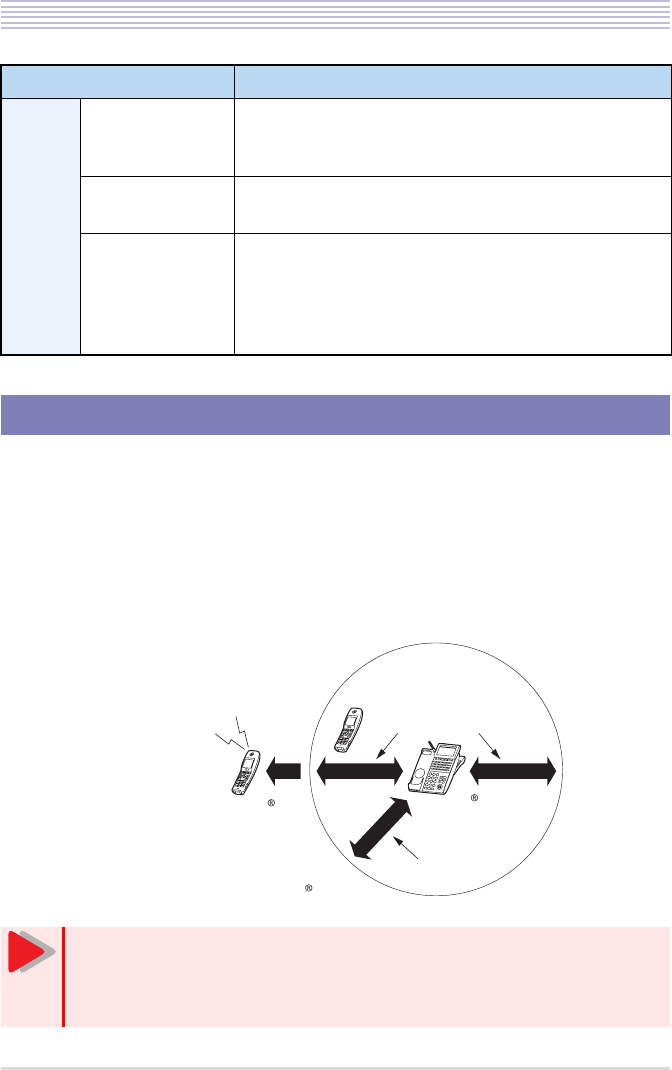
The Bluetooth® cradle and Bluetooth® handset can be separated from each other about 50m at
the remotest as a line-of-sight distance. This talking range, however, may shorten depending
on the office environment in which the cradle and handset are used; for example, they are
used near a metal or concrete wall.
If the handset gets too remote from the Bluetooth® cradle, the antenna mark will disappear
accompanied by an alarm tone.
Blue-
tooth®
Handset
(BTH)
Telephone func-
tion Allows you to originate calls to an extension or central
office line, answer terminating calls and more, all in Blue-
tooth® handset operations.
Hold/Transfer Places calls on hold and forward them to another tele-
phone.
Histories of origi-
nating and termi-
nating calls
Displays up to 10 originating and up to 10 terminating
calls (up to 20 calls in total), including the latest calls.
* This function may be inoperable or the number of calls
that can be displayed may vary depending on your sys-
tem.
Talking Range
• You may have difficulty originating a call by dialing from the Bluetooth® hand-
set. In this case, wait for a while and retry the dialing operation.
• Consult your dealer if you wish to use a cordless terminal together with an
office cordless telephone in the same environment.
Function Description
About 50m in
radius as a
line-of-sight distance
No antenna mark
appearing in
the LCD screen
Alarm Tone
About 2m
Bluetooth headset
Bluetooth
Handset
Bluetooth
Cradle
Caution
1 - 5
About Cordless Terminals
Before you use the Bluetooth® handset for the first time or reuse the handset after it has been
left out of service for a long time, charge it for at least 5 hours. (Full charging takes about 16
hours to complete.) A fully charged handset will allow you to talk for about 8 hours continu-
ously and stand by for about 30 hours if low-power mode is enabled or for about 24 hours if
low-power mode is disabled.
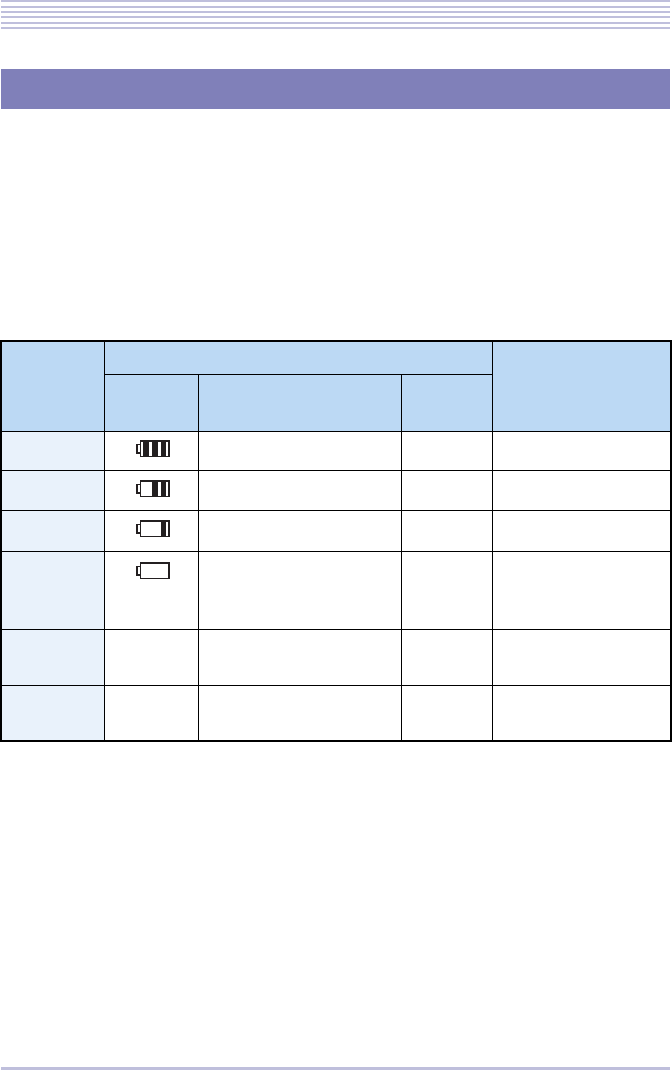
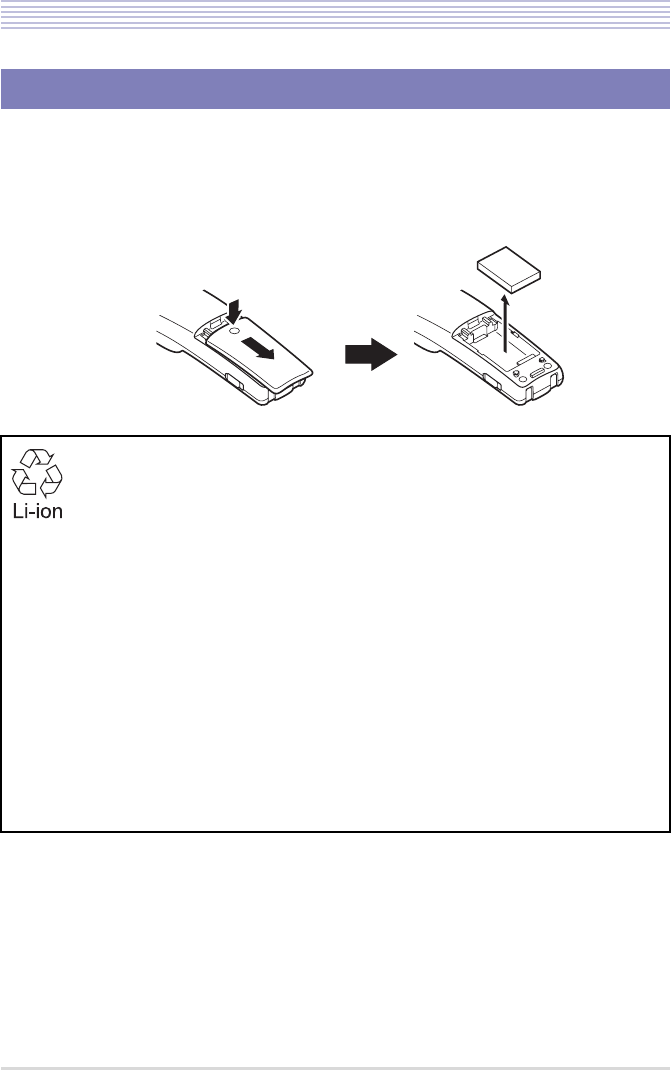
The remaining battery voltage icon appearing in the LCD screen, coupled by the incoming
call/charging lamp and an alarm tone, alerts you to the remaining battery voltage of the Blue-
tooth® handset. The table below describes how these indications appear depending on the
remaining battery voltage of the handset.
Charging
Remaining
battery
voltage
State indications
Remarks
Icon Incoming call/charging
lamp Alarm
Tone
High - -
Medium - -
Low - ×
Charging
required Blinking red ×The handset can be
used as long as the
beep sounds.
Charging in
progress - Fully charged: Lit green
Charging : Lit red -
Charging
error - Blinking orange -
1 - 6
About Cordless Terminals
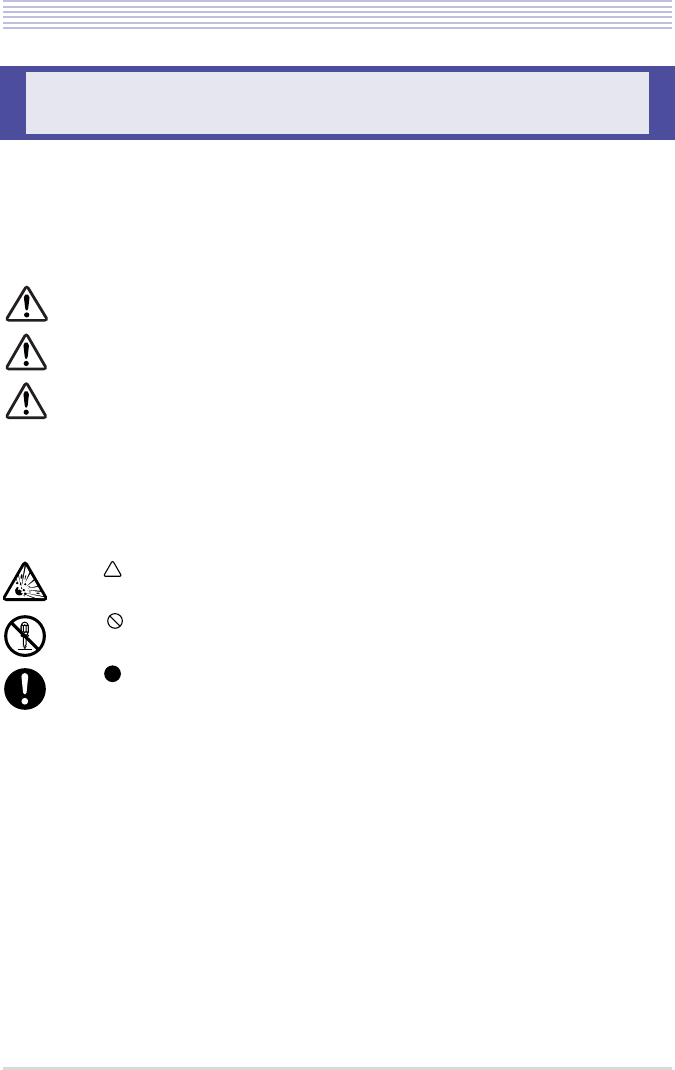
The battery loaded in the Bluetooth® handset has a useful life of about 2 years, though it is a
parameter of on how the handset has been used. If the battery voltage diminishes quickly
after the battery has been charged for a long time, replace with a new battery (Li-ion BAT-
TERY - option). For more details, ask your dealer.
Replacing the Battery
This product is powered by a lithium-ion battery.
Lithium-ion battery : 3.7V 1100mAh
The lithium-ion battery is a recyclable resource.
In recycling batteries that have been replaced or that have been unloaded from a used prod-
uct, take notice of this precaution to avoid smoking and firing:
• Bring batteries to our repair counter with the contacts being taped to prevent shorts or
enclosed individually in plastic bags.
<Our repair counter> For more details, visit the NEC Infrontia Environment Website.
URL http://www.necinfrontia.co.jp/company/kankyo/index.htm
Do not disassemble, tamper or damage the battery pack.
Please send your queries to:
• Dealer from whom your product or lithium-ion battery was purchased
• Our repair counter
Unload
the battery
Remove the cover
ԙ
Ԙ

1 - 7
About Cordless Terminals
Your cordless terminal will behave in the following manners:
・The charging function is shut down to keep the system battery from draining depending on
your system.
・The cordless terminal may be disabled depending on the system battery voltage.
・The cordless terminal is disabled if the system battery is exhausted.
・Calls in progress will be cleared if the system battery is exhausted in the meantime.
・If an optional AC adapter (AC-2RD UNIT) is used, the cordless terminal cannot be
charged while the power failure persists.
< On an IP multifunctional telephone only >
If security features are programmed on the system or on an IP multifunctional telephone, a
security mode icon appears in the LCD screen of the Bluetooth® handset (BTH), with the fol-
lowing functions being locked:
・Logging of originating/terminating calls
・Setup menu
The security features can be canceled from the system or the Bluetooth® cradle only. Calls
and other performance may be restricted depending on the security features. For more details,
refer to the user documentation that comes with your system.
In the Event of a Power Failure
If Security Features Are Used

1 - 8
About Cordless Terminals
Primary Specifications
Item Dimension Remarks
Bluetooth® version Bluetooth® version 2.0
Radio interface Bluetooth® Class1
Installed profiles Bluetooth® Handset (BTH)
・GAP : Generic Access Profile
・SPP : Serial Port Profile
・HSP : Headset Profile
Bluetooth® Cradle (BTC)
・GAP : Generic Access Profile
・SPP : Serial Port Profile
・HSP : Headset Profile
・HFP : Hands Free Profile
* For latest recommended prod-
uct information, browse the
following Web site:
http://www.necinfrontia.co.jp/
* Try to use a headset of the
recommended type to ensure
that it connects to the cradle
successfully and with the cor-
rectly matched sound volume.
Operating range About 50m (line-of-sight distance) Dependent on the environment.
Power consumption Bluetooth® Handset (BTH):About
0.5W
Bluetooth® Cradle (BTC) : About
1.5W Including the power used to charge
the handset.
Power feeding
method Power feeding from the multifunc-
tional telephone
Option AC-2RD UNIT Used only if the distance from the
main unit exceeds 400m.
Dimensions
(L × W × H) Bluetooth® Handset (BTH):
180mm × 51mm × 33mm Excluding the antenna.
Bluetooth® Cradle (BTC):
175mm × 226mm × 92mm
Weight Bluetooth® Handset (BTH):
About 200g Including the battery.
Bluetooth® Cradle (BTC):
About 300g Excluding the line cord, LAN cable.
Operating environ-
ment Temperature : 0 to 40℃
Relative humidity : 10 to 90% No dew condensing

1 - 9
About Cordless Terminals
* Bluetooth® is a registered trademark owned by Bluetooth SIG, Inc. and is licensed to NEC
Infrontia Corporation.
Restrictions Keep the cordless terminal at least 1m apart from other cordless terminals and
at least 3m apart from other radio equipment
Cordless terminals operate on a digital radio principle and are made less suscepti-
ble to interception by third parties. Radio waves used by the cordless terminals,
however, threaten the chances of intentional interception. To dismiss concerns
over possible interception by third parties, use a fixed-line telephone.
Item Dimension Remarks
Caution
1 - 10
Safety Precautions
This User’s Guide uses various pictorial markings to alert you to the precautions you need to
observe to safeguard you and others and prevent property damage.
The meanings of such pictorial markings and graphic symbols are defined below. Understand
these definitions fully before proceeding to read the main text.
Examples of Pictorial Markings
Safety Precautions
DANGER :Indicates a situation in which an impending risk of human
death or severe physical injury is anticipated.
WARNING :Indicates a situation in which a possibility of human death or
severe physical injury is anticipated.
CAUTION :Indicates a situation in which a possibility of physical injury
or property damage is anticipated.
NOTICE :Indicates a situation that could result in a failure to demon-
strate the intended performance of this system or in a func-
tional shutdown.
The symbol alerts you to a caution (including a danger or warning), which is
depicted within the marking (in this example, an electrical shock).
The symbol alerts you to a prohibited action, which is depicted within the mark-
ing (in this example, no wetting).
The symbol alerts you to a required or suggested, which is depicted within the
marking.
1 - 11
Safety Precautions
DANGER
●Observe these precautions en using a lithium-ion battery pack:
・Never charge the pack from other than the main unit.
・The lithium-ion battery pack has a specified connector orientation. In inserting the
pack into the unit, observe the correct connector orientation.
・Do not charge it with the lithium-ion battery pack unit.
・Use a specified type of lithium-ion battery pack. Do not use the specified type of lith-
ium-ion battery pack for any other device.
・Do not dispose of the lithium-ion battery pack in fires or heat it.
・Do not make direct soldering connections to the lithium-ion battery pack.
・Do not disassembly or tamper the lithium-ion battery pack.
・Do not carry or store the lithium-ion battery pack together with metallic products,
which could cause the pack to leak, heat or blast.
●If the internal fluid in the lithium-ion battery pack should contact the eyes, it
could threaten vision. Flush the eyes with plenty of fresh water immediately,
without rubbing them, and obtain medical attention promptly.
WARNING
●Do not remove the armor of the lithium-ion battery pack or scratch it, which
could cause the pack to leak, heat or blast.
●If the internal fluid in the lithium-ion battery pack should contact the skin or
clothes, it could cause physical harm to the skin. Flush with plenty of fresh water
immediately.
●Do not soak the lithium-ion battery pack in water or seawater or moisten it,
which could cause the pack to heat or rust.
●Discontinue using the lithium-ion battery pack whenever any signs of abnormal-
ity, such as leakage, discoloration or deformation, are noticed.
●Do not use the lithium-ion battery pack in bathrooms or shower rooms, which
could cause the pack to short-circuit, resulting in fires or electrical shock haz-
ards.
●Do not use the lithium-ion battery pack ere it may be splashed or wetted with
water, which could cause the pack to short-circuit, resulting in fires or electrical
shock hazards.
1 - 12
Safety Precautions
●Do not disassemble or tamper the unit, which could result in fires or electrical
shock hazards.
●Do not allow water inside the lithium-ion battery pack or wet it with water,
which could cause the pack to short-circuit, resulting in fires or electrical shock
hazards.
●Do not operate or make connections to this unit with wet hands, which could re-
sult in electrical shock hazards.
●Do not put flower vases, plant pots, cups, cosmetics, containers filled with
chemicals or water or small metallic objects on top of the unit, which could re-
sult in fires or electrical shock hazards if they spill or penetrate the interiors of
the unit.
●Do not insert metallic objects or put metallic objects into the interiors of the unit
through openings, which could result in fires, electrical shock hazards or fail-
ures.
●If it is necessary to use an AC adapter, use one of the specified type; otherwise,
fires, electrical shock hazards or failures could result.
CAUTION
●Do not give violent shocks to the lithium-ion battery pack or throw it.
●Keep the lithium-ion battery pack out of reach of infants and children.
●Do not leave the lithium-ion battery pack in a place exposed to direct sunlight or
in a hot place. A heightened internal temperature could result in fires.
●Do not place the unit in a place ere it could be splashed with heated oils or ex-
posed to steam, such as near a cooking table, or in a dusty place, which could
result in fires or electrical shock hazards.
●Do not mount the unit on a rickety table or in an inclined or unstable place,
which could cause the unit to tumble down out of balance or fall to cause phys-
ical injury.
WARNING
1 - 13
Safety Precautions
●Do not block ventilation holes in the unit, which could cause heat to build up in-
side the unit, resulting in fires.
●Do not place the unit in a place that is liable to frequent vibration or impact,
which could cause the unit to fall or tumble down, resulting in physical injury.
●Be careful not to let the antenna of a cordless telephone or the like stick into your
eyes by mistake.
●Do not shot-circuit the charging terminals.
●Do not charge the handset seated in the cradle while the charging terminals are
wet with water drops.
●If foreign matter or water should penetrate the interiors of the telephone, discon-
nect the line cord, LAN cable and AC adapter immediately and contact your
dealer.
NOTICE
●To use the unit safely and properly, avoid installing it in these places:
・Places there is much dust or vibration.
・Places that are filled vaporized chemicals or the unit may be exposed to chemicals.
・Places close to radios or TV receivers or sources of intense magnetic fields.
・Places in which there are sources of high-frequency interference nearby, such as high-frequency
sewing machines or electric welders.
CAUTION
1 - 14
Operating Instructions and Maintenance
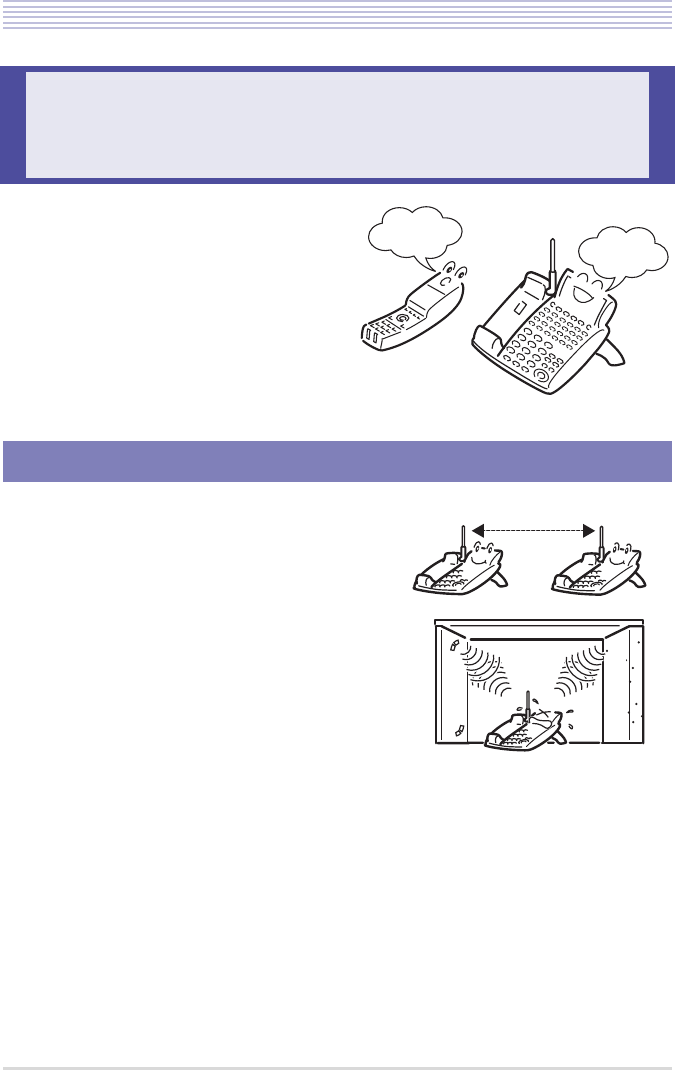
In using cordless terminals, take notice of these
instructions in particular.
・If multiple cordless terminals are installed, keep
their Bluetooth® cradles at least 1m apart from
one another.
・If the Bluetooth® cradle is installed near a metal,
concrete wall or any other structure that could
affect radio transmission, a communication fail-
ure might occur.
・Keep the Bluetooth® cradle at least 3m apart from
any of the devices listed below. Be also careful
not to get within 3m of these devices en using the
Bluetooth® handset. Before locating the cradle,
ask your dealer for a safety validation.
- Microwave ovens
- Wireless LAN access points (AP)
- Medical apparatus
- RFID (apparatus operating in the 2.4 GHz band)
- Manufacturing equipment, such as plasma strippers (LSI manufacturing)
- Speedway electronic toll gates
- Bluetooth® devices
Operating Instructions and
Maintenance
Locating the Bluetooth® Cradle
Maintenance
Environment
At least 1m apart
M
Concrete Wall
Metal
1 - 15
Operating Instructions and Maintenance
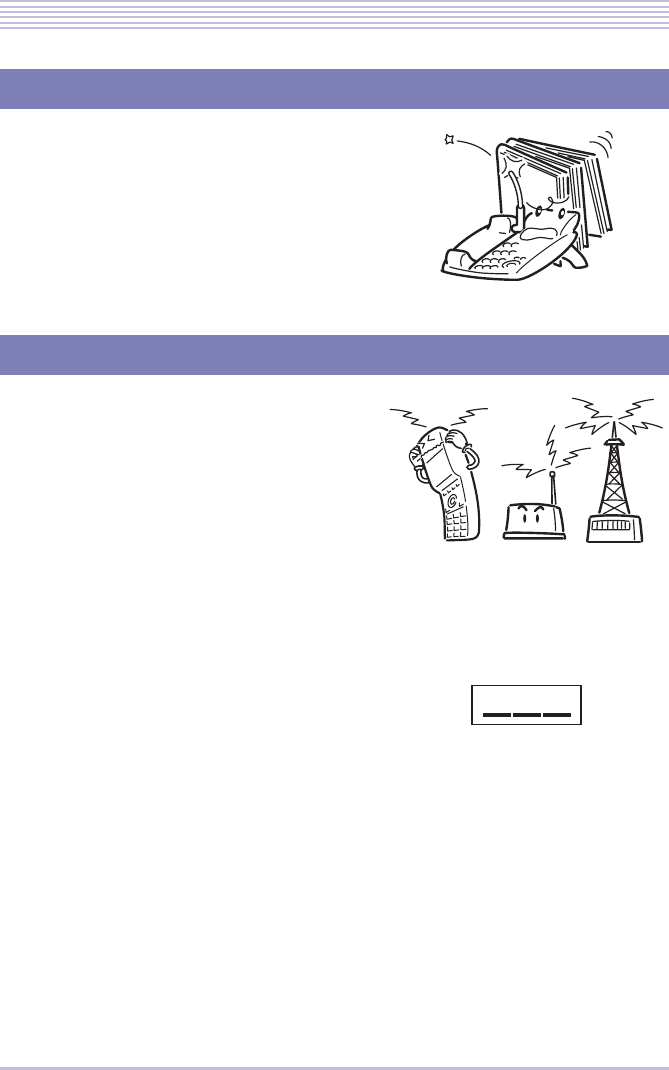
Use the antenna of the Bluetooth® cradle in an
upright position.
The antenna would be broken or bent if it is given
undue force.
Cordless terminals may not work or may be
affected by interference if they are used near a
broadcasting station or near sources of intense radio
transmission, such as ham radio and CB radio.
Because radio equipment might be disabled in the
presence of radio interference, ask your dealer for
preliminary environmental measurement. In install-
ing new radio equipment after the system has been
installed as well, request a preliminary verification
of freedom from radio interference. If interference
is detected after the system is installed, they may
not be corrected.
・This product features built-in radio equipment
that operates on the entire band of 2.4 to 2.4835
GHz. Bands in which mobile stations are identi-
fied can be avoided. The product supports the
FH-SS modulation method and an interfering dis-
tance of 80m. It is labeled with a mark to desig-
nate these characteristics as shown at right.
Antenna
Radio Transmission
2.4 FH 8
1 - 16
Operating Instructions and Maintenance
Cordless terminals are designed to heighten radio output automatically as the separation
between the Bluetooth® cradle and Bluetooth® handset widens, thereby maintaining a satis-
factory state of communication.
Heightened radio output could cause radio interference to neighboring equipment. In this
occurs, keep the Bluetooth® cradle farther apart from the neighboring equipment.
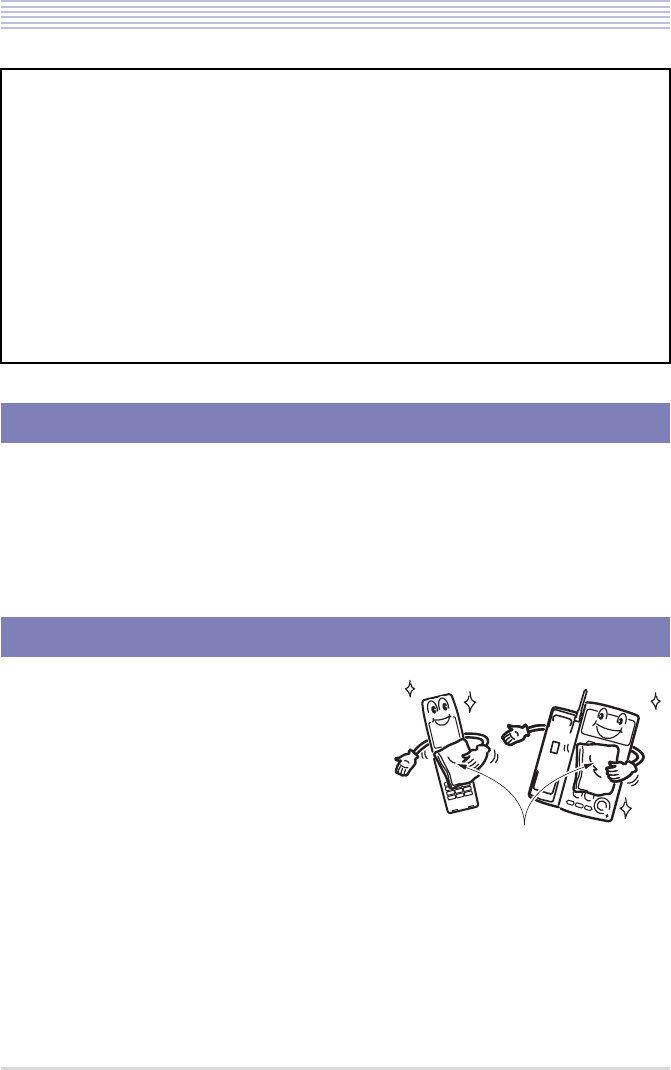
If the Bluetooth® cradle and Bluetooth® handset get
dirty, wipe their surfaces with a soft, dry cloth.
If they are heavily soiled, wipe them with a diluted
solution of a kitchen detergent and then wipe them
off with a dry cloth.
Never use organic solvents, such as alcohol, ben-
zine and thinner, for cleaning; these chemicals
could damage the surfaces of the telephone.
Also, avoid using a chemical duster.
Tips on Radio Transmission
The working frequency band of this device is shared by industrial, scientific and medical
equipment, such as microwave ovens, premises radio stations that are typically used in
manufacturing lines at plants for mobile identification (radio stations that require licensing)
and specified low-power radio stations (license-free radio stations).
• Before using this device, check that premises radio stations for mobile identification and
specified low-power radio stations are not used nearby.
• If any case of radio interference arises from a premises radio station used for mobile
identification, discontinue radio transmission from this device immediately and contact
your dealer for advice on how to take action for avoiding the interference.
• Further, if any case of radio interference arises from a specified low-power radio station
used for mobile identification or any troubles develop, contact your dealer.
Radio Interference
Maintenance
Dry cloth
1 - 17
Operating Instructions and Maintenance
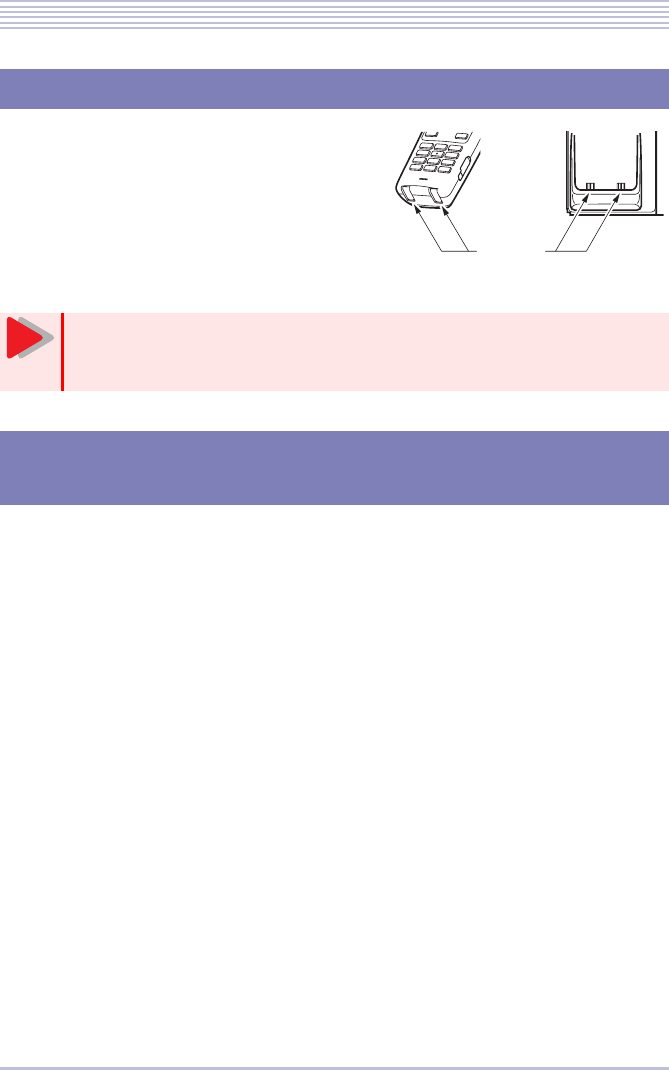
Keep the charging terminals of the Bluetooth® cra-
dle and Bluetooth® handset always clean. Wipe dust
off the charging terminals with a dry cotton swab or
the like at least once a month or rub them with a
cotton swab or the like impregnated with alcohol.
Because cordless terminals use radio transmission between their Bluetooth® cradle and Blue-
tooth® handset, they may take about 15 seconds after the line cord/LAN cable is instead into
the Bluetooth® cradle before calls can be made between the Bluetooth® cradle and Bluetooth®
handset.
If the Bluetooth® handset goes off- hook or the FNC/Conference or TALK key is pressed in
the meantime, the error tone “pi-pi-pi-pi” may sound without a wireless (line) connection
being established, but this is not a fault.
Charging Terminals
In cleaning the charging terminals, be sure not to:
• Touch the terminals with hands directly
• Short-circuit the terminals.
Operation Following Power Feeding to the Bluetooth®
Cradle
Charging
terminals
Caution
1 - 18
Component Names and Functions
The names and functions of the components of a cordless terminal are shown below.
Component Names and Functions
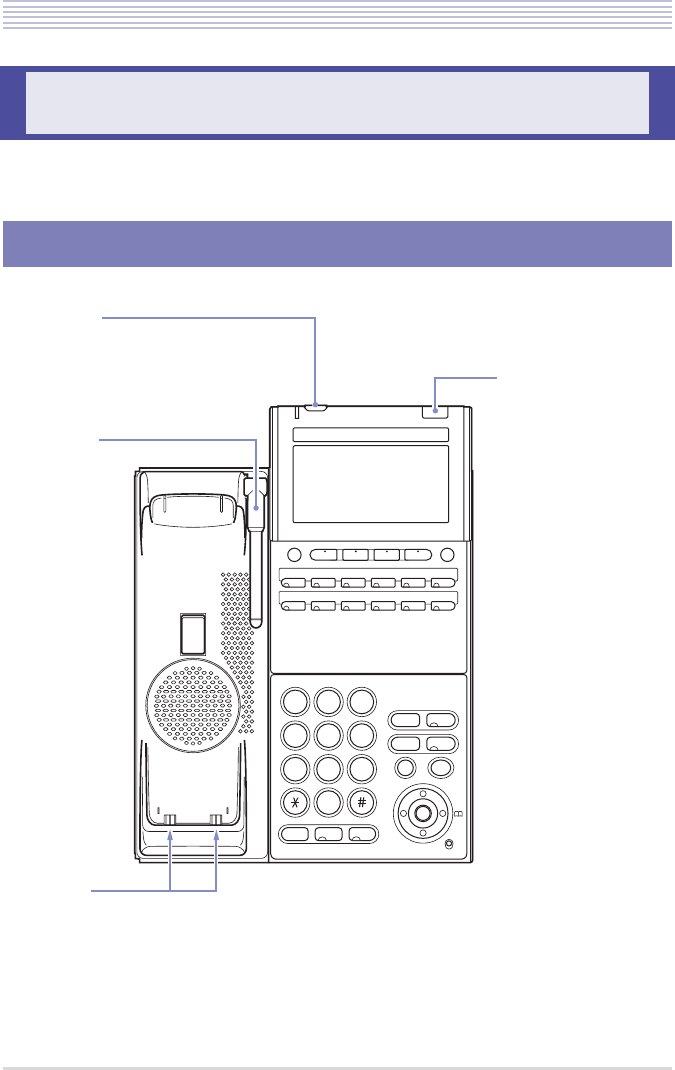
Bluetooth® Cradle (BTC)
Speaker
Answer
12
ABC 3
DEF
5
JKL
4
GHI 6
MNO
8
TUV
7
PQRS 9
WXYZ
0
Recall
%NGCT /GPW
Transfer
Hold
Feature
Mic
Exit Help
4GFKCN
Large lamp
Indicates the status
of a terminating call.
Security key
Use to enable the security features.
* The security key is not available on
some types of telephone.
Antenna
Charging
terminals
1 - 19
Component Names and Functions
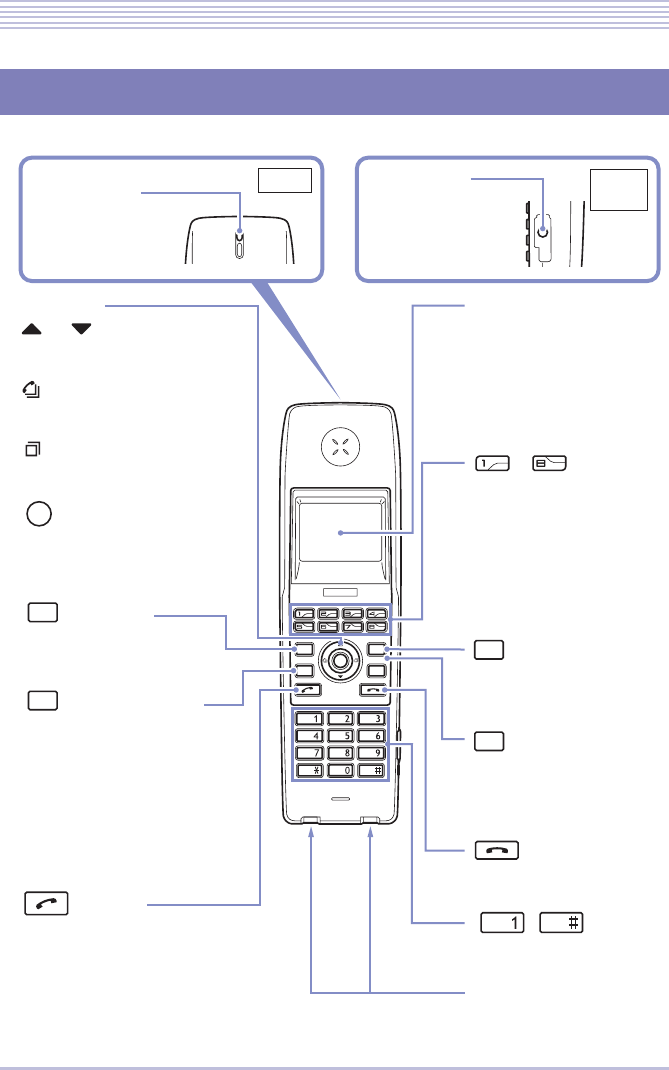
Bluetooth® Handset (BTH)
Back Right
side
HOLDTRF
CONF Recall
@ ABC DEF
GHI JKL MNO
PQRS TUV WXYZ
HOLD
Recall
CONF
FNC
TRF
FNC
㨇 ޓޓ㨪ޓޓ 㨉
㨇ޓޓ㨉
㨇ޓޓ㨉
㨇ޓ 㨉
㨇ޓޓ 㨪ޓ ޓ㨉
[ ޓ ] 㨪[ ޓ ]
[ޓ ]
[ޓ ]
㨇ޓޓ㨉
㨇ޓޓ㨉
[ ޓ ]
Incoming call/
charging lamp
Headset jack
Corsur key
Use to accept the terminating or
originating call history displayed
in the LCD screen or and make
a call.
Use to adjust tone volumes or
display densities.
Volume Up/Down key:
Received History key:
Use to view a history of
terminating calls.
Enter key:
Call History key:
Use to view a history of originating
calls.
Transfer key
Use to forward a call to an
extension or central office line.
FNC/Conference key
(with lamp)
Use to call an extention or answer
a call. This key can also be used to
on the man unit as a FNC (function
key) key. A setting on the man unit
is required to use this key as a FNC
key. For more details, refer to the
user dcocumentation that comes
with your system.
TALK key
(with lamp)
Use to originate a call to an
extension or central office line or
answer a terminating call.
Indicates the sutatus
of a terminating call
and in progress, and
the status of charging.
Accepts a wire
headset.
㨇ޓޓ㨉
LCD screen (with backlight)
Displays various information
according to the status of the
telephone, such as a clock,
remote party information,
originating and terminating call
histories and menues.
Line keys 1 to 8 (with lamp)
Access the functions
preporgrammed on function
buttons 1 to 8 on the cradle.
Also display the status of the
functions preprogrammed on
the buttons.
HOLD key
Use to place extention or
central office line calls on hold.
Recall key
Use to forward calls on a
private exchange (PBX) or
receive the call waiting service
feature.
END key (Disconect)
Use to clear a call.
Dial keys 1 to # (with backlight)
Charging terminals
@
1 - 20
Bluetooth® Handset LCD Screen
The Bluetooth® handset LCD screen displays certain information as described below accord-
ing to the status of the telephone. For information about the Bluetooth® cradle LCD screen,
refer to the user documentation that comes with your system.
▼Standby Sample Display
The information shown below is displayed en the telephone is not used.
For explanations of the icons, see “Explanations of Icons” (P.1-22).
Bluetooth® Handset LCD Screen
Displayed Information
・First line : Icon
・Second line : Date and time
・Third line : Extension number and line
・Fourth line : Active line key number
9'&2/
First line
Second line
Third line
Fourth line
Ĵ ĻĺĹĸķĶĵ
1 - 21
Bluetooth® Handset LCD Screen
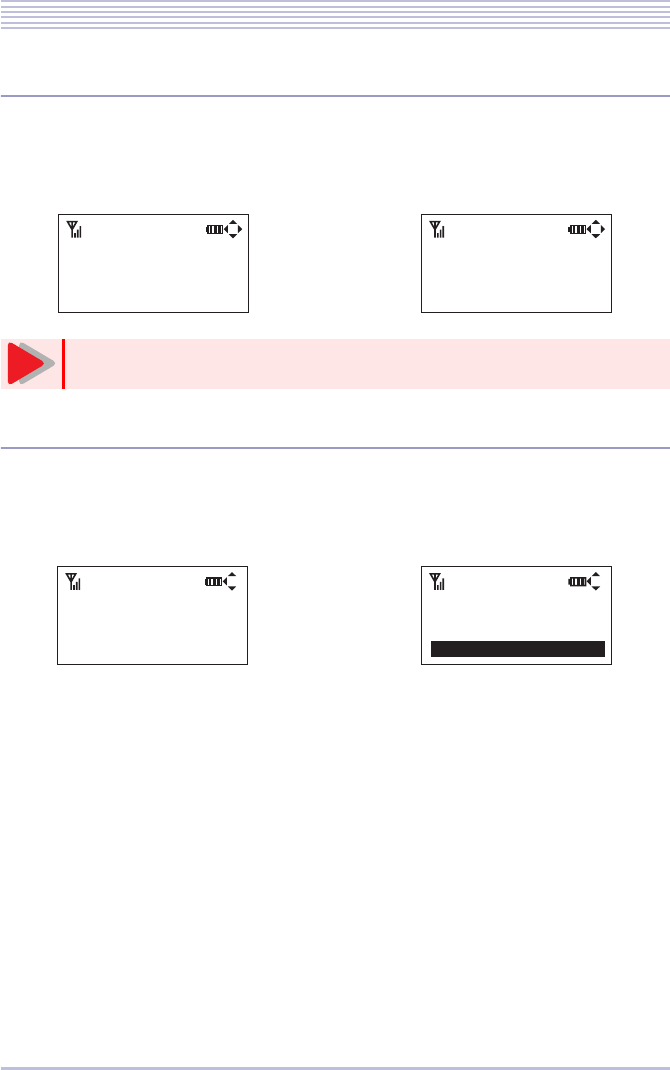
▼If an Originating or Terminating Call History Is Displayed
If an originating or terminating call history is displayed, the history number of a call and date
and time are displayed, along with the remote party’s name or telephone number.
▼If the Setup Screen Is Displayed
If the Setup Screen is displayed, the title of a setup item and its setting are displayed. For
more details, see “Configuring the Bluetooth® Handset (BTH)” (P.1-27).
<Originating call history> <Terminating call history>
The display may differ depending on your system.
<Volume/density control> <Item selection>
Caution
=4KPI8QNWOG?
4KPI8QNWOG
=
ĀĀĀĀĀ
?
=.QY2QYGT/QFG?
e&KUCDNG
e'PCDNG
1 - 22
Bluetooth® Handset LCD Screen
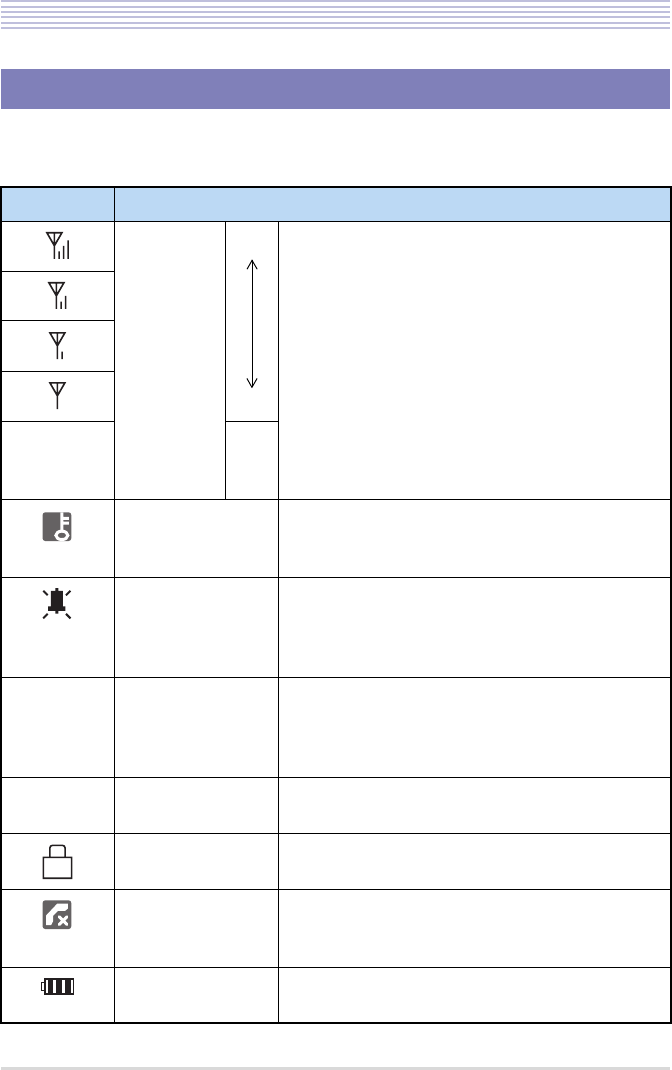
The table below summarizes the explanations of the icons that appear on the first and fourth
lines in the LCD screen.
Explanations of Icons
Icon Explanation
Antenna
marks High Indicates the strength of radio transmission between
the Bluetooth® cradle and Bluetooth® handset.
* If no service occurs while a call is in progress, the
call is cleared after about 20 seconds expire. The
call can last if it recovers from no service before
it is cleared.
* No service (no display) indicates that the tele-
phone is out of reach of radio transmission. Move
to a place ere an antenna mark lights.
Low
No
ser-
vice
Security mode Displayed en the telephone is locked in security key.
* Available only if the Bluetooth® cradle is an IP
multifunctional telephone.
Ring tone OFF Displayed en the telephone is configured to suppress
the ring tone. For more details, see “Ring Volume”
in “Configuring the Bluetooth® Handset (BTH)”
(P.1-27).
Unread instant
message notification Displayed en there are instant messages (IM) yet to
be read.
* Available only if the Bluetooth® cradle is an IP
multifunctional telephone.
Unheard voice
mail notification Displayed en there are voice mails in the mailbox
yet to be heard.
Key lock Displayed en a key lock has been set.
For more details, see “Key Lock” (P.2-3)
Unanswered call
history yet to be
confirmed
Displayed en there is a history of unanswered termi-
nating messages yet to be confirmed.
Remaining battery
voltage Indicates the remaining voltage of the battery. For
more details, see “Charging” (P.1-5).
S
+/
+/
8
8
/
/
L

1 - 23
Bluetooth® Handset LCD Screen
Available cursor
display Indicates the directions of the cursor keys available.
Line key status dis-
play Indicates the numbers of active line keys.
Icon Explanation
ĴĻ
À
1 - 24
Adjusting the Bluetooth® Handset
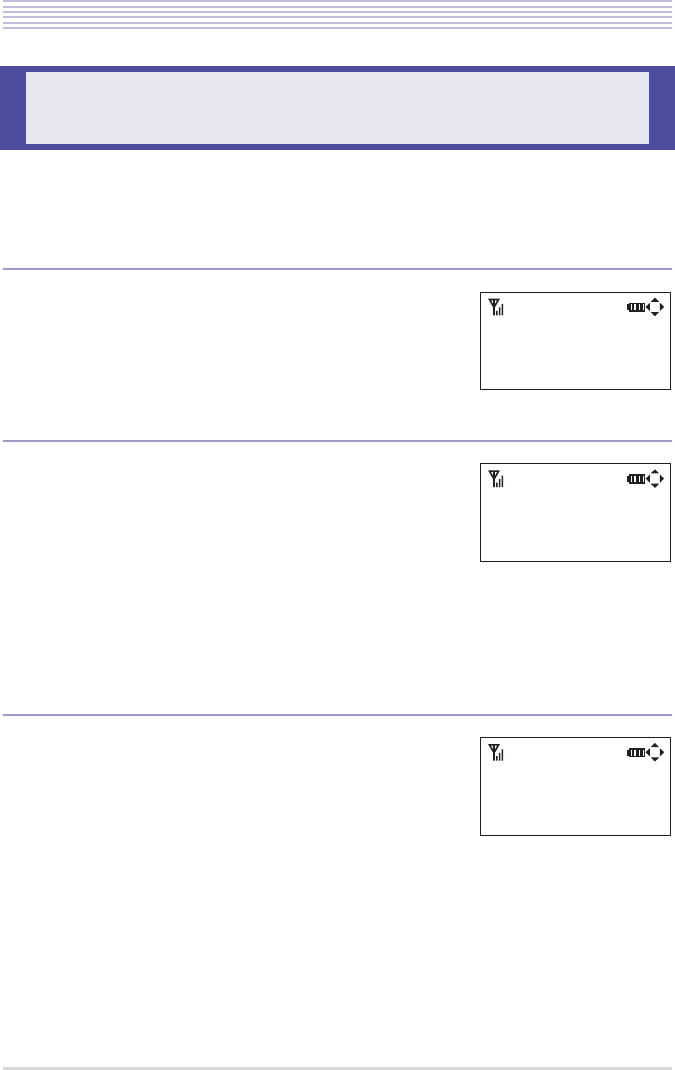
You can adjust the volumes of various tones and the display density of the Bluetooth® hand-
set using the up and down cursor keys.
▼Adjusting the Receiver Volume
You can adjust the volume of the voice that is heard from
the handset.
Press the up and down cursor keys (up: high, down: low)
while you are talking on the handset.
▼Adjusting the Ring tone Volume
You can adjust the volume of the ring tone of the Blue-
tooth® handset.
Press the up and down cursor keys (up: high, down: low)
while the ring tone sounds.
If you want to adjust the ring tone volume while the ring
tone does not sound, do as instructed in “Ring Volume” in
“Configuring the Bluetooth® Handset (BTH)” (P.1-27).
The ring tone OFF icon appears in the LCD screen if the
ring tone volume is turned off.
▼Adjusting the LCD Density
You can adjust the contrast of the LCD screen.
Press the up and down cursor keys (up: dark, down: light)
while the standby panel is on display.
Adjusting the Bluetooth® Handset
9'&2/
=?ć=A?
*0&
ĀĀĀĀĀĀ
9'&2/
40)
ĀĀĀĀĀĀĀĀ
9'&2/
.%&
ĀĀĀĀĀ

1 - 25
Configuring the Cordless Terminal
Start configuring Bluetooth® from the cradle setup menu.
The table below lists the setting of each setup item.
Configuring the Cordless Terminal
Configuring the Bluetooth® Cradle (BTC)
Menu display Setting
([ ] default) Explanation
Pairing
Mode Pairing - Up to 8 Bluetooth® devices located around the
Bluetooth® cradle (BTC) are located, among
which select a headset want to pair with the multi-
functional telephone.
For more details, see “Pairing with a Bluetooth®
Headset” (P.1-38).
PIN Code 4 to 16
digits
[0000]
Before pairing, you need to adjust the PIN Code
of the Bluetooth® cradle (BTC) and the Blue-
tooth® headset.
In pairing with a Bluetooth® headset having a PIN
Code other than 0000, enter a string of 4 to 16
digits to suit that device.
For more details, see “Pairing with a Bluetooth®
Headset” (P.1-38).
* The PIN Code is a password that is exchanged
between Bluetooth® devices preparatory to
launching a session of communication between
them.
Visibility 1. Disable
[2. Enable] Set ether to make information about the Blue-
tooth® cradle (BTC) visible to other Bluetooth®
devices or not.
• Disable : Invisible
• Enable : Visible
1 - 26
Configuring the Cordless Terminal
▼Key Operations at Menu Setup (Bluetooth® Cradle)
BT Information - You can view the following kinds of information
about the Bluetooth® cradle (BTC):
• Firmware version
• Hardware version
• BT module
• BT profile (Bluetooth® standard)
• SPP (SPP profile version)
• HSP (HSP profile version)
• HFP (HFP profile version)
• Device address
•Device name
Key Description
Cursor
keys Up • Moves up the highlighted item.
• Raises the volume or density.
Down • Moves down the highlighted item.
• Lowers the volume or density.
Left • Returns to the last page.
Right • Accepts the highlighted item and displays the next page.
Enter • Accepts the highlighted item and displays the next page.
• Saves the change and returns to the last page.
Dial keys • Accept the item of a number pressed and display the next page.
• Save the change to a number pressed and return to the last page.
• Enter numerals.
Clear key • Returns to the last page.
• Deletes one numeral.
* The clear key is not available on some types of telephone.
Exit key • Cancels an operation and returns to the standby panel.
You cannot originate calls or answer terminating calls while the Bluetooth®
menu setup is in progress. Exit the menu before originating calls or answering
terminating calls.
Menu display Setting
([ ] default) Explanation
Caution
1 - 27
Configuring the Cordless Terminal
On the Bluetooth® handset in standby mode, press the [HOLD] > [Transfer] keys and then
press dial keys (1) to (6) to see a Setup Screen associated with the dial key pressed.
The table below lists the setting of each item.
Configuring the Bluetooth® Handset (BTH)
The handset will return to the standby panel automatically if 4 minutes pass with
the no action being launched from the menu.
Dial key Item Setting
([ ] default) Explanation
(1) Base Call - Allows you to call up the paired Bluetooth®
cradle and identify it en it is unknown.
(2) Key Touch
Tone •Disable
•[Enable] Set ether to sound a confirmation tone each
time a key is pressed or not.
(3) Ring Volume Off (0),
1 to [8] to 13 Adjusts the ring tone volume.
The ring tone OFF icon appears in the LCD
screen if the ring tone volume is turned off.
(4) No Service
Tone •Disable
•[Enable] Set ether to sound a no service tone en no
service occurs.
(5) Low Power
Mode •Disable
•[Enable] Set ether to transition to low-power mode
automatically en no call or key operation
has been launched for a long time.
(6) Font Size • Double
Height
•[Normal]
Set ether to display the characters on the
two lines in the middle in the LCD screen
in double or normal height.
* Characters display in normal height
while a setup item is on display.
You cannot originate calls or answer terminating calls while the Bluetooth®
menu setup is in progress. Exit the menu before originating calls or answering
terminating calls.
Caution
Caution

1 - 28
Configuring the Cordless Terminal
▼Key Operations at Setup (Bluetooth® Handset)
Key Description
Cursor
keys Up • Moves up the highlighted item.
• Raises the volume or density.
Down • Moves down the highlighted item.
• Lowers the volume or density.
Left • Returns to the last page.
Right • Accepts the highlighted item and displays the next page.
Enter • Accepts the highlighted item and returns to the standby panel.
END key • Cancels an operation and returns to the standby panel.
1 - 29
Transforming the Standard Handset into a BCH-L(BK) UNIT
The BCH-L(BK) UNIT is an optional device that transforms the standard multifunctional
telephone into a cordless terminal. This section explains how to transform the standard hand-
set into a BCH-L(BK) UNIT.
▼Supported Telephone Type
The BCH-L(BK) UNIT can be connected to the following types of telephone:
▼Replacement Procedure
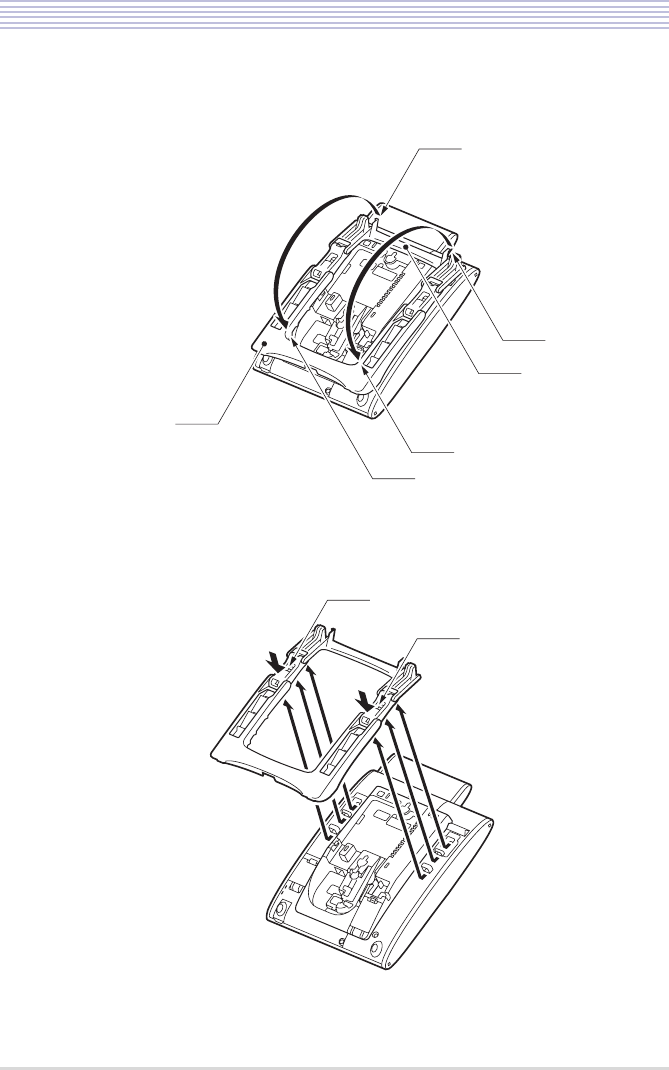
1Turn over the telephone.
2Remove the standard handset.
Release the coiled cord from the groove and out its modular plug from the HANDSET connector
on the back of the telephone.
3Lower the tilt legs to the first level.
Transforming the Standard Handset into
a BCH-L(BK) UNIT
Telephone type Description Remarks
Digital multifunctional
telephone • DTL-12/24/32D-1
• DTL-32DLK-1
• DTL-8LD-1
Not connectable to the DTL-
2E-1 and DTL-6DE-1.
IP multifunctional tele-
phone • ITL-12/24/32D-1
• ITL-32DLK-1
• ITL-8LD-1
• ITL-320C-1
Not connectable to the DTL-
2E-1 and DTL-6DE-1.
If the BCH-L(BK) UNIT is connected to a telephone, the following optional
devices cannot be connected at the same time:
• APR-L UNIT
• ADA-L UNIT
• BHA-L UNIT
• PSD-L(WH) UNIT
• PSA-L(WH) UNIT
Caution
1 - 30
Transforming the Standard Handset into a BCH-L(BK) UNIT
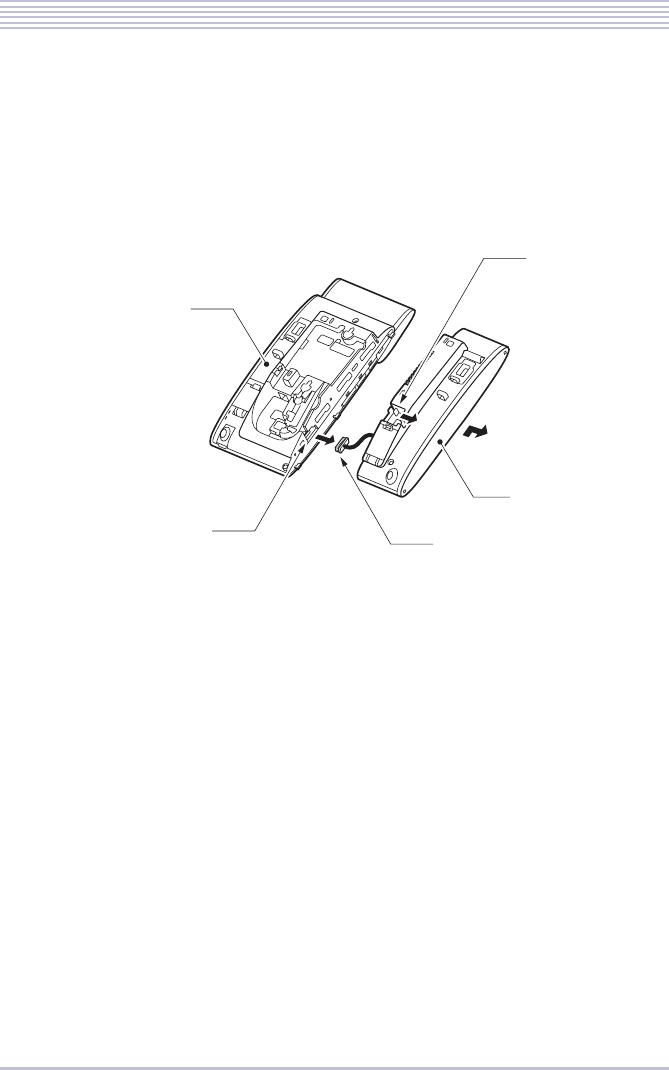
4Release lugs a and b on the stopper from grooves A and B in the
tilt legs and widen the tilt legs.
5Slide the tilt legs to front out of position while pushing claws c and
d.
a
A
B
b
Tilt leg
Stoppe
r
d
c
1 - 31
Transforming the Standard Handset into a BCH-L(BK) UNIT
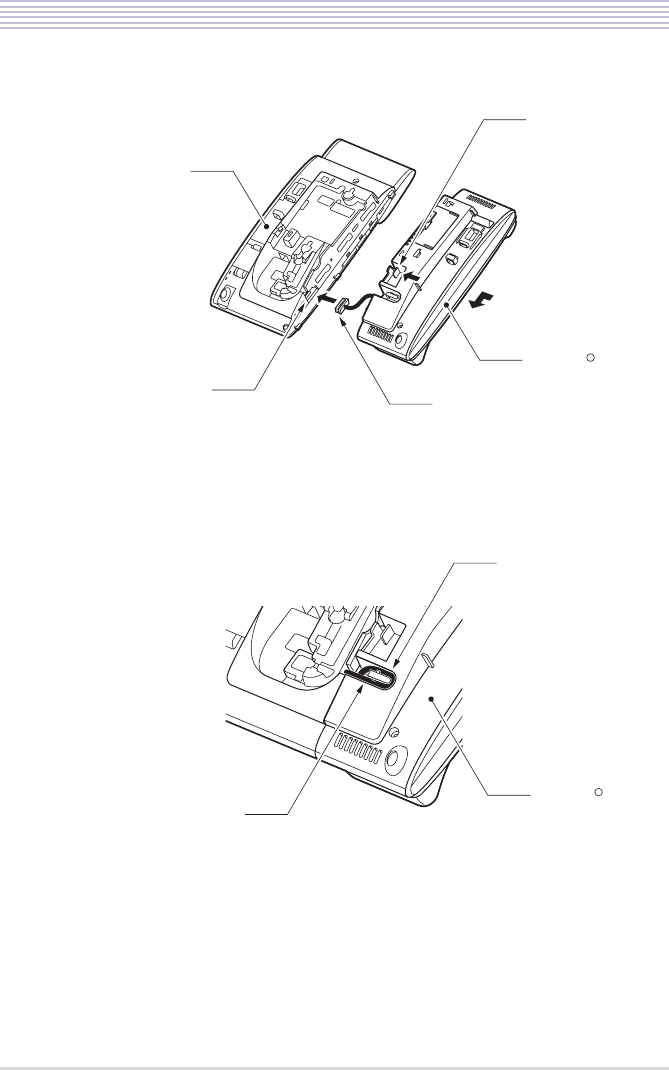
6Tilt the handset cradle stopper towards the cradle until it is
released with a click.
7Slide the handset cradle farther away to remove.
8Remove the cradle connecting cable from the telephone unit con-
nector.
9Insert the cradle connecting cable of the Bluetooth® cradle (BTC)
into the telephone unit connector.
10 Insert the lug on the telephone unit into the hole in the Bluetooth®
cradle (BTC).
Have the cradle connecting cable passed in the groove to keep it from being pinched.
Multifunctional
telephone unit
Handset cradle
Unit connector
Cradle connecting cable
Stopper
1 - 32
Transforming the Standard Handset into a BCH-L(BK) UNIT
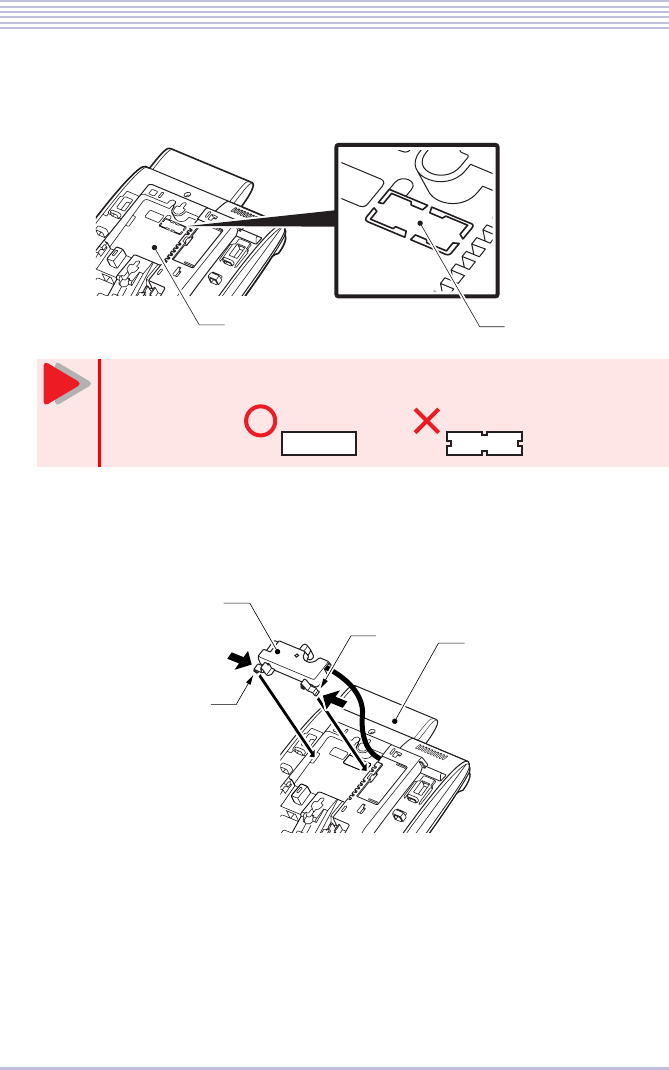
11 Slide the Bluetooth® cradle (BTC).
12 Push the Bluetooth® cradle (BTC) until the stopper clicks into
position.
13 Fit the cradle connecting cable in the groove to clamp.
Multifunctional
telephone unit
Bluetooth
cradle (BTC)
Unit connector
Cradle connecting cable
Stopper
R
Cradle connecting cable
Bluetooth
cradle (BTC)
R
Groove
1 - 33
Transforming the Standard Handset into a BCH-L(BK) UNIT
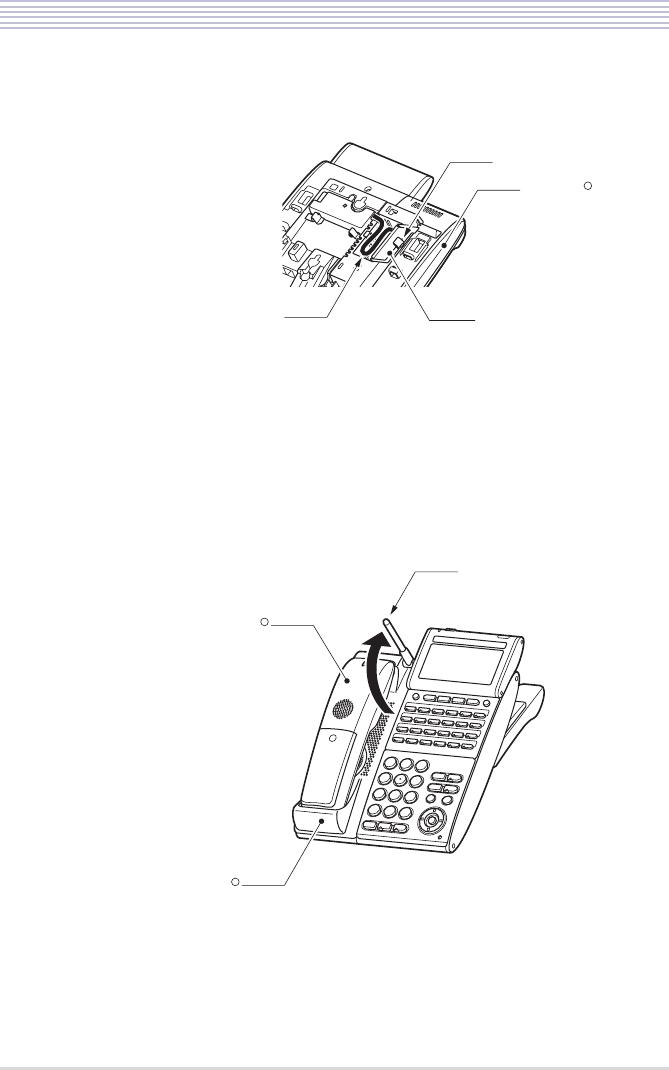
14 Cut out the notched section of the bottom unit connector on the
multifunctional telephone with nippers or the like.
15 Attach the bottom unit mounted in the Bluetooth® cradle (BTC) to
the telephone connector while pushing the claws on both sides of
the unit.
16 Uncover the bottom unit mounted in the Bluetooth® cradle (BTC)
while holding its knob.
Cut out the notched section at its base to leave no legs.
Notched section
Multifunction telephone
Caution
Multifunctional
telephone
Bottom unit
Claw
Claw
1 - 34
Transforming the Standard Handset into a BCH-L(BK) UNIT
17 Stow the extra length of the bottom unit connecting cable at the
bottom unit connector and close the bottom unit.
18 Widen the tilt legs until a click sounds.
19 The tilt legs in original position.
20 Place the Bluetooth® handset (BTH) in the Bluetooth® cradle
(BTC).
21 Erect the antenna of the Bluetooth® cradle (BTC).
The transformation of the standard handset into a BCH-L(BK) UNIT is
complete.
Cover
Knob
Bottom unit connecting cable
Bluetooth
cladle㧔BTC㧕
R
Antenna
Bluetooth
handset㧔BTH㧕
R
Bluetooth
cradle㧔BTC㧕
R
1 - 35
Wall-Mounting the Bluetooth® Cradle
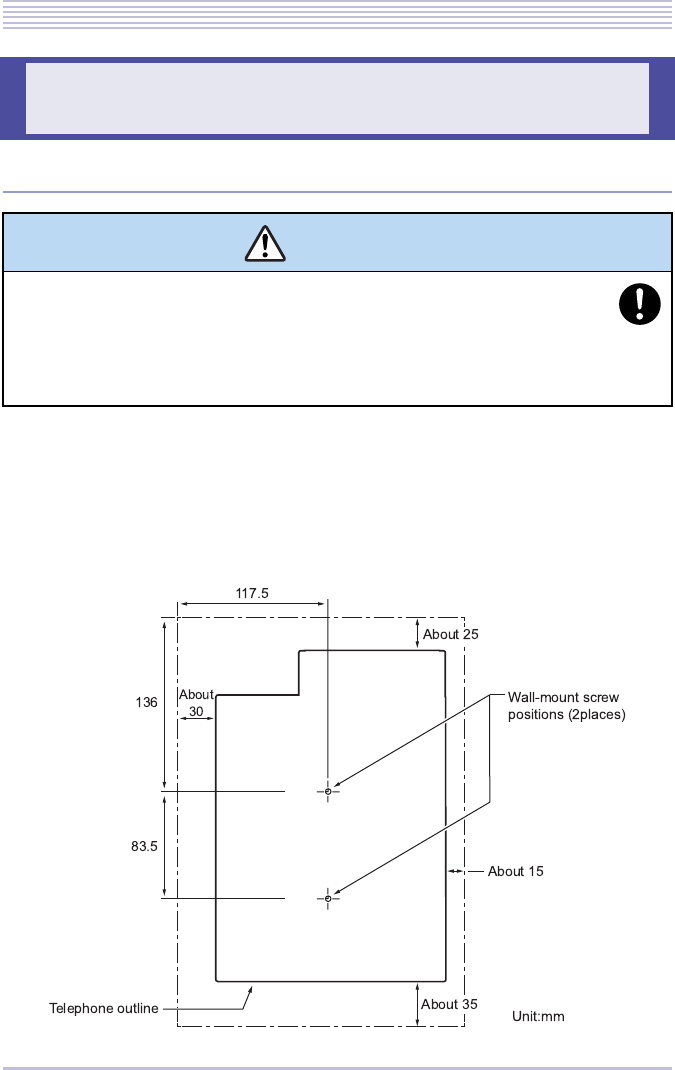
▼Selecting a Mounting Position
Clearances required for installing the Bluetooth® cradle are shown below. Avoid mounting
the cradle on a plaster-board wall, but before mounting the cradle on a wall, fully check that
the wall withstands the weight of the telephone and the load from pulling the telephone dur-
ing operation.
<< Wall-mounting dimension diagram >>
Wall-Mounting the Bluetooth
®
Cradle
CAUTION
●When the cradle is wall-mounted, watch for its fall.
- Physical injury could result.
●In wall-mounting the cradle, install it in firm position so it will not fall due its
own weight.
- Physical injury could result.
1 - 36
Wall-Mounting the Bluetooth® Cradle
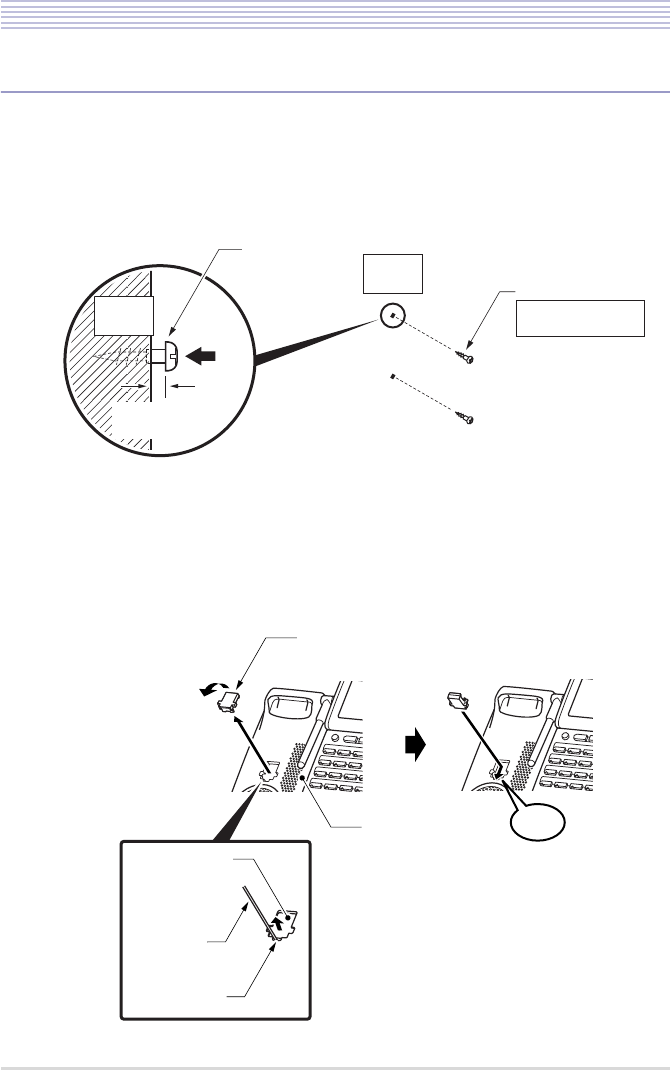
▼Installation Procedure
Finish cabling to the Bluetooth® cradle before mounting it.
1Attach two wood screws to the wall.
See “<< Wall-mounting dimension diagram >>” (P.1-35). Keep a clearance of about 2mm between
each wood screw and the wall.
2Remove the Bluetooth® handset hanger from the cradle.
Insert a rod in the hollow below and lift it up.
3Insert the handset hanger in a different direction and slide it down
to secure until it clicks into position.
Wood screw
Ǿ4.1mm
length 16 to 20mm
Wall
Surface
Wood screw Wall
Surface
Keep a clearance
of about 2mm.
Handset hanger
Rod
Hollow
Click
Multifunctional
telephone
Handset hanger
1 - 37
Wall-Mounting the Bluetooth® Cradle
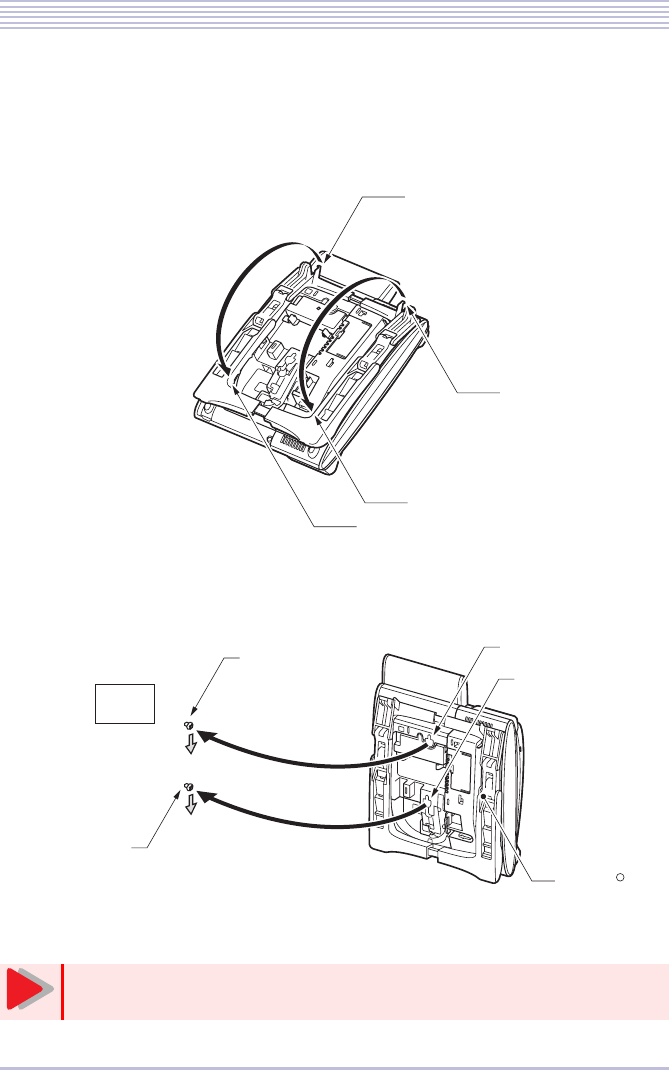
4Turn over the telephone and lower the tilt legs to the first level.
5Release lugs a and b on the stopper from grooves A and B in the
tilt legs and widen the tilt legs.
6Hook wall-mount holes C and D on the back of the telephone on
wood screws c and d attached in Step 1.
The installation of the Bluetooth® cradle is completed.
To return the Bluetooth® handset to a wall-mounted cradle, push it fully into
position until its contacts touch the rear.
a
A
B
b
Wood screw c
Wood screw d
Wall-mount hole C
Wall-mount hole D
Wall
Surface
Bluetooth cradle
R
Caution
1 - 38
Connecting a Headset
The following kinds of headsets can be used with a cordless terminal:
・Bluetooth® Cradle (BTC) side : Bluetooth® head set, wire head set
・Bluetooth® Handset (BTH) side : Wire head set
The method of connecting each headset is as follows.
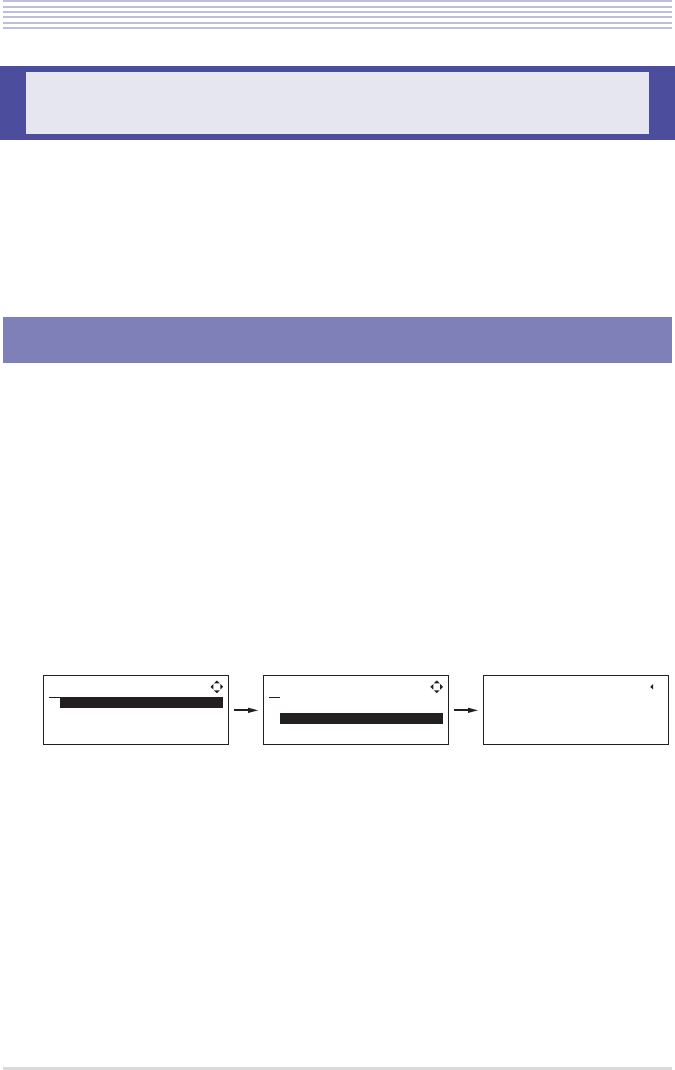
A Bluetooth® headset can be connected to the Bluetooth® cradle (BTC) by pairing in a cradle
menu operation. To perform pairing, follow these steps:
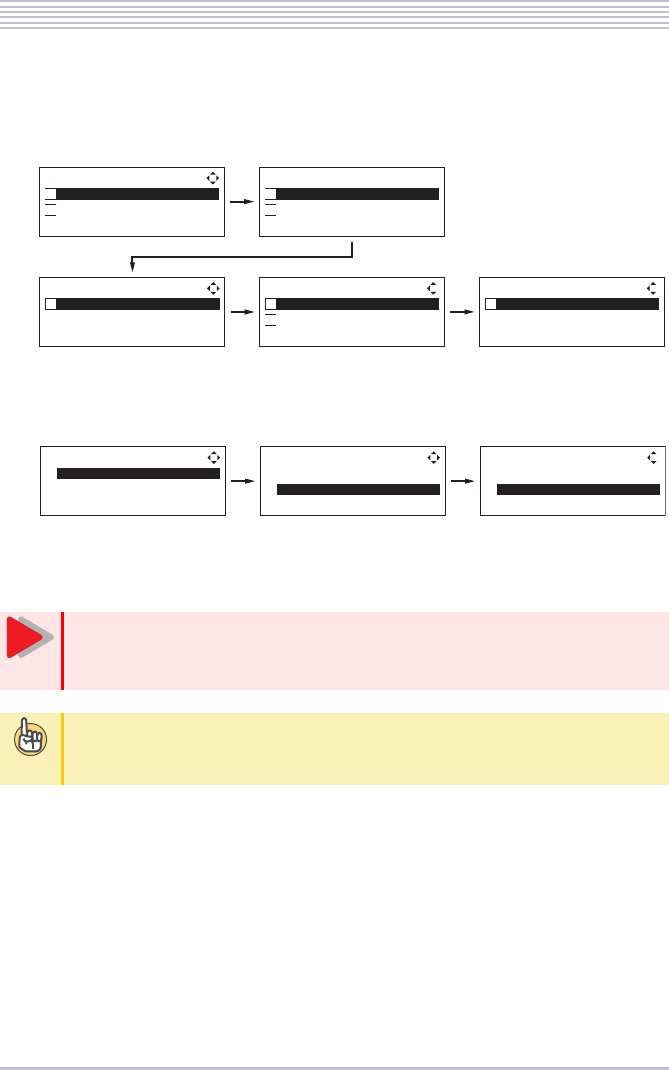
1Invoke the Bluetooth® device setup screen in the Bluetooth® cra-
dle LCD screen.
For instructions on how to invoke the setup screen, see “Configuring the Bluetooth® Cradle
(BTC)” (P.1-25).
If the Bluetooth® headset has a PIN code of ‘0000’, go to Step 3; else, go to Step 2.
2In the Bluetooth® screen, select [1. Pairing Mode] > [2. PIN Code]
in this order. Enter a PIN Code (4 to 16 digits) to suit the Bluetooth®
device and press the OK key.
Connecting a Headset
Pairing with a Bluetooth
®
Headset
=$NWGVQQVJ?
2CKTKPI/QFG
8KUKDKNKV[
ĉĊ$CEM1-
Ĵ
ĵ
=2CKTKPI/QFG?
2CKTKPI
2+0%QFG
ĉĊ$CEM1-
Ĵ
ĵ
=2+0%QFG?
2+0%QFG!
$-$CEM1-
Ĵ
ĵ
1 - 39
Connecting a Headset
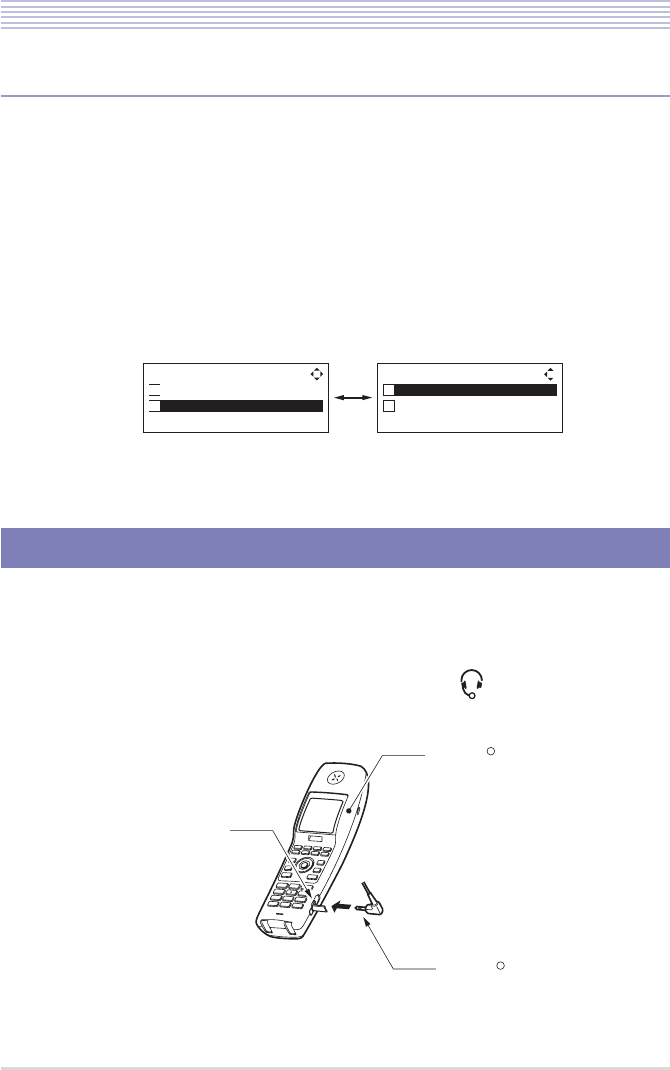
3In the Bluetooth® screen, select [1. Pairing Mode] > [1. Pairing] >
[1. -- Bluetooth Headset --] in this order and select a headset to pair
with from a list of Bluetooth® devices located.
4Select [1. Paired Head Set] > [2. Connect] > [2. Enable] in the pair-
ing screen in this order and press the OK key.
Pairing between the Bluetooth® headset and the Bluetooth® cradle
(BTC) is completed.
After pairing, be sure to configure the cradle connection with the Bluetooth®
headset in Step 4 to enable it. If connected setting is not done, the Bluetooth®
headset that does the pairing cannot be used.
To unpair a paired Bluetooth® headset
Select [1. Delete] in the Bluetooth® Headset screen in Step 4 above to switch to a Delete
screen. Press the OK key to unpair the paired Bluetooth® headset.
=2CKTKPI?
$NWGVQQVJ*GCFUGV
ĉĊ$CEM1-
Ĵ
=2CKTKPI?
ĉĊ$CEM1-
ĴĴ
=$NWGVQQVJ*GCFUGV?
CCDDEEFFGGHH
ĉĊ$CEM1-
Ĵ
ĵ
Ĵ
Ĵ Ĵ Ĵ
ĵ
=$NWGVQQVJ?
2CKTKPI/QFG
8KUKDKNKV[
ĉĊ$CEM1-
Ĵ
ĵ
=2CKTKPI/QFG?
2CKTKPI
2+0%QFG
ĉĊ$CEM1-
Ĵ
ĵ
Ĵ
ĵ
=2CKTKPI?
ĉĊ$CEM1-
ĴĴ
ĵ
=$NWGVQQVJ*GCFUGV?
&GNGVG
%QPPGEV
ĉĊ$CEM1-
Ĵ
ĵ
=%QPPGEV?
&KUCDNG
'PCDNG
ĉĊ$CEM1-
Ĵ
ĵ ĵ
Caution
T
i
p
s
1 - 40
Connecting a Headset
▼Visibility Setting
Set whether to make information about the Bluetooth® cradle (BTC) visible to other Blue-
tooth® devices. The example below assumes that the cradle information is not made visible.
1Invoke the Bluetooth® device setup screen in the Bluetooth® cra-
dle LCD screen.
For instructions on how to invoke the setup screen, see “Configuring the Bluetooth® Cradle
(BTC)” (P.1-25).
2In the Bluetooth® screen, select [2. Visibility] > [1. Disable] and
press the OK key.
The visibility setting is completed.
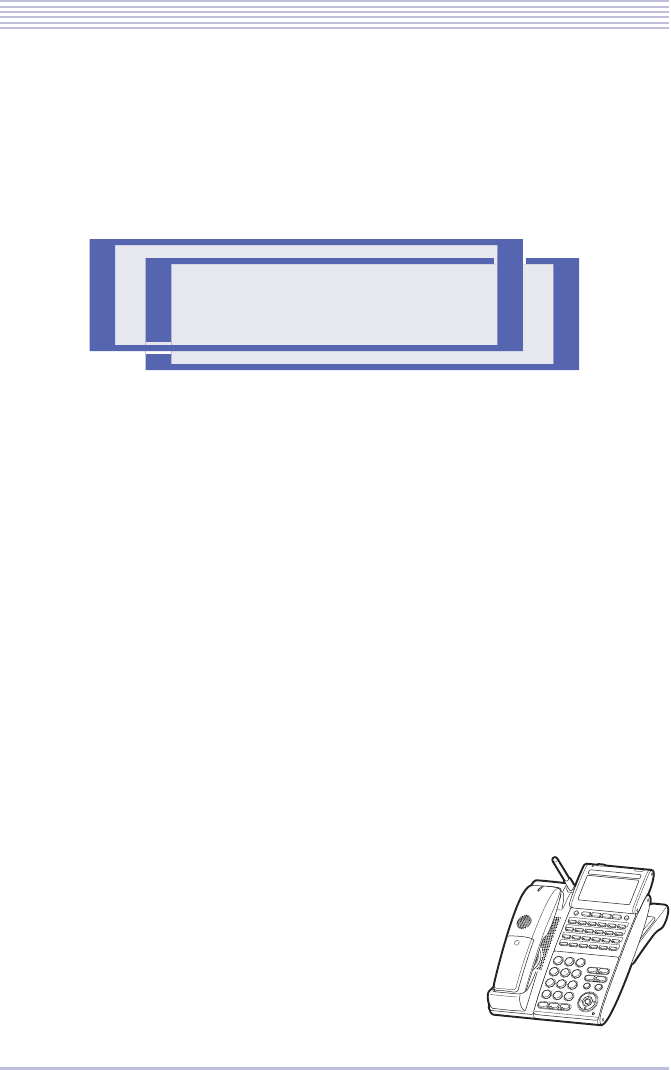
You can connect a headset to the Bluetooth® handset (BTH).
For latest recommended product information, browse the following Web site:
http://www.necinfrontia.co.jp/
Insert the headset plug firmly into the headset jack (bearing the mark in the cover) on the
right side of the Bluetooth® handset (BTH).
Connecting a Wire Headset
=$NWGVQQVJ?
2CKTKPI/QFG
8KUKDKNKV[
ĉĊ$CEM1-
Ĵ
ĵ
=8KUKDKNKV[?
&KUCDNG
'PCDNG
ĉĊ$CEM1-
Ĵ
ĵ
Ĵ
ĵ
Bluetooth Handset (BTH)
Headset jack
Bluetooth cradle 㧔BTC㧕
R
R
2 - 1
Bluetooth
®
Handset Operations
Caution ............................................................................ 2-2
Bluetooth® Handset Functions ........................................ 2-3

2 - 2
Caution
Take notice of these instructions when operating a cordless terminal:
・Cordless terminals take a certain length of time before they enable you to talk. Cordless
terminals also take some time before switching a call originated by on-hook dialing to the
Bluetooth® handset after you confirm the called party’s response to it.
・The TALK lamp on the Bluetooth® handset may light green while it stands by off-hook
after a dialing operation performed from the Bluetooth® cradle. Press the handset key to
switch the call to the Bluetooth® handset.
・When making a phone call from the Bluetooth® handset after pressing the TALK or FNC/
Conference key, make sure you hear a dial tone before pressing dial keys. Dial keys
pressed before a dial tone is heard will be ignored.
・For operating instructions that use line keys, refer to the user documentation that comes
with your system.
Caution
2 - 3
Bluetooth® Handset Functions
You can lock the Bluetooth® handset keys to disable them from being tampered.
▼How To Enable the Key Lock
1Press the Transfer key for 2 seconds.
2A key lock icon appears in the LCD
screen.
▼How to disable
1Press the Transfer key for 2 seconds.
2The key lock icon disappears from the
LCD screen.
Bluetooth® Handset Functions
Key Lock
If a call terminates while the key lock is enabled
Press the TALK key, blinking line key or FNC/Conference key to answer the terminating
call. While the call is in progress, the key lock is temporarily overridden to make all keys
functional. Hang up to return to the key lock enabled state.
9'&2/
L
T
i
p
s
9'&2/
3 - 1
Troubleshooting
Troubleshooting Tips ....................................................... 3-2

3 - 2
Troubleshooting Tips
If you suspect a failure, try the actions recommended in the table below first. If the problem
persists or the symptom you are experiencing is not listed here, call your dealer and request
service.
Troubleshooting Tips
Symptom Point to check Action
Shut down completely • Isn’t the Bluetooth® cradle
cord out of position?
• Is the battery correctly
loaded?
• Is the battery charged?
• Isn’t the handset too
remote from the Blue-
tooth® cradle? (Does the
antenna mark in the Blue-
tooth® handset LCD screen
show “Antenna” or isn’t it
off?)
• Inset the Bluetooth® cra-
dle cord firmly into posi-
tion.
• Reload the battery cor-
rectly.
• The battery may have been
exhausted aged if the hand-
set still fails when the bat-
tery is fully charged.
Replace the battery.
• Get closer to the Blue-
tooth® cradle to operate.
Ring back tone does
not sound • Isn’t the ring tone volume
turned OFF? (Doesn’t the
ring tone OFF appear in
the Bluetooth® handset
LCD screen?)
• Is the battery correctly
loaded?
• Adjust the ring tone vol-
ume.
• Reload the battery cor-
rectly.
Voice is disrupted while
talking • Does the antenna mark in
the handset LCD screen
show “Antenna” or isn’t it
off?
• Isn’t there an obstacle,
such as a concrete wall,
between the Bluetooth®
cradle and Bluetooth®
handset?
• Get closer to the Blue-
tooth® cradle to operate.
• Move to a location clear of
intervening obstacles.

3 - 3
Troubleshooting Tips
Noise heard while talk-
ing • Isn’t there any home appli-
ance or OA equipment
nearby?
• Electrical equipment can
be a source of radio inter-
ference. Keep apart from
electrical equipment.
Calls do not last long
than 10 minutes even
though the battery has
been charged for 8
hours or longer
• Is the Bluetooth® handset
correctly seated in the
Bluetooth® cradle?
• Aren’t the charging termi-
nals soiled?
• Hasn’t the handset been
used for nearly two years?
• Keep the Bluetooth® hand-
set properly seated in the
Bluetooth® cradle.
• Wipe off dirt from the
charging terminals of the
Bluetooth® cradle and
Bluetooth® handset with a
dry cloth.
• The battery may have been
exhausted if two years
have passed since the
handset was first used.
Replace the battery.
Remote party’s voice
hard to hear • Isn’t the Bluetooth® hand-
set receiver volume set
low?
• Press the up cursor key
while talking to adjust the
receiver volume.
It sometimes happens
that, when the TALK or
FNC/Conference key is
pressed, their respec-
tive lamps blink but do
not stay continuously lit
and the call is not
established, with an
error tone “pi-pi-pi-pi”
sounding from the
Bluetooth® handset.
• Radio interference may be
at fault.
• Isn’t there any source of
radio interference nearby?
• Is the cradle at least 3m
apart from the equipment
mentioned in “Locating the
Bluetooth® Cradle” (P.1-
14) ?
• Isn’t there any device near
the Bluetooth® handset that
is mentioned in “Locating
the Bluetooth® Cradle”
(P.1-14) ?
• Press the TALK or FNC/
Conference key one again.
• Keep the Bluetooth® cradle
and Bluetooth® handset at
least 3m apart from
sources of possible radio
interference.
Symptom Point to check Action

Store name
A50-012514-001 Issue 1.0
2007.12
Cordless Terminal User
s Guide
Please cooperate with recycling of a lithium ion battery.
NEC Infrontia Corporation