NEOLAB CONVERGENCE NWP-F121 Neo smartpen N2 User Manual
NEOLAB CONVERGENCE Neo smartpen N2
UserManual.wiki
>
NEOLAB CONVERGENCE
>
NWP F121 User Manual
User Manual
Navigation menu
Upload a User Manual
Namespaces
Wiki Guide
HTML
PDF
Info
Views
User Manual
Discussion / Help
Navigation

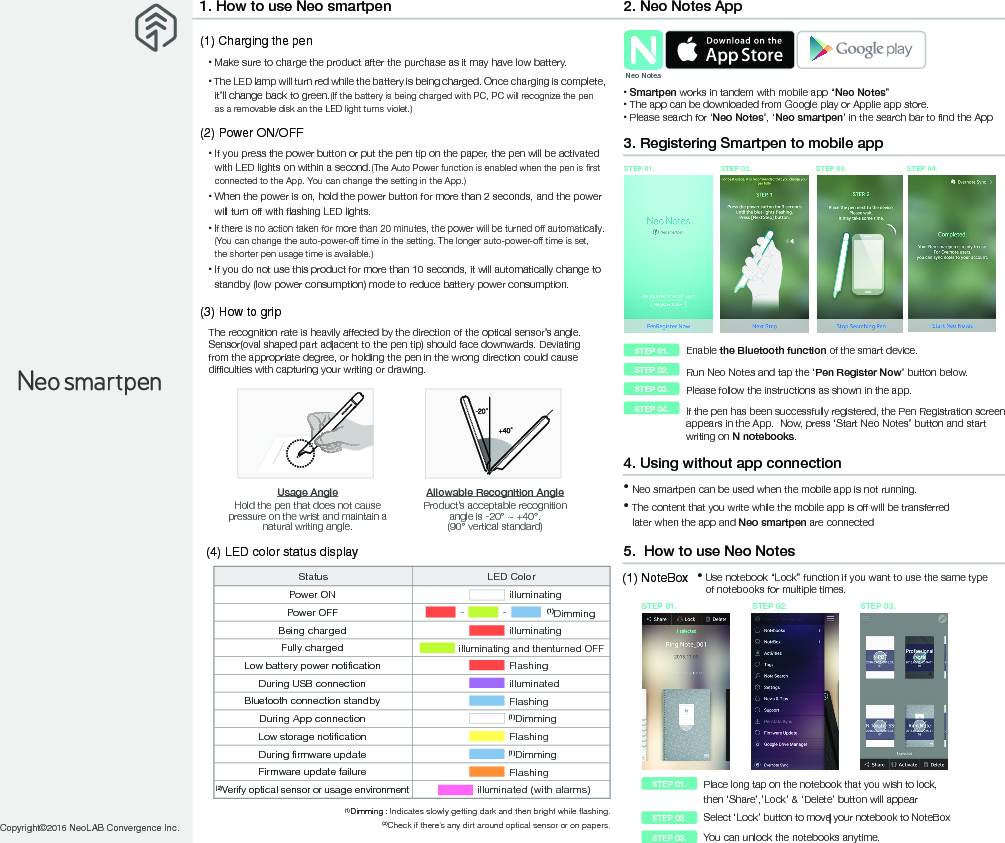
![NotebooksCheck your current notebooksNoteboxCheck Your locked notebooks to NoteBoxActivitiesCheck your writing by date TagsSearch tagged pagesNote SearchSearch transcribed textSettingsSelect your pen & app settingsNews & TipsCheck latest news & updated tipsPen Data SyncTransfer stored writing data to the appFirmware UpdateUpdate pen’s firmware to the latest version(3) Pen preference settings•Press button to see pen setting menu.•Press button on your note page to see.(2) Using buttonEdit ModeEdit,erase,change color/thickness or highlight your writing in the notebooksTranscribeTranscribe your handwritten notes into digital textTagTag your notes to organiza and search themRecordingRecord voice while writing notesReplayReplay your written notes and/with voice ShareShare the notes in PNG,PDF, TEXT & SVG format• Tap on icon, then a color palette will openand select a thickness and color(while the smartpen is connected to the app) •Tap anywhere outside the palette to make itdisappear. (4) Color & Thickness change•You have various pen colors and thickness settings to choose from in the app.6. Notebooks & StoresFind the perfect fit for among our wide range of notebooks.Worldshop.neosmartpen.com(except Latin America and Africa) * Pentips are D1 type which you can buy from any online or stationery store * Direct sunshine or any strong light may cause the loss of recognition of writing.Product specification tableModel Name NWP-F121Support Supported OS / Bluetooth Specification OS versionBluetooth versionAndroidKitkat 4.4 or higher 2.1 or higheriOSiOS 8.1 or higher[iPod 5th generation, iPhone 5, iPad 3rd generation] 4.0 LEWireless Connection Bluetooth 4.2 (CLASSIC / BLE)Receiving / Transmitting Frequency 2402 ~ 2480MHzAntenna Output Class 2Storage Media Battery Charging Time Rated Input Usage Time 90MB of internal memoryRechargeable Lithium Polymer Battery 3.7V / 280mAh About 2 hoursDC 5V / 300mA125 days in standby mode, 5 hours for continuous writingPC Connection Method USB2.0HS (microUSB) Usage Environment Temperature: 10~35℃ / humidity: ~95%Ink refills D1 multi pen ink refillsSize and Weight Length: 156mm (without a pen cap), thickness: 11.5~11.8mm / 22g (without a pen cap)](https://usermanual.wiki/NEOLAB-CONVERGENCE/NWP-F121/User-Guide-3396077-Page-4.png)