User manual

MID
MB709Q5
Points for Attention
1. Do not use the player in exceptionally cold or hot, dusty, damp or dry
environments.
2. Do not allow the player to fall down while using it.
3. Please charge your battery when
A. Battery power icon shows an empty icon;
B. The system automatically shuts down and the power is soon off when
you switch on the unit once again;
C. There is no response if you operate on any key
4. Please do not disconnect power abruptly when the player is being formatted
or in the process of uploading or downloading. Otherwise it may lead to
the error in the program.
5. When this unit is used as a moving disk, the user shall store or export files in
the proper file management operation method. Any improper operation
method may lead to the loss of files, for which this Company will be held
no liable.
6. Please do not dismantle this unit by yourself. If there is any inquiry, please
contact the dealer.
7. There will be no separate notice in the case of any change in the functions and
performance of this product.

Basic Operation
Power on
In the shutdown state, long press " " button boots
Power off
In the power on state, long press the " " key 3 seconds then pop-up device
options, select " Power off " for shut down.
Sleep
the machine under normal operating conditions, Short press the power button,
Into hibernation, Now, Screen will close. Short press the power button again, Be able
to resume normal mode. When the time being use this MID can enable this feature
when, To reduce power consumption.
Power reset
If there is shutdown to the player in the process of operation, you can turn off
and restart the player by pressing "reset" key.
Screen time out
If you do not contact the player within the set time, and do no operate by the
button, the contact screen will be automatically turns off.
In any state, short press " " button and for activation; Then skid the lock
upwards to the green of spotted which will accomplish to access to the upper
interface.
If it is necessary to deactivate the contact screen time out function, you can set
the [Screen time out] option under [display] function into "Never ".
Using the Micro SD card
After this unit is connected with the computer, you will find two moving disks.

The first one is the built-in memory disk for this unit and the other is the disk for the
Micro SD card. If no card is inserted, the second disk can not be opened. This unit
supports the extension of the Micro SD card from4GB to 32GB.
Inserting and Pulling out the Micro SD card
Inserting:
Put the Micro SD card face up (side with words), and slightly force the card into
the socket of the card, i.e. connecting the unit. Under this state, you can play the
content in the Micro SD card.
Pulling:
Slightly push the Micro SD, and it will bounce by a section, and then you can
take it out.
Caution:
Please perform inserting and pulling operation when power is off! Otherwise, it
will lead to the loss or damage to the files within the unit! If no card is inserted, the
computer will be unable to perform read and write operation for the disk notes of the
later removable disk (Micro SD card).
Battery:
High capacity Polymer battery is used for this unit.
The duration available of the battery power depends on volume, types of playing
files and operation of batteries. The player can be set up by the user as "user define
power off time" or "display setup" to save batteries.
Charging:
This unit can be recharged by USB port, you can also use DC Charger:
Take out the DC charger, plug it into the wall outlet with AC 220V(output
current 2500mA,output voltage 5V~5.2V)), then plug in the DC jack into the device
DC-in jack.
Warnings for charging:
1. A new battery may be empty and not charged before you get the device.

2. If the device is not used for long time, it is better to charge it to full capacity
every 2 or 3 months during storage.
Power adapter is a key component of the portable player, which play a crucial
role in keeping the portable player’s normal work and protecting your security when
using the player, a long-term customer surveys and after-sales service Practice shows
that the malfunction of the portable player In many cases were caused by using
inappropriate accessories, in particular the power adapter.
Use the substandard power adapter will shorten the life of the portable player by
considerably, the voltage instability will seriously affected the normal work of the
portable player and bring permanent damage on the player’s performance and
reliability, Use the substandard power adapter will also reduced the vocal quality of
the players, shutdown the player when you using it, In addition, Use the substandard
power adapter will cause combustion and explosion which will disserve the safety of
the consumers.
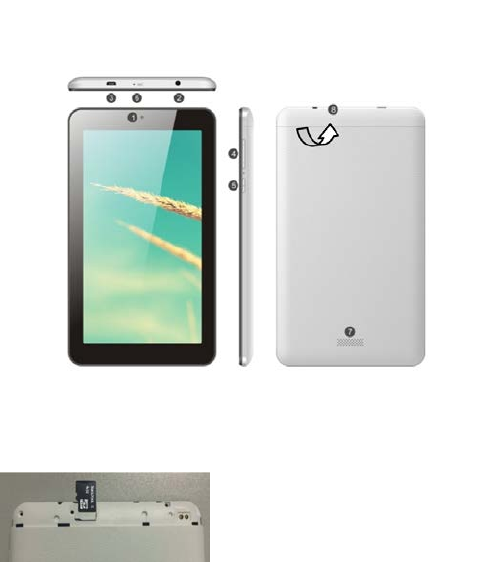
Shapes and Keys
1.Front camera 2. Earphone socket 3. USB socket
4. volume Add and subtract key 5. power switch 6. MIC
7. loudspeaker 8.IF Card
Open the card cover, can insert the IF card
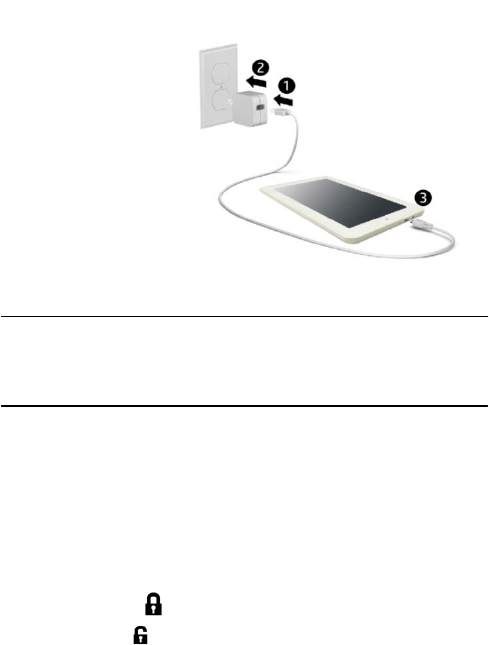
Setting up your tablet
1.
2.After charging the battery,
press and hold the power button for up to 5 seconds until the pattern is displayed.
IMPORTANT: If the battery image is not displayed on the screen, press the power
button briefly to display the image, and then press and hold the power button until the
logo is displayed.
3.Follow the on-screen instructions to select a language and a wireless network.
Lock and unlock Turn off the tablet
Lock—Press the power button. Press and hold the power button,
Unlock—Press the power button to touch Power off, and then touch OK.
turn on the tablet, then place your If your tablet becomes unresponsive,
finger on the lock icon and slide press and hold the power button for
the icon to the unlock position several seconds to turn off the tablet.
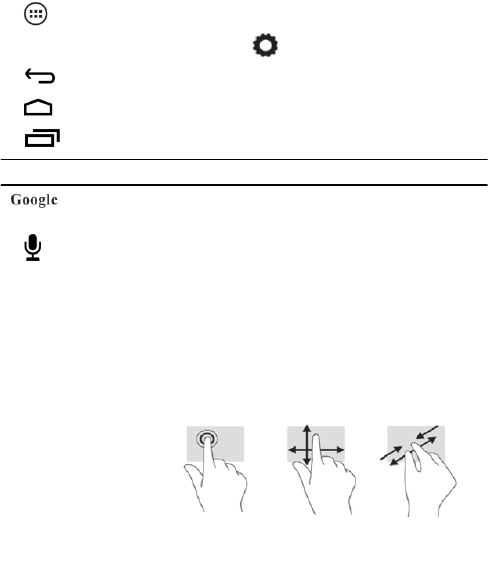
All apps—Displays a list of all apps installed. To confi you’re your
preferences, touch , and then touch .
Back—Opens the previous screen.
Home—Opens or returns to the Home screen.
Recent apps—Opens a list of apps used recently.
NOTE: The appearance of the Home screen may vary.
Search—Allows you to type one or more keywords to search.
Voice search—Allows you to speak one or more keywords to search with
the installed search app.
*The search feature varies by model and country.
with the installed search app.
Use gestures
The following gestures
can be used with your
tablet:
Organize the Home screen
• To add an app or a widget to the Home screen, touch the Apps tab or the Widgets
tab, and then tap and hold an app or widget until it is added to the Home screen.
• To remove an app or widget from the Home screen, drag it to the X at the top of the
screen.
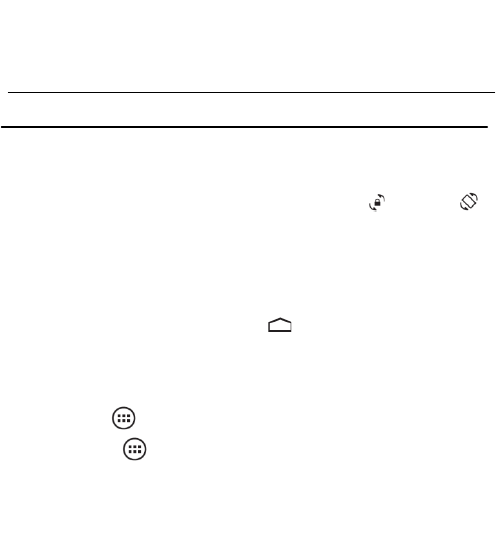
Change your tablet’s view
The Auto-rotate feature allows you to change your tablet’s view. For landscape view,
hold the tablet horizontally. For portrait view, hold the tablet vertically.
NOTE: Some apps do not rotate automatically.
To change the Auto-rotate setting, swipe down from the top of the screen to display
notifications, and then touch the Screen rotation icon to lock or unlock
the screen rotation.
Return to the Home screen
To quickly return to the Homescreen, touch .
Display apps, widgets, and notification
Apps—Touch , and then touch the Apps tab to see a list of all apps.
Widgets—Touch , and then touch the Widgets tab to see a list of all widgets.
Notification—Swipe down from the top of the screen to see your notifications.
Back up your data
Strongly encourages that you periodically back up your personal data and media on
your tablet to another computer, a dedicated storage device, or to the cloud using one

of several commercially available solutions.
Specification
Memory Flash Memory EMMC 8GB
General
Main Chip A33
Display 7" 1024*600 TN/IPS
PMU Mali 400
Operation system Android 5.0
DDR 512MB 128*16*2stick
Built-in WiFi
4 Hours video play time
TP
26 channels
RTC(Real-time clock)
yes
G-sensor yes
Power Charger 5V 1A
Front 0.3M,
Speaker yes
Dimensions Approx. 189*108.8*10.2mm
WiFi- connection WIFI RTL 8723
Operational -10~40°C
jack Speaker, MIC, MicroSD(SDHC) slot, OTG,HDMI
Language
Multi-language
English, Chinese, Russia, French, German, Spanish, Indian etc.
Power
Battery 2700mah

O/S Supported OS Windows, Mac and Linux
Compatible
format
Video Supports AVI, MOV, VOB, RM/RMVB, FLV, DAT, MKV, MPG, MPE etc.
Music Supports MP3, WMA,APE, FLAC etc
Photo Supports JPG, BMP, GIF and PNG photos
Ebook Support PDF,TXT,EPUB etc.e-book format
Application Google map/e-mail/MSN/SKPYE/GTALK/INETBOOKS
FCC Statement
This equipment has been tested and found to comply with the limits for a Class B digital device,
pursuant to Part 15 of the FCC Rules. These limits are designed to provide reasonable
protection against harmful interference in a residential installation. This equipment generates
uses and can radiate radio frequency energy and, if not installed and used in accordance with
the instructions, may cause harmful interference to radio communications. However, there is
no guarantee that interference will not occur in a particular installation. If this equipment does
cause harmful interference to radio or television reception, which can be determined by turning
the equipment off and on, the user is encouraged to try to correct the interference by one or
more of the following measures:
-- Reorient or relocate the receiving antenna.
-- Increase the separation between the equipment and receiver.
-- Connect the equipment into an outlet on a circuit different from that to which the receiver is
connected.
-- Consult the dealer or an experienced radio/TV technician for help.
Changes or modifications not expressly approved by the party responsible for compliance
could void the user's authority to operate the equipment.
This device complies with part 15 of the FCC Rules. Operation is subject to the following two
conditions:
(1) This device may not cause harmful interference, and
(2) this device must accept any interference received, including interference that may cause
undesired operation.