NEVCO Scoreboard ZW1 Wireless Controller User Manual Manual
NEVCO Scoreboard Company Wireless Controller Manual
users manual
Scoreboard Operator’s Instructions
MPCH Wireless Control
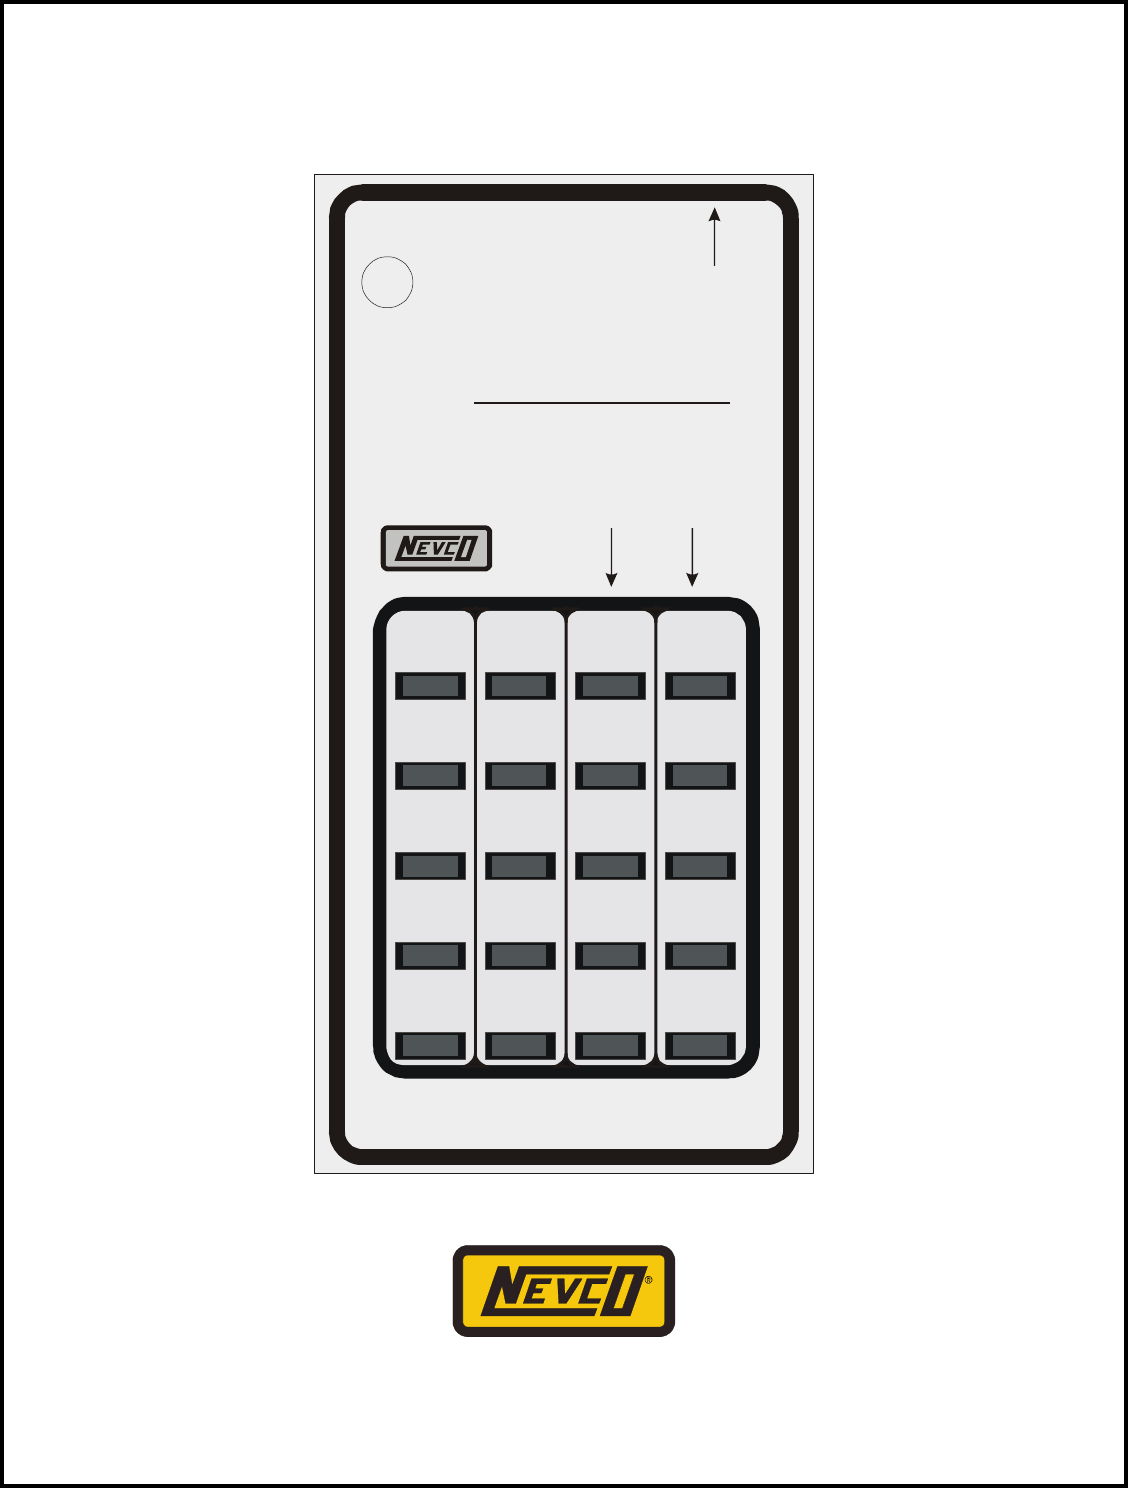
Time
Off
Infrared
Port
Set
Time
On
Time
Off
Next
Poss.
Home
Team
Fouls
Guest
Team
Fouls
Player
Number
6
4
Dim
8
Player
Fouls
Weight
Period
Shift
1
5
2
9
3
0
7
Home
Score
Guest
Score
Blank
On
Direct
Cable
Horn
T
u
r
n display off
Se
t Time of Da
y
Hold for 5 Seconds to:
Bonus
Some features on the keyboard overlay may not be included on the particular model being operated.
Since 1934
Retain this manual in your permanent files 2-20-01 MPCH Basketball

Instructions for:
LED models:
2500-D
2500-A4-D
2540
2540-A4
2550-D
2560
9510
Introduction
Welcome to the new MPCH wireless control now operating many of our current Nevco scoreboard model variations. It’s
loaded with advanced operating features that will simplify and enhance the operation of your scoreboard system. Some of the
features include:
v Tenth second displayed on the scoreboard timer during the last minute of the game.
v Set the Chronometer (time of day) on the scoreboard clock, it will keep accurate time even after turning off the
control.
v The control has the capability of direct cable connection in the event that your batteries are low.
v The control has seven different channels or frequencies, each channel having a very large number of randomly
selected Key Codes. This allows two different Nevco wireless controls to be on the same channel and yet not
interfere with each other’s operation of their perspective scoreboard.
Important Safety Information
Save this manual. It contains important safety information and operating instructions.
v Before using this product, please follow and adhere to all warnings, safety, and operating instructions located in this
manual.
v Do Not expose the product to water or moisture.
v Do Not expose the product to extreme hot or cold temperatures.
v Do Not expose the product to open flames.
v Do Not allow objects to fall on, or liquids to spill on the product.
v Do Not attempt to disassemble the product. Doing so will void the warranty. This product does not contain
consumer-serviceable components. Service should be performed only by Nevco Service Department.
v Do Not attempt to remove or replace the antenna. This antenna is permanently mounted internally.
v Remove batteries when not in use for long periods of time (during off seasons). This will increase battery life and
prevent battery corrosion. Always store this product in a cool and dry location when not in use.
v Do Not plug this device into any other source other than its designed purpose.
1
234
6
7
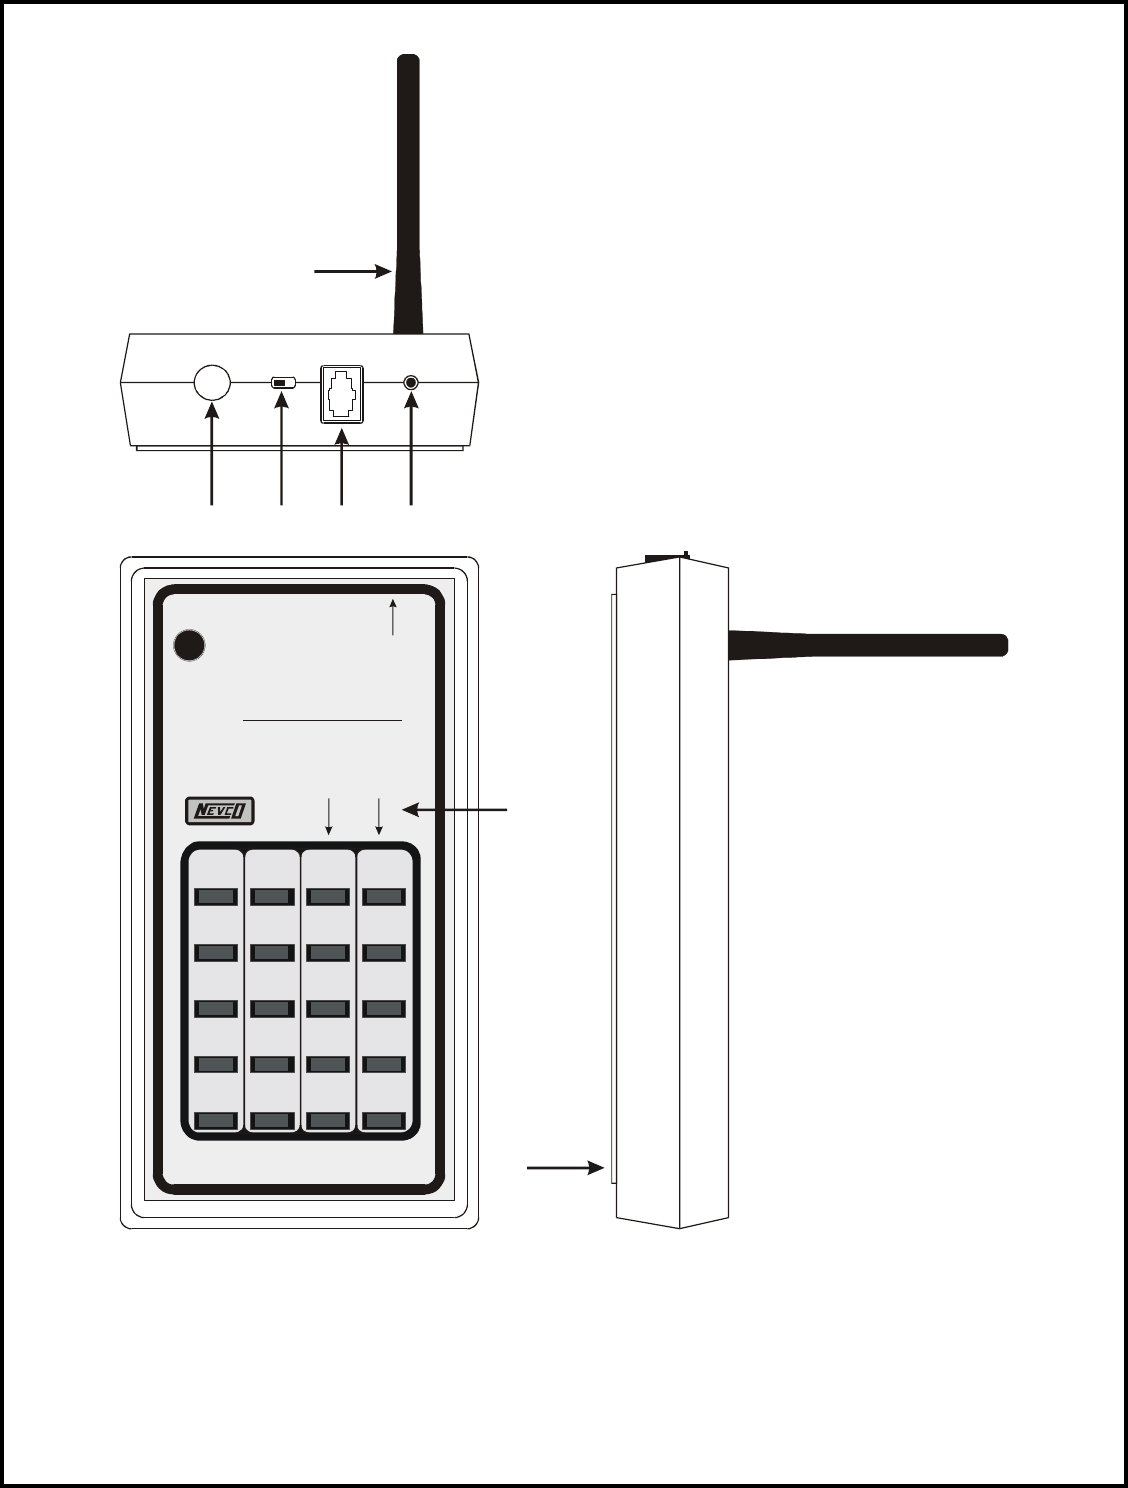
The follow is a list of the terms
used in this manual to describe
your MPCH wireless control.
1Antenna
2Infrared Port
3On/Off Switch
4Direct Cable Connector
5LED Power Indicator
6Keyboard Overlay
7Battery Compartment
Time
Off
Infrared
Port
Set
Time
On
Time
Off
Next
Poss.
Home
Team
Fouls
Guest
Team
Fouls
Player
Number
6
4
Dim
8
Player
Fouls
Weight
Period
Shift
1
5
2
9
3
0
7
Home
Score
Guest
Score
Blank
On
Direct
Cable
Horn
Tur
n d
i
s
pla
y
off
S
et
Time
o
f
Da
y
Hold for 5 Seconds to:
Bonus
5
Wireless Control Component Illustration

Start Up Procedure
Connecting the Receiver to the Scoreboard
The receiver is connected to the scoreboard using a cable, which is provided, and plugged into a telephone jack
located near the power input. The receiver receives its power from the scoreboard, therefore not requiring any
batteries.
The control requires 4 each AA batteries, which are not included. Once you have installed the batteries in the
control and plugged the receiver into the scoreboard, follow the instructions below.
Power must be turned on at the scoreboard before turning the wireless control on.
Setting a random channel for operation
The very first time that you use your wireless control, you must synchronize the control with the scoreboard that you
are going to be operating by setting the channel. Once you have done this you will not have to do it again unless
something would interfere with the signal. If this would happen, merely select another channel until the interference
goes away.
With the power turned on at the scoreboard, turn the wireless control on. The LED indicators on the receiver should
flash for about five seconds. This indicates that you have power to the scoreboard and the control is transmitting a
signal.
The control is equipped with an infrared port, located on the front edge, as does the receiver. To set the control to a
channel, hold the control within an inch of the receiver aligning the two infrared ports. The LED lights on the
receiver will randomly flash for a few seconds indicating that the two infrared ports are communicating, as well as
setting a channel. Once a channel is set, you cannot change to a different channel for at least 20 seconds. This
feature eliminates accidental channel changing.
Setting a Particular Channel for operation
If you choose to select a particular channel, follow these simple steps:
Select and hold down the key on the keyboard overlay of the channel number you desire (1 – 7).
While holding down the key, align the infrared port on the control with the infrared port on the receiver. Continue
holding the key down until the LED indicators on the receiver stop flashing, then release the key. The channel is
now set.
Below is a chart showing you which channel is being chosen when you see the LED indicators flashing on the
receiver. The Signal LED will only flash while pressing a key on the control indicating that data is being sent and
received. The Signal LED is the LED nearest the infrared port on the receiver.
Channel 1
˜™™™
™˜™™
˜˜™™
™™˜™
˜™˜™
™˜˜™
˜˜˜™
Channel 2
Channel 3
Channel 4
Channel 5
Channel 6
Channel 7
- LED 1
- LED 2
- LED 4
- Signal
˜
= LED On
™
= LED Off
Confirming your Channel Selection
To confirm or determine which channel is set between the control and the receiver, try the following.
Hold the TIME OFF key in the down position. You will notice that the Signal LED is flashing steadily. Now look
at LED 1, 2 and 4. Using the chart above, you can determine which channel is set.
Example: LED 1 is the only one lit indicating Channel 1.

Timer Operation
Entering Main Time
You must always enter the tenth second when setting the clock. Follow the example.
EXAMPLE: Press SET, then TIME
Press 8000
The scoreboard display shows 8:00. You had to enter the tenth second even though it does not display on the
scoreboard until the last minute of the game.
Starting and Stopping the Main Timer
Press TIME ON to start the timer and TIME OFF to stop the timer.
Period
Press SET, then PERIOD and the number desired.
As you see by the example, you don’t enter zeros that are not significant. In fact, to set the time to zero, just press
SET then TIME then YES.
Score Entries
Let’s enter a score for the home team.
Adding to Score
Press HOME SCORE
Press 2
The scoreboard displays a “2” in the HOME SCORE. Repeat this a few times.
It can add any number for you from 1 to 9.
Correcting Score
Sorry, you can’t subtract. Use the SET key.
Press SET then HOME SCORE. Now enter any amount you wish.
Naturally, GUEST SCORE also works this way.
Team Fouls
HOME and GUEST TEAM FOULS operate the same as HOME and GUEST SCORE.
Weight Class
Press SHIFT, then WEIGHT and the number desired.
Bonus Indicators
Press SHIFT, then BONUS.
The scoreboard follows this sequence; “HOME”, “GUEST”, both on, both off.
Next Possession Indicators
Press SHIFT, then NEXT POSS.
The NEXT POSSession works just like BONUS (alternating between HOME and GUEST) except there is no state
with both off or both on, once used for the first time.
Clearing Next Possession
You may blank the NEXT POSSession by pressing SHIFT, then NEXT POSS., and then BLANK.

Player Number and Fouls
Setting the Player Number
Press SHIFT, then PLAYER NUMBER and the number.
Setting Player Fouls
Press SHIFT, then PLAYER FOULS and the number.
Blanking the Scoreboard Display
If you want to remove the display from the scoreboard, you can do the following:
Press SHIFT, then PLAYER NUMBER and then BLANK. PLAYER FOULS works the same way.
Dimming the Scoreboard Display
You may dim the scoreboard display if it is too bright. Press SHIFT, and then DIM. Repeat the process to return
the scoreboard display to bright again.
Chronometer
A chronometer is a time piece designed to keep time with great accuracy.
If you wish to use the scoreboard to display the Chronometer Time (Time of Day) when a game is not being played,
try this.
Press SET, then TIME and enter a valid Time of Day. (i.e. 12000 for 12 o’clock). Next, hold the SET key down for
approximately 5 seconds. The scoreboard display will go blank except for the time. When this happens, you’re
done. You can shut the control off and put it away. The scoreboard will keep an accurate Time of Day until you
either turn the control back on and enter information or turn the power off to the scoreboard.

FCC Compliance Warning
Changes or modifications to the MCPH not expressly approved by NEVCO Scoreboards, Inc. could void
the user’s authority to operate this product.
Note: This equipment has been tested and found to comply with the limits for a Class B digital device,
pursuant to part 15 of the FCC Rules. These limits are designed to provide reasonable protection against
harmful interference in a residential installation. This equipment generates and can radiate radio
frequency energy and, if not installed and used in accordance with the instructions, may cause harmful
interference to radio communications. However, there is no guarantee that interference will not occur in a
particular installation. If this equipment does cause harmful interference to radio or television reception,
which can be determined by turning the equipment off and on, the user is encouraged to try to correct the
interference by one or more of the following measures:
• Reorient or relocate the receiving antenna.
• Increase the separation between the equipment and receiver.
• Connect the equipment into an outlet on a circuit different from that to which the receiver is
connected.
• Consult the dealer or an experienced radio/TV technician for help.

Five (5) Year Guarantee
Nevco scoreboards are guaranteed for a period of five (5) years from the date of invoice against defects in workmanship or
material and will be replaced or repaired without cost to the owner provided the equipment or parts (which includes LED
segments) are returned postage-paid to the Nevco factory. Shipping back to the owner will be surface postage prepaid except if
air or special method of return is specified, then shipping will be freight collect. Lamp bulbs are excluded from this guarantee.
No charges for time or material used by others in making repairs or corrections will be paid by Nevco Scoreboard Company.
Guarantee void if: any alteration or service, other than unplugging modules or controls, is performed without Nevco factory
authorization; or if the equipment shall have been connected to incorrect power, or is improperly grounded or improperly
installed. Equipment which is subjected to accident, neglect, abuse, misuse or other natural disasters, including but not limited
to: fire, wind, lightning, flood is not covered by this guarantee.
NEVCO SCOREBOARD COMPANY
301 East Harris Avenue
P.O. Box 609
Greenville, IL 62246-0609 USA
Fax: (618) 664-0398
Telephone: (618) 664-0360
__________________________
800-851-4040 TOLL-FREE
USA, all 50 states & Puerto Rico
— IN CANADA —
NEVCO SCOREBOARD COMPANY LTD.
Forestview Rd., P.O. Box 2629
Orillia, ON L3V 7C1 Canada
Fax: (705) 325-8891
Telephone: (800) 461-8550

REQUEST FOR SERVICE OR PARTS
Scoreboard Serial #______________________________________________________________________________________
Service: Module(s) Serial #________________________________________________________________________________
Service: Control(s) Serial #________________________________________________________________________________
Person to Contact__________________________________________________ Phone # ___________________________
Comments: ____________________________________________________________________________________________
Parts Request
Quantity Part No. Description
1. _______________________________________________________________________________________________
2. _______________________________________________________________________________________________
3. _______________________________________________________________________________________________
4. _______________________________________________________________________________________________
5. _______________________________________________________________________________________________
Purchase
Bill To:________________________________________________________________ Order # _______________________
P.O. Box # _____________________________________________________________________________________
Street _________________________________________________________________________________________
City ________________________________________________________State__________Zip Code_____________
Return To:_____________________________________________________________________________________________
Street _________________________________________________________________________________________
City ________________________________________________________State__________Zip Code_____________
Ship Via _______________________________________________________________________
Make a copy of this form to order parts needed and / or to return with item to be serviced.