NEXXT SOLUTIONS 330U1 IP Camera User Manual
NEXXT SOLUTIONS IP Camera
User Manual
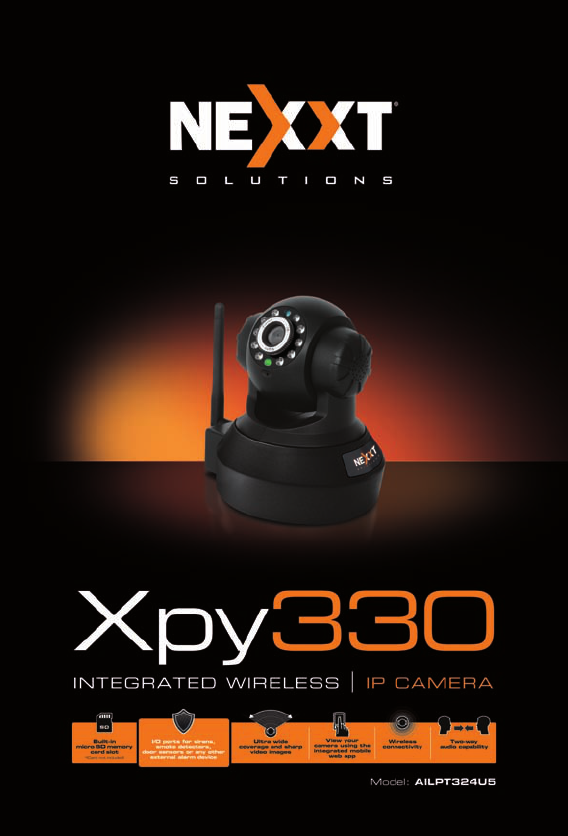

Nexxt Solutions - Integrated Wireless IP Camera with IR Cut-Off Filter
2
Integrated Wireless IP Camera
with IR cut-off filter
INTRODUCTION
Thank you for purchasing the Nexxt Solutions XPY
330 Camera. Featuring an infrared cut-off filter,
our new XPY is an integrated wireless IP Camera
solution that combines high quality digital video with
network connectivity and a powerful web server
to bring a clear picture to your desktop or mobile
phone from anywhere on your local network or over
the Internet.

Nexxt Solutions - Integrated Wireless IP Camera with IR Cut-Off Filter
3
This camera is intended for indoor use only.
Use the supplied power adaptor to connect the
camera to the AC mains (5.0V DC, 1.5A).
The warranty does not cover any damage caused
by applying the wrong voltage.
Never attempt to disassemble the unit. The warran-
ty does not cover damages as a result of tampering
with, or the improper alteration of the device.
Do not point the camera at the sun or at any other
strong light source.
Do not install the camera where it can be exposed
to rain or water
Wait at least 10 seconds when powering the
camera on and off. Otherwise, it can cause serious
damage to the CPU.
When updating the camera, please make sure that:
the camera is connected directly to a computer
using a network cable;
all other programs and windows on the computer
have been closed;
the camera remains connected during the entire
firmware update.
•
•
•
•
•
•
•
-
-
-
BEFORE YOU BEGIN

Nexxt Solutions - Integrated Wireless IP Camera with IR Cut-Off Filter
4
FEATURES
The camera combines a high-sensitivity 1/4 CMOS
image sensor, an advanced IR cut-off filter with a
powerful wireless web server in order to capture
lifelike images from anywhere, and to transmit
them instantly on your local network or over the
internet.
Can be used on WiFi or wired networks.
It uses the H.264 hardware compression tech-
nique, which can display high-quality and real-time
video transmission at 25FPS on a LAN/WAN
connection.
Selectable image resolution of 640x480 and
320x240 pixels.
The system can be expanded at any time by adding
multiple cameras.
Input and output ports with smart motion detection
to connect sirens, smoke detectors, door sensors
or any other external alarm devices.
Two-way audio capability with built in speaker and
microphone.
Convenient micro SD memory card slot for saving
recorded images.
View multiple cameras in split screen view or
choose full screen in order to monitor the activity
from a single camera.
Cameras can be viewed via standard PC or Mac
browsers, including Internet Explorer, Safari,
Chrome and Firefox.
Infrared LEDs for night vision (up to 15 meters).
Includes multi-level user management system,
which can be configured with passwords for
controlled access.
Easy- to-use web browser controls. They also allow
•
•
•
•
•
•
•
•
•
•
•
•
•

Nexxt Solutions - Integrated Wireless IP Camera with IR Cut-Off Filter
5
NOTE: if any of the listed items are missing or
damaged, please notify immediately the Nexxt Solutions
reseller from whom you purchased the product for
replacement or warranty information.
IP camera setup should be completed on a
Windows PC only using Internet Explorer.
Live viewing, taking snapshots, recording and
camera configuration are fully supported on
computers with Windows operating systems.
Wireless IP Camera x1
Wi-Fi antenna x1
AC power adaptor x1
Quick installation guide x1
CD-ROM x1
(includes the IP Super Client software)
Network cable x1
Mounting bracket and hardware
•
•
•
•
•
•
•
•
•
-
-
NOTES ON WINDOWS AND MAC COMPATIBILITY:
PACKAGE CONTENTS
quick configuration changes via the Settings menu.
Compatibility with smartphones enables remote
surveillance and camera control in real-time from
any location.
Supports image snapshots and image forwarding
via email and FTP upload.
Mac users are only able to:
- view live images via compatible web browsers
including Safari, Firefox and Chrome, but are limited
to streaming video from one camera at a time.
Open the box and make sure all items listed below
are included:
Nexxt Solutions - Integrated Wireless IP Camera with IR Cut-Off Filter
6
Our WiFi Pan and Tilt Camera can be set up in
minutes for instant monitoring and live viewing on
your Windows computer and 3G Smartphone - all
via your wireless network router or switch. For
optional recording capabilities, simply install the IP
Super Client software in your Windows PC and
configure it according to your particular needs.
1. Begin by screwing the bracket to the camera.
Connect the camera using the power adaptor that
comes with the product.
2. Using a standard Ethernet network cable,
connect the camera to your network.
The camera can either be connected to a router/
switch or directly to a PC with an Ethernet network
cable. We recommend setting up the camera on
your network using a wired connection prior to using
the device in a wireless configuration.
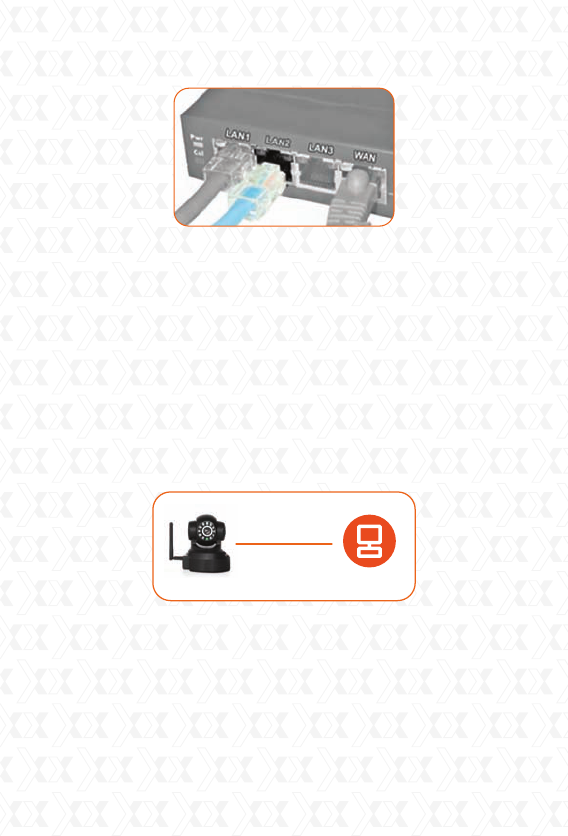
Step 1: Connect one end of the network cable to
the RJ45 interface of IP camera.
CAMERA INSTALLATION
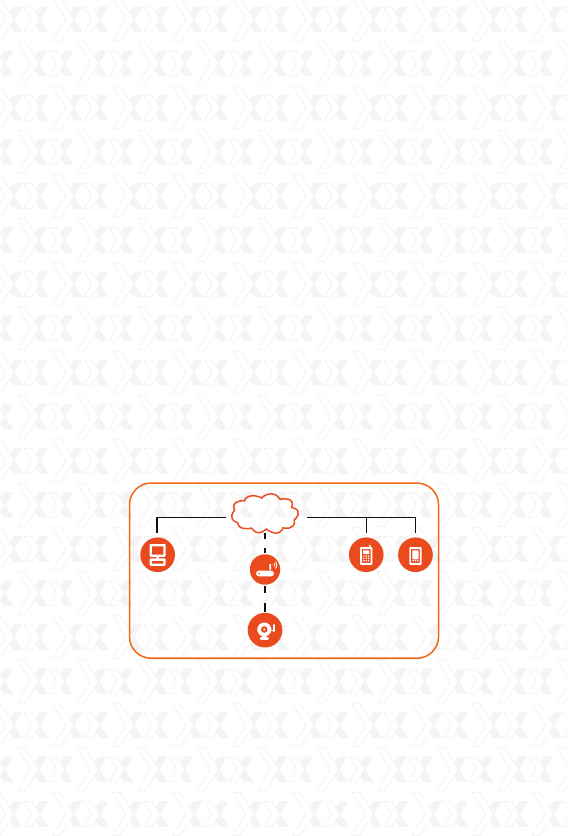
INTERNET
Cellular
Phone
IP Camera
Modem
PDAComputer
Intranet
Internet connection
Nexxt Solutions - Integrated Wireless IP Camera with IR Cut-Off Filter
7
Step 2: Connect the other end of the network cable
to the Ethernet switch, router or IP sharing device.
Step 3: Plug the power cable to the wall outlet and
turn on the device.
3. The camera can also be connected to a
computer directly.
Step 1: Connect one end of the network cable to
RJ45 interface of IP camera
Step 2: Plug the power adapter to the DC jack of
the IP camera and turn it on.
4. Continue with the setup of the camera (as
described in the following chapter). Once the
camera has been successfully connected to your
network, it can be mounted on the wall or ceiling
using the wall plugs and screws included with the
device. (The camera set up must be performed
using Windows operating system only.
ComputerIP Camera
Direct Connect

Nexxt Solutions - Integrated Wireless IP Camera with IR Cut-Off Filter
8
Please note that if you are using the camera on
a wireless network, you will need to configure the
camera for wired use, prior to configuring
wireless settings in the device (later described in
this manual).
SYSTEM REQUIREMENTS
Minimum Hardware Configuration
CPU: Pentium 1.6GHz
Memory: 256MB
Sound Card: for audio monitoring and
two-way communication
Hard Drive: to record video, minimum 40 GB
Software environment
System: 32 or 64 bit Windows2000/WindowsXP/
Windows2003/Windows Vista/Windows 7Mac
OS etc. Browser: Internet Explorer/Mozilla Firefox/
Google Browser TCP-/IP network protocol.
Accessing the IP camera
Using the IP Super Client Software
Note: The IP network camera is designed to work in
a local area network (LAN) or over the internet. For
the first method, we highly recommend using the
software included in the supplied CD. The installation
steps are described below.

Nexxt Solutions - Integrated Wireless IP Camera with IR Cut-Off Filter
9
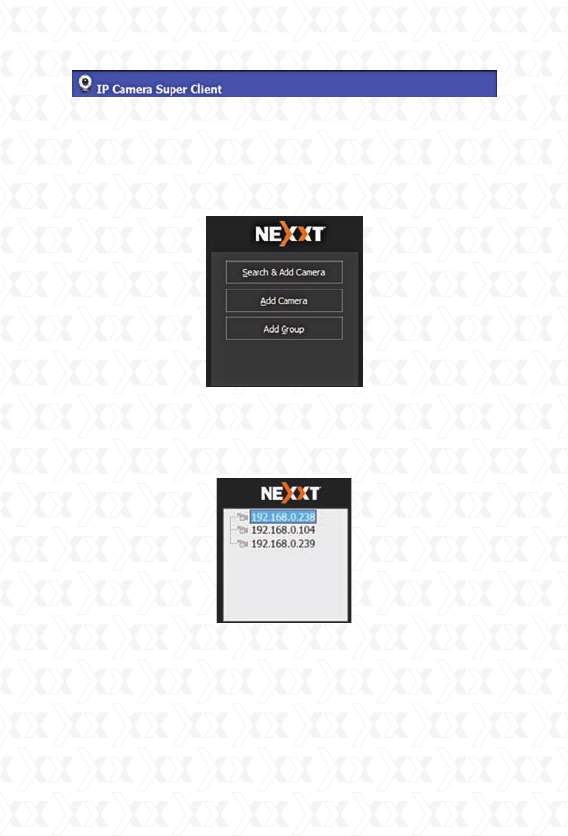
Introduction
The IP camera Super Client is an easy-to-use soft-
ware designed for surveillance applications with
multiple cameras. This software includes PT con-
trols, recording, alarm notifications, in addition
to a central management feature that allows the
administration, configuration and access control
settings for each individual device.
Functions:
*Supports up to 81-video monitoring in one screen.
*Supports multi-level structured device list.
*Supports scheduled recording with alarm.
*Supports panoramic recording.
*Supports motion detection, sound alert and
external alarm trigger.
*Supports audio, SMS, SMS modem, dialing, email,
FTP and alarm output switch.
*Supports inquiries, browsing of alarm and
operation log records.
*Supports multi-level access management.
*Supports remote login to check records and
alarm records.
Nexxt Solutions - Integrated Wireless IP Camera with IR Cut-Off Filter
10
Adding devices
After installing the client software, we need to add
the devices. When running the program, the device
list on the right of the main interface is empty; there
is a guide to show you how to add the devices.
Click the right button to choose “add new device” or
“add new group”. This program supports a
multi-level structure to manage existing devices.
Now, let’s take the 300-series and 330-series as
examples to introduce the adding device option.
Nexxt Solutions - Integrated Wireless IP Camera with IR Cut-Off Filter
11
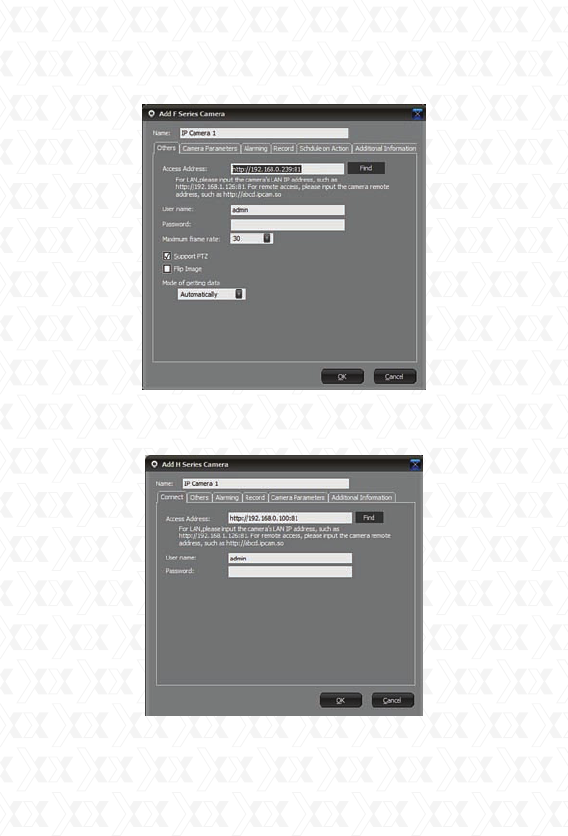
300-Series Image:
330-Series Image:

Nexxt Solutions - Integrated Wireless IP Camera with IR Cut-Off Filter
12
Name: name assigned to the camera, used to
distinguish it from other devices connected.
This name will be displayed on the camera list.
Basic information: the basic information used
for connecting the camera, such as connection
method, username, password, PT protocol, etc.
Device parameters: set size of the image and
frame rate. Not all series have this option available.
Alarm: This menu contains all the alarm-related
settings.
Record: This menu contains all recording related
settings.
Connection Information
IP/Domain mode: This mode provides LAN access
to the camera, or to a camera which has a domain
or fixed IP. To use this mode, an incoming port
should be assigned. By default, this port is set to
81.
Username/Password: The username and pass-
word used to access the camera.
Nexxt Solutions - Integrated Wireless IP Camera with IR Cut-Off Filter
13
Forwarding Server: It provides access to videos by
retrieving the files from the server. This requires the
setup of server settings. This mode cannot support
PT control.
Support P2P: Supports P2P technology. This mode
cannot support PT Control.
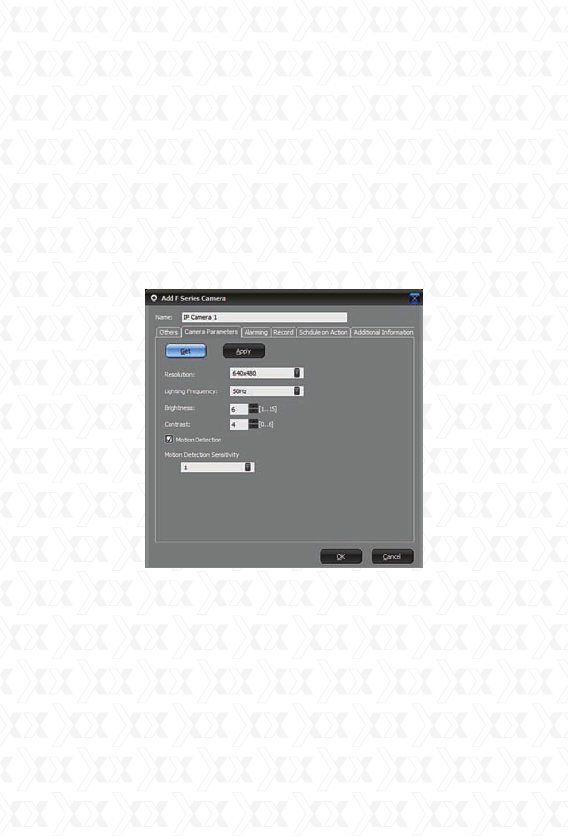
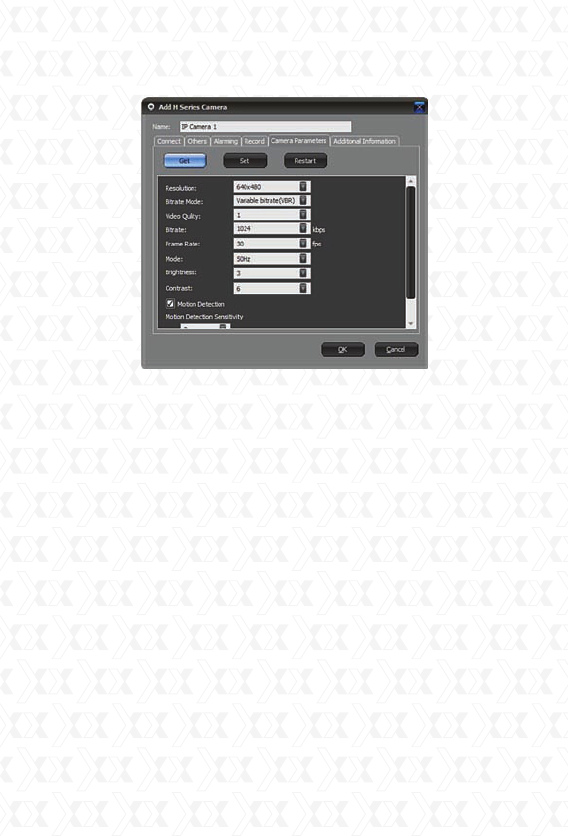
Camera Parameters
300-Series Image:
Nexxt Solutions - Integrated Wireless IP Camera with IR Cut-Off Filter
14
330-Series Image:
This menu is used to quickly set the camera
parameters. Not all models have this function. Click
the Get button to obtain the current settings. Click
Apply or Set depending on the model to save your
modifications.
Alarm
It includes all the alarm-related settings. Please
refer to the Alarm section for more details.
Record
It includes all the recording-related settings. Please
refer to the Recording section for more details.
Freq./Time Setup
It is used to schedule a timing action to change the
lightning frequency.
Nexxt Solutions - Integrated Wireless IP Camera with IR Cut-Off Filter
15
Additional information
It is used to enter personal-related information, such
as user name, telephone, address, and memo.
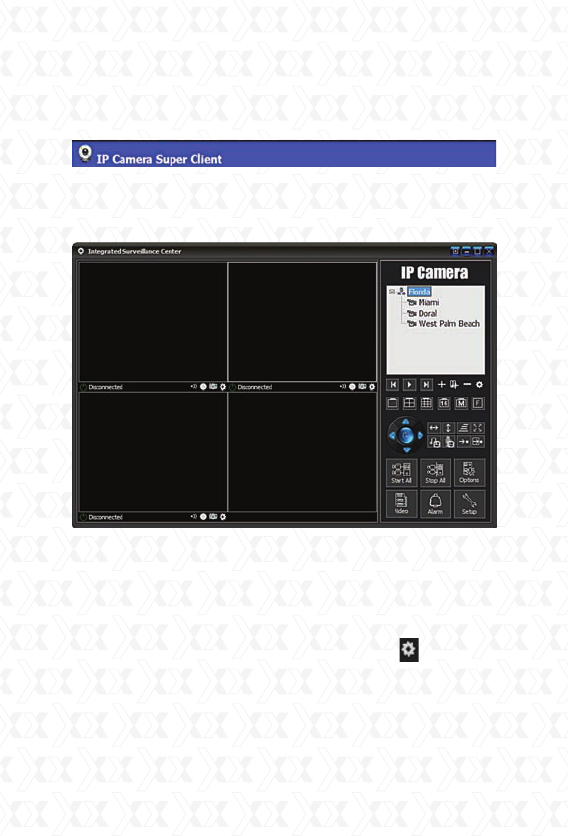
Introduction to the main window
Below is the main window of the client software.
Device Tree Components: this tree provides a visual
representation of all detected devices. Supports
multi-level structure from which users can connect
or disconnect devices in a particular group. Users
can double click on a device to connect it and see
the video in the display area, or click the Camera/
Group Options button to modify the settings.
Display Control Panel: users can choose between full
view in a single screen or a split screen
configuration of 4, 9,16,25,36,49, 64 or 81 frames.
PT Control Panel: direction buttons for controlling the
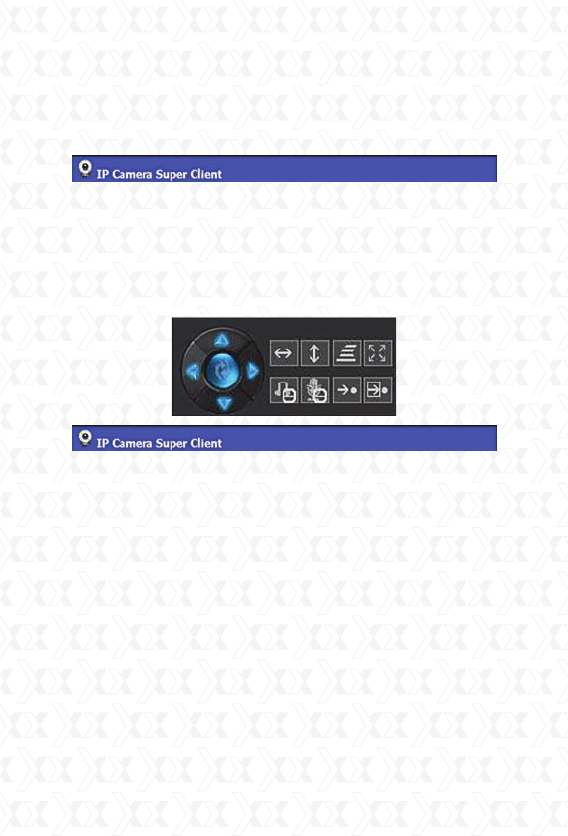
Nexxt Solutions - Integrated Wireless IP Camera with IR Cut-Off Filter
16
Pan and Tilt feature of the camera.
Main Menu: Allows the user to connect or
disconnect all the devices, open the history
manager, system setup, and other functions.
PT Control
This feature is available based on the model of the
camera. If your camera supports the Pan and Tilt
feature, enable it using the client software. Once
enabled, the movement of the camera can be
controlled with the buttons in the PT control area.
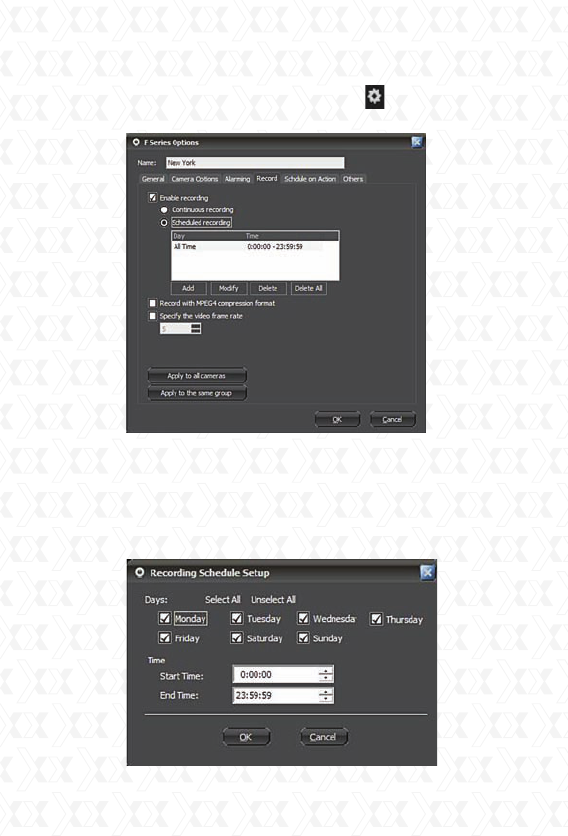
Video Recording
Video recording is a basic function of the client
software, where users can choose to record
continuously, schedule a recording or setup a
recording whenever an alarm is triggered. Under
the Scheduled recording option, users can set
specified dates and times. Records will be then
saved to the assigned folder path set in the options
settings, and will automatically overwrite the
earliest files when the disk is full. The user can set
the parameter of how long to keep the files. For the
IP camera with MJPEG format, the client software
can compress the saved data into MPEG4 format,
which can be used to reduce the usage of space on
the disk.
Nexxt Solutions - Integrated Wireless IP Camera with IR Cut-Off Filter
17
To set record function, right click the device and
choose Camera Options or click the Camera/
Group Options button. Next, go to Alarm tab.
Enable record: when selecting this option, the
recording function will be enabled.
Continuous recording: the client software will
record all the time.
Scheduled recording: users can appoint a certain
period in which the client will start recording.
Nexxt Solutions - Integrated Wireless IP Camera with IR Cut-Off Filter
18
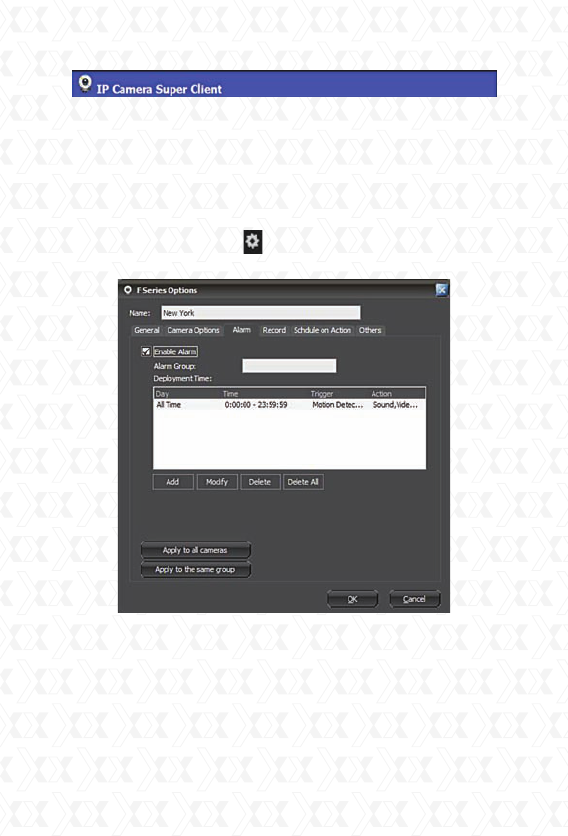
Alarm
The Client software supports various kinds of alarm
triggers, alarm events, and can be used to set an
alarm schedule.
Select the camera in the display area or from the
device list, click the right button to choose Camera
Options, or click the Camera/Group Options
button. Next, go to Alarm tab.
Enable alarm: In order to use the alarm function,
you must check this option.
Alarm group: It is a user-defined name to identify
and link cameras belonging to the same group.
Alarm lasting time: The period of time the software
will keep the alarm active. That will have the same
duration as the event causing the alarm, which
Nexxt Solutions - Integrated Wireless IP Camera with IR Cut-Off Filter
19
includes the capturing of audio and the video
recording time.
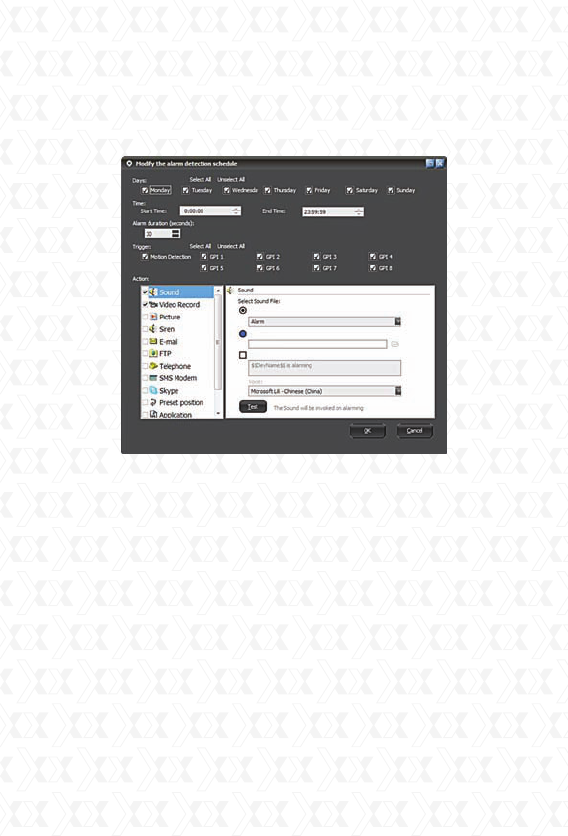
Schedule trigger: Sets the schedule during which
alarm can be triggered.
Days: specify the day(s) of the week the alarm will
be triggered.
Time: sets a starting and ending time for the alarm.
Trigger mode: specifies the type of event that would
trigger an alarm.
It currently supports motion detection and alarm
sensor input (depending on the model).
An action on alarm defines how the software will
respond once the alert is triggered.
The actions supported are: sound, video
recording, snapshots, alarm siren, email, FTP
uploading, SMS, calling, SMS modem, alarm-output
switching, program executing and URL opening.
Below is the detailed explanation for each alarm
action.

Nexxt Solutions - Integrated Wireless IP Camera with IR Cut-Off Filter
20
Sound: when an alarm is triggered, the program
will play a sound on the computer to frighten the
intruder. Sounds can be customized.
You can choose the sound from the list in the
program. Select the sound and click OK to save the
setting.
You can also choose other sound files from your
local disk drive. In other words, you can record
“Catch the thief” in a file, save it and then select the
sound file by clicking the folder button to add the file
you want.
If you want to read a text on alarm, you can check
the “Speech” icon and edit the contents to be read.
In addition to reading the normal text, the program
also displays the description of pre-defined features,
such the name of the alarm device and alarm time.
These pre-defined contents appear within the “$$”
symbols. The software includes the following
pre-defined content:
$$DevName$$: the name of the device sending the
alert signal.
$$AlarmTime$$: displays the time when the alarm
occurred.
$$Trigger$$: displays the event triggering the
alarm.
If you only need to read a text having no audio being
played, you can choose “sound file” without
specifying the use of one. Check the “Speech”
box below.

Nexxt Solutions - Integrated Wireless IP Camera with IR Cut-Off Filter
21
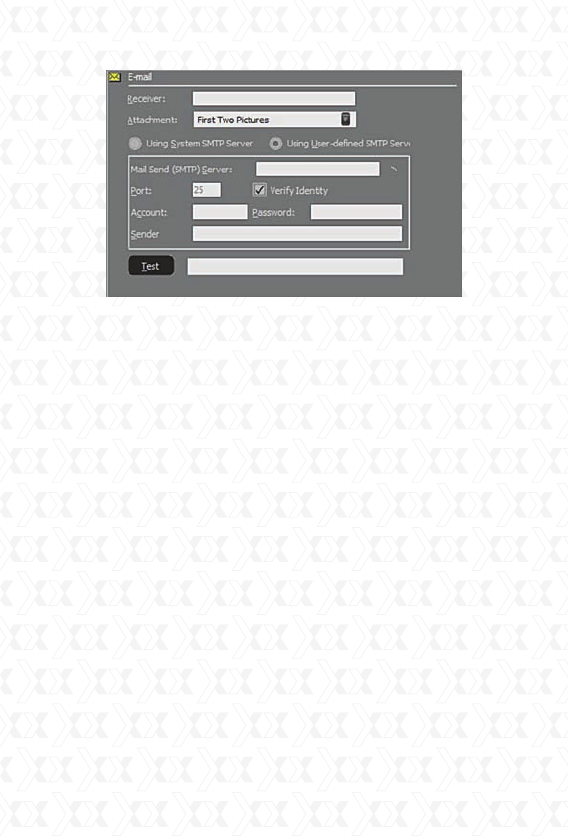
Email: when the alarm goes off, the program will
send an email acknowledgement with the pictures
or video recording attached.
Attachment: the user can choose to send emails
with or without attachments, or with pictures or
videos. However, when choosing to send an
attachment, the user needs to have the live
recording function enabled first.
Receiver: it is the email address to which the alarm
acknowledgement will be sent to.
Copy: it is the email address or addresses to which
the alarm acknowledgement will send a copy of the
message and attachments. Use commas to
separate multiple email addresses.
Test: when you click this button, the program will
send a test email. Users can check whether it was
correctly sent or not. If sending fails, the program
will show you the details of the failure.
Users have the option to choose the mail server
according to their own needs.
Nexxt Solutions - Integrated Wireless IP Camera with IR Cut-Off Filter
22
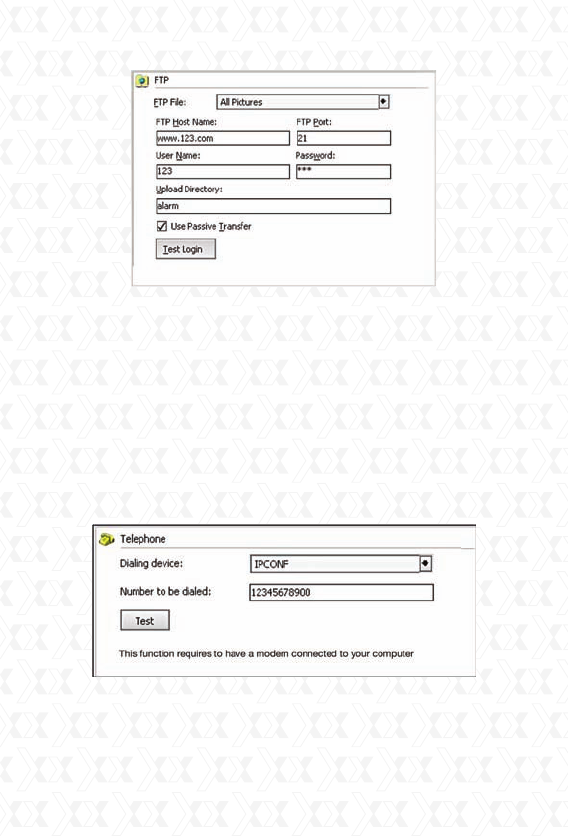
FTP Uploading: when the alarm is triggered, the
program will upload the snapshots to the FTP
server.
Upload file: three options are available: picture only,
video only, or both picture and video.
FTP host address: account information required to
access the File Transfer Protocol host.
FTP port: the default is set to 21.
User name: the user name used in the FTP login
window.
Password: the FTP password used in the login
window.
Upload Directory: This is the path used for
saving uploaded files. The program will create a
folder using the time the alarm went off. The
pictures and videos will be saved to this directory.
Nexxt Solutions - Integrated Wireless IP Camera with IR Cut-Off Filter
23
Dialing: when the alarm is triggered, the program
will dial the assigned telephone number
automatically using the PC’s modem. This service
requires a modem to be installed on the PC which
supports dialing functions.
Dialing device: choose the modem from the list that
supports the dialing feature.
Number to be dialed: the number which will be
dialed once the alarm is triggered.
Test: Click Test to make sure this setting is
functional.
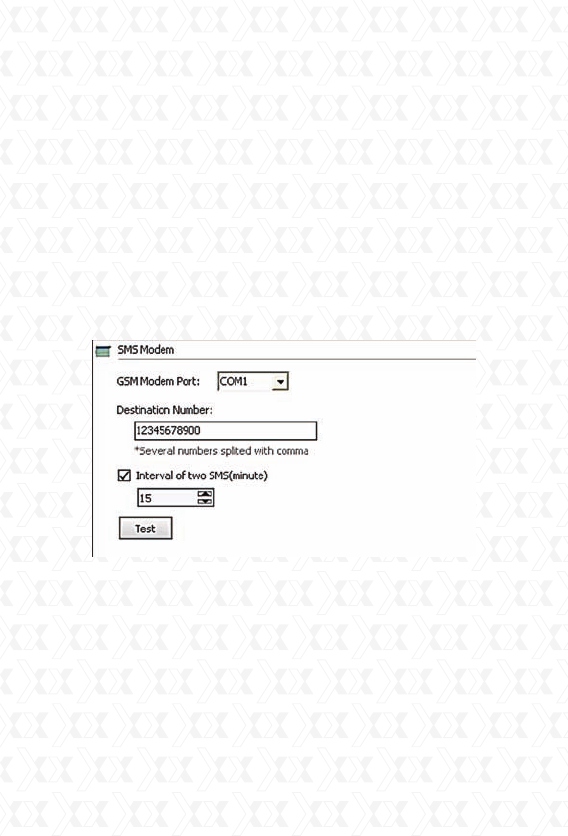
SMS modem: when an alarm is triggered, the
program will send a Short Message Service
transmission to the assigned phone through the
modem.
Nexxt Solutions - Integrated Wireless IP Camera with IR Cut-Off Filter
24
This service requires an SMS modem to be installed
on the PC.
SMS modem port: the serial port number which is
attributed to the SMS modem.
Receiving phone number: the enabled-SMS land
line or mobile phone number which will receive the
incoming message when the alarm is triggered.
SMS interval (in minutes): defines the time interval
in minutes that the SMS alerts will go off while the
alarm is active.
Test: click this button to test this service, the
program will send a SMS to the assigned phone
number.
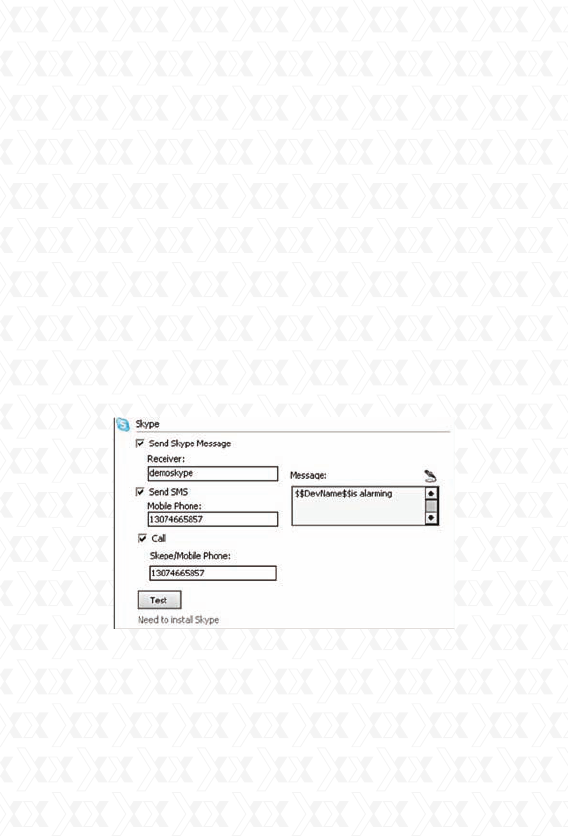
Skype: when an alarm is triggered, the program will
use Skype to send Skype messages, text messages,
Skype calls and call a mobile phone.
This feature requires for Skype to be installed on
your computer. When the alarm is triggered, the
program will call or open the Skype interface, so
that it can execute the actions mentioned above. If
Skype is not running, the program will automatically
start Skype. You can download Skype by going to
Nexxt Solutions - Integrated Wireless IP Camera with IR Cut-Off Filter
25
http://www.skype.com.
Send Skype Message: this option sends a text
“message” to the designated Skype account.
Send SMS: this option sends a text “message” to
the designated phone. Please note that this feature
requires a Skype account balance. To know more
about using Skype to send SMS, recharge informa-
tion, etc., please visit the official Skype website.
Call: it places a call to the designated Skype account
or to a designated phone number. Please note that
the “dial a designated telephone number” feature
requires a Skype account balance. To know more
about using Skype to make calls, please visit the
Skype official website.
Test: click Test to make sure this setting is
functional.
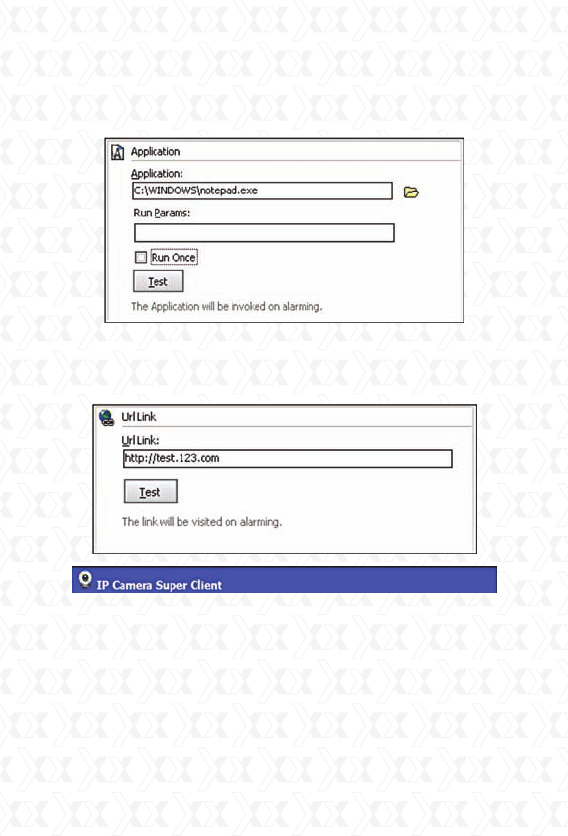
Application: when the alarm is triggered, the
program will execute the selected program.
Program: it defines the path for the .exe file
belonging to the selected program.
Run parameter: the run parameter values should
be entered in this box.
Nexxt Solutions - Integrated Wireless IP Camera with IR Cut-Off Filter
26
Run once: this option will execute the command only
when the alarm goes off for the first time, with no
further action after that.
URL Link: when the alarm is triggered, the program
will open the assigned URL. Usually, this is used to
inform other systems about the alert.
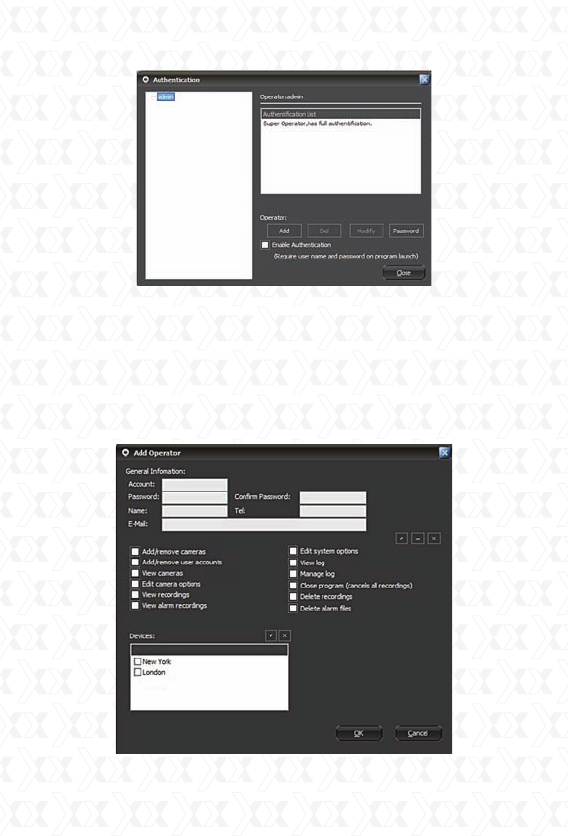
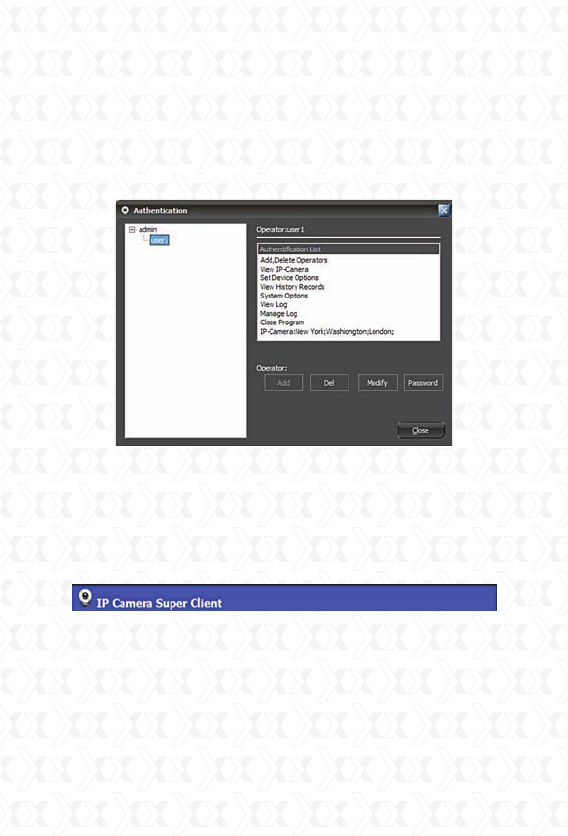
User Account Administration
The Client supports a multi-level management
system, whereby different users are granted
specific privileges and passwords for controlled
access.This function is not enabled by default.
Please click the Setup menu button on the lower
right side of the dialog window and choose User
Account Setup to continue.
Nexxt Solutions - Integrated Wireless IP Camera with IR Cut-Off Filter
27
When this feature is enabled, the program will
always request authentication from users.
By default, the admin account enjoys full administra-
tor privileges. This account can never be deleted;
however, its password can be changed.
Add operator: click the Add button and the dialogue
box below will appear.
Nexxt Solutions - Integrated Wireless IP Camera with IR Cut-Off Filter
28
Once you type in the account information and assign
the corresponding permissions, click OK to save it.
Privileges to add or remove accounts mean that the
account operator can include or delete its
dependant users. This takes effect only after logging
in with this account.
Delete: the currently selected operator will be
erased.
Modify authority: it changes the permission level
assigned to this operator.
Change password: it allows the user to modify the
existing password.
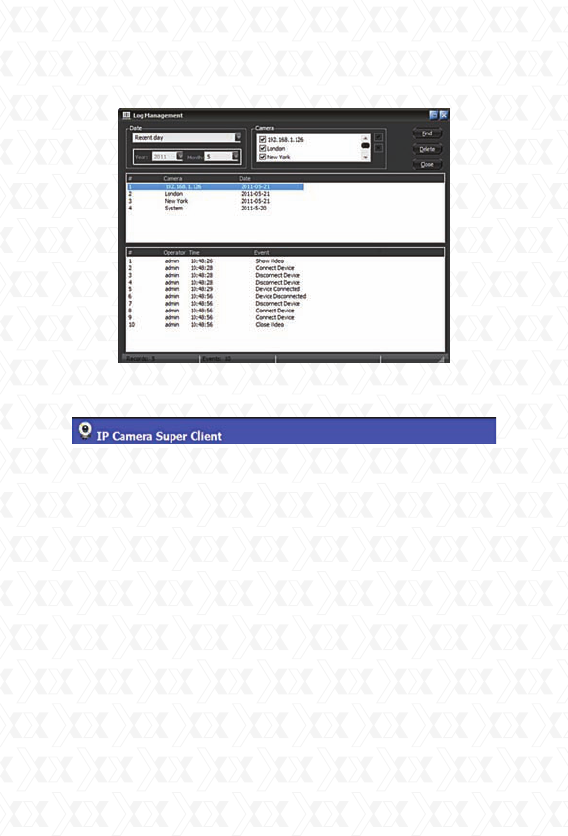
Log manager
The client software has log management function. It
will keep records of user operation and device con-
nection information. Click the Setup menu button on
the bottom right corner of the dialog box, and then
choose Log Management to open the window.
Nexxt Solutions - Integrated Wireless IP Camera with IR Cut-Off Filter
29
After selecting the desired device and date, click the
Find button.
Records publisher
Users can remotely view videos and alarm logs using
the records publishing tool from the client.
Click the Setup menu on the bottom right corner
of the dialog box, and choose Record History Web
Publisher. The following window will be displayed, as
shown below.
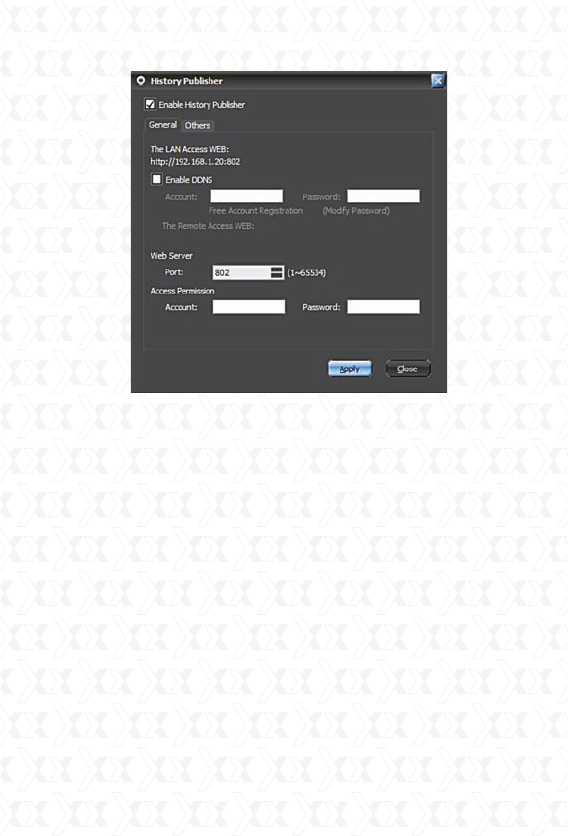
Nexxt Solutions - Integrated Wireless IP Camera with IR Cut-Off Filter
30
By default, this function is not enabled. You must
first select the Enable History Publisher option and
click the Apply button to enable this feature. The
LAN IP address will be displayed at this point. Users
can directly view records in the LAN if the PC has a
fixed IP address. Records can also be accessed by
entering the IP address and adding the port
number. If using a dynamic IP, then the DDNS
feature must be active to be able to view this
information remotely. This tool should allow users
to register a DDNS account for free. The account
name needs to be longer than 5 characters.
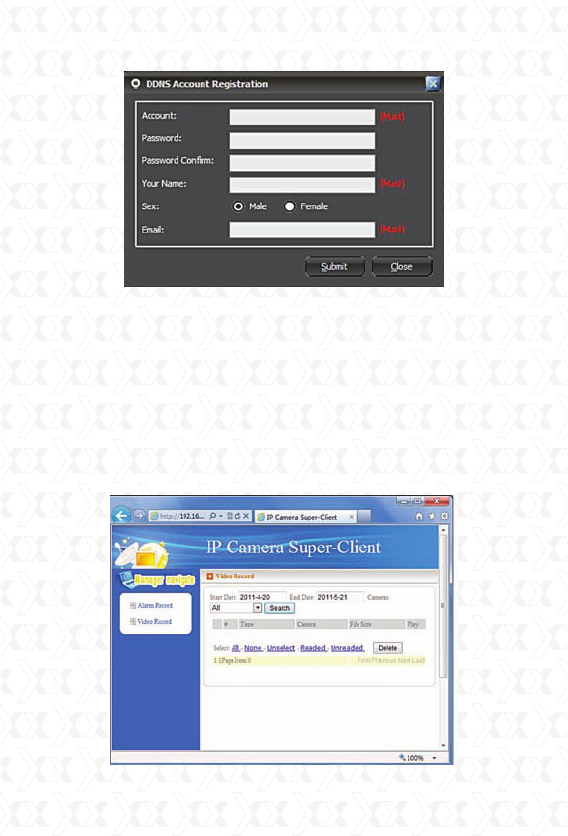
Click on the free account registration option. The
DDNS registration box will appear, as shown below.
Fill the form and click the Submit button to save your
settings. Once completed, it will exhibit the remote
access URL. Please note that port forwarding needs
to be set up directly on your router.
Nexxt Solutions - Integrated Wireless IP Camera with IR Cut-Off Filter
31
Users can set a password for controlled access
permissions.
The Web server port is the port provided for
remote visit. Normally, this value does not need to
be changed, but if that port is being occupied by
other devices, users can assign a different port
number within the 1 ~ 65535 range.
When entering the URL in IE address box, a page
like the one below this will be displayed.
Nexxt Solutions - Integrated Wireless IP Camera with IR Cut-Off Filter
32
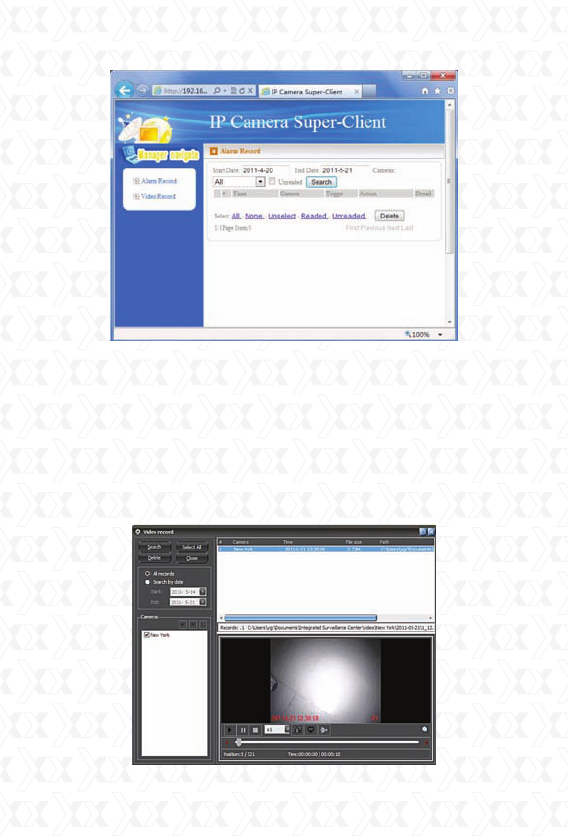
A list containing all the devices with recorded video
files will appear. Next, click on any specific device,
and a list of recordings identified with the date will
be displayed at this stage.
When the operator chooses a certain date, the
page below will pop up on the screen.
The list contains the files recorded that day. When
you click on a specific file, it will play the video.
Nexxt Solutions - Integrated Wireless IP Camera with IR Cut-Off Filter
33
During playback, the user can rewind or forward the
video, take a snapshot or invert the recorded images.
The process to remotely access alarm records is the
same as with video records.
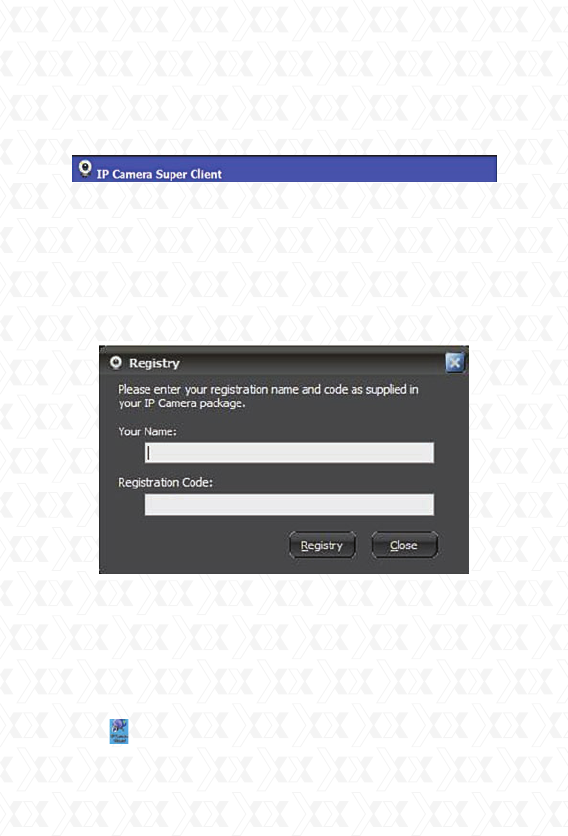
Registration
Go to the Setup menu and select Registration.
Enter the registration name and code, and click
Register to complete the process.
The registration name and code can be found on the
supplied CD-ROM.
Web browser
When the IP camera is connected to the LAN
through the router, you can operate the IP camera
via the PC.
Once the supplied software has been successfully
installed, you will also find the IP Camera Wizard
icon on your desktop. Double-click on this wizard,
and the following interface will appear:
Nexxt Solutions - Integrated Wireless IP Camera with IR Cut-Off Filter
34
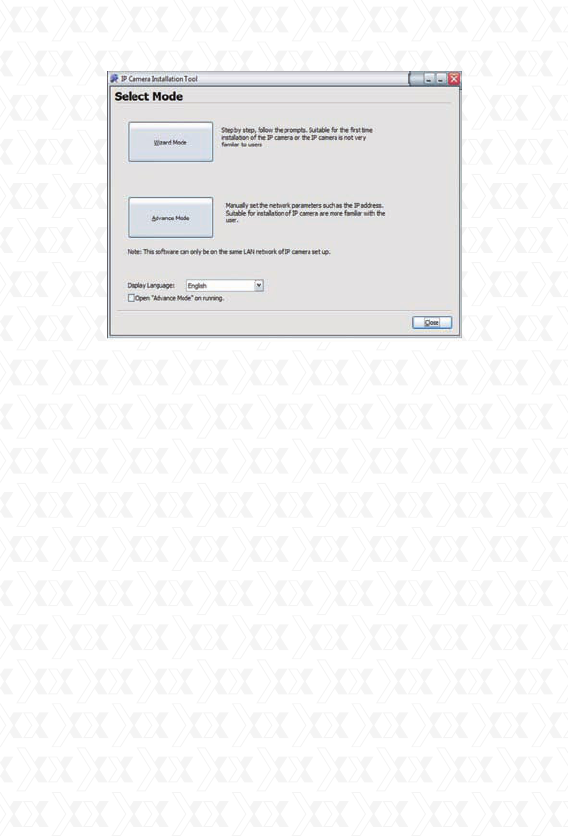
Wizard mode: this is for first time installation of the
IP camera or if the IP camera is not very familiar to
the user. This is a step-by-step process for success-
fully detecting and installing the IP camera.
Advanced mode: this is to be used to manually set
network parameters, such as the IP address. This
is suitable for users who are familiar with the
installation of the IP camera.
You can choose to open advance mode automati-
cally by clicking the corresponding option in the
bottom section of the dialog box.
You can choose the preferred language by opening
the “Display Language” drop-down menu.
The following interface is displayed when clicking on
the Advanced Mode menu.
Nexxt Solutions - Integrated Wireless IP Camera with IR Cut-Off Filter
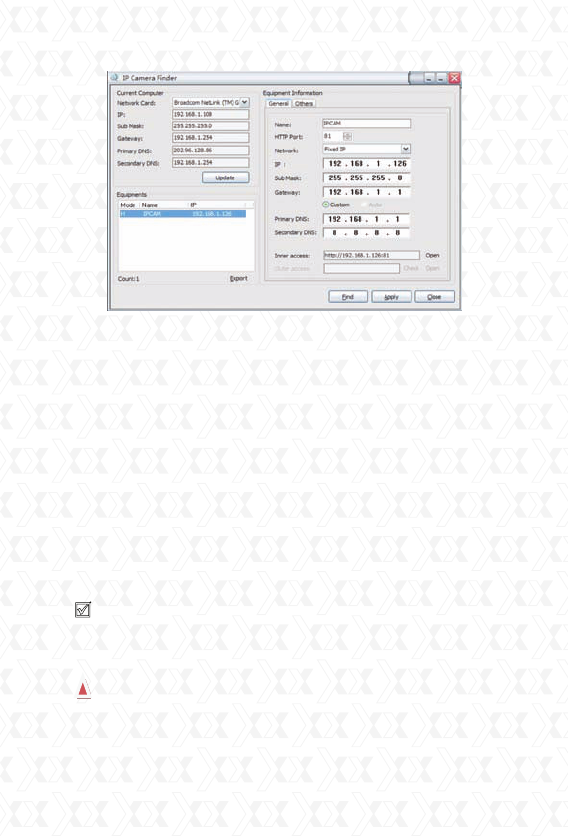
35
If network cable and power supply are correctly
connected, the device type, name and IP address
will be shown in the device list. (Otherwise, please
confirm whether the power supply and network
cable are functional).
In the interface above, the configuration information
of the current computer is listed on the left side; the
network configuration information of the selected
camera is listed on the right side. The default IP
address in this example is 192.168.1.126, and the
HTTP port is 81.
Inner Access refers to the LAN access address.
Outer Access refers to the WAN access address.
Tip: Port forwarding setting is necessary for
outer access, please refer to the router port
forwarding section of the manual.
Device information exhibits the IP camera basic
parameters.
2.When the current computer has a fixed IP
(namely non-DHCP IP), and the IP camera is used
Nexxt Solutions - Integrated Wireless IP Camera with IR Cut-Off Filter
36
for the first time, please click Update, so that IP
address of the IP camera, gateway and DNS can be
synchronous with the PC.
3. If it is necessary to manually modify the contents
including camera name, HTTP port, IP address,
submask, gateway, primary DNS server, secondary
DNS server and so on, you must click apply after
changes are made, and then click OK for access
validation after entering the username and
password of the IP camera in the pop-up dialog box.
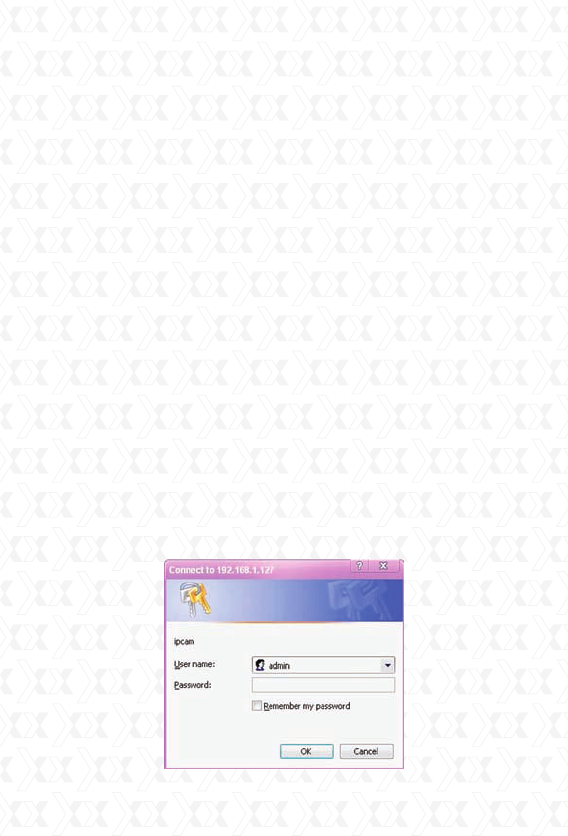
System Login
Open the Web page. You can open it directly by
clicking the Inner Access or Outer Access on the
IP Camera Finder, followed by the Open button
located in the same dialog box. You can also directly
input the corresponding address of the inner and
outer access into the address bar of the web
page, as the address shown in the picture above
http://192.168.1.126:81 (LAN); and http://
aodn.ipcam.so (WAN). If the IP camera has been
connected with the external network, the log-in
interface below will appear when you open the web
page through the LAN or the external network:
Nexxt Solutions - Integrated Wireless IP Camera with IR Cut-Off Filter
37
Input the authorized user name and password. The
default user name of the camera is admin, and the
password is left blank.
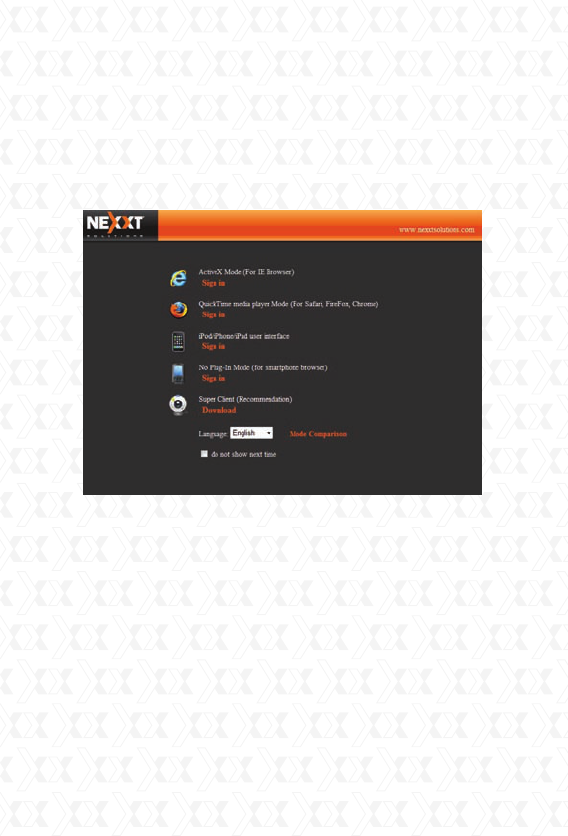
After successful authentication, the following page
will be shown:
When you visit the IP camera for the first time, it
will make you choose the corresponding language
automatically according to the language version of
the current web browser; other languages can also
be selected.
Active X mode: this module offer users the most
functionality and the best effects. Accessible via
Internet Explorer, this module provides the best
performance for local video and two-way audio
talk-back, and it can be ran only after the Active X
plug-in has been installed.
QuickTime media player mode: this mode applies

Nexxt Solutions - Integrated Wireless IP Camera with IR Cut-Off Filter
38
the QuickTime media player interface for FireFox,
Safari, and Google web browser.
iPod/iPhone/iPad user interface: this mode is
designed specifically for Apple mobile devices, such
as iPod, iPhone, and iPad. This can only be used for
monitoring, because it does not have the capability
for setting up the IP camera.
No Plug-In mode: this mode is mainly used for most
smart phones.
Integrated Surveillance Center: this directs you to
install and use the IP Super Client software.
Do not show next time: after clicking this option,
the selected page will not be displayed again when
you visit the IP camera from that point forward.
Note:
1. The default User Name of the camera is admin,
and the password is left blank.
2. Language selection no longer displays once
selected, since it is saved in the local temporary
files of the web page browser. However, when
history files are deleted in the web browser, that
information will be lost.
Operation
The Internet Explorer (IE) mode contains all the
functions of the IP camera. The picture below is the
video monitoring main interface. If this is the first
time you visit the page, you will be required to install
the ActiveX plug-in. Click to download, then click
refresh after the download and installation process
is complete.
Nexxt Solutions - Integrated Wireless IP Camera with IR Cut-Off Filter
39
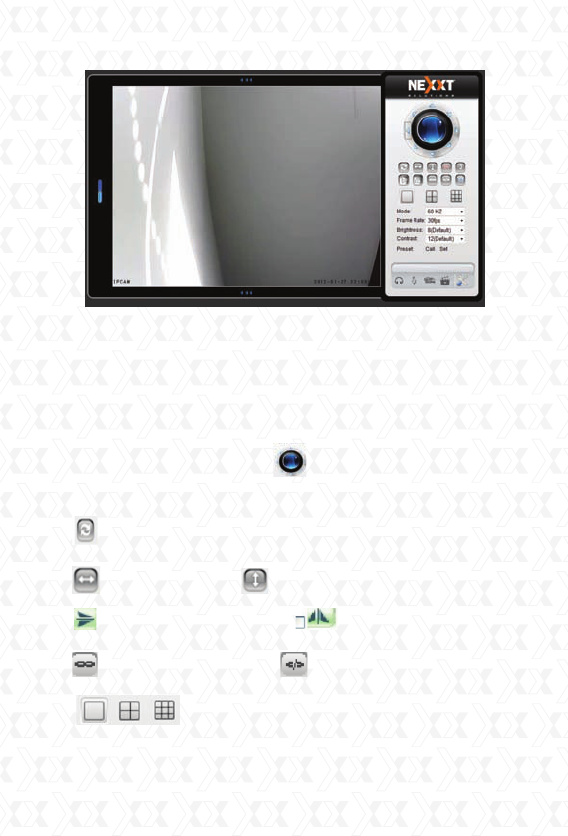
After logging into the device, the monitoring image
will be displayed on the left side of the screen.
The panel where users can implement the basic
parameters to operate the device will be shown
on the right side of the frame.
Pan/Tilt
Direction control arrows : click the arrow keys
to aim the lens in the direction you wish to look.
The camera returns to the center after rotating
one full circle.
Horizontal patrol : Vertical patrol
Horizontal mirror image Vertical mirror
image.
Switch alarm input on Switch alarm input off
Single screen, four screen, nine
screen display.
Nexxt Solutions - Integrated Wireless IP Camera with IR Cut-Off Filter
40
Mode: this value is set according to the frequency
of the fluorescent light. If the frequency does not
match the frequency of the light, markings will be
seen across the screen.
Frame rate: the maximum video frame rate is
25fps. If the network broadband is low, you can
choose a lower frame rate.
Brightness and contrast ratio: use it to adjust the
brightness and contrast ratio of the screen.
Preset position call: when clicked, it will show a
preset position list. The preset position is recalled
when clicking any number from that list.
Preset position setting: first, reset the IP camera
to its fixed position, click call next, and then choose
any available number to store the currently selected
position.
:monitor, this is used to enable the audio stream
from the camera.
:Talk back, this is used to remotely speak and
listen to people by the camera. Live audio can be
recorded as well.
:Click this icon to begin video recording and save
it to your local hard disk or SD card.
:Click this icon to take a snapshot image.
This button provides users a fast way to capture
a single image of the video from the camera.
This button opens the device interface.
Nexxt Solutions - Integrated Wireless IP Camera with IR Cut-Off Filter
41
IP CAMERA SETTINGS
Click the device button located on the right hand
corner of the control panel, to enter into the device
interface.
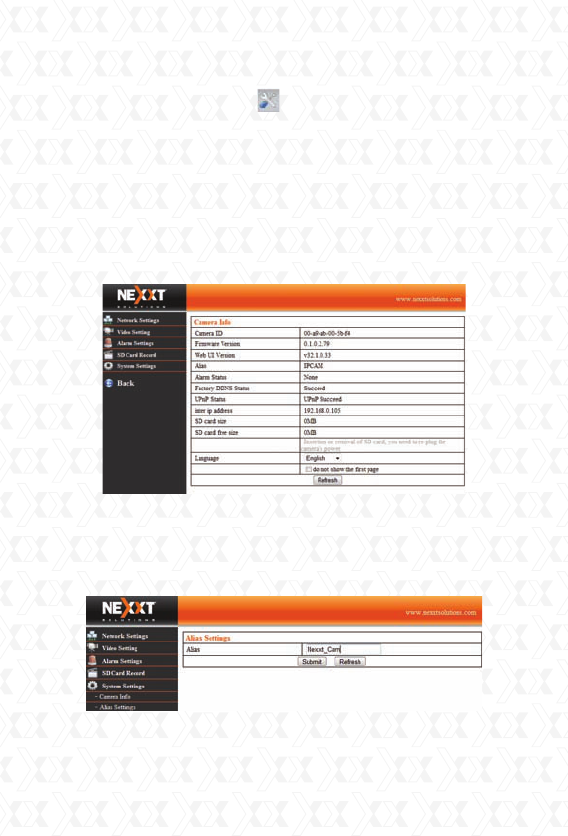
Camera Information
It displays the device ID, firmware, embedded Web
UI version, SD card size, IP address along with
other basic information pertaining to the camera.
Alias Settings
The name assigned to the device that is used for
displaying it in the IP camera finder, web page title
and multi-camera viewing.
Date & Time Settings
It’s used for the internal time of the IP camera. The
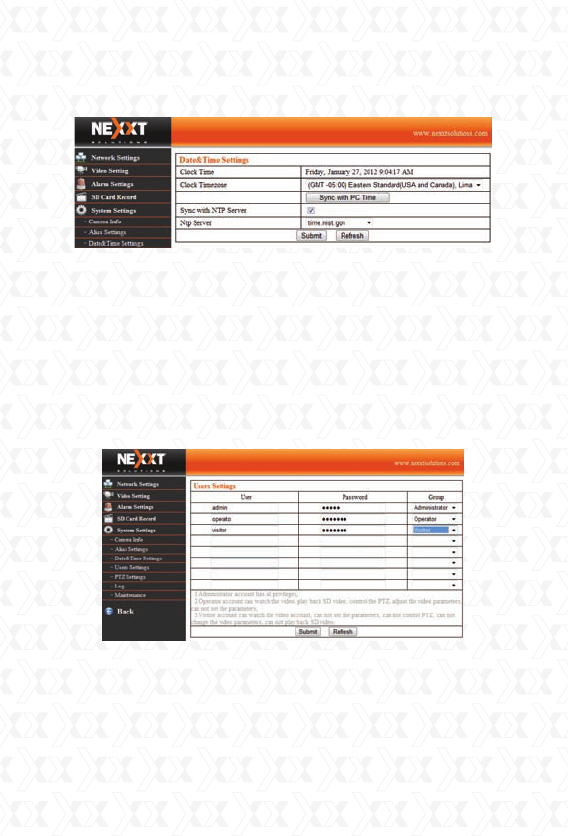
Nexxt Solutions - Integrated Wireless IP Camera with IR Cut-Off Filter
42
device uses this time as the naming scheme for the
saved recorded files on the PC or SD card.
If you synchronize time with the NTP server, please
make sure the IP camera’s gateway and DNS server
parameter are valid and correct.
Users Settings
Set the IP camera’s access accounts and
passwords. The system allows the configuration of
up to eight user accounts.
RTSP settings
Define the RTSP access. If you use RTSP for
accessing the IP camera, you will be required to
input a user name and password for authentication
and access control privileges.

Nexxt Solutions - Integrated Wireless IP Camera with IR Cut-Off Filter
43
Multi-Camera Settings
When you access the current IP camera, you can
also watch additional devices using the same inter-
face. The interface to add other cameras is illus-
trated below.
First click on the rows you want to add, e.g. the 2nd.
Click the 2nd camera, then input the camera’s IP
address and other information in the corresponding
form, as shown below:
Nexxt Solutions - Integrated Wireless IP Camera with IR Cut-Off Filter
44
When you finish filling out all the information, click
the add button below to save all these configuration
values in the camera. Note: multi- camera view is
currently supported only by IE.
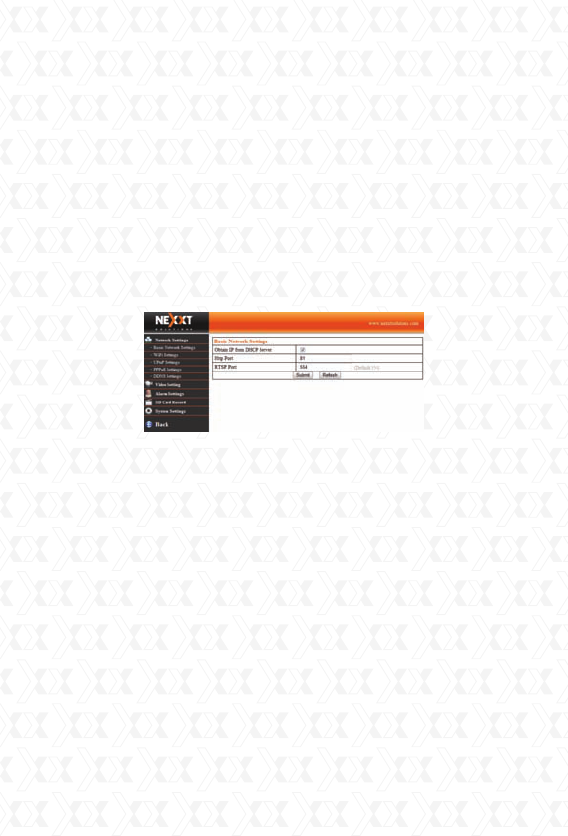
Basic Network Settings
Use this menu to set the IP camera’s IP Address,
subnet mask address, gateway, DNS server, HTTP
port, and RTSP port if settings are not being
acquired through a DHCP server. Otherwise,
enable “Obtain IP from DHCP Server” option as
seen below:
Wireless LAN (Wi-Fi) Settings
The following image exhibits the wireless connection
device. There are five kinds of security modes: WEP,
WPA-PSK and WPA2-PSK. When accessing the
Internet wirelessly, the camera’s SSID must be the
same as the wireless AP device’s number.
If the wireless router is currently running, first
connect the network cable to the IP camera and
open the camera’s page through the computer via
the web browser, then enter the device’s interface
under wireless LAN (Wi-Fi) settings. Click the Scan
button; the camera will start looking for radio
signals. After the search is completed, choose
the wireless router which is needed to connect. If
authority verification has been set, input the login
password, followed by the “submit” button to save
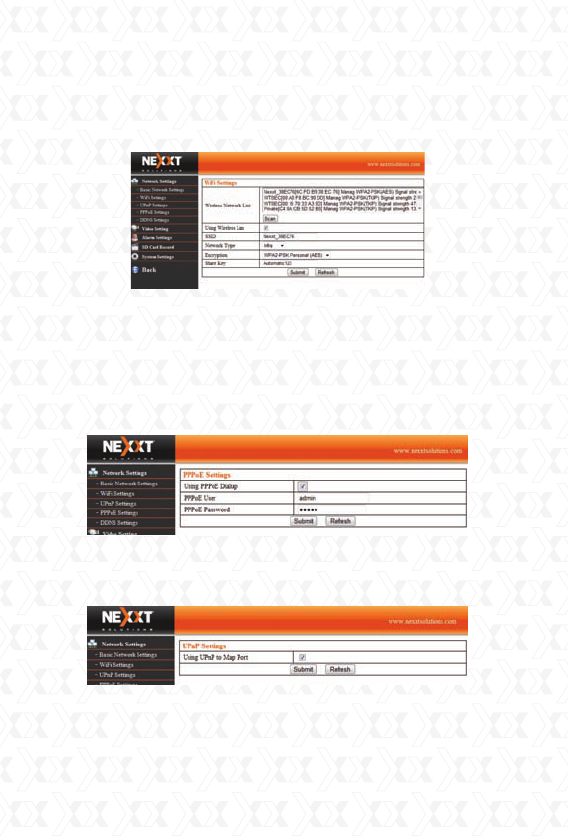
Nexxt Solutions - Integrated Wireless IP Camera with IR Cut-Off Filter
45
your settings. Since the camera will restart at this
time, the network cable must be unplugged. After
rebooting, you can access the camera again using
the correct device.
PPPoE Settings
This is used to set up the Point-to-Point Protocol
over Ethernet (PPPoE) parameters. If utilizing this
service, please make sure your modem is
connected to the computer and that the correct
user name and password have been entered, as
seen below under the PPPoE settings screen:
UPnP Settings
When the UPnP function is enabled, port forwarding
on the router can be setup.
DDNS Service Settings
If you want to remotely access an IP camera that
does not have a static external IP address, by
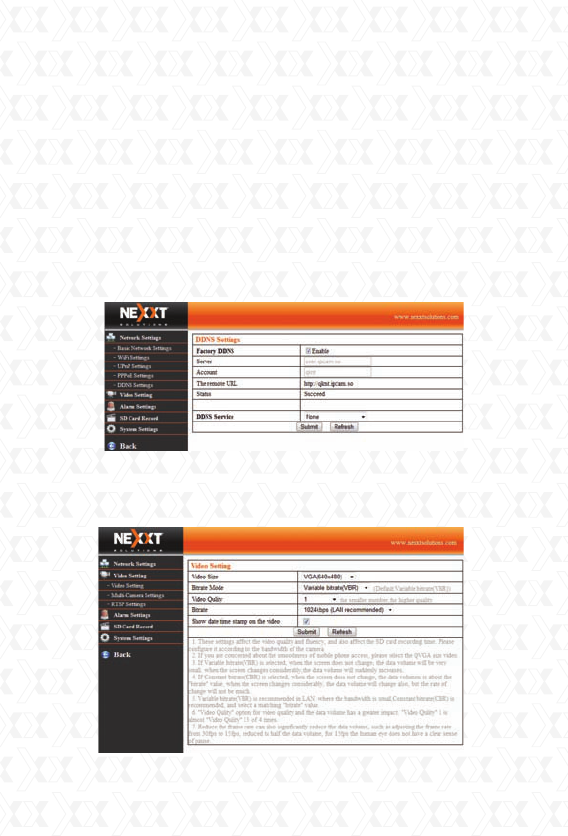
Nexxt Solutions - Integrated Wireless IP Camera with IR Cut-Off Filter
46
means of dial-up Internet for instance, you can use
the camera’s own DDNS. The IP camera supports
two DDNS methods, one is provided by the factory,
while the second one is generated by a third party’s
DDNS system, like DynDns.
When choosing the DDNS assigned by the factory,
users can directly apply such parameters without
further configuration needed. On the other hand,
users can use the third party’s DDNS configuration,
choose the corresponding service and fill in the
account information as prompted.
Video Setting
This is used to set the IP camera’s picture size, rate
mode, picture quality and bit rate.

Nexxt Solutions - Integrated Wireless IP Camera with IR Cut-Off Filter
47
When users check “show date timestamp on video”,
a timestamp will be added in the bottom right
corner of recorded footage.
Mail Service Settings
The mail service is mainly used to send email
notifications in case an alarm is triggered. The user
can set the program to send an email every time the
alarm goes off.
Sender: the mailbox belonging to the sender
Receiver 1, 2, 3, 4: recipients’ email addresses
SMTP server: this is the outgoing mail server
address. It might be used to scan specific
parameter values.
SMTP port: this is the outgoing mail server port;
usually this is set to 25.
Need Authentication: determines if authorization is
needed to send emails. Common communications
are required to authenticate. You need to fill in the
mail’s login account and password accordingly.
Test: when you click this button, the IP camera will
send a test e-mail and verify if it was was sent.
Note: make sure the DNS server and gateway
configuration under basic network settings have
been done correctly.

Nexxt Solutions - Integrated Wireless IP Camera with IR Cut-Off Filter
48
FTP Service Settings
The FTP server is mainly used for uploading live
pictures in case an alarm is triggered.
FTP server: the address of the FTP server.
FTP port: the port used for the FTP server. Usually,
this is set to 21.
FTP user and password: the user name and
password of the FTP site.
FTP upload folder: pictures are saved in the
subdirectory of the FTP server.
FTP mode: it must be selected according to the
mode the FTP server supports. When the IP
camera is behind the router, it will normally run on
passive mode.

Nexxt Solutions - Integrated Wireless IP Camera with IR Cut-Off Filter
49
Alarm Service Settings
This is used to set the alarm functions on the
camera. The XP 330 supports motion detection and
external alarm inputs. Motion detection means that
the IP camera will sense movement and immediately
it will trigger an alarm to alert about such an event.
Sensitivity can be determined in a scale from 1 to
10, 1 being the setting with the highest sensitivity,
while 10 represents the lowest level of motion
sensitivity you can preset.
Alarm actions include presets, alarm output, mail
notifications, and FTP uploading of pictures.
Input pins - The input pins can be used for a one-
way external sensor input. For example, you can
connect a Passive Infrared Sensor (PIR) to it for
motion detection. When an external sensor is
triggered, the IP camera can be programmed to
send an email with an image snapshot or control
the internal relay output. If you link an external alarm
with Pin 3 and Pin 4, and check the box of the
alarm input, the external alarm will be enabled (this
only applies to the models that have this feature
available).
Send Mail on Alarm - Sends picture & mail
information to the set email address after the alarm
is triggered.
Upload Image on Alarm - Enable this function to
upload an image after the alarm is triggered.
Scheduler - You can set the time range for the
motion alarm to be triggered. Schedules can be set
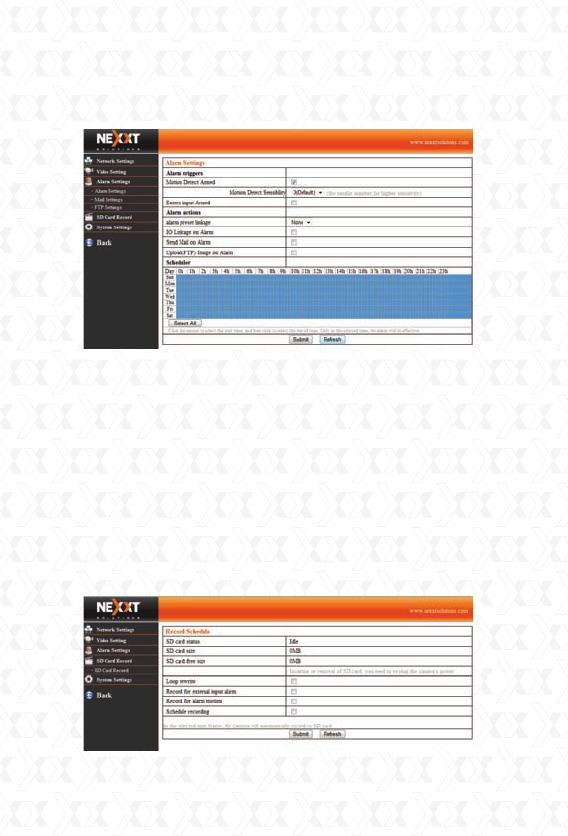
Nexxt Solutions - Integrated Wireless IP Camera with IR Cut-Off Filter
50
up on a weekly basis, within a 24 hour-time frame.
By selecting the scheduler you will be enabling the
alarm.
SD Card Record
This is used to set certain parameters of the SD
card recording.
Loop rewrite: overwrites old content.
Record for external input alarm: begins recording
when the alarm is triggered from an external input
device.
Motion activated recording: starts recording when
the alarm is triggered by motion.
Schedule recording: begins recording at a given
time period.
Nexxt Solutions - Integrated Wireless IP Camera with IR Cut-Off Filter
51
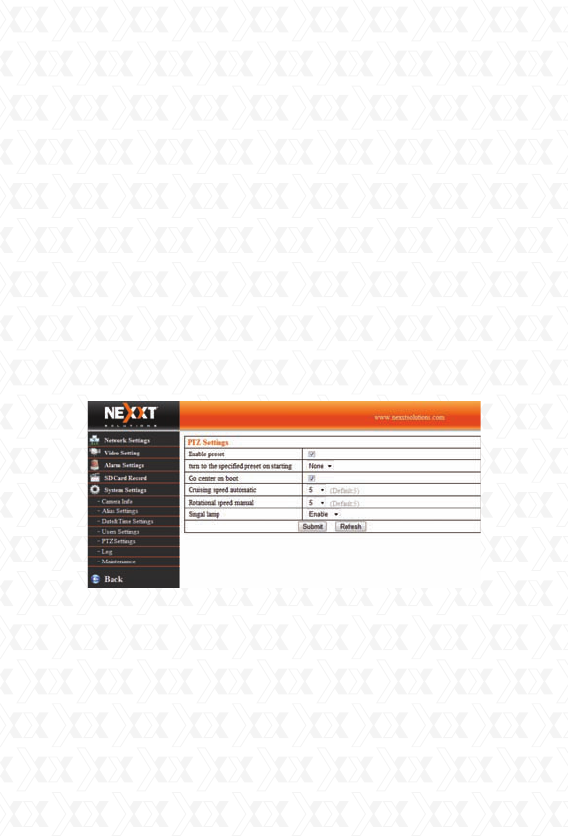
PT settings
This is used to set the pan and tilt parameters and
the signaling lamp. When this light is enabled, the
green LED of camera’s head will flash.
When the IP camera is powered on, it will rotate
by itself and stop at the center. Every time the IP
camera restarts, it will turn to its center position
automatically. Rotation towards the center is mainly
used for positioning.
Cruising speed: the rotation speed of camera’s
horizontal and upright patrolling. Rotational speed
such as upward speed, downward speed, leftward
speed and rightward speed is controlled by the
“Rotational speed manual” option.
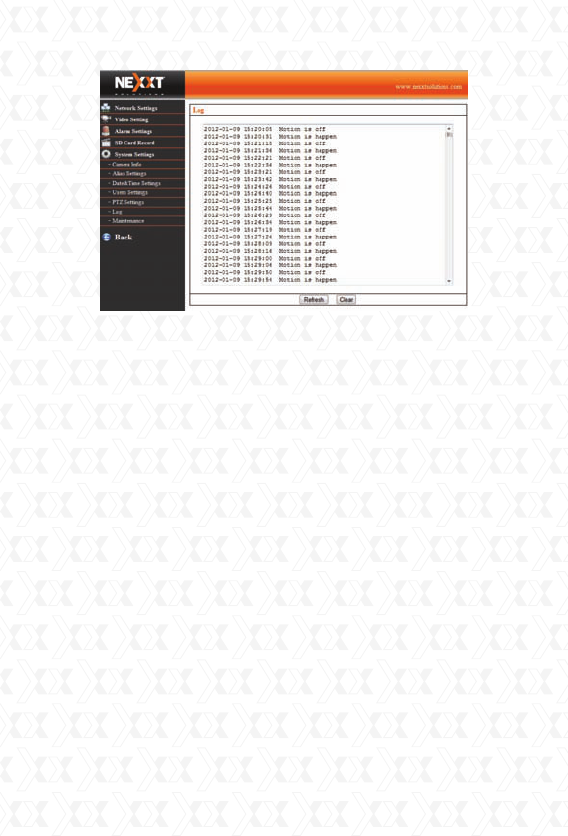
Log
The log keeps a record of the IP camera operation
status and information.
Nexxt Solutions - Integrated Wireless IP Camera with IR Cut-Off Filter
52
MOBILE ACCESS
To begin with, the mobile phone you must have
internet access and be connected to the wireless
LAN if attempting to login internally. If attempting
to access externally, you must ensure to type in the
correct DDNS address on the web browser or have
FTP forwarding function enabled in the router in
order to login via the camera’s IP address.
Smart phone access
Smartphones are mobile phones that run on an
operating system, such as Windows Mobile,
Android, MacOS, and Symbian. This powerful
capability allows the web page browser of such
phones to support JavaScript, making it possible for
them to view the live images captured by the
camera. Internet access on your cell phone is
required for this feature to work.
Use the browser on the phone to enter the
address of the IP camera, e.g. http://demo.ipcam.
so (“demo” is the Serial No. Each device has only
one Serial No).
Nexxt Solutions - Integrated Wireless IP Camera with IR Cut-Off Filter
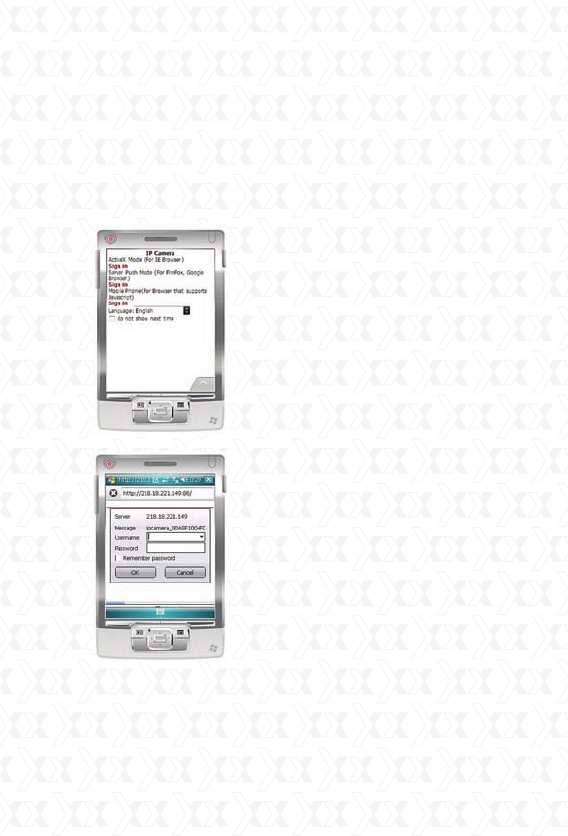
53
Next, taking the Opera mini 4 Version on Windows
Mobile as an example, we are going to present the
whole procedure.
1. Enter access address http://demo.ipcam.so in
the browser address bar; the following interface will
appear:
2. Once you input the
Username and Password of
the camera, the
following interface will pop
up. There are four login
options. Click the third Sign-in
option and use either the
Mobile Phone mode, or “No
Plug-In Mode (for the
smartphone browser)”:
Language is used to select
the display language.
Do not show next time: If
this option is selected, this
interface will not appear
when you log in the next
time. Instead, it will skip it
and directly lead you to the
monitoring page.
Nexxt Solutions - Integrated Wireless IP Camera with IR Cut-Off Filter
54
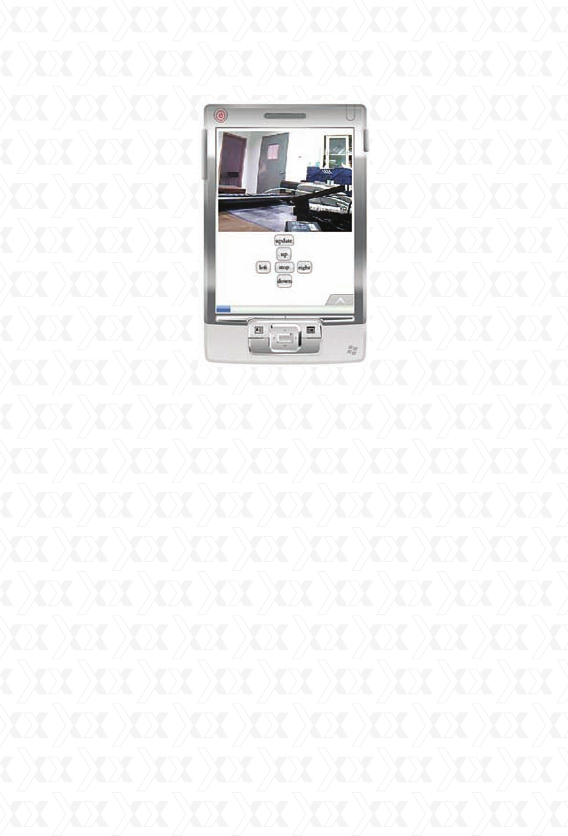
Monitoring page description:
Function of monitoring page keys:
Update: it is used to refresh the page. If the monitor
picture freezes, you may press this key to update the
contents of the page.
Up, down, left, and right: they are used to control
the direction of the IP camera. This only applies to
the P/T camera models.
Stop: stops the camera’s pan and tilt movement.
MISCELLANEOUS SETTINGS
Port Forwarding Settings in Router
When accessing the IP Camera remotely or exter-
nally, the port forwarding feature must be activated
in the router. Port forwarding is also called port
mapping or virtual server. Different brand routers
have different names, but the operation is basically
the same.
Let’s take our Nexxt Solutions Acrux 300 router’s
Nexxt Solutions - Integrated Wireless IP Camera with IR Cut-Off Filter
55
port forwarding setup for illustration (we recom-
mend to use our Nexxt Solutions routers for best
results).
For illustrative purposes, the router’s default access
address is 192.168.0.1, the IP camera’s access
address is 192.168.0.100, and the default access
port is 81.
1. First log in to the router’s web administration
interface (type 192.168.0.1 on your web browser).
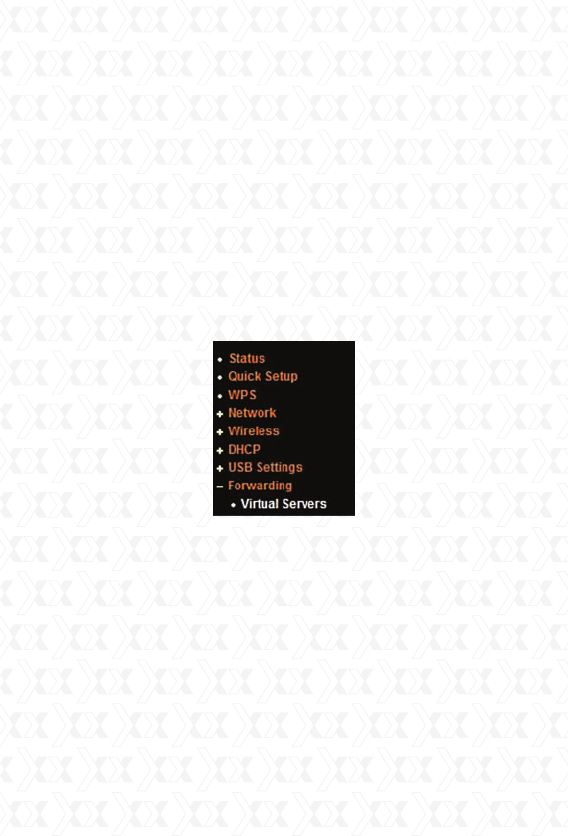
2. Click on Forwarding on the left column or on the
“+” (plus sign) in front.
3. After clicking Virtual Servers in the unfolded
menu, select Add New on the right hand side.
Nexxt Solutions - Integrated Wireless IP Camera with IR Cut-Off Filter
56
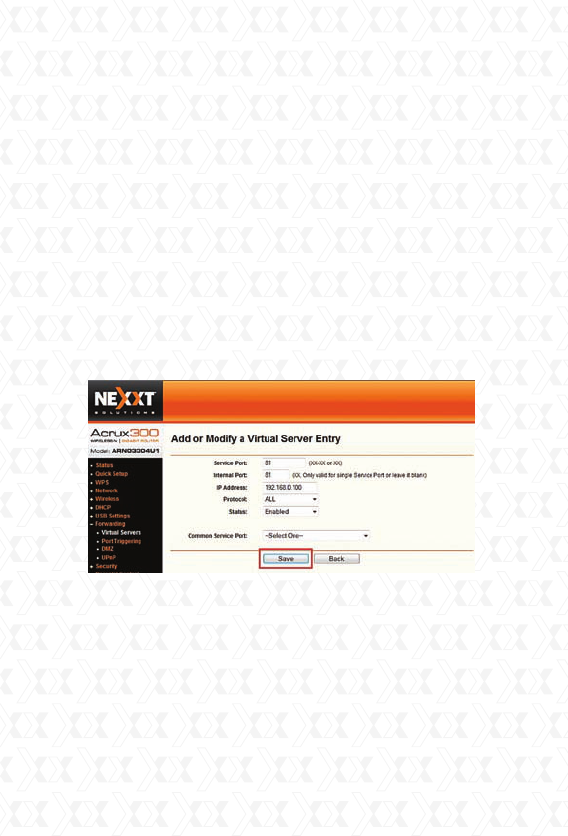
4. Under Service Port and Internal Port field,
input the incoming port for the IP camera (in this
example, it will be 81). In the IP Address field, type
the camera’s IP address (in this example, it will be
192.168.0.100). Under the Protocol drop-down
menu, you have the option to set it to UDP, TCP,
or ALL. We recommend setting it to ALL, but you
can set the option that best fits your configuration.
Next, from the drop down menu, set the Status
to Enabled in order to activate this feature. Leave
the Common Service Port unchanged unless your
Service Port number was changed from the default,
which is 81. Lastly, click Save to store the newly
applied settings.
The following picture illustrates the successful
enablement of Port Forwarding. You can now
access your camera externally utilizing the IP
address.

Nexxt Solutions - Integrated Wireless IP Camera with IR Cut-Off Filter
57
Common router default access addresses:
1.
2.
3.
4.
5.
6.
7.
Frequently-Asked Questions
Question: Why can’t the camera be found when
searching?
Answer:
1. First check if the IP camera and the computer
are in the same LAN network.
2. Ethernet cable and/or power connection can
also cause issues (under normal conditions, the
power LED (yellow) is always lit while the network
LED (green) is continuously flashing.)
Nexxt Solutions router’s default access address is
192.168.0.1
DLINK router’s default access address is
192.168.0.1
Linksys router’s default access address is
192.168.1.1
3com router’s default access address is
192.168.2.1
Microsoft router’s default access address is
192.168.2.1
Netgear router’s default access address is
192.168.1.1
Asus router’s default access address is
192.168.1.1

Nexxt Solutions - Integrated Wireless IP Camera with IR Cut-Off Filter
58
3. If a firewall is installed in your network or
computer, ensure this is not blocking inbound
connections to the camera and/or port.
Question: Does the 330 series allow users to
browse dynamic video through a mobile phone?
Answer: Yes, it does. The 330 series allows for
dynamic video viewing through most smart mobile
phones.
Question: How can you set the IP camera and PC
into the same segment within the LAN?
Answer: After finding the camera with the search
bar, click the Automatic Setting button.
Question: Why can’t the mobile phone access the
IP camera?
Answer:
1. Make sure whether the mobile phone has
internet access or not, and check that the IP
address or DDNS server was entered correctly on
the mobile phone’s web browser. .
2. Ensure that the IP camera can be accessed
through the Internet via your PC.
3. If accessing the camera internally, verify that your
mobile phone is connected to the same LAN.

Nexxt Solutions - Integrated Wireless IP Camera with IR Cut-Off Filter
59
SPECIFICATIONS
Model AILPT324U5
Specifications
Camera
Image sensor
Lens
Infrared LED
Pixels
Filter
Night vision range
AWS/AGC/AES exposure
Compression format
Minimum illumination
Audio
Input
Output
Image format
Max. frame rate
Resolution
Built int PT
PT angle
Horizontal speed
Vertical speed
Network interface
Supported protocols
WI-FI
Alarm port
Motion detection
Alarm events
Periodic sending
User authentication
Web browser
Simultaneous viewers
Mobile compatibility
Power
Power consumption
Operating temperature
Storage temperature
Operating humidity
Storage humidity
Gross weight
Certifications
Warranty
1/4 color CMOS
4 mm
10 pcs
300,000
infrared cut-off filter (ICR) to ensure lifelike daytime color and sensitive
night time performance
15 m
Auto
Supports H264 and M’JPED dual compression
0.1 Lux
2-way audio
Built in microphone
Built- in speaker
PAL/NTSC
25 fps
Resolution 640×480 (VGA), 320×240 (QVGA)
Supports 15 preset positions
Horizontal up to 325°, vertical up to 100°
0 - 16 °/s
0 - 16 °/s
RJ-45 (10BASE-T/100BASE-TX)
TCP/IP,HTTP,TCP,ICMP,UDP,ARP, IGMP,SMTP,FTP,DHCP,DNS,
DDNS,NTP,UPnP,RTSP,PPPOE
IEE802.1 b/g
Input and output ports to connect external alarm devices
Motion detection and video recording to local storage
Notification via SD card, email, FTP
Video recording to local storage and SD storage card
Send pictures and video to SD storage card, email/FTP within the time specified
User/password; administrator/operator/general user
IE 6.0 or above version, Mozilla Firefox, Safari, Opera, Chrome, etc
10 viewers@320x240 4 viewers@640x480
Supports Nokia, Symbian, Android, iPhone, Windows mobile phone,
and other smart cellular phones with Java MIDP 2.0
DC 5V 1.5 A
4W/6W (Infrared off/on)
-10 to+55 °C
-20 to+60 °C
10- 80% RH
10- 95%RH
600 g (including accessories)
CE; FCC; RoHS
Limited one year warranty
Audio
Video
Pan/Tilt
Network
Alarm
General

60
This equipment has been tested and found to comply with the limits for a
Class B digital device, pursuant to part 15 of the FCC Rules.
These limits are designed to provide reasonable protection against
harmful interference in a residential installation. This equipment generates
uses and can radiate radio frequency energy and, if not installed and
used in accordance with the instructions, may cause harmful
interference to radio communications. However
there is no guarantee that interference will not occur in a particular installation.
If this equipment does cause harmful interference to radio or television
reception, which can be determined by turning the equipment off and on
the user is encouraged to try to correct the interference by one or
more of the following measures:
1.Reorient or relocate the receiving antenna.
2.Increase the separation between the equipment and receiver.
3.Connect the equipment into an outlet on a circuit different from that to which the
receiver is connected.
4.Consult the dealer or an experienced radio/TV technician for help
Caution: Any changes or modifcations to this device not explicitly approved by
manufacturer could void your authority to operate this equipment.
This device complies with part 15 of the FCC Rules. Operation is
subject to the following two conditions: (1) This device may
not cause harmful interference, and (2) this device must
accept any interference received, including interference
that may cause undesired operation.
This equipment complies with FCC RF radiation exposure limits set forth
for an uncontrolled environment. This device and its antenna must not be
located or operating in conjunction with any other antenna or transmitter.
To comply with FCC RF exposure compliance requirements, this grant
is applicable to only mobile configurations. The antennas used for
this transmitter must be installed to provide a separation distance
of at least 20 cm from all persons and must not be co-located
or operating in conjunction with any other antenna or transmitter.”