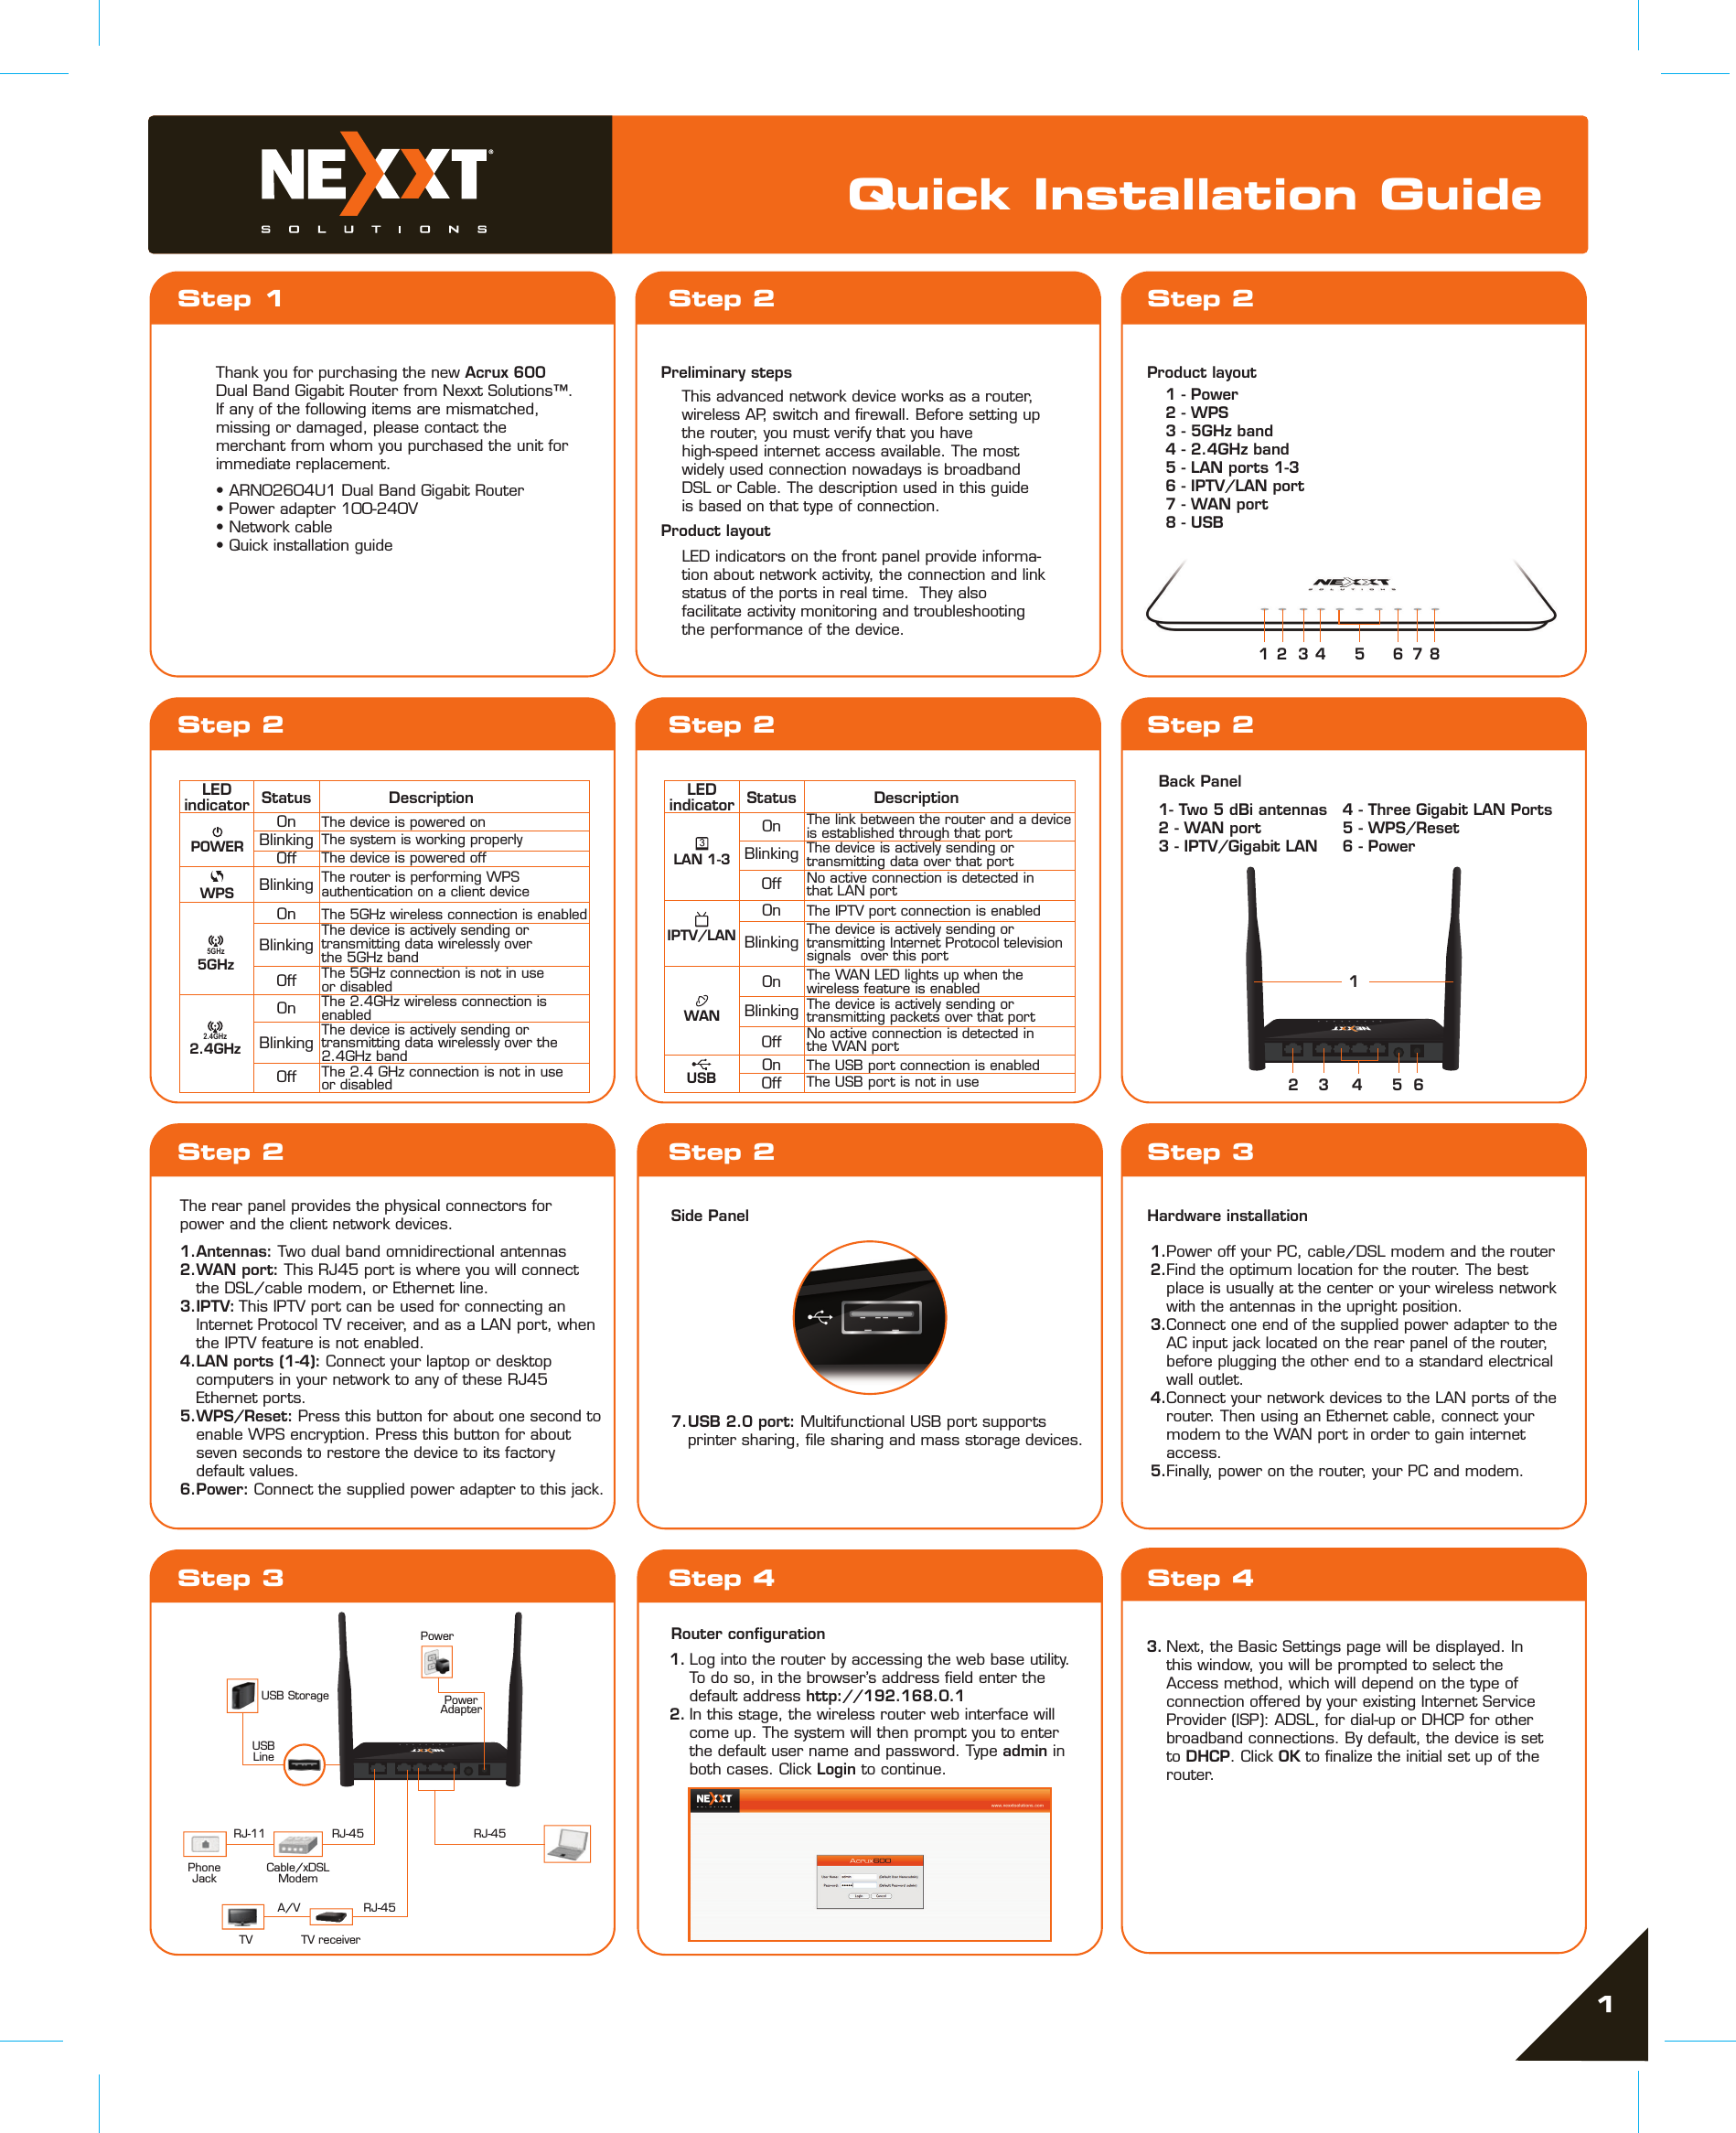
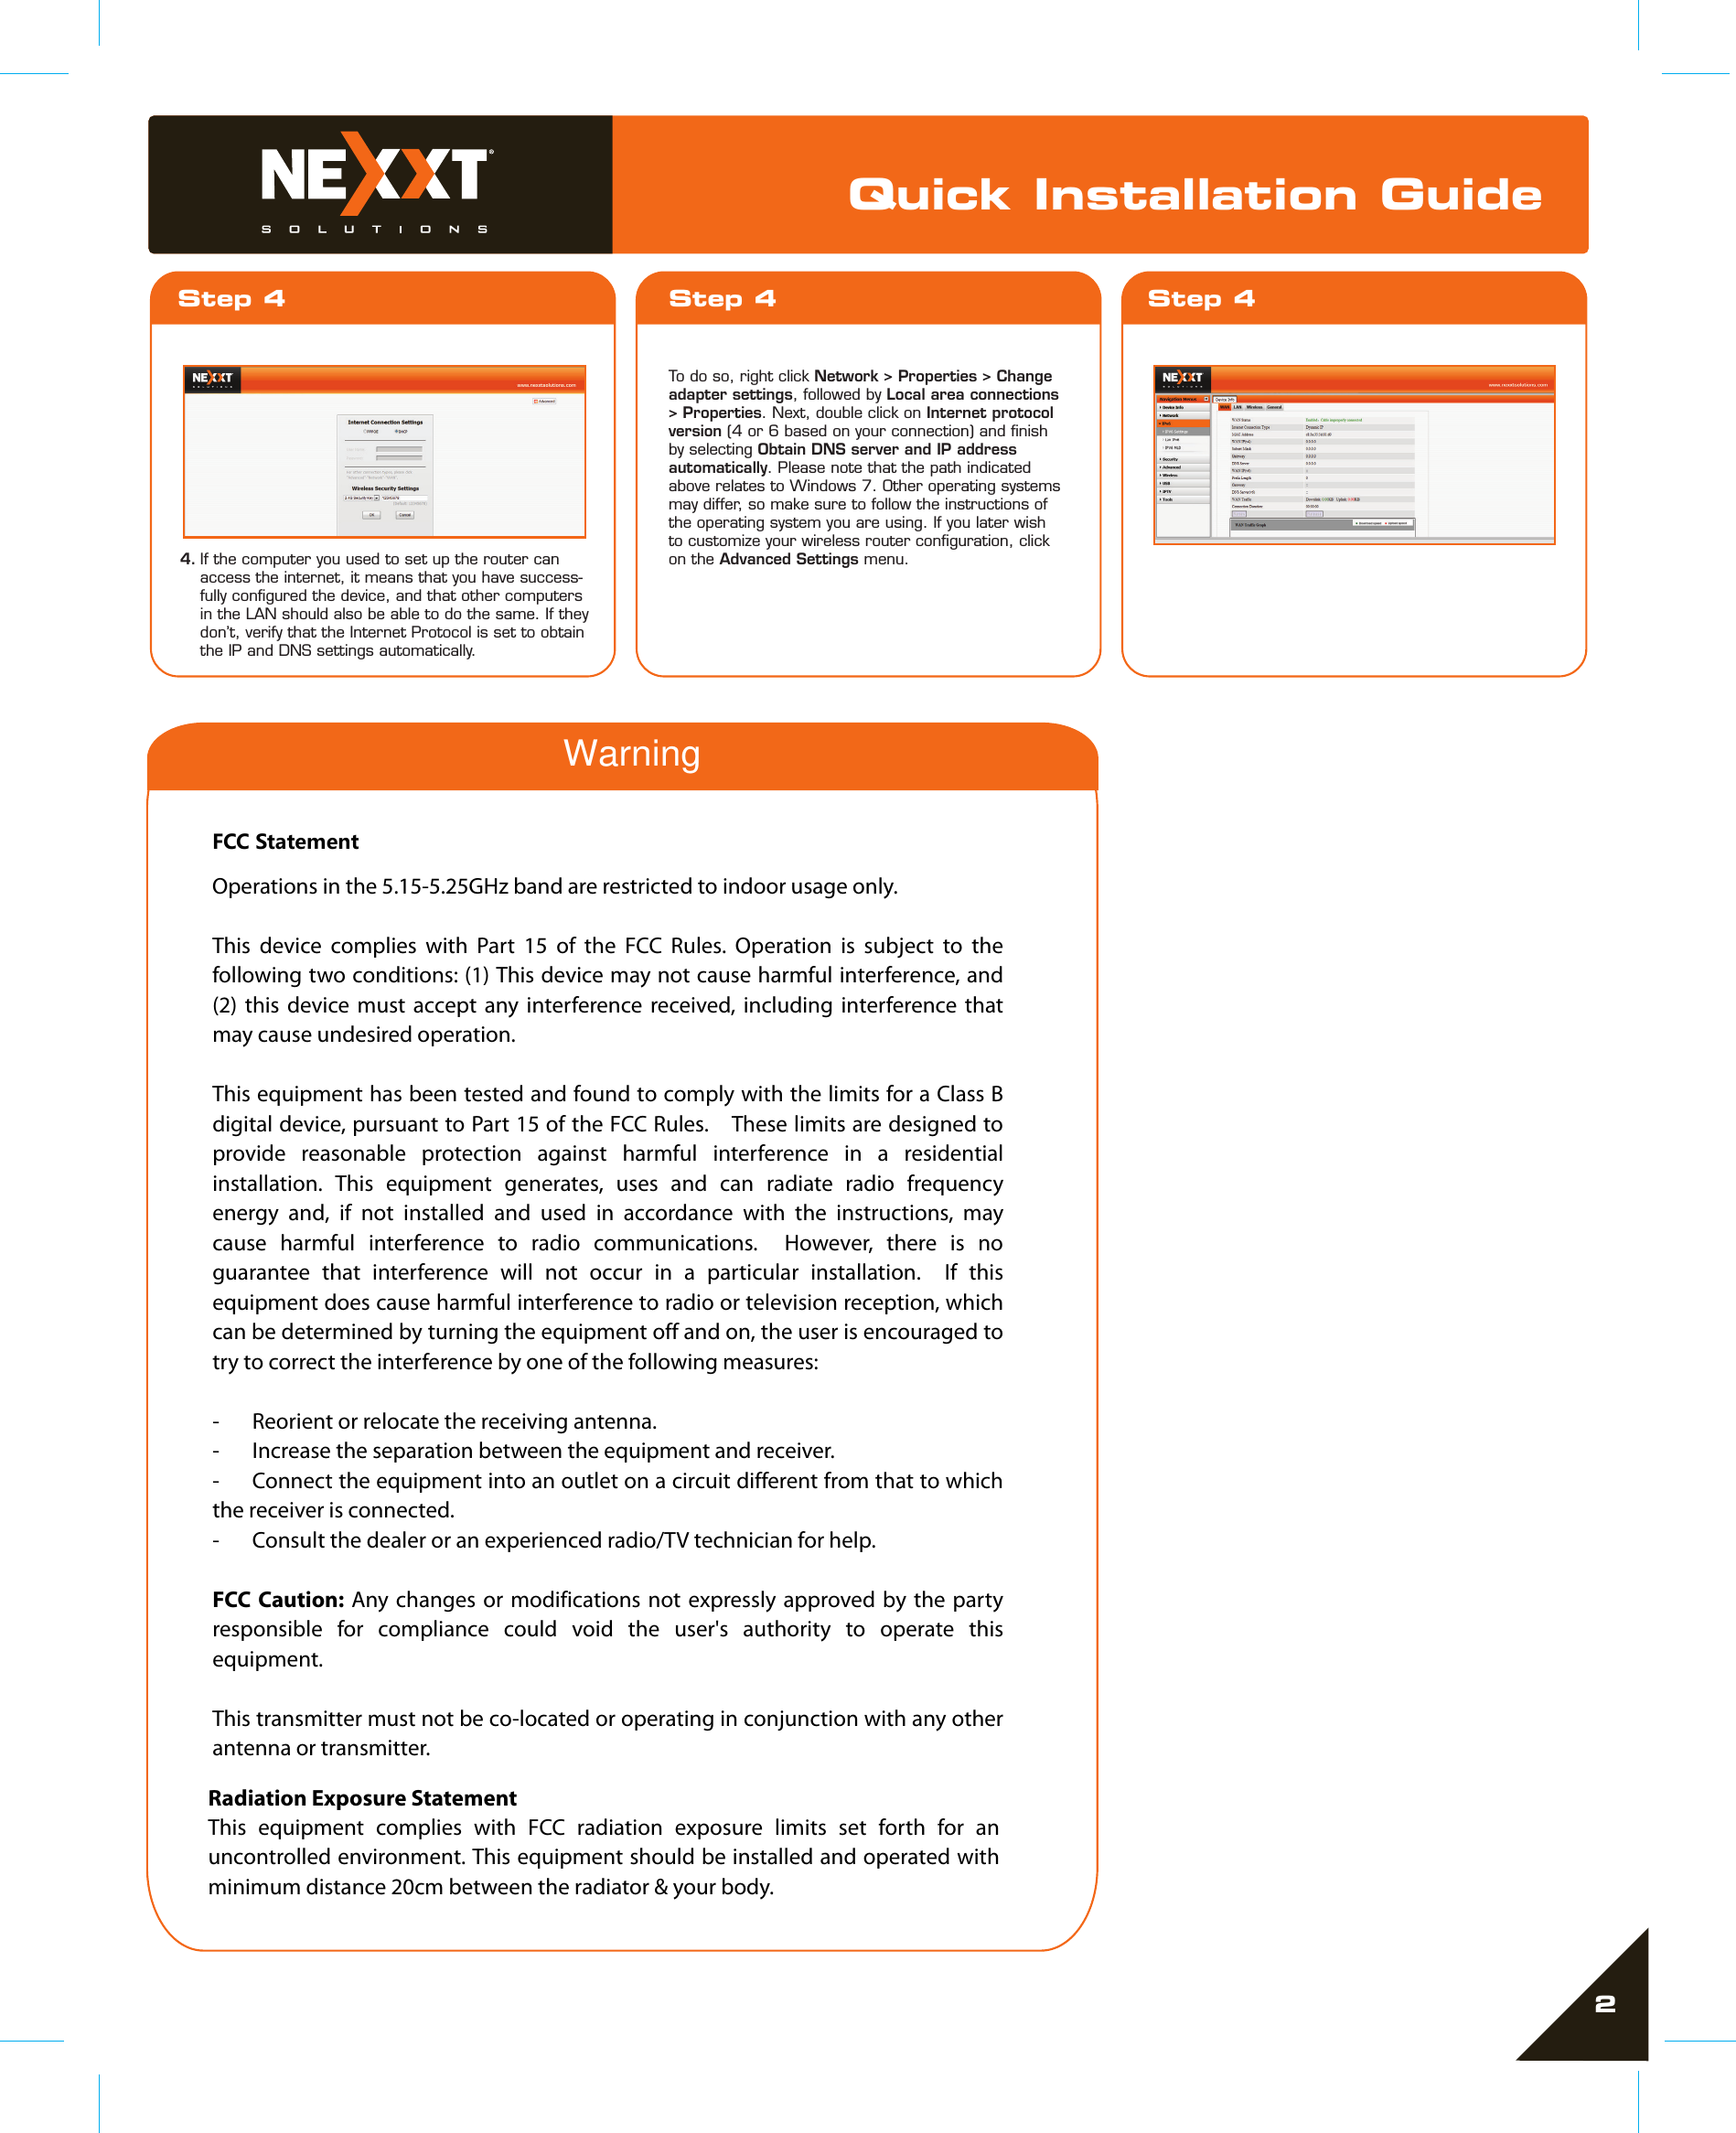
NEXXT SOLUTIONS 604U1 Wireless-N Dual Band Gigabit Router User Manual ARN02604U1 ACRUX 600 QIG ENG 04 01 2013

NEXXT SOLUTIONS Wireless-N Dual Band Gigabit Router ARN02604U1 ACRUX 600 QIG ENG 04 01 2013

Users Manual

5GHz5GHz2.4GHzWANLEDindicatorPOWERWPS2.4GHzOnBlinkingOffOnBlinkingOffBlinkingOnOffBlinkingThe device is powered on The system is working properlyThe device is powered offThe 5GHz wireless connection is enabledThe 2.4GHz wireless connection isenabledThe 2.4 GHz connection is not in use or disabledThe 5GHz connection is not in use or disabledThe device is actively sending or transmitting data wirelessly over the 2.4GHz bandThe device is actively sending or transmitting data wirelessly over the 5GHz bandThe router is performing WPS authentication on a client device Status DescriptionQuick Installation GuideStep 1 Step 2 Step 21Preliminary steps Product layoutBack PanelSide PanelRouter configuration Hardware installationThis advanced network device works as a router, wireless AP, switch and firewall. Before setting up the router, you must verify that you have high-speed internet access available. The most widely used connection nowadays is broadband DSL or Cable. The description used in this guide is based on that type of connection.Product layoutLED indicators on the front panel provide informa-tion about network activity, the connection and link status of the ports in real time.  They also facilitate activity monitoring and troubleshooting the performance of the device.The rear panel provides the physical connectors for power and the client network devices.USB 2.0 port: Multifunctional USB port supports printer sharing, file sharing and mass storage devices. Antennas: Two dual band omnidirectional antennas WAN port: This RJ45 port is where you will connect the DSL/cable modem, or Ethernet line.IPTV: This IPTV port can be used for connecting an Internet Protocol TV receiver, and as a LAN port, when the IPTV feature is not enabled.LAN ports (1-4): Connect your laptop or desktop computers in your network to any of these RJ45 Ethernet ports. WPS/Reset: Press this button for about one second to enable WPS encryption. Press this button for about seven seconds to restore the device to its factory default values.Power: Connect the supplied power adapter to this jack.1.2.3.4.5.6.7.Power off your PC, cable/DSL modem and the routerFind the optimum location for the router. The best place is usually at the center or your wireless network with the antennas in the upright position.Connect one end of the supplied power adapter to the AC input jack located on the rear panel of the router, before plugging the other end to a standard electrical wall outlet.Connect your network devices to the LAN ports of the router. Then using an Ethernet cable, connect your modem to the WAN port in order to gain internet access. Finally, power on the router, your PC and modem. 1.2.3.4.5.Thank you for purchasing the new Acrux 600 Dual Band Gigabit Router from Nexxt Solutions™. If any of the following items are mismatched, missing or damaged, please contact the merchant from whom you purchased the unit for immediate replacement.•฀ARN02604U1฀Dual฀Band฀Gigabit฀Router•฀Power฀adapter฀100-240V•฀Network฀cable฀•฀Quick฀installation฀guide฀Step 2 Step 2 Step 2Step 2  Step 2 Step 3 Step 4 Step 4Step 3Log into the router by accessing the web base utility. To do so, in the browser’s address field enter the default address http://192.168.0.1  In this stage, the wireless router web interface will come up. The system will then prompt you to enter the default user name and password. Type admin in both cases. Click Login to continue.1.2.Next, the Basic Settings page will be displayed. In this window, you will be prompted to select the Access method, which will depend on the type of connection offered by your existing Internet Service Provider (ISP): ADSL, for dial-up or DHCP for other broadband connections. By default, the device is set to DHCP. Click OK to finalize the initial set up of the router.3.1- Two 5 dBi antennas2 - WAN port3 - IPTV/Gigabit LAN4 - Three Gigabit LAN Ports5 - WPS/Reset6 - Power1 2 3 4 5 7 86LEDindicator LAN 1-3IPTV/LANUSBOnOnBlinkingOnOffOnOffThe USB port connection is enabledThe USB port is not in useOffBlinkingBlinkingThe link between the router and a deviceis established through that portThe IPTV port connection is enabledNo active connection is detected in the WAN portNo active connection is detected in that LAN portThe device is actively sending or transmitting Internet Protocol televisionsignals  over this portThe device is actively sending or transmitting data over that portThe WAN LED lights up when thewireless feature is enabledThe device is actively sending or transmitting packets over that portStatus Description2 3 415 6USB StoragePowerPowerAdapterUSBLineRJ-11TVA/VTV receiverRJ-45 RJ-45RJ-45PhoneJackCable/xDSLModem1 - Power2 - WPS3 - 5GHz band4 - 2.4GHz band5 - LAN ports 1-36 - IPTV/LAN port7 - WAN port8 - USB
Quick Installation GuideStep 4 Step 42Step 4To do so, right click Network > Properties > Change adapter settings, followed by Local area connections > Properties. Next, double click on Internet protocol version฀(4฀or฀6฀based฀on฀your฀connection)฀and฀finish฀by selecting Obtain DNS server and IP address automatically. Please note that the path indicated above relates to Windows 7. Other operating systems may differ, so make sure to follow the instructions of the operating system you are using. If you later wish to customize your wireless router configuration, click on the Advanced Settings menu.  If the computer you used to set up the router can access the internet, it means that you have success-fully configured the device, and that other computers in the LAN should also be able to do the same. If they don’t, verify that the Internet Protocol is set to obtain the IP and DNS settings automatically.4.WWarning  FCC Statement Operations in the 5.15-5.25GHz band are restricted to indoor usage only. This device complies with Part 15 of the FCC Rules. Operation is subject to the following two conditions: (1) This device may not cause harmful interference, and (2) this device must accept any interference received, including interference that may cause undesired operation. This equipment has been tested and found to comply with the limits for a Class B digital device, pursuant to Part 15 of the FCC Rules.    These limits are designed to provide reasonable protection against harmful interference in a residential installation. This equipment generates, uses and can radiate radio frequency energy and, if not installed and used in accordance with the instructions, may cause harmful interference to radio communications.  However, there is no guarantee that interference will not occur in a particular installation.  If this equipment does cause harmful interference to radio or television reception, which can be determined by turning the equipment off and on, the user is encouraged to try to correct the interference by one of the following measures: -  Reorient or relocate the receiving antenna. -  Increase the separation between the equipment and receiver. -  Connect the equipment into an outlet on a circuit different from that to which the receiver is connected. -  Consult the dealer or an experienced radio/TV technician for help. FCC Caution: Any changes or modifications not expressly approved by the party responsible for compliance could void the user's authority to operate this equipment. This transmitter must not be co-located or operating in conjunction with any other antenna or transmitter.   Radiation Exposure Statement This equipment complies with FCC radiation exposure limits set forth for an uncontrolled environment. This equipment should be installed and operated with minimum distance 20cm between the radiator & your body.

Navigation menu