NEXXT SOLUTIONS KRNS3V2 Universal Range Extender User Manual
NEXXT SOLUTIONS Universal Range Extender Users Manual
Users Manual
NE
}tx
1·
SOLUTIONS
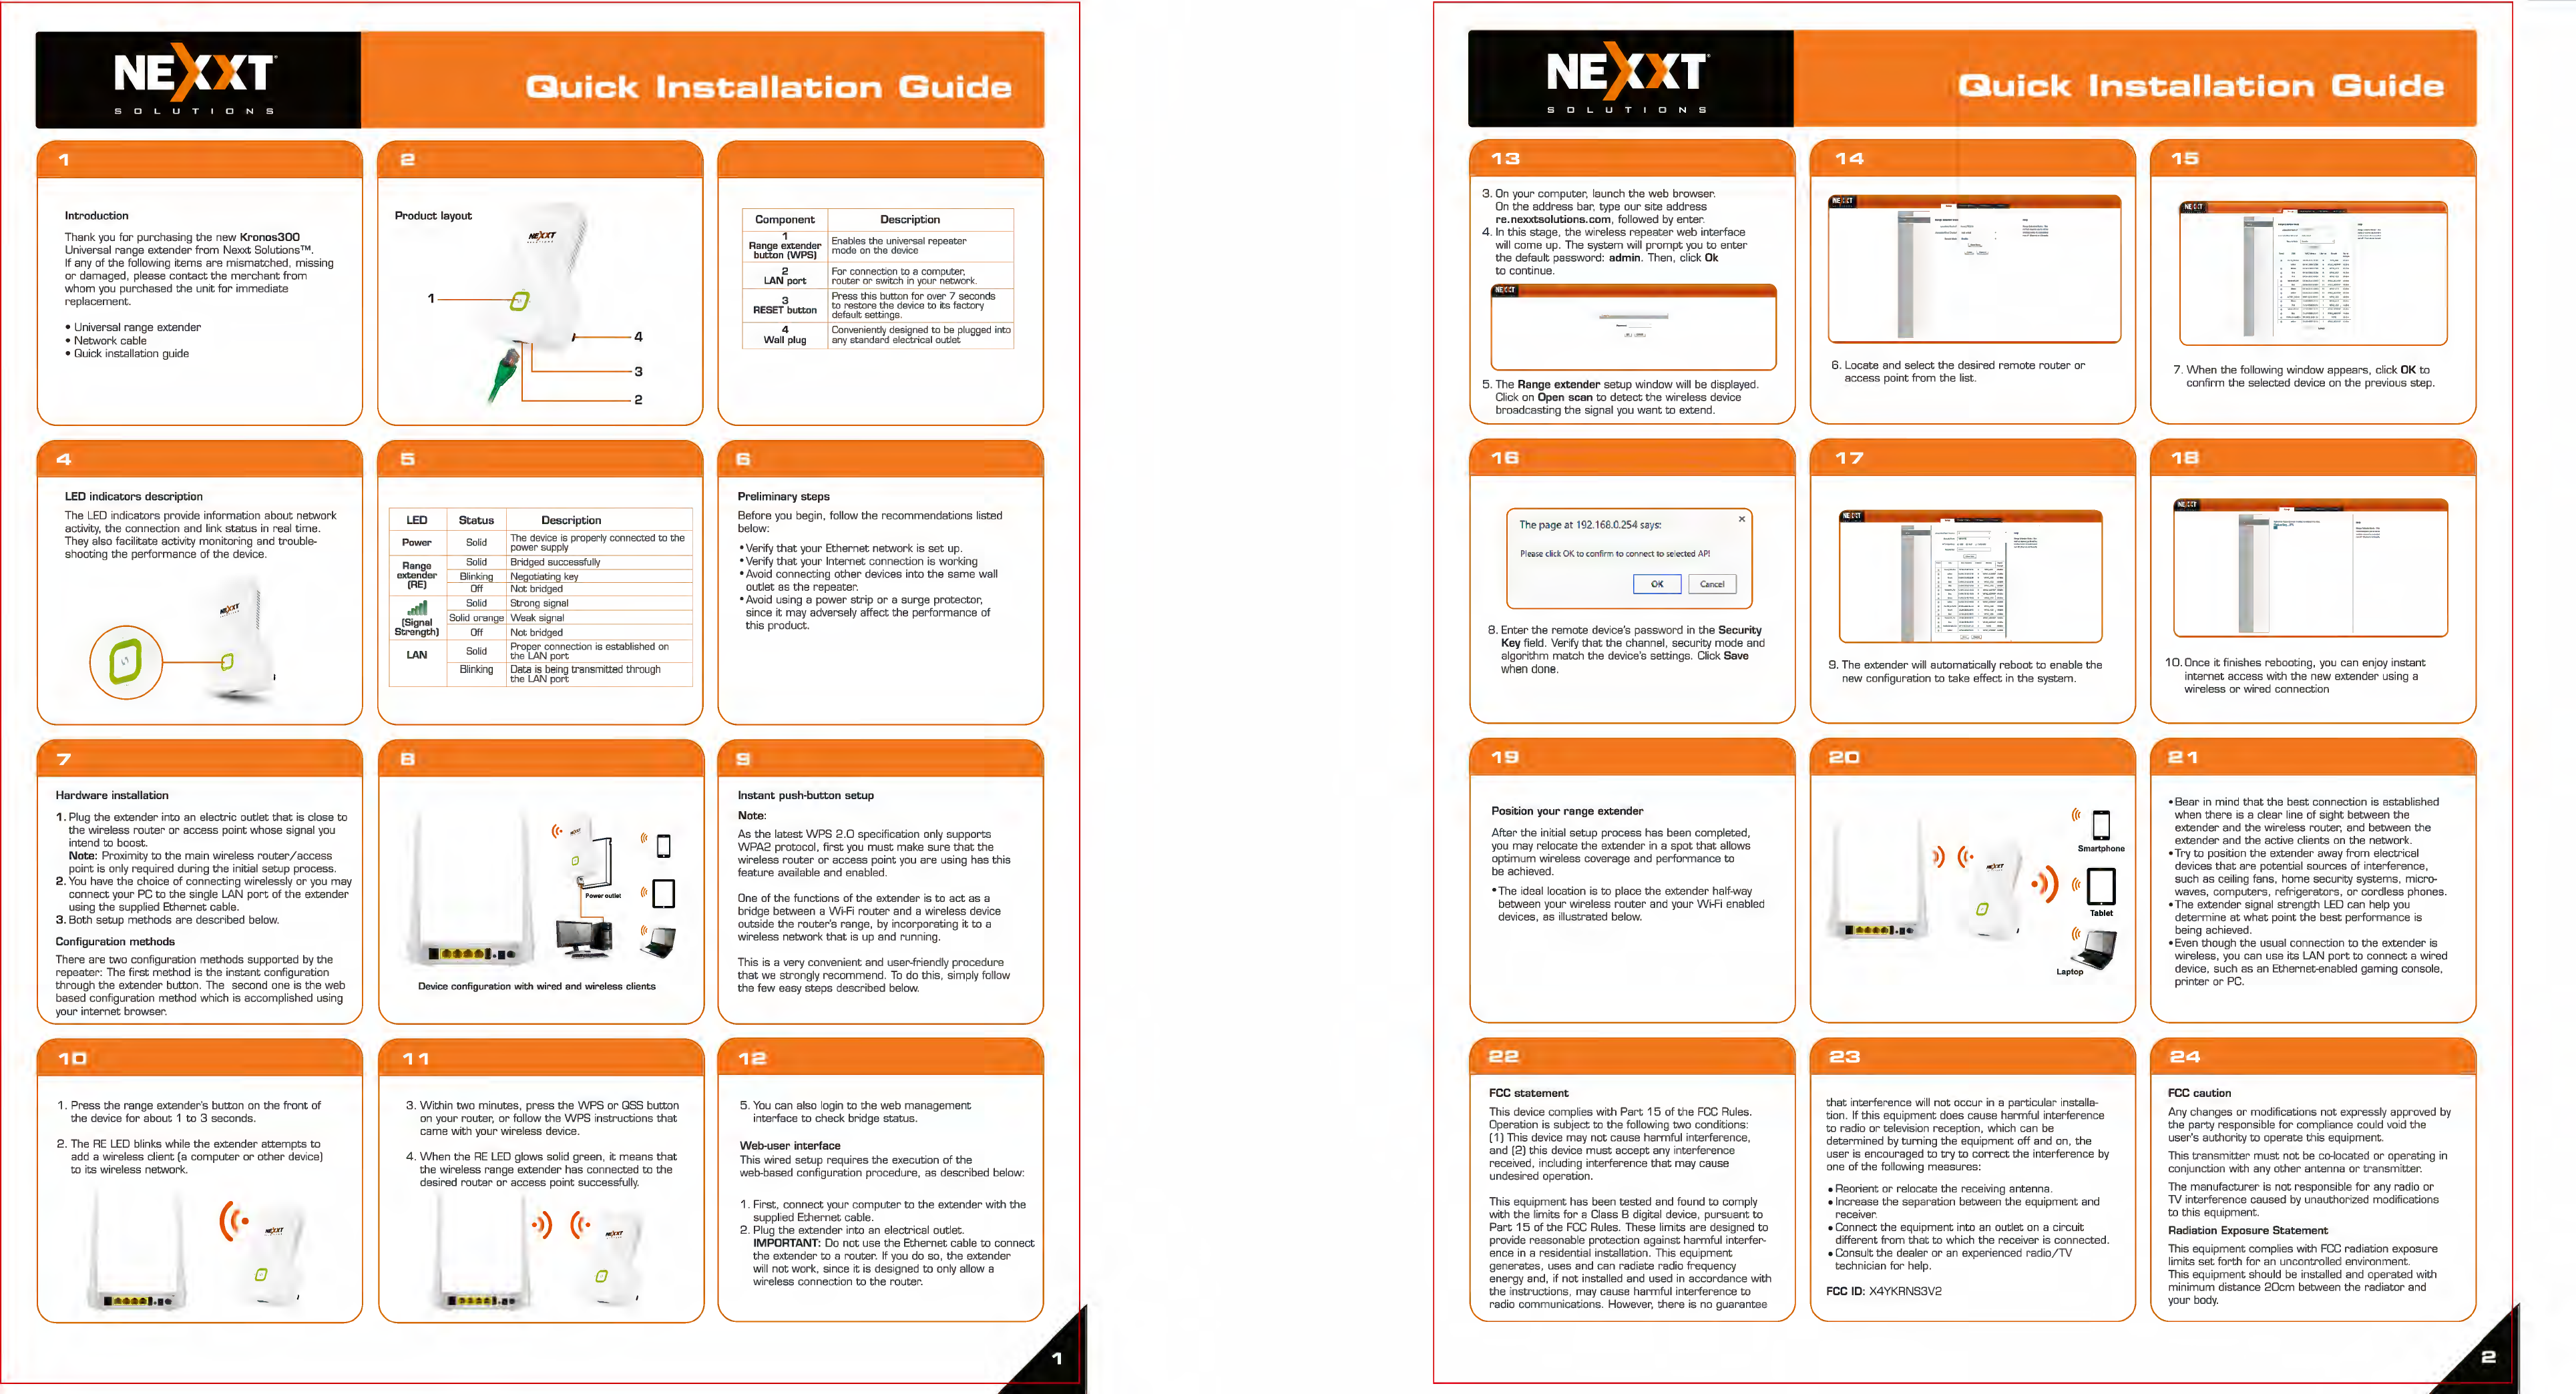
Introduction
Thank you
for
purchasing
the
new
Kronos300
Universal range extender
from
Nexxt Solutions™.
If any of the following
items
are
mismatched, missing
or
damaged, please
contact
the
merchant
from
whom
you purchased
the
unit
for
i
mmediate
replacement.
• Universal range extender
•
Network
cable
• Quick installation guide
LED
indicators
description
The
LED
indicators provide information
about
network
activity, the connection and link
status
in
real time.
They also facilitate activity monitoring and trouble-
shooting
the
performance
of
the
device.
Hardware
installation
1.
Plug
the
extender into an
electr
ic
outlet
that
is close
to
the
wireless
router
or
access poi
nt
whose signal you
intend
to
boost
.
Note:
Proximity
to
the main wireless
router/access
point
is
only required during
the
initial setup process.
2.
You
have the choice
of
connecting wirelessly
or
you may
connect
your
PC
to
the
single LAN
port
of
the
extender
using
the
supplied
Ethernet
cable.
3.
Both
setup
methods
are
described below.
Configuration
methods
There are
two
configuration
methods
supported
by
t he
repeater
: The
first
method
is the i
nstant
configuration
through
the
extender button. The second one is the web
based configuration method which
is
accomplished using
your
internet
browser
.
1. Press
the
range extender's button
on
the
front
of
the device
for
about
1
to
3 seconds.
2. The
RE
LED
blinks while
the
extender
attempts
to
add a wireless client
(a
computer
or
other
device)
to
its
wireless network.
(<·
0
Product
layout
.
N£
Ja!"
1
---
o
l--
---
4
LED
Status
Description
Power
So
l
id
The device is properly connected to the
power supply
Range
So
l
id
Bridged successfully
~
-
extender
Blinkinn
Nenotiatinn
ke\I
(RE)
Off
Not
bridged
.
~r~
So
l
id
Strong
signal
(Signal
Solid orange
Weak
si
gna
l
Strength)
Off
Not
bridged
LAN
So
l
id
Proper connection is
est.abl
ished on
the
LAN
port
Blinking
Data
is
being
transmitted through
the LAN
port
(<·
¢'
·
(re
D
0
rr,
D
Device
configuration
with
wired
and
wireless
clients
3.
Within
two
minutes,
press
the
WPS
or
QSS
button
on
your router,
or
follow the
WPS
instructions
that
came with
your
wire
less device.
4.
When
the
RE
LED
glows solid green,
it
means
that
the wireless range extender has connected
to
the
desired
router
or
access poi
nt
successfull
y.
·>)
(<·
0
Component
Description
1 Enables
the
unive:rsal repeater
Range extender
button
(WPS)
mode
on
the
device
2
Fo
r connection
to
a computer,
LAN
port router or switch
in
your network.
3 Press this button
for
over 7 seconds
RESET
button
t.o
restore the
dev
ice
to
its factory
default
sett
ings.
4
Conveniently
designed
to
be
plugged
into
Wall
plug
any
standard
electr
ical
outlet
Preliminary
steps
Before you begin, follow
the
recommendations
listed
below:
•Verify
that
your
Ethernet
network
is
set
up .
•Verify
that
your
Internet
connect
ion is working
•Avoid connecting
other
devices into
the
same wall
outlet
as
the
repeater.
•Avoid using a
power
strip
or
a surge protector,
since it may adversely
affect
the
performance
of
this
product.
Instant
push-button
setup
Note:
As
the
latest
WPS
2.0
specification only
supports
WPA2
protocol,
first
you
must
make
sure
that
the
wire
less
router
or
access point you
are
using has this
feature available and enabled.
One of
the
functions of the extender is
to
act
as a
br
idge between a Wi-Fi
router
and a wireless device
outside
the
router's
range,
by
incorporating it
to
a
wire
less network
that
is up and running.
This is a very convenient and user-friendly procedure
that
we strongly recommend.
To
do this, simply follow
the
few easy
steps
described below.
5.
You
can also login
to
the
web
management
interface
to
check bridge
status.
Web-user
interface
This wired setup requires the execution of
the
web-based configuration procedure. as described
be
low:
1.
First,
connect
your
computer
to
the extender with
the
supplied
Ethernet
cable.
2.
Plug
the
extender into an electrical outlet.
IMPORTANT: Do
not
use the
Ethernet
cable
to
connect
the extender
to
a router.
If
you
do so,
the
extender
will
not
work, since
it
is designed
to
only allow a
wireless connection
to
the
router.
3.
On
your computer, launch
the
web browser.
On
the address bar, type
our
site address
re.nexxtsolutions.com,
followed
by
enter
.
4 .
In
this stage,
the
wireless
repeater
web interface
will
come
up
. The system will
prompt
you
to
enter
the
default password:
admin
. Then, click Ok
to
continue.
5.
The Range
extender
setup window will be displayed.
Click on Open
scan
to
detect
the
wi
re
less device
broadcasting the signal you
want
to
extend.
The page at 192.163.0.254 sa
ys:
x
Ple
as
e d
ic
k OK to con
fi
rm
10 connect
~
o
~
e
l
e
c
t
e
d
API
OK 1 1
c
~
n
ce
l
8.
Enter the
remote
device's password in
the
Security
Key field. Verify
that
the channel, security mode and
algorithm
match
the
device's
settngs.
Click Save
when
done.
Position
your
range
extender
After
the
initial setup process has been completed,
you may
re
locate
the
extender in a
spot
that
allows
optimum
wireless coverage and
performance
to
be achieved.
•The
ideal
locat
ion is
to
place
the
extender half-way
between
your
wireless
router
and
your
Wi-Fi enabled
devices, as illustrated below.
FCC
statement
This device complies with
Part
15
of
the
FCC
Rules.
Operation is subject
to
the
following
two
conditions:
(1) This device
may
not
cause harmful interference,
and (2] this device
must
accept
any interference
received, including interference
that
may cause
undesired operation.
This equipment has been
tested
and found
to
comply
with the li
mits
for
a Class B digital device,
pursuant
to
Part
15
of the
FCC
Rules. These limits
are
designed
to
provide reasonable protection agai
nst
harmful
interfer
-
ence
in
a residential installation. This equipment
generates, uses and can radiate
rad
io frequency
energy and, if
not
installed and used
in
accordance wi
th
the
instructions, may cause harmful
interference
to
radio
commun
ications. However,
there
is no guarantee
-=-
-
~-
-
6.
Locate and select the desired
remote
router
or
access
point
from
the list.
-·
~
·
-
·-
·
~
-· -
·--
-
9 . The extender will automatically
reboot
to
enable the
new
configuration
to
take
effect
in
the
system.
((c
D
>)
(c·
Smartphone
Tablet
that
interference
will
not
occur
in a
particular
installa-
tion . If
th
is equipment does cause harmful
interference
to
radio
or
television reception, which can be
determ
ined by
turning
the
equipment
off
and on,
the
user
is encouraged
to
try
to
correct
the
interference
by
one
of
the
following
measures
:
•Reor
i
ent
or
relocate the receiving antenna.
•Increase
the
separation between
the
equipment and
rece
iver.
•Connect
the
equipment into an
outlet
on a ci
rcuit
different
from
that
to
which
the
receiver is connected.
•Consult
the
dealer
or
an
experienced
radio/TV
technician
for
help.
FCCID:
X4YKRNS3V2
..
-
~·
·
--
, ..
..
-·
~
--·
•M •
. ..
~
~
·
·
-
.
• ·- - u
•••-
· "
-
~
- -
:-
:.
::
::::
:. :
~
~~
·
~
•
~
-
U>
~ -
0
·
-
~
-• M
.
-~
·-
-
·
~
··
. -
··
· --
7.
When
the
following window appears, click OK
to
confirm
the
selected device
on
the
previous step.
~
i-7'
=~-·--
-
·-~
·«-
·•-·
1
D.
Once
it
finishes rebooting, you can enjoy
instant
internet
access
with
the
new extender using a
wireless
or
wired connection
•
Bear
in mind
that
the
best
connection
is
established
when
there
is a cl
ear
line of sight between
the
extender and
the
wireless router. and between the
extender and
the
active cl
ients
on
the
network.
•Try
to
positi
on
the
extender away
from
electrical
devices
that
are
potential
sources
of interference,
such as ceiling fans, home security systems, micro-
waves,
computers,
refrigerators,
or
cordless phones.
•The
extender signal
strength
LED
can help
you
determine
at
what
point
the
best
performance
is
being achieved.
•Even though
the
usual connection
to
the
extender is
wireless, you can use
its
LAN
port
to
connect
a wired
device, such as an
Ethernet
-enabled gaming console,
pr
i
nter
or
PC.
FCC
caution
Any changes
or
modifications
not
expressly approved by
the
party
responsible
for
compliance could void the
user's authority
to
operate
this equipment.
This
transmitter
must
not
be
co~ocated
or
operating in
conjunct
i
on
with any
other
antenna
or
transmitter.
The
manufacturer
is
not
responsible
for
any radio
or
TV
interference
caused
by
unauthorized modifications
to
this equipment.
Radiation Exposure
Statement
This
equipment
complies wi
th
FCC
radiation exposure
limits
set
forth
for
an uncontrolled environment.
This
equipment
should be installed and operated with
minimum
distance
20cm
between
the
radiator
and
your
body.