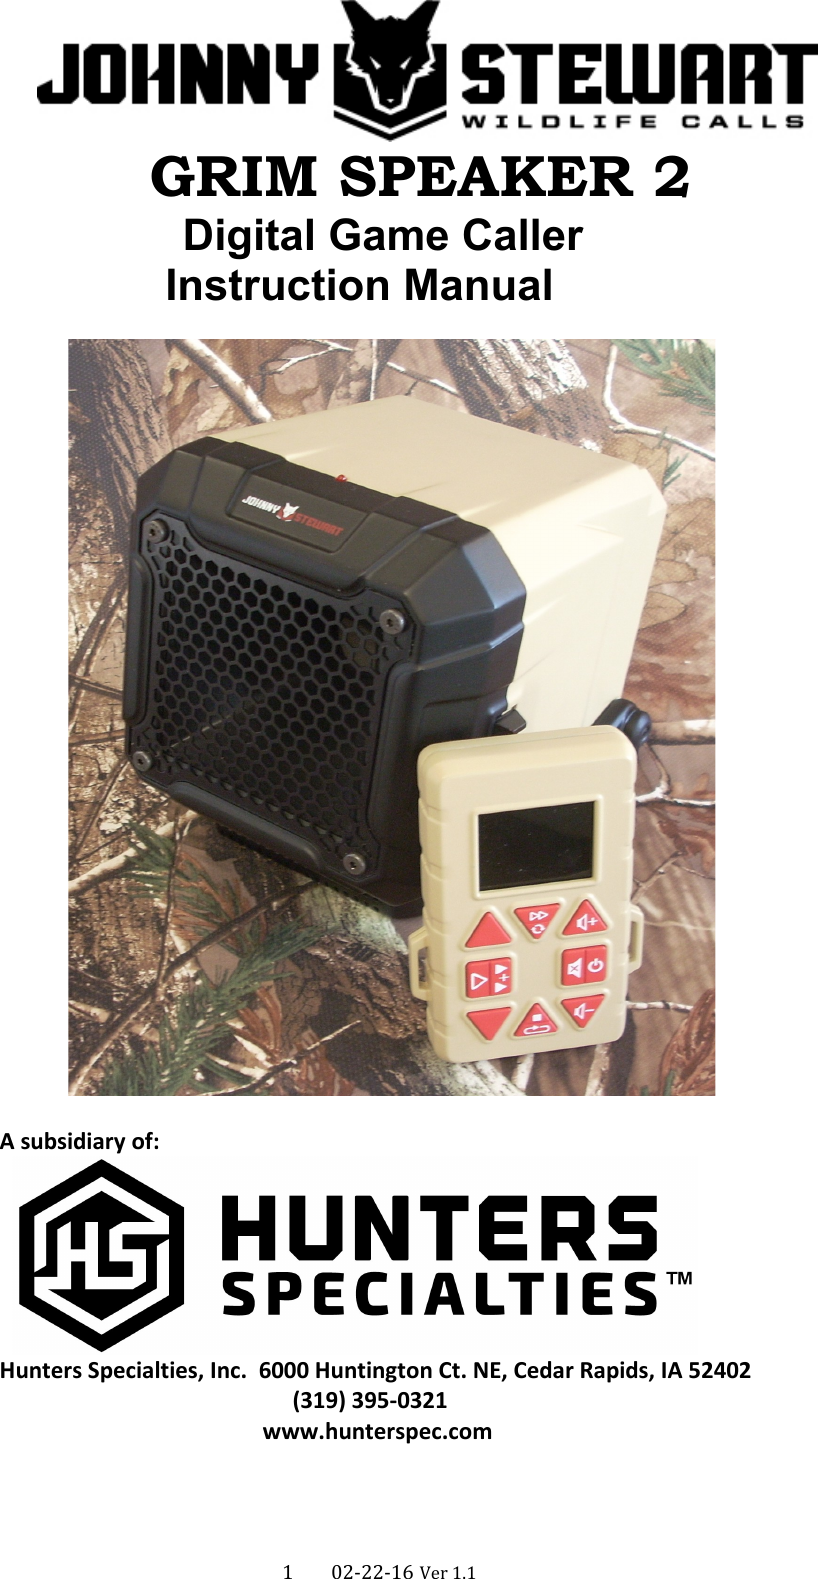
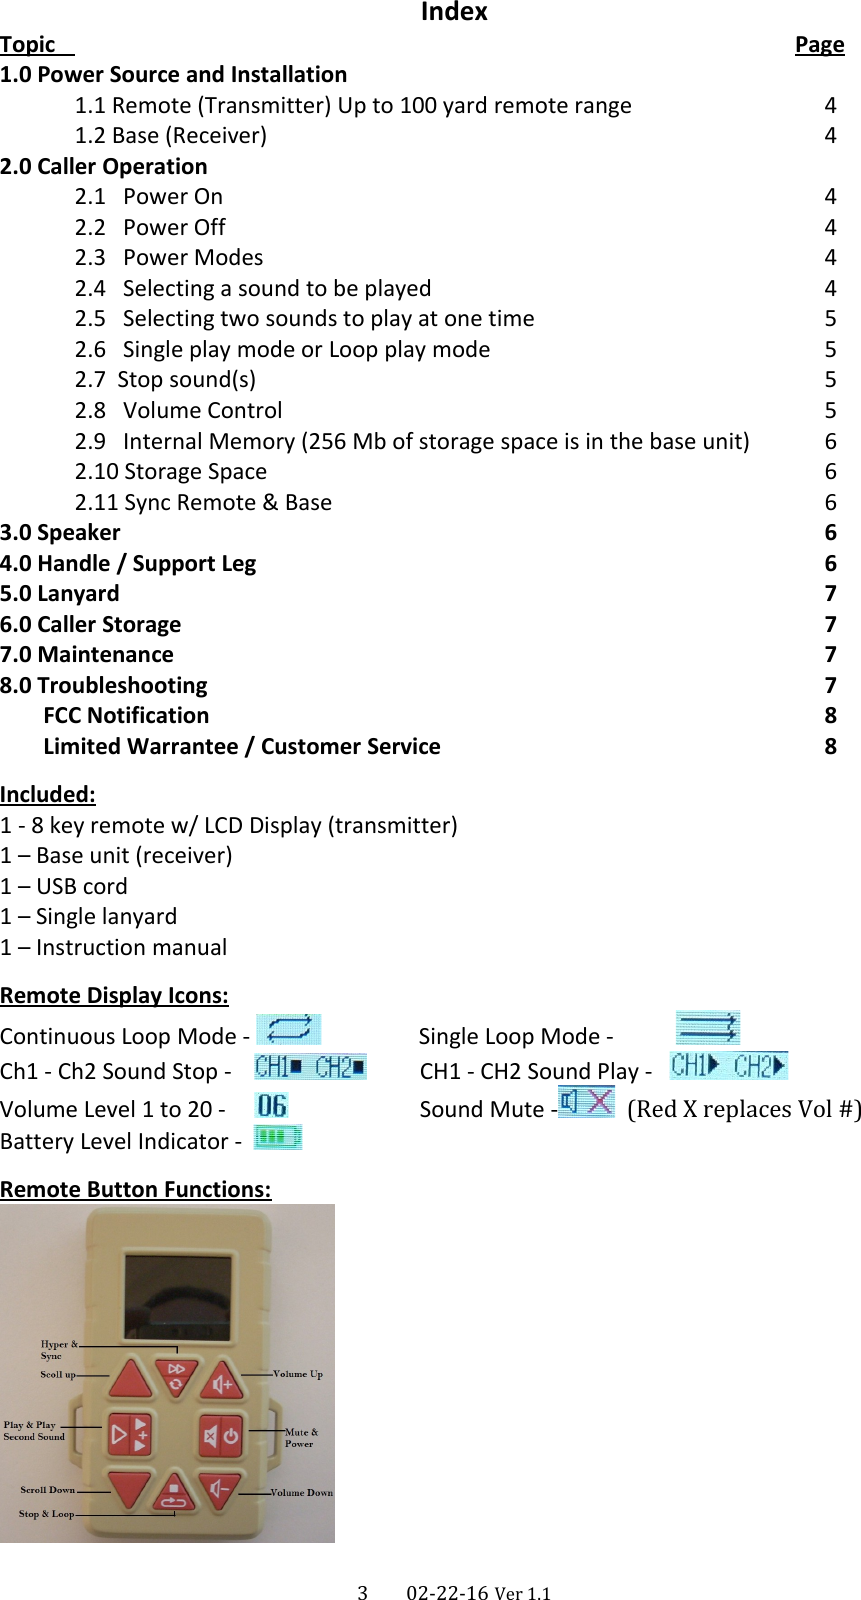
NFTZ Hangpack GS2B-CALLER Electronic Game Caller User Manual HS Wireless Caller LE Units

NFTZ Hangpack Int'l Trading Co., Ltd. Electronic Game Caller HS Wireless Caller LE Units

2ABWD-GS2B-CALLER_User manual

                                    GRIM SPEAKER 2   Digital Game Caller                      Instruction Manual                         A subsidiary of:              Hunters Specialties, Inc.  6000 Huntington Ct. NE, Cedar Rapids, IA 52402            (319) 395-0321                    www.hunterspec.com1      02-22-16 Ver 1.1
Important InformationJohnny Stewart Digital Callers are backed by over 40 years of experience.Our goal with the (J.S. line of callers) is to create incredible fun and successfor your enjoyment in the outdoors.Whether used for hunting, photography or observation of wildlife,Johnny Stewart callers create opportunities for you to experience nature up close, in a dynamic way, with superior sounds…Hunter's Specialties, Inc.6000 Huntington Court NECedar Rapids, IA 52402(319) 395-0321Fax: (319) 395-0326Business HoursMonday – Friday7:45 AM – 4:45 PM CSTContact UsCustomer Service: (319) 395-0321General Inquiry e-mail: Sales@hunterspec.comStay up to date with the latest Johnny Stewart sounds by visiting our online sound library. Watch for new products and upgrades at:www.hunterspec.comA subsidiary ofHunters Specialties, Inc6000 Huntington Court NECedar Rapids, IA 524022      02-22-16 Ver 1.1
IndexTopic                               Page1.0 Power Source and Installation1.1 Remote (Transmitter) Up to 100 yard remote range 41.2 Base (Receiver)  42.0 Caller Operation2.1   Power On 42.2   Power Off 42.3   Power Modes     42.4   Selecting a sound to be played 42.5   Selecting two sounds to play at one time 52.6   Single play mode or Loop play mode 52.7  Stop sound(s) 52.8   Volume Control 52.9   Internal Memory (256 Mb of storage space is in the base unit) 62.10 Storage Space 62.11 Sync Remote & Base 63.0 Speaker 64.0 Handle / Support Leg 65.0 Lanyard  76.0 Caller Storage 77.0 Maintenance 78.0 Troubleshooting 7       FCC Notification 8       Limited Warrantee / Customer Service 8Included:1 - 8 key remote w/ LCD Display (transmitter)1 – Base unit (receiver)1 – USB cord1 – Single lanyard1 – Instruction manualRemote Display Icons:Continuous Loop Mode -          Single Loop Mode -           Ch1 - Ch2 Sound Stop -              CH1 - CH2 Sound Play -   Volume Level 1 to 20 -                Sound Mute -   (Red X replaces Vol #)Battery Level Indicator -  Remote Button Functions:3      02-22-16 Ver 1.1
1.0 Power Source and Installation:1.1) Remote (Transmitter) – Is operated with 2 - AAA batteries. (Not Included)Battery installation: Remove battery cover by loosening the phillips head screw and lift cover off. Install batteries, being careful to orient the batteries for each position, then re- attach battery cover, be careful not to over tighten the screw.Note: the battery polarity alternates.1.2) Base (Receiver) - Is operated with four AA batteries. (Not included)Battery installation:  Remove battery cover by loosening the phillips head screw and lift cover off. Install batteries, being careful to orient the batteries for each position, then re- attach battery cover, be careful not to over tighten the screw.Note: the battery polarity alternates.Note: For maximum performance use high quality batteries.Tip: 1) Be prepared… pack replacement batteries and a screwdriver in your game caller bag.Tip: 2) To prolong battery life in cold conditions, hand warmers can be used between the ground and battery compartment to radiate heat to thebatteries. Do not put warmers in the battery compartment.2.0 Caller Operation:2.1) Power ona) For Base unit: Slide On/Off switch to the ON position. The RED LED will       illuminate.b) For Remote: Press power button and release. Display will boot up. 2.2) Power Offa) For base unit: Slide On/Off switch to the off position. RED LED will go off.b) For Remote: Press and hold power button for 3 seconds. Display will power off.2.3) Unit Power ModesThe unit has five power modes:a) Active mode: When the unit is powered on and playing a soundb) Stop mode: When the unit has been stopped with the stop button. Remote display is still active. Base is idle waiting for a command from the remote.c) Sleep mode: Remote display will go black after 30 seconds if a button is not pressed. Display will reactivate by pressing any button.d) Hibernate mode: When unit is left on but in-active for 60 minutes (no button pressed on remote) the remote and base units go to hibernate mode. The LED flashes on the base unit once every three seconds to indicate this mode. User needs to turn both remote and base units off and back on to restart the unit.e) Off mode: When power is turned off.2.4) Select sound to be played a) With remote display in active or stop mode, use the {scroll up} or {scroll down} button to navigate through the sound list until the desired sound is highlighted. Then press the play button and the highlighted sound will begin to play. The icon at the top of the display will show " "b) To start a new sound, while a sound is playing, simply use the {scroll up} or {scroll down} button to navigate through the sound list until the desired sound is highlighted. Then press the play button; the active sound will stop and the new sound will start to play. The icon at the top of the display will show " "c) When scrolling; if the bottom or top of a page is reached, there is a 1 second delay, then the page will flip displaying the next or previous page of sounds.4      02-22-16 Ver 1.1
2.0 Caller Operation Continued:2.5) Select two sounds to play at one timea) With remote display in active or stop mode, use the {Scroll up} or {Scroll down} button to navigate through the sound list until the desired sound is highlighted, then press the play button and the highlighted sound will begin to play. The display will show " "b) While the first sound is playing, use the {Scroll up} or {Scroll down} button to navigate through the sound list to find the second sound to be played at the same time as the first sound. When the desired second sound is highlighted, press and hold the play button for three seconds. The second sound will start playing while the first sound continues to play. The display will show " "c) To change a sound while two sounds are playing, use the {Scroll up} or {Scroll down} button to navigate through the sound list to find the desired sound to be played at the same time as the first sound. When the desired second sound is highlighted, press and hold the play button for three seconds. The active second sound will stop and the new sound will play while the first sound continues to play. The display will show " "Note: The first sound can not be replaced while two sounds are playing.2.6) Single Play Mode or Loop Mode:a) The GS2 caller has two play modes.Single play mode, is when the selected sound will play one time through then stop.b) Loop mode, is when the selected sound will play in a continuous loop until the stop button is pressed. This is the default mode for this unit.To change the play mode; press and hold the loop button for three seconds. This will change the active mode. The active mode will appear on the remote display. see page 3 for "Remote display Icons".2.7) Stop a sounda) Press the “Stop” button on the remote when you want to stop the active sound(s). The active sound(s) will play in a continuous loop until the stop button ispressed, or unless the loop mode is turned off.2.8) Volume Controla) The volume setting can be changes before selecting a sound to play or while a sound is playing. Press the {Volume UP} or {Volume DN} button to increase or decrease the volume level. This level can be seen on the remote display.You can press and release the respective button to adjust the sound level up or down by a single step, or press and hold the respective button for rapid volume level adjustment.Each time the base unit is powered on, the first sound selection will start at volume level 2 unless volume level is adjusted prior to pressing play. Any sound selection after that will start at the last selected volume level.The remote has 20 volume steps: Steps 1-5 are small volume increments where steps 6-20 have larger volume increments, with 20 being maximum volume. b) The “MUTE” button makes any active sound(s) playing or selected to play inaudible, but the sound will still be running. If the mute button is pressed again, the sound(s) that were playing will become audible where ever it is in the play loop.5      02-22-16 Ver 1.1
2.9) Internal Memory (256 Mb of Storage Space is in the Base Unit)a) The base unit has 256 Mb of memory for sound storage and playback.b) To access the storage space, plug the base unit into a computer through the USB port using the USB cord supplied with the unit. This will show up as a removable drive on your computer.2.10)Storage Spacea) Viewing Sound Files:To view storage space on the unit, plug the base unit into a computer through theUSB port using the USB cord supplied with the unit. The storage space will show up, and can be viewed, as a removable storage devise. Example: (E) or (F) depending on your computer system. You can open the storage space to view what is stored and how it is arranged.b) Adding Sound Files:To add sound file(s) to the unit, copy or download the sound file(s) to your computer. You can then copy and paste the new sound(s) into the storage space.A five digit numeric is required to arrange and play sounds in the unit. See 2.9 d) below Organizing Sound Files.c) Deleting Sound Files:To delete sound file(s) from the base, go into the storage space and click on the file(s) you desire to remove. Do not delete the file(s) unless you want to lose them permanently. It is recommended that you cut or copy them from the storage space on the base and paste them to a desired location on your computer. This way you will still have them if you want to add them back to your caller. See 2.9 d) below Organizing Sound Files.d) Organizing Sound Files:Organizing storage space: When you view a storage space on the unit you will notice that the files are arranged numerically. 00001, 00002, 00003 and so forth. The numeric sequence is the order that the sounds will appear on the remote display. Example: 00001 is the first sound displayed in your sound list.this numeric is required to view and play a sound on the unit.2.11Sync the remote and base unitsIf a sound(s) are added to, - deleted from, - or re-organized on the base unit, the remote and base will need to be synced for the sounds to show in the correct order on the remote display.To do this; power up the base and remote units, press and hold the sync button on the remote. The remote display will refresh when the sync process is complete. Release the sync button and the process is complete. Thos should only take a few seconds.3.0 Speaker:The 10 watt cone style speaker has a wide tonal range and will easily reproduce the original Johnny Stewart sounds with high quality at peak volume, and with no distortion.4.0 Handle / Support LegThis caller has been designed with a handle / support leg feature on the base unit.To used this feature, simply pull on the arm and ratchet to the desired position. This feature can be used as a multi position carry handle, or as a multi position leg, to adjust the angle of the unit and speaker direction.6      02-22-16 Ver 1.1
5.0 Lanyard:A lanyard with cord lock is supplied to secure the remote around your neck for quick access.Remove cord lock by squeezing the cord lock from each end and pulling one end of the cord out. Insert the loose end of the cord down through one of the lanyard loops on either side of the remote, across the back of the remote, then back up through the other lanyard loop on the opposite side. Insert the loose end of the cord back through the cord lock and adjust to the desired length.Hint: tying  a knot in the end of the lanyard cord will prevent the cord lock from come off unintentionally.Do not use the lanyard to hang the base unit.    6.0 Caller Storage:Ensure the J.S. Caller is turned off. If you intend to store your J.S. Caller for an extended period of time, it is recommended that the batteries be removed from both the remote and base units to protect against any battery leakage.(Note: Damage from battery leakage is not covered under manufacturer’s warranty)7.0 Maintenance:With proper care your J.S Caller requires little or no maintenance.Tip: Always carry a new set of batteries with you or in your vehicle to avoid getting caught short in the field. Note: J.S. Callers are water resistant, NOT water proof.8.0 Troubleshooting:1) Remote range issues:     a. Improve line of sight with the base unit.    b. Replace batteries in Base unit. (see 1.2 for instruction)    c. Replace battery in Remote unit. (see 1.1 for instruction)    Note: Optimum conditions produce 100 yard remote transmission range.2) Sound Description on remote does not match what plays:    a. see 2.10 Storage Space to check “Sync Remote and Base units”3) Caller stops playing when at / or increasing to high volume:    a. Change batteries in base unit.         The amplifier requires a minimum battery voltage to produce higher               volumes. When the battery voltage starts getting low, they can not support         the power needed by the amplifier.     Note: When batteries in the base unit get to a certain voltage level, the RED    LED on the base unit will start flashing to indicate a low battery    condition.7      02-22-16 Ver 1.1
FCC Notice■This device complies with Part 15 of the FCC Rules. Operation is subject to thefollowin g two conditions: (1) this device may not cause harmful interference, and (2)this device must accept any interference received, including interference that maycause undesired operation.■The manufacturer is not responsible for any radio or TV interference caused byunauthorized modifications to this equipment. Such modifications could void theuser’s authority to operate the equipment.■This equipment has been tested and found to comply with the limits for a Class B digitaldevice, pursuant to Part 15 of the FCC Rules. These limits are designed to provide reasonable protection against harmful interference in a residential installation. This equipment generates, uses, and can radiate radio frequency energy, and if not installed and used in accordance with the instructions, may cause harmful interference to radio communications.However, there is no guarantee that interference will not occur in a particular installation. If this equipment does cause harmful interference to radio or television reception, which can be determined by turning the equipment OFF and ON, the user is encouraged to try to correct the interference by one or more of the following measures:Reorient or relocate the receiving antenna.Increase the separation between the equipment and receiver.Connect the equipment into an outlet on a circuit different from that to whichthe receiver is connected.Consult the dealer or an experienced radio/TV technician for help.Industry Canada Notice ■This device complies with industry Canada license-exempt RSS standards(s).Operation is subject to the following two conditions: (1)this device may not causeinterference,and (2)this device must accept any interference , includinginterferernce that may cause undesired operation of the device.■Le présent appareil est conforme aux CNR d’lndustrie Canada applicables auxappareils radio exempts de licence. L’exploitation est autorisée aux deuxconditions suivantes: (1) I’appareil ne doit pas produire de brouillage, et (2)I’utilisateur de I’appareil doit accepter tout brouillage radioélectrique subi, mêmesi le brouillage est susceptible d’en compromettre le fonctionnement.■Under industry Canada regulations,this radio transmitter may only operate usingan antenna of a type and maximum(or lesser)gain approved for the transmitter byindustry Canada. To reduce potential radio interference to other users,theantenna type and its gain should be so chosen that the equivalent isotropicallyradiated power (e.i.r.p.) is not more than that necessary for successfulcommunication. Conformément à la réglementation d’lndustrie Canada, leprésent émetteur radio peut fonctionner avec une antenne d’un type et d’un gainmaximal (ouinférieur) approuvé pour l’ émetteur par Industrie Canada. Dans lebut de réduire les risques de brouillage radioélectrique à l’intention des autresutilisateurs, il faut choisir le type d’antenne et son gain de sorte que la puissanceisotrope rayonnée équivalente (p.i.r.e.) ne dépasse pas l’intensité nécessaire à l’établissement d’une communication satisfaisante.8      02-22-16 Ver 1.1
Please record the serial numbers for your J.S Caller(Located in the bottom of the battery compartment of each unit)IMPORTANT NOTICES & RETURN POLICYIf you experience difficulty or have any questions please call:Hunter's Specialties, Inc,Johnny Stewart Wildlife Calls1-319-395-0321All returns must be authorizedRA# must be on outside of insured return packagePlease fill out and return the warranty card orGo on-line at www.hunterspec.com to register your caller serial numbers.There are unique serial numbers for each unit to keep an accurate servicelog.A subsidiary ofHunter's Specialties, Inc6000 Huntington Court NECedar Rapids, IA 524029      02-22-16 Ver 1.1LIMITED WARRANTY STATEMENTYour Johnny Stewart Caller is a quality product, fully warranted against defects in material and workmanship for a period of 12 months from the date of purchase. Faulty parts covered under this warranty will be replaced free of charge. If it becomes necessary to return your unit, all shipments must be insured and  sent prepaid to and from the factory. This warranty is void if the warranty card has not been returned to us or if you have not registered your unit online at www.hunterspec.com at the time of purchase. This warranty  shall not apply if the unit has not been operated in accordance with the instructions or the machine has been altered, repaired or mistreated in any way that we believe has caused the failure or destruction of the unit. This warranty is in lieu of all other expressed or implied except for any special written agreement entered into with Johnny Stewart.Remote Serial Number:              Base Serial Number:

Navigation menu