NITGEN and SW301R FINGERPRINT ACCESS CONTROLLER User Manual Englilsh Manual SW300Series
NITGEN & COMPANY FINGERPRINT ACCESS CONTROLLER Englilsh Manual SW300Series
USERS MANUAL

© Copyright 2012, NITGEN&COMPANY Co., Ltd.
All rights reserved.
NITGEN&COMPANY Customer Service Center
Tel: +82.2.513.2147
Fax: +82.2.513.2191
Email: customer@nitgen.com
z
Unauthorized reproduction of part or all of this manual’s content in any form is
prohibited.
z
Product specifications may change without prior notice to improve functionality.
z
NITGEN & COMPANY and NITGEN logo are registered trademarks of NITGEN &
COMPANY.
z
Other names and trademarks belong to respective companies.

3
Contents
C
HAPTER
1
G
ETTING
S
TARTED
................................................................................... 4
P
RODUCT
I
NTRODUCTION
........................................................................................... 5
S
YSTEM
C
ONFIGURATION
........................................................................................... 6
P
RODCUT
D
ESCRIPTION
.............................................................................................. 7
T
OUCH
S
CREEN
D
ISPLAY
............................................................................................ 8
C
HAPTER
2
A
DMINISTRATOR
M
ENU
............................................................................ 9
E
NTERMING
A
DMINISTRATOR
M
ENU
......................................................................... 10
U
SER MANAGEMENT
................................................................................................ 17
A
UTHENTICATION
C
ONFIGURATION
.......................................................................... 37
S
YSTEM
M
ANAGEMENT
............................................................................................ 48
N
ETWORK
C
ONFIGARTION
....................................................................................... 65
USB
M
EMORY
M
ANAGEMENT
.................................................................................. 72
E
XTERNAL
IO
C
ONNECTION
..................................................................................... 78
T
ERMINAL
I
NITIALIZATION
......................................................................................... 84
C
HAPTER
3
A
PPENDIX
............................................................................................. 89
T
ROUBLESHOOTING
................................................................................................. 90
S
PECIFICATION
........................................................................................................ 92

Chapter 1 Getting Started
Product Introduction
System Configuration
Product Description
Touch Screen Display
5
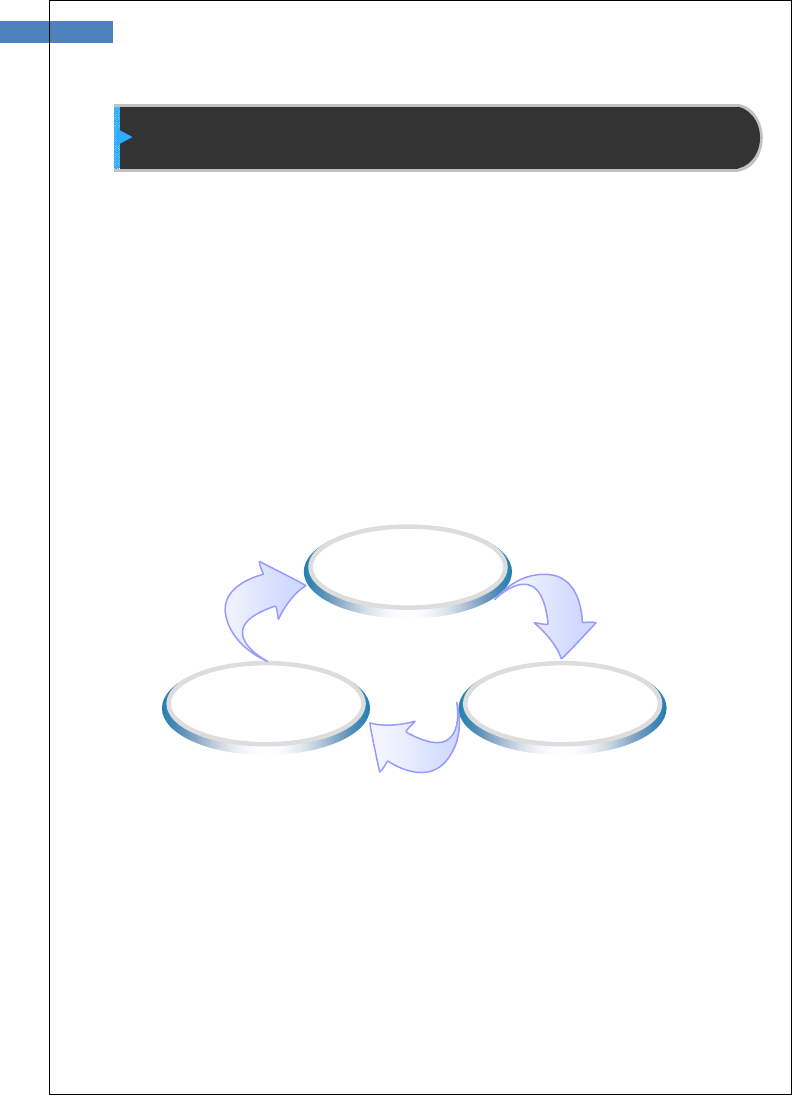
Product Introduction
The SW300/SW301 is general purpose Access controller using
NITGEN’s core technologies – fingerprint authentication algorithm,
optical sensor, embedded system design experiences, and
application programs for PC.
It introduces more friendly design and user interface through 4.3”
touch screen TFT-LCD. And it provides various authentication
methods – fignerrprint, RF card, ID & password, and combinations of
them.
Biometric
technology
Ergonomic
Design
User-friendly
software

System Configuration
The SW300/SW301 can operation as network mode or stand-alone
mode by configuration. In network mode, multiple terminals are
connected to server PC through TCP/IP links and managed by
administer. In stand-alone mode, single terminal operates and
administrated without server connection.
To use SW300/SW301 in network mode, a server and a
management program (Access manager Professional) must be
installed.
Item Functions
Server PC
1. ServerS/W : AccessManager Professional
2. Terminal management, communication,
and log data collection
3. User profile and log DB
4. Authentication
Client PC
1. Client S/W : RemoteManager
2. User registration and management
3. Checking terminal status and monitoring
events
terminal
(SW300/SW301 )
1. User registration, changing, deletion and
checking
2. Consecutive registration of card-only users
3. Handling Warning / Alarm
4. Door control
5. Customizing users
6. Checking logs
7
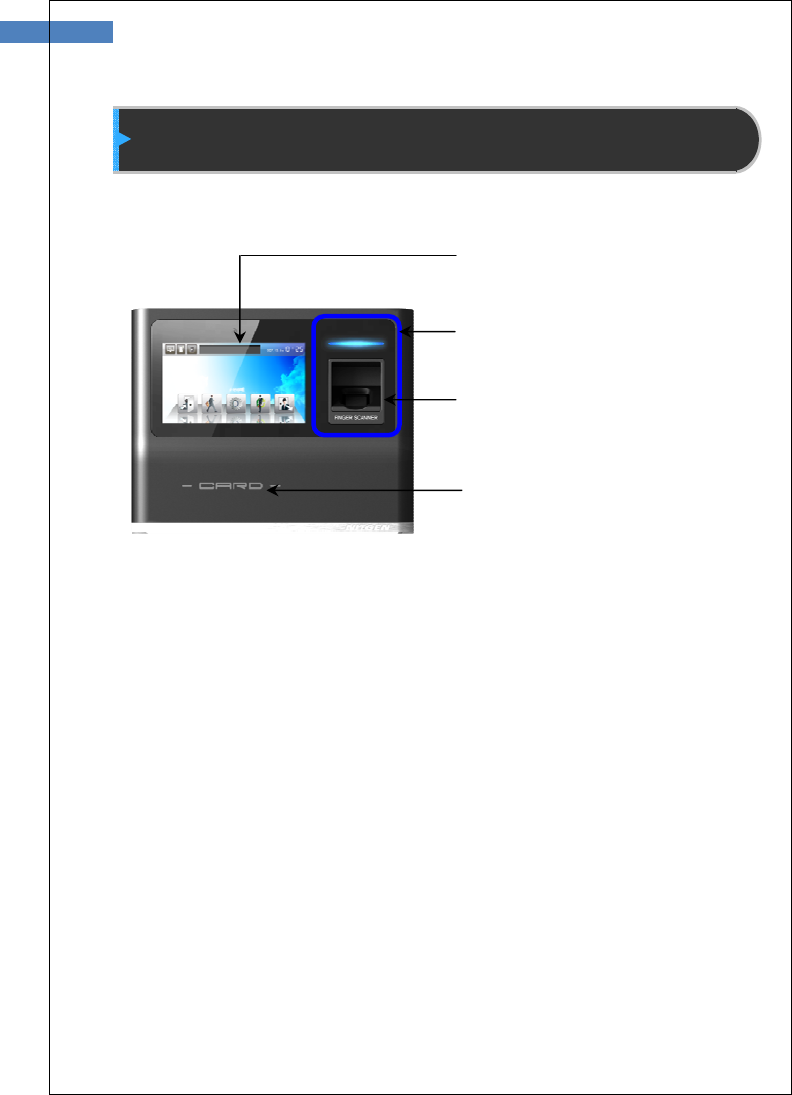
Prodcut Description
Touch Screen LCD
Indicator LED Blue: Stand-by
Green: Success
Red: Fail
Fingerprint window
Card input area
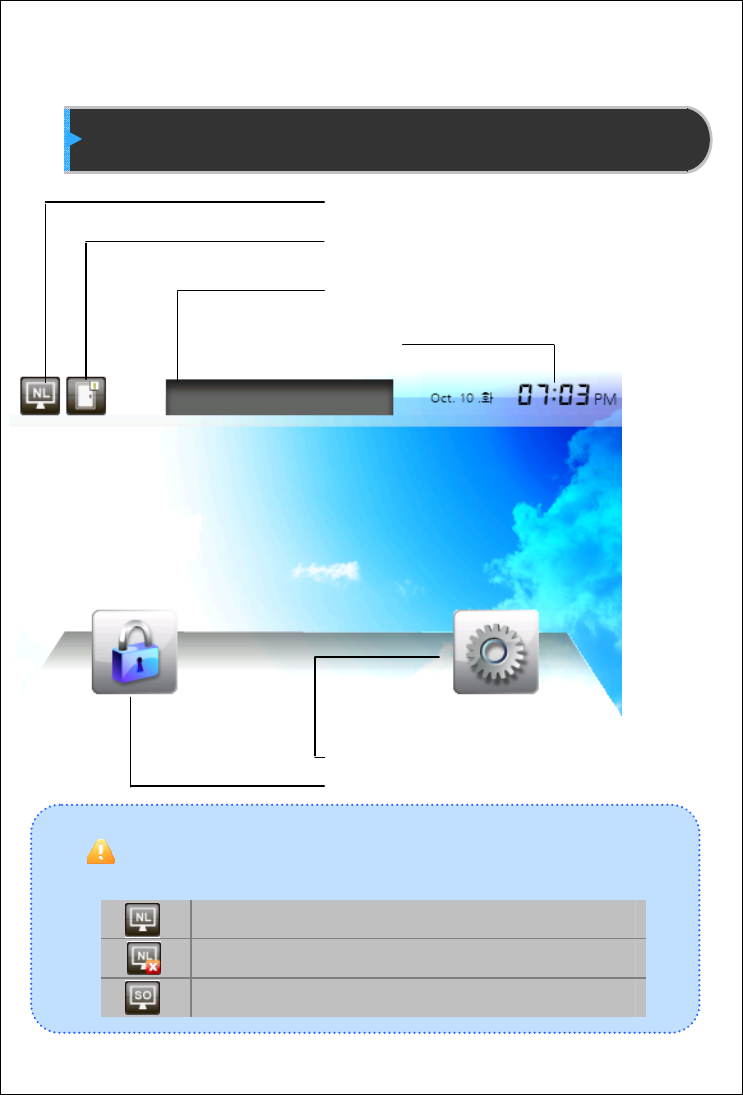
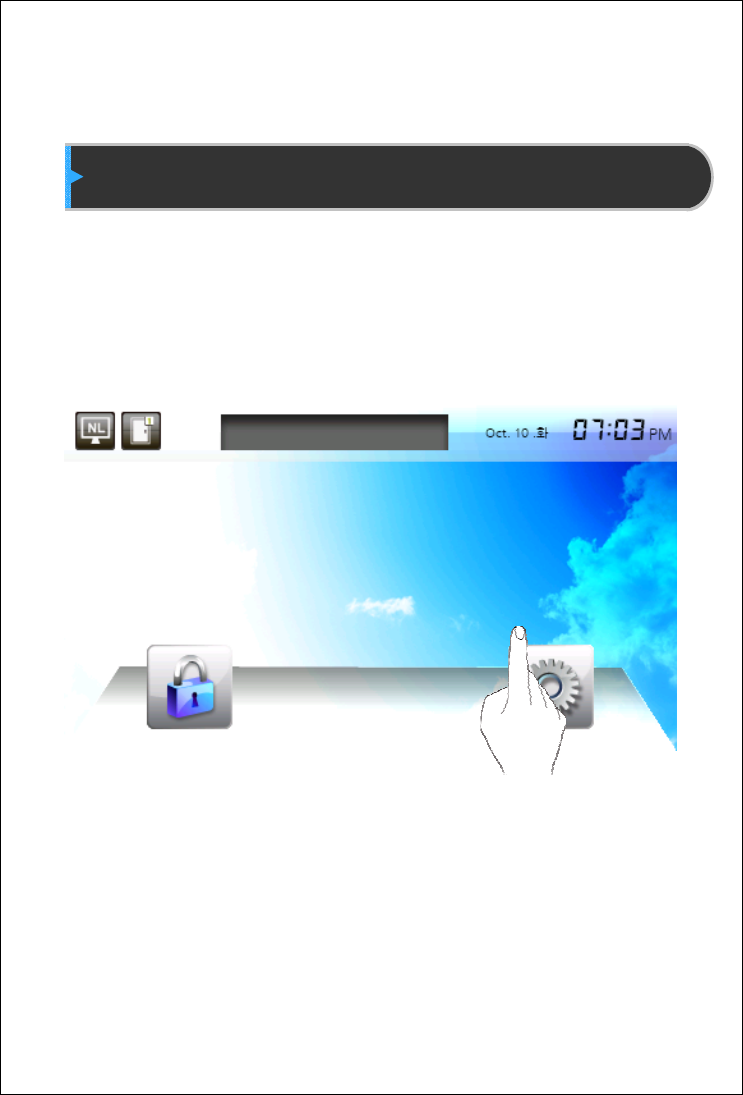
Touch Screen Display
The follwiong symbos are displayed depending on the network connection
status and mode
Connected to server in network mode
Not connected to server in network mode
Stand-alone mode
Network Connection Status
Door Status
Message from server
Time
Administration Menu Button
Authentication Button
Chapter 2 Administrator Menu
Entering Administrator Menu
User Management
Authentication Configuration
System Management
Network Configuration
USB Memory Management
External IO Connection
Terminal Initialization
Enterming Administrator Menu
Terminalsers are consists of general users and administrators.
General users are only allowed to authentication operation while
administrator can change terminal’s function by administrator menu.
By touching administrator menu button, administrator authentication
screen is displayed.
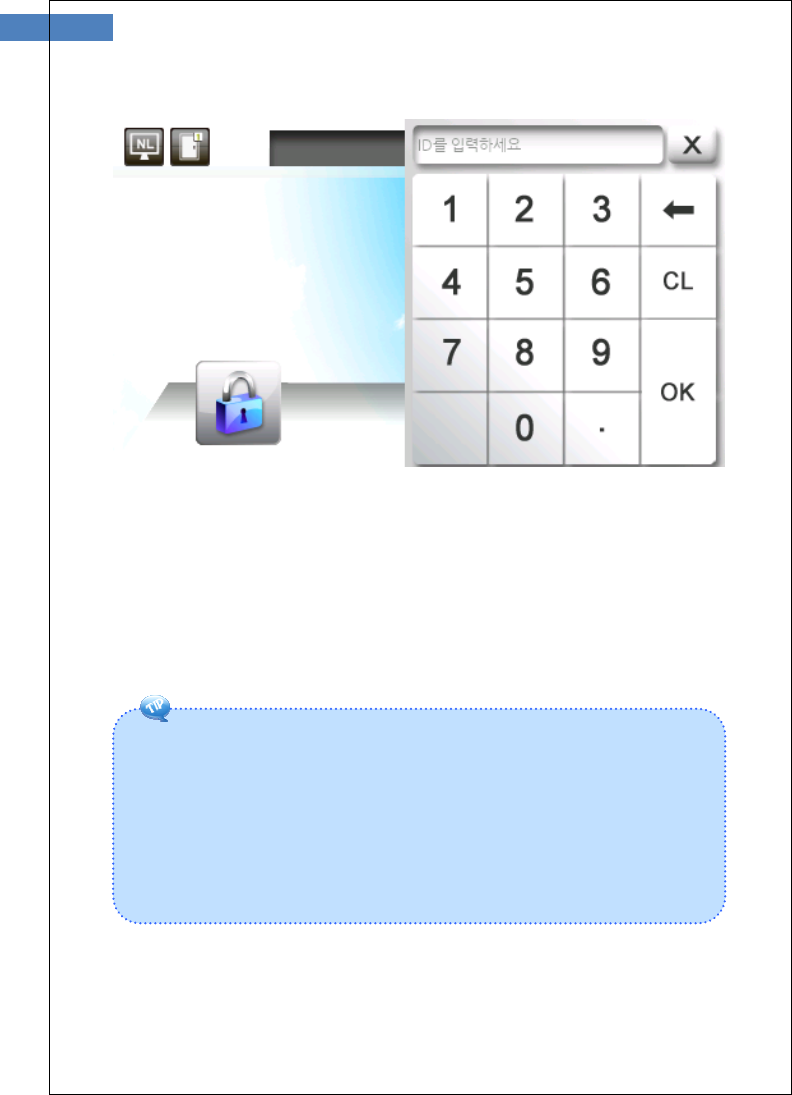
11
1. If no administrator is designated and only general users are
registrated in network mode, all users are allowed to enter the
administrator menu without authentication.
2. 1:N authentication is used, an administroator with a registered
fingerpint can enter administrator menu by authentication of fingerprint
without entering ID.
After authenticating the administrator, administrator menu will be
displayed. When delivered from factory, any user can enter the
administrator menu without authentication because no user is
registered. More than one user must be registered as administrator
for security purposes.
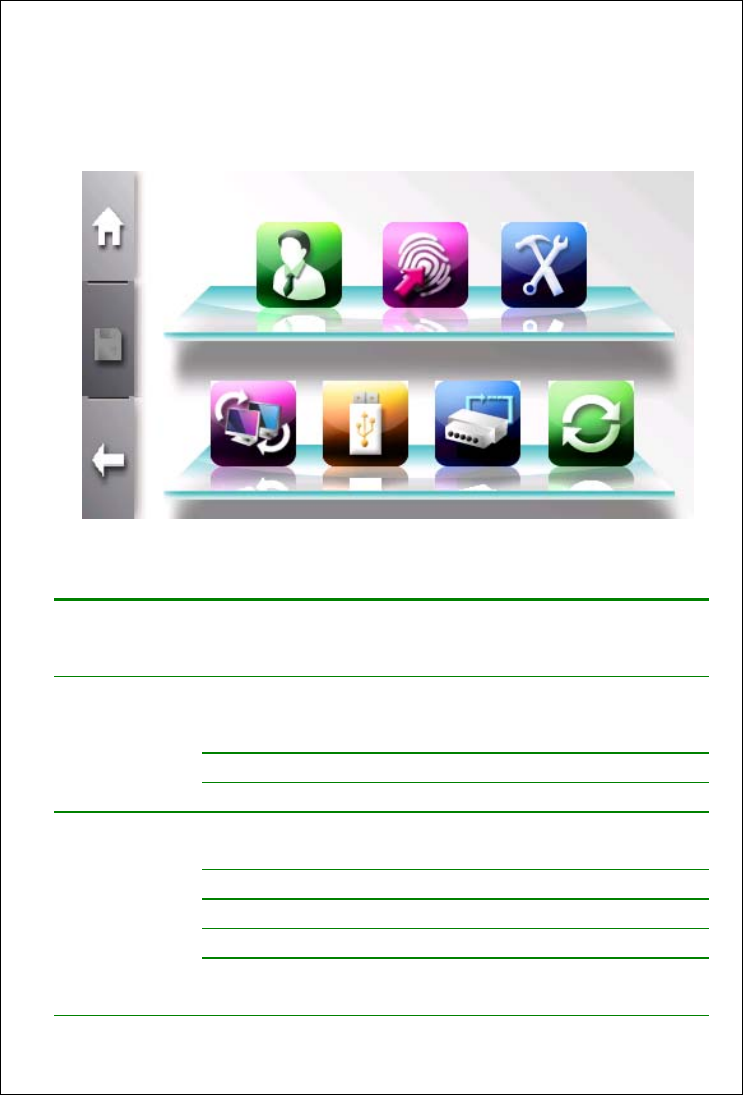
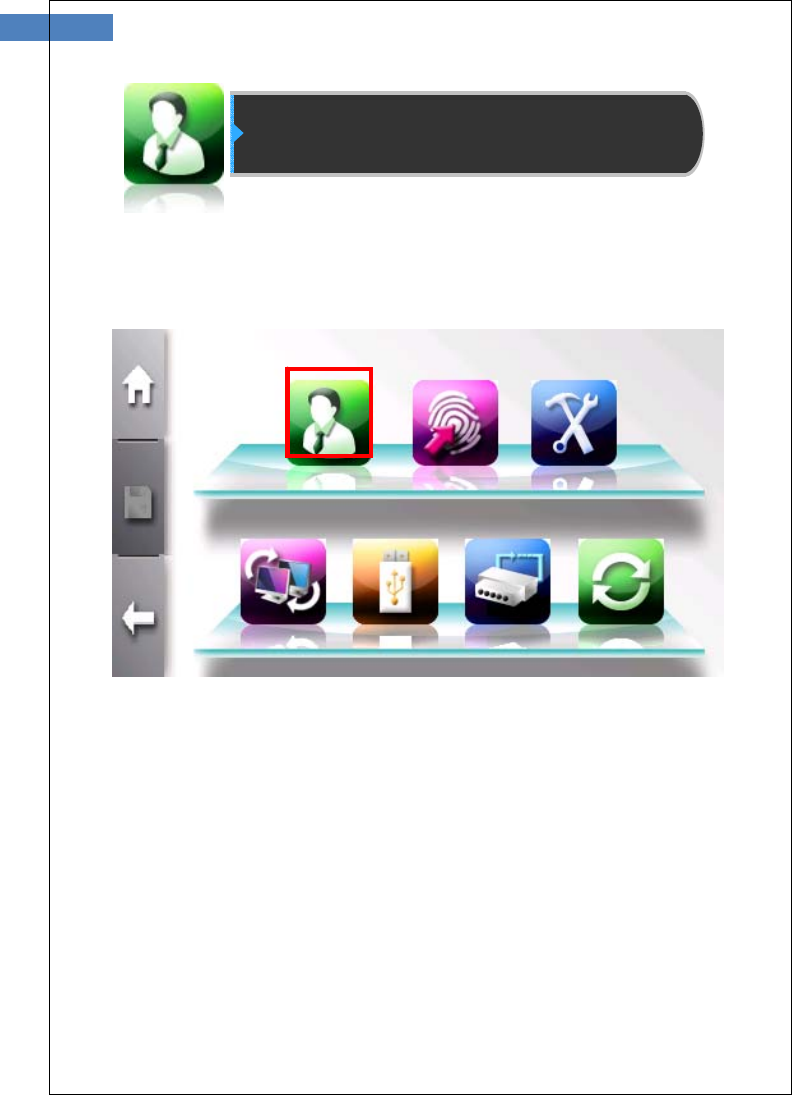
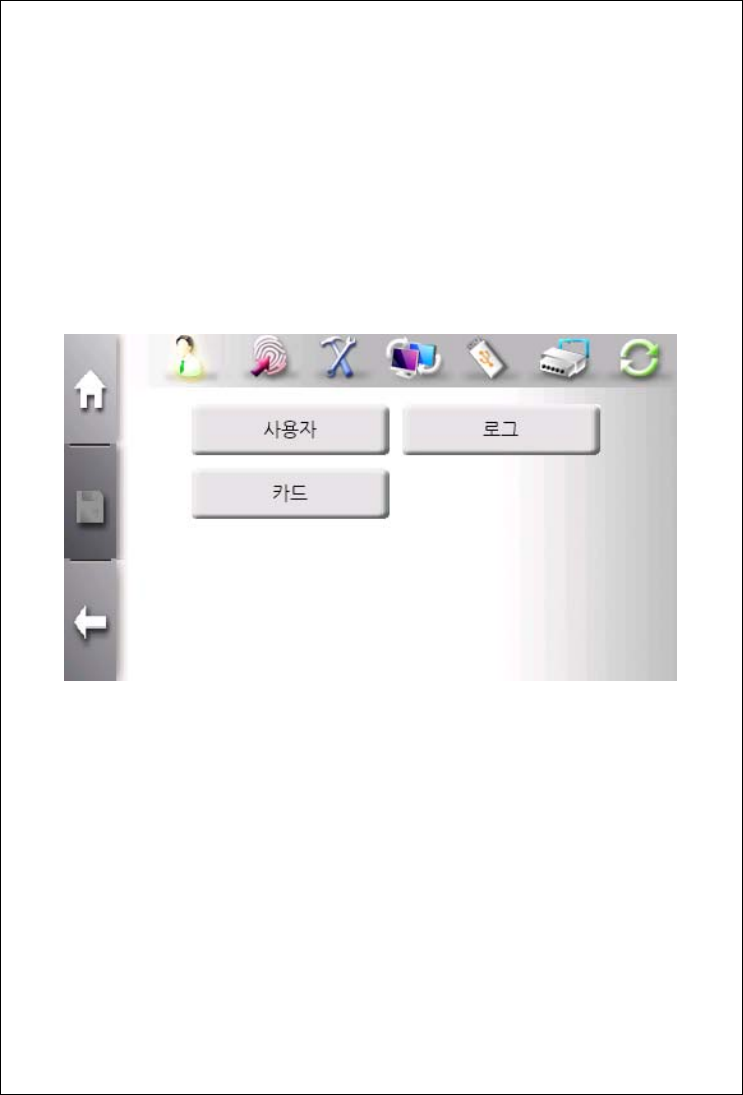
The administrator menu consists of 7 top-menus as shown below.
Top Menu Sub Menu Funtion Lists
User Management Registration, Changing, Deletion, List, and
Seraching
Card-Only Registration of card user
Log Viewing and Searching
Authentication Default Security Level, 1:N Authentication,
1:N Authentication Timeout
T & A T&A Type, T&A Auth. Only
Timezone Checking Timezone
Camera Capture setting, Display
ETC Log Saving Enble, User name display
mode

13
System Display Languate, LCD Brightness
Sensor Capture Timeout, LFD Level,
Sensor Option (Brightness, gain, Contrast)
Information Terminal ID, Template mode, Firmware
Version, OS Version, and so on
Wallpaper Terminal Wallpaper
Sound Voice, Effect, Volume
User Info. Template count, ID length
Card Card Type
Date/Time Setting data and time
Network General Tye, Encryption, Ping Time, AP List
TCP/IP Terminal ID, DHCP, Terminal IP, Server IP,
Subnet, Gateway, Port number
External IO Wiegand Terminal Code, Mode
Door Door Function Selection, Signal type,
OpenTime, Warning Time
USB Memory
Management
Download
logs
Downlaod all
logs
Download
Users
Upload Users
Update
Firmware
Initailization Factory reset Delete all users and logs
Reboot
Touch
Calibaration
Self Diagnosis Check sensor, camera, RTC, network, DB
and so on
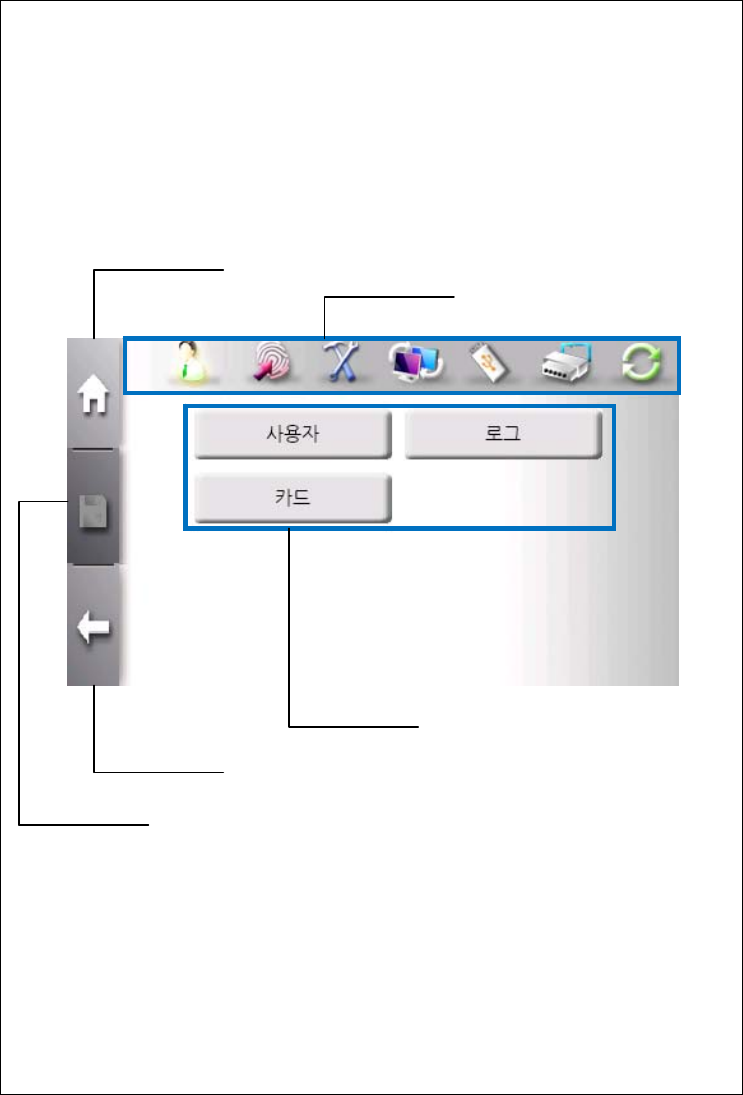
Using Administrator Menu
Top menu has it’s sub menus.If top-menu is seleted, sub-menus are
displayed in main window. Top-menus are listed in top of window as
shown below.
“Home Button” placed in left upper is used to quit current stage and
go to initial display.
Save Button
Back Button
Home Button
Top Menus
Sub Menus
15
“Save Button” placed in left center is enabled when terminal
configuration is changed. By clicking this button, new terminal
configuration is saved.
“Back Buttoon” placed in left bottom is used to go to upper stage.
“Top Menus” placed in top is used to change menu regardless of
current sub-menu.
“Sub Menus” displays all function lists. By selecting function list,
window is changed to support function.
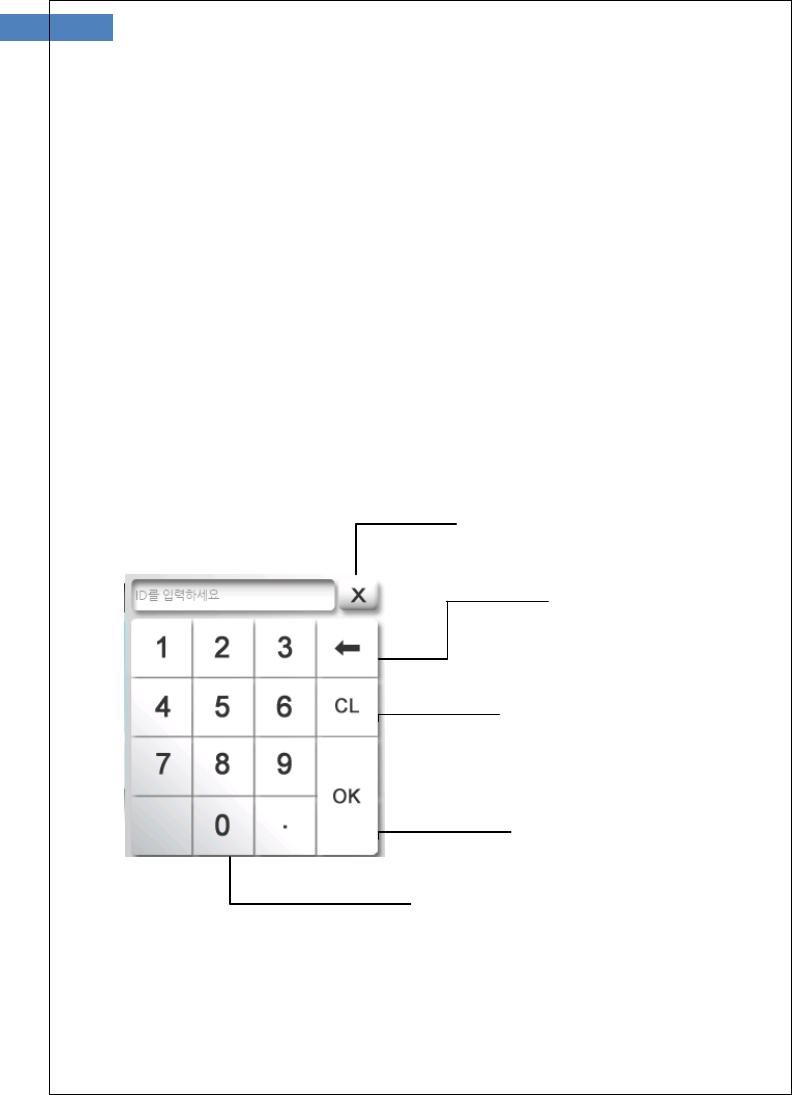
Using Number Keypad
Enter Button
Number Key
Close Button
Delete Button
Clear Button

Using Alpabet Keypad
Enter Button Close Button
Num Lock
Clear Button Delete Button
Caps Lock
17
User management
This menu provides user registration, deletion, changing, list of all
users, and log of each user.
User Registrartion
The maximum template capacity of terminal is 100,000. And the user
capacity is 100,000.
Accordiing to authentication mode, user has different templates. All
users can have password of Card. But user having fingerpint
authentication mode has more than 2 and less than 20 templates.
New user can be added if template count is less than 100,000 and
user count is also less than 100,000.
The firstly registered user is automatically added as administrator.
For example, 5000 users have 20 templates for each. It reaches the
limit of template capacity, but not user capacity. New user can be
added if user has only password and Card until user count reaches
100,000.
To add new user, use “Top Menu” Æ “User Management” Æ
“Registration”.
19
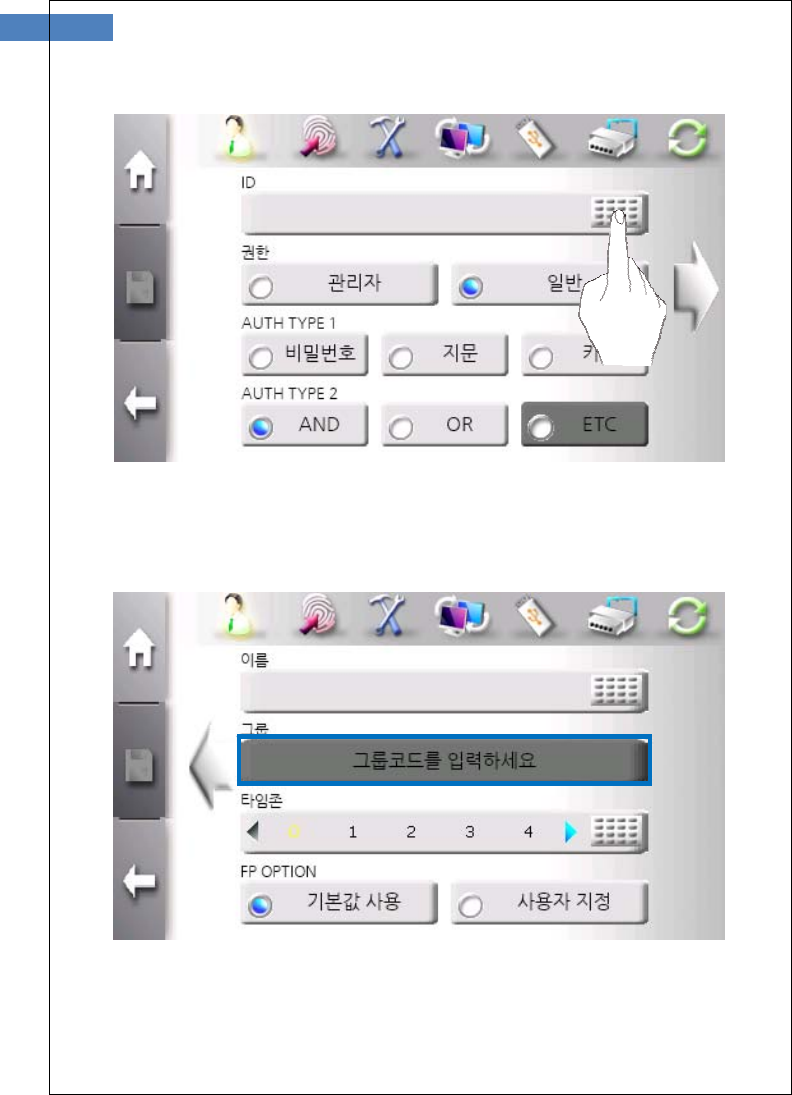
Click “Keypad” button to input ID.
If wanting to assign user to group, select group which is defined in
Access Manager Professional program.
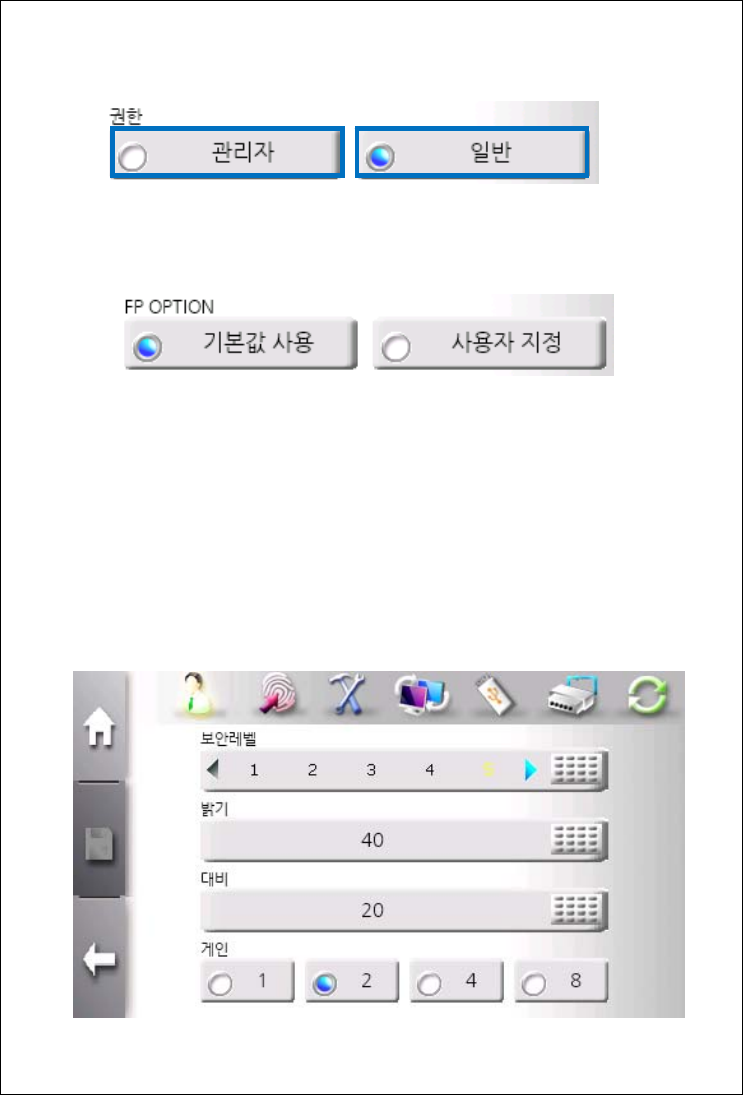
Select privilege. Only administrator can enter administrator menu.
“FP option” means fingerpint option. These options are used to
sensor capture condition and fingerprint matching level. Sensor
capture condition affects fingerprint image quality. Fingerprint
matching level defines required matching level to adapt templates.
When adding new user, terminal needs twice placements of
fingerprint. Each placement produces template. These two templates
has more than matching level defined in fingerprint matching level to
be registered. We recommend default value if not in specific case.
This screen displays “User define’ FP option.

21
Select more than one of authentication types – Password, fingerpint
and RF ID. And click “Save” Buuton.
User Registration - Fingerprint
If fingerprint authentication is selected, the following window is
display to get fingerpint.
Select a finger to be registered.

If finger is placed in sensor, fingerprint image is diaplayed. For better
aception rate, please place the core of ginerprint on the sensor.
After registering finerprint successfully, green light is turned on above
finger. To change registered finger, click green light.
To finish fingerprint registration, click “Save” button in left center.
23
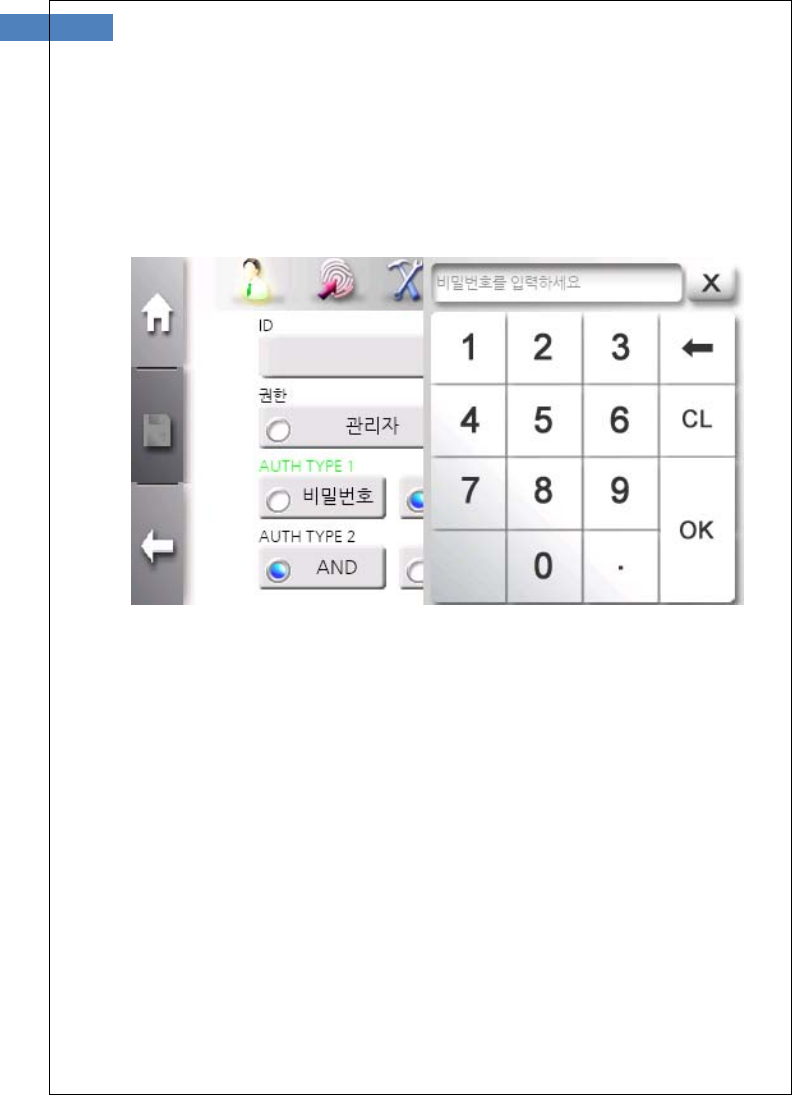
User Registration - Password
If password authentication is selected, the number keypad window is
display to get password.
The length of password is between 4 and 11.
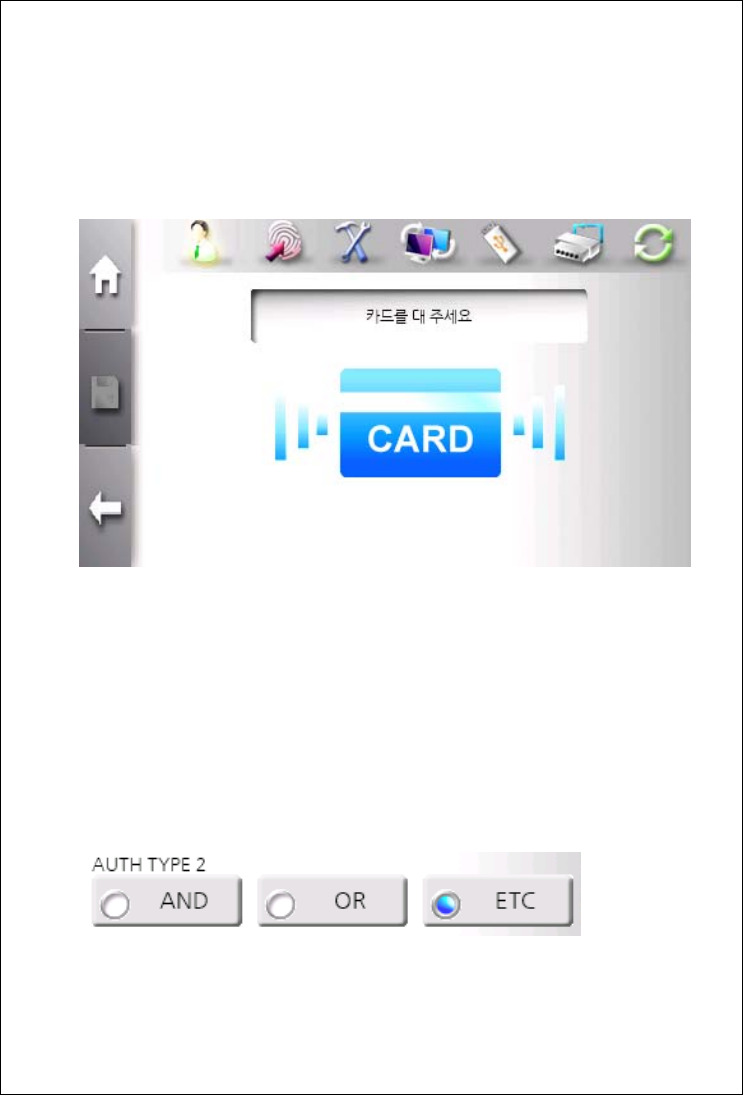
User Registration - Card
If card authentication is selected, the card input window is display to
get card ID.
Touch card to card input area.
Caution) Card type must be selected in system management sub
menu before touching card.
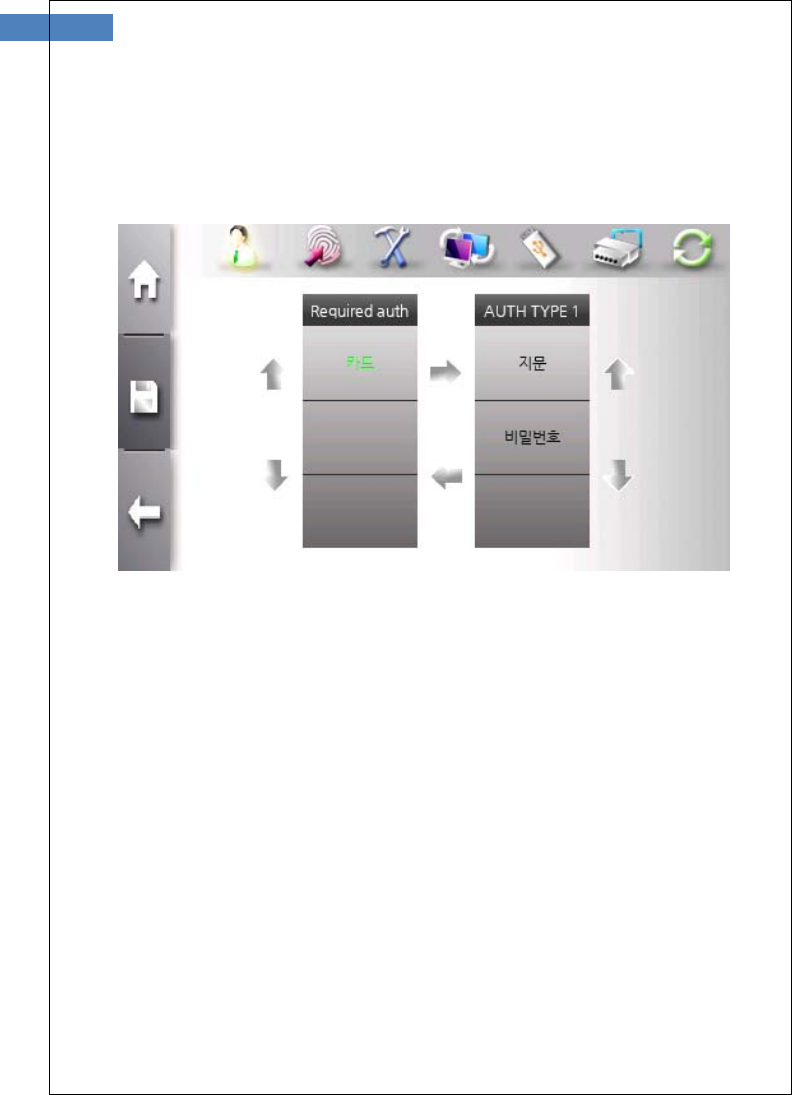
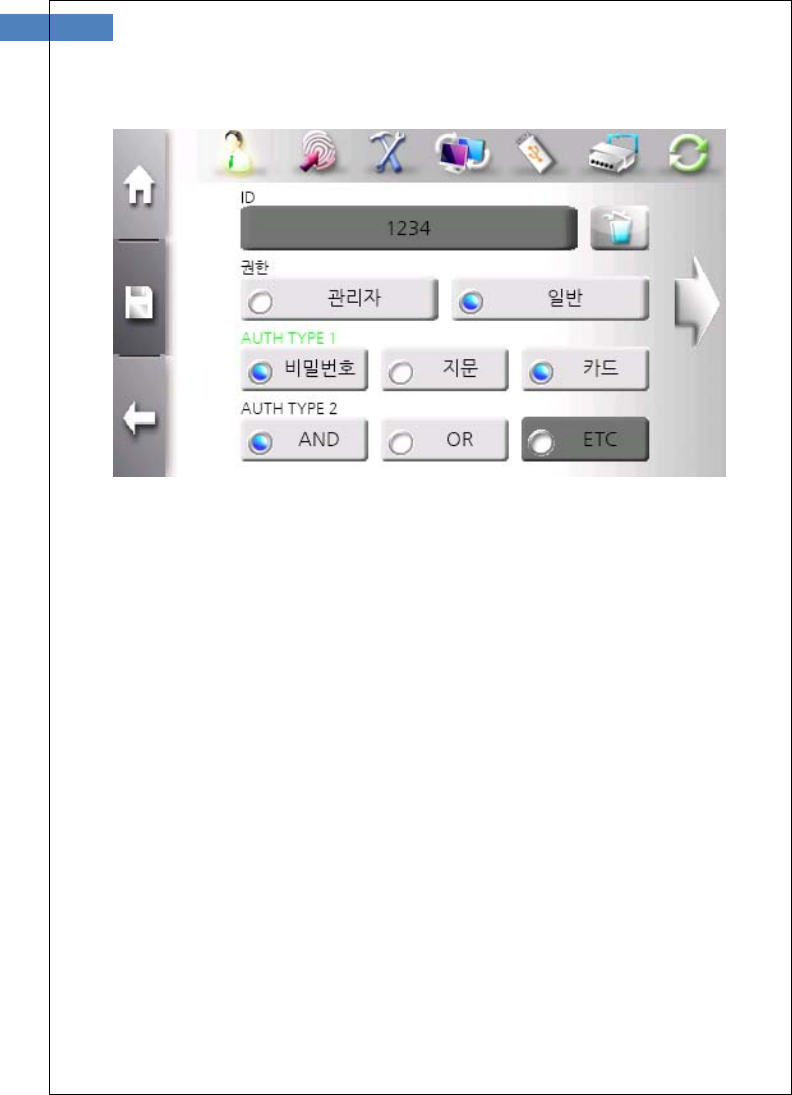
Combination of authentication mode
User can select various combination of authentication mode.
There are “AND” and “OR” operator. If more than two authentication
modes are selected, user can select operator.
25
With “AND” operator, all of authentication modes are satisfied to be
authenticated. With “OR” operator, any one of authentication mode is
satisfied to be authenticated.
There is our new authentication type for more flexible combination.
User can select thie mode using “ETC” operator.
In “ETC” mode, user can combine 3 authentication types. One is
mandatory type and others are optinal types that is combined with
“OR” operator.
For example,
If card is mandatory type, fingerprint or password is required for
authentication after card authentication.
User Change
An administrator can change user information by selecting user from
list that shows user ID and name.
User ID is unique and cannot be changed. Group is only changed in
Access Contorl Professional program. The other information can be
freely changed.
To change user, use “Top Menu” Æ “User Management” Æ “Change”
and enter user ID or select user from list.
Caution
▪If there is only one administrator, it cannot be changed to general user.
27
Select item user want to change and click “Save” button.
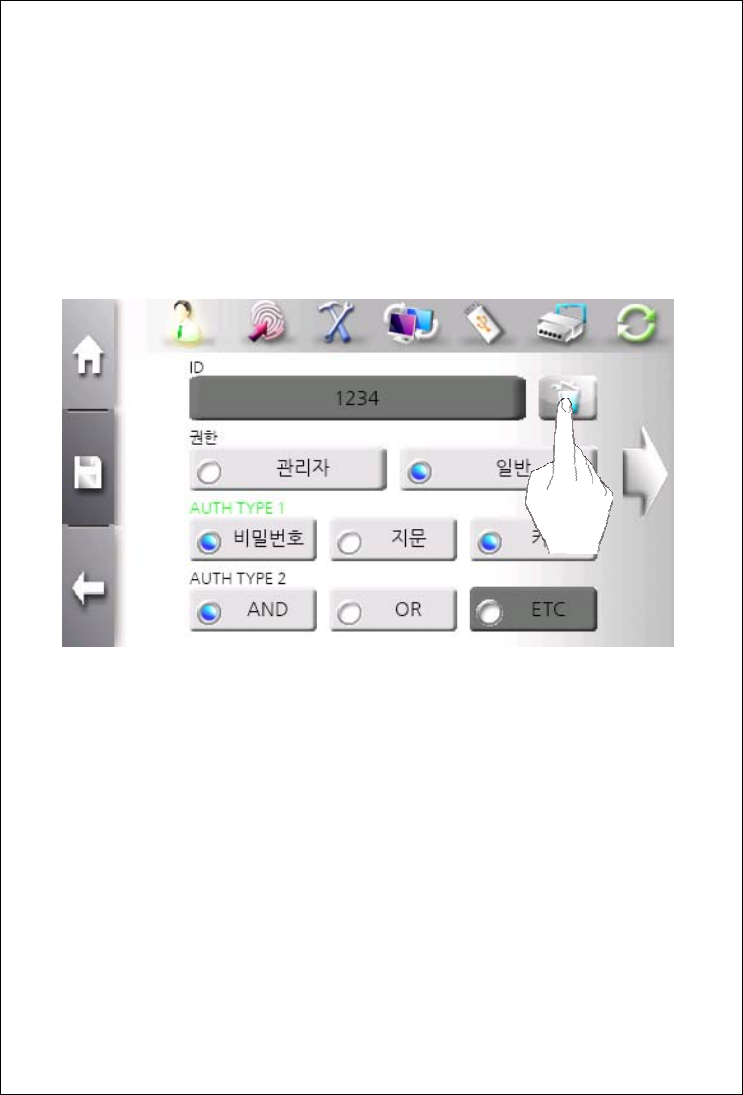
User Deletion
An administrator selects user from list that shows user ID and name
and enter change mode to delete user. By processing this sequence,
it prevents unintentional deletion.
By click “garbage can” button, user is deleted. For double checking,
comfirmation window is displayed.
29
Total User Deletion
There is case when an administrator wants to delete all users.
Terminal provides this function in initialization menu.
In initialization menu, click “Factory Reset” button.
Click “Total User Deletion” button.
31
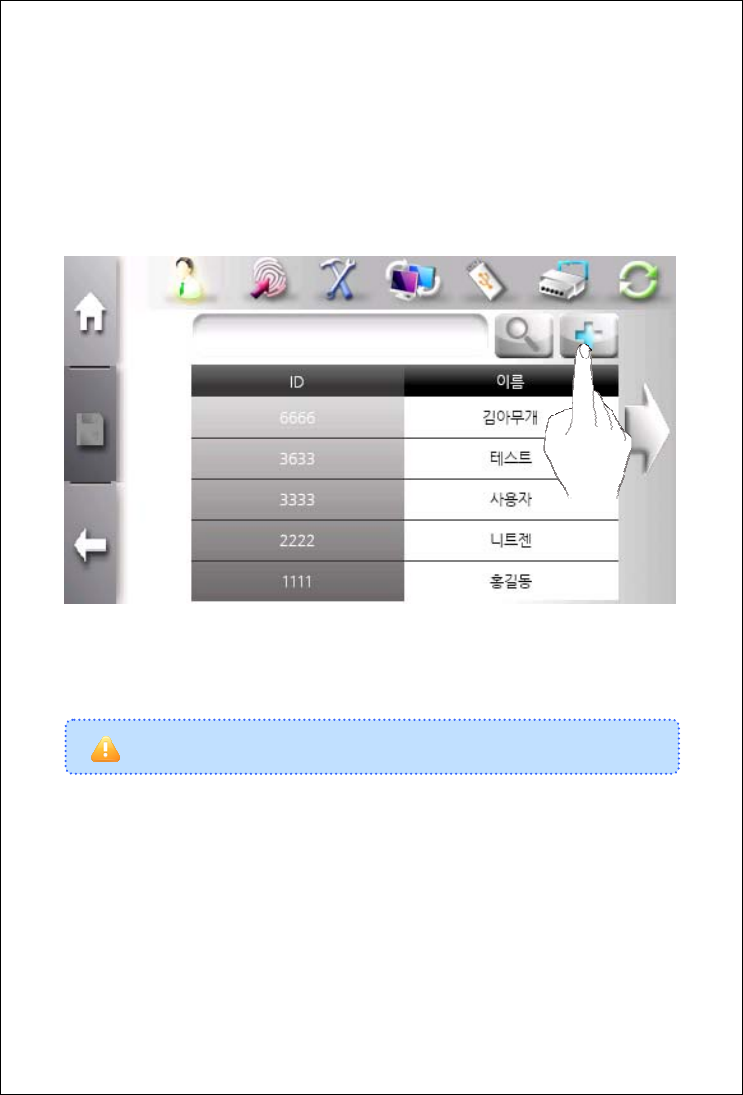
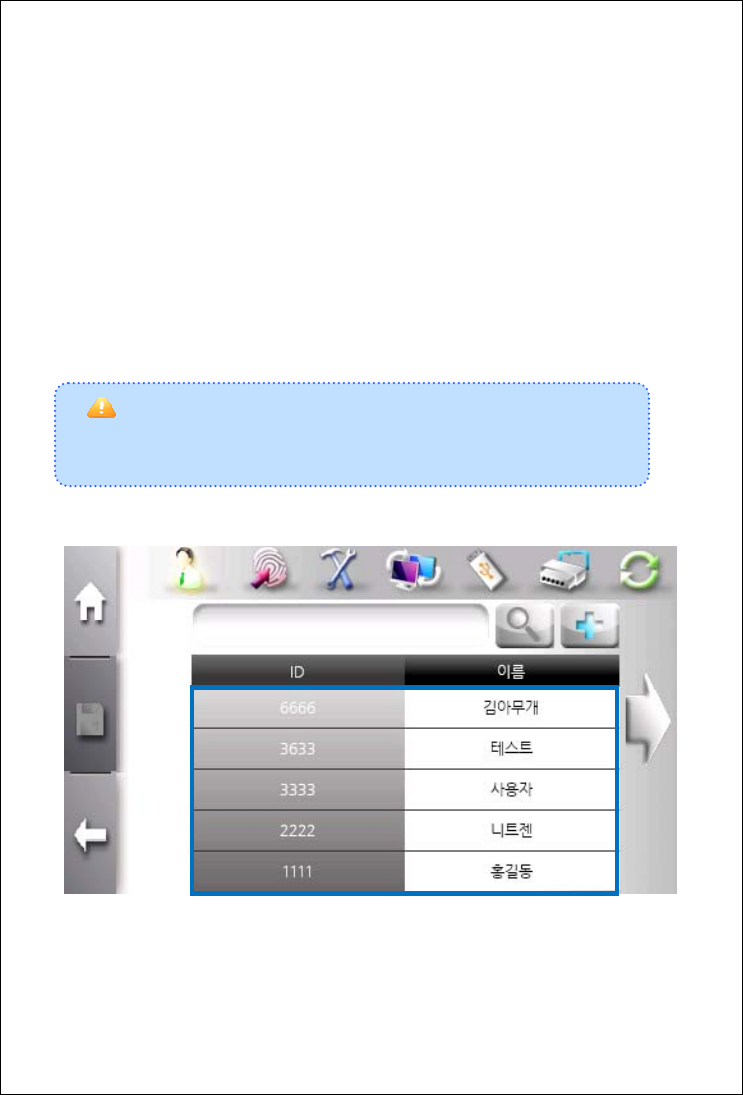
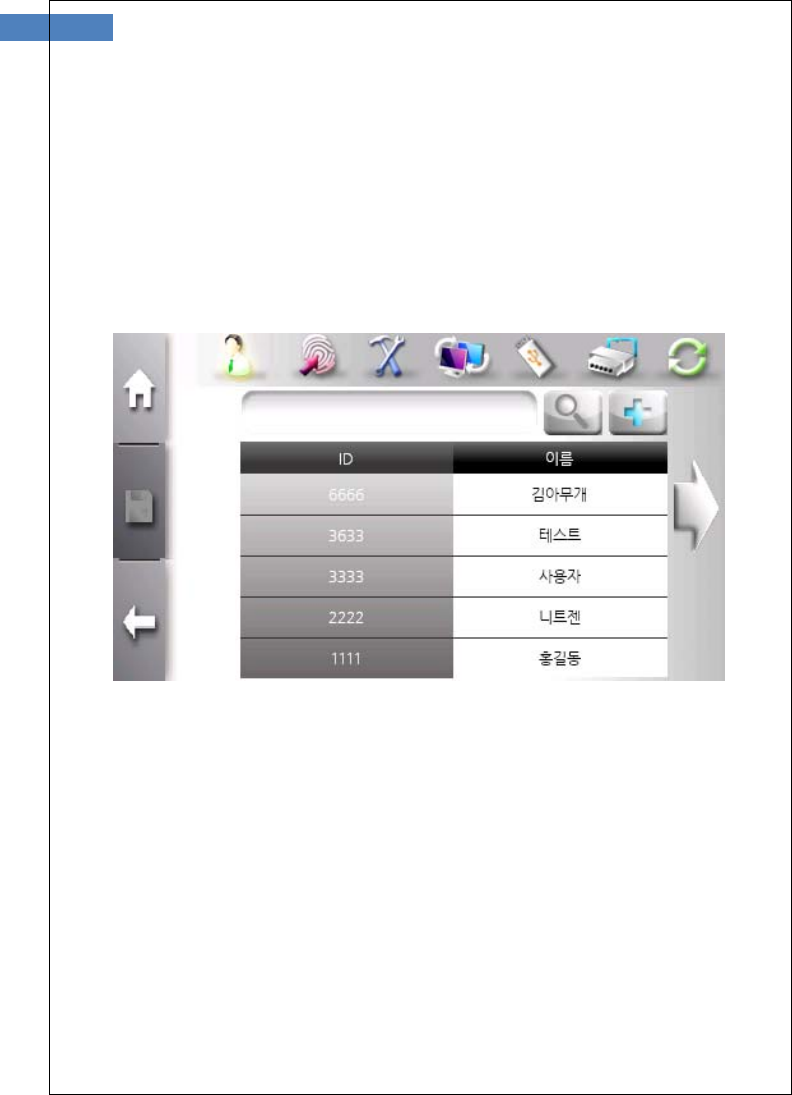
User Search
An administrator can check registered user in terminal and search
specific user.
In one list, five users are displalyed. If more than 5 users are
registered, user list is updated using left and right arrow button.
The above window displays registered user list.
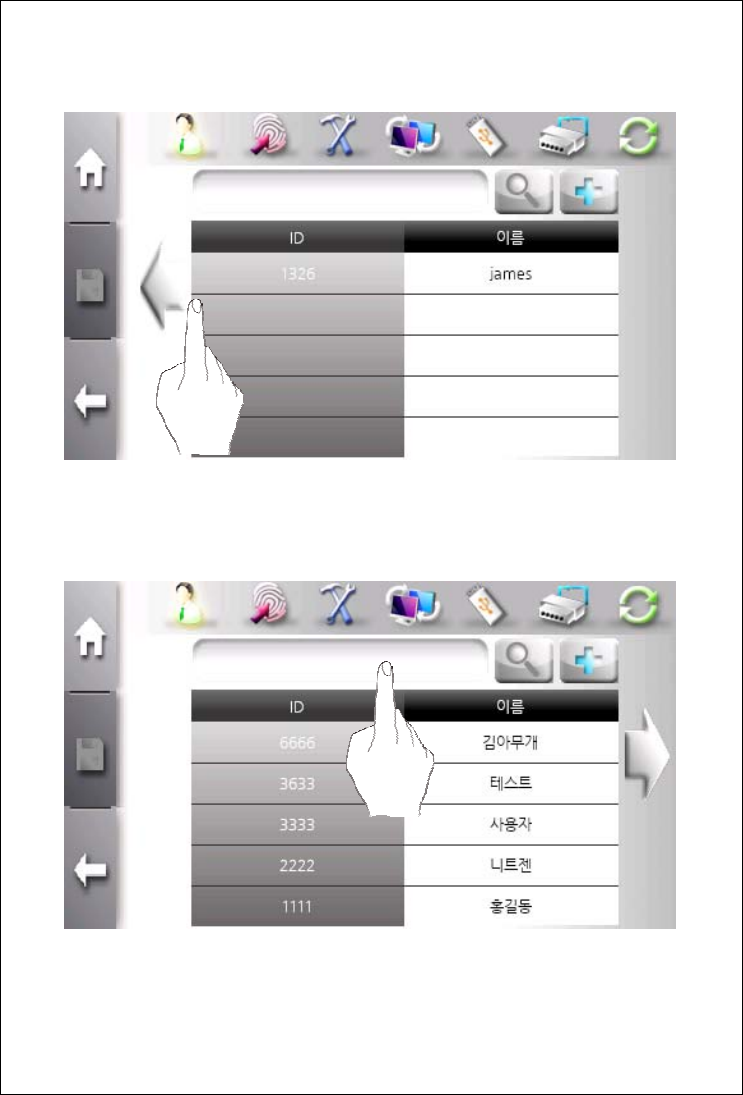
An administrator moves to previous or next page using left or right
arrow button.
An administrator can enter user ID to find specific user and click
search button.
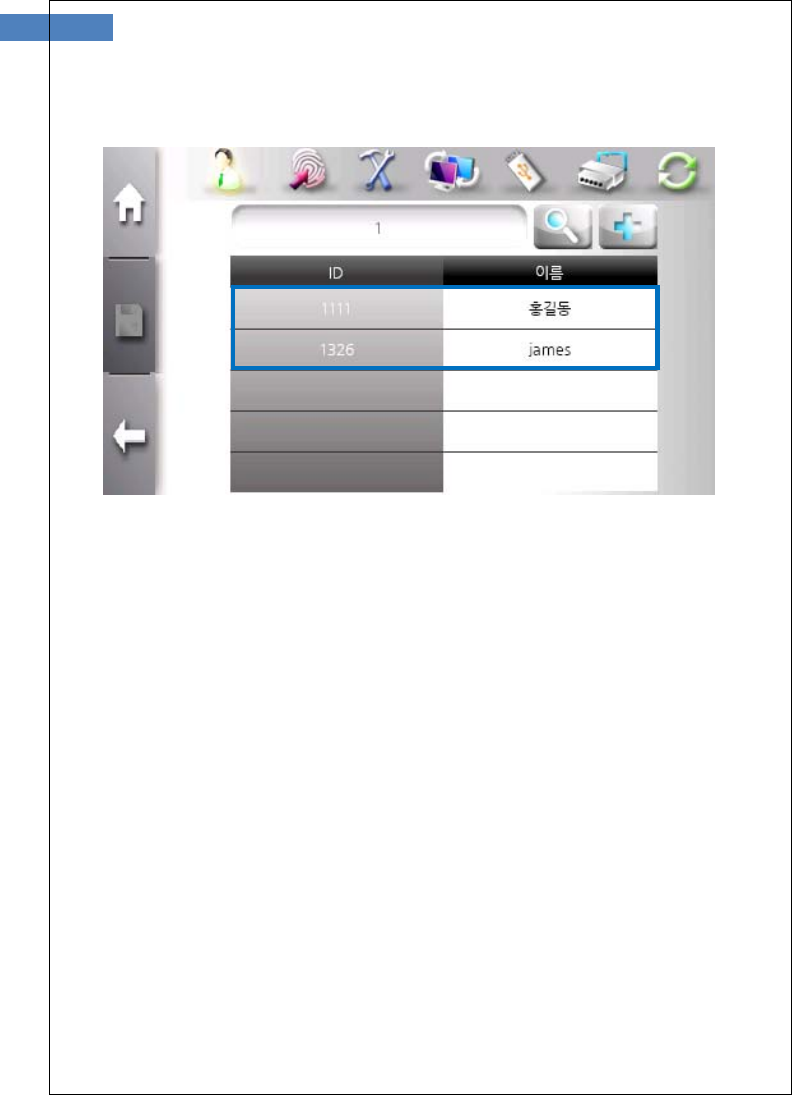
33
If partial ID is entered, all matching ID is listed.
Card-only User Registration
The SW300/SW301 terminal allows door access to be controlled
only by card authentication, not fingerprints or passwords. The
card-only feature is provided for an aminitrator to conveniently
register users. The card-only users are also viewed and changed in
user list.
To enter card-only registeration, use “Top Menu” Æ “User
Management” Æ “Card”.
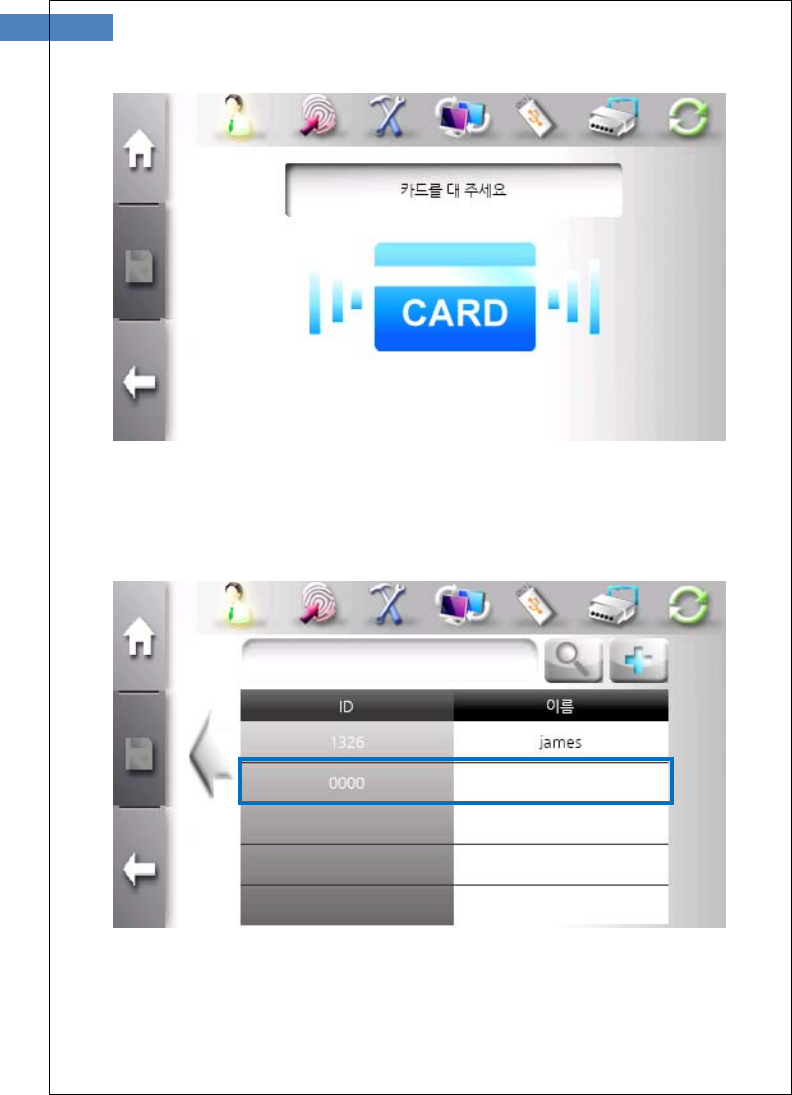
35
Touch a card on card input area. A card ID is automatically created
and user registration is completed.
The registered card-only user can be viewed in user list.
To authenticate with the registered card, touch a card on card input
area without user ID.
## Information
Card ID is generated from “0”. If ID is used, next ID is automatically
increased.
This card-only registration is only supported in network mode.
37
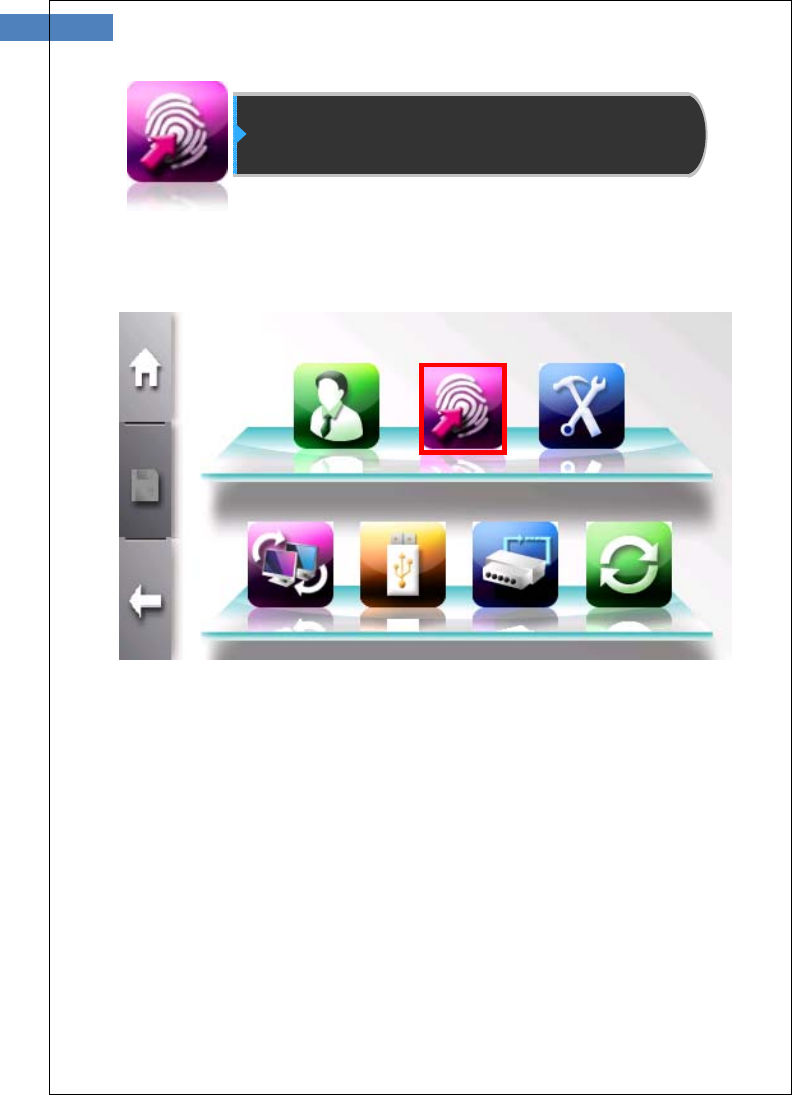
Authentication Configuration
In this menu, administrator can change Authentication options,
sensor options, T&A mode, and card type.
Click top center button to enter authentication configuration menu.

The sub menu consists of Default, T&A, Camera, Timezone, and
ETC button.
vie
The “Default” button is used to set security level, 1:N indentification
mode selection, identification timeout and so on.
The “T&A” button is used to set T&A mode.
The “Camera” button is used to configure snapshot camera
operation.
The “Timezone” button is used to view current timezone and select
timezone from server timezone list.
The “ETC” button is used to configure log saving options and so on.
39
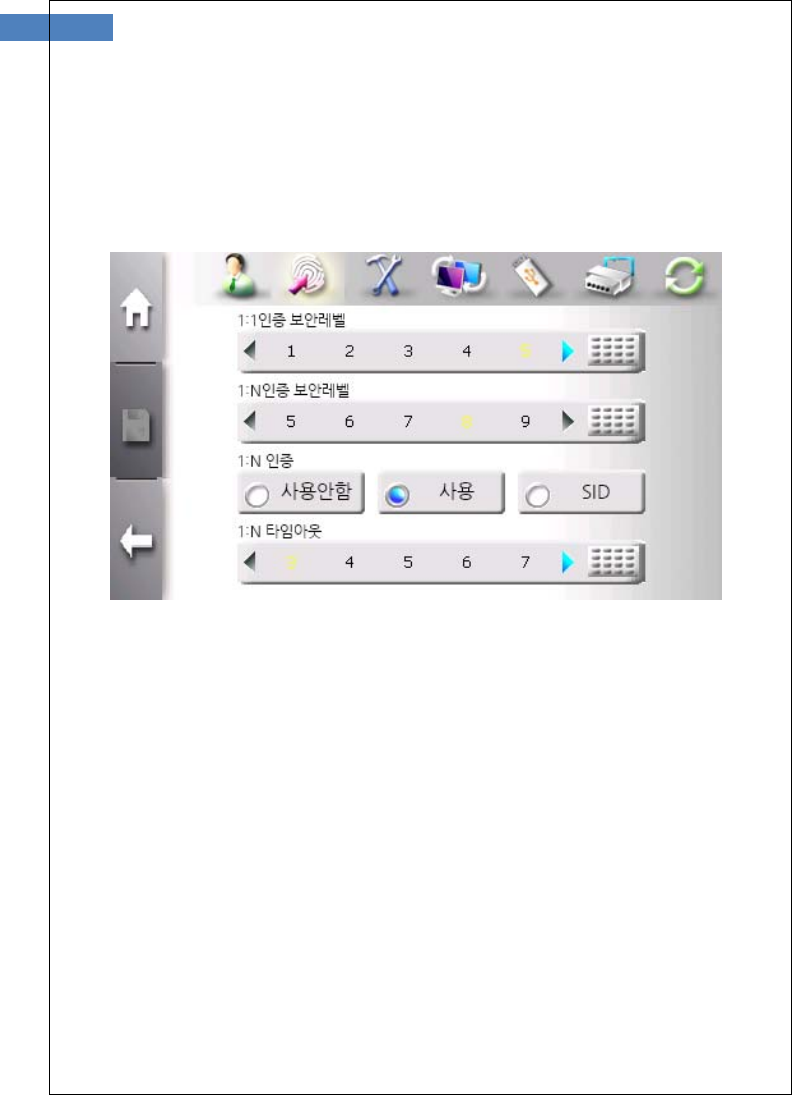
Default Menu
In this menu, 1:1 security level, 1:N security level, the use of 1:N
identification mode, and 1:N identification timeout are configured.
The use of 1:N identification mode
SW300/SW301supports two fingerprint authentication mode – 1:1
verification and 1:N identification. In 1:1 verification mode, an user ID
must be needed for authentication. On the other hand, In 1:N
identification mode, user ID is not needed and authentication is done
by searching all templates.
1:1 verification is recommended for faster authentication and 1:N
identification is recommended for simple authentification.
To use 1:N identification, select “Use” check box.
Security Level

There are two security levels – 1:1 verification security level and 1:N
identification security level. The 1:1 verification security level is
between 1 and 9, and the default is 5. The 1:N identification security
level is between 5 and 9, and the default is 8. The higher security
level is, the higher FRR (False Reject Ratio) is. The lower security
level is, the higher FAR (False Accept Ratio) is. Therefore the default
level is recommended. This level is applied to all users except those
who choose user security level.
1:N identification timeout
When 1:N identification is used, terminal needs the time limit during
which template data is searched. This time can be from 3 to 9
seconds with default 3 seconds. If not find matching template,
“Identification timeout” error will occur.
41
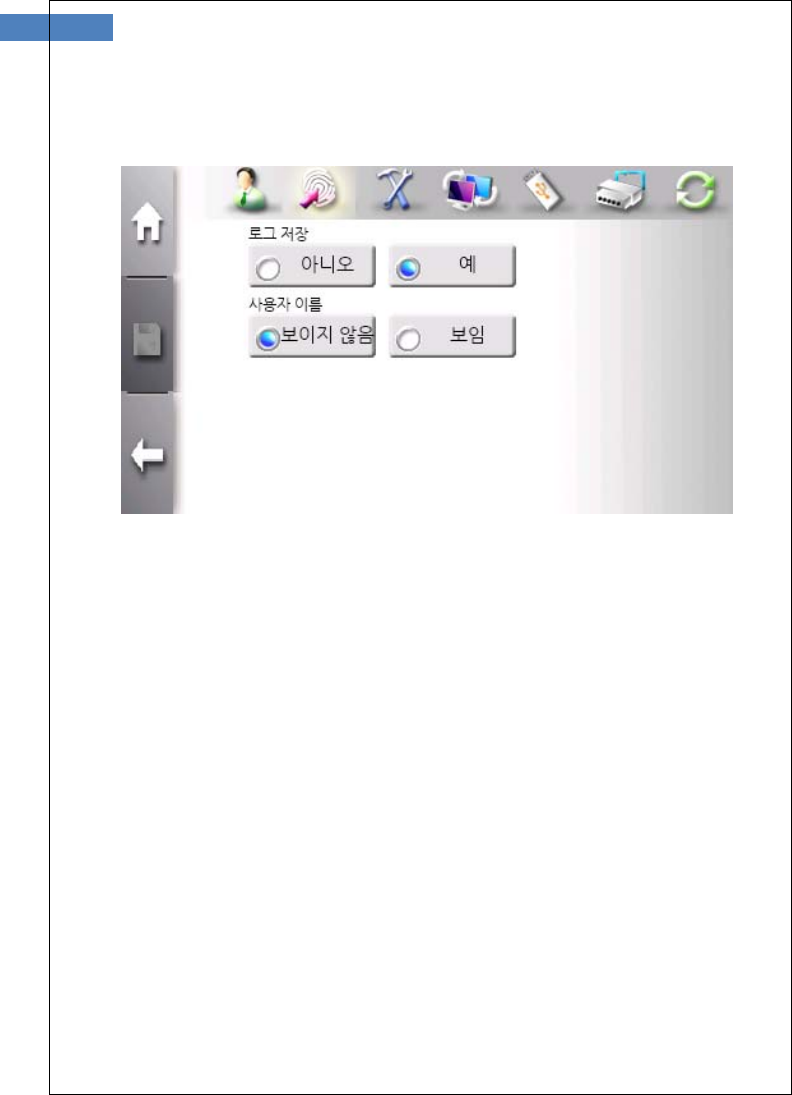
ETC Menu
The use of User name Display
It selects whether user name is displayed when authentification is
succeeded,
Saving Logs
It selects whether logs occurred during user authentication are saved
or not. To save logs, select “Yes” check box.
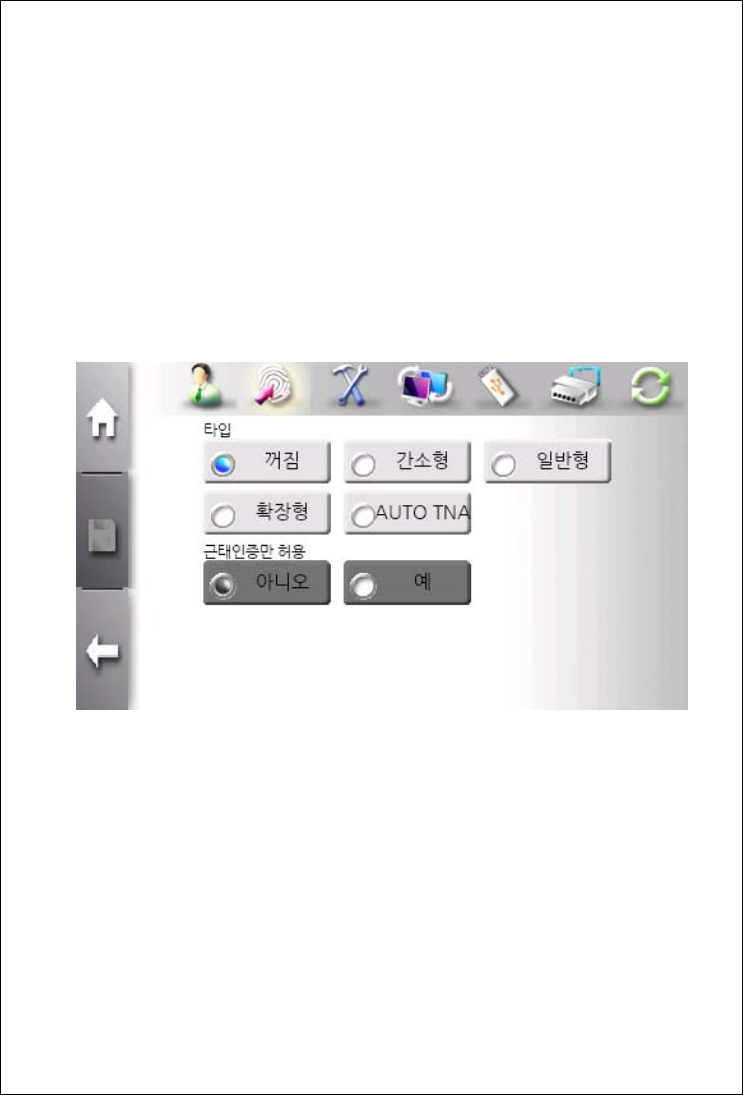
T&A Menu
In Time and attendance mode, user must touch function key before
performing ahtuentication process. The authentication log will be
sent to server with function key information.
According to function keys, user records are classified into “Coming
to work”, “Leaving work”, “Going out”, and “Returning” for efficient
management.
Time and Attendance mode selection
To use T&A mode, select one of “Simple”, “Normal”, and “Extended”
check box. “Simple” mode supports 2 function keys, “Normal” mode
supports 4 function keys, and “Extended” mode supports 99 function
keys. The default setting for “Simple” and “Normal” are as followings.
F1: Coming to work
F2: Leaving work
F3: Going out

43
F4: Returning
In “Extended” mode, function keys can be freely defined depending
on the user’s requirements
To allow entry only through T&A authentication, select “Yes” check
box in “T&A Auth Only” type. If this mode is enabled, user must press
function key to open the door.
Click “Save” button to save current setting.
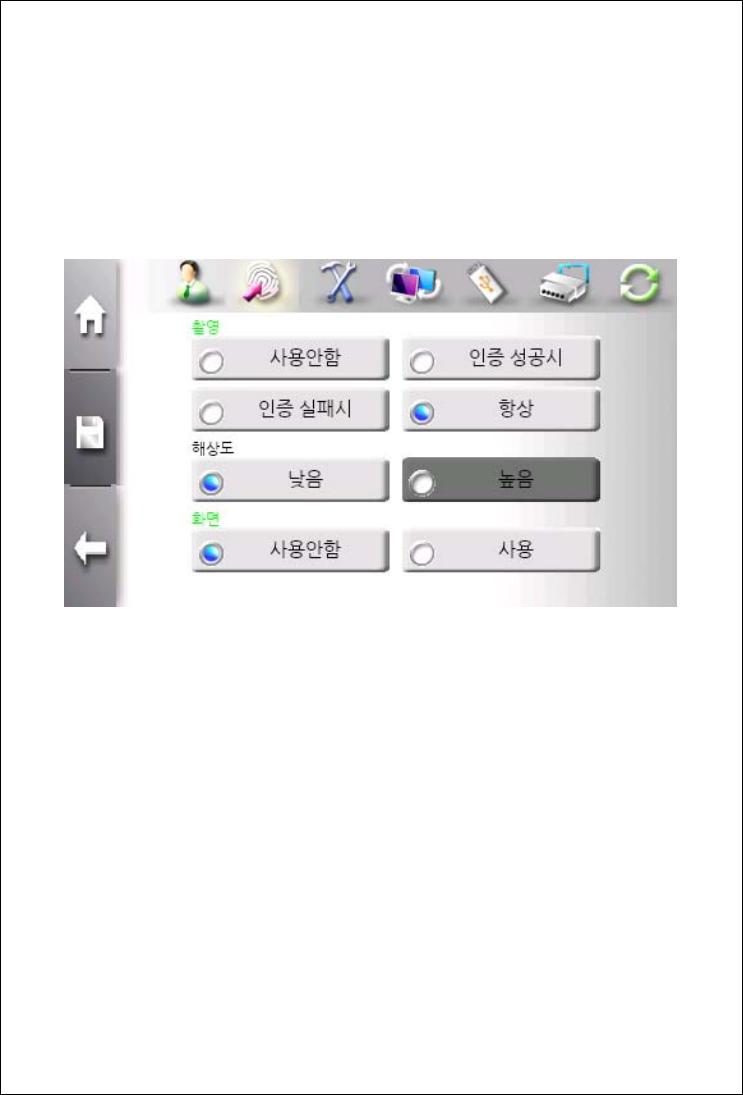
Camera Menu
In this menu, camera operation such as the usage and the time of
capture can be configured.
Capture mode
The usage of camera and the capture timing can be configured.
Camera takes picture when authentication success, fail, or both
according to the capture mode.
Resolution mode
This mode is fixed to Low (320 x 240 pixels).
Display mode
If display mode is enabled, captured image is shown on the screen
after authentication result window is closed.

45
# Information
The photo data is saved in ACM pro folder in server and SD memory in
terminal. Server has no limit for photo count, but terminal can save
upto 20,000 photos. If new photo is added after reaching limit, the
oldest photo is deleted.
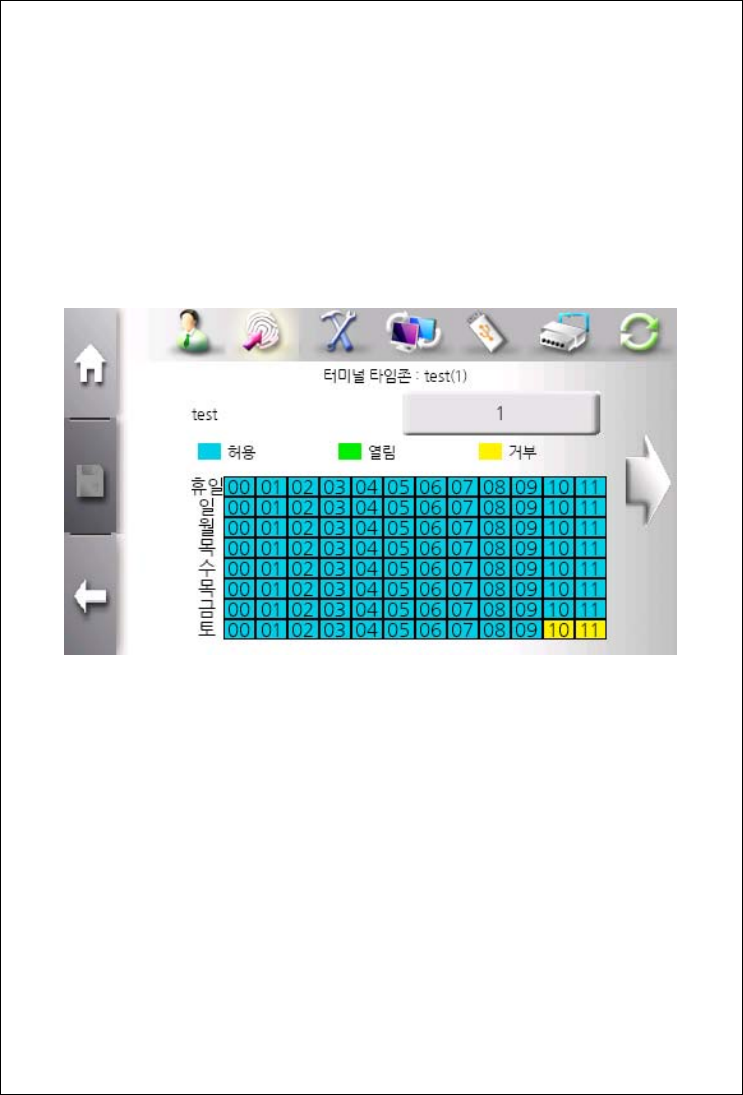
Timezone Menu
This menu is used to restrict or allow access during certain time
period – time or date. In this menu, current timezone configuration is
displayed. The selection of timezone is configured in “User
Management” menu.
Terminal Timezone means currently applied timezone name.
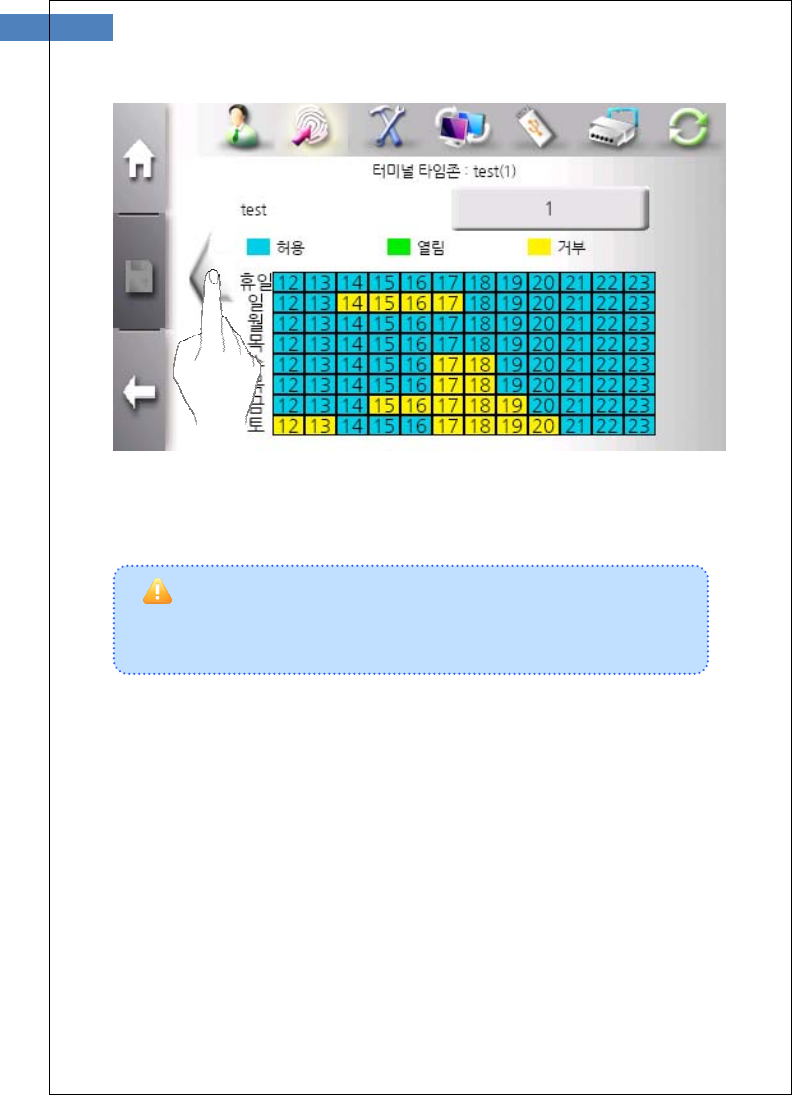
47
Using left or right arrow, display can be scrolled.
## Information
Terminal supports 16 timezone configurations. It cannot change timezone
configuration but selects which timezone is to be sued.
Caution
▪Timezone can be set only through AccessMnanger Professinal program
but not through terminal.
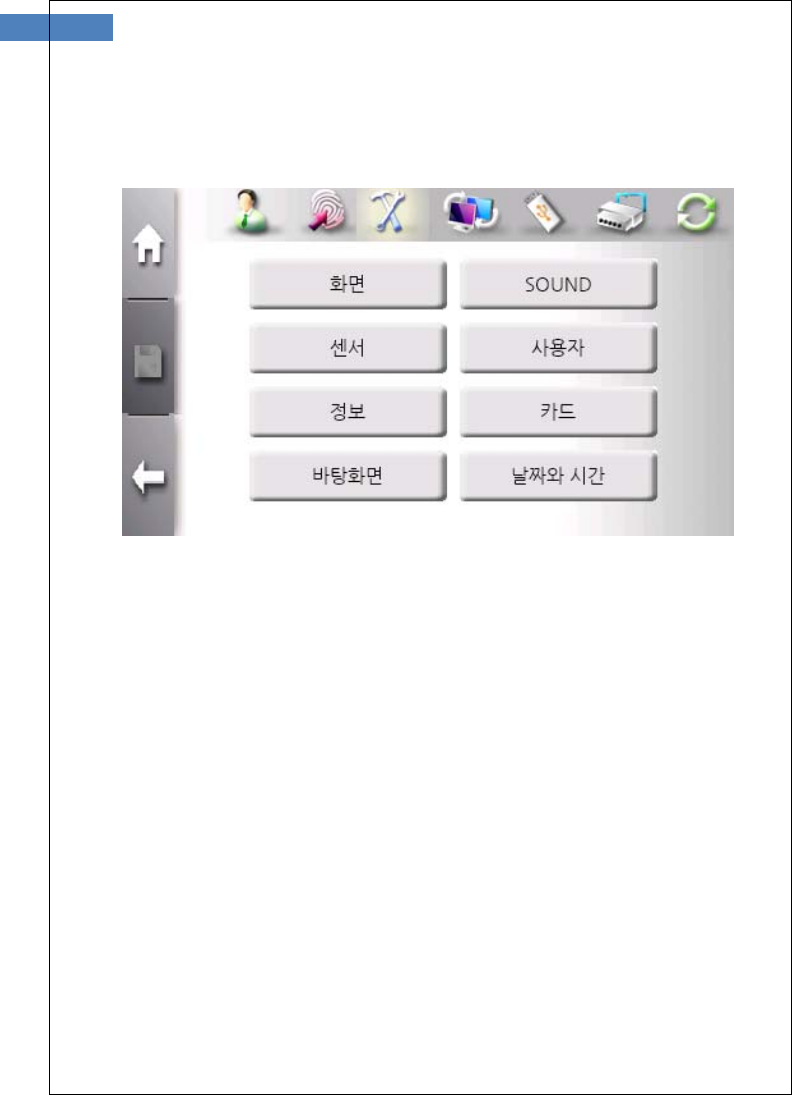
System Management
In this menu, administrator can change backgroud wallpaper,
language, time, sound and so on.
Click top right button to enter system management menu.
49
The sub menu consists of Display, Sound, Sensor, User, Information,
Card, Background, and Date&Time button.
The “Display Menu” button is used to set terminal language, the
brightness of LCD.
The “Sound” button is used to set sound effect, voice, and volume.
The “Sensor” button is used to config sensor options and capture
timeout.
The “User” button is used to set user information such as ID length,
the number of template for one user, and so on.
The “Information” button is used to check current terminal status.
The “Card” button is used to set card type and usage.

The “Background” button is used to change backgroud image.
The “Data&Time” button is used to set system data & time.
51
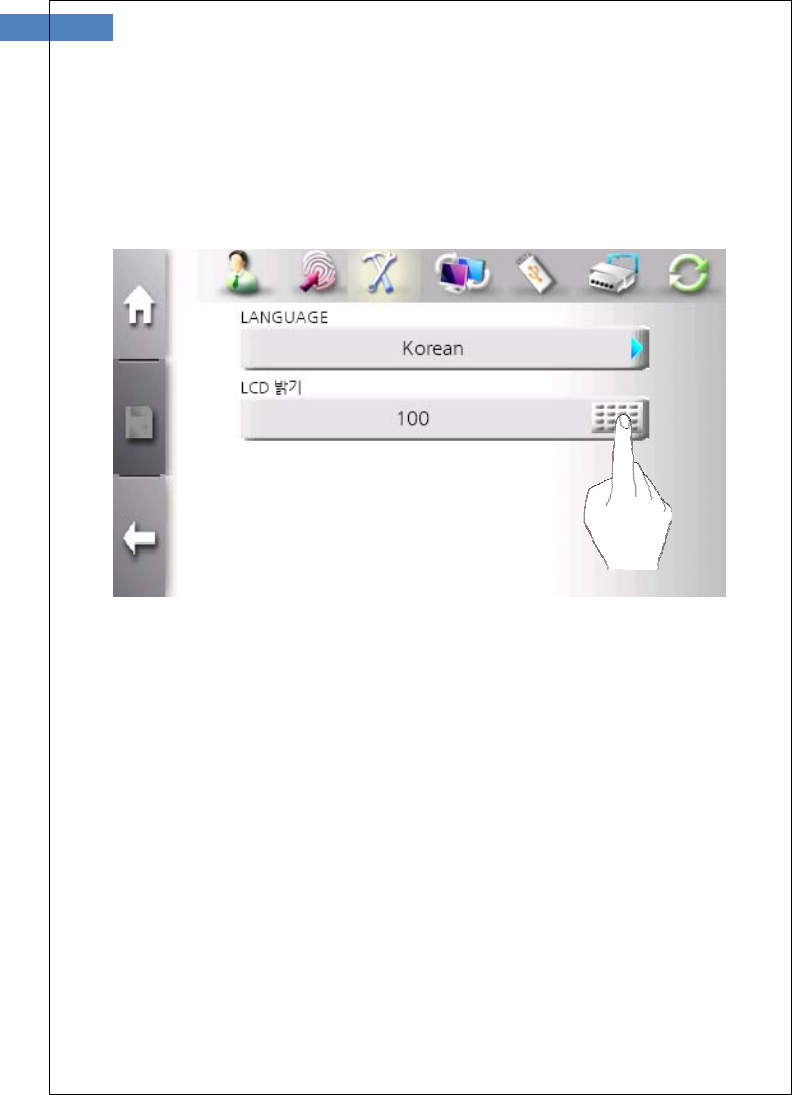
Display Menu
This menu is used to change display & voice language and adjust
LCD brightness.
LCD brightness
LCD brightness can be set between 1 and 100. The default value is
100. The smaller value is, the darker LCD brightness is. To change
value, click keypad button and enter value.

Language
Select language pack applied to display and voice. More language
will be added.
53
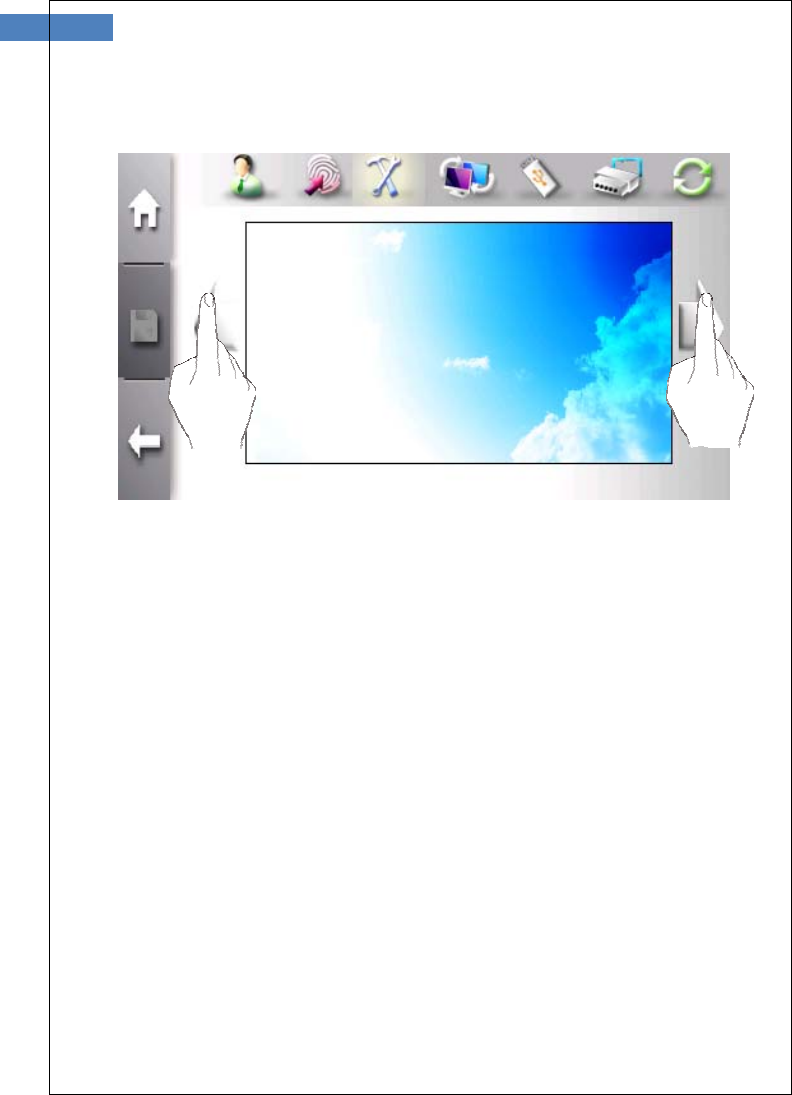
Background Menu
Background
The background image can be selected from defult images and user
images using left or right arrow button. After selecting, click “Save”
button to activate. User images must be transferred to terminal
through AccessManager professional program before selection.
# Information
If the size of image is less then 480x272, image can be contorted.
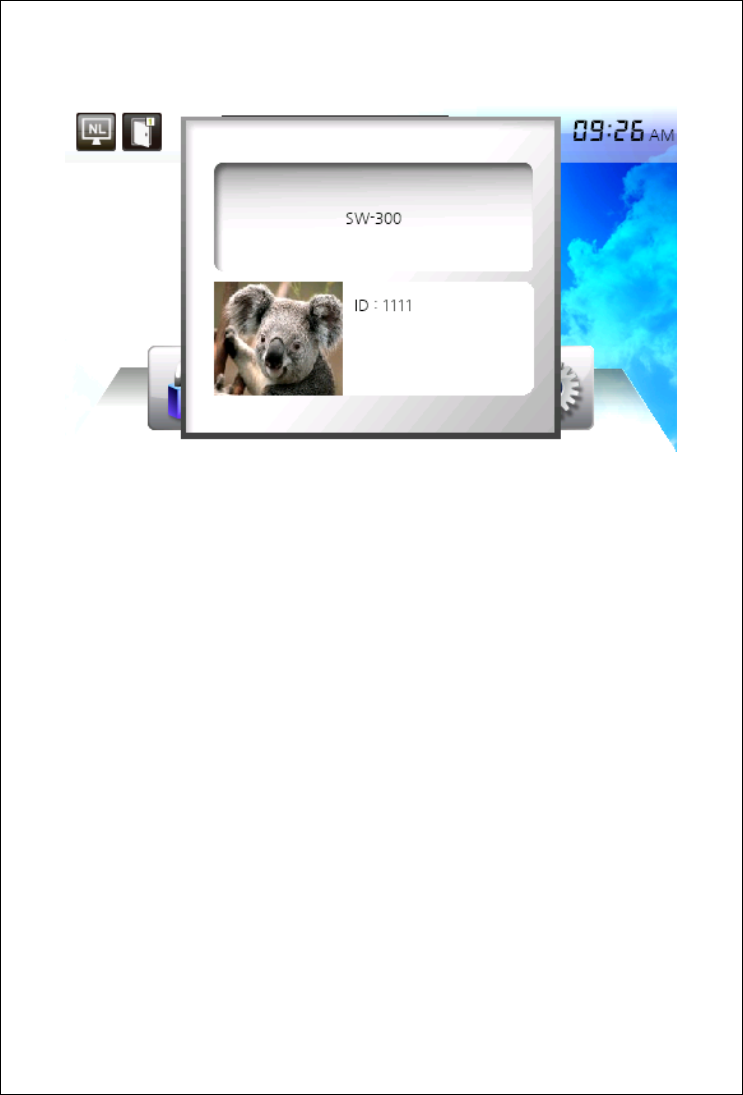
Display photo and text for each user
When user is authenticated successfully, user-defined photo and text
can be displayed. This function is only configured through
AccessMange professional program. For more information, please
refer to “AccessMananger professional user manual”.
55
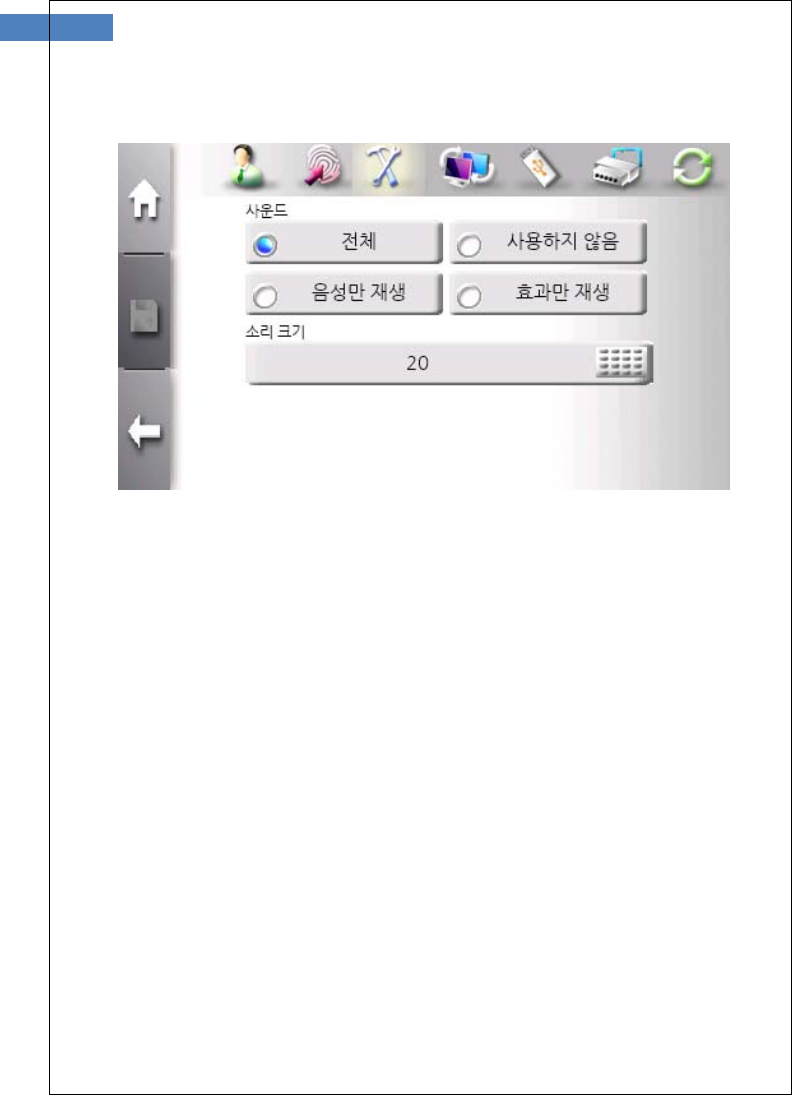
Sound Menu
Volum can be set between 0 and 100. But 0 means mute. To change
volume, click keypad button and enter value. According to sound
selection, voice only or sound effect only is possible.
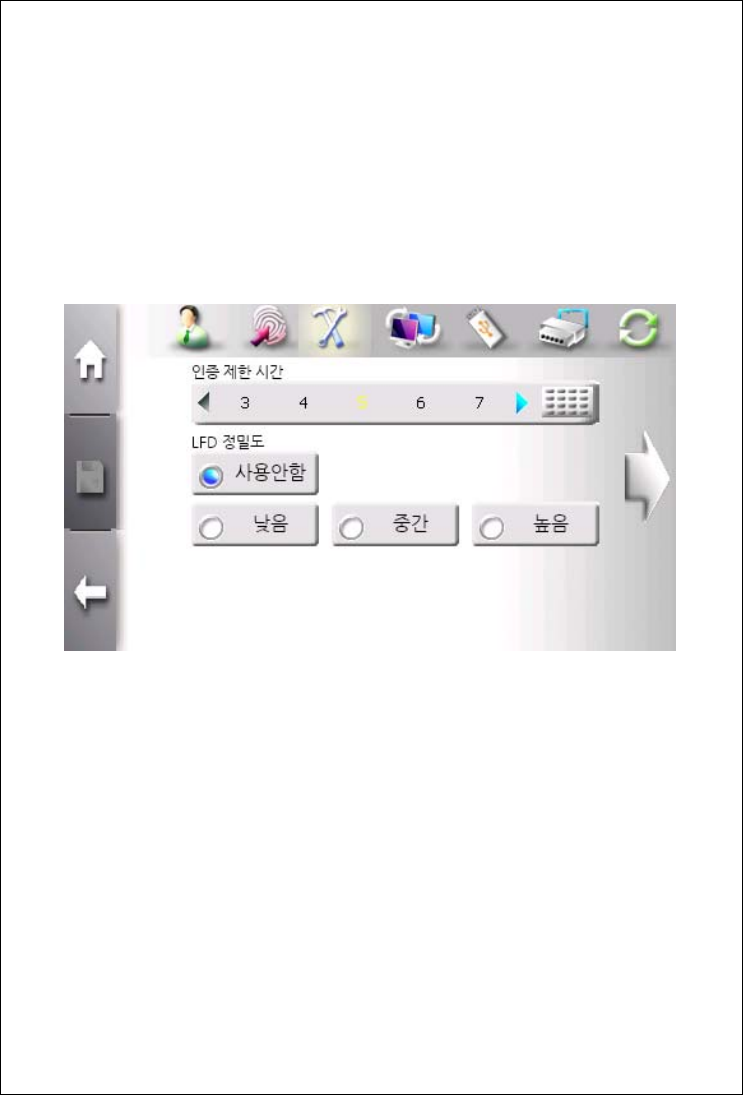
Sensor Menu
This menu is used to sensor options such as gain, brightness,
contrast, capture timeout, and LFD level. Thiese options are terminal
default values. If individual user’s options are not defined in
registration process, terminal default values are applied.
Capture Timeout
This value defines how log sensor waits to finish capture. This value
is set from 3 to 9 seconds. The default value is 5 seconds.
LFD (Live Finger Detection) Level
This selects which level of LFD is used. “Low”, “Middle”, “High” and
“Disable” are available.
57
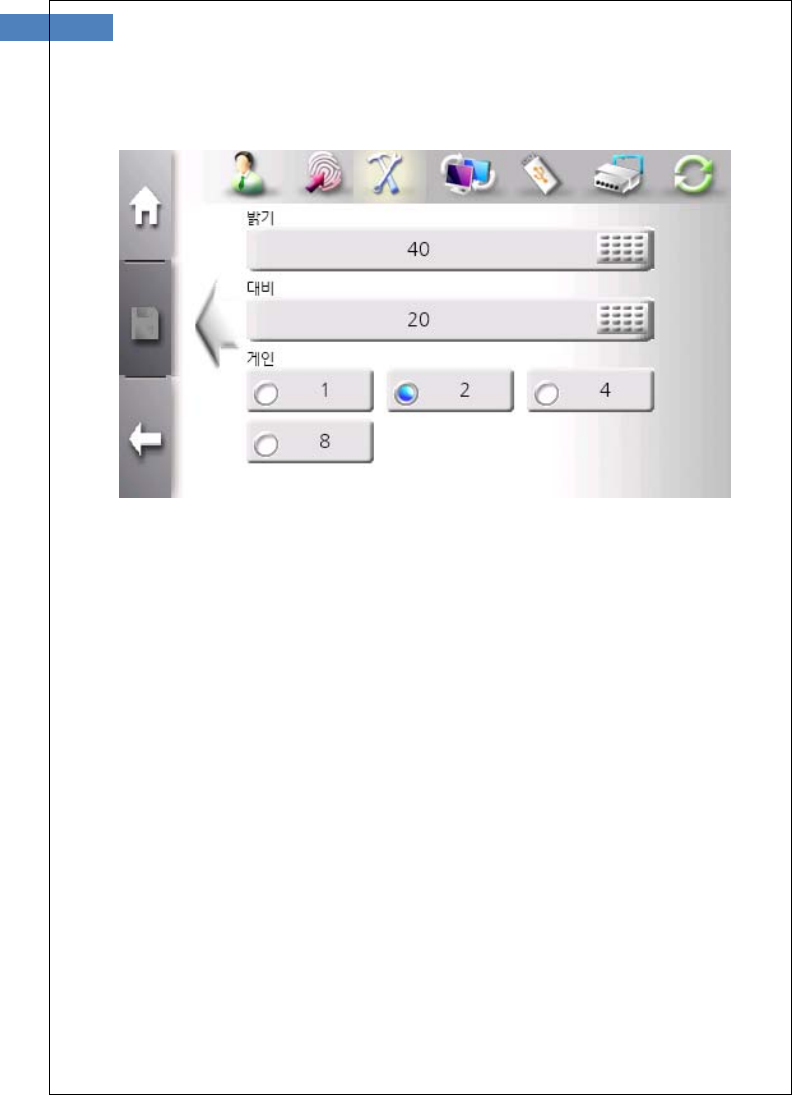
Sensor Options
If the image of fingerprint is too bright or dark, sensor options can be
adjusted. The brightness and contrast is chaged by clicking keypad
button. And the gain is selected from 1, 2, 4, and 8.
The default brightness is 40, the default contrast is 20, and the
default gain is 2. These values are seletected deliberately by
NITGEN&COMPANY. We strongly recommend these default vaules.
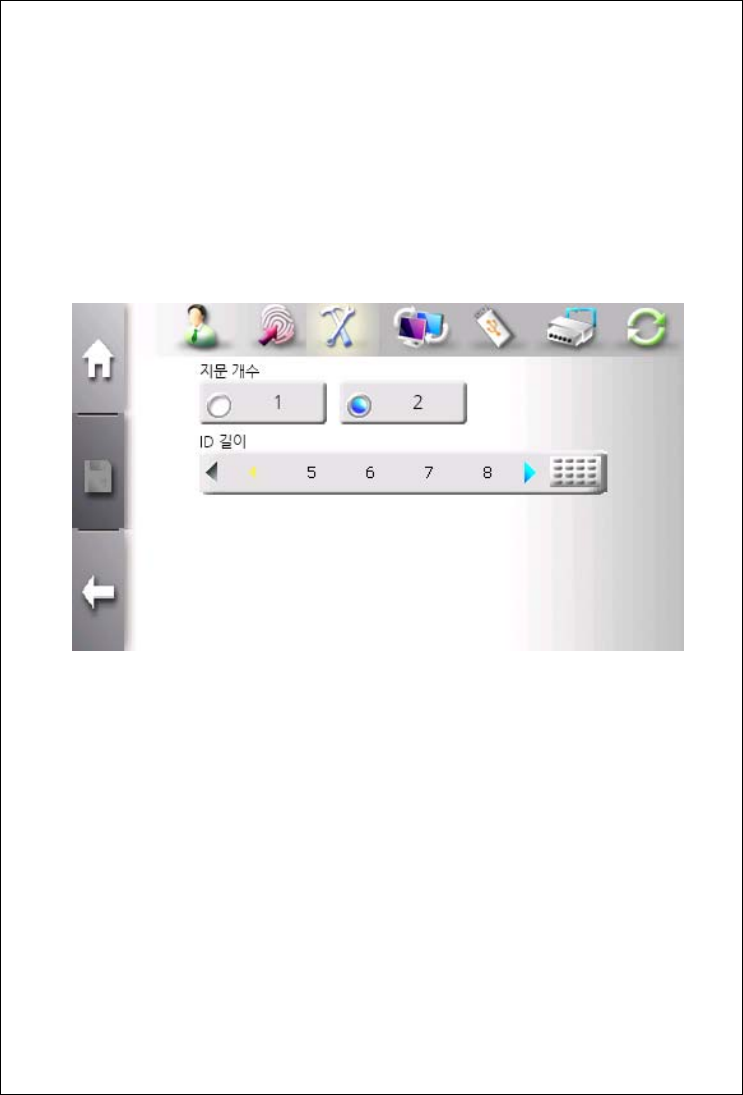
User Menu
This menu is used to configure fingerprint scan count to be inpuuted
during fingerprint registration and the length of ID. These values can
be changed only when there is no user in terminal. An administrator
must delete all users before changing vaules.
The finigerprint scan count is selected to 1 or 2. The default value is
2.
The length of ID is selected from 4 to 20. The default value I 4.
59
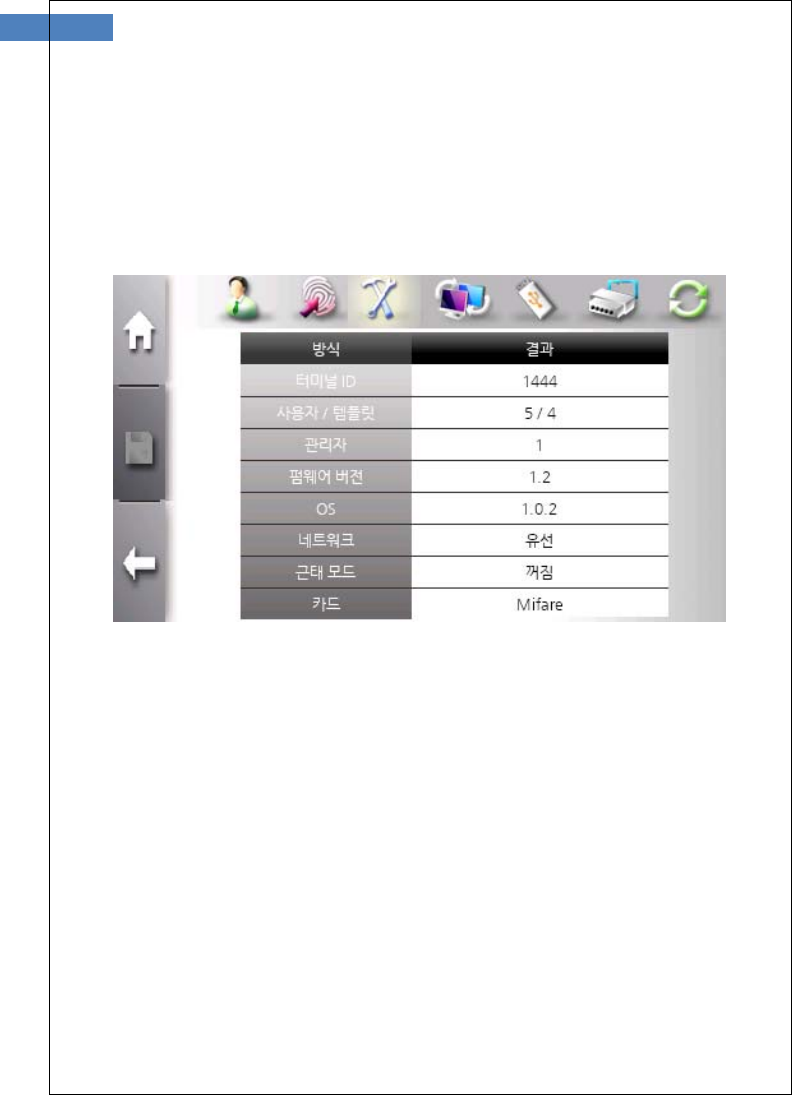
Information Menu
This menu is used to check terminal ID, the total number of users
and templates, the number of administrators, firmware version, OS
version, network version, T&A mode, and card type.
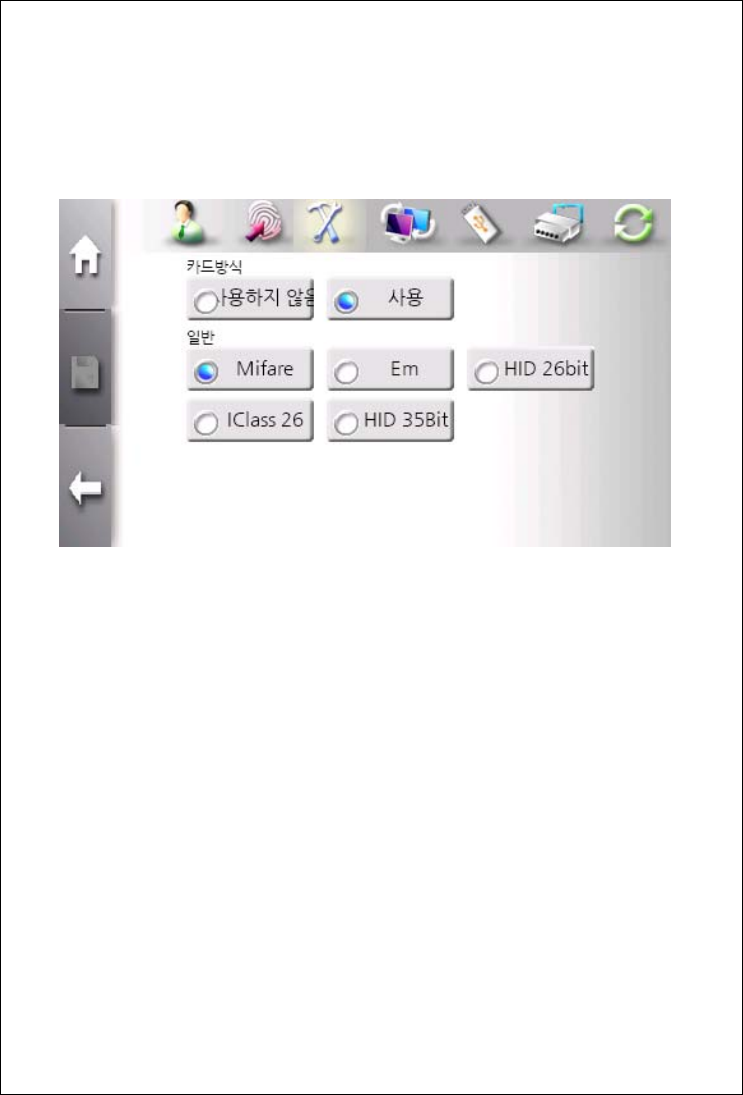
Card Menu
This menu is used to configure the usage of card and card type.
The usage of card is selected. To accept card authentication, this
selection must be set to “Normal”
Five card types are currently supported. These ara available card
types.
Mifare
EM
HID 26-bit
HID 35-bit
IClass 26-bit
If card type is not match to card module installed in terminal, card
authentication does not operate normally.

61
If the usage of card is selected as “Disable”, card types are disabled
and unselectable.
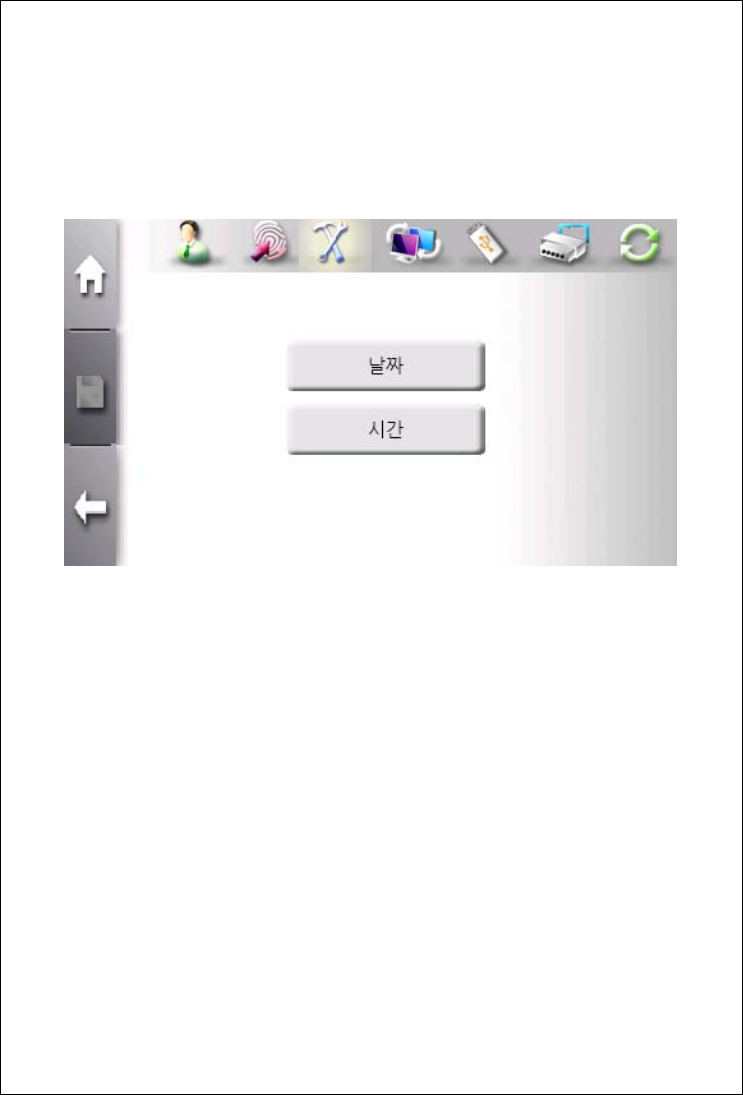
Data&Time Menu
This menu is used to set terminal system data and time.
The “Date” button and the “Time” button are provided for selection.
63
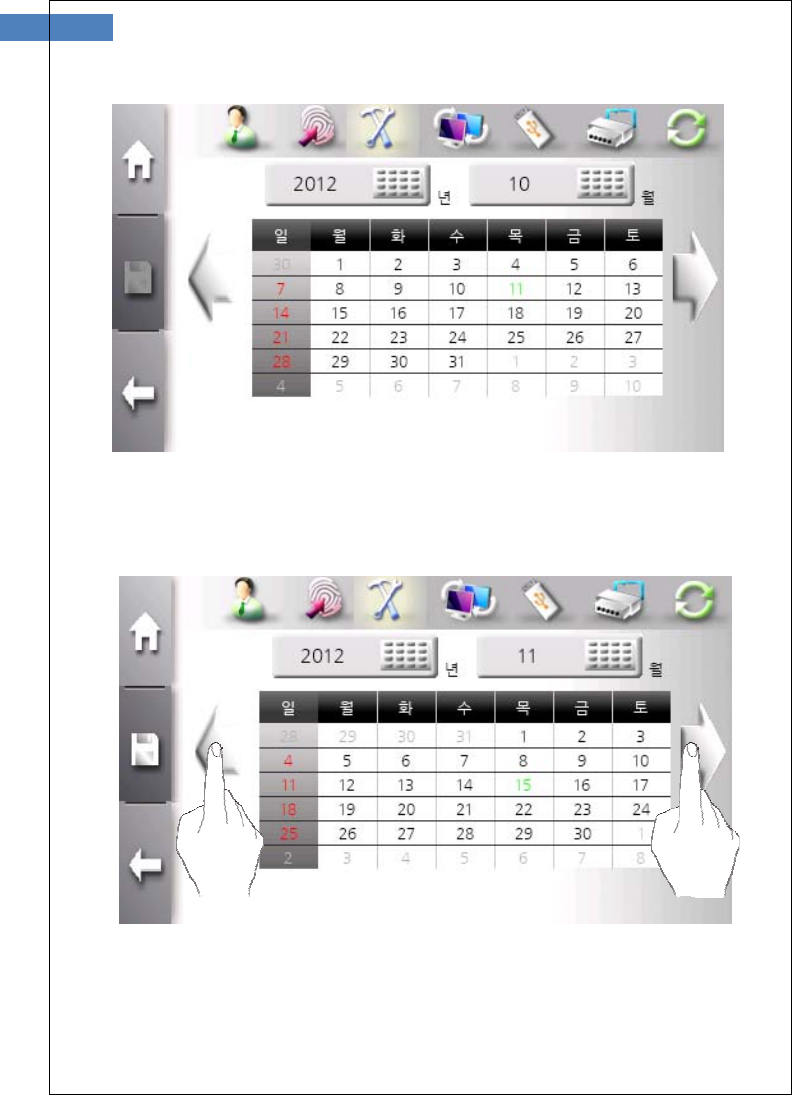
Year and Month is set using keypad. Year can be selected from
1900 to 2300. And Month can be selected form 1 to 12.
Using left or right arrow button, month can be moved previous or
next month.
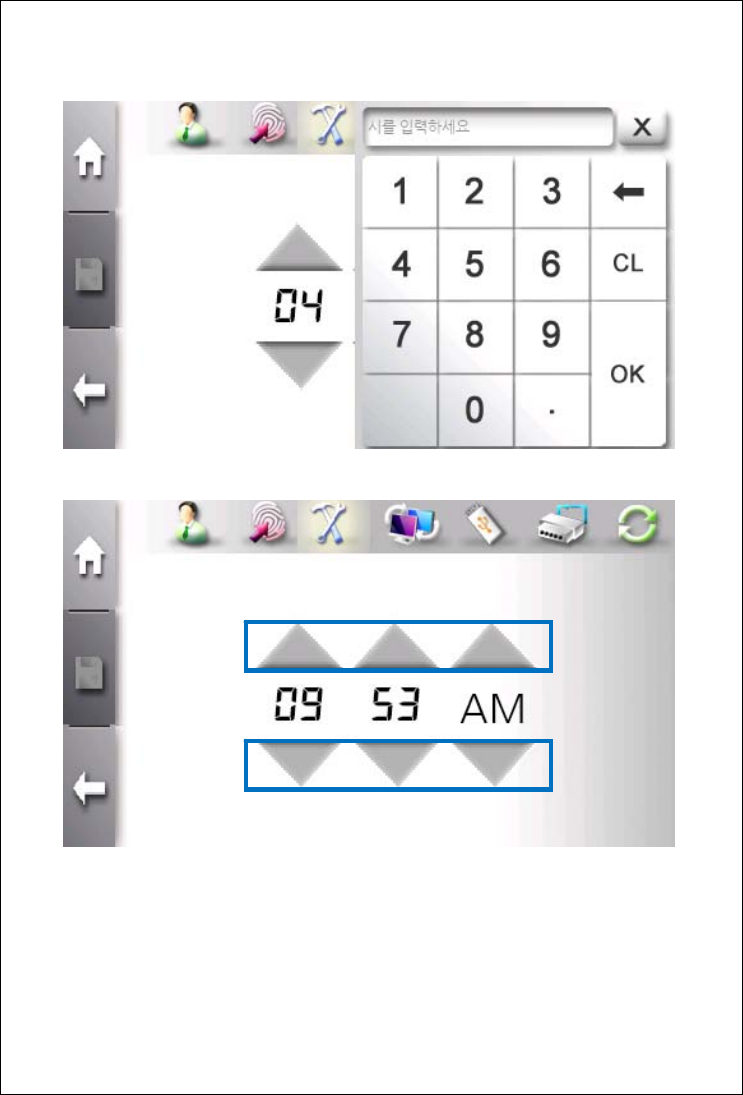
Time can be changed by enter value from keypad after clicking hour
or minute or by clicking up/down arrow.
65
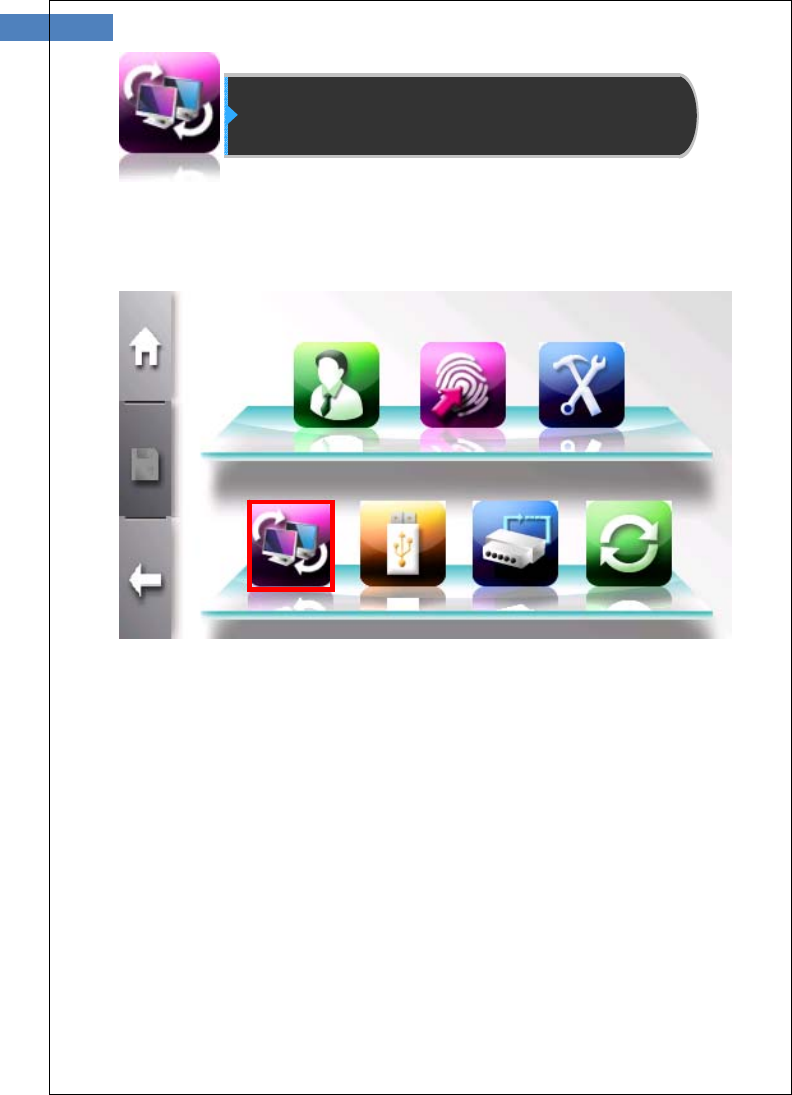
Network Configartion
SW300/301 terminal operates either in network or stand-alone mode.
In network mode, wire or wireless network is supported.
Click bottom left button to enter network configration menu.
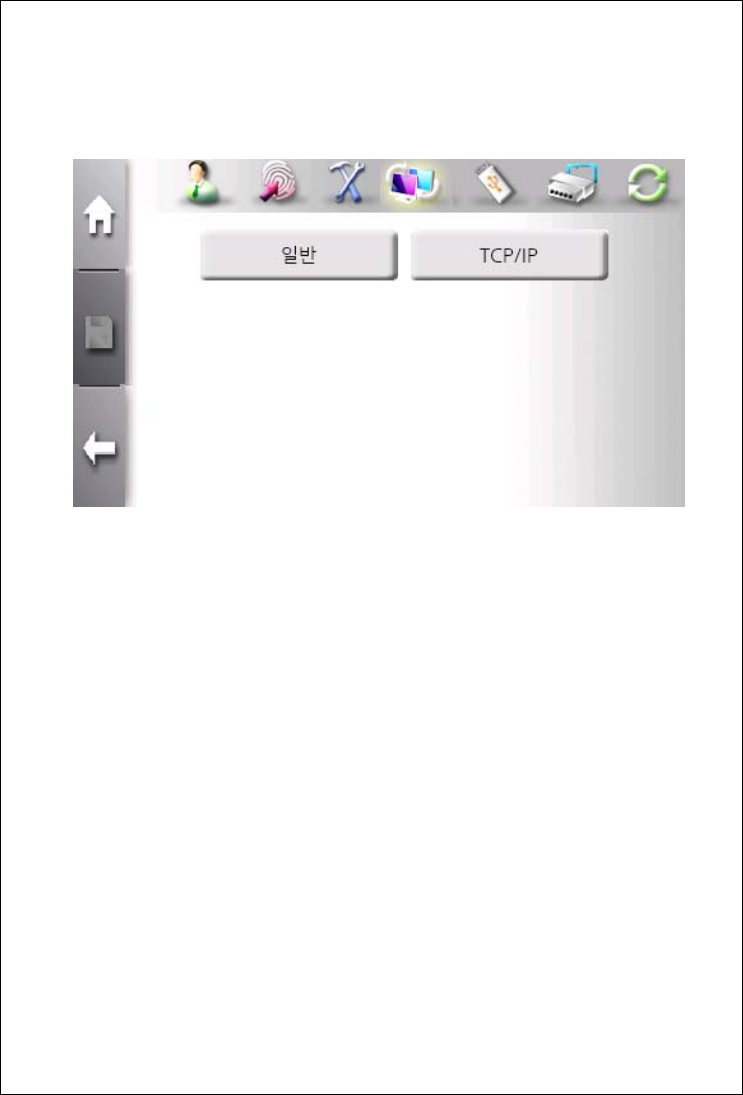
The sub menu consists of General and TCP/IP button.
The “Normal” button is used to select operation mode and related
option about network.
The “TCP/IP” button is used to configure server IP, server port
number, ad the usage of DHCP.

67
In stand-aline mode, all operations about registeraion
and authentication are done in terminal.
Normal Menu
Stand-alone mode
`
The terminal operates without external connection through network.
To change to stand-alone mode, set type to “Disable” check box.
This changed is activated after clicking “save” button.
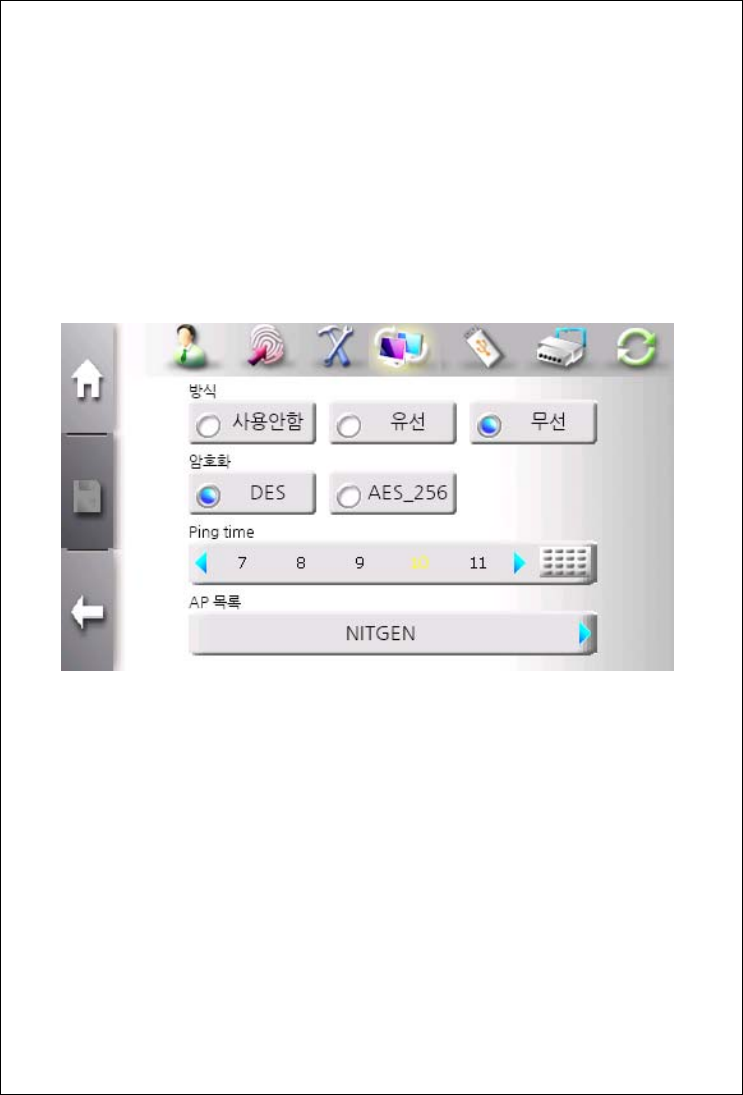
Notwork mode
The terminal communicates with server for convient and efficient
management such as registration, log control, user management,
and so on.
To use network mode, AccessManager Professional program and
server must be installed in PC.
Network mode is selected by setting type to “Wire” check box to use
wire network or by setting type to “Wireless” check bot to use
wireless network
The “Encryption” field selects which encryption algorithm is used to
exchange data between terminal and server. It supports DES and
AES 256bit mode.
69
1. “Ping Time”은 단말기 서버간 통신상태를 점검하는
기능으로 기본값은 10 초이며, 2 ~ 20 초까지 설정할 수 있습니다.
매 지정시간 마다 Ping 테스트가 수행됩니다.
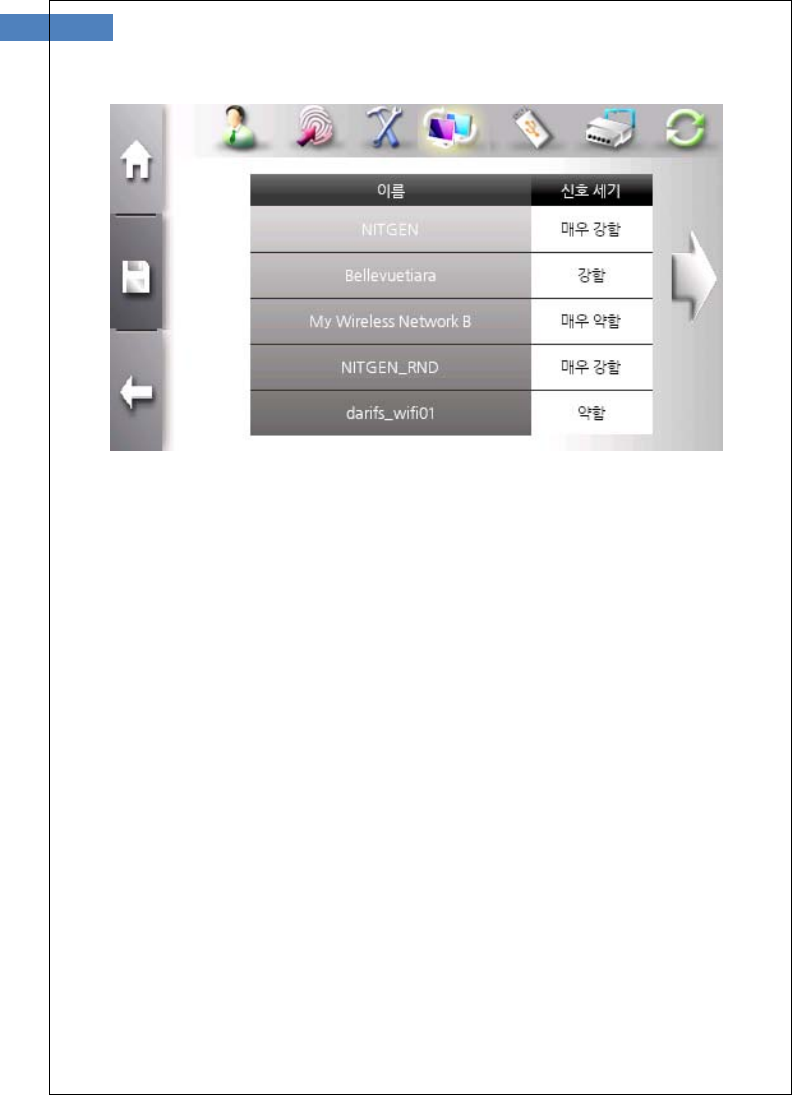
AP (Access Point) list shows available wirless network connection.
According to AP prection mode, some AP requires protection key.
This changed is activated after clicking “save” button.
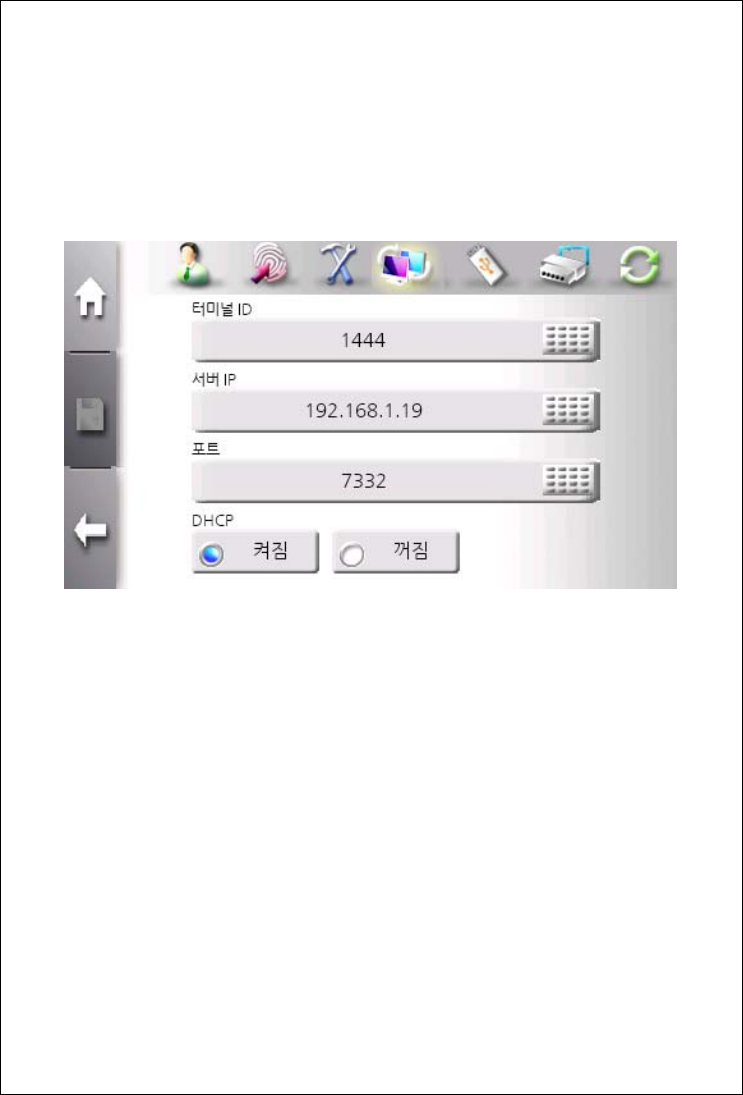
TCP/IP Menu
After selecting network mode, TCP/IP must be configured to connect
to server.
The “Terminal ID” is unique identification number assigned to
terminal between 1 and 2000.
The “Server IP” field must have IP address of PC in which
AccessManager Professional program.
The “Port” field must have port address of PC in which
AccessManager Professional program. This value can be set
between 2000 and 65535. The default value is 7332. This value must
be same as that of AccessManager Professional program.
If DHCP is enabled, terminal gets network configuration from DHCP
server.
71
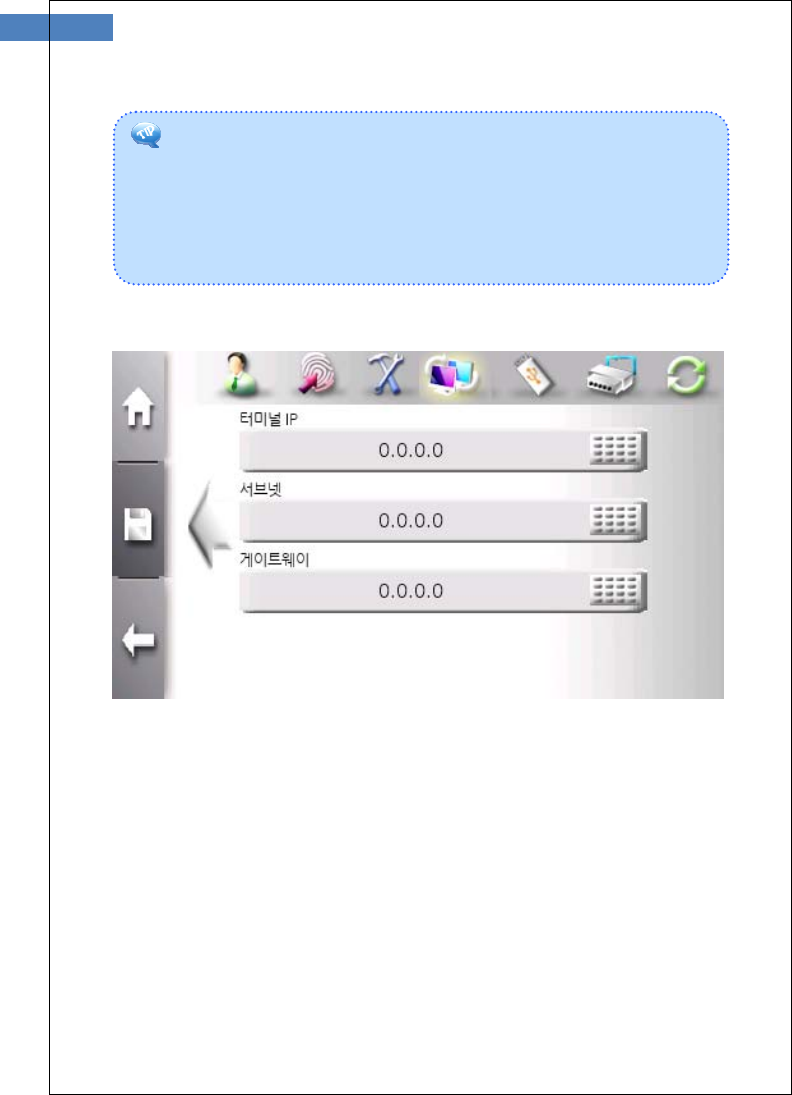
If DHCP is disabled, network configuration needs to be set manually.
Network configuration consists of terminal IP, subnet mask and
gateway IP. Please contact IT manager of office to get available
setting.
This changed is activated after clicking “save” button.
What is DHCP (Dynamic Host Configuration Protocol)?
The DHCP server automatically allocates and manages
settings for TCP/IP communication. If DHCP is on, related
information such as terminal IP, subnet mask, and gateway
are automatically allocated.
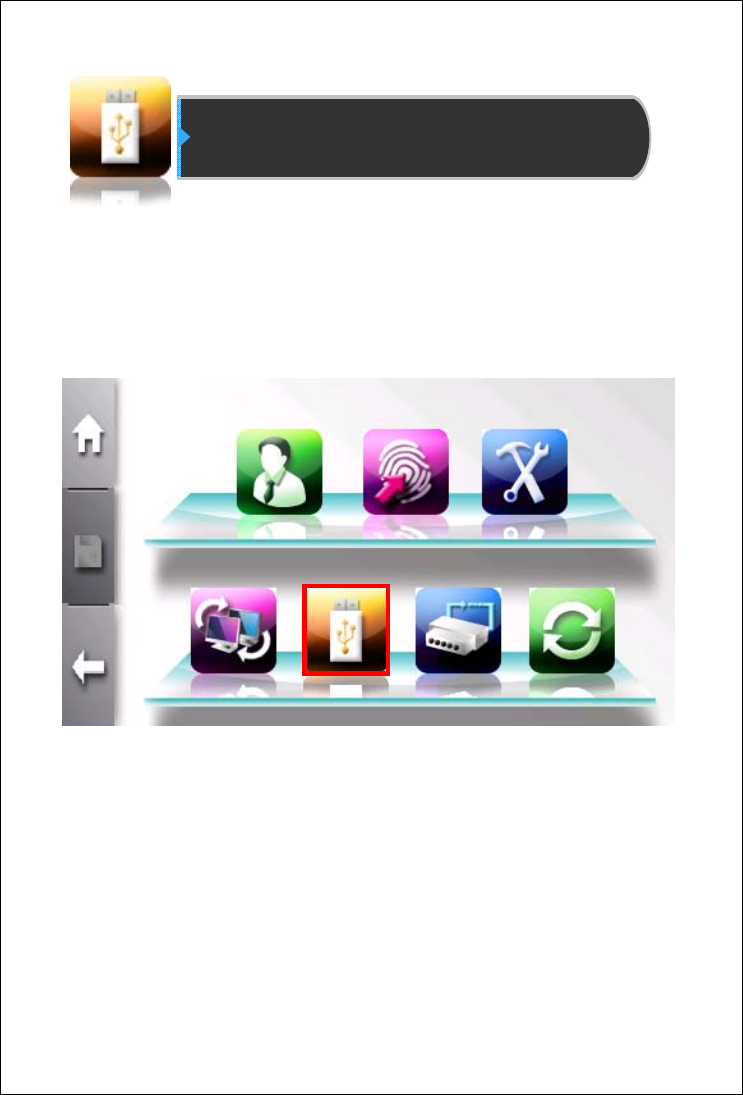
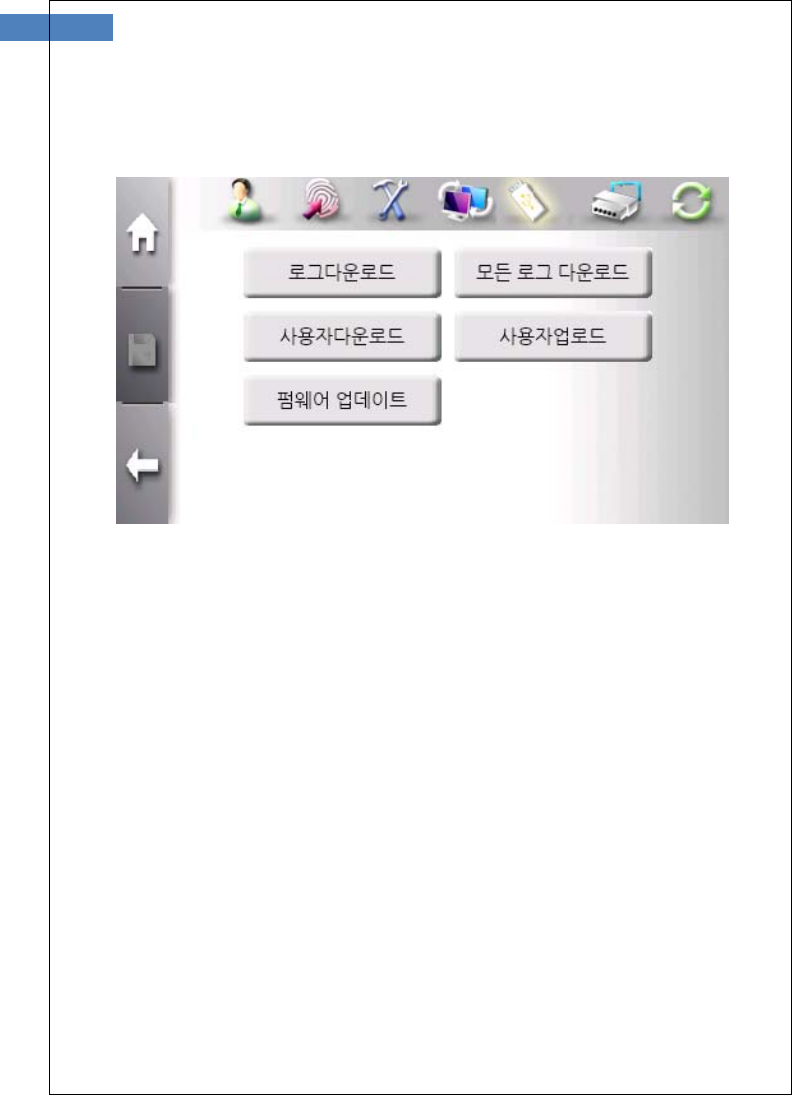
USB Memory Management
SW300/SW301 terminal provides USB port to upload/download user
data and download log data.
All upload/download functions are available in stand-alone mode, but
log download function is available in network mode.
Click bottom “USB memory” icon button to enter USB memory
mangement menu.
73
The sub menu consists of Log Download, All Log Donwload, User
Download, User Upload, and Firmware Update.
The “Log Download” button is used to download newly added logs
after downloading lastly.
The “All Log Donwload” button is used to download all logs that
saved in terminal.
The “User Download” button is used to download all of users.
The “User Upload” button is used to upload new users from USB
memory to terminal.
The “Firmware Update” button is used to update firmware.
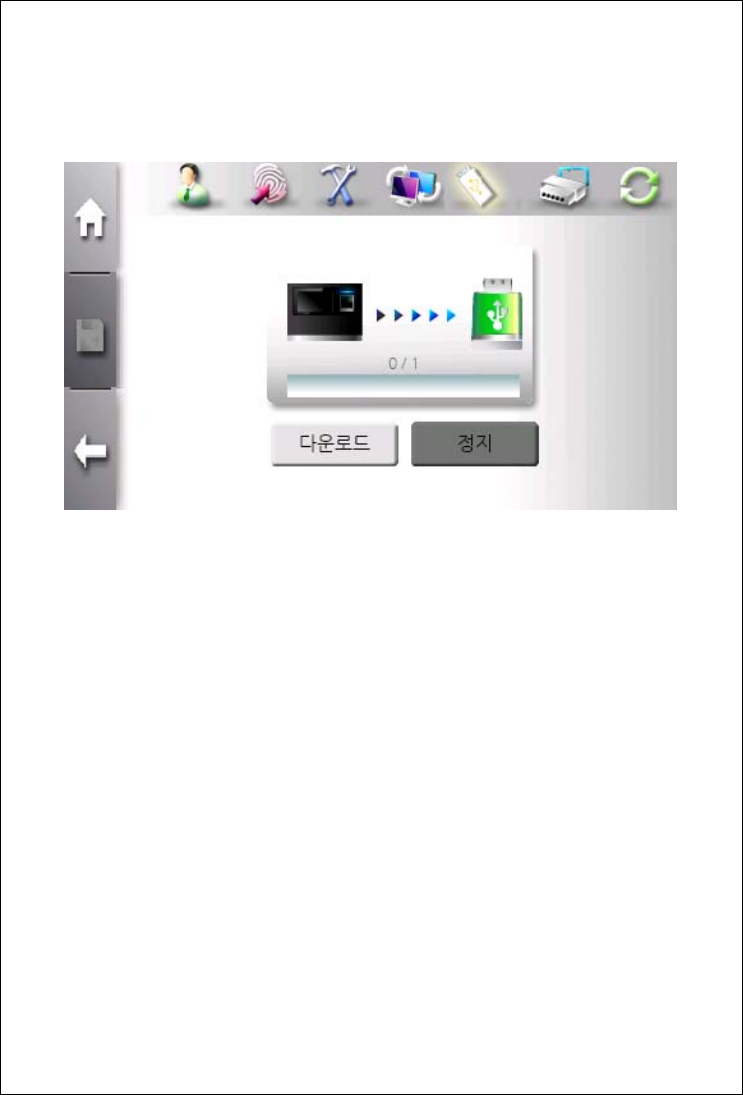
Log Download Menu
Log data would be downloaded to USB memory stick selectively - all
logs or newly added logs.
In network mode, all logs are saved in server without network
problem. If network problem occurs, newly added logs can be
downloaded using USB memory management function
Log data is stored with file name of SW300_LogDB_Dn1.nlg. New
log data is stored in same USB memory stick , filename is changed
to increase last index such as SW3000_LogDB_Dn2. Log,
SW300_LogDB_Dn3.log and so on.
All log data stored in USB memory stick can be loaded by
AccessManager Professional and saved to server.
75
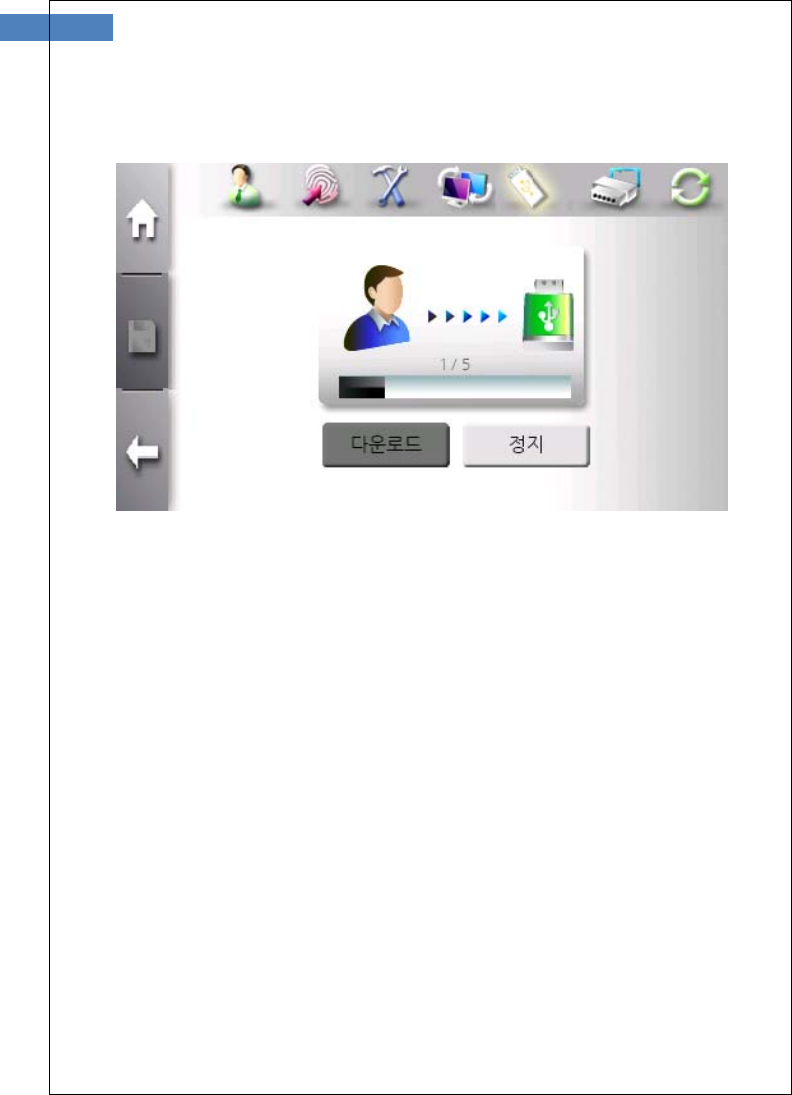
User Download Menu
When downloading user data to USB memory stick, user data is
stored in root directory with filename “_User.ndb”.
Pop-up window is displayed to confirm overwriting if same-named file
exists. If “No” is selected, user-download is cancelled.
User data stored in USB memory stick can be loaded by
AccessManager Professional.
User-download function is only available in stand-alone mode.

User Upload Menu
When uploading user data from USB memory stick to a terminal, it is
added to the existing DB, and if the user ID exists already, this user
data is ignored.
User-uoload function is only available in stand-alone mode.
To move the user data form terminal #1 to terminal #2, process
the following sequences
1. Insert USB memory stick to terminal #1 and select user-download
function.
2. If finished, “SW300_User.ndb” file is created in root directory.
3. Insert USB memory stick to terminal #2 and select user-upload
function.
77
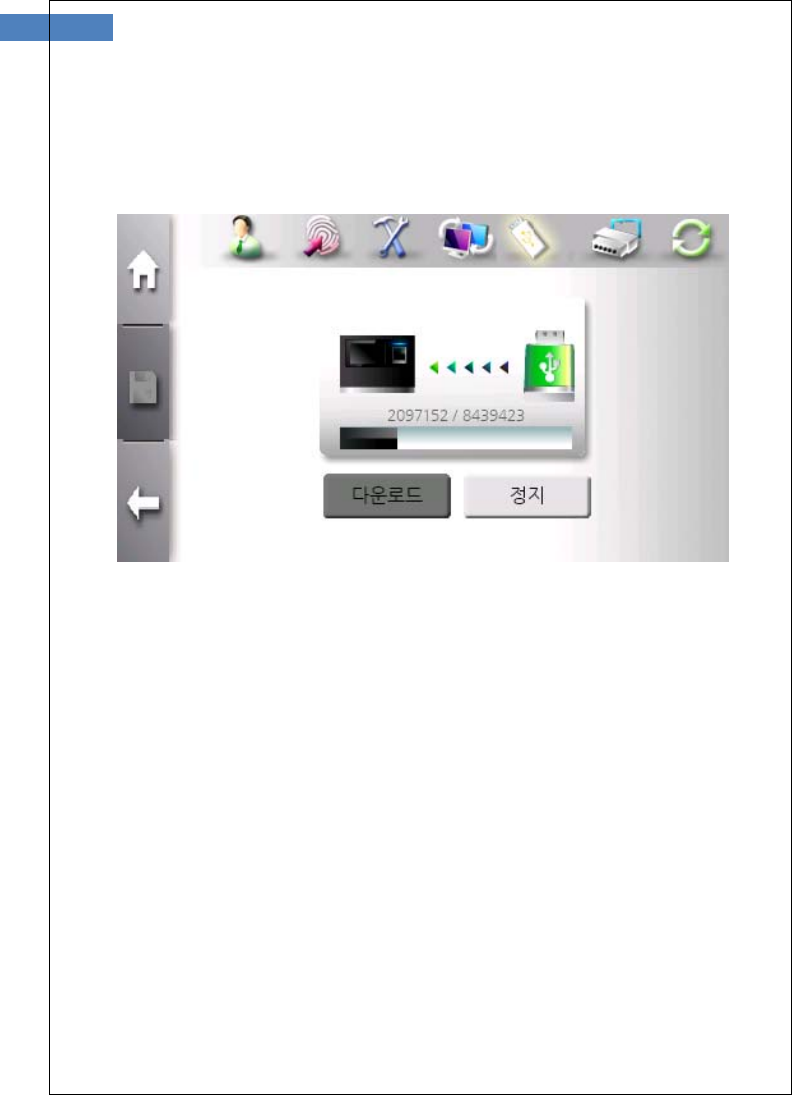
Firmwware Update Menu
SW300/SW301 supports firmware update using USB memory stick.
After inserting USB memory stick having SW300_Cab.CAB file in
root directory, click “Firmware Update” button. During copying, the
progressing bar is displayed. If done, terminal will be rebooted.
There is another way to update firmware.
After inserting USB memory stick, reboot terminal. When rebooting,
terminal checks USB memorystick and update firmware
automatically.
Firmware update can be possible from Remote Manager program of
AccessManager Professional.
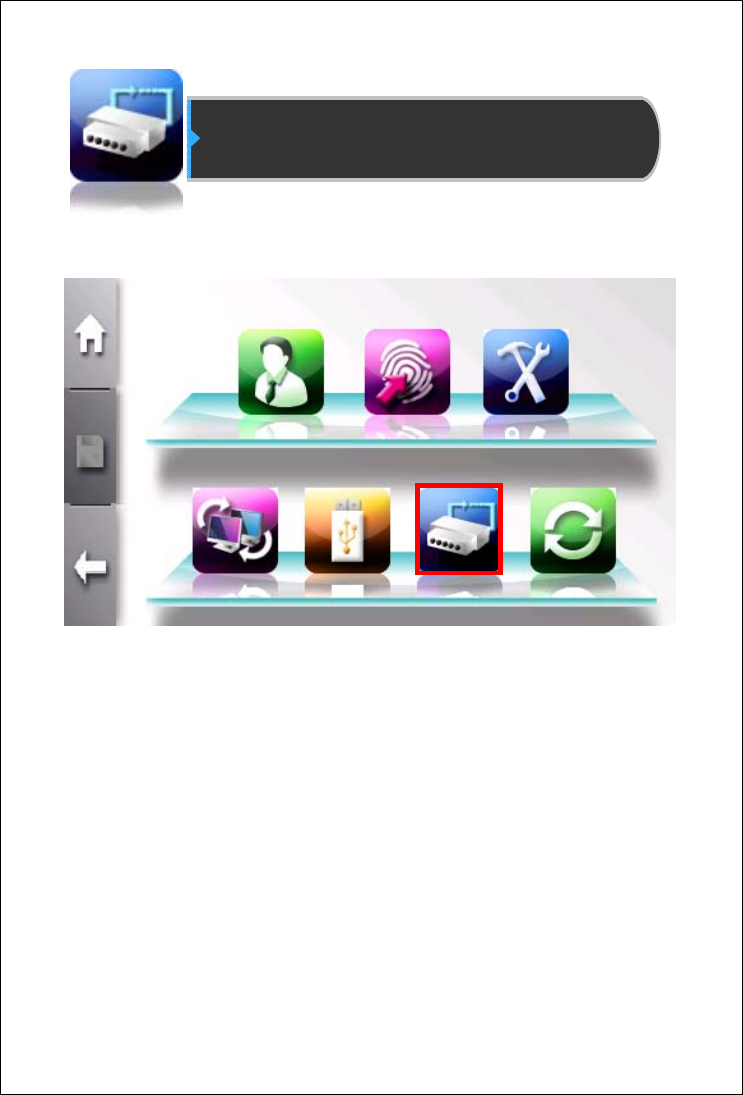
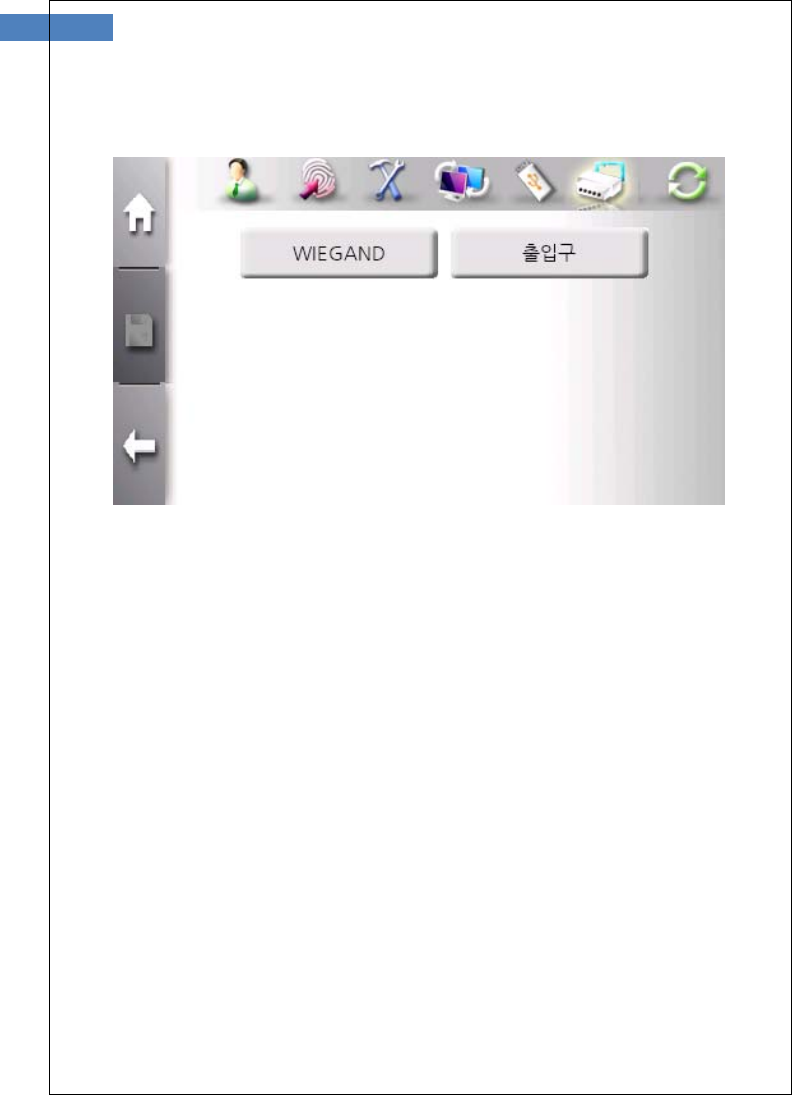
External IO Connection
An administrator configures external IO operation through this menu.
79
The sub menu consists of Wiegand and Door.
The “Wiegand” button is used to select the usage of wiegand data
line and data format.
The “Door” button is used to configure door control and operation.
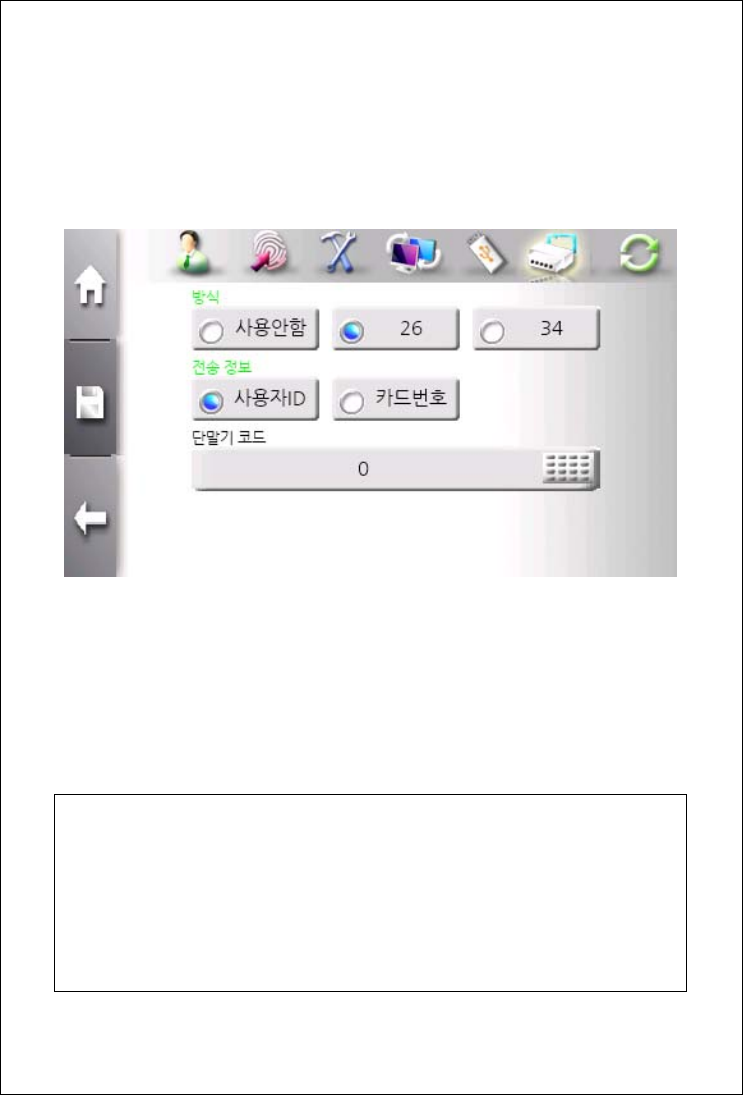
Wiegand (Wiegand out configuration) Menu
When authentication success occurs, terminal transmits data through
wiegand lines according to the configuration of this menu.
The “Type” field defines the usage of wiegand out lines. When
enabled, 26-bit and 34-bit formats are supported.
The “Send Data” field selects which information is send between
user ID and card ID.
User ID
- 26bit Wiegand: E.Parity(1bit)+Facility Code(8bit)+User ID(16bit)+O.Parity(1bit)
- 34bit Wiegand: E.Parity(1bit)+Facility Code(16bit)+User ID(16bit)+O.Parity(1bit)
Card Number
- 26bit Wiegand: E.Parity(1bit)+Card Data(24bit)+O.Parity(1bit)
- 34bit Wiegand: E.Parity(1bit)+Card Data(32bit)+O.Parity(1bit)

81
Wiegand In (with Externl RF Reader) Operation
- It is possible to use external RF reader with wiegnad-In port.
- Wiegand-In is configured as card type.
- Wiegnad in can be set to 34bit (Mifare) or26bit (EM,HID26).
- External RF reader should be installed near terminal. If a user
uses the fuction of T&A Auth Only or Combined authentication, a
user must touch the LCD or sensor with the terminal
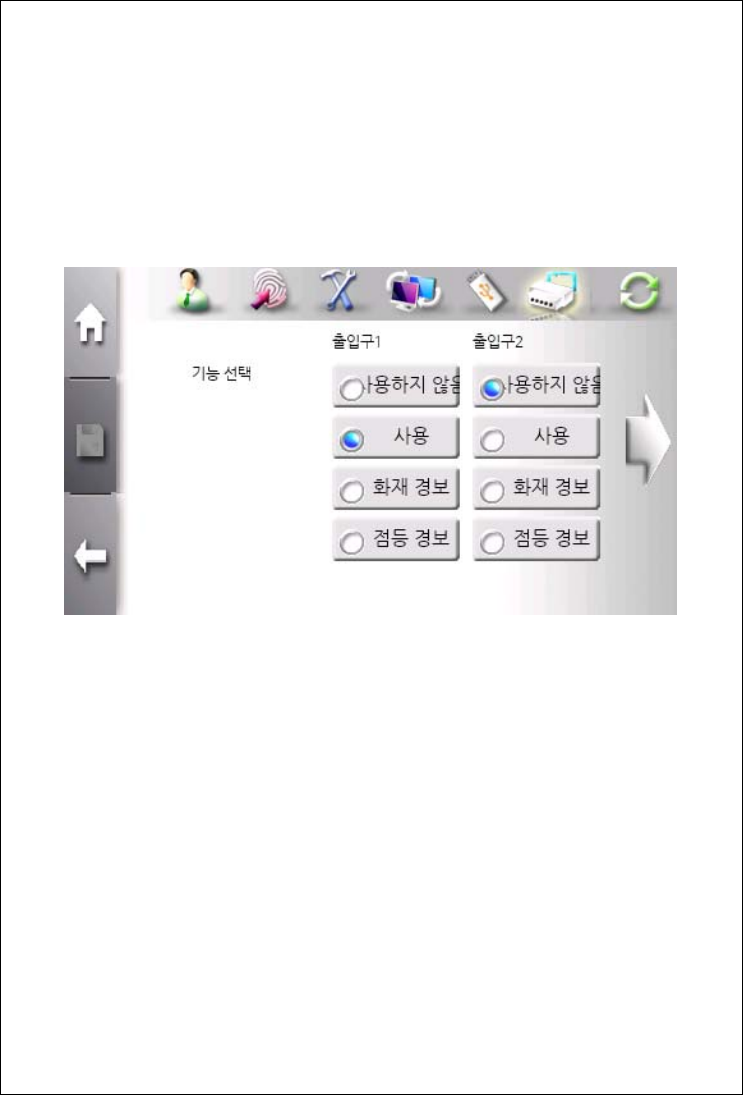
Door Menu
This menu is used to configure two doors operation mode. Each door
has three operatioin modes – Normal use, Fire Alarm, and Light
Alarm.
If “Fire Alarm” is selected, external event is detected, warning
message is displayed and waring sound is played.
83
The “Result signal” field selects in which result signal is outputted. If
“Success” is selected, active signal is outputted when successful
authentication occur.
The “Open Duration” field defines how log signal is active. This value
is from 5 to 20.

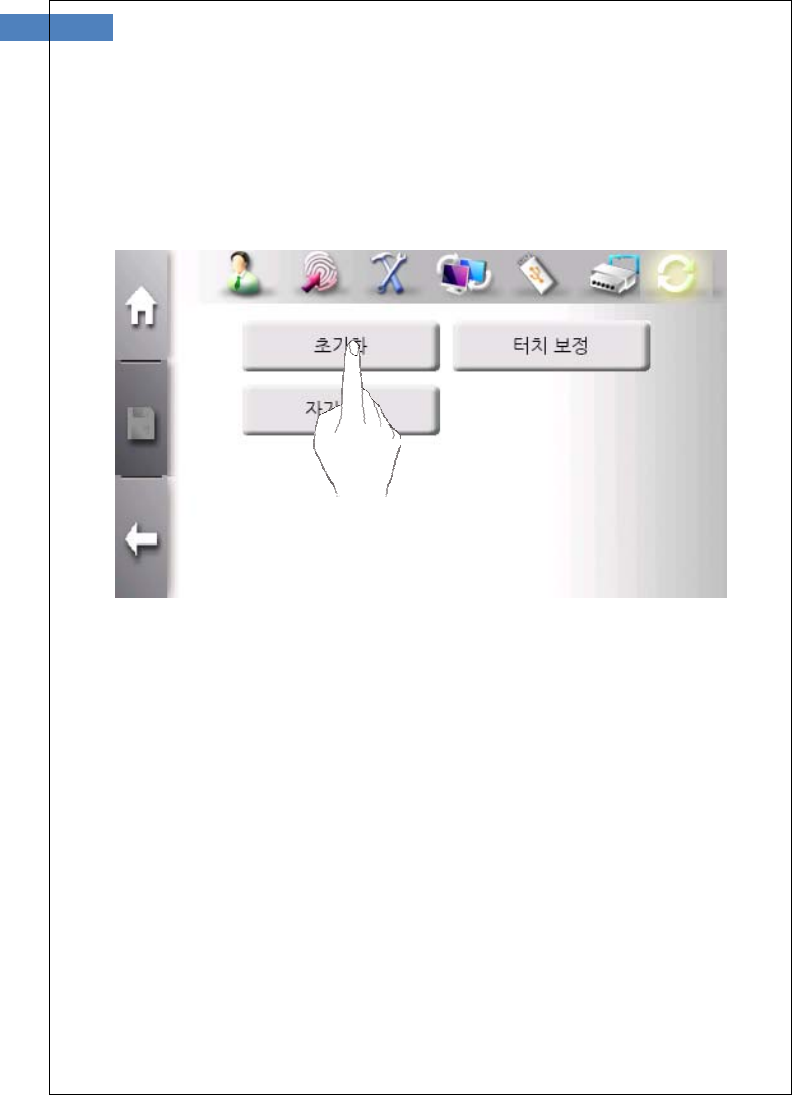
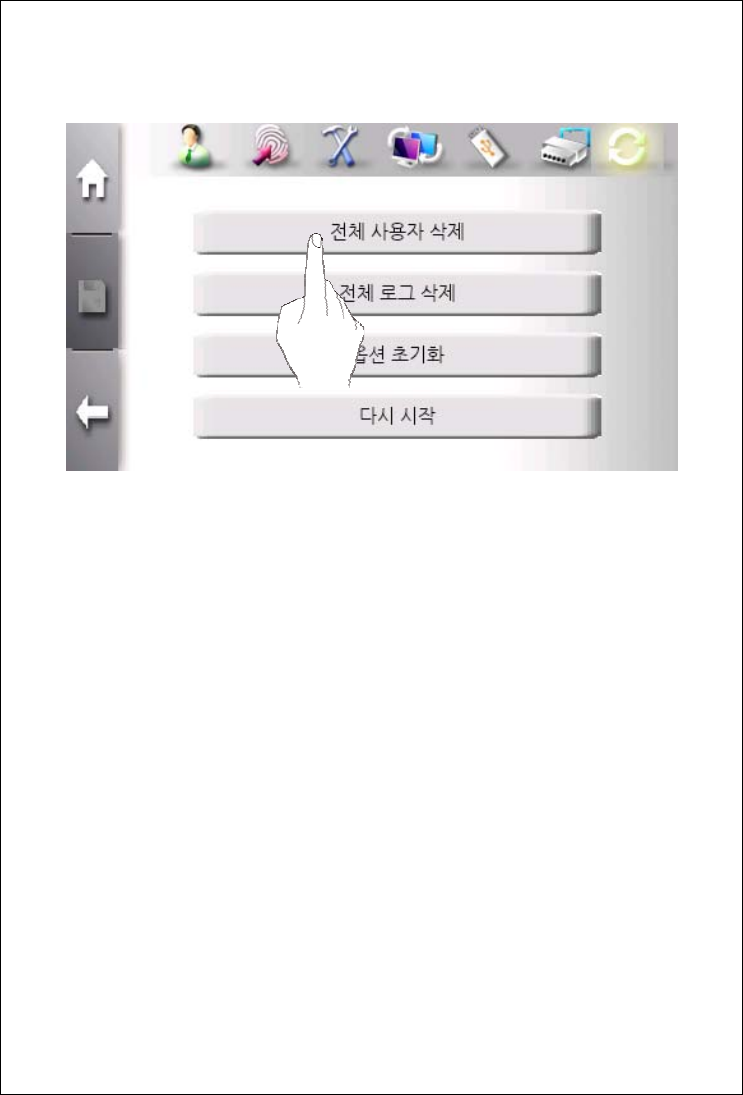
Terminal Initialization
An administrator instiallzes terminal to factory-setup and calibrates
touch-panel.
85
The sub menu consists of Initialization, Calribration and
Self-Diagnosis.
Initialization Menu
The “Delete All Users” button is used to delete all users.
The “Delete All Logs” button is used to delete all logs.
The “Option Initializatoin” button is used to set option to default
value.
The “Reset” button is used to reboot terminal.
87
Self-Diagnosis Menu
In this menu, terminal tests internal parts such as sensor, camera,
RTC, network, and DB validity.
The diagnosis is started by clicking “Start Self Test” button.
Accordign to the result, “OK” or “Fail” is marked for each list.

Calibration Menu
In this menu, the sensitivity and position of touch-panel is adjusted.
Carefully press the “+” mark and keep holding for a while.
After the “+” mark moves, repeat press and hold.
After completing calibaration, touch the screen once and save the
calibration data. If no action is taken for 30 seconds, the calibration
will be cancelled and the previous setting will be restored.
For touch the screen correctly, please use a delicate tool such as
styplus pen.

89
Chapter 3 Appendix
Troubleshooting
Specification

Troubleshooting
<If the Touch function does not work properly>
1. Check if there is any dust on the touch sensor, and clean the
sensor with soft towel or paper.
2. If the area of the finger touching the screen is large,
sensitivity may drop. Use your fingertip when touching the
screen.
3. Scratches or damage to the touch sensor may result in
malfunctioning. Check for scratches or damage to the touch
screen.
4. Adjust the sensitivity of the touch screen by selecting
“Initialization” Æ “Calibration”.
The device is designed to respond when your finger is removed from
the touch screen. If the position where the finger was placed is
different from the position where the finger was removed, the touch
function may not work properly
<If fingerprint authentication takes too long>
1. If the terminal uses 1:N authentication in network mode,
server overload may occur, resulting in slow authentication
and recognition. In this case, a dedicated server should be
used.
2. Check if the finger and the sensor are clean. Clean the finger
and the sensor. If the user’s finger is hurt, the user must
register another fingerprint.
3. If the fingerprint is not clean, lower the security level of the
user and use the 1:1 authentication method.
Input the user’s ID in 1:1 mode and check if the user exists.

91
<If fingerprint is not registered>
If the finger is too dry or humid, fingerprint image quality may be
poor and may not register. Dry or moisturize the finger before
registering the fingerprint.

Specification
Item Description
LCD 4.3” Touch Screen TFT-LCD
High Color(16Bit), 480(H) x 272(W)
CPU 667MHz 32Bit RISC
Memory 256MB RAM, 256MB Nand Flash
RF
Characteristic
125KHz, 500uV/n @ Less than 3m
Sensor NITGEN OPP06 Optic sensor
500DPI(LFD, Auto-On)
Authenticaition
Speed
1:1 Verificaitoin: less than 0.5 second
1:N Identification: less than 1 second
in 4000 templats
FAR/FRR 0.001% /0.1%
Capacity 100,000 templates or
100,000 users(PW, RF)
Communication TCP/IP, WIFI, Wiegand
Dimension 167.4(W) x 146.5(L) x 67(H) mm
Adaptor Power Input : AC 100V ~ 240V, 50/60 Hz
Output: DC 12V, 3A
Door Connection Upto two doors (DeadBolt, Electro Magnetic-lock,
Elecric Strike, Auto door Fire Alarm)
Temperature/
Humidity
-20 ~ 60℃

93
etc Voice announcement, USB Port, Warning/Alarm
WARNING
This is a class A product. In a domestic environment this product may cause radio
interference in Which case the user may be required to take adequate measures.
INFORMATION TO THE USER (15.105(a))
For Class A digital device
INFORMATION TO THE USER
This equipment has been tested and found to comply with the
limits for a Class A digital device, pursuant to part 15 of the
FCC Rules. These limits are designed to provide reasonable
protection against harmful interference when the equipment is
operated in a commercial environment. This equipment
generates, uses, and can radiate radio frequency energy and,
if not installed and used in accordance with the instruction
manual, may cause harmful interference to radio
communications. Operation of this equipment in a residential
area is likely to cause harmful interference in which case the
user will be required to correct the interference at his own
expense.
WARNING(Part 15.21)
Any changes or modifications not expressly approved by the
manufacturer could void the user’s authority to operate the
equipment.