NT ware Systemprogrammierung MICROMIND1 USB to Ethernet Bridge User Manual microMIND Installation Configuration
NT-ware Systemprogrammierung GmbH USB to Ethernet Bridge microMIND Installation Configuration
Contents
- 1. Users Manual
- 2. user manual
Users Manual

microMIND
Installation Guide


microMIND
All rights reserved. No parts of this work may be reproduced in any form or by any means - graphic, electronic,
or mechanical, including photocopying, recording, taping, or information storage and retrieval systems - without
the written permission of the publisher.
Company and product names mentioned herein are registered or unregistered trademarks of their respective
companies. Mention of third-party products is for information purposes only and constitutes neither an
endorsement nor a recommendation. NT-ware assumes no responsibility with regard to the performance or use
of these products. Also, NT-ware makes no claim to these trademarks. Any use of trademarks, logo, service
marks, trade names, and product names is prohibited without the written permission of the respective owners.
adlib Software of Adlib Software
Adobe®, Adobe® Reader, Acrobat®, Distiller®, and PostScript® of Adobe Systems Incorporated
Therefore of Therefore TM
Apple®, the Apple® logo, Mac®, Mac OS®, and Macintosh® of Apple Inc.
CANON, iR, imageRUNNER ADVANCE, MEAP, CPCA, AMS, iWAMS, iSend, of Canon Inc.
Crystal Reports of Business Objects SA, as of July 1, 2008: BusinessObjects of SAP
eCopy™, eCopy ShareScan®, and eCopy ScanStation® of eCopy Inc.
PAS™ of Equitrac Corporation
Hewlett Packard, HP, LaserJet, and PCL of Hewlett-Packard Company
Microsoft®, Windows®, Windows Vista®, Internet Explorer®, Internet Information Server, Microsoft® Word,
Microsoft® Excel, SQL Server® of Microsoft Corporation
Novell®, Novell eDirectory® of Novell Inc.
PosterJet of Eisfeld Datentechnik GmbH & Co. KG
UNIX® of The Open Group
uniFLOW Output Manager®, MIND®, and MiCard® are registered trademarks of NT-ware
Systemprogrammierung GmbH
All other trademarks, trade names, product names, service marks are property of their respective owners and
are hereby acknowledged.
While every precaution has been taken in the preparation of this document, NT-ware assumes no responsibility
for errors or omissions, or for damages resulting from the use of information contained in this document or from
the use of programs and source code that may accompany it. In no event shall NT-ware be liable for any loss of
profit or any other commercial damage caused or alleged to have been caused directly or indirectly by this
document.
In addition, this manual provides links to the sites of affiliated or independent companies and certain other
businesses. NT-ware is not responsible for examining or evaluating, and NT-ware does not warrant the offerings
of, any of these businesses or individuals or the content of their Web sites. NT-ware does not assume any
responsibility or liability for the actions, product, and content of all these and any other third parties. You should
carefully review their privacy statements and other conditions of use.
Note : If not expressly stated otherwise the term iR refers to all iR in general - including imageRUNNER
ADVANCE.
NT-ware Systemprogrammierung GmbH, Niedersachsenstr. 6, 49186 Bad Iburg, Germany
Printed: 16 August 2010 in Bad Iburg (Germany)
Disclaimer
Installation Guide

microMIND Installation & Configuration
Publisher
Technical Editors
NT-ware Systemprogrammierung GmbH
Marja Pals
Lydia Abghay
Production
NT-ware Systemprogrammierung GmbH
Team Coordinator
Claudia Kleinekemper
Elke Witt
Thomas Lemmer
Publisher
NT-ware Systemprogrammierung GmbH
Technical Authors
Thomas Lemmer
Production
NT-ware Systemprogrammierung GmbH
Symbols used in this manual:
Note
Important
Note
Online link
Printer Wizard
Settings
Advanced
Configuration
Advanced
Printer
Configuration

I
Table of Contents
Foreword 0
1Document Versioning Information 2
2microMIND 4
42.1 Introduction
62.2 Scope of supply
62.3 Technical Specifications
72.4 FCC and IC Compliance Note
72.5 Installation
82.6 LED Status
92.7 Configuration
......................................................................................................................................................... 9
2.7.1 Configurable parameters
102.8 Firmware update

II

Document Versioning Information 1

2
microMIND - Installation Guide
Version:
1.0
Date:
16 August 2010
First Draw-up Date:
16.08.2010
Author:
Thomas Lemmer
Revision history:
Version:
Revision date:
Reviewer:
Final Review:
1.0
16.08.2010
Holger
Bauszus, Karl
Vieth
Holger Bauszus
Technologies concerned:
microMIND
File name:
microMIND_Installation_&_Configuration_V1-0.PDF
Short Summary:
This manual describes the features, the installation, and the configuration of the microMIND
in detail.
microMIND is a registered trademark of NT-ware Systemprogrammierung GmbH.

microMIND 2
4
microMIND - Installation Guide
2.1 Introduction
The microMIND provides the possibility to add a MiCard (V2) reader as a Secure Print
solution for any printer. Thus allowing you to turn your normal office printer into a cost
effective secure print solution. No matter if this printer is a USB, a network printer or a
printer with a different connection. The microMIND supports both, MiCard V1 (deprecated
former version of the MiCard) and MiCard V2 readers.
The microMIND is designed to add the Secure Print feature to single function printers, not
only limited to Canon devices. Each device from each vendor is supported. It doesn't
matter if your printer provides an Ethernet TCP/IP network connection, WLAN connection,
USB connection etc. Thus, NT-ware provides an easy and cost effective solution to include
almost all printers makes and install them in uniFLOW as a secure printer.
However, an Ethernet TCP/IP network connection is required for the microMIND. The
microMIND has a build in network switch, allowing it to connect the printer to the network
through the microMIND. This can be required for network printers. Note that the microMIND
must not be attached to the printer. It only transfers the ID data, read from the users ID card,
to the uniFLOW Server and thus tells the uniFLOW Server to release the print jobs for this
user.
The microMIND is designed to support Secure Printing. As Secure Printing
always requires a uniFLOW Server to be present, Emergency Access is not
possible with the microMIND. This is not a specific limitation of the microMIND
itself, but should be mentioned here.
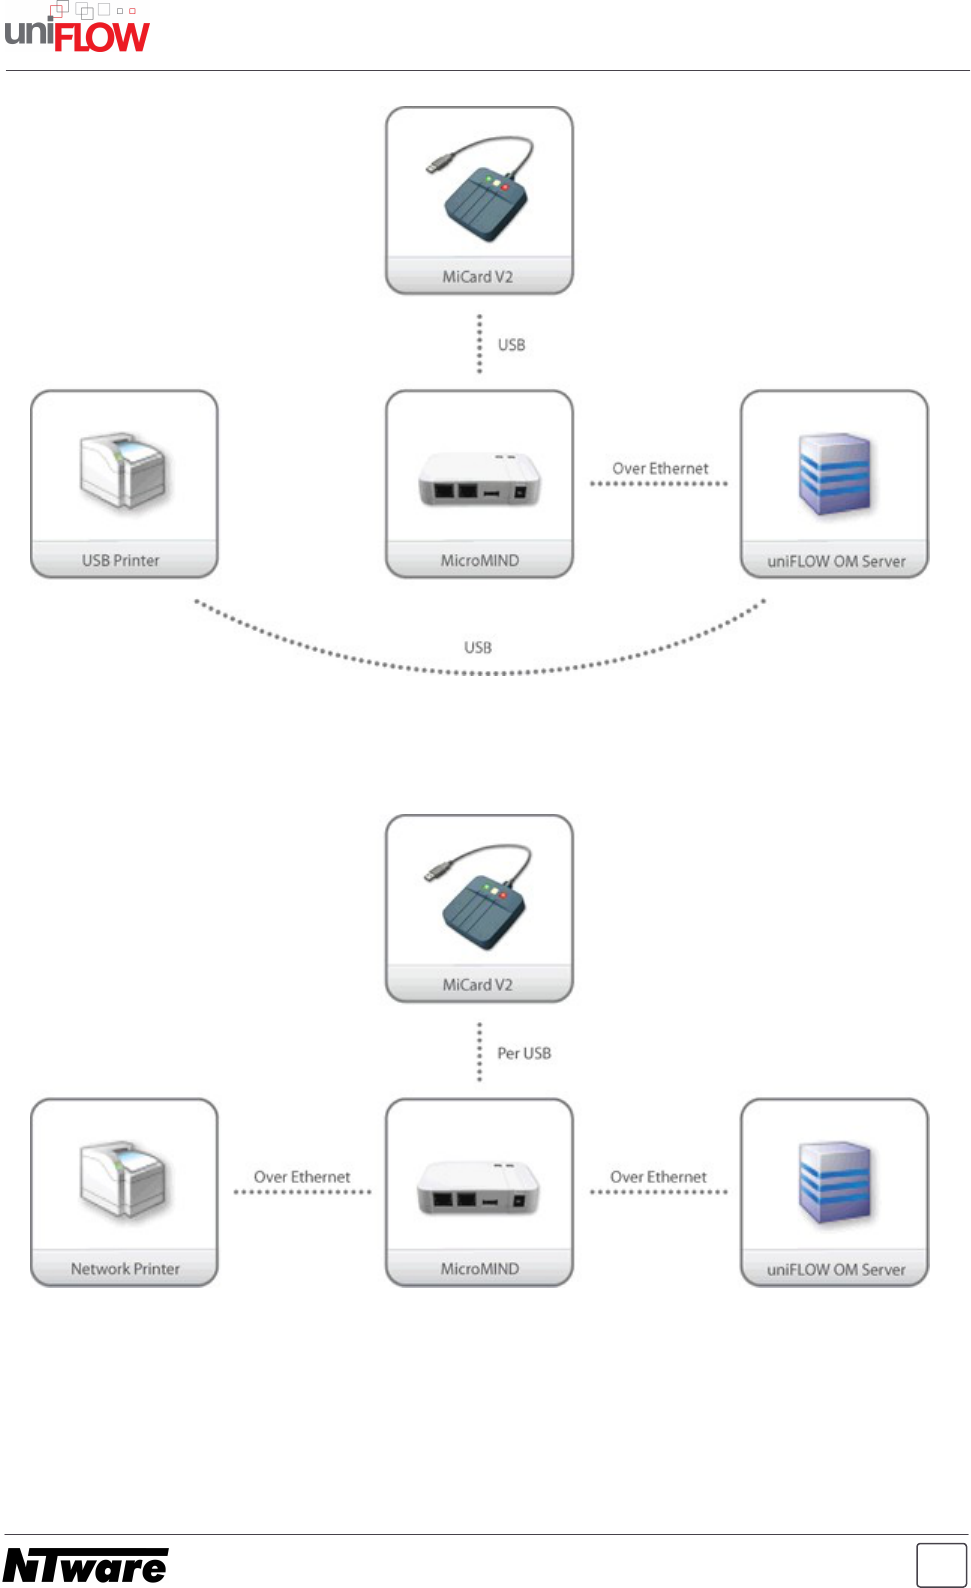
The following graphics outline how the microMIND is implemented in the network
environment. The microMIND also offers two Ethernet ports, allowing both the microMIND
and a network printer to connect to the companies network. Thus no additional network
port or switch port is required. The first graphic shows a USB printer connected to the
uniFLOW Server. The second graphic shows a normal network printer using the build in
network switch.
5
microMIND - Installation Guide
microMIND attached to a USB printer
microMIND attached to a network printer
6
microMIND - Installation Guide
2.2 Scope of supply
The microMIND package includes
the microMIND device
a short patch cable to connect the device to a printer
Power supply (if no PoE microMIND)
a Quick Installation Guide
2.3 Technical Specifications
Power Supply:
The microMIND is available in two different versions. One with
PoE (Power over Ethernet) and one without. If you have a
microMIND which doesn't support PoE or if your network switch
doesn't support PoE, you have to use the respective power
supply. If you have purchased the device without PoE support,
the power supply is delivered with the device.
Rated Voltage:
12 V LPS
Ethernet:
2x RJ-45 Ethernet connection with a build in 10/100MBit switch
USB:
USB Type A connection with USB 1.1 (Full-Speed) to connect a
MiCard (V2) reader
Ambient
temperature:
0 … +40 °C (32 … +104 °F)
Printer:
Any printer with or without a respective network interface can be
connected to the uniFLOW Server. Printers without network
connections, such as USB or LPT connections, can also be
"virtually" attached to the microMIND via the uniFLOW Server.
Supported Readers:
MiCard (V1) and MiCard V2
uniFLOW:
uniFLOW and/or RPS V5.x or higher
Status LEDs:
The microMIND is equipped with colored status LEDs .
Note that the MiCard (V2) readers are the only readers supported by the
microMIND. Do not attach different readers or USB devices to the microMIND.
8
7
microMIND - Installation Guide
Important Note:
Changes and/or modifications of the microMIND not approved by NT-ware
Systemprogrammierung GmbH will make void the user’s authority to operate
the microMIND.
2.4 FCC and IC Compliance Note
This equipment has been tested and found to comply with the limits for a Class B digital
device, pursuant to part 15 of the FCC Rules. These limits are designed to provide
reasonable protection against harmful interference in a residential installation. This
equipment generates, uses and can radiate radio frequency energy and, if not installed
and used in accordance with the instructions, may cause harmful interference to radio
communications. However, there is no guarantee that interference will not occur in a
particular installation. If this equipment does cause harmful interference to radio or
television reception, which can be determined by turning the equipment off and on, the user
is encouraged to try to correct the interference by one or more of the following measures:
Reorient or relocate the receiving antenna.
Increase the separation between the equipment and receiver.
Connect the equipment to an outlet on a circuit different from that to which the receiver is
connected.
Consult the dealer or an experienced radio/TV technician for help.
This Class B digital apparatus complies with Canadian ICES-003.
Cet appareil numérique de la classe B est conforme à la norme NMB-003 du Canada.
2.5 Installation
Required components:
microMIND
Power supply for the microMIND if no PoE support
Printer
Ethernet patch cable (delivered with the microMIND)
MiCard (V2)
USB cable (delivered with the MiCard (V2)
Installation
1. Switch off the desired printer.
8
microMIND - Installation Guide
2. If it is a network printer, disconnect the device from the network.
3. If it is a network printer, plug-in the printers network cable in one of the RJ45 input jacks.
4. Attach the MiCard (V2) reader to the microMIND's USB port.
5. Attach the microMIND reader to the network.
6. Plug-in the power supply of the microMIND if required. This is necessary if you have no
PoE microMIND or if you have a PoE microMIND but your network doesn't support PoE.
7. The microMIND reader boots up.
8. Switch on the printer.
The microMIND and MiCard (V2) reader are now ready for more advanced configurations.
For the microMIND configuration, see chapter Configuration . For the MiCard (V2)
reader, refer to the respective MiCard (V2) manual and the uniFLOW manual.
2.6 LED Status
The microMIND is equipped with two status LEDs. The tables below show the status
information given by the respective LED.
Power LED:
Status/Color
Status description
Off
No power supplied or boot loader phase (see also chapter Firmware
update ).
Green
Device is powered with Power over Ethernet (PoE).
Orange
Device is powered with an external power supply.
Status LED:
Status/Color
Status description
Off
The microMIND did not boot. It is most likely defective.
Green
A MiCard (V2) card reader is connected and has been identified. The
microMIND is ready to receive data from the MiCard (V2).
Green flashing
No USB card reader is connected. This status will only be displayed if
the microMIND is connected to the network and to a uniFLOW Server.
Green flashing
(fast)
If a new firmware has been loaded successfully during the boot loader
phase, the green LED is flashing fast (see also chapter Firmware
update ).
9
10
10

9
microMIND - Installation Guide
Status/Color
Status description
Orange
A card has been detected by the MiCard (V2) reader and the uniFLOW
server has been informed about it. This status is shown for approx. 2
seconds. Afterwards the LED turns green again. It also lights up in
orange during the boot loader phase.
Orange flashing
A not supported USB card reader has been connected. Note that only
MiCard (V2) readers are supported by the microMIND.
Red
The microMIND has an IP address but is not connected to a uniFLOW
Server nor to an RPS, thus it is inoperable.
Red Flashing
The microMIND has no IP address and is trying to acquire an IP
address, thus it is inoperable.
RJ45 LEDs:
LEDs
Status description
Green
A link to a network is established.
Green flashing
Link established and data is transmitting.
Yellow ON
Network speed is 100 Mbit/s
Yellow OFF
Network speed is 10 Mbit/s
2.7 Configuration
The microMIND works without any additional configuration if your network has a DHCP
server configured to provide an IP address for the microMIND. However, some “advanced”
options are available which are explained below.
2.7.1 Configurable parameters
IP Address
The IP configuration of the microMIND is performed directly via uniFLOW.
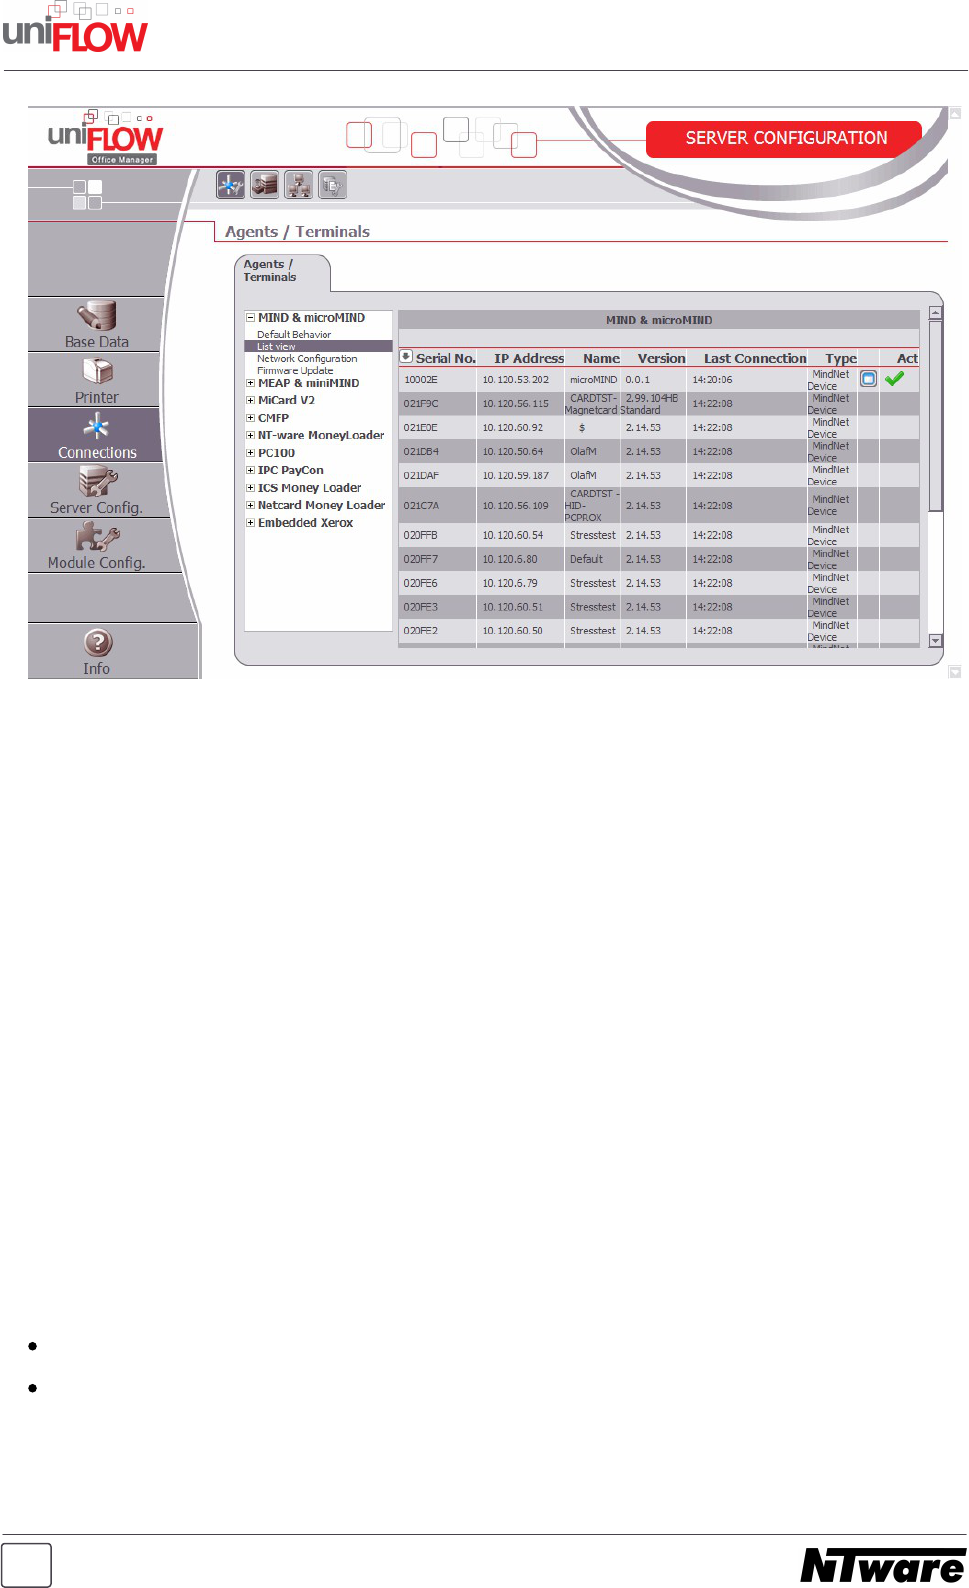
To configure a microMINDs IP address, open the uniFLOW Server Configuration, choose
the main menu Connections / Agents/Terminals / MIND & microMIND and select the
List view page.
In this screen you can see the status information of the attached MINDs / microMINDs. The
column Type shows you if it is a MIND or a microMIND.
10
microMIND - Installation Guide
The microMINDs IP configuration can be found by selecting a microMIND via mouse click
on the IP address. You’ll find the serial number of the respective microMIND on a sticker on
the back of the microMIND. A browser screen will open to configure the microMINDs IP
address.
By default the microMIND is set to DHCP, meaning that the microMIND receives it's
configuration from the companies DHCP server if available.
If there is no DHCP server available or if a DHCP server doesn't send any IP configuration
to the microMIND, the microMIND will appear on the MIND & microMIND / List view
page as well. This is because the microMINDs vendor MAC address portion is known to
the uniFLOW Server.
After all settings have been made, confirm the settings by clicking on Save Settings.
The rebooting process of the microMIND takes a few seconds.
2.8 Firmware update
The microMINDs firmware can be updated with a normal USB stick.
Requirements:
USB stick formatted with FAT and a sector size of 512 bytes.
New firmware with the file name MMAPP (note that the file name has no extension).

11
microMIND - Installation Guide
Update process:
Format your USB stick according to the requirements listed above.
Copy the MMAPP file onto the USB stick.
Detach your microMIND from the power supply. If PoE is used, detach the network
connection.
Attach the USB stick to the microMIND.
Attach the power supply. If PoE is used, attach the network connection.
Update proceedure:
LED Status:
1. The device starts with the boot loader phase.
The microMIND checks if there is a USB stick with a
valid firmware connected to the device.
Power LED: off
Status LED: orange
2. If there is no valid firmware found, the device starts
normally (step 3. and 4. are skipped)
3. If there is a valid firmware found, it gets loaded.
4. Once the firmware has been successfully and completely
loaded, the Status LED is flashing green.
Power LED: off
Status LED: green flashing
5. Afterwards the microMIND starts its normal application.

©2010 MiCard is a registered trademark of NT-ware
Sy stemprogrammierung GmbH