NVIDIA P1988 Tablet User Manual P1988 User manual 3x
NVIDIA Corporation Tablet P1988 User manual 3x
NVIDIA >
User Manual
1
r
Tablet
User Guide
2
Contents
About Tegra NOTE 7 LTE ....................................................................................................................................... 4
What’s in the Box ............................................................................................................................................... 5
Buttons and Connectors ..................................................................................................................................... 6
Charging the Battery .......................................................................................................................................... 7
Inserting an SD/SIM Card .................................................................................................................................... 8
Micro SD Card ................................................................................................................................................. 8
SIM Card ......................................................................................................................................................... 8
Get Started ............................................................................................................................................................ 9
Power On ........................................................................................................................................................... 9
Do I Need a Google Account? .......................................................................................................................... 9
Let Your Fingers (or Stylus) do the Work .......................................................................................................... 10
About the NVIDIA® DirectStylus™ .................................................................................................................... 11
Home Screens ...................................................................................................................................................... 12
Favorites Icon Tray ............................................................................................................................................ 13
Navigation Icons ................................................................................................................................................ 13
Quick-Access Tray ............................................................................................................................................ 14
Notification Icons ............................................................................................................................................. 14
Status Icons ....................................................................................................................................................... 15
Organize Home Screens ................................................................................................................................... 16
Add Widget/App Icon to Home Screen .......................................................................................................... 16
Move Widget/App Icon .................................................................................................................................. 16
Making Folders .............................................................................................................................................. 17
Changing Font Size ........................................................................................................................................ 17
Select a Background Wallpaper ...................................................................................................................... 17
Customizing Sounds and Notifications ........................................................................................................... 17
Using the Keyboard ............................................................................................................................................. 18
Keyboard Layout .............................................................................................................................................. 18
Basic Keyboard Usage ................................................................................................................................... 19
Tegra NOTE 7 Software Apps ............................................................................................................................... 21
Write by Stylus labs .......................................................................................................................................... 21
Camera Awesome ............................................................................................................................................ 22
Focus and Exposer ........................................................................................................................................ 22
Camera Icons ................................................................................................................................................ 23
Focus, Exposure, Zoom, and Tap to Track Gestures ...................................................................................... 24
Video Capture and Slow Motion .................................................................................................................... 25
NVIDIA DirectStylus™ Launcher ...................................................................................................................... 25
Tegra NOTE 7 Draw .......................................................................................................................................... 26
NVIDIA Lasso Capture Tool .............................................................................................................................. 26
NVIDIA TegraZone™ ........................................................................................................................................ 26
Settings ............................................................................................................................................................... 29
Wireless & Networks ........................................................................................................................................ 29
Wi-Fi ............................................................................................................................................................. 29
Miracast ........................................................................................................................................................ 29
Bluetooth ...................................................................................................................................................... 30
Data Usage ................................................................................................................................................... 30
Airplane Mode ............................................................................................................................................... 31
Default SMS App ............................................................................................................................................ 31
Tethering & Portable Hotspot ........................................................................................................................ 31

3
Portable Wi-Fi Hotspot .................................................................................................................................. 31
Set-Up Wi-Fi Hotspot ..................................................................................................................................... 31
Bluetooth Tethering ....................................................................................................................................... 31
VPN .............................................................................................................................................................. 32
Mobile Networks ........................................................................................................................................... 32
Mobile Network Settings ............................................................................................................................... 33
Device .............................................................................................................................................................. 34
Controller ...................................................................................................................................................... 34
Sound ............................................................................................................................................................35
Display ...........................................................................................................................................................35
NVIDIA DirectStylus™................................................................................................................................... 36
HDMI ............................................................................................................................................................ 36
Storage .......................................................................................................................................................... 37
Battery ........................................................................................................................................................... 37
Power Saving ................................................................................................................................................ 38
Apps ............................................................................................................................................................. 38
Users ............................................................................................................................................................. 39
Personal ........................................................................................................................................................... 40
Location Access ............................................................................................................................................ 40
Security ......................................................................................................................................................... 40
Language and Input ...................................................................................................................................... 41
Backup and Reset .......................................................................................................................................... 42
Accounts .......................................................................................................................................................... 43
Add an Account ............................................................................................................................................. 43
Remove an Account ...................................................................................................................................... 43
System ............................................................................................................................................................. 43
How To… ............................................................................................................................................................. 44
Bookmarks ....................................................................................................................................................... 44
Sync Bookmarks ........................................................................................................................................... 44
How to Create an All-in-One Calendar .............................................................................................................. 45
How to Email .................................................................................................................................................... 45
Reading Incoming Messages ......................................................................................................................... 45
Sending Email ............................................................................................................................................... 45
Setting General Options ................................................................................................................................ 45
Setting Personal Options .............................................................................................................................. 46
How to Use the Clock ....................................................................................................................................... 46
Compliance ...........................................................................................................Error! Bookmark not defined.47
UNITED STATES ................................................. Error! Bookmark not defined.Error! Bookmark not defined..
Health and Safety ................................................................................................................................................ 51
Important Safety Information............................................................................................................................ 51
Symbols on Equipment .................................................................................................................................... 52
General Precautions ......................................................................................................................................... 52

4
About Tegra NOTE 7 LTE
Congratulations on your new Tegra NOTE™ 7 tablet, powered with the leading-edge NVIDIA® Tegra® 4 quad-
core applications processor. The Tegra NOTE 7 LTE also has a built-in modem with ultra-fast connectivity
anywhere with download speeds up to 100 Mbps and upload speeds up to 50 Mbps. Your tablet is loaded with the
Google® Android™ operating system and functions as any standard Android device. You can use your Tegra
NOTE 7 to surf the web, video chat with friends, take pictures, play games, make phone calls through any third-
party app, and much more. The new Tegra NOTE 7 LTE provides a slot for your SIM card, which allows you to take
your connected experience anywhere.
Your Tegra NOTE 7 LTE comes with the standard Android apps and with the following preloaded software:
Adobe® Reader®
Camera Awesome® by SmugMug®
Tegra NOTE Draw
Write by Stylus Labs®
NVIDIA DirectStylus™ Launcher
NVIDIA Lasso Capture tool
NVIDIA TegraZone™
NVIDIA Game Mapper
About Tegra NOTE 7 LTE
5
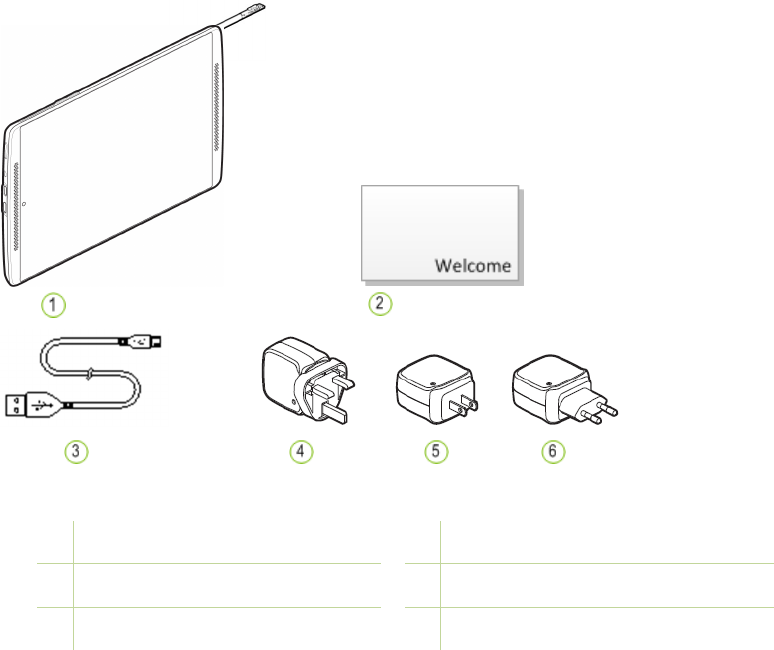
What’s in the Box
1 Tegra NOTE 7 with Stylus 4 Power Adapter – Hong Kong, UK
2 Quick Start Guide 5 Power Adapter – China, Japan, US
3 USB-to-Micro USB cable 6 Power Adapter – Europe
About Tegra NOTE 7 LTE
6
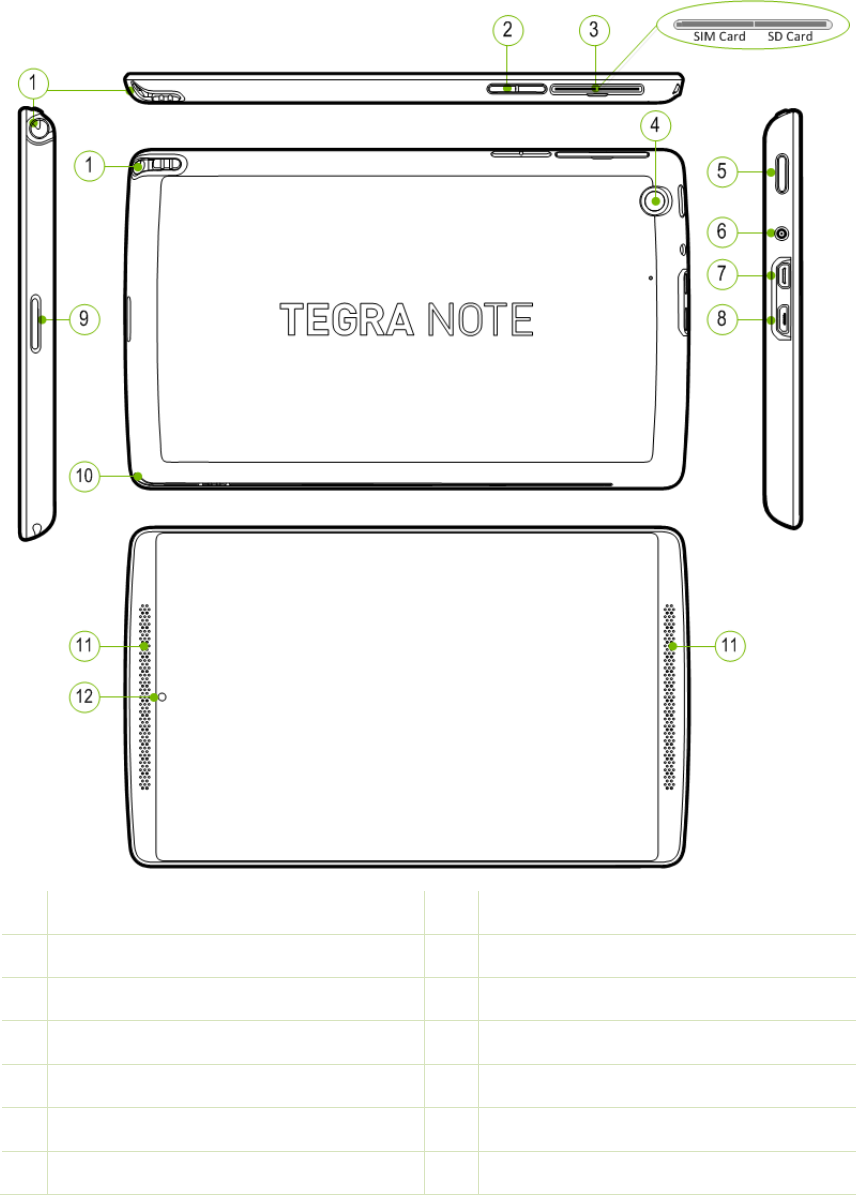
Buttons and Connectors
1 Stylus in Housing 8 Micro USB
2 Volume Up/Down 9 Base Reflux Port
3 Micro SD Card Slot 10 Cover Spine (slide out to install cover)
4 Rear Camera 11 Dual Speakers
5 Power/Sleep Button 12 Front Camera (behind glass)
6 3.5 MM Audio Port Microphone (behind speaker grill)
7 Micro HDMI
About Tegra NOTE 7 LTE
7
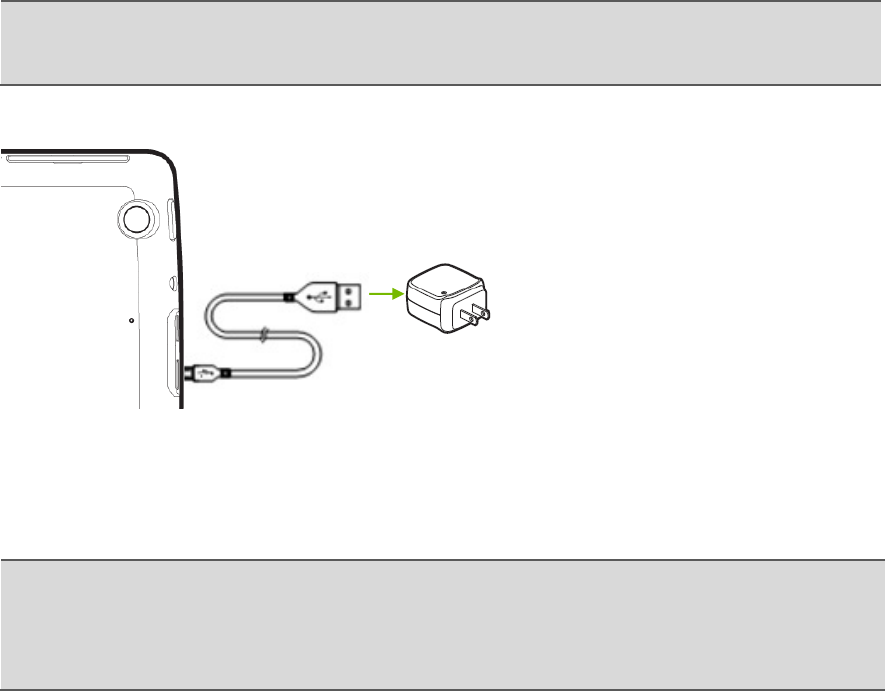
Charging the Battery
The battery in your new Tegra NOTE
™
7 is partially charged. It is recommended that you fully charge your device
as soon as possible.
To charge your Tegra NOTE 7, use the included AC adapter and the USB cable. Plug the micro USB end of the
cable into the Tegra NOTE 7 and the other standard USB end into the power adapter. Plug the power adapter into
a wall power outlet.
Note:
Use the AC Adapter and the USB cable that came with your Tegra NOTE 7. Other chargers and USB
cables may be different and could charge more slowly or not at all. Using other USB adapters may
add noise that can interfere with the touch function.
You can also charge your Tegra NOTE 7 by plugging the standard end of the USB cable into any USB connection
on your computer system. However, using the AC adapter plugged into a wall outlet will charge your Tegra NOTE
7 faster. When connected to a PC, if the tablet is on, it may consume more power than it is getting from the
charge.
Note:
It is recommended that when charging your Tegra NOTE 7, make sure the tablet is turned off
specifically when the power is low or you are charging it from a PC. Charging should take
approximately two hours. However, if the tablet is on while charging, it continues to consume power
and will extend the charging time. When the Tegra NOTE 7 is plugged into a PC, it may continue to
drain faster than it charges.
About Tegra NOTE 7 LTE
8
Inserting an SD/SIM Card
Micro SD Card
There are various types of SD cards available; Standard, Mini, and Micro. Your Tegra NOTE 7 uses a Micro SD card.
The SD card is used as extra storage space for games, photos, music, or anything else you would like to keep on
your Tegra NOTE 7. Note that most apps will not load to an SD card.
Remove the cover off of the Micro SD-card/SIM card slot.
When selecting an SD card for your tablet, note that they come in different sizes (capacity) and different classes. The
size is the amount of space on the card; for example, 16 GB or 32 GB. The class of an SD card reflects the speed. A
Class 2 SD card has a write speed of about 2MB/s, a class 4 SD card is about 4 Mb/s, and so on. For your tablet, a class
6 or higher is recommended.
SIM Card
To use your tablet with mobile network data, you must first insert and activate a SIM card. If no
card is installed, the message No SIM card displays on the tablet’s lock screen.
Tegra Note 7 LTE SIM card slot requires the Micro SIM card size. If you have regular size SIM you should exchange
it for the Micro SIM size card.
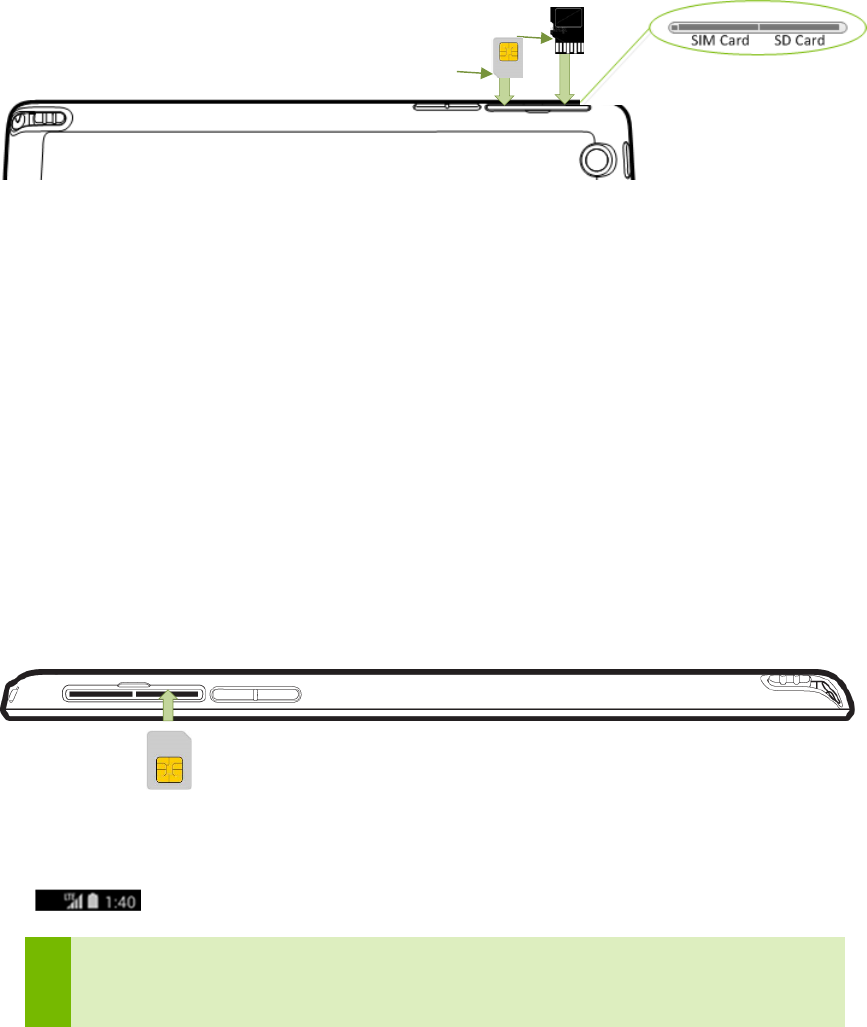
Insert SIM card
1. Hold your tablet with the screen facing down and the card slot facing you.
2. Open the cover over the slot for the SD/SIM Card.
3. Gently insert the SIM Card into the slot on the right, notch first and the metal contacts facing up.
4. You will be prompted to reset your tablet to enable the SIM.
Back of Tablet
Front of Tablet
Activate SIM card
5. Be sure that the SIM you are using is valid. SIMs that are expired will not work
6. Follow the activation instructions provided by your carrier
In most cases the tablet will get on the network right away and display signal strength on the notification bar
.
Important: It may take time for some carriers to activate your SIM card. If you feel it is taking too long,
try restarting your tablet. Call your carrier if you cannot get the SIM card to activate. Some carriers
may require special functions or require you to enter data.
When installing the SD card into the SD slot, make sure the fingers
are facing the back of the tablet.
9
Get Started
Power On
Your new Tegra NOTE 7 tablet is loaded with the Google Android operating system.
When you power on your tablet, you are going to be guided through the standard
Android setup.
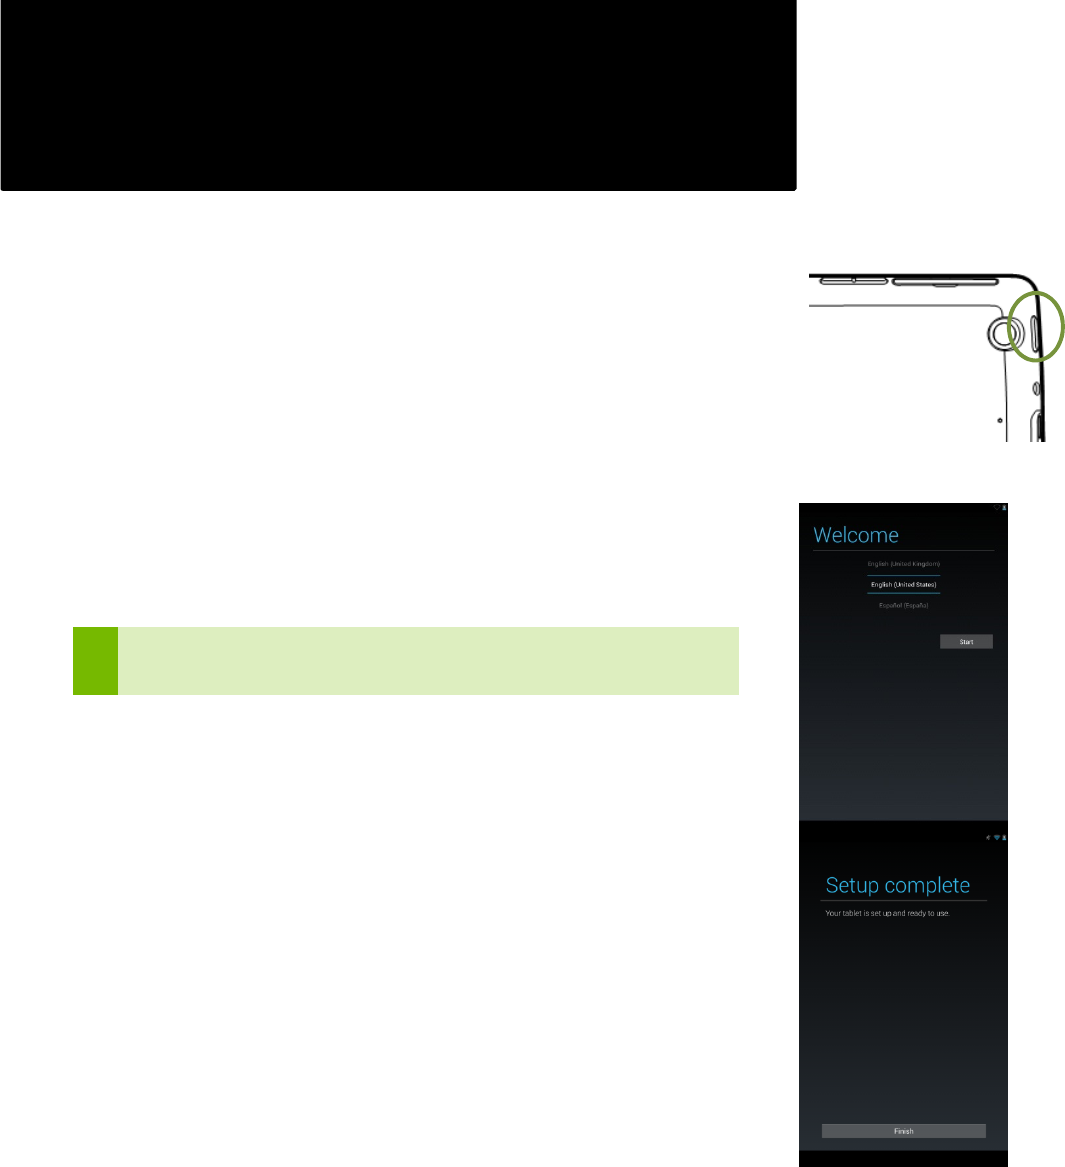
To turn on your Tegra NOTE 7, press the Power button on the right side of the tablet for
a few seconds and then release.
The first time you power on your Tegra NOTE 7, a Welcome screen displays. Select
your language and press Start.
The automated set-up takes you through a series of screens to customize your tablet.
You will be asked to set-up a Google account and configure your Wi-Fi connections.
Important: During set-up, you must have a Wi-Fi connection to complete the
process.
When you are prompted to sign-in or create a Google account, you can use an email
account for any one of the following Google accounts you may have:
Gmail
YouTube
Google Apps
Any other Google product
When you sign in with a Google account, all the email, contacts, calendar events, and
other data associated with that account are automatically synced with your tablet. If
you have multiple Google accounts, you can add the others later after you have
completed the set-up
When set-up is done, press Finish to begin enjoying your new Tegra NOTE 7.
Do I Need a Google Account?
No, you are not required to have a Google account associated with your Tegra NOTE
7. However, you do need an account if you want to use Google mobile services (like
Google Play, Google Music, Google Books, etc.) to download and manage Google
apps between devices.
Get Started
10
A Google Account does provide the ability to organize and access personal information from any computer or
mobile device that is also using your Google account. A Google Account lets you organize and access your
personal information from any computer or mobile device:
Use Google Play. Google Play brings together all your favorite content in one place: movies, TV shows, books,
music, magazines, apps, and more.
Synchronize and back up everything. Whether you draft an email, add an event to your calendar, or add a
friend’s address, your work gets backed up continuously by Google and synchronized with any computer
where you use the same Google Account.
Access from anywhere. Check your latest calendar, email, text messages, or social stream, no matter what
computer or mobile device you’re using.
Keep everything secure and available. Google works round the clock to protect your personal data from
unauthorized access and to ensure that you get it when you need it, wherever you need it.
Simplify shopping. You can connect your Google account with Google Wallet, which makes it easy to purchase
music, books, apps, and more on Google Play and other online stores.
Let Your Fingers (or Stylus) do the Work
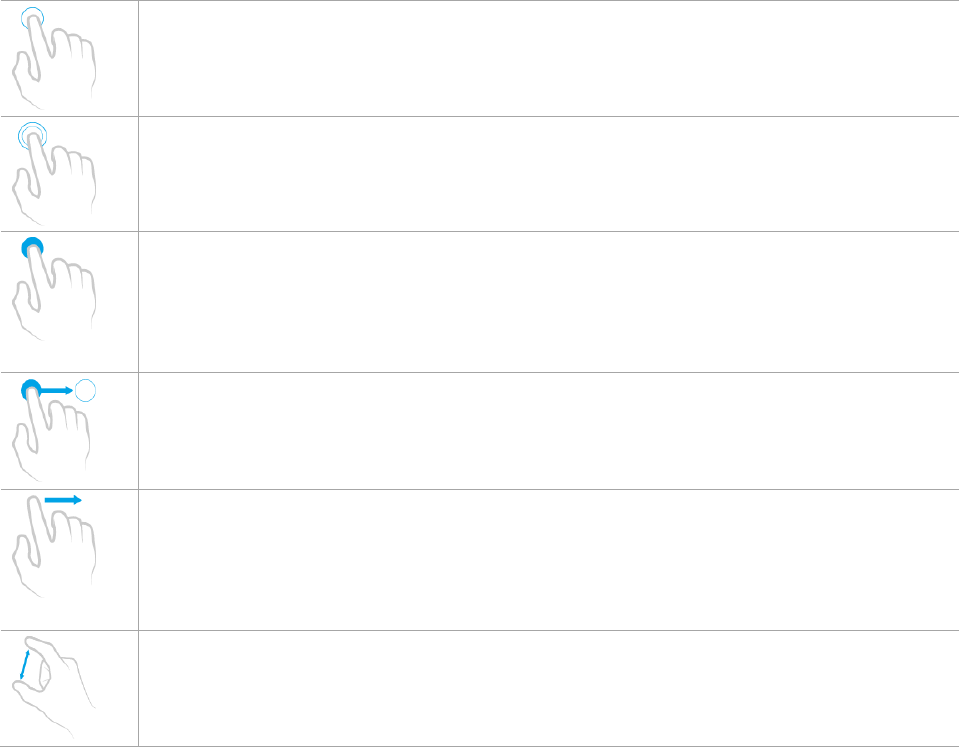
With Android, your fingers do all the work. Swipe, pinch, press, or tap—they all have a resulting action.
Touch or Tap
Most apps require just a touch to open and run. A simple tap on the app icon opens the
application. A touch in a field requiring input displays a keyboard.
Double-Tap
Tap twice quickly on a webpage, map, or other screen to zoom. An example would be to double-
tap a picture in Browser to zoom in, and double-tap again to zoom out
Touch and Hold
Pressing and holding an item on-screen can trigger different actions. An example is the
keyboard: If you touch an alphabet key, a letter is typed. If you touch and hold the key, a number
or a mark (displayed in upper right corner of key) is typed. Use touch and hold with drag to move
icons between screens
Drag
To drag, touch and hold an icon and without lifting your finger, move it to any location on a
screen. To drag it to another screen, move to the edge of the current screen in either direction to
go to the adjacent screen
Swipe or Slide
Swipe your finger across the surface of the screen, without pausing, up/down or across to move
through lists, screens, or pictures. When swiping, do not pause or hesitate or you may end up
dragging something you touched. For example, you can slide a screen left or right to view
another screen
Pinch
There are some apps such as Browser, Gallery, and Maps, that you can zoom in and out by
placing two fingers on the screen at once and pinching them together to zoom in (make it
smaller) or spreading them apart to zoom out (making it bigger).
Get Started
11
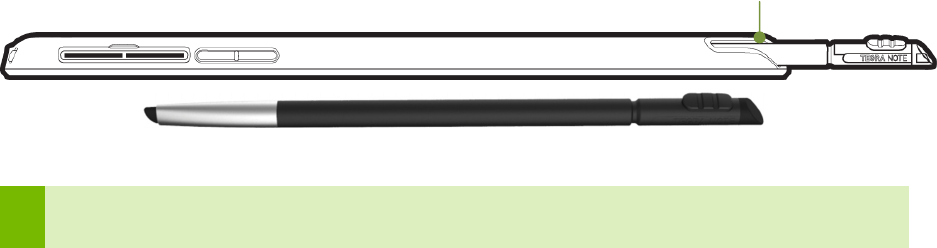
About the NVIDIA® DirectStylus™
Your Tegra NOTE 7 has a built-in stylus that launches specified apps when pulled from its Tegra NOTE 7 housing.
Wherever you can control the tablet with your finger, you can also use the stylus to tap, swipe, or draw. The
DirectStylus gives you fine point control that makes it much easier to write, draw, and activate small buttons or
browser hot spots.
The optional DirectStylus Pro accessory kit has two different tips; the chisel pen tip and the 2 mm fine point tip.
The chisel pen tip is shaped like a highlighter pen tip and can be used to easily create thin and thick lines, allowing
you to switch from writing fine lines to bold strokes all with a twist of the stylus1.
1
The application must have pressure sensitivity support in order to experience dynamically changing stroke
widths.
Stylus Housing
12
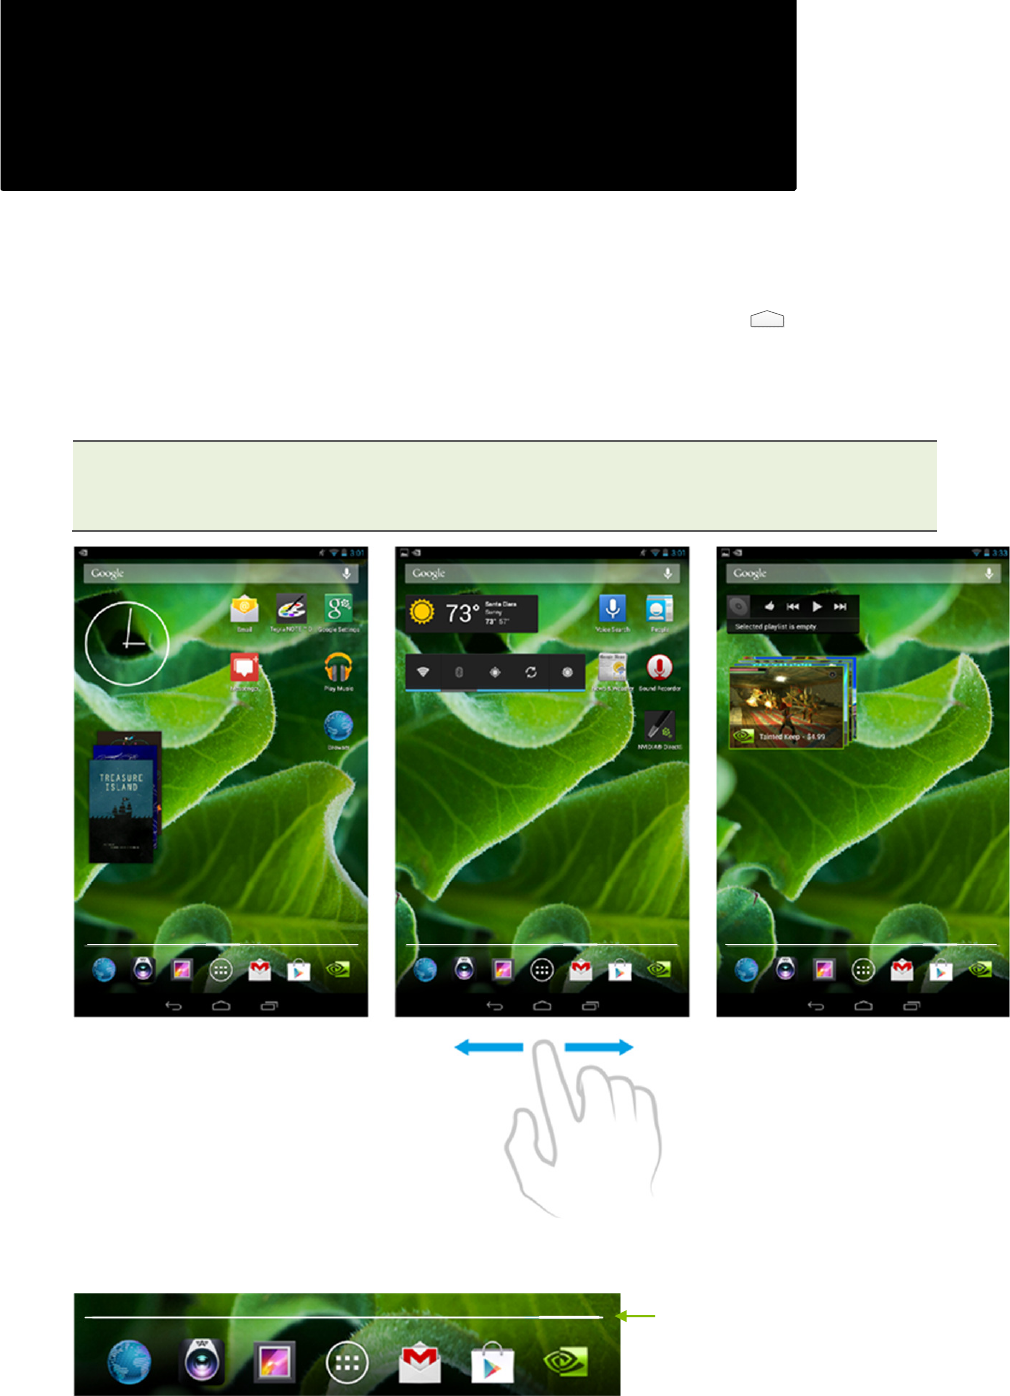
Home Screens
Your Tegra NOTE 7 supports multiple screens that can be configured with various apps and widgets. The center
screen is the default home screen that is displayed every time you press the Home icon. To move between
screens, swipe left or right.
A suggestion would be to place your most used app/widget icons on the Home page. You can then configure the
other screens for games, one for music, and so on.
The difference between an App and a Widget is that a Widget runs continuously (such as a clock, weather,
tasks, etc.) and does not take up the entire screen.
An App is an application that you start and close and while it is running, takes up the entire screen (such as
games, music, photo gallery, etc.).
Swipe left or right to see other pages
Note that the Favorites tray and the Navigation
Icons are displayed on each page.
The thickness in the white line indicates the
home page you are currently on. This will move
as you swipe through the pages. After a second
the highlight will fade away.
Home Screens
13
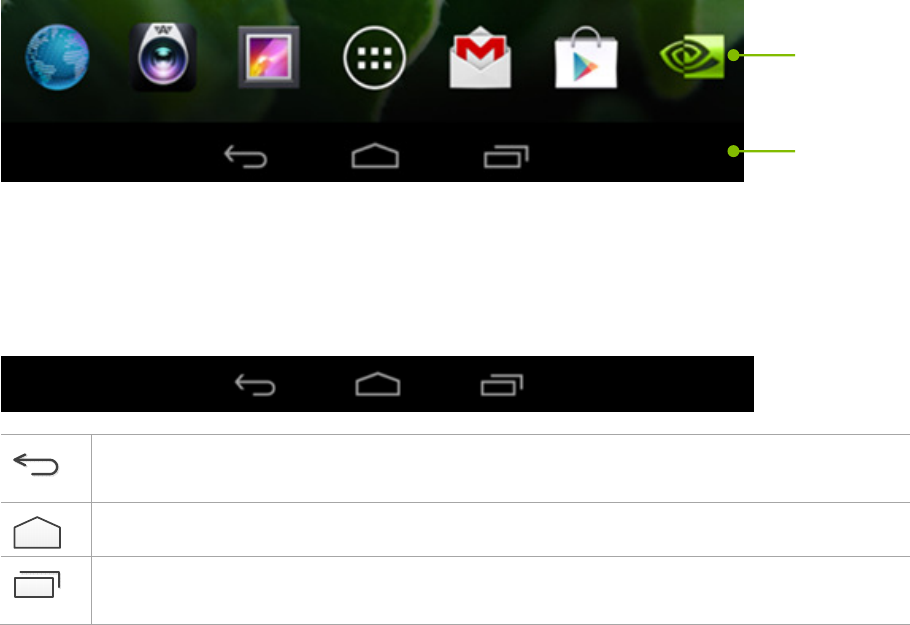
Favorites Icon Tray
At the bottom of every Home screen is an area called Favorites Tray. This area is for you to place your favorite and
most used apps or short-cut icons for faster access. To replace an icon, simply press and hold your finger on the
desired icon and move it to the Favorites Tray over an icon you wish to replace. Lift your finger and the icon is in
place.
Navigation Icons
Always displayed at the bottom of every screen are three navigational buttons:
Back: Takes you back to the previous screen you were in. With each tap of the Back icon you are
taken back through the previous screens/apps until you are at the Home screen.
Home: A tap of the Home icon takes you to the central Home screen.
Recent Apps: A tap of this icon opens a thumbnail list of recently used apps. To open one of the
apps listed, touch the thumbnail.
If you do not use these buttons for an extended length of time, they may shrink to dots or fade away. To bring
them back, touch their location.
Favorites Tray
Navigation Bar
Home Screens
14
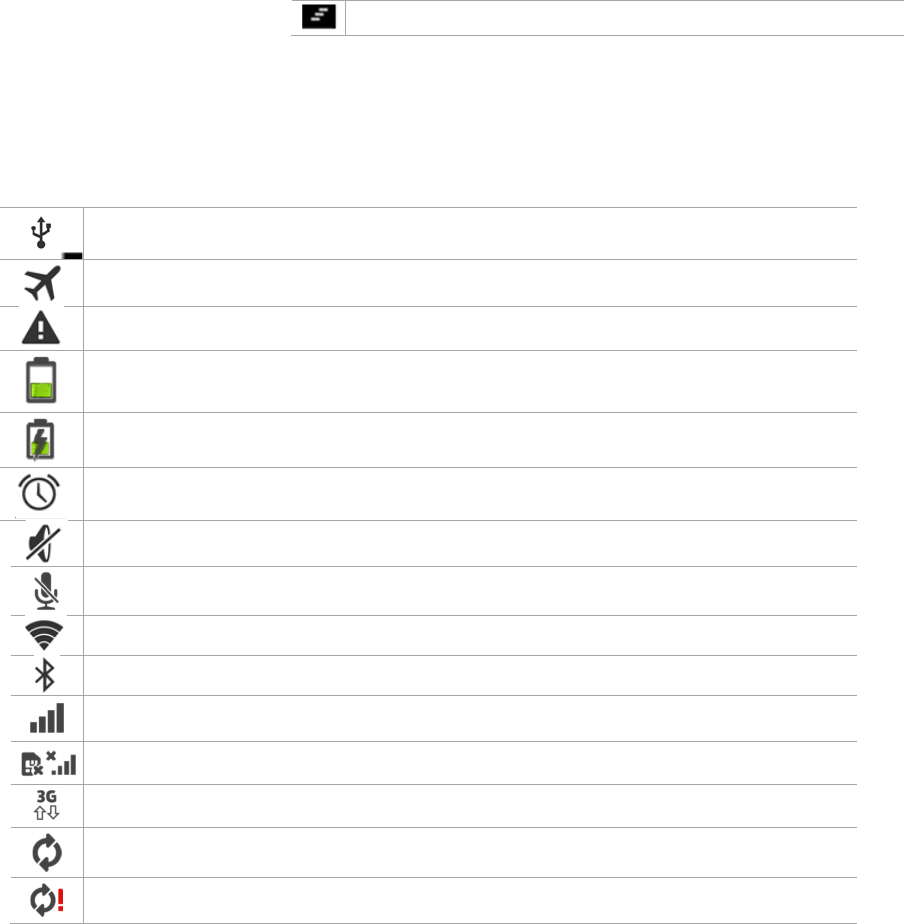
Some notifications can be expanded to show more information, such as email
previews or calendar events. The notification at the top is always expanded
when possible.
When finished with a notification, just swipe it away horizontally.
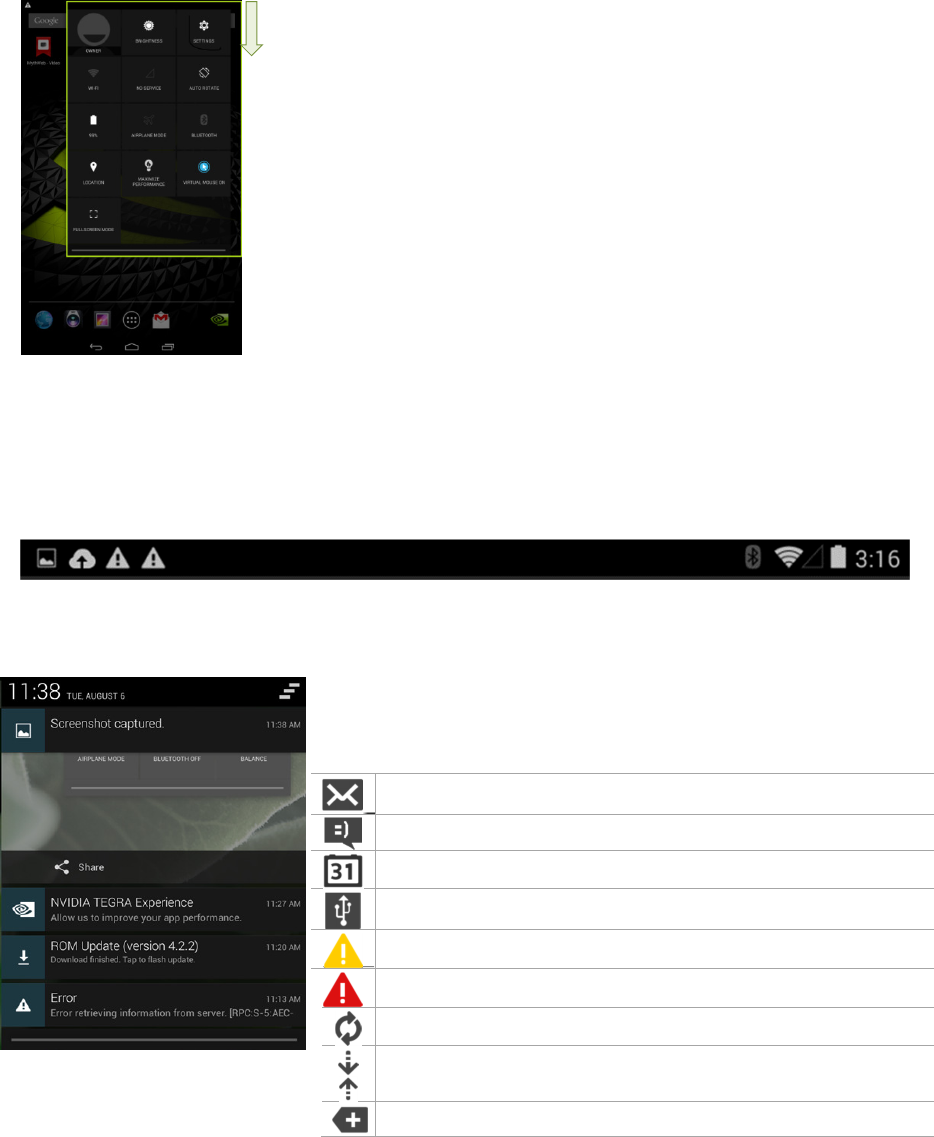
Quick-Access Tray
Swipe down from the top of the screen to display a quick-access tray with commonly used controls and settings.
This saves you from having to navigate through the
settings menus.
Notification Icons
Along the top of every screen icons are displayed to notify you that new text or email messages, calendar events,
alarms, and any ongoing downloads such as app updates or video downloads have occurred.
Notification Icons Status Icons
To view the notification shade, swipe down from the top. A shade is an informational area that swipes down and
up just like a window shade.
New Email message
New text message
Upcoming calendar event
Tegra NOTE 7 is connected to a computer via a USB cable.
Warning message
Error message
Software updates available
Upload/download data
More undisplayed notifications
Swipe down from the top of the tablet screen to
display the Quick Access Tray. The tray contains
commonly-used controls and settings.
Home Screens
15
Dismiss all notifications
Status Icons
Along the top right of each screen is the status area. Here is where you will see battery status, Wi-Fi connection
status, and Bluetooth status. The time is also displayed.
Tablet is connected to a computer
Airplane mode. Device can be used but Wi-Fi and Bluetooth are turned off.
Error occurred or caution required
Batter power status. The level of fill in the battery icon represents the percentage of battery
power.
Battery is charging
Alarm: Alarm clock is set and activated
Mute. Sound is turned off
The microphone is muted
Wi-Fi: Number of bars shown on the icon represents the strength of the Wi-Fi signal.
Bluetooth: Bluetooth is on.
Cellular bars indicate signal strength
SIM card is not installed
3G is available
Synchronization is ongoing
Problem with sign-in or synchronization
Home Screens
16
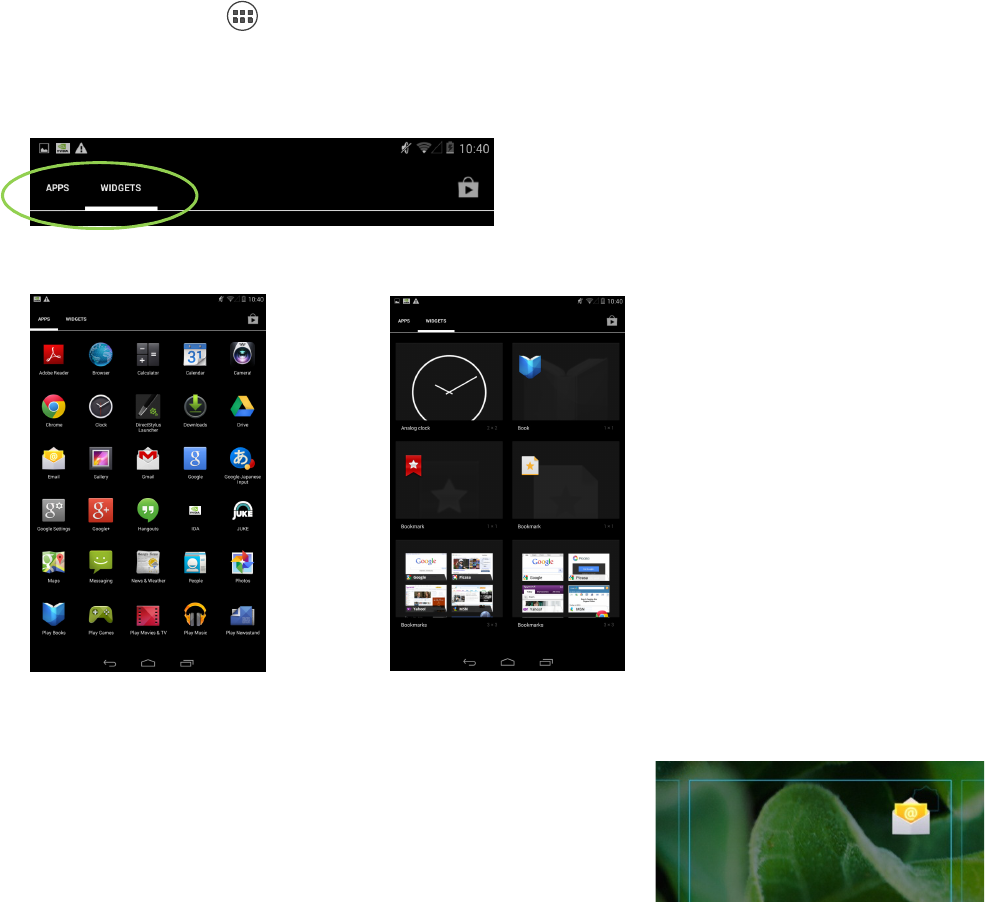
Organize Home Screens
Add Widget/App Icon to Home Screen
To add an app or widget icon to a Home screen:
1. Go to the Home screen where you want to place the widget/app.
2. Touch the All Apps icon.
3. Swipe through the widget/app to find the widget you are looking for.
4. Touch and hold the widget/app until the Home screen displays, slide
it into place, and lift your finger.
0.
Move Widget/App Icon
Use the following steps to move an app or widget icon to a different
location on a Home screen or to a different screen:
1. Touch and hold the icon.
2. Slide your finger to the new position dragging the icon.
•
To move between Home screens, slide toward the edge of the
screen.
•
To bump another icon out of the way, slide slowly into it.
3. Lift your finger and the icon drops into its new position.
0.
Touch and hold the icon and drag it
from one home screen to another. An
outline of the home screen shows as
you drag the icon.
Touch WIDGETS
for a list of
Widget icons
Touch APPS
for a list of
App icons
Home Screens
17
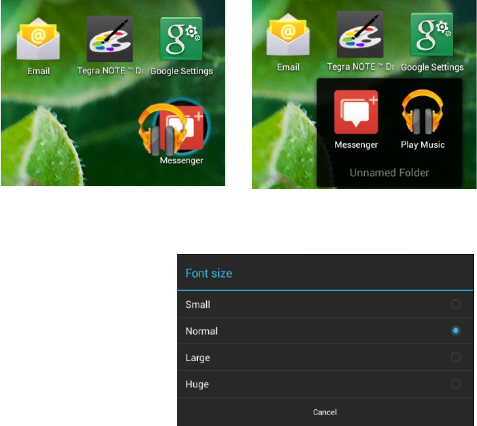
Making Folders
To combine two icons in a folder, slide one over the
other.
To rename a folder, touch its name.
The keyboard displays for you to type a new name
To open a folder, touch it.
To add icons to a folder, drag them to the folder and
let go.
Changing Font Size
To change the font size that displays on your tablet, go to:
SettingsDeviceDisplayFont Size
Select a Background Wallpaper
To change the background wallpaper on the home screens, go to:
SettingsDisplayWallpaper
You have the option of changing the wallpaper for your Home screens and the Lock screen. Select from preloaded
wallpaper, from your Gallery of pictures, or from a third party app.
To use a picture you have taken of a person or place, select Gallery and scroll through your pictures.
Customizing Sounds and Notifications
You can customize the notification sounds on your tablet so you can distinguish between a text and an email and
any other notifications you receive. To change the notification sounds, volume, and more, go to:
SettingsDeviceSounds
Use the standard tablet sounds, create your own, or use any third party app.
18
Using the Keyboard
The nice thing about owning a tablet is you are not constrained to typing on a tiny thumb keyboard (as is the case
with phones). You can use the virtual keyboard that displays whenever you touch an area that requires input or
you can connect an external standard keyboard via Bluetooth. See Pairing a Bluetooth Device for details.
The virtual keyboard will not display when you have a Bluetooth keyboard connected. This gives more room on
the tablet screen as you type.
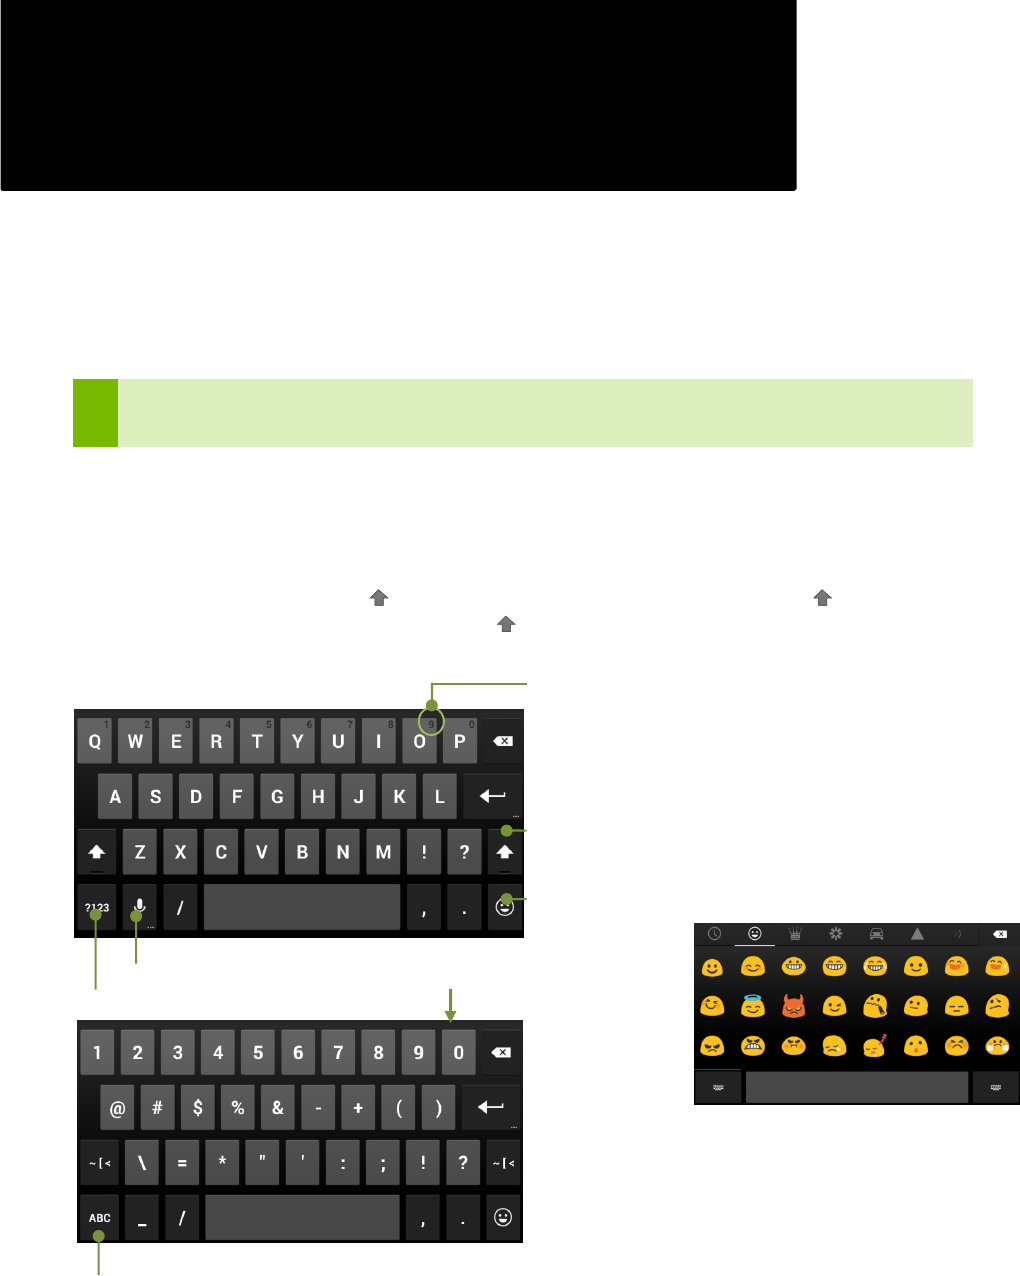
Keyboard Layout
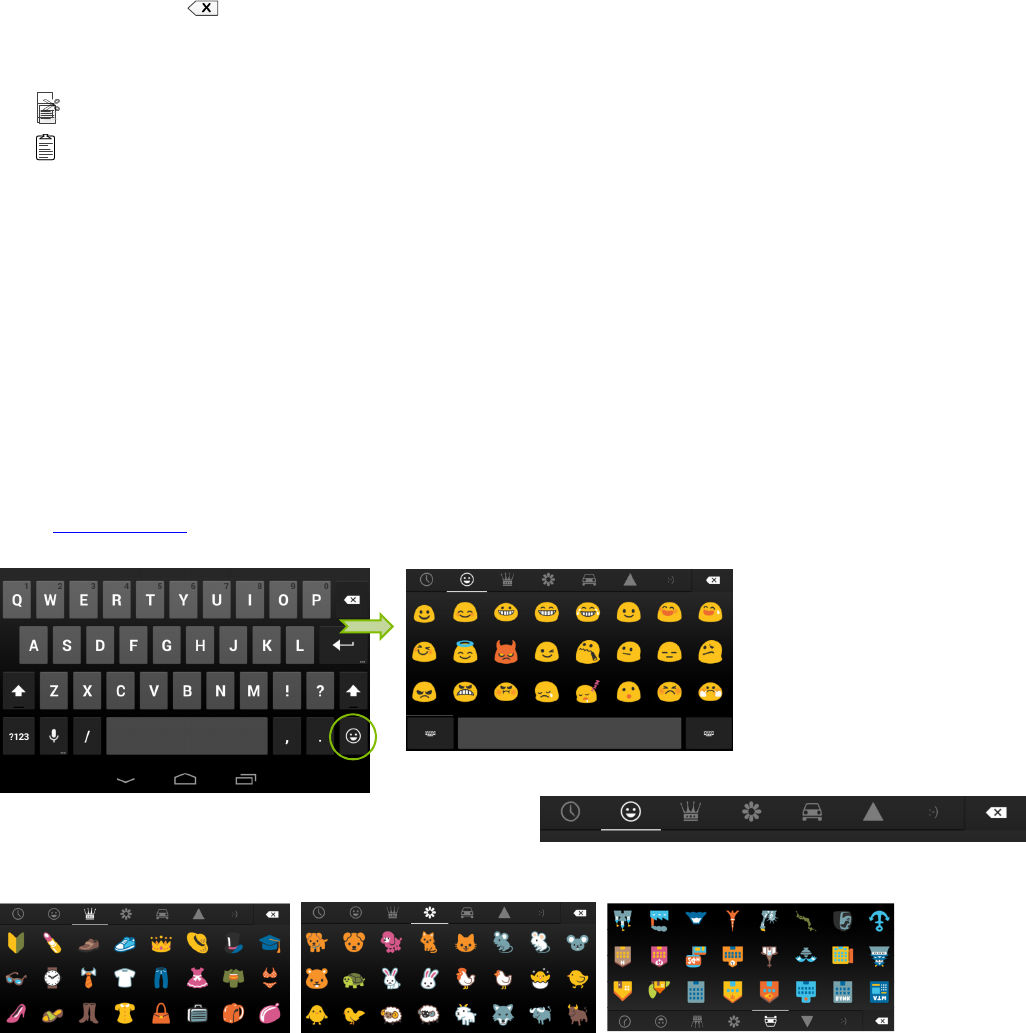
The keyboard that is displayed is a basic layout with some different ways of doing things. For example; to type a
capital letter, tap the uppercase key . To capitalize more than one letter, double tap the key to change it to
uppercase. To go back to lowercase letters, tap the key again.
Tap to capitalize one letter,
Double-tap to turn on Caps Lock.
Tap once to turn off Caps Lock.
Toggle to numbers and symbols keyboard
Voice: Speak rather than type
Touch to display a selection of smiley
faces
To type characters in upper right corner of keys,
Touch and Hold the key. When you lift your finger,
the character is typed.
Toggle back to alphabet keyboard
Using the Keyboard
19
Basic Keyboard Usage
Text input methods include voice (where you speak your message), tap (where you tap every letter and the space
bar), and gesture typing. Try using your stylus for controlling the keyboard! You will have better control for hitting
the letters you want and your hand does not need to travel as much so you can enter text even faster.
Depending on what you are inputting, the keyboard may be different (when composing an email, for example).
Voice Input
Voice input can be activated in the text area of any app, with the exception of password fields. Tap the area where
you want to enter text and tap the microphone icon on your tablet's onscreen keyboard to open a voice input
pop-up. Speak into the tablet's microphone when prompted. Speak the names of punctuation marks, and Google
automatically replaces the spoken name with the correct punctuation.
To correct any errors, tap where the correction is to be made and type the correction.
Gesture Typing
Instead of tapping the letters on the keyboard you can also trace the letters in a word without lifting your finger or
stylus. The system will show a trail of your finger movement. Gesture typing automatically inserts a space
between words when you start the next word in your sentence; you do not need to tap the space bar.
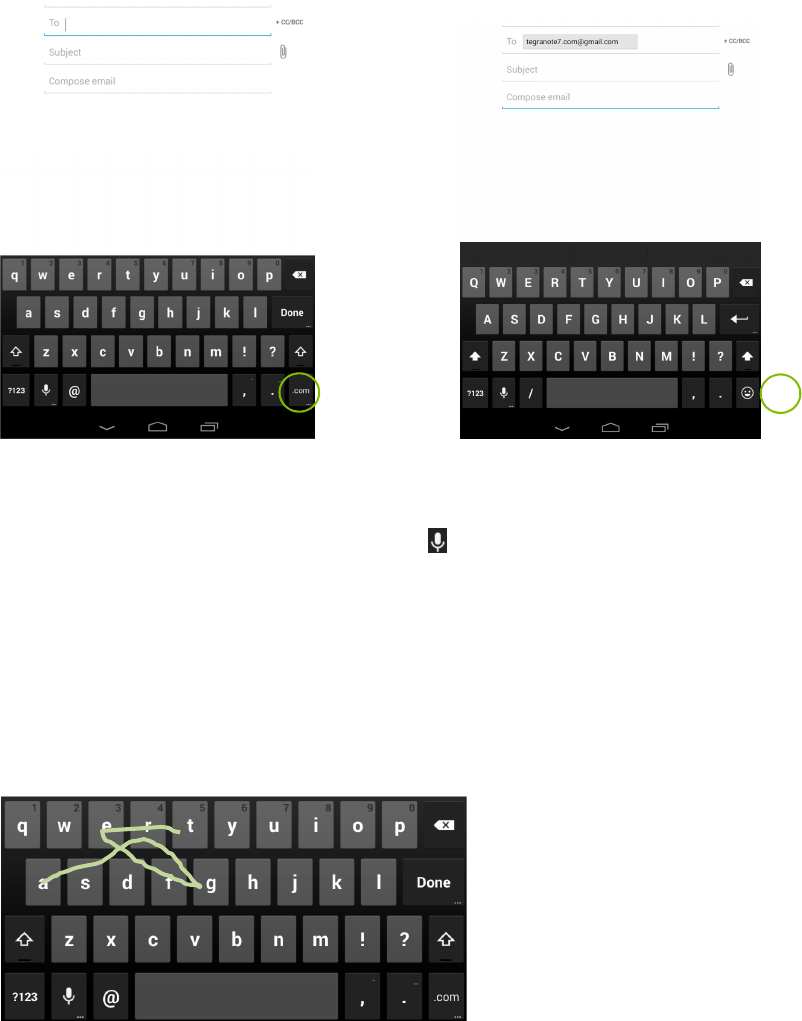
Inputting Text
Moving insertion point: Touch where you want to type and the cursor blinks in the new position. A blue tab
displays. Drag the tab to move the cursor.
When you are composing an email and you
are entering an address in the To field, the
lower right button is .com.
Short press enters .com
Long Press enters .net
When you are entering text in the
Compose email field, the lower button is
the Emoticons icon.
See Emoticons on page 20
Gesture trail for the word “Tegra”
Using the Keyboard
20
Select text: Touch and hold or double-tap within the text. The nearest word highlights, with a tab at each end
of the selection. Drag the tabs to change the selection. The tab disappears after a few moments. To make it
reappear, touch the text again.
Delete text: Touch to delete selected text or the characters before the cursor.
Cut, copy, paste. Select the text you want to edit and a pop-up screen appears with the following options:
Cut button
Copy button
Paste button
To change any keyboard input method, go to:
SettingsPersonalLanguage & Input
Emoticons
Attaching Emoticons (also called smileys) to instant messages, texts, and e-mail can be a fun and easy way to add
character to your messages. There are some smileys built into your Tegra NOTE 7 keyboard that you may not
know about. However, finding them is just a couple of taps away.
1. Open the app you want to send a message from.
2. Tap the screen where you want to start typing so the keyboard displays.
3. Press and hold on the happy smiley face on your keyboard, and a menu of other faces displays.
4. Select the smiley face you want to use and tap it once to insert it into your message.
0.
If the default smileys are not enough for you, some third-party messaging apps also have smiley packs available
on the Android Market.
Note that at the top of the Emoticons there is a selection bar.
Each selection displays different types of icons. Swipe your finger from right-to-left to see more icons in that
category. For example:

21
Tegra NOTE 7 Software Apps
Your Tegra NOTE 7 is loaded with the standard Android apps and widgets and the following specialized Tegra
NOTE 7 apps:
Write by Stylus labs
Camera Awesome
NVIDIA DirectStylus™ launcher
Tegra NOTE 7 Draw
NVIDIA Lasso Capture tool
Write by Stylus labs
Write by Stylus Labs is a word processor for handwriting. In addition to all the usual features of a
vector drawing application, it provides a unique set of tools for editing and navigating handwritten
documents. Write is perfect for note-taking, brainstorming, and drawing. With Write, you can
insert images and add notations, erase only part of a stroke, and use folders to organize
documents. Handwritten text can be reflowed when words are deleted or space is added for new
words. Bookmarks are labeled with handwriting. The native HTML+SVG document format can be
viewed in any web browser.
Use your Tegra Stylus to take notes, draw pictures, and grab information from Web pages and videos.
Go to document list.
Pan
Draw/Select pen color
Select eraser
Select
Insert Space
Undo. Tap to undo once or press and drag to undo/redo
Clipboard menu
Show bookmarks
Previous Page
Next Page
More
For more information on Write, go to http://www.styluslabs.com.
Tegra NOTE 7 Software Apps
22
Camera Awesome
Camera Awesome is a powerful, intuitive camera application designed to take full advantage of
Tegra computational camera capabilities like Always-On HDR, Tap-to-Track, slow-motion video
and a variety of photo-editing features. Camera Awesome lets you easily apply special effects to
pictures right on your tablet.
Camera Awesome from SmugMug allows you to better compose your shots by including a visual horizontal level
as well as various grid overlays. You can separately set exposure and focus settings by tapping with two fingers on
the screen and there's also a pop out menu on the right of the viewfinder that lets you choose fast and slow burst
modes, turn on the image stabilizer or activate the shot timer. You can even set the app up to take photos at set
intervals ranging from one second to one minute.
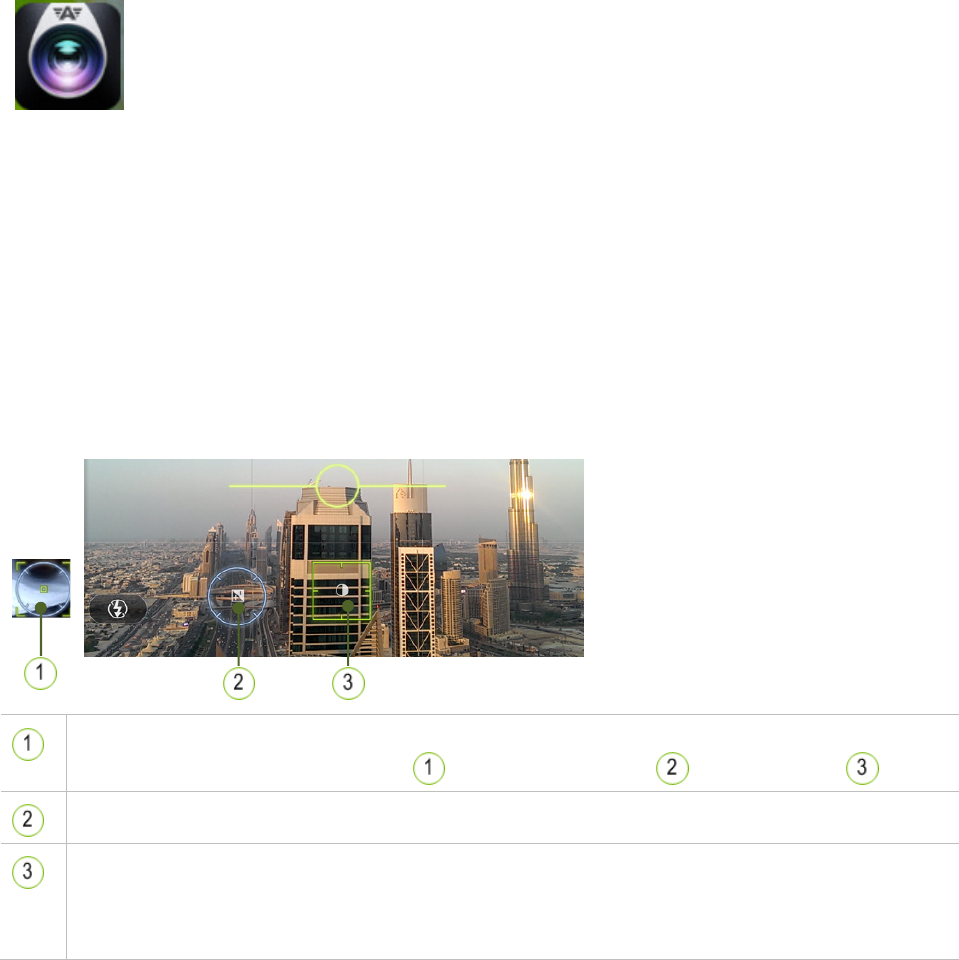
Focus and Exposer
The native camera app restricts light adjustment to the point of focus causing areas with lower light to be
underexposed. Camera Awesome allows you to split focus and exposure to get the best photo. Tap the screen to
display the focus icon on the image field. Using two fingers, tap the focus icon to display both the focus and
exposer icons. Move the icons to obtain the best picture quality. When taking a back-lit picture, you can move the
exposer icon so the picture is not so bright and you can see your subject.
a) Touch image field to display the focus icon
b) With two fingers, touch the focus icon to display both the focus and exposure icon
Focus Icon. Move the focus icon top the area of the image field you would like to focus on
Exposure icon. Move the exposer icon to an area of the image field you would like image exposed. When
you move the exposer icon to a bright area of the image, your image darkens to adjust the exposer to a
brighter background. When you move it to a darker area of the image, the image brightens to allow more
light into the image.
Tegra NOTE 7 Software Apps
23
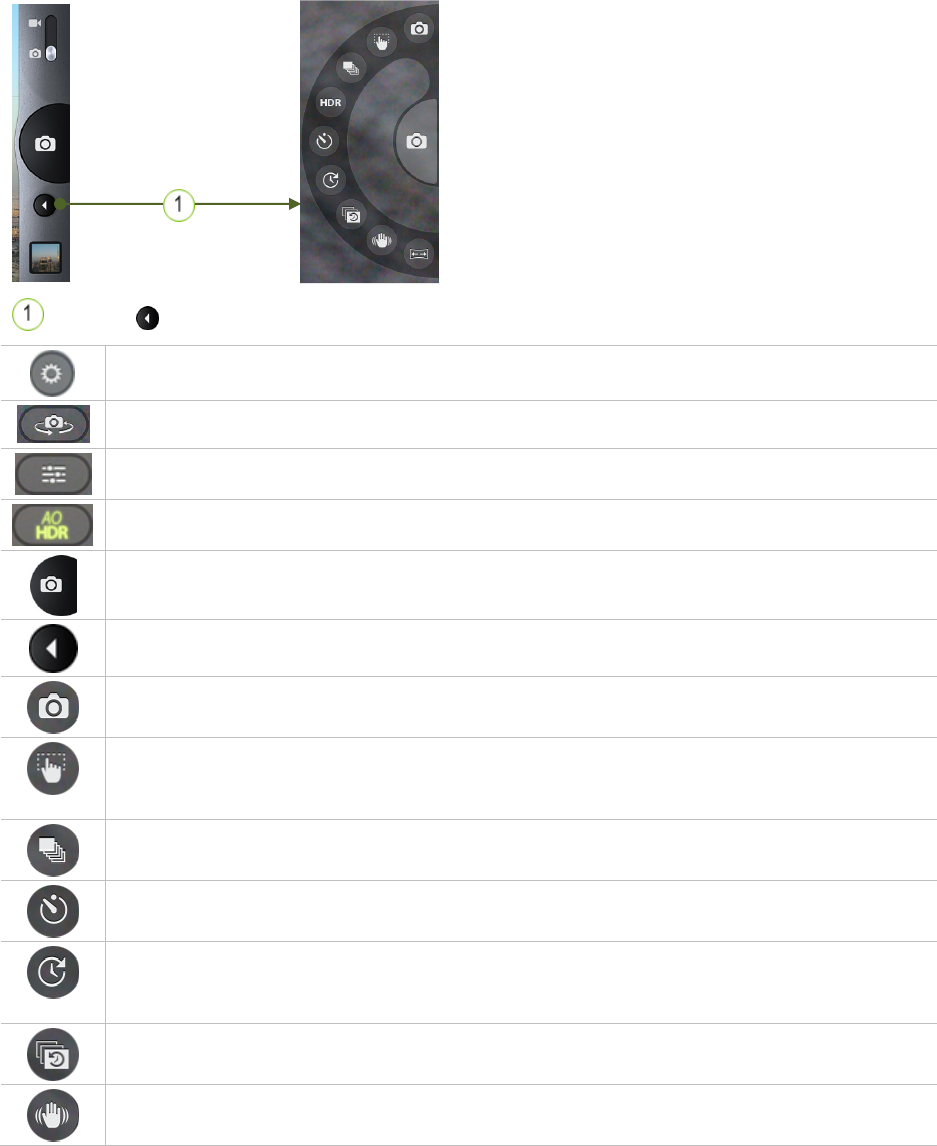
Camera Icons
There is a full range of icons that help you take the best pictures you can. When Camera Awesome is launched,
you see controls displayed along the side or bottom of your screen.
Displayed along the
side/bottom of screen
Touch the icon to display the camera function icons
Access settings.
Switch between front camera and rear camera.
Access controls for ISO, white balance, and exposure.
Enable or disable Always On HDR (AOHDR). Green color indicates the feature is on.
Shutter. Press here to take a picture.
Display camera functions.
Standard camera mode turns off previously selected modes. Takes a single picture.
This makes the entire screen the shutter button so you to tap anywhere on the screen to take a
picture instead of just using the shutter button. Selecting the button changes the image on the
shutter button.
Fast burst mode. Hold the shutter button to take a fast burst of 4 full resolution images.
Timer. Allows you to setup the camera to take a picture 1-to-60 seconds after you hit the shutter.
Time laps. Allows you to set interval time that a picture is taken. For example, set the timer to 15
seconds and press the camera button. Every 15 seconds a picture is taken until you press the
camera button again to stop the process.
Continuous burst. Continues to take pictures as long as you press the camera button.
Image stabilization. Applies real-time image processing to reduce shakiness of videos or pictures.
Tegra NOTE 7 Software Apps
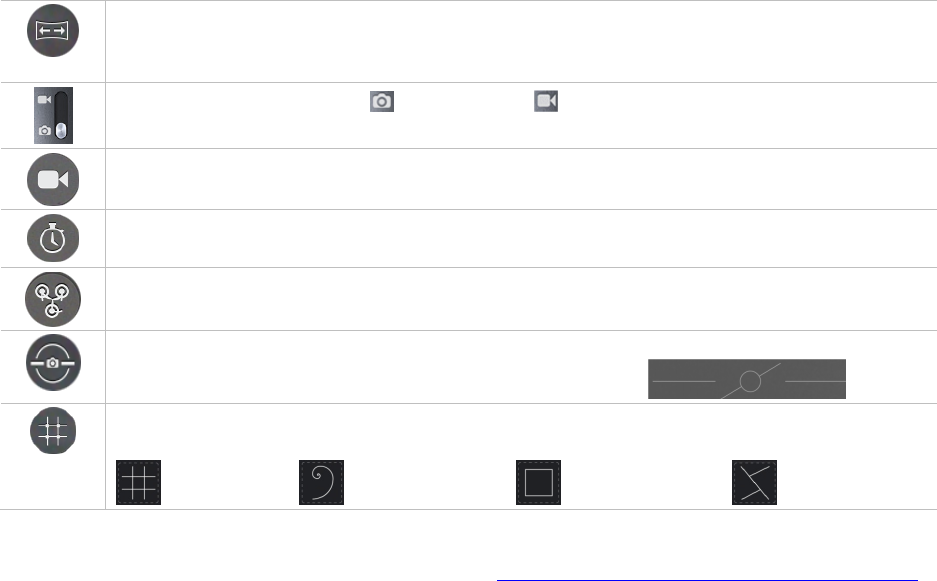
24
Panoramic mode. Allows you to take a 180-degree panorama shot by panning from left to right.
The camera will tell you if you are panning too quickly. When done, the Tegra 4 processor will
stitch the image together in record time.
Switch between camera mode and video mode
Video mode. Returns camera to standard mode by turning off other features.
Turns on fast 120 frames per second (fps) video capture (ideal for capturing fast action). When you
play back the video it displays as if in slow motion since it plays back at 30 fps.
Pre-capture video mode. In this mode, five seconds of video are buffered, allowing you to capture
moments you might otherwise miss (when you are little late hitting the start capture button).
Integrated Horizon. Displays a level so you can move the tablet to align the image field. Use the
composition tool overlays to align the image field to the overlay.
Composition tools. These overlays are displayed on your image field to help lineup the perfect
balanced scene. Use the overlays with the Integrated Horizon tool to lineup a scene.
Thirds Golden Square Trisec
For more detailed information on Camera Awesome, go to http://news.smugmug.com/tag/camera-awesome/.
Focus, Exposure, Zoom, and Tap to Track Gestures
Put two fingers on the screen simultaneously and slide them apart to show pinch zoom – reverse motion to
zoom back out.
Put one finger on the screen and lift to get the auto-focus/auto-exposure icon.
Put two fingers on the screen and lift without sliding them together or apart to get separate AF/AE icons.
You can get the camera to automatically optimize focus and exposure on an object in the scene by placing
your finger at the top left of the object and slide down to the bottom right of the object. If the camera
identifies an object, a green box displays around the object. This is the Tegra Note exclusive Tap to Track
feature that is based on advanced Tegra computational photography features. As you move the camera
around notice that the box stays centered on the object. Even when the object leaves the scene, when it
reappears the Tap to Track box displays again. Use this feature as an easy way to keep your subject in focus and
properly exposed.
Tegra NOTE 7 Software Apps
25
Video Capture and Slow Motion
Click the camera/movie camera icon on the bottom right of the screen to switch to video capture mode.
Click the semicircle with arrow in the top-right corner of the screen to pull out the camera modes menu.
Select the stopwatch icon to choose slow-motion video capture mode.
Press the large semicircular icon with the glowing dot to start and stop video recording. When the video
captures are played back in the gallery, they play in slow motion (4x, at 720p).
Pre-capture video
•
To access Pre-capture video mode, press the semicircle with arrow in the top right corner of the screen to
pull out the camera modes menu.
•
Select the icon with three circles (think of it as film reels). When you record video, it will have about five
seconds of pre-capture recorded before you pressed the capture button.
NVIDIA DirectStylus™ Launcher
This is a convenient way to access the pen-optimized applications on your Tegra NOTE 7. The
DirectStylus Launcher displays on the screen whenever the
NVIDIA DirectStylus Pro
is removed
from the device, showing several applications with special features for the pen. You can easily
change the behavior of the launcher in several ways. If you click the settings at the top of the
launcher, you can drag and drop different applications on to the NVIDIA DirectStylus Launcher bar
so you can access the apps you want when it launches. Alternatively, you can go to the pen
settings part of the Android Settings tool, and change them so the NVIDIA DirectStylus Launcher does not show
up at all, or a particular app is opened at the removal of the pen rather than the launcher.
Tegra NOTE 7 Software Apps
26
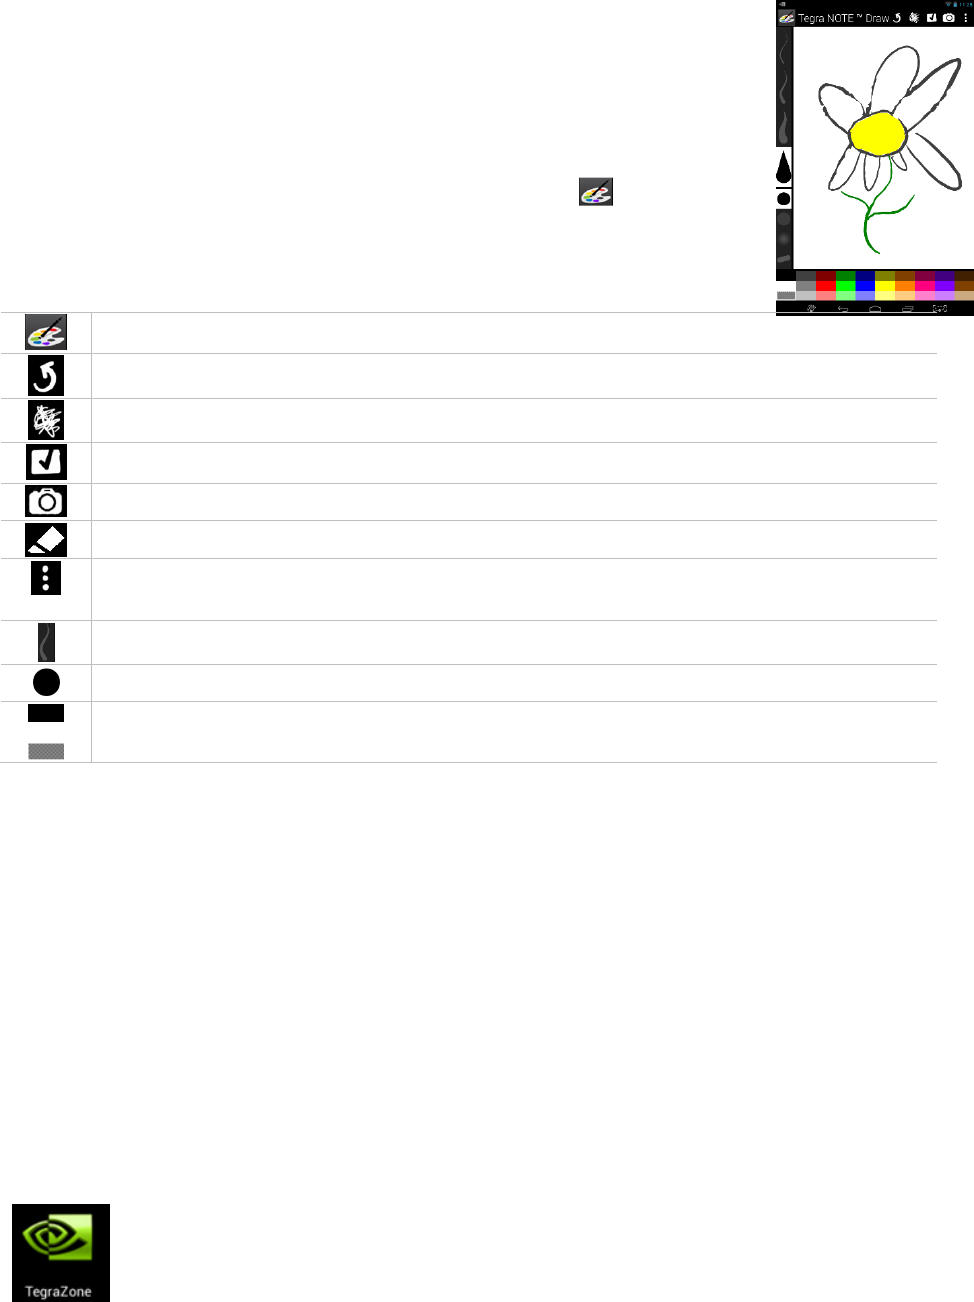
Tegra NOTE 7 Draw
Tegra Draw is a simple, multi-touch, pressure-sensitive drawing app. You can use your
finger or the Tegra NOTE 7 Stylus to draw. The pressure sensitivity that works with most
Android devices, adjusts to the pressure of the stylus as it touches the glass by drawing a
thicker line.
This interface is also kid-friendly, showing every pen size and color on-screen for them to
choose from. Display the drawing tools by touching the paint palette displayed in the
upper corner of the screen.
Share your drawings to other apps, and share images into Tegra NOTE 7 Draw to draw on
top of them.
Toggles the menus off and on for full-screen mode
Undo tool
Erase all
Saves the image to the picture gallery
Starts the camera app to take a picture for the back ground
Toggle between draw mode and erase mode
Menu with more features like back ground control and sharing options so you can mail your creation
to friends
Line width
Brush type
Color pallet. Touch to select pen color. Hold for 2 seconds to set background color.
NVIDIA Lasso Capture Tool
NVIDIA provides a convenient and unique way to capture and share a tablet experience with co-workers, friends,
and family. The Tegra NOTE 7 provides the user with standard full-screen and rectangular region capturing ability.
In addition to those standard features, two additional features are made possible by NVIDIA's DirectStylus
technology: lasso capture and free hand capture annotation. Lasso capture allows the user to easily and creatively
select an arbitrary, freeform area of the screen simply by tracing the desired region with their DirectStylus Pro.
Freehand capture annotation lets the user personalize their captured selection, making it easier to tell a story,
explain an idea, or simply make a normal capture more fun. All of the capture and annotation features are
available to the user whenever they remove their DirectStylus Pro and click on the lasso icon in the navigation bar.
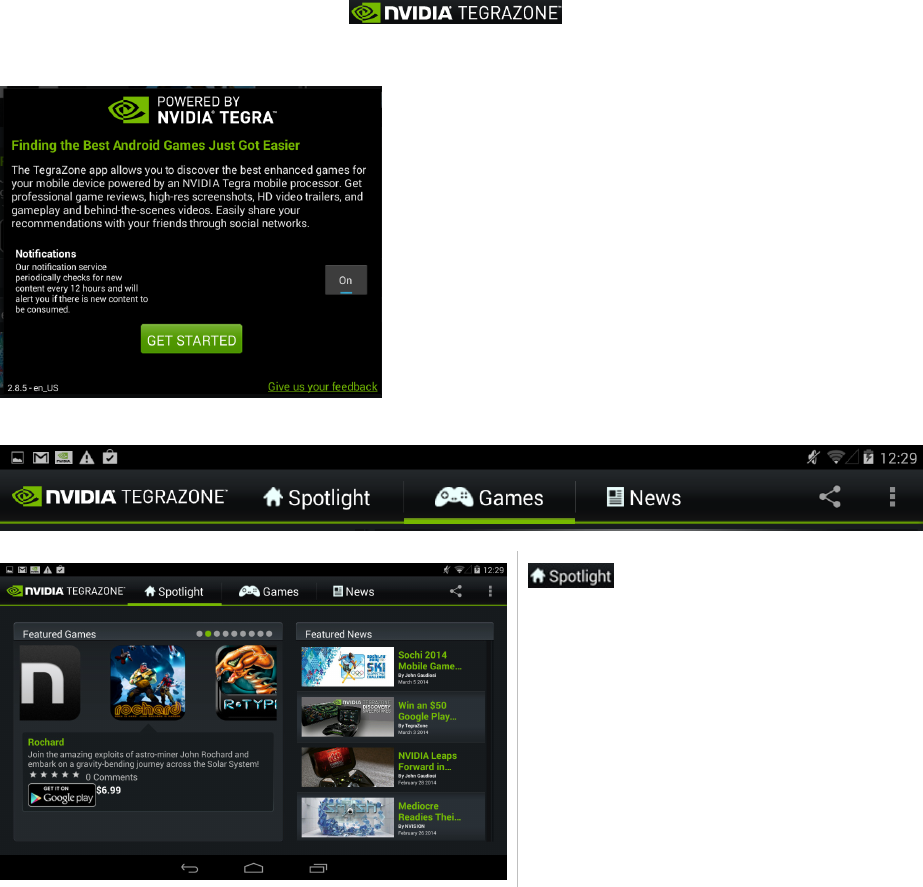
NVIDIA TegraZone™
Browse and download the latest and greatest Android games from TegraZone. Each of the games
that appear on TegraZone is optimized for your Tegra NOTE 7 tablet. Look through the list of games
and read the information provided with each game before purchasing. Access professional game
reviews, high-resolution screenshots, HD videos, and behind-the-scenes footage. Read the latest
Tegra NOTE 7 Software Apps
27
gaming news and follow gaming forums. You can also connect the TegraZone app to your social networks and let
your friends know about your favorite new games.
To purchase and download your chosen game, you’ll be redirected to Google Play.
When you first select Tegra Zone or select from the top ribbon, The Get Started screen
displays.
The Selection bar across the top of the NVIDIA TEGRAZONE screen lists Spotlight, Games, and News.
displays the current featured games
and the featured news about games.
Tegra NOTE 7 Software Apps
28
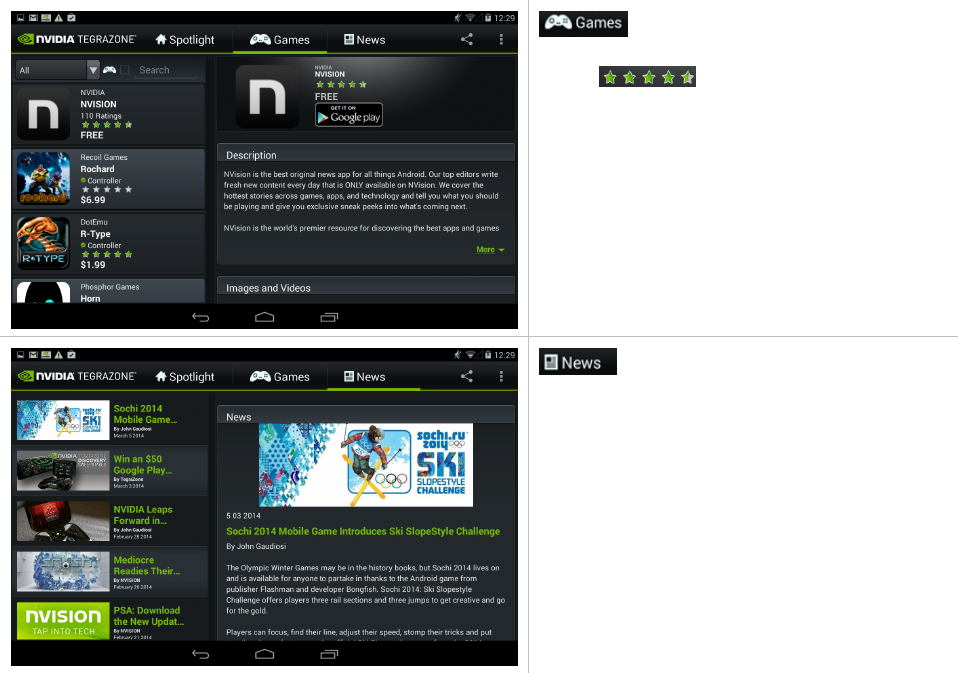
lists all the available games. Selecting
a game displays a brief description of the game,
its star rating, and where you can get
it (Google play in this case).
displays all the news pertaining to
NVIDIA, the games, and special events.
29
Settings
Use the Settings menu to customize a wide variety of features and get the most out of your Tegra NOTE 7,
To get to Settings no matter what screen you are on, swipe down your Notifications from the top of any screen
and touch the small Settings icon near the top.
Tapping the Settings icon displays a list of configuration settings that can be adjusted and changed. Topics
include:
Wireless & Networks
Device
Personal
Accounts
System
Wireless & Networks
Under Wireless & Networks settings are
Wi-Fi
Miracast
Bluetooth
Data usage
Airplane mode
Default SMS app
Tethering and Portable hotspot
VPN
Mobile Networks
Mobile Plan
Wi-Fi
The Wi-Fi capability of your Tegra NOTE 7 allows you to connect to the Internet wherever there is a
wireless access point or Hotspot available (such as a coffee shop). When you setup your Tegra
NOTE 7, you were asked to connect to your home wireless router. To view available wireless access points or
Hotspots in your immediate area, go to:
SettingsWireless & NetworksWi-Fi
Any Wi-Fi accounts that show Secured will require a key to join. The list of available wireless accounts
includes all accounts in your immediate area, including private Wi-Fi accounts.
Miracast
Settings
30
Miracast is a wireless technology that allows you to stream the contents of your screen to a
Miracast receiver that is connected to an HDTV. Miracast is like a wireless version of HDMI,
so it is easy to enjoy movies or share pictures and browsing by showing them on a big
screen. The Miracast implementation in Tegra Note 7 is ideal for video content up to 720p resolution. You need
to set up your Miracast receiver before you try to access it from your tablet.
Playing games over Miracast is not recommended since latency (delays) between action on the tablet and the
image on the screen can be quite long.
Resolution
This function defaults to high setting (720p). Because Miracast uses the same Wi-Fi frequency as your tablet
uses to access the Internet over Wi-Fi, there are performance limitations you may encounter. The Miracast
link will use up some bandwidth that limits the throughput from your Internet access point to the tablet. Other
devices like Bluetooth, baby monitors, and cordless phones also use the same 2.4 GHz frequency, causing your
Miracast link to degrade. Content stored on your tablet will typically play nicely at 720p resolution (the TN7
screen resolution) over Miracast. Streaming video from the Internet may need to be reduced to SD to
maintain smooth playback. If video playback over Miracast is stuttering, try reducing resolution to medium or
low.
Displays
If there are Miracast receivers within range, they will be listed automatically. Tap on the display you want to
connect to initiate communication. Some Miracast receivers require you to press a button to connect or you
may be prompted with a PIN that you need to enter to allow the devices to communicate.
Bluetooth
Bluetooth is a connectivity tool that provides a secure connection between devices over a
short distance (distance must be less than eight meters or 26 feet).
The most common Bluetooth devices used are game controllers, keyboards, headsets (with or without
microphone) for listening to music, videos, or chatting, speakers, etc.
Before you can use a Bluetooth device, you need to Pair the device to your Tegra NOTE 7.
Pairing a Bluetooth Device
1. Verify the Bluetooth is turned on.
− Go to SettingsWireless & NetworkBluetooth
− Make sure Bluetooth is ON
2. Place the Bluetooth device into Discoverable mode.
3. Select Search for Devices
4. Select Bluetooth from Wireless & Network on your Tegra NOTE 7 to see a list of discovered devices.
5. Select the device you wish to pair to from the list.
0.
If you have no Bluetooth devices to pair with your tablet, it is recommended that you turn Bluetooth off. If
Bluetooth is on, it will attempt to pair with any device within range.
For instructions on pairing a specific Bluetooth device, refer to that device’s documentation.
Data Usage
Touching the Data usage icon displays the amount of data used during a specified
timeframe. The display also lists the data usage by apps.
You can use the menu at the top right to get the system to list data transferred over Wi-Fi or Cellular.
Settings
31
Airplane Mode
Settings More… Airplane Mode
When Airplane mode is ON, the tablet turns off all external connections such as Wi-Fi and Bluetooth. This allows
you to play games and use any other functions of your Tegra NOTE 7 while on an airplane.
Tapping Airplane mode turns it off and on (
indicates Airplane mode is On). When Airplane mode is on, the only
apps and widgets that work are those that do not require connection to a network or data service.
When the tablet is in Airplane Mode, it is possible to use the settings menu to turn wireless connections on
individually. This is handy if you want to just turn on Wi-Fi when travelling because it will guarantee that there are
no roaming charges for cellular data.
Default SMS App
The Default SMS app allows you to define what application is used to handle incoming and outgoing SMS
messages. Android Messaging is the default app but you may want to change that to Google Hangouts for a data-
only device.
Tethering & Portable Hotspot
Tethering allows you to use the Internet connection with other devices by connecting via USB cable
Portable Wi-Fi Hotspot
Portable hotspot allows you to share the Internet connection with other Wi-Fi devices by turning your Tegra Note
into an access point. You should secure your connection to avoid unintended use by other individuals in your area.
Set-Up Wi-Fi Hotspot
Use Set-Up Wi-Fi Hotspot to set the access point name, security protocol, and password and keep other people
from connecting to the Internet through your device.
Bluetooth Tethering
Bluetooth Tethering allows you to share your Internet connection over Bluetooth.
Settings
32
VPN
Settings
More
VPN
A Virtual Private Network (VPN) provides the ability to securely connect to your workplace network remotely and
is a common standard tool used by most Information Technology (IT) departments. A VPN connection provides
the security of your workplace firewall and allows you to exchange emails and view sensitive work-related
information.
You may need to obtain specific format and settings information from your workplace; such as:
PPTP (Point-to-Point Tunneling Protocol)
L2TP (Layer 2 Tunneling Protocol)
Mobile Networks
There are two versions of the Tegra NOTE 7 LTE:
Americas Version Rest of World Version
LTE Support
FDD-LTE Bands Band Frequency (MHz) FDD-LTE Bands Band Frequency (MHz)
2
4
5
7
17
1900
1700
850
2600
700
3
7
20
1800
2600
800
3G Support
HSPA+ Bands Band Frequency (MHz) HSPA+ Bands Band Frequency (MHz)
1
2
4
5
2100
1900
1700
850
1
2
5
8
2100
1900
850
900
EDGE Support
Yes
GPRS Support
Yes
To use the mobile network, you need to get a micro SIM from a carrier to insert into your Tegra Note. Make sure
the SIM is valid, as inactivated or prepaid SIMs with no credit left will not work. Make sure the carrier uses bands
listed above in your area. To insert the SIM card, lift the slot cover near the volume buttons. The SIM card slot is
on the right when the screen is face down. Insert the SIM card, notch first, with contacts facing up. The connector
is a push–push type so you have to push until you feel a slight click and the card stay in. If it pops out, you did not
push the card in far enough. Your tablet reads the SIM card and attempts to connect to the network. Signal
strength bars are displayed in the notification bar upon connection to the network. If Wi-Fi is not turned on, you
will see what type of data connection is available.
With the modem enabled, you may need to configure an APN for the network; check with your carrier.
The previous table shows that when you travel you should have access to cellular networks in most places.

Settings
33
The following table has a list of carriers that operate networks compatible with Tegra Note 7 LTE.
Country Carrier Country Carrier
Angola Movicel, Unitel Malaysia Celcom, DiGi, Maxis
Antigua Digicel Mauritius Orange
Argentina Personal, Claro Mexico Movistar, Telcel
Australia Telstra, Optus Moldova T-Mobile, Tele2, Vodafone
Austria 3, T-Mobile, A1 Montenegro Moldcell, Orange
Bahamas BTC/C&W, Lime Namibia MTC
Bahrain Batelco, VIVA, Zain Netherlands T-Mobile, Telenor
Belgium Base, Mobistar, Proximus New Zealand Telecom New Zealand, Vodafone
Brazil Claro, Oi, TIM, Vivo Nigeria Glo Mobile, Smile
Canada Bell Canada, Rogers, Telus Norway Telenor, Netcom
Cayman Islands C&W, Lime Poland Plus, Orange, T-Mobile
China China Unicom Portugal Optimus,TMN, Vodafone
Croatia T-Hvatski Telekom, Vipnet Qatar Vodafone
Czech Republic Telefonica,O2, T-Mobile Romania Vodafone, Cosmote
Denmark Telia, 3, TDC Russia*** Beeline, MegaFon, MTS
Egypt Etisalat Saudi Arabia STC, Zain
Equador Claro Singapore M1, Singtel
Estonia Elisa, EMT, Tele2 Slovakia Telefonica, Mobitel
Finland Elisa, Sonera South Africa MTN, Neotl, Vodacom
France Bouygues, Free, Orange, SFR South Korea SKT, LGU+, KTF
Germany E-Plus, Telefonica O2, Deutsche
Telecom, Vodafone
Spain Movistar, Vodafone, Orange
Greece Cosmote, Vodafone Sri Lanka Dialog, Etisalat
Greece Cosmote, Vodafone Sweden 3, Telia
Hong Kong China Mobile Hong Kong, CSL, 3, PCCW Switzerland Orange, Swisscom
Hungary Magyar Telekom,Telenor Tanzania Smile
Iceland Nova, Vodafone Thailand DTAC, TrueMove-H
India MTNL, Videocon UAE Du, Etisalat
Indonesia XL Axiata, Indosat Uganda Orange, Smile
Italy 3, TIM, Vodafone United Kingdom Vodafone, EE, O2, H3G
Kuwait VIVA, Zain Uruguay Ancel, Claro
Latvia Telia, Tele2, Telecom, Baltijia, Triatel USA AT&T, T-Mobil
Lithuania Bite, Omnitel Uzbekistan Beeline
Luxembourg Tango, Orange Venezuela Movistar
Macedonia One, T-Mobile
Mobile Network Settings
Data enabled
You must select this option to use your cellular connection to access the Internet.
Settings
34
Data roaming
This option allows you to use cellular connections to other networks to transfer data. There are typically
additional and extremely expensive charges for using data while roaming.
Preferred network type
This option was introduced when 3G networks used more power than 2G networks however faster data
transfer on faster networks typically uses less power since the modem does not need to transmit as long.
Access Point Names
Typically, the SIM you insert will include APN data for the network it is associated with. You should see at least
one APN. Use the “+” sign at the top of the screen to add an APN if needed.
Network operators
This option will scan for all carriers available in your area and provide a list for you to choose from. If you select
a carrier other than your current carrier, you will incur roaming charges for data transferred.
Device
Device contains all the configurable features of the tablet:
Controller
Sound
Display
DirectStylus™
HDMI
Storage
Battery
Power Saving
Apps
Users
Controller
Your Tegra NOTE 7 is the best tablet when it comes to Android gaming. Special
capabilities unique to Tegra NOTE and the NVIDIA SHIELD™ make playing console-class
games possible on Android. Connecting a USB or Bluetooth game controller to your Tegra NOTE enables system
navigation and console-like game play from across the room. Connect your Tegra NOTE via HDMI for a big screen
gaming experience no other Android tablet offers.
Gamepad Mapper
Gamepad Mapper allows you to control how the gamepad buttons are used. If you want your game controller to
work like an XBOX controller, you can set up the buttons to act the same way.
Predefined gamepad mappings can be downloaded automatically from NVIDIA servers. These settings are based
on feedback from the gaming community for ideal settings of the buttons.
Virtual Mouse
The Virtual mouse allows you to use the right analog stick as a mouse. When you move the stick, a cursor will
appear on the display to emulate where you will want to touch. This gives you terrific navigational control over the
tablet, even when you are many feet away.
Settings
35
Sound
Tapping Sound displays configurable slides to adjust the volume for music, videos, games, and
other media. It also allows you to specify the volume of incoming notifications and alarms.
Under the Sound topic, you can specify the default system notification sound, the sound made when the screen
locks, and when you touch an icon. Sounds can be selected from the Android default sounds or from a third party
app.
Display
Display provides the ability to adjust the following:
Screen brightness
Set the display brightness using the slider to select specific brightness level or select automatic mode that
adjusts backlight brightness to fit your ambient lighting conditions (brighter under bright lighting and dimmer
for lower lighting conditions).
Wallpaper
Background wallpaper selected from Android default wallpaper or from third party apps.
•
Gallery: Select wallpaper from your gallery. You can add photos, drawing, or any background you like to
your gallery.
•
Live Wallpapers: These are dynamic backgrounds that move and change. Select from the default wallpaper
or download more from the Web.
•
Wallpapers: Select from a list of loaded default static backgrounds.
Sleep time
Sleep time is the time the screen stays lit with no activity before it is closed and locked. You can select from 15
seconds up to 30 minutes.
Daydream
The Daydream option allows selection of an image to display as a screen saver rather than putting the tablet
into Sleep Mode. When Daydream is on, your Tegra Note 7 can display clocks, colors, and more while it is
being charged or docked. To enable this feature, go to SettingsDisplayDaydream. Switch the slide to ON.
From here you can choose what type of visual you would like the system to use when daydreaming, and set
when the device should begin using it.
•
Clock displays the device's digital or analog clock. You can change the clock style or select the Night mode
option by touching the Settings icon next to Clock.
•
Colors shows changing colors on the screen.
Once a daydream has started, simply tap on the screen to wake up the device.
− Time to sleep
You can choose the amount of time your device is inactive before sleep mode starts.
Go to SettingsDeviceDisplay
Touch one of the options

Settings
36
− Turn off Daydream
Go to SettingsDeviceDisplay
Touch Daydream
Slide the switch to Off.
Font size
Provides the ability to adjust the font size between Small, Normal, Large, and Huge.
Color correction preset
The default setting is sRGB which tells the system to use standard processing of color functions when sending
color managed output to the display. The native setting overrides standard sRGB and uses the settings that
are preprogrammed for the display.
NVIDIA DirectStylus™
DirectStylus uses the processing power of the Tegra 4 processor and is the most
innovative feature of Tegra Note 7. DirectStylus can recognize the difference between
a finger and a stylus to allow control of everything you do with your tablet. Sometimes it is nearly impossible to
tap small buttons on web pages with your finger, but it is really easy with the fine tip control of the stylus. Writing
and drawing are enabled with such precision that you can vary the width of a line simply by changing the angle of
the chisel tip stylus (in apps that recognize a pen).
Additional controls for ignoring finger input allow you to have utmost control with your stylus even when your
palm is on the display.
Default action
When you remove the stylus from the tablet, it is detected and the system defaults to launching an interface
that shows all the stylus enabled applications you want. Select an application or touch outside the menu to
hide the launcher. This control allows you to redefine the default action.
Show draw cursor
When this feature is enabled, a small cursor is drawn to show where the system sees the stylus. When you
move the pen quickly, the system sometimes lags but the cursor has ultra-fast 40 ms responsiveness that gives
you an immediate visual cue where electronic ink will eventually show up.
Show eraser cursor
This feature shows a large circle where the erase function will be active when the system detects an eraser.
Set Timer
Typically, when you use the stylus, there is a delay before you use your finger on the display. This timer sets a
period when finger events will be ignored after the stylus is used.
Left-handed
If you are left handed, there are times that it is more convenient for menus in the Tegra Draw to appear on the
right side of the screen. Use this control to move the menu to the right side.
HDMI
If you use an HDMI display, you can tell the system to use sRGB color management or you can
set color management for default values.

Settings
37
Storage
It is a good idea to check your current storage space to ensure that you do not overload
your device. To check, go to Settings
Storage. From here, you can monitor the
storage on your tablet as well as the installed SD card.
Used space is color-coded with the type of data stored. Scroll down to see the data assigned to each color. Touch
the data category and a list is displayed showing specifically what is stored. For example; touching Apps lists all
apps that are loaded on your device.
Battery
The battery icon is displayed in the status section of the upper ribbon. The icon shows the
current battery charge and is a reminder to charge your battery as the level drops.
To access battery status, go to:
SettingsDeviceBattery
This Battery screen shows statistics for which applications or system components have been draining the battery
and a graph that gives you an idea how quickly the battery is being used up.
If you touch any of the battery consumption statistics, you can see more detailed information about activity of
that service or device.
Settings
38
Power Saving
Tegra NOTE includes several innovative features that help you experience industry
leading performance and terrific battery life. This section gives you more control
over the tradeoffs.
Tegra PRISM
PRISM is an NVIDIA patented innovation that decreases the power used by the backlight during video
playback without perceptibly degrading the visual experience. This feature can save up to 40% of the power
used by the screen backlight, so it is on by default.
Processor
•
Maximize Performance
Gamers will appreciate this setting as it delivers the highest performance.
•
Balance
This setting delivers great performance but limits frame rates to save power.
•
Save Battery
This setting puts priority on battery by further limiting frame rates and processors used.
nSaver
Some applications constantly check for updates and in doing so, wake up the processor and waste power
unnecessarily. nSaver allows you to set applications to wake less often and to batch up requests to reduce
system traffic. It is like planning your shopping trips to make as few stops as possible. This control works on an
app-by-app basis if you like.
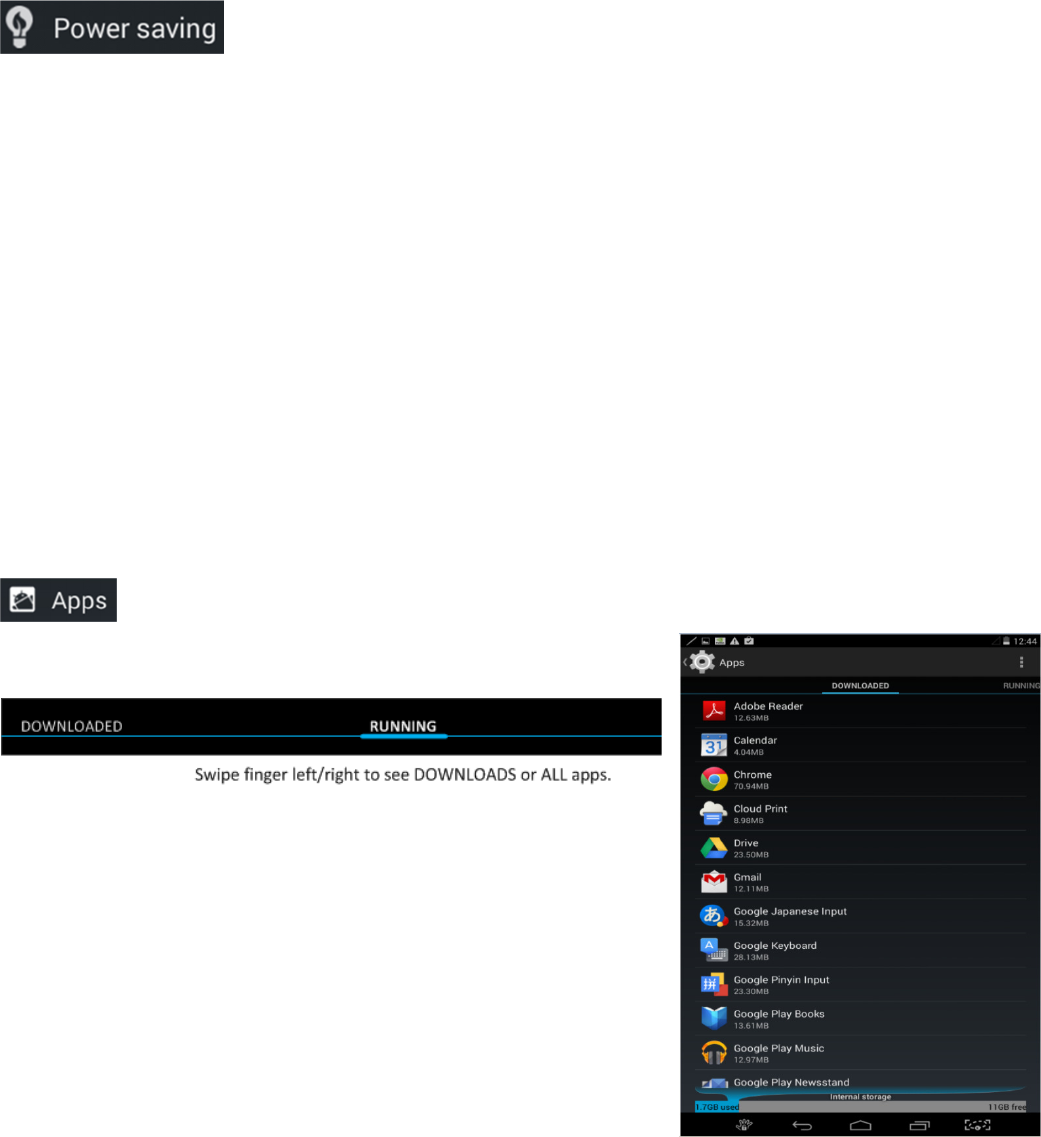
Apps
The Apps screen lists all of the applications downloaded to the tablet and the internal storage
used and available. Swipe to the left to see all the apps that are running. You will also see statistics
about system memory allocation at the bottom of the screen.
Swipe left again to see all apps including system functions.
Tap on any app to get more information about the app or to control the app.
Force Stop
This can be useful for an application that is stuck or unresponsive. Using this
function may cause the application to misbehave.
Disable / Uninstall
Disabling a system function may cause other applications to stop working.
The uninstall option is only offered for non-system applications
Storage
Shows the storage used by the app. There are two other options that allow
you to move the app and its data to an SD card if you have one installed. The
second option allows you to move an SD card resident app back to the
tablet’s internal storage.
Data
Allows you to clear data the app may have stored. This can be helpful for applications that have become
unresponsive as it sets them back to a state similar to when the app was installed.

Settings
39
Cache
Allows you to clear any cached information associated with the application. This can also help unstick an
application without getting rid of all the stored data the app may be using.
Launch by default
Permissions
A full list of permissions granted to an app is listed here. This is particularly useful for understanding what
system resources an app may have and what personal data it may take advantage of.
Users
Selecting Users lists the name of each person using the tablet. Tap ADD USER in the upper
right corner to add another user. When you add a user to the tablet, they go through the same
system setup that happens with a new tablet.
When there are several users set up on a tablet, the lock screen will list the users, allowing to effectively log in as if
you were the only user of the tablet. The other user will not have access to your data but can use your
applications.
Settings
40
Personal
Personal settings allow you to control the following:
Location access
Security
Language & input
Backup and reset
Location Access
The Location Access screen has a toggle to turn access on or off for all apps. One mode allows you to opt for high
accuracy that uses all location information to determine your location but uses more power. Or you can select
Battery saving mode that only uses external networks to determine your location while turning off advanced
sensors inside the tablet that interact with GPS satellites.
Applications that have requested access to your location are listed. Tap any application in the list to control how
that application uses your location data.
Security
Screen lock: Select the type of lock you want enabled so that other people cannot easily access your tablet or
its data.
•
None
No password, no lock
•
Slide
Slide your finger across the screen to unlock.
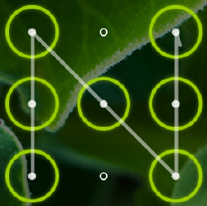
•
Pattern
Select a pattern screen lock that is visible on the lock screen. Select Screen lock to
display a grid. You enter a swipe pattern on the grid that will be used to unlock the
tablet. Select Confirm saved pattern when you are satisfied of the swipe pattern.
•
Pin
Create a Pin to unlock your tablet.
•
Password
Create a Password to unlock your tablet.
Automatically lock: Toggle setting that allows you to tell the tablet to lock as soon as it goes to sleep.
Power button instantly locks: Toggle setting
Enable widgets: Toggle setting that enables screen widgets to be active and accessible even when the tablet is
locked. This can be very convenient for media, news, and weather widgets so you can access them without
entering a password but is very dangerous for mail or other apps that could make sensitive personal data
available to anyone who has access to your tablet.
Owner info: Allows you to list name and contact info on the lock screen so that someone who finds the tablet
knows who the tablet belongs to.
Encryption: You can encrypt the storage on your tablet so, if anyone takes your tablet, they cannot get at your
data even if they move the storage device to another tablet. Enabling this function also sets up the system to
automatically wipe your data if more than 10 attempts are made to log into your tablet. When your storage is
encrypted, every read and write from storage requires extra processing so it does consume extra power.
However, the Tegra 4 processor has plenty of performance to make this almost unnoticeable.
Encrypt tablet: This operation takes a long time, so you have to fully charge your battery before performing
encryption.
Settings
41
SIM CARD LOCK
Set up SIM card lock,so that if someone takes your SIM, they can only use it if they enter your password.
Passwords
Make passwords visible is a toggle that ensures that passwords are never displayed when you enter them, even
if the application provides a setting to display passwords.
Device Administration
•
Device Administrators
Enables corporate control and allows you to enable the feature to wipe the storage if there are too many
failed password attempts.
•
Unknown sources
Toggle setting allows you to control whether applications can be loaded from sources other than the Google
marketplace. If you want to be able to install apps from a SIM card, you will have to enable this setting.
When you enable this setting you will get a warning that installing applications from unknown sources is a
security risk. Your call.
•
Verify Apps
Allows Google to verify applications before they are installed. This is like a simple form of application anti-
virus that allows Google to block known badly behaved applications. When this feature is disabled, Android
will ask to enable the feature every time you try to install an app.
Credential Storage
Every secure website you visit must provide credentials for the authenticity of that site. This security measure
allows Android to avoid allowing websites to falsely provide services and potentially steal your data. Before
following a link to a website, Android will check the authenticity of the credential provide against a central
database. If the credential is not known, then you will be warned so that you can choose not to go to that site.
•
Storage type
•
Trusted credentials
•
Install from SD card
•
Clear Credentials
Language and Input
Language and input allows you to select automatic spell checking, identify a personal dictionary that is updated
with your word usage, allows you to select a default keyboard, configure voice, and determine the pointer speed
on the screen.
Language
Touch this entry to select the language you want Android to use for all menus and applications. Scroll down
the list and select your language by tapping it.
Spell checker
The Google spell checker is used by default. Use the menu setting to enable using your contact list when spell-
checking is active.
Personal dictionary
When typing using the virtual keyboard, the system keeps track of words you have allowed that were not in
the Android dictionary. This setting allows you select any word and delete it or correct it.

Settings
42
Keyboard and Input Methods
Android supports a wide variety of languages that may require different keyboards. Use this setting to select
the keyboard you prefer. Third-party keyboard applications are enable using this setting. If you have a
handwriting recognition application, select it instead of using a keyboard.
Speech
•
Voice Search
These settings allow you to control how speech recognition can be used to provide input to applications like
the search engine or the browser. This menu gives you an interesting access point to all the permissions you
have granted to Google. Take a look at the Google Account dashboard.
•
Text-to-speech output
Controls how quickly Android talks to you when converting text to speech and allows you to control
language output. This is an interesting option if you want to learn a new language since you can hear in
another language what you are reading in your current language.
Mouse/Trackpad
When you use an external mouse or the RS mouse feature, this setting allows you to set the sensitivity and
responsiveness of the mouse.
Backup and Reset
This selection allows you to back-up your data to a Google server and revert to factory data settings.
You can back up settings and other data associated with one or more of your accounts, which is recommended if
for any reason you need to replace or factory-reset your device.
These options are available:
Speech
Back up my data. If you check this option, a wide variety of your personal data is backed up automatically, such
as app data, Wi-Fi passwords, and other settings.
Backup account. Displays the Google accounts whose information gets backed up. You must sign in with one
or more of these accounts on a new or reset device to retrieve the associated information.
To add a new account, touch Backup account > Add account.
Automatic restore. Check this option to restore settings and other data when you reinstall an app. This feature
requires that you are backing up your data with your Google Account and that the app is using the backup
service.
Factory data reset. Touch this option, then Reset tablet or Reset phone to erase all your personal data from
internal storage, including information about your Google Account, any other accounts, your system and app
settings, any downloaded applications, and your music, photos, videos, and other files.
After resetting your device, you need to re-enter the same information requested when you first set up your
device. If you have been backing up your data to a Google account, an option during the setup process allows you
to restore it.
If you're using a tablet with multiple users, only the owner can see the Backup & Reset options.
Settings
43
Accounts
Accounts lists the apps currently loaded on your tablet that require specific account details, such as Google and
Skype.
Add an Account
1. Go to SettingsAccountsAdd account.
2. Touch the kind of account to add.
3. Follow the on-screen instructions.
When you are finished, the account is added in one of two places:
Google Accounts show up under SettingsAccountsGoogle.
Other accounts show up under SettingsAccounts.
Remove an Account
Tap the account you want to remove to open that account.
Tap the account to open up Sync settings.
Tap the Menu icon.
Select Remove account.
Confirm the request to remove the account.
System
Configure the date and time format, accessibility, and view information about the tablet when you select System
settings.
System update periodically checks online to see if there is a newer version of software for your tablet. If there is a
newer version, the system downloads the new software over Wi-Fi and prompts you to install the new software
image.
About tablet
•
System updates
Check here to see if there are any system updates you have not installed yet. Typically when there is an
Over-the-Air (OTA) update you will see a notification to download and install. If you ignore the message you
can still get the update here.
•
Send feedback to NVIDIA
This is a handy way to let NVIDIA know what you like or dislike about your Tegra Note. If you find a bug, let
us know how to reproduce it so we can fix it in a future OTA.
•
Status
Very important information is found here like your data network connectivity information, Wi-Fi address,
Bluetooth address, and the serial number of the tablet. This is information you need to provide if you have a
problem with the tablet.
•
Legal information
When you turned on the device for the first time, you were presented with an End User License Agreement
that includes the terms of use. This page shows you what you agreed to.
44
How To…
This section goes through the common How to instructions. Included in this section are:
How to use the Calendar
How to use Email
How to text
How to use Voice actions
How to use Google Play
Bookmarks
While browsing the Internet, you may come to locations you want to revisit. Tap the Star icon in the upper right
corner of the top ribbon to save a bookmark to that location. You can save the bookmark to a Bookmark area (this
is the default and the easiest option). You can also save the bookmark as a shortcut on your Home screen or to a
designated folder.
The Bookmark area can be accessed by taping the Bookmarks tab in the upper left corner of the screen to list your
bookmarked sites. This screen also has a History tab that lists the sites you have recently visited but may not have
bookmarked. Any site that has been bookmarked has a star next to it.
Bookmark History Add Bookmark
Sync Bookmarks
Sometimes it is handy to sync your bookmarks between your tablet and your computer. Use the following steps
to sync bookmarks:
4. Go to SettingsGeneral
5. Select Sync with Google.
6. Select the option to either merge bookmarks from your Tegra NOTE 7 or delete bookmarks.
0.
0.
How To…
45
How to Create an All-in-One Calendar
Your Tegra NOTE 7 comes with a full-featured web-based Google Calendar app. You can use this
app to manage personal, shared, and public events all on one calendar.
You will need a Google account to register for Google calendar. If you did not set up a Google
account at start-up, you will need to do so before using the calendar. To access the Google
calendar, go to http://calendar.google.com.
If you are using a Microsoft Exchange server to manage your company events, you may want to
sync it with your Google Calendar to make life easier. You can sync your calendars in both places (work and home)
by downloading and installing the Google Calendar Sync app from:
http://dl.google.com/googlecalendarsync/GoogleCalendarSync_Installer.exe.
When you install the sync, you decide if this is a two-way sync where events are editable in both programs or if
this is a one-way sync where events are only editable in one program.
Viewing the calendar on the tablet can be done by month, week, and day, configurations. Add an event to your
calendar by tapping the New Event icon .
How to Email
You can use any Email account on your Tegra NOTE 7 device. During setup you were asked to open a Gmail
account. The Gmail app lets you read and write Email from any mobile device or browser. To open it, touch the
Gmail icon on a Home or All Apps screen.
Reading Incoming Messages
1. Tap the Gmail icon .
2. Select and tap the message to read.
3. Tap if you want to preserve the message in a separate folder.
4. Tap if you want to delete the message.
0.
Sending Email
1. Tap the Gmail icon .
2. Tap New Email icon .
3. Enter the recipient’s email address, a subject, and the message.
4. Tap Send.
0.
Setting General Options
1. Tap the Gmail icon .
2. Tap SettingsGeneral Settings.
3. Adjust the setting options.
0.
How To…
46
Setting Personal Options
1. Tap the Gmail icon .
2. Tap Settings.
3. Tap your Gmail account and adjust the settings options.
How to Use the Clock
To open the Clock, touch the Clock icon from a Home or All Apps screen.
How to Set an Alarm
Touch the Alarm Clock icon in the lower left corner of the screen.
Touch the Add icon to add a new alarm.
Select the time you want the alarm to sound.
Touch OK.
Any existing alarms will show in the main Clock screen. To turn an alarm On or Off, slide the switch.
An alarm status icon displays in the status ribbon at the top of the screen to remind you that an alarm has been
set.
You can also add a label to an alarm and change the ringtone. To change these options for a single alarm, touch
the arrow underneath the On/Off switch.
How to Set a Timer
Touch the Timer icon in the top left corner of the screen.
Enter the amount of time you want by touching the hour/minute/seconds.
Touch Start to begin the timer.
When the timer is going, you can add an additional minute, pause the timer, or delete the current timer.
The timer beeps when the time is up and keeps beeping until you touch Stop.
How to Use the Stopwatch
Touch the Stopwatch icon in the top right corner of the screen.
Touch Start to start the stopwatch.
If you want to pause the stopwatch, touch Stop. You can also add laps while the stopwatch is running by touching
the icon to the left of the stopwatch.
To share your results, touch the Share icon to share using Google+, Gmail, and more.
How to View your Clock
To view the current date and time, touch the Clock icon at the top center of the screen.
47
Compliance
The P1988 is compliant with the agencies listed in this section. In addition to the standard compliance marks,
P988 also contains the following marks:
Li-ion Li-ion indicates that the product contains a Lithium Ion battery.
This is a universal recycling symbol. A product marked with this symbol can be recycled if the
regulations and/or ordnances of the local community provide for its collection.
This is a universal recycling symbol indicating that the product cannot be disposed of in the trash
and must be recycled according to the regulations and/or ordnances of the local community.
Power Rating
5.0 V DC, 2 A
United States
Federal Communications Commission (FCC)
FCC ID: VOB-P1988
This device complies with part 15 of the FCC Rules. Operation is subject to the following two conditions: (1) this
device may not cause harmful interference, and (2) this device must accept any interference received, including
any interference that may cause undesired operation of the device.
This equipment has been tested and found to comply with the limits for a Class B digital device, pursuant to Part
15 of the FCC Rules. These limits are designed to provide reasonable protection against harmful interference in a
residential installation. This equipment generates uses and can radiate radio frequency energy and, if not installed
and used in accordance with the instructions, may cause harmful interference to radio communications. However,
there is no guarantee that interference will not occur in a particular installation.
If this equipment does cause harmful interference to radio or television reception, which can be determined by
turning the equipment off and on, the user is encouraged to try to correct the interference by one or more of the
following measures:
• Reorient or relocate the receiving antenna.
• Increase the separation between the equipment and receiver.
• Connect the equipment into an outlet on a circuit different from that to which the receiver is connected.
• Consult the dealer or an experienced radio/TV technician for help.
FCC Warning: The FCC requires that you be notified that any changes or modifications to this device not expressly
approved by the manufacturer could void the user’s authority to operate the equipment.

How To…
48
RF Radiation Exposure Statement:
This equipment complies with FCC RF radiation exposure limits set forth for an uncontrolled environment. This
equipment must be installed and operated in accordance with provided instructions and the antenna(s) used for
this transmitter must be installed to provide a separation distance of at least 0 mm from all persons and must not
be co-located or operating in conjunction with any other antenna or transmitter. End-users and installers must be
provide with antenna installation instructions and consider removing the no-collocation statement.
Underwriters Laboratories (UL)
I.T.E E204896
California Energy Commission (CEC)
This product meets the applicable energy efficiency requirements for a battery charging system
Canada
Industry Canada (IC)
IC: 7361A-P1988
CAN ICES-3(B)/NMB-3(B)
This device complies with RSS-210 of the Industry Canada Rules. Operation is subject to the following two
conditions: (1) this device may not cause interference, and (2) this device must accept any interference, including
interference that may cause undesired operation of the device.
Ce dispositif est conforme à la norme CNR-210 d'Industrie Canada applicable aux appareils radio exempts de
licence. Son fonctionnement est sujet aux deux conditions suivantes: (1) le dispositif ne doit pas produire de
brouillage préjudiciable, et (2) ce dispositif doit accepter tout brouillage reçu, y compris un brouillage susceptible
de provoquer un fonctionnement indésirable.
RF Radiation Exposure Statement:
This transmitter must not be co-located or operating in conjunction with any other antenna or transmitter. This
equipment should be installed and operated with a minimum distance of 0 millimeters between the radiator and
your body.

How To…
49
d'exposition aux radiations:
Cet émetteur ne doit pas être Co-placé ou ne fonctionnant en même temps qu'aucune autre antenne ou émetteur.
Cet équipement devrait être installé et actionné avec une distance minimum de 0 millimètres entre le radiateur et
votre corps
European Union
European Conformity; Conformité Européenne (CE)
This device bears the CE mark and class-2 identifier in accordance with Directive 1999/5/CE
This device complies with the following Directives:
EMC Directive for Class B, I.T.E equipment.
R&TTE Directive for radio equipment
Low Voltage Directive for electrical safety
RoHS Directive for hazardous substances
India
Bureau of Indian Standards (BIS)
Self Declaration - Conforming to IS13252:2010 xx.xx
Wireless Planning & Coordination Wing (WPC)
ETA CERTIFICATION NO: XXXX/YYYY/WROL
Russia/Kazakhstan/Belarus
EurAsian Customs Union

How To…
50
Bluetooth
Bluetooth v4.0 LE
Qualified Design ID: Bxxxxxx
Wi-Fi ALLIANCE®
Wi-Fi CERTIFIED™
Certification ID: WFAxxxxx

51
Health and Safety
Important Safety Information
Tegra NOTE 7 is designed to operate safely when installed and used according to the product instructions and
general safety practices. The guidelines included in this document explain the potential risks associated with
equipment operation and provide important safety practices designed to minimize these risks. By carefully
following the information contained in this document, you can protect yourself from hazards and create a safer
environment.
This product is designed and tested to meet IEC-60950-1, the Standard for Safety of Information Technology
Equipment. This also covers the national implementation of IEC-60950-1 based safety standards around the world
e.g. UL-60950-1. These standards reduce the risk of injury from the following hazards:
• Electric shock: Hazardous voltage levels contained in parts of the product
• Fire: Overload, temperature, material flammability
• Mechanical: Sharp edges, moving parts, instability
• Energy: Circuits with high energy levels (240 volt amperes) or potential as burn hazards
• Heat: Accessible parts of the product at high temperatures
• Chemical: Chemical fumes and vapors
• Radiation: Noise, ionizing, laser, ultrasonic waves
Retain and follow all product safety and operating instructions. Always refer to the documentation supplied with
your equipment. Observe all warnings on the product and in the operating instructions.
Read all safety information below and operating instructions before using the Tegra NOTE 7 to avoid injury.
WARNING: FAILURE TO FOLLOW THESE SAFETY INSTRUCTIONS COULD RESULT IN FIRE,
ELECTRIC SHOCK OR OTHER INJURY OR DAMAGE.
ELECTRICAL EQUIPMENT CAN BE HAZARDOUS IF MISUSED. OPERATION OF THIS PRODUCT,
OR SIMILAR PRODUCTS, MUST ALWAYS BE SUPERVISED BY AN ADULT. DO NOT ALLOW
CHILDREN ACCESS TO THE INTERIOR OF ANY ELECTRICAL PRODUCT AND DO NOT PERMIT
THEM TO HANDLE ANY CABLES.
Health and Safety
52
To reduce the risk of bodily injury, electric shock, fire, and damage to the equipment, observe the safety labels
included on the equipment.
Symbols on Equipment
This symbol in conjunction with any of the following symbols indicates the presence of a
potential hazard. The potential for injury exists if warnings are not observed. Consult your
documentation for specific details.
This symbol indicates the presence of hazardous energy circuits or electric shock hazards. Refer
all servicing to qualified personnel.
!
WARNING: To reduce the risk of injury from electric shock hazards, do not open this enclosure.
Refer all maintenance, upgrades, and servicing to qualified personnel.
This symbol indicates the presence of electric shock hazards. The area contains no user or field
serviceable parts. Do not open for any reason.
General Precautions
To reduce the risk of electric shock, personal injury, or damage to the equipment, observe the following
precautions:
Follow all cautions and instructions marked on the equipment.
Do not bend, drop, crush, puncture, incinerate, or push objects into openings of the gaming console.
Do not connect or disconnect any cables or perform maintenance or reconfiguration of this product during an
electrical storm.
Do not use Tegra NOTE 7 in rain or near sink or other wet locations. Take care not to spill any food or liquid
into the console. In case Tegra NOTE 7 gets wet, unplug all cables and turn off before cleaning, and allow it to
dry thoroughly before turning it on again.
Do not expose Tegra NOTE 7 to any gas that is not normally contained in the atmosphere, as it may cause
defects.
Never turn on any equipment when there is evidence of fire, water, or structural damage.
Place the product away from radiators, heat registers, stoves, amplifiers, or other appliances that produce
heat.
Never force a connector into a port. Check for obstructions on the port. If the connector and port don’t join
with reasonable ease, they probably don’t match. Make sure that the connector matches the port and that you
have positioned the connector correctly in relation to the port
If you use an AC Power Adapter to charge the gaming console, make sure the power adapter is fully assembled
before you plug it into a power outlet. Then insert the AC Power Adapter firmly into the power outlet. Do not
connect or disconnect the AC Power Adapter with wet hands.
Operate the AC adapter in a ventilated area.
When you are using the Tegra NOTE 7 or charging the battery, it is normal for the system and/or AC power
adapter to get warm.
Do not use conductive tools that could bridge live parts
Do not make mechanical or electrical modifications to the equipment.

Health and Safety
53
Never attempt to repair Tegra NOTE 7 yourself. This device does not contain any user-serviceable parts. Do
not attempt to open, disassemble, or remove the battery. You run the risk of electric shock.
To clean the display, use a soft, lint-free cloth. If necessary, breathe upon the display surface and wipe off
immediately and softly. Avoid getting moisture in openings. Don’t use window cleaners, household cleaners,
aerosol sprays, solvents, alcohol, ammonia, or abrasives to clean the display.
Operate the Tegra NOTE 7 in a place where the temperature is always between 5 and 30°C (41 to 86°F).
Store Tegra NOTE 7 in a place where the temperature is always between 0 and 35°C (32 to 95°F) with a relative
humidity of 70% or lower. When taking the device from a low temperature condition, allow the device to reach
room temperature before turning the power on.
Use this product only with approved equipment and/or accessories
If the product sustains damage requiring service, disconnect the product from the AC electrical outlet and refer
servicing to an authorized service provider.
LITHIUM BATTERY WARNING: THIS GAMING DEVICE CONTAINS A NON-USER-SERVICEABLE
LITHIUM-ION BATTERY PACK. THERE IS RISK OF EXPLOSION, FIRE, BURN OR LEAKING WHICH
CAN BE CAUSED BY IMPROPER CHARGING, SHORTING OF THE BATTERY PACK, CRASH
DAMAGE OR OTHER MISUSE. ALWAYS USE CHARGERS DESIGNED SPECIFICALLY FOR USE
WITH THIS GAMING DEVICE. DO NOT ATTEMPT TO DISASSEMBLE, REPLACE, OR OTHERWISE
ATTEMPT TO ACCESS THE BATTERY PACK.
CONTACT CUSTOMER SUPPORT FOR REPAIR OR REPLACEMENT INFORMATION. RECYCLE
THE DEVICE ACCORDING TO LOCAL RULES AND REGULATIONS. CONTACT YOUR LOCAL
WASTE DISPOSAL/RECYCLE FACILITY.
54
Notice
The information provided in this specification is believed to be accurate and reliable as of the date provided. However, NVIDIA Corporation (“NVIDIA”) does not
give any representations or warranties, expressed or implied, as to the accuracy or completeness of such information. NVIDIA shall have no liability for the
consequences or use of such information or for any infringement of patents or other rights of third parties that may result from its use. This publication supersedes
and replaces all other specifications for the product that may have been previously supplied.
NVIDIA reserves the right to make corrections, modifications, enhancements, improvements, and other changes to this specification, at any time and/or to
discontinue any product or service without notice. Customer should obtain the latest relevant specification before placing orders and should verify that such
information is current and complete.
NVIDIA products are sold subject to the NVIDIA standard terms and conditions of sale supplied at the time of order acknowledgement, unless otherwise agreed in
an individual sales agreement signed by authorized representatives of NVIDIA and customer. NVIDIA hereby expressly objects to applying any customer general
terms and conditions with regard to the purchase of the NVIDIA product referenced in this specification.
NVIDIA products are not designed, authorized or warranted to be suitable for use in medical, military, aircraft, space or life support equipment, nor in applications
where failure or malfunction of the NVIDIA product can reasonably be expected to result in personal injury, death or property or environmental damage. NVIDIA
accepts no liability for inclusion and/or use of NVIDIA products in such equipment or applications and therefore such inclusion and/or use is at customer’s own risk.
NVIDIA makes no representation or warranty that products based on these specifications will be suitable for any specified use without further testing or
modification. Testing of all parameters of each product is not necessarily performed by NVIDIA. It is customer’s sole responsibility to ensure the product is suitable
and fit for the application planned by customer and to do the necessary testing for the application in order to avoid a default of the application or the product.
Weaknesses in customer’s product designs may affect the quality and reliability of the NVIDIA product and may result in additional or different conditions and/or
requirements beyond those contained in this specification. NVIDIA does not accept any liability related to any default, damage, costs or problem which may be
based on or attributable to: (i) the use of the NVIDIA product in any manner that is contrary to this specification, or (ii) customer product designs.
No license, either expressed or implied, is granted under any NVIDIA patent right, copyright, or other NVIDIA intellectual property right under this specification.
Information published by NVIDIA regarding third-party products or services does not constitute a license from NVIDIA to use such products or services or a
warranty or endorsement thereof. Use of such information may require a license from a third party under the patents or other intellectual property rights of the
third party, or a license from NVIDIA under the patents or other intellectual property rights of NVIDIA. Reproduction of information in this specification is
permissible only if reproduction is approved by NVIDIA in writing, is reproduced without alteration, and is accompanied by all associated conditions, limitations,
and notices.
ALL NVIDIA DESIGN SPECIFICATIONS, REFERENCE BOARDS, FILES, DRAWINGS, DIAGNOSTICS, LISTS, AND OTHER DOCUMENTS (TOGETHER AND
SEPARATELY, “MATERIALS”) ARE BEING PROVIDED “AS IS.” NVIDIA MAKES NO WARRANTIES, EXPRESSED, IMPLIED, STATUTORY, OR OTHERWISE WITH
RESPECT TO THE MATERIALS, AND EXPRESSLY DISCLAIMS ALL IMPLIED WARRANTIES OF NONINFRINGEMENT, MERCHANTABILITY, AND FITNESS FOR A
PARTICULAR PURPOSE. Notwithstanding any damages that customer might incur for any reason whatsoever, NVIDIA’s aggregate and cumulative liability
towards customer for the products described herein shall be limited in accordance with the NVIDIA terms and conditions of sale for the product.
VESA DisplayPort
DisplayPort and DisplayPort Compliance Logo, DisplayPort Compliance Logo for Dual-mode Sources, and DisplayPort Compliance Logo for Active Cables are
trademarks owned by the Video Electronics Standards Association in the United States and other countries.
HDMI
HDMI, the HDMI logo, and High-Definition Multimedia Interface are trademarks or registered trademarks of HDMI Licensing LLC.
ARM
ARM, AMBA and ARM Powered are registered trademarks of ARM Limited. Cortex, MPCore and Mali are trademarks of ARM Limited. All other brands or product
names are the property of their respective holders. ʺARMʺ is used to represent ARM Holdings plc; its operating company ARM Limited; and the regional
subsidiaries ARM Inc.; ARM KK; ARM Korea Limited.; ARM Taiwan Limited; ARM France SAS; ARM Consulting (Shanghai) Co. Ltd.; ARM Germany GmbH; ARM
Embedded Technologies Pvt. Ltd.; ARM Norway, AS and ARM Sweden AB.
OpenCL
OpenCL is a trademark of Apple Inc. used under license to the Khronos Group Inc.
Trademarks
NVIDIA, the NVIDIA logo, Tegra, and Tegra NOTE 7 are trademarks and/or registered trademarks of NVIDIA Corporation in the U.S. and other countries. Other
company and product names may be trademarks of the respective companies with which they are associated.
Copyright
© 2014 NVIDIA Corporation. All rights reserved.