NVIDIA P753A 3D Vision Pro HUB User Manual 3DVISION PRO Userl Guide indd
NVIDIA Corporation 3D Vision Pro HUB 3DVISION PRO Userl Guide indd
UserManual.wiki
>
NVIDIA
>
P753A User Manual
>
Users Manual
Contents
1.
Users Manual
2.
User Manual
Users Manual
Navigation menu
Upload a User Manual
Namespaces
Wiki Guide
HTML
PDF
Info
Views
User Manual
Discussion / Help
Navigation


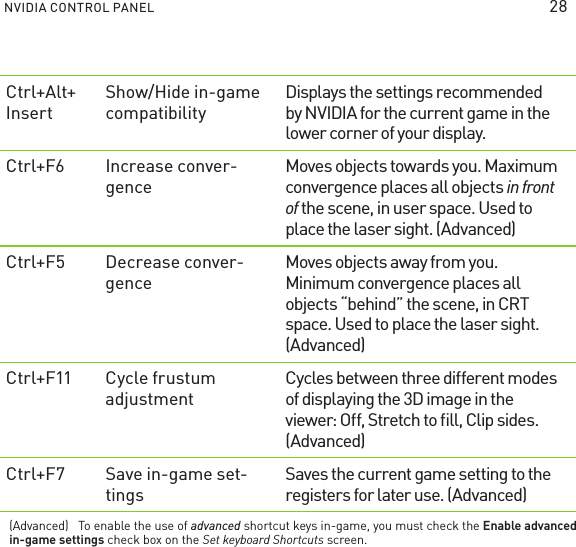

![ADVANCED INFORMATION Application Configuration GuidelinesThe following table lists some adjustment guidelines to use for specific issues when you are in a game.Table 2. Application Configuration GuidelinesIssue SuggestionObject are too close Decrease Convergence [Ctrl+F5]Side borders are blurred, not clear, not visibleCycle frustum adjustments until borders are clear [Ctrl+F11]Convergence settings not good for all parts of the gameIncrease/decrease conver-gence [Ctrl+F6/Ctrl+F5]Stereoscopic 3D unclear, not sure what needs to be adjustedSee Tips and Troubleshooting on page 39Once you are happy with the way the game looks in stereoscopic 3D, press Ctrl-F7 to save these settings to the register. The settings are associated with this game only (based on the name of the game executable file).Viewing Practices >>Depth Amount: The recommended starting point for Depth Amount is 15%, but always adjust the depth to a comfortable level. You can increase it over time as your eyes get used to stereoscopic 3D viewing.>>Viewing Distance: Maintain a distance no closer than 2 to 2.5 feet away from the monitor. Viewing from too close a distance can cause too much strain on your eyes, and can reduce stereoscopic quality.>>Viewing Angle: Keep your eyes parallel to the screen. The imagi-nary line connecting your eyes should be parallel to the horizontal level of the screen. The stereoscopic 3D effect is based on side-to-side or horizontal—displacement of each image. If you tilt your head, your eyes no longer see the displacement as horizontal, and the stereoscopic 3D effect is diminished or even eliminated. While your brain may adjust to this viewing, it must work harder, result-ing in eye strain and fatigue.](https://usermanual.wiki/NVIDIA/P753A.Users-Manual/User-Guide-1379450-Page-38.png)