National Datacomm 4010S01 Wireless USB Adapter User Manual manual NWH4010
National Datacomm Corporation Wireless USB Adapter manual NWH4010
Users Manual
1
Your Installation Guide to
IEEE 802.11b USB Wireless LAN
Version: 2.01 — March 2001

1
Table of Contents
REGULATORY INFORMATION...........................................................................2
STEP BY STEP INSTALLATION GUIDE...........................................................3
1 Install the IEEE802.11b USB WLAN Utility / Driver..........................................4
2 Install the USB Adapter......................................................................................7
3 IEEE802.11B USB WLAN UTILITY......................................................................8
4 Remove your USB Adapter ...............................................................................16
5 Uninstall the IEEE802.11b USB WLAN Utility / Driver...................................17
Copyright Statement
No part of this publication may be reproduced, stored in a retrieval system, or transmitted in any form or by any
means, whether electronic, mechanical, photocopying, recording or otherwise without the prior writing of the
publisher.
Windows 95/98 and Windows 2000 are trademarks of Microsoft Corp.
Pentium is trademark of Intel.
All copyright is reserved.

2
Regulatory Information
Federal Communication Commission Interference Statement
This equipment has been tested and found to comply with the limits for a Class B digital device,
pursuant to Part 15 of the FCC Rules. These limits are designed to provide reasonable protection
against harmful interference in a residential installation. This equipment generates, uses and can
radiate radio frequency energy and, if not installed and used in accordance with the instructions, may
cause harmful interference to radio communications. However, there is no guarantee that interference
will not occur in a particular installation. If this equipment does cause harmful interference to radio or
television reception, which can be determined by turning the equipment off and on, the user is
encouraged to try to correct the interference by one of the following measures:
- Reorient or relocate the receiving antenna.
- Increase the separation between the equipment and receiver.
- Connect the equipment into an outlet on a circuit different from that to which the receiver is
connected.
- Consult the dealer or an experienced radio/TV technician for help.
FCC Caution: To assure continued compliance, (example - use only shielded interface cables when
connecting to computer or peripheral devices) any changes or modifications not expressly approved
by the party responsible for compliance could void the user's authority to operate this equipment.
This device complies with Part 15 of the FCC Rules. Operation is subject to the following two
conditions: (1) This device may not cause harmful interference, and (2) this device must accept any
interference received, including interference that may cause undesired operation.
IMPORTANT NOTE:
FCC Radiation Exposure Statement:
This equipment complies with FCC radiation exposure limits set forth for an uncontrolled environment.
This equipment should be installed and operated with minimum distance 20cm between the radiator
& your body.
This transmitter must not be co-located or operating in conjunction with any other antenna or
transmitter.

3
Step by step Installation Guide
This section will lead you through the installation of USB Adapter and IEEE802.11b USB WLAN
software in through details. You may wish to skip to quick start guide to wireless networking.
To establish your wireless network connection, the following steps should be executed.
1. Install the software using the installation CD.
2. Install the USB Wireless LAN Adapter.
3. Install the required network protocols to communicate with your network. Most likely, you will
need the TCP / IP protocol.
The product is designed to operate in Windows 98, Windows Me, and Windows 2000. And the
installation procedure is about the same. Please follow up the installation wizard that provided by
your system to install the software. The example here is based on the Windows 98SE.
4
1 Install the IEEE802.11b USB WLAN Utility / Driver
Please install the IEEE802.11b USB WLAN Utility / Driver first before inserting the
IEEE802.11b USB Wireless LAN.
1. Insert the IEEE802.11b USB Wireless LAN installation CD into your CD-ROM drive. The
setup program will then automatically start.
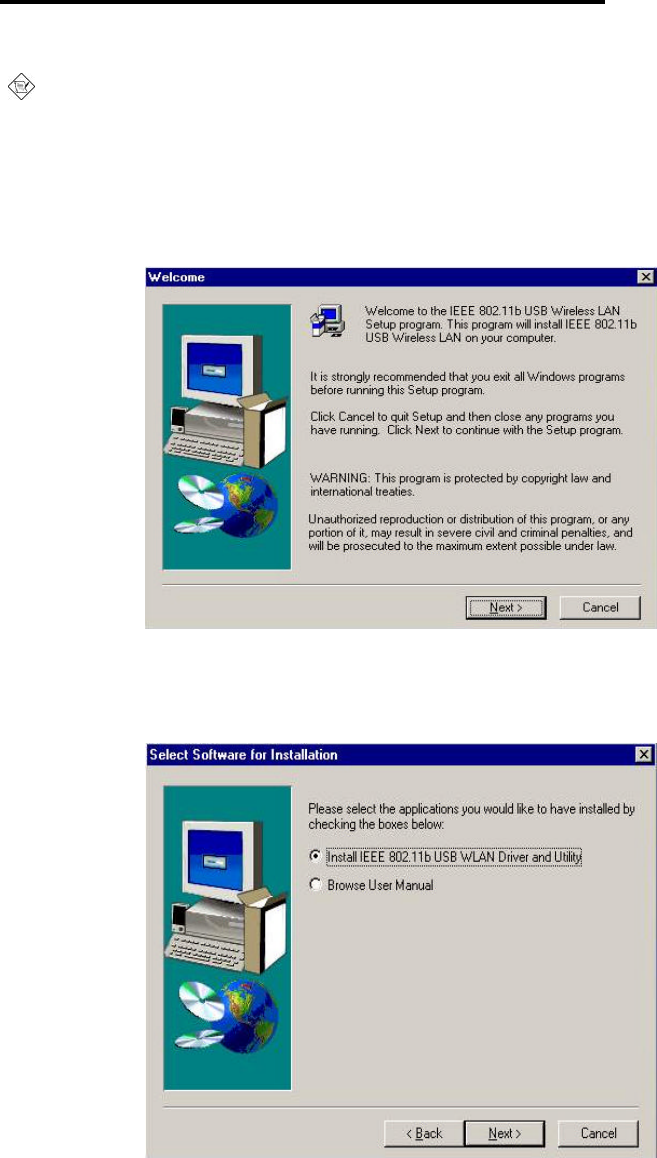
2. The setup program will start and the setup screen will appear on your monitor. Select
“ Next “ to go to the next screen.
3. Please select the applications you would like to install, and click “ Next “. If you select
“ Browse User Manual “, system will prompt a message to suggest you installing the
Acrobat Reader.
5
4. The default destination folder is displayed in the setup dialog column. To change the default
folder you can click “ Browse “ to set the destination folder. Click “ Next “ to go to the next
screen.
5. Select the Program Folder for IEEE802.11b USB WLAN Utility and click “ Next “.
6
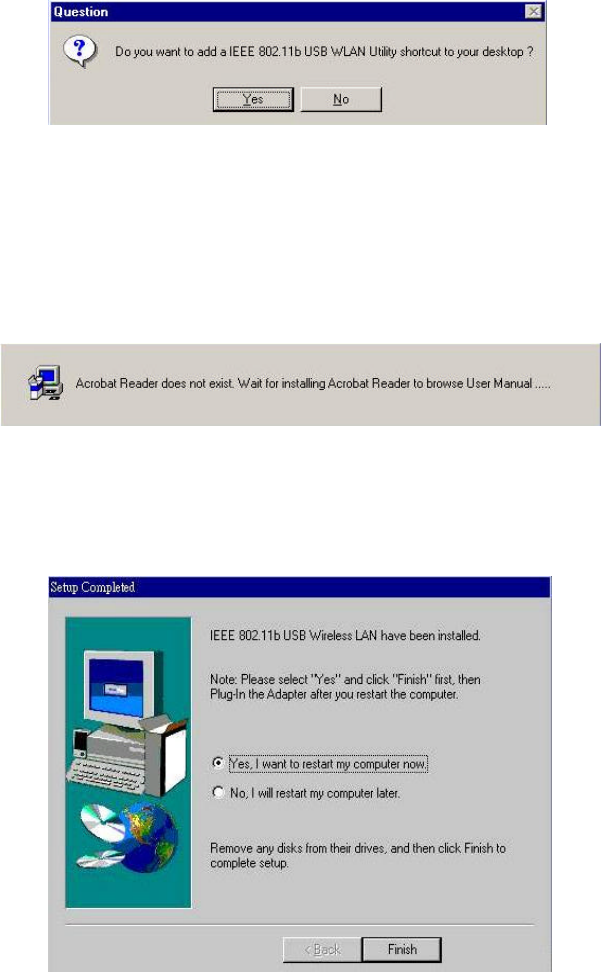
6. You will be asked if you want to add an IEEE802.11b USB WLAN Utility shortcut to your
desktop. Click “ Yes “.
7. The user manual is published in Portable Document Format (PDF). If Acrobat Reader
doesn’t exist in your system, the following message will be prompted and automatically enter
Acrobat Reader installation screen. Please follow the instructions to complete the Acrobat
Reader 4.05 installation.
8. The Driver and Help files will be copied to the system. Wait the setup program to finish the
IEEE802.11b USB WLAN installation. Then select “ Yes “ and click “ Finish “ to complete the
installation. It’s recommended to close other applications before rebooting your system.
9. Regards to install the IEEE802.11b USB Adapter, please refer to the next chapter 3.2
“ Install the USB Adapter. “
7
2 Install the USB Adapter
The IEEE802.11b USB WLAN driver and utility are included on the accompanying
installation CD. Please follow the installation procedures in Section 3.1. (Your USB Adapter
will not work properly if the driver and utilities are not installed correctly.)
1. After completing the software installation, please insert the USB Adapter and then the setup will
automatically start.
If you’re asked to insert a “ Windows 98 CD-ROM “ during the installation, insert your
“ Windows 98 CD-ROM “ and click “ Yes “. Once the setup task is completed, the “ Microsoft
Internet Explorer “ should start up. Please close it.
2. When the USB Adapter setup task is completed, you can start the IEEE 802.11b USB WLAN
Utility. To start the utility, please refer to the chapter 3.3 “ IEEE 802.11b USB WLAN Utility“.
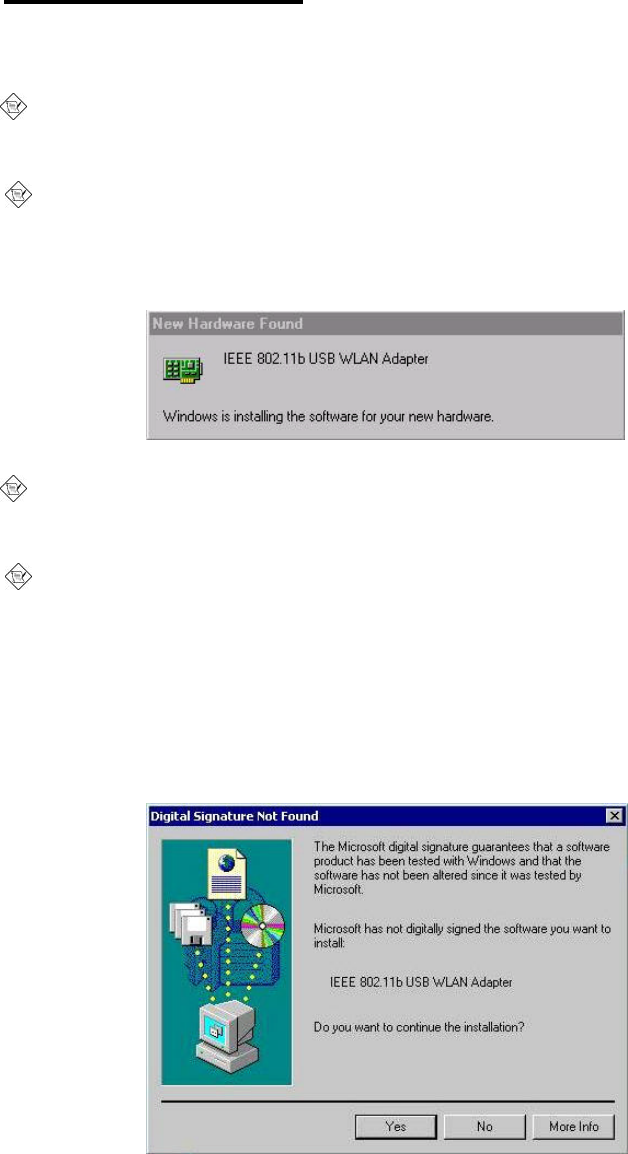
Additional Note for Windows 2000
If you install the IEEE802.11b USB Wireless LAN under Windows 2000, it will be a little bit
different from Windows 98 or Me. A message will be prompted as follows, click “Yes” to
complete the USB adapter setup.

8
3 IEEE802.11b USB WLAN Utility
IEEE802.11b USB WLAN Adapter has its own management software. Users can control all
functions provided by the application named IEEE802.11b USB WLAN Utility. The Utility icon will
appear in the taskbar by clicking the IEEE802.11b USB WLAN Utility shortcut on your desktop.
The monitor Utility includes six tabs: Monitor, Statistics, Site Survey, Encryption, Advanced, and
Version.
In AdHoc mode, the Channel and SSID must be the same among stations so that the computers
can communicate within the local LAN properly. Moreover, all connected computers should have
the same netid and subnetid, you can follow the procedure below to check whether you have the
same netid and subnetid among stations:
1. Right-click on the Network Neighborhood on your desktop and then click on “Properties”.
2. In Configuration, click on “TCP/IP -> IEEE802.11b USB WLAN Adapter” and then click on
“Properties”.
3. Click on “IP Address”.
4. Click on “Specify an IP Address” and make sure having the same netid and subnetid of all the
connected computers.
To open IEEE802.11b Utility, please double click the icon in the taskbar.
9
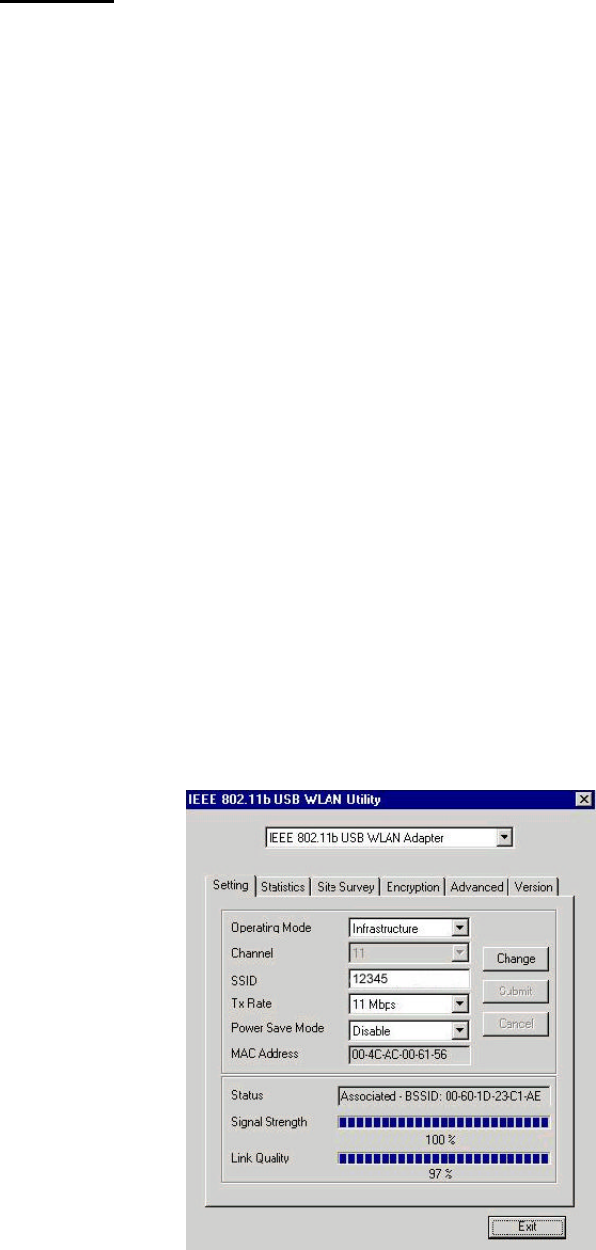
3.1 Setting
• Operating Mode:
If you want to connect with Access Point, please set the mode as” Infrastructure”. If you have
more stations and just want to set them as local network, please set the Mode as ” Ad Hoc”.
• Channel:
It shows radio channel numbers that used for networking. The Channel number must be the same
among stations, so that computers can communicate within the local LAN. It can be changed only
under the Ad Hoc Mode. If the Mode is Infrastructure, this parameter will not be active.
• SSID:
SSID is the group name that will be shared by every member of your wireless network .You will
only be able to connect with an Access Point (AP), which has the same SSID. Note that the SSID
will be case sensitive. Please note that when you are in the Ad-hoc mode, the SSID must be the
same among stations so that computers can communicate within the local LAN properly.
• Tx Rate:
You can choose one of the transmission rates as follows, 1Mbps, 2Mbps, 5.5Mbps, 11Mbps, and
Fully Auto.
• Power Save Mode:
You can set this mode as Power Save to set your USB adapter as power saving mode.
• MAC Address:
It shows the MAC address of your IEEE802.11b USB device, and the parameter can’t be
changed.
• Other information:
The Signal Strength and Link Quality will be shown in the screen below under the Status of your
USB adapter,
• Status:
The Status will show the “OK” if you select “Ad Hoc mode” in the Operating Mode. Besides, the
Status will show BSSID of AP that you associated if you select the “Infrastructure “ in the
“Operating Mode”.
There are three processes once you want to change the parameter in the “Setting”:
1. Click the “Change” button first if you want to change any of the parameter.
2. Choose the parameter you wish to change.
3. After changing the parameter, please click on the “Submit” button to finish.
10
11
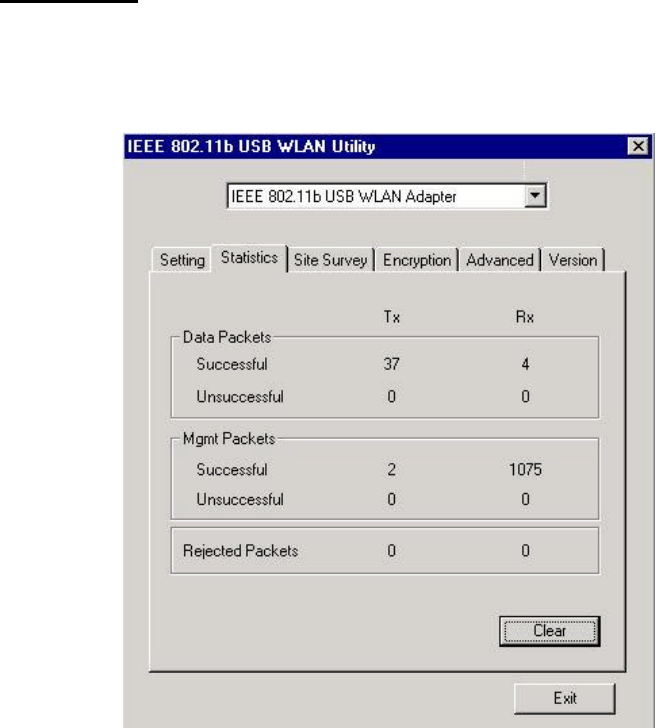
3.2 Statistics
• The following screen shows various statistics including the Data Packets, Management
Packets and Rejected Packets in transmitting and receiving status.
• You can click the Clear button to reset Statistics Tab.
12
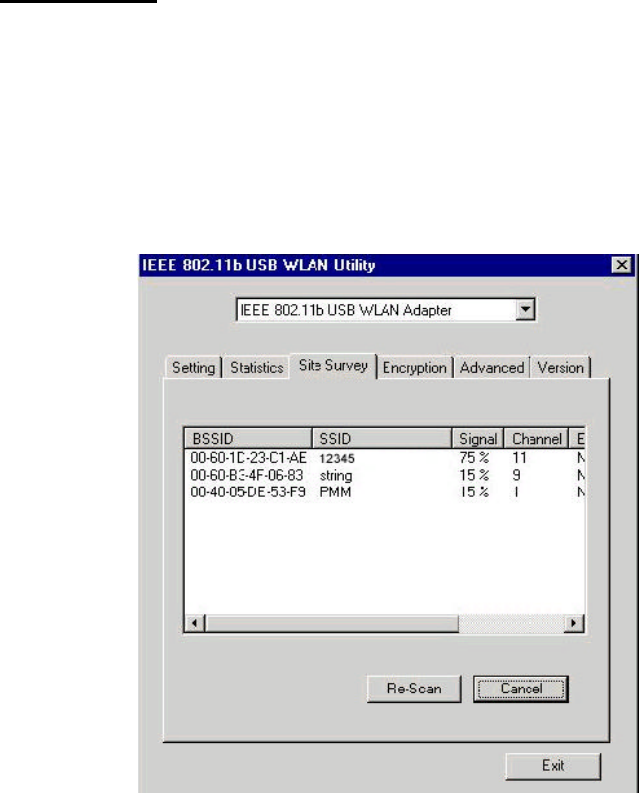
3.3 Site Survey
• The screen shows all the messages of Access Point around your IEEE 802.11b USB device.
The messages of Access Point include BSSID, SSID, Signal, the Channel used by AP, and
enabled the Encryption AP or not.
• You can click the Rescan button to find the new AP.
• You can double-click the BSSID to choose the AP that you want to connect with.
13
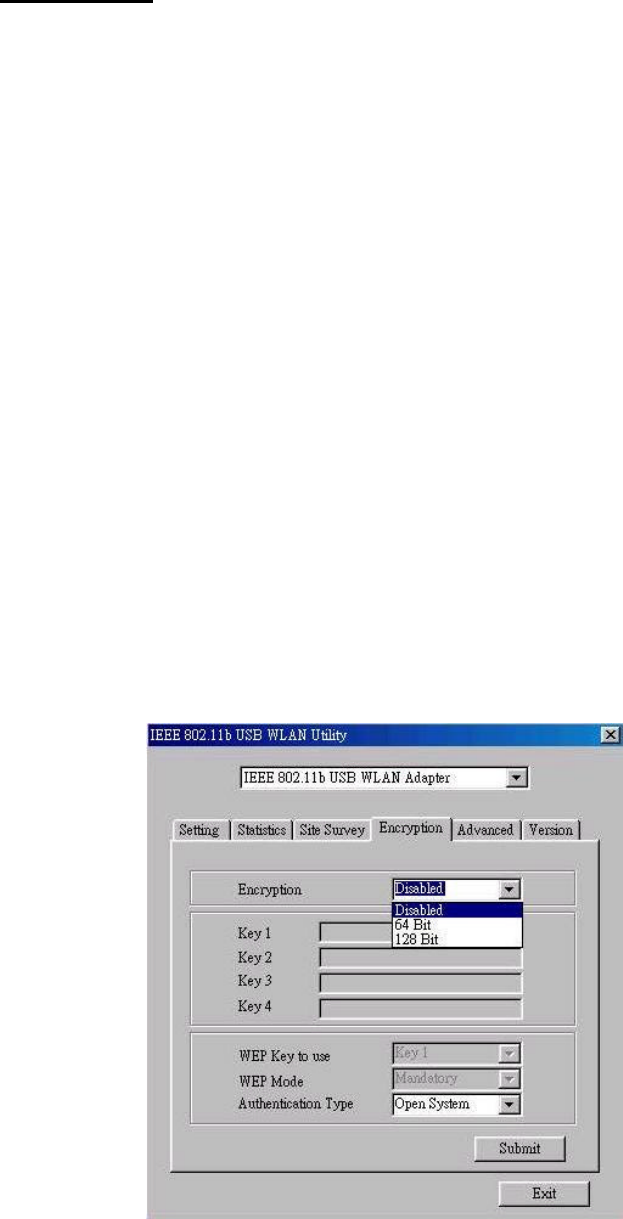
3.4 Encryption
You may desire an additional measure of security in your wireless network, which can be achieved
by using the Encryption function.
• WEP Key to use:
You can choose one of the four Keys you typed (Key1~Key4) as the WEP Key.
• WEP Mode:
If you set the Mode to Optional, your device can communicate with the stations with disabled WEP.
Otherwise, if you set Mode to Mandatory, then your device cannot communicate with the stations
with disabled WEP.
• Authentication Type:
Open System Authentication algorithm is mostly used. In Shard Key Authentication algorithm, you
must have WEP on, the algorithm should be different, and some steps use packets with
encryption by transferring a challenge text. In order to choose which authentication algorithm will
be used, you must know which one the AP supports first. Most APs only support Open System.
! Caution:
WEP Key needs to be the same for all IEEE802.11b stations.
Follow the steps below to set your WEP:
(1) Select the Encryption type: 64bit or 128bit.
(2) Type WEP Key: If you select 64bit, you must type 10 values in the following range
(0~F) from Key1 to Key 4 space. Besides, if you select 128 bit, you must type 26
values (0~F) in each WEP Key from Key 1 to Key 4. Please note that all the WEP
Keys (key1~key4) have to be filled.
(3) Select WEP Key: Select one of WEP Key from Key1 to Key4 for using.
(4) Choose the WEP Mode: Mandatory for communicating with all stations having WEP
enabled or Optional for WEP disabled.
(5) Select the Authentication Type: Open System or Shared Key.
(6) After all the settings are completed, click on Submit button to save the setting.
14
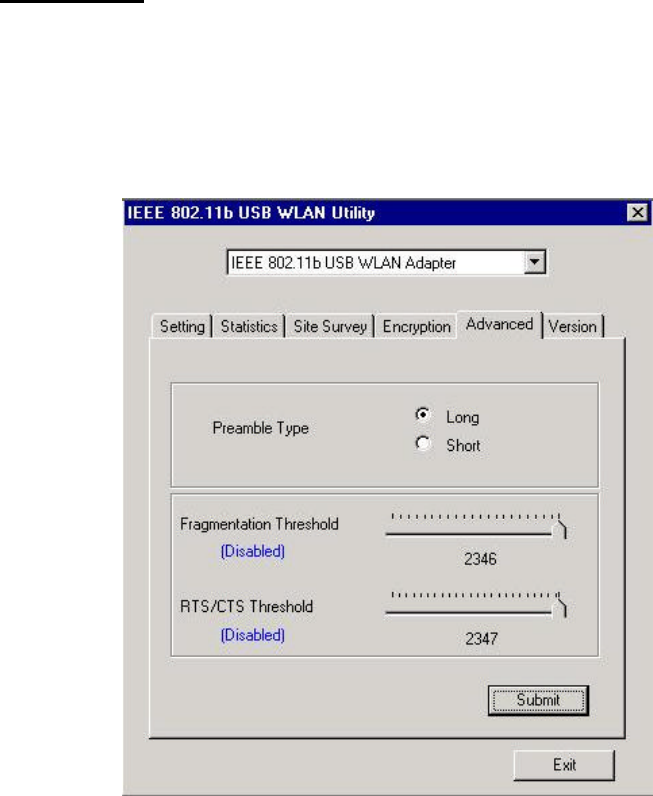
3.5 Advanced
• The screen shows the advanced setting of the IEEE802.11b USB WLAN Utility, and it includes
Preamble Type, Fragmentation Threshold, and RTS / CTS Threshold. We suggest to use the
default settings: Preamble Type: Long.
• Click on Submit button to save all the settings.
15
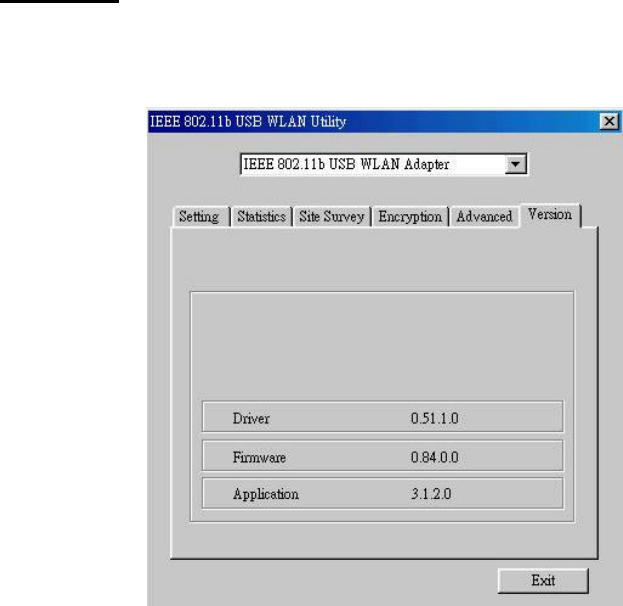
3.6 Version
• The screen shows the version of Driver, Firmware, and Application for IEEE802.11b USB
WLAN Utility / Driver.
16
4 Remove your USB Adapter
If you do not need the wireless connectivity of your IEEE802.11b USB WLAN Adapter, you can
unplug your USB adapter directly, and follow the procedures mentioned below to remove the PC
Card from its slot.
! Caution:
• When removing the IEEE802.11b USB WLAN Adapter, you will lose your connection to the
network. Make sure you have closed all files and network applications (such as e-mail) prior to
removing the USB device,
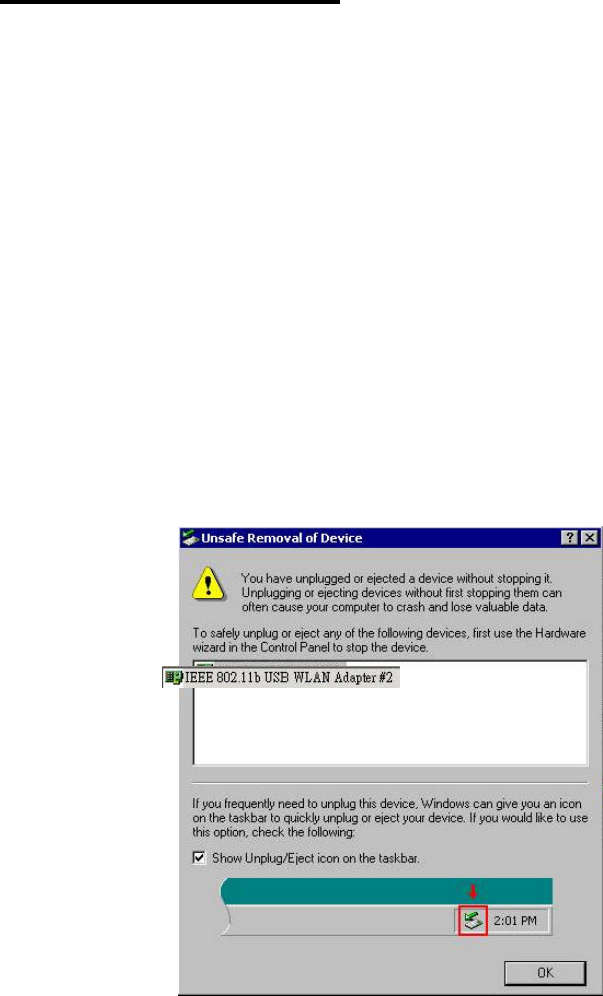
Additional Note for Windows 2000
If you directly remove your USB device in Windows 2000, a message of unsafe remove device
will be prompted as follows. Please click OK.
17
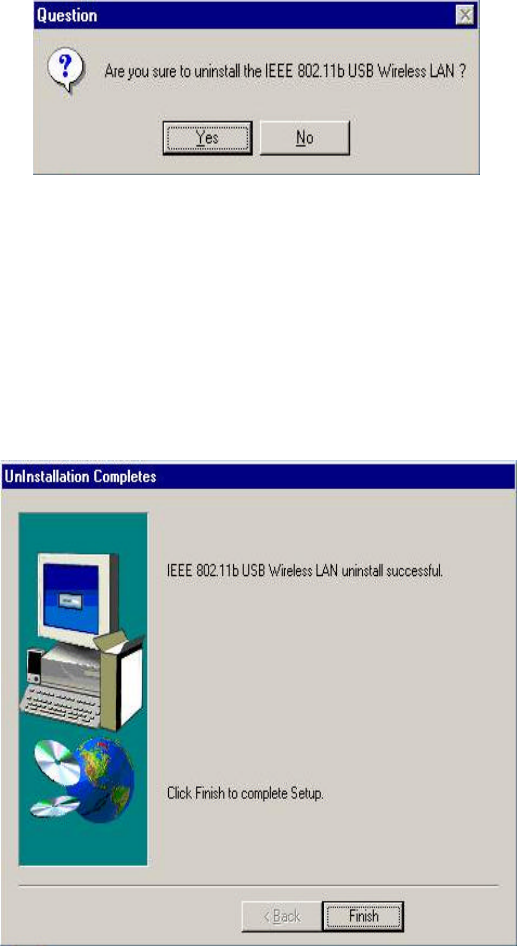
5 Uninstall the IEEE802.11b USB WLAN Utility / Driver
If you do not need the wireless connectivity of your IEEE802.11b USB WLAN Adapter,
1. First you should remove the IEEE802.11b USB WLAN Adapter.
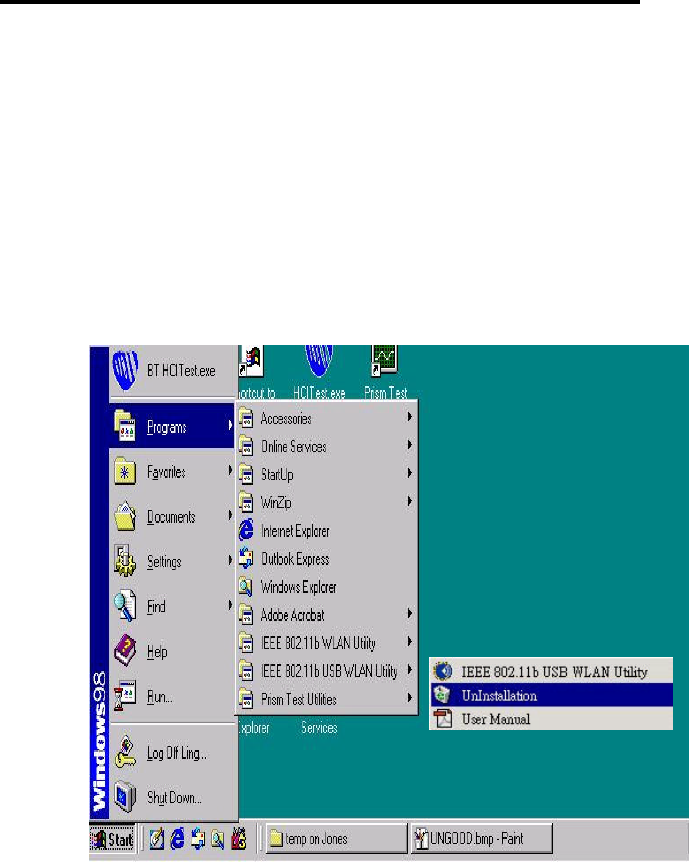
2. To uninstall the IEEE802.11b USB WLAN Utility and Driver, you can move to Start --->
Programs ---> IEEE802.11b USB WLAN Utility, and click “ IEEE802.11b USB WLAN
Un-Installation “.
18
3. You will be asked if you want to uninstall the IEEE802.11b USB WLAN Utility and all of its
components. Click “ Yes “ to uninstall or click “ No “ to exit.
4. Now the un-installation is completed. Please click “ Finish “.