National Electronics and Watch M11-870GPS GPS Watch with 2.4G HRM User Manual M11 870 i Manual ALTI GPS rev 1 1
National Electronics & Watch Co., Ltd GPS Watch with 2.4G HRM M11 870 i Manual ALTI GPS rev 1 1
Users manual
National Electronics & Watch Co,. Ltd.
BC04
M11-870 GPS watch User Manual
Ref: XT7 M11-870D sw01-022
Introduction
Thank you for purchasing the GPS watch. This GPS watch is packed with personal Training
features like speed, trip time, laps, etc. GPS navigation features were integrated in various
modes like Run mode and Waypoint mode. GPS can display your current location in an
electronic map. It has also a dedicated Altimeter sensor for altitude and atmospheric pressure
measurement. Watch features include 12/24H Time format, Chronograph, World time, 5 daily
Alarms, Data, and Set modes. This watch can communicate with a PC to store and review your
performance. This watch also has a power saving mode to increase operating hours. It uses a
rechargeable battery that can be charged through USB port of your PC. It also uses HRM belt
(optional unit) with 2.4 GHz technology to monitor your heart rate for all your HR related
information.
Caring for your GPS watch:
Clean your GPS watch and heart rate monitor with a dampened cloth preferably with mild
detergent solution. Wipe dry using a dry cloth. Do not use chemical cleaners and solvents that
may damage plastic components.
Do not store your GPS watch to prolonged exposure to extreme temperatures as this may result
to permanent damage to your unit.
About GPS:
Global Positioning System (GPS) is a satellite- based navigation system made up of a network
of 24 or more satellites. GPS works best in clear weather condition, anywhere in the world, 24
hours a day. Tall buildings may interfere with GPS accuracy. When 3 satellite signals are
received, the watch will have 2D GPS fixed (Latitude and Longitude). When 4 or more satellite
signals are received, the watch will have 3D GPS Fixed (Latitude, Longitude, and Altitude).
Water immersion:
This GPS watch is designed to be water resistant up to 3 ATM. It can resist water pressure up
to 30 meters. After submersion to water, please make sure to wipe dry and air dry the unit
before using or charging.
Caution: This unit is not intended to be used while swimming. Prolonged water submersion may
cause electronic shorting in the unit which may cause minor skin burn or irritation.
Getting Started
Step 1) Know your watch:
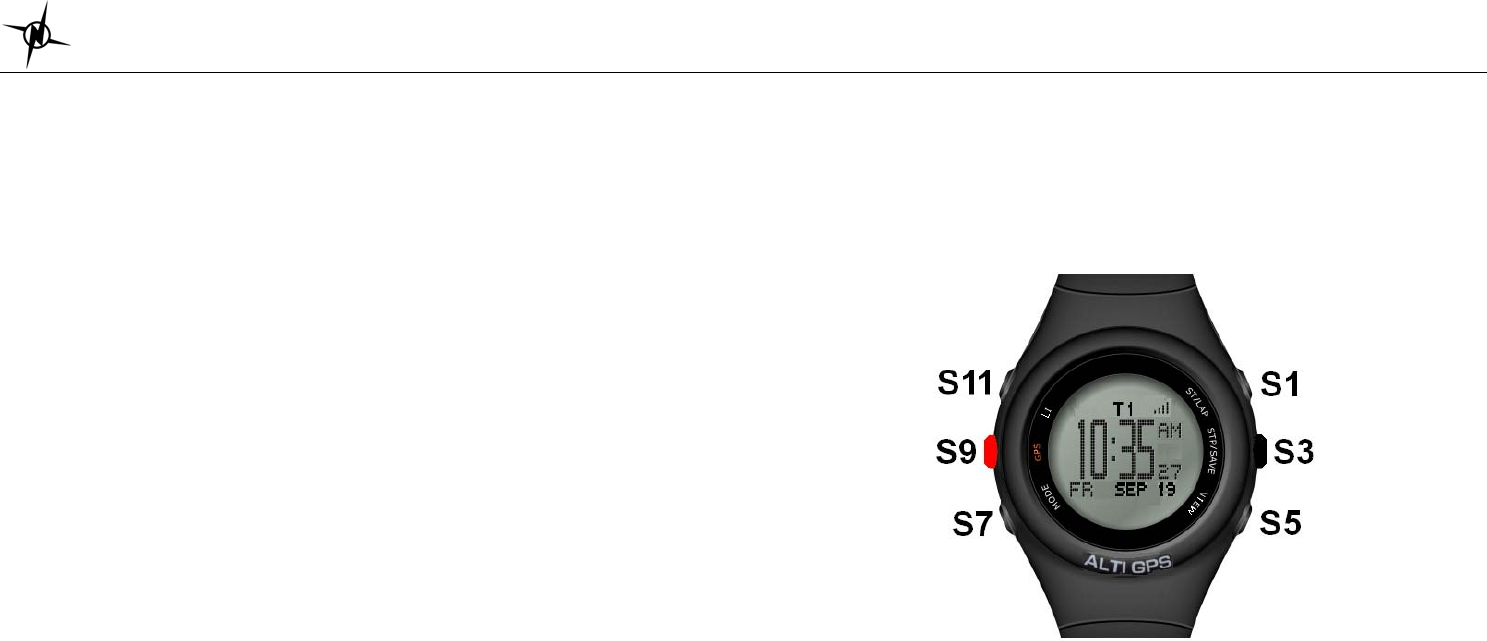
Push button location:
Push button Function:
S1 – Start / Lap / Increase adjust / Fast increase adjust
S3 – Stop / Save/ Decrease adjust / Fast decrease adjust
S5 – View / Confirm
S7 – Mode / Exit
S9 – GPS On / Hold to turn Off GPS
S11 – Light
Note: Actual color of the watch and artwork may vary from style to style.
National Electronics & Watch Co,. Ltd.
BC04
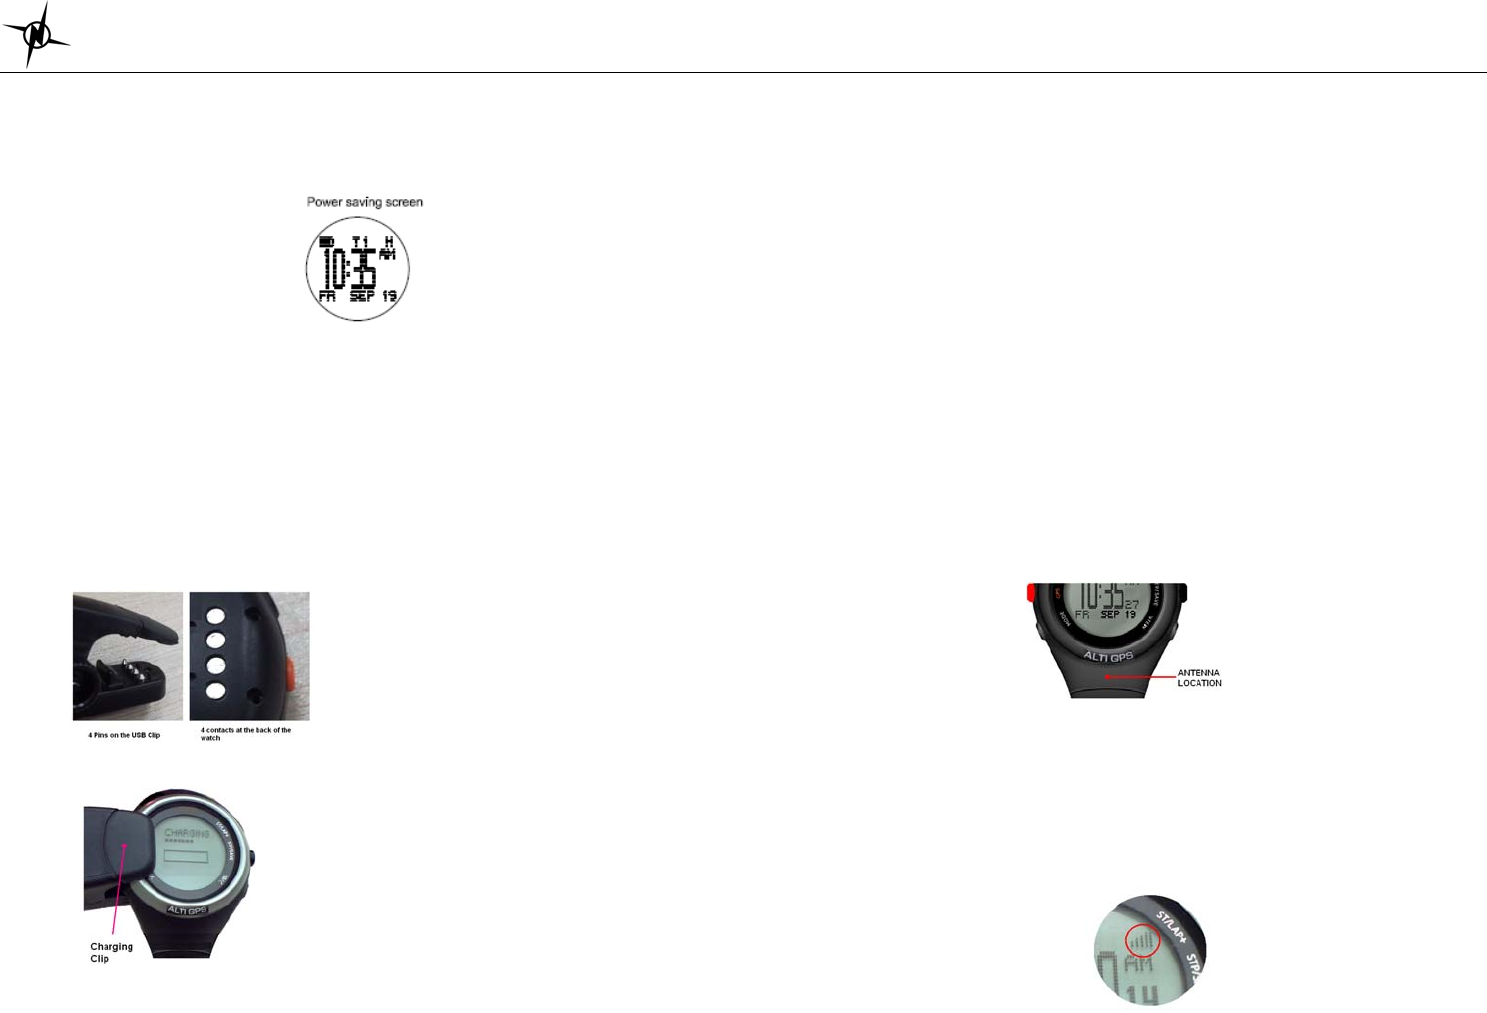
Power Saving Screen:
This watch has a power saving feature to prolong battery life. When GPS is OFF, HRM is not
linked, and no key operation for 1 minute, the display will auto go to Power saving screen. In
power saving Screen, Press S7 to go to Run mode. Press any other key will go from power
saving screen to Time mode.
Note: If GPS is ON or Chronograph is running, it will not go to power saving screen.
The watch will display only the date, battery level indicator and time in power saving screen.
Step 2) Charging the Battery:
Charge the unit for at least 4 hours before first use. The length of time for a fully charged battery
will last depend on the actual usage. It is recommended to regularly re-charge your battery
every 1-2 months even if it is not used to maintain good battery condition.
2.1) Plug your USB PC link cable to your PC
2.2) Align the charging clip with the contacts on the back of the watch.
2.3) Connect the charging clip securely to the watch.
Note: Please thoroughly dry the charging contacts and surrounding area to ensure proper
electrical contact and to prevent corrosion.
When the battery is low, it is time to charge the GPS watch.
Note: You cannot turn ON the GPS when the battery is low.
When it displays check the charger, re-adjust the clip and make sure there are no contamination
or dirt between the contacts of the clip and the back of the watch.
Once the battery is full, it will display CHARGING COMPLETE.
Step 3) Configure your watch:
Before using your GPS watch, you have to do the following:
3.1) Set the Alarm, Time 1, Time 2, and display format. Go to Time sub modes for the details
on how to set these parameters. Time and Alarm can also be set in SET mode.
3.2) Go to SET mode to set TIME, ALARM, UNITS, USER details, DISPLAY format, AUTOLAP,
BAROMETER, ALTIMETER, HRM, HRM LINK, HRM ON/ OFF, LCD CONTRAST,
KEYTONE, and NIGHT mode.
Step 4) Acquire Satellite signals:
In order to get the correct time of day and begin using your GPS watch, you have to acquire
GPS signals. It may take a few minutes to get the signals.
4.1) Go outside to an open area away from tall buildings and trees. Orient the GPS antenna
towards the sky for best reception. The antenna is located at the 6 o’clock position of the
watch.
Note: In order to accurately navigate the GPS, you need to have a good line of sight to the
satellites.
4.2) Stand still and do not begin moving while searching the Satellites until the signals are
already received.
4.3) How to Turn ON the GPS: Press S9 to turn ON the GPS. The watch will start locating the
satellites. After receiving the satellite signals, it will automatically go to RUN mode ready for
the exercises. The watch will display the relative signal strength on the upper sight side of
the display:
National Electronics & Watch Co,. Ltd.
BC04
4.4) If you press S9 again, the watch will momentarily display GPS / INDOOR. User can select
GPS or INDOOR by pressing S1/S3. If you select GPS, it will display your current location,
and then go to RUN mode. If you select INDOOR, the watch will go direct to RUN mode
and you will have no GPS function.
4.5) How to turn OFF the GPS: If you wish to turn OFF the GPS, press and hold S9 for about 3
seconds and the watch will momentarily display GPS OFF and then return to Time view.
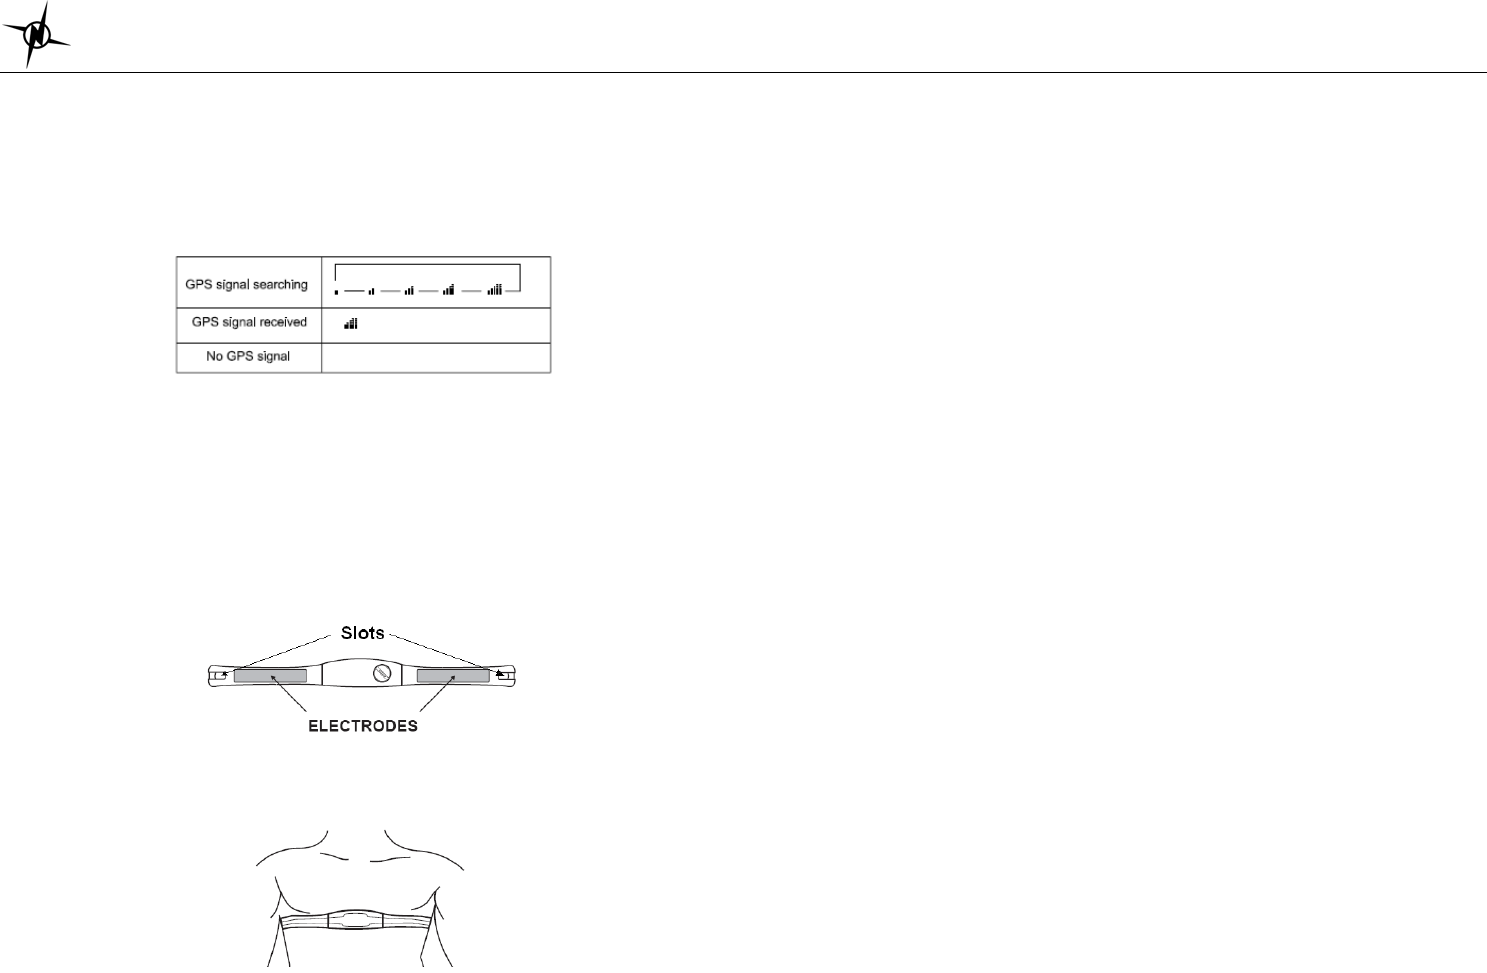
GPS signals and its meaning:
You will hear a beep sound when the watch has received a GPS signal or when the GPS signal
has been lost. LOST GPS signal will also be displayed in the screen. If no Satellite signals
received, the watch will display “NO GPS”.
Step 5) Using your Heart Rate monitor:
The HRM belt is on standby and ready to send data to your watch. Wear the belt directly on
your skin just below your breastplate. It should be snug enough to stay in place during your run.
5.1) Push one tab on the strap through the slot in the HRM transmitter.
5.2) Wet both electrodes with a damp cloth on the back of the HRM belt. This will help create a
strong electrical connection between your chest and the HRM transmitter.
5.3) Wrap around the chest belt around your rib cage just below the pectoral muscles and
attach the other end of the strap to the HRM transmitter. The elastic strap should be
adjusted so that it is snug enough so that it will not move during use but not so tight as to
restrict breathing.
5.4) Bring the GPS watch within range of the HRM transmitter (3 meters). Got to SET mode/
HRM LINK to start linking the HRM belt with the watch. The watch will auto detect the HR
belt ID. Click YES to accept. The watch will then automatically go to RUN mode. Your Heart
rate information will now be displayed in the watch.
5.5) If the heart rate will not be displayed, or you have an erratic heart rate data, follow the
following tips :
5.1.1) Make sure the HR belt is snugly fit to your body
5.1.2) Reapply water or electrode gel to the electrode of the HR belt
5.1.3) Clean the electrodes from possible contamination that may interfere with heart
rate signals
5.1.4) Wear a cotton shirt or if possible, wet your cotton shirt. Synthetic fabrics that rubs
with your skin may create static electricity and interfere with the heart rate signal
5.1.5) Move away from strong electromagnetic fields and other wireless sensors which
can interfere with your heart rate sensor. Possible sources of wireless interference
may include high voltage power lines, electric motors, microwave ovens, cordless
phones, and wireless LAN or access points.
Note: Set your Heart rate zone in SET mode/ HRM.
Step 6) Go for a Run:
Before going for a run, it is highly recommended that you set your user profile first so that the
calories will be calculated properly. Go to SET mode / USER to do this.
6.1) Using Run mode:
6.1.1) Press S1 or S7 from Time mode to go to RUN mode.
6.1.2) The watch will prompt you to select GPS or INDOOR. The default is GPS. Press
S1/S3 to select. If you select GPS, The watch will automatically search for GPS
signal. If you select INDOOR, you will be performing your exercise without GPS
signal.
6.1.3) After your selection, the watch will display the remaining BATTERY power level,
remaining DATA TRACK MEMORY and then display view 1. Press S5 to change
views.
6.1.4) Press S1 to START or TAKE LAP. If auto lap function is set, the watch will take lap
automatically based on auto lap setting. The EL will turn ON and there is also a
beep sound during taking of auto lap.
6.1.5) Press S3 to stop after completing your run.
6.1.6) Press and hold S3 to save your data
When the chronograph is stopped or reset, the GPS will automatically turn OFF after
15 minutes and return to time mode.
6.2) Using Chronograph mode:
RUN mode and CHRONOGRAPH mode has the same timer counter. When the chronograph is
started or stopped in RUN mode, the same thing happens in Chronograph mode. They just
differ in the views when you press S5. This mode is dedicated to chronograph, lap time,
exercise time, Heart rate, and distance travelled.
6.2.1) Press S7 from RUN mode to go to CHRO mode.

National Electronics & Watch Co,. Ltd.
BC04
6.2.2) The watch will prompt you to select GPS or INDOOR. Press S1/S3 to select. If you
select GPS, the watch will automatically search for GPS signal. If you select
INDOOR, you will be performing your exercise without GPS signal.
6.2.3) After your selection, the watch will display the remaining BATTERY power level,
remaining DATA TRACK MEMORY and then display view 1. Press S5 to change
views.
6.2.4) Press S1 to START or TAKE LAP. If auto lap function is set, the watch will take lap
automatically based on auto lap setting. The EL will turn ON and there is beep
sound during taking auto lap.
6.2.5) Press S3 to stop after completing your run.
6.2.6) Press and hold S3 to save your data.
6.3) Using HRM mode:
RUN mode and HRM mode has the same timer counter. When the chronograph is started or
stopped in RUN mode, the same thing happens in HRM mode. They just differ in the views
when you press S5. This mode is dedicated to HRM views
6.3.1) Press S3 from Time to HRM mode or press S7 from CHRO mode to go to HRM
mode.
6.3.2) The watch will prompt you to select GPS or INDOOR. Press S1/S3 to select. If you
select GPS, the watch will automatically search for GPS signal. If you select
INDOOR, you will be performing your exercise without GPS signal.
6.3.3) After your selection, the watch will display the remaining BATTERY power level,
remaining DATA TRACK MEMORY and then display view 1. Press S5 to change
views.
6.3.4) Press S1 to START or TAKE LAP. If auto lap function is set, the watch will take lap
automatically based on auto lap setting. The EL will turn ON and there is also a
beep sound during taking auto lap.
6.3.5) Press S3 to stop after completing your run.
6.3.6) Press and hold S3 to save your data.
6.4) Using Altimeter mode:
6.4.1) Press S7 from Barometer mode to go to Altimeter mode.
6.4.2) The watch will prompt you to select GPS or INDDOR. Press S1/S3 to select. If you
select GPS, The watch will automatically search for GPS signal. If you select
INDOOR, you will be performing your exercise without GPS signal.
6.4.3) After your selection, the watch will display the remaining BATTERY power level,
remaining DATA TRACK MEMORY and then display the view 1. Press S5 to change
the views.
6.4.4) Press S1 to START or TAKE LAP. If auto lap function is set, the watch will take lap
automatically based on auto lap setting.
6.4.5) Press S3 to stop after completing your run.
6.4.6) Press and hold S3 to save your data.
Important note:
Before User can perform above steps, the ff. should be set in SET mode:
• Go to SET mode.
• Press S1 or S3 to select ALTI
• Press S5 to enter
• Press S1 or S3 to change the value. ALTI should be set / calibrated based on
the current location (current weather / Barometric sea level pressure).
• Press S5 to confirm setting.
• Press S7 to exit.
• Press S7 again to go to Altimeter mode.
6.5) Using Barometer mode:
6.5.1) Press S7 from Time mode to go to BARO mode (the watch will display the Temp.
/Sea Level/current Barometric pressure).
6.5.2) The watch will prompt you to select GPS or INDDOR. Press S1/S3 to select. If you
select GPS, The watch will automatically search for GPS signal. If you select INDOOR,
you will be performing your exercise without GPS signal.
6.5.3) After your selection, the watch will display the remaining BATTERY power level,
remaining DATA TRACK MEMORY and then display the view 1. Press S5 to change the
views.
6.5.4) Press S5 to change view to 24 hour recall view.
6.5.5) Press S1 or S3 to change the hourly record for the past 24 hours.
6.5.6) Press S7 to exit.
6.6) Using GOTO waypoint function in WAYPOINT mode
If there is no GPS signal, RUN mode, or GO BACK function of Run Data mode is running, you
cannot use GOTO waypoint function. Also there should also be a waypoint save in the memory
to go to.
6.6.1) Press S7 from Run Data mode to go to Waypoint mode. The watch will display the
list of available waypoints.
6.6.2) Press S1/S3 to select which waypoint to go to.
6.6.3) Press S5 to open GOTO/ VIEW/ EDIT/ DELETE/ EXIT sub modes.
6.6.4) Press S5 to select GOTO sub mode. The chronograph will automatically start.
6.6.5) Press S5 again to change views.
6.6.6) Press S1 to START or TAKE LAP. If auto lap function is set, the watch will take lap
automatically based on auto lap setting.
6.6.7) Press S3 to STOP after you complete your exercise.
6.6.8) Press and hold S3 to save your exercise.
6.7) Using GOBACK function in RUN DATA mode:
6.7.1) Press S7 from RUN mode to go to RUN DATA mode. The watch will display the list
of available Data files.
6.7.2) Press S1/S3 to select which file to open.
6.7.3) Press S5 to view the details of the selected file. Press S1/S3 to scroll through the
details
6.7.4) Press S5 to open the RUN DATA sub modes: GO BACK, VIEW, EDIT, DELETE,
DELETE ALL, and EXIT.
6.7.5) Press S1/S3 to select which sub mode to use. In this case select GO BACK.
National Electronics & Watch Co,. Ltd.
BC04
6.7.6) Press S5 to start your exercise (the chronograph will auto start).
6.7.7) Press S5 again to change views
6.7.8) Press S1 to START or TAKE LAP. If auto lap function is set, the watch will take lap
automatically based on auto lap setting.
6.7.9) Press S3 to STOP after you complete your exercise.
6.7.10) Press and hold S3 to save your exercise.
Note: If there is no GPS signal, RUN mode, or GO TO WAYPOINT function is running, you
cannot use GO BACK function.
Step 7) Download your data to PC:
The watch comes with PC software to make communication between your watch and PC easy
and enjoyable. Please install the PC software to your PC using the installer provided. The
watch is using a USB PC link cable to connect the watch to PC.
Run the GPS PC software on your PC. Plug the USB cable with the watch clamped in the other
end of the cable. PC software will then prompt you to download the data. Click the download
button to begin downloading. User has the option to delete the data in the watch or not.
The PC software installation and instruction guide can be found at the end of this manual.
Please take time to read the guide.
General Operations
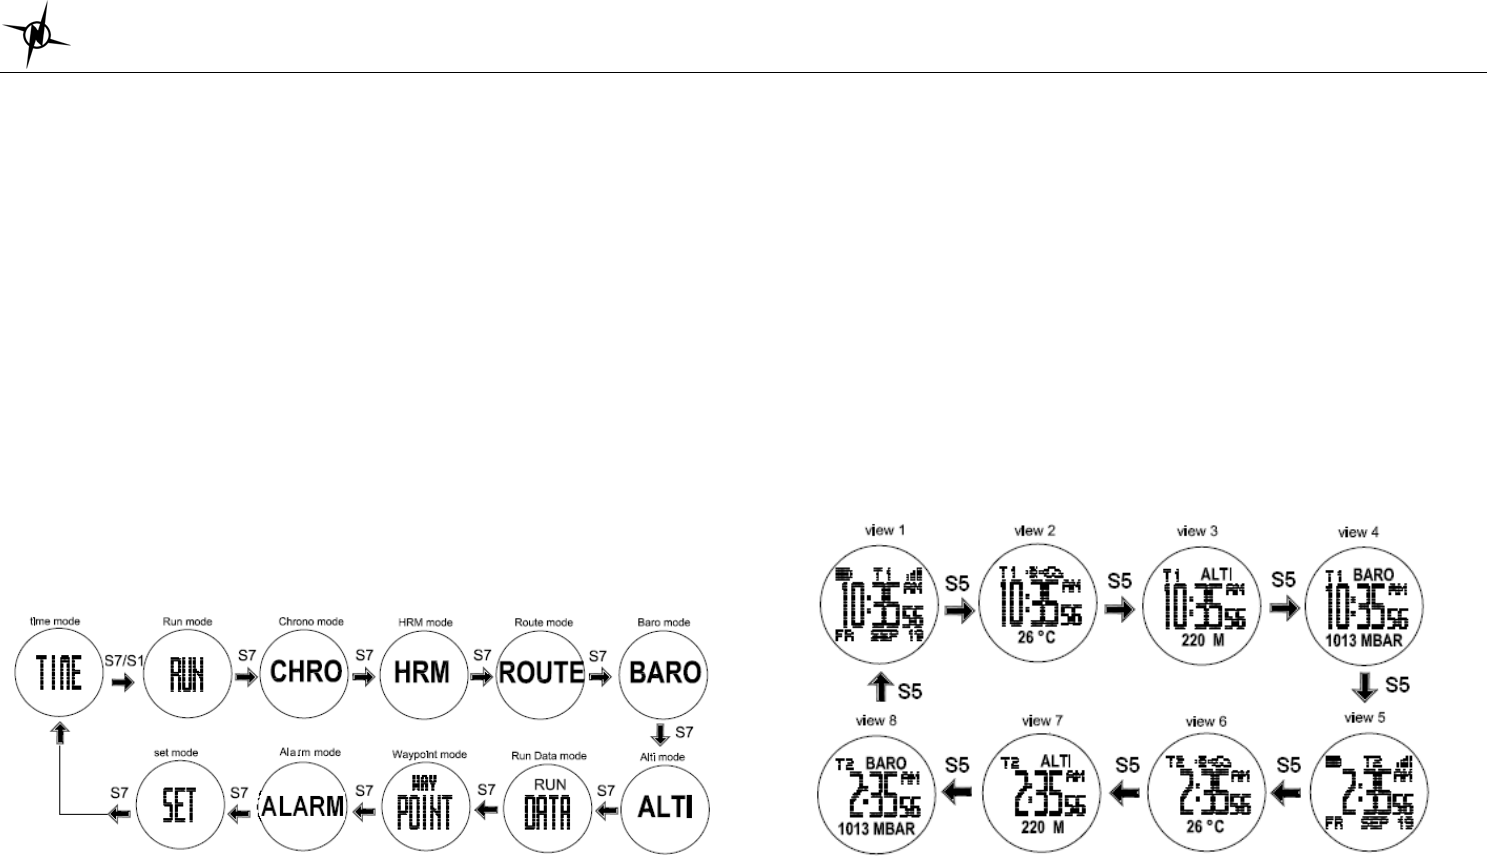
The watch has the following main modes: Time, Run, Chronograph, HRM, Route, Barometer,
Altimeter, RUN Data, Waypoint and Set modes. Press S7 to scroll through these modes.
Note: Press S1 or S7 from TIME mode to go to RUN mode.
EL backlight:
This watch has a night mode function. Following are the options in the setting mode and their
functions:
PUSH ON – Pressing any key will turn ON the EL for 10 seconds from 6:00 pm to 7:00 am
every day.
STAY ON – EL back light will be continuous ON from 6 am to 7 pm if GPS is ON and
Chronograph is running.
Outside the time frame from 6 pm to 7 am, only press S5 can turn ON the El for 10 seconds.
You can set the night mode function in SET mode and Run sub mode.
TIME MODE
Press S7 from SET mode to TIME mode. Press S5 to scroll through the following views with the
corresponding information displayed:
View 1 Æ Time 1, Week day, Month, Date, Battery level indicator, GPS relative signal strength
View 2 Æ Time 1, Temperature, weather forecast
View 3 Æ Time 1, Altitude
View 4 Æ Time 1, Barometric pressure
View 5 Æ Time 2, Week day, Month, Date, Battery level indicator, GPS relative signal strength
View 6 Æ Time 2, Temperature, weather forecast
View 7 Æ Time 2, Altitude
View 8 Æ Time 2, Barometric pressure
TIME 1 setting in SET MODE:
You have two options in setting the watch, AUTO or MANUAL. In manual setting, you can
manually set the time. If you select the AUTO option, the watch will be automatically set base
on the data from GPS satellites. Also note if User select MANUAL, the AUTO ON display will
be auto change to AUTO OFF.

National Electronics & Watch Co,. Ltd.
BC04
• Select TIME 1 by pressing S5
• Select AUTO or MANUAL setting by pressing S1 or S3 and then press S5 to enter.
AUTO setting:
¾ Select TIME ZONE by pressing S1/3 and then press S5/S7 to enter. There are 106 cities
to select in this time zone setting.
¾ Select DST ON or OFF by pressing S1/S3 and then press S5/S7 to enter.
¾ The watch will display the CONFIRM screen and then go back to view 1 of Time 1
MANUAL setting:
¾ Set the HOUR by pressing S1/3 and then press S5/S7 to enter.
¾ Set the Minute by pressing S1/3 and then press S5/S7 to enter.
¾ Set the SECOND by pressing S1/3 and then press S5/S7 to enter.
¾ Set the YEAR by pressing S1/3 and then press S5/S7 to enter.
¾ Set the MONTH by pressing S1/3 and then press S5/S7 to enter.
¾ Set the DATE by pressing S1/3 and then press S5/S7 to enter.
¾ Set the 12/24 hour by pressing S1/3 and then press S5/S7 to enter.
¾ The watch will display the CONFIRM screen.
TIME 2 setting in SET MODE:
You have two options in setting the watch, AUTO or MANUAL. In manual setting, you can
manually set the time. If you select the AUTO option, the watch will be automatically set base
on the data from GPS satellites.
The procedure in setting time 2 is the same with time 1 setting.
12/24 hour Display format setting:
You can select 12H or 24H format. Press S5 to enter setting mode. Press S1 or S3 to select
12H or 24H format. Press S5 or S7 to confirm and exit.
EXERCISE MODES
The watch has the following major exercise modes: RUN, Chronograph, HRM, Barometer,
Altimeter and WAYPOINT mode. After setting the watch and wearing your HRM belt, the user
can now start doing the various exercise modes.
RUN mode:
Press S1 or S7 from Time mode to enter RUN mode. The watch will display the following in
succession:
RUN Æ RUN/ GPS / INDOOR Æ LOCATING SATELLITES Æ BATTERY level Æ DATA
TRACK MEMORY Æ view 1 of RUN mode
If the power level of the battery is low, the GPS cannot be turned on. The watch will display
BATT.LOW.
Different views in Run mode:
Following are the various views that User can choose by pressing S5 in CHRO mode.
View 1 Æ Exercise time / Distance / HR%Max (This view is hidden if HR belt is not linked)
View 2 Æ Exercise Time/ Distance / Clock
View 3 Æ Exercise Time/ Distance/ Speed
View 4 Æ Exercise Time/ Distance / Pace
View 5 Æ Exercise time/ Distance/ Calorie
View 6 Æ Exercise time/ Speed/ HR%Max
View 7 Æ Exercise time/ Distance/ Altitude
View 8 Æ Exercise time/ ASC/DSC/ Temperature
View 9 Æ Track view (Exercise time/Speed/Distance/ HR icon or auto Route scale).
Notes:
• When you enter Run mode and the GPS signal is not yet received, the watch will display
LOCATING SATELITE.
• While in Run mode, then the GPS signal suddenly becomes weak for any reason, the
watch will display LOST GPS signal until it receives GPS signal again.
CHRONOGRAPH mode:
Press S7 from RUN mode to enter CHRONOGRAPH mode. RUN and CHRONOGRAPH modes
have the same timer counter. When the chronograph is started or stopped in RUN mode, the
same thing happens in Chronograph mode. They just differ in the views when you press S5.
This mode is dedicated to chronograph, lap time, exercise time, Heart rate, and distance
travelled. The watch will display the following in succession:
CHRO Æ RUN/ GPS/ INDOOR Æ LOCATING SATELLITES Æ BATTERY level Æ DATA
TRACK MEMORY Æ view 1 of CHRONOGRAPH mode
If the power level of the battery is low, the GPS cannot be turned on. The watch will display
BATT.LOW after the screen GPS OFF.
Different views in CHRO mode:
Following are the various views that User can choose by pressing S5 in CHRO mode.
View 1 Æ Lap / HR%Max / Exercise Time (This view is hidden if HR belt is not linked)
View 2 Æ Lap/ Distance/ Exercise Time
View 3 Æ Lap Time/ Exercise Time
View 4Æ Lap Time HRM mode:
Press S7 from CHRONOGRAPH mode to enter HRM mode. RUN and HRM modes have the
same timer counter. When the chronograph is started or stopped in RUN mode, the same thing
happens in HRM mode. They just differ in the views when you press S5. This mode is dedicated
to HRM views. The watch will display the following in succession:
HRM Æ RUN/ GPS/ INDOOR Æ LOCATING SATELLITES Æ BATTERY level Æ DATA
TRACK MEMORY Æ view 1 of HRM mode

National Electronics & Watch Co,. Ltd.
BC04
If the power level of the battery is low, the GPS cannot be turned on. The watch will display
BATT.LOW.
Different views in HRM mode:
Following are the various views that User can choose by pressing S5 in HRM mode.
View 1 Æ Exercise Time/ HRM %Max/ Calorie
View 2 Æ Exercise Time/ HRM %Max/ In Zone
View 3 Æ Exercise Time/ HRM %Max/ Distance
View 4 Æ Exercise Time/ HRM %Max/ Clock
View 5 Æ Exercise Time/ HRM %Max/ Speed
View 6 Æ Exercise Time/ HRM %Max/ Pace
ROUTE mode:
Press S7 from HRM mode to enter ROUTE mode. RUN and ROUTE modes have the same
timer counter. When the chronograph is started or stopped in RUN mode, the same thing
happens in Route mode. They just differ in the views when you press S5. This mode is
dedicated to track map view. The watch will display the following in succession:
HRM Æ RUN/ GPS/ INDOORF Æ LOCATING SATELLITES Æ BATTERY level Æ DATA
TRACK MEMORY Æ Track map with Speed, Distance, Exercise time and Auto Route
scale.
If the power level of the battery is low, the GPS cannot be turned on. The watch will display
BATT.LOW.
BAROMETER mode:
Press S7 from ROUTE mode to enter Barometer mode. The watch will momentarily display
BARO and then display Temperature/ Sea Level/ Current Barometric pressure. Press S5 to
change view to 24 hour recall view. Press S1/S3 to change the hourly record for the past 24
hours. Press S7 to exit.
Note: The thermometer takes a reading once every minute. Pressure sensor range is 300 to
1,100 mbar /Hpa.
ALTIMETER mode:
Press S7 from Barometer mode to enter Altimeter mode. RUN and Altimeter modes have the
same timer counter. When the chronograph is started or stopped in RUN mode, the same thing
happens in Altimeter mode. They just differ in the views when you press S5. This mode is
dedicated to Altitude related views. The watch will display the following in succession:
HRM Æ RUN/ GPS ON / GPS OFF Æ LOCATING SATELLITES Æ BATTERY level Æ
DATA TRACK MEMORY Æ view 1 of ALTI mode
If the power level of the battery is low, the GPS cannot be turned on. The watch will display
BATT.LOW after the screen GPS OFF.
Different views in ALTI mode:
Following are the various views that User can choose by pressing S5 in ALTI mode.
View 1 Æ Exercise Time/ Altitude/ Distance
View 2 Æ Exercise Time/ Altitude/ Slope
View 3 Æ Exercise Time/ Difference/ Asc/Dsc Speed
View 4 Æ Exercise Time/ Altitude/ temperature
View 5 Æ Ascending/ Descending / Altitude
View 6 Æ Exercise Time/ Altitude/ Clock
View 7 Æ Exercise Time/ Altitude / Speed
View 8 Æ Exercise Time/ Altitude / Pace
View 9 Æ Exercise Time/ Altitude / Calorie
View 10 Æ Exercise Time/ Altitude / HR% Max
RUN DATA MODE
Press S7 from ALTI mode to enter Run DATA mode. The watch will display the Data list view.
In this view you can see how many files are saved in RUN data. The watch will show the list of
data files with newest on the top of the list.
1. Press S1/S3 to scroll thru the list.
2. Press S5 to enter the selected data file. Press S7 to exit.
3. Press S1/S3 to view the details of the data file. Following are the details available:
• Start/ End Time/ Trip Distance
• Speed Data (Exercise time/ Distance/ Ave Speed/PACE/ HR)
• Exercise Time/ Average Speed/ Average Pace
• Total Ascending/ Descending
• Maximum/ Minimum Altitude
• Track Map- If GPS is OFF during making the data, this view is hidden
• Lap 1 Time/ Distance/ ave speed / ave HR
• Lap 2 Time/ Distance/ ave speed / ave HR
• Lap 3… ETC…
4. Press S7 to exit
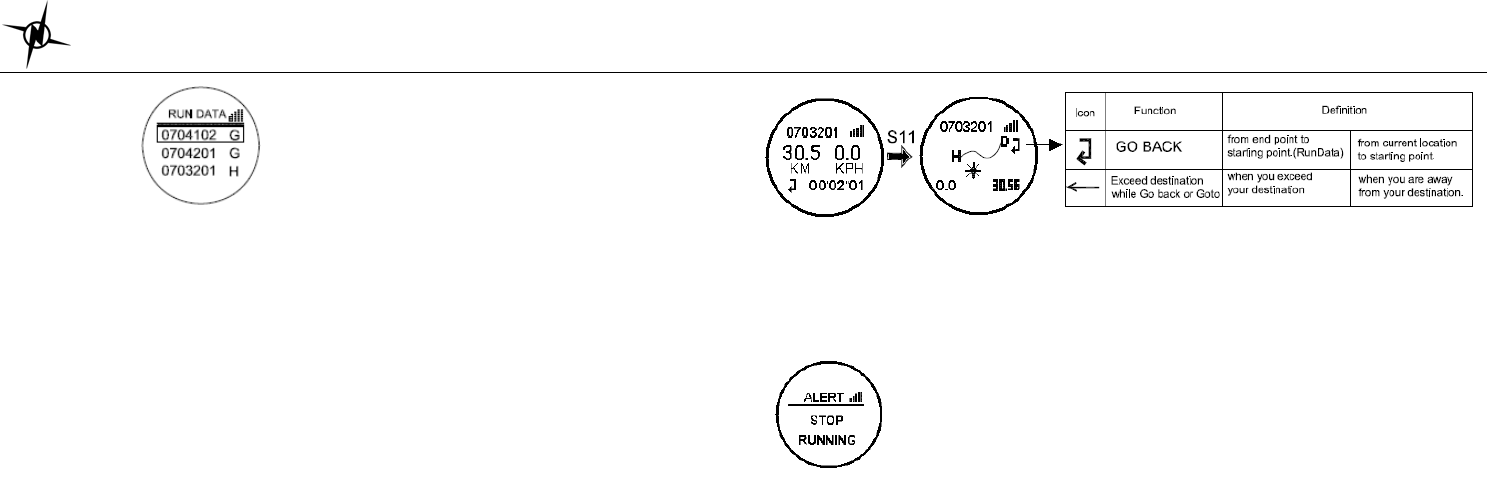
Data numbering system/ Legend:
Following is the data numbering system.
Sample data number: 0704102 G
National Electronics & Watch Co,. Ltd.
BC04
07 - Month
04 - Day
1 - Data is referred to Time 1 or 2 for Time 2
02 - File number of the day
G - Data with track from GPS (if replaced with H- data w/o track, w/o GPS)
Data mode Sub-modes
Press S5 from any view in Data mode to enter the sub modes. Following are the sub modes:
GO BACK
VIEW
EDIT
DELETE
DEL ALL
EXIT
Press S1/S3 to scroll thru these sub modes.
GO BACK sub-mode:
GO BACK function means going from current location to the starting point of the selected data
track. See below table for more details. User cannot use this function if GPS is OFF.
1. Select the GO BACK sub mode and Press S5 to start. Chronograph will start and 2
seconds later, the watch will display view 1 with the remaining distance to the destination
and the chronograph time.
2. Press S5 to change view to track map (View 2). Press S5 to change view to view 3 with
Speed, HRM, and Exercise time. Continue pressing S5 to change views. The views are
the same with RUN mode views except for views 1 and 2.
3. Press S1 to take Lap. When Auto lap is ON, the watch will automatically take laps based
on the settings.
4. Press S3 to stop. Press S1 to re-start.
5. While the chronograph is stopped, press S3 to save the current Track.
6. While Chronograph is running, you can change views by pressing S5.
At the upper right side of the screen or lower left side, there is an indicator whether you are in
GO BACK, GOTO function, or you have exceeded your destination.
If there is no GPS signal, or the Run mode is running, you cannot use the GO BACK or GOTO
function.
When the Chronograph mode is running in the background and the user wants to use the GO
BACK function, the watch will display below to remind the user to stop the Chronograph first
before going to GO BACK function.
When you arrived at your destination, the watch will display “ARRIVED DEST”.
VIEW sub-mode:
Press S5 to enter view mode then Press S1/S3 to change views.
EDIT sub-mode:
1. Press S5 to edit the name of the data file.
2. Press S1/S3 to change values of the highlighted digit.
3. Press S5 to set the next digit. Press S7 to exit setting mode.
DELETE sub-mode:
1. Press S5 to enter delete sub mode. The watch will display the data list. In this view, the
oldest file is on the top of the list. At the bottom of the list is the DEL ALL option.
2. Press S1/S3 to select which file to delete.
3. Press S5 to confirm delete.
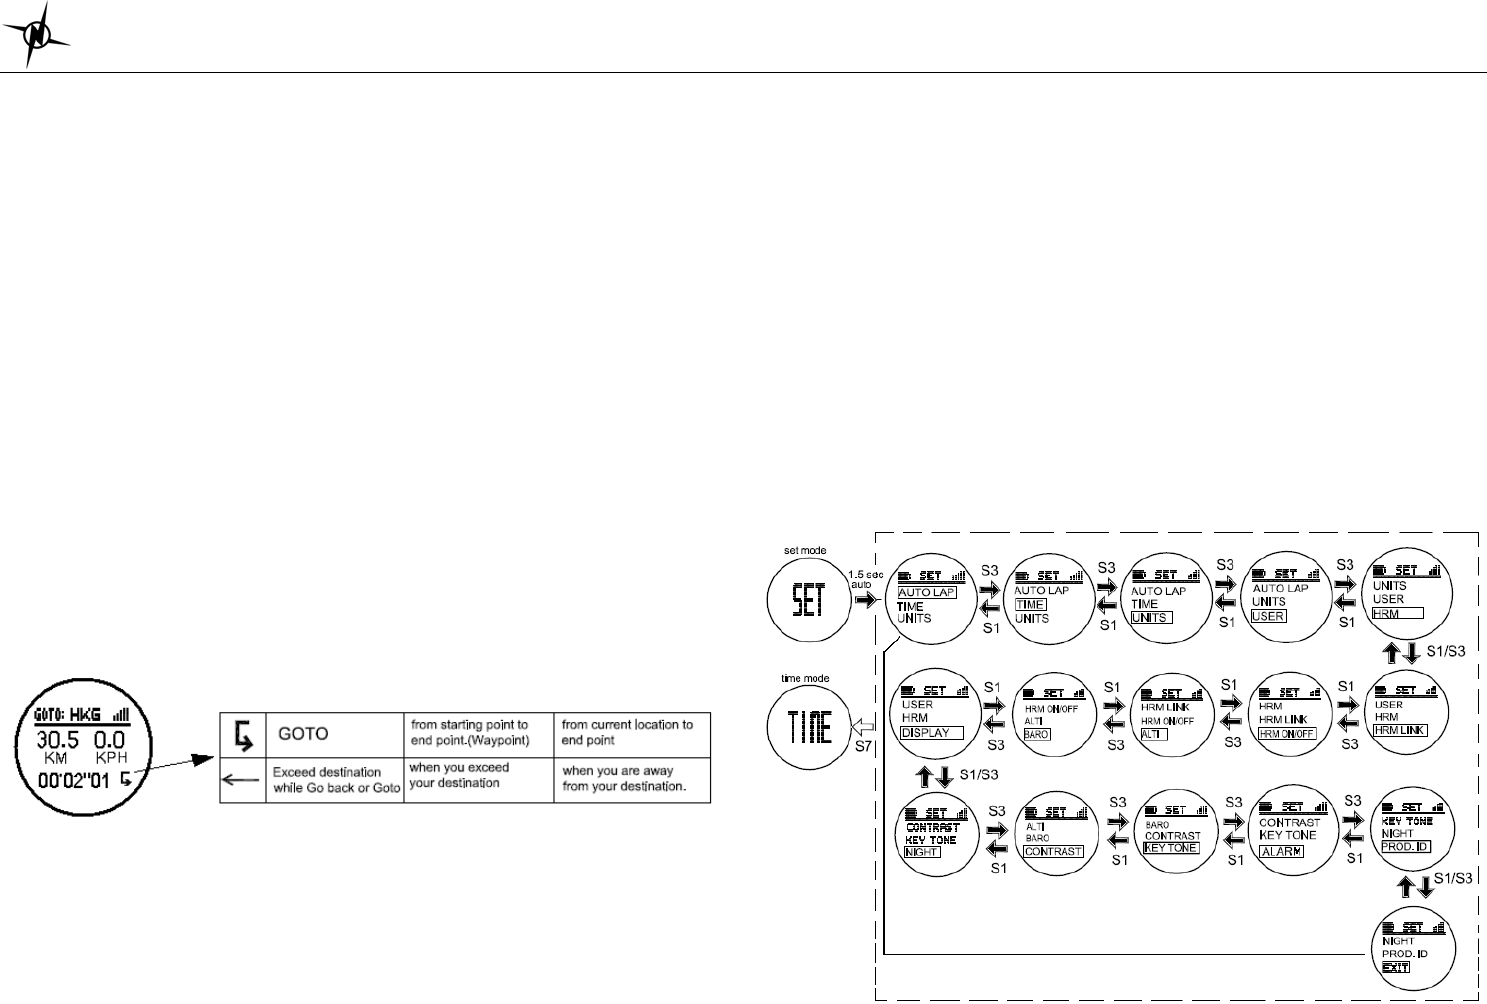
WAYPOINT mode
Press S7 from Run Data mode to enter Waypoint mode. The watch will momentarily display
WAYPOINT and then display the list of saved waypoints. If there are no waypoints saved in
memory, the watch will display “NO DATA”. In Waypoints mode, Press S5 to choose your saved
waypoint. Press S1 / S3 to select or view various waypoints in memory. The “DELETE”
selection will display after the last waypoint. Press S5 to delete all Waypoints. The watch will
ask for your confirmation, YES or NO. Press S1/S3 to choose, Press S5 to CONFIRM.
National Electronics & Watch Co,. Ltd.
BC04
Going to your saved WAYPOINT
At Waypoint Mode, Press S1 / S3 to select a desired Waypoint. Press S5 to choose a waypoint.
After pressing S5 you will be prompted with GOTO / EDIT / DELETE options. Press S1 / S3 to
scroll thru these options. Press S5 to confirm. If there is no GPS signal, the user cannot use the
GOTO waypoint function.
Choose GOTO to start your exercise. You will be going from your current location to the
coordinates of the selected Waypoint.
Choose EDIT to change the name of the saved Waypoint.
Choose DELETE to delete the selected Waypoint.
GOTO function:
1. Press S5 to confirm start after selecting the GOTO function. Chronograph will start running.
2 seconds later, the watch will the remaining distance to your destination and the
chronograph time. 3 seconds later, the watch will display the electronic map of your current
location and destination.
2. Press S5 to change views. The views when you press S5 are the same views in RUN
modes except for View 1 and View 2
3. Upon selecting your view, you have started your exercise. Press S1 to take Lap, when
Auto lap is ON, the watch will automatically take lap. You will also hear a beep sound.
4. Press S3 to stop. While chronograph is stopped, press S3 to save data.
At the lower left side of the screen, there is an icon to signify you are in GOTO function, or you
have exceeded your destination.
If there is no GPS signal, or the Run is running, you cannot use the GOTO function.
When you arrived at your destination, the watch will display ‘ARRIVED DEST”.
Saving your WAYPOINT
1. Press and hold S11 from any view then release. The watch will display the locations’
coordinates (Latitude, longitude, and Altitude). 3 seconds later it will prompt the user to
save the location. The default name of the saved waypoint is the date of Time 1. The
format (sample: 001 072201) The first 3 digits are for the Data file number, the second two
digits means for the month, the next two digits means for the day and the last two digits
means the number for the day.
2. Press S1/S3 to select data to edit.
3. Press S5 to enter.
4. Press S5 again to edit the first digit.
5. Press S1/S3 to edit individual digits. You can edit the location name up to 7 digits.
6. Press S5 to set the next digit.
7. Press S7 to exit setting mode. After saving the location name, it will be saved in the
Waypoints list. Maximum of 100 locations can be saved in memory.
When the user is saving the waypoint and the watch is not receiving the GPS signal, it will
display “GPS NOT AVAILABLE”.
SET MODE
Press S7 from Waypoint mode to Set mode. seconds later the watch will display the setting
options: AUTOLAP / TIME / UNITS / USER / HRM / HRM LINK / HRM On/Off / ALTI / BARO /
DISPLAY / NIGHT / CONRAST / KEY TONE/ ALARM / PROD ID / EXIT. Press S1/S3 to scroll
through these options. Press S5 to enter selected option to set. Press S7 to exit to Time mode.
If there is no key operation after 1 minute in this mode, the watch will auto exit to Time mode.
National Electronics & Watch Co,. Ltd.
BC04
TIME setting in SET mode:
TIME sub modes:
Press S5 to enter the time sub mode. In these sub modes, you can set the TIME 1, TIME 2,
Time zone, etc. Press S1/S3 to scroll through these sub modes.
TIME 1 setting:
You have two options in setting the watch, AUTO or MANUAL. In manual setting, you can
manually set the time. If you select the AUTO option, the watch will be automatically set base
on the data and time data from GPS satellites.
• Select TIME 1 by pressing S5
• Select AUTO or MANUAL setting by pressing S1 or S3 and then press S5 to enter.
AUTO setting:
¾ Select TIME ZONE by pressing S1/S3 and then press S5/S7 to enter. There are 106
cities to select in this time zone setting.
¾ Select DST ON or OFF by pressing S1/S3 and then press S5/S7 to enter.
¾ Select 12H or 24H format setting by pressing S1/S3. Press S5/S7 to enter.
¾ The watch will display the CONFIRM screen.
MANUAL setting:
¾ Set the HOUR by pressing S1/S3 and then press S5/S7 to enter.
¾ Set the Minute by pressing S1/S3 and then press S5/S7 to enter.
¾ Set the SECOND by pressing S1/S3 and then press S5/S7 to enter.
¾ Set the YEAR by pressing S1/S3 and then press S5/S7 to enter.
¾ Set the MONTH by pressing S1/S3 and then press S5/S7 to enter.
¾ Set the DATE by pressing S1/S3 and then press S5/S7 to enter.
¾ Set the 12/24H by pressing S1/S3 and then press S5/S7 to enter.
¾ The watch will display the CONFIRM screen.
TIME 2 setting:
You have two options in setting the watch, AUTO or MANUAL. In manual setting, you can
manually set the time. If you select the AUTO option, the watch will be automatically set base
on the data and time data from GPS satellites.
The procedure in setting time 2 is the same with time 1 setting.
12H/24H format setting:
You can select 12H or 24H format. Press S5 to enter setting mode. Press S1 or S3 to select
12H or 24H format. Press S5 or S7 to confirm and exit.
AUTOLAP setting:
You can use auto lap to automatically take the lap at specific traveled distance. This setting is
helpful for comparing your performance over different part of the RUN.
To set the Auto lap:
1. Press S5 to set the Auto lap.
2. Press S1/S3 to select the various settings. Following are the auto lap preset range: OFF,
0.5 Km, 1 Km, 2 Km, 3 Km, 4 km and 5 Km. Default value is 1.0 KM.
3. Press S5/S7 to save the selection and exit.
UNITS setting:
1. Press S5 to enter UNITS setting
2. Press S1/S3 to change the Units
3. Press S5/S7 to accept selected unit and exit.
Units: KM/M/KG or MI/FT/LBS
Setting the User’s information:
1. Press S5 to enter USER setting. GENDER parameter will be displayed.
2. Press S5 again to set the parameter. The parameters to set are Gender Æ AGE Æ
WEIGHT Æ HEIGHT.
3. Press S1/S3 to change values.
4. Press S7 to exit
Weigh range : 20 to 255 Kg ( 44 to 561 Lbs)
Height range: 89-241 cm(2’11”- 8’00” ft’ inch”)
Age Range : 7 to 99
Gender : Male or Female
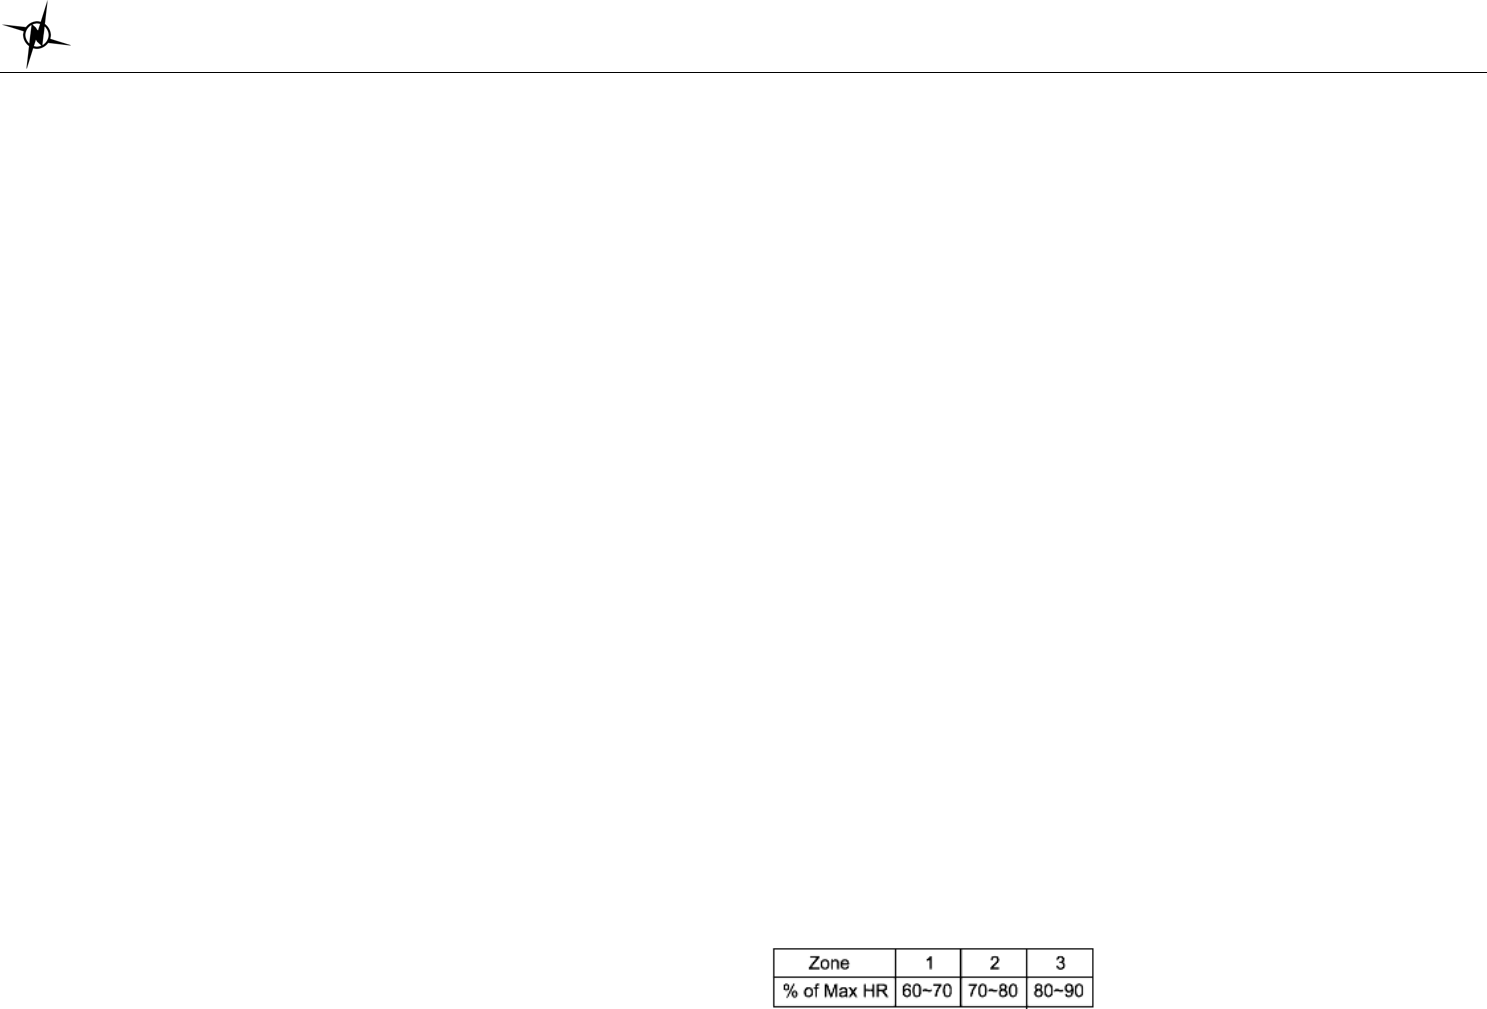
HRM setting:
You can set the HR zones and Zone alarm here.
1. Press S5 to enter HR Zone setting
2. Press S1/S3 to change values Zone 1 to 3
3. Press S5 to set the Low limit of the selected zone.
4. Press S1/S3 to change the Low Limit value. There is a default value but you change it if
you want.
5. Press S5 to accept the setting and set the High limit of the selected zone.
6. Press S1/S3 to change the High Limit value. There is a default value but you change it if
you want.
7. Press S5 to accept the value and set the Zone Alarm.
8. Press S1/S3 to turn ON or OFF the Alarm.
9. Press S5/S7 to accept and exit.
Heart rate range: 30 to 240 BPM
Low Limit setting range = 30 BPM to High limit value
High Limit setting range = Low Limit Value to 240 BPM
Max HR = 220- Age
HR Zone Table:

National Electronics & Watch Co,. Ltd.
BC04
HRM LINK setting:
Press S5 to start linking your HRM belt. The watch will display the old HRM ID and then start
searching for new HRM ID. If a new belt ID is found, it will display new the ID and then prompt
the user to use the new ID (YES or NO). If you select NO by pressing S1/S3, it will use the OLD
ID and go to RUN mode.
HRM ON or OFF setting:
1. Press S5 to enter HRM ON/ OFF setting.
2. Press S1/S3 to turn ON or OFF the HRM.
3. Press S5 to accept and exit.
Altimeter setting:
You can set the Current Altitude.
1. Press S5 to enter Altimeter setting.
2. Press S1/S3 to set your current Altitude.
3. Press S5 to accept value and exit.
BAROMETER setting:
You can set the current weather and barometric pressure here.
1. Press S5 to set the current weather.
2. Press S1/S3 to change values.
3. Press S5 to set the Sea level barometric pressure.
4. Press S1/S3 to change values.
5. Press S5 to set the UNIT for Temperature
6. Press S1/S3 to change deg C to deg F or vice versa.
7. Press S5 to accept the value and exit.
Setting the DISPLAY:
1. Press S5 to enter.
2. Press S1/S3 to turn ON or OFF the 2 line views and /or the 4 line views.
3. Press S5/S7 to confirm setting.
Contrast setting:
Contrast Range is 0 to 100%.
1. Press S5 to enter Contrast setting.
2. Press S1/S3 to change values. The range is 0 to 100%.
3. Press S5 to accept and exit.
Key tone setting:
You can set the key tone ON or OFF. If key tone is on, there is confirmation sound every time
you press a button.
1. Press S5 to enter Key tone setting.
2. Press S1/S3 to turn ON or OFF
3. Press S5 to accept and exit.
Alarm setting:
• Select ALARM by pressing S5
• Select ALARM 1 to ALARM 5 by pressing S1 or S3 and then press S5 to enter.
• Set the HOUR. Press S1/S3 to change values. Press S5 to enter
• Set the MINUTE. Press S1/S3 to change values. Press S5 to enter
• Set the alarm time referred to T1 or T2. Press S1/S3 to change values. Press S5 to enter
• Set the alarm ON or OFF. Press S1/S3 to change values. Press S5 to enter
• Press S7 to exit alarm setting
Night mode setting:
Press S5 to enter Night setting. Press S1/S3 to Select PUSH ON or STAY OFF.
PUSH ON – Pressing any key will turn ON the EL for 10 seconds from 6:00 pm to 7:00 am
every day.
STAY ON – EL back light will be continuous ON from 6 am to 7 pm if GPS is ON and
Chronograph is running.
Outside the time frame from 6 pm to 7 am, only press S5 can turn ON the El for 10 seconds.
Viewing PRODUCT ID:
Press S5 when PROD. ID is highlighted to View the current Software code of the watch. Press
S7 to exit.
EXIT :
Press S5 or S7 to exit to Time mode. Nothing to set here.
Battery:
Watch is using a rechargeable Lithium Ion battery that will require approximately 4 hours
charging time using the USB cable. While battery is charging, the watch cannot be used and all
buttons are disabled. User needs to recharge the battery when the watch indicates a low battery
level.
Battery Life: Approximately 8 hrs minimum in training mode.

National Electronics & Watch Co,. Ltd.
BC04
GPS watch troubleshooting guide:
PROBLEM/ QUESTION SOLUTION/ ANSWER
I cannot get a GPS signal Take your GPS watch outdoors and away from tress and
tall buildings. Remain stationary and try acquiring GPS
signal again. Be sure that the antenna is pointing towards
the sky for better signal reception.
Can I reset the watch? You can reset the watch by pressing S1, S5, S7, and S11
together. The date and time will be reset to default
values. You can set it again manually or automatically thru
GPS.
Will my data and personal
settings be lost after watch
reset?
Your data and personal settings are saved in the flash
memory and will not be lost after watch reset.
The battery indicator does
not seem to be accurate Allow your GPS watch to fully discharge and then fully
charge it without interruption. It is recommended to
regularly re-charge your battery every 1-2 months even if
it is not used to maintain good battery condition.
My heart rate data seems
inaccurate.
- Make sure the HR belt is snugly fit to your body
- Reapply water, saliva, or electrode gel to the electrode
of the HR belt
- Clean the electrodes from possible contamination that
may interfere with heart rate signals
- Wear a cotton shirt or if possible, wet your cotton shirt.
Synthetic fabrics that rubs with your skin may create
static electricity and interfere with the heart rate signal
- Move away from strong electromagnetic fields and other
wireless sensors which can interfere with your heart rate
sensor. Possible sources of wireless interference may
include high voltage power lines, electric motors,
microwave ovens, cordless phones, and wireless LAN
or access points.
National Electronics & Watch Co,. Ltd.
BC04
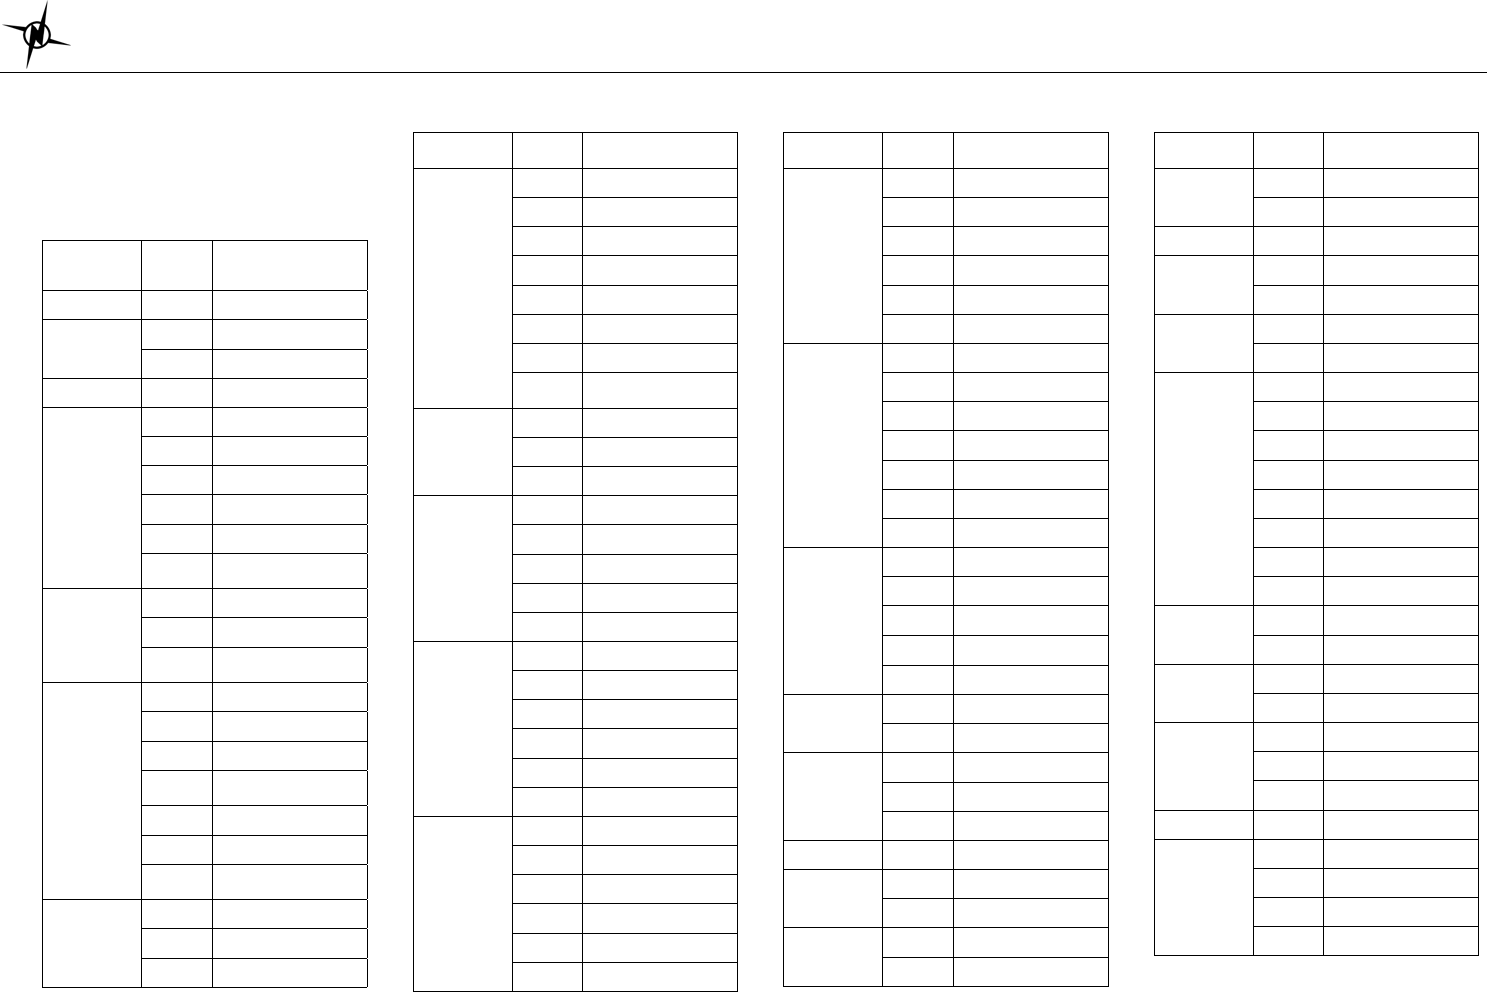
City code Table:
Following is the list of city codes used in
view 3 of Time mode and the corresponding
differential time with respect to GMT:
GMT
Differential CITY
CODE
CITY
-11 PPG PAGO PAGO
-10 HNL HONOLULU
PPT PAPEETE
-9 ANC ANCHORAGE
-8
YVR VANCOUVER
SFO SAN FRANCISCO
LAX LOS ANGELES
LAS LAS VEGAS
SEA SEATTLE
US-P Pacific standard
Time
-7
DEN DENVER
ELP EL PASO
US-M Mountain Standard
time
-6
MEX MEXICO CITY
CHI CHICAGO
HOU HOUSTON
DFW DALLAS/ FORT
WORTH
MSY NEW ORLEANS
YWG WINNIPEG
US-C Central Standard
Time
-5
MIA MIAMI
NYC NEW YORK
YUL MONTREAL
GMT
Differential CITY
CODE
CITY
-5
DTW DETROIT
BOS BOSTON
PTY PANAMA CITY
HAV HAVANA
ATL ATLANTA
YYZ TORONTO
WAS WASHINGTON
US-E Eastern Standard
time
-4
CCS CARACAS
LPB LA PAZ
SCL SANTIAGO
-3
RIO RIO DE JANEIRO
GRU SAO PAULO
BUE BUENOS AIRES
BSB BRASILIA
MVD MONTEVIDEO
0
LON LONDON
DUB DUBLIN
LIS LISBON
CAS CASABLANCA
DKR DAKAR
ABJ ABIDJAN
+1
PAR PARIS
MIL MILAN
ROM ROME
BER BERLIN
MAD MADRID
FRA FRANKFURT
GMT
Differential CITY
CODE
CITY
+1
AMS AMSTERDAM
VIE VIENNA
ALG ALGIERS
STO STOCKHOLM
HAM HAMBURG
ZRH ZURICH
+2
IST ISTANBUL
CAI CAIRO
JRS JERUSALEM
ATH ATHENS
HEL HELSINKI
DAM DAMASCUS
CPT CAPE TOWN
+3
JED JEDDAH
MOW MOSCOW
KWI KUWAIT
ADD ADDIS ABABA
NBO NAIROBI
+3.5 THR TEHRAN
SYZ SHIRAZ
+4
DXB DUBAI
AUH ABU DHABI
MCT MUSCAT
+4.5 KBL KABUL
+5 KHI KARACHI
MLE MALE
+5.5 DEL DELHI
BOM MUMBAI
GMT
Differential CITY
CODE
CITY
+6 DAC DHAKA
CMB COLOMBO
+6.5 RGN YANGON
+7 BKK BANGKOK
JKT JAKARTA
+7 PNH PHNOM PENH
HAN HANOI
+8
SIN SINGAPORE
HKG HONG KONG
KUL KUALA LUMPUR
TPE TAIPEI
PER PERTH
PEK BEIJING
MNL MANILA
SHA SHANGHAI
+9 SEL SEOUL
TYO TOKYO
+9.5 ADL ADELAIDE
DRW DARWIN
+10
GUM GUAM
SYD SYDNEY
MEL MELBOURNE
+11 NOU NOUMEA
+12
WLG WELLINGTON
CHC CHRISTCHURCH
NAN NADI
AKL AUCKLAND
National Electronics & Watch Co,. Ltd.
BC04
GPS NE PRO PC software
Your GPS watch comes with PC software. This software is compatible with the following
operating system:
• Windows 7
• Windows XP SP 1, 2, 3
• Windows Vista SP 1, 2
• Windows 2000 SP 4
• Windows 98
You can use the software to view and analyze your data.
A) Software installation:
1) Install the GPS NE PRO PC software to your computer. The installer is bundled in
the box with your GPS watch.
2) Follow the installation guide of the software. This is just a simple installation
procedure. You will be prompt on what drive you want to install the software. Default
location is Program files\GPS NE PRO. You may change the location if you wish.
3) Click FINISH to complete the installation.
4) You may need to re-start your PC after installation.
5) GPS NE PRO icon will be placed in your desktop after installation.
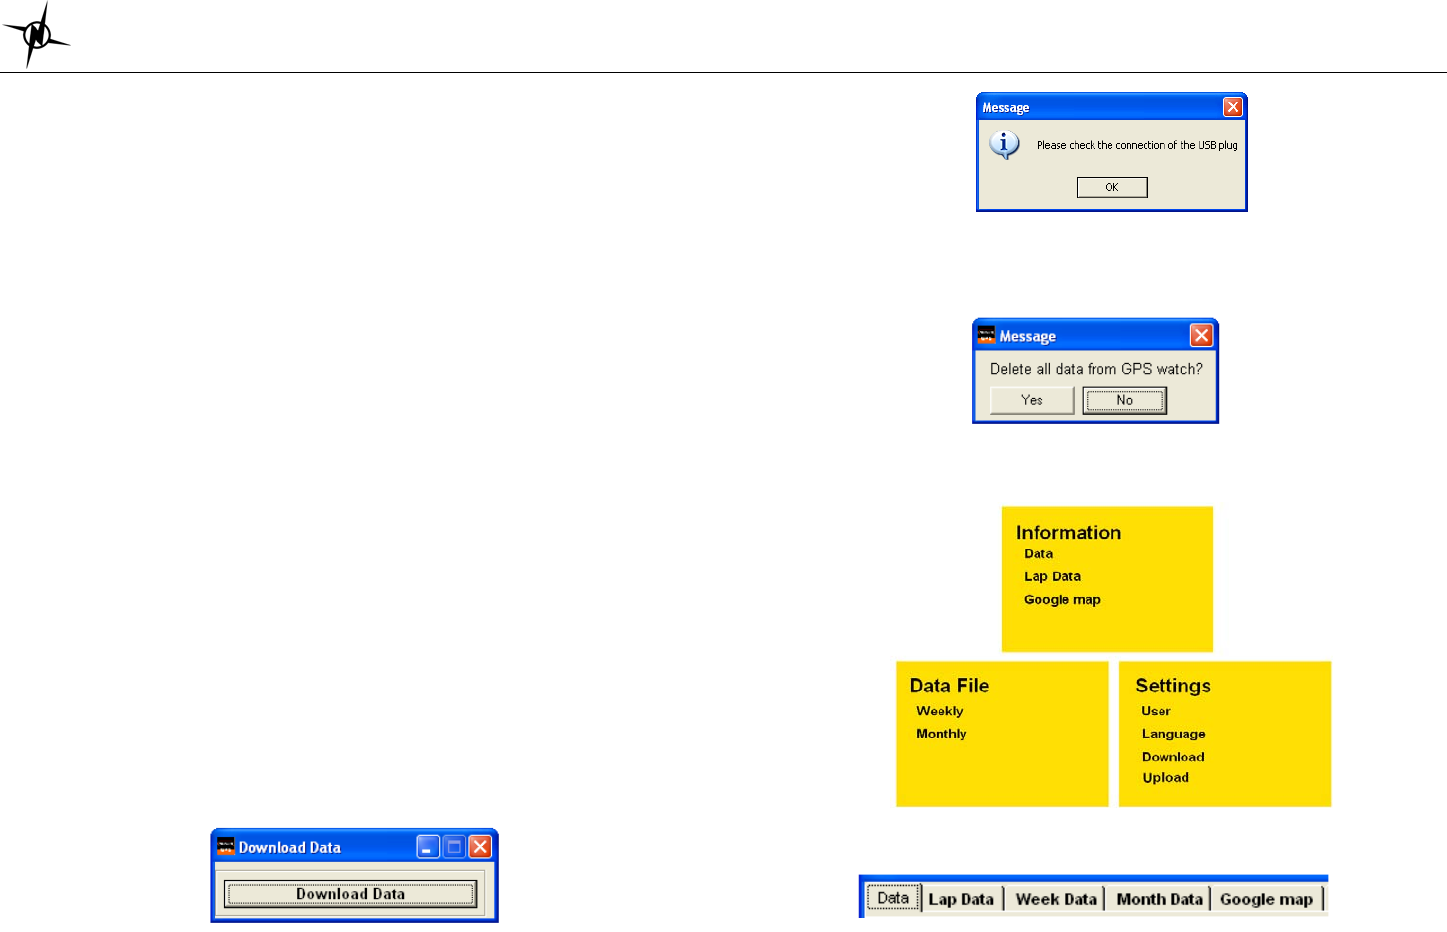
B) How to use the software:
1) Run the software by double clicking the icon on your desktop. The welcome screen
will appear on your desktop.
2) Clip the USB cable to your watch. This is the same cable used to charge the battery
of the GPS watch. Make sure the four pins of the clip have a good connection to the
four electrical contacts at the back of the watch.
3) Connect the USB cable to the USB port of your PC. The first time you do this, the
PC will automatically install the drivers for the device.
4) The Software will prompt you to download the data.
5) Click on the Download Data tab. Data will be automatically downloaded to your PC.
If there no proper contact between the USB clip and the watch, an error may occur
and the software will prompt you to check the cable. Repeat the downloading after
checking the cable.
6) After downloading the data, the software will prompt you to delete all data in the
GPS watch. Default option is NO.
WARNING! If you select yes, all data in the watch will be deleted.
7) Click the ENTER tab to open Home page below
8) Click on any of the tabs to open up the desired window. A new window will open
with the various tabs. Click any of the tabs to view your activity.

National Electronics & Watch Co,. Ltd.
BC04
FCC Statement
1. This device complies with Part 15 of the FCC Rules. Operation is subject to the
following two conditions:
(1) This device may not cause harmful interference.
(2) This device must accept any interference received, including interference that
may cause undesired operation.
2. Changes or modifications not expressly approved by the party responsible for
compliance could void the user's authority to operate the equipment.
NOTE:
This equipment has been tested and found to comply with the limits for a Class B
digital device, pursuant to Part 15 of the FCC Rules. These limits are designed to
provide reasonable protection against harmful interference in a residential
installation.
This equipment generates uses and can radiate radio frequency energy and, if not
installed and used in accordance with the instructions, may cause harmful
interference to radio communications. However, there is no guarantee that
interference will not occur in a particular installation. If this equipment does cause
harmful interference to radio or television reception, which can be determined by
turning the equipment off and on, the user is encouraged to try to correct the
interference by one or more of the following measures:
Reorient or relocate the receiving antenna.
Increase the separation between the equipment and receiver.
Connect the equipment into an outlet on a circuit different from that to which the
receiver is connected.
Consult the dealer or an experienced radio/TV technician for help.