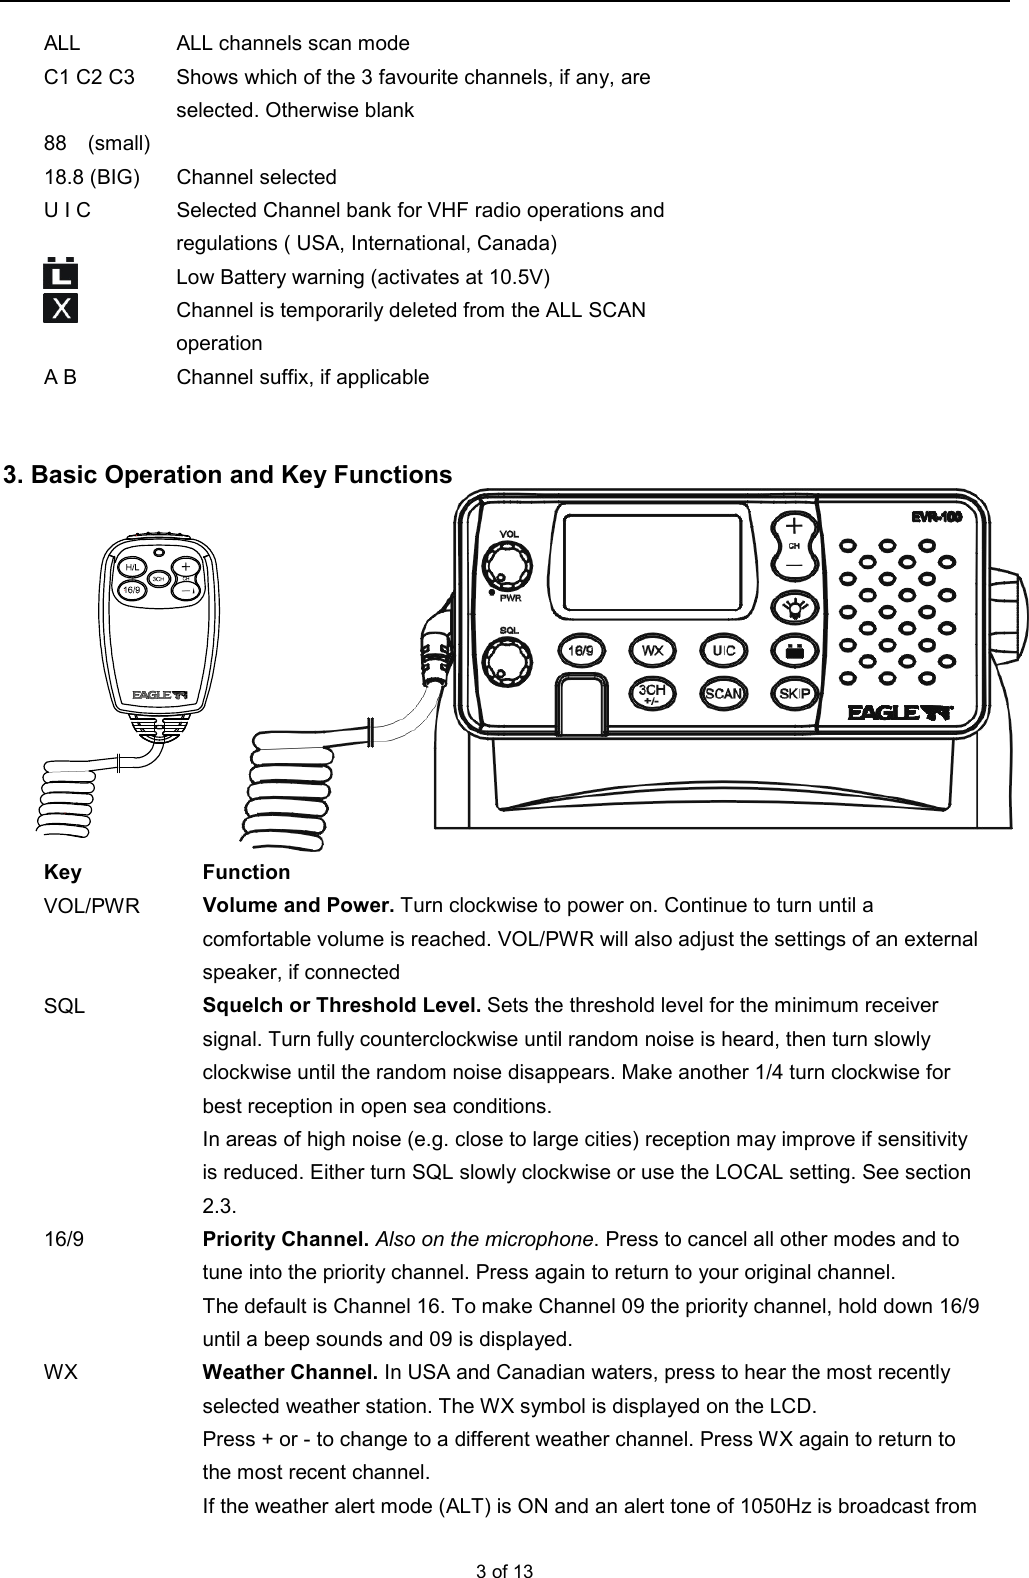
Navico EVR100US FIX MOUNT MARINE RADIO User Manual EVR 100US manual draft
Navico Auckland Limited FIX MOUNT MARINE RADIO EVR 100US manual draft
UserManual.wiki
>
Navico
>
EVR100US User Manual
USERS MANUAL
Navigation menu
Upload a User Manual
Namespaces
Wiki Guide
HTML
PDF
Info
Views
User Manual
Discussion / Help
Navigation

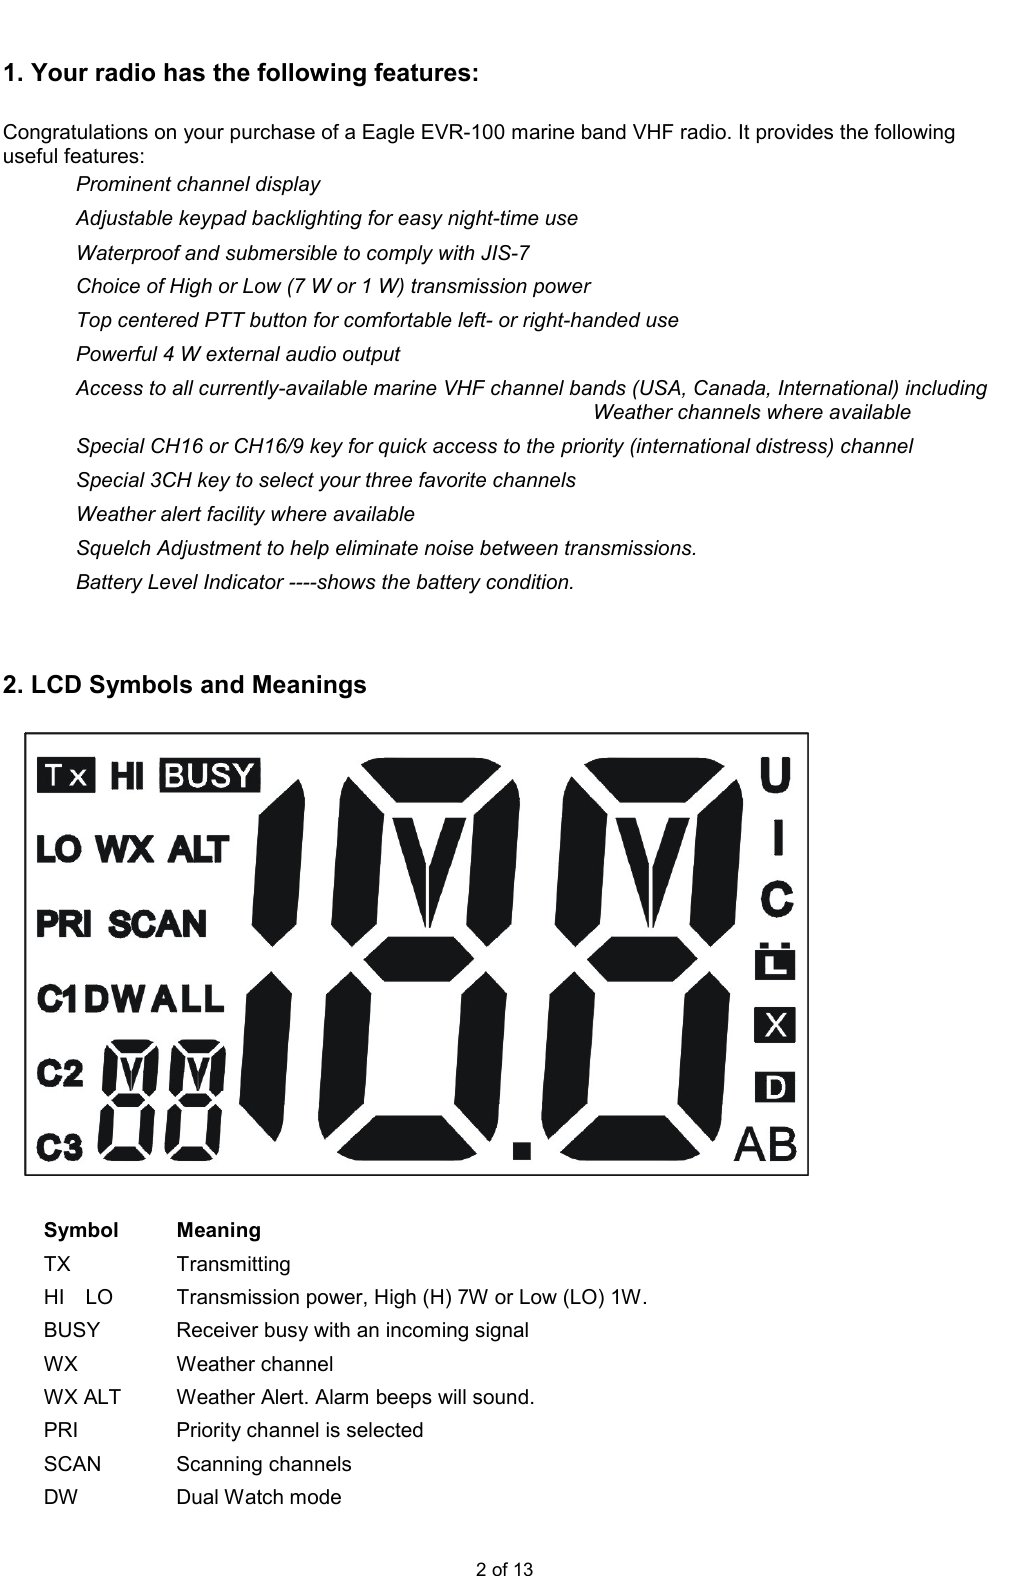
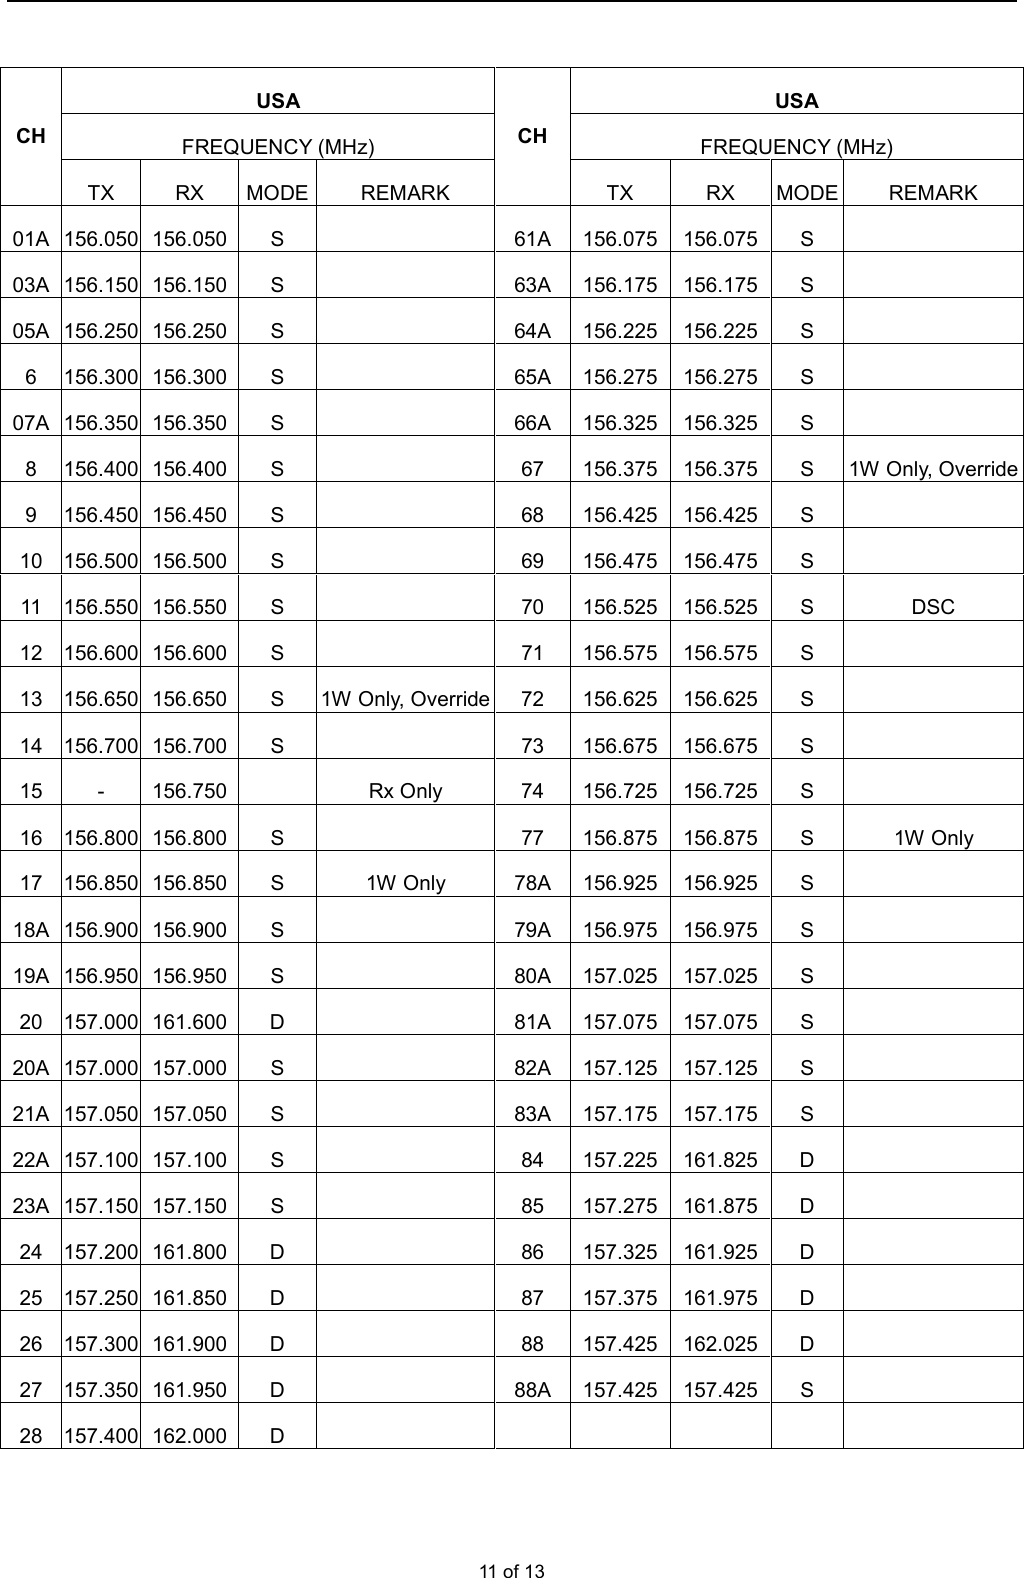
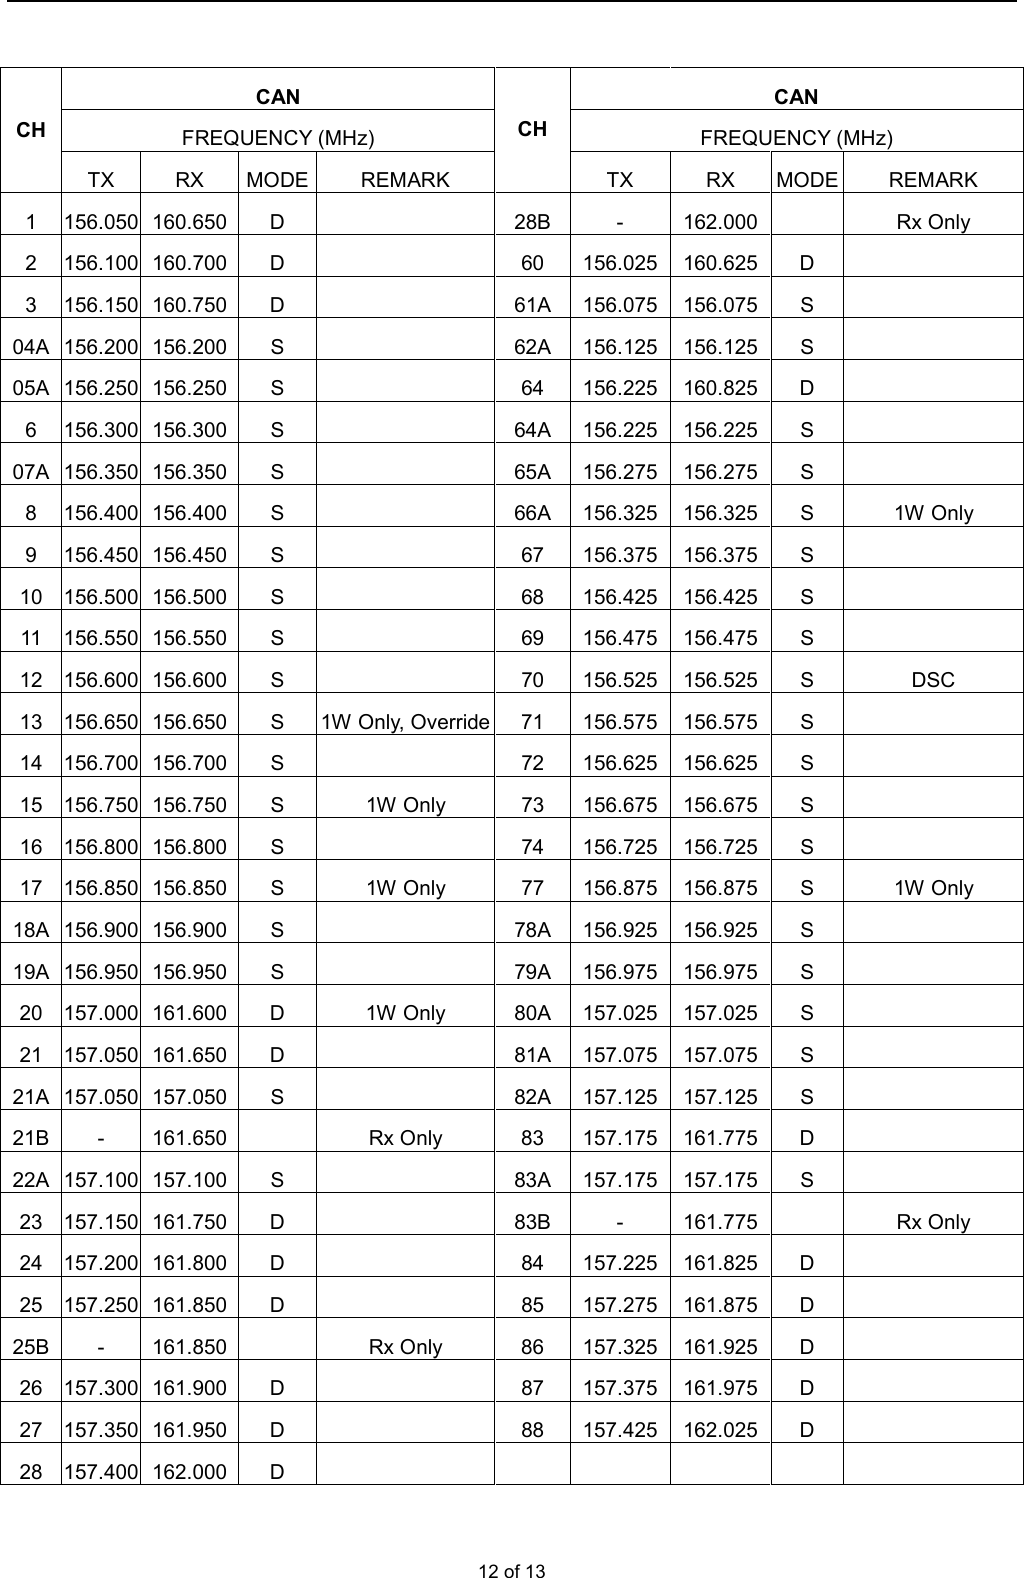
![5 of 13 power transmission setting is incorrect. Some channels allow only low power transmissions initially, but can be changed to high power by holding down H/L and PTT at the same time. See Appendix for a complete listing of channel charts. PTT Push To Talk. On the microphone ONLY Push to start the transmitting 4. Radio Operation Turning On/Off Your Radio Rotate Power/volume knob to turn the radio on or off with an indicating voice of click. And adjust the volume to a comfortable level. Adjusting Squelch Rotate SQL fully counterclockwise in advance, After VOL rotated to adjust the audio output level, then Rotate SQL clockwise until the noise disappears Squelch is used to eliminate static and background noise and allows for silent operation of your radio until a transmission is received. If the squelch is too high, only the strongest transmissions can be heard, and when too low, intermittent static and noise are heard. Selecting High/Low Power Press and release this key to toggle the transmit power between high and low. When the unit is operating at low power, “Lo” appears on LCD and “Hi” appears on LCD when operating at high power. [Some channels allow only low power transmissions. Error beeps will sound if the power transmission setting is incorrect. Some channels allow only low power transmissions initially, but can be changed to high power by holding down H/L and PTT at the same time. See Appendix for a complete listing of channel charts.] Selecting Channels Press the / (UP/DOWN )button to scroll through the available channels. Note: Not all channel numbers are available in INT bands. Transmitting and Receiving Press and hold the Push-To-Talk (PTT) key to transmit on the selected channel, then release to receive. The TX indicator appears while transmitting. Scanning Features Your radio is equipped with 2 types of scan options: All Scan, 3CH Scan (Favourite Channel Scan). If there are no channels added as favourite channels, the default is All Scan. This function automatically searches for transmissions on the channel set being scanned. If a TX signal is received, the scan stops on the receiving channel as long as it is present and the SCAN indicator flashes. If the signal is lost for 3 seconds, the radio resumes scanning. During the Scan Modes: Press the Channel / (UP/DOWN) will escape from the SCAN mode. Press SCAN button again to terminate the SCAN mode. All Scan](https://usermanual.wiki/Navico/EVR100US/User-Guide-877485-Page-5.png)
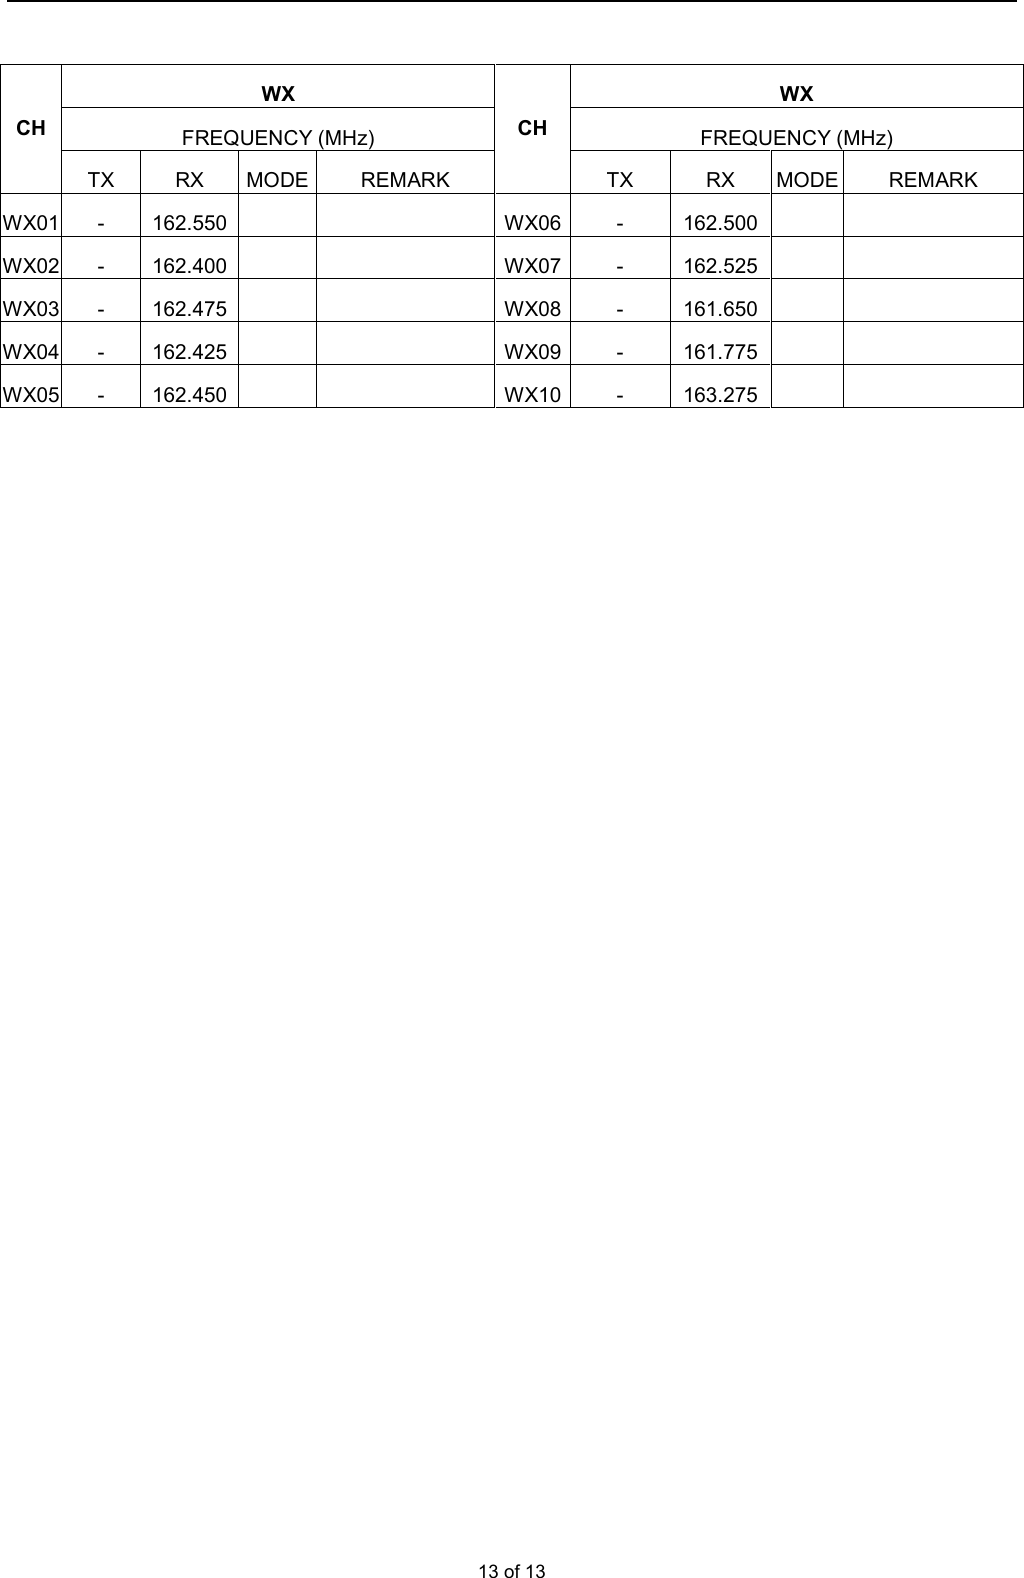
![6 of 13 Press and release the SCAN button to activate the All Scan function. The SCAN and ALL indicator appears on the LCD during All Scan. In All Scan mode, all channels in the channel set are scanned in sequence except the channel set as Cancel channel using SKIP button operation. After the last channel number has been scanned, the cycle repeats. 3CH Scan ( Favourite Channels Scan) Press 3CH button into 3CH shortcuts button when there is at least one favourite channel Press and release the SCAN button to start 3CH Scan , the SCAN indicators appear on the LCD. Only the favourite channels and priority channels (CH16) are scanned in sequence. Your radio can store up to three favourite channels. The favourite channels are the ones scanned in the 3CH Scan mode. Press 3CH shortly can access these favourite channels as shortcuts To Add Channels to 3CH List During normal operation mode, use the UP or DOWN key to select the desired channel for programming. Press and hold the 3CH button for 3 seconds. The "C1" icon appears to indicate the current channel has been saved in first favourite channel. The similar to the second and third favourite as C2 and C3 respectively. Any number of channels can be saved as favourite channels To Delete Channels from 3CH List Press 3CH shortly into 3CH shortcuts mode, press 3CH repeatedly until the channel to be deleted. Press and Hold 3CH button more than 3 seconds until the “Cn” disappears Monitor Modes (Dual Watch) The Watch Modes monitor the programmed Priority Channel (CH16) and other user selected channel. The watch is halted when activity is detected on a monitored channel. Press SCAN shortly to activate the Dual Watch mode. The "DW" indicator appears on the LCD. Dual Watch monitors the current working channel and Channel 16 in cycle. Press SCAN button to terminate Dual Watch and return to the previous working channel. Note: During Dual Watch mode, the SCAN and Channel / (UP/DOWN) button are inactive and sounds an error beep if pressed. Monitor modes are terminated when the PTT once pressed. NOAA WEATHER CHANNELS To receive a NOAA weather channel, press the [WX] key from any channel. The transceiver will go to the last selected weather channel. Press the / (UP/DOWN )button to scroll through the available channels. To exit from the NOAA weather channels, press the [WX] key. The transceiver returns to the channel it was on prior to a weather channel. Or press 16/9 to access the priority channels NOAA WEATHER ALERT In the event of extreme weather disturbances, such as storms and hurricanes, the NOAA (National Oceanic and Atmospheric Administration) sends a weather alert accompanied by a 1050 Hz tone and subsequent weather report on one of the NOAA weather channels. When the Weather Alert feature is enabled, the transceiver is capable of receiving this alert In the Weather channel, Press and hold Wx button more than 3 seconds to active the Alert function, LCD will appears “ALT”. To cancel the alert function, Press and hold WX button more than 3 seconds again, the “ALT”](https://usermanual.wiki/Navico/EVR100US/User-Guide-877485-Page-6.png)