Ncomputing N Series Users Manual
2015-06-15
: Ncomputing Ncomputing-N-Series-Users-Manual-747679 ncomputing-n-series-users-manual-747679 ncomputing pdf
Open the PDF directly: View PDF ![]() .
.
Page Count: 38

N-series Thin Clients
for Citrix HDX
User Manual
(Firmware 1.5.0)

NComputing N-series User Manual rev10.08.13_1.5.0
Page 2 of 38
Important Notices
Please note that reproduction of this User Manual in whole or in part, without express written
permission from NComputing, is not permitted.
NComputing reserves the right to make improvements and/or changes to this User Manual and to the
products, programs and/or specifications described herein at any time without notice. Information
contained in this document may have been obtained from internal testing or from a third party.
NComputing shall not be liable for any direct, indirect, special, incidental or consequential damages in
connection with the use of this material. The latest version of this User Manual can be downloaded from
the “Documentation” page in the Support section of the NComputing website at:
www.ncomputing.com
Refer to the Limited Hardware Warranty applicable to your region for information on what is and what
is not covered by the warranty, your responsibilities, exclusions, and how to obtain service. It is your
responsibility to download a copy of the warranty at the time of purchase to keep for your records. The
warranty can be downloaded from the “Documentation” page in the Support section of the NComputing
website.
This product gives users shared access to computer resources. It is not a computer, and may not
support all software applications, especially high-resolution graphics applications or 3D games that are
designed to be supported by stand-alone computers. Similarly, it may not support all hardware
peripherals that are designed to be supported by stand-alone computers.
Refer to your computer operating system and application software vendors’ license agreements for
information on using these products with NComputing systems. Additional software licenses may be
required.
The NComputing hardware and software products described in this user manual are protected by
numerous granted and pending U.S. and international patents. Some components of NComputing
products utilize open-source software. Please refer to the GPL Declarations section of this User Manual
for more information.
Your N-series purchase was bundled with an entitlement
to vSpace Management Center and Premium Support
Review section 4.1 of this manual to learn more about claiming your vSpace Management Center
license(s) and access to NComputing Premium Support.
© 2003-2012 NComputing Inc. All rights reserved. NComputing and Numo are registered trademarks of NComputing Inc. – USA.
VESA is a trademark of Video Electronics Standards Association. Kensington is a trademark of ACCO World Corporation. All
other trademarks are the property of their respective owners.

NComputing N-series User Manual rev10.08.13_1.5.0
Page 3 of 38
TABLE OF CONTENTS
Important Notices ......................................................................................................................................... 2
Regulatory Compliance ................................................................................................................................. 4
FCC Information ........................................................................................................................................ 4
GPL Declarations ....................................................................................................................................... 5
Safety Information ........................................................................................................................................ 5
1.0 N-series Overview ................................................................................................................................... 6
1.1 N-series models ................................................................................................................................... 6
1.2 N-series Package Contents .................................................................................................................. 7
1.3 N-series Peripheral Connections ......................................................................................................... 7
1.4 VESA Mount ........................................................................................................................................ 8
1.5 Citrix Requirements ............................................................................................................................ 8
1.6 Secondary Display Adapter ................................................................................................................. 9
2.0 Device Configuration ............................................................................................................................. 10
2.1 Citrix Tab ........................................................................................................................................... 11
2.2 Preferences Tab - Display .................................................................................................................. 12
2.3 Preferences Tab – Date/Time ........................................................................................................... 12
2.4 Preferences Tab – Keyboard ............................................................................................................. 13
2.5 Network Tab ...................................................................................................................................... 13
2.6 Security Tab – Per-Tab Access........................................................................................................... 15
2.7 Security Tab – Certificates ................................................................................................................ 15
2.8 Security Tab – Imprivata ................................................................................................................... 16
2.9 Security Tab – Device Shadowing ..................................................................................................... 16
2.10 Management Tab – Device Name ................................................................................................... 17
2.11 Management Tab – Firmware/Wallpaper Update ......................................................................... 17
2.12 Management Tab – vSpace Management Center .......................................................................... 18
2.13 Peripherals Tab – Redirection Policy............................................................................................... 19
2.14 Peripherals Tab – Audio .................................................................................................................. 19
2.15 Peripherals Tab – Printers ............................................................................................................... 20
2.16 Peripherals Tab – Scanners ............................................................................................................. 20
2.17 Peripherals Tab – Serial Devices ..................................................................................................... 21
2.18 Peripherals Tab – USB Serial ........................................................................................................... 21
2.19 Information Tab .............................................................................................................................. 22
3.0 Connecting to your Citrix Environment ................................................................................................ 24
4.0 Support and Additional Resources ........................................................................................................ 25
4.1 Accessing your vSpace Management Center License(s) and Premium Support Entitlement........... 25
4.2a Pre-1.5.0 Firmware Update Best Practices ..................................................................................... 26
4.2b 1.5.0 Firmware Update Best Practices ............................................................................................ 27
4.2c Directing N-series Devices To The Firmware Archive Using the N-series GUI ................................ 29
4.2d Directing N-series Devices To The Firmware Archive Using Device Profiles .................................. 29
4.2e Example of FTP Folder Setup Using FileZilla ................................................................................... 31
4.3 DHCP Options for Automatic N-series Configuration ....................................................................... 31
4.4 NComputing Technical Support ........................................................................................................ 37
4.5 Additional Information on Citrix products and support ................................................................... 38
Disclaimers and Legal Information ......................................................................................................... 38
NComputing N-series User Manual rev10.08.13_1.5.0
Page 4 of 38
Regulatory Compliance
FCC Information
This equipment has been tested and found to comply with the limits for a class B digital device, pursuant
to part 15 of the FCC Rules.
These limits are designed to provide reasonable protection against harmful interference in a residential
installation. This equipment generates, uses, and can radiate radio frequency energy, and if not installed
and used in accordance with the instructions, may cause harmful interference to radio communications.
However, there is no guarantee that interference will not occur in a particular installation. If this
equipment does cause harmful interference to radio or television reception, which can be determined
by turning the equipment off and on, the user is encouraged to try and correct the interference by one
or the following measures:
Reorient or relocate the receiving antenna
Increase the separation between the equipment and the receiver
Connect the equipment to a power outlet on a circuit different from which the receiver is
connected
Consult your dealer or an experienced radio TV technician for help
Changes or modifications not expressly approved by the party responsible for compliance could void the
user’s authority to operate the equipment.
European Community:
Disposal Information:
This symbol means that according to local laws and regulations your product should be disposed of
separately from household waste. The separate recycling of your product will help ensure that it is
recycled in a manner that protects human health and the environment.

NComputing N-series User Manual rev10.08.13_1.5.0
Page 5 of 38
GPL Declarations
The NComputing N-series access device contains – in part – some free software (software licensed in a
way that ensures your freedom to run, copy, distribute, study, change and improve the software). This
free software is also contained in the N-series firmware update files that are distributed online. The free
software contained within the N-series firmware includes a version of X-LOADER, U-BOOT, LINUX,
LIBSYSFS, LIBUCI, LIBUSBIP, ETHTOOL, UCLIBC, QT and BUSYBOX.
Further, for at least three (3) years from the date of distribution of the applicable product or software,
we will give to anyone who contacts us at gplcoderequest@ncomputing.com, for a charge of no more
than our cost of physically performing source code distribution, a machine-readable copy of the
complete corresponding source code for the version of the software that we distributed to you. For
additional information refer to this page on the NComputing website:
www.ncomputing.com/gplcodedownload
Safety Information
Refer to the following to prevent any physical injury or loss of assets caused by damage to the product.
A user must read this User Manual carefully before use and properly follow the instructions.
Make sure that the place of installation is not too hot (above 35˚C), too cold (below 0˚C), or too
wet (above 85% relative humidity).
Avoid any severe impacts to the product
Make sure that the product is not exposed to direct sunlight or any hot machinery.
Please keep the product away from any items which have strong magnetic properties.
Do not disassemble, repair or rebuild the product.
Please properly route all cables and power cords to avoid a tripping hazard. An electric shock,
fire, damage to the product or physical injury may occur as a result of tripping over the cable.
NComputing N-series User Manual rev10.08.13_1.5.0
Page 6 of 38
1.0 N-series Overview
The NComputing N-series HDX-ready Citrix access device utilizes powerful third-generation Numo™ 3
System on Chip technology to deliver a high-performance, affordable client for Citrix environments. This
user manual will walk you through the differences between each of the different N-series models and
explain their basic functionality.
1.1 N-series models
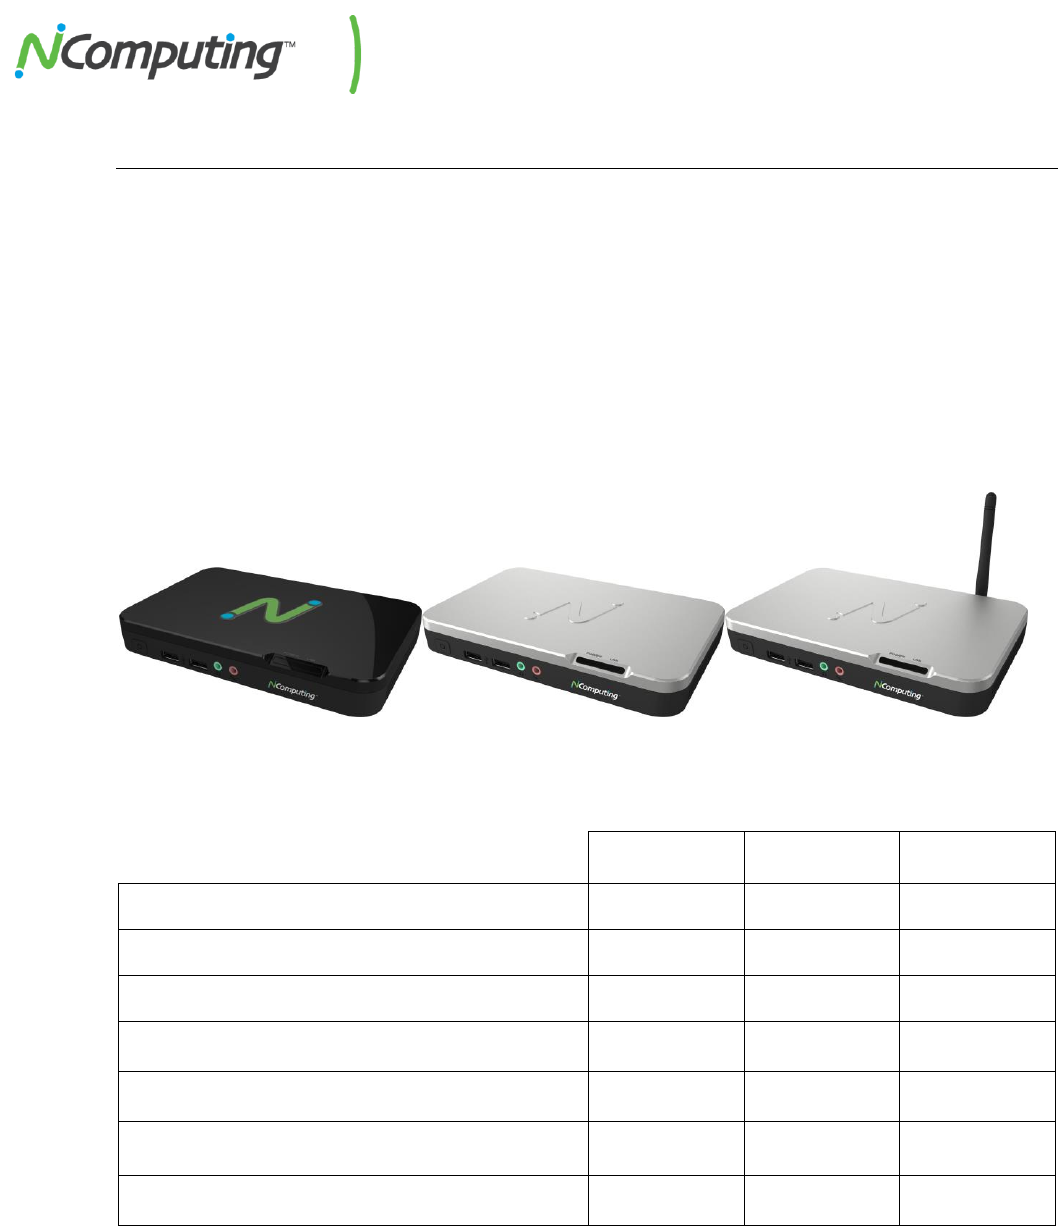
The N-series is available in three distinct versions; the N400, N500, and N500w. The entry level N400 is
the thin client of choice for task workers and those workers with light multimedia needs. The N500 adds
client-side video rendering to enable the delivery of full 1080p multimedia content, improved network
capabilities, as well as options for dual monitor and wireless connectivity.
N400
N500
N500w
Network Bandwidth
10/100/1000
10/100/1000
10/100/1000
Onboard Memory
512 MB
1024 MB
1024 MB
Video Playback
720p
1080p
1080p
4x USB 2.0 Ports
DVI Video Output
Optional Dual Monitor Support
Wireless Network Connectivity
NOTE: The N500w supports secured wireless networks with visible SSIDs using WPA or WPA2.
On-device memory is reserved for use with NComputing-supplied and approved firmware only.
N400
N500
N400
N500w
NComputing N-series User Manual rev10.08.13_1.5.0
Page 7 of 38
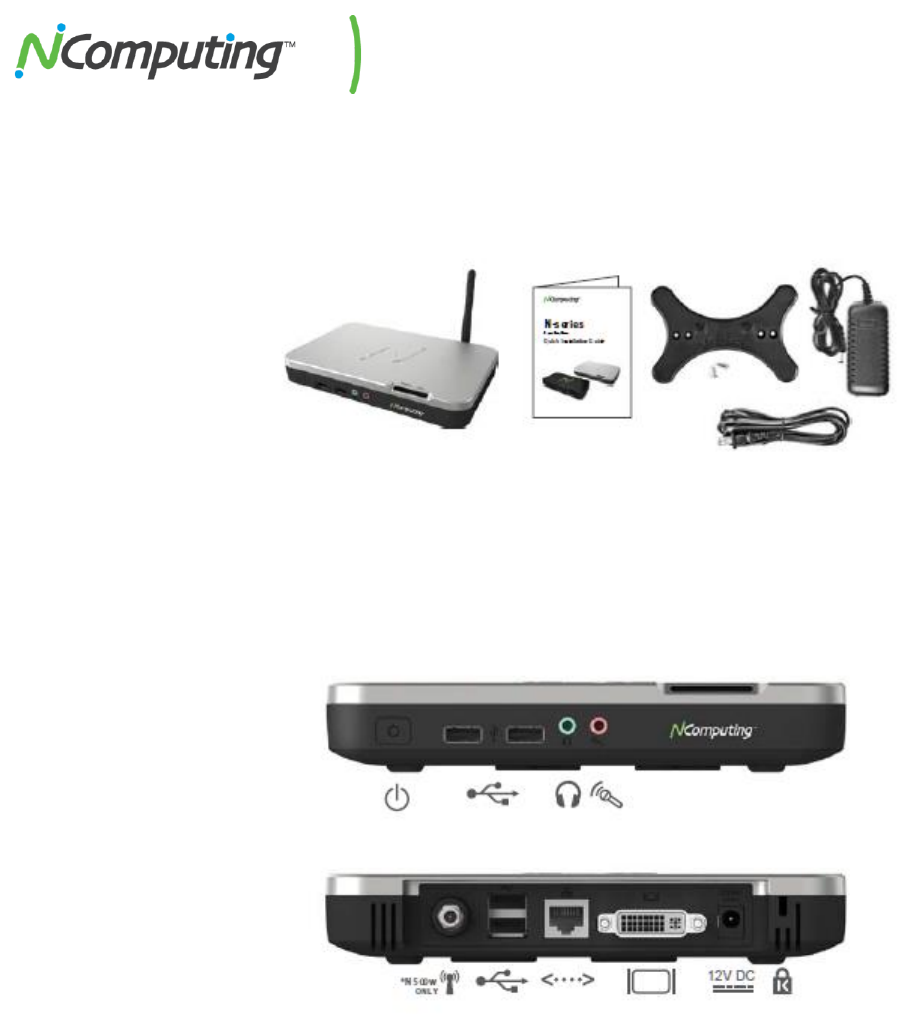
1.2 N-series Package Contents
When you unpack your N-series device, you will find the following items: N-series device, N-series Quick
Installation Guide, VESA Mounting bracket with screws, and 12V Power adapter.
1.3 N-series Peripheral Connections
Each of the different models within the N-series lineup feature the following peripheral options listed
below from left to right in order of appearance on the device.
Front of Device
Back of Device
Power On/Off/Reset Switch
2x USB 2.0 Ports
Analog Speaker Port
Analog Microphone Port
Wireless Network Antennae (N500w only)
2x USB 2.0 Ports
RJ45 Ethernet Port
DVI Monitor Port
12V DC Power Port
Kensington Security Lock
Front
Back
NComputing N-series User Manual rev10.08.13_1.5.0
Page 8 of 38
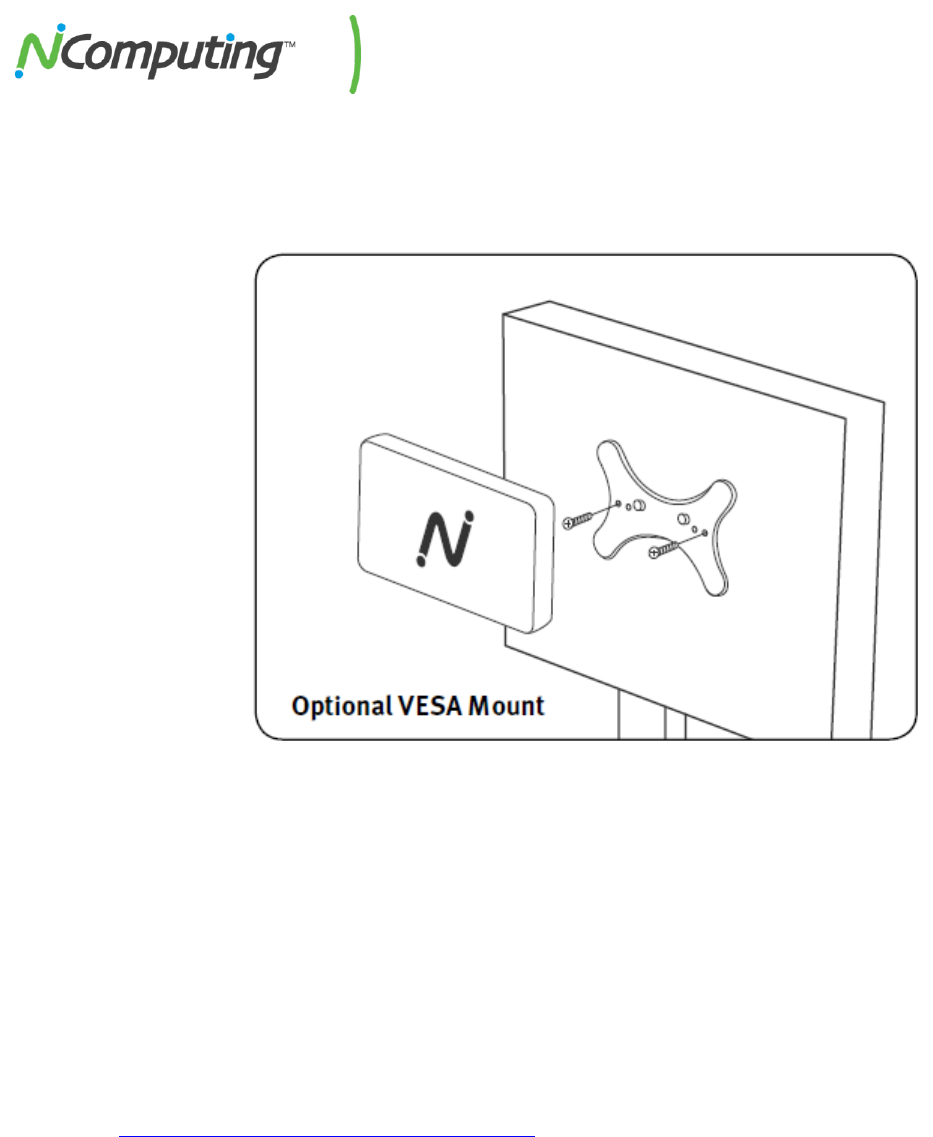
1.4 VESA Mount
Included with each N-series device is a VESA mount which can be used to attach the N-series device to
the back of any VESA compatible monitor, as shown below.
1.5 Citrix Requirements
To utilize the N-series device, you will need access to a Citrix environment. The N-series is compatible
with the following Citrix environments:
XenDesktop versions 5.0, 5.5, and 5.6
XenApp versions 6 and 6.5
VDI-in-a-box 5.0 and 5.1
For more information on the installation and configuration of Citrix environments, visit
http://www.citrix.com/lang/English/home.asp
NComputing N-series User Manual rev10.08.13_1.5.0
Page 9 of 38
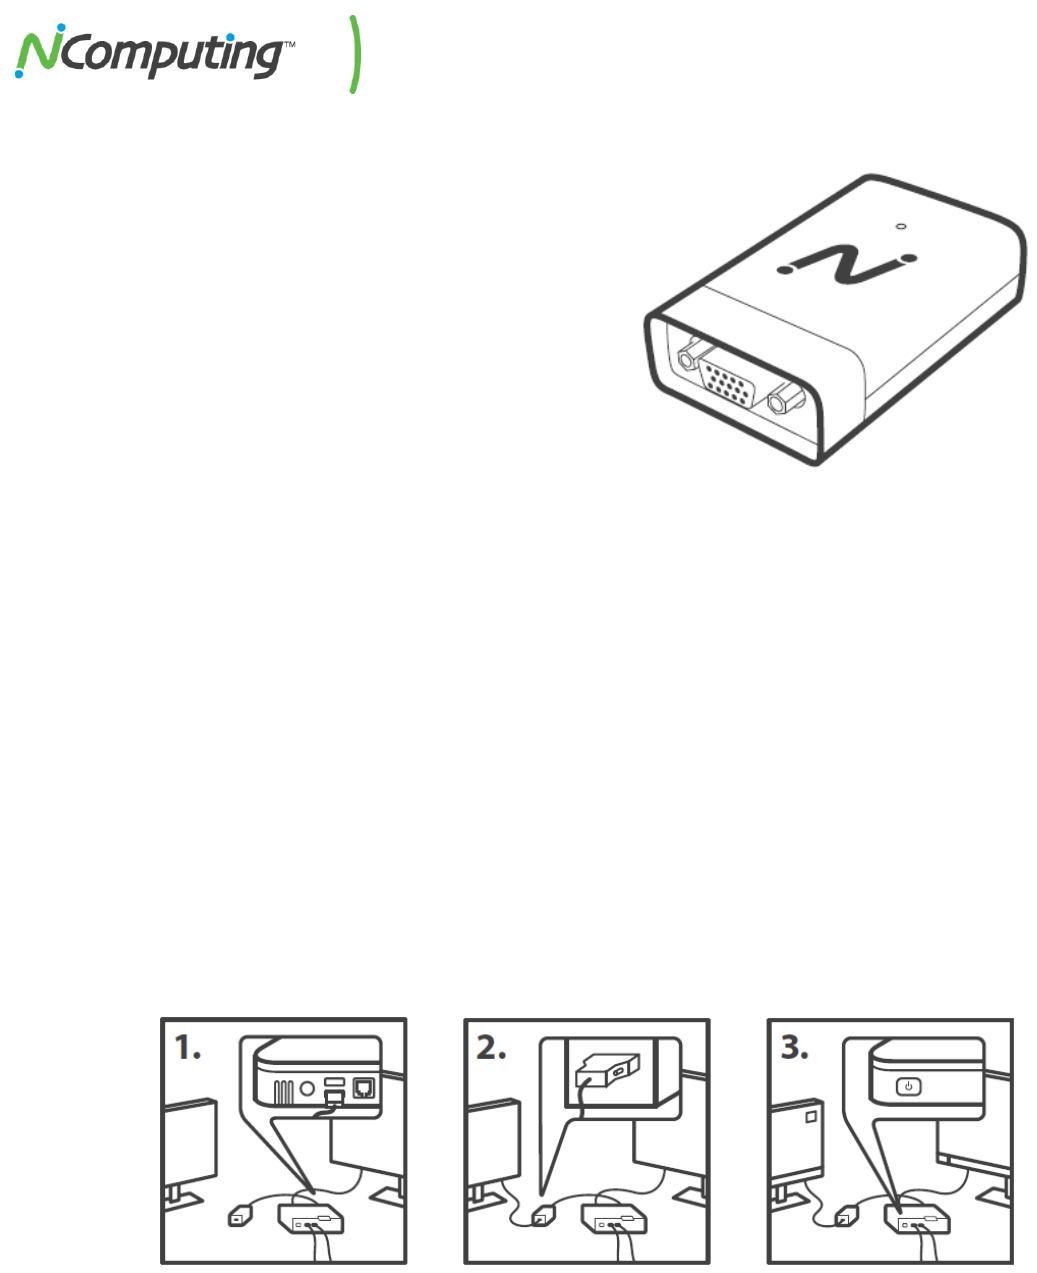
1.6 Secondary Display Adapter
For deployments requiring two monitors per user,
NComputing offers the N-series Secondary Display
Adaptor. This accessory is offered in VGA and DVI
models and is optimized for use with productivity
applications and 2D graphics content.
The Secondary Display Adaptor makes use of DDC
interface technology, allowing it to automatically scale
its output to the full native resolution of most
monitors. This default resolution can be changed from
within the N-series settings menu, under the
Preferences -> Display Tab.
Installing the Secondary Display Adaptor
1. With the N-series powered off, connect the Secondary Display Adaptor to the lower USB port on
the back of the device. This USB port is marked with a keyboard symbol.
Note: You can relocate your USB keyboard to either of the USB ports on the front of the N-
series. If you have run out of USB ports, a powered USB hub can be connected to either of
the USB ports on the front the N-series device to support additional connections.
2. Connect your second monitor to the Secondary Display Adaptor and turn it on.
3. Turn on your N-series device.
NComputing N-series User Manual rev10.08.13_1.5.0
Page 10 of 38
2.0 Device Configuration
It is strongly recommended that before connecting your N-series for the first time, you review the
configuration options to ensure that they conform to the needs of your environment.
You can reach the configuration screen by clicking the gear icon to the bottom left of the initial Log-in
screen. Next to the gear icon is a dropdown that will allow you to change your keyboard layout to match
a number of regional and national standards, as shown above.
Once in the configuration screen, you can return to the Log-in screen at any time using the “Home”
button. Remember to SAVE your configuration changes as you apply them using the “Save” button to
the bottom left of the configuration window.
NComputing N-series User Manual rev10.08.13_1.5.0
Page 11 of 38
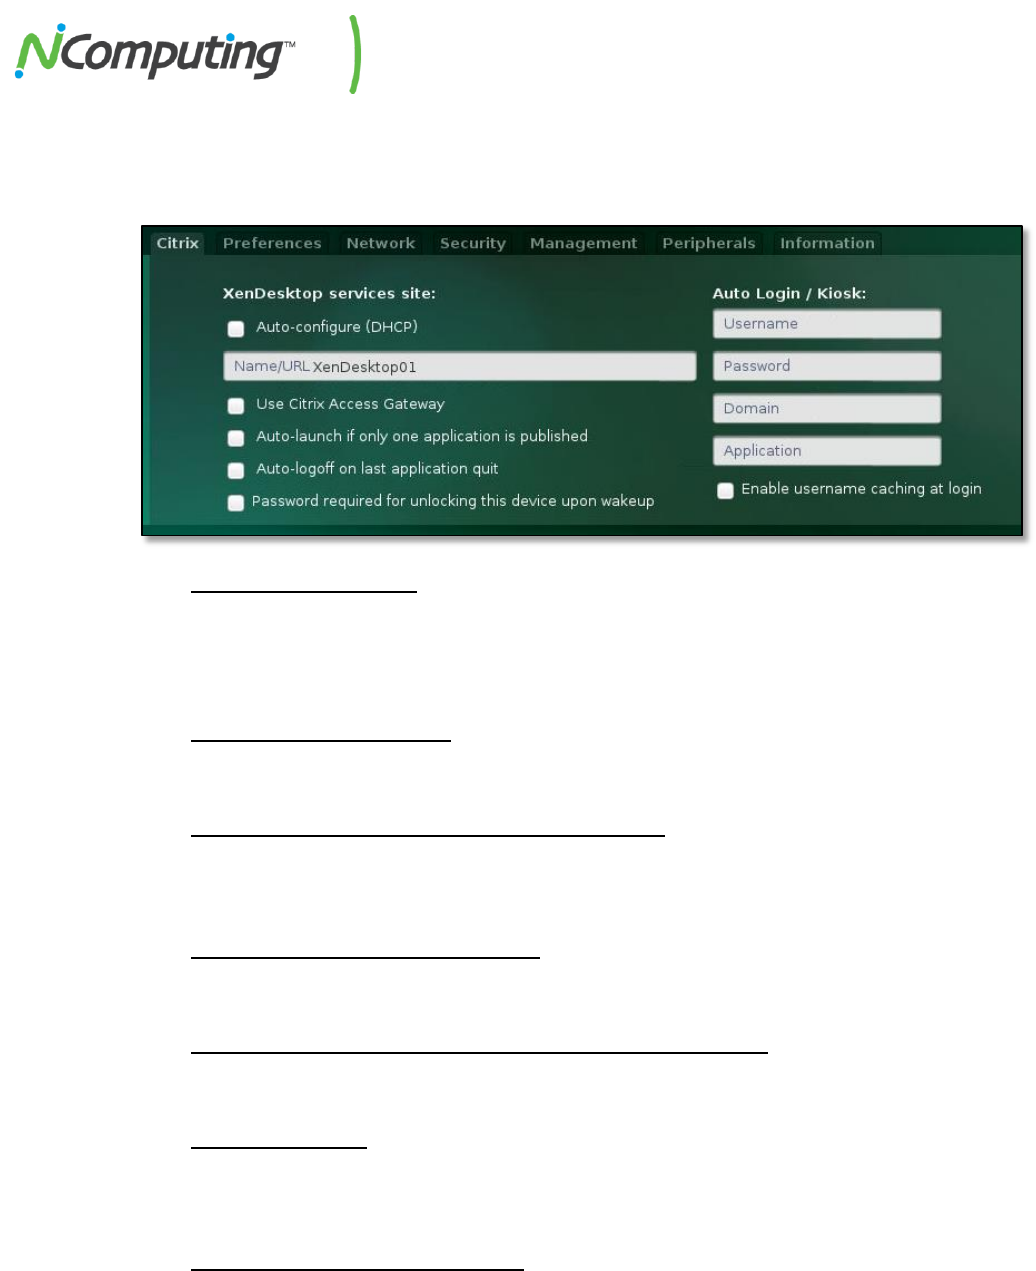
2.1 Citrix Tab
The Citrix tab is used to point your N-series device to your XenDesktop Services Site as well as configure
certain login and application behaviors.
Auto-configure (DHCP)*
Instructs the N-series device to obtain XenDesktop Services Site information automatically via
DHCP (requires that you configure your DHCP server to distribute this information). If this
feature is disabled, use the Name/URL field to manually enter the IP, URL, or Fully Qualified
Domain Name of your XenDesktop Services Site.
Use Citrix Access Gateway
Enabling this feature will allow your N-series device to access your Citrix environment securely
from outside your network via the Citrix Access Gateway.
Auto-launch if only one application is published
If your Citrix environment is configured to only publish a single application to the user session
obtained by a given device, you can use this feature to automatically launch that application or
desktop on login.
Auto-logoff on last application quit
Enabling this feature will cause your N-series device to automatically log out if all applications
are closed.
Password required for unlocking this device upon wakeup
Enabling this feature will cause your N-series device to prompt the user for their login password
when the device comes out of a standby state.
Auto login / kiosk
Use the Username, Password, and Domain fields to configure your device for auto login. The
Application field can be used to enter the name of an application (as it appears when published
by XenApp) to be automatically launched on login.
Enable username caching at login
Enabling this feature will leave the user name of the last user to log in cached in the user name
field after they log out. This can speed up the login process when a single specific user is most
likely to use a given device.
NComputing N-series User Manual rev10.08.13_1.5.0
Page 12 of 38
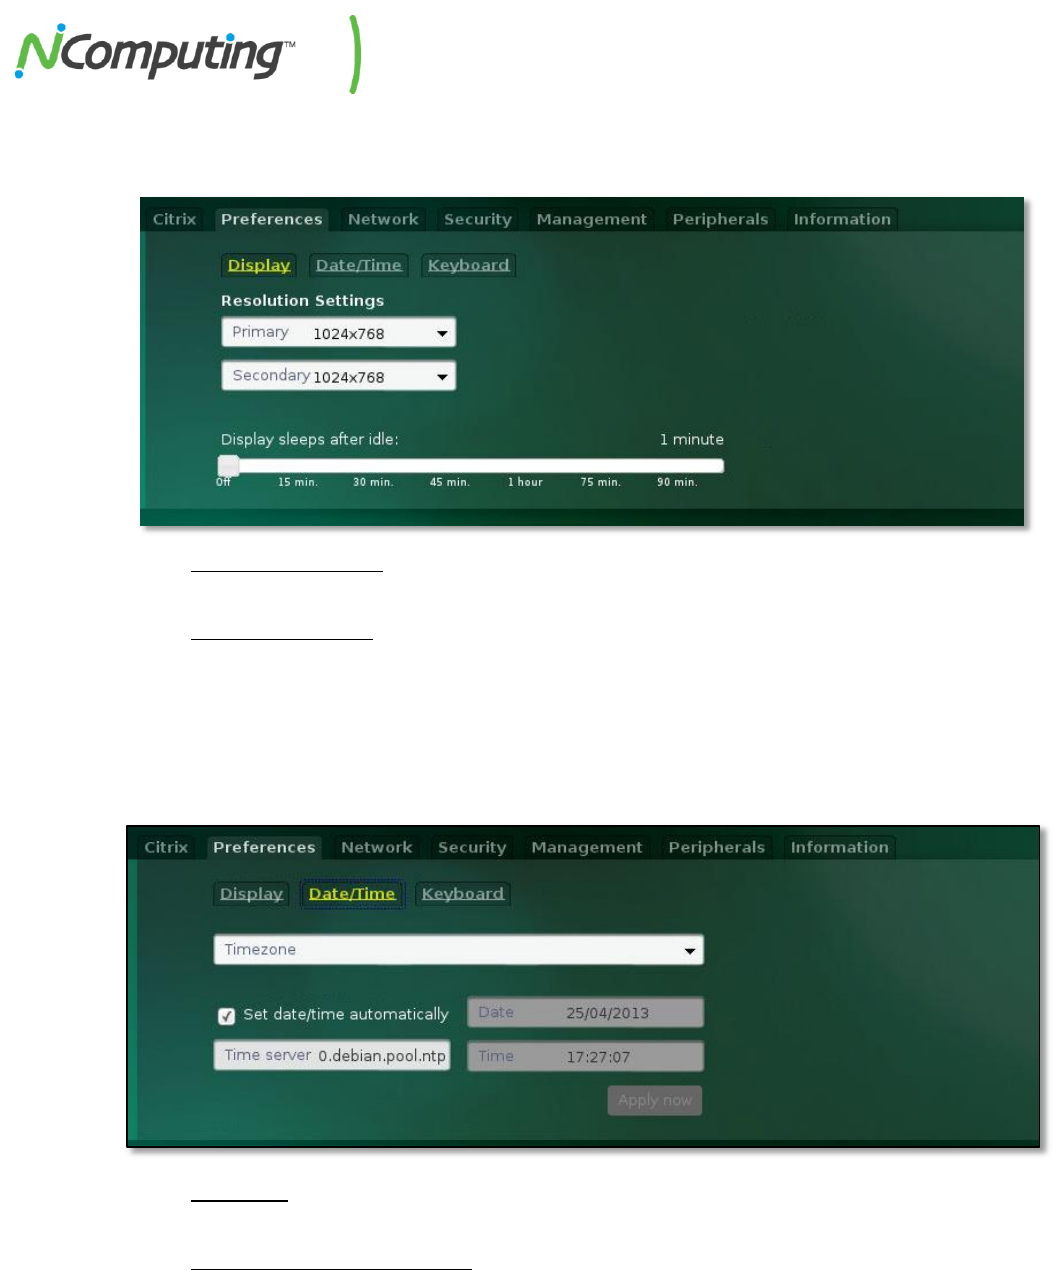
2.2 Preferences Tab - Display
The Display section of the Preferences Tab is used to manage monitor resolution and standby settings.
Resolution Settings
Use the Resolution dropdown menu(s) to select your desired monitor resolution.
Screensaver Delay
The N-series can be instructed to turn off its video signal after a predefined period of idle time.
Use this slider to enable this feature and define the desired idle period.
2.3 Preferences Tab – Date/Time
The Date/Time Tab is used to set the internal clock of the N-series device.
Timezone
Select the appropriate time zone from this dropdown menu.
Set date/time automatically
Enables the use of the NTP service to obtain automatic date/time information via your network.
If disabled, the date and time can be manually configured using the fields to the right side of the
menu.
NComputing N-series User Manual rev10.08.13_1.5.0
Page 13 of 38
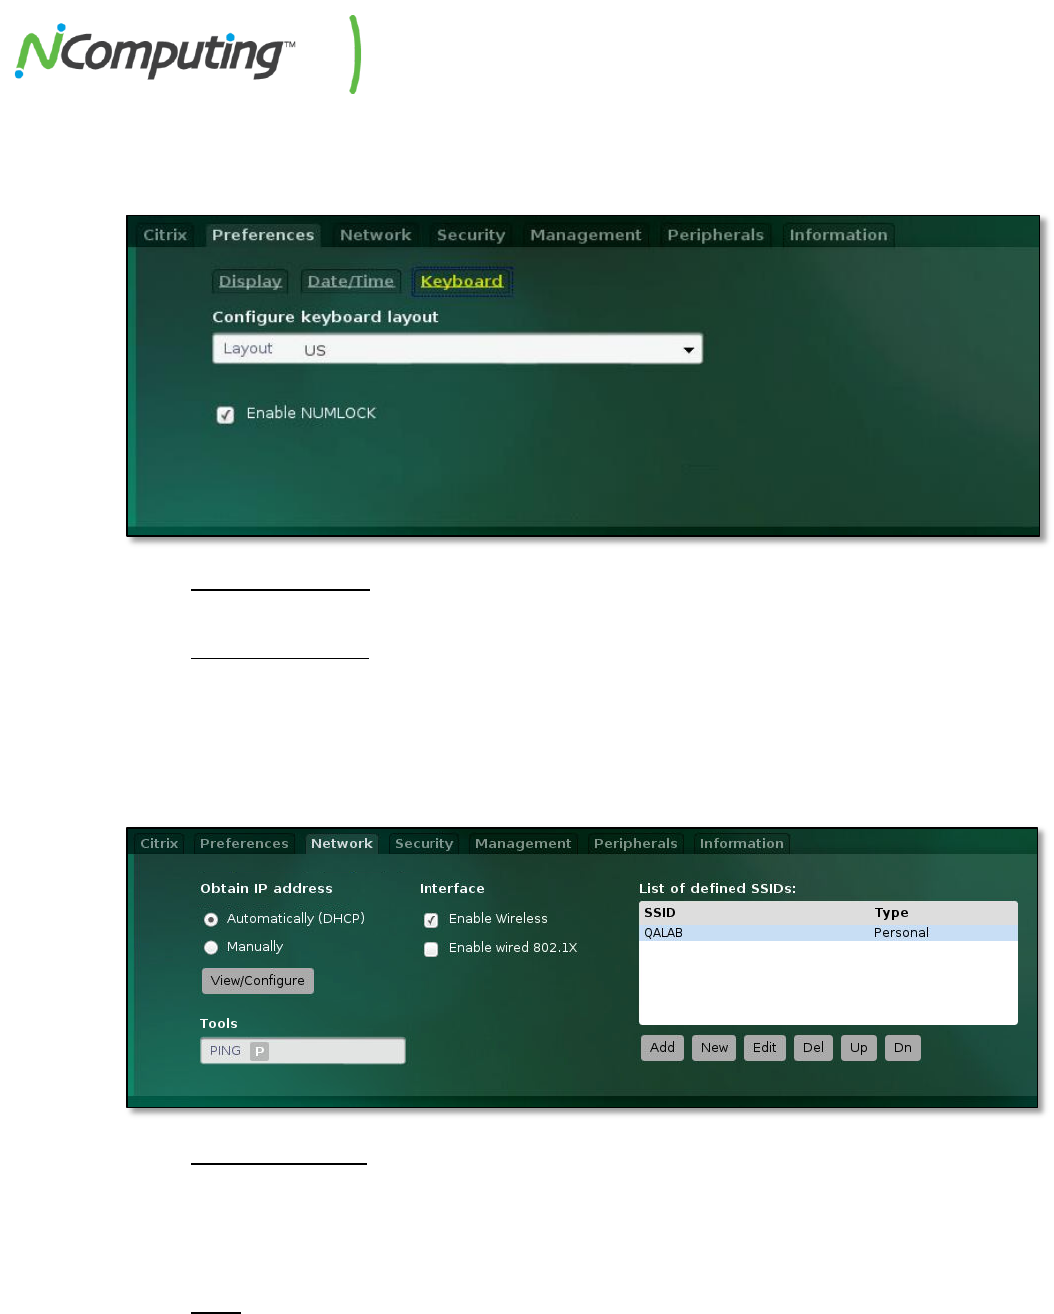
2.4 Preferences Tab – Keyboard
The Keyboard Tab provides access to localized keyboard layout support.
Layout Dropdown
Select the desired keyboard layout (by country) from this dropdown menu.
Enable NUMLOCK
When enabled, the NUMLOCK key will be on by default when the device turns on.
2.5 Network Tab
The Network Tab allows configuration of N-series device network settings.
Obtain IP address
Select whether to obtain network settings via DHCP, or enter network settings manually using
the fields provided to the right of this menu. The View/Configure button allows you to view the
current network connection information or, if using a manual configuration, to modify the
current settings.
PING
This feature allows the user to test an IP address to determine whether it is in use before
assigning it to the N-series device. This can also be used to verify general network functionality.
NComputing N-series User Manual rev10.08.13_1.5.0
Page 14 of 38
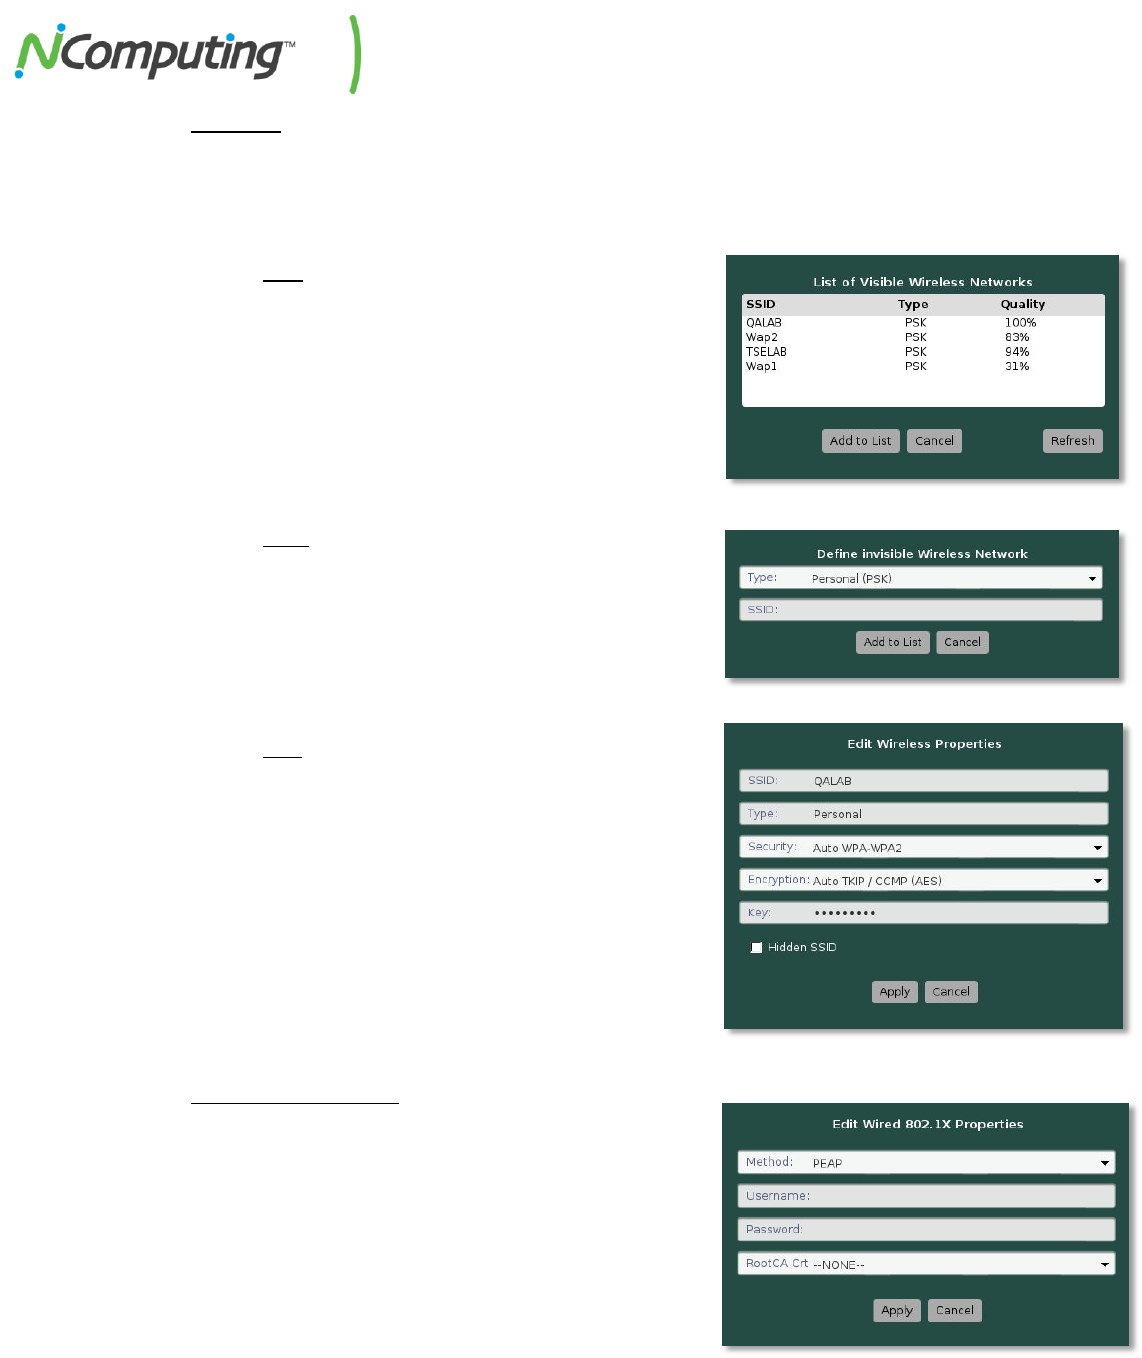
Interface
N500w model devices feature wireless connectivity, and this mode can be enabled by selecting
the Enable Wireless checkbox. When checked, a list of defined SSIDs will appear to the right of
the Network tab containing all currently configured SSIDs. Below this list are several buttons,
outlined below:
o Add
The Add button below the list of defined SSIDs
allows users to view all currently visible SSIDs
accessible by the N-series device, and add one of
them to it’s list of defined SSIDs via the menu
pictured at right.
o New
The New button below the list of defined SSIDs
allows users to define a new SSID, separate from
those currently visible to the device, via the
menu pictured at right.
o Edit
The Edit button below the list of defined SSIDs
allows users to fully configure an SSID added via
the New button. Select the defined SSID in
question, press the Edit button, and the
following menu interface at right will be
displayed.
Consult your network administrator for settings
and values appropriate for your wireless
environment.
Enable Wired 802.1X
All N-series devices running firmware 1.5.0 or newer can
make use of wired 802.1X by checking the Enable Wired
802.1X option in the center of the Network Tab. Once
checked, a new configuration button appears below the
checkbox allowing you to specify your 802.1X settings
using the menu pictured at right.
As with the wireless settings, if you are uncertain of the
values displayed in this menu, consult your network
administrator for the appropriate settings.

NComputing N-series User Manual rev10.08.13_1.5.0
Page 15 of 38
2.6 Security Tab – Per-Tab Access
The Per-Tab Access section of the Security Tab allows administrators to lock specific tabs within the N-
series device GUI.
Administrator Password
Enabling this feature allows the administrator to restrict access to specific tabs within the N-
series GUI by prompting for the password entered in the password field.
Lock Tabs
Each of the N-series configuration tabs can be individually selected and locked using the
checkboxes provided within this menu.
2.7 Security Tab – Certificates
The Certificates section allows users to add and view Server and Client security certificates.
Server (Root CA)
Selecting this option displays Server (Root CA) certificates in the certificate list.
Client (PKCS#12)
Selecting this option displays Client (OKCS#12) certificates in the certificate list.
URL/Name, Add, Remove
Certificates can be added to or removed from the device using the URL/Name, Add and Remove
buttons
NComputing N-series User Manual rev10.08.13_1.5.0
Page 16 of 38
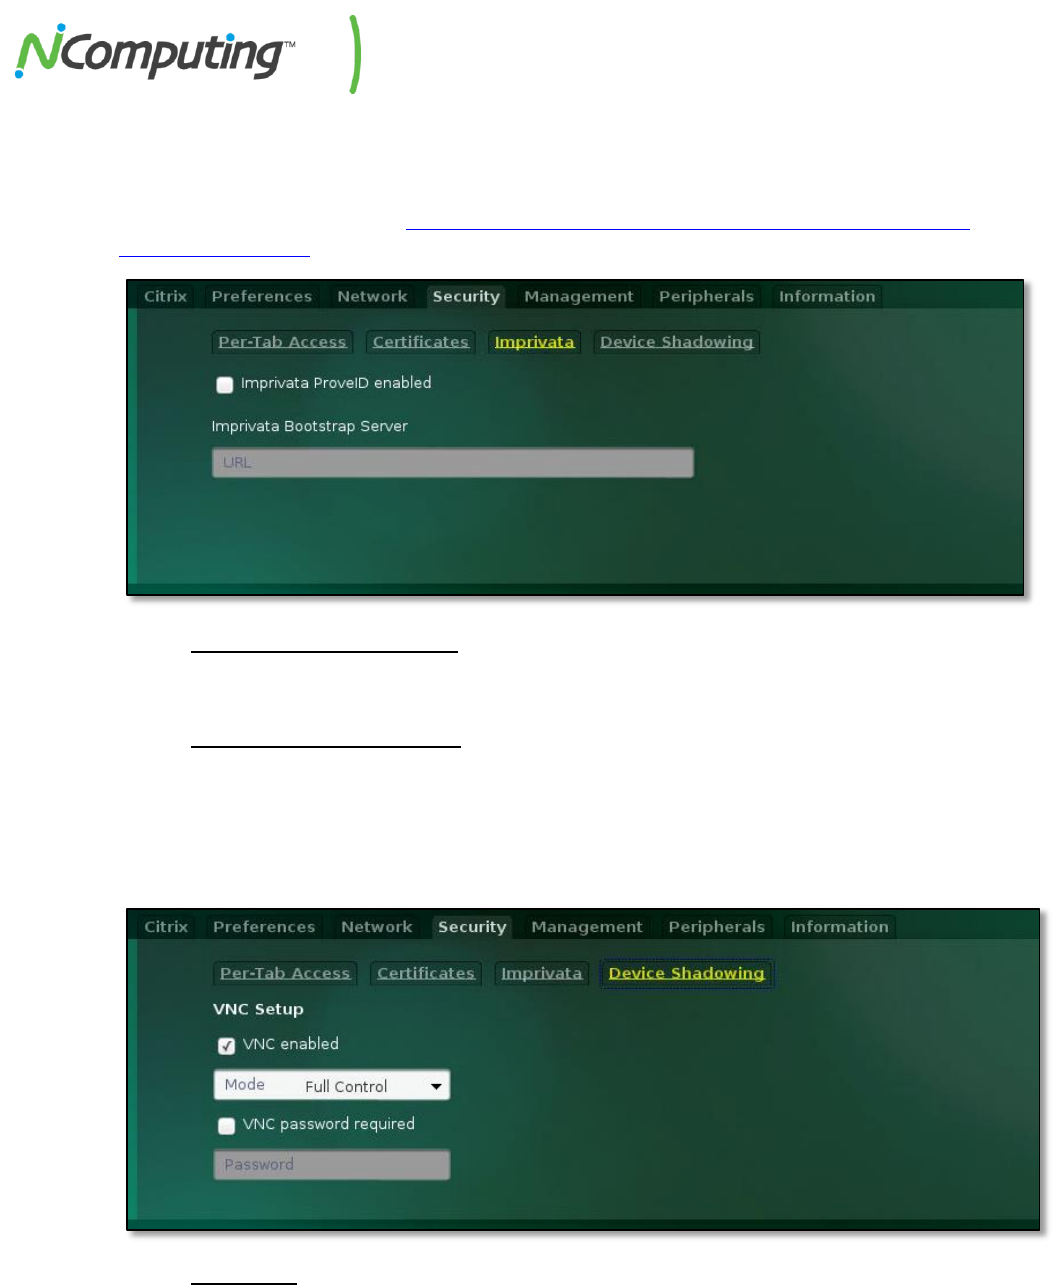
2.8 Security Tab – Imprivata
The Imprivata section of the Security Tab can be configured to allow for login via RFID cards and readers
using Imprivata’s OneSign technology. For more information on Imprivata OneSign integration, review
the following integration guide: http://www.ncomputing.com/kb/HOW-TO-Imprivata-OneSign-
Integration_409.html
Imprivata ProveID enabled
This setting can be used to enable or disable the use of RFID cards and readers to login into and
out of Citrix accounts.
Imprivata Bootstrap Server
This field is used to specify the location of the Imprivata Bootstrap Server, a required setting for
the use of Imprivata OneSign.
2.9 Security Tab – Device Shadowing
The Device Shadowing feature allows N-series devices to be viewed and controlled by VNC clients.
VNC Setup
With VNC enabled, the Mode dropdown can be used to determine how much control the VNC
session is allowed over the N-series device. The VNC Password Required option allows the N-
series device to prompt connecting VNC clients for a password.
NComputing N-series User Manual rev10.08.13_1.5.0
Page 17 of 38
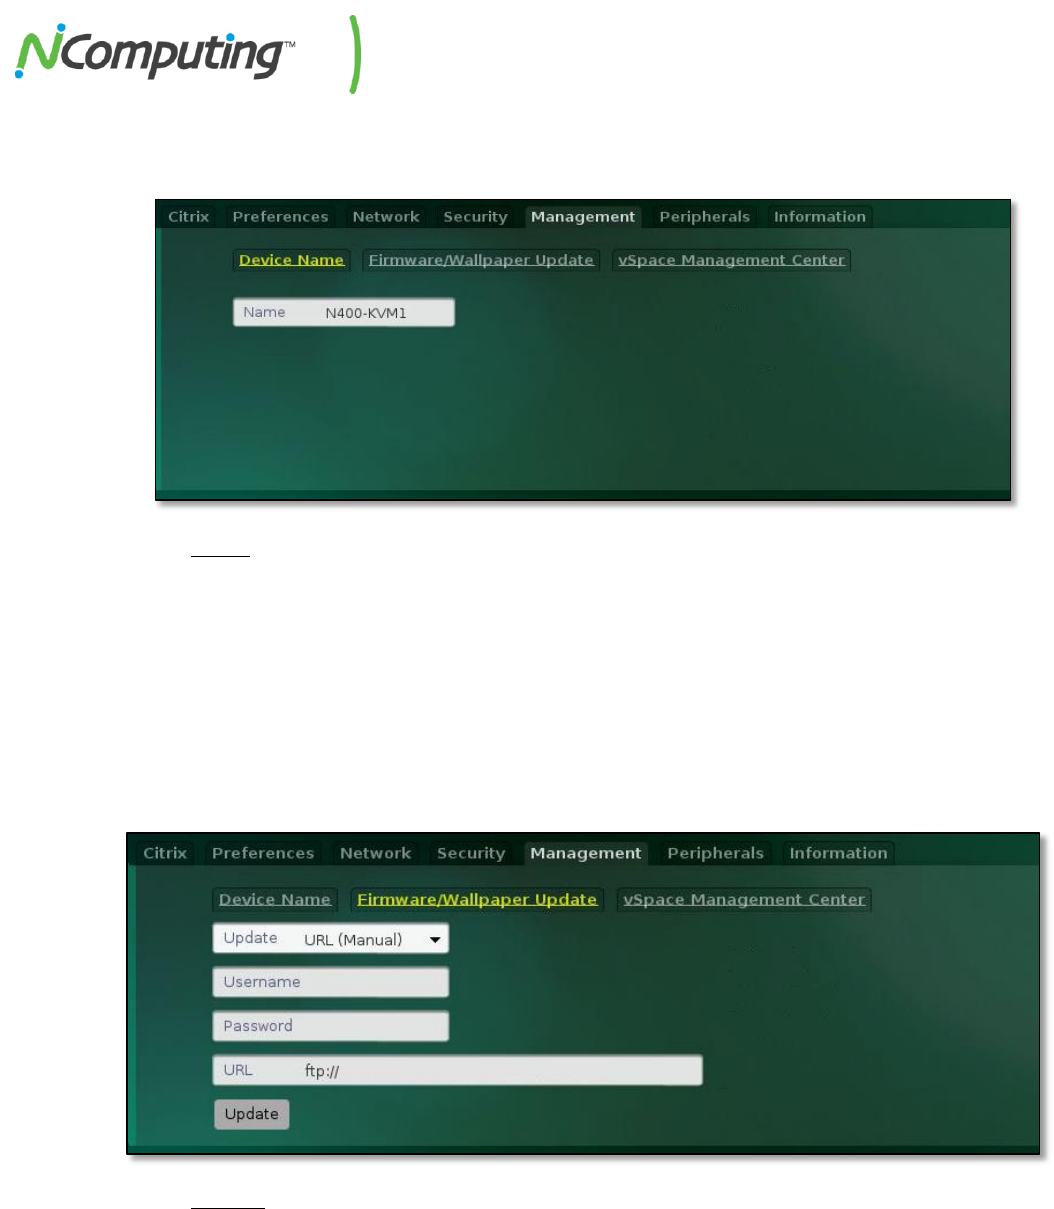
2.10 Management Tab – Device Name
The Device Name section of the Management Tab allows administrators to name their N-series devices.
Name
Naming an N-series device can make sorting and locating devices within a deployment more
expedient. For example: device names can include a room number, floor, department, or user
name. Note that your DHCP server is provided this name to associate with the IP address
assigned to the N-series device.
2.11 Management Tab – Firmware/Wallpaper Update
The Firmware/Wallpaper section of the Management Tab allows administrators to control how, when,
and from where N-series devices acquire firmware and wallpaper updates.
Update
DHCP (Automatic) will check your DHCP server for a firmware path*. URL (Automatic) will check
a specified URL at startup. URL (Manual) requires that the Update Firmware button be pressed
to initialize an update.
NOTE: DHCP (Automatic) and URL (Automatic) require firmware version 1.4.1 or newer.
NComputing N-series User Manual rev10.08.13_1.5.0
Page 18 of 38
Username / Password
Enter the username and password of the FTP server you’ve stored your updated N-series
firmware on.
URL
Enter the URL of the FTP server you’ve stored your updated N-series firmware or new
background image on.
Update Button
Once you’ve specified the above information, press the Update button to begin a firmware
update.
*Note: You can configure your DHCP server to automatically provide your N-series device(s) with vSpace
Management Center server information. This eliminates the need for you to manually configure this setting for
each device. Review section 4.3 DHCP Options for Automatic N-series Configuration for more information.
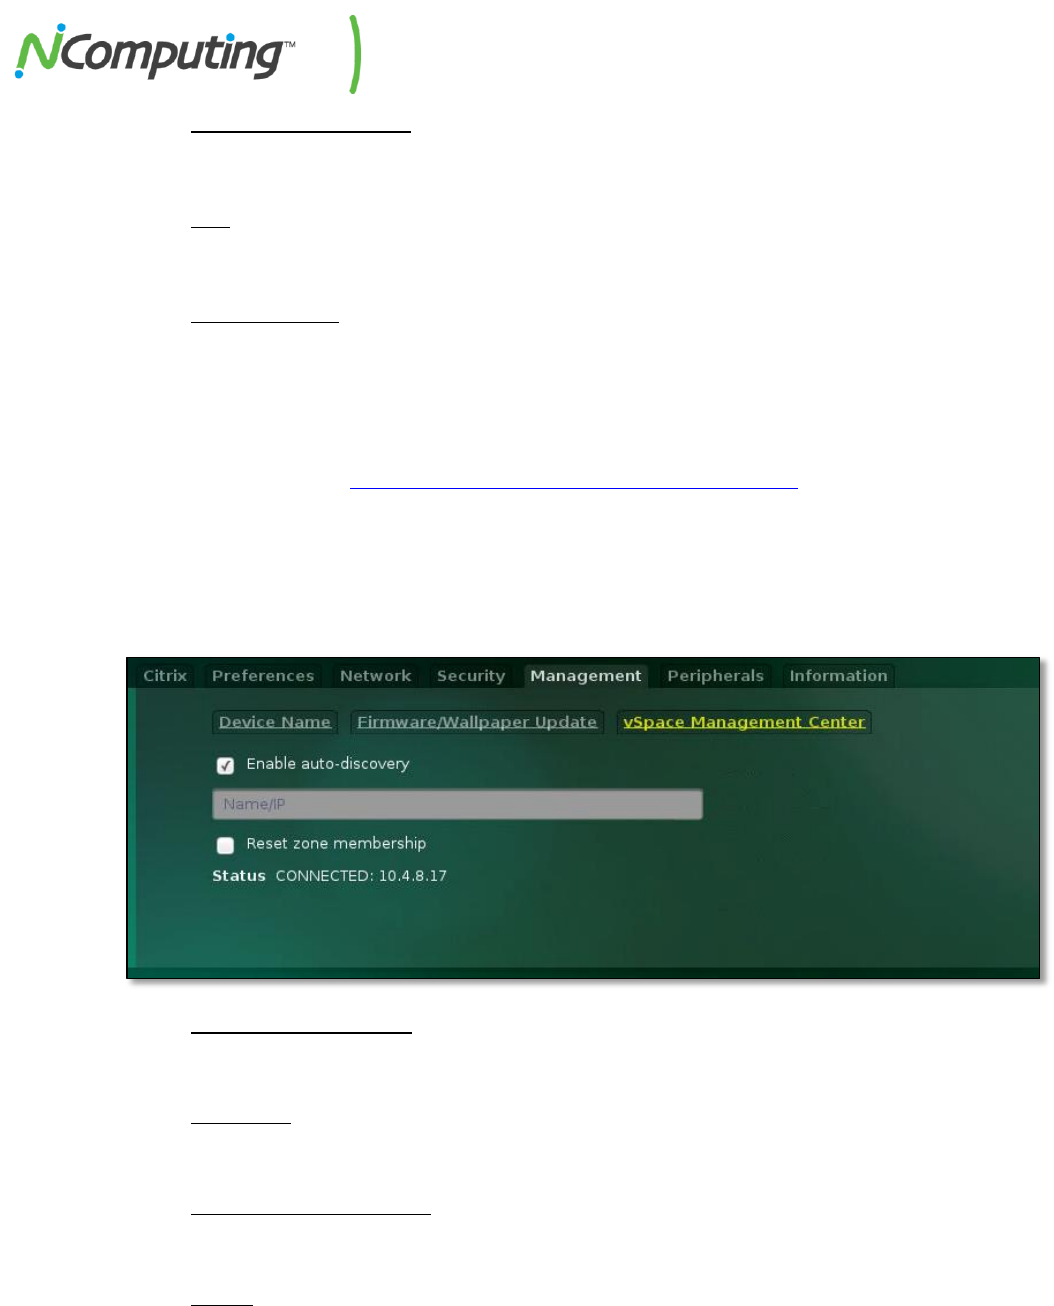
2.12 Management Tab – vSpace Management Center
The vSpace Management Center section of the Management Tab allows administrators to manage the
device’s connection to vSpace Management Center servers.
Enable auto-discovery
Instructs your N-series device to automatically search for and connect to vSpace Management
Center servers within its subnet.
Name / IP
Here you can manually enter the IP or Fully Qualified Domain Name of a vSpace Management
Center server within your network.
Reset zone membership
Enabling this feature will clear any previous zone membership information as the device joins a
new vSpace Management Center server.
Status
This field provides basic information regarding the device’s current Management Server status.
NComputing N-series User Manual rev10.08.13_1.5.0
Page 19 of 38
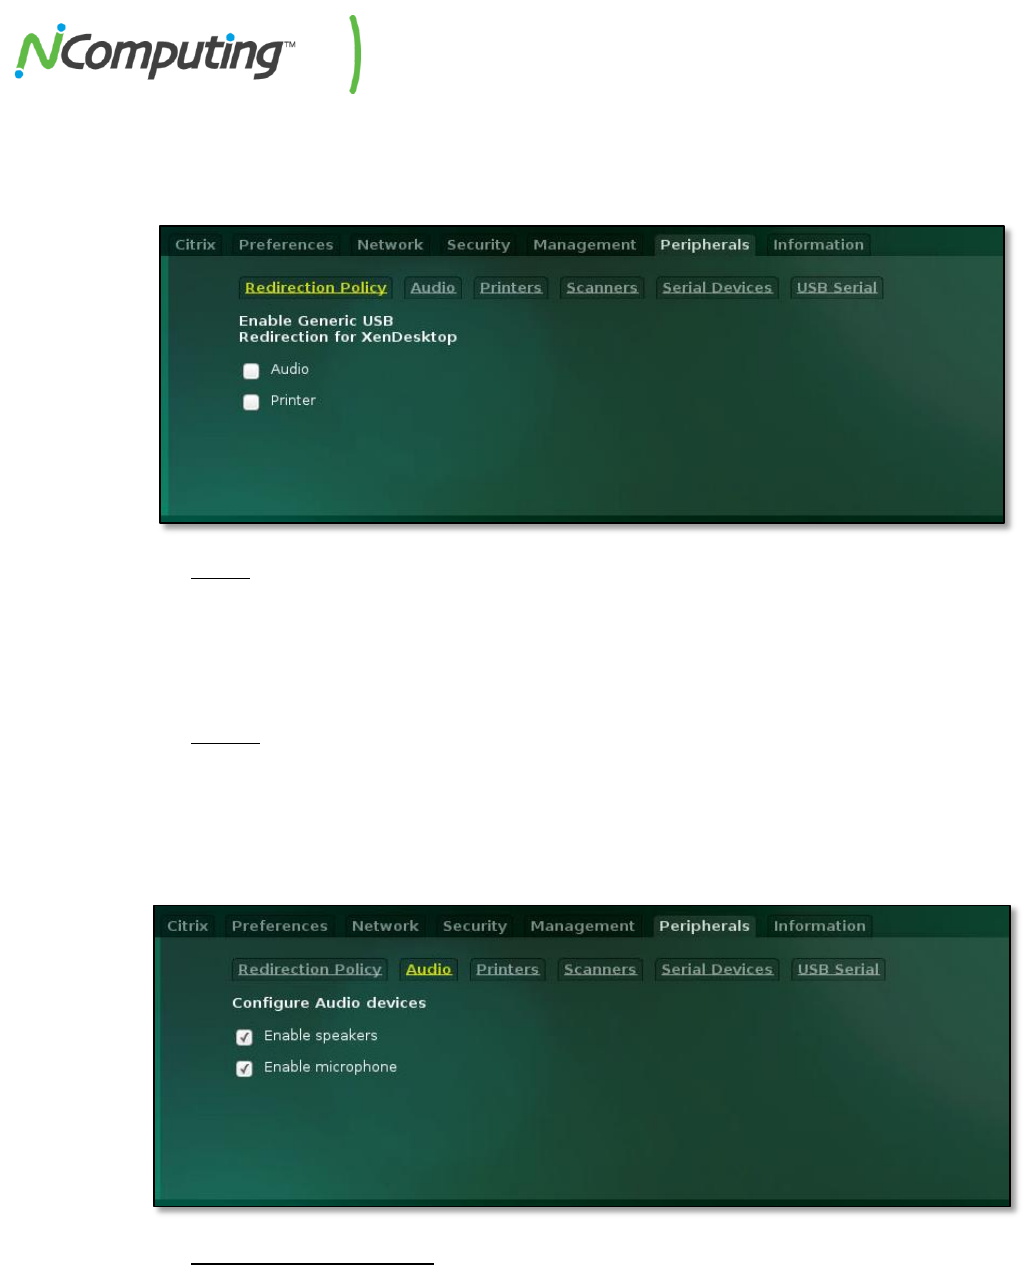
2.13 Peripherals Tab – Redirection Policy
The Redirection Policy section of the Peripherals Tab allows administrators to enable and disable
alternate methods of USB peripheral behavior.
Audio
A number of specific deployment types, such as those including call centers that rely on USB
headsets to deliver microphone input to certain applications, will benefit from enabling Audio
redirection. Note that while enabled, users may experience reduced audio playback quality
when playing video or browsing multi-media intensive websites.
Printer
Enabling printer redirection can resolve issues with certain printer specific OEM applications
within XenDesktop.
2.14 Peripherals Tab – Audio
The Audio section of the Peripherals Tab offers controls for audio input and output.
Configure Audio Devices
The checkboxes within this section of the menu control speaker (audio out) and microphone
(audio in) functionality on the N-series device.

NComputing N-series User Manual rev10.08.13_1.5.0
Page 20 of 38
2.15 Peripherals Tab – Printers
The Printers section of the Peripherals Tab can be used to associate printers with the N-series device.
Configure Printer
Printers can be added to the N-series device using the drop down menus to select printer Type,
Make, and Model.
Printer Info
Multiple printers can be associated with a given device at any given time. All currently
associated printers are listed within this field. Right-clicking within this field displays the CUPS
(Citrix Universe Print Server) name of associated printers.
2.16 Peripherals Tab – Scanners
The Scanners section of the Peripherals Tab can be used to associate SANE compatible scanners with the
N-series device.
Configure Scanner
Using the Type dropdown, Port, Client IP, and Scanner IP fields (if applicable) allow the
administrator to specify USB and network printers for association with the N-series device.
Available Scanners
Multiple scanners can be associated with a given device, and all currently associated scanners
are listed within this field.
NComputing N-series User Manual rev10.08.13_1.5.0
Page 21 of 38
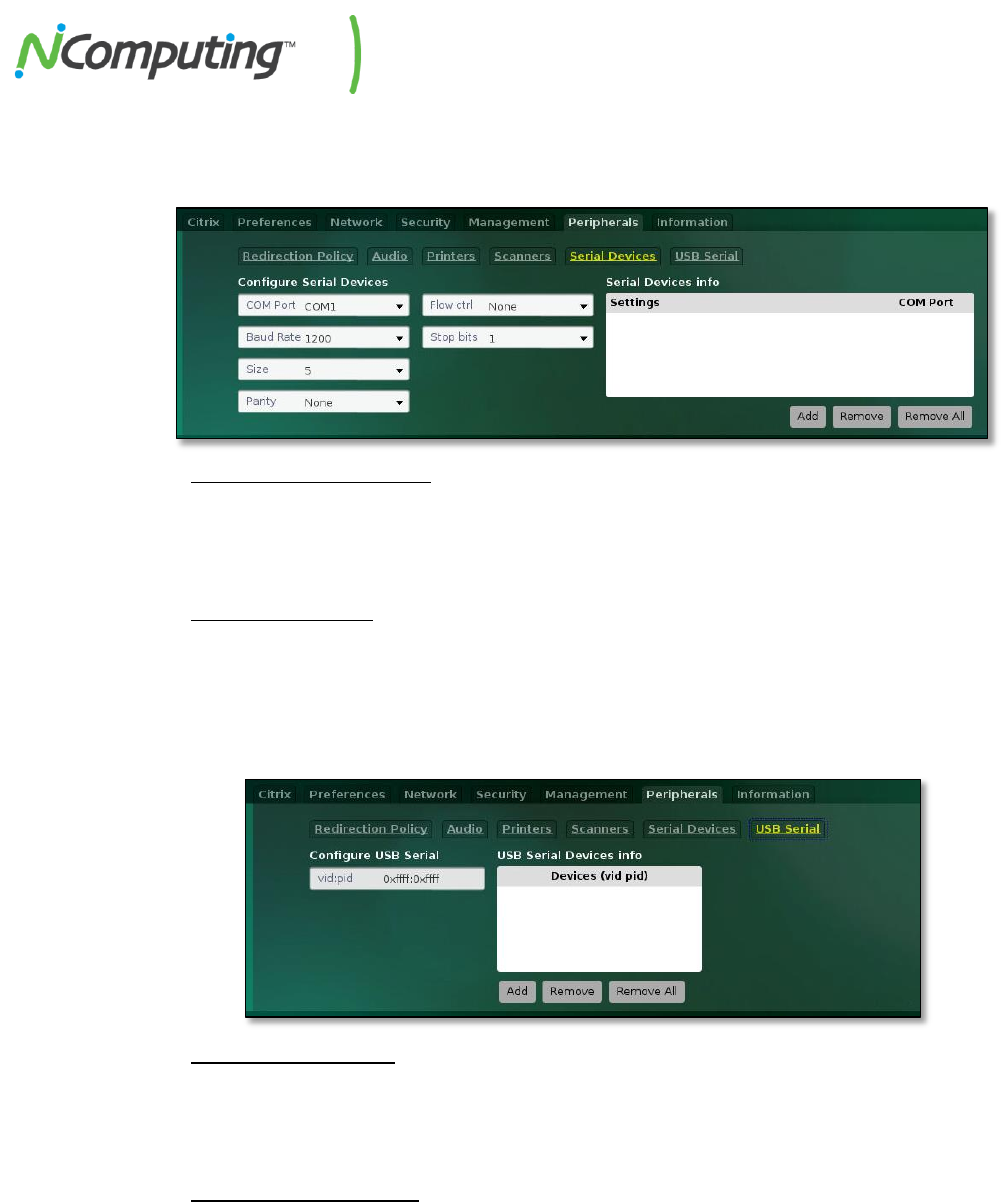
2.17 Peripherals Tab – Serial Devices
N-series devices support the use of serial devices* over USB. This is one of two menus that allow
administrators to configure N-series devices for use with serial peripherals.
Configure Serial Devices
The COM Port, Baud Rate, Size, Parity, Flow Ctrl, and Stop Bits drop down menus are used to
configure a given serial device for use with an N-series access device. Consult the peripheral
user manual for guidance on the values that should be used.
Serial Devices Info
Multiple serial devices can be associated with a given device, and all currently associated
devices are listed within this field.
2.18 Peripherals Tab – USB Serial
The USB Serial Tab is the second method of associating serial devices* with N-series access devices.
Configure USB Serial
The vid:pid field can be used to add serial devices over USB by specifying the Vendor and
Product ID of the device. Consult the peripheral’s user manual for guidance on the values that
should be used in this field.
USB Serial Devices Info
Multiple serial devices can be associated with a given device, and all currently associated
devices are listed within this field.
*Note: The N-series supports PL2303 and FTDI compatible serial-to-USB adaptors only.
Consult the adaptor’s user manual or vendor to confirm compatibility.
NComputing N-series User Manual rev10.08.13_1.5.0
Page 22 of 38
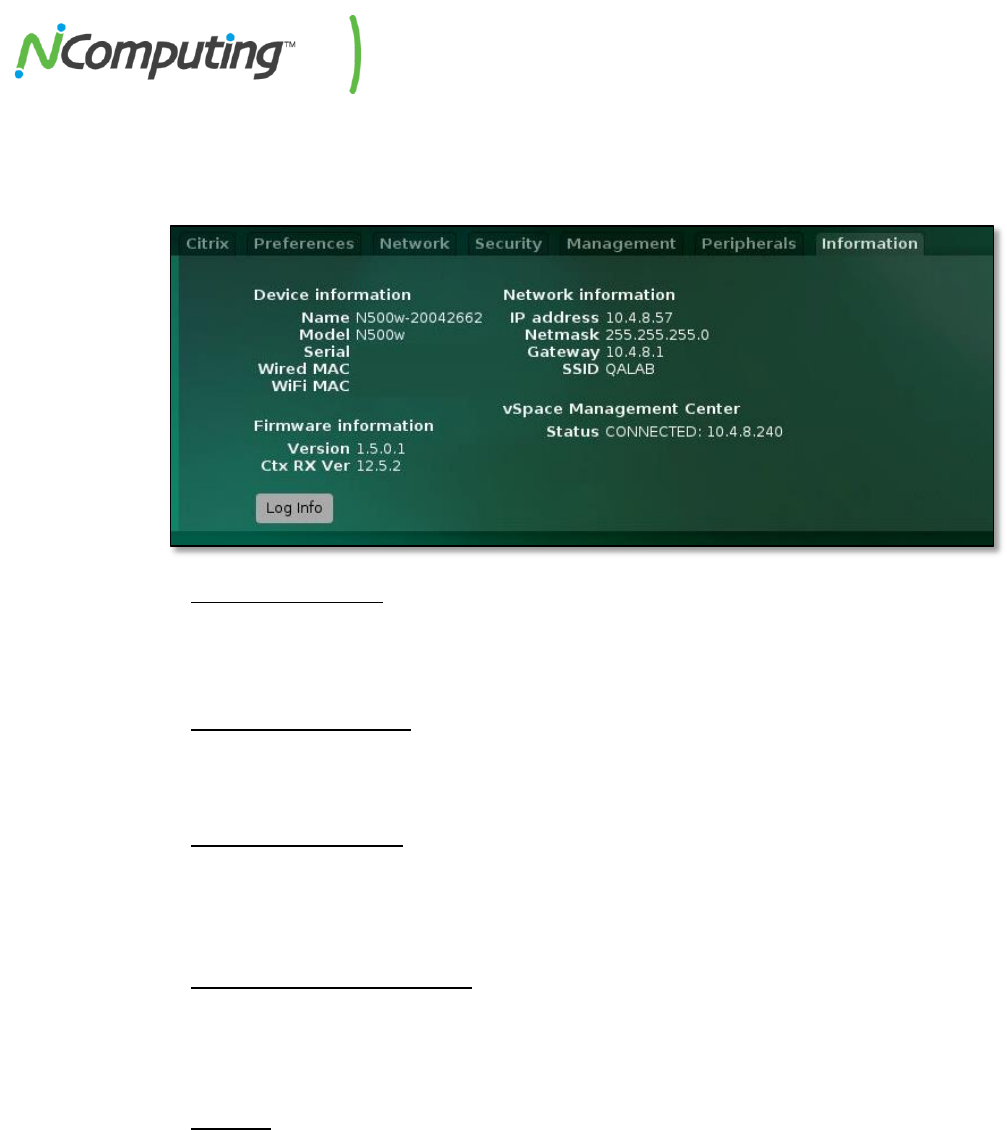
2.19 Information Tab
The Information Tab servces as a reference point for several key points of information including
Network , Device, Firmware, and Management details.
Device Information
This field contains Device Name, Model, and Serial information. Also included in this section are
the wired and WiFi MAC addresses associated with the device.
Firmware Information
Listed within this field is the version number for firmware currently running on the N-series
device as well as the current Citrix Receiver version.
Network Information
This field lists the current device IP address, Netmask, Gateway, and Ethernet MAC address. This
information, with the exception of the MAC address, is updated whenever settings within the
Network Tab are changed.
vSpace Management Center
The current connection status and IP address of the vSpace Management Center server
associated with the N-series device can be seen within this field. This field mirrors the status
field at the bottom of the vSpace Management Center section of the Management Tab.
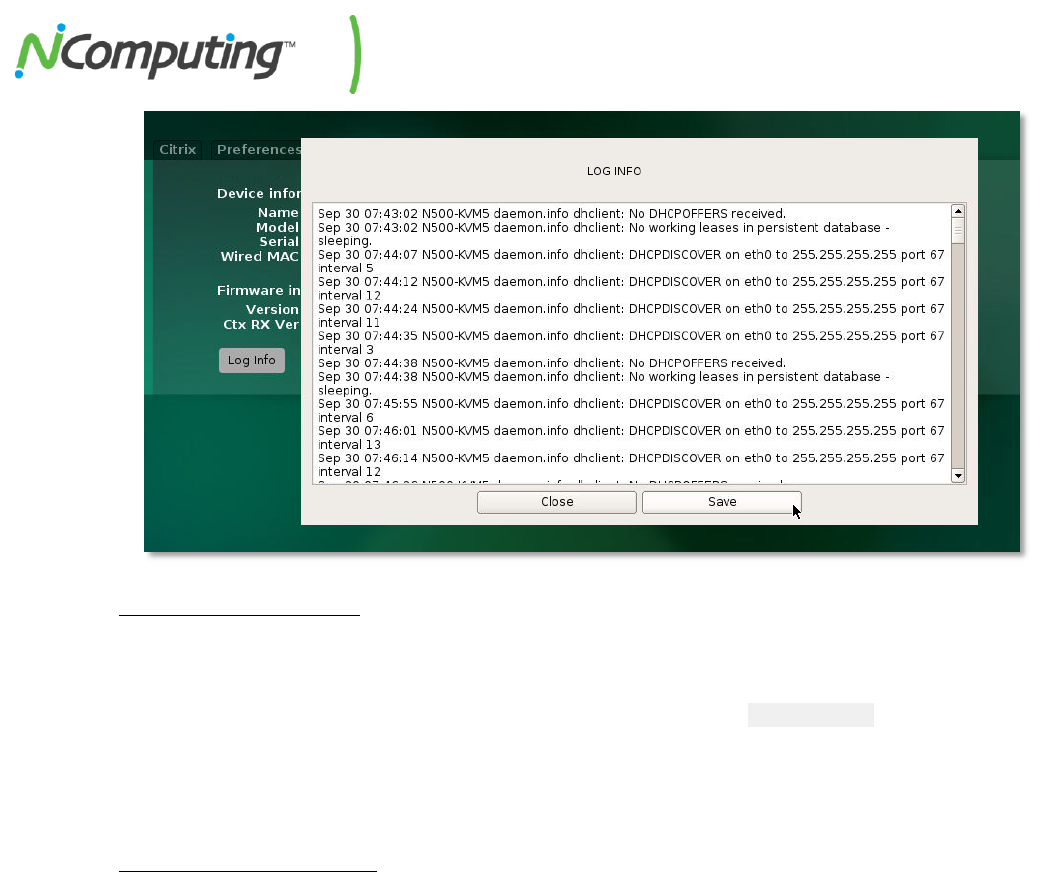
Log Info
The Log Info button brings up a time-stamped activity log displaying the most recent events to
occur within the N-series device. This log can be useful for troubleshooting purposes or
validating events, and can be saved to a USB storage device.
NComputing N-series User Manual rev10.08.13_1.5.0
Page 23 of 38
Saving N-series Log Files
To save an N-series Log file, follow these steps:
1. Connect a USB storage drive to any USB port on the N-series access device.
2. Access the Log menu from the Information Tab of the N-series device as outlined above.
3. From the Log menu, click "Save" button.
Additional Log File Details
The Log File is a standard, Linux log file in text format.
The first 8 digits of the Log File name is a time stamp, using the YYYY/MM/DD format.
Each entry in the Log File is time stamped.
The N-series continually stores activity in the log file. This process does not need to be initiated
manually.
The Log File is recorded in a 256KB buffer which is automatically cleared when it reaches
capacity, meaning that the data saved at any given moment represents the most recent activity
since the last buffer clear.

NComputing N-series User Manual rev10.08.13_1.5.0
Page 24 of 38
3.0 Connecting to your Citrix Environment
From the initial Log-in screen, enter the User Name, Password, and Domain information of the Citrix
Environment you wish to connect to. Once this information is entered, press the “LogOn” button.
Once you’ve logged into your Citrix environment, you’ll be presented with a standard Citrix desktop
layout as shown below. From this screen you can return to the Log-in screen by clicking “Log Off”
towards the top of the window. You can lock your desktop using the “Lock” button, and unlock the
desktop using the same password you used to log into your Citrix environment. The search bar at the
top of the window can be used to locate applications available to your Citrix environment.
The “Home” icon on the left side of the screen returns you to this default desktop layout. The “Apps”
icon allows you to browse through available applications and environments. Click the “Add Apps” button
in the center of the screen to create shortcuts for available applications and environments. You can
quickly switch between open applications by holding CTRL+ALT and then pressing the UP or DOWN key.

NComputing N-series User Manual rev10.08.13_1.5.0
Page 25 of 38
4.0 Support and Additional Resources
4.1 Accessing your vSpace Management Center License(s) and Premium Support
Entitlement
Your N-series thin client was bundled with an entitlement to receive the NComputing vSpace
Management Center software along with one (1) year of Premium Support. To activate these
entitlements follow these steps:
1. Go to: http://www.ncomputing.com/enroll
a. If you already have an account on ncomputing.com – login at the prompt and fill out all the
fields.
- If you do not have an account – follow the links to create an account (this also gives
you access to various resources including posting on the NComputing Community) -
make sure you enter your e-mail address correctly as this will be used to deliver your
licenses and entitlement information
- Return to the http://www.ncomputing.com/enroll page and fill out all the fields
b. Click “Submit”
2. You will receive an e-mail confirmation immediately after your submit your request.
3. Within 2 business days you will receive an e-mail that includes:
a. License key(s) for activating your vSpace Management Center installation (see vSpace
Management Center user manual for details)
b. Link to activate your Premium Support entitlement.
You will now have everything you need to begin taking advantage of your Premium Support account as
well as the remote management features of vSpace Management Center.
NComputing N-series User Manual rev10.08.13_1.5.0
Page 26 of 38
4.2a Pre-1.5.0 Firmware Update Best Practices
N-series firmware versions prior to 1.5.0 are designed to be applied sequentially, with each new build
applied to the previous build in order of their release. Administrators can manually step a device
through sequential firmware updates if desired, or they can configure the devices to perform a
sequential update automatically.
NOTE: If a device is updated out of sequence and ends up skipping a firmware build,
administrators can simply downgrade the device and reapply the firmware update process from
beginning to end. Furthermore, once the initial step of downgrading a device to firmware
version 1.1.1 (the first public firmware build), the remainder of the update process can be
automated, as outlined below.
Requirements for Automatic, Sequential Updates
An automatic update requires that the devices be set to either of the “automatic” (DHCP* or URL)
update modes (found in Firmware/Wallpaper Update section of the Management Tab in the N-series
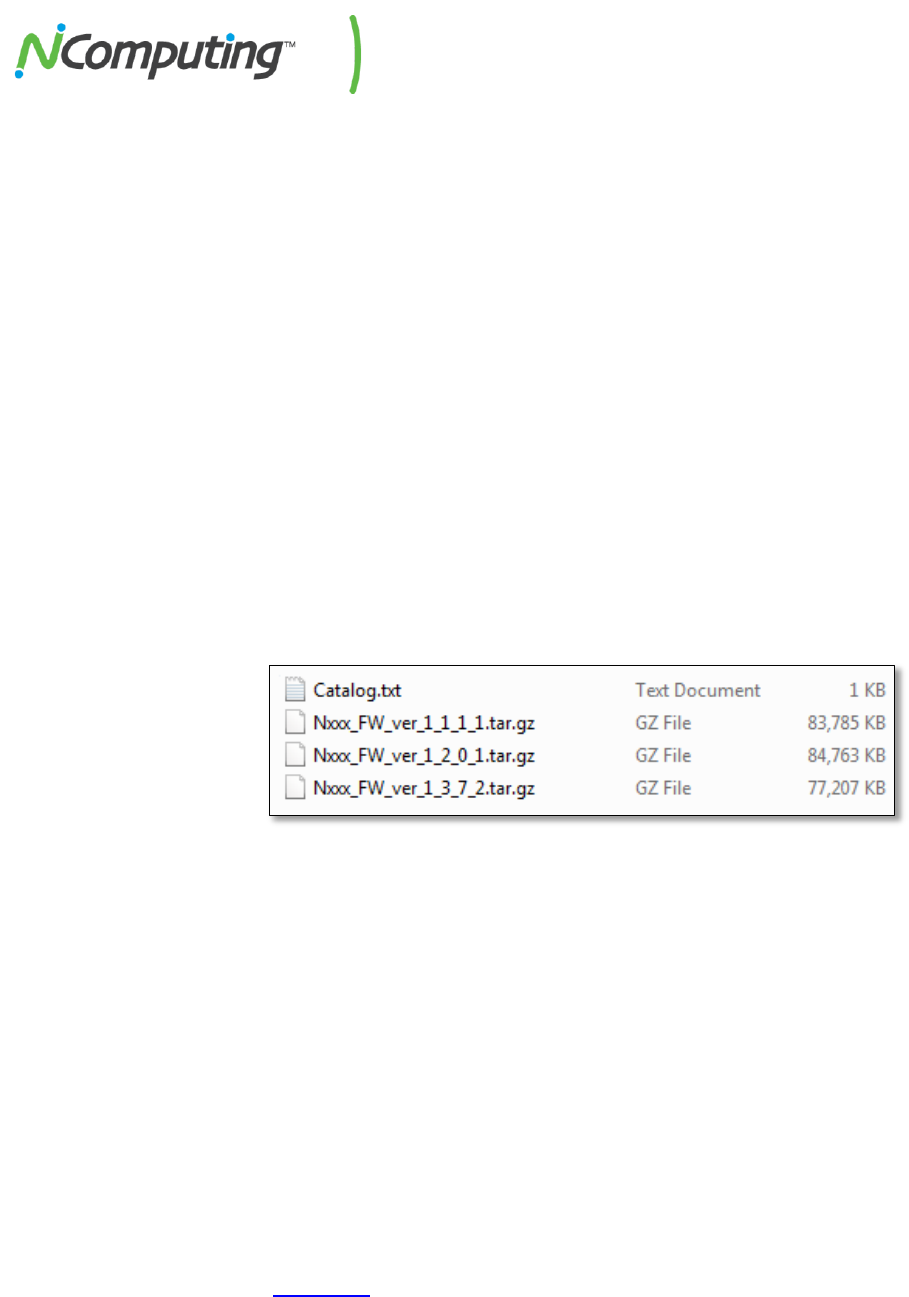
GUI) and pointed to a network accessible folder** that contains each of the required firmware builds.
The folder should contain the desired firmware files themselves as well as a catalog.txt file, as pictured
below:
The catalog.txt file functions as a table of contents for the update service; listing each of the firmware
builds in a given archive in the order that they were released. Below is an example of the contents of a
catalog.txt file that contains information for three firmware builds, ranging from build 1.1.1 to build
1.3.7.
Nxxx_FW_ver_1_1_1_1.tar.gz 0 0 0 1 1 1 1 02e90025e8239722e58b62b3a9b92386
Nxxx_FW_ver_1_2_0_1.tar.gz 0 0 0 1 2 0 1 945434214db5285596a24404a637471d
Nxxx_FW_ver_1_3_7_2.tar.gz 0 0 0 1 3 7 2 a4f5dcdeb8de66aaabfe804fc3a5ee93
Each new firmware build is released with a catalog.txt file containing a single line. The above catalog.txt
file contains three lines because it was written for an archive that contains three firmware builds. In the
event that a new firmware build was released, the archive could be updated by adding the firmware file
itself to the folder, and copying the catalog.txt line included with that firmware into the archive’s
catalog.txt file. In this case, the next firmware build would add a fourth line.
* Note that using the DHCP setting requires that DHCP tags be configured with the appropriate FTP
information. See section 4.3 of this manual for more information on this feature.
** If a network accessible folder is not available, or assistance is needed to set up such a resource, an
example is given using FileZilla at the end of this guide.

NComputing N-series User Manual rev10.08.13_1.5.0
Page 27 of 38
4.2b 1.5.0 Firmware Update Best Practices
As of version 1.5.0, each new N-series firmware release will include two firmware files.
The first, intended for use as a single-version, sequential update, works exactly as previous firmware
versions. That is, as an update from the last official release to the current release. The second file,
intended as a complete, standalone install of the current firmware, can be used to update a device that
is several versions behind the current release version in a single step; without the need to
progress through each previous version in the order of their release.
This new system offers new flexibility and streamlines the firmware update process when devices are
several versions behind the current release, while retaining the ability to perform rapid, single version
updates using minimal file sizes when possible.
The following sections will outline some of this new functionality and provide administrators with
detailed installation steps for implementing firmware 1.5.0 using a number of different install methods.
Identifying the new firmware files:
The single-version update file and full, standalone update file are differentiated by the first set of digits
in their version number. The full update’s value is incremented by 100, while the remaining digits
remain identical. For example:
Nxxx_FW_ver_1_5_0.tar.gz
single-version sequential update, for use with the previous official release.
Nxxx_FW_ver_101_5_0.tar.gz
full update, usable when a device is several versions behind.
Note that both of these files should be added to your firmware repository before updating to 1.5.0.
Administrators must only direct their devices to the Nxxx_FW_ver_1_5_0.tar.gz file (not the 101.5.0
file). The firmware will automatically use the full update file if the update in question spans more than
two versions.
Installing 1.5.0 via N-series GUI
When installing 1.5.0 on a device for the first time using the device GUI, follow these steps:
1. Ensure both of the firmware files (sequential and full) have been uploaded to an FTP accessible
folder. If you are unfamiliar with this process, consult the FileZilla example in the following KB
document: http://www.ncomputing.com/kb/afile/370/342/

NComputing N-series User Manual rev10.08.13_1.5.0
Page 28 of 38
2. From the N-series GUI, under the Management -> Firmware/Wallpaper Update Tab, select the
URL (Manual) update type and fill out the URL field, using the FTP address of the firmware file.
(again, this will be the 1.5.0 file, not the 101.5.0 file)
This step is essential. The FTP URL must be pointed at the 1.5.0 file. In the event that DHCP tags
are being used, ensure that the DHCP tags have been updated to point at this same file.
3. Once the URL field has been populated, you can perform the firmware update using the method
of your choosing (URL Manual, Automatic, DHCP, etc.).
Installing 1.5.0 via USB Drive*
When installing 1.5.0 on a device for the first time using a USB memory device, follow these steps:
1. Copy the catalog.txt and Nxxx_FW_ver_1_5_0.tar.gz files to the USB storage peripheral and
connect it to the N-series access device.
2. From the N-series GUI, under the Management -> Firmware/Wallpaper Update Tab, select the
USB (Manual) update type and fill out the URL field, using the directory location of the
Nxxx_FW_ver_1_5_0.tar.gz file from step 1.
3. Once the URL field has been populated, you can perform the firmware update.
*NOTE: USB update requires firmware 1.4.1. Feature not present in older versions.
Installing 1.5.0 via vSpace Management Center
When installing 1.5.0 on a device for the first time using vSpace Management Center, start by verifying
that all VMC servers within the Managed Zone have been fully updated to VMC version 3.3.1. Once
that's done, follow these steps:
1. Ensure that the full update file has been uploaded to an FTP accessible folder (this is the 101.5.0
file), and that the sequential update file (1.5.0) has been added to VMC’s firmware repository. If
you are unfamiliar with hosting files via FTP, consult the FileZilla example in the following KB
document: http://www.ncomputing.com/kb/afile/370/342/
2. From VMC, push a profile update to the device(s) in question, setting the FTP URL value in the
firmware update tab to that of the full update file location (this is the 101.5.0 file).
3. Once the profile push has completed successfully, you can initiate a firmware update from
vSpace Management Center to 1.5.0 using the Device Management -> Update firmware menu.
NComputing N-series User Manual rev10.08.13_1.5.0
Page 29 of 38
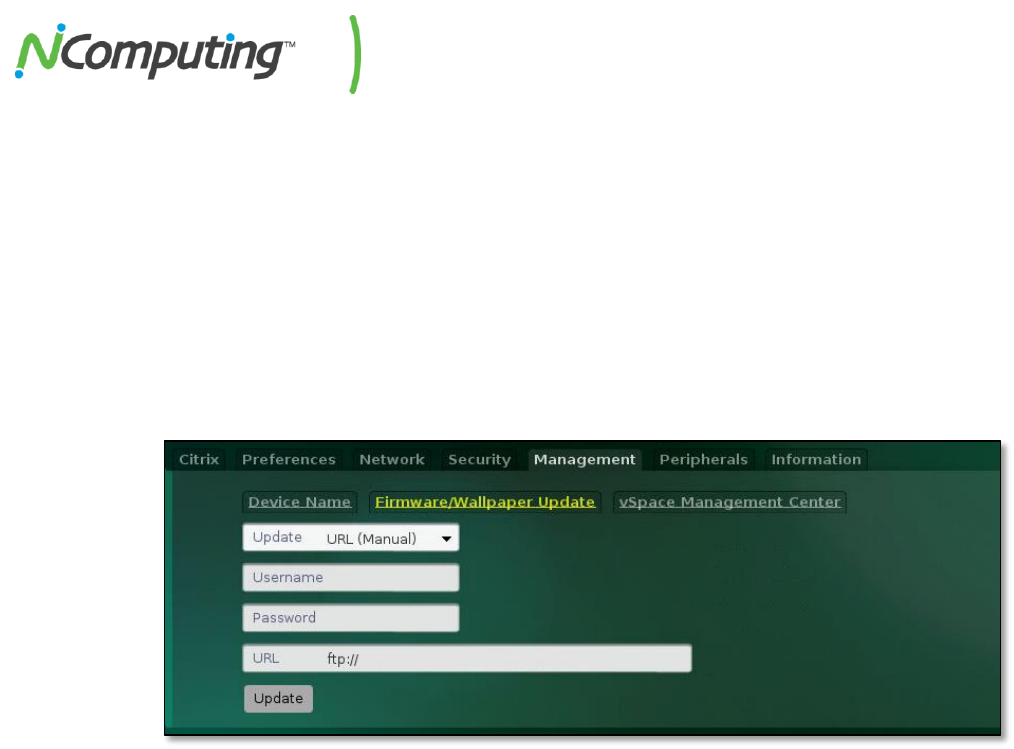
4.2c Directing N-series Devices To The Firmware Archive Using the N-series GUI
Once a folder or archive is set up with the above listed requirements, administrators can configure their
N-series devices on a per-device basis if desired. This process is outlined in the steps below.
1. From the Manage Profiles menu, select the N-series profile you wish to edit. If an N-series
profile does not already exist, use the steps outlined in Section 4.5 of this manual to create a
new profile for the devices you wish to update.
2. Navigate to the Management Tab, and then select Firmware/Wallpaper Update (pictured
below).
3. Using the FTP, User, and Password fields, enter the FTP location of the newest firmware build
within the archive you have created. (this will be a file ending in .tar.gz)
4. When finished, click the Update button to begin the sequential update.
At this point the device will begin the process of updating to the newest version of firmware available
within the archive you have created, proceeding through each of the intervening builds between its
current version and the newest version as outlined within the catalog.txt file.
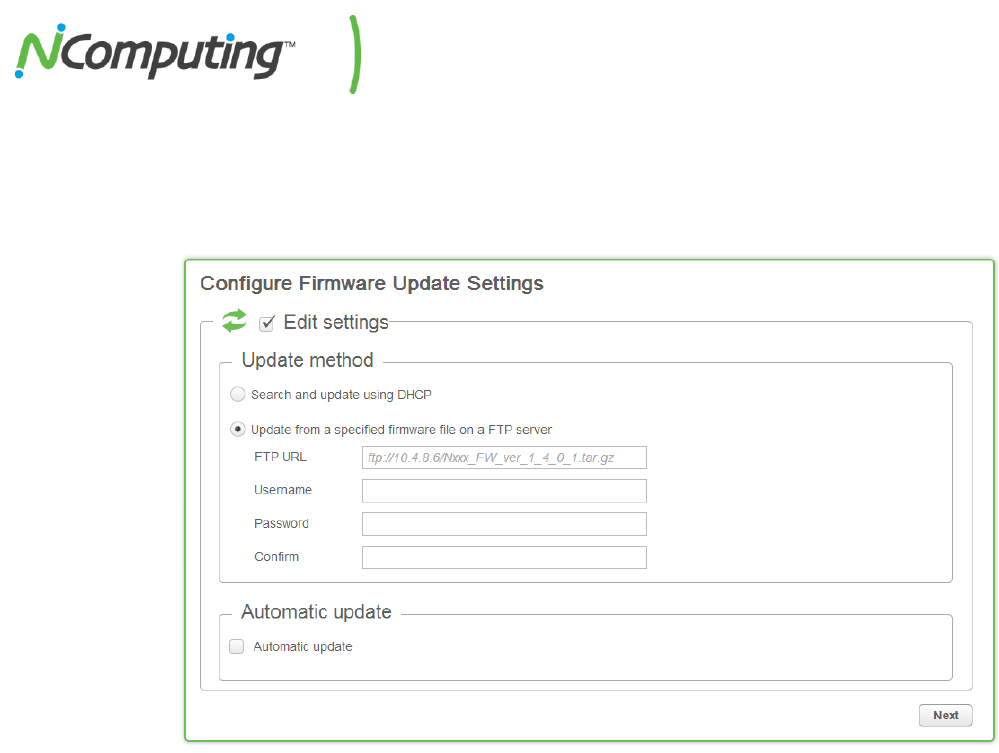
4.2d Directing N-series Devices To The Firmware Archive Using Device Profiles
If a deployment includes vSpace Management Center, administrators can configure all of their N-series
devices for automatic updates at the same time through the use of Device Profiles. Keep in mind that as
with the device GUI method, the FTP folder and firmware archive must be set up prior to initiating the
update. The process for initiating the update from vSpace Management Center is outlined in the steps
below.
IMPORTANT NOTE: N-series devices must already be running firmware version 1.2.0.1 or newer to
receive a firmware update from vSpace Management Center. If the intended devices are running
firmware older than 1.2.0.1, the device GUI method above must be used instead.
NComputing N-series User Manual rev10.08.13_1.5.0
Page 30 of 38
1. From the Manage Profiles menu, select the N-series profile you wish to edit. If an N-series
profile does not already exist, use the steps outlined in Section 4.5 of this manual to create a
new profile for the devices you wish to update.
2. Navigate to the Firmware Update Tab (pictured below).
3. Check the box next to “Edit settings” setting at the top of the menu, then select “Update from a
specified firmware file on a FTP server”.
4. Using the FTP, User, and Password fields (making sure to re-enter your password in the Confirm
field), enter the FTP location of the newest firmware build within the archive you have created.
(this will be a file ending in .tar.gz)
5. Take a moment to verify that all other profile settings are as you desire (including screen
resolution, XenDesktop settings, etc), and apply the profile from the Summary Tab.
6. If you have not done so already, upload the latest firmware build to your vSpace Management
Center server, using the Manage Firmware menu under the Administration Tab.
7. Once the above steps have been completed, head to the Manage Devices menu under the
Device Management Tab and initiate a firmware update on the devices of your choice, selecting
the most recent firmware version available.
At this point the selected devices will begin pulling updated firmware in the order specified within the
catalog.txt with automatic reboots between each firmware version until the process is complete.
NComputing N-series User Manual rev10.08.13_1.5.0
Page 31 of 38
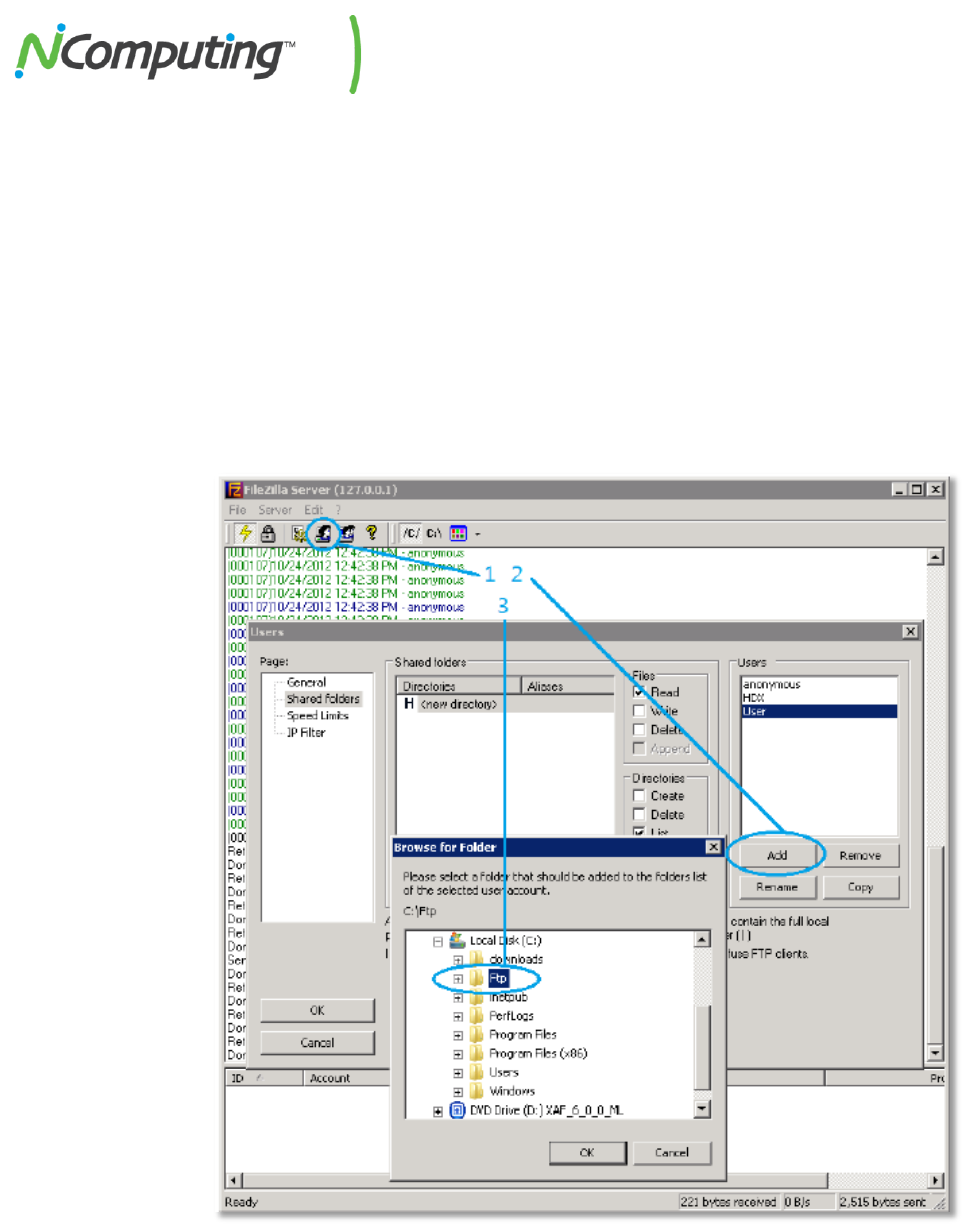
4.2e Example of FTP Folder Setup Using FileZilla
In the case of FileZilla, hosting an existing folder on your host system is a simple process. Once installed,
open the FileZilla server interface and complete the following steps:
1. Click on the Users icon at the top left of the FileZilla Server window.
2. Click the Add button under the Users section to the right of the window and create a new user.
(This will be the user account you add to your NComputing device later in this guide)
3. Add a new folder under the Shared Folders section and select the folder containing your
firmware files. This can be the folder mentioned in the previous section, or any other folder if
you’ve decided to host the files elsewhere. (Note the folder’s path as it will be important later in
this guide)
Your firmware files are now shared and available for download via FTP by your devices.
4.3 DHCP Options for Automatic N-series Configuration
NComputing N-series User Manual rev10.08.13_1.5.0
Page 32 of 38
This section of the manual will assist administrators in configuring their Microsoft Windows DHCP
server(s) to allow the NComputing N-Series to automatically connect to XenDesktop and vSpace
Management Center environments. For the purpose of this user manual, we’ll be illustrating this process
using Server 2003 and Server 2008 R2. It should be noted however that any DHCP server can be used.
If you are already familiar with the administration of DHCP servers and the creation of option tags, feel
free to skip to the N-series DHCP Tags section of this guide for a list of tags that the N-series supports.
For those less familiar with DHCP administration, the following pages describe how to access the DHCP
settings in Server 2003 and Server 2008 respectively.
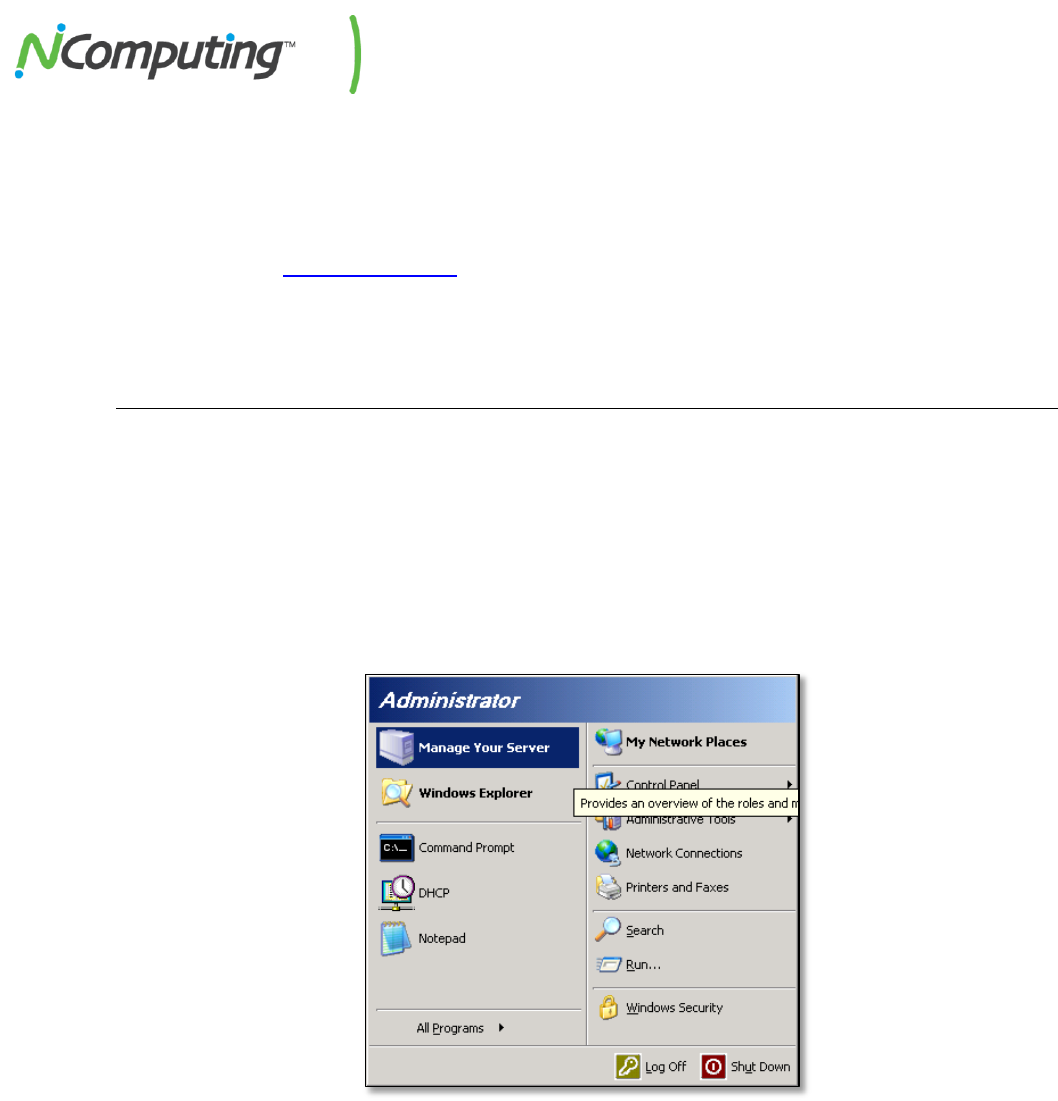
Accessing DHCP Settings in Windows Server 2003
From the DHCP server:
1. From the Start Menu click “Manage Your Server”
2. Click “Manage this DHCP server” as seen below:

NComputing N-series User Manual rev10.08.13_1.5.0
Page 33 of 38
3. Select DHCP and click “Set Predefined Options” as seen below.
4. Proceed to the N-series DHCP Tags section of this guide for a description of available DHCP tags
and instructions for adding them to your DHCP server.
Accessing DHCP Settings in Windows Server 2008

NComputing N-series User Manual rev10.08.13_1.5.0
Page 34 of 38
From the DHCP Server:
1. Right-click Computer and select “Manage”
2. From the Computer Management window, open the Roles section and then the DHCP Server
section as seen below.
3. Open the DHCP Server Name in question, right-click on IPv4, and select “Set Predefined
Options”. You are now ready to specify which DHCP tags you wish to add to your N-series
environment. Each of the potential tags and their functions are explained in the next section of
this guide.
N-series DHCP Tags

NComputing N-series User Manual rev10.08.13_1.5.0
Page 35 of 38
The N-series can make use of several DHCP tags and functions. This section will walk you through adding
the tags and functions appropriate for your deployment.
NOTE: This functionality requires N-series firmware version 1.4.1 or newer to be installed on all
devices that will be making use of automatic DHCP configuration.
1. From the Predefined Options and Values window, click the “Add” button.
2. Select and implement your chosen tags by filling out the Name, Data type, Code, and
Description fields as specified below. Note that the “STRING VALUE” is used later in step 5.
XenDesktop Tag 181
This tag will automatically link your N-series
device(s) with their designated XenDesktop
server(s).
Name
XenDesktop*
Data Type
String
Code
181
Description
Default XenDesktop server
STRING VALUE
(The IP, URL, or Fully Qualified
Domain Name of your
XenDesktop server.)
Notes
*We recommend you use
“XenDesktop” plus the IP
address or URL of your
XenDesktop server to
differentiate this tag from any
future tags you might add.
NComputing CMF Tag 171
This tag will automatically link your N-series
Name
VMC*

NComputing N-series User Manual rev10.08.13_1.5.0
Page 36 of 38
device(s) with their designated vSpace
Management Center server.
Data Type
String
Code
171
Description
Default vSpace Management
Center Server
STRING VALUE
(The IP or Fully Qualified Domain
Name of your vSpace
Management Center server)
Notes
*We recommend you use “VMC”
plus the IP address or URL of
your vSpace Management
Center server to differentiate
this tag from any future tags you
might add.
N-series Firmware Tag 172
This tag allows you to direct your N-series
devices to a server that you have created to
store and distribute N-series firmware.
Use this tag to store the firmware server’s
network address.
If your firmware server requires a username
and password, use tags 173 and 174 to store
those details.
Name
N-series Firmware URL
Data Type
String
Code
172
Description
Address of firmware update
server.
STRING VALUE
(The FTP, HTTP, or HTTPS
address of your firmware
server.)
Notes
If the server you are storing N-
series firmware on requires a
username and password, add
NComputing CMF Tags 173 and
174 to store that information.
N-series Firmware Tag 173
Use this tag in conjunction with 172 to store the
firmware server’s username (if username and
password are required).
Name
N-series Firmware Username
Data Type
String
Code
173
Description
Address of firmware update
server.
STRING VALUE
(The user name required by your
FTP server.)
Notes
This tag is only required if the
server you are storing N-series
firmware on requires a
username.
N-series Firmware Tag 174
Use this tag in conjunction with 172 to store the
firmware server’s password (if username and
Name
N-series Firmware Password
Data Type
String

NComputing N-series User Manual rev10.08.13_1.5.0
Page 37 of 38
password are required).
Code
174
Description
Address of firmware update
server.
STRING VALUE
(The password required by your
FTP server.)
Notes
This tag is only required if the
server you are storing N-series
firmware on requires a
password.
To the right is an example of a completed
entry (in this case, the VMC 171 tag).
3. You can now verify that the tag you created has been saved by clicking on the Option Name
drop down (see image below) and searching for the tag(s) in question.
4. Once again from the Predefined Options and Values window, select each tag and fill in the Value
field with the string values specified earlier in step 2.
a. Example: For Tag 171, the string
value would be the IP address or Fully
Qualified Domain Name of your
vSpace Management Center server.
b. Note: For tags that accept IP
addresses, you can enter multiple IP
addresses so long as each IP is
separated by a semi-colon (;).
5. Once your entries are complete, click “OK”.
Your DHCP Tags are now configured. You may
now exit Server Management.
4.4 NComputing Technical Support
For additional technical documentation, solutions, and how-to’s, visit
http://www.ncomputing.com/kb/

NComputing N-series User Manual rev10.08.13_1.5.0
Page 38 of 38
To request Technical Support for NComputing products, please visit the NComputing Support
page at http://www.ncomputing.com/support
4.5 Additional Information on Citrix products and support
For additional information and support for Citrix products and environments, visit
http://www.citrix.com/lang/English/home.asp
Disclaimers and Legal Information
Information contained in this document may have been obtained from internal testing or from a third party.
This information is for informational purposes only. Information may be changed or updated without
notice. NComputing reserves the right to make improvements and/or changes in the products, programs
and/or specifications described herein anytime without notice. All NComputing software is subject to
NComputing intellectual property rights and may be used only in conjunction with Genuine NComputing
hardware and in accordance to the NComputing End User Licensing agreement and Terms of Use.
www.ncomputing.com
©Copyright 2003-2012 NComputing, Inc. All rights reserved. NComputing is the property of NComputing.
Other trademarks and trade names are the property of their respective owners. Specifications are subject to change without notice.
Performance may vary, depending on the configuration of the shared computer.
