Nero Media Home Operating Guide En US
User Manual: Nero MediaHome - Operating Guide Free User Guide for Nero Software, Manual - page2
Open the PDF directly: View PDF ![]() .
.
Page Count: 90
Nero MediaHome

Nero MediaHome 2
Copyright and Trademark Information
This document and all its contents herein are subject to and protected by international copyright and other intellectual property rights
and are the property of Nero AG and its subsidiaries, affiliates or licensors. All rights reserved. No part of this document may be
reproduced, transmitted or transcribed without the express written permission of Nero AG. All trade names and trademarks and/or
service marks are the property of their respective owners. The trademarks mentioned are expressly named for information purposes
only. Nero AG rejects any claims that transcend the clauses of the guarantee rights to the fullest extent. Nero AG does not undertake
any liability for the correctness of the content of this document. The contents of the software supplied, as well as of this document,
may be changed without prior warning. Some applications of the Nero Suites require technologies developed by third-party manufac-
turers. Some of these are included as a trial version in this suite. These technologies need to be activated online (free of charge) or
by sending an activation fax to have unlimited use of the version. Nero will then undertake to release the data necessary to activate
technologies licensed by third-party manufacturers for unlimited use with Nero 2014 or Nero 2014 Platinum. It is therefore necessary
to have an Internet connection or a fax machine. Unless you own the copyright or have permission from the copyright owner, you
may be violating national or international copyright laws and be subject to payment of damages and other remedies, if you duplicate,
reproduce, modify, or distribute copyrighted material. If you are unsure of your rights you should contact your legal advisor.
Copyright © 2013 Nero AG and its licensors. All rights reserved.
Nero, Nero BackItUp, Nero Burn, Nero Digital, Nero Express, Nero MediaStreaming, Nero Recode, Nero RescueAgent, Nero
SmartDetect, Nero Simply Enjoy, Nero SmoothPlay, Nero StartSmart, Nero Surround, Burn-At-Once, LayerMagic, Liquid Media,
SecurDisc, the SecurDisc Logo, Superresolution, UltraBuffer, Nero Burning ROM, NeroKwik, Nero MediaHome Blu-ray, Nero Me-
diaHome Media, Nero MediaHome Burn, Nero MediaHome Play, Nero MediaHome DVD, Nero MediaHome Photobook, Nero Me-
diaHome Faces, Nero MediaHome Move it, Nero MediaHome Sync, Nero Disc to Device, Nero MediaBrowser, Nero MediaHome
Themes, Nero Video, Nero Video Express, Nero SoundTrax, Nero WaveEditor and Nero CoverDesigner are common law trade-
marks or registered trademarks of Nero AG.
Portions of the Software utilize Microsoft Windows Media Technologies. Copyright © 1999-2002. Microsoft Corporation. All Rights
Reserved. This product contains portions of imaging code owned by Pegasus Software LLC, Tampa, FL. Gracenote, CDDB, Mu-
sicID, MediaVOCS, the Gracenote logo and logotype, and the "Powered by Gracenote" logo are either registered trademarks or
trademarks of Gracenote in the United States and/or other countries. Manufactured under license from Dolby Laboratories. Dolby,
Pro Logic, and the double-D symbol are registered trademarks of Dolby Laboratories, Inc. Confidential unpublished works. Copyright
2011 Dolby Laboratories. All rights reserved. Manufactured under license under U.S. Patent Nos: 5,956,674; 5,974,380; 6,487,535 &
other U.S. and worldwide patents issued & pending. DTS, the Symbol, & DTS and the Symbol together are registered trademarks &
DTS Digital Surround, DTS 2.0+Digital Out and the DTS logos are trademarks of DTS, Inc. Product includes software. © DTS, Inc.
All Rights Reserved.
AVCHD and AVCHD logo, AVCHD Lite and AVCHD Lite logo are trademarks of Panasonic Corporation and Sony Corporation.
Facebook is a registered trademark of Facebook, Inc. Yahoo! and Flickr are registered trademarks of Yahoo! Inc. My Space is a
trademark of MySpace, Inc. Google, Android YouTube and Google Drive are trademarks of Google, Inc. Apple, Apple TV, iTunes,
iTunes Store, iPad, iPod, iPod touch, iPhone, Mac and QuickTime are trademarks of Apple Inc. registered in the U.S and other
countries. Blu-ray Disc, Blu-ray, Blu-ray 3D, BD-Live, BONUSVIEW, BDXL, AVCREC and the logos are trademarks of the Blu-ray
Disc Association. DVD Logo is a trademark of Format/Logo Licensing Corp. registered in the U.S., Japan and other countries.
Bluetooth is a trademark owned by Bluetooth SIG, Inc. The USB logo is a trademark of Universal Serial Bus Implementers Corpora-
tion. ActiveX, ActiveSync, Aero, Authenticode, Bing, DirectX, DirectShow, Internet Explorer, Microsoft, MSN, Outlook, Windows,
Windows Mail, Windows Media, Windows Media Player, Windows Mobile, Windows.NET, Windows Server, Windows Vista, Win-
dows XP, Windows 7, Xbox, Xbox 360, PowerPoint, Silverlight, the Silverlight logo, SkyDrive, Visual C++, the Windows Vista start
button, and the Windows logo are trademarks or registered trademarks of Microsoft Corporation in the United States and other
countries. FaceVACS and Cognitec are either registered trademarks or trademarks of Cognitec Systems GmbH. DivX and DivX
Certified are registered trademarks of DivX, Inc. DVB is a registered trademark of the DVB Project. NVIDIA, GeForce, ForceWare,
and CUDA are trademarks or registered trademarks of NVIDIA. Sony, Memory Stick, PlayStation, and PSP are trademarks or
registered trademarks of Sony Corporation. HDV is a trademark of Sony Corporation and Victor Company of Japan, Limited (JVC).
3GPP is a trademark of European Telecommunications Standards Institute (ETSI). Adobe, Acrobat, Reader, Premiere, AIR, and
Flash are trademarks or registered trademarks of Adobe Systems, Incorporated. AMD Athlon, AMD Opteron, AMD Sempron, AMD
Turion, ATI Catalyst, ATI Radeon, ATI, Remote Wonder, and TV Wonder are trademarks or registered trademarks of Advanced
Micro Devices, Inc. Linux is a registered trademark of Linus Torvalds. CompactFlash is a registered trademark of SanDisk Corpora-
tion. UPnP is a registered trademark of UPnP Implementers Corporation. Dropbox is a trademark of Dropbox Inc. Ask and Ask.com
are registered trademarks of IAC Search & Media. IEEE is a registered trademark of The Institute of Electrical and Electronics
Engineers, Inc. Philips is a registered trademark of Koninklijke Philips Electronics.N.V. InstallShield is a registered trademark of
Macrovision Corporation. Unicode is a registered trademark of Unicode, Inc. Check Point is a registered trademark of Check Point
Software Technologies Ltd. Labelflash is a trademark of Yamaha Corporation. LightScribe is a registered trademark of the Hewlett-
Packard Development Company, L.P. Intel, Intel Media SDK, Intel Core, Intel XScale and Pentium are trademarks or registered
trademarks of Intel Corporation in the U.S. and/or other countries. MP3 SURROUND, MP3PRO and their logos are trademarks of
Thomson S.A. This product is furnished under U.S. and foreign patents owned and licensed by AT&T Corp.
Other product and brand names may be trademarks of their respective owners and do not imply affiliation with, sponsorship, or
endorsement by owners.
Nero AG reserves the right to change specifications without notice. Use of this product is subject to the acceptance of the End User
License Agreement upon installation of the software. www.nero.com
Nero AG, Im Stoeckmaedle 18, 76307 Karlsbad, Germany.
Copyright © 2013 Nero AG and its licensors. All rights reserved.

Table of Contents
Nero MediaHome 3
Table of Contents
1 Start Successfully 6
1.1 About the Manual 6
1.2 About the Application 6
1.3 Versions and System Requirements 7
1.4 Installation 7
1.5 Starting the Program 9
2 Working With the Program 10
2.1 Header 10
2.2 Library Management and Options 11
2.3 Nero MediaBrowser 12
3 Market 14
4 Photos and Videos 15
4.1 Upper Taskbar 16
4.1.1 Media Info Tab 17
4.2 Lower Taskbar 18
4.2.1 More Features 19
4.2.1.1 Change Date and Time 20
4.3 List of Marked Items 20
4.4 Albums 21
4.5 Faces 22
4.5.1 Upper Taskbar 23
4.5.2 Lower Taskbar 23
4.5.2.1 More Features 24
4.5.3 Adding Names to Faces 25
4.6 Person Groups 25
4.7 Find 27
4.8 Photo Preview 29
4.8.1 Upper Taskbar 30
4.8.2 LowerTaskbar 30
4.8.2.1 More Features 31
4.9 Photo Editing 32
4.9.1 Enhance Tab 33
4.9.2 Adjust Tab 33
4.9.3 Effects Tab 34
4.9.4 General Editing of Photos 34
4.9.4.1 Removing Red Eyes 35
4.9.4.2 Adding Effects to Photos 36

Table of Contents
Nero MediaHome 4
4.9.4.3 Cropping a Photo 36
4.10 Video Playback 37
4.10.1 More Features 39
4.10.2 Starting Video Playback 40
4.11 Full Screen Control Bar 41
5 Music 43
5.1 Upper Taskbar 44
5.1.1 Media Info 44
5.2 Lower Taskbar 45
5.2.1 More Features 47
5.3 List of Marked Items 48
5.4 Playlists 48
5.5 Starting Music Playback (Library or Playlist) 49
5.6 Creating a Playlist 49
6 Slide Shows 51
6.1 Upper Taskbar 52
6.2 Lower Taskbar 53
6.2.1 More Features 53
6.3 Lower Taskbar (Slide Show Screen) 54
6.4 Personalize Slide Show Window 55
6.4.1 Themes 55
6.4.2 Titles 55
6.4.3 Music and Duration 56
6.5 Creating a Slide Show 56
6.6 Saving Slide Show as a Video File 57
7 Photo Products 58
7.1 Select a Product 59
7.2 Select a Photo Project Theme 60
7.3 Select Your Photobook Photos 61
7.4 Edit Your Photo Project 63
7.4.1 Photo Project Work Area 64
7.4.2 Photo Project Tabs 67
7.5 Preview Your Project 68
7.6 Creating an Instant Photobook 70
7.7 Creating a Custom Photobook 71
7.8 Creating a Calendar 73
8 Audio CD Browsing and Playback 76
8.1 Starting Audio CD Playback 77
8.2 Ripping From Audio CD 77
9 Video Playback from Disc 79

Table of Contents
Nero MediaHome 5
10 Nero MediaHome as Media Server 81
10.1 Nero Play to TV 82
10.2 Nero Slideshow to TV 82
11 Devices 83
11.1 Device Settings Tab 84
11.2 Importing From Device or Data Disc 85
12 Share and Burn 86
13 Index 88
14 Contact 90
Start Successfully
Nero MediaHome 6
1 Start Successfully
1.1 About the Manual
This manual is intended for all users who want to learn how to use Nero MediaHome. It is
process-based and explains how to achieve a specific objective on a step-by-step basis.
To make best use of this documentation, please note the following conventions:
Indicates warnings, preconditions or instructions that have to be pre-
cisely followed.
Indicates additional information or advice.
1. Start … The number at the beginning of a line indicates a prompt for action.
Carry out these actions in the order specified.
Indicates an intermediate result.
Indicates a result.
OK Indicates text passages or buttons that appear in the program inter-
face. They are shown in boldface.
(see…) Indicates references to other chapters. They are executed as links and
are shown in red and underlined.
[…] Indicates keyboard shortcuts for entering commands.
1.2 About the Application
Nero MediaHome is an all-in-one media management software for photos, videos and music.
It lets you conveniently play back tracks in your library, import new music from CD as well as
create new playlists and sync these or albums with any mobile device connected either wire-
lessly or via USB mass storage.
Share your photos, music and videos through upload to your favorite social media websites.
In addition, you can always burn a music CD. Nero MediaHome lets you easily create cine-
ma-style videos and photo slide shows with integrated movie themes – plus burn your com-
pilations on DVD as a gift for friends and family (Nero MediaHome DVD Pack).
Improve the quality of your photos with just a few clicks, cut off unwanted parts, or automati-
cally remove red eyes. Use the automatic face detection to sort the many photos in your
library by the people in your pictures. Face groups make it also easier to find the right pic-
tures for quick and simple photo projects such as a photo card. In creating photobooks, cal-
Start Successfully
Nero MediaHome 7
endars, or cards, you can choose from numerous themes, cliparts, and layout options.
Transform memories into shareable keepsakes just by ordering your individual compilations
directly through Nero MediaHome.
Nero MediaHome can also act as a media server. You can access your complete Nero Me-
diaHome media library from DLNA-enabled TVs and other devices, or stream your media
onto these devices. Slide shows are transcoded on-the-fly, without the need to export them
to a video file first. Access your media library from anywhere in your home!
1.3 Versions and System Requirements
Nero MediaHome is available in various versions. The Nero MediaHome full and Essentials
versions are included in the different Nero Suite product packs. In addition, a free standalone
version is available.
Essentials or OEM software as well as the Nero MediaHome free standalone version differ
from the full version in a more or less broad functional range. Thereby, the feature limitations
of your single essentials version compared to the full range depends on the co-contractor's
choice.
You can always upgrade from your Essentials version to the full featured version.
In addition, Nero MediaHome offers various add-ons to customize and expand the applica-
tions feature range to your personal needs. You can always obtain these add-ons right from
the Market in Nero MediaHome.
Detailed system requirements of Nero MediaHome and all other Nero products can be found
in the Support section on our Web site www.nero.com.
1.4 Installation
If you use Nero MediaHome within Nero 2014 or Nero 2014 Platinum, the applica-
tion is installed automatically with the other applications of the suite. In this case,
you can skip this chapter.
If you use a Nero MediaHome standalone version, this chapter guides you
through a step-by-step installation.
Detailed system requirements of Nero MediaHome and all other Nero products
can be found in the Support section on our Web site www.nero.com.
To install Nero MediaHome, you need administrator rights for all operating sys-
tems.
An installation wizard walks you through the quick and uncomplicated installation process.
To install Nero MediaHome, proceed as follows:
1. Close all Microsoft Windows programs and exit any anti-virus software that may be running.
2. Start the installation process by double-clicking the downloaded installation file.
Start Successfully
Nero MediaHome 8
The files are automatically unzipped and stored on the C:\ drive in a temporary folder
from which they are automatically deleted once they have been used.
The installation is prepared and the Welcome Screen is displayed.
If applications are found on your computer that could conflict with the software to
be installed, an appropriate screen is displayed. It is recommended that these
applications are uninstalled before proceeding with the installation.
Nero MediaHome checks the availability of required components, such as Mi-
crosoft Silverlight on your PC. If applications are missing, an appropriate screen is
displayed. Click the Install button to proceed. A third party installation wizard may
appear and walk you through the installation process. A reboot may be required.
The Nero installation will automatically proceed after the reboot is executed.
3. Click the Next button.
4. The AVG Toolbar screen is displayed.
5. Please read the licensing agreement carefully. If you want to install the AVG Security
Toolbar, select the first check box. If you want AVG to be your default search provider, se-
lect the second check box. If you want to set your home page to isearch.avg.com, select the
third check box.
6. Click the Next button.
7. The License Agreement (EULA) screen is displayed.
8. Please read the license agreement carefully and select the appropriate check box if you
agree to the terms of the agreement. Installation is not possible without this agreement.
9. Click the Next button.
The Ready to Install screen is displayed.
10. If you want to change the default installation path:
1. Click the Installation Settings button.
The Installation Settings screen is displayed.
2. Click the Change button.
The Current Destination Folder screen is displayed.
3. Select the desired destination using the Look in drop-down menu and the Folder name
text field.
11. If you want to create a shortcut for the application on your desktop, activate the correspond-
ing check box.
12. If you want to open multimedia files with Nero MediaHome by default, activate the
corresponding check box.
13. If you want to take part in the Nero Product Improvement Program, select the corre-
sponding option button.
In order to offer better service, this Nero Product Improvement Program collects anony-
mous data to determine which features are used and what problems, if any, occur. This in-
formation helps Nero to identify which features to improve. No personal information is col-
lected that could be used to contact you.
Start Successfully
Nero MediaHome 9
14. Click the Install button.
The installation process is started. Nero MediaHome is installed in the selected folder,
and a progress bar informs you of the progress of the installation process.
After the installation is finished, the InstallShield Wizard Completed screen is dis-
played.
15. Click the Finish button.
The installation wizard is closed.
You have now installed Nero MediaHome. The Nero MediaHome desktop icon is
now available on the computer's desktop. Click the icon to start the application.
Nero MediaHome is checking for available updates in the background. When the
first update is available, you are asked if you want to turn on the automatic update
feature. If you agree, updates are from then on downloaded silently as soon as
they are available. A dialog then asks whether the new update should be installed
now or later.
You can always select/deselect this feature in the Update category of the Op-
tions window.
1.5 Starting the Program
There are several ways to open Nero MediaHome, depending on various factors such as the
product you have installed and the operating system you are using.
On Windows 7 and earlier versions of Windows, you can start Nero MediaHome via:
Start (the start icon) > (All) Programs > Nero > Nero 2014 > Nero MediaHome
the Nero MediaHome desktop icon if you use Nero MediaHome as a standalone product
the Nero 2014 desktop icon if you use Nero 2014
The application launcher Nero 2014 provides easy access to Nero applica-
tions, offers information about the main use cases, and links to tutorials and other
interesting Web sites by Nero.
On Windows 8, you can start Nero MediaHome via:
the Nero 2014 tile (Windows 8 Start screen) or the Nero 2014 desktop icon (Win-
dows 8 desktop) if you use Nero 2014
the Nero MediaHome tile (Windows 8 Start screen) or the Nero MediaHome desktop
icon (Windows 8 desktop) if you use Nero MediaHome as a standalone product

Working With the Program
Nero MediaHome 10
2 Working With the Program
When you start Nero MediaHome for the first time, a Welcome screen is displayed, allowing
you to start an automatic search for media files on your computer. The found folders and
files will be the basis of your media library in Nero MediaHome. At this point, you can also
narrow the search to specific drives, or cancel the automatic search all along and manually
add the desired folders later on. If you let Nero MediaHome search for media files, the found
folders will be displayed after the search with the possibility to include or exclude them indi-
vidually from the library.
After the initial search, the application is opened with the photo and video browsing screen
displayed by default. If you open Nero MediaHome the next time and have selected the re-
spective option, the last viewed screen will be displayed. You can switch between the differ-
ent browsing screens by clicking one of the entries in the navigation tree (such as Music).
The Nero MediaHome folder scanner automatically searches all local, external and mapped
network drives for media files and adds them to the index of the application.
You can of course fill and manage the media libraries in the Options window any time later.
Simply click the Options button in the header of the main window.
See also
Library Management and Options →11
Nero MediaBrowser →12
2.1 Header
Additionally to the Options button, the following overall setting options are available in the
header of the main window:
Button
Market
Displays the Market screen which lists a broad range of apps and
creative packs.
Drop-down menu
Sign In
Displays a menu with input fields to log in to your Nero account.
Your user name is displayed instead of the Sign In menu as long
as you are logged in.
Drop-down menu
[Nero Account User
Name]
Offers access to your personal account information such as your
account settings as well as an overview of your market downloads
and photo gift orders in Nero MediaHome.
This menu stays available as long as you are logged into your ac-
count. If you are not logged in, a Sign In menu is displayed.
Drop-down menu
Help
Links to the Nero MediaHome manuals and help files, online tutori-
als and the Nero Web site.
See also
Working With the Program →10

Working With the Program
Nero MediaHome 11
2.2 Library Management and Options
The Options window is opened when you click the Options button in the header of the main
window. Here you can show the application where your media files are located on your com-
puter and set up your personal audio, video, and photo settings.
The Options window is divided into a categories area on the left and a main settings area.
The main settings area is adapted depending on the category you choose.
The following categories are displayed:
Library
Displays the Library settings area.
All monitored folders are displayed in the respective Watched folders
or drives area. If you want to add additional media folders, click the
Add Manually button and select the desired folder from the navigation
tree. Click the Add Automatically button to have Nero MediaHome
perform a search for new media folders on your computer. To exclude
certain media types (music, videos, or photos) from a folder, click the
respective button to the right of the folder. To delete a folder from the
application's watchlist, hover your cursor over the listed folder and
click the button.
You can also just drag files or folders to Nero MediaHome. A window
automatically opens and asks if you want to add the folder(s) to the
library.
In the General area you can select to list your external playlists (such
as iTunes) as entries in the navigation tree of Nero MediaHome.
Portable Devices
Displays import options for portable devices. If you import files to the
library, the files you import will be copied to the folders you choose in
this area. Click the respective Browse button to browse to your pre-
ferred storage directories.
You can also view and remove the devices for which you have set that
music and/or photos and videos should be imported automatically.
MediaHome Displays general as well as timeline, face recognition, and smart al-
bum and playlist options.
Audio Displays music recognition, audio playback, and Dolby Digital setting
options.
Video Displays video playback and video encoding options.
Slide Show Displays instant slide show playback options.
Streaming Displays media server, media server setting, and slide show streaming
quality options.
Burning Displays video and cache options.
Working With the Program
Nero MediaHome 12
CD-Ripping Displays CD ripping options.
Update Displays update options which allow you to select the update behavior
of Nero MediaHome.
See also
Working With the Program →10
2.3 Nero MediaBrowser
Nero MediaBrowser is a tool which you can use to easily find, view, and access media files
and add them to your project. More precisely, with Nero MediaBrowser you can access a
media library which contains all your media files that were indexed by Nero MediaHome.
Nero MediaBrowser is designed to be accessed in several Nero applications, but is also
available as a standalone application.
You can use Nero MediaBrowser within Nero MediaHome for slide show and photo product
projects. When you double-click a media file or select it and click the Add button in Nero
MediaBrowser, the media file will be added to your current project.
To use Nero MediaBrowser with a non-Nero application, open Nero MediaBrowser via the
Windows start menu or its tile, depending on your operating system. You will then be able to
add media files to any active application by dragging the desired media file onto the applica-
tion. When you double-click a media file in Nero MediaBrowser, it is opened in its default
program.
Nero MediaBrowser

Working With the Program
Nero MediaHome 13
Nero MediaBrowser features the same categories (Photos & Videos, and Music) as Nero
MediaHome. There are different views available for each category: Clicking one of the en-
tries in the upper part of the list (for example Faces) displays the same view as when click-
ing the corresponding tabs in Nero MediaHome. Also, the same scroll bar as in Nero Media-
Home is used. This is either the standard scroll bar or the dynamic scroll bar.
The Options window is opened with the Library Manager category displayed when you
click the button on the upper taskbar. The options refer directly to Nero MediaHome.
See also
Working With the Program →10
Market
Nero MediaHome 14
3 Market
The Market in Nero MediaHome lists a broad range of apps and creative packs. Your shop-
ping cart is displayed in the right column of the screen.
The first time you click the Market button in the header, you are asked to select your country
from a drop-down menu. Click the Continue button to browse the Market.
Each add-on is listed with a short description and price information. You can double-click a
product to display its detailed product information and see more preview images. The Market
automatically checks which apps and creative packs are already supported in your version of
Nero MediaHome (included, free download, or purchased before) and displays respective
add-ons as installed. It is not possible to purchase them again.
The Market requires an Internet connection to display all current offers.
Click the Add to cart button in either overview or detailed view to add a chosen item to your
cart. The Your Cart area on the right of the screen shows all items which are currently in
your cart. It lists each product’s single price plus a subtotal below. You can also remove sin-
gle products from the shopping cart by clicking the respective Remove button.
Clicking the Checkout button starts the payment process. The Market guides you step by
step through a secure payment process. As soon as the payment is finished, the new func-
tionality is immediately accessible in Nero MediaHome. Creative packs are downloaded right
after purchase; the installation starts automatically.
To make a purchase through the Market, you need to register. If you already have a Nero
account, simply log in using your e-mail address and password.
All existing Nero accounts work with Nero MediaHome, regardless of where you
have created your account.
If you are a new customer, please create your account now. If you are already logged in to
your account when you proceed to the payment, the Market asks you to verify your pass-
word for security reasons.
Photos and Videos
Nero MediaHome 15
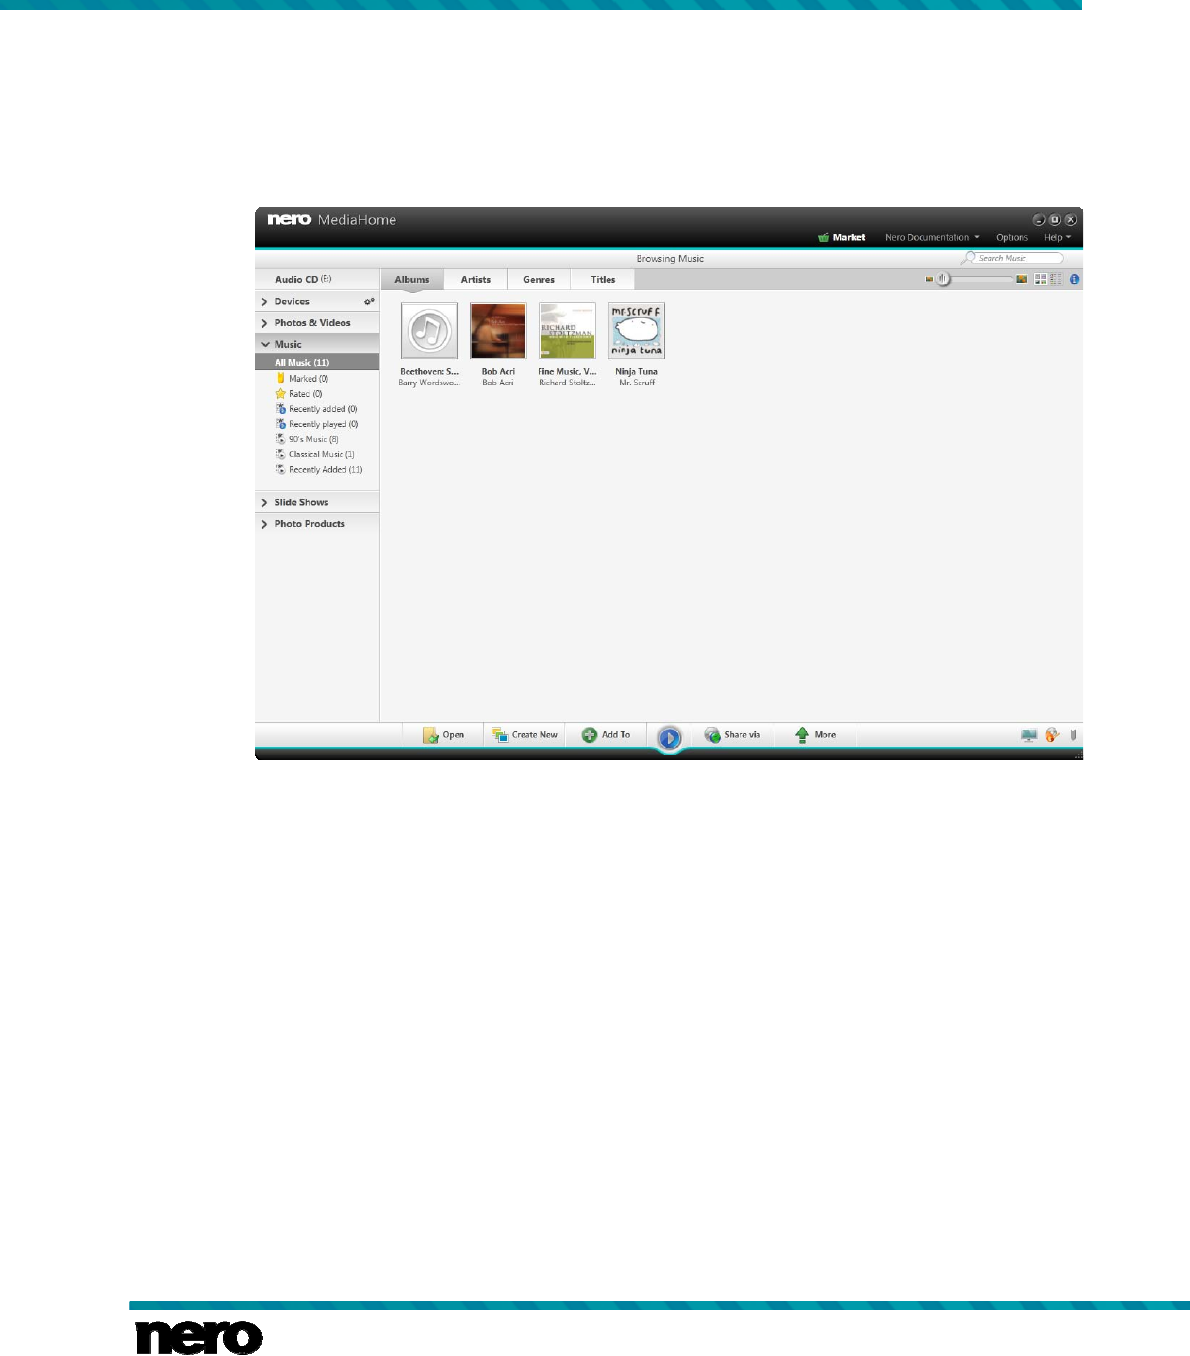
4 Photos and Videos
In the photo and video browsing screen you can browse the items of your Photos & Videos
library group. An overview is displayed when you choose the Photos & Videos main entry in
the navigation tree on the left.
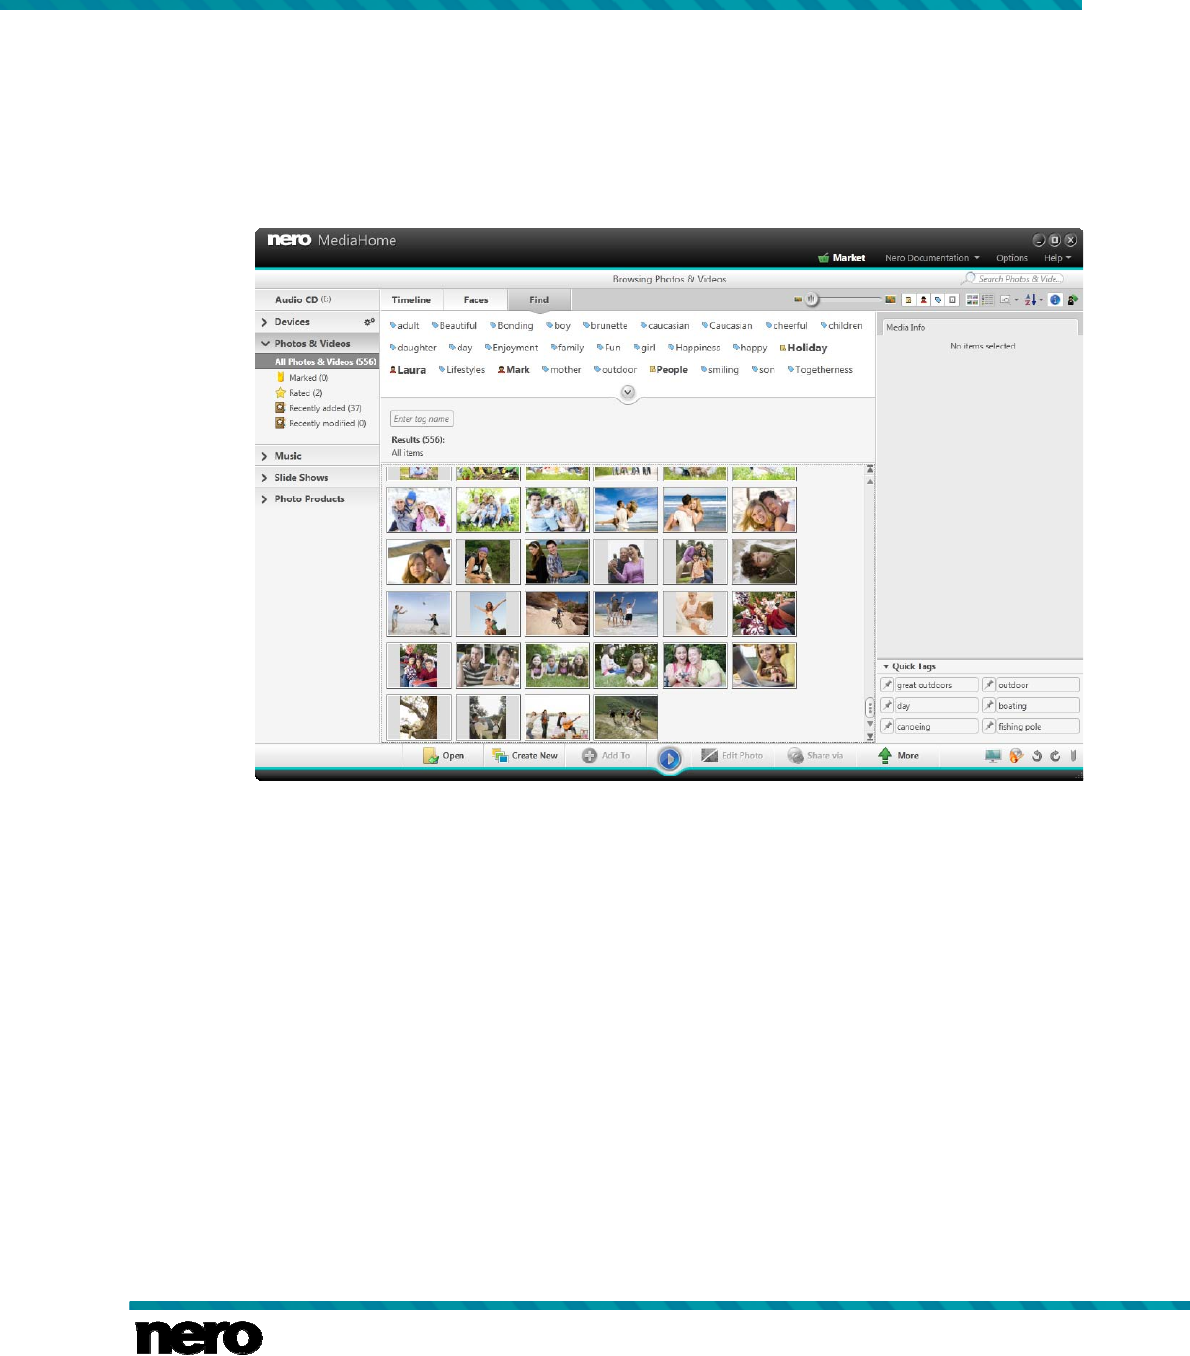
Photo and video browsing screen
By default, your photos and videos are sorted by day (Day option button) in a timeline view
(Timeline tab). Content can also be arranged by month (Month option button). A dynamic
scroll bar on the right screen margin enables you to scroll your files on the Timeline tab. If
you prefer a standard scroll bar, you can change the scroll bar type in the Options window.
Double-clicking a single photo in the browsing screen displays a preview in the Viewing
Photos screen; double-clicking a single video displays the Playback screen. Playback is
started automatically.
Click the Recently added or Recently modified entry below the Photos & Videos main
entry (in the navigation tree on the left) to display only recently added/modified items.
Changes or additions of the last 4 weeks are displayed by default. You can choose to show
items from only today, yesterday, last week etc.
The following setting option is available in the header of each browsing screen:
Input field
Search
Uses key word search to search for file names, artists, albums and
so on. Results will be displayed in detailed browsing view.

Photos and Videos
Nero MediaHome 16
See also
Upper Taskbar →16
Lower Taskbar →18
List of Marked Items →20
Albums →21
Faces →22
Person Groups →25
Find →27
Photo Preview →29
Photo Editing →32
Video Playback →37
Full Screen Control Bar →41
4.1 Upper Taskbar
The following additional setting options are available on the upper taskbar of the Photos &
Video screen:
Slider
Zoom Zooms into and out of the browsing view.
Button
Displays all photos and videos in a thumbnail view. This view is se-
lected by default.
Button
Lists all photos and videos in a detailed view that displays the date
taken and file type in addition to thumbnail and file name.
Drop-down menu
Displays all photos and videos by default. You can select the Photos
(or Videos) entry if you prefer to list your photos (or videos) only.
Drop-down menu
Allows you to sort your media by Date, Name, or Type.
Button
Opens the Media Info tab in the right screen column that shows
information about the metadata of the selected item.
Click the button on the upper taskbar again to close the tab.
Photos and Videos
Nero MediaHome 17
Button
Opens the Tag Manager tab in the right screen column; here you
can rename or remove tags manually.
The Quick Tags area below lists the six most frequently used tags in
Nero MediaHome. Here you can also pin tags if you want to keep a
list of preferred tags displayed. You can also drag any tag from the
tag list above onto a quick tag display field to exchange the current
quick tag with your preferred keyword.
Click the button on the upper taskbar again to close the tab.
See also
Photos and Videos →15
4.1.1 Media Info Tab
The Media Info tab in the right screen column shows information about the metadata of a
selected item. If available, you can see details like file size or format. Click the button on
the upper taskbar to display the tab. Click the button on the upper taskbar again to close the
tab.
The following setting options are available on the Media Info tab:
Option
Rating
Adds a rating of up to five stars to your item. The respective number of
stars shows up in the lower right corner of the items in the browsing
screen. You can remove or change the rating of items at any time.
Click the Rated entry below the main entry (in the navigation tree on
the left) to display only rated items.
Area
Camera Informa-
tion
Shows information such as the camera model and the ISO sensitivity
with which the shot was taken.
Only available for photos.
Area
Video Details
Shows information such as the aspect ratio and the frame rate of the
selected video.
Only available for videos.
Area
Tags
Displays existing tags.
You can add and remove tags. Click the Add tag input field to add
additional tags manually. Move your cursor over an existing tag and
click the small on its right to remove the tag.
Area
Faces
Lists names tagged in the respective picture.
You can also click the Name Person button to directly access the
Editing Photos screen and add additional face tags.
Only available for photos.
Photos and Videos
Nero MediaHome 18
Area
Quick Tags
Lists the six most recently used tags in Nero MediaHome.
Here you can also pin tags if you want to keep a list of preferred tags
displayed. You can also drag any tag from the tag list in the Tag Man-
ager tab onto a quick tag display field to exchange the current quick
tag with your preferred keyword.
4.2 Lower Taskbar
The following setting options are available on the lower taskbar of the Photos & Videos
screen:
Button
Opens a Windows Explorer window that lets you browse for and
open additional media stored on your computer.
Menu
Displays all available entries you can choose from to create projects
in Nero MediaHome.
The Photobook entry for example lets you create your custom pho-
tobook just the way you want it. A window is opened where you can
enter a name for your new photobook.
Menu
Displays existing projects such as your previously created slide
shows. You can choose to add your item(s) to any of your listed pro-
jects.
At least one item must be selected.
Button
Starts playback of an instant slide show. The slide show is presented
with default transitions and default background music. Slide shows
are played in full screen view.
To avoid conflicts, any ongoing background music is suspended and
the slide show's own music is played.
You can preselect photos and movies you want to play back in your
instant slide show.
Button
Displays the Editing Photos screen in which you can view, edit, and
enhance your photos.
At least one item must be selected.
Menu
Displays the share options you can choose from. You can send
items via e-mail or publish content to an Internet community.
At least one item must be selected.
Menu
Displays more features.
Photos and Videos
Nero MediaHome 19
Menu
Allows you to select a device to which you can stream the currently
selected item(s).
Button
Opens the Burn window that lists all available burn options to
choose from. You can also choose to copy an entire disc.
Button
/
Rotates a selected item 90° to the left or to the right.
At least one item must be selected.
Button
/
Adds the respective item to or removes it from the list of marked
items.
Click the Marked entry below the Photos & Videos main entry (in
the navigation tree on the left) to display only your list of marked
items.
At least one item must be selected.
See also
Photos and Videos →15
4.2.1 More Features
The following entries are available in the menu:
Copy to
Opens the Copy Selected Files to window. Here you can choose a
target device to copy the selected files to.
At least one item must be selected. A target device must be at-
tached.
Open with
Windows Explorer
Opens a Windows Explorer window that shows the respective
browser path to the directory in which the selected item is stored on
your computer.
At least one item must be selected.
Print Opens the Print window. You can select your printer and printing
preferences. Click the Print button to start the printing process.
Nero Video Opens Nero Video for further editing of your media.
Only available for videos. At least one item must be selected.
Nero Recode Opens Nero Recode for further editing of your media.
Only available for videos. At least one item must be selected.
Photos and Videos
Nero MediaHome 20
Change Date and
Time
Opens the Change date and time window where you can adjust the
original date and time of a photo or video taken.
Remove from
Library
Removes an item or a whole stack from the Nero MediaHome li-
brary. The items will remain in their original folder on your hard drive.
You can restore removed files to the Nero MediaHome library in the
Library category of the Options window.
At least one item must be selected.
Delete from hard
disk
Deletes an item or a whole stack from the Nero MediaHome library
and from your hard drive.
At least one item must be selected.
Rename
Lets you change the name of the actual file as saved on your com-
puter.
At least one item must be selected.
4.2.1.1 Change Date and Time
The following setting options are available in the Change date and time window:
Selected item Shows a preview of the photo or video you selected.
Original date and
time Shows the original date and time.
Change date and
time
Displays input fields where you can adjust date and time to your
preference. An additional button allows you to open a calendar so
you can conveniently select the date.
The exact difference to the original (in years, days, hours, minutes
and seconds) is displayed below.
4.3 List of Marked Items
If you hover over a photo, video (Photos & Videos screen), music album or track (Music
screen) thumbnail, an icon is displayed in the upper right corner. Enable the icon to mark
the thumbnail. This way, you can make a selection. Click the Marked entry below the main
screen entry (in the navigation tree on the left) to display only your list of marked items.
Another click on the marked icon removes the respective item from the Marked list.
Click the Remove All Markers button on the upper taskbar of the Marked screen to remove
the whole preselection and start a new sample. A preselection may be useful if you want to
start an instant slide show that plays back only selective photos, or if you want to burn an
Audio CD of selected tracks.
Photos and Videos
Nero MediaHome 21
By default your selected photos and videos are sorted in the manual order in which you have
added the items. Click the button on the upper taskbar to change the sorting order
(view arrangement).
Double-clicking a photo or video in your selection displays either a photo preview (Viewing
Photos screen) or the Playback screen (videos). Double-clicking a track starts its playback.
4.4 Albums
Your album and Smart Album compilations are listed under the Photos & Videos
entry in the navigation tree; you can always open and edit existing creations from there.
Double-clicking a photo or video in your selected album displays either a photo preview
(Viewing Photos screen) or the Playback screen (videos).
If you want to create an album, click the menu on the lower taskbar of the photo and
video browsing screen. A window is opened where you can enter a name for the new album.
You can always add more photos and videos to your existing albums. Click the button
on the lower taskbar of the photo and video browsing screen and choose your album from
the displayed projects.
If you want to create a Smart Album, click the menu on the lower taskbar of the photo
and video browsing screen; the Find tab must be selected to display the Smart Album set-
ting option. A new ‘smart’ album is created based on your current tag selection. New photos
and videos matching these criteria are automatically added to the album.
For example, if you chose the two tags Sailing and Sea for a combined search
and to create your new Smart Album, every additional item you upload to your
library tagged both Sailing and Sea will automatically be added to the album. An
item tagged with both essential tags as well as with any additional tag (such as
Beach, 2012, Sun) is also added to the album whereas a photo or video that
misses either of the criteria tags (here: Sailing and Sea) will not be added.
You can of course base your Smart Album on more than two tags.
If you click one of your albums in the navigation tree, the content is shown in a thumbnail
preview. By default your album photos and videos are sorted in the order in which you have
added the items (Manually). Click the drop-down menu on the upper taskbar to
change the sorting order (view arrangement).
In addition, the Smart Album displays the chosen criteria tags below the upper taskbar. You
can remove tags, but you cannot add additional sorting criteria.
The following adjusted entries are available in the menu:
Remove from
Album
Removes selected items from an album.
At least one item must be selected in the respective album.
Rename Allows you to change the name of the selected photo or video.
Photos and Videos
Nero MediaHome 22
Delete [smart]
Album
Removes the album or smart album. Contained photos and videos are
no longer displayed in a respective album selection.
Rename [smart]
Album Allows you to change the name of the album or smart album.
See also
Photos and Videos →15
4.5 Faces
The Faces tab in the photo and video browsing screen lists all photos with detected and
recognized named faces in stack groups sorted by the people in your pictures. You can also
assign names to listed suggestions of unnamed persons (lower area of the screen). In addi-
tion, you can just drag these thumbnails or stacks from the list of unnamed persons to the
stacks of already recognized and named faces.
Face recognition makes it easy for you to find photos of people you are looking for to e.g.
create personalized slide shows. If Nero MediaHome has not detected any faces on your
photos yet, the screen displays a short introduction on Nero MediaHome Faces. After Nero
MediaHome has detected faces on your photos, you can start assigning names to single
thumbnails or stacks.
Faces tab

Photos and Videos
Nero MediaHome 23
If you double-click a stack in the overview, all confirmed photos of a tagged face as well as
additional suggestions are listed in a single person browsing view. You can accept or decline
a suggestion or assign photos to other persons. Clicking the Confirm All button (on the
right) accepts all suggested photos. Clicking the All Faces button in the upper left of the tab
returns to the overview.
If Nero MediaHome Faces does not recognize the face of an already tagged person on a
photo, you can add the missing photo manually in the Editing Photos screen.
Just like on the Timeline tab, if you hover over a photo or stack, an icon is displayed in
the upper left corner. Enable the icon to mark the item. This way, you can make a selection.
Click the Marked entry below the Photos & Videos main entry (in the navigation tree on the
left) to display only your list of marked items.
See also
Adding Names to Faces →25
4.5.1 Upper Taskbar
In addition, the setting options on the upper taskbar stay available just like on the Timeline
tab in the photos and videos browsing screen. Nero MediaHome Faces adds the following
setting options:
Button
Shows only the faces of named people in a photo. This view is se-
lected by default.
Only available in the single person browsing view.
Button
Shows the full-size photos of named people.
Only available in the single person browsing view.
Drop-down menu
Filters the items that are listed in the overview. All photos of a tagged
person are displayed by default. You can choose to filter the list by
confirmed or suggested photos.
See also
Faces →22
4.5.2 Lower Taskbar
The setting options on the lower taskbar stay available just like on the Timelime tab on the
photos and videos browsing screen. Nero MediaHome Faces adds the following setting opti-
ons:
Menu
Displays all available entries you can choose from to create projects
in Nero MediaHome. The additional Person Group entry creates a
new group for tagged faces. A window is opened where you can
enter a name for the new group.

Photos and Videos
Nero MediaHome 24
You can add a person to one (such as family members) or different
groups (such as maybe friends, classmates, co-workers). Click the
[Groupname] entry under the Photos & Videos main entry (in the
navigation tree on the left) to display only the members of the select-
ed group.
Menu
Displays existing projects such as your previously created slide
shows. The additional Person Group entry lets you add your tagged
face(s) to any of your listed person groups.
At least one item must be selected.
See also
Faces →22
More Features →24
4.5.2.1 More Features
The following adjusted entries are available in the menu on the Faces tab:
Move To Another
Person
Displays possible alternative names for a tagged face.
At least one photo must be selected.
Set as Top Photo
Selects the respective photo that is displayed as a person’s preview
photo in Faces overview.
A single photo must be selected. Only available on the Faces tab
single person browsing view.
This Is Not [Name]
Removes the assigned name tag from the selected face.
A single photo must be selected. Only available on the Faces tab
single person browsing view.
Confirm
Confirms selected or all (Confirm All) additional suggestions that
are listed for a tagged person.
Only available on the Faces tab single person browsing view. At
least one additional suggestion must be selected.
Delete Person
Removes the name tag from the selected person. Photos are no
longer displayed on the Faces tab.
At least one photo must be selected. Only available on the Faces tab
single person browsing view.
Rename Person
Lets you change the name of the tagged person in the input field.
At least one photo must be selected. Only available on the Faces tab
single person browsing view.
Photos and Videos
Nero MediaHome 25
See also
Lower Taskbar →23
4.5.3 Adding Names to Faces
The following requirement must be fulfilled:
▲ The desired photo is opened for editing in the Editing Photos screen.
To add a name to a face, proceed as follows:
1. Click the button on the lower taskbar.
The Faces tab is opened in the left screen column. Each recognized face is automatical-
ly marked with a rectangle.
2. Enter the person’s name in the Name Person input field below the rectangle and press the
Enter key on your keyboard.
3. If a person’s face on your photo was not automatically recognized and you want to tag it:
1. Click the Add missing Face button on the Faces tab.
A highlighted rectangle is displayed in the content area.
2. Drag the rectangle over the face of the person you want to add. You can resize the rec-
tangle by dragging its edges or corner.
The highlighted rectangle is adapted.
3. Enter the person’s name into the Name Person input field below the rectangle and press
the Enter key on your keyboard.
All changes are saved to the photo. The Faces tab on the photos and videos browsing
screen now lists all photos with recognized named faces in stack groups sorted by the
people in your pictures.
You have added a name to a face.
You can also name persons directly on the Faces tab in the photo and video
browsing screen: Select a photo, then click the button in the upper taskbar to
open the Media Info tab and enter the name in the Name Person input field.
See also
General Editing of Photos →34
Faces →22
4.6 Person Groups
Your person groups are listed under the Photos & Videos entry in the navigation tree; you
can always open and edit existing groups from there. Click the respective [Person group]
entry in the navigation tree to display people you have added in a thumbnail preview. Dou-
ble-clicking a photo in your selected group displays a photo preview (Viewing Photos
screen).
Photos and Videos
Nero MediaHome 26
If you want to create a person group for tagged faces, click the menu on the lower
taskbar in the Faces tab. A window is opened where you can enter a name for the new
group.
You can always add more people to your existing groups. Select the desired person(s), click
the button on the lower taskbar in the Faces tab and choose your group from the dis-
played projects. You can add a person to one (such as family members) or different groups
(such as maybe friends, classmates, co-workers).
In addition, the setting options on the upper taskbar stay available just like on the Timelime
tab in the photos and videos browsing screen. The [Person group] view adds the following
setting options:
Button
Shows only the faces of named people in a photo. This view is se-
lected by default.
Button
Shows the full-size photos of named people.
Drop-down menu
Changes the sorting order (view arrangement). By default your group
members are sorted in the manual order in which you have added
them to the group.
Names of people in a respective group are listed below the upper taskbar. To remove a per-
son from the group click the button next to the name display (right).
The following adjusted entries are available in the menu:
Move To Another
Person
Displays possible alternative names for a tagged face.
At least one photo must be selected.
This Is Not [Name] Removes the assigned name tag from the selected face.
A single photo must be selected.
Delete Person
Group
Removes the person group. Contained tagged faces are no longer
displayed as a group.
Rename Person
Group Allows you to change the name of the person group.
See also
Photos and Videos →15
Photos and Videos
Nero MediaHome 27
4.7 Find
The Find tab in the photo and video browsing screen displays the Nero MediaHome tag
browsing view. Similar to a tag cloud on blogs etc. tags and their combinations can be used
to find or filter specific media assets. Existing tags are displayed in the upper area of the
screen enabling you to create a query.
Find tab
All media files in Nero MediaHome are automatically tagged with the names of all folders in
their hierarchy. For example a file that is saved in the folder Vacations > subfolder Camping
> subfolder Yosemite on your computer is likewise tagged with Yosemite, Camping and
Vacations.
In addition, the tag cloud lists tags that you have manually assigned as well as names of
tagged faces from Nero MediaHome Faces. Per default all tags are displayed in alphabetical
order with different font styles indicating the amount of content the folders have.
In addition to the given tags, you can also tag single or multiple items manually to enrich
them with contextual information such as occasions, events or descriptions. You can always
add tags manually on the Media Info tab of any browsing screen. Select the respective item
to add a tag. Or use the Quick Tags that are displayed on the Media Info and Tag Manager
tabs.

Photos and Videos
Nero MediaHome 28
The following setting options are available on the tab:
Button
Expands the display of the tag cloud and collapses it again.
Input field
Enter tag name
Lets you select a tag from the cloud or enter the tag name into the
input field. Results are displayed below.
An additional input field is displayed after you have entered your first
tag name; a third input field after you have entered your second tag
name, and so on. You can add multiple tags for a combined search.
Button
Clear Tag Selection
Removes the tag name(s) from the input field(s).
You can also remove a single tag name from the combination search
by clicking the icon in the respective tag name input field.
In addition, the setting options on the upper taskbar stay available just like on the Timeline
tab in the photos and videos browsing screen. The view on the Find tab adds the following
setting option:
Buttons
Displays all tags by default. You can select the Folders, Faces,
Tags, and/or Albums buttons if you prefer to list only respective tag
matches in the upper area of the screen.
The setting options on the lower taskbar stay available just like on the Timelime tab in the
photos and videos browsing screen. The view on the Find tab adds the following setting
option:
Menu
Displays all available entries you can choose from to create projects
in Nero MediaHome.
The additional Smart Album entry creates a new ‘smart’ album
based on your current tag selection. New photos and videos match-
ing these criteria are automatically added to the album.
For example, if you chose the two tags Sailing and Sea for a combined search
and to create your new Smart Album, every additional item you upload to your
library tagged both Sailing and Sea will automatically be added to the album. An
item tagged with both essential tags as well as with any additional tag (such as
Beach, 2012, Sun) is also added to the album whereas a photo or video that
misses either of the criteria tags (here: Sailing and Sea) will not be added.
You can of course base your Smart Album on more than two tags.
Photos and Videos
Nero MediaHome 29
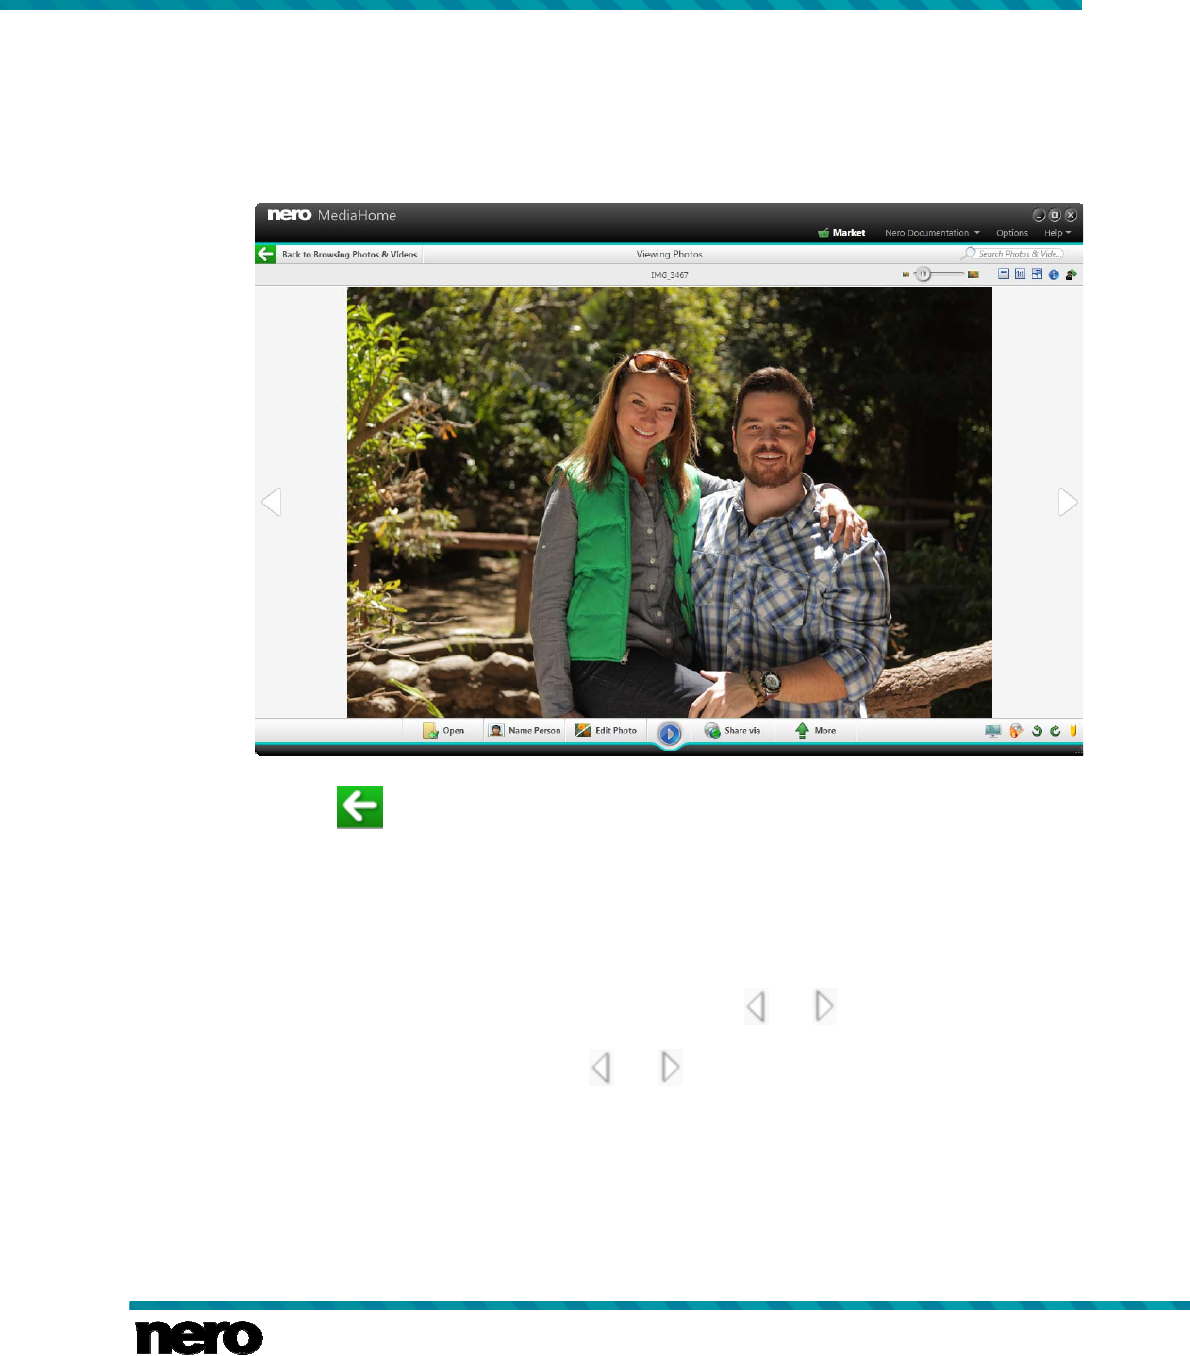
4.8 Photo Preview
A preview of your photo is displayed in the Viewing Photos screen when you double-click
the respective thumbnail in the photo and video browsing screen. Here you can view as well
as proceed to edit and enhance your photos.
Editing Photos screen
Click the button in the upper left of the screen (header) to return to the previous screen.
If you place the cursor in the upper third of the content area, a thumbnail strip will fade in.
The thumbnail strip shows all items you selected in the photo browsing screen (thumbnail
selected). If you selected only one item, the thumbnail strip shows the photos of the corre-
sponding group. If a photo is rated, the respective rating star icons are displayed in the lower
right corner of its thumbnail.
You can navigate through the thumbnail strip using the and buttons. Click a thumbnail
to choose the respective photo and to display it in the content area. You can also skip to the
next or previous photo by clicking the and buttons to the left and right of the photo in
the content area.
See also
Photos and Videos →15
Upper Taskbar →30
LowerTaskbar →30
Photos and Videos
Nero MediaHome 30
4.8.1 Upper Taskbar
Adapted setting options are additionally displayed on the upper taskbar of the Viewing Pho-
tos screen. The following setting options are available:
Slider
Zoom Zooms into and out of the content view.
Button
Turns the thumbnail strip on/off.
Button
Shows the displayed item selectively in its original size or fits it to the
size of the content area. The aspect ratio is kept.
Button
Displays an item in full screen view.
See also
Photo Preview →29
4.8.2 LowerTaskbar
The following setting options are available on the lower taskbar of the Viewing Photos
screen:
Button
Opens a Windows Explorer window that lets you browse for and
open additional media stored on your computer.
Button
Opens the Faces tab on the left. Each recognized face is marked
with a frame. Enter names to tag them.
Face recognition helps you sort your photo library by the people in
your pictures. If a person’s face is not recognized and marked with a
frame automatically, click the Add missing Face button on the Fac-
es tab. Drag the frame over the face of the person you want to add,
enter a name into the Name Person input field below the frame, and
click the OK button on the tab.
Button
Opens the editing tabs in the left screen column where you can
choose from several effects, adjustments and enhancements pre-
sented on three correspondent tabs. (See Photo Editing chapter.)
Button
Starts playback of an instant slide show. The slide show is presented
with default transitions and default background music. Slide shows
are played in full screen view.

Photos and Videos
Nero MediaHome 31
To avoid conflicts, any ongoing background music is suspended and
the slide show's own music is played.
Menu
Displays the share options you can choose from. You can send
items via e-mail or publish content to an Internet community.
At least one item must be selected.
Menu
Displays more features.
Button
Allows you to select a device to which you can stream the currently
selected item(s).
Button
Opens the Burn window that lists all available burn options to
choose from. You can also choose to copy an entire disc.
Button
/ Rotates a selected item 90° to the left or to the right.
Button
/
Adds the respective item to or removes it from the list of marked
items.
Click the Marked entry below the Photos & Videos main entry (in
the navigation tree on the left) to display only your list of marked
items.
See also
Photo Preview →29
More Features →31
4.8.2.1 More Features
The following entries are available in the of the Viewing Photos screen:
Send To Opens the Copy Selected Files to window. Here you can choose a
target device to copy the selected files to.
Open with
Windows Explorer
Opens a Windows Explorer window that shows the respective
browser path to the directory in which the selected item is stored on
your computer.
Print Opens the Print window. You can select your printer and printing
preferences. Click the Print button to start the printing process.
Photos and Videos
Nero MediaHome 32
Remove from
Library
Removes an item or a whole stack from the Nero MediaHome li-
brary. The items will remain in their original folder on your hard drive.
You can restore removed files to the Nero MediaHome library in the
Library category of the Options window.
At least one item must be selected.
Delete from hard
disk
Deletes an item or a whole stack from the Nero MediaHome library
and from your hard drive.
At least one item must be selected.
See also
LowerTaskbar →30
4.9 Photo Editing
The Editing Photos screen is displayed with editing tabs in the left screen column when you
click the Edit button on the lower taskbar of the photo and video browsing screen. You can
also display the Editing Photos screen via the Viewing Photos screen by clicking the
button on the lower taskbar.
Click the button in the upper left of the screen (header) to return to the previous screen.
You can skip to the next or previous photo by clicking the and buttons to the left and
right of the photo in the content area. Setting options on the upper and lower taskbar stay the
same in both preview and actual editing mode. (See Photo Preview chapter.)
In addition, you can choose from several effects, adjustments and enhancements presented
on the following tabs:
Enhance Displays various enhancement options you can use to improve the
visual impression of your photos.
Adjust
Displays various sliders. You can use these modification options to
improve the visual impression of your photos.
A preview of your adjustments is displayed in the content area.
Effects
Lists color and editing effects you can choose from to modify your
photos.
If you place the cursor on an effect thumbnail, a preview of the result
is displayed in the content area. Click the thumbnail to actually apply
the desired effect.
If you are not totally satisfied with the improvement, simply click the or buttons in
the lower area of the tabs to reverse or repeat editing steps; or click the Revert to Original
button.

Photos and Videos
Nero MediaHome 33
See also
General Editing of Photos →34
Enhance Tab →33
Adjust Tab →33
Effects Tab →34
4.9.1 Enhance Tab
The following buttons are available on the Enhance tab:
Auto Enhance Automatically improves the quality based on terms of reference.
Auto Exposure Automatically improves the exposure of your photos based on terms
of reference.
Auto Color Automatically improves the color of your photos based on terms of
reference. It offers an alternative to the manual color correction.
Crop
Displays the Cropping option drop-down menu with several tem-
plates that define the aspect ratio of a crop frame. You can also
change the size of your item manually.
Straighten Displays a slider that lets you drag your photo to your preferred tilt
angle.
Red Eye Removal
Automatically removes red eyes from your photo. In addition, the
Red Eye Removal window is opened and the cursor changes into a
cross.
If you are not totally satisfied with the improvement, simply click the or buttons be-
low to reverse or repeat editing steps; or click the Revert to Original button.
See also
Photo Editing →32
4.9.2 Adjust Tab
The following sliders are available on the Adjust tab:
Brighten Regulates the brightness of the color. Move the slider to set the de-
sired value.
Backlight
Illuminates the picture from the back to improve separation between
subjects and their background in the picture. Move the slider to set
the desired value.

Photos and Videos
Nero MediaHome 34
Color Temperature Regulates the primary colors. Slide the regulator to the right or left to
change the primary color hue.
Saturation Regulates the saturation of the colors. Slide the regulator to the right
to increase the saturation or to the left to decrease.
If you are not totally satisfied with the improvement, simply click the or buttons be-
low to reverse or repeat editing steps; or click the Revert to Original button. The Reset
button in the lower area of the Adjust tab sets all sliders to their original position.
See also
Photo Editing →32
4.9.3 Effects Tab
The following buttons are available on the Effects tab:
Sepia Displays your photo with sepia color effect.
Grayscale Shows your photo in black-and-white.
Blur Makes your image blurry.
Sharpen Sharpens the display.
Glow Adds an intense light effect to your picture.
Antique Gives your photo a vintage look.
Vignette Places a dark vignette shadow over your photo.
Frames Frames your photo. (Simple white frame.)
If you are not totally satisfied with the improvement, simply click the or buttons be-
low to reverse or repeat editing steps; or click the Revert to Original button.
See also
Photo Editing →32
4.9.4 General Editing of Photos
To edit and enhance photos in Nero MediaHome, proceed as follows:
1. Click the Photos & Videos main entry in the navigation tree on the left.
The photo and video browsing screen is displayed.
2. Select the photo you want to edit.

Photos and Videos
Nero MediaHome 35
3. Click the button on the lower taskbar.
The Editing Photos screen is displayed with editing tabs in the left screen column. A
preview of the preselected photo is displayed in the content area.
4. Click the Auto Enhance button on the Enhance tab.
The quality of the selected photo is automatically improved, based on terms of refer-
ence.
5. If you want to additionally adjust a photo by means of cropping or adding an effect, choose
the respective editing option from the tabs.
All changes are automatically saved to your photo.
You have edited and enhanced a photo.
See also
Photo Editing →32
Adding Names to Faces →25
Removing Red Eyes →35
Adding Effects to Photos →36
Cropping a Photo →36
4.9.4.1 Removing Red Eyes
The following requirement must be fulfilled:
▲ The desired photo is opened for editing in the Editing Photos screen.
To remove red eyes from a photo, proceed as follows:
1. Click the Red Eye Removal button on the Enhance tab.
The red eyes are removed automatically. In addition, the Red Eye Removal window is
opened. The cursor is changed into a cross.
2. If you are not totally satisfied with the auto improvement:
1. Press the left mouse button and keep it pressed to define the size and position of the
rectangle around the affected area of the photo.
2. Release the mouse button to apply the effect.
The red eyes are removed automatically.
All changes are automatically saved to the photo.
You have removed red eyes from a photo.
See also
General Editing of Photos →34

Photos and Videos
Nero MediaHome 36
4.9.4.2 Adding Effects to Photos
The following requirement must be fulfilled:
▲ The desired photo is opened for editing in the Editing Photos screen.
To add an effect to a photo, proceed as follows:
1. Click the Effects tab.
Color and editing effects are listed.
2. If you want to see a preview of an effect, place the cursor on an effect thumbnail.
A preview of the result is displayed in the content area.
3. Click the respective thumbnail to actually apply the desired effect.
The effect is added to the photo.
You have added an effect to a photo.
See also
General Editing of Photos →34
4.9.4.3 Cropping a Photo
The following requirement must be fulfilled:
▲ The desired photo is opened for editing in the Editing Photos screen.
To crop your photo, proceed as follows:
1. Click the Crop button on the Enhance tab.
Cropping options are displayed on the tab; a rectangle is displayed in the content area.
You can choose from several templates that define the aspect ratio of a crop frame. You
can also change the size of your item manually.
2. If you want to choose a defined format:
1. Select the respective entry from the drop-down menu.
The highlighted rectangle in the content area is adapted.
2. If you want to rotate the cropping frame from horizontal to upright or vice versa, select
the respective Landscape/Portrait option button.
The highlighted rectangle is adapted.
3. If you want to crop manually:
1. Choose the Manual entry from the drop-down menu.
A highlighted rectangle is displayed in the content area.
2. Hover over an angle of the cropping frame.
The cursor changes into a cropping tool.
3. Click, hold, and move the cropping tool to adjust the size of the rectangle and cropping
frame.
4. Click and hold the rectangle and move the cropping frame to the desired position in the
content area.
The highlighted rectangle is adapted.

Photos and Videos
Nero MediaHome 37
4. Click the Apply button.
The item is cut to the size of the highlighted rectangle. All changes are automatically
saved to the photo.
You have cropped a photo.
See also
General Editing of Photos →34
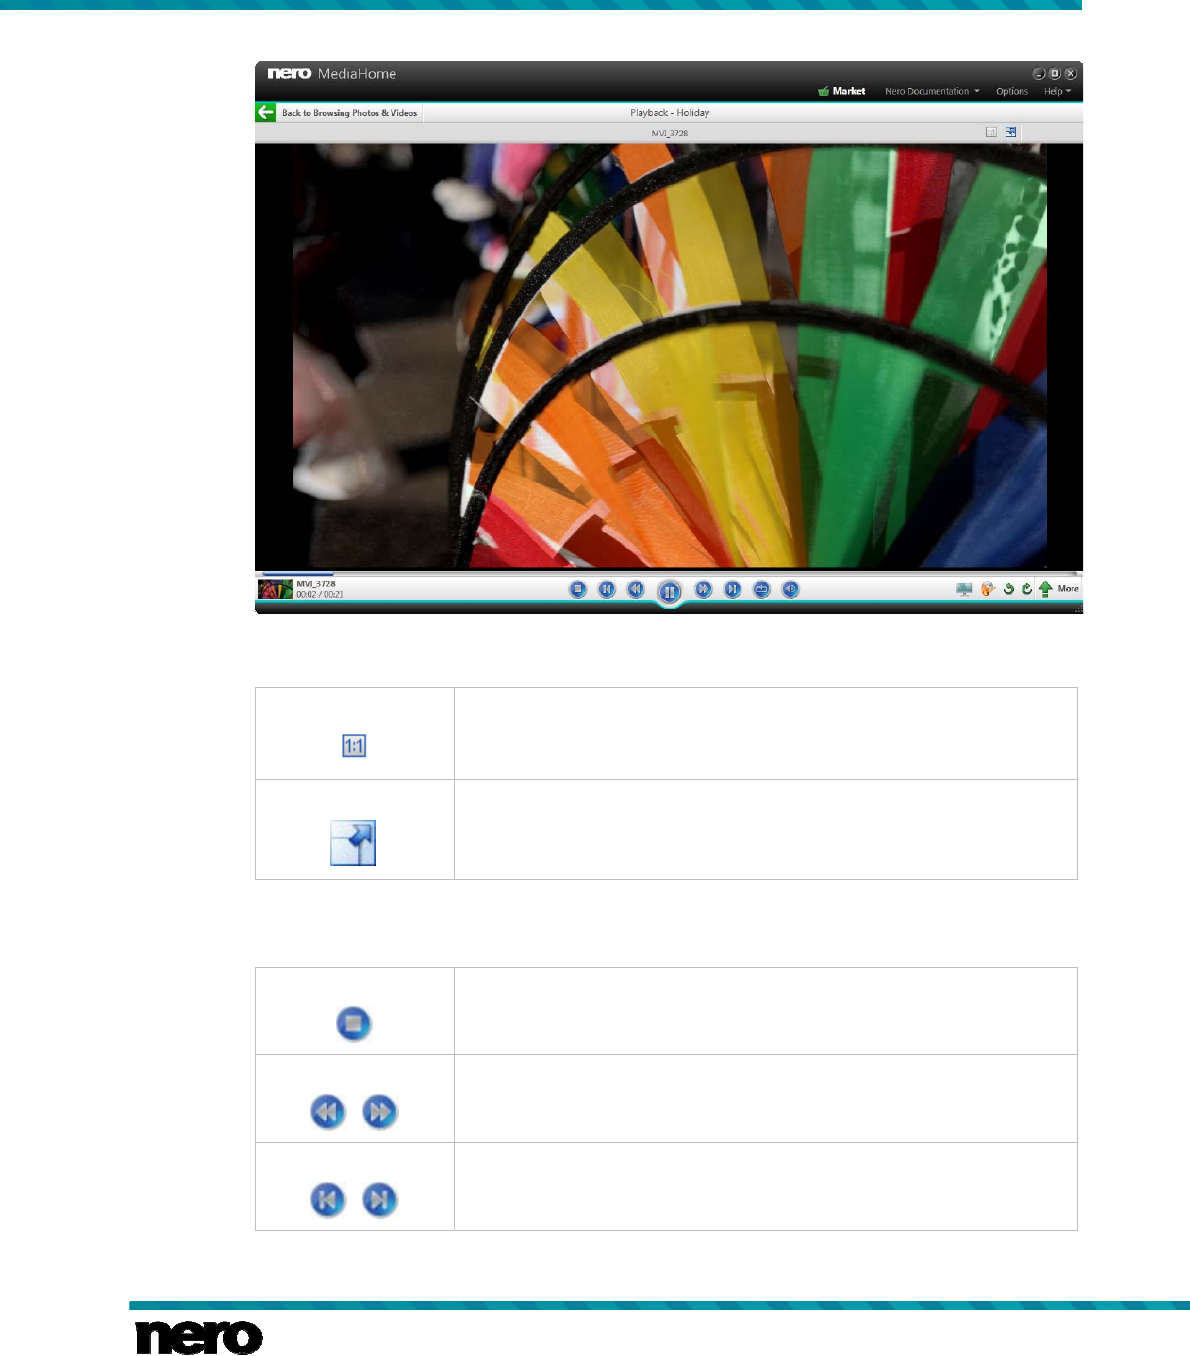
4.10 Video Playback
The Playback screen is displayed when you click the button in the photo and video
browsing screen or when you start playback from an optical disc. Here you can view your
videos.
Some of the features mentioned here are only available with Nero MediaHome
Playback installed on your computer. Nero MediaHome Playback plays all videos
from your library, regardless of format.
Nero MediaHome Playback is automatically included in Nero 2014 and Nero 2014
Platinum. If you use another version of Nero MediaHome, the add-on is not part
of the application.
DVD playpack and DVD Video burning is only available with Nero MediaHome
DVD Pack installed on your computer.
Nero MediaHome DVD Pack is automatically included in Nero 2014 and Nero
2014 Platinum. If you use another version of Nero MediaHome, the add-on is not
part of the application.
Playback of DTS digital surround sound in DVD and digital video files is only
available with Nero MediaHome DTS installed on your computer.
Nero MediaHome DTS is automatically included in Nero 2014 Platinum. If you
use another version of Nero MediaHome, the add-on is not part of the application.
Click the button in the upper left of the screen (header) to return to the previous screen.
Photos and Videos
Nero MediaHome 38
Playback screen
The following setting options are available on the upper taskbar:
Button
Fits the displayed item to the size of the content area. The aspect
ratio is kept.
Button
Displays an item in the full screen view.
In the lower left of the screen a thumbnail of the currently playing video and a time display is
shown. In addition, the following setting options are available on the lower taskbar:
Button
Stops playback.
Button
/
Rewinds/fast forwards the playing item.
Button
/ Skips to the next/previous video.
Photos and Videos
Nero MediaHome 39
Button
/ Starts/pauses play back of selected items.
Button
Plays the currently played item or selection again.
Button
Adjusts the volume. Activating the additional Mute button below the
slider mutes the background music.
Button
Opens the Burn window that lists all available burn options to
choose from. You can also choose to copy an entire disc.
Button
/ Rotates a selected item 90° to the left or to the right.
Menu
Displays more features.
See also
Photos and Videos →15
More Features →39
Starting Video Playback →40
4.10.1 More Features
The following entries are available in the menu in the Playback screen:
Copy To Opens the Copy Selected Files to window. Here you can choose
a target device to copy the selected files to.
Open with Windows
Explorer
Opens a Windows Explorer window that shows the respective
browser path to the directory in which the selected item is stored
on your computer.
Open Opens the Open window in which you can browse for and select
a video file for playback.
Share via Displays the share options you can choose from. You can send
items via e-mail or publish content to an Internet community.
Add Marker / Remove
Marker
Adds the respective video to or removes it from the list of marked
items.
Photos and Videos
Nero MediaHome 40
Click the Marked entry below the Photos & Videos main entry
(in the navigation tree on the left) to display only your list of
marked items.
Fit Video to Screen Displays possible options for the setup of aspect ratio.
Languages Allows you to select the audio track of the video file.
Remove from Library
Removes an item or a whole stack from the Nero MediaHome
library. The items will remain in their original folder on your hard
drive.
You can restore removed files to the Nero MediaHome library in
the Library category of the Options window.
Delete from hard disk Deletes an item or a whole stack from the Nero MediaHome li-
brary and from your hard drive.
See also
Video Playback →37
4.10.2 Starting Video Playback
Some of the features mentioned here are only available with Nero MediaHome
Playback installed on your computer. Nero MediaHome Playback plays all videos
from your library, regardless of format.
Nero MediaHome Playback is automatically included in Nero 2014 and Nero 2014
Platinum. If you use another version of Nero MediaHome, the add-on is not part
of the application.
Playback of DTS digital surround sound in DVD and digital video files is only
available with Nero MediaHome DTS installed on your computer.
Nero MediaHome DTS is automatically included in Nero 2014 Platinum. If you
use another version of Nero MediaHome, the add-on is not part of the application.
To play back a video, proceed as follows:
1. Click the Photos & Videos library entry in the navigation tree on the left.
The photo and video browsing screen is displayed.
2. Select the respective video that you want to play back and click the button on the lower
taskbar.
Playback is started. The Playback screen is displayed.
You have started the playback of your video.
Photos and Videos
Nero MediaHome 41
4.11 Full Screen Control Bar
Different full screen setting options are available for video and instant slide show playback.
When you move the mouse in the lower third of the respective full screen, the control bar is
faded in.
On the left of the video playback control bar a thumbnail of the currently playing video and a
time display are shown. In addition, the following buttons are available:
Ends the full screen view and returns to the default application
screen.
Stops playback.
/ Rewinds/fast forwards the playing item.
/ Skips to the next/previous video.
/ Starts/Pauses play back of selected items.
Plays the currently played item or selection again.
Adjusts the volume. Activating the additional Mute button below the
slider mutes the background music.
/ Rotates the item 90° to the left or to the right.
Displays more features such as video playback and sharing options.
The following buttons are available on the instant slide show control bar:
Ends the full screen view and returns to the default application
screen.
/ Skips to the previous/next item.
Starts playback of the slide show in full screen view.
Adjusts the volume. Activating the additional Mute button below the
slider mutes the background music.
Allows you to select a device to which you can stream the currently
playing item(s).
/ Rotates the item 90° to the left or to the right.

Photos and Videos
Nero MediaHome 42
/
Adds the respective photo to or removes it from the list of marked
items.
Click the Marked entry below the Photos & Videos main entry (in
the navigation tree on the left) to display only your list of marked
items.
Music
Nero MediaHome 43
5 Music
In the music browsing screen you can browse the items of your Music library group. Your
existing playlists are also listed under the Music main entry in the navigation tree on the left.
An overview is displayed when you choose the Music main entry in the navigation tree.
Music browsing screen
The overview is the entry point into the detailed browsing view. By default, your music in the
overview is sorted by album (Albums tab). Content can also be arranged by Artists, Gen-
res or Titles. Click the respective tab on the upper taskbar to change the sorting criteria.
Each stack then shows information about the amount of albums included.
With a double-click on any stack you can switch into the detailed browsing view. Only the
items of the chosen stack are displayed, the stack works like a filter. The detailed browsing
view is displayed with focus on the first item. All other items of the selected stack are listed
below, a scrollbar on the right screen margin enables you to scroll the detailed browsing
view. To mark all items with one click, click the album art to the left of the items. Clicking the
All Albums button in the leftmost table column ends the detailed browsing view and returns
to the overview.
Double-clicking a single item in the detailed browsing view starts its playback. Playback con-
trols are displayed on the lower taskbar. Switching to another screen will not stop the play-
back. A small display in the lower left corner of the main window stays visible and shows the
title and play back time. You can click this display to get back to the music browsing screen.

Music
Nero MediaHome 44
Click the Recently added or Recently played entry below the Music main entry (in the
navigation tree on the left) to display only recently added/played items. Changes or additions
of the last 4 weeks are displayed by default. You can choose to show items from only today,
yesterday, last week etc.
The following setting option is available in the header of each browsing screen:
Input field
Search
Uses key word search to search for file names, artists, albums and
so on. Results will be displayed in detailed browsing view.
See also
Upper Taskbar →44
Lower Taskbar →45
Playlists →48
5.1 Upper Taskbar
The following additional setting options are available on the upper taskbar of the music
browsing screen:
Slider
Zoom
Zooms into or out of the browsing view.
Only available in the overview.
Button
Displays all albums in a thumbnail view. This view is selected by
default.
Button
Lists all albums in a detailed view that displays the artist and track
list in addition to album art and name.
Button
Opens the Media Info side bar in the right screen column that shows
information about the metadata of the selected item.
Click the button on the upper taskbar again to close the tab.
See also
Music →43
5.1.1 Media Info
The Media Info tab in the right screen column shows information about the metadata of a
selected item. You can see details like the title, album, or duration. Some details can also be
changed here directly by clicking them (e.g. Title, Album, and Genre).
Click the button on the upper taskbar to display the tab. Click the button on the upper
taskbar again to close the tab.

Music
Nero MediaHome 45
The following setting options are available on the Media Info tab:
Button
Change cover
Allows you to replace the current cover with a picture located on your
hard drive, or to remove the current cover. Unlike cover art obtained
through Gracenote, personal pictures located on your hard drive which
you set as cover art can be transferred to mobile devices. Additionally,
cover art might not be available for every album, so you can use this
function to add the respective picture.
Drop-down menu
Genre
Allows you to select a genre, either for the whole album or single
tracks.
Option
Rating
Allows you to add a rating of up to five stars to your item. The respec-
tive number of stars shows up in the lower right corner of the items in
the browsing screen. You can remove or change the rating of items at
any time.
Click the Rated entry below the main entry (in the navigation tree on
the left) to display only rated items.
Display area
Song Details Displays the Bitrate, Frequency, and Channels of the selected track.
5.2 Lower Taskbar
The following setting options are available on the lower taskbar of the music browsing
screen:
Button
Opens a Windows Explorer window that lets you browse for and
open additional media stored on your computer.
Menu
Displays a Playlist entry. A window is opened where you can enter a
name for the new playlist.
Menu
Displays existing playlists. You can choose to add your item(s) or
stacks to any of your listed playlists.
At least one item must be selected.
Button
Starts play back of selected items or albums.
If you click the button in the overview with a stack selected, the de-
tailed browsing view will be displayed, and the first item will start
playing automatically. Playback controls are displayed on the lower
taskbar.
Menu
Displays the share options you can choose from. You can send
items via e-mail or publish content to an Internet community.
At least one item must be selected.

Music
Nero MediaHome 46
Menu
Displays more features.
Menu
Allows you to select a device to which you can stream the currently
selected item(s).
Button
Opens the Burn window that lists all available burn options to
choose from. You can also choose to copy an entire disc.
Button
/
Adds the respective item to or removes it from the list of marked
items.
Click the Marked entry below the Music main entry (in the naviga-
tion tree on the left) to display only your list of marked items.
At least one item must be selected.
When you start the playback, playback controls are displayed on the lower taskbar. The
following setting options are available:
Button
Stops playback.
Button
/
Skips to the next/previous track.
If you click the respective button when the last (first) track of an al-
bum comes to an end, the playback of the next (previous) album will
be started.
Button
/ Starts/pauses play back of selected items or albums.
Button
Plays selected items or an album in a random sequence.
Button
Plays the currently played item, selection, album or playlist again.
Button
Adjusts the volume. Activating the additional Mute button below the
slider mutes the background music.
Button
Opens the Burn window that lists all available burn options to
choose from. You can also choose to copy an entire disc.

Music
Nero MediaHome 47
Button
/
Adds the respective item to or removes it from the list of marked
items.
Click the Marked entry below the Music main entry (in the naviga-
tion tree on the left) to display only your list of marked items.
At least one item must be selected.
Menu
Displays more features.
See also
Music →43
More Features →47
5.2.1 More Features
The following entries are available in the menu in the music browsing screen:
Copy To
Opens the Copy Selected Files to window. Here you can choose
a target device to copy the selected files to.
At least one item must be selected. A target device must be at-
tached.
Open with Windows
Explorer
Opens a Windows Explorer window that shows the respective
browser path to the directory in which the selected item is stored
on your computer.
At least one item must be selected.
Get Song Information
Opens the Get Song Information window.
With Gracenote MusicID in Nero MediaHome you can identify
music files out of any sort of audio compilation. So-called metada-
ta such as artist, title, and genre are accessed from the Graceno-
te Media Database and displayed in Nero MediaHome. The iden-
tified metadata is written to the audio file(s) and is then available.
In this way your music collection is correctly tagged with all infor-
mation. This is particularly useful when audio files are not named
or are only partially named.
Click the Accept button in the lower right of the window to syn-
chronize the found data to your file(s).
At least one item must be selected.
Edit Song Information
Opens the Media Info area.
You can edit metadata - like add missing data into the input fields.
At least one item must be selected.
Music
Nero MediaHome 48
Remove from Library
Removes an item or a whole stack from the Nero MediaHome
library. The items will remain in their original folder on your hard
drive.
You can restore removed files to the Nero MediaHome library in
the Library category of the Options window.
At least one item must be selected.
Delete from hard disk
Deletes an item or a whole stack from the Nero MediaHome li-
brary and from your hard drive.
At least one item must be selected.
See also
Lower Taskbar →45
5.3 List of Marked Items
If you hover over a photo, video (Photos & Videos screen), music album or track (Music
screen) thumbnail, an icon is displayed in the upper right corner. Enable the icon to mark
the thumbnail. This way, you can make a selection. Click the Marked entry below the main
screen entry (in the navigation tree on the left) to display only your list of marked items.
Another click on the marked icon removes the respective item from the Marked list.
Click the Remove All Markers button on the upper taskbar of the Marked screen to remove
the whole preselection and start a new sample. A preselection may be useful if you want to
start an instant slide show that plays back only selective photos, or if you want to burn an
Audio CD of selected tracks.
By default your selected photos and videos are sorted in the manual order in which you have
added the items. Click the button on the upper taskbar to change the sorting order
(view arrangement).
Double-clicking a photo or video in your selection displays either a photo preview (Viewing
Photos screen) or the Playback screen (videos). Double-clicking a track starts its playback.
5.4 Playlists
Your existing playlists are listed under the Music main entry in the navigation tree on the left.
If you click one of your playlists, the content is shown in a numbered order (the order you
added the single tracks or albums to the list) in detailed browsing view.
If you want to create playlists, click the button on the lower taskbar of the music brows-
ing screen. A window is opened where you can enter a name for the new playlist.
If you want to add an additional track to an existing playlist, simply drag the selected track
from the browsing screen to the respective playlist on the navigation tree.
Just like on the music browsing screen, double-clicking a single item in the detailed browsing
view starts its playback. Playback controls are displayed on the lower taskbar. Switching to

Music
Nero MediaHome 49
another screen will not stop the playback. A small display in the lower left corner of the main
window stays visible and shows the title and play back time. You can click this display to get
back to the playlist. You can also add more tracks while the actual list is playing as back-
ground audio.
5.5 Starting Music Playback (Library or Playlist)
The following requirement must be fulfilled:
▲ Desired tracks are available in the application.
To play back tracks, albums, or a playlist, proceed as follows:
1. If you want to play back tracks or an album:
1. Click the Music main entry in the navigation tree on the left.
The music browsing screen is displayed.
2. Select the respective stack, album or track you want to play back and click the but-
ton on the lower taskbar.
Playback is started. Switching to another screen will not stop the playback. A small
display in the lower left corner of the main window stays visible and shows the title and
play back time. You can click this display to get back to the music browsing screen.
If you selected your album from a stack that contains more than one album, the play-
back is automatically continued with the following album. Likewise, if you selected the
check box of a single track in an album, the playback is automatically continued with
the following tracks.
2. If you want to play back a playlist:
1. Click the respective playlist entry (below the Music main entry) in the navigation tree on
the left.
2. Click the button on the lower taskbar.
Playback is started. Switching to another screen will not stop the playback. A small
display in the lower left corner of the main window stays visible and shows the title and
play back time. You can click this display to get back to the Playlist screen.
You have started the playback of your tracks, albums, or of a playlist.
5.6 Creating a Playlist
To create a playlist in the application, proceed as follows:
1. Click the Music main entry in the navigation tree on the left.
The music browsing screen is displayed.
2. Select multiple tracks (detailed browsing view) by presssing the [CTRL] key on your
keyboard and keeping it pressed while selecting the desired tracks.
If you want to add a whole album to your playlist, click the cover art and all album
items will be selected. If you want to add whole stacks to your playlist, stay in the
overview of the browsing screen and select the desired stack.

Music
Nero MediaHome 50
3. Choose the Playlist entry from the menu on the lower taskbar.
A window is opened.
4. Enter a name for your new playlist in the input field and click the OK button.
The new playlist is displayed, the content is shown in a numbered order (the order you
added the single tracks or albums to the list). A new entry is added to the navigation
tree.
5. If you want to add more tracks to your playlist:
1. Return to the music browsing screen.
2. Select a desired track, a selection of tracks, an album or a stack.
3. Choose the Playlists entry from the menu on the lower taskbar.
A window shows your existing playlist.
4. Choose the respective playlist you want to add the tracks to.
The content is added to your playlist.
6. If you want to change the order of the tracks in your playlist, drag single tracks to the
desired position.
You have created a playlist from an individual selection of tracks. You can now start
the playback or publish your project.
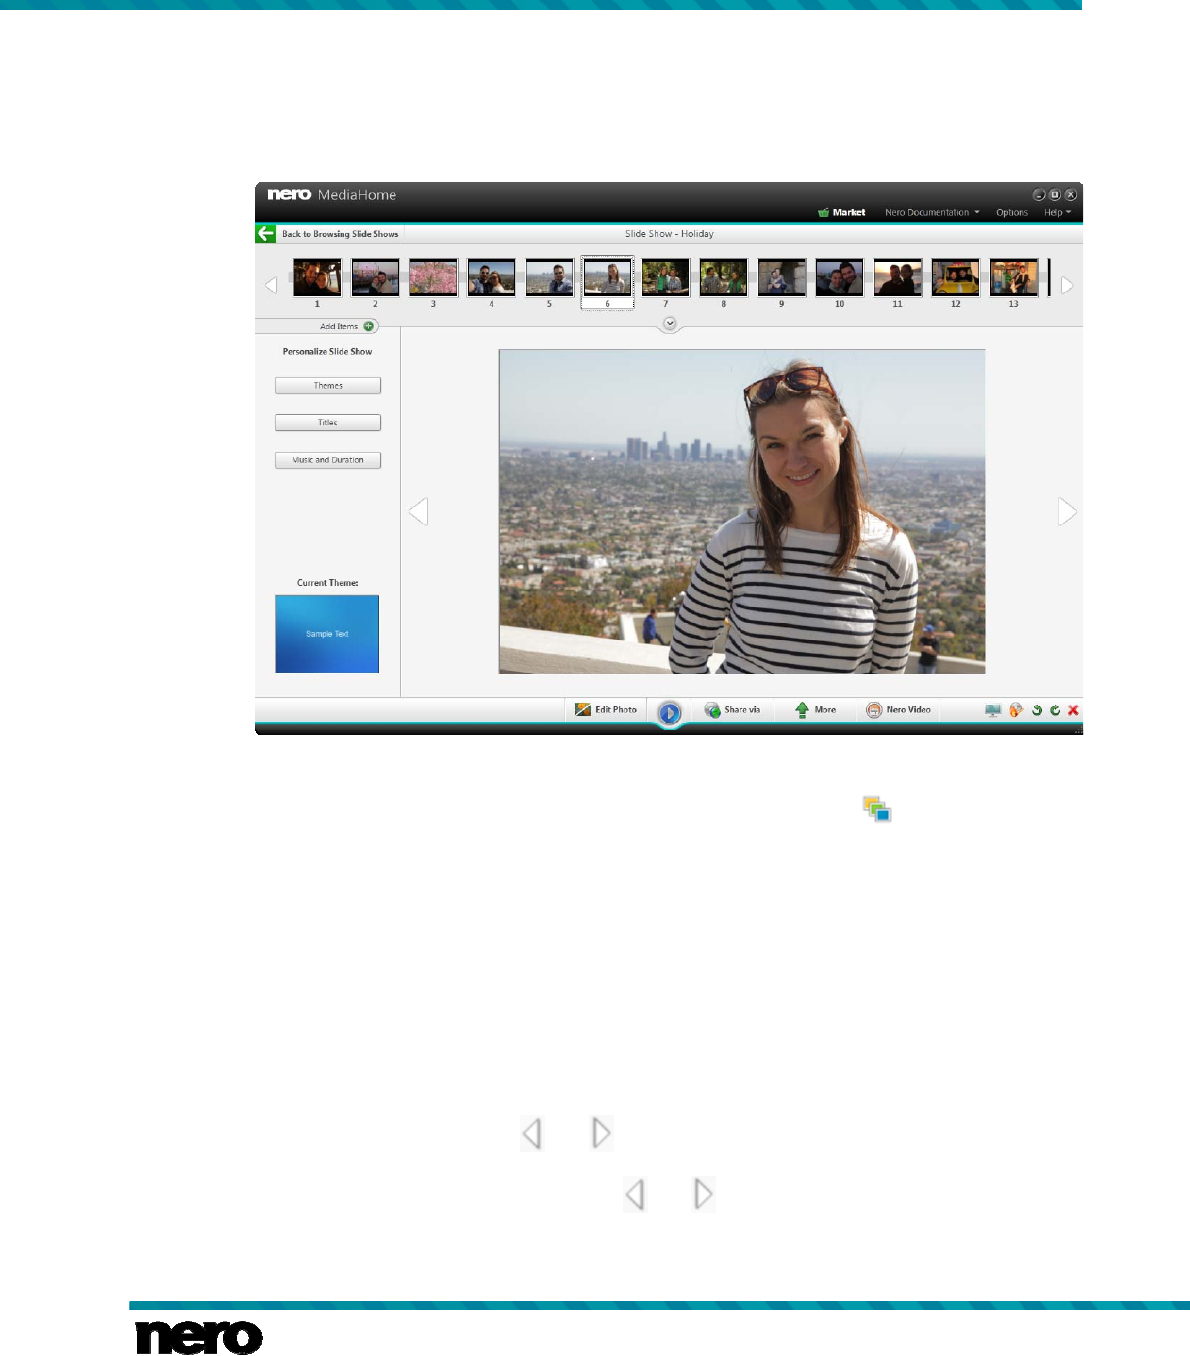
Slide Shows
Nero MediaHome 51
6 Slide Shows
Your slide show compilations are listed below the Slide Shows main entry in the navigation
tree; you can always open or edit existing creations from there.
Slide Show screen
If you want to create additional slide shows, there are several possibilities: Either click the
Create New button on the slide shows browsing screen, or click the menu on the lower
taskbar of the slide show or the photo and video browsing screen and select the Slide Show
entry. In either case, a window is opened where you can enter a name for the new slide
show before it is displayed in the Slide Show screen as well as listed below the Slide
Shows main entry (in the navigation tree on the left).
Available on each Slide Show screen are a preview area to preview the single items of the
slide show compilation, and a thumbnail strip in the upper area of the screen. Clicking one of
the buttons in the Personalize Slide Show area on the left opens the Personalize Slide
Show window. You can choose from the various templates, add titles, browse for your per-
sonal background music or adapt the volume of the background music. The currently select-
ed template (if any) is also visible in the left- and rightmost thumbnail on the thumbnail strip.
The thumbnail strip shows all items included in your slide show. You can navigate through a
long thumbnail strip using the and buttons to its left and right. Click a thumbnail to
choose the respective photo or video and display it in the content area. You can also skip to
the next or previous photo by clicking the and buttons to the left and right of an item in
the content area. Drag any thumbnail on the strip to the preferred position to change the
order of the items in your slide show.

Slide Shows
Nero MediaHome 52
The following buttons are available on the thumbnail strip:
Add Items
Opens Nero MediaBrowser. You can choose photos and videos to
be added to the slide show.
See the respective chapter for details about the handling of Nero
MediaBrowser.
Expands the display of the thumbnail strip over the full size of the
screen. This overview may be useful while you are bringing the items
of your slide show into the correct order.
Click the Collapse the storyboard button to scale down the thumb-
nail strip again.
See also
Lower Taskbar (Slide Show Screen) →54
Personalize Slide Show Window →55
Creating a Slide Show →56
6.1 Upper Taskbar
The following additional setting options are available on the upper taskbar of the Slide show
screen:
Slider
Zoom Zooms into and out of the browsing view.
Button
Displays all projects in a thumbnail view. This view is selected by
default.
Button
Lists all projects in a detailed view that displays the titles with small
thumbnail preview sorted by category (slide shows, albums, cards
etc.).
Button
Opens the Media Info tab in the right screen column that shows
information about the metadata of the selected item. If available, you
can see details like creation date or type.
Click the button on the upper taskbar again to close the tab.
Slide Shows
Nero MediaHome 53
6.2 Lower Taskbar
The following setting options are available on the lower taskbar of the slide shows browsing
screen:
Button
Opens a Windows Explorer window that lets you browse for and
open additional media stored on your computer.
Menu
Opens a window where you can enter a name for your new compila-
tion before it is displayed below the Slide Shows main entry (in the
navigation tree on the left) as well as in the overview.
Button
Displays a full screen preview of the selected photobook or plays
back your slide show compilation.
Button
Opens your existing compilation in the respective editing screen.
Menu
Displays the share options you can choose from. You can send
items via e-mail or publish content to an Internet community.
At least one item must be selected.
Menu
Displays more features.
Button
Allows you to select a device to which you can stream the currently
selected item(s).
Button
Opens the Burn window that lists all available burn options to
choose from. You can also choose to copy an entire disc.
See also
More Features →53
6.2.1 More Features
The following entries are available in the menu in the Projects screen:
Nero Video
Moves the respective slide show to Nero Video for expert editing.
Only available with a Nero 2014 installation. Nero Video is an appli-
cation that is automatically installed during the main installation pro-
cedure of your program. Please see the separate user manual for full
instructions.
Only available for slide shows.

Slide Shows
Nero MediaHome 54
Delete Project
Deletes an item from Nero MediaHome and from its folder on your
computer.
At least one item must be selected.
Rename
Enables the title input field where you can enter the desired new
name for the item.
An item must be selected.
Save as Allows you to save your slide show as a video file.
An item must be selected.
See also
Lower Taskbar →53
6.3 Lower Taskbar (Slide Show Screen)
When you open a slide show for further editing, the Slide Show screen is displayed.
The following setting options are available on the lower taskbar:
Button
Displays the Editing Photos screen in which you can view, edit, and
enhance your photos.
At least one item must be selected. Only available for photos.
Button
Starts playback of the slide show in full screen view.
Menu
Displays the share options you can choose from. You can publish
slide shows to an Internet community.
Menu
Displays the Save as entry which allows you to save your slide show
as a video file.
Button
Nero Video Opens Nero Video for further editing of your slide show.
Button
Allows you to select a device to which you can stream the currently
selected item(s).
Button
Opens the Burn window that lists all available burn options to
choose from. You can also choose to copy an entire disc.
Slide Shows
Nero MediaHome 55
Button
/ Rotates a selected item 90° to the left or to the right.
Button
Removes a selected item from your compilation.
See also
Slide Shows →51
Personalize Slide Show Window →55
Creating a Slide Show →56
6.4 Personalize Slide Show Window
The Personalize Slide Show window is opened when you click one of the buttons in the
Personalize Slide Show area on the left of the Slide Show screen. Three tabs are available
in the window, corresponding to the buttons in the Personalize Slide Show area.
6.4.1 Themes
You can choose from various slide show templates on the left of the Themes tab in the Per-
sonalize Slide Show window. Select a template to see an animated preview on the upper
right of the tab. In addition, the following setting options are available:
Check box
Apply pan-and-
zoom effects for
pictures
Enables pan-and-zoom effects and fading transitions between the
pictures. This effect gives the slide show an additional feeling of
motion.
If the check box is cleared, the wizard ignores pan-and-zoom effects.
See also
Personalize Slide Show Window →55
6.4.2 Titles
The following setting options are available on the Titles tab in the Personalize Slide Show
window:
Check box
Skip intro
Skips the intro of the selected theme and starts the slide show right
with the first photo.
Check box
Skip outro
Skips the outro of the selected theme and ends the slide show right
after the last photo.

Slide Shows
Nero MediaHome 56
Input area
Opening title
Shows the default text for the intro title of the selected template. You
can modify the text. Other text attributes such as font and alignment
are defined by the template and cannot be modified.
Input area
Closing title
Shows the default text for the outro text of the selected template.
You can modify the text. In contrast to the intro text, line breaks are
allowed. Other text attributes such as font and alignment are defined
by the template and cannot be modified.
See also
Personalize Slide Show Window →55
6.4.3 Music and Duration
The following setting options are available on the Music and Duration tab in the Personal-
ize Slide Show window:
Area with input field
Slide duration
Sets the default duration of still pictures in your slide show. The min-
imum possible duration is one second, the maximum is 60 seconds.
The default duration is three seconds.
Area with check box
and slider
Video Sound
Specifies the volume level of the audio added by the template in
contrast to the volume level of all other audio tracks which are al-
ready available in the timeline (e.g. sound of video file). If you do not
move the slider, both Video and Background music have the same
audio level. You can also select the check box above the slider if you
prefer to mute the video sound.
Area with drop-down
menu
Background Music
Specifies the background audio source. The theme music is used by
default. You can also select the Use own music entry if you prefer
your own music, or disable the background music altogether.
See also
Personalize Slide Show Window →55
6.5 Creating a Slide Show
The following requirement must be fulfilled:
▲ Desired photos are available in the Photos & Videos library group.
To create a slide show, proceed as follows:
1. Click the Photos & Videos main entry in the navigation tree on the left.
The photo and video browsing screen is displayed.
2. Select photos or videos (detailed browsing view) or whole stack(s) (overview) that you want
to add to your slide show.

Slide Shows
Nero MediaHome 57
3. Choose the Slide Show entry from the menu on the lower taskbar.
A window is opened.
4. Enter a name for your new slide show in the input field and click the OK button.
The new slide show is displayed in the Slide Show screen. The thumbnail strip shows
all items you selected.
5. If you want to add more items to the slide show:
1. Click the Add items button.
Nero MediaBrowser is opened.
2. Choose the desired photos or videos and click the Add button.
3. Click the Close button.
The photos or videos are added to the end of the slide show.
6. If you want to change the order of the items in your slide show, drag any thumbnail on the
strip to the desired position.
7. If you want to personalize your slide show, choose your preferred slide show theme in the
Personalize Slide Show area. (Proceed as described in the Personalize Your Slide Show
chapter.)
You have created a slide show. You can now start the playback or publish your pro-
ject.
6.6 Saving Slide Show as a Video File
Nero MediaHome allows you to save your slide shows as video files. That way, you can cre-
ate files that can be played on any computer as well as on many other devices, depending
on the output format you select.
The following requirement must be fulfilled:
▲ You have created a slide show.
To save a slide show as a video file, proceed as follows:
1. Click the Slide Shows main entry in the navigation tree on the left.
The slide shows browsing screen is displayed.
2. Select the desired slide show from the navigation tree.
The [slide show name] screen is displayed.
3. Click the > Save as menu entry in the lower taskbar.
The Save Slide Show as window is opened.
4. Select the desired Name, Format, Resolution, and the target folder to which you want to
save the video file.
5. Click the OK button.
You have saved your slide show as a video file.
Photo Products
Nero MediaHome 58
7 Photo Products
The Photo Products main entry available in the navigation tree on the left allows you to
create, edit, preview, and purchase photobooks, calendars, and cards. The entry also lists all
photo products you have created so you can conveniently open and edit them from there.
To create a photo product project, there are several possibilities:
Select the desired product on the initial Creating Photo Product screen. (Only dis-
played before you have started a photo product project.)
Click the Create New button on the photo products browsing screen.
Click the menu on the lower taskbar of the photo products and select the desired
entry.
Click the menu on the photo and video browsing screen and select the desired en-
try.
Select the Photo Products tile in the Nero application launcher.
In any case, a window is opened where you can enter a name for the new project before it is
displayed in its creating screen (for example Creating Photobook).
In addition, when you start creating your photo product, you are asked to select
your country from a drop-down menu. Ordering of photo products is only possible
within the listed countries.
If you are already logged in to your account, a pop-up window will inform you in
case Nero does not ship photo products to your region.
Available on each creating screen are a work and/or preview area to create, edit, and pre-
view your photo compilation, and different tabs displayed in the lower area of the screen.
Click the button in the footer of the screen to create and view your photo
product in convenient full screen mode.
With the creation of a new photobook, calendar, or photo card you are guided through easy
steps before you can start the actual editing – Edit Your Project.
In an additional preview step – Preview Your Project – you can thereafter verify your com-
pilation to finally place a perfect photo product order.
Your photo product is automatically saved after each change that is made. If you
prefer to continue editing or to order later on, simply return to the browsing
screen. Click the button in the upper left of the screen (header) to return to
the previous screen.
See also
Select a Product →59
Photo Products
Nero MediaHome 59
Select a Photo Project Theme →60
Select Your Photobook Photos →61
Edit Your Photo Project →63
Preview Your Project →68
Creating an Instant Photobook →70
Creating a Custom Photobook →71
Creating a Calendar →73
7.1 Select a Product
Step 1 - Select a Product - is automatically displayed with the creating screen when you
start the compilation of a new photo product in Nero MediaHome. No preview is shown as
long as you have not chosen your product basics on the Products tab in the lower area of
the screen.
On the Products tab you can first pick your preferred category such as a hard or a soft cov-
er for photobooks, or either a flat or a folded card. Then you can choose from available sizes
and formats such as landscape or portrait. A respective example preview of your product is
displayed in the work area.
The following setting options are available on the Products tab just like on any other tab in
the creating screen:
Button
( )
Expands (or downsizes) the tab for a better overview of available
options.
Button
Return to the higher selection level.
Button
/
Scrolls up and down the content view and displays options currently
outside the visible area.
When you are satisfied with your choices in this step, click the Next step button on the lower
taskbar. In addition, the following setting option is available on the lower taskbar:
Display Field
Quantity
Displays the quantity and price of your photo products planned to
order. The price is automatically adjusted to the formats and catego-
ries you choose. Shipping costs are not included.
Click the button in the footer of the screen to create and view your photo
product in convenient full screen mode.
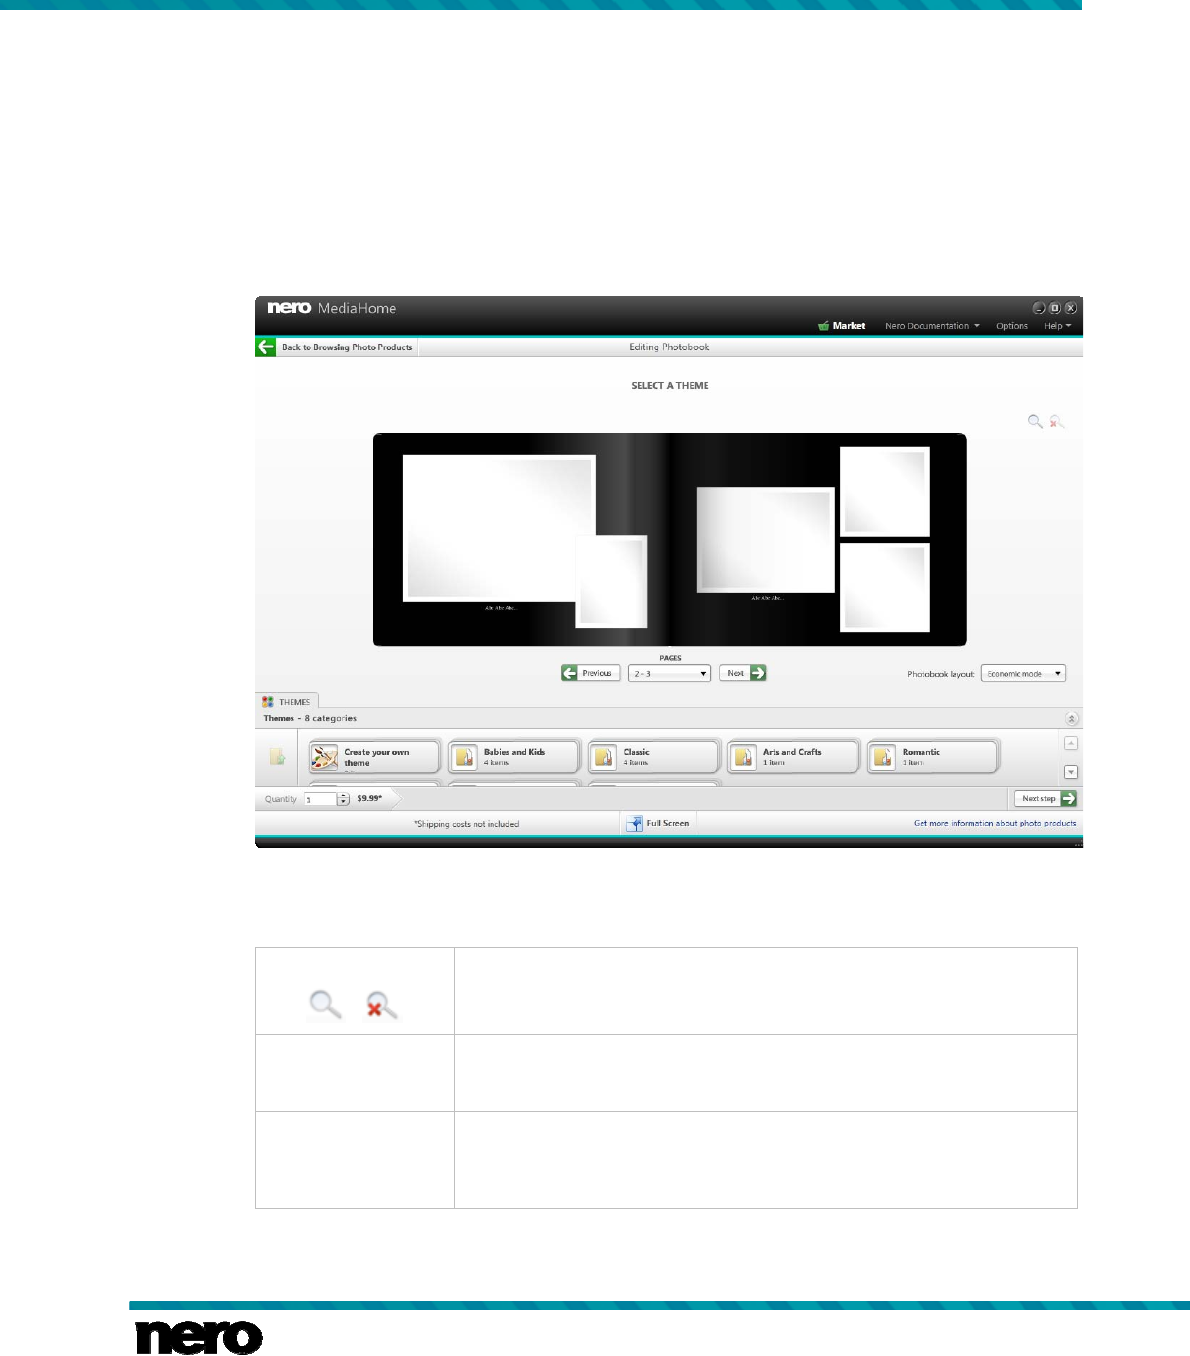
Photo Products
Nero MediaHome 60
See also
Photo Products →58
7.2 Select a Photo Project Theme
In step 2 - Select a Theme - your photo project is displayed in the work area of the screen.
You can now select a theme from the Themes tab in the lower area of the screen. The photo
product preview is instantly adapted to your chosen theme.
Select a Theme
For Photobook projects, in addition to showing your project, the following setting options are
now available in the work area:
Buttons
/
Zooms on the currently displayed double-page spread in the work
area, and accordingly unzooms all.
Button
Previous Scrolls to the previous double-page spread.
Drop-down menu
Pages
Shows the page numbers currently displayed in the work and pre-
view area. You can select any page number to directly open the
respective display.
Photo Products
Nero MediaHome 61
Button
Next Scrolls to the next double-page spread.
Drop-down menu
Photobook layout
Lets you choose between two layout modes.
Economic mode (selected by default) limits the number of pages of
your book to the smallest possible. In Design mode you can add
pages; the layout will have as much variety as possible.
Displayed only after you chose your theme.
For Calendar projects, in addition to showing your project, the following setting options are
now available in the work area:
Drop-down menu
Starting Month
Displays possible months to start with your calendar. You can
choose to start your calendar the next month from today.
Drop-down menu
Language
Sets your preferred language for calendar terms (days of the weeks,
months).
Card projects show their front, back as well as the inside (if you chose a folded card) in the
work area.
When you are satisfied with your choices in this step, click the Next step button on the lower
taskbar. You can always go back to the previous step by clicking the Previous step button.
In addition, the following setting option is available on the lower taskbar:
Display Field
Quantity
Displays the quantity and price of your photo products planned to
order. Shipping costs are not included.
Click the button in the footer of the screen to create and view your photo
product in convenient full screen mode.
See also
Photo Products →58
7.3 Select Your Photobook Photos
In the additional Select Your Photos step for photobooks your preselected photos are dis-
played in a thumbnail view.
A capacity bar in the upper area of the screen shows the number of photos you have already
added. The capacity bar also indicates if additional pages are required. A Remove icon is
displayed in the lower right of each photo’s thumbnail when you hover over it with your cur-
sor. You can click the icon to adapt your selection.
Photo Products
Nero MediaHome 62
The following setting options are available:
Button
Sort by date Sorts selected photos by date.
Button
Remove all
Removes all photos from your compilation.
To remove a single photo, a Remove icon is displayed in the lower
right of a thumbnail when you hover over it with your cursor. Click the
icon to adapt your selection.
Display
Cover
Displays the currently selected cover photo in a thumbnail. To
change and choose your cover photo, drag your preferred item to the
display.
Button
Add photos from
Windows Explorer
Opens Windows Explorer which allows you to browse for your pho-
tos and add them to the project.
Button
Add photos from
Nero MediaBrows-
er
Opens Nero MediaBrowser which allows you to browse for your pho-
tos and add them to the project.
When you are satisfied with your choices in this step, click the Next step button on the lower
taskbar. You can always go back to the previous step by clicking the Previous step button.
An additional Start over button is now available that returns to the first step of the preselec-
tion. In addition, the following setting option is available on the lower taskbar:
Display Field
Quantity
Displays the quantity and price of your photo products planned to
order. Shipping costs are not included.
Click the button in the footer of the screen to create and view your photo
product in convenient full screen mode.
See also
Photo Products →58

Photo Products
Nero MediaHome 63
7.4 Edit Your Photo Project
In the Edit Your Project step your photo project is ready to be edited. Click the Customize
button on the lower taskbar to display more detailed editing features and tabs.
Edit Your Project
When you are satisfied with your choices in this step, click the Preview button on the lower
taskbar. You can always go back to the previous step by clicking the Previous step button
or click the Start over button that returns to the first step of the preselection. In addition, the
following setting option is available on the lower taskbar:
Display field
Quantity
Displays the quantity and price of your photo products planned to
order. Shipping costs are not included.
Your photo product is automatically saved after each change that is made. If you
prefer to continue editing or to order later on, simply return to the browsing
screen. Click the button in the upper left of the screen (header) to return to
the previous screen.
Click the button in the footer of the screen to create and view your photo
product in convenient full screen mode.

Photo Products
Nero MediaHome 64
See also
Photo Products →58
Photo Project Work Area →64
Photo Project Tabs →67
7.4.1 Photo Project Work Area
The work area shows your photo project in its chosen layout. In addition, the following setting
options are available in the work area for every photo project:
Buttons
Reverses the last action/editing step.
Button
Repeats the last action/editing step.
Button
Cuts a selected photo, clipart or text from the page displayed in the
work area. You can paste the item back onto any page of your photo
project.
Button
Copies a selected photo, clipart or text from the page displayed in
the work area. You can paste the item onto any page of your photo
project.
Button
Pastes an item onto any selected page of your photo project.
Only active after you cut or copied a photo, clipart or text from the
work area.
For Photobook projects, the following setting options are available in the work area:
Display fields
Worktable
Works like a clipboard. The tables on the left and right of the work
area list a selection of photos you either previously deleted from a
photobook page (e.g. by exchanging one photo through another) or
by dragging items from the My Photos tab. This way the worktables
help to compile shortlists.
Button
Shares the background image, clipart and text across both pages. As
only one background image can be kept for a double-page spread, a
pop-up window asks if you prefer to keep the current left or right
template.
Buttons
/
Zooms on the currently displayed double-page spread in the work
area, and accordingly unzooms all.

Photo Products
Nero MediaHome 65
Button
Previous Scrolls to the previous double-page spread.
Drop-down menu
Pages
Shows the page numbers currently displayed in the work and pre-
view area. You can select any page number to directly open the
respective display.
Button
Next Scrolls to the next double-page spread.
For Calendar projects, the following setting options are available in the work area:
Buttons
Zooms either on the collage or grid of your calendar; or you can
see the calendar as a whole. Depending on the calendar catego-
ry, you can also add photos, text and clipart to the grid.
Only available for particular calendar categories.
Drop-down menu / list
Pages
Lists the pages. You can select any page to directly open the
respective display.
For Card projects, the following setting options are available in the work area:
List
Pages
Lists the front, back, and inside (depending on card type) pages of
your card. Click the respective entry to edit each page of your card
separately in the work area.
If you select single items in the work area, respective editing options are displayed in seper-
ate windows. Click an editing option button to use it on your selected item in the work area.
Following editing options are available for photos, clipart and text areas:
Move Lets you drag your photo to a preferred position on the photobook
page.
Resize
Adds arrows to your cursor in the work area. Keep the left
mouse button pressed and drag the respective item larger or smaller.
A Width entry is available for adapting text areas instead.
Width
Adds arrows to your cursor in the work area. Keep the left
mouse button pressed and drag the respective item to your preferred
width. Height is adjusted automatically depending on the number of
text lines and font used.
Only available for text areas.

Photo Products
Nero MediaHome 66
Rotate
Adds arrows to your cursor in the work area. Keep the left
mouse button pressed and drag the respective item to your preferred
tilt angle.
Edit photo
Opens the Edit Photo window where you can add additional effects
and adjust your photo.
Only available for photos.
Crop
Highlights sides and corners of your selected photo. Keep the left
mouse button pressed and drag the photo to your preferred cropping
size.
Only available for photos.
Place in front Places the selected item as topmost of two or more overlapping
items on your photobook page.
Send to back Places the selected item as lowermost of two or more overlapping
items on your photobook page.
Set as background Uses the selected photo as full page background image.
Only available for photos.
Opacity
Adds arrows to your cursor in the work area. Keep the left
mouse button pressed and drag left (low) or right (high) to adjust the
opacity of your selected photo.
Only available for photos.
Delete Deletes the selected item from the photo project.
Following editing options are available for backgrounds:
Rotate clockwise /
counterclockwise Rotates the background picture 90° to the left or right.
Zoom
Adds arrows to your cursor in the work area. Keep the left
mouse button pressed and drag left (zoom out) or right (zoom in) to
adjust the zoom factor of your selected background image.
Pan
Adds arrows to your cursor in the work area. Keep the left
mouse button pressed and pan your selected background image into
position.
Panning is not possible if your background image matches the page
size. If you want to pan, zoom into the background image in a first
step and select the preferred display detail in a second step.
Photo Products
Nero MediaHome 67
Brightness
Adds arrows to your cursor in the work area. Keep the left
mouse button pressed and drag left (darker) or right (lighter) to ad-
just the brightness of your selected background image.
Delete Deletes the selected item from the photo project.
See also
Edit Your Photo Project →63
7.4.2 Photo Project Tabs
Following tabs are available in the lower area of the creating screen:
My Book
Displays thumbnails of your photobook pages. Drag any item on the
tab to the preferred position to change the page order in your photo-
book.
Clicking the additional Add Sheet button in the upper right of the tab
adds a sheet (front and back side) between the currently displayed
pages of your photobook. Clicking the Remove Sheet button removes
the right sheet of the currently displayed pages from your photobook.
The front and back side of the sheet will be removed. Depending on
the cover style and format you selected for your project, a minimum of
pages is required.
These buttons are only available with customized editing.
Only available for photobooks.
Templates
Displays background elements of the selected theme and layouts to
choose from. Drag your preferred background or layout from the tab to
the respective page in the work area.
You can place your cursor on an item’s thumbnail to display a preview.
It will fade out when you move the cursor away.
Layouts can be dragged to blank pages or changed on pages with
blank photo place holders.
Only available for photobooks.
My Photos
Displays thumbnails of your selected photos. Drag items from the tab
to your preferred photo place holder in the work area.
Photos that are already added to your project are marked with a check
mark icon. You can place your cursor on an item’s thumbnail to display
a preview. It will fade out when you move the cursor away.
You can of course edit any photo in the work area such as move,
resize and rotate it to adjust the respective page’s layout.
Clicking the additional Add photos button in the upper right of the tab
opens Nero MediaBrowser where you can browse for more photos.

Photo Products
Nero MediaHome 68
Clipart
Displays clipart in various categories such as birthday or vacations.
Drag items from the tab to a page or place it on a photo in the work
area.
You can place your cursor on an item’s thumbnail to display a preview.
It will fade out when you move the cursor away.
You can of course edit the chosen item in the work area such as
move, resize and rotate it to adjust the respective page’s layout.
Only available with customized editing.
Backgrounds
Displays background elements of various themes in addition to the
currently selected theme you chose (in the second preselection step).
Drag your preferred background from the tab to the work area.
You can place your cursor on an item’s thumbnail to display a preview.
It will fade out when you move the cursor away.
Only available with customized editing.
Borders
Displays numerous borders sorted in different categories for a better
overview. Drag your preferred border from the tab to a photo in the
work area.
Only available with customized editing.
Text
Displays a single ABC item that you can drag to your preferred posi-
tion in the work area to add a blank text area.
You can of course edit this blank text area in a first step by moving or
rotating it as well as by adapting its widths to adjust the respective
page’s layout. Height is adjusted automatically depending on the num-
ber of text lines and font used.
You can also select the blank text area and display an input field and
setting options for text layout on the Text tab. Enter your individual text
into the input field and adjust your preferred layout such as font color.
See also
Edit Your Photo Project →63
7.5 Preview Your Project
The Preview Your Project step is displayed when you are satisfied with your creation in the
preselection and editing steps and click the Preview button on the lower taskbar.
For Photobook projects, the following setting options are available:
Buttons
/
Zooms on the currently displayed double-page spread in the pre-
view area, and accordingly unzooms all.

Photo Products
Nero MediaHome 69
Button
Previous Scrolls to the previous double-page spread.
Button
Next Scrolls to the next double-page spread.
Drop-down menu / list
Pages
Lists the pages (page numbers). You can select any page (page
number) to directly open the respective display.
For Calendar projects, the following setting options are available in the work area:
Buttons
Zooms either on the collage or grid of your calendar; or you can
see the calendar as a whole.
Drop-down menu / list
Pages
Lists the pages. You can select any page to directly open the
respective display.
When you are satisfied with your photo project, click the Order button on the lower taskbar.
You can always go back to the editing options by clicking the Back button or click the Start
over button that returns to the first step of the preselection. In addition, the following setting
option is available on the lower taskbar:
Display field
Quantity Displays the quantity and price of your photo project planned to order.
Your photo product is automatically saved after each change that is made. If you
prefer to continue editing or to order later on, simply return to the browsing
screen. Click the button in the upper left of the screen (header) to return to
the previous screen.
Click the button in the footer of the screen to create and view your photo
product in convenient full screen mode.
See also
Photo Products →58
Photo Products
Nero MediaHome 70
7.6 Creating an Instant Photobook
To create an instant photobook in Nero MediaHome, proceed as follows:
1. Click the Photos & Videos main entry in the navigation tree on the left.
The photo and video browsing screen is displayed.
2. Select all the photos you want to add to your instant photobook by pressing the [CTRL] key
on your keyboard and keeping it pressed while selecting the desired items.
3. Choose the Instant Photobook entry from the Create New menu on the lower taskbar.
A window is opened that asks you to enter a name for your new photobook.
4. Enter a name for your new photo product into the input field.
5. Click the OK button.
Your photobook is instantly assembled and displayed in the Creating Photobook
screen. Nero MediaHome automatically chooses the best available format for the
amount of photos selected.
The Front page is displayed in the work area. You can select any photobook page from
the My Book tab in the lower area of the screen.
Click the button in the footer of the screen to create and view your photo
product in convenient full screen mode.
6. Select the text element on the front page.
An input field and setting options for text layout are displayed on the Text tab in the low-
er area of the screen. A Text window is opened in the work area.
7. Enter your individual photobook title into the input field on the tab.
You can also adjust your preferred text layout such as font color. In addition, you
can edit the selected text element in the work area by moving or rotating it as well
as by adapting its widths to adjust the respective page’s layout. Choose the
respective editing option from the Text window.
8. If you want to add more captions, select any photobook page from the My Book tab and
repeat the last two action steps.
You can make modifications to your instant photobook just like you adjust your
personalized photobook. You can for example rotate, crop or edit photos, change
background themes or add background pictures, or adjust clipart elements.
9. Click the Preview button in the lower right.
The preview of your project is displayed. You can click through the pages to review the
layout of your instant photobook before you place your order.
Photo Products
Nero MediaHome 71
If you prefer to make modifications or continue editing, you can use the Back
button in the lower right of the screen to go back to the previous step, or even
click the Start over button that returns to the first step of the preselection. When
you are satisfied with your compilation, click the Order button and the order pro-
cess is started.
If you prefer to order later on, simply click the button in the upper left of the
screen (header) to return to the Browsing Photo Products screen.
You have created your instant photobook in Nero MediaHome.
See also
Photo Products →58
7.7 Creating a Custom Photobook
To create your custom photobook in Nero MediaHome, proceed as follows:
1. Click the Photos & Videos main entry in the navigation tree on the left.
The photo and video browsing screen is displayed.
2. Select all the photos you want to add to your photobook by pressing the [CTRL] key on your
keyboard and keeping it pressed while selecting the desired items.
3. Choose the Custom Photobook entry from the Create New menu on the lower taskbar.
4. A window is opened that asks you to enter a name for your new photobook.
5. Enter a name for your new photo product into the input field.
6. Click the OK button.
The Creating Photobook screen is displayed showing the Select a Product step. With
the creation of each new photobook, calendar or card, you are guided through easy
steps before you can start the actual editing.
Your photo product will be saved automatically after each change that you make.
Click the button in the footer of the screen to create and view your photo
product in convenient full screen mode.
7. Choose your preferred photobook category such as softcover or hardcover on the Products
tab in the lower area of the screen.
A preview is displayed in the work area. The price in the lower left of the screen is
adapted to the chosen product.
8. Choose your preferred book format from the Photobook options drop-down menu on the
right of the work area and click the Next step button in the lower right of the screen.
The Select a Theme step is displayed.
9. Choose your preferred layout from the Themes tab.
Photo Products
Nero MediaHome 72
The photo project preview is instantly adapted to your chosen theme; you can use the
Previous and Next buttons in the work area to view the arrangements of the single pho-
tobook pages.
An additional Photobook layout drop-down menu is displayed in the lower right of the
work area. It lets you choose between two layout modes: The Economic mode (select-
ed by default) limits the number of pages of your book to the smallest possible. In De-
sign mode you can add pages; the layout will have as much variety as possible.
10. Choose your preferred layout mode from the Photobook layout drop-down menu and click
the Next step button.
The Select Your Photos step is displayed.
11. To add photos, either click the Add photos from Windows Explorer or the Add photos
from Nero MediaBrowser button.
12. The respective window is opened.
13. Select the photos you want to add to your photo project and click the Add button.
Thumbnails of your chosen photos are displayed in the work area. A capacity bar in the
upper area of the screen shows the number of photos you have already added. The ca-
pacity bar also indicates if additional pages are required.
You can change the order of the selected photos. Simply drag any thumbnail to
the desired position.
You can also remove single photos again. A Remove icon is displayed in the
lower right of a thumbnail when you hover over it with your cursor. Click the icon
to adapt your selection.
14. Drag your preferred cover photo to the Cover display on the left and click the Next step
button.
The Edit Your Project step is displayed with the Front page opened in the work area.
You can select any photobook page from the My Book tab in the lower area of the
screen. Thumbnails of the single photobook pages are displayed on this tab.
Thumbnails of your chosen photos are displayed on the My Photos tab. A photo that is
added to your photobook is marked with a check mark icon on this tab. You can place
your cursor on an item’s thumbnail to display a preview. It will fade out when you move
the cursor away.
15. Select a page from the My Book tab.
The selected page is displayed in the work area.
For a more detailed view, click the button in the work area and choose from
various options in the Zoom window.
16. Drag a desired photo from the My Photos tab to your preferred picture holder in the work
area.
Photo Products
Nero MediaHome 73
A photo that is added to your photobook is marked with a check mark icon on the My
Photos tab.
In addition, the Photo window is opened. Here you can resize, rotate or crop each photo
that you add to or select in the work area. You can move a photo on the page, place it in
front of or behind other pictures or clipart elements, or even use it as the page’s full size
background picture. Choose the Edit photo editing option if you want to modify your
photo by for example removing red eyes or adding color effects.
17. Adjust the photo to your preferences and finally click the X button to close the Photo
window.
18. Repeat the last three action steps to place your photos into the preferred picture holders of
your photobook.
19. If you have photos left and want to add more sheets to your book, select a double-page
spread from the My Book tab and click the Add sheet button in the upper right of the tab.
An additional sheet (front and back side) is added between the selected and currently
displayed pages of your photobook. The layout is automatically adjusted to your chosen
template.
20. If you want to change the page order in your photobook, drag any page on the My Book tab
to the preferred position.
21. Click the Preview button in the lower right.
The preview of your project is displayed. You can click through the pages to review the
layout of your photobook before you finally place your order.
If you prefer to make modifications or continue editing, you can use the Back
button in the lower right of the screen to go back to the previous step, or even
click the Start over button that returns to the first step of the preselection. When
you are satisfied with your compilation, click the Order button and the order pro-
cess is started.
If you prefer to order later on, simply click the button in the upper left of the
screen (header) to return to the Browsing Photo Products screen.
You have created your custom photobook in Nero MediaHome.
See also
Photo Products →58
7.8 Creating a Calendar
To create a personalized photo calendar in Nero MediaHome, proceed as follows:
1. Click the Photos & Videos main entry in the navigation tree on the left.
The photo and video browsing screen is displayed.
2. Select all the photos you want to add to your calendar by pressing the [CTRL] key on your
keyboard and keeping it pressed while selecting the desired items.
3. Choose the Calendar entry from the Create New menu on the lower taskbar.
Photo Products
Nero MediaHome 74
A window is opened that asks you to enter a name for your new calendar.
4. Click the OK button.
The Creating Calendar screen is displayed showing the Select a Product step. With
the creation of each new photobook, calendar or card you are guided through easy pre-
selection steps before you can start the actual editing.
Your photo product will be saved automatically after each change that you make.
Click the button in the footer of the screen to create and view your photo
product in convenient full screen mode.
5. Choose your preferred calendar format such as wall or desktop calendar on the Products
tab in the lower area of the screen.
A preview is displayed in the work area. The price in the lower left of the screen is
adapted to the chosen product.
6. Click the Next step button in the lower right of the screen.
The Select a Theme step is displayed.
7. Select the month you want your calendar to begin with from the Starting Month drop down
menu on the right.
8. Select the language (country) you want to use to set up your calendar grid from the
Language drop-down menu on the right. National holidays for example are entered depend-
ing on this setting.
9. Choose your preferred layout from the Themes tab.
The photo project preview is instantly adapted to your chosen theme.
10. Click the Next step button.
The Edit Your Project step is displayed.
11. Click the Add photos button in the right corner of the My Photos tab.
Nero MediaBrowser is opened.
12. Browse Nero MediaBrowser, select the photos you want to add to your calendar project and
click the Add button.
Thumbnails of your chosen photos are displayed on the My Photos tab. You can place
your cursor on an item’s thumbnail to display a preview. It will fade out when you move
the cursor away.
13. Select a calendar page from the Pages list on the left.
The selected page is displayed in the work area.
For a more detailed view, click the buttons in the pad to zoom either on the
collage or grid part of your calendar. Depending on the calendar category, you
can also add photos, text and clipart to the grid.
Only available with particular calendar categories.
Photo Products
Nero MediaHome 75
14. Drag a desired photo from the My Photos tab to your preferred picture holder in the work
area.
A photo that is added to your calendar is marked with a check mark icon on the My Pho-
tos tab.
In addition, the Photo window is opened. Here you can resize, rotate or crop each photo
that you add to or select in the work area. You can move a photo on the page, place it in
front of or behind other pictures or clipart elements, or even use it as the page’s full size
background picture. Choose the Edit photo editing option if you want to modify your
photo by for example removing red eyes or adding color effects.
15. Adjust the photo to your preferences and finally click the X button to close the Photo
window.
16. Repeat the last three action steps to fill all picture holders on all calendar pages.
17. Click the Preview button in the lower right.
The preview of your project is displayed.
18. Click through the calendar pages to review the layout of your calendar project.
Your calendar project is now ready for being ordered.
If you prefer to make modifications or continue editing, you can use the Back
button in the lower right of the screen to go back to the previous step, or even
click the Start over button that returns to the first step of the preselection. When
you are satisfied with your compilation, click the Order button and the order pro-
cess is started.
If you prefer to order later on, simply click the button in the upper left of the
screen (header) to return to the Browsing Photo Products screen.
You have created your personalized photo calendar in Nero MediaHome.
See also
Photo Products →58
Audio CD Browsing and Playback
Nero MediaHome 76
8 Audio CD Browsing and Playback
The content of a disc inserted in your disc drive is listed for playback when you choose the
respective optical disc drive entry in the navigation tree on the left. The Nero MediaHome
integrated optical disc player supports playback of DVDs and CDs.
DVD playpack and DVD Video burning is only available with Nero MediaHome
DVD Pack installed on your computer.
Nero MediaHome DVD Pack is automatically included in Nero 2014 and Nero
2014 Platinum. If you use another version of Nero MediaHome, the add-on is not
part of the application.
Playback of DTS digital surround sound in DVD and digital video files is only
available with Nero MediaHome DTS installed on your computer.
Nero MediaHome DTS is automatically included in Nero 2014 Platinum. If you
use another version of Nero MediaHome, the add-on is not part of the application.
In addition, Nero MediaHome offers a simple import of media files from data disc.
Import options are displayed when you choose the respective disc entry.
The tracks of for example an Audio CD are listed in detailed browsing view. Just like on the
music browsing screen, double-clicking a single item in the detailed browsing view starts its
playback. Playback controls are then displayed on the lower taskbar. Switching to another
screen will not stop the playback. A small display in the lower left corner of the main window
stays visible and shows the title and playback time. You can click this display to get back to
the Audio CD browsing screen.
In addition to the playback controls, a menu is available on the lower taskbar. It provi-
des the following entries:
Get CD
Information
Retrieves CD information from Gracenote.
With Gracenote MusicID Nero MediaHome can identify music files.
Identification is possible for complete original Audio CDs. So-called
metadata such as artist, title, and genre are accessed from the Grace-
note Media Database and displayed in Nero MediaHome. The identi-
fied metadata is written to the music file and is then available. In this
way your music collection is correctly tagged with all information.
Edit CD
Information
Opens the Edit CD Information window.
You can edit metadata - like add missing data into the input fields.
Click the Accept button in the lower right of the window to synchronize
the data to your file(s). The metadata is sent to Gracenote and added
into the database.
At least one item must be selected.
Audio CD Browsing and Playback
Nero MediaHome 77
Import track(s) /
Import CD Starts ripping of selected tracks or a whole Audio CD.
See also
Starting Audio CD Playback →77
Ripping From Audio CD →77
Importing From Device or Data Disc →85
8.1 Starting Audio CD Playback
To play back songs from Audio CD, proceed as follows:
1. Insert the desired Audio CD into the optical disc drive of your computer.
2. Click the entry of the respective Audio CD in the navigation tree on the left.
The music browsing screen is displayed. The tracks are listed in detailed browsing view.
3. Select the respective tracks that you want to play back and click the button on the lower
taskbar.
Playback is started.
Switching to another screen will not stop the playback. A small display in the lower left
corner of the main window stays visible and shows the title and play back time. You can
click this display to get back to the music browsing screen.
You have started the playback of your Audio CD.
See also
Audio CD Browsing and Playback →76
8.2 Ripping From Audio CD
To rip single tracks or a whole album from an Audio CD, proceed as follows:
1. Insert the respective Audio CD into the disc drive of your computer.
2. Click the entry of the respective Audio CD in the navigation tree on the left.
The Audio CD browsing screen is displayed.
3. If you want to rip a single track, select the desired track.
4. If you want to rip several tracks, keep the CTRL key pressed while selecting the desired
tracks.
5. If you want to rip the whole album, click the album art (or album art placeholder) image to
select all tracks.
6. Click the > Import track(s) / Import CD entry on the lower taskbar.
The ripping process is started. Switching to another screen will not stop the ripping. A
small display in the lower left corner of the main window stays visible and shows the
progress.

Audio CD Browsing and Playback
Nero MediaHome 78
When the ripping is completed, the library is updated.
You have saved single tracks or a whole album from an Audio CD to your computer.
See also
Audio CD Browsing and Playback →76
Video Playback from Disc
Nero MediaHome 79
9 Video Playback from Disc
The content of a disc inserted in your disc drive is listed for playback when you choose the
respective optical disc drive entry in the navigation tree on the left. Here you can view your
videos. The Nero MediaHome integrated optical disc player supports playback of DVDs and
CDs. Playback view and taskbar are displayed. Switching to full screen view is possible.
Some of the features mentioned here are only available with Nero MediaHome
Playback installed on your computer. Nero MediaHome Playback plays all videos
from your library, regardless of format.
Nero MediaHome Playback is automatically included in Nero 2014 and Nero 2014
Platinum. If you use another version of Nero MediaHome, the add-on is not part
of the application.
DVD playpack and DVD Video burning is only available with Nero MediaHome
DVD Pack installed on your computer.
Nero MediaHome DVD Pack is automatically included in Nero 2014 and Nero
2014 Platinum. If you use another version of Nero MediaHome, the add-on is not
part of the application.
It is possible to start the playback of Blu-ray discs and AVCHD content in Nero
MediaHome. However, this function is only available with Nero 3D Blu-ray in-
stalled on your computer.
Choose an AVCHD title in your Nero MediaHome library or the respective optical
disc drive entry with the desired BD inserted (in the navigation tree) to open the
additional Nero Blu-ray Player in a separate window. Please see the separate
Nero Blu-ray Player user manual for full instructions.
Playback of DTS digital surround sound in DVD and digital video files is only
available with Nero MediaHome DTS installed on your computer.
Nero MediaHome DTS is automatically included in Nero 2014 Platinum. If you
use another version of Nero MediaHome, the add-on is not part of the application.
Once you start the playback, the following setting options are available on the upper taskbar:
Button
Fits the displayed item to the size of the content area. The aspect
ratio is kept.
Button
Displays an item in the full screen view.
Video Playback from Disc
Nero MediaHome 80
Before you start the playback, the following setting option is available in the lower taskbar:
Starts the playback.
Rip Disc with Nero
Recode
Lets you rip your movie with Nero Recode.
Only available with a Nero Suite installation. Nero Recode is an ap-
plication that is automatically installed during the main installation
procedure of your program. Please see the separate user manual for
full instructions.
Once you start the playback, a thumbnail of the currently playing video and a time display is
shown in the lower left of the screen. Just like when you start a video or music from your
library, playback controls are displayed on the lower taskbar. The additional button dis-
plays the disc main menu.
The menu provides the following entries:
Fit Video to Screen Fits the displayed item to the size of the content area. The aspect
ratio is kept.
Go to Title(s) Starts playback of a selected title or chapter. Select a respective title
or chapter from the displayed list.
Audio Displays all languages available for audio playback.
Subtitles Switches subtitles on or off. You can choose from all available subti-
tle languages.
Angle Changes the camera perspective if different camera perspectives are
available on the respective video.
On Screen Display
On/Off
Tracks video and audio data such as the output frame rate and de-
coding speed in a display on the playback screen.
Eject Ejects the disc from the drive.
Click the button in the upper left of the screen (header) to return to the previous screen.
Nero MediaHome as Media Server
Nero MediaHome 81
10 Nero MediaHome as Media Server
Nero MediaHome can act as a media server in your home network. This means that you can
stream your media library content to supported devices or access the media library from
these devices. Generally, all DLNA-enabled devices which are in your network are supported
by Nero MediaHome – this includes TVs, gaming consoles, Blu-ray players, tablets, and
smartphones.
The Streaming category in the Options window allows you to configure the Nero Media-
Home media server and all relevant options. It includes three main areas: the Media Server
area, the Media Server settings area, and the Slide Show Streaming Quality area.
In the Media Server area, you can enable or disable the media server.
The Media Server Settings area includes various options regarding media content and de-
vice access. The following setting options are available:
Input field
Media Server name
Allows you to change the name with which Nero MediaHome is rep-
resented on your TV and other devices.
When browsing for the Nero MediaHome media server on your TV,
you will have to look for the name entered here.
Check boxes
Select content to
share
Allow you to select what kind of media content you want to share.
Check boxes
Transcoding
Allow you to select what kind of media content you want to have
transcoded. Photos are transcoded into the JPEG format with a reso-
lution of 1920x1080 pixels. Music is transcoded into the LPCM for-
mat.
List with check box-
es and buttons
Device access con-
trol
Allows you to select which devices may or may not access the Nero
MediaHome media server. You can also remove devices or restore
them.
Option buttons
Port Allow you to select the port that is used for streaming.
The Slide Show Streaming Quality area allows you to set the quality with which your slide
show is streamed to your device.
Nero MediaHome as Media Server
Nero MediaHome 82
10.1 Nero Play to TV
The Nero Play to TV feature allows you to stream video files to your DLNA-enabled TV and
other devices with DLNA support such as Blu-ray players and game consoles. This means
that you can start the playback of a video file in Nero MediaHome and the video file will be
displayed on your TV. You can even stop playback and change the target device – playback
will resume from the exact point at which you have stopped it previously.
To stream video files to a device, click the menu on the lower taskbar and select the
desired device.
This feature is only available with Nero MediaHome Play to TV installed.
10.2 Nero Slideshow to TV
The Nero Slideshow to TV feature allows you to stream slide shows to your DLNA-enabled
TV and other devices with DLNA support without having to export the slide shows as a video
file first. You can even select your own theme and music. The slide show will then be con-
verted into a video in real time.
To stream a slide show to a device, click the menu on the lower taskbar and select the
desired device.
This feature is only available with Nero MediaHome Play to TV installed.
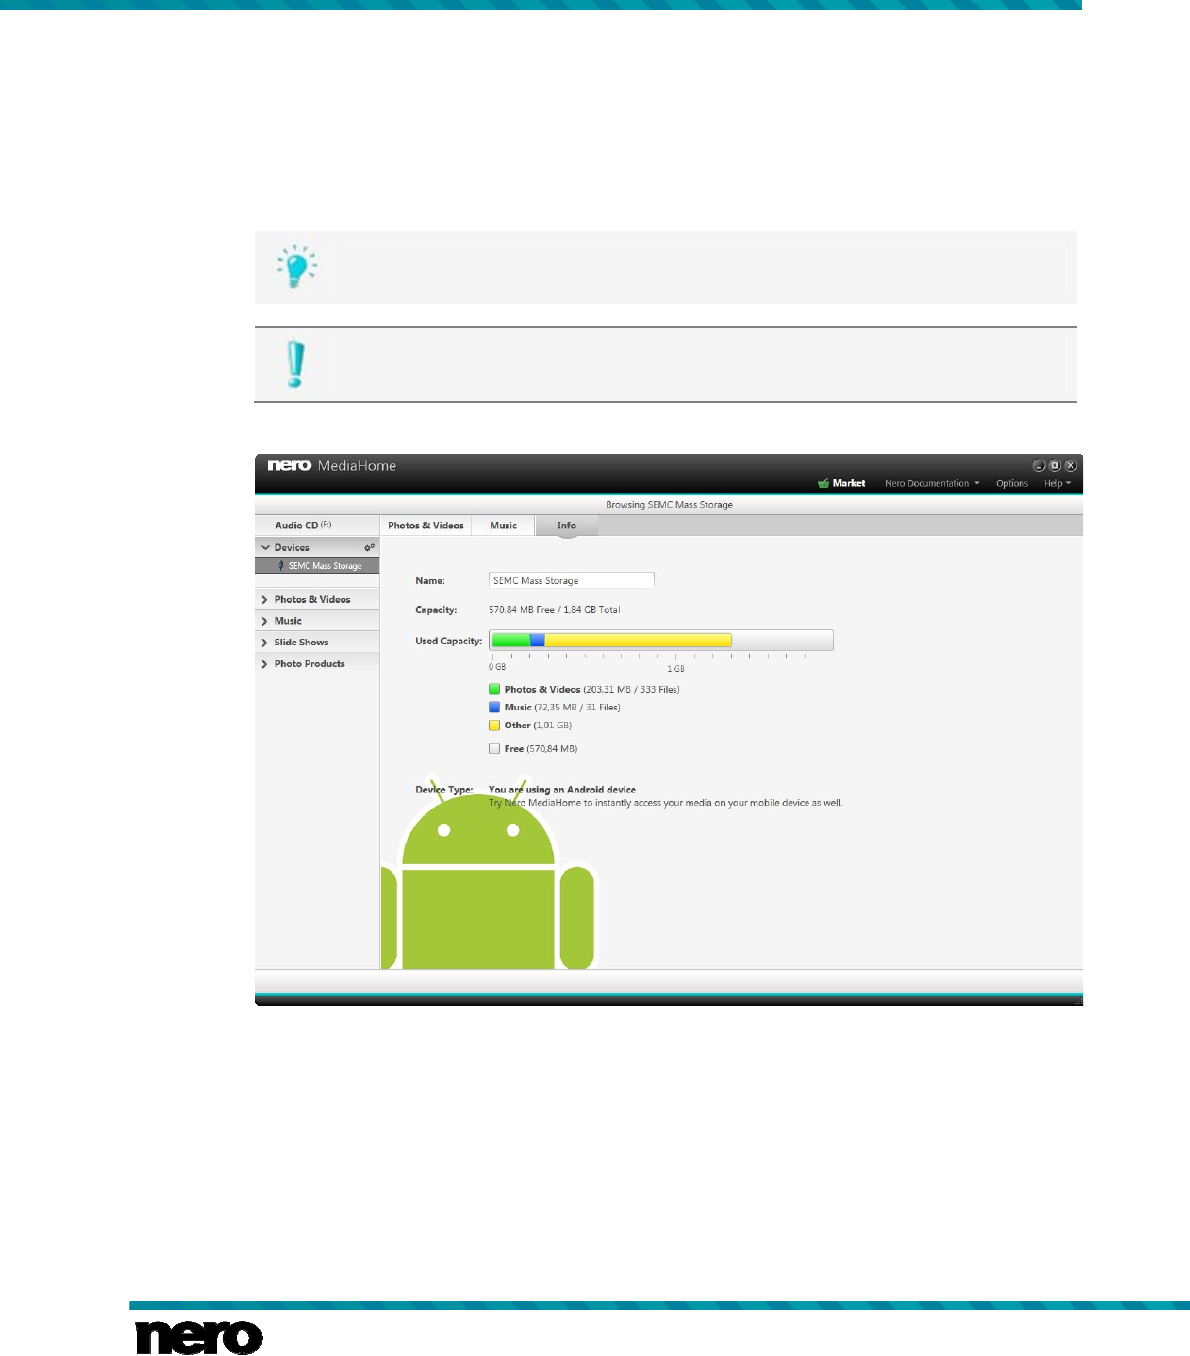
Devices
Nero MediaHome 83
11 Devices
Basically, Nero MediaHome supports a simple import of media from all mobile devices con-
nected to your computer – no matter if the device is still unknown to the Nero device data-
base. The app provides maximum multimedia flexibility between all your devices and em-
powers your digital life.
Some of the features mentioned here are limited without or only available with
Nero MediaHome Sync installed on your computer.
Nero MediaHome Sync is automatically included in Nero 2014 Platinum . If you
use another version of Nero MediaHome, the add-on is not part of the application.
Device
For each connected device, a [Device name] entry is available in the navigation tree as
soon as you connect it to your computer. Nero MediaHome displays the device name pro-
vided in the system device properties. Selecting the Device Settings button next to the De-
vices main entry (in the navigation tree on the left) opens the Device Settings window; here
you configure export options to copy media files from your computer to the connected de-
vice.
Click the Eject device button at the right hand side of the respective [Device name] entry to
safely remove your connected device.
Devices
Nero MediaHome 84
When you click the [Device name] entry, the media content of the respective device as well
as information about the device itself is displayed on three different tabs. The following set-
ting options are available:
Tabs
Photos & Videos /
Music
Allow you to browse the media content of the connected device. Use
the option buttons to display only new files that have not yet been
imported to Nero MediaHome (Show new files) or to display all me-
dia files (Browse).
Tab
Info
Allows you to view the total and used capacity of your device. Addi-
tionally, you can change its display name.
Button
Select All
Selects all files.
Only available on the Photos & Videos and Music tabs with the
Show new files option button being selected.
Button
Import
Allows you to import selected files.
Only available on the Photos & Videos and Music tabs with the
Show new files option button being selected.
Preview and rotating of photos as well as video, photo (instant slide show), and music play-
back are possible directly on the device.
Please note that in contrast to items stored on your PC, the rating feature (Favor-
ites) is not available for files on discs or saved on any removable device.
11.1 Device Settings Tab
The Device Settings window allows you to define options that are applied when you export
media files to a device. Select the Device Settings button next to the Devices main entry (in
the navigation tree on the left) to open the Device Settings window. If you have connected
more than one device, select the desired device on the left side of the window to display the
respective Device Settings area.
The following setting options are available in the Device Settings area:
Drop-down menu
Music
Allows you to select the quality to which the files you export will be
converted. You can also decide not to convert the files.
Drop-down menu
Photo
Allows you to select the file format to which the files you export will
be converted. You can also decide not to convert the files.
Drop-down menu
Video
Allows you to select the resolution to which the files you export will
be converted. You can also decide not to convert the files.

Devices
Nero MediaHome 85
Check box
Enable high quality
conversion
Enables high quality conversion.
See also
Devices →83
11.2 Importing From Device or Data Disc
Nero MediaHome offers a conventient import option for your media files like photos or videos
from an attached device or a data disc.
To import media files from an attached device or a data disc, proceed as follows:
1. Attach the desired device or insert the desired data disc into the optical disc drive of your
computer.
2. Click the respective entry in the navigation tree on the left.
The browsing screen is displayed.
3. Select the desired category you want to browse (Photos & Video or Music) in the upper
taskbar.
4. Select the Show new files option button below the upper taskbar.
All files that are not yet in the Nero MediaHome library are displayed.
5. Select the files you want to import.
6. Click the Import button.
The Import window is opened.
7. If you want to place the imported media files in an album, select the respective check box,
then select an album from the drop-down menu.
8. If you want to import new files automatically and with the settings you choose in the Import
window, select the respective check box.
9. If you want to import the media files into a specific folder, browse for the folder in the More
options area.
10. Click the Import button in the lower right.
The importing process is started. A status bar is displayed in the lower left of the main
window to show the progress of the importing process.
When the importing process is successfully completed, the files are automatically dis-
played in the respective browsing screen.
You have imported media files from an attached device or a data disc.
See also
Audio CD Browsing and Playback →76
Share and Burn
Nero MediaHome 86
12 Share and Burn
Clicking the or button on the lower taskbar in one of the browsing screens dis-
plays all available publishing and burning options in Nero MediaHome.
The Share via menu displays the share options you can choose from. At least one item
in the browsing screen must be selected. The following entries are available:
E-Mail
Opens the E-Mail window. You can attach the file(s) either in
original size or resized (select the respective option button) to a
new e-mail in your default e-mail application. Information about
the estimated file size is displayed in brackets.
Online Communities
Opens the Nero Community Upload window where you can sign
into your account and publish your current file or compilation to an
Internet community.
The following burning options are available in the Burn window:
DVD-Video Creates a video on DVD that can be watched on every DVD player.
AVCHD Creates a video as an AVCHD disc that can be watched on a Blu-ray
player.
Audio CD Creates an Audio CD that will play on all Audio CD players.
MP3 Disc Creates an MP3 disc with your favorite songs that will play on any
PC or device supporting MP3.
Data Disc
Creates a data disc which can be used to save all types of files and
complete folders.
Clicking the button on the lower taskbar switches to advanced burn-
ing in Nero Burning ROM.
Copy Disc Creates a copy of an entire disc.
Selecting your preferred burn option switches to a burning or copy screen. You can preselect
elements in the browsing screen before you choose the desired burn option and you can add
more files once you switched to the burning/copy screen. The total project size is displayed
for your information. Select the drive from the Recorder drop-down menu and click the Burn
button in the lower right of the screen to start the burning process. A status bar is displayed
to show the progress.
Instead of publishing your slide show in Nero MediaHome you can move the un-
finished compilation to Nero Video for expert editing. Choose the button >
Edit Video with Nero Video entry on the lower taskbar to move the selection.
Share and Burn
Nero MediaHome 87
DVD playpack and DVD Video burning is only available with Nero MediaHome
DVD Pack installed on your computer.
Nero MediaHome DVD Pack is automatically included in Nero 2014 and Nero
2014 Platinum. If you use another version of Nero MediaHome, the add-on is not
part of the application.
Burning of high definition videos and slideshows to BDMV or AVCHD discs is only
available with Nero MediaHome HD Burn installed on your computer. Appropriate
hardware is required in addition.
Nero MediaHome HD Burn is automatically included in Nero 2014 and Nero 2014
Platinum. If you use another version of Nero MediaHome, the add-on is not part
of the application.

Index
Nero MediaHome 88
13 Index
Add
Effects to photos ....................................... 32, 36
Name to face .................................................. 25
Photos to slide show ....................................... 51
Albums ................................................. 21
Smart album ................................................... 27
Smart albums ................................................. 21
Apps ..................................................... 14
Browse
Music .............................................................. 43
Photos ............................................................ 15
Videos ............................................................. 15
Burn
Disc ................................................................. 86
Music .............................................................. 45
Photos ...................................................... 18, 30
Slide show ................................................ 53, 54
Videos ............................................................. 18
Calendars ............................................. 58
Cards .................................................... 58
Copy
Disc ................................................................. 86
Photos ............................................................ 19
Videos ............................................................. 19
Create
Calendar ......................................................... 73
Instant photobook ........................................... 70
Photo products ............................................... 58
Photobook ...................................................... 71
Playlist ................................................ 45, 48, 49
Slide show ................................................ 51, 56
Smart album ................................................... 27
Devices
Import ............................................................. 83
Settings ........................................................... 84
Discs
Audio CD playback ......................................... 77
Audio playback ............................................... 76
Burn ................................................................ 86
Import from data disc ...................................... 85
Playback ......................................................... 37
Rip Audio CD .................................................. 77
Video Playback ............................................... 79
Edit
Crop photos .................................................... 36
Faces ........................................................24, 25
Photo products ................................................ 63
Photos ...........................................18, 30, 32, 34
Remove red eyes from photos ........................ 35
Slide show .................................................54, 55
With Nero Recode ........................................... 19
With Nero Video ........................................19, 53
Faces .................................................... 22
Add name ........................................................ 25
Edit ............................................................24, 25
Person group .................................................. 25
Person groups ................................................. 23
Help ...................................................... 10
Import
From data disc ................................................ 85
From device ..............................................83, 85
Installation .......................................... 7, 7
Library ...................................... 10, 11, 11
Manual conventions ............................... 6
Mark
Music ...................................................20, 45, 48
Photos ...........................................18, 20, 30, 48
Videos .................................................18, 20, 48
Market .................................................. 14
Media info ....................................... 16, 17
Music ............................................................... 44
Music .................................................... 43
Album art ......................................................... 44
Burn ................................................................ 45
Create playlist ................................................. 49
Mark ....................................................20, 45, 48
Media info ....................................................... 44
Metadata ......................................................... 47
Play ................................................................. 45
Playback ......................................................... 49
Playlist ............................................................. 45
Playlists ........................................................... 48

Index
Nero MediaHome 89
Nero account ........................................ 10
Nero MediaBrowser ....................... 12, 51
Options ........................................... 10, 11
Photo products
Create calendar .............................................. 73
Create instant photobook ............................... 70
Create photobook ........................................... 71
Edit ................................................................. 63
Preview ........................................................... 68
Select product ................................................. 59
Select theme ................................................... 60
Photobooks .......................................... 58
Photos .................................................. 15
Add effects ................................................ 32, 36
Add name to face ........................................... 25
Add to slide show ........................................... 51
Burn ................................................................ 30
Crop ................................................................ 36
Edit ..................................................... 30, 32, 34
Find by tag ...................................................... 27
Mark .................................................... 20, 30, 48
Person group .................................................. 25
Preview ........................................................... 29
Remove red eyes ........................................... 35
Play
Audio CD ........................................................ 77
Instant slide show ........................................... 18
Music ........................................................ 45, 49
Slide show ................................................ 53, 54
Videos ................................................. 18, 37, 40
Playback
Audio CD ........................................................ 76
Controls .......................................................... 41
Video Discs ..................................................... 79
Preview
Photo products ............................................... 68
Print ................................................ 19, 31
Projects ................................................ 18
Publish
To online community ...................................... 86
Rip
Audio CD .................................................. 76, 77
Search
Music ............................................................... 43
Photos ............................................................. 15
Videos ............................................................. 15
Settings
Devices ........................................................... 84
Share
Photos ............................................................. 18
Videos ............................................................. 18
Slide shows
Burn ..........................................................53, 54
Create .......................................................51, 56
Edit ............................................................54, 55
Edit with Nero Video ....................................... 53
Instant slide show ...............................18, 30, 41
Music & duration ............................................. 56
Play ...........................................................53, 54
Save as video file ............................................ 57
Start
Via Application Launcher .................................. 9
Streaming ......... 18, 30, 41, 45, 53, 54, 81
Subtitles................................................ 79
System requirements ............................. 7
Tags ......................................... 16, 21, 27
Tag manager ................................................... 16
Versions ................................................. 7
Videos .................................................. 15
Mark ..........................................................20, 48
Playback .............................................37, 40, 41
View
Faces .............................................................. 23
Photos ............................................................. 29
Zoom ............................................................... 16

Contact
Nero MediaHome 90
14 Contact
Nero MediaHome is a Nero AG product.
Nero AG
Im Stoeckmaedle 18 Internet: www.nero.com
76307 Karlsbad Help: http://support.nero.com
Germany Fax: +49 724 892 8499
Copyright © 2013 Nero AG and its licensors. All rights reserved.
