Nero STE_UML_ENG_INTRN_061218_V01__NeroShowTime_Eng_3 5 0 Show Time 3 User Manual Eng
User Manual: Nero ShowTime 3 - User Manual Free User Guide for Nero Software, Manual - page1
Open the PDF directly: View PDF ![]() .
.
Page Count: 40
Nero ShowTime Manual
Nero AG
Copyright and Trademark Information
The Nero ShowTime manual and all its contents are protected by copyright and are the
property of Nero AG. All rights reserved. This manual contains material that is protected by
internationally valid copyright. No part of this manual may be reproduced, transmitted or
transcribed without the express written permission of Nero AG.
Nero AG rejects any claims that transcend the clauses of the guarantee rights. Nero AG
does not undertake any liability for the correctness of the content of the Nero ShowTime
manual. The contents of the software supplied, as well as of the Nero ShowTime manual,
may be changed without prior warning.
For versions with 2 channel DTS decoding:
DTS is a registered trademark of DTS, Inc. and
DTS 2.0 + Digital Out is a trademark of DTS, Inc.
For versions with 5.1 channel DTS decoding:
DTS and DTS Digital Surround are registered trademarks of DTS, Inc.
All trade names and trademarks are the property of their respective owners.
The trademarks mentioned here are named for information purposes only.
Copyright © 2007 Nero AG and its licensors. All rights reserved.
REV 1.0, SW 3.5.0.0

General information
Page 3
Contents
1 General information 5
1.1 About the manual 5
1.2 About Nero ShowTime 5
1.3 Versions of Nero ShowTime 5
2 Technical information 7
2.1 System requirements 7
2.2 Formats supported 7
3 Launching the program 8
3.1 Launching Nero ShowTime via Nero StartSmart 8
3.2 Launching Nero ShowTime directly 8
4 Program interface 9
4.1 Playback window 9
4.2 Control panel 10
4.3 Extended area 11
5 Options window 12
5.1 General 12
5.1.1 OSD setting 12
5.1.2 Keyboard and mouse 13
5.1.3 Capturing a frame 14
5.1.4 Configuring the toolbar 14
5.1.5 Tooltip settings 15
5.2 Disc playback 16
5.2.1 Bookmarks editor 17
5.2.2 Parental control 17
5.3 Video 19
5.3.1 Video mode 20
5.3.2 Video quality 20
5.3.3 Nero Digital settings 21
5.3.4 Film effects 21
5.3.5 Enhance video 21
5.3.6 Multimonitor support 22
5.4 Audio 22
5.5 External subtitles 22

General information
Page 4
5.6 DNC 23
5.7 Skin browser 23
6 Playback 24
6.1 Playing discs from the drive 24
6.2 Play from Folder 24
6.3 Playing a media file 25
6.4 Playlists from media files 25
6.4.1 Playlist window 25
6.4.2 Creating and saving a playlist 27
6.4.3 Playing a playlist 27
6.4.4 Editing a playlist 28
6.5 Playing media 29
6.6 Using Internet services 29
7 Control during playback 31
7.1 Toolbar 31
7.2 Context menu 32
8 Key combinations 33
9 List of figures 35
10 Glossary 36
11 Index 38
12 Contact 40
General information
Page 5
1 General information
1.1 About the manual
This manual is intended for all users who want to learn how to use Nero ShowTime. It is
therefore structured according to operations and provides step-by-step instructions for what
you want to do.
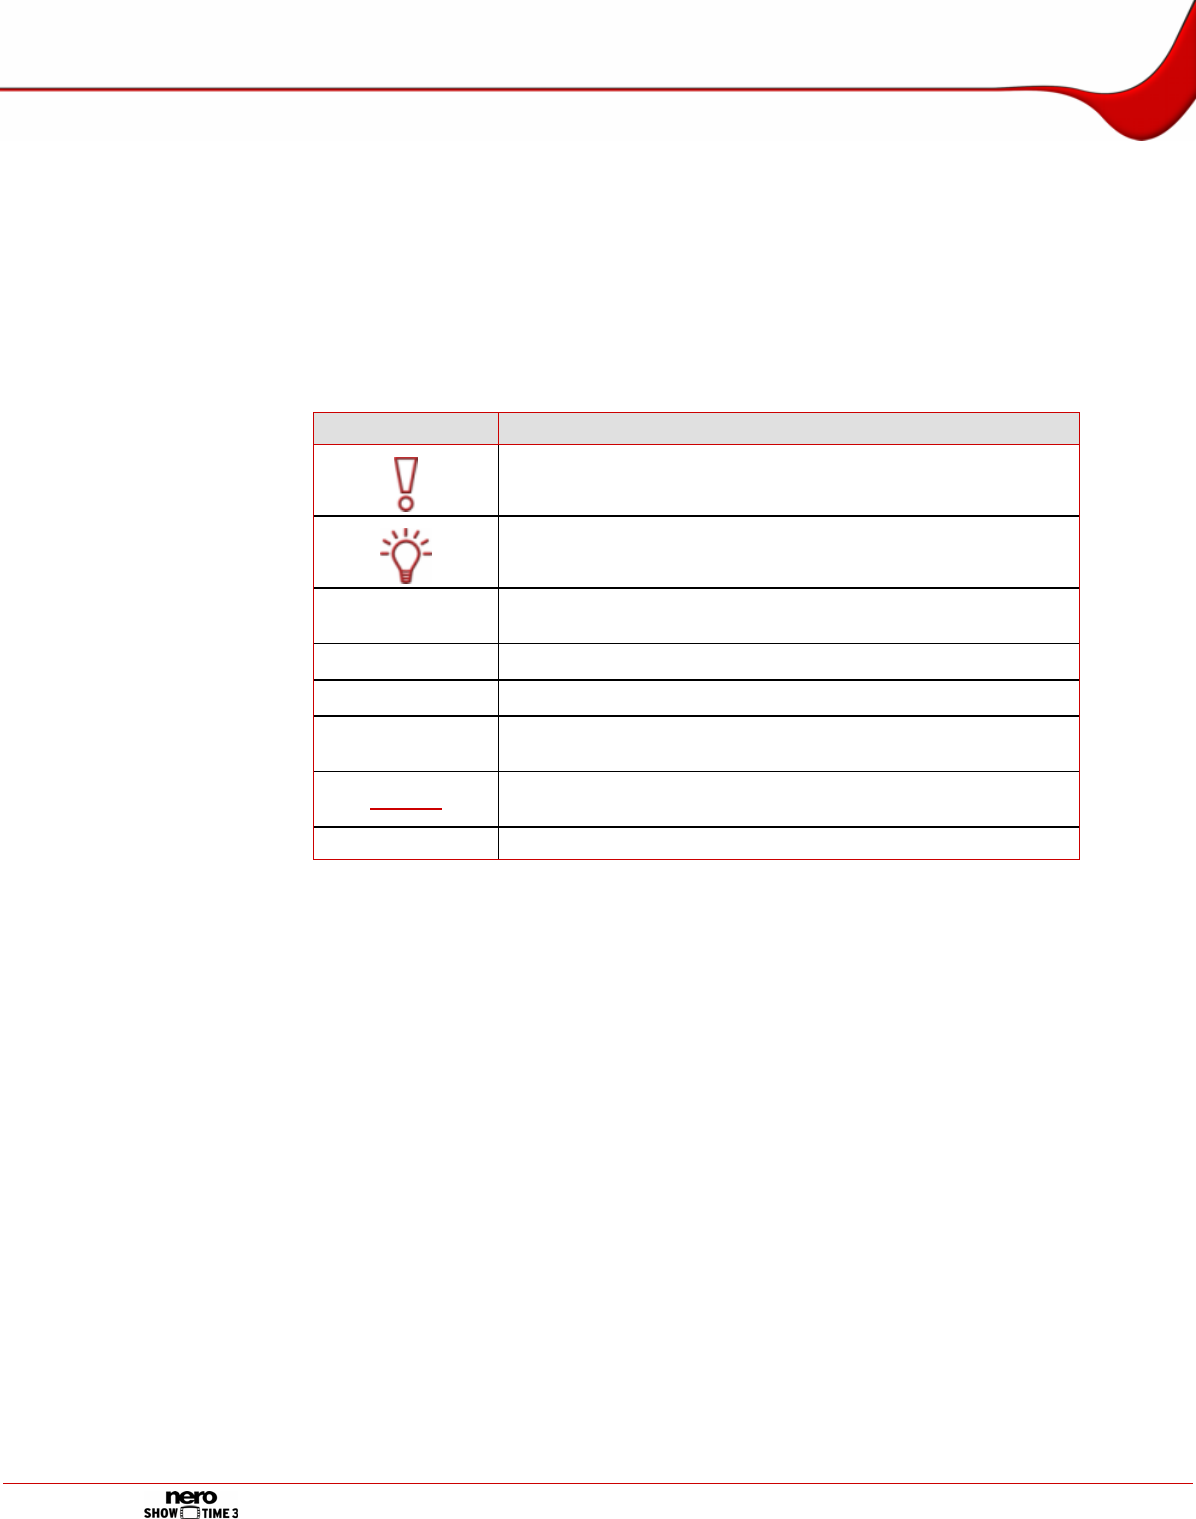
In order to make best use of this manual, please note the following conventions:
Symbol Meaning
Indicates warnings, preconditions or instructions that have to be
followed strictly.
Indicates additional information or advice.
1. Start … A number at the beginning of a line indicates a request for ac-
tion. Carry out these actions in the order specified.
Æ Indicates an intermediate result.
Î Indicates a result.
OK Indicates text passages or buttons that appear in the program
interface. They are shown in bold print.
Chapter Indicates references to other chapters. They are executed as
links and are shown in red and underlined.
[…] Indicates keyboard shortcuts for entering commands.
1.2 About Nero ShowTime
Nero ShowTime allows you to play back all digital recordings (movies, TV programs, home
videos, DVD format) with excellent picture and sound quality. Nero ShowTime features a
reminder function for each disc inserted and allows you to create screenshots of the video
being shown during playback. Nero ShowTime supports the formats DVD-Video (also from a
hard drive), VCD, SVCD, miniDVD, Nero Digital™, MPEG-1/-2/-4 as well as AVI - in both
PAL and NTSC. The playback window can be scaled down or viewed in full-screen mode.
The audio output of Nero ShowTime supports Dolby® Digital AC3, LPCM, MPEG-1/-2 and
S/PDIF for digital sound.
1.3 Versions of Nero ShowTime
Different versions of Nero ShowTime are available:
Nero ShowTime Retail
Nero ShowTime Essentials
Nero ShowTime Essentials CE
Nero ShowTime Retail and Nero ShowTime Essentials provide the full functionality.
If the DVD-Video plug-in is not installed, Nero ShowTime Essentials CE will have the fol-
lowing functionality restrictions in comparison with the full version:

General information
Page 6
It is not possible to play back from the drive (see Playing discs from the drive)
Only the playlist (media files) can be used as a playback source (see Playlists from media
files)
No read character functionality (see e.g. Bookmarks editor)
No parental control (see Parental control)
It is not possible to change perspective
Technical information
Page 7
2 Technical information
2.1 System requirements
Nero ShowTime is installed together with the Nero Suite and the system requirements are
the same. Refer to the QuickStart Guide for detailed information on system requirements.
The following additional requirements also apply:
Microsoft® DirectX® 9.0c (or higher) must be installed on your operating system.
You can download and install the latest version of DirectX from the
http://www.microsoft.com/windows/directx via the Internet.
Plus: DVD drive for playing DVD-Video
16-bit Windows® compatible sound card and speakers
Optional:
Multichannel/Dolby® Digital 5.1 channel decoding plug-in (Dolby® Digital
5.1 sound system for audio playback in 5.1 channel)
DVD-Video plug-in for DVD-Video functions and encoding in Dolby® Digi-
tal 2 channel sound. (The DVD-Video plug-in is already included in the re-
tail version.)
Installation of the latest WHQL-certified device drivers is recommended. WHQL stands for
Windows Hardware Quality Labs and means that the device driver certified by Microsoft® is
compatible with Microsoft® Windows® and the relevant hardware.
2.2 Formats supported
Nero ShowTime supports playback of the following formats or technologies:
Audio formats Video formats TV formats Disc formats Copy protection
-
mechanisms
Nero Digital™
Audio
Nero Surround
DAT
Dolby Digi-
tal/Dolby Sur-
round
LPCM
MPEG-1
S/PDIF output
for digital
sound
MPEG-2
WMA
Nero Digital™
Video
MPEG-1
MPEG-2
MPEG-4
ASF
AVI
DV
DVD-MS
H.264/AVC
MOV
Windows mov-
ies
WMV
16:9 Wide-
Screen
NTSC and
PAL
DVD-Video
(from disc
and hard
drive)
VCD
2.0/SVCD
DVD+VR/-VR
miniDVD
(DVD files on
CD)
HD DVD
WMA (DRM)
WMV (DRM)
CPRM
Launching the program
Page 8
3 Launching the program
3.1 Launching Nero ShowTime via Nero StartSmart
To launch Nero ShowTime via Nero StartSmart, proceed as follows:
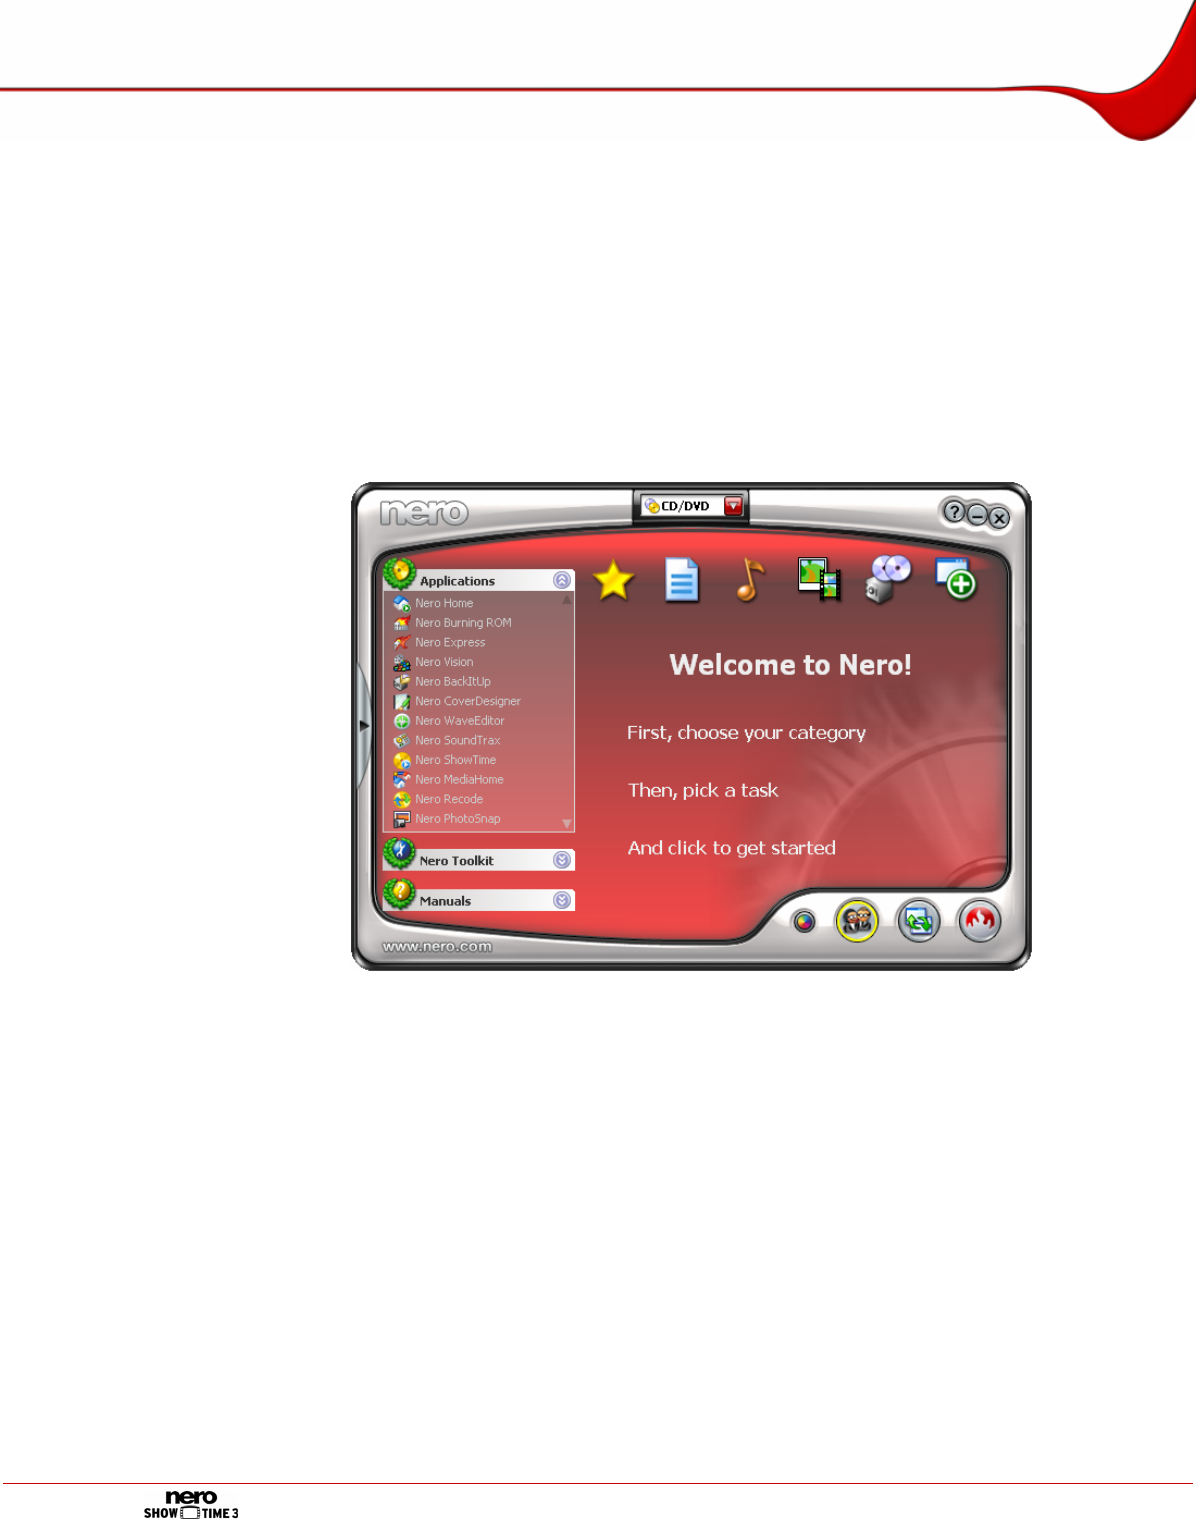
1. Click on the Nero StartSmart icon.
Æ The Nero StartSmart window will open.
2. Click on the arrow button on the left side of the window.
Æ The extended area will open.
Fig. 1: Nero StartSmart
3. Select the Nero ShowTime entry from the Applications selection list.
Æ The Nero ShowTime window will open.
Î You have successfully launched Nero ShowTime via Nero StartSmart.
3.2 Launching Nero ShowTime directly
To launch Nero ShowTime directly, proceed as follows:
1. If you are using the Windows-XP Start menu, click on the menu Start > All Programs > Nero
7 (Premium) > Play > Nero ShowTime.
If you are using the traditional Start menu, click on the menu Start > Programs > Nero 7
(Premium) > Play > Nero ShowTime.
Æ The Nero ShowTime window will open.
Î You have successfully launched Nero ShowTime.
Program interface
Page 9
4 Program interface
The Nero ShowTime program interface is the starting point for all actions that you perform
using Nero ShowTime.
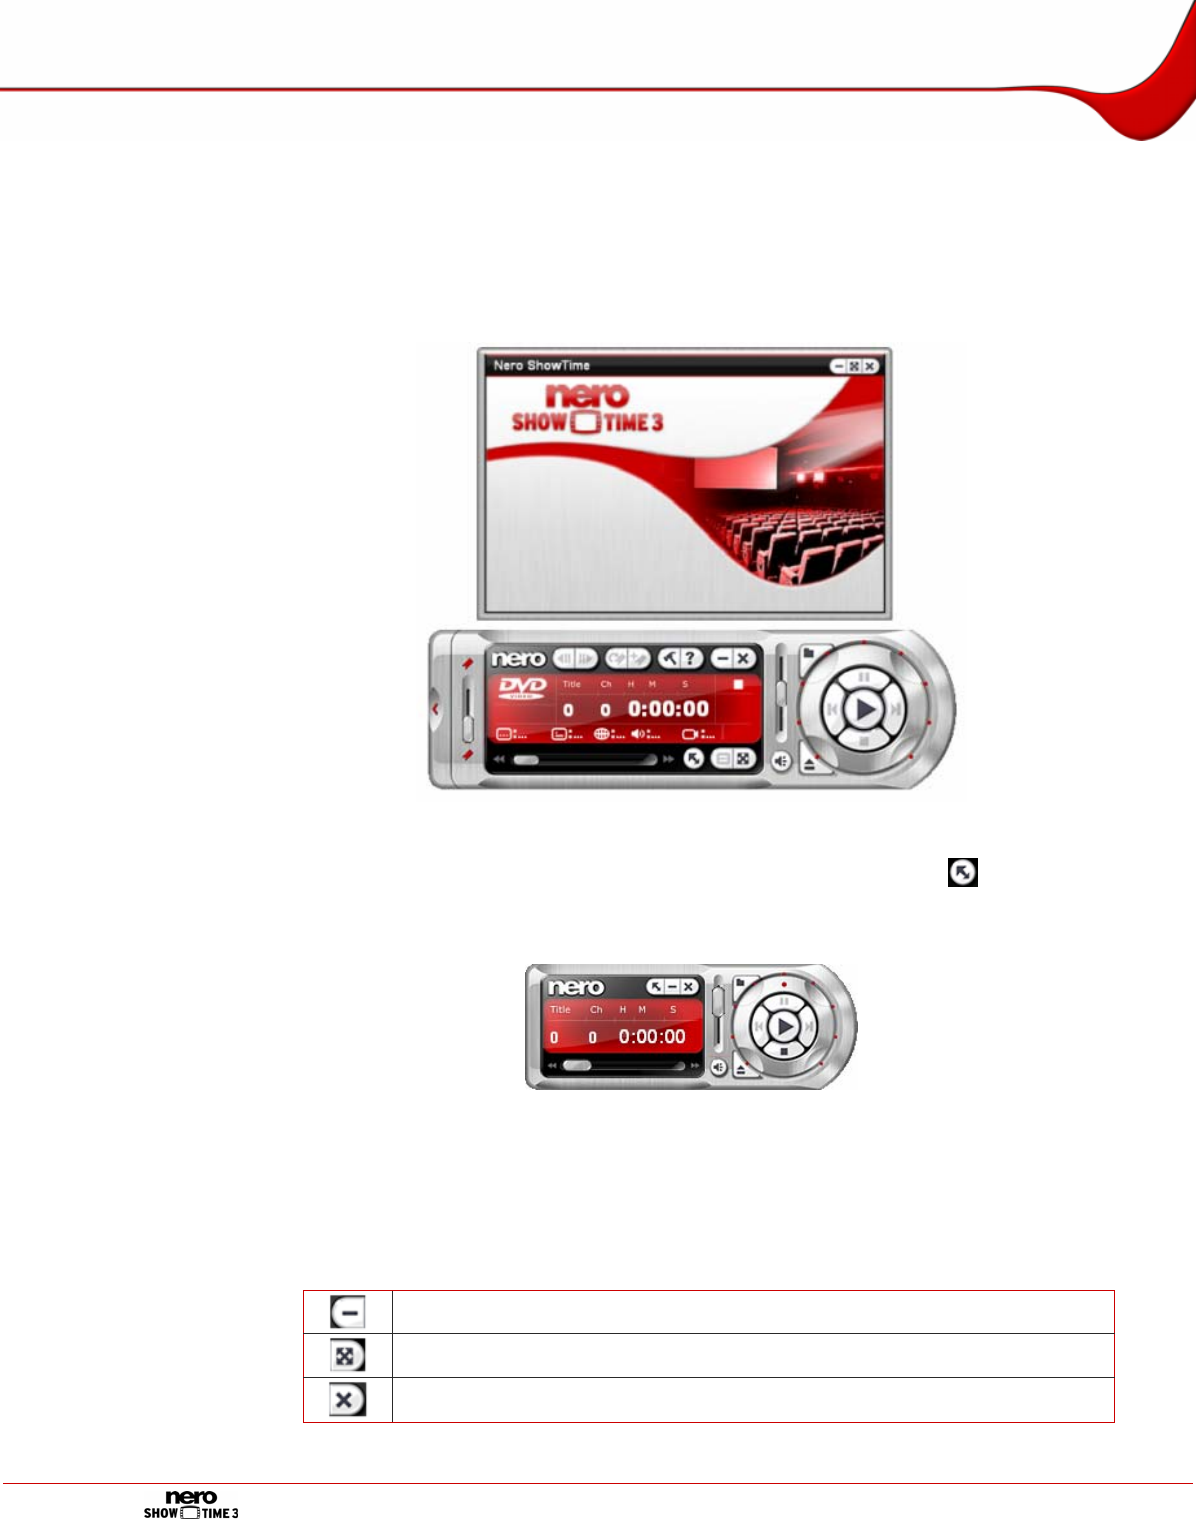
The program interface consists of a playback window containing the status bar and the con-
trol panel with the playback, settings and information areas.
Fig. 2: Program interface
A minimized version of the control panel is also available. You can use the button to
switch between the normal and minimized views. The minimized version of the control panel
does not contain all buttons.
Fig. 3: Minimized view of control panel
4.1 Playback window
The movie is shown and played in the Nero ShowTime playback window. The following but-
tons are available in the status bar:
Minimizes Nero ShowTime in the taskbar.
Changes between full-screen and normal view. [Z]
Exits Nero ShowTime.
Program interface
Page 10
4.2 Control panel
The control panel allows you to select a file or a video to play, to open options, to adjust the
volume and to view information on the file you have just played.
Nero ShowTime allows you to play back both discs (e.g. Video-DVD or Audio CD) and me-
dia files from the hard drive. The configuration options are not enabled for every playback
form, but are sometimes grayed out and cannot be used.
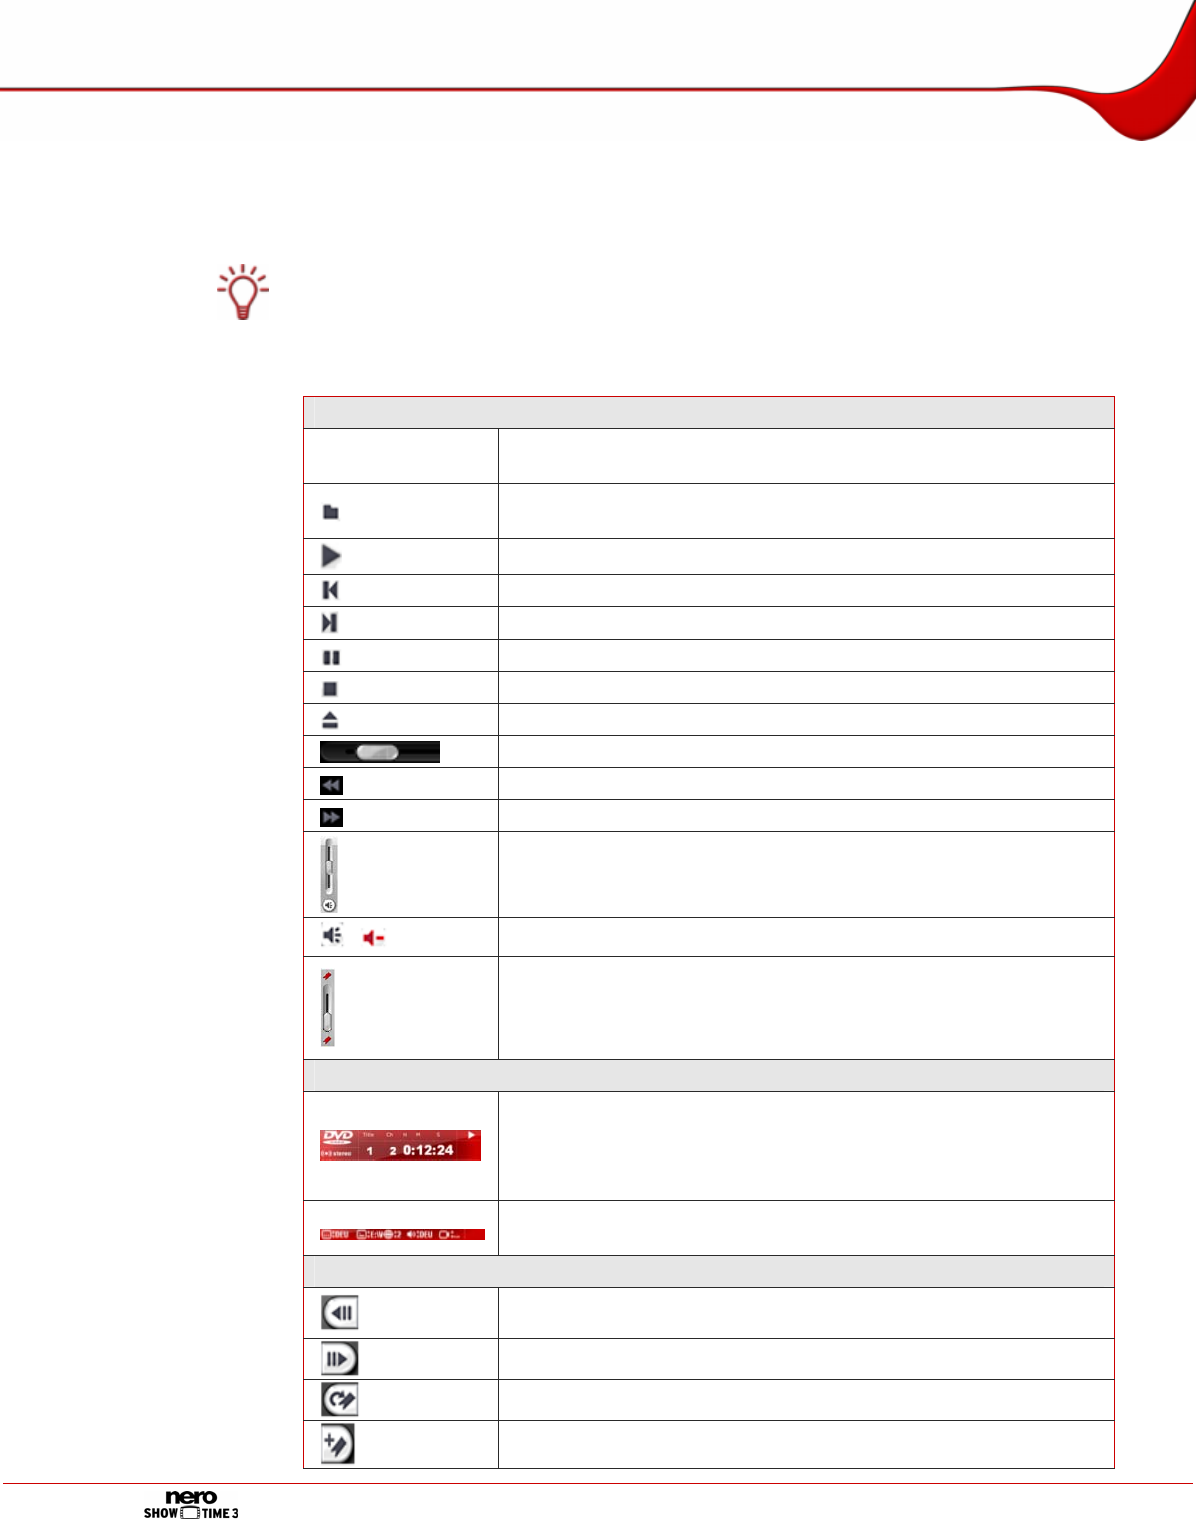
The following configuration options are available:
Playback area
Jog shuttle Rewinds and fast forwards within the track. The further the wheel
moves in one direction, the faster it winds.
Opens selection of the playback source. This is where you can
select the media file or a playlist that is to be played back. [O]
Starts playback. [Enter]
Jumps to the previous chapter or to the previous media file. [P]
Jumps to the next chapter or to the next media file. [N]
Interrupts playback, then continues it after a second click. [Space]
Finishes playback. [S]
Ejects the disc. [J]
Navigates smoothly (no chapter boundaries).
Selects a rewind speed. [B]
Selects a fast forward speed. [F]
Adjusts the volume.
Move the slider up to increase the volume. Move the slider down
to reduce the volume
/ Switches to mute/loud. [Q]
Selects the chapter.
Move the slider up to select the next chapter. Move the slider
down to select a previous chapter.
Information area
Among other things, displays the activated function, title, current
chapter, and running time.
If you double-click on the runtime, the Seek to time dialog box
will open. You can select a specific runtime here. [Ctrl+G]
Displays the subtitle language, drive, regional code, language,
angle, and the audio settings.
Settings area
Jumps back one intra code picture, approximately 10 frames.
[Ctrl+B]
Jumps one frame forwards. [T]
Jumps to the next bookmark. [G]
Adds a bookmark. [M]
Program interface
Page 11
Opens the Options menu. [Ctrl+C]
Shows the Help file. [F1]
Minimizes Nero ShowTime in the taskbar.
Exits Nero ShowTime .
Displays the minimized view of the control panel.
Opens selection of the existing menu or the playlist. [L]
Changes between full-screen and normal view. [Z]
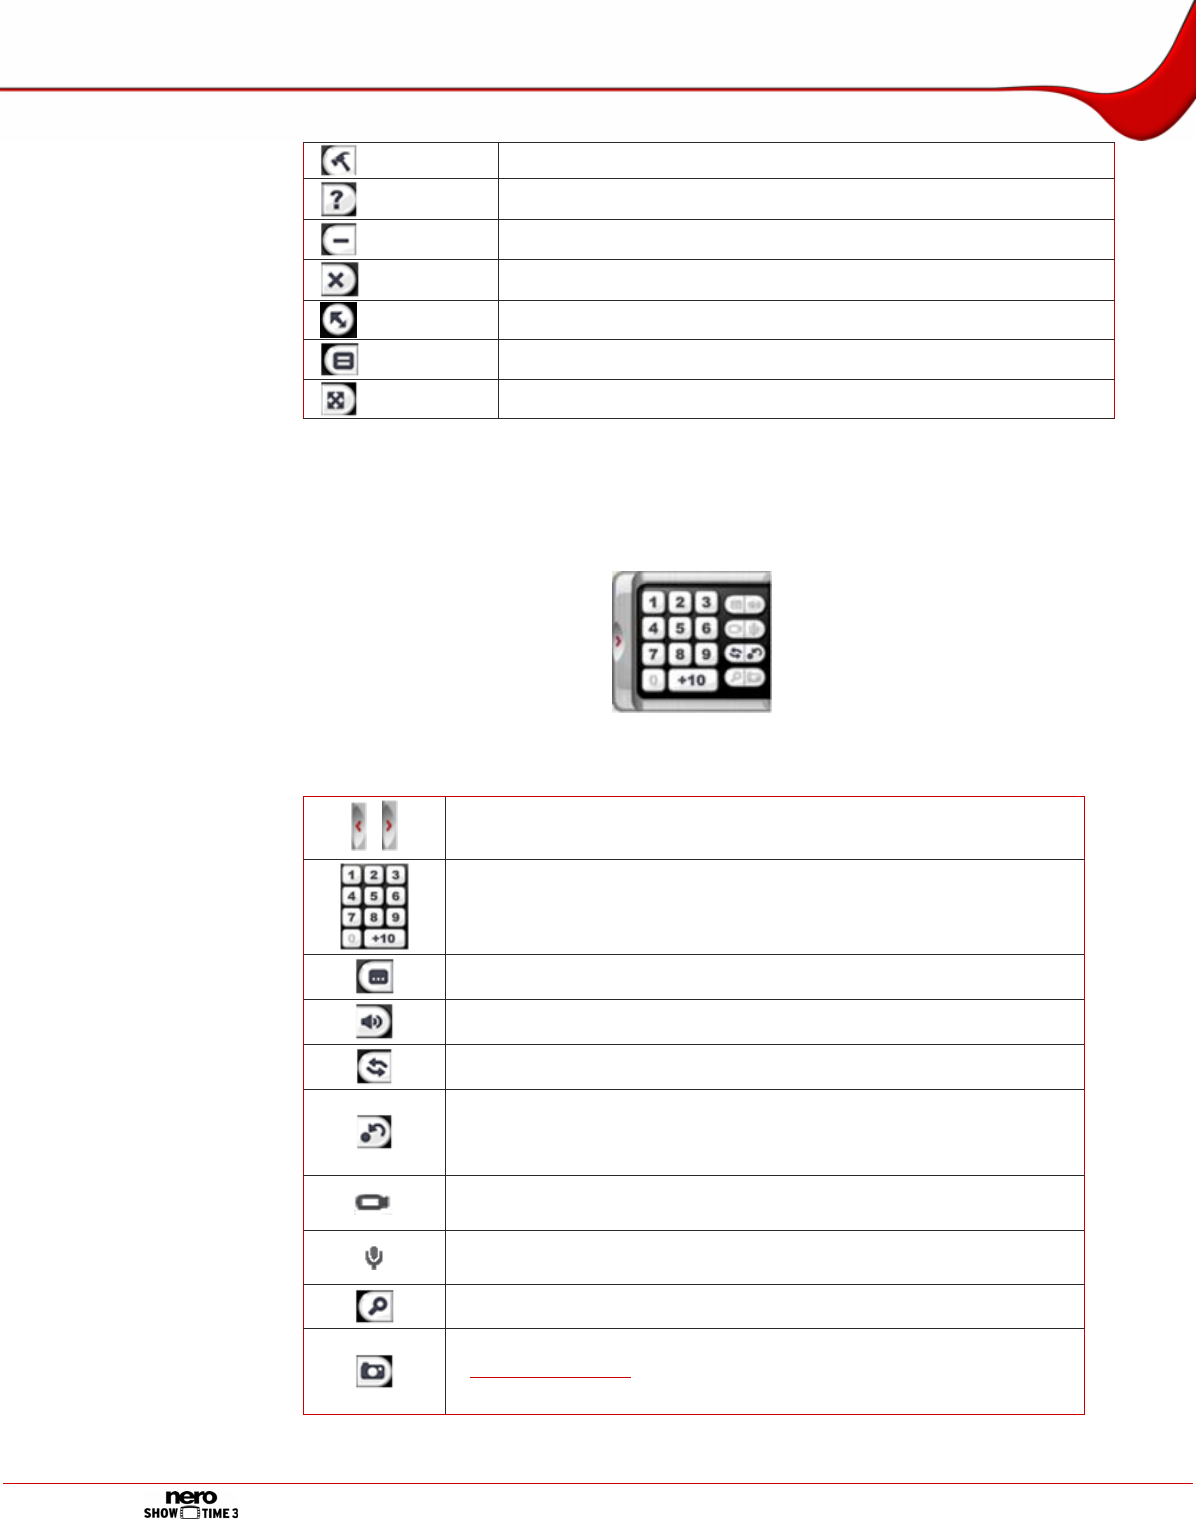
4.3 Extended area
You can open an extended area on the control panel. This contains advanced selection and
configuration options.
Fig. 5: Program interface – Extended area
The following operating elements are available in the extended area:
/ Opens/closes the extended area.
Allows you to jump to chapters immediately when playing back
VCDs and Audio CDs.
Opens subtitle selection. [U]
Changes language. [H]
Repeats a chapter, a title or everything. [Ctrl+R]
Repeats a section or stops repeating. [R]
Depending on the format, first set two markers between which the
chapter or title is repeated using this button.
Changes the perspective insofar as the movie provides different
camera settings for individual scenes. [A]
Changes channels in a karaoke DVD.
This option is only available if a karaoke DVD is inserted. [K]
Activates/deactivates the enlargement tool (digital zoom). [D]
Creates a screenshot and saves it to the specified folder (see
Capturing a frame). [C]
This function is only available if hardware acceleration is disabled.
Options window
Page 12
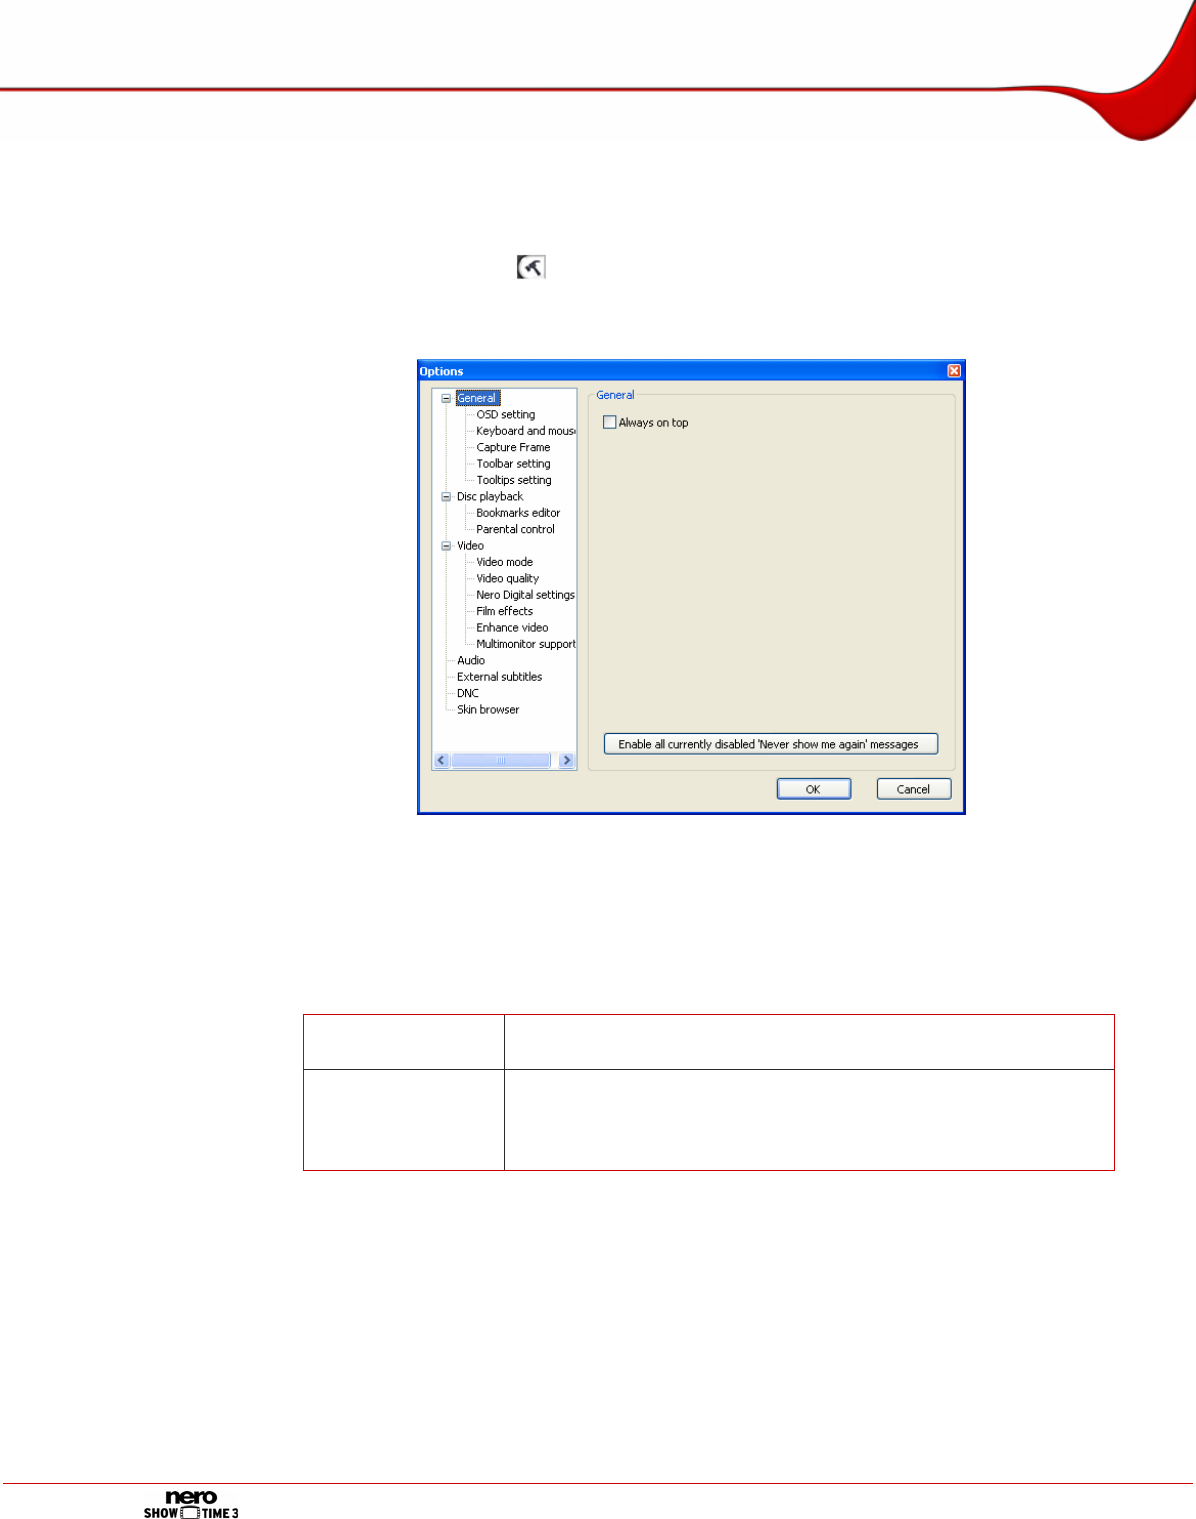
5 Options window
The Options window provides various options for customizing the appearance of the Nero
ShowTime interface and for performing settings according to your requirements. You can
open the window with the button. It consists of a navigation tree and a screen area. De-
pending on the entry that is selected in the navigation tree, a different screen area is dis-
played.
Fig. 4: Options window
5.1 General
The General area contains general configuration options. The following configuration options
are available:
Always on top Nero ShowTime remains in the foreground even if other pro-
grams are started.
Enable all cur-
rently disabled
"Never show me
again" messages
Re-enables all dialog boxes that you had disabled with the "Do
not show this message again" check box.
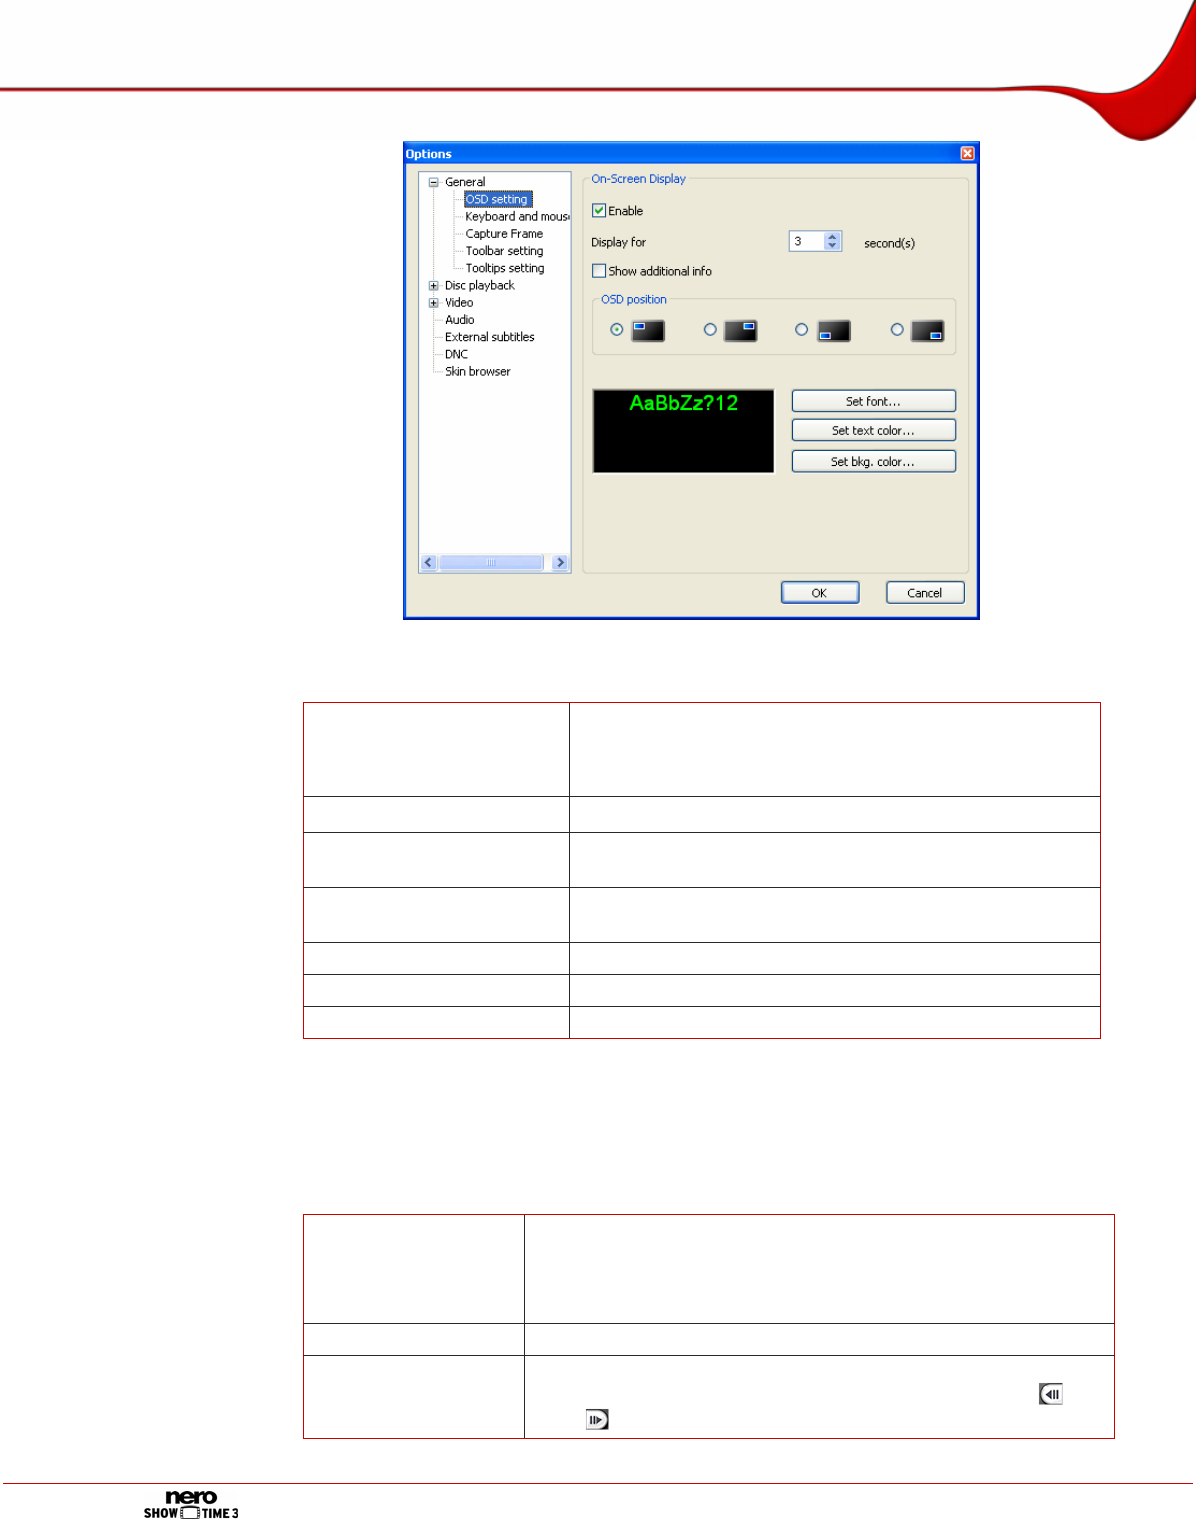
5.1.1 OSD setting
The area General > OSD setting contains configuration options for the on-screen display.
The on-screen display indicates the current procedure in the playback window such as
"Play" or "Volume increased" for instance.
Options window
Page 13
Fig. 5: Options – OSD setting window
The following configuration options are available:
Activate
Enables/disables the on-screen display.
If the on-screen display is enabled, the current proce-
dure is displayed in the playback window.
Display for Defines the time of the on-screen display in seconds.
Display extra information Enables display of additional information, e.g. about the
video stream bit rate and audio encoding.
OSD position Defines the position of the on-screen display in the
playback window.
Set font... Defines the font for the on-screen display.
Set text color... Defines the text color for the on-screen display.
Set bkg. color... Defines the background color for the on-screen display.
5.1.2 Keyboard and mouse
The area General > Keyboard and mouse setting contains configuration options for con-
trol via the keyboard and mouse.
The following configuration options are available:
Use mouse wheel
for
Defines which function the scroll wheel on the mouse should
take on during playback.
The Volume, Time and Previous/Next Chapter entries are
available.
Inverse Reverses the scroll wheel function of the mouse.
Time seek dura-
tion
Defines the time interval in seconds that makes it possible to
jump forwards and backwards in the program using the
and buttons.
Options window
Page 14
5.1.3 Capturing a frame
The Capture Frame entry provides configuration options for the frame. A frame is a snap-
shot of the playback window.
The following configuration options are available:
Capture to...
Clipboard Depending on the configuration of your PC saves one picture
only.
Wallpaper Saves one snapshot immediately as the desktop wallpaper.
File Numbers your snapshots and saves them in BMP format. You
can use the button to specify the path of the folder where the
saved pictures are to be stored.
Printer Sends a snapshot directly to the printer.
Captured aspect ratio
Original video
source size Saves the snapshot in the original aspect ratio of the movie.
Current video
window size Saves the snapshot in the current aspect ratio of the playback
window.
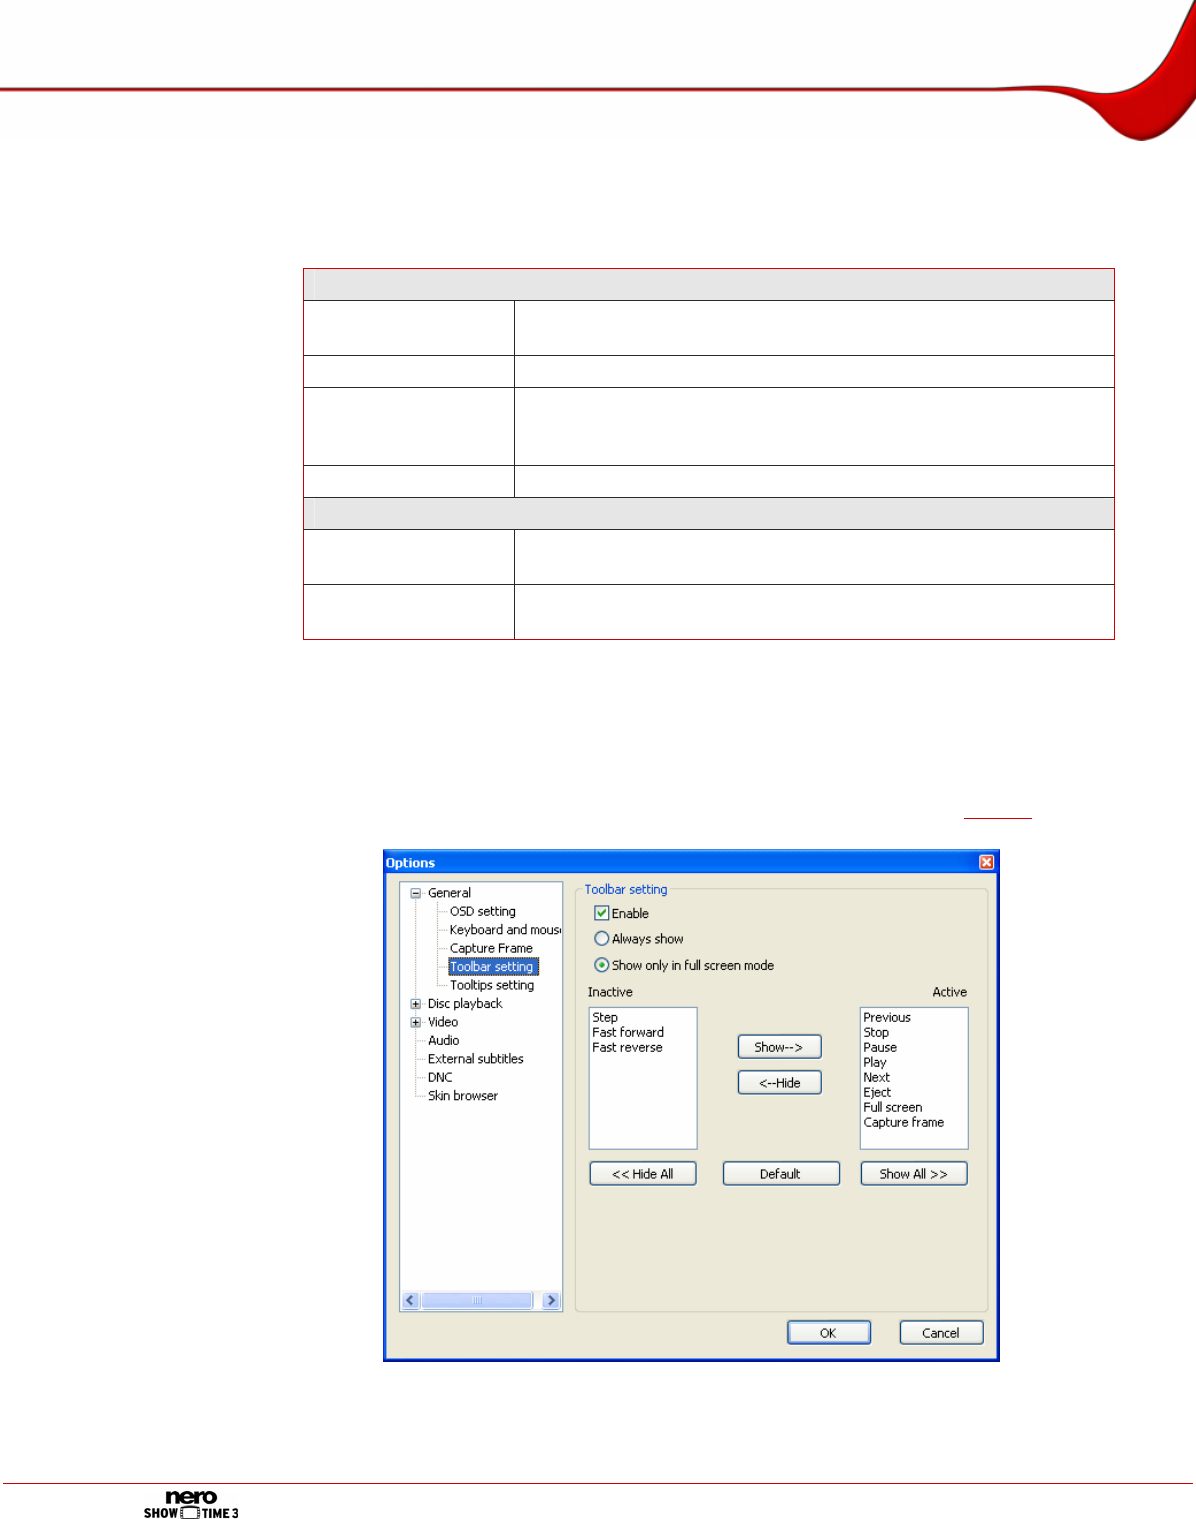
5.1.4 Configuring the toolbar
The Toolbar setting entry provides configuration options for the toolbar. The toolbar is used
principally so that the entire control panel does not need to be displayed during payback. It is
displayed at the top of the screen during playback if you move the cursor to this position and
provides selection and configuration options for the movie being shown (see Toolbar).
Fig. 6: Options – Toolbar setting window

Options window
Page 15
The following configuration options are available:
Activate Enables the toolbar.
Always show Enables the toolbar for playback in full-screen and normal
mode.
Show only in full
screen mode Activates the toolbar only for playback in full screen mode.
Inactive Displays the functions that are not on the toolbar.
Active Displays the functions on the toolbar.
Hide All
Removes all functions from the Active selection list and
moves them to the Inactive selection list.
The toolbar is displayed without any additional buttons. Only
the slider for the content view, time display and the button
is displayed.
Standard
Resets the Active and Inactive selection lists to the default
setting.
The most frequently used buttons are displayed in the toolbar.
Show All Adds all functions to the Active selection list.
All buttons are displayed in the toolbar.
5.1.4.1 Toolbar settings
To configure the toolbar, proceed as follows:
1. If you want to add a function to the toolbar:
1. Select the desired function from the Inactive selection list.
2. Click on the Show button.
Æ The function is added to the Active selection list.
3. Repeat the two last steps until you have added all of the desired functions to the toolbar.
2. If you want to remove a function from the toolbar:
4. Select the desired function from the Active selection list.
5. Click on the Hide button.
Æ The function is added to the Inactive selection list.
6. Repeat the two last steps until you have removed all of the desired functions from the
toolbar.
Î You have configured the toolbar according to your requirements and can use them dur-
ing playback.
5.1.5 Tooltip settings
The Tooltip settings entry provides configuration options for the tooltips. Tooltips contain
brief explanatory information that is displayed if you hover the cursor over individual ele-
ments on the Nero ShowTime interface.
Options window
Page 16
The following configuration options are available:
Do not show tooltips Hides the tooltips.
Show Windows style
tooltip Shows the tooltips in classic Windows style.
Show balloon tooltips Shows the tooltips in comic style (as "speech balloons").
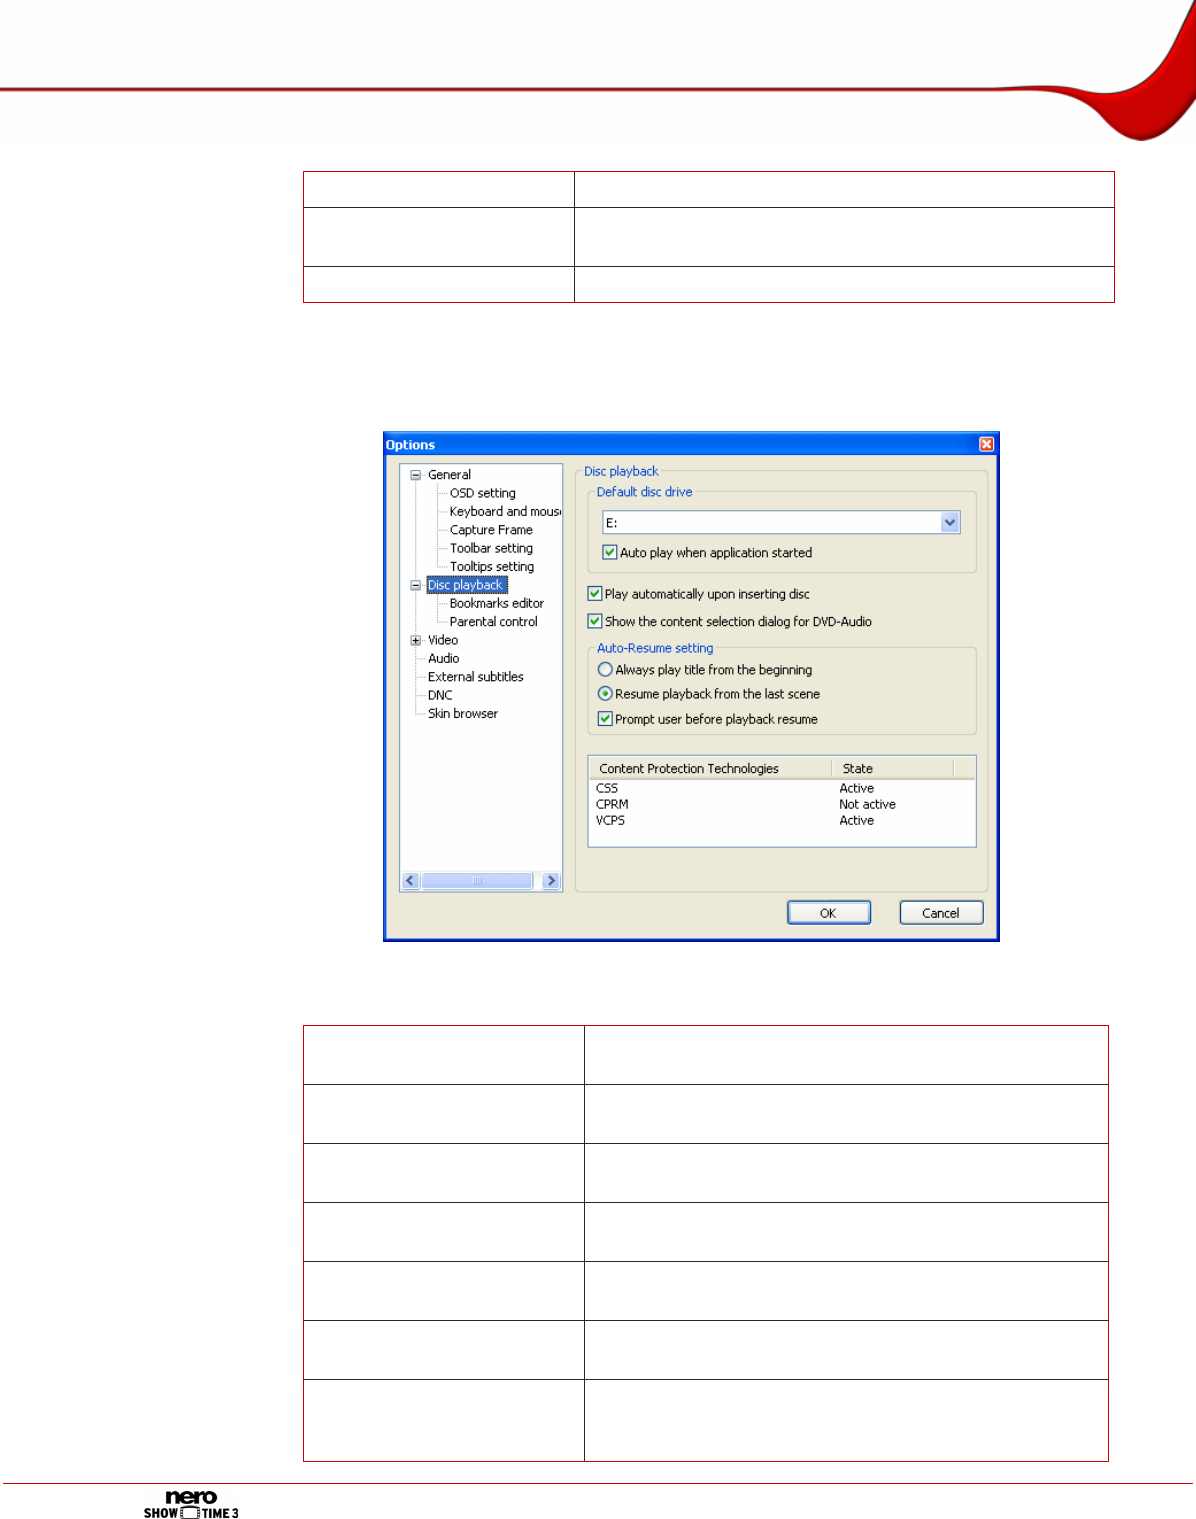
5.2 Disc playback
The Disc playback entry provides configuration options for showing videos from a drive.
Fig. 7: Options – Disc playback dialog box
The following configuration options are available:
Default disc drive Defines the drive from which discs are played by de-
fault.
Auto play when application
started Checks the drives when launching Nero ShowTime and
starts playback if a relevant disc has been inserted.
Play automatically upon
inserting disc Starts playback as soon as the appropriate disc has
been inserted.
Show the content selection
dialog for DVD-Audio Prior to playback of a DVD-Audio disc, shows a dialog
box for selecting content.
Always play title from the
beginning Starts playback from the beginning if a disc that is al-
ready known is inserted again.
Resume playback from the
last scene Resumes playback if a disc that is already known is in-
serted again.
Prompt user before play-
back resume
Asks the user before playing back a disc that is already
known whether it should be resumed at the last posi-
tion viewed or started from the beginning.
Options window
Page 17
5.2.1 Bookmarks editor
The Disc playback > Bookmarks editor entry makes available the bookmarks editor Nero
DVD. The Bookmarks editor area contains a list of all bookmarks that have been set so far
under the name of the DVD. You can display the bookmarks for a DVD by clicking on the +
icon before of the name.
The following configuration options are available:
Go to Selects the point to which the selected bookmark jumps in
the video. If you close the Options window, you can resume
the movie from the selected bookmark.
Edit name... Edits the name of the selected bookmark.
Delete Deletes the selected bookmark.
Bookmark file Displays the path where the bookmark file is stored. You can
change the path by clicking on the button.
5.2.2 Parental control
The Disc playback > Parental control entry enables you to set up parental control. The pa-
rental control feature in Nero ShowTime enables you to prevent your children from watching
a movie that is not appropriate for them. You can also create a user profile for each of your
children and specify restrictions. If a DVD - for which parental control criteria are relevant - is
inserted, a login window is displayed. A user with a defined profile can log in and show the
movie, or can be prevented from doing so by virtue of inadequate rights.
Users (children) cannot change their profiles themselves, only an administrator (parent) can
view and administer the profiles.
You must have administrator rights on your computer in order to be able to set up parental
control.
The Parental level area indicates the restrictions that apply for the user currently logged on.
The following levels are available:
G Released without age restriction. Suitable for general audiences.
Level 2 Films up to release Level 2 are played. Suitable for most audiences.
PG Not suitable for children under 13.
PG-13 Parental guidance suggested for children under 13.
Level 5 Films up to release Level 5 are played. Suitable for teenagers.
R Parental guidance suggested for children under 18.
NC-17 Not suitable for children under 18.
Level 8 Films up to release Level 8 are played. Maximum age restriction.
Unlimited All films are played.
The following buttons are available:
Login Opens the Login window where an administrator or a user
can log into the system.
Administrator Opens the User administration dialog box where you can
create new profiles for administrators and users. You can
also view and edit the profiles of the administrators and the

Options window
Page 18
users. For example you can change the parental control level
and/or the password.
The button is only active if you have logged into the system
as an administrator. Users cannot view or change profiles.
To create a user you must have created an administrator first and then log into the system
as an administrator.
5.2.2.1 Setting up parental control: creating an administrator
In order to set up parental control, you must first create an administrator. Only an administra-
tor can create users and specify a restriction for them for watching movies. To create an ad-
ministrator, proceed as follows:
1. Click on the Administration... button.
Æ The User administration dialog box will open.
2. Click on the Add User button.
Æ The Edit user dialog box will open.
3. Enter a name and a password.
4. Select the Unlimited option button in the Parental level area
All films will be played only if the Unlimited option has been activated.
5. Click on the OK button.
Î You are entered as administrator. You will see your profile in the list in the User ad-
ministration dialog box.
You can now log into the system to create users.
5.2.2.2 Setting up parental control: creating a user
An administrator can create profiles for users. You can specify which movies can and cannot
be viewed for each user. To do this, define the parental level. To set up parental control and
to create a user, proceed as follows:
1. If you are not logged into the system, click on the Login button and log in.
Æ The Administrator button is enabled.
2. Click on the Administrator button.
Æ The User administration dialog box will open.
3. Click on the Add User button.
Æ The Edit user window will open.
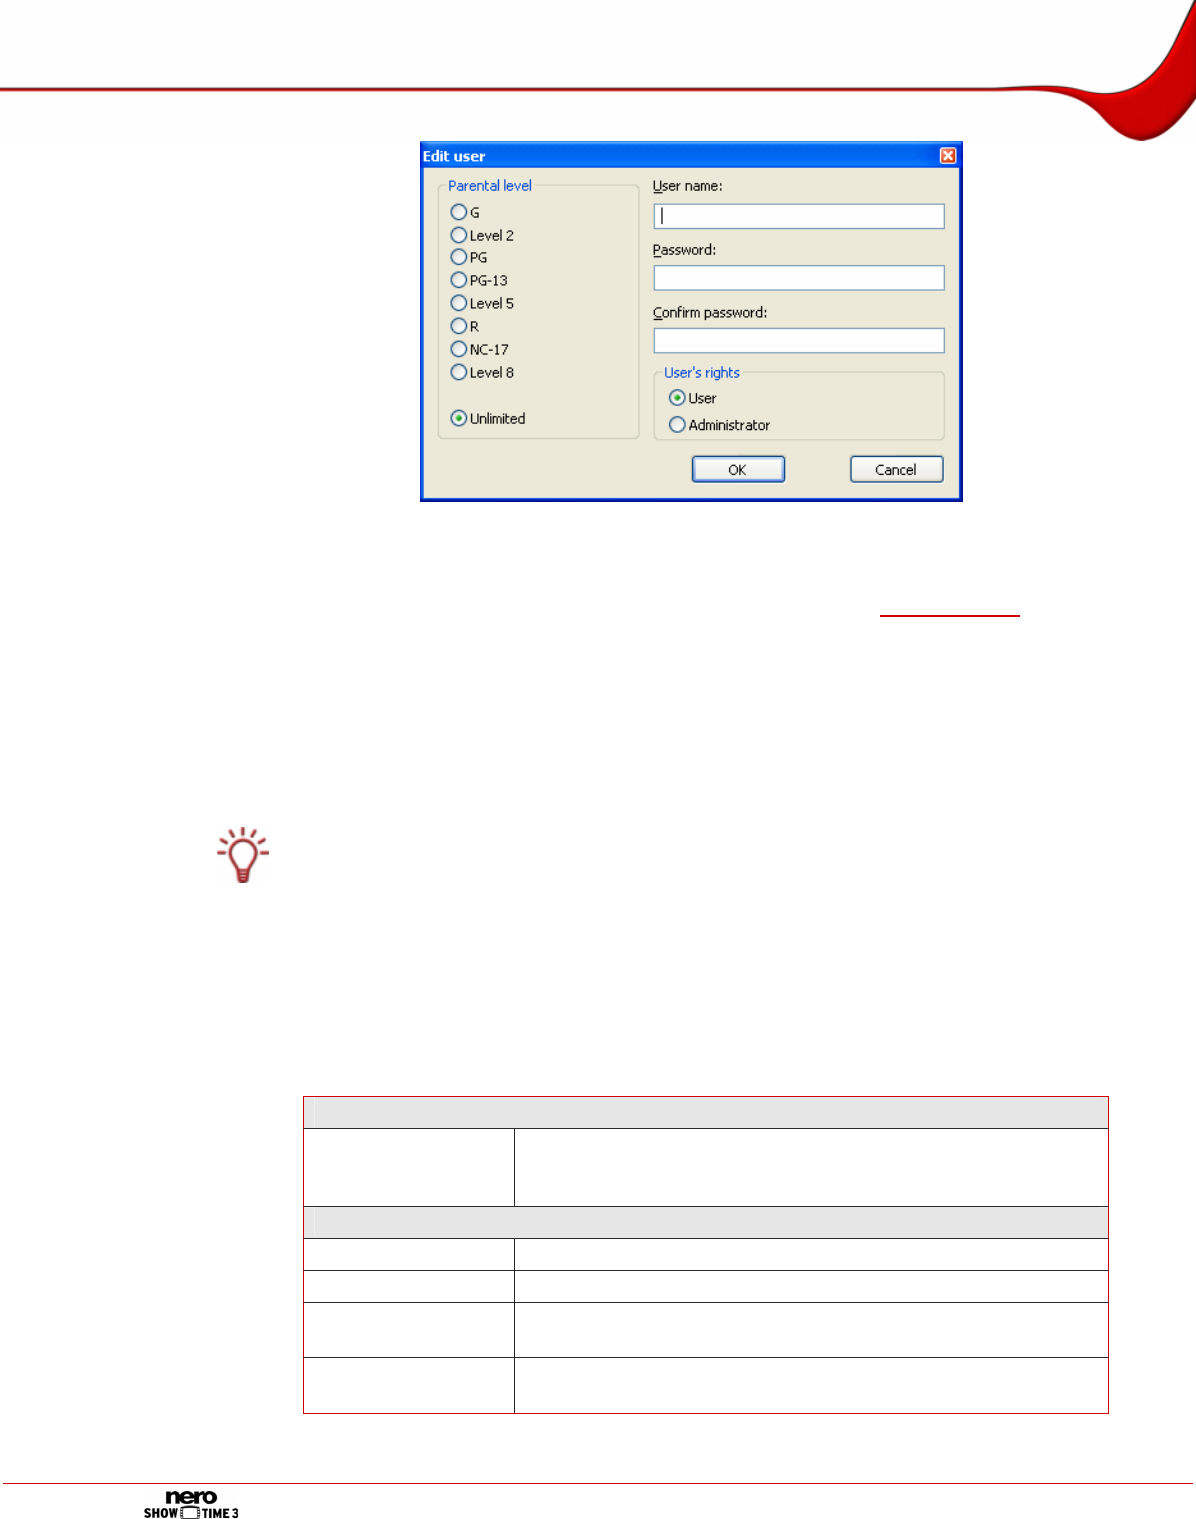
Options window
Page 19
Fig. 8: Edit user dialog box
4. Enter a name and a password for the user.
5. Select the desired restriction option in the Parental level area (see Parental control).
6. Click on the OK button.
Æ The desired profile is created and entered in the list.
7. If you want to create other profiles, repeat the last four steps.
Î You have successfully set up parental control and created users.
If a DVD for which the parental control criteria are relevant is inserted, then a login window
appears. A user with an established profile can log in to watch the film.
5.3 Video
The Video entry provides configuration options for playing videos.
The following configuration options are available:
Hardware acceleration
Activate Enables hardware acceleration. This means that DVD-Video
image acceleration is performed by the graphics card. This
reduces the load on the main processor.
Screen control
Run full screen Shows the movie automatically on the full screen.
Keep aspect ratio Shows the movie in proportion to its original aspect ratio.
Hide video win-
dow Only shows the playback window when the movie has been
played.
Video mode pref-
erence Establishes the format in which the videos are played.

Options window
Page 20
5.3.1 Video mode
The Video mode entry provides configuration options for interlacing. In interlaced mode
video images are shown as two half images. In the first half image every second line (1, 3, 5,
…, 575) is shown. The second half image displays the rest of the lines in the image (2, 4,
6,… 576) so that it appears as a complete picture to the eye. Most video material consists of
half images.
A deinterlacer is required for display on a full-screen device (monitor, projector). Nero Show-
Time supports the deinterlacing techniques weave, bob and adaptive.
Weave, the simplest type for filling in the half images consists of displaying even and uneven
half images simultaneously. In this way a half image fills in the missing lines in the other half
image. This method is appropriate when both half images originate at the same time and can
interleave without being conspicuous.
With adaptive deinterlacing the missing lines in the fields are found and added taking into
consideration the surrounding fields. Good adaptive deinterlacers take into consideration up
to five images in both directions. The more images the algorithm takes into account, the
more the output may lag.
With bobbing the missing lines in the fields are found thus expanding each field to form a full
image. The result of this technique is soft blending and some horizontal details may be miss-
ing.
The following configuration options are available:
No deinterlacing Defines that deinterlacing is not used.
Adaptive deinterlacing
Defines that the computer performance takes over the
deinterlacing process.
Depending on the processor, there may be interrup-
tions in the images. This is not possible if the hardware
acceleration is deactivated.
Fine-tuning view Adjusts the picture quality.
Fixed deinterlacing
Defines that the hardware takes over the deinterlacing
process.
Recommended in particular for older PCs with less
than 600 MHz processor performance.
Set default values Restores the default setting.
If you detect stripes running through the image during playback of a film, you should dis-
able the No deinterlacing option.
5.3.2 Video quality
The Video quality entry provides configuration options regarding the quality of Nero Digi-
tal™ videos.
The settings in this section only affect Nero Digital™ videos and have no significance for
DVD-Videos, VCDs and SVCDs.
To guarantee the best quality setting for your computer, it is recommended that you select
the Auto-adjust entry from the selection list.
Options window
Page 21
The following option buttons are available.
Off Deactivates adjustment of the quality.
Manual Selects manual quality setting.
Auto-adjust Adjusts the quality automatically.
5.3.3 Nero Digital settings
The Nero Digital settings entry provides configuration options for playing Nero Digital™
videos.
The settings in this section only affect Nero Digital™ videos and have no significance for
DVD-Videos, VCDs and SVCDs.
The following configuration options are available:
Remember subtitle
setting
when play Nero Digital
movie
Retains the settings for the subtitles for the next time a
film is played.
Display subpicture
smoothly Improves the display of subtitles.
Use Mpeg-4 SP video
padding
Fits a Nero Digital™ video with black bars into the Nero
ShowTime video window.
Subtitles are adjusted in the picture.
5.3.4 Film effects
The Film effects entry provides the option for applying effects to the video movie.
The following configuration options are available:
Use film effects Activates the use of film effects.
Luma Defines the brightness of the image.
Chroma Defines color hue and color saturation.
Reset Restores the default setting.
5.3.5 Enhance video
The Enhance video entry allows you to change the appearance of the video. To do this you
can define presets.
The following configuration options are available:
Presets Selects a predefined entry and adjusts the slider accordingly.
If the values are changed, the Custom entry is selected.
Save preset as... Opens the New Preset dialog box where you can store the cur-
rent setting under a name of your choice.
Delete Preset Deletes the currently selected self-defined preset. (Presets pre-
Options window
Page 22
defined by the system cannot be deleted.)
Brightness Defines the brightness of the video.
Contrast Defines the contrast of the video.
Saturation Defines the saturation of the video.
Hue Defines the hue of the video.
Gamma Adjusts the gamma setting of the video.
Sharpness Defines the sharpness of the video.
Reset Restores the default setting.
5.3.6 Multimonitor support
The Multimonitor support entry allows you to access multiple monitors.
The following configuration options are available:
Enable Activates multimonitor support.
Automatically Crop
Letterboxing Fits a video with black bars into the playback window.
Monitor Border Size Changes the distance between the video content and the
margin of the playback window.
5.4 Audio
The Audio entry provides configuration options for the output of audio files.
The following configuration options are available:
Audio Output Defines the number of loudspeakers used.
Output mode Defines the output mode.
Enable Cover Art Displays the cover in the playback window during playback
of Nero Digital™ audio files.
Enable Display of Nero
Digital Audio Logo When Nero Digital™ audio files are started, displays the
Nero Digital™ Audio Logo in the playback window.
5.5 External subtitles
The External subtitles entry allows you to enable external subtitles and to define the dis-
play.
The following configuration options are available:
Enable external sub-
titles
Enables display of external subtitles.
External subtitles are only available if the relevant file with
external subtitles is saved in the same directory as the se-
lected film.
Set font... Defines the font of the subtitles.
Set text color... Defines the font color for the subtitles.
Use shadow Enables shadows around external subtitles.
Options window
Page 23
5.6 DNC
The DNC entry provides configuration options for Dynamic Noise Control. It reduces the
noise produced by the drive during playback.
The following check box is available:
Enable DNC Enables dynamic noise control if the integrated drive sup-
ports this function.
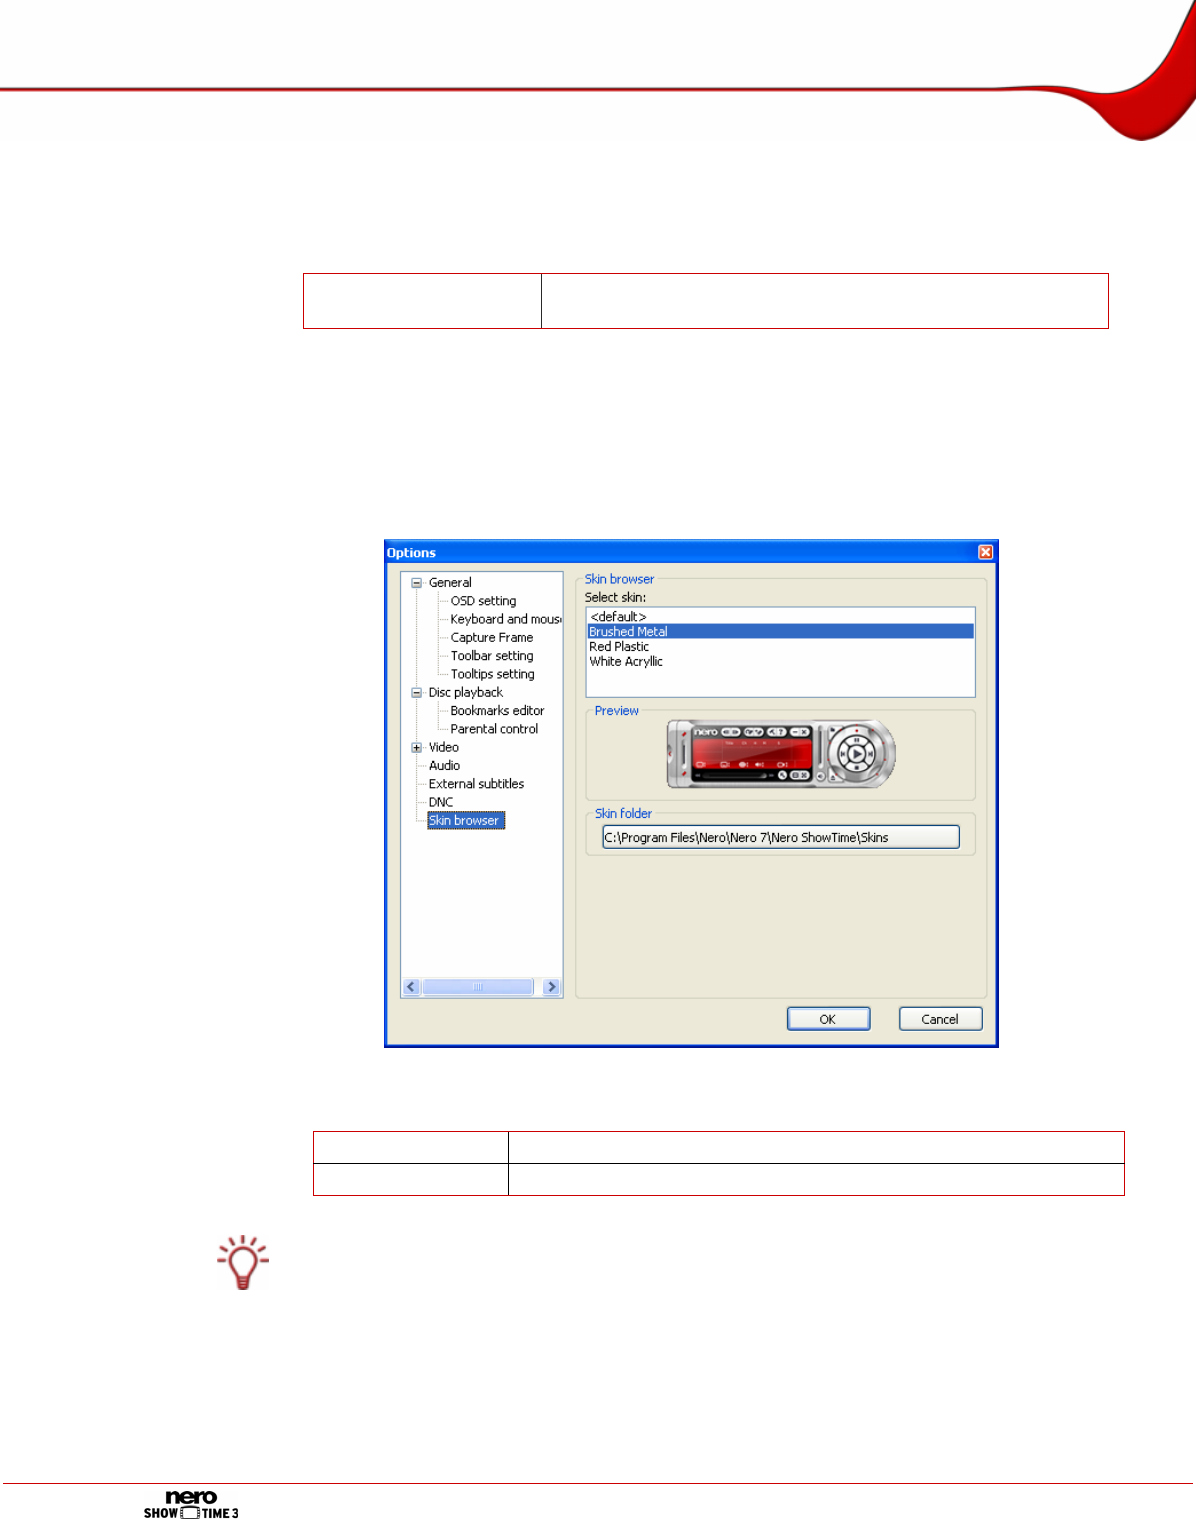
5.7 Skin browser
The Skin browser entry allows you to adjust the appearance of the skin or graphical inter-
face of Nero ShowTime. It is opened by default when you launch Nero ShowTime for the first
time.
Fig. 9: Options – Skin browser dialog box
The following configuration options are available:
Select skin Defines the desired graphical user interface.
Skin folder Defines the folder where the templates are installed.
Two files are required so that a skin can be loaded in Nero ShowTime. One file in the for-
mat *.skn and one *.bmp file, both of which must have the same file name (e.g.
Blue_Interface.bmp and Blue_Interface.skn).
Playback
Page 24
6 Playback
Nero ShowTime allows you to play media files. You can select the following media files to
play:
Video files
Audio files
Video movie that is available in a video folder structure, on a DVD or hard drive for in-
stance
Audio CD
Picture files
You can start media files from different sources. Select the source using the button.
6.1 Playing discs from the drive
Nero ShowTime can play media files that are contained on an optical disc (e.g. CD or DVD) .
You can play a video movie for example from DVD or an Audio CD. To do this, proceed as
follows:
1. Insert the optical disc in the drive.
2. Click on the button.
Æ The selection list for the source will open.
1. Select the drive containing the optical disc.
2. Click on the button.
Î The media file or files are played by the selected drive.
If a DVD-Video has already been played, the DVD Auto-Resume dialog box opens. You
can select here whether the DVD-Video should be resumed at the point last seen or from
the beginning.
Normally each DVD-Video has a menu with various options with which you can define the
language of the movie, the picture size or view bonus material. Playback of the feature
movie is also started in the menu.
These menus in your DVD-Video are independent of Nero ShowTime!
6.2 Play from Folder
Nero ShowTime can play media files that are contained in a folder. The folder can contain a
video title such as a DVD-Video movie copied to the hard drive or any other media files. To
play media files from a folder, proceed as follows:
1. Click on the button.
Æ The selection list of the source will open.
2. Select the Play from Folder entry.
Æ The Select folder dialog box will open.

Playback
Page 25
3. Select the folder you want and click on the OK button.
Î Playback from the folder starts.
If the folder has a video title, the video movie is played.
If the folder contains any number of media files, the files are played in alphabetical or-
der. You can use the button to view the list during playback and to select individual
files.
6.3 Playing a media file
Nero ShowTime allows you to select an individual media file to play it. To do this, proceed as
follows:
1. Click on the button.
Æ The selection list for the source will open.
2. Select the File entry.
Æ A dialog box is opened.
3. Select the media file you require and click on the Open button.
Î The media file is played back.
You can only select one media file using the File entry. If you would like to select multiple
media files to play, create a playlist using the entry Media Files (see Playlists from media
files).
6.4 Playlists from media files
Nero ShowTime allows you to create playback lists. A playlist can contain media files of dif-
ferent formats. During playback, the files are played in the order in which you compiled them.
You can save the playlist you created and load it again later in order to play them again or to
edit them quickly and easily.
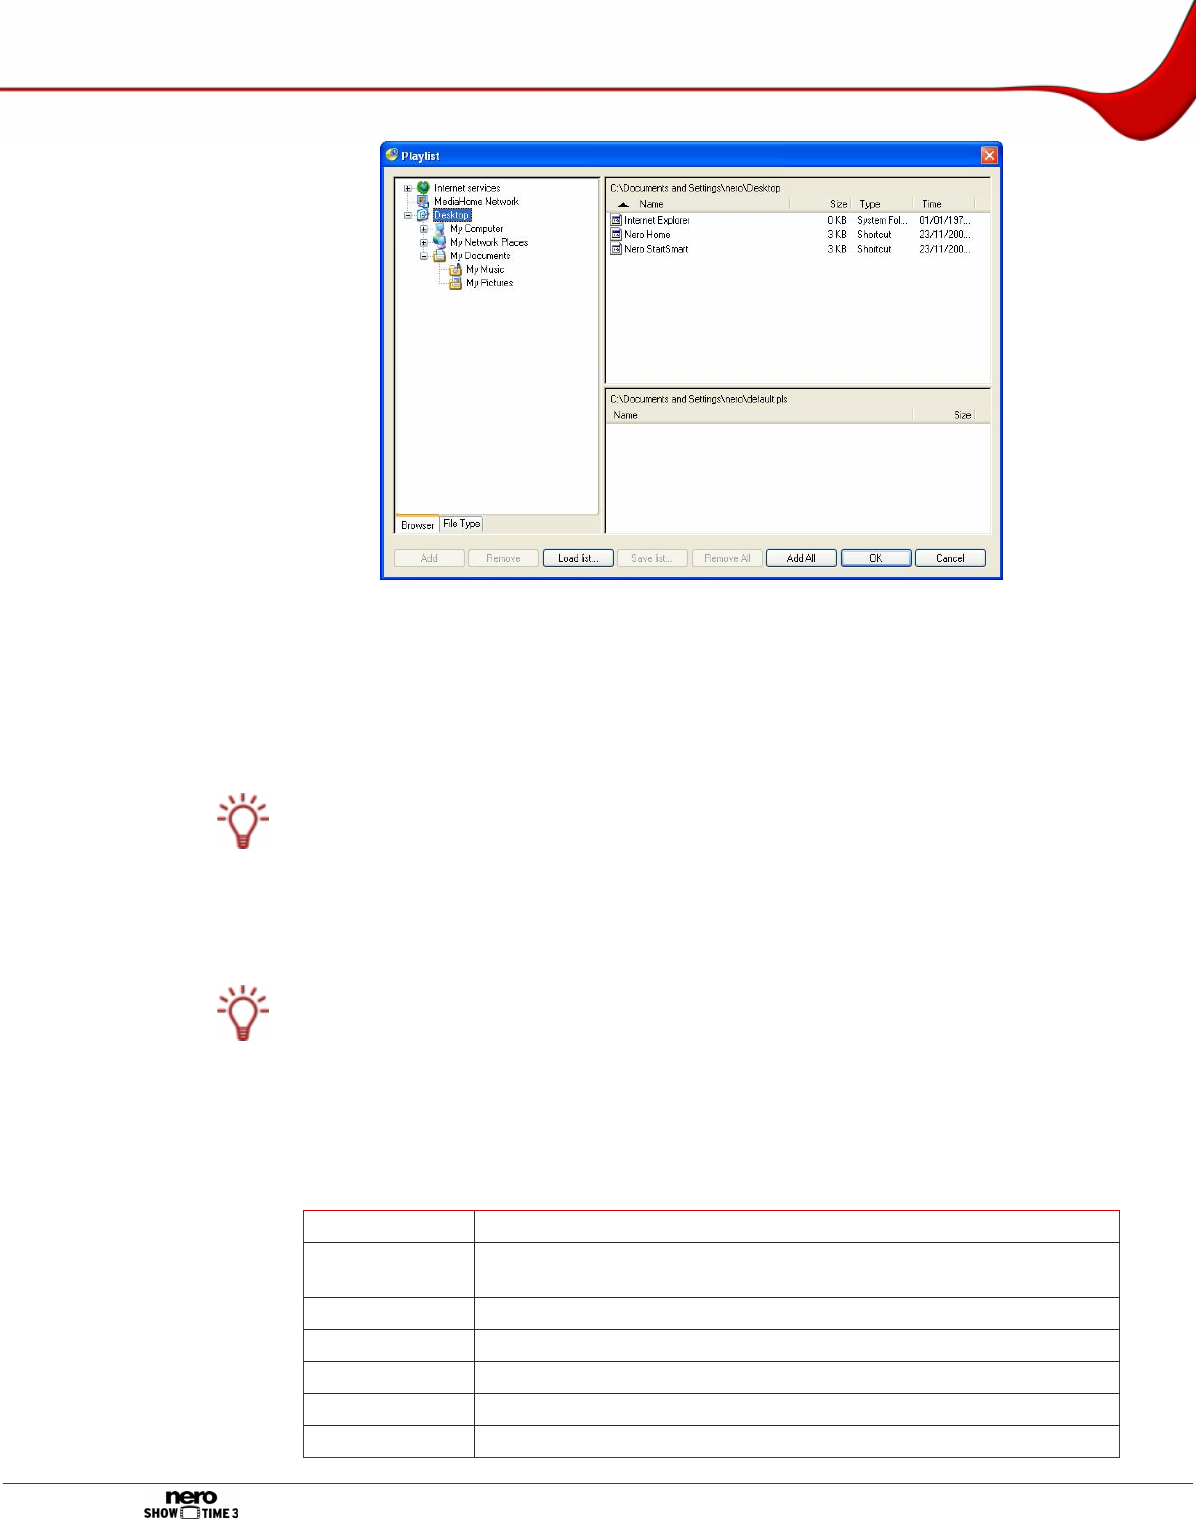
6.4.1 Playlist window
The Playlist window is the starting point for creating, loading, saving and editing playlists. It
consists of various buttons and three areas where - if the Browser tab is selected - you can
select folders from a navigation tree, select files and compile the playlist.
Playback
Page 26
Fig. 10: Playlist window
If the Browser tab is selected, a navigation tree is displayed in the left-hand area from which
you can select the media files. The familiar Windows® folder structure is always displayed.
The MediaHome Network entry may also be available.
The MediaHome Network entry contains accessible files if a Nero MediaHome Server has
been started in the local network.
Nero MediaHome is an application in the Nero 7 program suite and is automatically in-
stalled while Nero 7 is being installed. Nero MediaHome is a media server, which makes
files available in a local network and transcodes them in real time as required. Please refer
to the Nero MediaHome manual for further information.
If you subscribe to Nero Scout Internet services such as Internet TV or Internet radio, the
Internet Services entry contains these Internet addresses.
Nero Scout is an application in the Nero 7 program suite and is automatically installed while
Nero 7 is being installed. Nero Scout indexes and catalogs all media files on your com-
puter. Please refer to the Nero Scout manual for further information.
The files in the selected folder are shown in the top right-hand area.
The bottom right-hand area shows the playlist. It contains the media files that you have
added to the list using the Add button.
The following configuration options are available:
Browser Displays the folder and services in a navigation tree.
File Type Displays a selection list with formats. This is where you can select
which formats should be displayed.
Add Adds a selected media file to the playlist.
Remove Removes a selected media file from the playlist.
Load list... Loads a saved playlist.
Save list... Saves the current playlist.
Remove All Removes all media files from the current playlist.
Playback
Page 27
Add All Adds all media files in the selected folder to the playlist.
OK Closes the window and begins playing the playlist.
Cancel Cancels the procedure and closes the window.
6.4.2 Creating and saving a playlist
To create and save playlists, proceed as follows:
1. Click on the button.
Æ The source selection list will open.
2. Select the Media Files entry.
Æ The Playlist window will open.
3. Select the desired file.
4. Click on the Add button.
Æ The file is added to the playlist.
5. Repeat the last two steps for each additional file that is to be added to the playlist.
6. Click on the Save list... button.
Æ The Save As dialog box will open.
7. Select the desired playlist format in the File Type text box.
The formats PLS, M3U and RSS are available for selection.
8. Enter the desired file name in the File Name input field.
9. Click on the Save button.
Î The playlist is saved.
You can now play the playlist by clicking on the OK button. To close the window without
starting playback, click on the Cancel button.
6.4.3 Playing a playlist
To load a saved playlist, proceed as follows:
1. Click on the button.
Æ The source selection list will open.
2. Select the Media Files entry.
Æ The Playlist window will open.
3. If you want to play a saved playlist:
1. Click on the Load list... button.
Playback
Page 28
Æ The Open dialog box will open.
2. Select the desired playlist.
3. Click on the Open button.
Æ The playlist is displayed in the Playlist window.
4. If you want to create a new playlist:
1. Select the desired file in the left-hand area.
2. Click on the Add button.
3. The file is added to the playlist.
4. Repeat the two last steps for each additional file to which the playlist is to be added.
5. Click on the OK button.
Î The Playlist window is closed.
Nero ShowTime starts by playing the playlist.
During playback you can use the button to view the list and select individual files.
6.4.4 Editing a playlist
To edit a saved playlist, proceed as follows:
1. Click on the button.
Æ The source selection list will open.
2. Select the Media Files entry.
Æ The Playlist window will open.
3. Click on the Load list... button.
Æ The Open dialog box will open.
4. Select the desired playlist.
5. Click on the Open button.
Æ The dialog box closes and the selected playlist is displayed at the bottom right-hand area
of the Playback window.
6. If you want to add files to the playlist:
1. Select the desired file.
2. Click on the Add button.
Æ The file is added to the playlist.
3. Repeat the last two steps for each file that is to be added to the playlist.
7. If you want to remove files from the playlist:
1. Select all files that you want to remove.
2. Click on the Remove button.
Æ The file is removed from the playlist.
8. If you want to save the playlist under a new file name:

Playback
Page 29
1. Click on the Save list... button.
Æ The Save As dialog box will open.
2. Enter the desired file name in the File Name input field.
Æ The playlist is saved.
9. If you want to save changes to the selected playlist:
1. Click on the Save list... button.
Æ The Save As dialog box will open.
2. Select the file name of the selected playlist.
3. Click on the Save button.
Æ The selected playlist is overwritten.
Î You have successfully edited a saved playlist.
6.5 Playing media
Nero ShowTime enables you to play various media. If a Nero MediaHome Server is started
in the network and has made TV channels available for streaming , you can watch TV using
Nero ShowTime.
To play media, proceed as follows:
1. Click on the button.
Æ The source selection list will open.
2. Select the Media Files entry.
Æ The Playlist window will open.
3. Select a medium of your choice from the MediaHome Network entry.
4. Click on the Add button.
Æ The file is added to the playlist.
5. Click on the OK button.
Î The Playlist window closes.
Nero ShowTime commences playback.
6.6 Using Internet services
If you have entered Internet services in Nero Scout such as Internet TV or Internet radio ,
you can retrieve and use these Internet services in Nero ShowTime.
To use Internet services, proceed as follows:
6. Click on the button.
Æ The source selection list will open.
7. Select the Media Files entry.

Playback
Page 30
Æ The Playlist window will open.
8. Select a medium of your choice in the Internet Services entry.
9. Click on the Add button.
Æ The file is added to the playlist.
10. Click on the OK button.
Î The Playlist window closes.
Nero ShowTime begins with playback.
Control during playback
Page 31
7 Control during playback
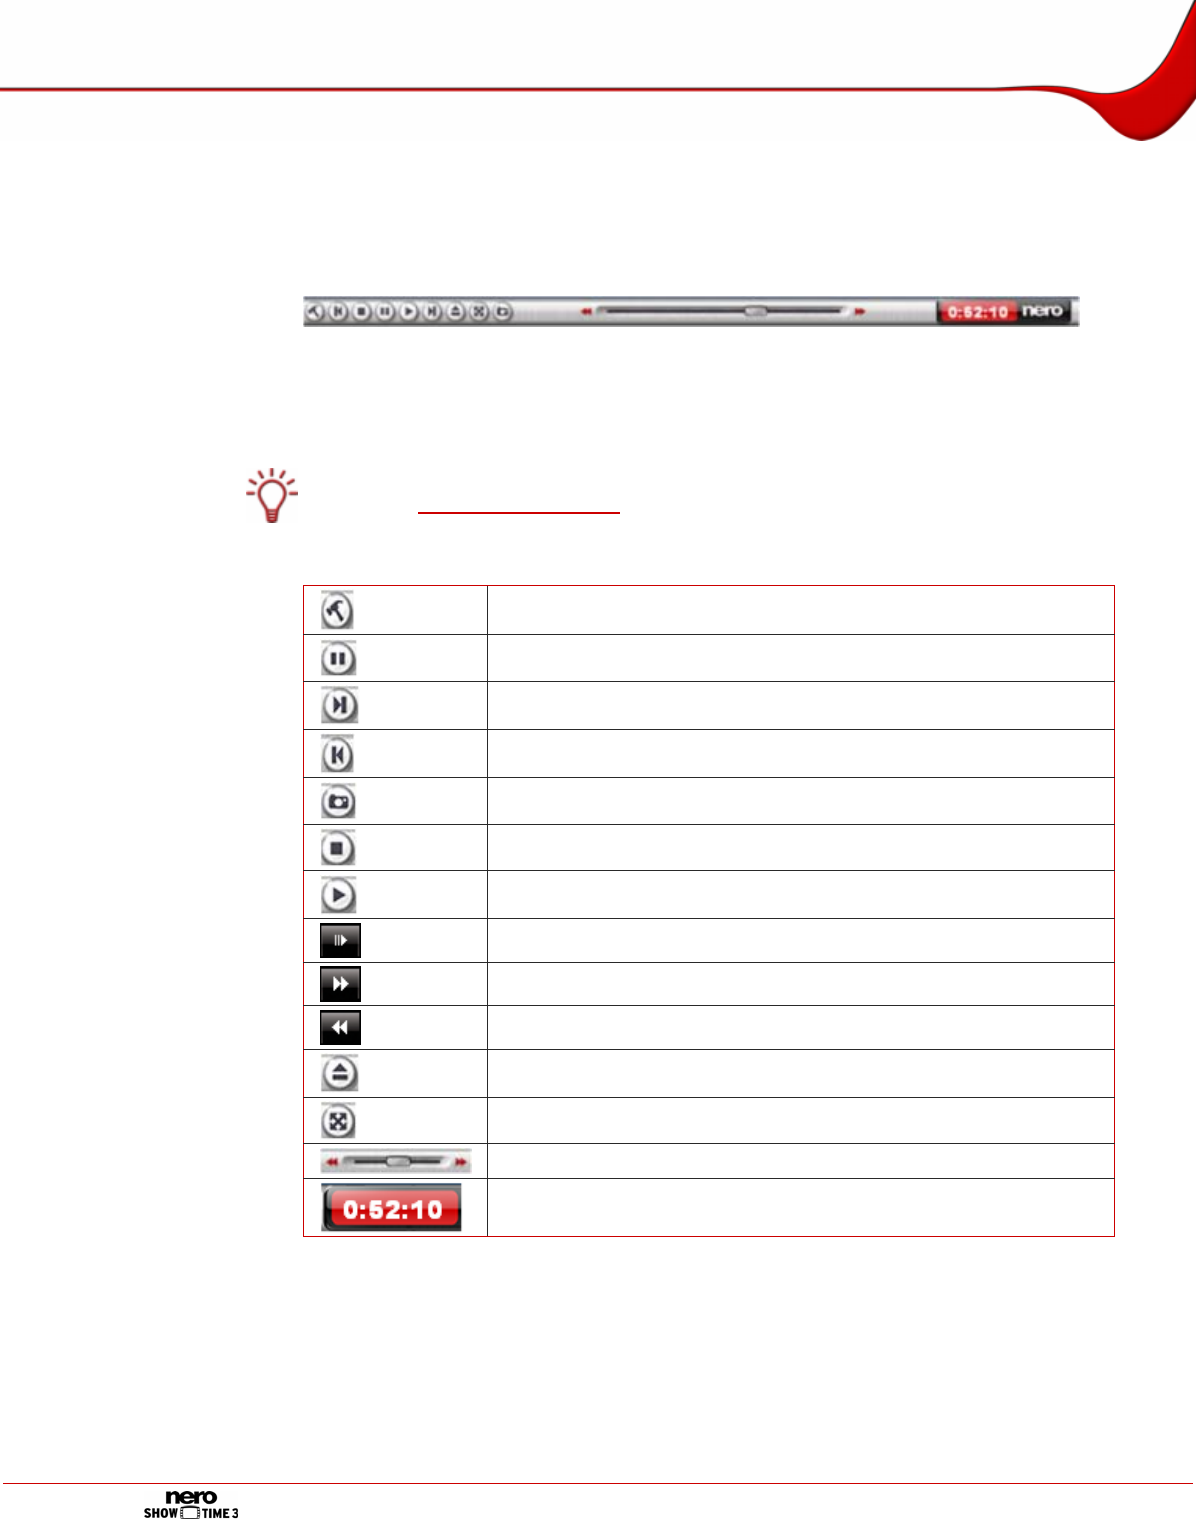
7.1 Toolbar
Fig. 11: Program interface- Toolbar
You can show a toolbar during playback by moving the mouse pointer to the top of the
screen.
The precise configuration of the toolbar will depend on your settings made under Op-
tions (see Configuring the toolbar).
The following buttons are available:
Opens the Options window. [Ctrl+C]
Interrupts playback, then continues it after a second click. [Space]
Jumps to the next chapter or to the next media file. [N]
Jumps to the previous chapter or to the previous media file. [P]
Creates a snapshot. [C]
Ends playback. [S]
Starts playback. [Enter]
Jumps one frame forwards. [T]
Selects a fast forward speed. [F]
Selects a rewind speed. [R]
Ejects the disc. [J]
Switches between full-screen and normal view. [Z]
Navigates smoothly (no chapter boundaries).
Shows the playback time.

Control during playback
Page 32
7.2 Context menu
You can use the context menu to control Nero ShowTime during playback. It is not configur-
able. The functions of the individual entries correspond to the buttons on the program inter-
face (see Program interface).
The following entries are also available:
Enter New Se-
rial Number Allows you to enter a new serial number if you have received one
for switching from the test version to the full version.
About Opens the About Nero ShowTime window where you will find in-
formation on the version number for instance.

Control during playback
Page 33
8 Key combinations
The following keyboard shortcuts and key combinations have been defined for Nero Show-
Time:
+ Raises the volume.
- Reduces the volume.
[Enter] Starts playback.
[Space] Cancels playback/resumes playback.
[Q] Switches to mute/loud.
[R] Repeats a selected part of the movie.
[Ctrl+R] Repeats a chapter or title.
[T] Jumps one frame forwards.
[Ctrl+t] Minimizes the program interface.
[U] Opens subtitle selection.
[Ctrl+U] Shows/hides the subtitles.
[Ctrl+Alt+U] Shows/hides external subtitles.
[O] Opens the selection of the playback source.
[Ctrl+O] Opens the playback list.
[P] Jumps to the previous chapter.
[N] Jumps to the next chapter.
[Ctrl+P] Opens the file.
[A] Changes the camera perspective.
[S] Ends playback.
[D] Enables/disables the zoom tool.
[F] Plays the movie forwards.
[G] Jumps to the next bookmark.
[Ctrl+G] Opens the Time dialog box.
[Ctrl+Alt+S] Opens the Subtitle Control dialog box.
[H] Changes the language.
[J] Ejects the disc.
[K] Switches between the channels on a karaoke DVD.
[L] Opens the selection of the available menus.
[Z] Changes between full-screen and normal view.
[B] Plays the movie backwards.
[Ctrl+B]
Jumps back one intra codec picture.
An intra codec picture is compressed in the video stream inde-
pendently of other pictures while the picture is being processed.
This corresponds to approximately 10 frames.
Control during playback
Page 34
[C] Creates a snapshot.
[Ctrl+C] Opens the Options menu.
[M] Adds a bookmark.
[0-9] Keyboard range 0-9.
[F1] Shows the Help file.
[Page up] Fast forwards.
[Page down] Rewinds.

List of figures
Page 35
9 List of figures
Fig. 1: Nero StartSmart 8
Fig. 2: Program interface 9
Fig. 3: Minimized view of control panel 9
Fig. 4: Options window 12
Fig. 5: Options – OSD setting window 13
Fig. 6: Options – Toolbar setting window 14
Fig. 7: Options – Disc playback dialog box 16
Fig. 8: Edit user dialog box 19
Fig. 9: Options – Skin browser dialog box 23
Fig. 10: Playlist window 26
Fig. 11: Program interface- Toolbar 31

Glossary
Page 36
10 Glossary
Container format
A container format defines type and structure, in other words sets out the framework for
packing the file types. AIFF for audio, AVI for video, MPG or MP4 for audio, video, and subti-
tles for instance are particularly commonly used containers.
DRM
Abbreviation for Digital Rights Management. The purpose of digital rights management is to
protect intellectual property rights against illegal copying by means of pirated editions and to
create billing options for licenses.
Dolby Surround
Dolby Surround is an analog system that makes four channels from two audio tracks. In ad-
dition to the stereo channels (left and right) there are two other surround channels (rear left
and rear right). The surround signal is mono and is extracted from both stereo channels. Fur-
thermore, the frequency range is restricted.
Dolby Surround Pro Logic II
Dolby Surround Pro Logic II is a further improvement on Dolby Surround. The surround
channels are in stereo and the rear channels have no frequency restrictions.
DTS
Digital Theater System. This multi-channel sound format works for Video-DVDs with a bit
rate of 754.5 or 1509.25 Kbps. DTS works with higher data rates than Dolby Digital and
therefore requires more space on the DVD.
High Efficiency AAC Audio
High Efficiency AAC Audio is an audio compression process based on the MPEG-4 specifi-
cation. Compared to other formats such as MP3, High Efficiency AAC Audio has a variety of
advantages, for instance improved quality at the same file size or support for multi-channel
audio with up to 48 sound channels.
Intra Codec Picture
An intra codec picture is compressed independently of other pictures in the video stream
while the image is being processed. It corresponds to approximately 10 frames.
miniDVD
A miniDVD is simply a CD-R or CD-RW, which has been burned in UDF format with a DVD
structure. It has the same technical options and qualities as a DVD. MiniDVDs can be played
on the computer without any problem whereas there is no guarantee that they can be played
in all DVD players.
MPEG
Is short for Motion Picture Experts Group. This is a group of experts concerned (among other
things) with standardizing audio and video compression or container formats.

Glossary
Page 37
MPEG-1
MPEG-1 is a compression standard for video and audio files. The standard is tailored to the
multi-media area where only a limited storage capacity (Video-CD) or limited bit rates are
available. The quality roughly corresponds to that of a VHS video cassette. The MPEG-1
Audio-Layer 3 audio coding process is popularly know as "MP3".
MPEG-2
MPEG-2 is a compression standard for video and audio files. Because of higher bit rates on
the video side, the quality of videos compressed using MPEG-2 is higher on the video side
than the quality of videos compressed using MPEG-1. MPEG-2-coded videos are used for
both SVCDs and DVDs. Audio files were upgraded to lower bit rates and multiple channels
(5.1).
MPEG-3
MPEG-3 was originally planned as the standard for high-definition television (HDTV) and has
meanwhile been implemented in the MPEG-2 standard. The MPEG-3 standard has not ma-
terialized.
MPEG-4
MPEG-4 is a further development of the MPEG-2 format. In comparison with MPEG-2, the
data is compressed even more and the format has been extended to support video objects,
3-D contents, artificial objects, and so on. Certain standards such as AAC as well as the
support of Digital Rights Management (DRM) have been defined in the audio sector.
Nero Digital
Nero Digital is the next generation of MPEG-4-compatible compression technology – with al-
gorithms for premium-quality video encoding and with full High Efficiency AAC Audio. Nero
Digital is compatible with ISO/14496-2/3, MPEG-4 and all MPEG-4 applications.
S/PDIF
Abbreviation of Sony/Philips Digital Interface. S/PDIF is a standardized transmission format
for audio data. The interface is found on digital audio devices such as DAT recorders or
high-quality PC sound cards. S/PDIF permits digital transmission from one device to another,
without the need to first convert the data to produce an analog signal.
SVCD
Super Video Compact Disc. Movies and audio/video data with the MPEG-2 compression
standard are stored on a SVCD. In comparison with a VCD, there is an improvement in the
picture quality.
VCD
Video Compact Disc. Movies and audio/video data are stored on a CD with the MPEG-1
compression standard. The basis for this is an ISO file system and digital video movies are
also included. A VCD can be played back by most CD-ROMs, DVD players and DVD-ROM
drives using the software. The picture format is played back in 4:3 and the sound in stereo.
Multiple sound tracks or selectable subtitles are not provided for.

Index
Page 38
11 Index
A
Administrator
Creating 19
Audio 7
Audio Formats 7
Audio Meta Data 23
Displaying Cover 23
Stereo Mode 23
Audio CD 25
Audio File 25
B
Bookmark
Adding Bookmark 11
Bookmarks 18
C
CD
Playing 25
Chapter 10, 32
Repeating 11
Selecting 11
Smooth Navigation 10, 32
Configuration
Configuring Toolbar 15
Context menu 33
Control XE
Control Panel 9
Minimize 9
Conventions 5
Copy Protection 7
D
Disc
Automatic Playback 17
Playing 25
DVD
Auto Play 17
Auto-Resume 25
Playing 25
Dynamic Noise Control 24
E
Effects
Chroma 22
Luma 22
F
Film effects XE
Formats 7
Full-screen Mode
Change View 9
Full-Screen Mode
Changing View 11, 32
G
Glossary 37
H
Hardware Acceleration 20
I
Installation 7
Internet Radio 30
Internet TV 30
J
Jog Shuttle 10
L
Launching Program 8
M
Media
Playing 30
Media File 32
Mouse
Configuring Mouse Wheel 14
N
Nero Digital

Page 39
Subtitle Setting 22
Nero Digital™ 21
Nero Digital™ Audio
Displaying Cover 23
Displaying Logo 23
Nero MediaHome 27
O
On-Screen Display 13
P
Parental control 18
Parental Control 18
Creating an Administrator 19
Creating Users 19
Parental Level 18
Picture File 25
Playback
Finishing 10
Playback List
Displaying 26
Playback Source
Select 10
Playback Window 9
Playlist 26
Creating 28
Displaying 11
Editing 29
Loading 28
Playing 28
Saving 28, 29
Program Interface 32
Control Panel 10
Playback Window 9
Selecting Skin 24
Toolbar 32
S
Screen
Letterboxing 23
Monitor Border Size 23
Screen Control 20
Skin
Selecting Skin 24
Snapshot 12, 32
Configuring 15
Start 24
System Requirements 7
Sound Card 7
T
Target Group 5
Toolbar 32
Setting 15
Tooltip 16
TV 30
U
User
Creating 19
V
Video 7
Brightness 23
Contrast 23
DVD-Auto Resume 25
Gamma 23
Hue 23
Saturation 23
Sharpness 23
Video Formats 7
Video File 25
Video Mode
Deinterlacing 21
Video Movie 25
W
WHQL Certified Driver 7