Ness SMC315 Remote controlled alarm system/radio dialer User Manual Medi Call
Ness Security Products Pty Ltd. Remote controlled alarm system/radio dialer Medi Call
Ness >
Users Manual
MEDI-CALL UNIT
USER MANUAL

1
TABLE OF CONTENTS
TABLE OF CONTENTS...........................................1
INTRODUCTION......................................................1
SMARTLINK FEATURES........................................2
USING SMARTLINK................................................3
SPECIAL FUNCTIONS.............................................5
DISPLAYS AND WARNINGS..................................6
SPECIFICATIONS....................................................7
INTRODUCTION
Your SmartLink Medi-
Call unit has been designed to provide you with the freedom
and peace
of mind in that, should you need assistance or HELP, it is available to you
24 hours a day with the simple press of a Button.
The modern slim line design of the SmartLink Medi-
Call unit allows it to be installed
unobtrusively anywhere and is ready when you
need help. HELP can be summonsed
by pressing a Button on your personal Pendant or Wristwatch, which you can wear
both inside your home or outside in the garden, ready for any emergency, giving you
the freedom you enjoy for total control at all times.
The SmartLink Medi-
Call unit has been built to the highest of technical standards for
the protection of people and property and manufactured to Australian and
International quality standards.
Your SmartLink Medi-Call unit can be supplied with additional fixed
or portable
Radio Key Pendants, which can be worn or placed around the home as needed. Please
contact your supplier for more information.
2
SMARTLINK FEATURES
3
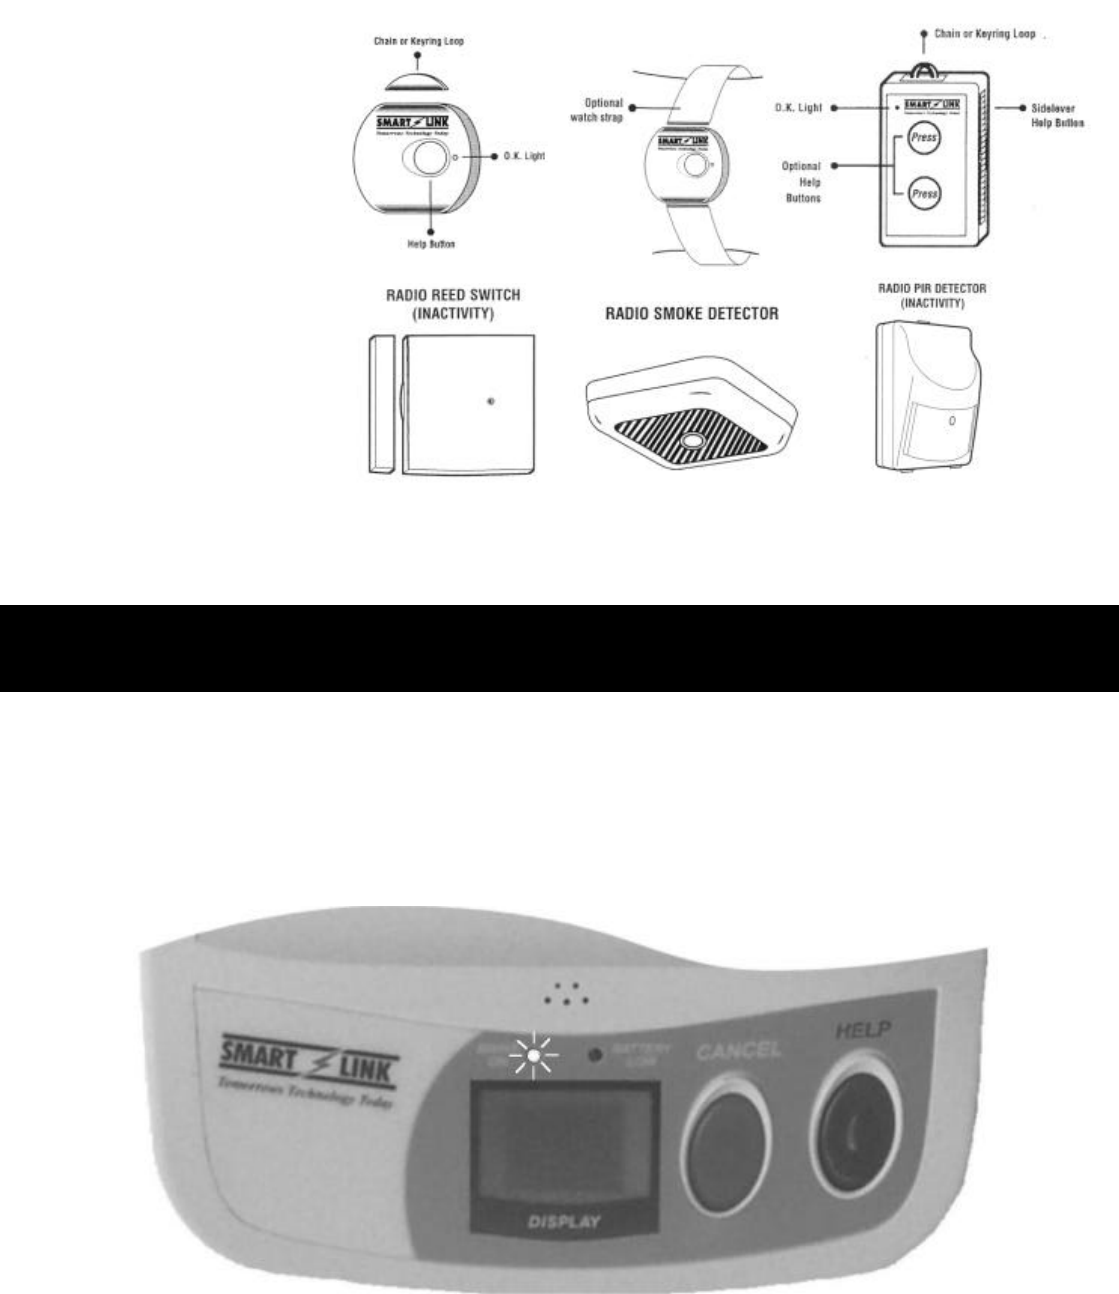
PENDANTS
(WRISTWATCH
or CHAIN)
DETECTORS
USING SMARTLINK
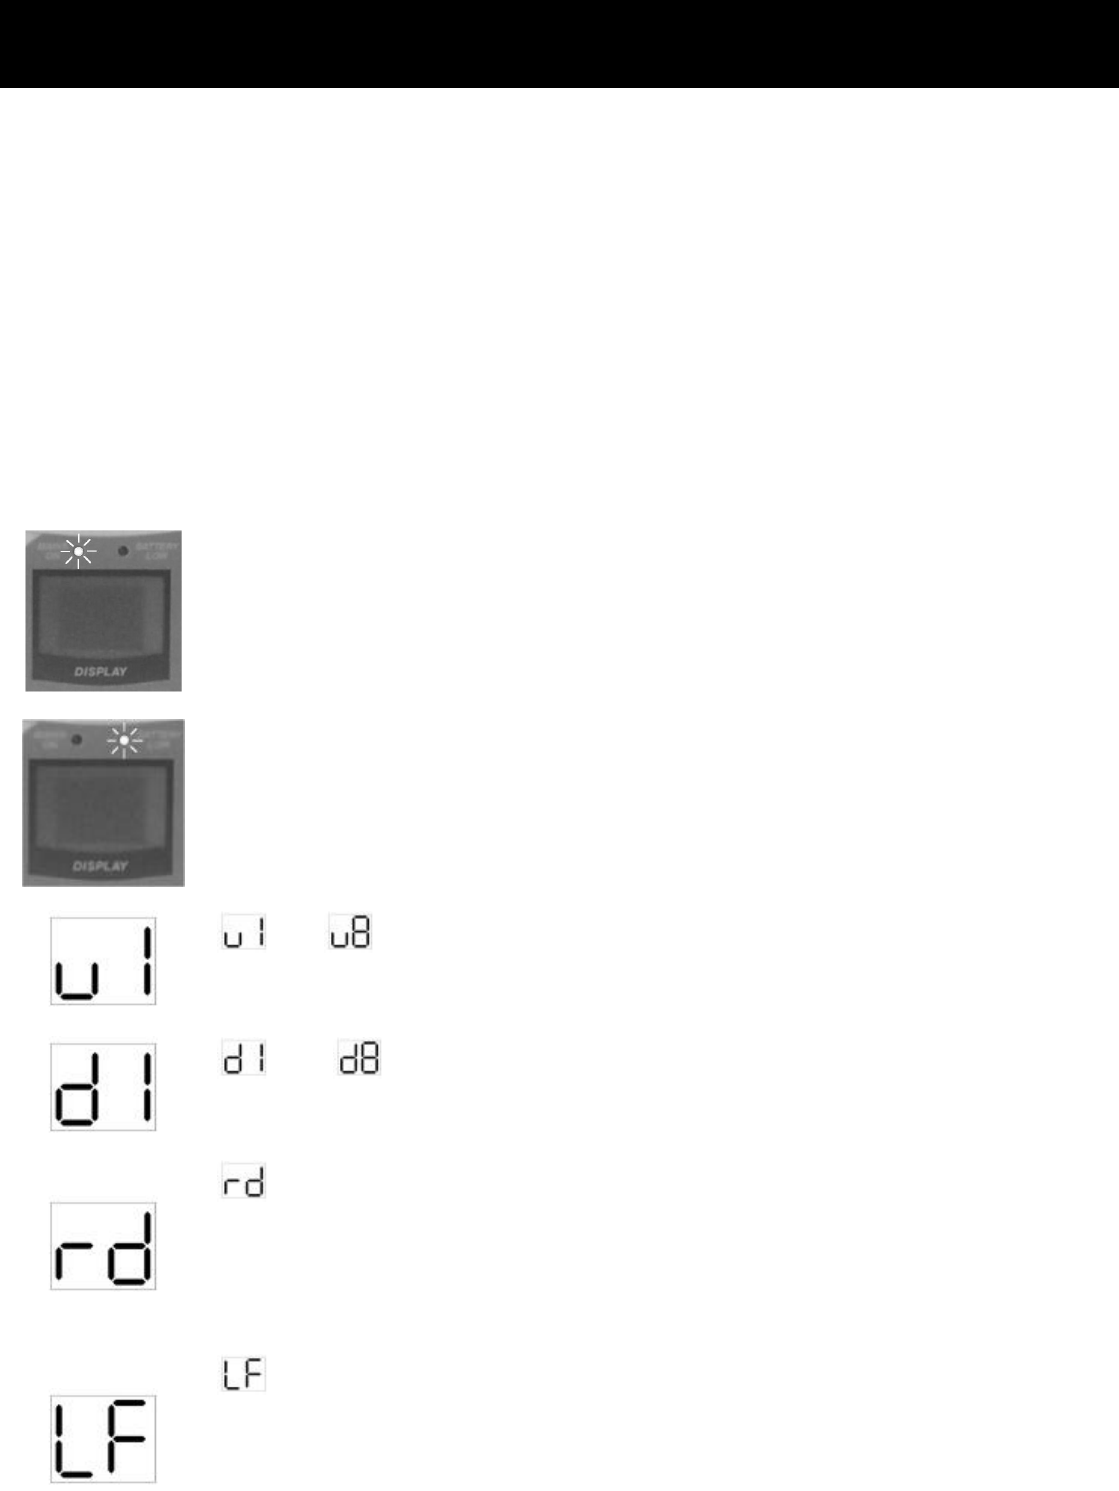
NORMAL OPERATION
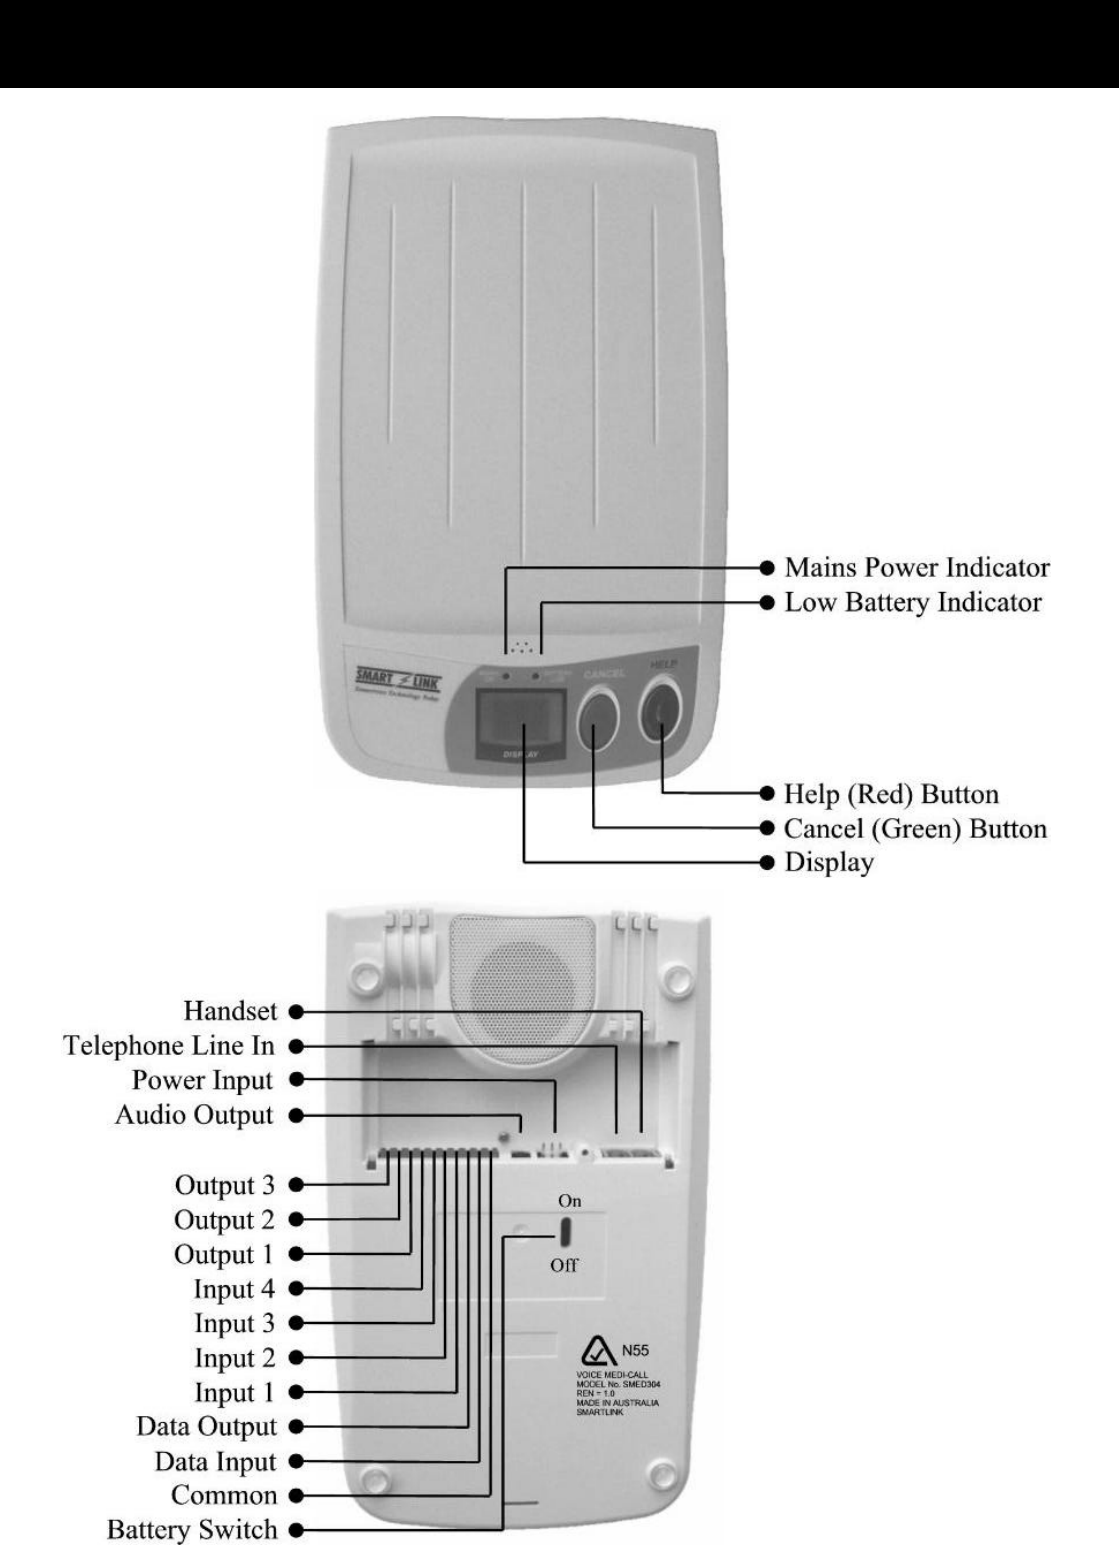
Your SmartLink unit will normally look like this:
The MAINS ON Light should be ON and the CANCEL (GREEN) BUTTON will
FLASH every 4 seconds.
4
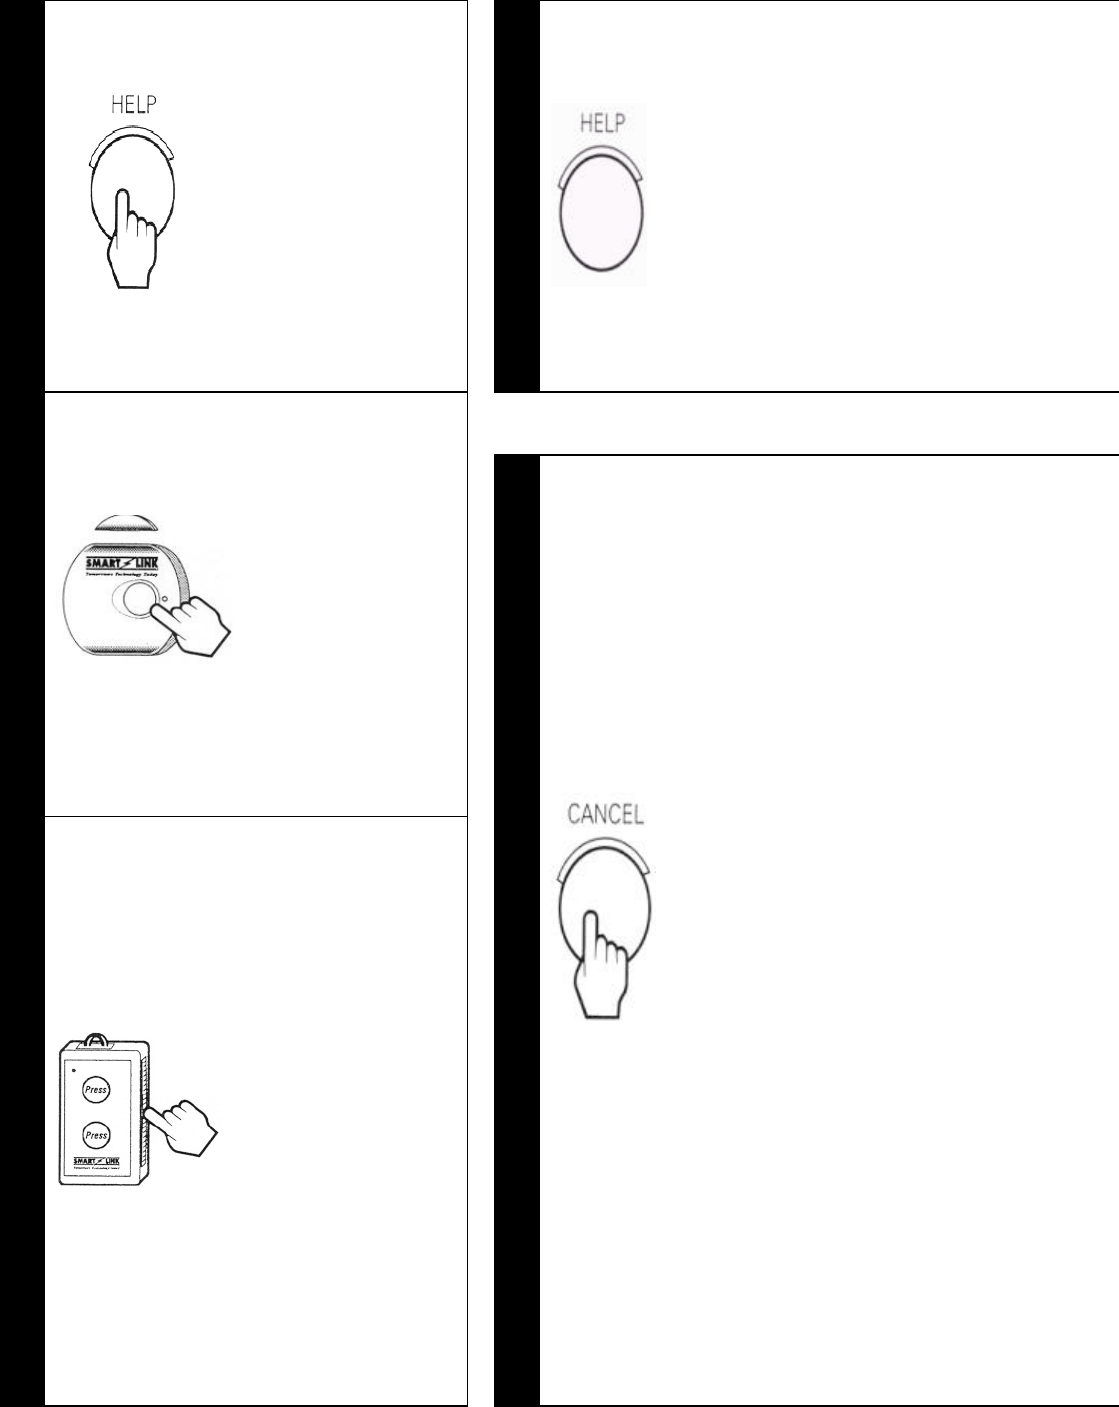
TO CALL FOR HELP
You can make your SmartLink Call for Help by either:
Pressing the
HELP (RED)
BUTTON on
the SmartLink
unit.
2
The HELP (RED) BUTTON will
FLASH rapidly and the SmartLink
unit will start beeping.
This is a Pre-Alarm warning,
while this is sounding you can
Cancel the Help alarm by pressing
the CANCEL (GREEN)
BUTTON on the SmartLink unit.
OR
Pressing the
Large HELP
(Panic)
BUTTON on
your
Wristwatch/
Pendant for 2
Seconds
1
OR
Pressing the
Front or Side
Lever HELP
(Panic)
Button(s) on
your Box Style
Pendant for 2
Seconds.
3
If the CANCEL (GREEN)
BUTTON is not pressed within
the pre-alarm time (0-60 seconds),
then your SmartLink unit will dial
your Control Centre using the
telephone line.
(NOTE: Your SmartLink unit will
cut off your telephone for the
duration of the call to ensure that
there is no interference to the call,
this will normally take about 15
seconds).
When your Control Centre has
received the Help Call, your
SmartLink unit will beep 7 times
to let you know that the call has
been received. The HELP (RED)
BUTTON will now FLASH
slowly every 4 seconds to indicate
that your SmartLink unit has
called for Help.

5
SPECIAL FUNCTIONS
Your SmartLink unit may have been programmed with one or more special
features by your installer,
these are described below, check with your
Monitoring Company if you have any queries about these or other features.
OVER DUE TIMER (PILL TIMER)
Your SmartLink unit can be programmed to produce regular warning beeps such as a
Medication reminder.
When the Over Due Timer is active it will be pre-
set by your Installer to provide
warning beeps and flash the HELP (RED) BUTTON for 10 minutes as a reminder to
take your Medication. You can stop the warning by pressing the CANCEL (GREEN)
BUTTON while the warning is happening.
NOTE: There is no Help message sent to your Control Centre, the warning is a
reminder for you only.
If you do not press the CANCEL (GREEN) BUTTON while the warning is sounding
(10 minutes) the Over Due Timer will de-activate and it will not re-
start until the
CANCEL (GREEN) BUTTON is pressed again.
You can use this as a useful feature if you wish to change the timer to commence at a
different time. For example
simply press the CANCEL (GREEN) BUTTON at
4pm to have the Over Due Timer warning soun
d every day at 4 o’clock in the
afternoon.
If you wish to change the timer to a different interval e.g. every week, then your
Control Centre may be able to change this time over the phone or your Installer can
change it for you.
INACTIVITY MONITOR
Your Sma
rtLink unit may have been programmed by your Installer to ensure
that you have not had an accident and are unable to move and you do not have a
Pendant with you to call for Help.
The Inactivity Monitor, after a fixed period of time without any activity, wi
ll
automatically send a Help message to your Control Centre. The SmartLink unit
will produce warning beeps and flash the HELP (RED) BUTTON.
6
DISPLAYS AND WARNINGS
HELP (RED) BUTTON FLASHING QUICKLY WHILE BEEPING
Your SmartLink unit is about to send a Help message to your Control Centre.
HELP (RED) BUTTON FLASHING SLOWLY
Your SmartLink unit has sent a Help message to your Control Centre and is waiting to
send the I’m O.K message. The CANCEL (GREEN) BUTTON will need to be
pressed to send the I’m O.K message.
FAULT DISPLAYS
MAINS ON LIGHT FLASHING
AC Power Fail – Check and make sure that the MAINS Power Pack
is plugged in and turned ON at the Power Point.
BATTERY LOW LIGHT FLASHING
Power has been off for too long and Battery is Low or Faulty.
Contact your Installer or Control Centre.
TO IS ON THE DISPLAY
Pendant Low Battery – Contact your Installer or Control Centre.
TO IS ON THE DISPLAY
Detector Low Battery - Contact your Installer or Control Centre.
IS ON THE DISPLAY
The SmartLink unit failed to send a message to your Control
Centre – Check and make sure that the telephone lead is plugged in
and all normal telephones are working.
IS ON THE DISPLAY
The telephone line has failed – Check and make sure that the
telephone lead is plugged in and all normal telephones are working.
(SmartLink unit will also beep for 25 seconds).

Part No. 890-293-2
7
SPECIFICATIONS
WARNING: For safety reasons, only connect equipment with a telecommunications
compliance label. This includes customer equipment previously labelled permitted or certified.
Changes or modifications not expressly approved by the manufacture could void the user's
authority to operate the equipment. This device complies with Part 15 of the FCC Rules.
Operation is subject to the following two conditions; (1) this device may not cause harmful
interference, and (2) this device must accept any interference received, including interference
that may cause undesired operation.
© Copyright SmartLink International Pty Ltd
August 2001
Email: smartlink@smartlink.com.au
Web Site: www.smartlink.com.au
To the best of our knowledge, the information contained in this manual is correct at the time of print. SmartLink International
Pt
y Ltd reserve the right to make changes to the features and specifications at any time without prior notice in the course of
product development.
SmartLink Unit
§ Dimensions
§ Weight
§ Quiescent Current
§ AC Plug Pack
§ Battery Backup
§ Radio Receiver
§ Sensitivity
§ Range
286 x 174 x 38 mm
590gms (including battery)
1mA
17V AC 300mA with integral earth
8.4V Rechargeable Ni-MH
Superheterodyne
> -105 dbm
50 metres open air
(Subject to environmental conditions)
Transmitter
§ Type
§ Frequency
§ Power Output
SAWR stabilised
303.875 MHz
< 10 uW (or various international compliances)
Conforming Standards
§ IS09001
§ AS2999/4607
§ TS002
§ AS2201.4 (C2)
§ AS4268.2
International Quality Standards
Personal Response Systems
Austel Public Switched Telephone Network
Intruder Alarm Systems - Wireless
Emissions