Netgear orporated 06100028 802.11a/g Prosafe Wireless Access Point User Manual Netgear AP
Netgear Incorporated 802.11a/g Prosafe Wireless Access Point Netgear AP
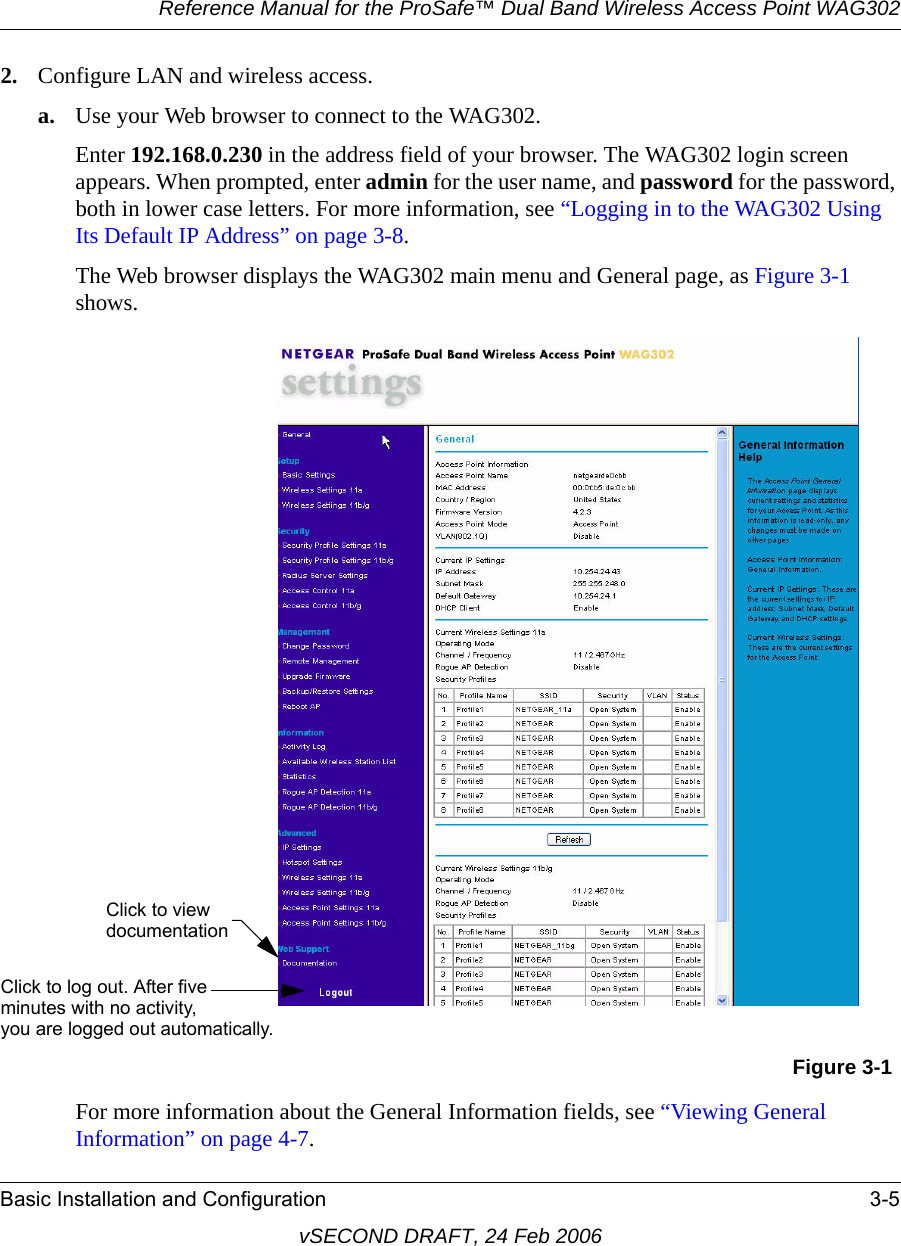
UserManual.wiki
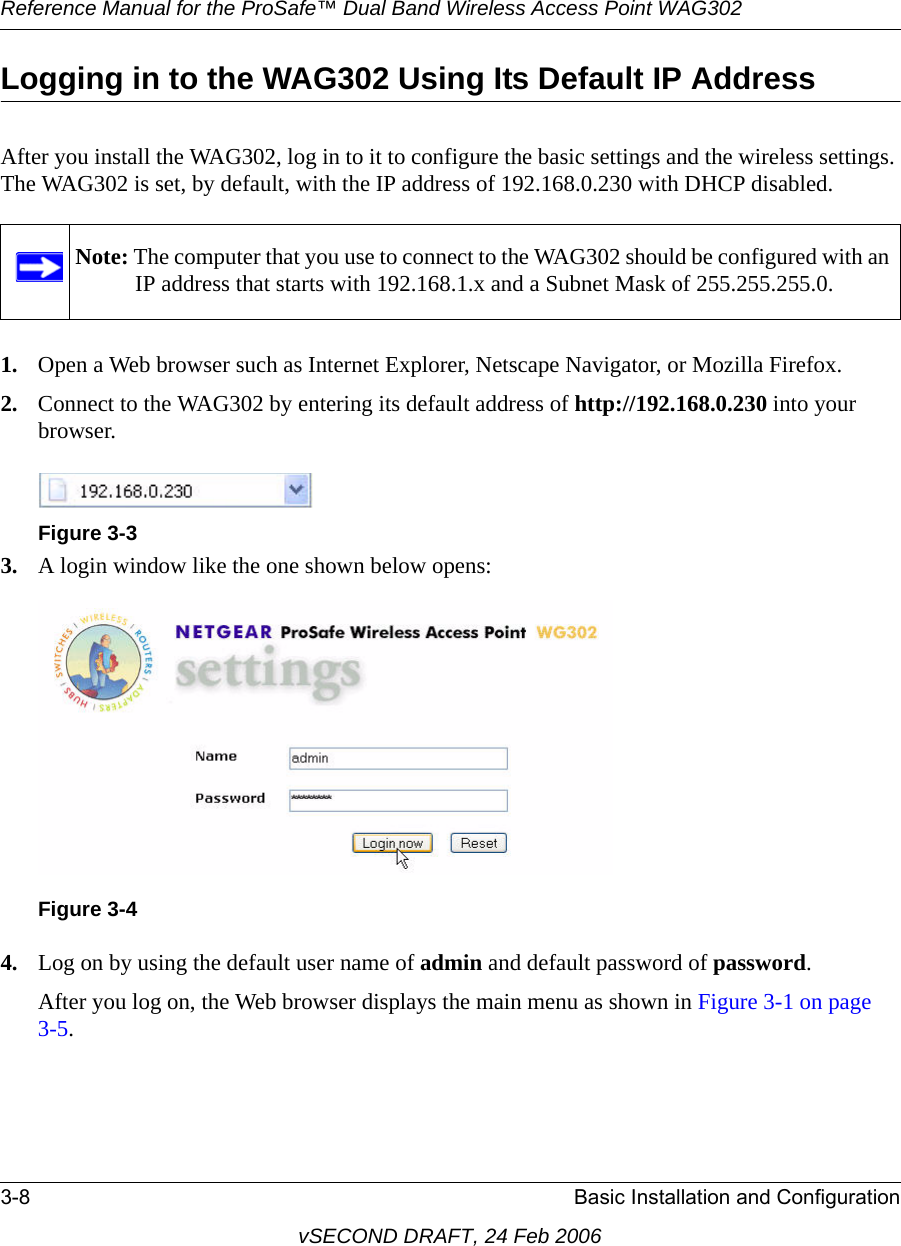
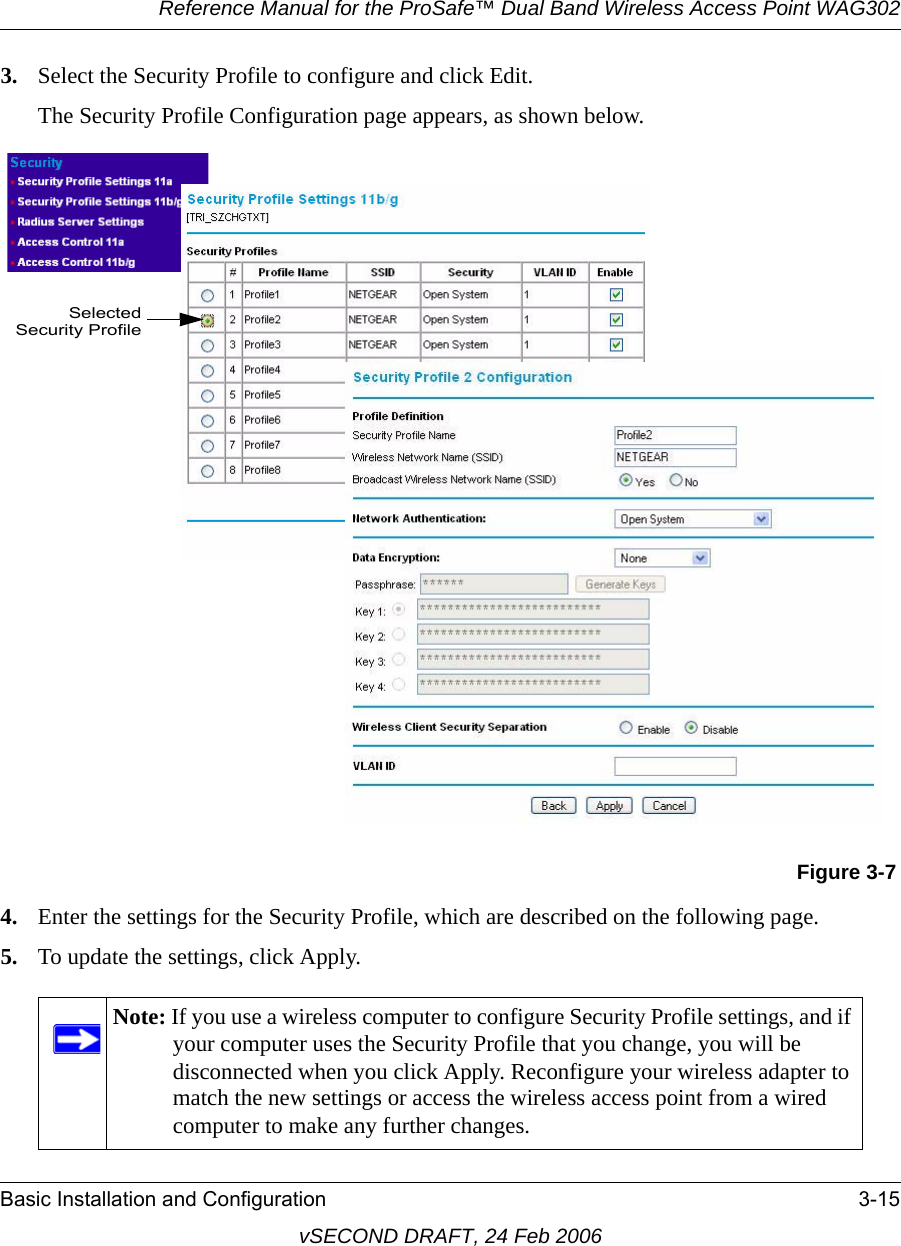
>
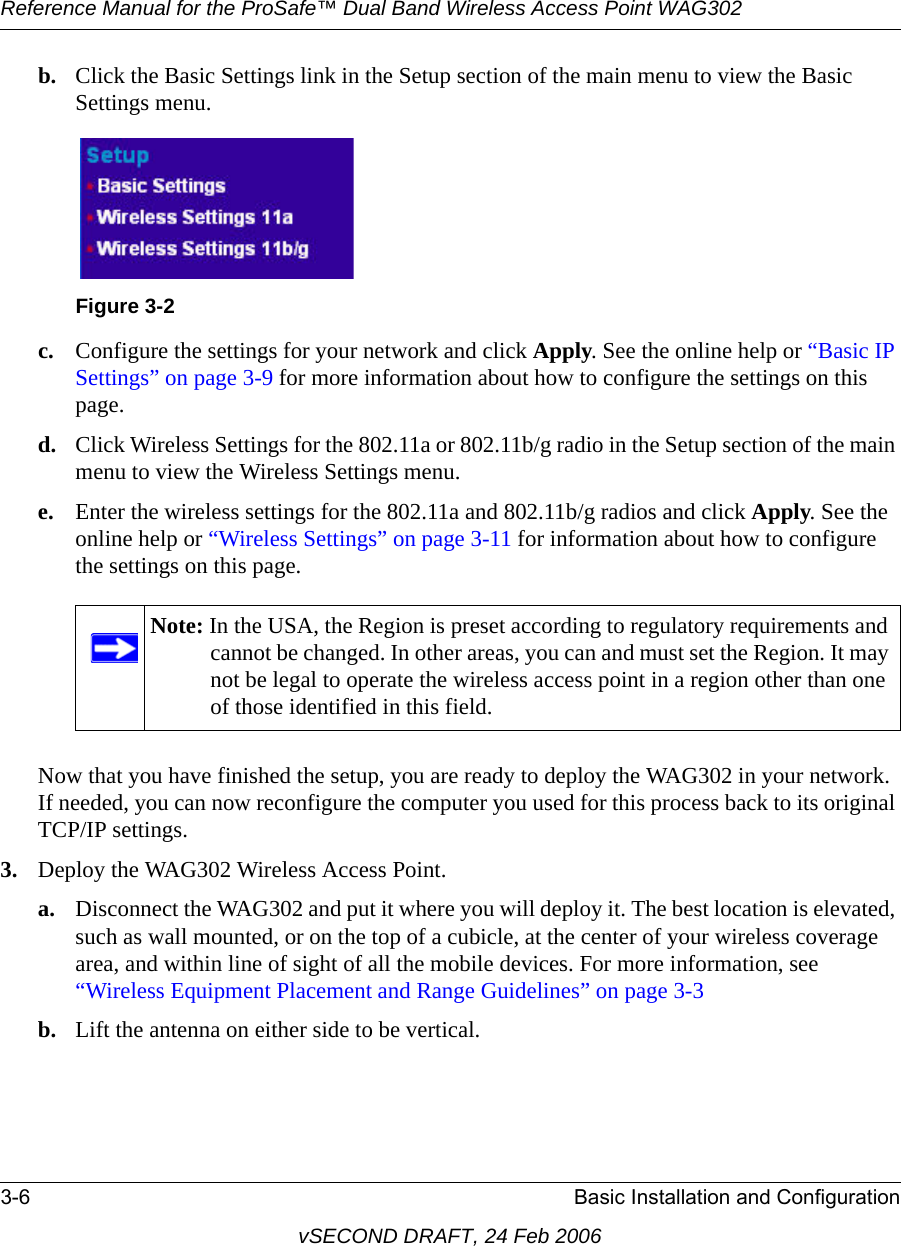
Netgear orporated
>
06100028 User Manual
Manual
Navigation menu
Upload a User Manual
Namespaces
Wiki Guide
HTML
PDF
Info
Views
User Manual
Discussion / Help
Navigation


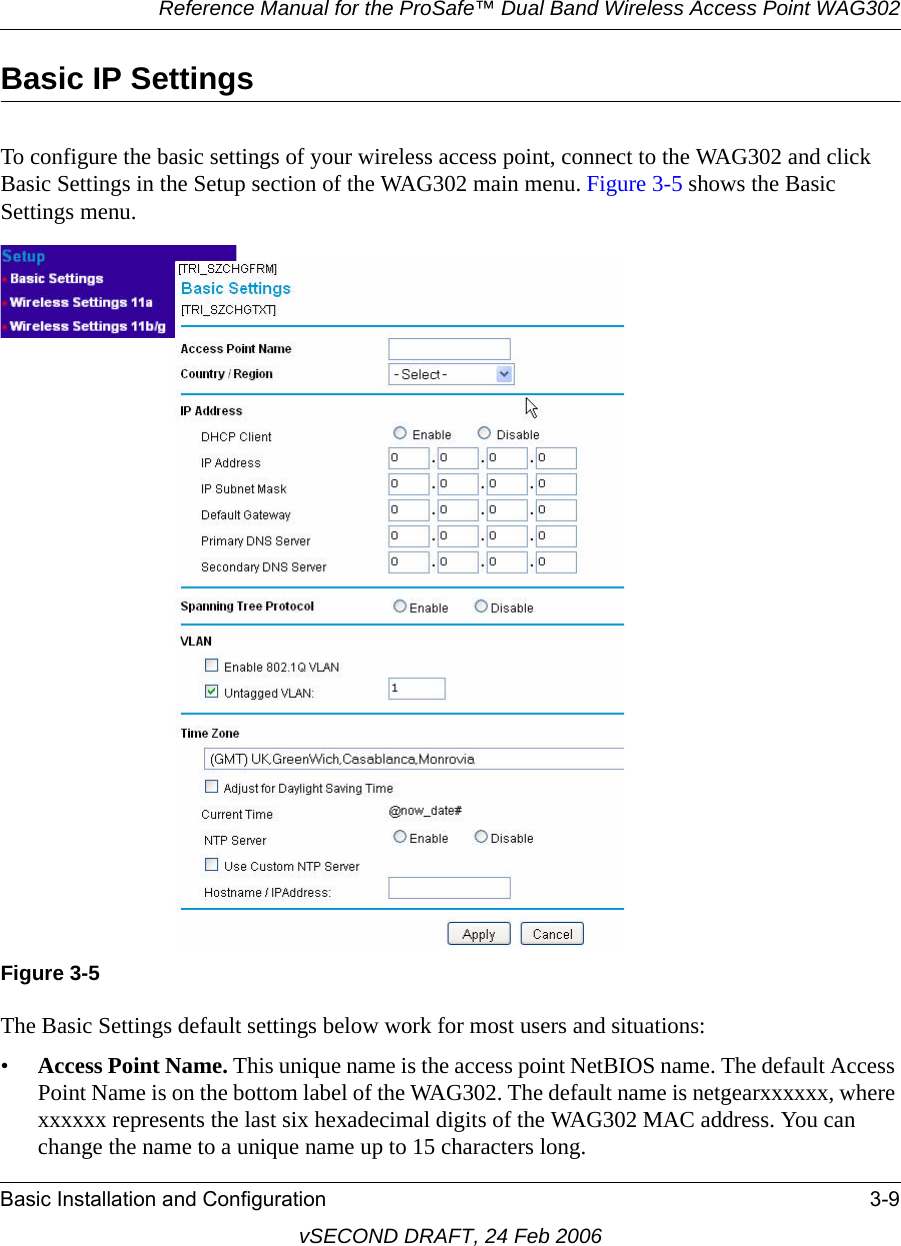

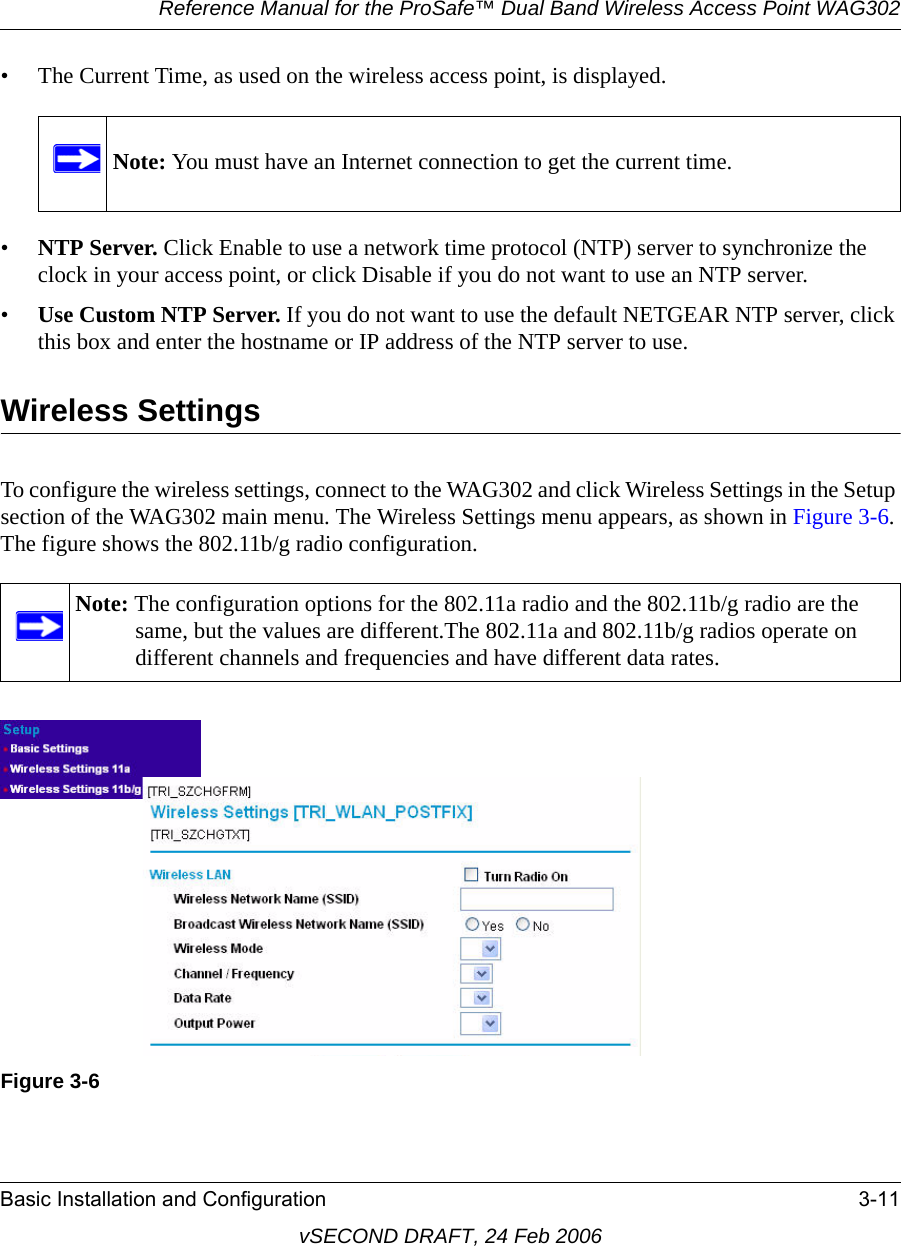


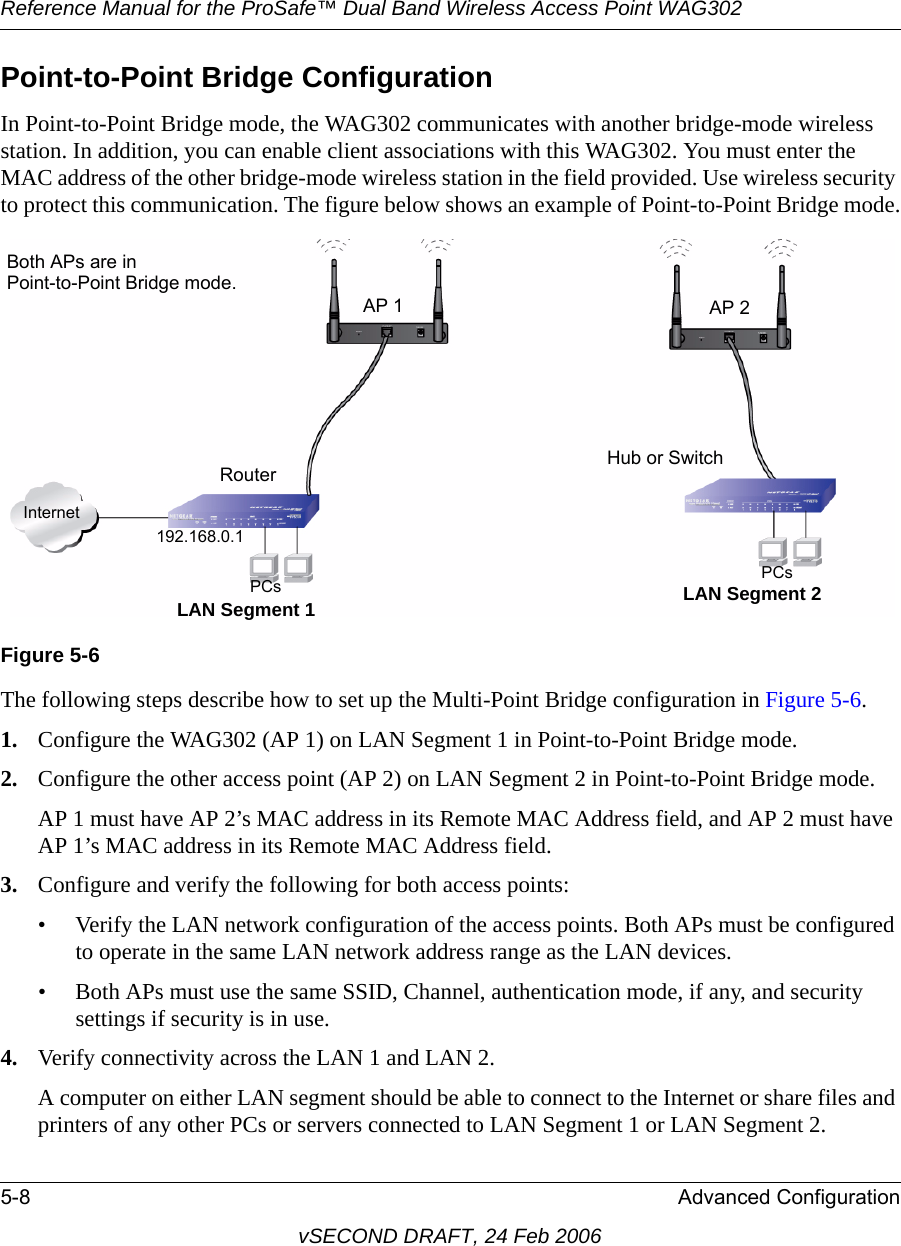
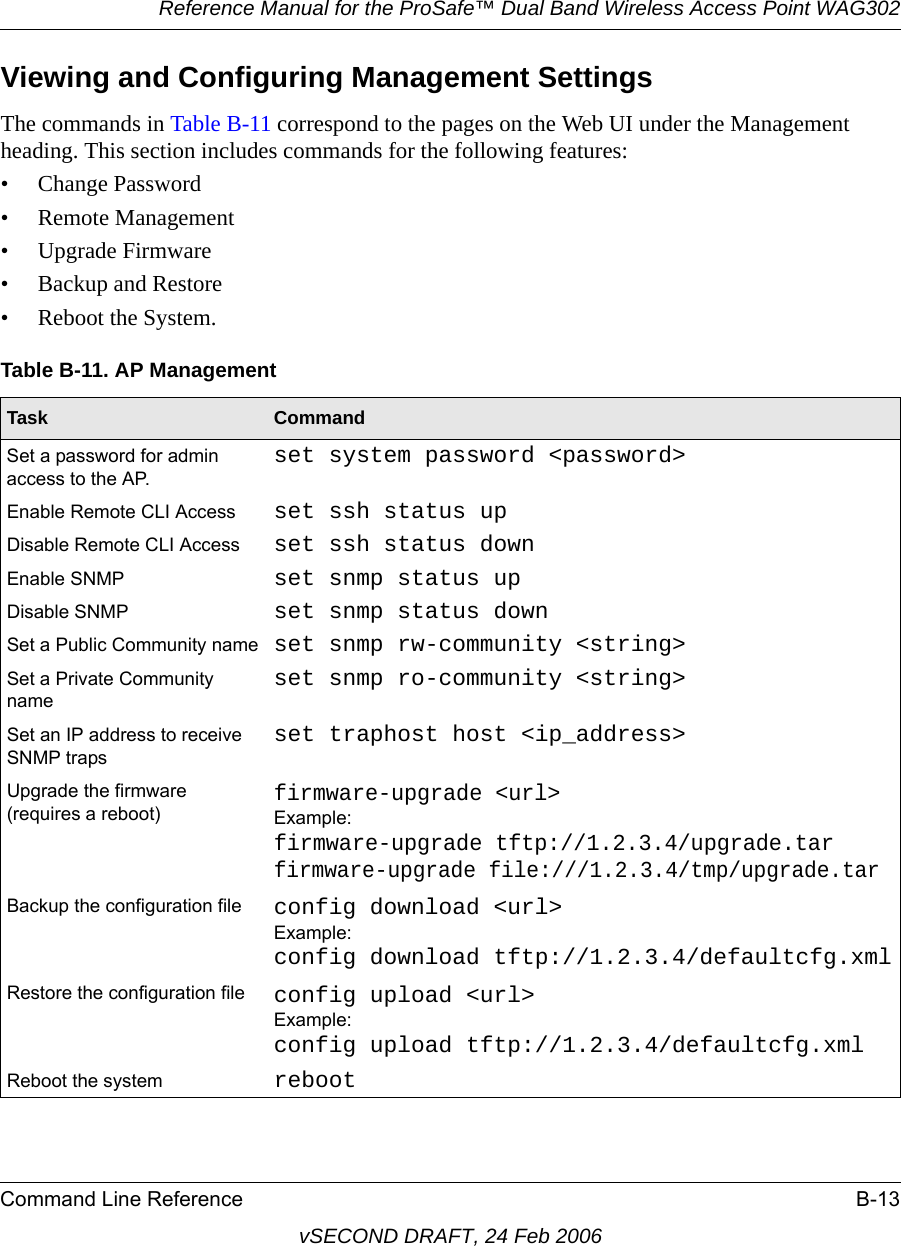
![Reference Manual for the ProSafe™ Dual Band Wireless Access Point WAG302B-8 Command Line ReferencevSECOND DRAFT, 24 Feb 2006Configuring Wireless SettingsThe commands in Table B-6 correspond to the Wireless Settings page on the Web UI.Disable Spanning Tree Protocol set interface br0 stp offSet the Management VLAN ID set mgmtvlan vlan-id <1-4096>Enable Untagged VLANs and set the VLAN ID set untaggedvlan vlan-id <1-4096>Use the default NETGEAR NTP Server set ntp use-default-servers onUse a custom NTP server set ntp use-default-servers offSet the Hostname or IP Address for the custom NTP server set ntp server <NTP_Server>Example:set ntp server ntp.netgear.comorset ntp server 192.168.10.10Set the Time Zone set time zone <timezone>Adjust for Daylight Savings Time set time daylight-saving [on | off]View the Current Time get time nowTable B-6. Wireless SettingsTask CommandTurn on the Radio set interface wlan0 status upConfigure the Wireless Network Name (SSID) set interface wlan0 ssid <ssid_name>Example:set interface wlan0 ssid test_labAllow SSID Broadcastsset radio wlan0 ignore-broadcast-ssid offDeny SSID Broadcastsset radio wlan0 ignore-broadcast-ssid onSet the Wireless Mode set radio wlan0 mode gset radio wlan0 mode b set radio wlan0 mode aSet the Channel/Frequency Not permittedTable B-5. Basic SettingsTask Command](https://usermanual.wiki/Netgear-orporated/06100028/User-Guide-654123-Page-84.png)
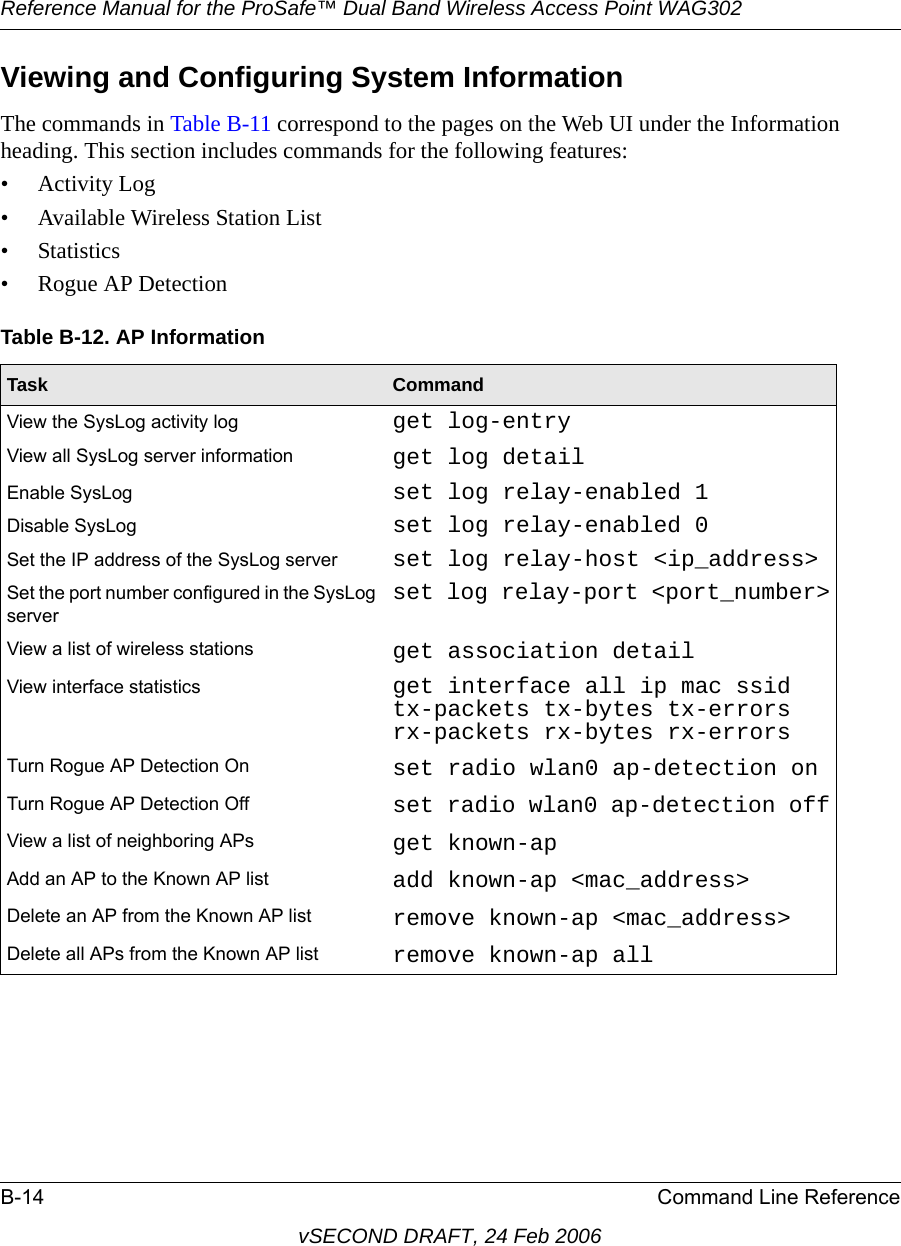
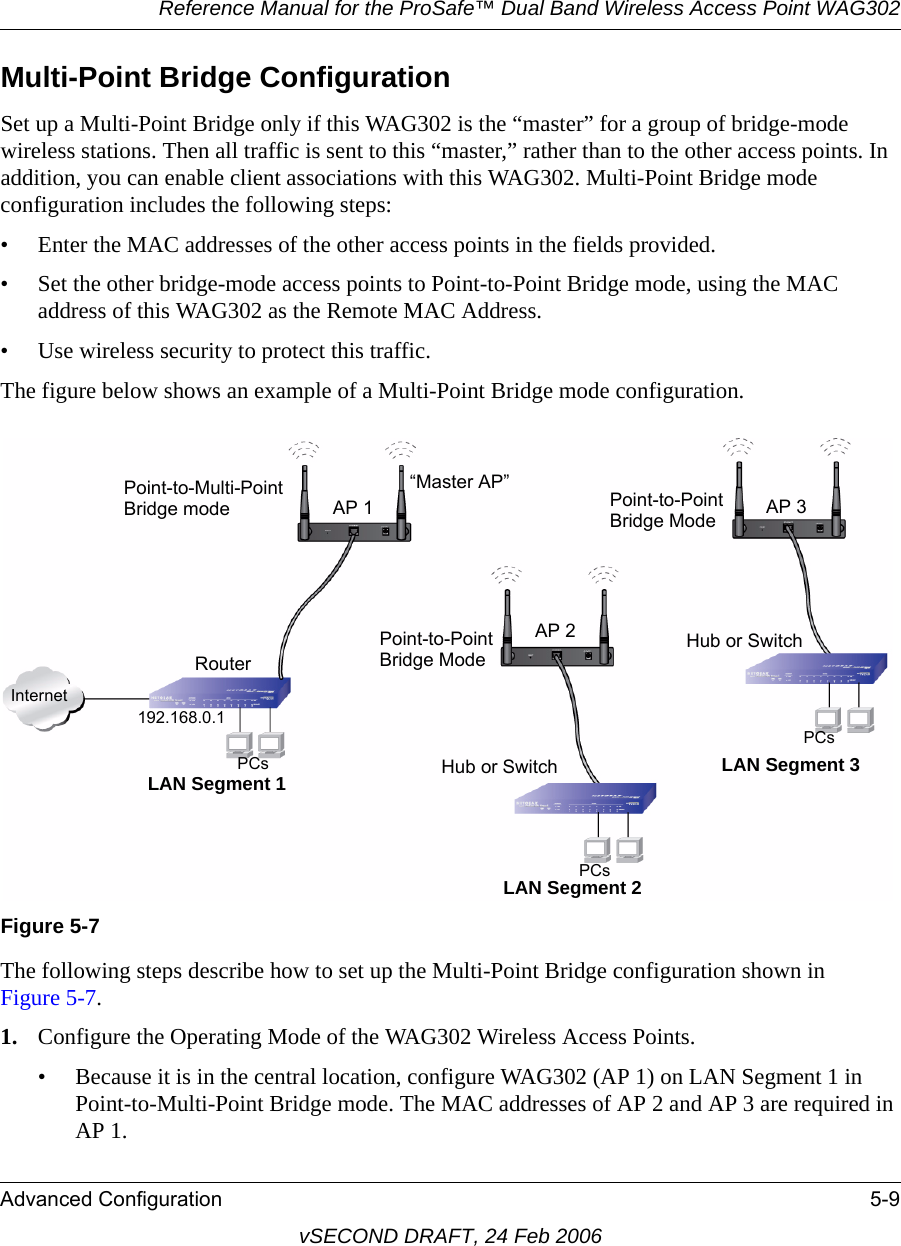
![Reference Manual for the ProSafe™ Dual Band Wireless Access Point WAG302Command Line Reference B-11vSECOND DRAFT, 24 Feb 2006RADIUS Server SettingsThe commands in Table B-9 correspond to the RADIUS Server Settings page on the Web UI.Set Network Authentication to WPA set interface wlan0 security wpa-personal set bss wlan0bssvap0 wpa-allowed on set bss wlan0bssvap0 wpa2-allowed offSet Network Authentication to WPA2 set interface wlan0 security wpa-personal set bss wlan0bssvap0 wpa-allowed off set bss wlan0bssvap0 wpa2-allowed onSet Network Authentication to WPA and WPA2 set interface wlan0 security wpa-personal set bss wlan0bssvap0 wpa-allowed on set bss wlan0bssvap0 wpa2-allowed onSet the WPA Passphrase set interface wlan0 wpa-personal-key <key>Exampleset interface wlan0 wpa-personal-key “KeY !”orset interface wlan0 wpa-personal-key My!KeYEnable Wireless Client Security Separation set radio station-isolation onDisable Wireless Client Security Separation set radio station-isolation offSet the VLAN ID for the Security Profile set vap vap0 radio wlan0 vlan-id <1-4096>Table B-9. RADIUS Server SettingsTask CommandSet the IP Address of the Primary or Secondary Authen-tication Serverset radius-client authentication [primary | secondary] server <ip_address>Set the Port Number of the Primary or Secondary Authen-tication Serverset radius-client authentication [primary | secondary] port <port_number>Table B-8. Security Profile SettingsTask Command](https://usermanual.wiki/Netgear-orporated/06100028/User-Guide-654123-Page-87.png)
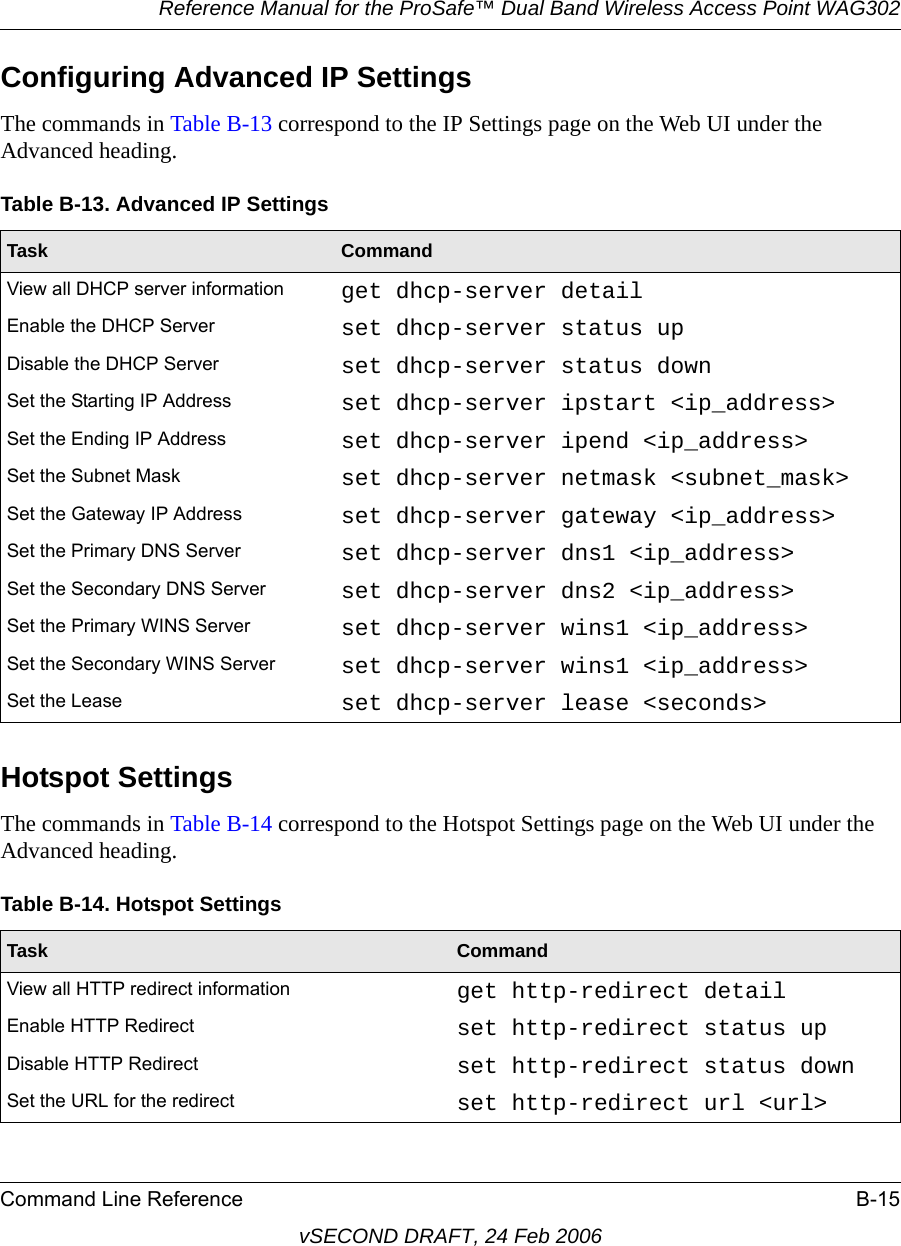
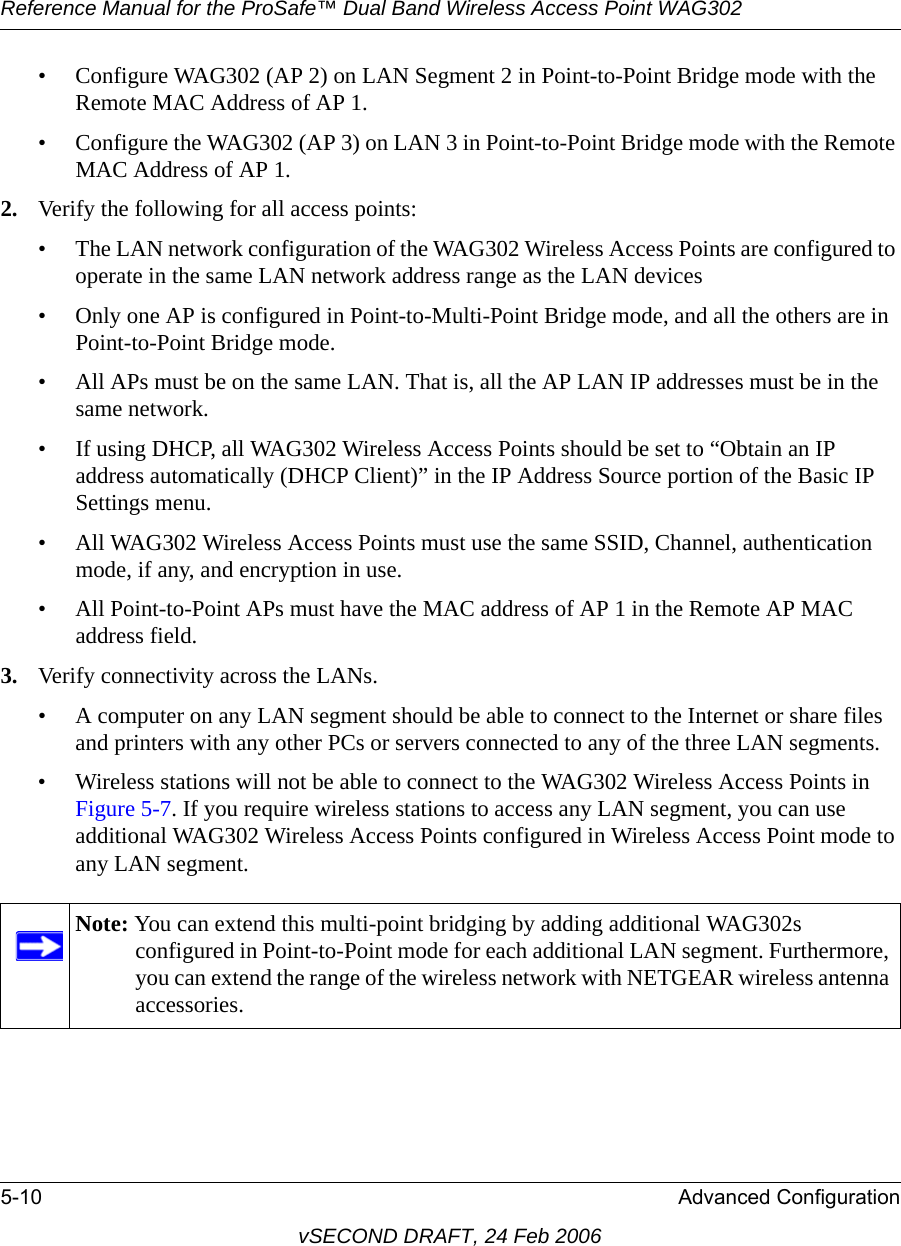
![Reference Manual for the ProSafe™ Dual Band Wireless Access Point WAG302B-12 Command Line ReferencevSECOND DRAFT, 24 Feb 2006Access ControlThe commands in Table B-10 correspond to the Access Control page on the Web UI.Set the Shared Secret for the Primary or Secondary Authen-tication Serverset radius-client authentication [primary | secondary] key <value>Set the IP Address of the Pri-mary or Secondary Accounting Serverset radius-client accounting [primary | secondary] server [hostname | ip_address]Set the Port Number of the Pri-mary or Secondary Accounting Serverset radius-client accounting [primary | secondary] port <port_number>Set the Shared Secret for the Primary or Secondary Accounting Serverset radius-client accounting [primary | secondary] key <value>Table B-10. Access Control SettingsTask CommandView a list of wireless clients by MAC address get association stationCreate a list of clients to permit or deny access to the AP set bss wlan0bssvap0 mac-acl-mode accept-list set bss wlan0bssvap0 mac-acl-mode deny-listAdd a client to the Trusted Wireless Stations list add mac-acl wlan0bssvap0 mac <mac_address> Example:add mac-acl wlan0bssvap0 mac 00:01:02:03:04:05add mac-acl wlan0bssvap0 mac 00:01:02:03:04:06Remove a client from the Trusted Wireless Stations list remove mac-acl wlan0bssvap0 mac <mac_address>Disable MAC Access Control (remove all clients from the list)remove mac-acl allTable B-9. RADIUS Server SettingsTask Command](https://usermanual.wiki/Netgear-orporated/06100028/User-Guide-654123-Page-88.png)