Netgear orporated 06100037 RangeMax Next Wireless Router User Manual FullManual

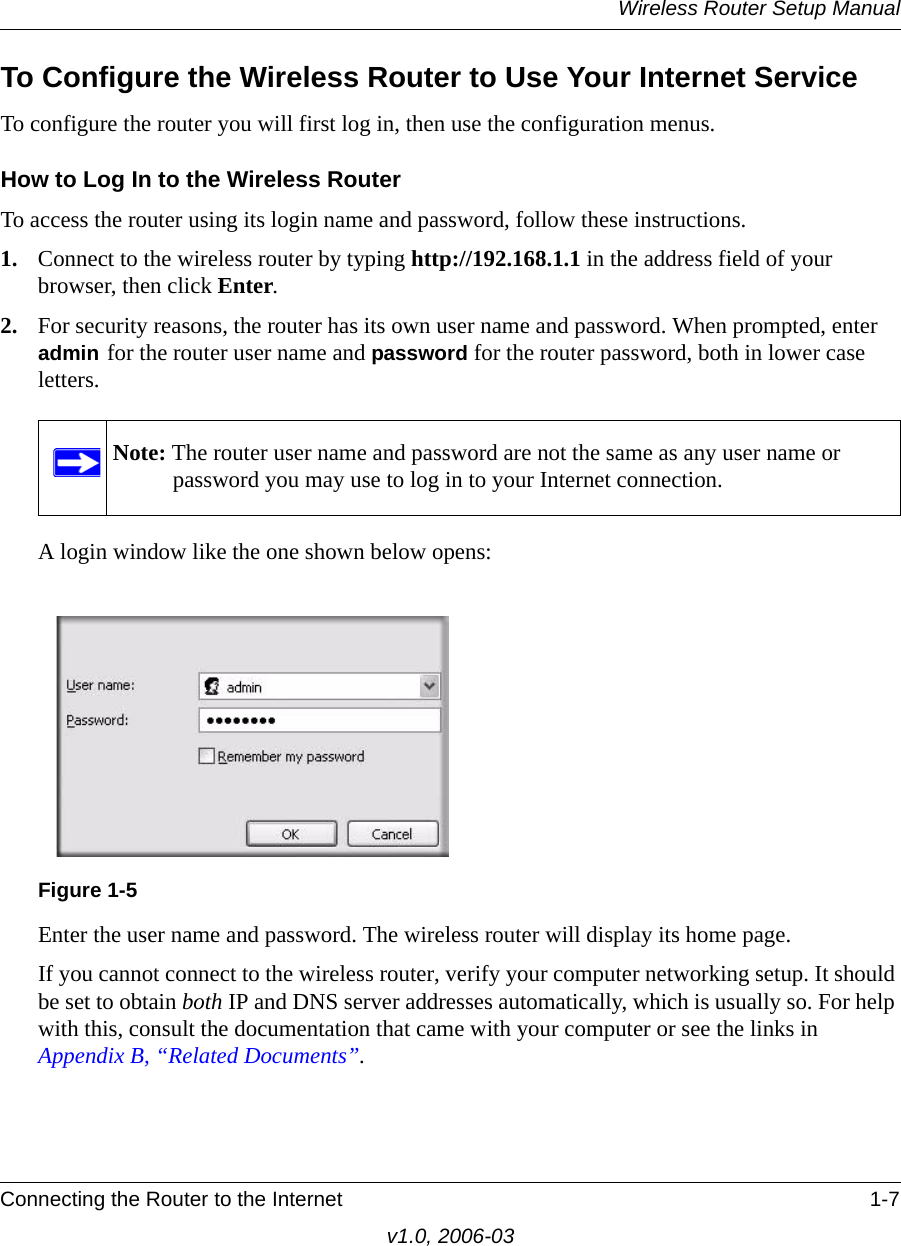
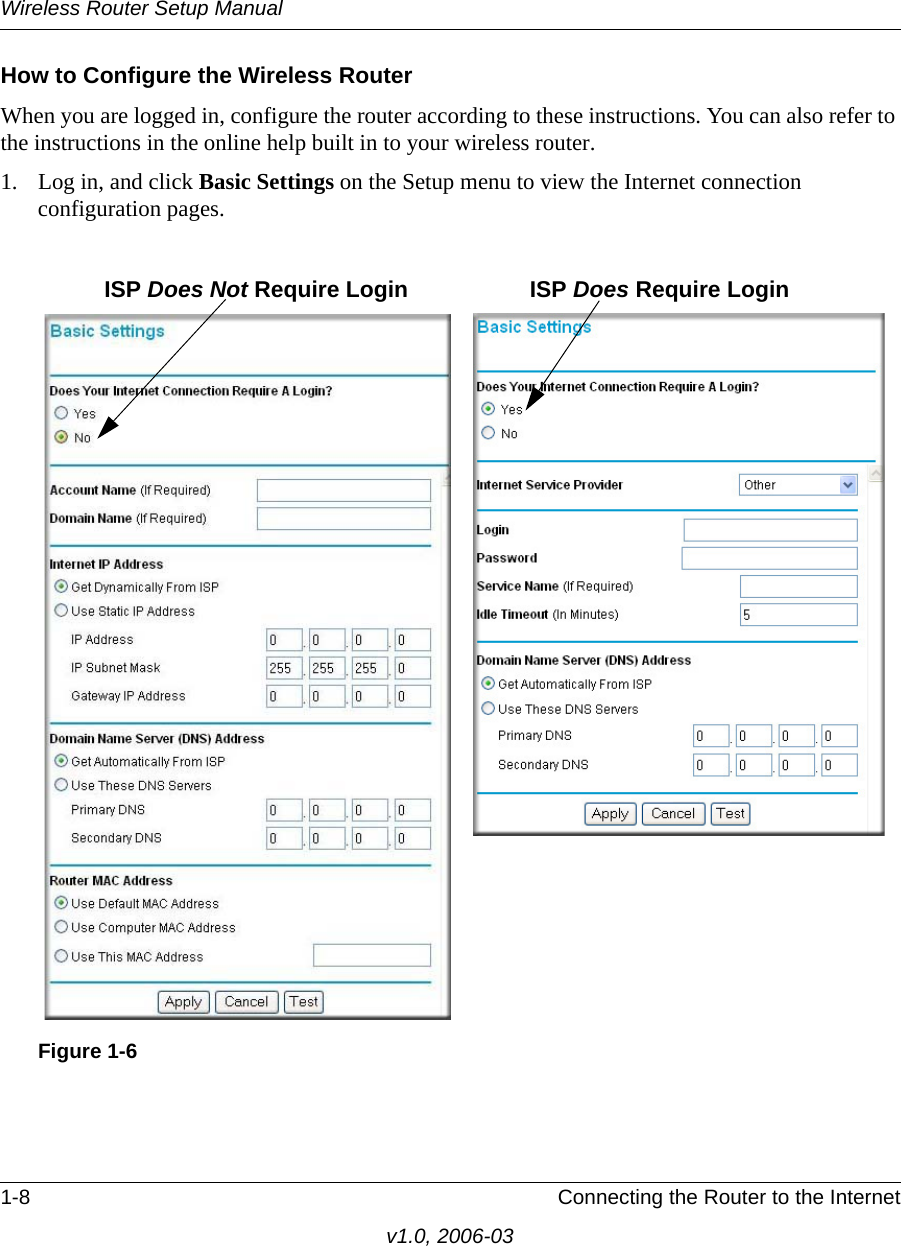
Netgear Incorporated RangeMax Next Wireless Router FullManual

Users Manual

  2006-03NETGEAR, Inc.4500 Great America Parkway Santa Clara, CA 95054 USAWireless Router Setup Manual
© 2006 by NETGEAR, Inc. All rights reserved.  Trademarks NETGEAR is a trademark of Netgear, Inc. Microsoft, Windows, and Windows NT are registered trademarks of Microsoft Corporation. Other brand and product names are registered trademarks or trademarks of their respective holders.  Statement of Conditions In the interest of improving internal design, operational function, and/or reliability, NETGEAR reserves the right to make changes to the products described in this document without notice. NETGEAR does not assume any liability that may occur due to the use or application of the product(s) or circuit layout(s) described herein.   Federal Communication Commission Interference Statement This equipment has been tested and found to comply with the limits for a Class B digital device, pursuant to Part 15 of the FCC Rules.  These limits are designed to provide reasonable protection against harmful interference in a residential installation.  This equipment generates, uses and can radiate radio frequency energy and, if not installed and used in accordance with the instructions, may cause harmful interference to radio communications.  However, there is no guarantee that interference will not occur in a particular installation.    If this equipment does cause harmful interference to radio or television reception, which can be determined by turning the equipment off and on, the user is encouraged to try to correct the interference by one of the following measures:    Reorient or relocate the receiving antenna.   Increase the separation between the equipment and receiver.   Connect the equipment into an outlet on a circuit different from that to which the receiver is connected.   Consult the dealer or an experienced radio/TV technician for help.   This device complies with Part 15 of the FCC Rules. Operation is subject to the following two conditions: (1) This device may not cause harmful interference, and (2) this device must accept any interference received, including interference that may cause undesired operation.  FCC Caution: Any changes or modifications not expressly approved by the party responsible for compliance could void the user's authority to operate this equipment.  IMPORTANT NOTE: FCC&IC Radiation Exposure Statement: This  equipment  complies  with  FCC  radiation  exposure  limits  set  forth  for  an  uncontrolled environment. This equipment should be installed and operated with minimum distance 20cm between the radiator & your body.  This  transmitter  must  not  be  co-located  or  operating  in  conjunction  with  any  other antenna or transmitter.      ii  v1.0, 2006-03
"Operation is subject to the following two conditions: (1) this device may not cause interference, and (2) this device must accept any interference, including interference that may cause undesired operation of the device."  "To reduce potential radio interference to other users, the antenna type and its gain should be so chosen that the equivalent isotropically radiated power (EIRP) is not more than that required for successful communication". "This device has been designed to operate with an antenna having a maximum gain of [2] dBi. Antenna having a higher gain is strictly prohibited per regulations of Industry Canada. The required antenna impedance is 50 ohms."  “To reduce potential radio interference to other users, the antenna type and its gain should be so chosen that the equivalent isotropically radiated power (e.i.r.p.) is not more than that permitted for successful communication.”                                        iii  v1.0, 2006-03
1v1.0, 2006-03ContentsWireless Router Setup ManualChapter 1  Connecting the Router to the InternetWhat’s in the Box? ..........................................................................................................1-1The Wireless Router Label .......................................................................................1-1The Front of the Wireless Router .............................................................................1-2The Back of the Wireless Router  .............................................................................1-3What You Need Before You Begin ..................................................................................1-3To Set Up Your Router ....................................................................................................1-4To Connect Your Wireless Router  ............................................................................1-4To Configure the Wireless Router to Use Your Internet Service  ..............................1-7To Set Up and Test Basic Wireless Connectivity ..........................................................1-10Implement Appropriate Wireless Security  .................................................................... 1-11Chapter 2  TroubleshootingQuick Tips .......................................................................................................................2-1Be sure to always start your network in this sequence:   ..........................................2-1Make sure the Ethernet cables are securely plugged in.  .........................................2-1Make sure the network settings of the computer are correct.   .................................2-1Check the router status lights to verify correct router operation.  .............................2-2To Verify Basic Functioning  ............................................................................................2-2Power Light Not On ..................................................................................................2-2LAN or Internet Port Lights Not On  ..........................................................................2-3Troubleshooting Logging In to the Wireless Router ........................................................2-3Troubleshooting the Internet Service Connection ...........................................................2-3Internet Connection ..................................................................................................2-4Obtaining an Internet IP Address .............................................................................2-4Troubleshooting PPPoE ...........................................................................................2-5
2v1.0, 2006-03Troubleshooting Internet Browsing  ..........................................................................2-5Restoring the Default Configuration and Password ........................................................2-6Advanced Troubleshooting Using the Ping Utility ...........................................................2-6Testing the Path from a PC to Your Router ..............................................................2-6Testing the Path from a PC to the Internet ...............................................................2-7Appendix A  Technical SpecificationsFactory Default Settings  ................................................................................................ A-1Technical Specifications ................................................................................................. A-2Appendix B  Related Documents
Connecting the Router to the Internet 1-1v1.0, 2006-03Chapter 1 Connecting the Router to the InternetThis chapter describes how to connect your router and how to access the Internet through it.What’s in the Box?The product package should contain the following items:• The wireless router• An AC power adapter (varies by region)• An Ethernet cable•Resource CD• Warranty and Support Information cardsIf any of the parts are incorrect, missing, or damaged, contact your NETGEAR dealer. Keep the carton, including the original packing materials, in case you need to return the product for repair.The Wireless Router LabelView the label on the wireless router to identify the serial number, default login information, and other useful information.
Wireless Router Setup Manual1-2 Connecting the Router to the Internetv1.0, 2006-03The Front of the Wireless RouterYou can use the status lights on the front of the wireless router to verify various conditions. Table 1-1.  Status Light Activity Description1. Power OnOff Power is supplied to the router.Power is not supplied to the router.2. InternetOn -- GreenOffThe Ethernet cable is connected to a powered on cable or DSL modem.The Ethernet cable is not connected or the cable or DSL modem is not powered on.3. Wireless On Indicates that the Wireless port is initialized.4. LAN (Local Area Network) Lights  1-4On (Green)Blink (Green)On (Amber)Blink (Amber)OffThe local port is connected to a 1000 Mbps device.Data is being transmitted at 1000 Mbps.The local port has detected a link with a 10 or 100 Mbps device.Data is being transmitted at 10 or 100 Mbps.No link is detected on this port.
Wireless Router Setup ManualConnecting the Router to the Internet 1-3v1.0, 2006-03The Back of the Wireless Router The back of the wireless router has the following port connections:1. Factory default reset button2. Four local Ethernet ports for connecting the local computers3. Internet port for connecting to a cable or ADSL modem4. Power adapter portWhat You Need Before You BeginPrepare the following before you set up your router:• Internet service.• The configuration information your Internet Service Provider (ISP) gave you. Depending on how your Internet account was set up, your may need one or more of these settings for the wireless router to access the Internet: — Host and Domain Names— Internet Login Name and Password (frequently an email address and password)— Domain Name Server (DNS) Addresses— Fixed or Static IP AddressYour ISP should have provided you with all the information needed to connect to the Internet. If you cannot locate this information, you can ask your ISP to provide it. • For cable modem service, use the computer you first used to set up your Internet service.Figure 1-11.2.3.4.
Wireless Router Setup Manual1-4 Connecting the Router to the Internetv1.0, 2006-03To Set Up Your RouterThere are two steps to setting up your wireless router:1. Connect the cables. Connect the router to the ADSL or cable modem, and connect a computer to the router.2. Configure the router to use your Internet service. To Connect Your Wireless Router1. Connect the wireless router, the computer, and the modem.a. Turn off your computer.b. Turn off and unplug the cable or ADSL broadband modem.c. Locate the Ethernet cable (1) that connects your computer to the modem.d. Disconnect the cable at the computer end only (2).Note: Your computer has to be set to automatically get its TCP/IP network settings from the router via DHCP. This is usually the case. If your are unsure about this, use the wizard on the CD which automatically takes care of this for you, or refer to the documentation for your computer.Figure 1-212
Wireless Router Setup ManualConnecting the Router to the Internet 1-5v1.0, 2006-03e. Securely insert the Ethernet cable from your modem into the Internet port of the wireless router (3).f. Securely insert the Ethernet cable (4) that came with your wireless router into a LAN port on the router such as LAN port 1 (5), and the other end into the Ethernet port of your computer (6).Your network cables are connected and you are ready to start your network.2. Start your network in the correct sequencea. First, plug in and turn on the cable or DSL modem. Wait 2 minutes. Figure 1-3Figure 1-4Warning: Failure to start or restart your network in the correct sequence could prevent you from accessing the Internet.)NTERNET3465
Wireless Router Setup Manual1-6 Connecting the Router to the Internetv1.0, 2006-03b. Now, plug the power cord into your wireless router and into a power outlet. Wait 1 minute. c. Last, turn on your computer.d. Check the wireless router status lights to verify the following:•Power: The power light should turn solid green. If it does not, see “Quick Tips” on page 2-1.•Wireless: The wireless light is lit after turning on the router.•Internet: The Internet port light should be lit. If not, make sure the Ethernet cable is securely attached to the wireless router Internet port and the modem, and the modem is powered on.•LAN: A LAN light should be lit. Green indicates your computer is communicating at 1000 Mbps; amber indicates 10 or 100 Mbps. If a LAN light is not lit, check that the Ethernet cable from the computer to the router is securely attached at both ends, and that the computer is turned on.Note: For DSL customers, if software logs you in to the Internet, do not run that software. You may need to go to the Internet Explorer Tools menu, Internet Options, Connections tab page where you can select “Never dial a connection.”
Wireless Router Setup ManualConnecting the Router to the Internet 1-7v1.0, 2006-03To Configure the Wireless Router to Use Your Internet ServiceTo configure the router you will first log in, then use the configuration menus.How to Log In to the Wireless Router To access the router using its login name and password, follow these instructions.1. Connect to the wireless router by typing http://192.168.1.1 in the address field of your browser, then click Enter.2. For security reasons, the router has its own user name and password. When prompted, enter admin for the router user name and password for the router password, both in lower case letters. A login window like the one shown below opens:Enter the user name and password. The wireless router will display its home page.If you cannot connect to the wireless router, verify your computer networking setup. It should be set to obtain both IP and DNS server addresses automatically, which is usually so. For help with this, consult the documentation that came with your computer or see the links in Appendix B, “Related Documents”.Note: The router user name and password are not the same as any user name or password you may use to log in to your Internet connection.Figure 1-5
Wireless Router Setup Manual1-8 Connecting the Router to the Internetv1.0, 2006-03How to Configure the Wireless Router When you are logged in, configure the router according to these instructions. You can also refer to the instructions in the online help built in to your wireless router.1. Log in, and click Basic Settings on the Setup menu to view the Internet connection configuration pages.Figure 1-6ISP Does Not Require Login ISP Does Require Login
Wireless Router Setup ManualConnecting the Router to the Internet 1-9v1.0, 2006-032. If your Internet connection does not require a login, click No at the top of the Basic Settings menu and fill in the settings according to the instructions below. If your Internet connection does require a login, click Yes, and skip to step 3.a. Enter your Account Name (may also be called Host Name) and Domain Name.  These parameters may be necessary to access your ISP’s services such as mail or news servers.b. Internet IP Address:  If your ISP has assigned you a permanent, fixed (static) IP address for your computer, select “Use static IP address”. Enter the IP address that your ISP assigned. Also enter the netmask and the Gateway IP address. The Gateway is the ISP’s router to which your router will connect.c. Domain Name Server (DNS) Address:  If you know that your ISP does not automatically transmit DNS addresses to the router during login, select “Use these DNS servers” and enter the IP address of your ISP’s Primary DNS Server. If a Secondary DNS Server address is available, enter it also.d. Router’s MAC Address:  This section determines the Ethernet MAC address that will be used by the router on the Internet port. Some ISPs will register the Ethernet MAC address of the network interface card in your computer when your account is first opened. They will then only accept traffic from the MAC address of that computer. This feature allows your router to masquerade as that computer by “cloning” its MAC address. To change the MAC address, select “Use this Computer’s MAC address.” The router will then capture and use the MAC address of the computer that you are now using. You must be using the one computer that is allowed by the ISP. Or, select “Use this MAC address” and type it in here.e. Click Apply to save your settings.Note: If you enter an address here, restart the computers on your network so that these settings take effect.
Wireless Router Setup Manual1-10 Connecting the Router to the Internetv1.0, 2006-033. If your Internet connection does require a login, fill in the settings according to the instructions below. Select Yes if you normally must launch a login program such as Enternet or WinPOET in order to access the Internet.a. Fill in the parameters for your Internet service provider.b. Click Apply to save your settings. Click Test to verify that you have Internet access.You are now connected to the Internet! To Set Up and Test Basic Wireless ConnectivityFollow the instructions below to set up and test basic wireless connectivity. Once you have established basic wireless connectivity, you can enable security settings appropriate to your needs.1. Log in to the router at its default LAN address of http://192.168.1.1 with its default user name of admin and default password of password, or using whatever LAN address and password you have set up.2. Click the Wireless Settings link in the main menu of the router.3. Note that the default SSID is NETGEAR.4. Set the Region. Select the region in which the wireless interface will operate.5. Click Apply to save your changes.6. Configure and test your computers for wireless connectivity.Note: After you finish setting up your router, you will no longer need to launch the ISP’s login program on your computer in order to access the Internet. When you start an Internet application, your router will automatically log you in.Note: The SSID of any wireless adapters must match the SSID you configure in the router. If they do not match, you will not get a wireless connection.Note: If you are configuring the router from a wireless computer and you change the router’s SSID, channel, or security settings, you will lose your wireless connection when you click Apply. You must then change the wireless settings of your computer to match the router’s new settings.
Wireless Router Setup ManualConnecting the Router to the Internet 1-11v1.0, 2006-03Program the wireless adapter of your computers to have the same wireless network name (SSID) as the router. Check that they have a wireless link and are able to obtain an IP address by DHCP from the router.Implement Appropriate Wireless SecurityUnlike wired network data, your wireless data transmissions can extend beyond your walls and can be received by anyone with a compatible adapter. For this reason, use the security features of your wireless equipment. The router provides highly effective security features which are covered in detail in full reference manual that is available from a link on the CD as well as a link in the main menu of your router. Follow the instructions in the full manual and in the router help screens to deploy the security features appropriate to your needs.Warning: Indoors, computers can connect over 802.11g wireless networks at a maximum range of up to 300 feet. Such distances can allow for others outside of your immediate area to access your network.
Troubleshooting 2-1v1.0, 2006-03Chapter 2 TroubleshootingThis chapter gives information about troubleshooting your wireless router. Quick TipsHere are some tips for correcting simple problems you may have.Be sure to always start your network in this sequence: 1. Turn off and unplug the modem from it’s power outlet, and turn off the wireless router and computer.2. Turn on the modem, and wait two minutes3. Turn on the wireless router and wait 1 minute4. Turn on the computer. Make sure the Ethernet cables are securely plugged in. • The Internet status light on the wireless router will be lit if the Ethernet cable to the wireless router from the modem is plugged in securely and the modem and wireless router are both turned on. • For each powered on computer connected to the wireless router with a securely plugged in Ethernet cable, the corresponding wireless router LAN port status light will be lit. The label on the wireless router identifies the number of each LAN port. Make sure the network settings of the computer are correct. • LAN connected computers must be configured to obtain an IP address automatically via DHCP. Please see the links see links in Appendix B, “Related Documents” for help with this.
Wireless Router Setup Manual2-2 Troubleshootingv1.0, 2006-03• Some cable modem services require you to use the MAC address of the computer registered on the account. If so, in the Router MAC Address section of the Basic Settings menu, select, “Use this Computer’s MAC Address.” Click Apply to save your settings. Restart the network in the correct sequence.Check the router status lights to verify correct router operation. If the Power light does not turn solid green within 2 minutes after turning the router on, reset the router according to the instructions in “Restoring the Default Configuration and Password” on page 2-6.To Verify Basic FunctioningAfter you turn on power to the router, the following sequence of events should occur:1. When power is first applied, verify that the Power light is on (see “The Front of the Wireless Router” on page 1-2 for an illustration).2. Verify that the Test light lights within a few seconds, indicating that the self-test procedure is running.3. After approximately 20 seconds, verify that:a. The LAN port lights are lit for any local ports that are connected.b. The Internet port is connected and its light is lit.If a port’s light is lit, a link has been established to the connected device. If a LAN port is connected to a 10/1001000 Mbps device, verify that the port light is green for a 1000 Mbps device. If the port is 10 or 100 Mbps, the light will be amber.Power Light Not OnIf the Power and other lights are off, check the following:• Make sure that the power cord is properly connected to your router and that the power supply adapter is properly connected to a functioning power outlet.• Check that you are using the power adapter supplied by NETGEAR for this product.If the error persists, you have a hardware problem and should contact technical support.
Wireless Router Setup ManualTroubleshooting 2-3v1.0, 2006-03LAN or Internet Port Lights Not OnIf either the LAN or Internet lights do not light when the Ethernet connection is made, check the following:• Make sure that the Ethernet cable connections are secure at the router and at the computer.• Make sure that power is turned on to the connected computer.• Be sure you are using Ethernet cables like the cable that was supplied with the wireless router.Troubleshooting Logging In to the Wireless RouterIf you are unable to log in to the wireless router, check the following:• If you are using an Ethernet-connected computer, check the Ethernet connection between the computer and the router as described in the previous section.• Make sure you are using the correct login information. The factory default login name is admin and the password is password. Make sure that CAPS LOCK is off when entering this information.• Your computer’s address should be in the range of 192.168.1.2 to 192.168.1.254. Refer to your computer’s documentation for help with finding your computer’s IP address. • Make sure your browser has Java, JavaScript, or ActiveX enabled. If you are using Internet Explorer, click Refresh to be sure the Java applet is loaded. Try quitting the browser and launching it again.Troubleshooting the Internet Service ConnectionIf your router is unable to access the Internet, check that the Internet connection is working, and then check that the wireless router can get an Internet address. Note: If your computer’s IP address is 169.254.x.x, verify that you have a good connection from the computer to the router, then restart your computer.
Wireless Router Setup Manual2-4 Troubleshootingv1.0, 2006-03Internet ConnectionFirst verify that your cable or ADSL modem has a successful connection. The cable or ADSL modem status lights indicate if the modem connection is successful or not. Check your modem documentation or call your Internet service provider for help with verifying that the modem has a successful connection. Wireless Router Internet Light OffIf the Internet light is off, verify that the Ethernet cable is securely connected between the cable or ADSL modem, and that both the modem and wireless router are turned on. Obtaining an Internet IP AddressIf your wireless router is unable to access the internet, and your Internet light on, check the wireless router to see if it is able to get an Internet IP address from your service provider. Unless you have a static IP address, your wireless router automatically requests an IP address from your service provider. To check the Internet IP address from the browser interface: 1. Log in to the wireless router.2. Use the Router Status link under the Maintenance heading to check that an IP address is shown for the Internet Port. If 0.0.0.0 is shown, your wireless router has not obtained an IP address from your service provider.If your router is unable to obtain an IP address from the your service provider, the problem may be one of the following:• Your service provider may require a login. Ask your service provider whether they require PPP over Ethernet (PPPoE) login.• You may have incorrectly set the Service Name, User Name and Password. See “Troubleshooting PPPoE”, below.• Your service provider may check for your computer's host name. Assign the computer Host Name of your ISP account to the wireless router in the browser-based Basic Settings menu.• Your service provider only allows one Ethernet MAC address to connect to Internet, and may check for your computer’s MAC address.
Wireless Router Setup ManualTroubleshooting 2-5v1.0, 2006-03In this case, inform your service provider that you have bought a new network device, and ask them to use the wireless router’s MAC address.ORConfigure your router to spoof your computer’s MAC address. This can be done in the Basic Settings menu. Refer to the online help in the wireless router main menu.Troubleshooting PPPoE Troubleshoot a PPPoE connection in this way:1. Log in to the wireless router.2. Under the Maintenance heading, select the Router Status link.3. Click the Connection Status button.4. If all of the steps indicate “OK” then your PPPoE connection is up and working.5. If any of the steps indicates “Failed”, you can attempt to reconnect by clicking “Connect”. The wireless router will continue to attempt to connect indefinitely.If you cannot connect after several minutes, you may be using an incorrect Service Name, User Name or Password. There also may be a provisioning problem with your ISP.Troubleshooting Internet BrowsingIf your wireless router can obtain an IP address but your computer is unable to load any Web pages from the Internet, check the following.• Your computer may not recognize any DNS server addresses. A DNS server is a host on the Internet that translates Internet names (such as www addresses) to numeric IP addresses. Typically your ISP will provide the addresses of one or two DNS servers for your use. If you entered a DNS address during the wireless router’s configuration, restart your computer. Alternatively, you can configure your computer manually with DNS addresses, as explained in the documentation for your computer.• Your computer may not have the wireless router configured as its default gateway.Note: Unless you connect manually, the wireless router will not authenticate using PPPoE until data is transmitted to the network.
Wireless Router Setup Manual2-6 Troubleshootingv1.0, 2006-03Reboot the computer and verify the wireless router address (192.168.1.1) is listed by your computer as the default gateway address.Restoring the Default Configuration and PasswordThis section explains how to restore the factory default configuration settings, changing the router’s administration password to password and the IP address to 192.168.1.1. You can erase the current configuration and restore factory defaults.To restore the factory default configuration settings, use the Default Reset button on the rear panel of the router.1. Use a sharp object like a pen or a paper clip to press and hold the default reset button for about 20 seconds (see page 1-3), until the test light on the front turns on.2. Release the reset button and wait for the router to reboot.Advanced Troubleshooting Using the Ping UtilityMost computers and routers have a diagnostic utility called ping that sends an request to a target device. The device then replies. The ping utility makes it easy to troubleshoot a network.Testing the Path from a PC to Your RouterYou can ping the wireless router to verify that the LAN path from your computer to your router is set up correctly.1. From the Windows toolbar, click Start and select Run.2. In the field provided, type Ping followed by the address of the router, as in this example:   ping 192.168.1.1 3. Click OK.You should see a message like this one:   Pinging 192.168.1.1 with 32 bytes of data If the path is working, you see this message:   Reply from 192.168.1.1: bytes=32 time=NN ms TTL=xxx If the path is not working, you see this message:   Request timed out
Wireless Router Setup ManualTroubleshooting 2-7v1.0, 2006-03If the path is not functioning correctly, you could have one of the following problems:• Wrong physical connections— Make sure the LAN port light is on. If the light is off, follow the instructions in “LAN or Internet Port Lights Not On” on page 2-3.— Check that the corresponding lights are on for your computer’s network interface card.• Wrong network configuration— Verify that the Ethernet card driver software and TCP/IP software are both installed and configured on your computer.— Verify that the IP address for your router and your computer are correct and that the addresses on both begin with 192.168.1.Testing the Path from a PC to the InternetAfter verifying that the path between your computer and the wireless router works correctly, test the path from your PC to the Internet. From the Windows run menu, type:PING -n 10 <IP address>where <IP address> is the IP address of a remote device such as your ISP’s DNS server.If the path is functioning correctly, replies as in the previous section are displayed. If you do not receive replies:— Check that your PC has the IP address of your router listed as the default gateway. If the IP configuration of your PC is assigned by DHCP, this information will not be visible in your PC’s Network Control Panel. Verify that the IP address of the router is listed as the TCP/IP default gateway.— Check to see that the network address of your PC (the portion of the IP address specified by the netmask) is different from the network address of the remote device.— If your ISP assigned a host name to your PC, enter that host name as the Account Name in the Basic Settings menu.
Technical Specifications A-1v1.0, 2006-03Appendix ATechnical SpecificationsThis appendix provides the factory default settings and specifications for your wireless router.Factory Default SettingsThe table below identifies the factory default settings for your router. When you reset all settings to their factory defaults, your router will return to these settings.Table A-1. Home Router Default Configuration SettingsFeature Default BehaviorRouter Login Default AccessRouter Login URL http://192.168.1.1Login Name (case sensitive)  adminLogin Password (case sensitive)  passwordInternet ConnectionWAN MAC Address Use default hardware addressMTU Size 1500Local NetworkRouter Lan IP address printed on product label (also known as Gateway IP address) 192.168.1.1Router Subnet 255.255.255.0DHCP Server EnabledTime Zone GMTTime Zone Adjusted for Daylight Saving Time DisabledFirewallInbound (coming in from the Internet) Disabled (bars all unsolicited requests except for traffic on port 80, the http port)Outbound (going out to the Internet) Enabled (all)
Wireless Router Setup ManualA-2 Technical Specificationsv1.0, 2006-03Technical SpecificationsThis table provides technical specifications for the wireless router.WirelessWireless Communication EnabledSSID Name NETGEARSecurity DisabledBroadcast SSID EnabledTransmission Speed Auto*Country/Region United States in the US, otherwise varies by regionRF Channel 11 until region selected Operating Mode g and b Data Rate BestOutput Power Full*. Maximum Wireless signal rate derived from IEEE Standard 802.11 specifications. Actual throughput will vary. Network conditions and environmental factors, including volume of network traffic, building materials and construction, and network overhead, lower actual data throughput rate.Network Protocol and Standards CompatibilityData and Routing Protocols: TCP/IP, DHCP, PPPoE, Dynamic DNS, and UPnPPower Adapter Varies by regionInput 120V 60 Hz, 240V, 50 Hz, 230V 50 Hz, or 100V, 50/60 HzAll regions (output): 12 V DC @ 1.5A outputEnvironmental Operating temperature: 0° to 40° C    (32º to 104º F)Operating humidity: 90% maximum relative humidity, noncondensingElectromagnetic EmissionsMeets requirements of: FCC Part 15 Class BTable A-1. Home Router Default Configuration SettingsFeature Default Behavior
Wireless Router Setup ManualTechnical Specifications A-3v1.0, 2006-03Interface SpecificationsLAN: 10BASE-T or 100/1000BASE-Tx, RJ-45WAN: 10BASE-T or 100/1000BASE-Tx, RJ-45
Related Documents B-1v1.0, 2006-03Appendix B Related DocumentsThis appendix provides links to reference documents you can use to gain a more complete understanding of the technologies used in your NETGEAR product.Document LinkInternet Networking and TCP/IP Addressing http://documentation.netgear.com/reference/enu/tcpip/index.htmPreparing a Computer for Network Access http://documentation.netgear.com/reference/enu/wsdhcp/index.htmGlossary http://documentation.netgear.com/reference/enu/glossary/index.htm

Navigation menu