Netgear orporated 07300069 RANGEMAX NEXT WIRELESS-N USB User Manual FullManual
Netgear Incorporated RANGEMAX NEXT WIRELESS-N USB FullManual
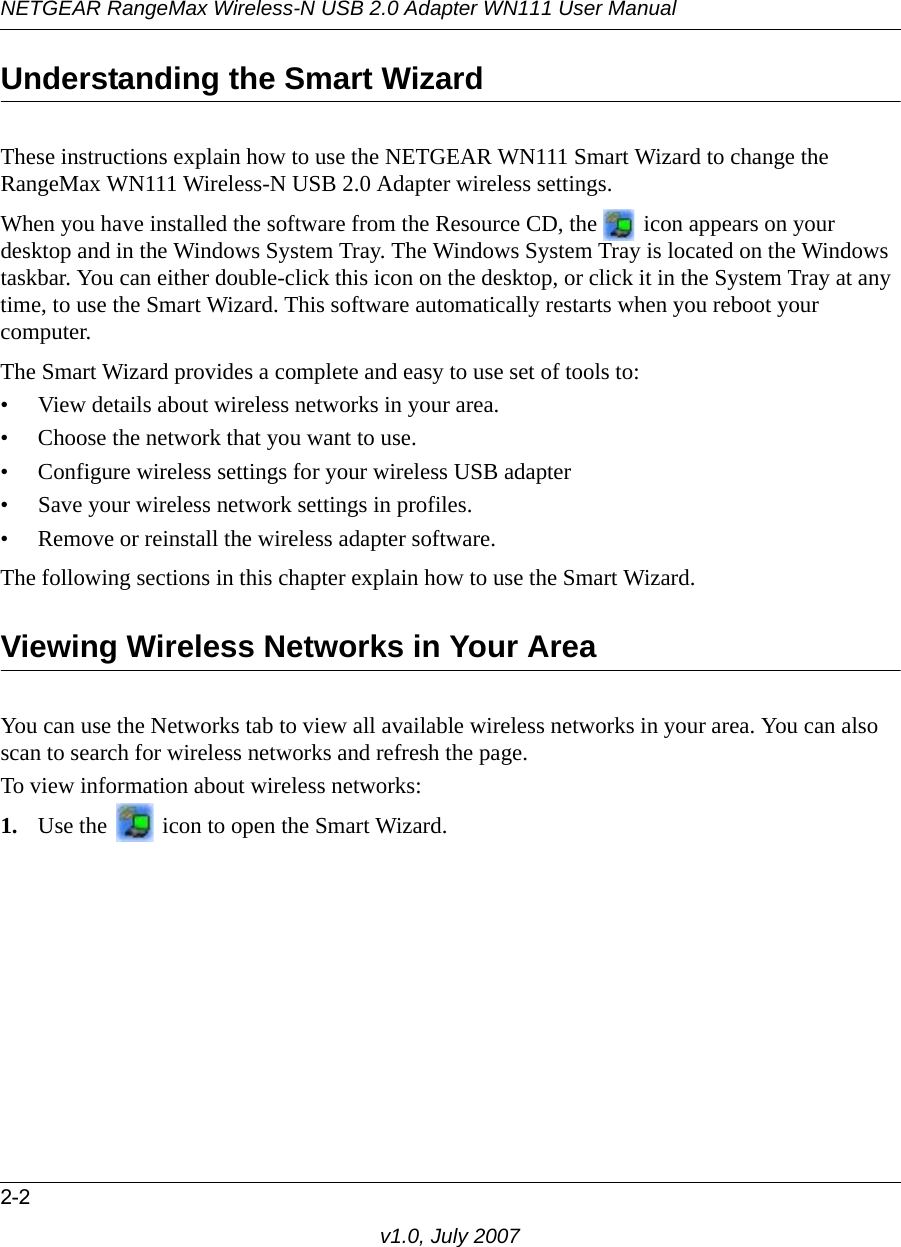
UserManual.wiki
>
Netgear orporated
>
07300069 User Manual
User Manual
Navigation menu
Upload a User Manual
Namespaces
Wiki Guide
HTML
PDF
Info
Views
User Manual
Discussion / Help
Navigation


![v1.0, July 2007iii• Reorient or relocate the receiving antenna • Increase the separation between the equipment or devices • Connect the equipment to an outlet other than the receiver’s • Consult a dealer or an experienced radio/TV technician for assistanceFCC Caution: Any change or modification to the product not expressly approved by Netgear could void the user’s authority to operate the device. For product available in the USA/Canada market, only channel 1~11 can be operated.Selection of other channels is not possible. This device and its antenna(s) must not be co-located or operating in conjunction with any other antenna or transmitter.FCC RF Radiation Exposure and SAR StatementsSAR Statement The NETGEAR WN111 has been tested for body-worn Specific Absorption Rate (SAR) compliance. The FCC has established detailed SAR requirements and has established that these requirements have been met while installed in host notebook computer. RF Exposure InformationThe radio module has been evaluated under FCC Bulletin OET 65C (01-01) and found to be compliant to the requirements as set forth in CFR 47 Sections, 2.1093, and 15.247 (b) (4) addressing RF Exposure from radio frequency devices. This model meets the applicable government requirements for exposure to radio frequency waves. The highest SAR level measured for this device was 0.46 W/kg.Canadian Department of Communications Industry Canada (IC) Notice Operaton is subject to the following two conditions:(1)this device may not cause interference, andthis device must accept any interference, including interference that may cause undesired operaton of the device This Class B digital apparatus complies with Canadian ICES-003 and RSS-210. Cet appareil numérique de la classe B est conforme à la norme NMB-003 et CNR-210 du Canada. “To prevent radio interference to the licensed service, this device is intended to be operated indoors and away from windows to provide maximum shielding. Equipment (or its transmit antenna) that is installed outdoors is subject to licensing.”“Pour empêcher que cet appareil cause du brouillage au service faisant l’objet d’une licence, il doit être utilisé à l’intérieur et devrait être placé loin des fenêtres afin de fournir un écran de blindage maximal. Si le matériel (ou son antenne d’émission) est installé à l’extérieur, il doit faire l’objet d’une licence.”Europe - EU Declaration of ConformityA printed copy of the EU Declaration of Conformity certificate for this product is provided in the WN111 product package. Èesky [Czech] NETGEAR, Inc. tímto prohlašuje, že tento NETGEAR RangeMax Wireless-N USB 2.0 Adapter WN111 je ve shodì se základními požadavky a dalšími pøíslušnými ustanoveními smìrnice 1999/5/ES.Dansk [Danish]Undertegnede NETGEAR, Inc. erklærer herved, at følgende udstyr NETGEAR RangeMax Wireless-N USB 2.0 Adapter WN111 overholder de væsentlige krav og øvrige relevante krav i direktiv 1999/5/EF.Deutsch [German]Hiermit erklärt NETGEAR, Inc., dass sich das Gerät NETGEAR RangeMax Wireless-N USB 2.0 Adapter WN111 in Übereinstimmung mit den grundlegenden Anforderungen und den übrigen einschlägigen Bestimmungen der Richtlinie 1999/5/EG befindet.](https://usermanual.wiki/Netgear-orporated/07300069/User-Guide-835060-Page-3.png)
![v1.0, July 2007ivEesti [Estonian]Käesolevaga kinnitab NETGEAR, Inc. seadme NETGEAR RangeMax Wireless-N USB 2.0 Adapter WN111 vastavust direktiivi 1999/5/EÜ põhinõuetele ja nimetatud direktiivist tulenevatele teistele asjakohastele sätetele.English Hereby, NETGEAR, Inc., declares that this NETGEAR RangeMax Wireless-N USB 2.0 Adapter WN111 is in compliance with the essential requirements and other relevant provisions of Directive 1999/5/EC.Español [Spanish]Por medio de la presente NETGEAR, Inc. declara que el NETGEAR RangeMax Wireless-N USB 2.0 Adapter WN111 cumple con los requisitos esenciales y cualesquiera otras disposiciones aplicables o exigibles de la Directiva 1999/5/CE.Ελληνική [Greek]ΜΕ ΤΗΝ ΠΑΡΟΥΣΑ NETGEAR, Inc. ΔΗΛΩΝΕΙ ΟΤΙ NETGEAR RangeMax Wireless-N USB 2.0 Adapter WN111 ΣΥΜΜΟΡΦΩΝΕΤΑΙ ΠΡΟΣ ΤΙΣ ΟΥΣΙΩΔΕΙΣ ΑΠΑΙΤΗΣΕΙΣ ΚΑΙ ΤΙΣ ΛΟΙΠΕΣ ΣΧΕΤΙΚΕΣ ΔΙΑΤΑΞΕΙΣ ΤΗΣ ΟΔΗΓΙΑΣ 1999/5/ΕΚ.Français [French]Par la présente NETGEAR, Inc. déclare que l'appareil NETGEAR RangeMax Wireless-N USB 2.0 Adapter WN111 est conforme aux exigences essentielles et aux autres dispositions pertinentes de la directive 1999/5/CE.Italiano [Italian]Con la presente NETGEAR, Inc. dichiara che questo NETGEAR RangeMax Wireless-N USB 2.0 Adapter WN111 è conforme ai requisiti essenziali ed alle altre disposizioni pertinenti stabilite dalla direttiva 1999/5/CE.Latviski [Latvian]Ar šo NETGEAR, Inc. deklarç, ka NETGEAR RangeMax Wireless-N USB 2.0 Adapter WN111 atbilst Direktîvas 1999/5/EK bûtiskajâm prasîbâm un citiem ar to saistîtajiem noteikumiem.Lietuviø [Lithuanian] Šiuo NETGEAR, Inc. deklaruoja, kad šis NETGEAR RangeMax Wireless-N USB 2.0 Adapter WN111 atitinka esminius reikalavimus ir kitas 1999/5/EB Direktyvos nuostatas.Nederlands [Dutch]Hierbij verklaart NETGEAR, Inc. dat het toestel NETGEAR RangeMax Wireless-N USB 2.0 Adapter WN111 in overeenstemming is met de essentiële eisen en de andere relevante bepalingen van richtlijn 1999/5/EG.Malti [Maltese]Hawnhekk, NETGEAR, Inc., jiddikjara li dan NETGEAR RangeMax Wireless-N USB 2.0 Adapter WN111 jikkonforma mal-tiijiet essenzjali u ma provvedimenti orajn relevanti li hemm fid-Dirrettiva 1999/5/EC.Magyar [Hungarian]Alulírott, NETGEAR, Inc. nyilatkozom, hogy a NETGEAR RangeMax Wireless-N USB 2.0 Adapter WN111 megfelel a vonatkozó alapvetõ követelményeknek és az 1999/5/EC irányelv egyéb elõírásainak.Polski [Polish] Niniejszym NETGEAR, Inc. oœwiadcza, ¿e NETGEAR RangeMax Wireless-N USB 2.0 Adapter WN111 jest zgodny z zasadniczymi wymogami oraz pozosta³ymi stosownymi postanowieniami Dyrektywy 1999/5/EC.Português [Portuguese] NETGEAR, Inc. declara que este NETGEAR RangeMax Wireless-N USB 2.0 Adapter WN111 está conforme com os requisitos essenciais e outras disposições da Directiva 1999/5/CE.Slovensko [Slovenian] NETGEAR, Inc. izjavlja, da je ta NETGEAR RangeMax Wireless-N USB 2.0 Adapter WN111 v skladu z bistvenimi zahtevami in ostalimi relevantnimi doloèili direktive 1999/5/ES.](https://usermanual.wiki/Netgear-orporated/07300069/User-Guide-835060-Page-4.png)
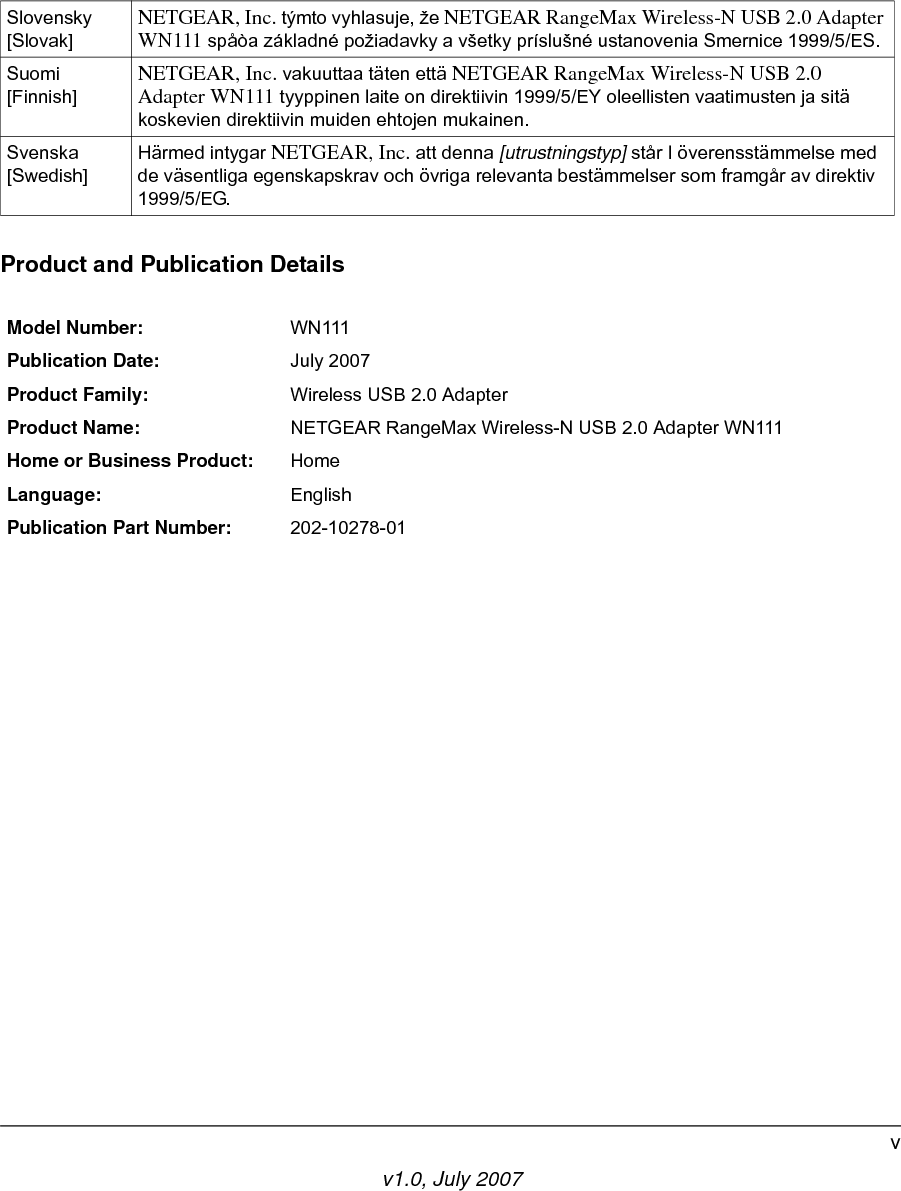
![v1.0, July 2007vProduct and Publication DetailsSlovensky [Slovak] NETGEAR, Inc. týmto vyhlasuje, že NETGEAR RangeMax Wireless-N USB 2.0 Adapter WN111 spåòa základné požiadavky a všetky príslušné ustanovenia Smernice 1999/5/ES.Suomi [Finnish] NETGEAR, Inc. vakuuttaa täten että NETGEAR RangeMax Wireless-N USB 2.0 Adapter WN111 tyyppinen laite on direktiivin 1999/5/EY oleellisten vaatimusten ja sitä koskevien direktiivin muiden ehtojen mukainen.Svenska [Swedish]Härmed intygar NETGEAR, Inc. att denna [utrustningstyp] står I överensstämmelse med de väsentliga egenskapskrav och övriga relevanta bestämmelser som framgår av direktiv 1999/5/EG.Model Number: WN111Publication Date: July 2007Product Family: Wireless USB 2.0 AdapterProduct Name: NETGEAR RangeMax Wireless-N USB 2.0 Adapter WN111Home or Business Product: HomeLanguage: EnglishPublication Part Number: 202-10278-01](https://usermanual.wiki/Netgear-orporated/07300069/User-Guide-835060-Page-5.png)


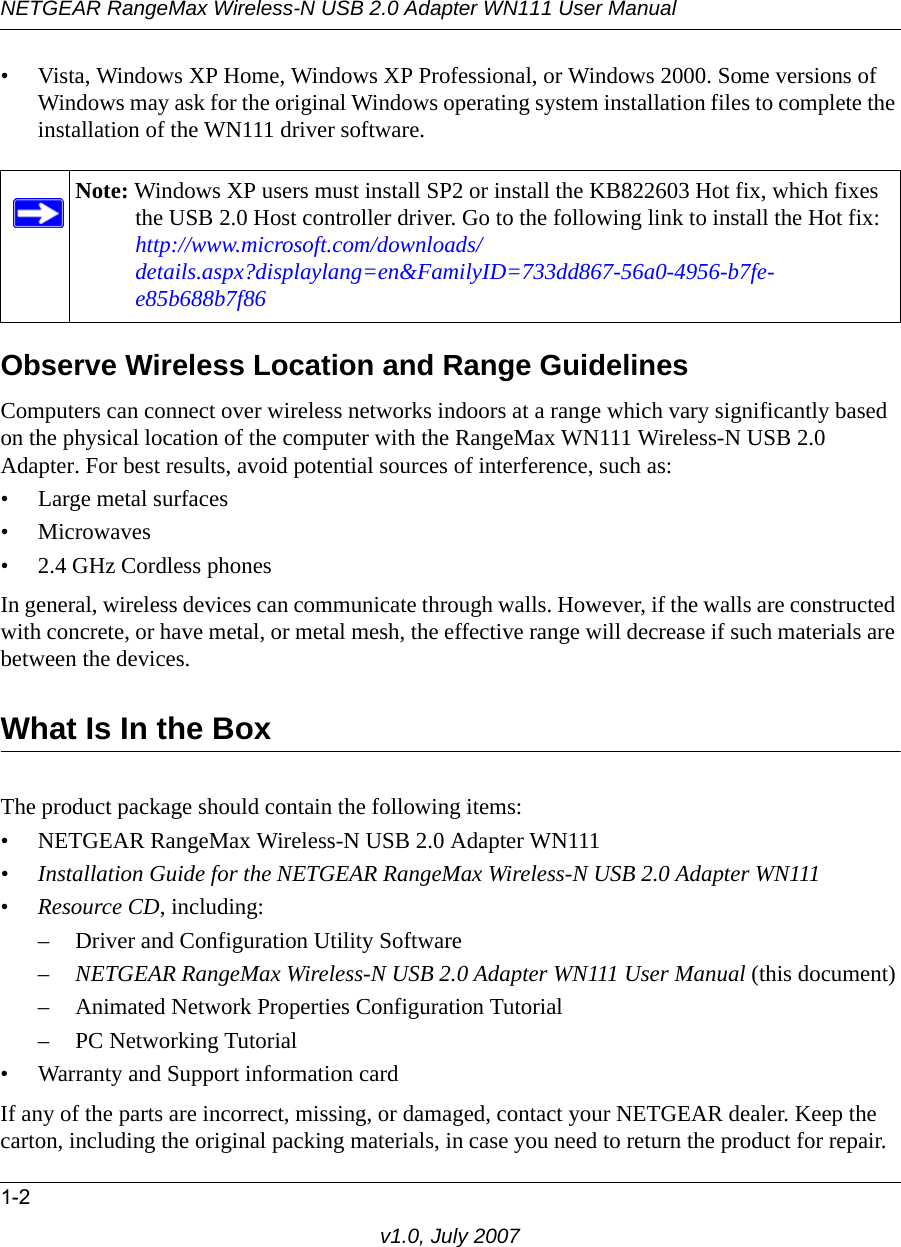


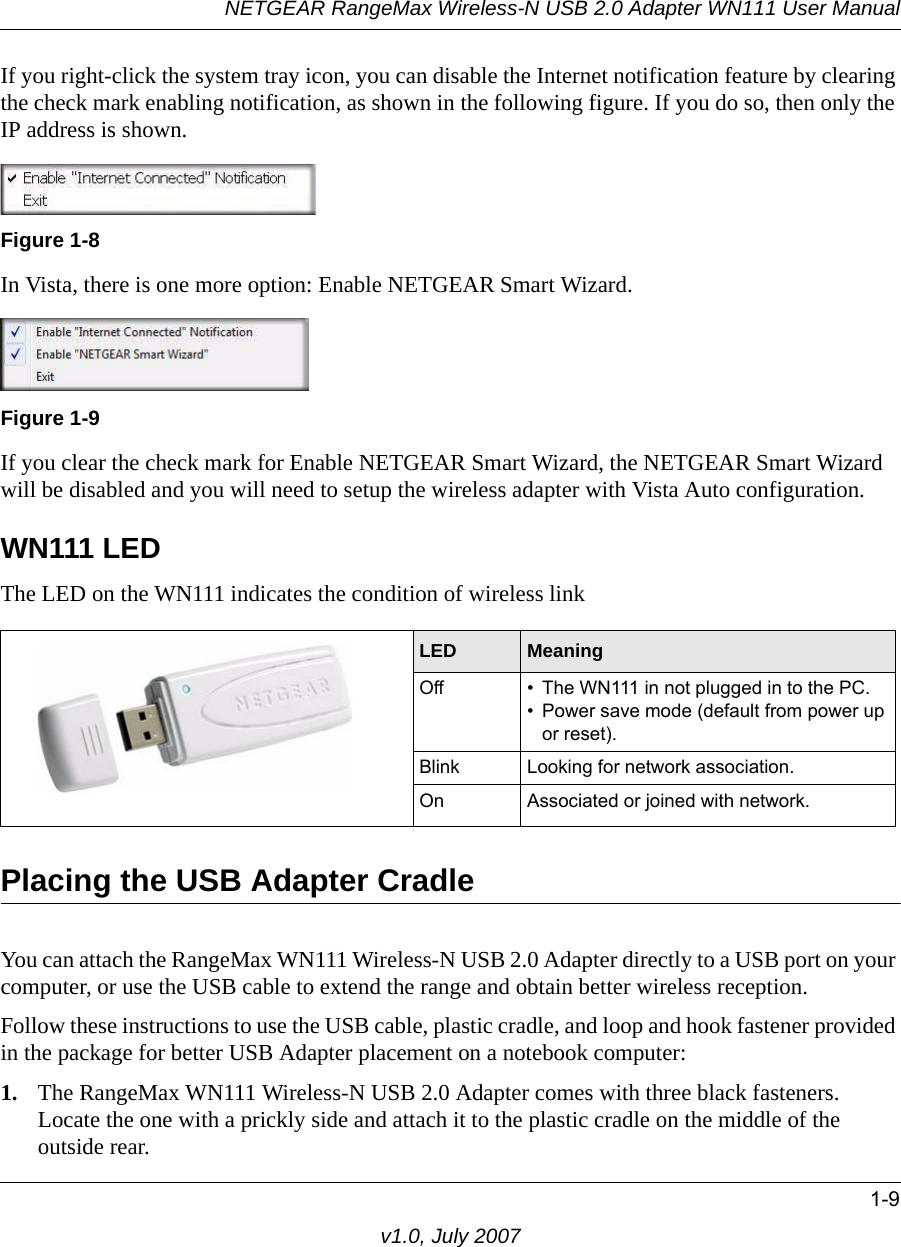


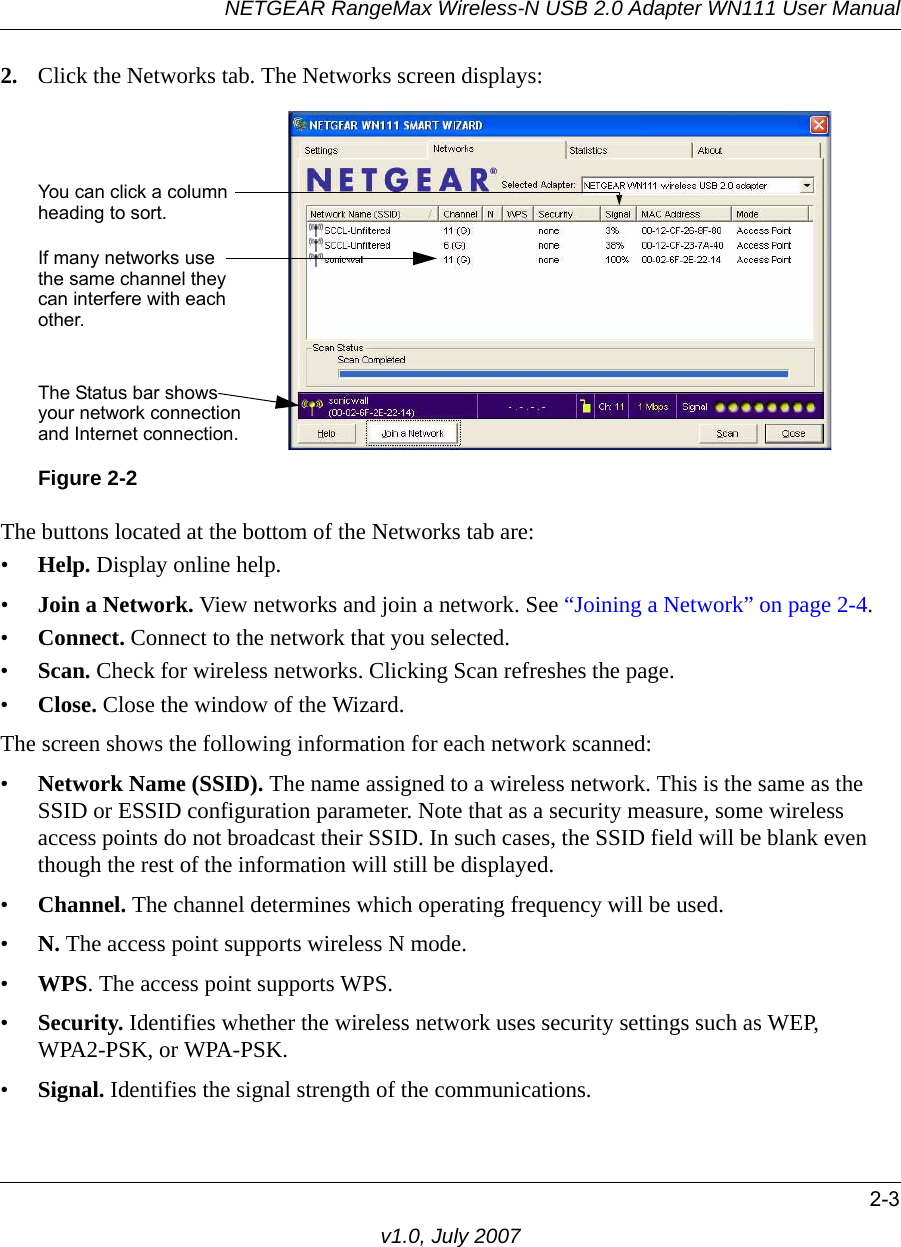


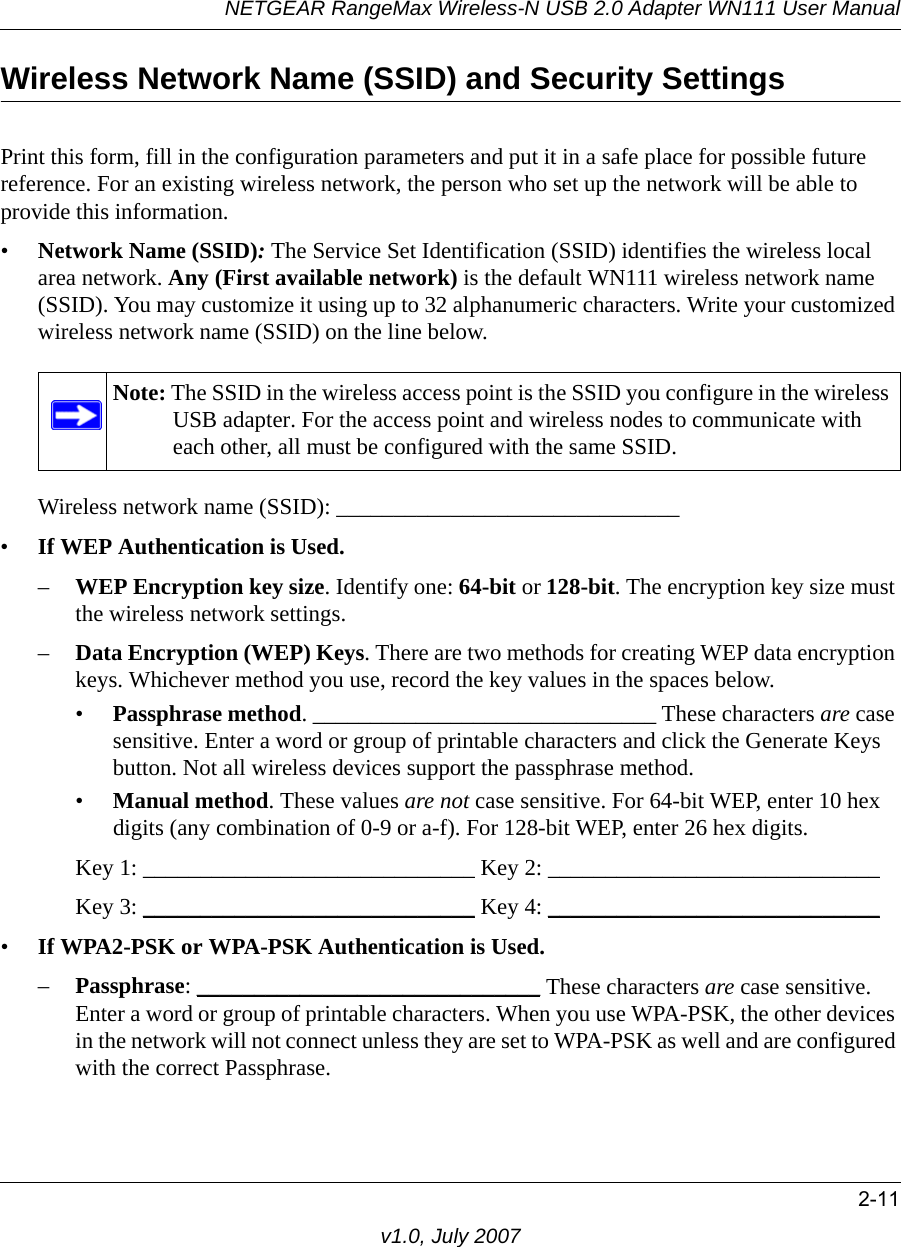
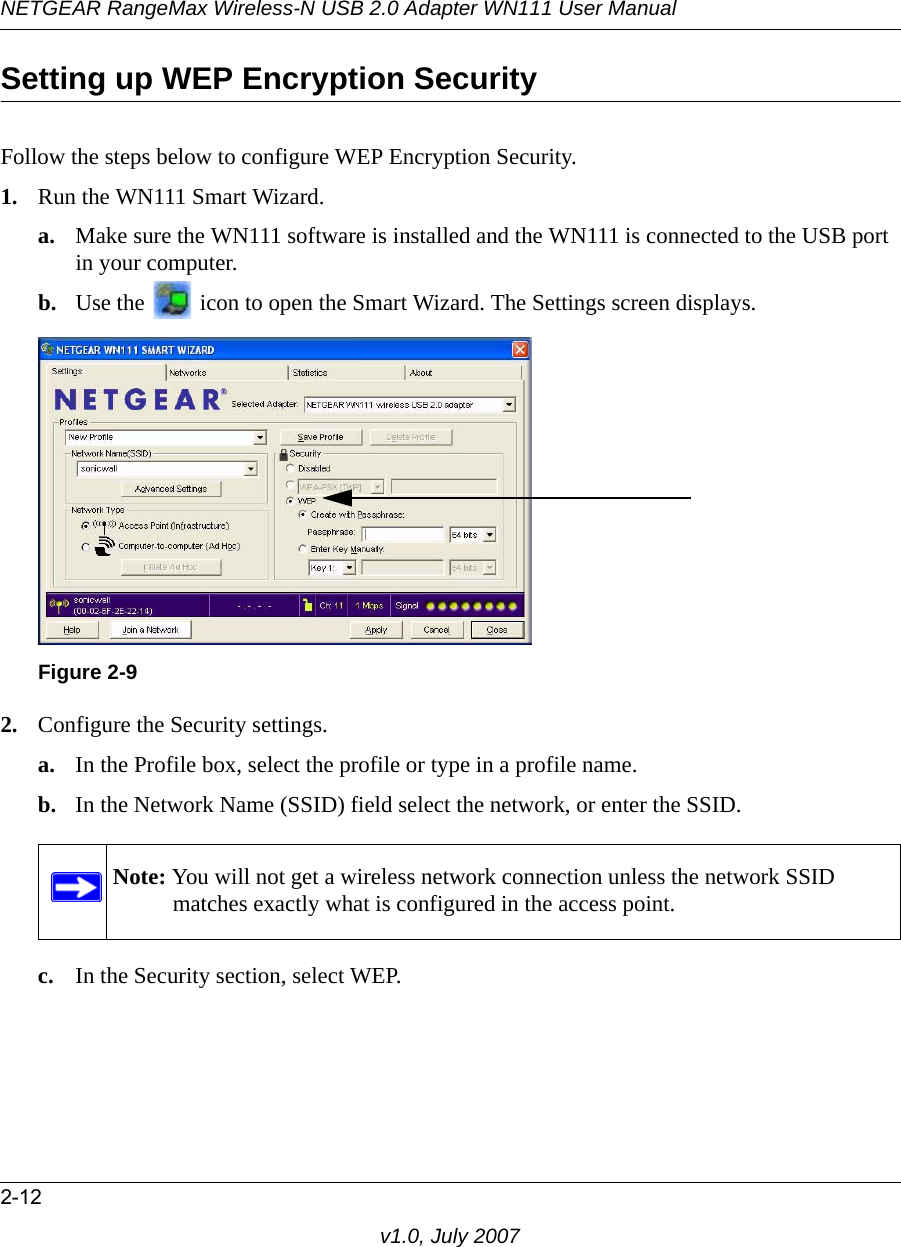
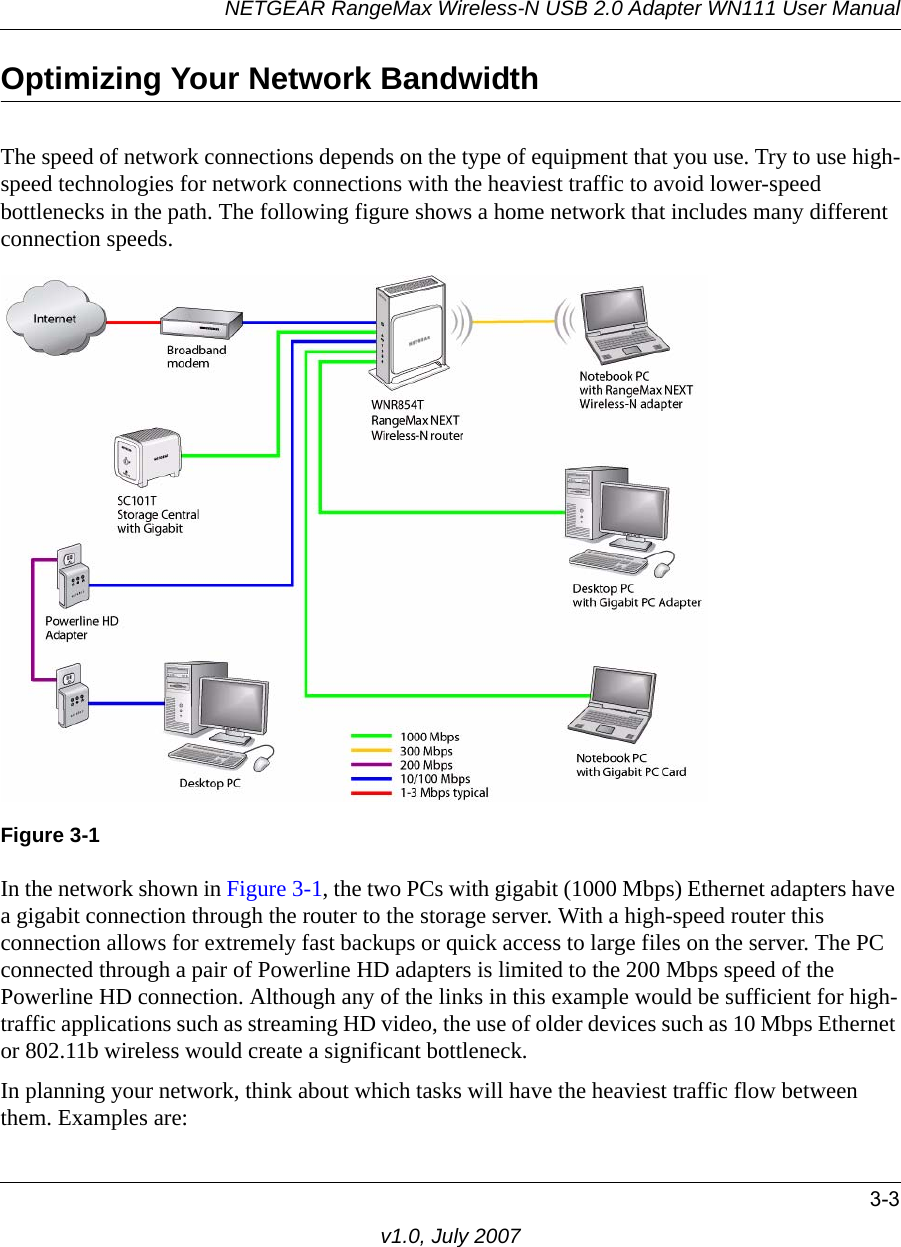
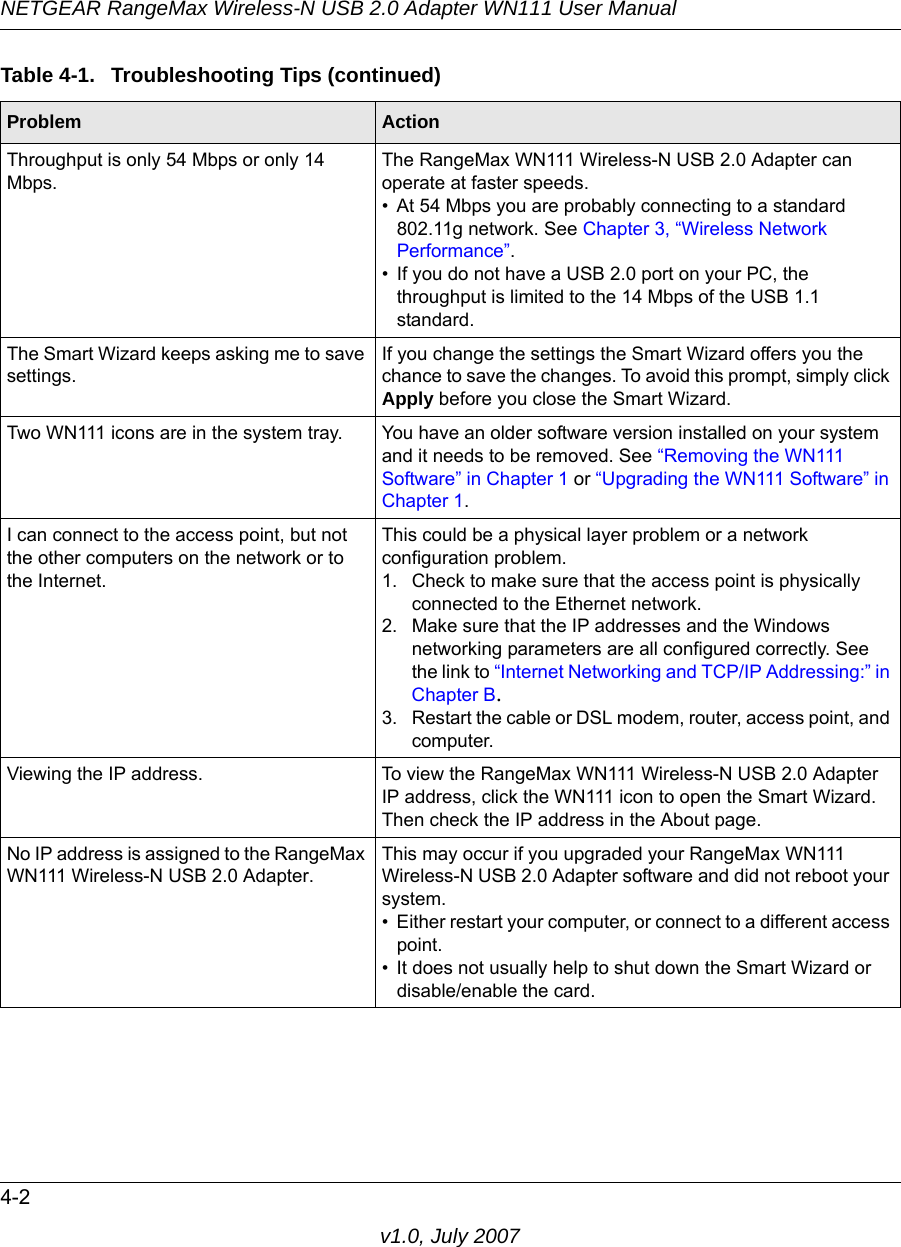
![NETGEAR RangeMax Wireless-N USB 2.0 Adapter WN111 User Manual2-14v1.0, July 2007b. Use the icon to open the Smart Wizard. The Settings screen displays:2. Configure the Security settings. a. In the Profile box, select the profile or type in a profile name.b. In the Network Name (SSID) field select the network, or enter the SSID.c. In the Security section, select WPA2-PSK [AES].For more about WPA2-PSK, see the link to “Wireless Communications:” in Appendix B.3. Save your settings in a Profile. a. Click the Save Profile button. All the configuration settings are saved in this profile. b. Click Apply and then click Close to exit the Smart Wizard.Figure 2-10Note: You will not get a wireless network connection unless the network SSID matches exactly what is configured in the access point.](https://usermanual.wiki/Netgear-orporated/07300069/User-Guide-835060-Page-38.png)