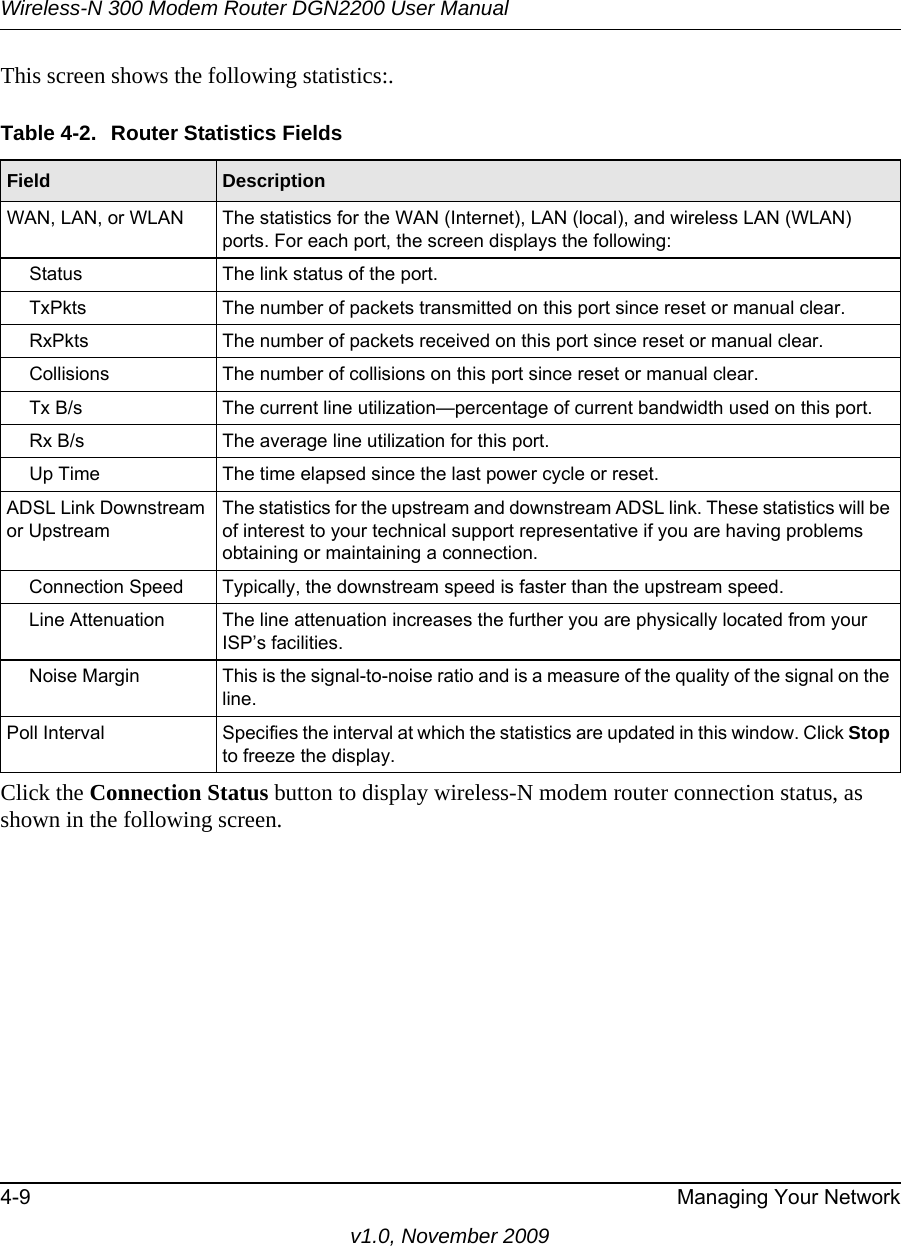
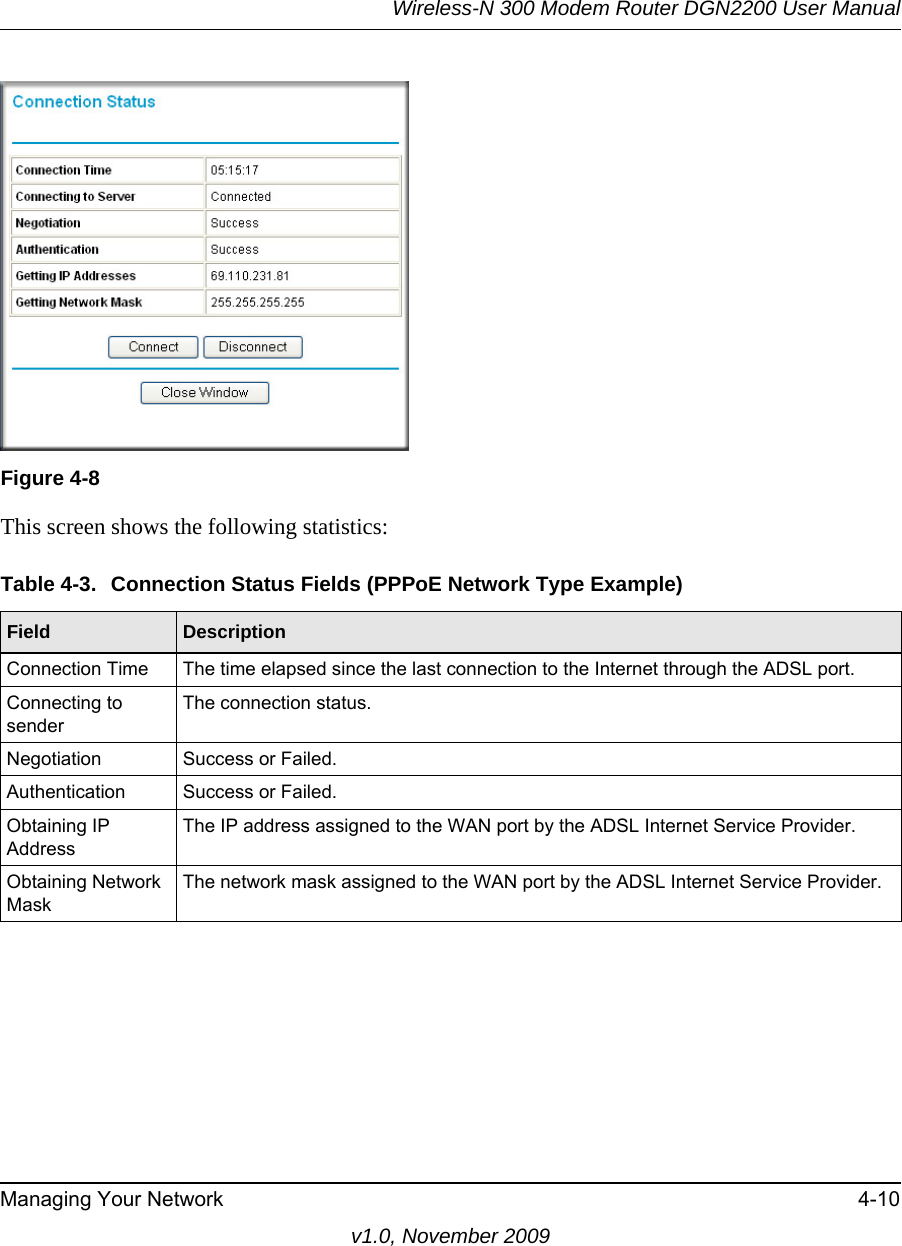
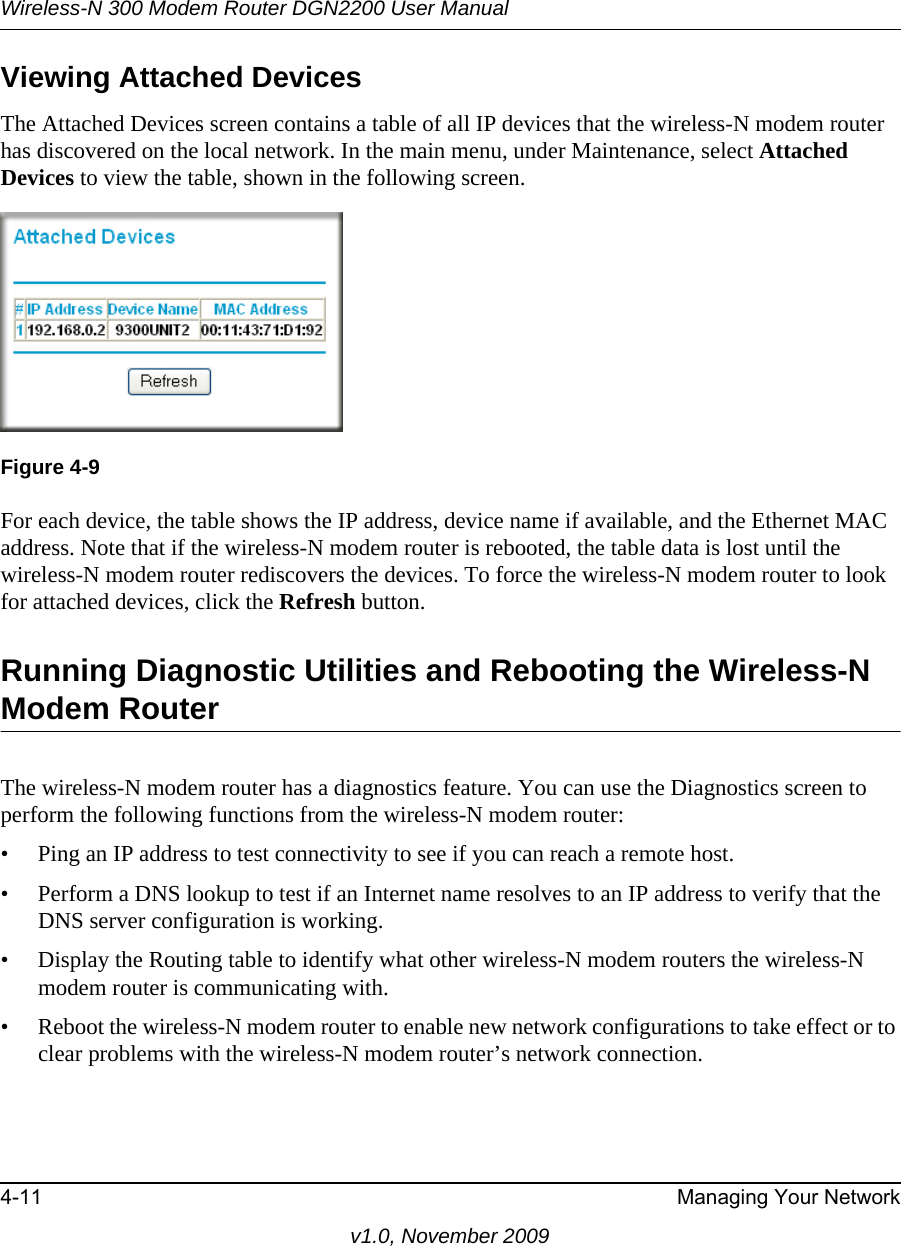
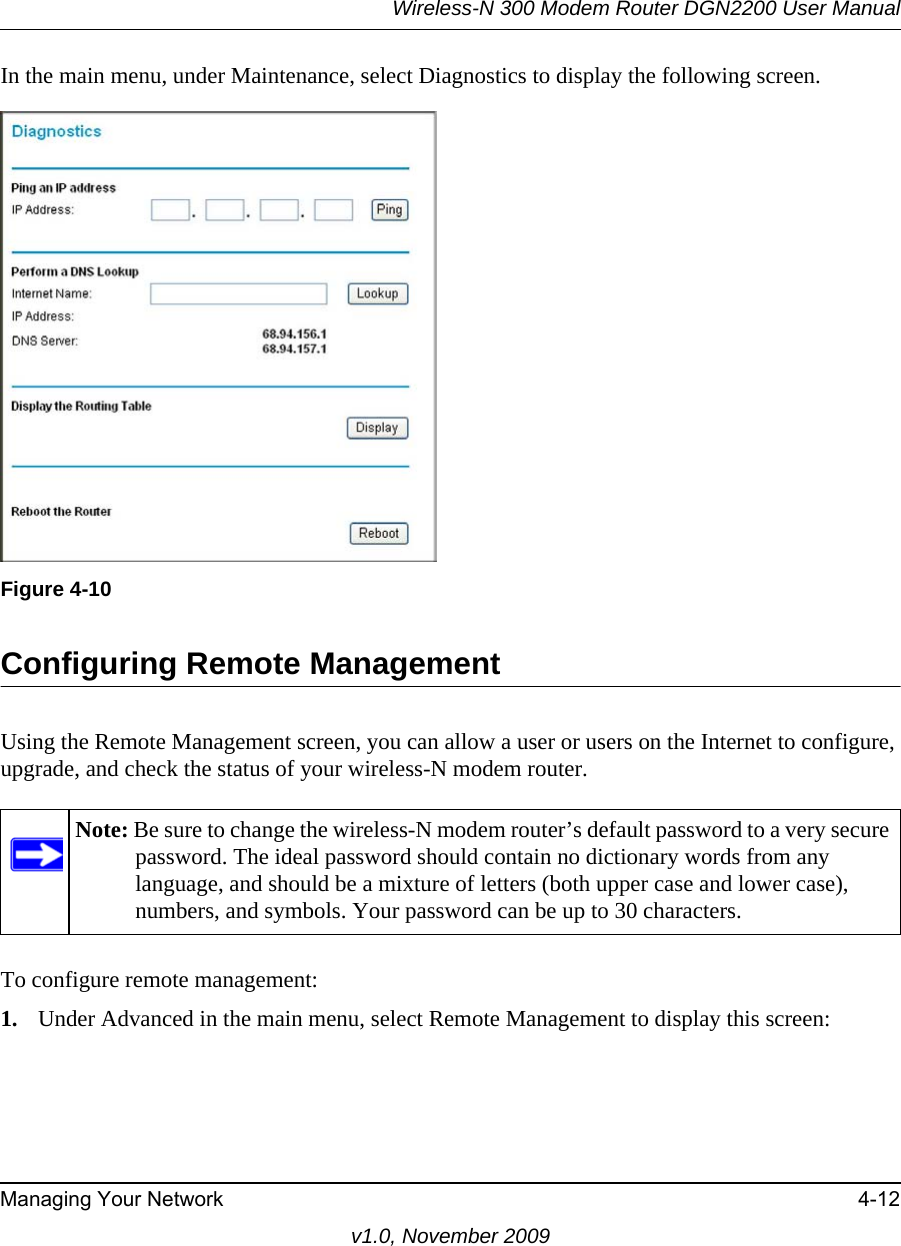
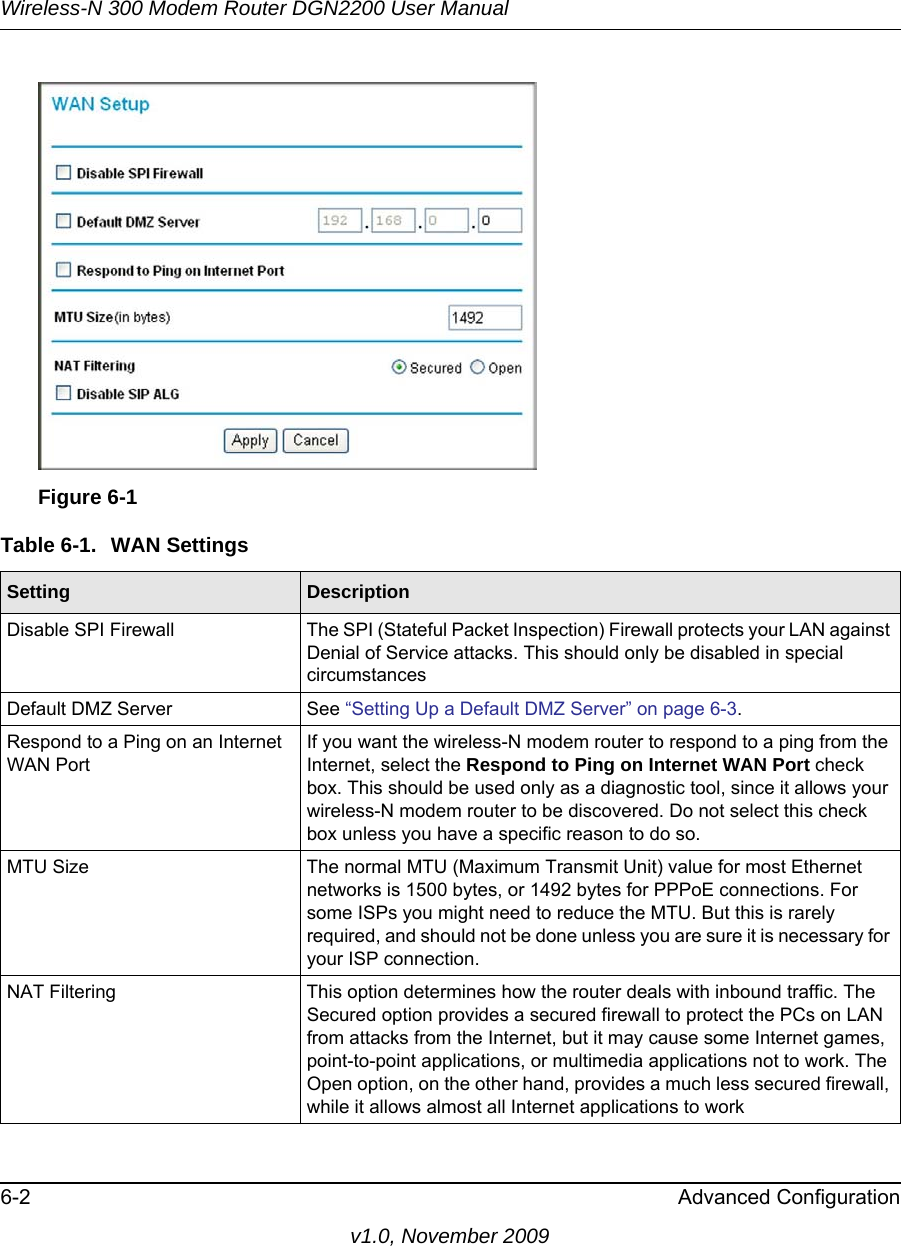
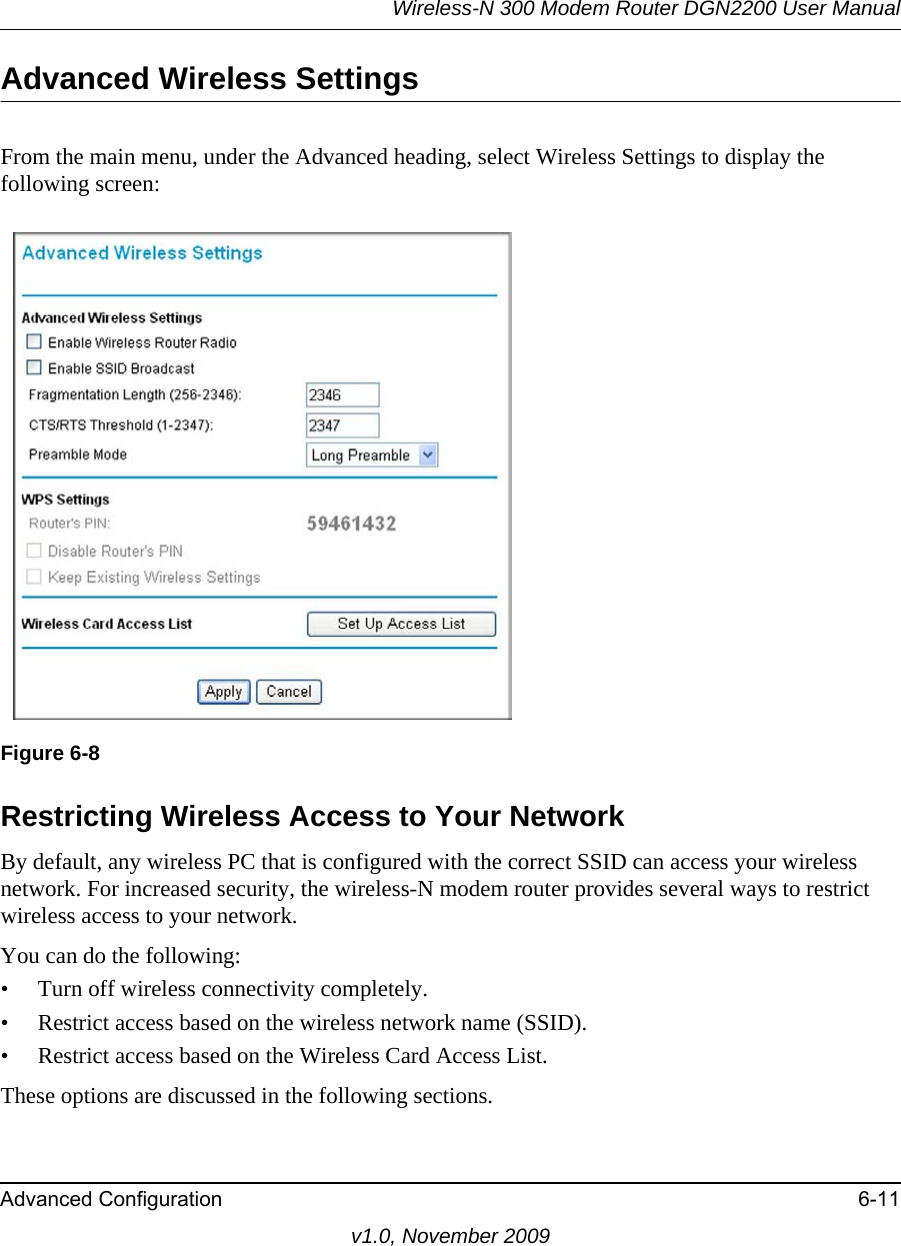
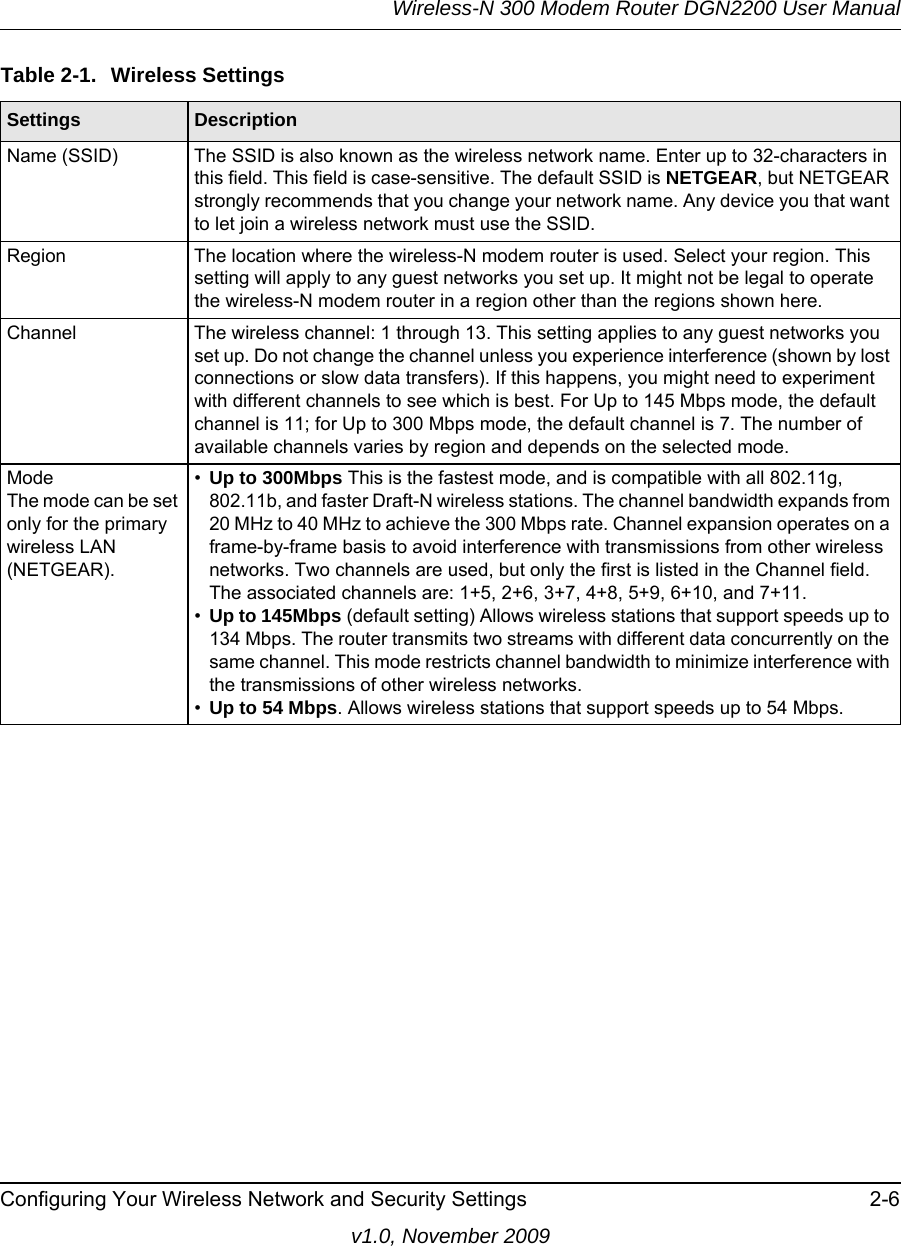
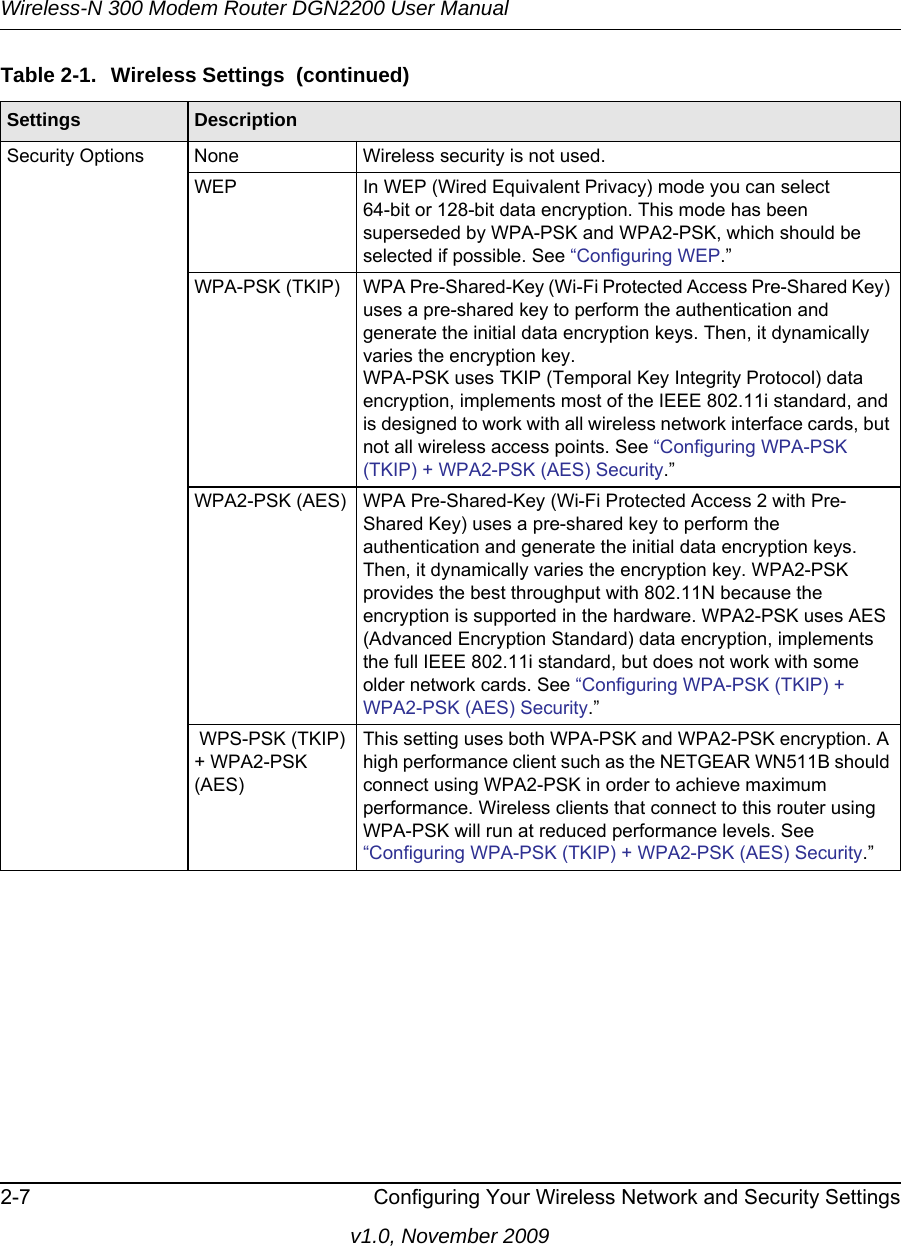
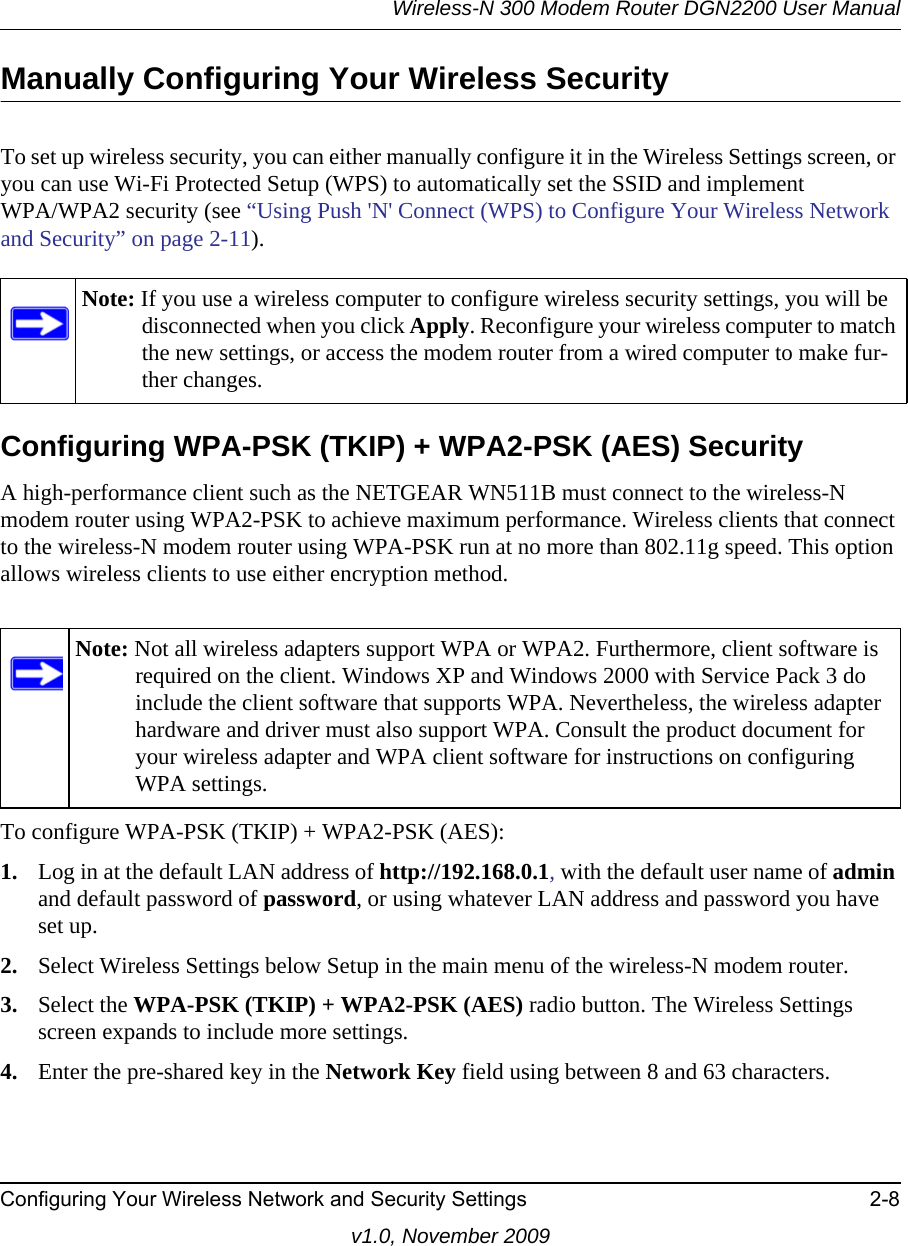
Netgear orporated 09200112 Wireless-N 300 Modem Router/Mobile Broadband Router User Manual
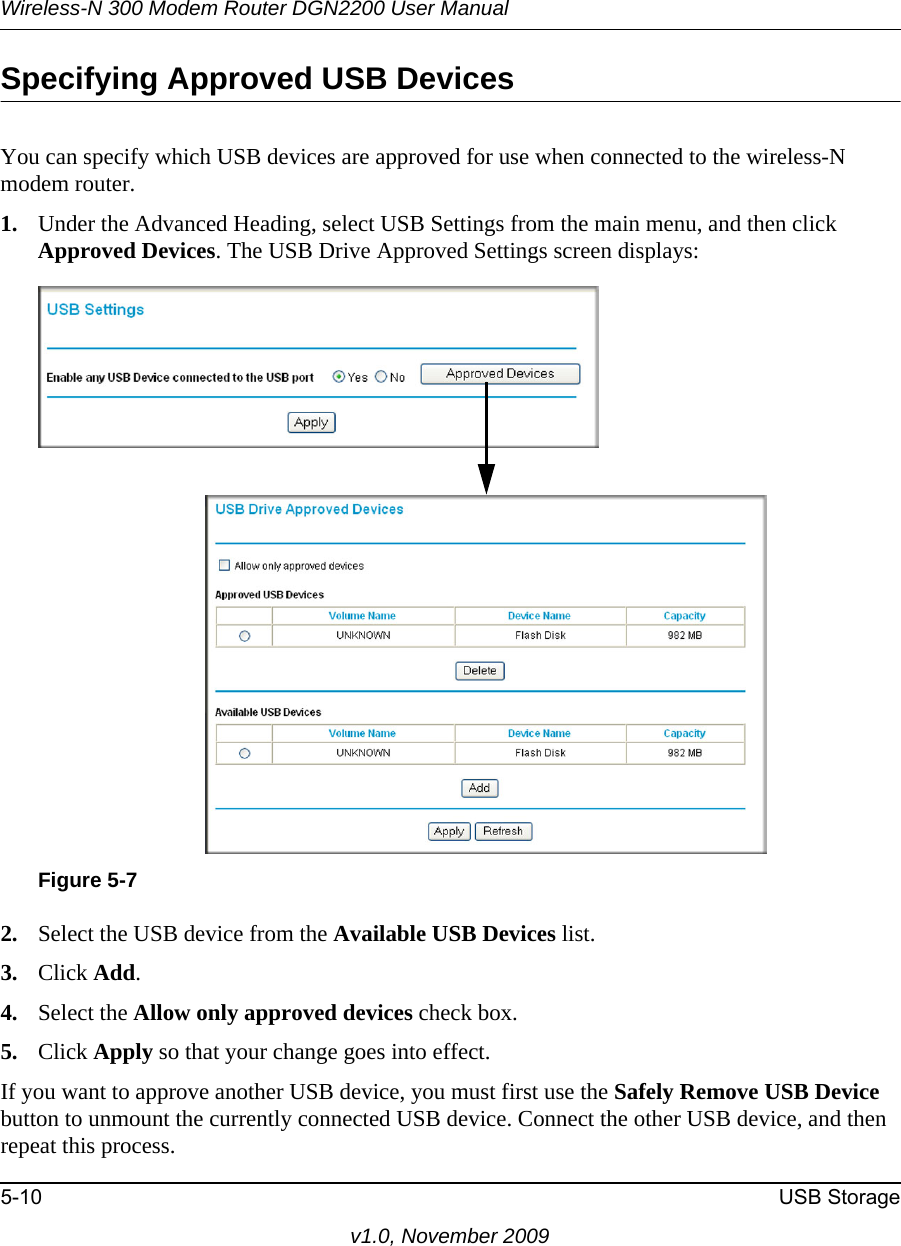
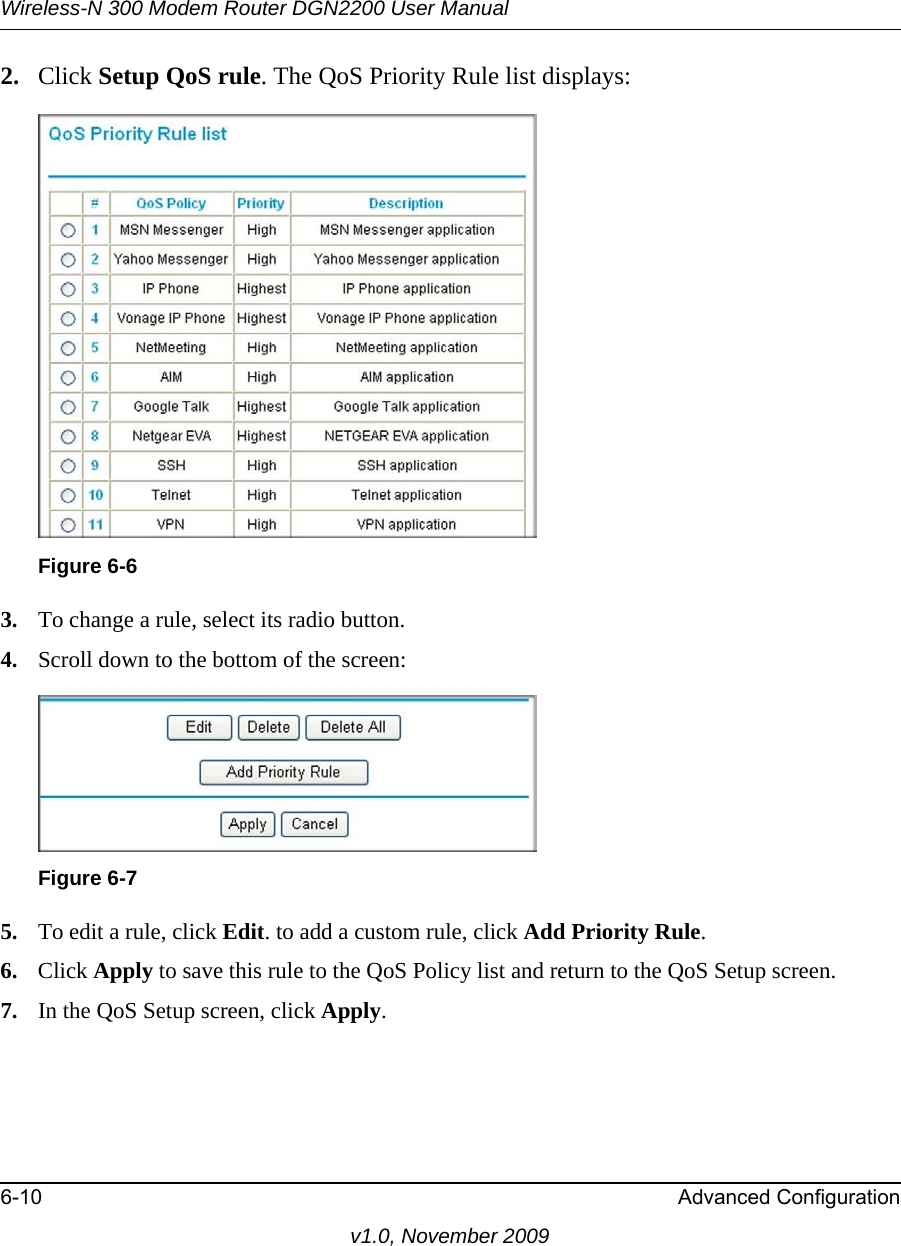
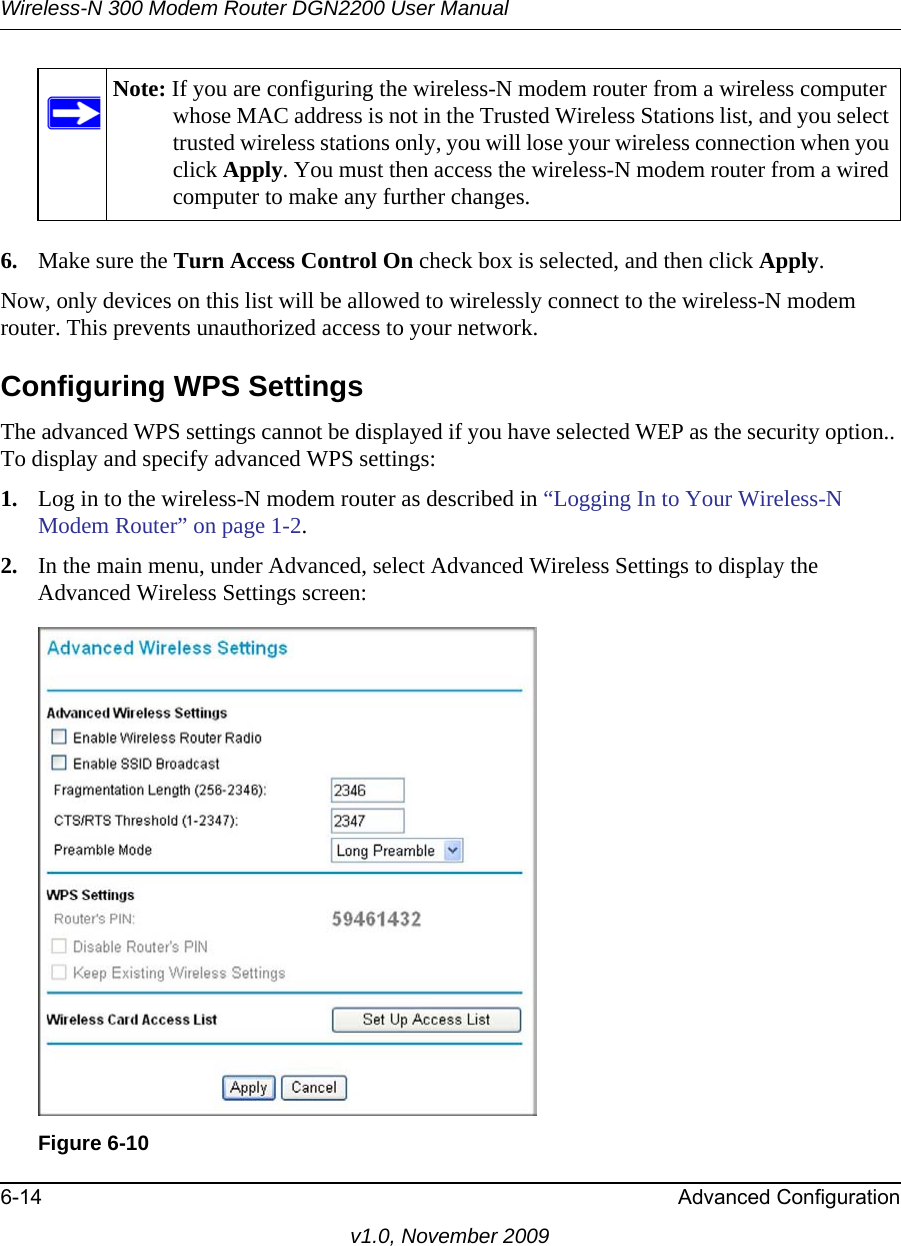
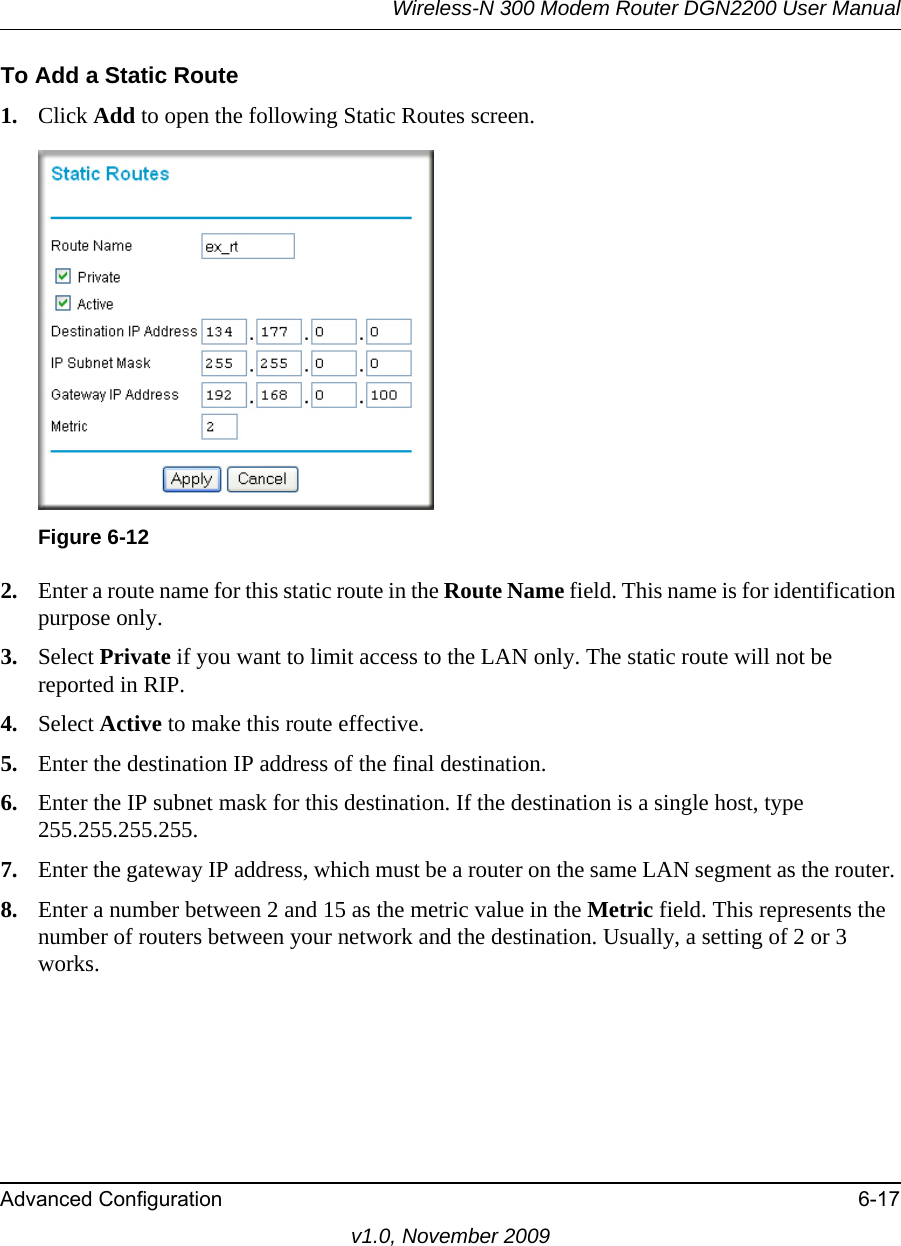
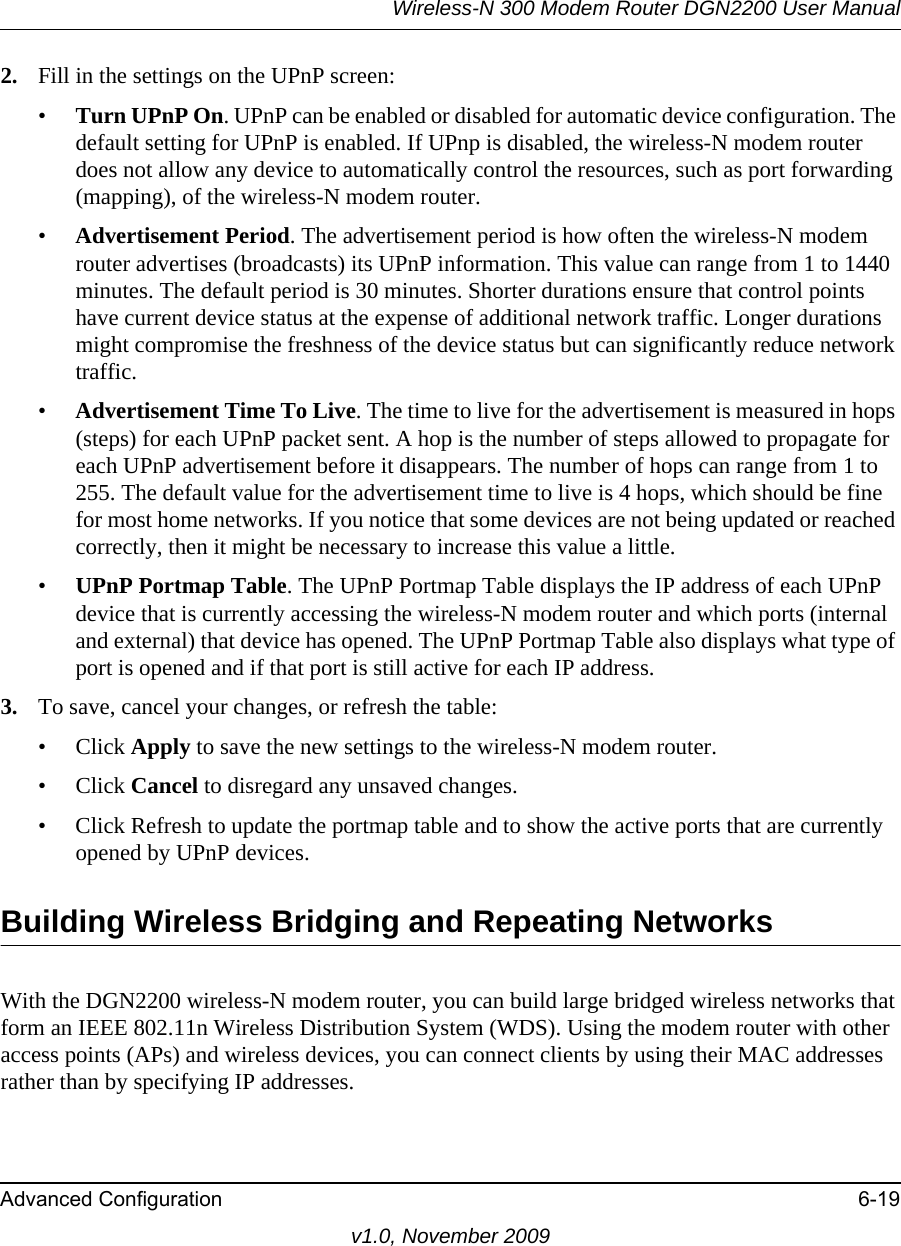
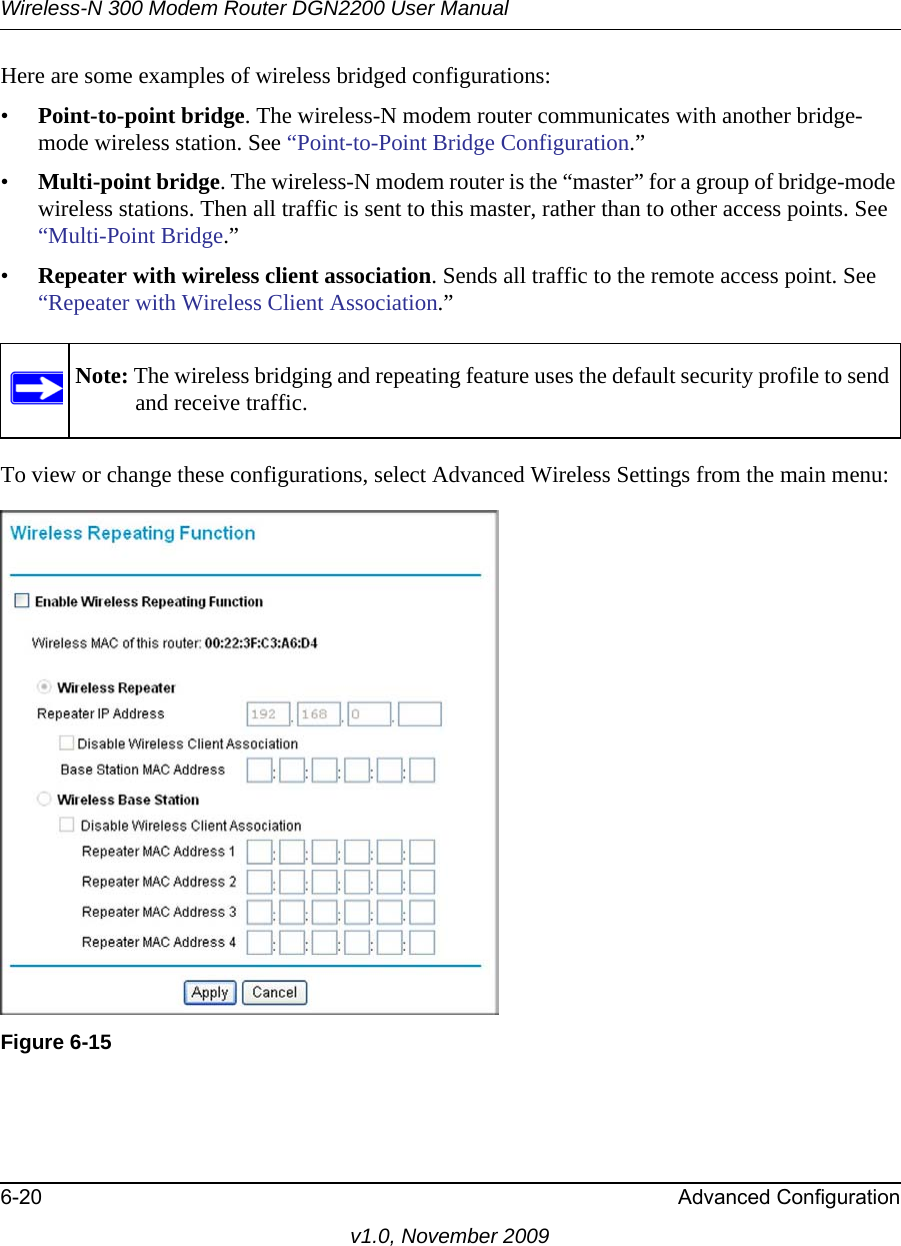
Netgear Incorporated Wireless-N 300 Modem Router/Mobile Broadband Router
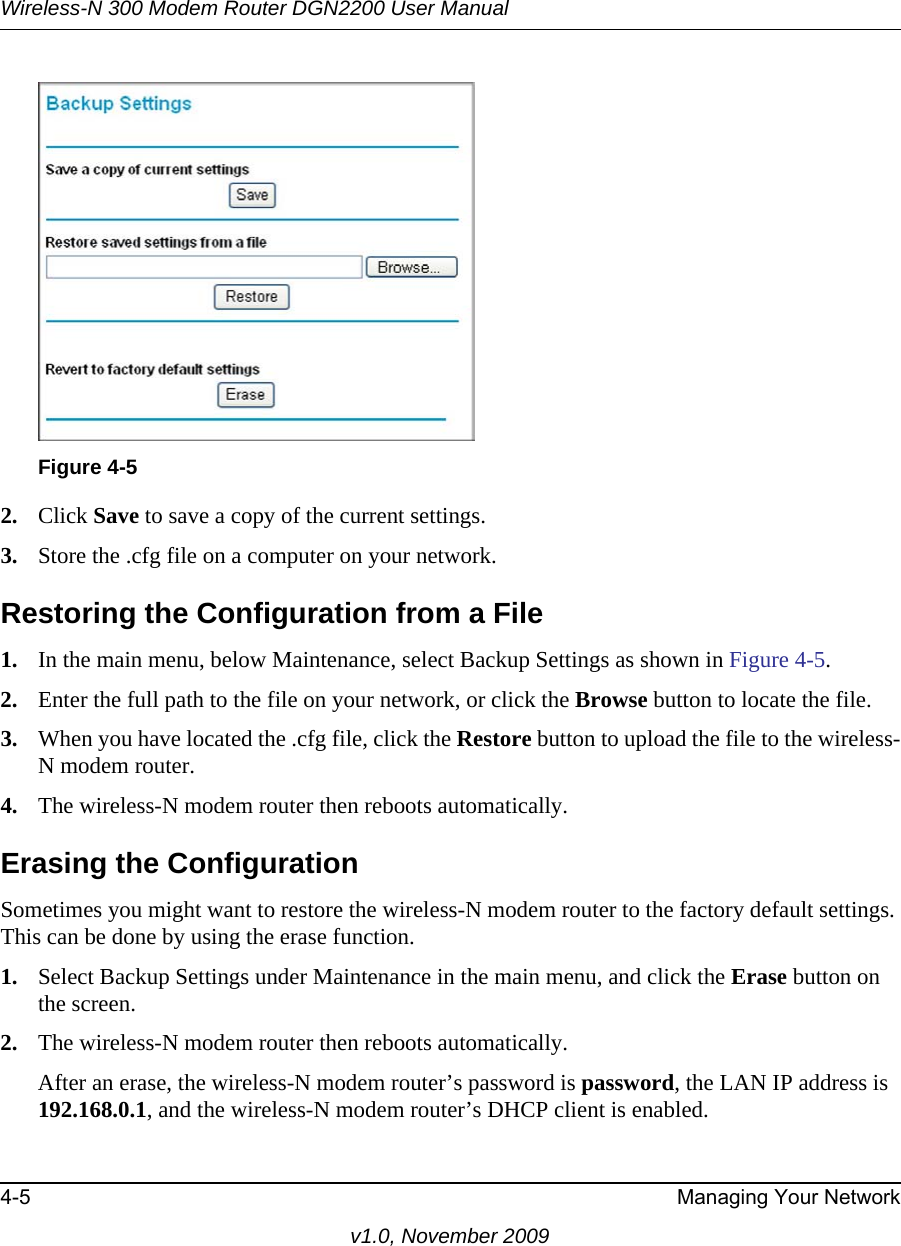
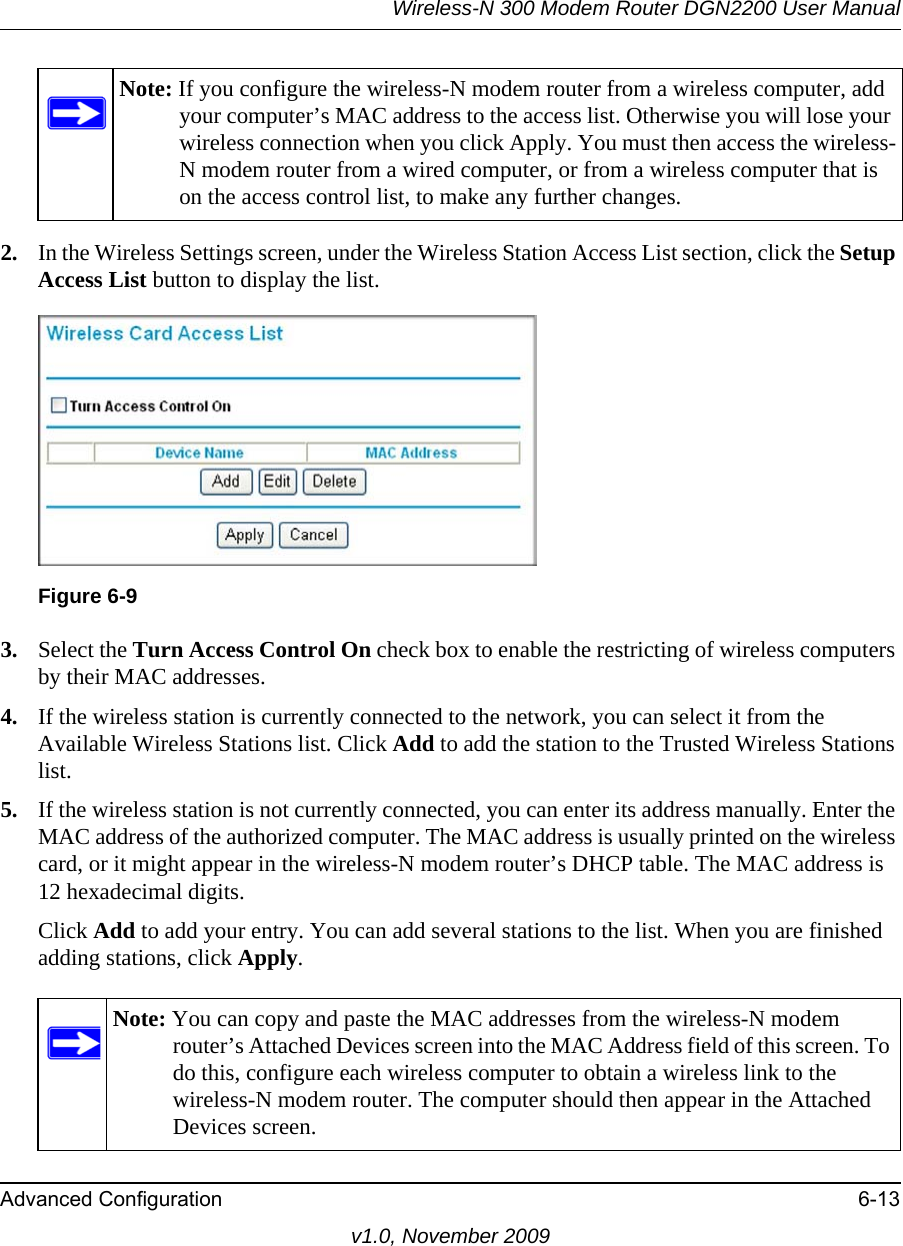
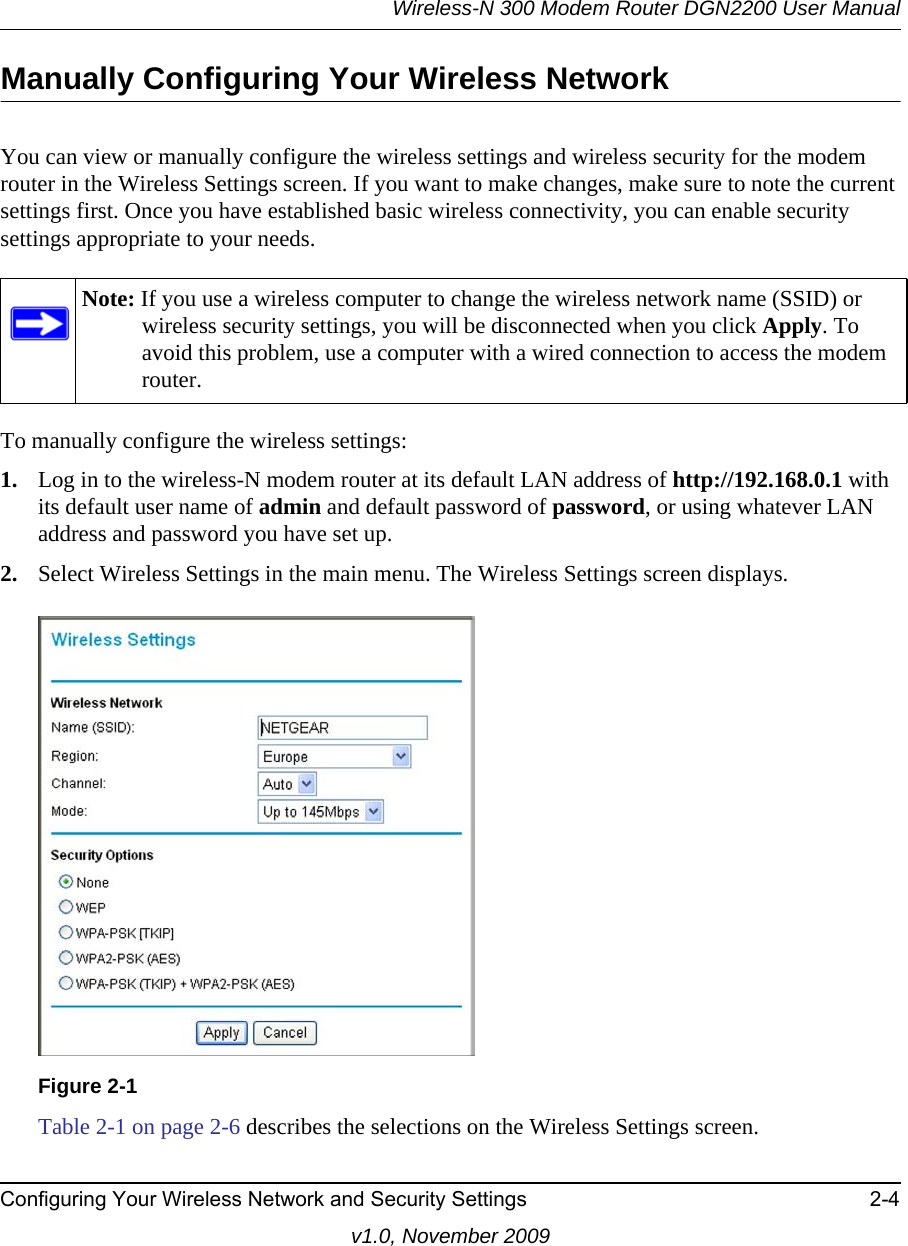
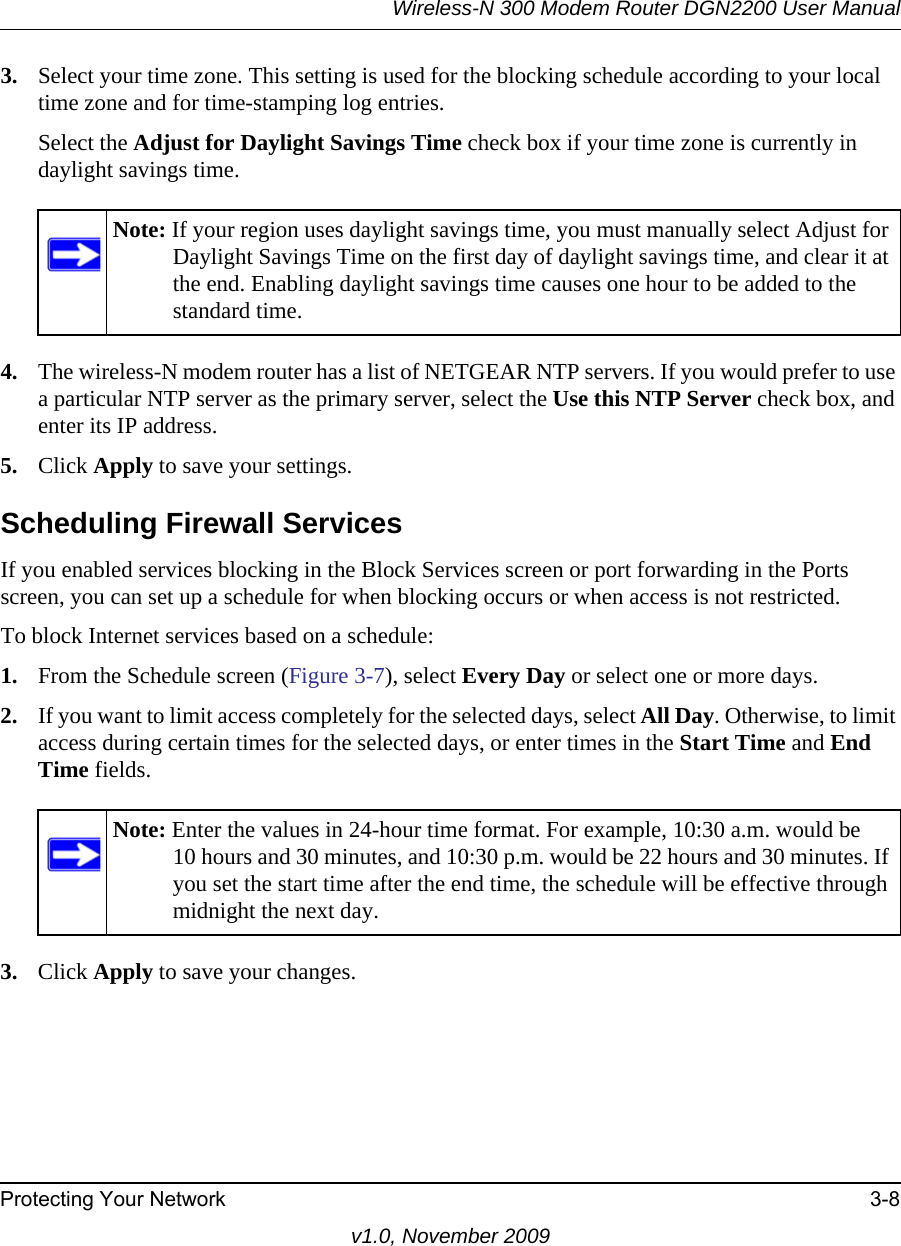
UserManual.wiki
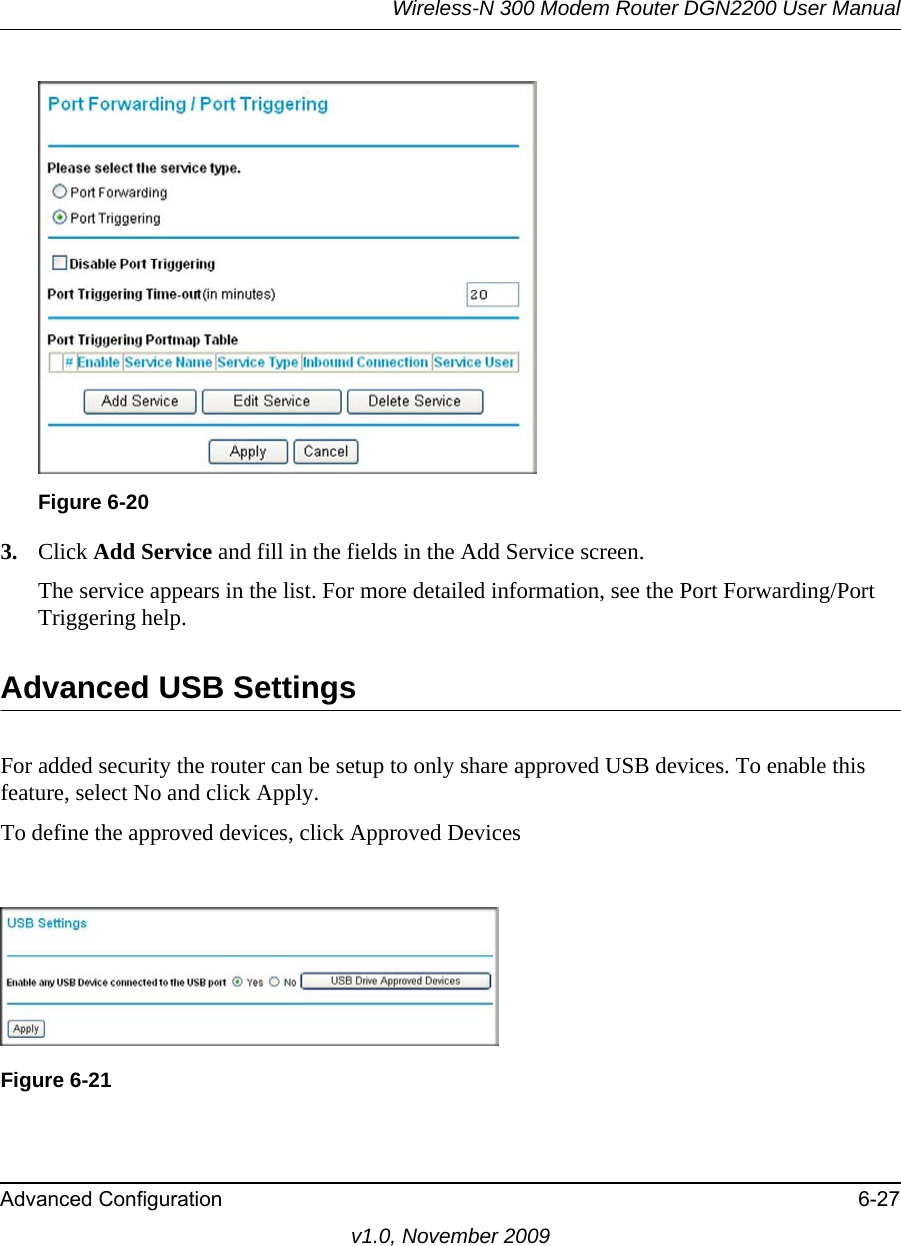
>
Netgear orporated
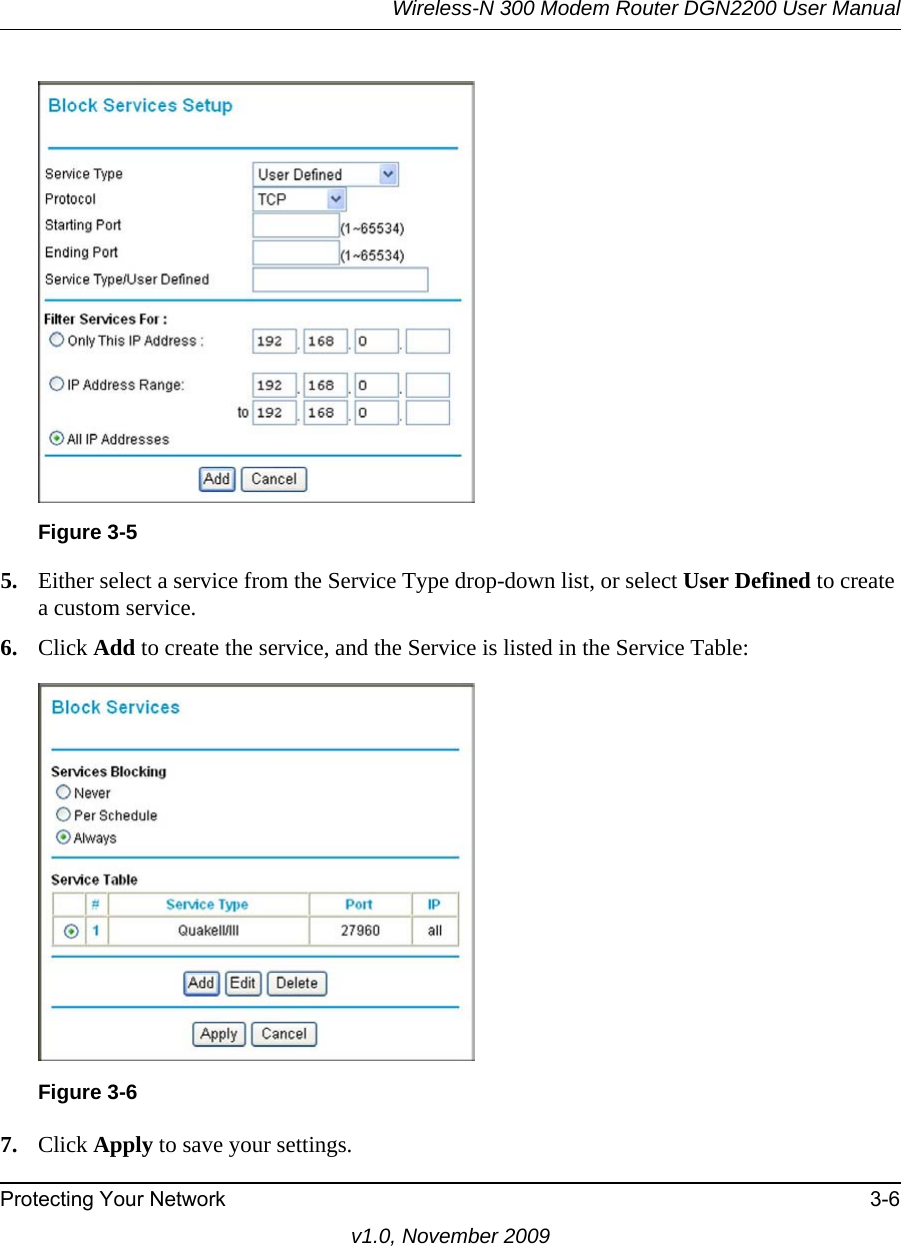
>
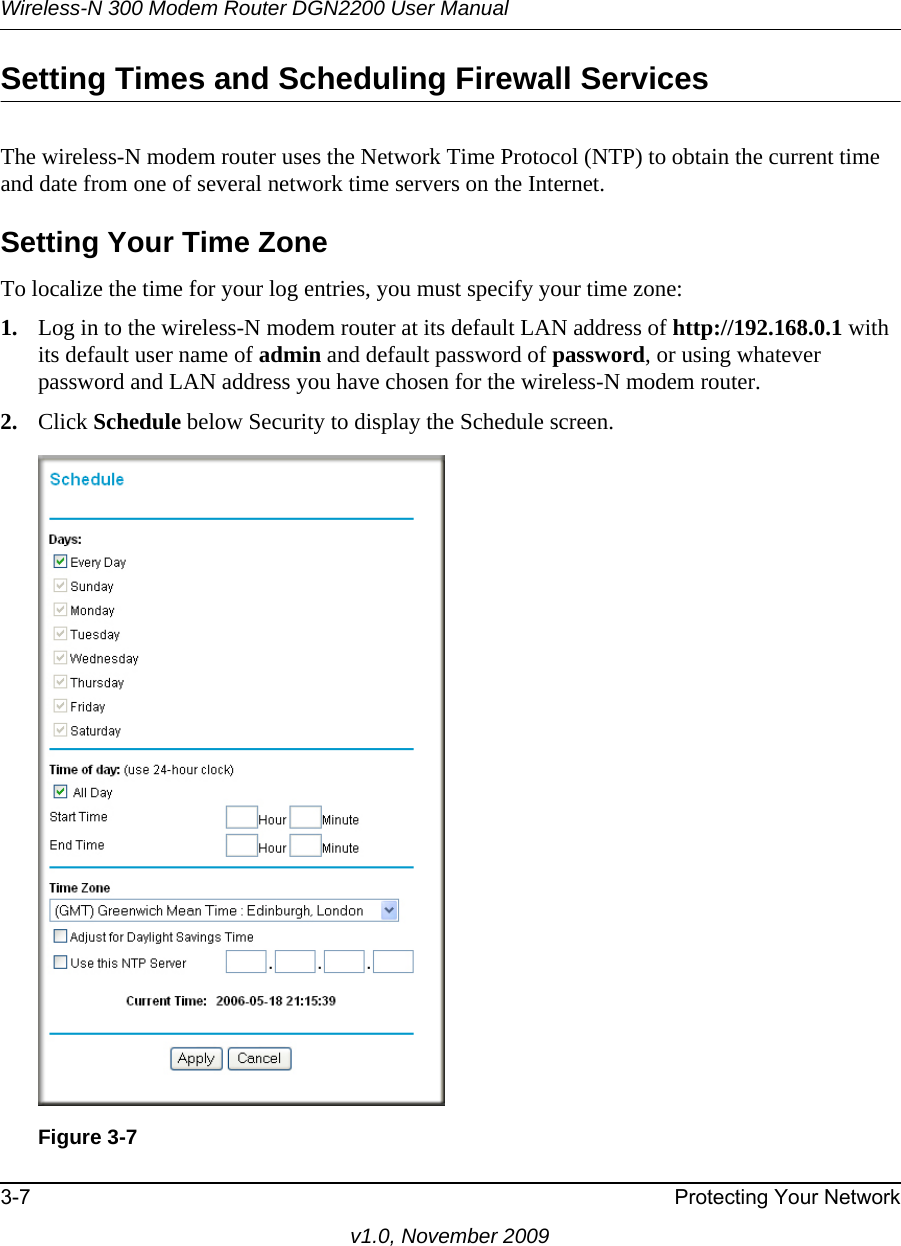
09200112 User Manual
>
Users Manual DGN2200
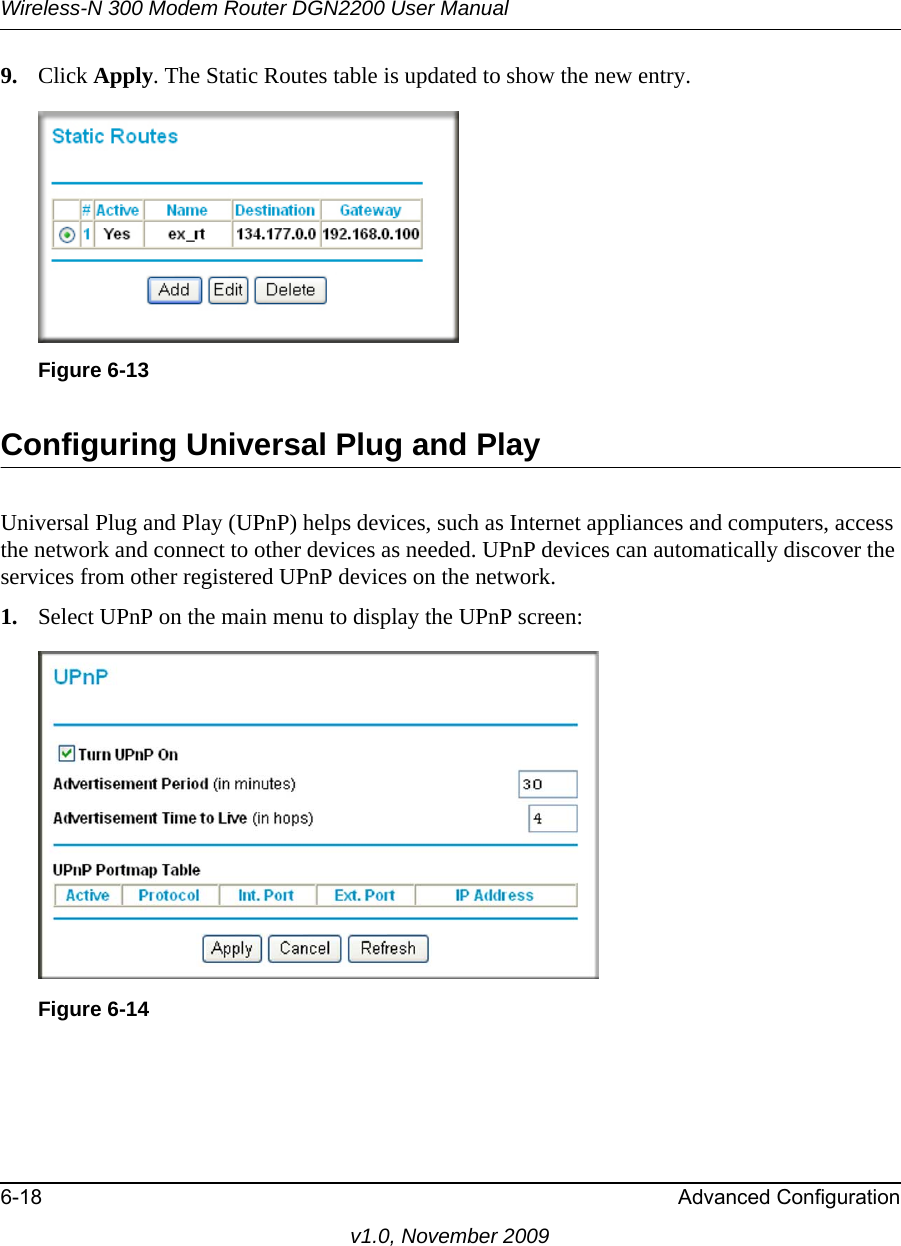
Contents
1.
Users Manual DGN2200
2.
Users Manual MBRN3000
Users Manual DGN2200
Navigation menu
Upload a User Manual
Namespaces
Wiki Guide
HTML
PDF
Info
Views
User Manual
Discussion / Help
Navigation
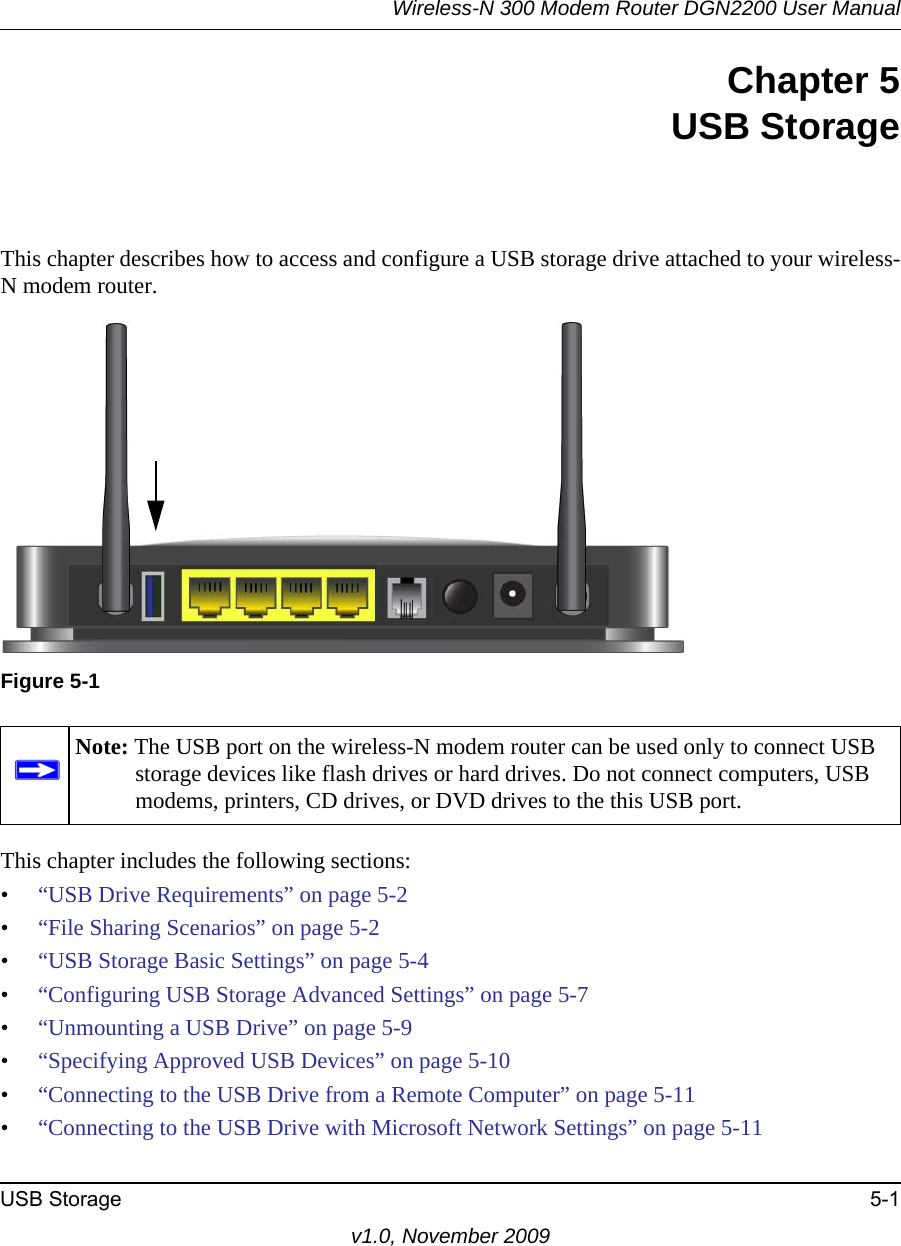
![v1.0, November 2009iiiEuropean Union Statement of ComplianceHereby, NETGEAR, Inc. declares that this wireless-N modem router is in compliance with the essential requirements and other relevant provisions of Directive 1999/5/EC.Èesky [Czech] NETGEAR, Inc. tímto prohlašuje, že tento Wireless-N 300 Modem Router DGN2200 je ve shodì se základními požadavky a dalšími pøíslušnými ustanoveními smìrnice 1999/5/ES.Dansk [Danish] Undertegnede NETGEAR, Inc. erklærer herved, at følgende udstyr Wireless-N 300 Modem Router DGN2200 overholder de væsentlige krav og øvrige relevante krav i direktiv 1999/5/EF.Deutsch [German] Hiermit erklärt NETGEAR, Inc., dass sich das Gerät Wireless-N 300 Modem Router DGN2200 in Übereinstimmung mit den grundlegenden Anforderungen und den übrigen einschlägigen Bestimmungen der Richtlinie 1999/5/EG befindet.Eesti [Estonian] Käesolevaga kinnitab NETGEAR, Inc. seadme Wireless-N 300 Modem Router DGN2200 vastavust direktiivi 1999/5/EÜ põhinõuetele ja nimetatud direktiivist tulenevatele teistele asjakohastele sätetele.English Hereby, NETGEAR, Inc., declares that this Wireless-N 300 Modem Router DGN2200 is in compliance with the essential requirements and other relevant provisions of Directive 1999/5/EC.Español [Spanish] Por medio de la presente NETGEAR, Inc. declara que el Wireless-N 300 Modem Router DGN2200 cumple con los requisitos esenciales y cualesquiera otras disposiciones aplicables o exigibles de la Directiva 1999/5/CE.Ελληνική [Greek] ΜΕ ΤΗΝ ΠΑΡΟΥΣΑ NETGEAR, Inc. ΔΗΛΩΝΕΙ ΟΤΙ Wireless-N 300 Modem Router DGN2200 ΣΥΜΜΟΡΦΩΝΕΤΑΙ ΠΡΟΣ ΤΙΣ ΟΥΣΙΩΔΕΙΣ ΑΠΑΙΤΗΣΕΙΣ ΚΑΙ ΤΙΣ ΛΟΙΠΕΣ ΣΧΕΤΙΚΕΣ ΔΙΑΤΑΞΕΙΣ ΤΗΣ ΟΔΗΓΙΑΣ 1999/5/ΕΚ.Français [French] Par la présente NETGEAR, Inc. déclare que l'appareil Wireless-N 300 Modem Router DGN2200 est conforme aux exigences essentielles et aux autres dispositions pertinentes de la directive 1999/5/CE.Italiano [Italian] Con la presente NETGEAR, Inc. dichiara che questo Wireless-N 300 Modem Router DGN2200 è conforme ai requisiti essenziali ed alle altre disposizioni pertinenti stabilite dalla direttiva 1999/5/CE.Latviski [Latvian] Ar šo NETGEAR, Inc. deklarç, ka Wireless-N 300 Modem Router DGN2200 atbilst Direktîvas 1999/5/EK bûtiskajâm prasîbâm un citiem ar to saistîtajiem noteikumiem.Lietuviø [Lithuanian] Šiuo NETGEAR, Inc. deklaruoja, kad šis Wireless-N 300 Modem Router DGN2200 atitinka esminius reikalavimus ir kitas 1999/5/EB Direktyvos nuostatas.](https://usermanual.wiki/Netgear-orporated/09200112.Users-Manual-DGN2200/User-Guide-1210346-Page-3.png)
![v1.0, November 2009ivA printed copy of the EU Declaration of Conformity certificate for this product is provided in the DGN2200 product package. Bestätigung des Herstellers/ImporteursEs wird hiermit bestätigt, daß das Wireless-N 300 Modem Router DGN2200 gemäß der im BMPT-AmtsblVfg 243/1991 und Vfg 46/1992 aufgeführten Bestimmungen entstört ist. Das vorschriftsmäßige Betreiben einiger Geräte (z.B. Testsender) kann jedoch gewissen Beschränkungen unterliegen. Lesen Sie dazu bitte die Anmerkungen in der Betriebsanleitung.Das Bundesamt für Zulassungen in der Telekommunikation wurde davon unterrichtet, daß dieses Gerät auf den Markt gebracht wurde und es ist berechtigt, die Serie auf die Erfüllung der Vorschriften hin zu überprüfen.Certificate of the Manufacturer/ImporterIt is hereby certified that the Wireless-N 300 Modem Router DGN2200 has been suppressed in accordance with the conditions set out in the BMPT-AmtsblVfg 243/1991 and Vfg 46/1992. The operation of some equipment (for example, test transmitters) in accordance with the regulations may, however, be subject to certain restrictions. Please refer to the notes in the operating instructions. Nederlands [Dutch] Hierbij verklaart NETGEAR, Inc. dat het toestel Wireless-N 300 Modem Router DGN2200 in overeenstemming is met de essentiële eisen en de andere relevante bepalingen van richtlijn 1999/5/EG.Malti [Maltese] Hawnhekk, NETGEAR, Inc., jiddikjara li dan Wireless-N 300 Modem Router DGN2200 jikkonforma mal-tiijiet essenzjali u ma provvedimenti orajn relevanti li hemm fid-Dirrettiva 1999/5/EC.Magyar [Hungarian] Alulírott, NETGEAR, Inc. nyilatkozom, hogy a Wireless-N 300 Modem Router DGN2200 megfelel a vonatkozó alapvetõ követelményeknek és az 1999/5/EC irányelv egyéb elõírásainak.Polski [Polish] Niniejszym NETGEAR, Inc. oœwiadcza, ¿e Wireless-N 300 Modem Router DGN2200 jest zgodny z zasadniczymi wymogami oraz pozosta³ymi stosownymi postanowieniami Dyrektywy 1999/5/EC.Português [Portuguese] NETGEAR, Inc. declara que este Wireless-N 300 Modem Router DGN2200 está conforme com os requisitos essenciais e outras disposições da Directiva 1999/5/CE.Slovensko [Slovenian] NETGEAR, Inc. izjavlja, da je ta Wireless-N 300 Modem Router DGN2200 v skladu z bistvenimi zahtevami in ostalimi relevantnimi doloèili direktive 1999/5/ES.Slovensky [Slovak] NETGEAR, Inc. týmto vyhlasuje, že Wireless-N 300 Modem Router DGN2200 spåòa základné požiadavky a všetky príslušné ustanovenia Smernice 1999/5/ES.Suomi [Finnish] NETGEAR, Inc. vakuuttaa täten että Wireless-N 300 Modem Router DGN2200 tyyppinen laite on direktiivin 1999/5/EY oleellisten vaatimusten ja sitä koskevien direktiivin muiden ehtojen mukainen.Svenska [Swedish] Härmed intygar NETGEAR, Inc. att denna [utrustningstyp] står I överensstämmelse med de väsentliga egenskapskrav och övriga relevanta bestämmelser som framgår av direktiv 1999/5/EG.](https://usermanual.wiki/Netgear-orporated/09200112.Users-Manual-DGN2200/User-Guide-1210346-Page-4.png)
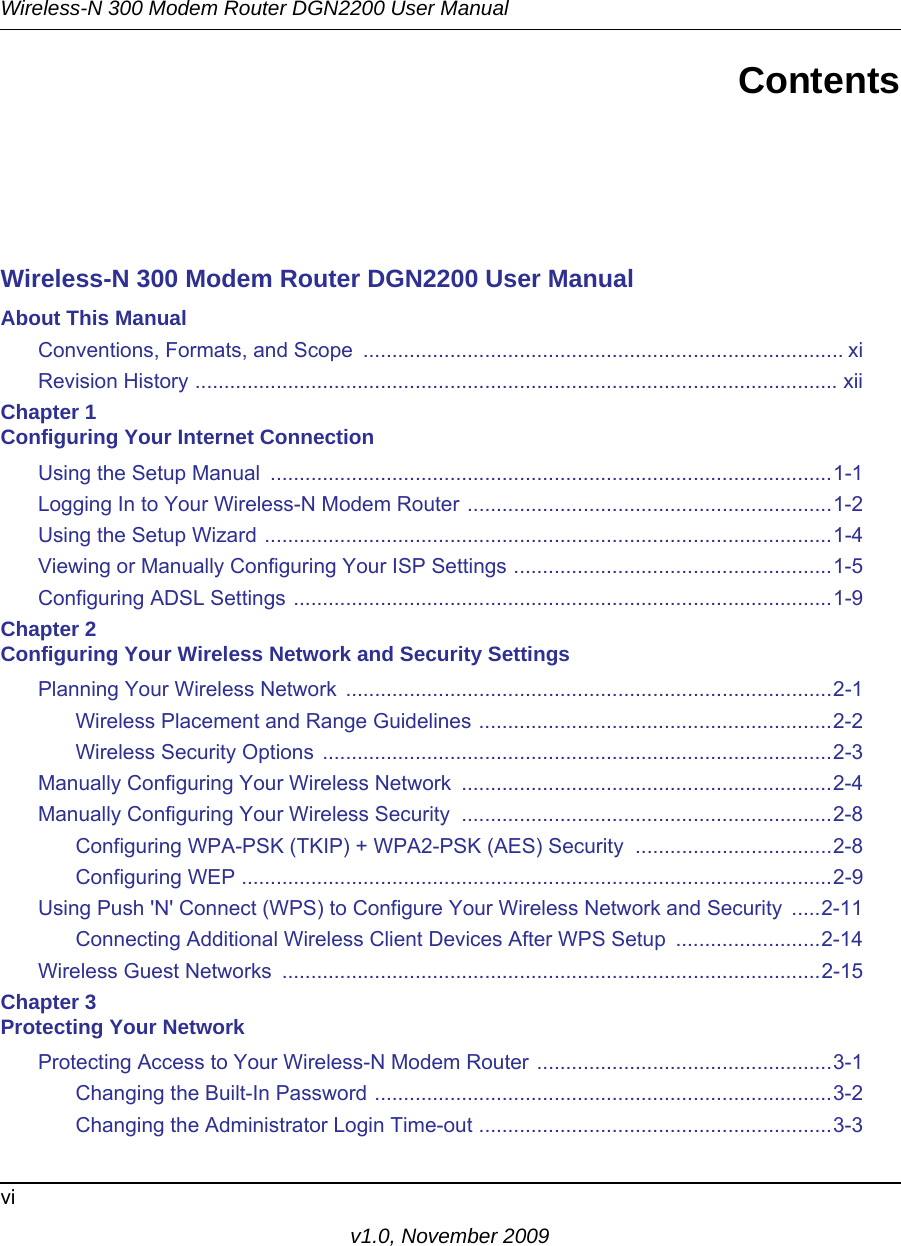
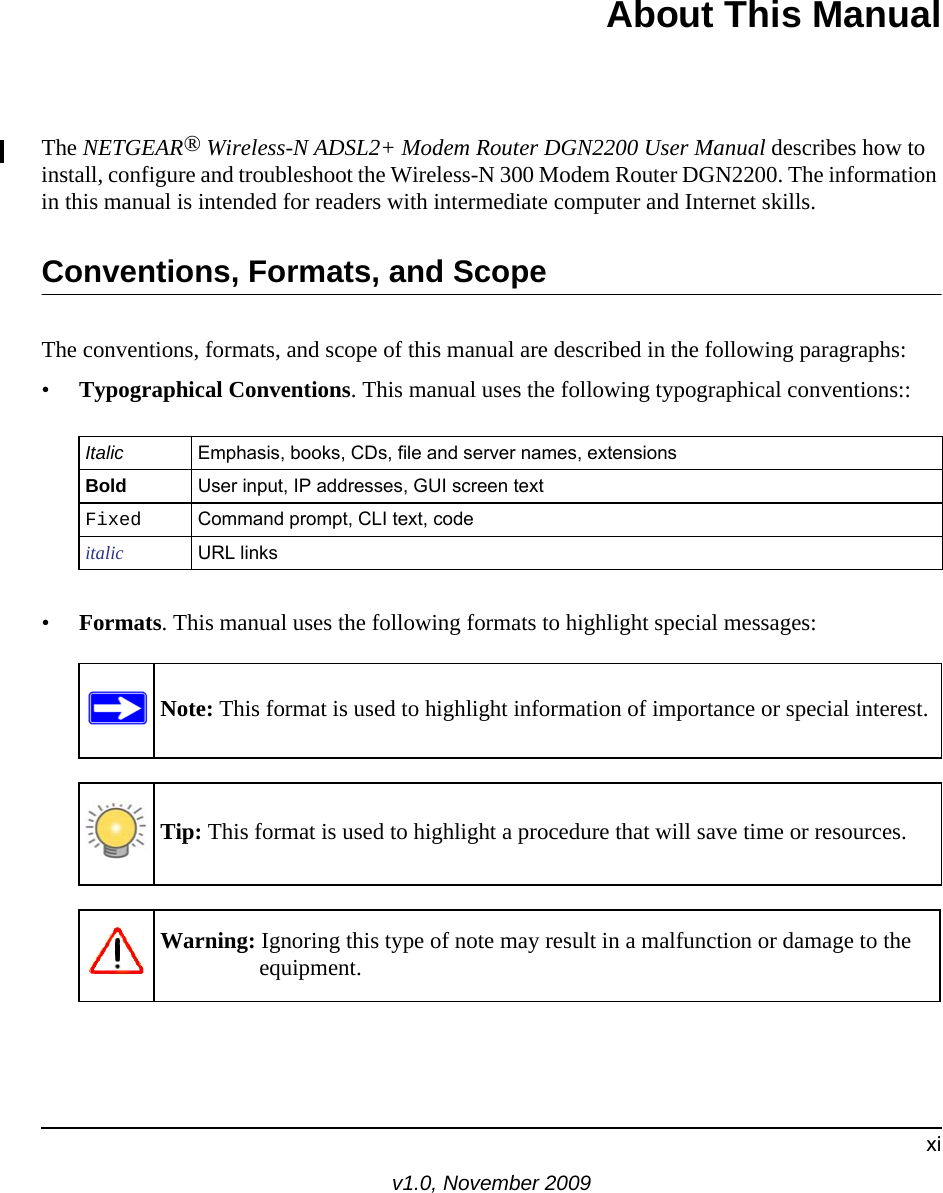


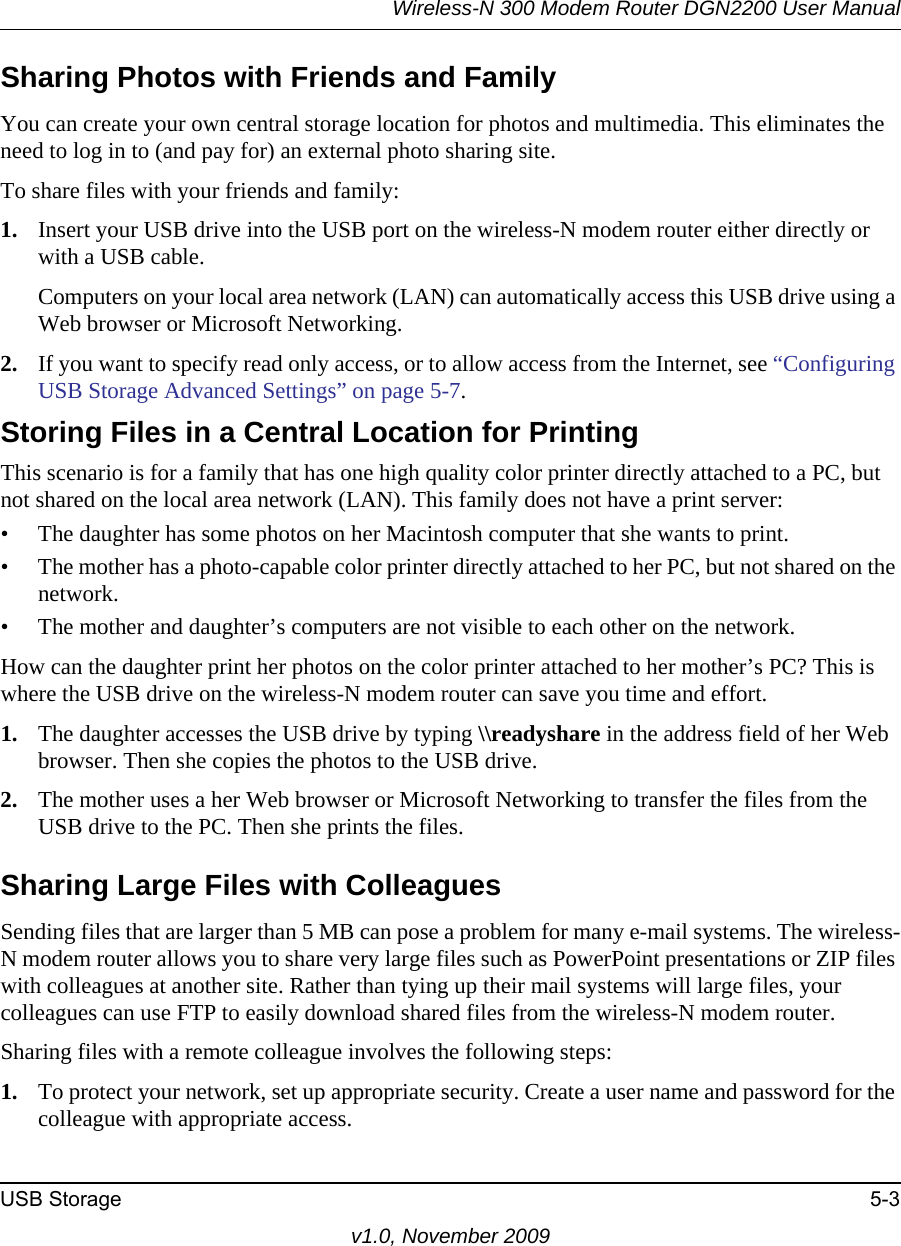
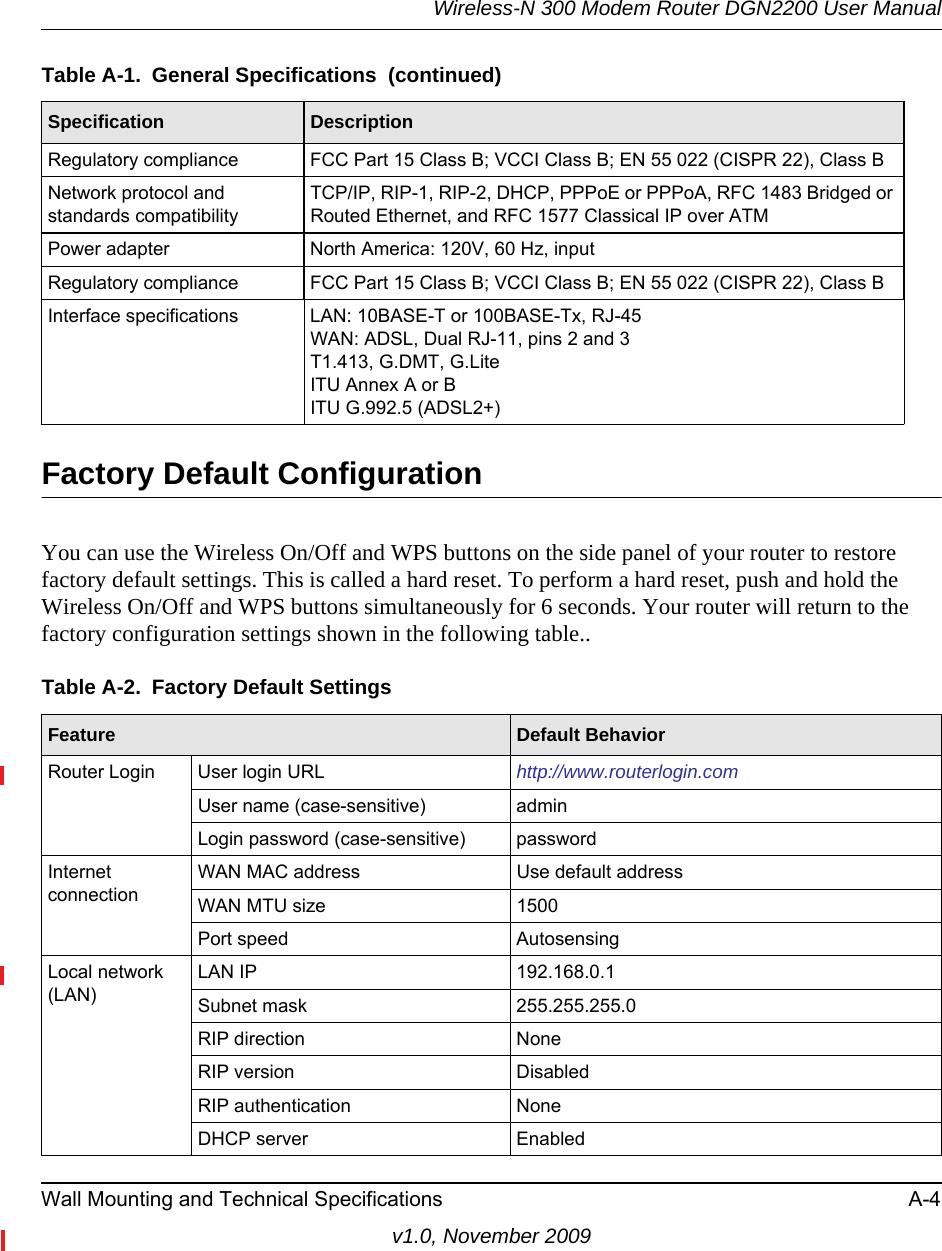
![Wireless-N 300 Modem Router DGN2200 User Manual2-13 Configuring Your Wireless Network and Security Settingsv1.0, November 2009•Entering a PIN. If you want to use the PIN method, select the PIN radio box. A screen similar to the one shown below displays. – Go to your wireless client and, from the client’s WPS utility, get the wireless client’s security PIN, or follow the client’s WPS utility instructions to generate a security PIN. – Then, enter this PIN in the Enter Client’s PIN field provided on the wireless-N modem router and click Apply. You have 4 minutes to enable WPS on the router using this method.Using either method, the client wireless device will attempt to detect the WPS signal from the wireless-N modem router and establish a wireless connection in the time allotted.• While the wireless-N modem router attempts to connect to a WPS-capable device, the Push 'N' Connect LED on the front of the wireless-N modem router blinks green. When the wireless-N modem router has established a WPS connection, the LED is solid green.• If a connection is established, the wireless-N modem router WPS screen displays a message confirming that the wireless client was successfully added to the wireless network. (The wireless-N modem router has generated an SSID, implemented WPA/WPA2 wireless security [including a PSK security password] on the wireless-N modem router, and has sent this configuration to the wireless client.)5. Note the new SSID and WPA/WPA2 password for the wireless network.To access the Internet from any computer connected to your wireless-N modem router, launch a browser such as Microsoft Internet Explorer. You should see the wireless-N modem router’s Internet LED blink, indicating communication to the ISP.Figure 2-4Note: If no WPS-capable client devices are located during the 2-minute timeframe, security will not be implemented on the modem router.](https://usermanual.wiki/Netgear-orporated/09200112.Users-Manual-DGN2200/User-Guide-1210346-Page-33.png)

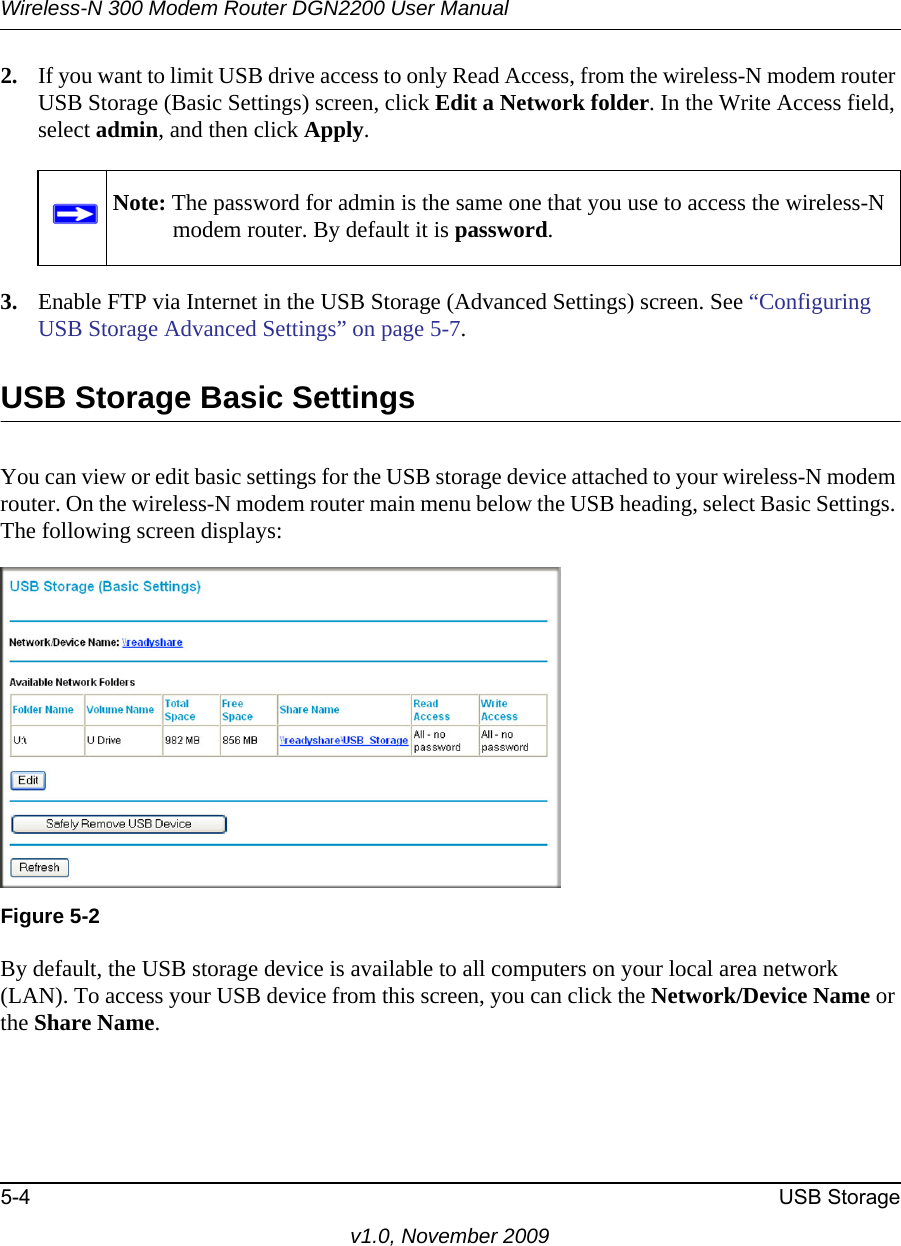
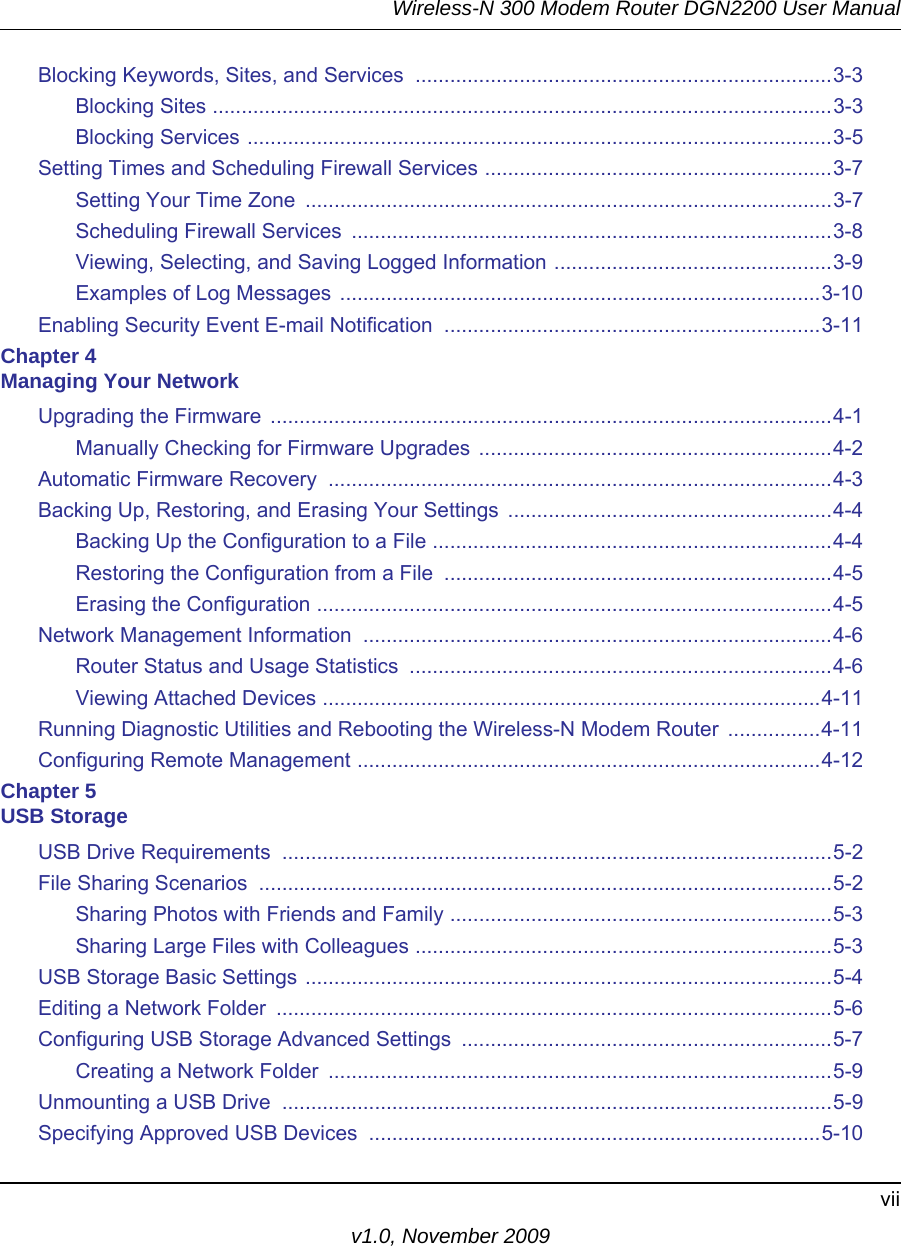
![Wireless-N 300 Modem Router DGN2200 User ManualProtecting Your Network 3-10v1.0, November 2009Examples of Log MessagesFollowing are examples of log messages. In all cases, the log entry shows the time stamp asday, year-month-date hour:minute:second.Activation and AdministrationTue, 2006-05-21 18:48:39 - NETGEAR activated [This entry indicates a power-up or reboot with initial time entry.]Tue, 2006-05-21 18:55:00 - Administrator login successful - IP:192.168.0.2 Thu, 2006-05-21 18:56:58 - Administrator logout - IP:192.168.0.2 [This entry shows an administrator logging in and out from IP address 192.168.0.2.]Tue, 2006-05-21 19:00:06 - Login screen timed out - IP:192.168.0.2[This entry shows a time-out of the administrator login.]Wed, 2006-05-22 22:00:19 - Log emailed[This entry shows when the log was e-mailed.]Dropped Packets Wed, 2006-05-22 07:15:15 - TCP packet dropped - Source:64.12.47.28,4787,WAN - Destination:134.177.0.11,21,LAN - [Inbound Default rule match]Sun, 2006-05-22 12:50:33 - UDP packet dropped - Source:64.12.47.28,10714,WAN - Destination:134.177.0.11,6970,LAN - [Inbound Default rule match]Sun, 2006-05-22 21:02:53 - ICMP packet dropped - Source:64.12.47.28,0,WAN - Destination:134.177.0.11,0,LAN - [Inbound Default rule match]Source IP The IP address of the initiating device for this log entry.Source port and interface The service port number of the initiating device, and whether it originated from the LAN or WAN.Destination The name or IP address of the destination device or website.Destination port and interfaceThe service port number of the destination device, and whether it is on the LAN or WAN.Table 3-1. Security Log Entry Descriptions (continued)Field Description](https://usermanual.wiki/Netgear-orporated/09200112.Users-Manual-DGN2200/User-Guide-1210346-Page-46.png)
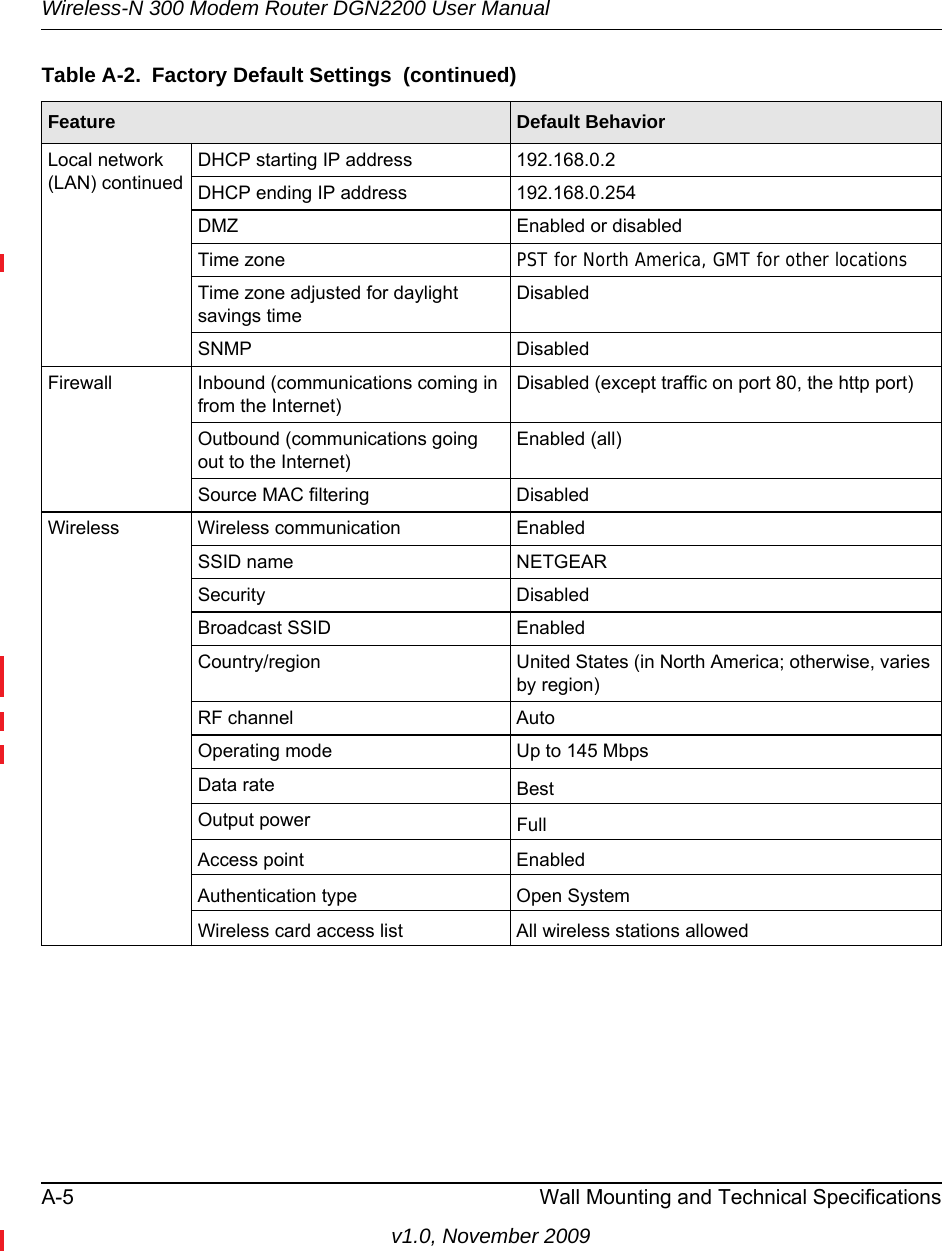
![Wireless-N 300 Modem Router DGN2200 User Manual3-11 Protecting Your Networkv1.0, November 2009[These entries show an inbound FTP (port 21) packet, a User Datagram Protocol (UDP) packet (port 6970), and an Internet Control Message Protocol (ICMP) packet (port 0) being dropped as a result of the default inbound rule, which states that all inbound packets are denied.]Enabling Security Event E-mail NotificationTo receive logs and alerts by e-mail, you must provide your e-mail information in the E-mail screen and specify which alerts you would like to receive and how often. In the main menu, under Security, select E-mail. The E-mail screen displays.The E-mail screen allows you to make the following selections:•Turn E-mail Notification On. Select this check box if you want to receive e-mail logs and alerts from the wireless-N modem router.Figure 3-9](https://usermanual.wiki/Netgear-orporated/09200112.Users-Manual-DGN2200/User-Guide-1210346-Page-47.png)