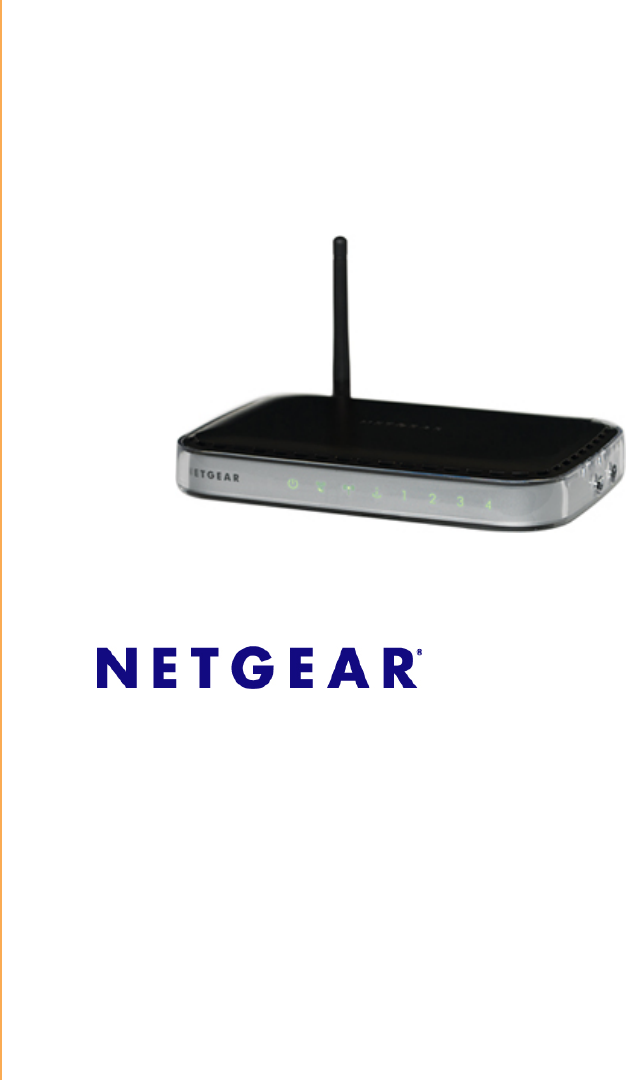
Netgear orporated 09300122 Wireless-N 150 Router User Manual
Netgear Incorporated Wireless-N 150 Router
Contents
- 1. Manual
- 2. User Manual
Manual
September 2009
208-10465-01
v1.0
NETGEAR, Inc.
350 E. Plumeria Drive
San Jose, CA 95134 USA
Wireless-N 150 Router
Setup Manual
ii
©2009 by NETGEAR, Inc. All rights reserved.
Trademarks
NETGEAR and the NETGEAR logo are trademarks of NETGEAR. Inc. Microsoft, Windows, and Windows NT are
registered trademarks of Microsoft Corporation. Wi-Fi Protected Setup is a trademark of the Wi-Fi Alliance. Other
brand and product names are registered trademarks or trademarks of their respective holders.
Statement of Conditions
In the interest of improving internal design, operational function, and/or reliability, NETGEAR reserves the right to
make changes to the products described in this document without notice.
NETGEAR does not assume any liability that may occur due to the use or application of the product(s) or circuit
layout(s) described herein.

iii
Contents
Wireless-N 150 Router Setup Manual
Getting to Know Your Wireless Router................................................................................1
Unpacking Your New Router .............................................................................................1
Hardware Features ............................................................................................................2
Front Panel ..................................................................................................................2
Back Panel ..................................................................................................................4
Side Panel ...................................................................................................................4
Router Label ................................................................................................................5
Positioning Your Wireless Router ......................................................................................5
Installing Your Wireless Router .........................................................................................6
Updating Your Router Firmware ........................................................................................7
Installing Your Router Using the Smart Wizard ..................................................................8
Using the Smart Wizard .....................................................................................................8
Accessing Your Router After Installation .........................................................................10
Manually Installing Your Router .........................................................................................11
Connecting Your Wireless Router ...................................................................................12
Verifying Your Connection ...............................................................................................15
Setting Up Your Router for Internet Access ....................................................................16
Configuring Your Wireless Network...................................................................................20
Specifying Wireless Settings ...........................................................................................20
Setting Your SSID and Wireless Security Manually ..................................................20
Using Push 'N' Connect (WPS) to Configure Your Wireless Network .......................22
Testing Basic Wireless Connectivity ................................................................................25
Troubleshooting...................................................................................................................27
Basic Setup Checklist ......................................................................................................27
Checking Basic Router Functions ...................................................................................28
Troubleshooting Login Problems .....................................................................................30

iv
Checking the Internet Service Connection ......................................................................31
Obtaining an Internet IP Address ....................................................................................31
Troubleshooting PPPoE ............................................................................................32
Troubleshooting Internet Browsing ...........................................................................33
Using the Ping Utility to Troubleshoot .............................................................................33
Testing the Path from Your Computer to Your Router ..............................................33
Testing the Path from a Computer to the Internet .....................................................34
Technical Specifications .....................................................................................................35
Default Configuration Settings .........................................................................................35
Restoring the Default Password and Configuration Settings ...........................................37
Related Documents .............................................................................................................38
Registration and Certifications............................................................................................40
Getting to Know Your Wireless Router 1
Getting to Know Your Wireless Router
Congratulations on your purchase of a NETGEAR® high-speed wireless router, the Wireless-N
150 Router Model WNR1000v2.
Before you begin installing your router, check the package contents (see “Unpacking Your New
Router” on page 1). Become familiar with the front and back panels of your router—especially the
status lights—and the important information on the router label (see “Hardware Features” on
page 2). Then, read the section on “Positioning Your Wireless Router” on page 5 to ensure that
you have selected the best location to install your router.
Unpacking Your New Router
Your product package should contain the following items:
• The Wireless-N 150 Router
• An AC power adapter (varies by region)
• A yellow Ethernet cable
• The Resource CD, which includes:
– The Smart Wizard Installation Assistant (Autorun.exe)
– A PDF version of this manual
– A link to the online User Manual
If any of the parts are incorrect, missing, or damaged, contact your NETGEAR dealer. Keep the
carton, including the original packing materials, in case you need to return the product for repair.
A link to the online User Manual is also available from the router interface,
after the router is installed. Click Documentation on the main menu.
Getting to Know Your Wireless Router 2
To prepare your router for installation:
1. Carefully peel off any protective film covering the sides of your router.
2. Place your router in a suitable area for installation (near an AC power outlet and accessible to
the Ethernet cables for your wired computers).
Hardware Features
Before you install and connect your router, take a moment to become familiar with the front and
back panels of the router—especially the status lights on the front panel.
Front Panel
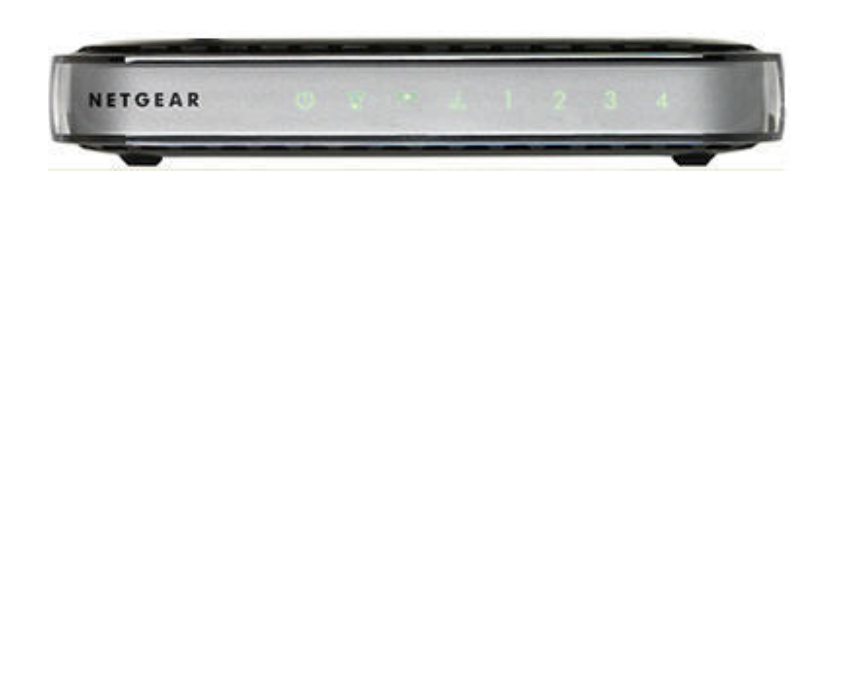
The router front panel, shown in Figure 1, contains status lights. (For more information on
interpreting the status lights, see “Verifying Your Connection” on page 15 and “Checking Basic
Router Functions” on page 28.)
Figure 1

Getting to Know Your Wireless Router 3
You can use the status lights to verify various conditions.
Table 1. Status Light Descriptions
Label Activity Description
1. Power
Solid Amber
Solid Green
Fast blink–Green
Slow blink–Green
Off
The router is performing the power-on self-test diagnostic.
The power is on and the router is ready.
A software update is in progress.
Firmware is corrupted. See “Checking Basic Router Functions” on
page 28 for instructions on restoring your router firmware.
Power is not being supplied to the router
2. Push 'N'
Connect
Solid Green
Blinking Green
Off
Indicates that wireless security is enabled.
WPS-capable devices can associate with the router within 2
minutes.
No WPS connection exists.
3. Internet
Solid Amber
Solid Green
Blinking Green
Off
No IP address acquired.
The wireless router has acquired an Internet address.
Data is being communicated with the Internet.
No Ethernet cable is connected to the modem.
4. Wireless
Solid Blue
Blinking Blue
Off
The wireless interface is enabled.
Data is being communicated over the wireless network.
The wireless interface is turned off.
5. LAN
(Ports 1–4)
Solid Green
Blinking Green
Solid Amber
Blinking Amber
Off
The local port is connected to a 100 Mbps device.
Data is being transmitted at 100 Mbps.
The local port is connected to a 10 Mbps device.
Data is being transmitted at 10 Mbps.
No link is detected on this port.
Getting to Know Your Wireless Router 4
Back Panel
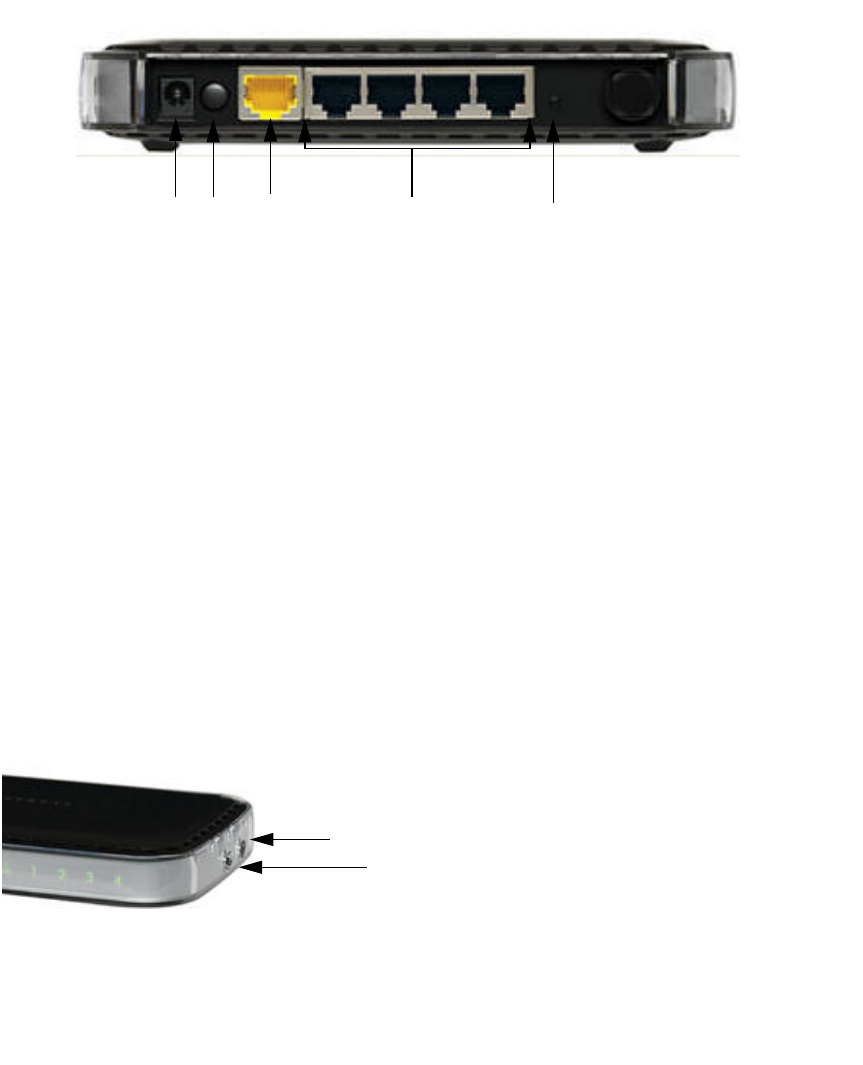
The router back panel, shown in Figure 2, contains port connections.
Viewed from left to right, the rear panel contains the following elements:
1. AC power adapter outlet for connecting the power adapter.
2. Power on/off push-button.
3. Internet/Wide Area Network (WAN) Ethernet port for connecting the router to a cable or DSL
modem.
4. Four Local Area Network (LAN) 10/100 Mbps Ethernet ports for connecting the router to
your local computers.
5. Restore factory settings button. Press for approximately 5 seconds to reset the router to the
factory default settings.
Side Panel
The router side panel is shown in Figure 3.
Figure 2
Figure 3
1 4
32 5
1
2
Getting to Know Your Wireless Router 5
1. WPS button – Turns Push ‘N’ Connect (WPS) security on and off. When wireless security is
enabled, the Push ‘N’ Connect LED on the front of the wireless router is solid green. See
“Push 'N' Connect” on page 3.
2. Wireless On/Off button – Turns the Wireless network on and off. When the Wireless
network is enabled, the Wireless LED on the front of the router is solid green. See “Wireless”
on page 3.
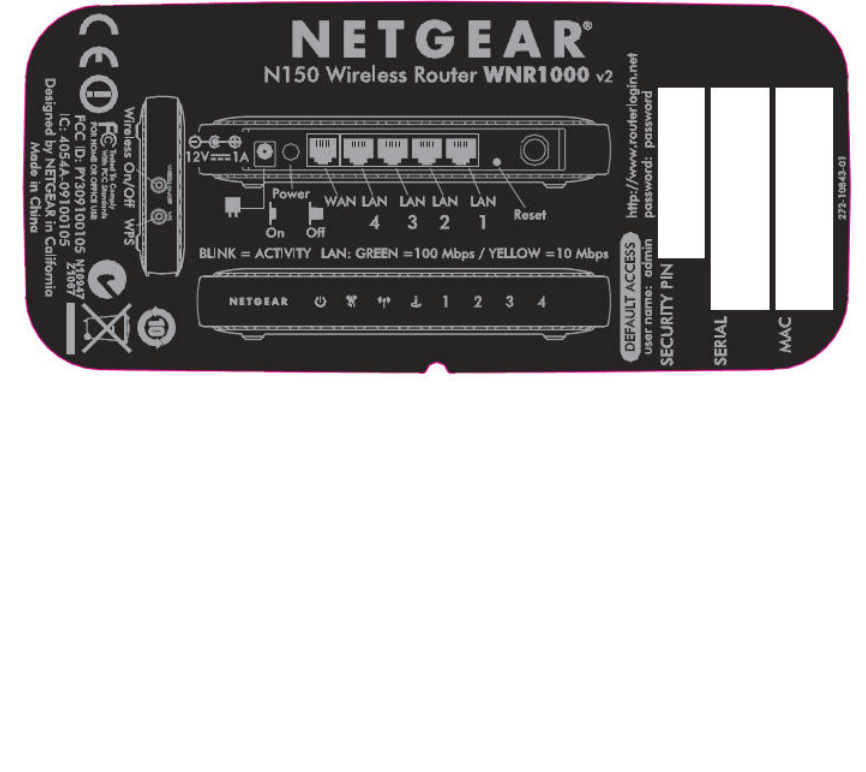
Router Label
The label on the bottom of the wireless router shows the router’s MAC address, serial number,
security PIN, and factory default login information.
The ports on the router are color-coded to distinguish your Internet port from the other four ports
that connect to the wired computer(s) on your Local Area Network (LAN).
Positioning Your Wireless Router
The wireless router lets you access your network from virtually anywhere within the operating
range of your wireless network. However, the operating distance or range of your wireless
connection can vary significantly depending on the physical placement of your router. For
example, the thickness and number of walls the wireless signal must pass through might limit the
range. For best results, place your router:
Figure 4

Getting to Know Your Wireless Router 6
• Near the center of the area where your computers and other devices will operate, preferably
within line of sight to your wireless devices.
• Accessible to an AC power outlet and near Ethernet cables for wired computers.
• In an elevated location such as a high shelf, keeping the number of walls and ceilings between
the wireless router and your other devices to a minimum.
• Away from electrical devices which are potential sources of interference, such as ceiling fans,
home security systems, microwaves, or the base for a cordless phone.
• Away from any large metal surfaces, such as a solid metal door or aluminum studs. Large
expanses of other materials such as glass, insulated walls, fish tanks, mirrors, brick, and
concrete can also affect your wireless signal.
Installing Your Wireless Router
To help you set up your router and get on the Internet quickly, the Resource CD contains a Smart
Wizard™ Installation Assistant. The Installation Assistant walks you through the steps required to
connect your router, modem, and PC(s); configure your wireless settings; and enable wireless
security for your network. When you have finished, you will be Internet ready!
You can set up your wireless router using one of two methods:
•Smart Wizard Setup: The Smart Wizard Installation Assistant setup is available on your
Resource CD. See “Installing Your Router Using the Smart Wizard” on page 8 to use the
Smart Wizard Installation Assistant.
– This is the easiest option. The wizard guides you through the setup process. It automates
many of the steps and verifies that the steps have been successfully completed.
Failure to follow these guidelines can result in significant performance degradation
or an inability to wirelessly connect to the Internet.
NETGEAR does not recommend or support adding a NETGEAR router behind
another router, or replacing a gateway with a NETGEAR router.
If you have a Macintosh or Linux system, you need to use the manual installation
method (see “Manually Installing Your Router” on page 11).

Getting to Know Your Wireless Router 7
– Smart Wizard requires a PC running Microsoft Windows.
•Manual Setup: If you cannot or prefer not to use the Smart Wizard Installation Assistant, see
“Manually Installing Your Router” on page 11. For example, if you are connecting to a Mac,
are using a Linux operating system, or are technically knowledgeable, select this option. If you
choose to use this option and install your router manually, for best results, install and set up
your router in this order:
1. Install and connect your wireless router to your network (see “Connecting Your Wireless
Router” on page 12).
2. Set up your wireless router for Internet access (see “Setting Up Your Router for Internet
Access” on page 16).
3. Configure your wireless network and select wireless security settings to protect your
wireless network (see “Configuring Your Wireless Network” on page 20).
Updating Your Router Firmware
NETGEAR is always improving the operability and features included with your router. To make it
easy for you to receive the best, most up-to-date features of your router, NETGEAR provides a
variety of methods for updating your product.
• The Smart Wizard Installation Assistant lets you check for and install updates as part of the
setup activity (see “Using the Smart Wizard” on page 8).
• The router includes an update feature that lets you check for and install updates. You must log
in to the router to use this feature see “Setting Up Your Router for Internet Access” on
page 16, or the online User Manual).
Before running the Smart Wizard Installation Assistant on a corporate PC to
set up your home router, check with your company’s network support staff.
Corporate network settings or Virtual Private Network (VPN) client
software might conflict with the default settings of a home router. If you are
unsure about whether there might be a conflict, use a different computer.
Installing Your Router Using the Smart Wizard 8
Installing Your Router
Using the Smart Wizard
The Smart Wizard setup procedure should take about 15 minutes to complete. Before using the
Smart Wizard, ensure that:
• You are using a PC with Windows Vista, Windows 2000, or Windows XP with Service Pack 2,
and with a wired Ethernet connection, not a wireless connection.
• You have an Internet service connection through an Internet Service Provider (ISP).
• You have the configuration information provided by your ISP.
Using the Smart Wizard
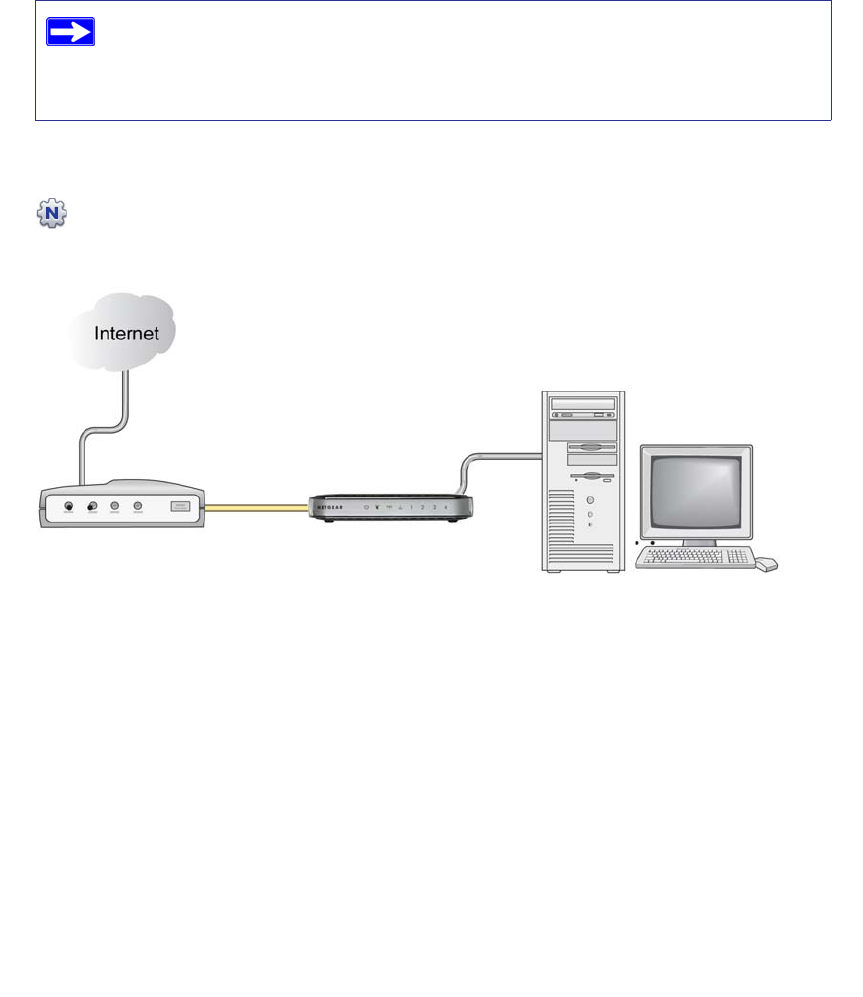
The NETGEAR Smart Wizard takes you through the procedure to connect your router, modem,
and PC(s). It then helps you to configure your wireless settings and enable wireless security for
your network. The Smart Wizard guides you through the setup process by automating many of the
steps. At each step in the setup process, the Smart Wizard checks to ensure that the steps you
perform are successfully completed.
To set up your router using the Smart Wizard:
1. Insert the Resource CD into your Windows PC. The CD will automatically start and detect the
language you are using on your PC. Select a different language option, if you prefer.
2. In the CD’s menu, click Setup to start the Smart Wizard.
3. When the Smart Wizard prompts you about updates, click Yes to check for updates for your
router, or No, to update later (for more information, see “Setting Up Your Router for Internet
Access” on page 16, or the online User Manual).
4. Follow the remaining instructions and prompts.
If the CD does not automatically start, browse the CD and double-click on .
Installing Your Router Using the Smart Wizard 9
The Smart Wizard guides you through installing your router, connecting your router to the
Internet, configuring your wireless network settings, and selecting the optimum security
protection for your network. If you choose not to select a security option during installation,
you can always access the router’s user interface later to select a security option (see
“Configuring Your Wireless Network” on page 20).
At the close of installation, the Smart Wizard places a Router_Setup.html file on your
computer’s desktop so that you can view the router settings. It also places the Router Login
shortcut on the desktop for you to access the router’s main menu.
You are now connected to the Internet.
To set up additional wireless computers in your network to access the router and connect to the
Internet, see “Configuring Your Wireless Network” on page 20.
To ensure optimum performance of your high-speed wireless router, the
wireless adapter card for each computer in your network should support the
same technology as your router. For more information, see the online User
Manual.
Figure 5

Installing Your Router Using the Smart Wizard 10
Accessing Your Router After Installation
The Smart Wizard only appears when you first install the router or when the router is in its factory
default state (for example, if you have reset the router to its default factory settings). If you want to
change the settings after installing and configuring your router using the Smart Wizard, you must
open a browser window and log in to the router. You will also be prompted to check for new router
firmware. For more information, see “Configuring Your Wireless Network” on page 20.

Manually Installing Your Router 11
Manually Installing Your Router
Before installing and connecting your router manually, review the list below and make sure that
you have all of the necessary information.
• Internet service connection through an Internet Service Provider (ISP).
• The configuration information your ISP gave you. Depending on how your Internet account
was set up, you might need the following information to set up your wireless router and access
the Internet:
– Host and domain name
– Internet login name and password (frequently an email address and password)
– Domain Name Server (DNS) addresses
– Fixed or static IP address
Your ISP should have provided you with all the information needed to connect to the Internet.
If you cannot locate this information, ask your ISP.
• If you have cable modem service, make sure that you are using the same computer on which
you first set up your Internet account.
If you have not already done so:
• Check the package contents of your router to ensure that it is complete (see “Unpacking Your
New Router” on page 1).
• Select an optimum location for your wireless router after reviewing the guidelines presented in
“Positioning Your Wireless Router” on page 5.
Use the procedures in this topic if you are an advanced user, or a user of Macintosh
and Linux systems.
Manually Installing Your Router 12
Connecting Your Wireless Router
Before you install your wireless router, make sure that the Internet Protocol (TCP/IP) Property
settings on your computer are set to “automatically obtain an IP address” using DHCP and “Obtain
DNS server address automatically.” You can check these settings by looking at the TCP/IP
Properties of your Internal Network Connections, which are accessible through the Control Panel
of your computer. If you are unsure about this, refer to the documentation for your computer or see
the link to TCP/IP Addressing in “Related Documents” on page 38.
If you are replacing an existing router, disconnect it completely from your network and set it aside
before starting to install your new router. Then, skip to step 5 in the following procedure
To connect the wireless router, the computer, and the modem:
1. Turn off your computer.
2. Turn off and unplug the cable or DSL broadband modem.
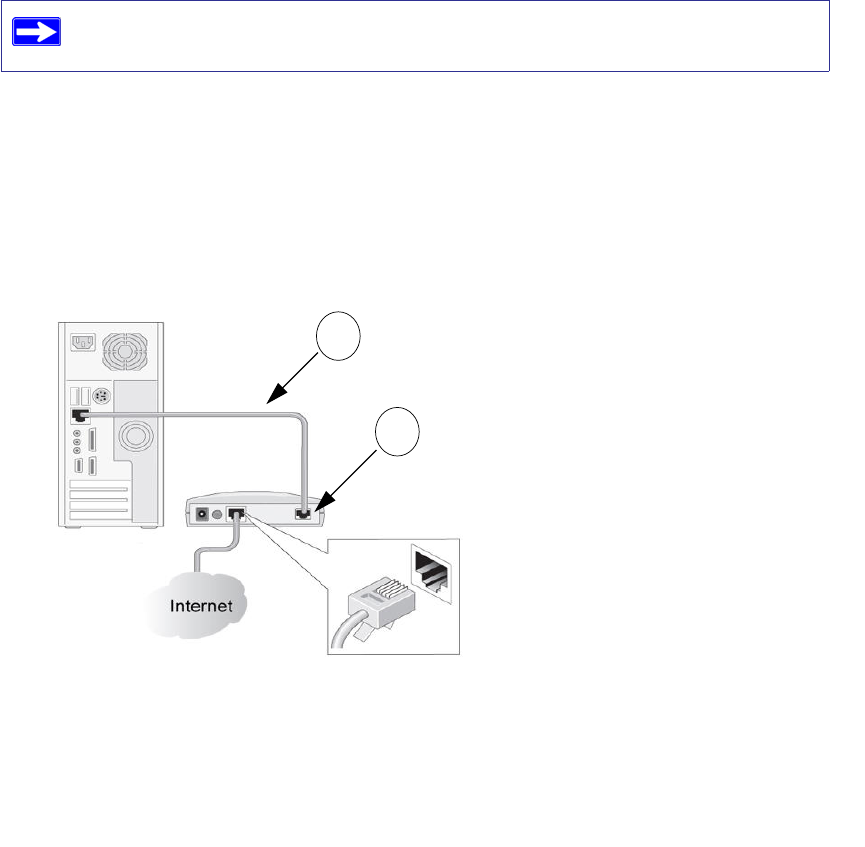
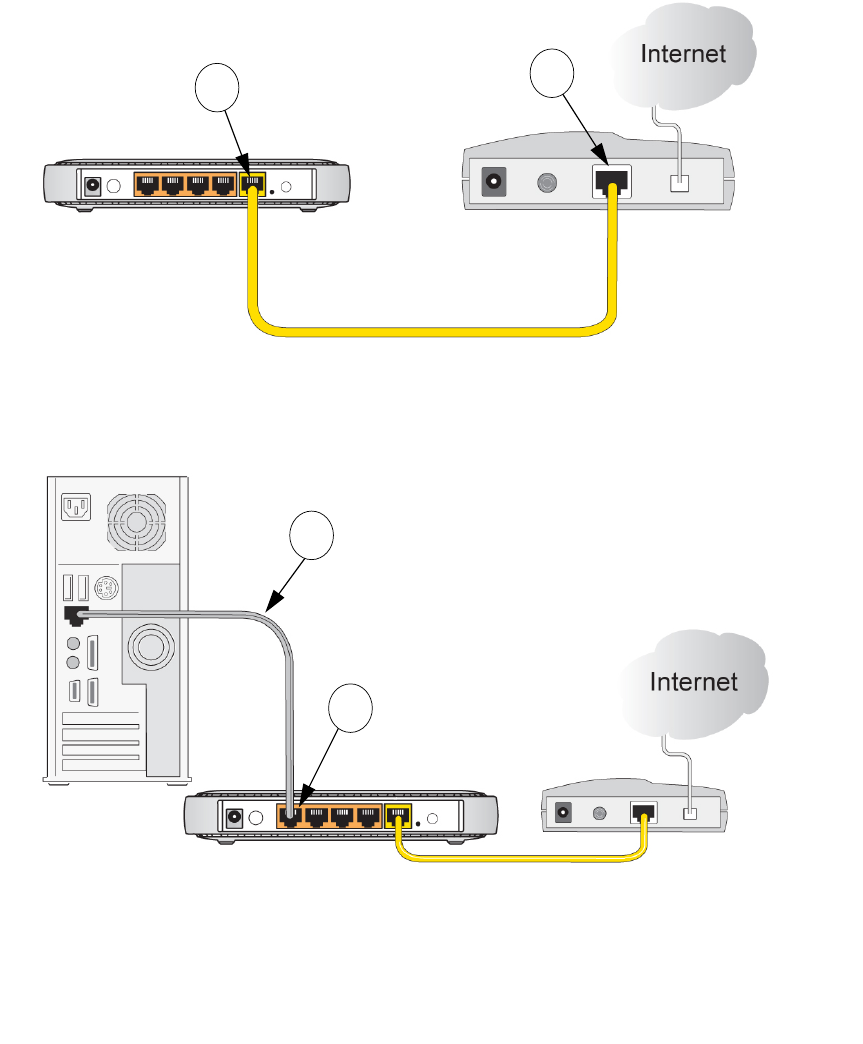
3. Locate the cable (A) that connects your computer to the modem.
4. Disconnect the cable at the modem end only (B). You will connect it to the router later.
NETGEAR does not recommend or support adding a NETGEAR router behind
another router, or replacing a gateway with a NETGEAR router.
Figure 6
A
B
Manually Installing Your Router 13
5. Locate the Ethernet cable that came with your NETGEAR product. Securely insert one end of
the Ethernet cable into your modem (C) and the other end into the Internet port of the wireless
router (D). (The cable and the Internet port label are color coded.)
6. Locate the cable (A) that is still attached to your computer (see step 4). Securely insert that
cable into a port on the router, such as port 1 (E), as shown in Figure 8.
Figure 7
Figure 8
C
D
A
E
1 2 3 4
Manually Installing Your Router 14
7. Connect any additional wired PCs to your router by inserting an Ethernet cable from a PC into
one of the three remaining LAN ports.
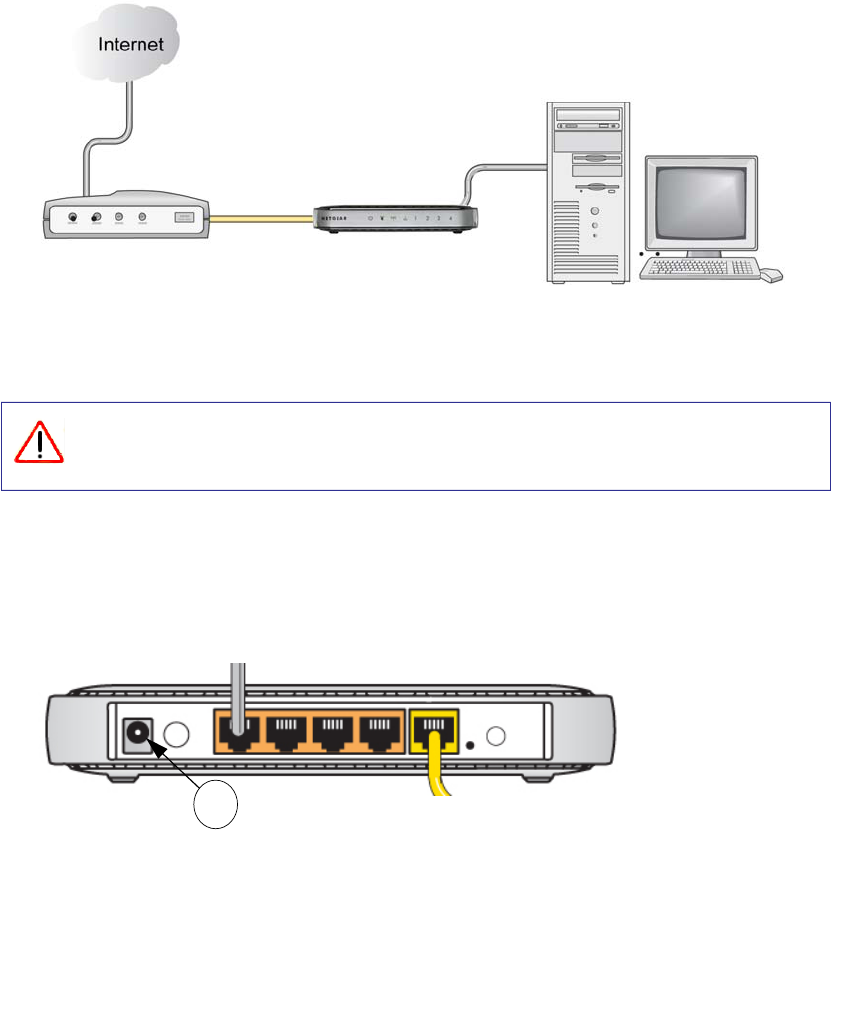
8. Review that your network is now set up (as shown in Figure 9); you are ready to start your
network.
9. Start your network in the correct sequence, as described below.
To start your network:
1. Plug in and turn on the cable or DSL modem. Wait 2 minutes.
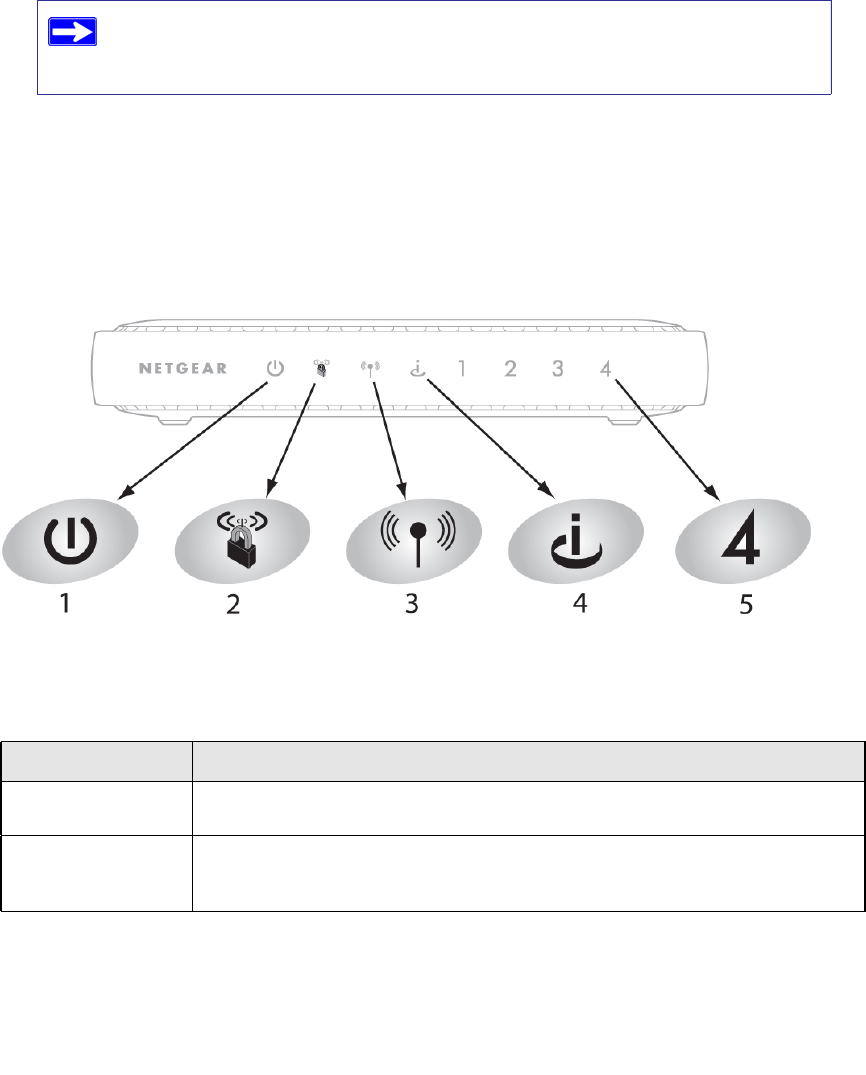
2. Plug the end of the power adapter’s cord into the wall or a power strip, and into the power
adapter outlet of your wireless router (F), as shown in Figure 10. Wait 1 minute.
Figure 9
Failure to start or restart your network in the correct sequence could prevent you
from accessing the Internet.
Figure 10
F
Manually Installing Your Router 15
3. Turn on your computer. It will take several minutes for your router to establish a connection
with your computer and your Internet provider.
Verifying Your Connection
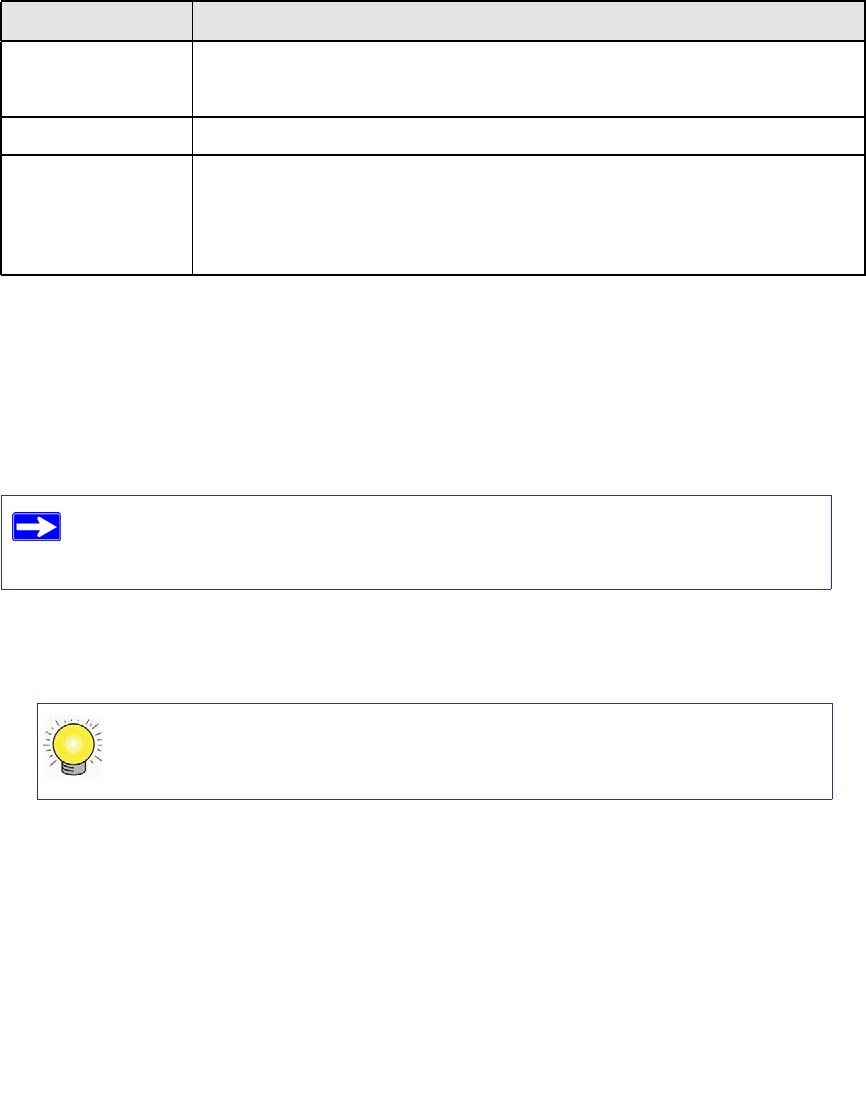
Verify that your router is connected correctly by checking the wireless router status lights (as
illustrated in Figure 11).
For DSL customers, if software logs you in to the Internet, do not run that
software. You might need to go to the Internet Explorer Tools menu, Internet
Options, Connections tab and select “Never dial a connection.”
Figure 11
Table 2. Status Lights After Installation
Label Description
1. Power The power light should turn solid green. If it does not, see “Checking Basic Router
Functions” on page 28.
2. Push 'N' Connect
The WPS button/light will not be lit unless you push it to enable Push ‘N’ Connect
(WPS) security. See “Using Push 'N' Connect (WPS) to Configure Your Wireless
Network” on page 22.
Manually Installing Your Router 16
Setting Up Your Router for Internet Access
When configuring your wireless router manually, you must log in to your wireless router to set it
up initially and to make any changes to your wireless router’s settings later.
To access the router:
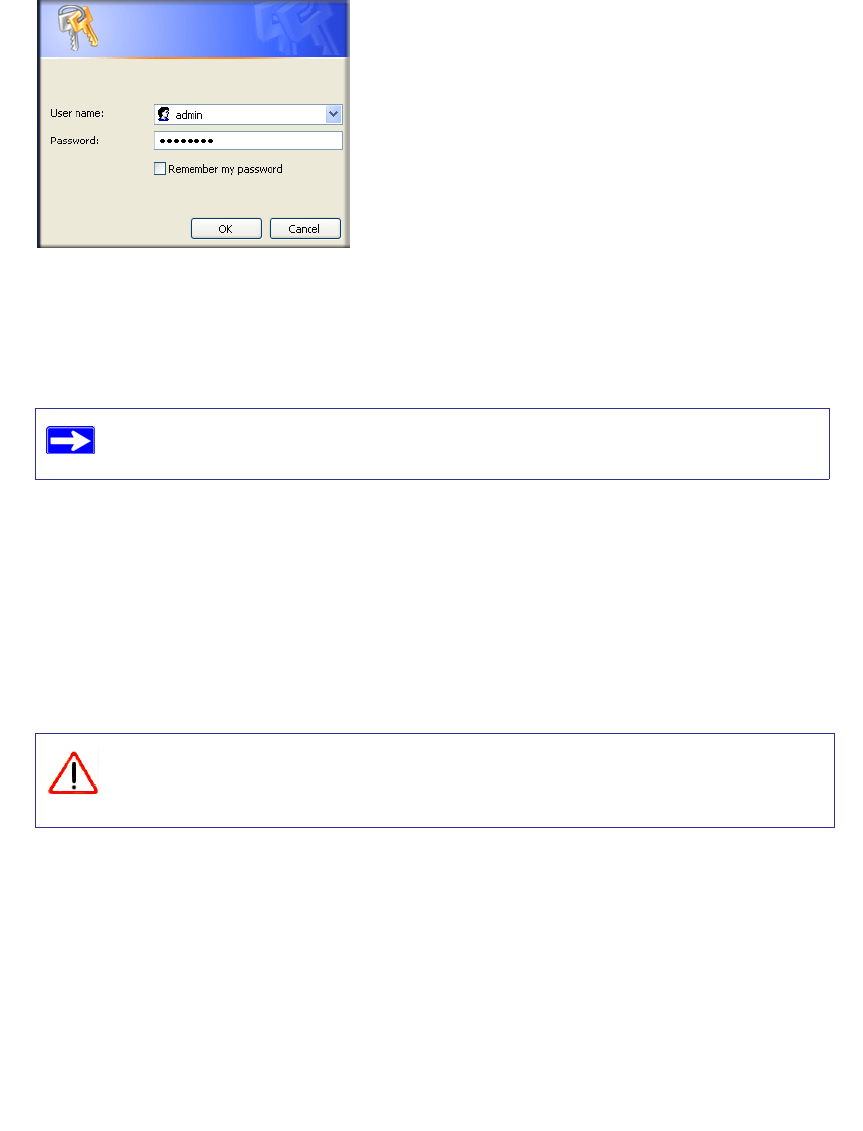
1. Type http://www.routerlogin.net in the address field of your browser, and then click Enter.
A login window similar to the one shown in Figure 12 will display.
3. Internet
The Internet port light should be lit. If it is not, make sure the Ethernet cable is
securely attached to the wireless router Internet port and the modem, and that the
modem is powered on.
4. Wireless The wireless light should be lit after turning on the wireless router.
5. LAN
(Ports 1–4)
A LAN light should be lit for each connected computer on your network. Green
indicates that your computer is communicating at 100 Mbps; amber indicates
communication at 10 Mbps. If a LAN light is not lit for each connected Ethernet
cable, make sure that the Ethernet cable from the computer to the router is securely
attached at both ends, and that the computer is turned on.
The factory default state is reset when you use the Restore Factory Settings button.
See “Restoring the Default Password and Configuration Settings” on page 37 for
more information.
You can enter either of these addresses to connect to your wireless router:
http://www.routerlogin.net or http://www.routerlogin.com.
Table 2. Status Lights After Installation (continued)
Label Description
Manually Installing Your Router 17
2. When prompted, enter admin for the router user name and password for the router password,
both in lowercase letters. (For security reasons, the router has its own user name and
password.)
The Firmware Upgrade Assistant screen will display.
3. Click Yes to check for new firmware (recommended). The router will automatically check the
NETGEAR database for a new firmware image file. If no new firmware version is available,
the message “No New Firmware Version Available” will display. (If you select “No,” you can
check for new firmware later; see the online User Manual.)
4. If new firmware is available, click Yes, and the router will automatically upgrade itself with
the latest firmware.
Figure 12
The router user name and password are not the same as any user name or
password you might use to log in to your Internet connection.
Do not try to go online, turn off the router, shut down the computer, or do
anything else to the router until the router finishes restarting! When the Power
light stops blinking, wait a few seconds more before using the router.
Manually Installing Your Router 18
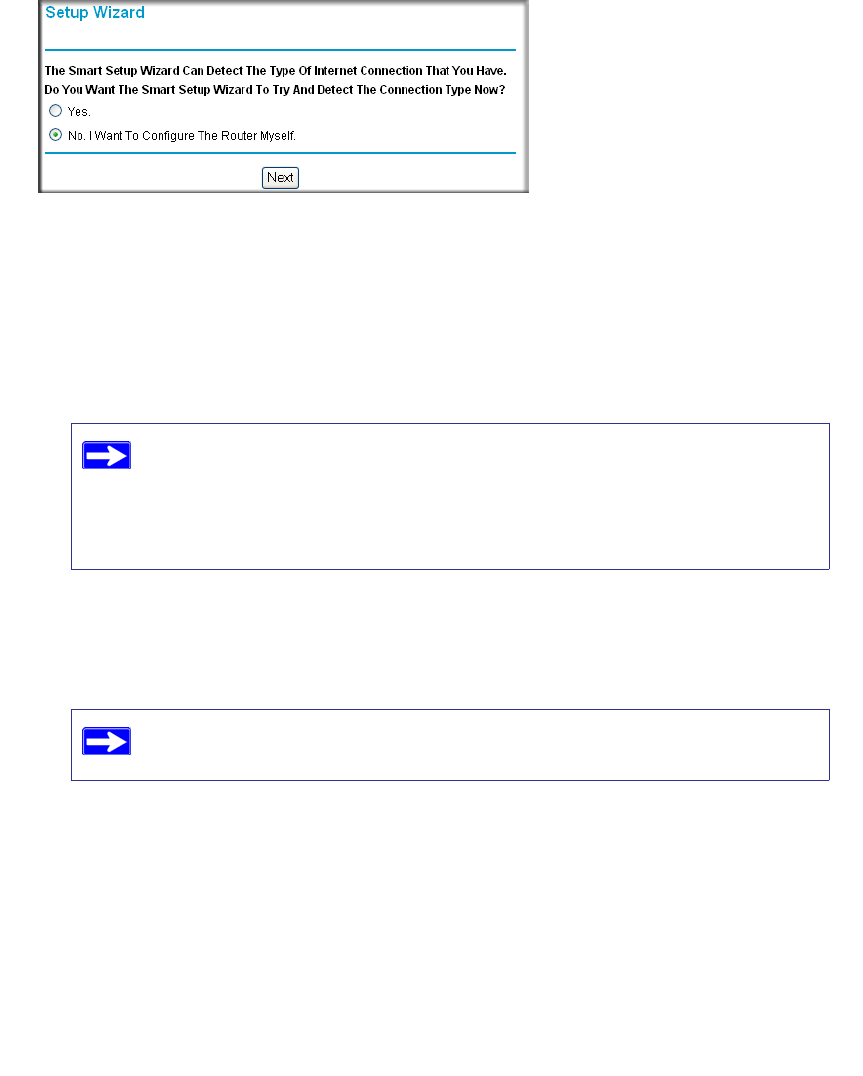
5. From the menu options in the left navigation pane, click Setup Wizard. The Setup Wizard
screen will display.
6. Select one of the following options:
• Select Yes to allow the Setup Wizard to detect your Internet connection. When prompted,
click Next. The wizard will assist you with configuring your wireless router to access the
Internet.
• Select No to set up the connection yourself. Click Next and the Basic Settings screen will
display. Enter the required information for your ISP connection in the appropriate fields. If
you need assistance, follow the Basic Settings Help screens on the router interface or see
the online User Manual for this wireless router.
7. Click Apply to save your settings and complete your connection.
You should now be connected to the Internet!
Figure 13
If you cannot connect to the wireless router, check the Internet Protocol
(TCP/IP) properties in the Network Connections section of your Control
Panel. It should be set to obtain both IP and DNS server addresses
automatically. For assistance, see your computer documentation or see the
links in “Related Documents” on page 38.
For more information about configuring settings, see “Configuring Your
Wireless Network” on page 20.

Manually Installing Your Router 19
If you do not connect successfully:
• Review your settings and make sure that you have selected the correct options and typed
everything correctly.
• Contact your ISP to verify that you have the correct configuration information.
• Read “Troubleshooting” on page 27.
If problems persist, register your NETGEAR product and contact NETGEAR Technical Support.
Configuring Your Wireless Network 20
Configuring Your Wireless Network
This section describes additional configuration and testing for your network, after you have
performed basic installation of the Wireless-N 150 Router.
For a wireless connection, the router and each wireless computer must use the same SSID, also
called the wireless network name, and the same wireless security. NETGEAR strongly
recommends that you use wireless security.
Specifying Wireless Settings
The Wireless Settings screen lets you set your wireless network connections and the wireless
security option for your network and router. To configure the wireless network, you can either
manually specify your network name (SSID) and your wireless security settings (see “Setting
Your SSID and Wireless Security Manually” on page 20) or, if the clients in your network are
WPS capable, you can use Wi-Fi Protected Setup (WPS) to automatically set the SSID and
implement WPA/WPA2 security on both the router and the client device (see “Using Push 'N'
Connect (WPS) to Configure Your Wireless Network” on page 22).
For a complete overview of all the security configurations that can be implemented on this router,
see the online User Manual.
Setting Your SSID and Wireless Security Manually
To specify the wireless settings, you must know the following:
• SSID. The default SSID for the router is NETGEAR.
Indoors, computers can connect over wireless networks at a range of several hundred
feet. This can allow others outside of your immediate area to access your network.
If you configure the router from a wireless computer and you change the router’s
SSID, channel, or security settings, you will lose your wireless connection when
you click Apply. You must then change your computer’s wireless settings to match
the router’s new settings. To avoid this situation, you can use a computer that is
connected to the router with an Ethernet cable.
Configuring Your Wireless Network 21
• The wireless mode (802.11g/b, or 802.11n) that each wireless adapter supports.
• Wireless security option. NETGEAR strongly recommends that you use wireless security. To
successfully implement wireless security, check each wireless adapter to determine which
wireless security option it supports.
To set up basic wireless connectivity:
1. Log in to the wireless router as described in “To access the router:” on page 16.
2. On the main menu, select Wireless Settings to display the Wireless Settings screen.
Note that the default SSID is NETGEAR.
3. Set the Region. Select the region where the router is located.
4. Leave the wireless mode at its default setting.
5. Click Apply to save your changes.
To set up your computers for wireless connectivity:
1. Program the wireless settings of each computer or wireless adapter to have the same SSID
(wireless network name) as the router.
2. Check that the wireless adapter on each computer can support the mode and security option
that you selected. (If you have a question, see the online User Manual or review the settings
you selected previously).
3. Check that the security settings on each wireless device match the security settings of the
router. For example, if you selected a security option requiring a passphrase, then the same
passphrase must be used for each wireless computer.
4. Check that each wireless computer has a wireless link and is able to obtain an IP address by
DHCP from the router.
The SSID of any wireless adapters must match the SSID you configure in the
wireless router. If they do not match, you will not get a wireless connection.
For a Windows PC, go to the Control Panel and select Network Connections.
Check the Wireless Connections Properties and ensure that TCP/IP Properties
are set to Obtain an IP address automatically.

Configuring Your Wireless Network 22
To access the Internet from any computer connected to your wireless router, launch a browser such
as Microsoft Internet Explorer or Netscape Navigator. You should see the wireless router’s
Internet LED blink, indicating communication to the ISP.
Using Push 'N' Connect (WPS) to Configure Your Wireless
Network
If your wireless clients support Wi-Fi Protected Setup (WPS), you can use this feature to configure
the router’s SSID and security settings and, at the same time, connect the wireless client securely
and easily to the router (computers that will connect wirelessly to the router are clients). Look for
the symbol on your client device.1 WPS automatically configures the SSID and wireless
security settings for the router (if the router is in its default state) and broadcasts these settings to
the wireless client.
If the router has already been configured manually, and either WPS-PSK or WPA2-PSK security
has been enabled, a wireless client can be connected quickly and simply by using the WPS method
of connecting to the wireless network. In this case, the router preserves its existing wireless
settings and broadcasts them to the WPS-capable client.
If you install a NETGEAR adapter that supports WPS, its installation procedures guide you
through a WPS connection without the need to log in to the router. However, if you wish to
perform any WPS connection using the router settings, use the procedures below. (For more
information on setting up a mixed network, see the online User Manual.
To add a WPS client to your network:
1. Log in to the wireless router, type http://www.routerlogin.net or http://
www.routerlogin.com in the address field of your browser, and then click Enter.
1. For a list of other Wi-Fi-certified products available from NETGEAR, go to http://www.wi-fi.org.
NETGEAR’s Push 'N' Connect feature is based on the Wi-Fi Protected Setup (WPS)
standard. All other Wi-Fi-certified and WPS-capable products should be compatible
with NETGEAR products that implement Push 'N' Connect.
If you choose to use WPS, the only security methods supported are WPA-PSK and
WPA2-PSK. WEP security is not supported by WPS.
Configuring Your Wireless Network 23
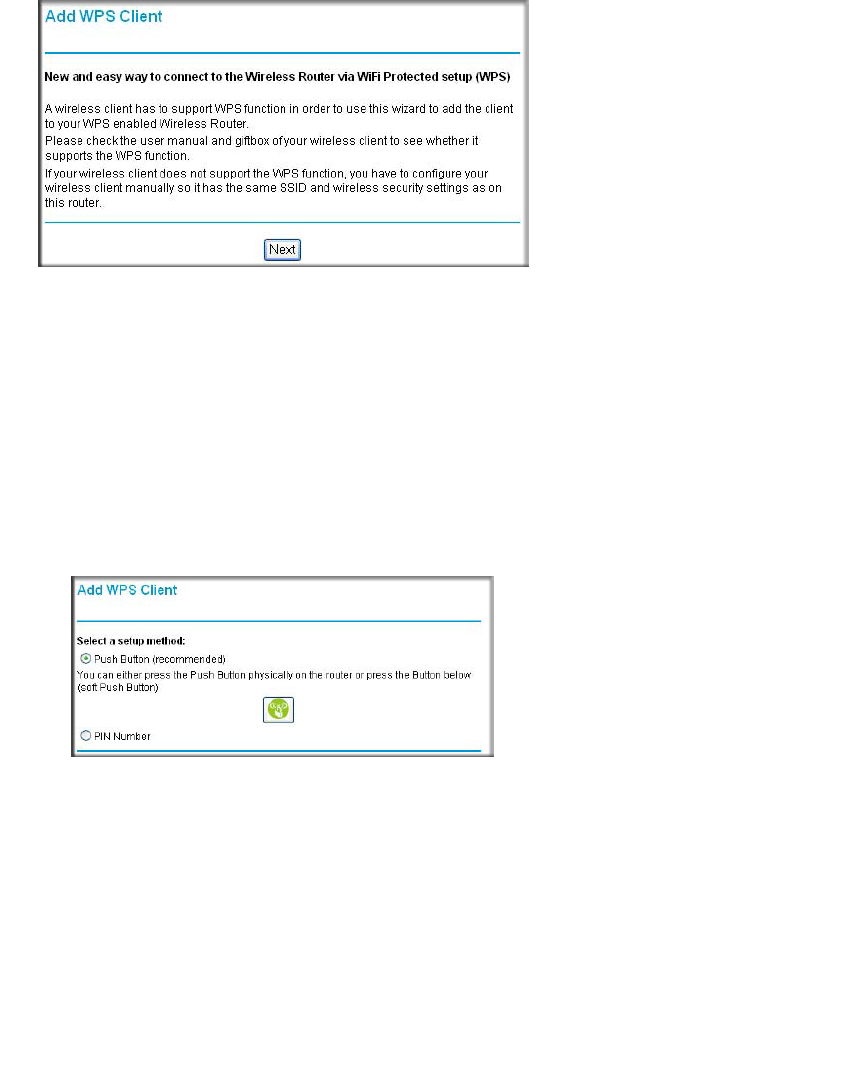
2. On the router main menu, select Add a WPS Client. The Add WPS Client wizard screen
displays. Click Next.
3. Select the method for adding the WPS client. A WPS client can be added using the push-
button method or the PIN method.
•Using the Push-Button. This is the preferred method.
– Select the Push-Button radio box and either press the WPS push-button on the router
or click the soft WPS push-button on the screen (as shown below).
– The router will attempt to communicate with the client; you have 2 minutes to enable
WPS from the client device using the client’s WPS networking utility.
:
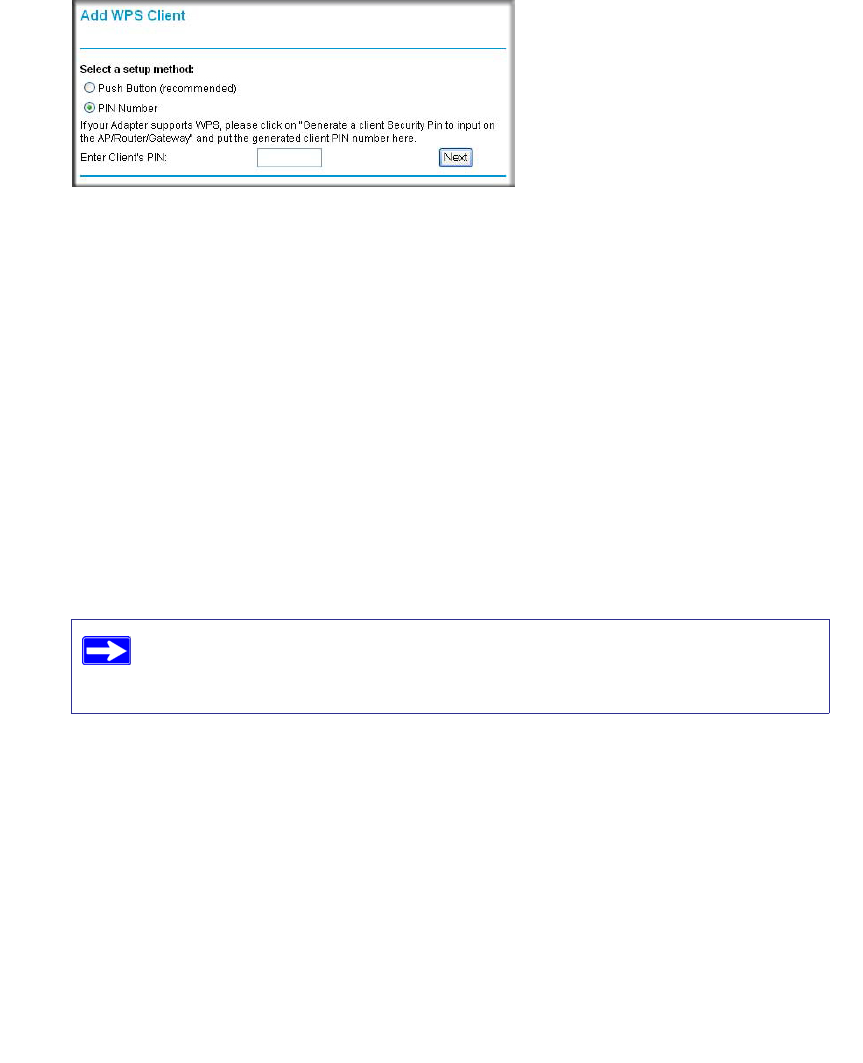
•Entering a PIN. If you want to use the PIN method, select the PIN radio box. A screen
similar to the one shown below displays.
– Go to your wireless client and, from the client’s WPS utility, obtain the wireless
client’s security PIN, or follow the client’s WPS utility instructions to generate a
security PIN.
Figure 14
Figure 15
Configuring Your Wireless Network 24
– Then, enter this PIN in the Enter Client’s PIN field provided on the router and click
Next. You have 4 minutes to enable WPS on the router using this method.
Using either method, the client wireless device will attempt to detect the WPS signal from the
router and establish a wireless connection in the time allotted.
• If no connection is detected:
– WPS did not establish a secure connection with a wireless device.
– Neither the SSID nor the WPA/WPA2 security settings were configured on the router.
• If a connection is established:
– The router WPS screen displays a message confirming that the wireless client was
successfully added to your wireless network.
– The router generated an SSID, implemented WPA/WPA2 wireless security (including
a PSK security password), and broadcast these settings to the client; the client now
shares the same security settings as the router.
4. Note your SSID and WPA/WPA2 PSK security password (whether previously set or
generated) for your wireless network.
Figure 16
If the router was already configured manually, and either WPS/PSK or
WPA2/PSK security enabled and a PSK security password selected, then
the client now shares these same security settings.

Configuring Your Wireless Network 25
To access the Internet from any computer connected to your wireless router, launch a browser such
as Microsoft Internet Explorer or Netscape Navigator. You should see the wireless router’s
Internet LED blink, indicating communication to the ISP.
For more information on setting up your wireless network and configuring your wireless security
settings, see the online User Manual.
Testing Basic Wireless Connectivity
Once you have established basic wireless connectivity, you can enable security settings
appropriate to your needs.
To set up and test basic wireless connectivity:
1. Log in to the wireless router as described in “To access the router:” on page 16.
2. Click Wireless Settings in the main menu.
3. Note whatever SSID you have set up.
4. Configure and test your computers for wireless connectivity.
Program the wireless adapter of your computers to have the same wireless network name
(SSID) as the wireless router. Check that they have a wireless link and are able to obtain an IP
address by DHCP from the wireless router.
Your wireless router is now configured to provide Internet access for your network. Your wireless
router automatically connects to the Internet when one of your computers requires access. It is not
necessary to run a dialer or login application such as Dial-Up Networking or Enternet to connect,
If you are planning a mixed network of WPS capable devices and non-WPS capable
devices, NETGEAR suggests that you set up your wireless network and security
settings manually first, and only use WPS for adding the WPS capable devices.
The SSID of any wireless adapters must match the SSID you configure in the
wireless router. If they do not match, you will not get a wireless connection. If
you are configuring the wireless router from a wireless computer and you
change the wireless router’s SSID, channel, or security settings, you will lose
your wireless connection when you click Apply. You must then change the
wireless settings of your computer to match the wireless router’s new settings.

Configuring Your Wireless Network 26
log in, or disconnect. These functions are performed automatically by the wireless router as
needed.
To access the Internet from any computer connected to your wireless router, launch a browser such
as Microsoft Internet Explorer or Netscape Navigator. You should see the wireless router’s
Internet LED blink, indicating communication to the ISP. The browser should begin to display a
Web page.

Troubleshooting 27
Troubleshooting
If you have difficulties accessing the Internet, use the Basic Setup Checklist to make sure that you
have connected and set up your router correctly. If your basic setup is correct, then look for your
problem in one of the subsequent sections.
Basic Setup Checklist
The following items are the most common errors made when initially setting up a router. Carefully
review the checklist to make sure that you have followed the recommended procedures.
•Be sure you always start your network in this sequence:
1. Turn off and unplug the modem from the power outlet. Next, turn off the wireless router
and computer.
2. Turn on the modem and wait 2 minutes.
3. Turn on the wireless router and wait 1 minute.
4. Turn on the computer.
•Make sure the Ethernet cables are securely plugged in.
– The Internet status light on the wireless router will be lit if the Ethernet cable to the
wireless router from the modem is plugged in securely and the modem and wireless router
are both turned on (see “Connecting Your Wireless Router” on page 12).
– For each powered-on computer connected to the wireless router with a securely plugged-
in Ethernet cable, the corresponding wireless router LAN port status light will be lit. The
label on the back of the wireless router identifies the number of each LAN port (see “LAN
(Ports 1–4)” on page 3).
•Make sure the network settings of the computer are correct.
– LAN connected computers must be configured to obtain an IP address automatically using
DHCP. For more information, see the links in “Related Documents” on page 38.
For more information, refer to the online User Manual. A link to this document is
included on the Resource CD, and is also available from the router interface, after the
router is installed. Click Documentation on the main menu.

Troubleshooting 28
– Some cable modem services require you to use the MAC address of the computer
registered on the account. If so, in the Router MAC Address section of the Basic Settings
menu, select “Use this Computer’s MAC Address.” Click Apply to save your settings.
Restart the network in the correct sequence.
•Check the router status lights to verify correct router operation. If the Power light does
not turn solid green within 2 minutes after turning the router on, reset the router according to
the instructions in “Restoring the Default Password and Configuration Settings” on page 37.
Checking Basic Router Functions
After you turn on power to the router, check that the following sequence of events has occurred:
1. When power is first applied, verify that the power light is on (see “Front Panel” on page 2 for
an illustration).
2. Verify that the power light turns amber within a few seconds, indicating that the self-test
procedure is running.
3. After approximately 20 seconds, verify that:
a. The color of the power light changes to green.
b. The LAN port lights are lit for any local ports that are connected.
If a port’s light is lit, a link has been established to the connected device. If a LAN port is
connected to a 100 Mbps device, verify that the port’s light is green. If the port is 10
Mbps, the light will be amber.
c. The Internet port is connected and its light is lit.
4. If you have enabled WPS security, verify that the Push 'N' Connect status light stops blinking
and changes to green (otherwise the Push 'N' Connect status light should be off).
If the correct behavior does not occur, check for a remedy from the following list:
•Power Light Not On. If the Power and other lights are off (see “Connecting Your Wireless
Router” on page 12), check the following:
– Make sure that the power cord is properly connected to your router and that the power
adapter is properly connected to a functioning power outlet.
– Check that you are using the power adapter supplied by NETGEAR for this product.
If the error persists, you have a hardware problem and should contact technical support.
•Power Light Blinks Green Slowly and Continuously. The router firmware is corrupted.

Troubleshooting 29
To restore your firmware:
a. Make sure your PC is connected to your router and the router is powered on.
b. Insert the Resource CD that came with your router into your PC.
– The CD will automatically start and detect the language you are using on your PC.
Select a different language option, if you prefer.
– If the CD does not automatically start, browse the CD and double-click on .
c. In the CD’s menu, click Supporting Software, then click Netgear Firmware Recovery
Utility, and follow the prompts for the recovery process.
Installation of the utility places a NETGEAR Router Recovery shortcut on the
desktop.
d. After firmware recovery is complete, follow the prompts to restore your configuration
settings.
•Power Light Stays Amber. When the router is turned on, the Power light turns amber for
about 20 seconds and then turns green. If the light does not turn green, the router has a
problem.
If the Power light is still amber 1 minute after turning on power to the router:
a. Turn the power off and back on to see if the router recovers.
b. Clear the router’s configuration to factory defaults. This will set the router’s IP address to
192.168.1.1. This procedure is explained in “Restoring the Default Password and
Configuration Settings” on page 37.
If the error persists, you might have a hardware problem and should contact technical support.
•Internet Light Stays Amber. When the router is turned on, the Internet light turns amber for
about 20 seconds and then turns green. If the light does not turn green, the router has a
problem.
If the Internet light is still amber 1 minute after turning on power to the router:
a. The Internet is not accessible. Confirm that you have the correct internet setting.
b. Clear the router’s configuration to factory defaults. This will set the router’s IP address to
192.168.1.1. This procedure is explained in “Restoring the Default Password and
Configuration Settings” on page 37.
c. Turn the power off and back on to see if the router recovers.
•Internet or LAN Port Lights Not On. If either the LAN or Internet lights do not light when
the Ethernet connection is made, check the following:
Troubleshooting 30
a. Make sure that the Ethernet cable connections are secure at the router and at the computer.
b. Make sure that power is turned on to the connected computer.
c. Be sure you are using Ethernet cables like the cable that was supplied with the wireless
router.
See “Connecting Your Wireless Router” on page 12 for instructions.
For more information on WPS functionality and advanced features, see the online User Manual.
Troubleshooting Login Problems
If you are unable to log in to the wireless router, check the following:
• If you are using an Ethernet-connected computer, check the Ethernet connection between the
computer and the router as described in “Checking Basic Router Functions” on page 28.
• Make sure you are using the correct login information. The factory default login name is
admin and the password is password. Make sure that the Caps Lock is off when entering this
information.
• Make sure your computer’s IP address is on the same subnet as the router. If your are using the
recommended addressing scheme, your computer’s address should be in the range of
192.168.1.2 to 192.168.1.254. Refer to your computer’s documentation or see “Preparing a
Computer for Network Access” in “Related Documents” on page 38 for help with configuring
your computer.
• If your router’s IP address has been changed and you don’t know the current IP address, reset
the router’s configuration to the factory defaults. This procedure will reset the router’s IP
address to 192.168.1.1 (see “Restoring the Default Password and Configuration Settings” on
page 37).
• Make sure your browser has Java, JavaScript, or ActiveX enabled. If you are using Internet
Explorer, click Refresh to be sure the Java applet is loaded. Try closing the browser and
reopening it again.
If your computer cannot reach a DHCP server, some operating systems will
assign an IP address in the range 169.254.x.x. If your IP address is in this range,
verify that you have a good connection from the computer to the router, then
restart (reboot) your computer.

Troubleshooting 31
• If you are attempting to set up your NETGEAR router as an additional router behind an
existing router in your network, consider replacing the existing router instead. NETGEAR
does not support such a configuration.
• If you are attempting to set up your NETGEAR router as a replacement for an ADSL gateway
in your network, the router cannot perform many gateway services, for example, converting
ADSL or Cable data into Ethernet networking information. NETGEAR does not support such
a configuration.
Checking the Internet Service Connection
If your router is unable to access the Internet, check the Internet connection, and then check the
wireless router.
•Internet Connection. The cable or DSL modem status lights indicate if the modem
connection is successful or not. Check your modem documentation or call your Internet
service provider for help with verifying that the modem has a successful connection.
•Wireless Router Internet Light is Green or Blinking Green. If your Internet light is green
or blinking green, then you have a good Internet connection and your wiring is correct.
•Wireless Router Internet Light Off. If the Internet light is off, verify that the Ethernet cable
is securely connected between the cable or DSL modem, and that both the modem and
wireless router are turned on.
Obtaining an Internet IP Address
If your wireless router is unable to access the Internet, and your Internet light is amber, check the
wireless router to see if it is able to get an Internet IP address from your service provider. Unless
you have a static IP address, your wireless router automatically requests an IP address from your
service provider.
To check the Internet IP address from the browser interface:
1. Log in to the wireless router.
2. Select the Router Status link under the Maintenance heading to check that an IP address is
shown for the Internet Port. If 0.0.0.0 is shown, your wireless router has not obtained an IP
address from your service provider.
If your router is unable to obtain an IP address from the your service provider, the problem might
be one of the following:

Troubleshooting 32
• Your service provider might require a login. Ask your service provider whether they require a
PPP over Ethernet (PPPoE) login.
• You might have incorrectly set the service name, user name or password. See
“Troubleshooting PPPoE” on page 32.
• Your service provider might check for your computer's host name. Assign the computer Host
Name of your ISP account to the wireless router on the Basic Settings screen.
• Your service provider might only allow one Ethernet MAC address to connect to the Internet,
and check for your computer’s MAC address. If this is the case:
– Inform your service provider that you have bought a new network device, and ask them to
use the wireless router’s MAC address, or
– Configure your router to spoof your computer’s MAC address. On the Basic Settings
screen in the Router MAC Address section, select “Use this Computer’s MAC Address”
and click Apply. Then restart your network in the correct sequence (see “Basic Setup
Checklist” on page 27).
Troubleshooting PPPoE
If you are using PPPoE, try troubleshooting your Internet connection.
To troubleshoot a PPPoE connection:
1. Log in to the wireless router.
2. Select Router Status under Maintenance on the main menu.
3. Click Connection Status. If all of the steps indicate “OK,” then your PPPoE connection is up
and working.
If any of the steps indicate “Failed,” you can attempt to reconnect by clicking Connect. The
wireless router will continue to attempt to connect indefinitely.
If you cannot connect after several minutes, you might be using an incorrect service name,
user name, or password. There also might be a provisioning problem with your ISP.
Unless you connect manually, the wireless router will not authenticate using
PPPoE until data is transmitted to the network.

Troubleshooting 33
Troubleshooting Internet Browsing
If your wireless router can obtain an IP address but your computer is unable to load any web pages
from the Internet, check the following:
•Your computer might not recognize any DNS server addresses. A DNS server is a host on
the Internet that translates Internet names (such as www addresses) to numeric IP addresses.
Typically, your ISP will provide the addresses of one or two DNS servers for your use. If you
entered a DNS address during the wireless router’s configuration, restart your computer.
Alternatively, you can configure your computer manually with a DNS address, as explained in
the documentation for your computer.
•Your computer might not have the wireless router configured as its default gateway.
Reboot the computer and verify that the wireless router address (192.168.1.1) is listed by your
computer as the default gateway address.
Using the Ping Utility to Troubleshoot
Most computers and routers have a diagnostic utility called ping that sends a request to a target
device. The device then replies. The ping utility makes it easy to troubleshoot a network.
Testing the Path from Your Computer to Your Router
You can ping the wireless router to verify that the LAN path from your computer to your router is
set up correctly.
To ping the wireless router from a Windows PC:
1. From the Windows task bar, click Start and select Run.
2. In the field provided, type ping followed by the address of the router, as in this example:
ping www.routerlogin.net
3. Click OK. You should see a message like this one:
Pinging www.routerlogin.net with 32 bytes of data
If the path is working, you see this message:
Reply from www.routerlogin.net: bytes=32 time=NN ms TTL=xxx
If the path is not working, you see this message:
Request timed out

Troubleshooting 34
If the path is not working correctly, you could have one of the following problems:
• Wrong physical connections
– Make sure the LAN port light is on. If the light is off, follow the instructions in “Basic
Setup Checklist” on page 27.
– Check that the corresponding lights are on for your computer’s network interface card.
• Wrong network configuration
– Verify that the Ethernet card driver software and TCP/IP software are both installed and
configured on your computer.
– Verify that the IP addresses for your router and your computer are correct and that both
addresses are on the same subnet (for example, 192.168.1.x/255.255.255.0).
Testing the Path from a Computer to the Internet
After verifying that the path between your computer and the wireless router works correctly, test
the path from your PC to the Internet.
To test the path using ping from a Windows PC:
1. From the Windows task bar, click Start and select Run.
2. In the field provided, type cmd. A command screen will display.
3. At the > prompt, type the following:
ping -n 10 <IP address>
where <IP address> is the IP address of a remote device such as your ISP’s DNS server.
4. Press Enter.
If the path is working correctly, replies as in the previous section will display. If you do not receive
replies:
• Check that your PC has the IP address of your router listed as the default gateway. If the IP
configuration of your PC is assigned by DHCP, this information will not be visible in your
PC’s Network Control Panel. Verify that the IP address of the router is listed as the TCP/IP
default gateway.
• Check to see that the network address of your PC (the portion of the IP address specified by
the netmask) is different from the network address of the remote device.
• If your ISP assigned a host name to your PC, enter that host name as the Account Name in the
Basic Settings menu.
Technical Specifications 35
Technical Specifications
Default Configuration Settings
This section provides factory default settings and technical specifications for the Wireless-N 150
Router Model WNR1000v2.
Table 3. Home Router Default Configuration Settings
Feature Default Setting
Router Login
Router Login URL http://www. routerlogin.net;
http://www.routerlogin.com; or http://192.168.1.1
Login Name (case sensitive) admin
Login Password (case sensitive) password
Internet Connection
WAN MAC Address Default hardware address (on label)
MTU Size 1500
Local Network
Router Lan IP address (the Gateway IP
address) 192.168.1.1
IP Subnet Mask 255.255.255.0
DHCP Server Enabled
Time Zone GMT
Time Zone Adjusted for Daylight Saving
Time Disabled
Firewall
Inbound (communications coming in from
the Internet) Disabled (bars all unsolicited requests except for
traffic on port 80, the http port)
Outbound (communications going out to
the Internet) Enabled (all)

Technical Specifications 36
Wireless
Wireless Communication Enabled
SSID Name NETGEAR
Security Disabled
Broadcast SSID Enabled
Transmission Speed Autoa
Country/Region United States (North America only; otherwise varies
by country and region)
RF Channel 11 in North America, 13 in most other regions
Operating Mode Up to 150 Mbps
Data Rate Best
Output Power Full
a. Maximum Wireless signal rate derived from IEEE Standard 802.11 specifications. Actual throughput will vary. Network
conditions and environmental factors, including volume of network traffic, building materials and construction, and net-
work overhead lower actual data throughput rate.
Table 3. Home Router Default Configuration Settings (continued)
Feature Default Setting

Technical Specifications 37
Restoring the Default Password and Configuration
Settings
You can restore the factory default configuration settings that reset the router’s user name to
admin, the password to password, and the IP address to 192.168.1.1.
To restore the factory default configuration settings:
1. Use a sharp object such as a pen or a paper clip to press and hold the restore factory settings
button, located on the rear panel of the router, for about 5 seconds, until the Power light begins
to blink (see “Back Panel” on page 4).
2. Release the restore factory settings button, and wait for the router to restart, and for the Power
light to stop blinking and become solid green.
The factory default settings will be restored so that you can access the router from your Web
browser using the factory defaults.
This procedure will erase all the current configuration settings and restore the factory
defaults.

Related Documents 38
Related Documents
This section provides links to reference documents that you can use to gain a more complete
understanding of the technologies used in your NETGEAR product.
Table 4. Related Documents
Document Link
Internet Networking and
TCP/IP Addressing http://documentation.netgear.com/reference/enu/tcpip/index.htm
Preparing a Computer
for Network Access http://documentation.netgear.com/reference/enu/wsdhcp/index.htm
Glossary http://documentation.netgear.com/reference/enu/glossary/index.htm

Related Documents 39

40
Registration and Certifications
Product Registration, Support, and Documentation
Register your product at http://www.NETGEAR.com/register. You must register before you can use our telephone
support service. Product updates and Web support are always available by going to: http://www.NETGEAR.com/support.
Setup documentation is available on the CD, on the support website, and on the documentation website. When the
wireless router is connected to the Internet, click the KnowledgeBase link to view support information or click the
Documentation link to view the online User Manual for this wireless router.
Maximum Wireless Signal Rate Derived from IEEE Standard 802.11 Specifications
Actual data throughput will vary. Network conditions and environmental factors, including volume of network traffic,
building materials and construction, and network overhead, lower actual data throughput rate.
Federal Communications Commission (FCC) Compliance Notice: Radio Frequency Notice
This equipment has been tested and found to comply with the limits for a Class B digital device, pursuant to part 15 of
the FCC Rules. These limits are designed to provide reasonable protection against harmful interference in a residential
installation. This equipment generates, uses, and can radiate radio frequency energy and, if not installed and used in
accordance with the instructions, may cause harmful interference to radio communications. However, there is no
guarantee that interference will not occur in a particular installation. If this equipment does cause harmful interference to
radio or television reception, which can be determined by turning the equipment off and on, the user is encouraged to try
to correct the interference by one or more of the following measures:
• Reorient or relocate the receiving antenna.
• Increase the separation between the equipment and receiver.
• Connect the equipment into an outlet on a circuit different from that to which the receiver is connected.
• Consult the dealer or an experienced radio/TV technician for help.

FCC Caution: Any changes or modifications not expressly approved by the party responsible
for compliance could void the user's authority to operate this equipment.
This device complies with Part 15 of the FCC Rules. Operation is subject to the following two
conditions: (1) This device may not cause harmful interference, and (2) this device must
accept any interference received, including interference that may cause undesired operation.
IMPORTANT NOTE:
FCC Radiation Exposure Statement:
This equipment complies with FCC radiation exposure limits set forth for an uncontrolled
environment. This equipment should be installed and operated with minimum distance 20cm
between the radiator & your body.
This transmitter must not be co-located or operating in conjunction with any other antenna or
transmitter.
The availability of some specific channels and/or operational frequency bands are country
dependent and are firmware programmed at the factory to match the intended destination. The
firmware setting is not accessible by the end user.
Industry Canada statement:
This device complies with RSS-210 of the Industry Canada Rules. Operation is subject to the
following two conditions:
(1) This device may not cause harmful interference, and (2) this device must accept any
interference received, including interference that may cause undesired operation.
IMPORTANT NOTE:
Radiation Exposure Statement:
This equipment complies with IC radiation exposure limits set forth for an uncontrolled
environment. This equipment should be installed and operated with minimum distance 20cm
between the radiator & your body.