Netgear orporated 09400125 Universal WiFi Internet Adapter User Manual
Netgear Incorporated Universal WiFi Internet Adapter
UserManual.wiki
>
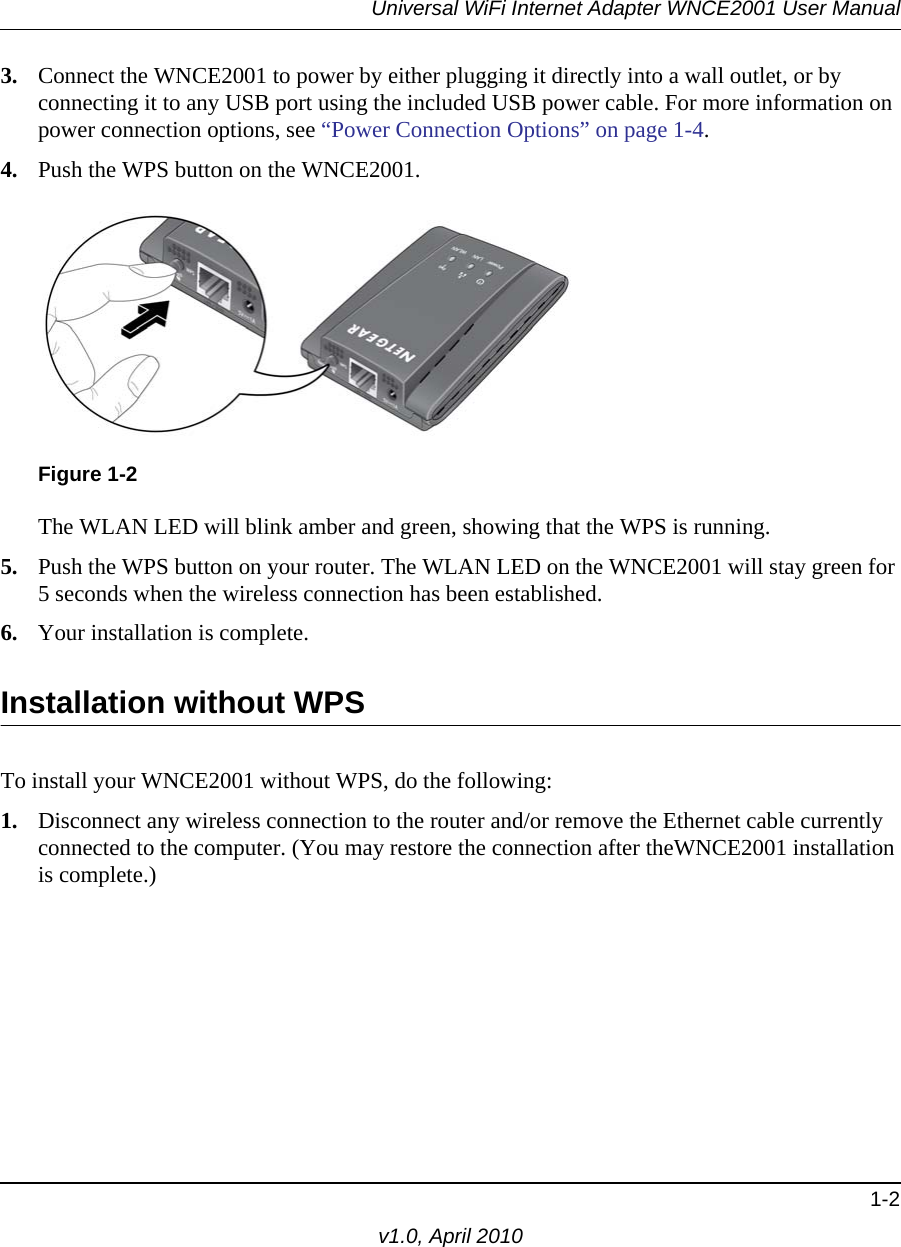
Netgear orporated
>
09400125 User Manual
User Manual
Navigation menu
Upload a User Manual
Namespaces
Wiki Guide
HTML
PDF
Info
Views
User Manual
Discussion / Help
Navigation
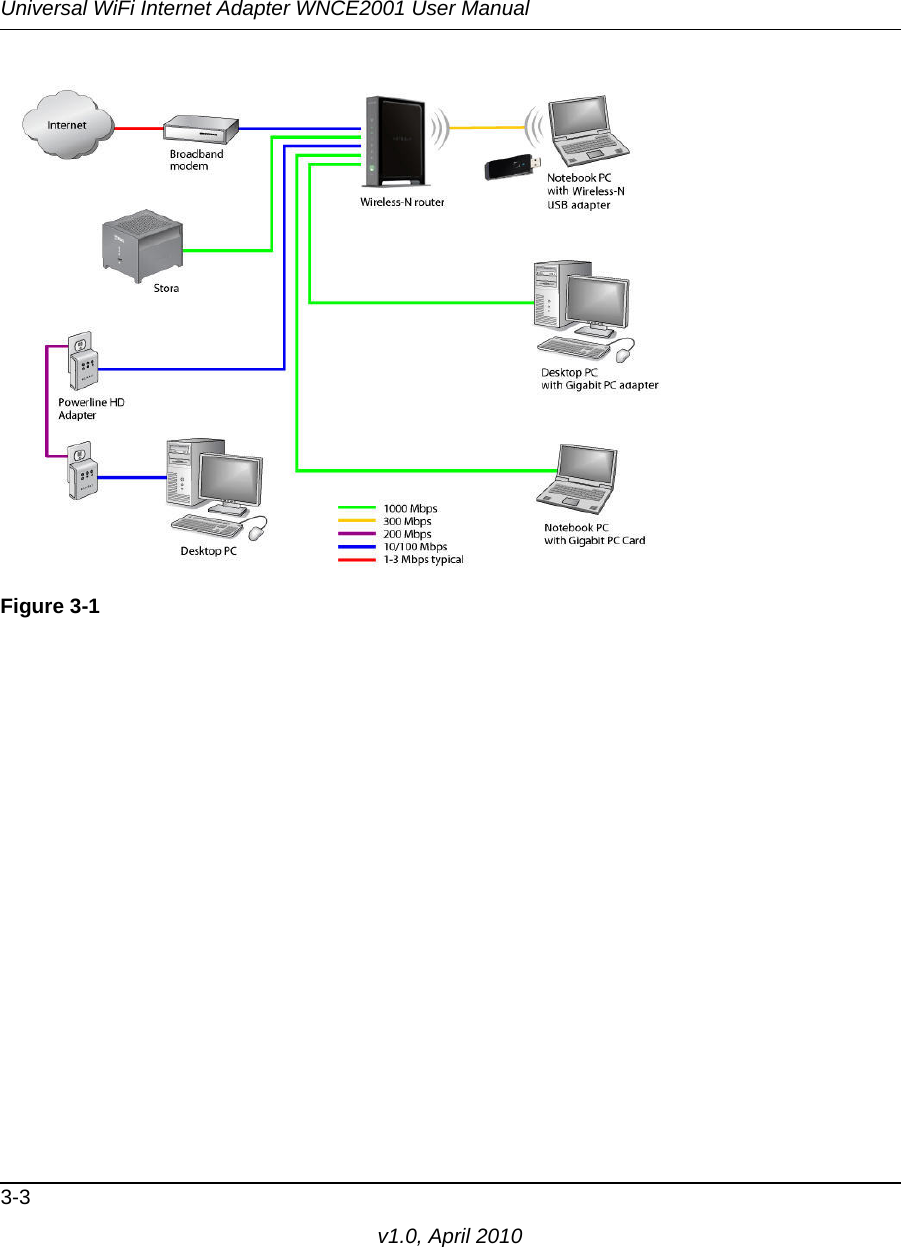
![vv1.0, April 2010ContentsAbout This ManualConventions, Formats, and Scope ................................................................................... viHow to Print This Manual ................................................................................................ viiRevision History ........................................................................................................ viiChapter 1 InstallationInstallation with WPS ......................................................................................................1-1Installation without WPS .................................................................................................1-2Power Connection Options ......................................................................................1-4LEDs ........................................................................................................................1-5Chapter 2 Network Connections and Wireless SecurityViewing Wireless Networks in Your Area .......................................................................2-1Selecting a Network ........................................................................................................2-1Using Push 'N' Connect to Join a Network ...............................................................2-1About Wireless Security .................................................................................................2-2Wireless Network Name (SSID) and Security Settings ............................................2-2Setting Up WPA-PSK [TKIP] or WPA2-PSK [AES] Security ....................................2-3Setting Up WEP Encryption Security .......................................................................2-4Chapter 3 Wireless Network PerformanceOptimizing Wireless Performance ..................................................................................3-1Optimizing Your Network Bandwidth ..............................................................................3-2Chapter 4 TroubleshootingTroubleshooting Tips ......................................................................................................4-1Appendix A Technical Specifications and Factory Default SettingsTechnical Specifications ................................................................................................ A-1Factory Default Settings ................................................................................................ A-2Appendix B Related Documents](https://usermanual.wiki/Netgear-orporated/09400125/User-Guide-1268351-Page-5.png)


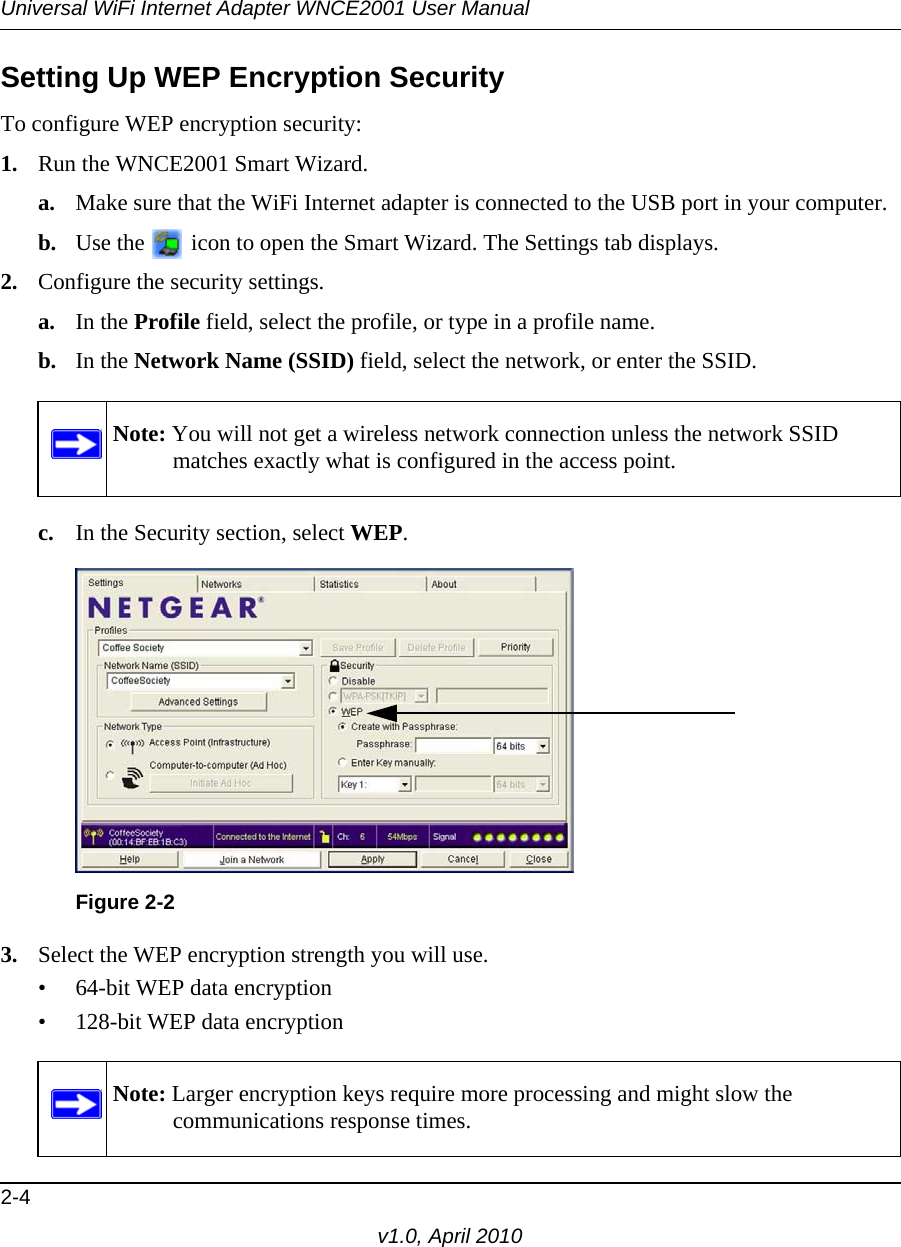
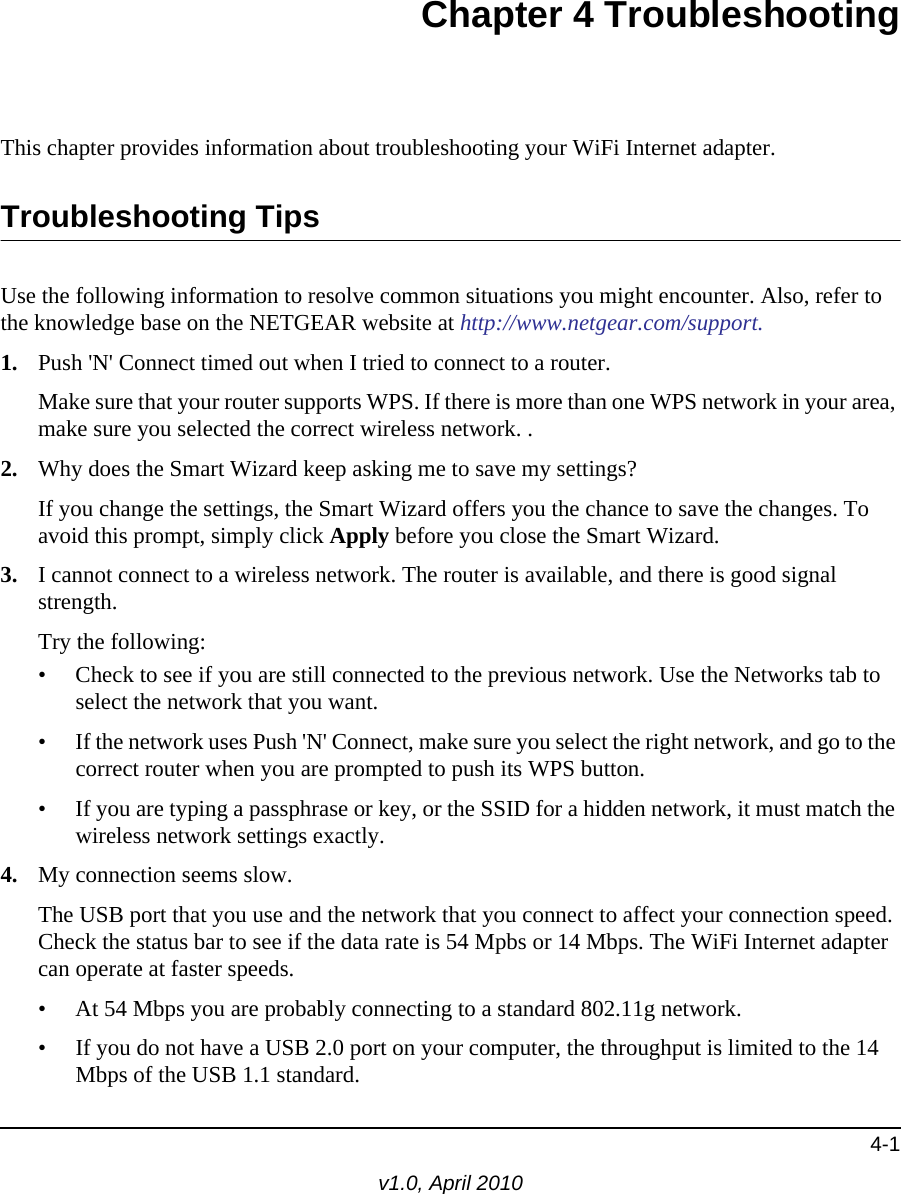
![Universal WiFi Internet Adapter WNCE2001 User Manual2-2v1.0, April 20103. Follow the wizard steps to push the router’s WPS button within 2 minutes, and connect to the wireless network. About Wireless SecurityMany networks use wireless security to encrypt wireless data communications. To connect to a network with wireless security, you must set up the WiFi Internet adapter with exactly the same kind of wireless security settings. If you use the Smart Wizard to set up security, you can take advantage of Push 'N' Connect (WPS) to set up WPA-PSK [TKIP] security. Otherwise, you can manually set one of the following types of wireless security used for home networks:• WPA-PSK [TKIP] or WPA2-PSK [AES]. See “Setting Up WPA-PSK [TKIP] or WPA2-PSK [AES] Security” on page 2-3.•WEP. See “Setting Up WEP Encryption Security” on page 2-4.For more information about wireless security, click the link to “Wireless Networking Basics” in Appendix B. Wireless Network Name (SSID) and Security SettingsIf you do not use WPS, then you need to know the security settings to join a secured wireless network. You can save the settings in a profile. You can also print this page, fill in the wireless network settings, and put it in a safe place for future reference.•Network Name (SSID) ______________________________ •If WPA2-PSK or WPA-PSK authentication is used: Passphrase: ______________________________ These characters are case-sensitive. •If WEP authentication is used:–WEP encryption key size. Circle one: 64-bit or 128-bit. –Data encryption (WEP) keys. There are two methods for creating WEP data encryption keys. Whichever method you use, record the key values in the spaces below.•Passphrase method: ______________________________ This is case-sensitive. Not all wireless devices support the passphrase method.•Manual method. These values are not case-sensitive. For 64-bit WEP, enter 10 hex digits (any combination of 0–9 or a–f). For 128-bit WEP, enter 26 hex digits.Key 1: _____________________________ Key 2: _____________________________ Key 3: _____________________________ Key 4: _____________________________](https://usermanual.wiki/Netgear-orporated/09400125/User-Guide-1268351-Page-14.png)
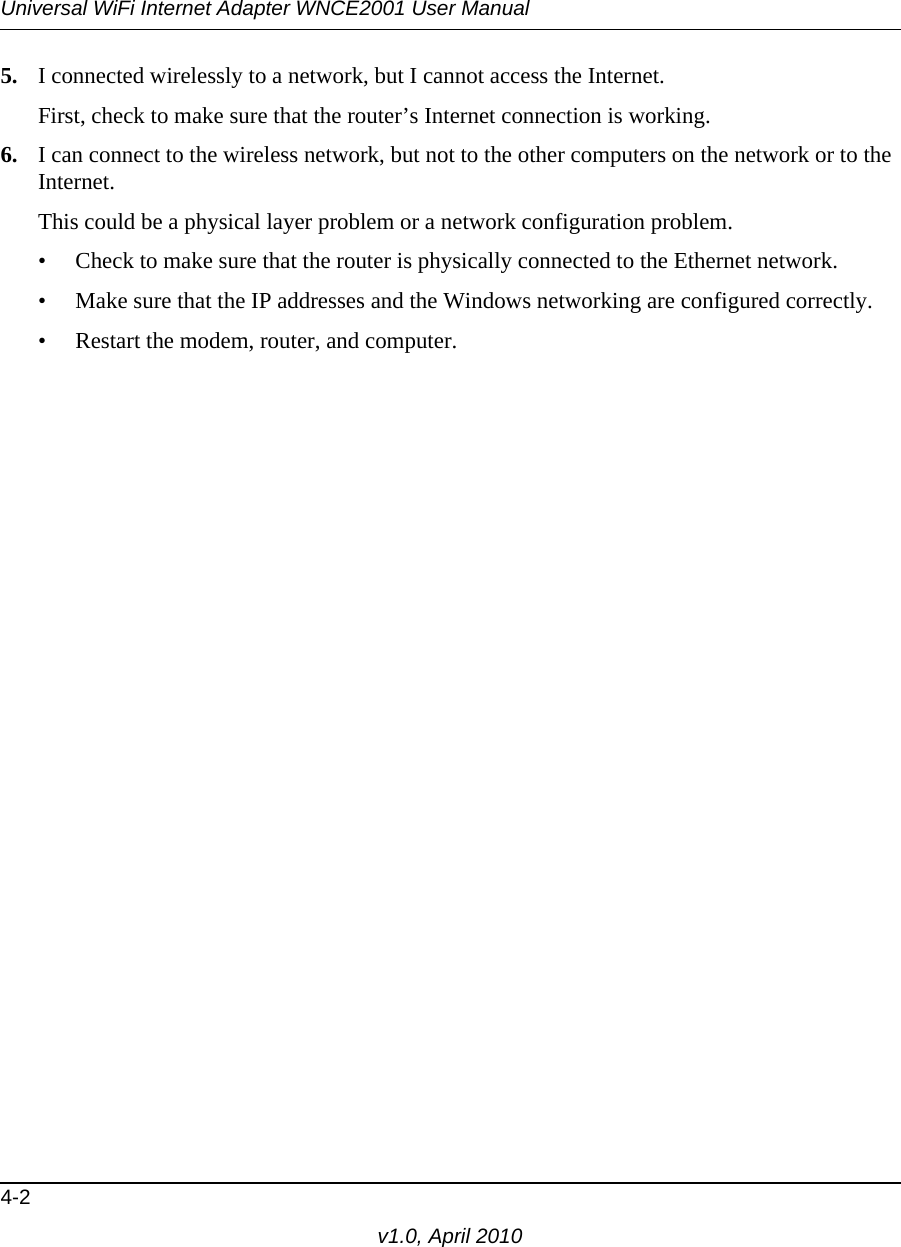
![Universal WiFi Internet Adapter WNCE2001 User Manual2-3v1.0, April 2010Setting Up WPA-PSK [TKIP] or WPA2-PSK [AES] SecurityTo configure WPA-PSK (TKIP) or WPA2-PSK (AES) security:1. Run the WNCE2001 Smart Wizard.a. Make sure that the WiFi Internet adapter is fully inserted in a USB port in your computer.b. Use the icon to open the Smart Wizard. The Settings tab displays.2. Configure the security settings. a. In the Profile field, select the profile, or type in a profile name.b. In the Network Name (SSID) field, select the network, or enter the SSID.c. In the Security section, select WPA-PSK [TKIP] or WPA2-PSK [AES], and enter the passphrase.For more about WPA2-PSK, click the link to “Wireless Networking Basics” in Appendix B.3. Save your settings in a profile. a. Click the Save Profile button. All the configuration settings are saved in this profile. b. Click Apply, and then click Close to exit the Smart Wizard.Note: You will not get a wireless network connection unless the network SSID matches exactly what is configured in the access point.Figure 2-1](https://usermanual.wiki/Netgear-orporated/09400125/User-Guide-1268351-Page-15.png)