Netgear orporated 11300177 N300 Wireless Gigabit router with USB User Manual User Man PY311300177
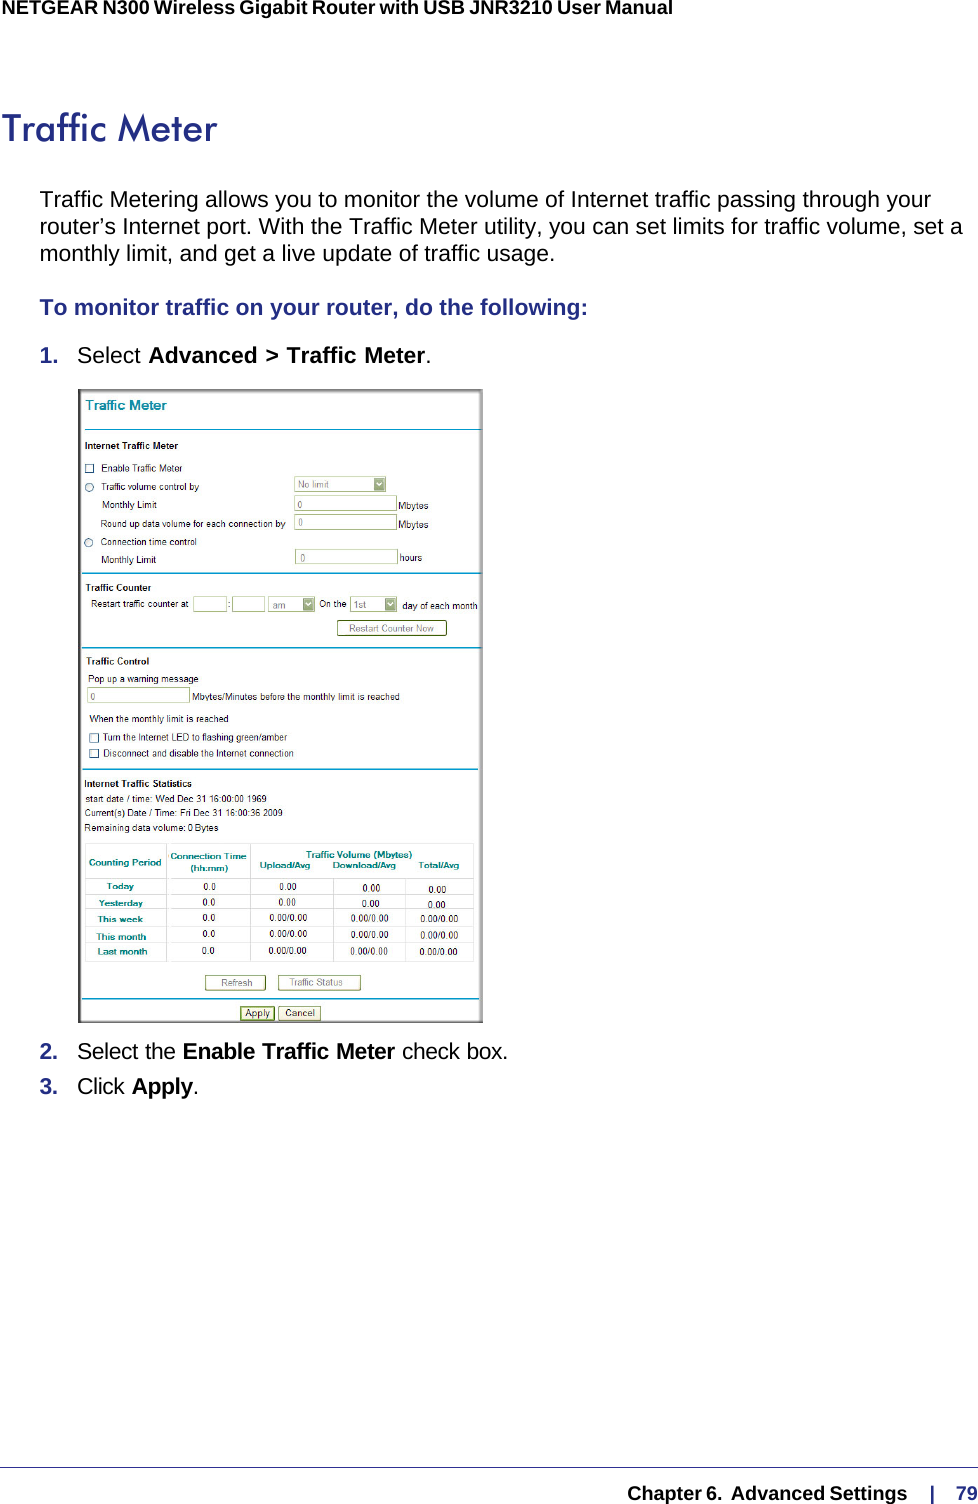
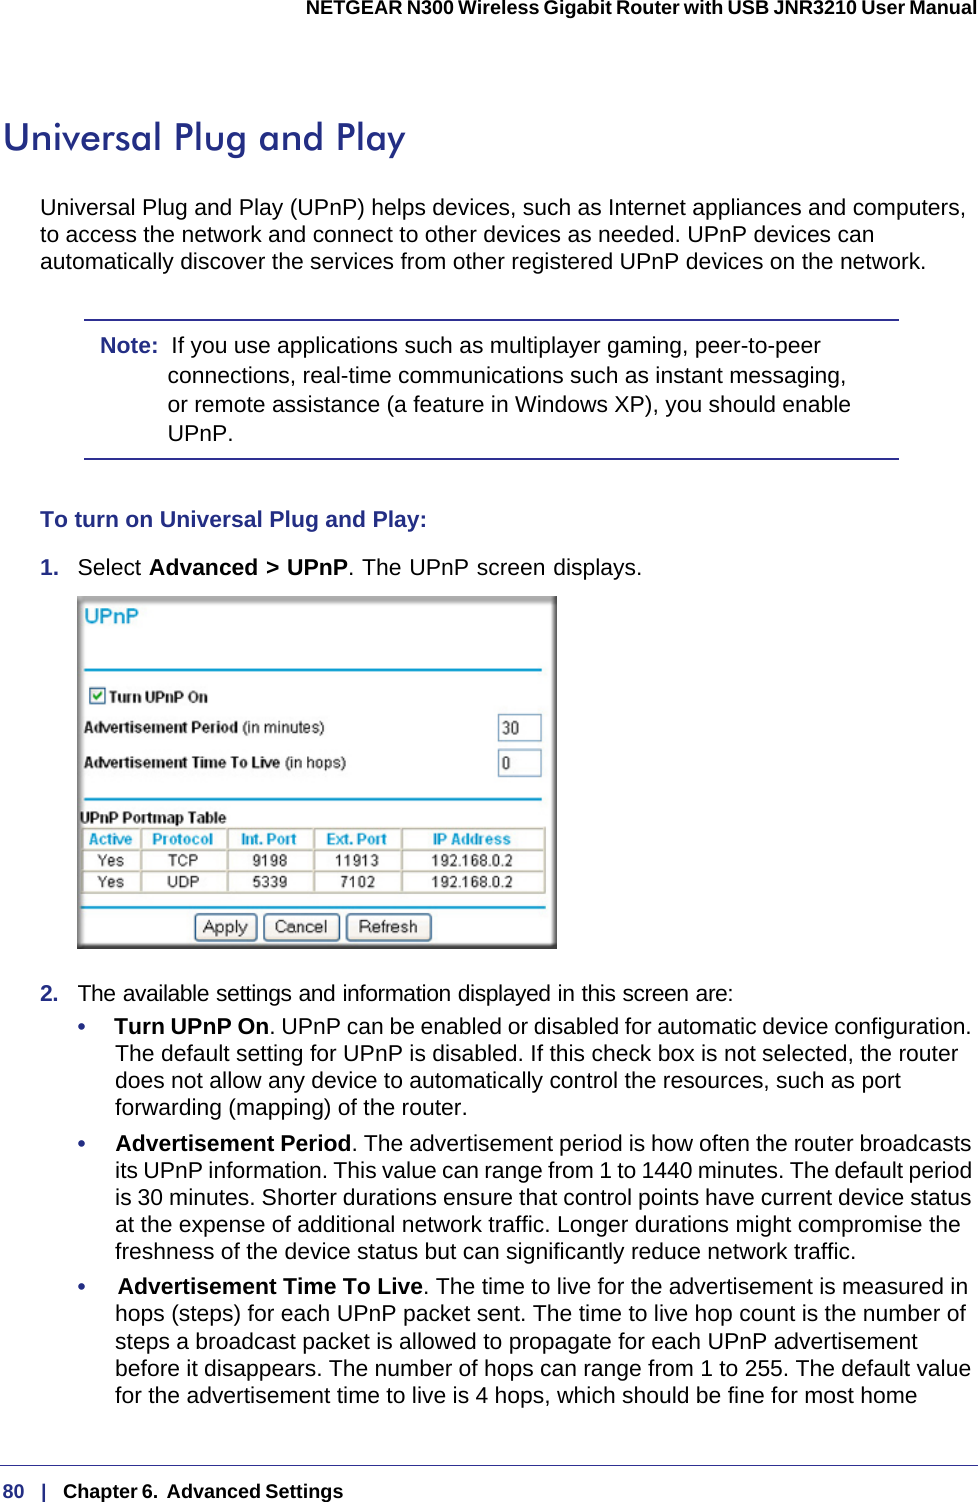
Netgear Incorporated N300 Wireless Gigabit router with USB User Man PY311300177
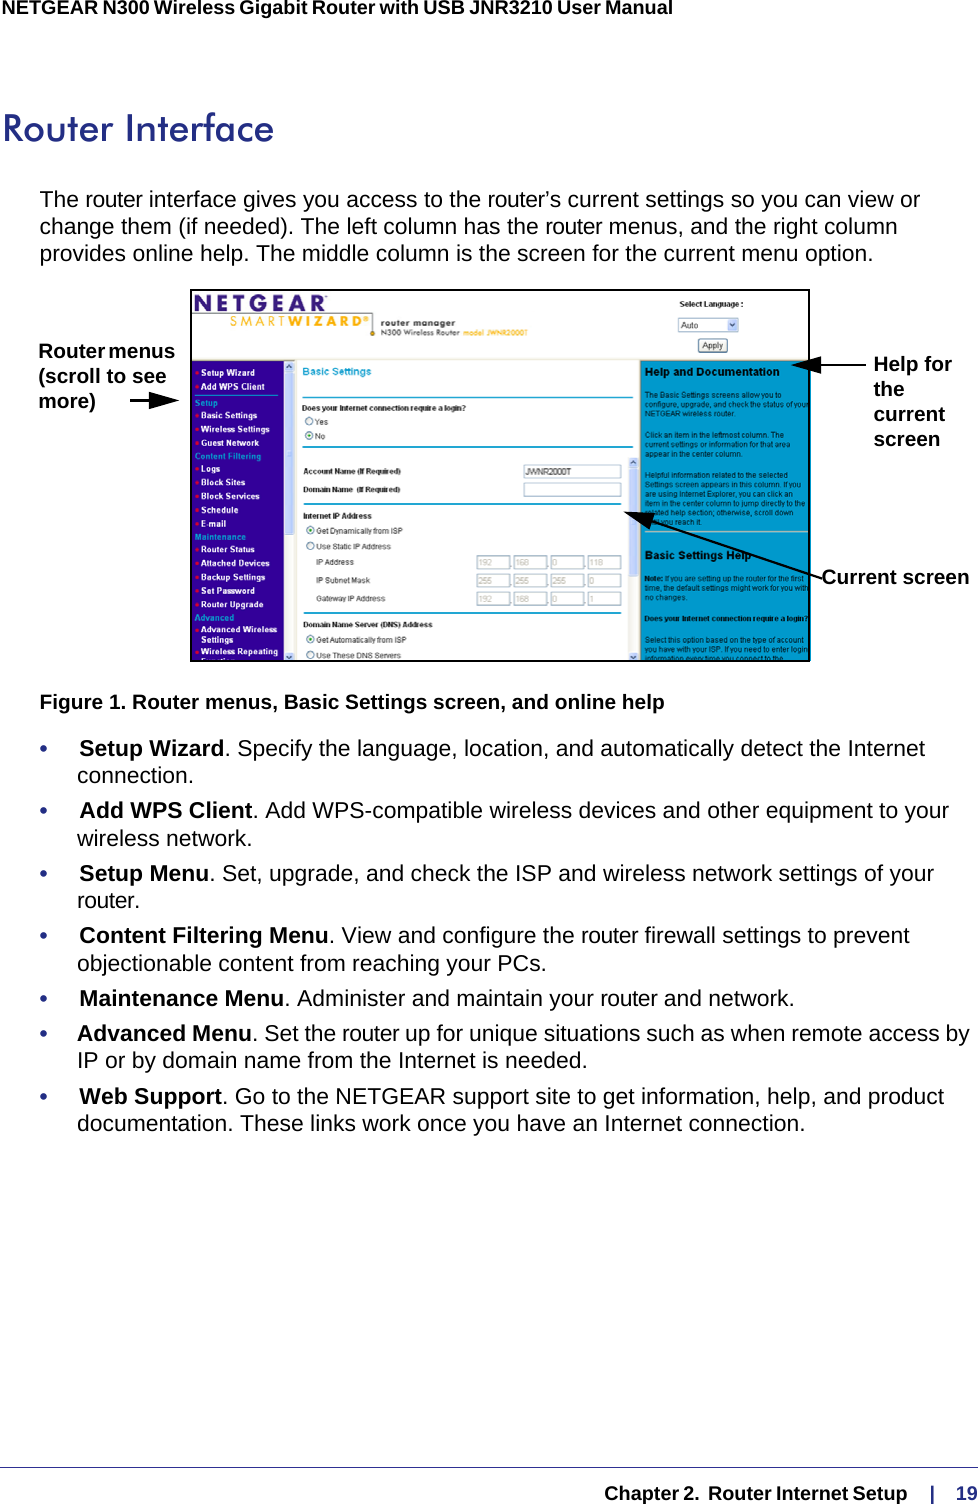
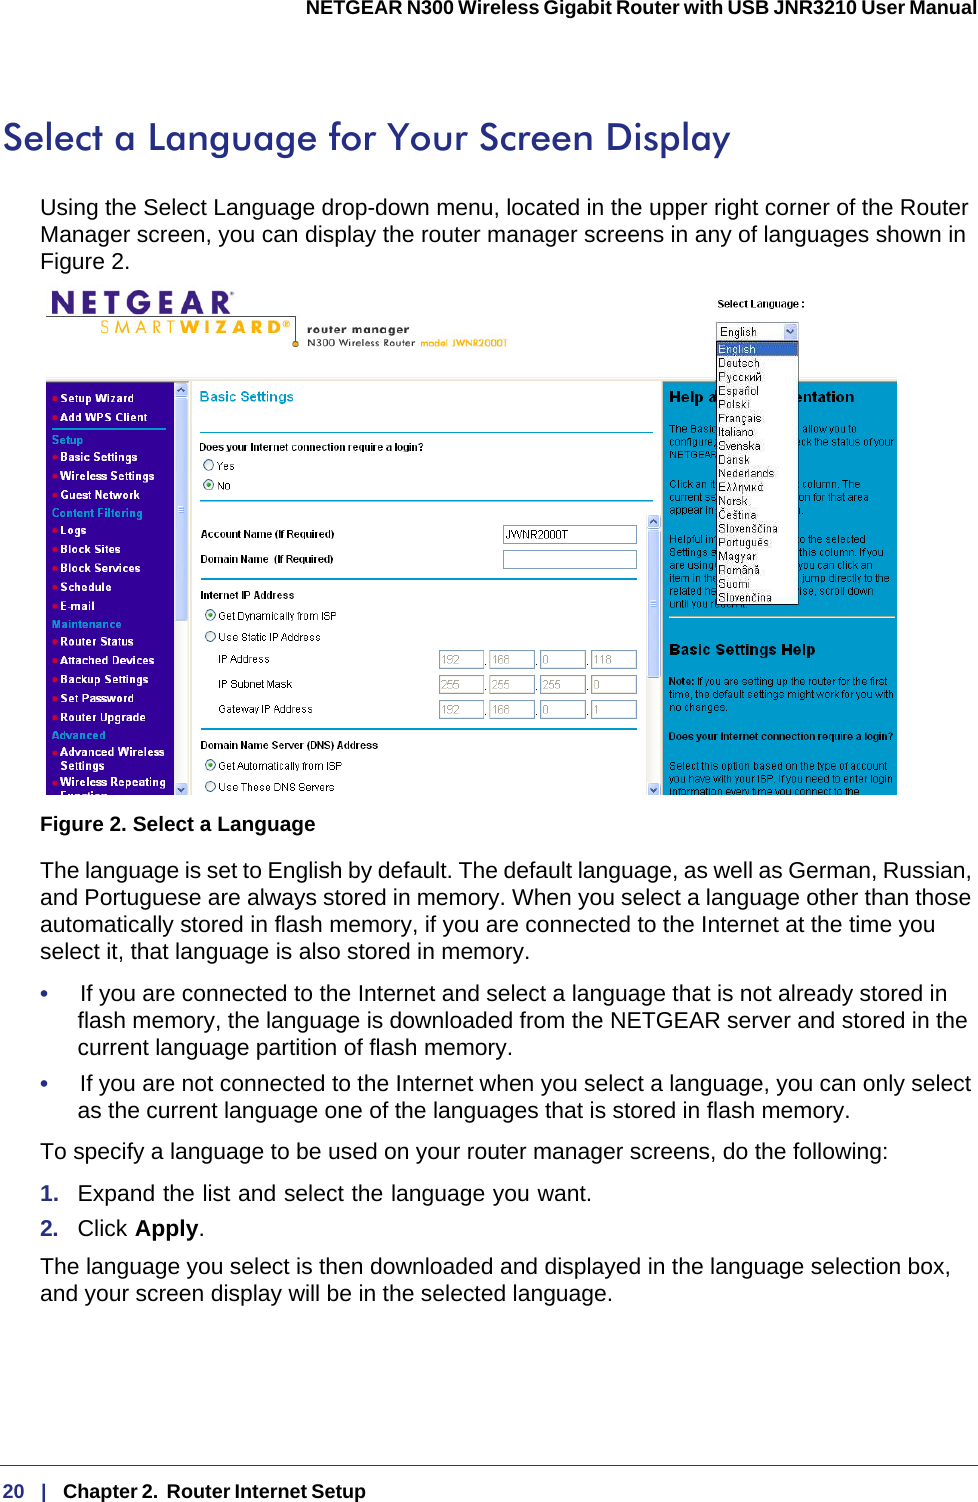
UserManual.wiki
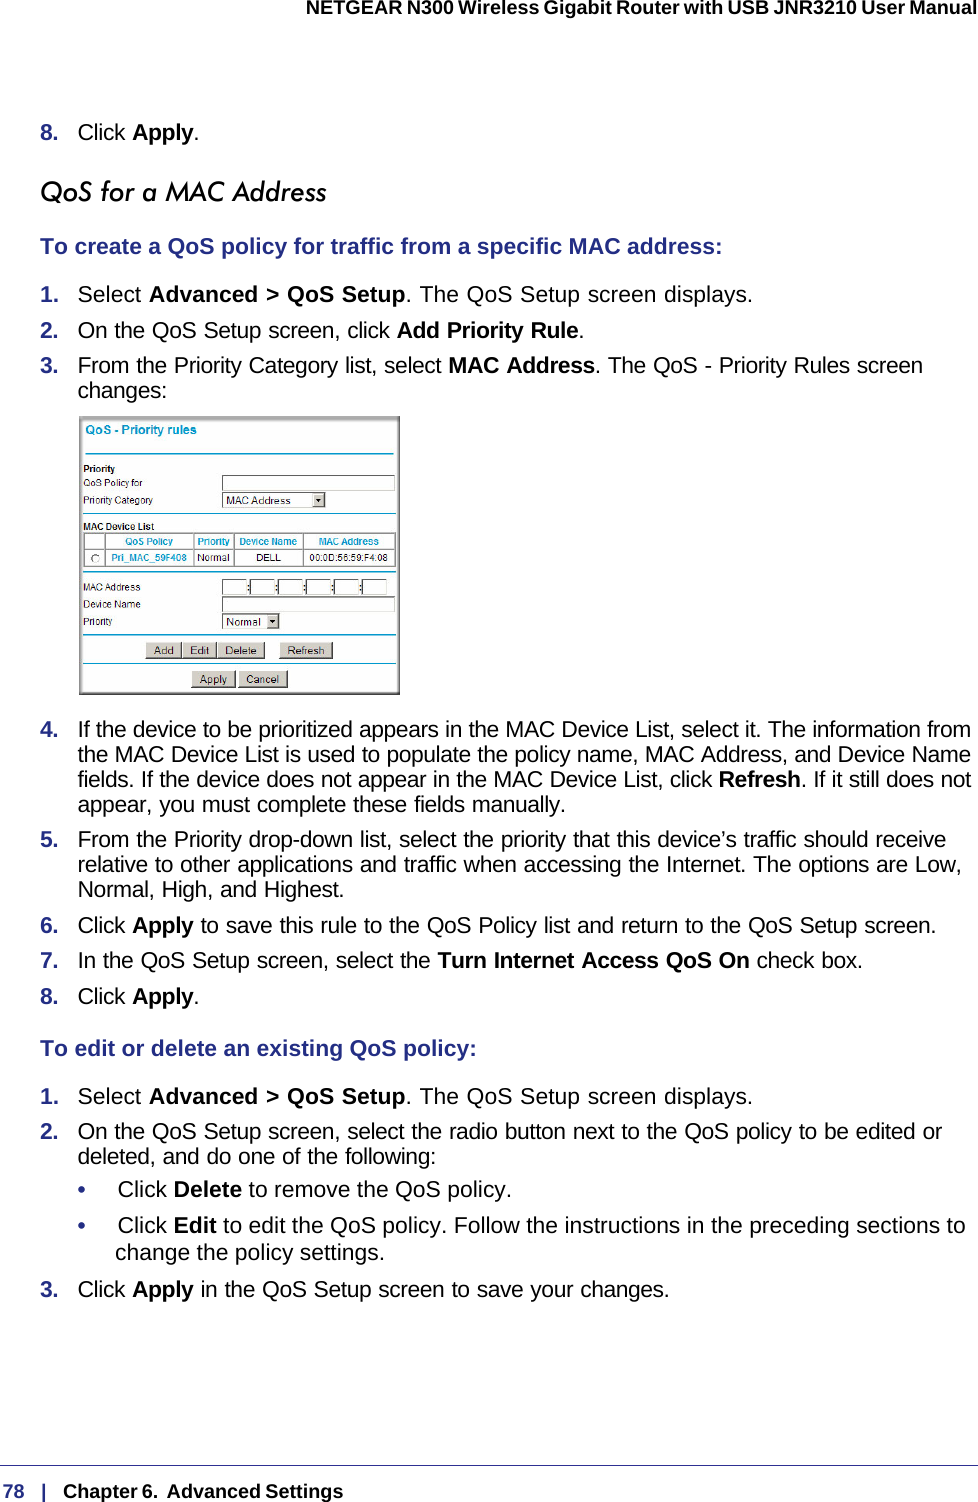
>
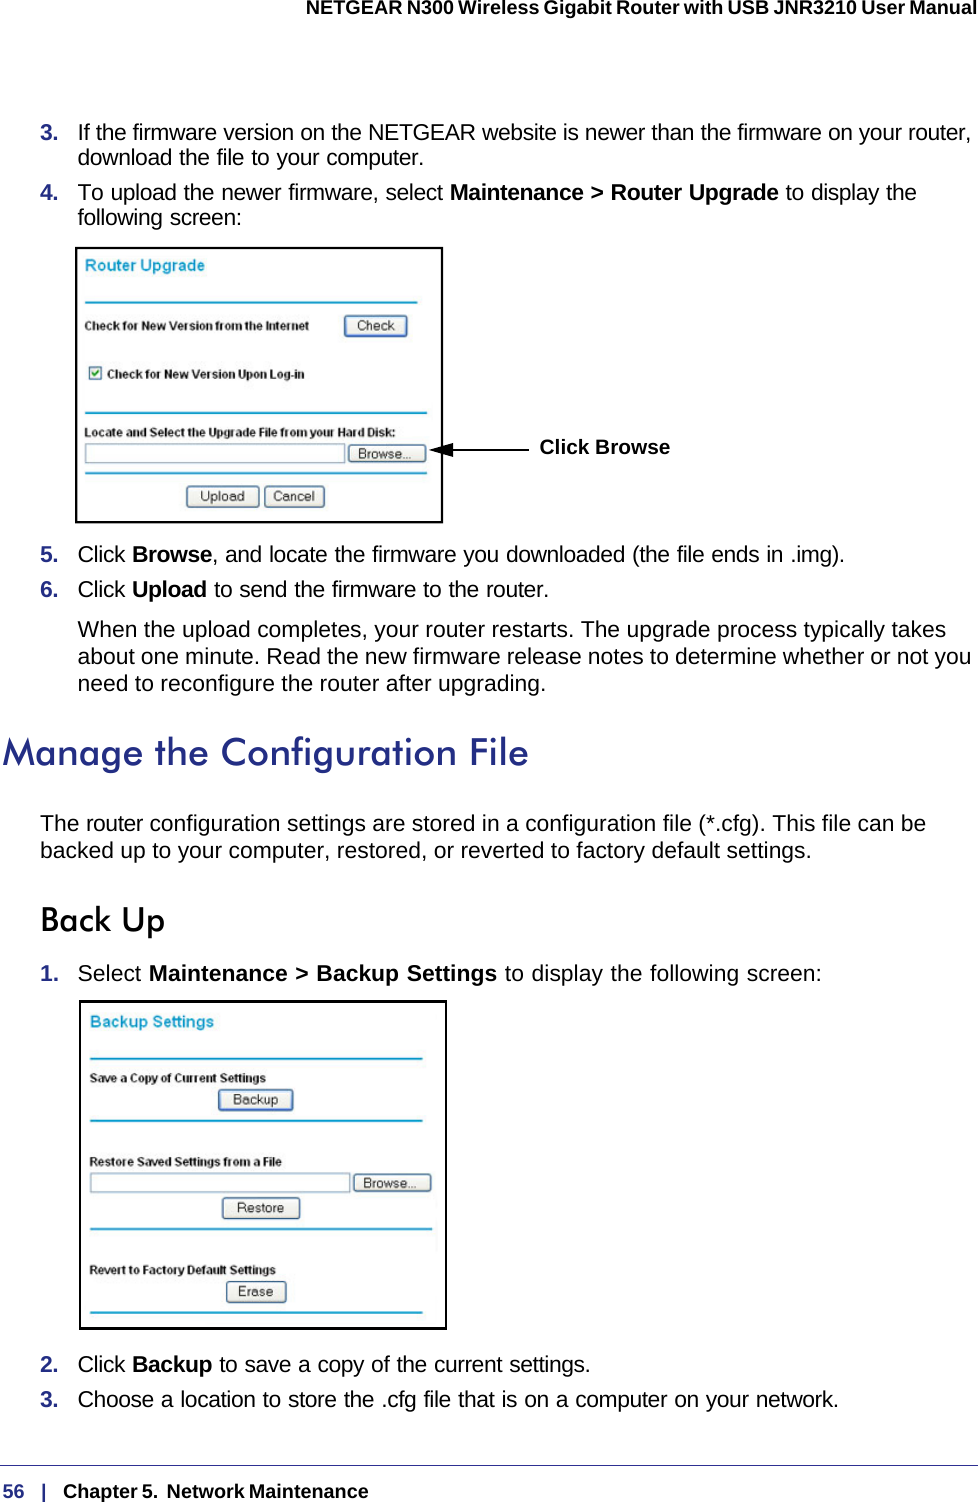
Netgear orporated
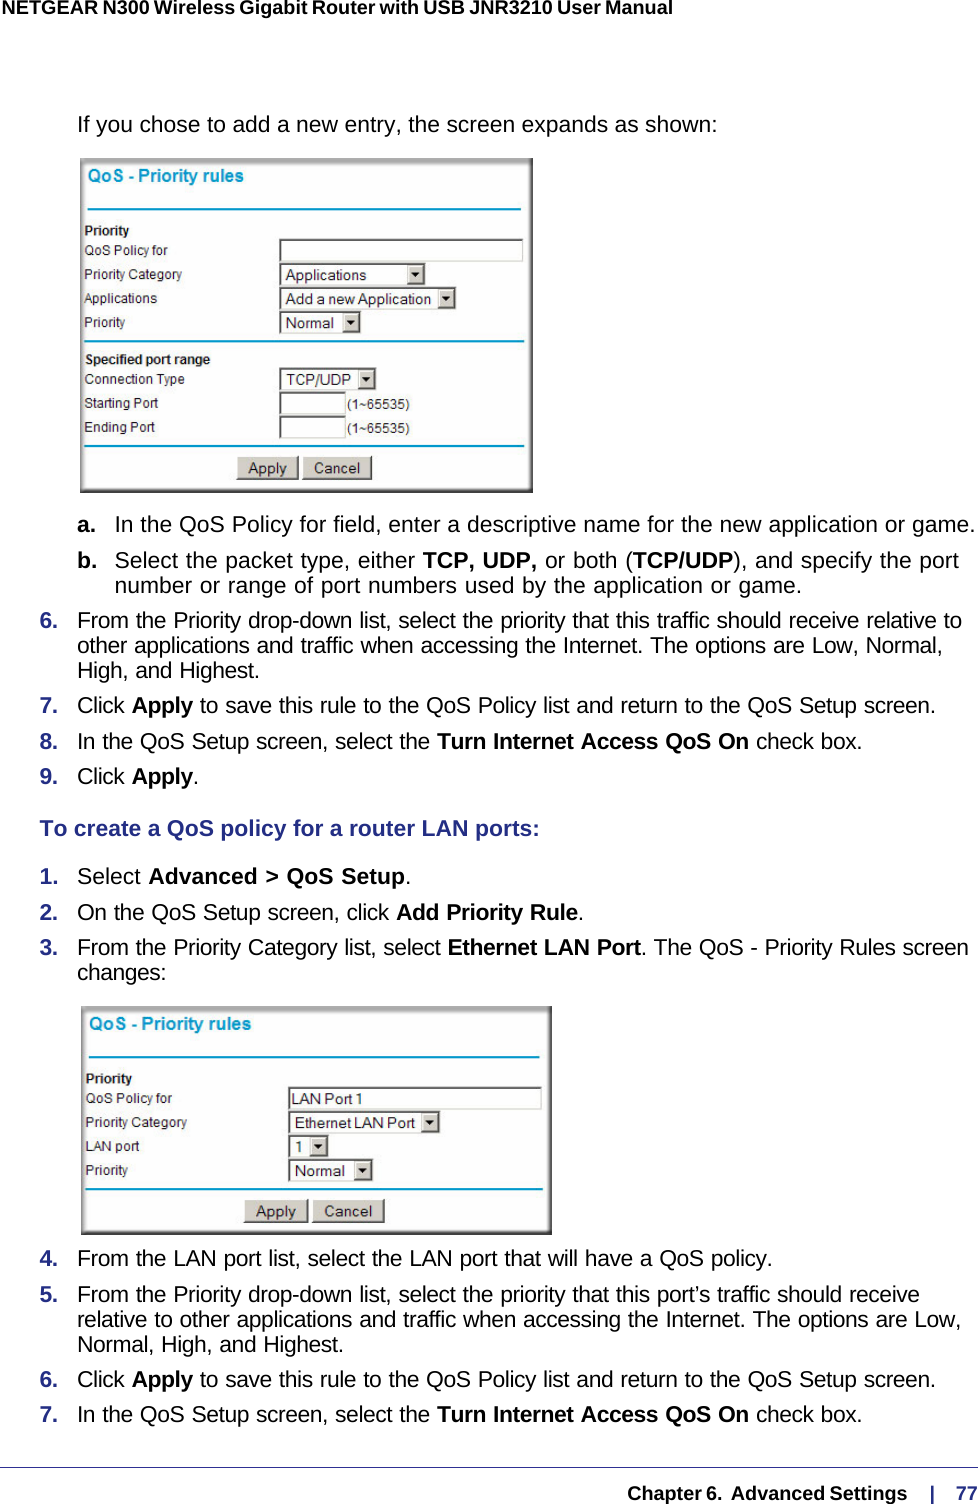
>
11300177 User Manual
User Man_PY311300177
Navigation menu
Upload a User Manual
Namespaces
Wiki Guide
HTML
PDF
Info
Views
User Manual
Discussion / Help
Navigation
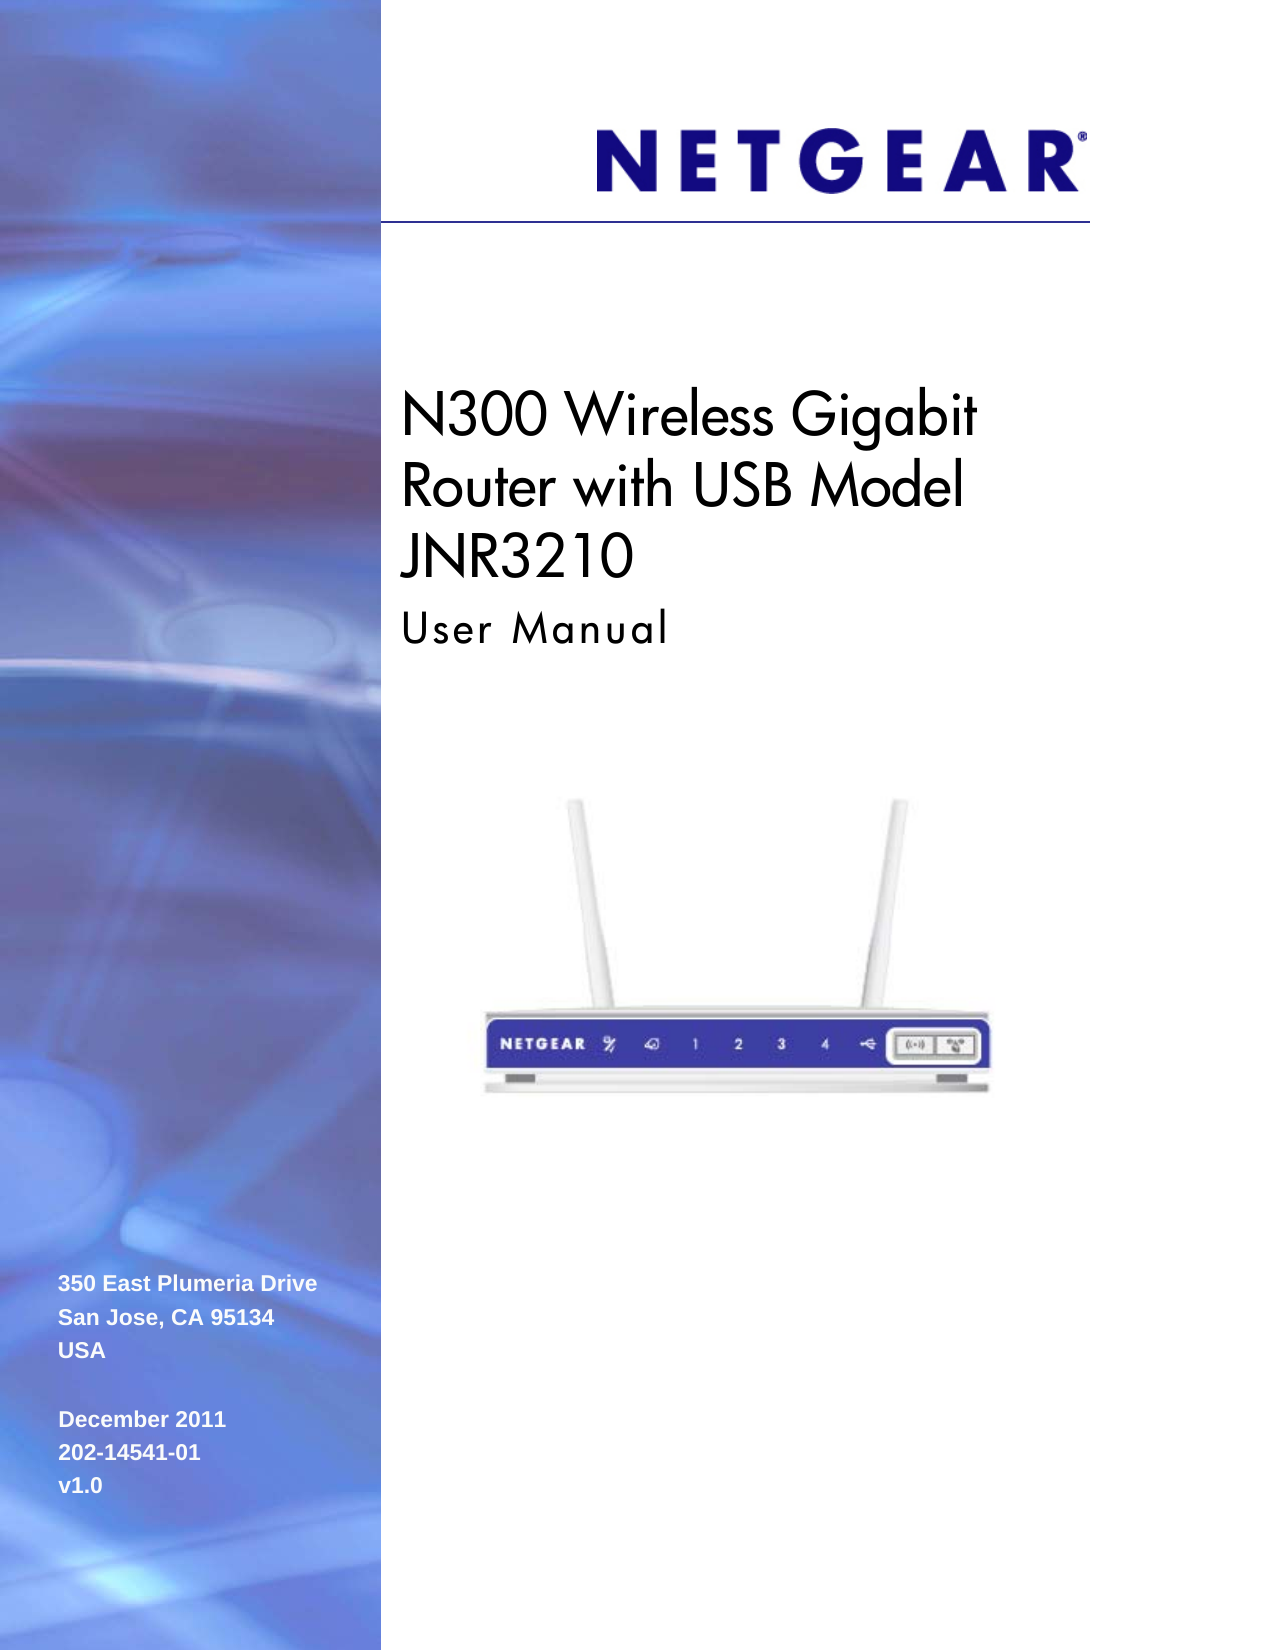

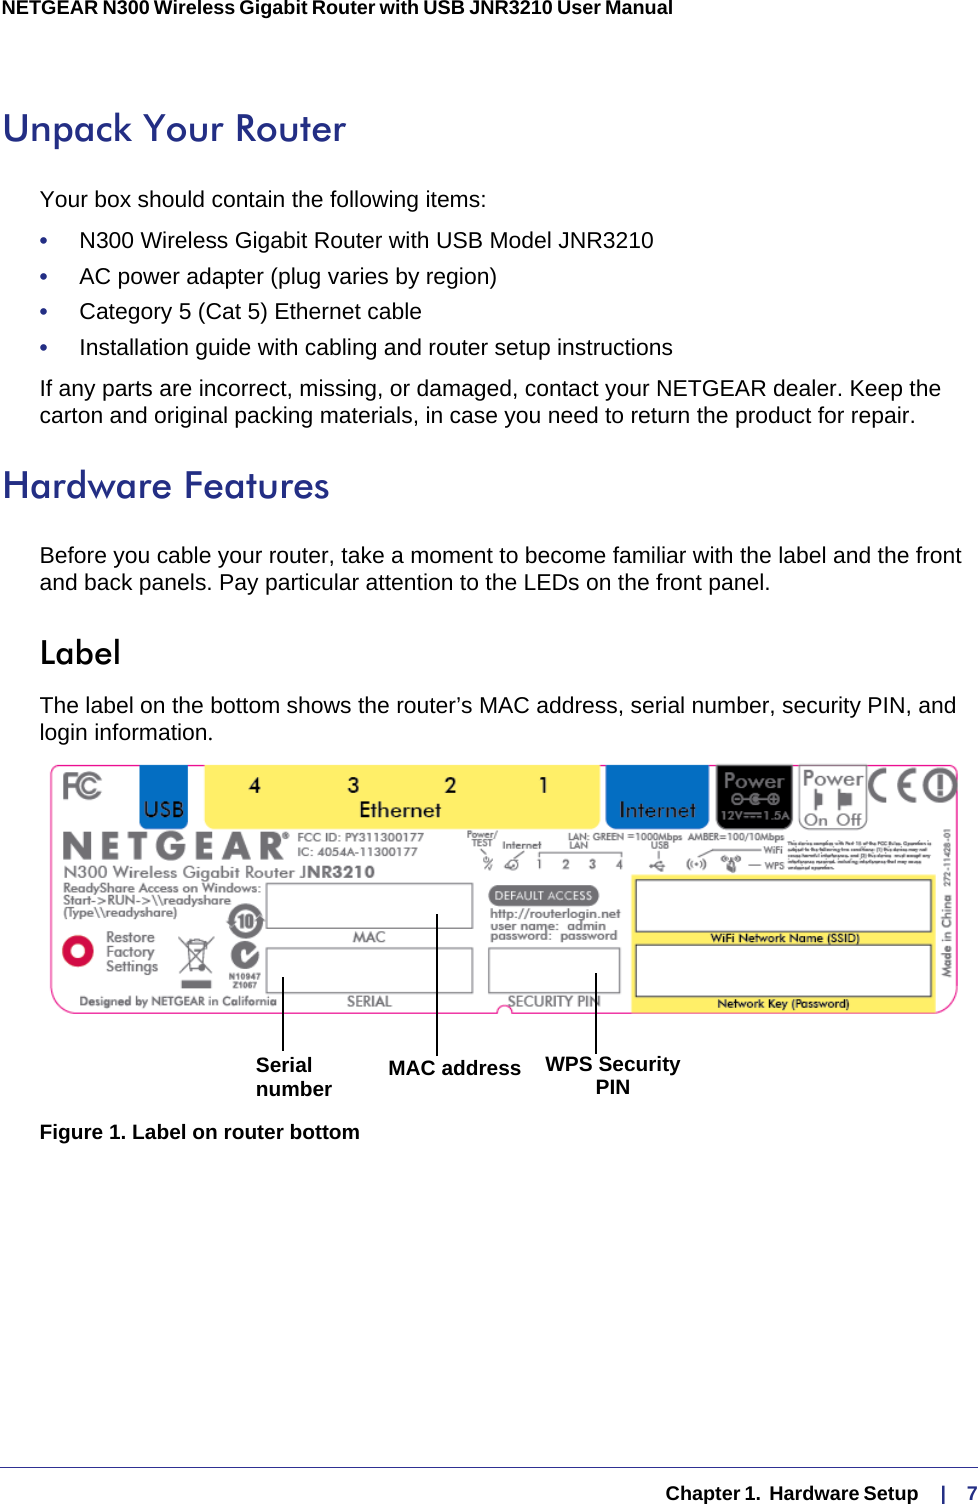
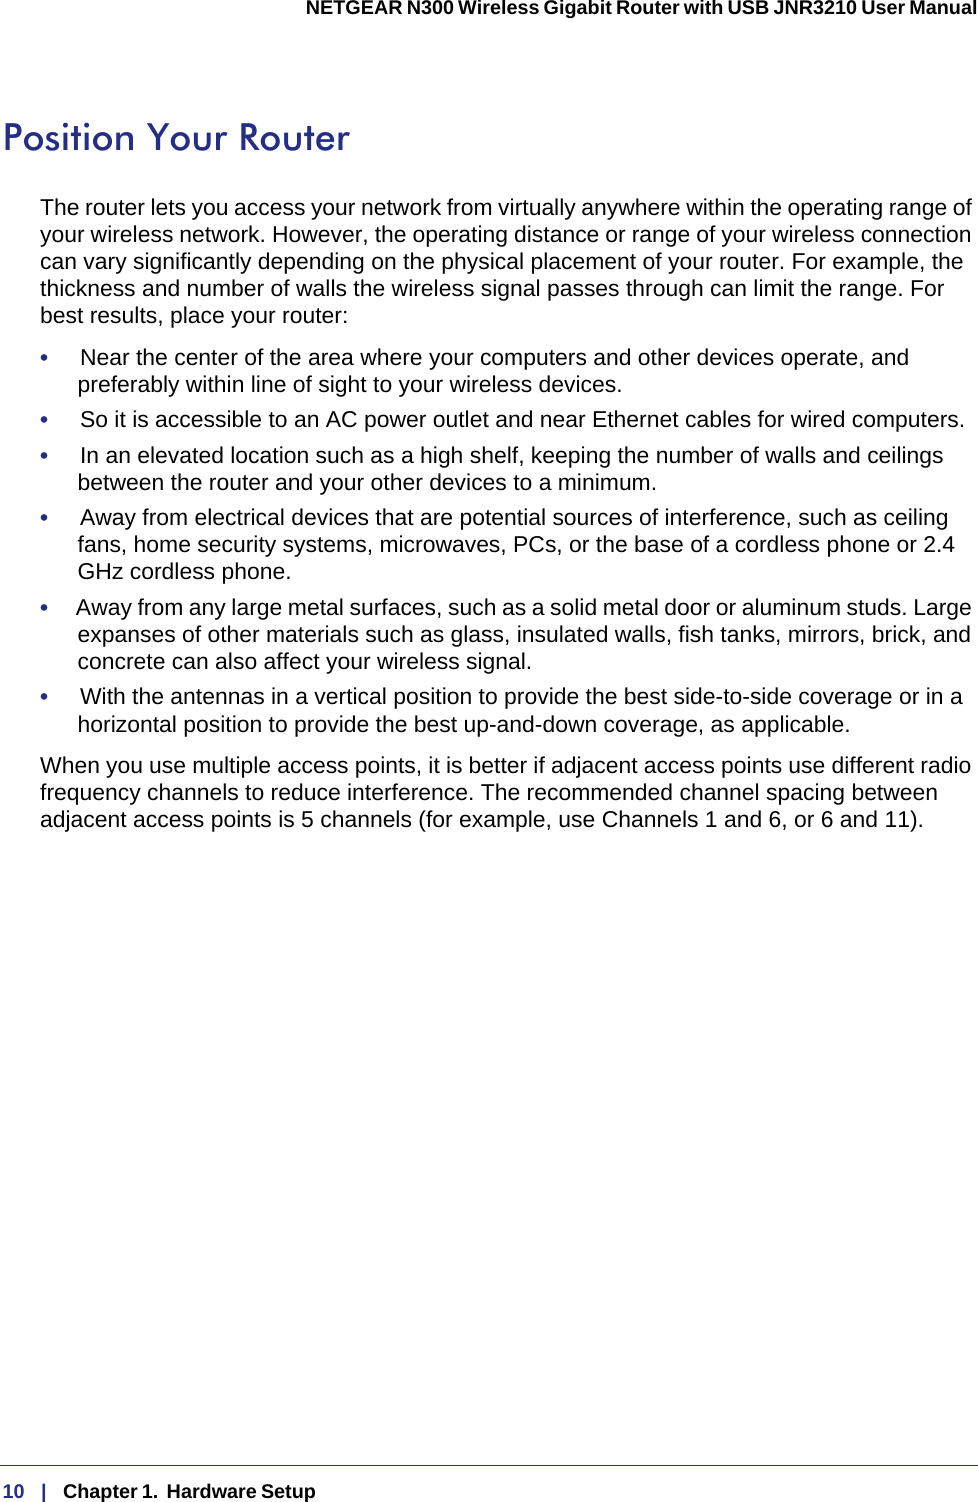

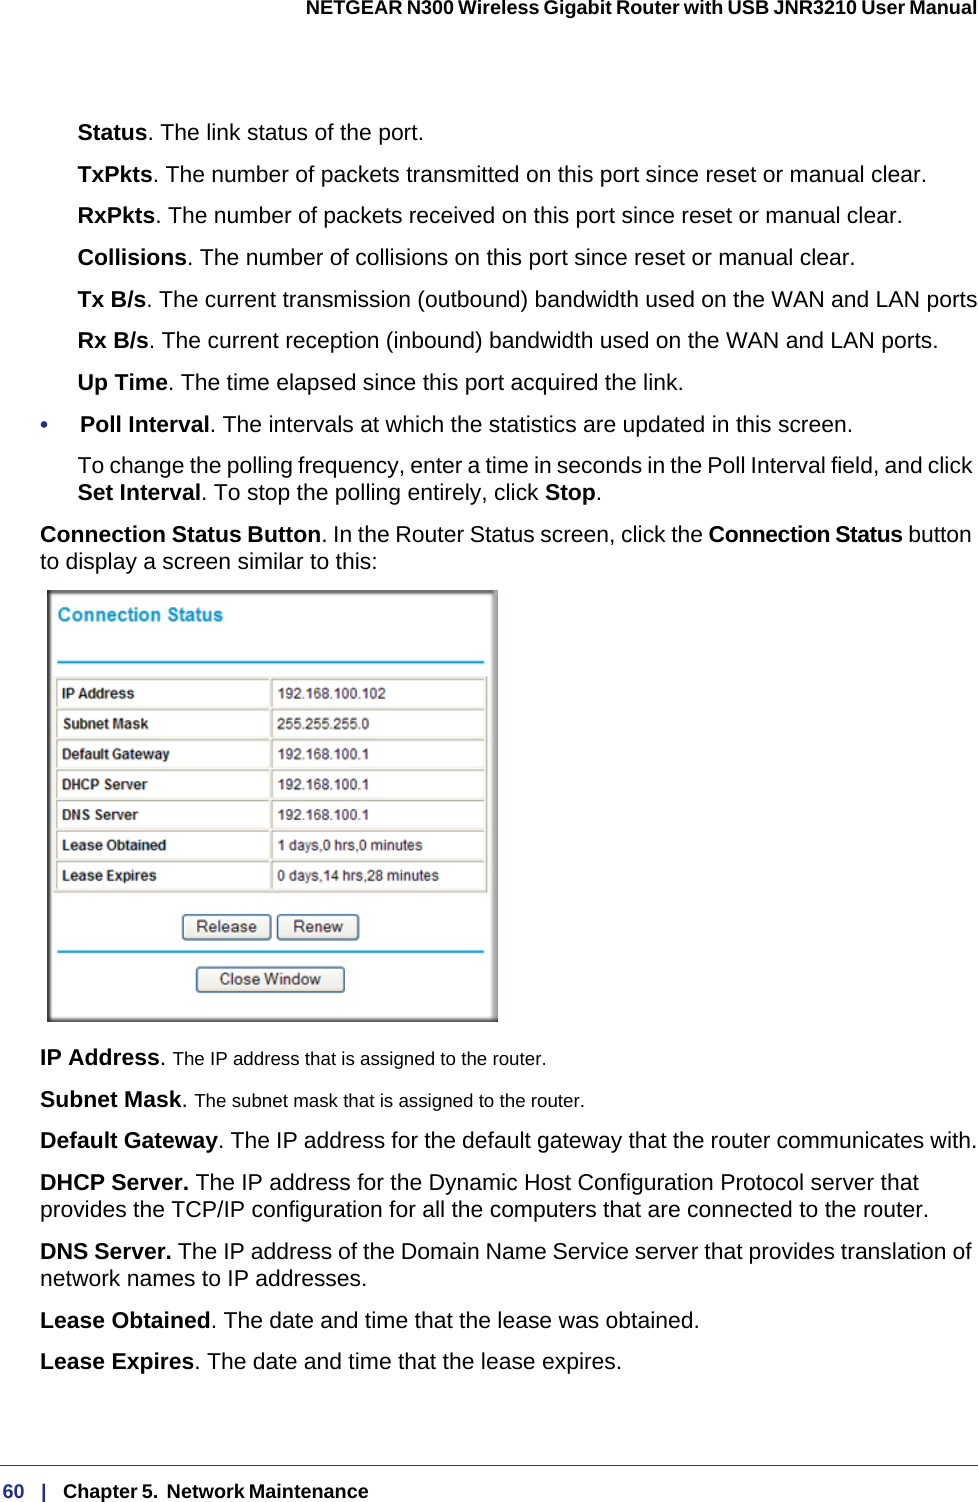
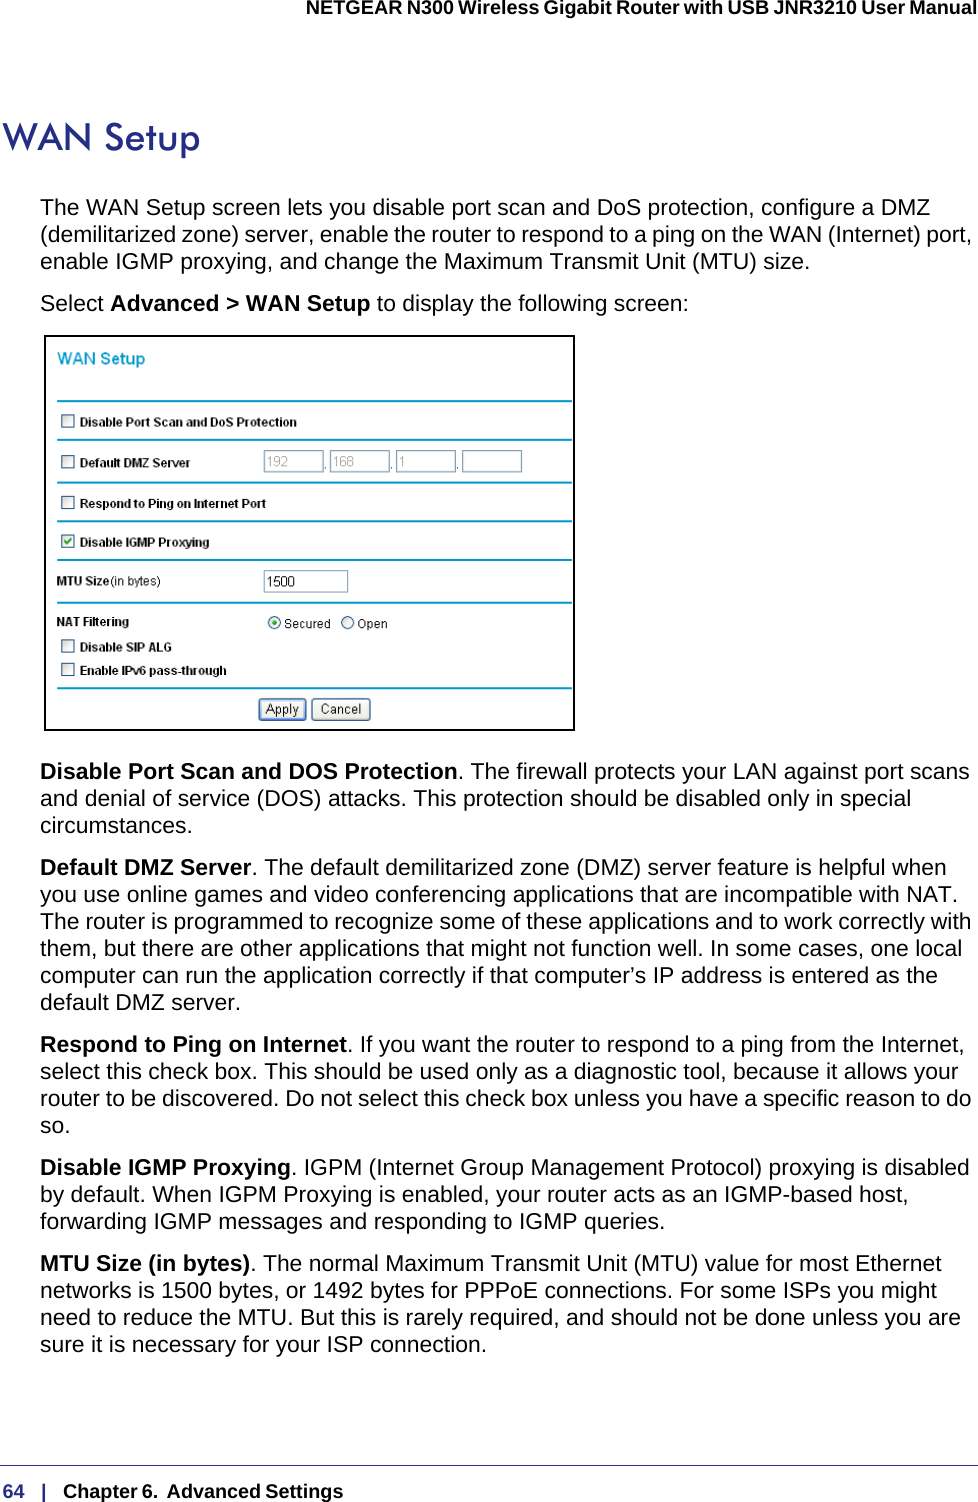
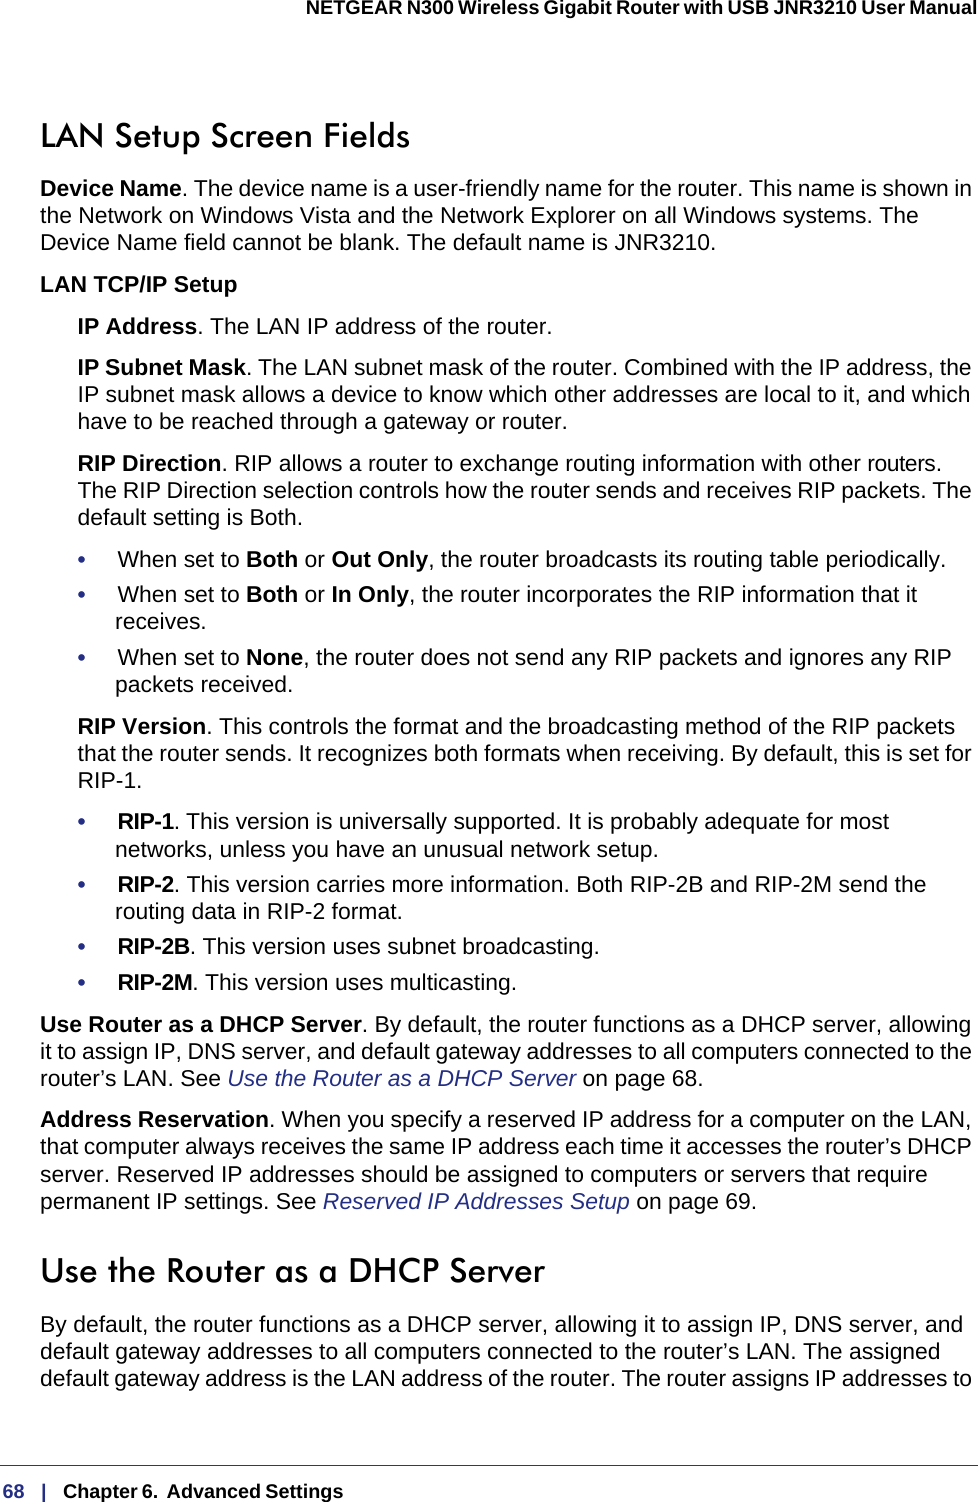
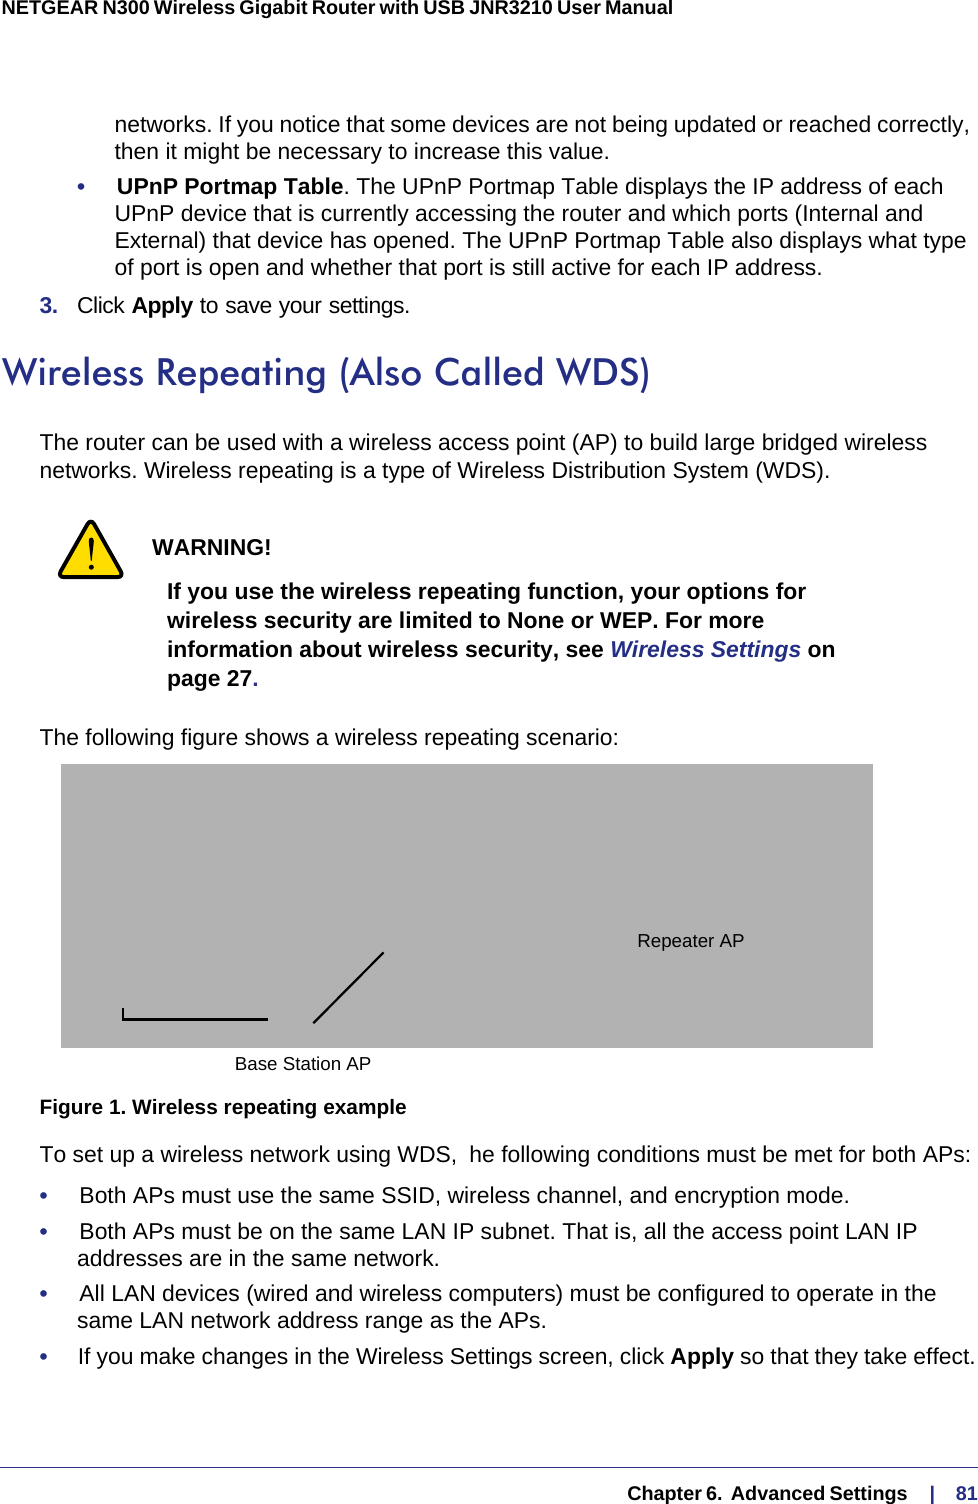
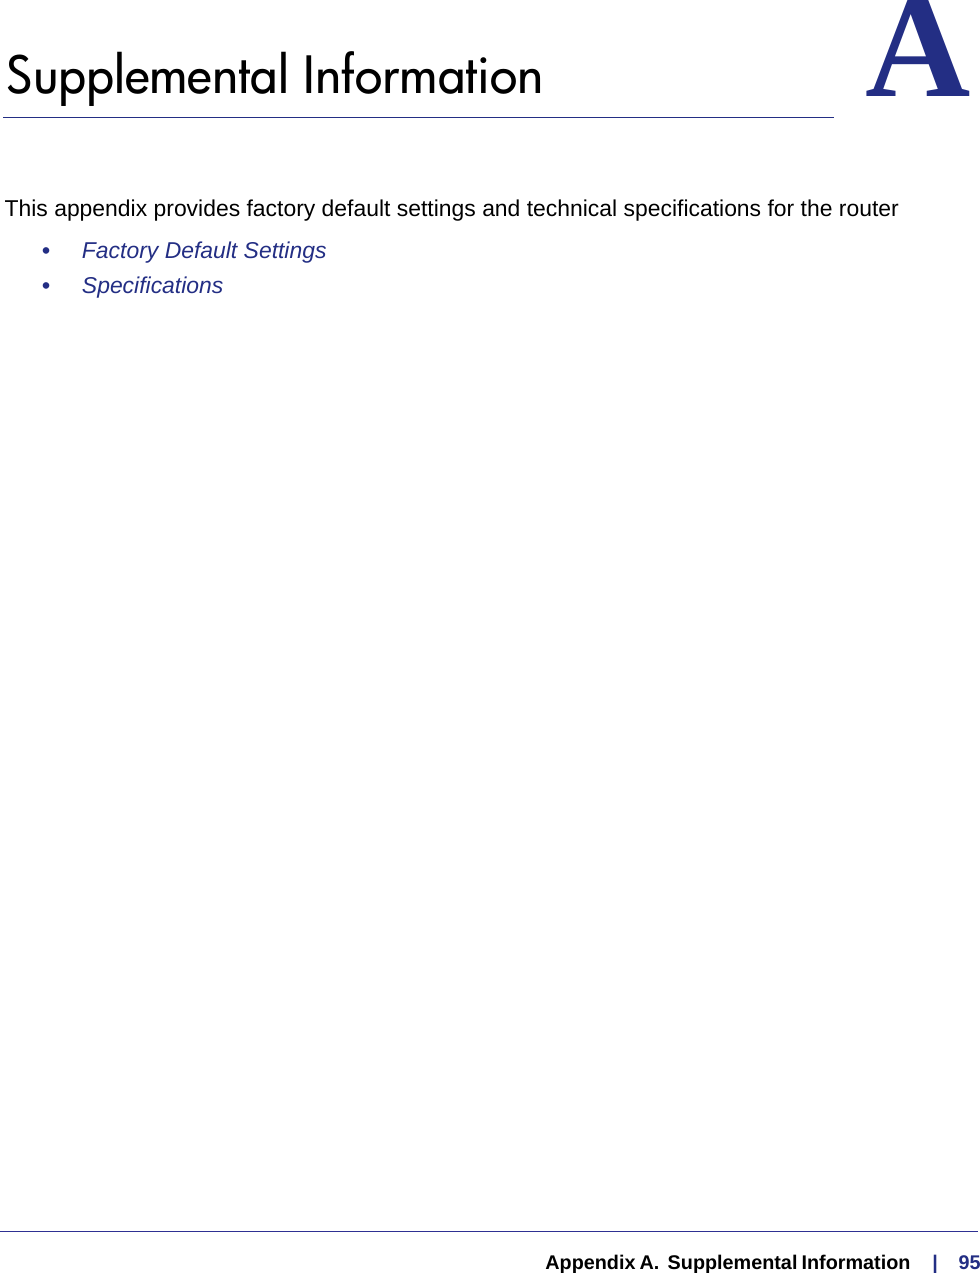
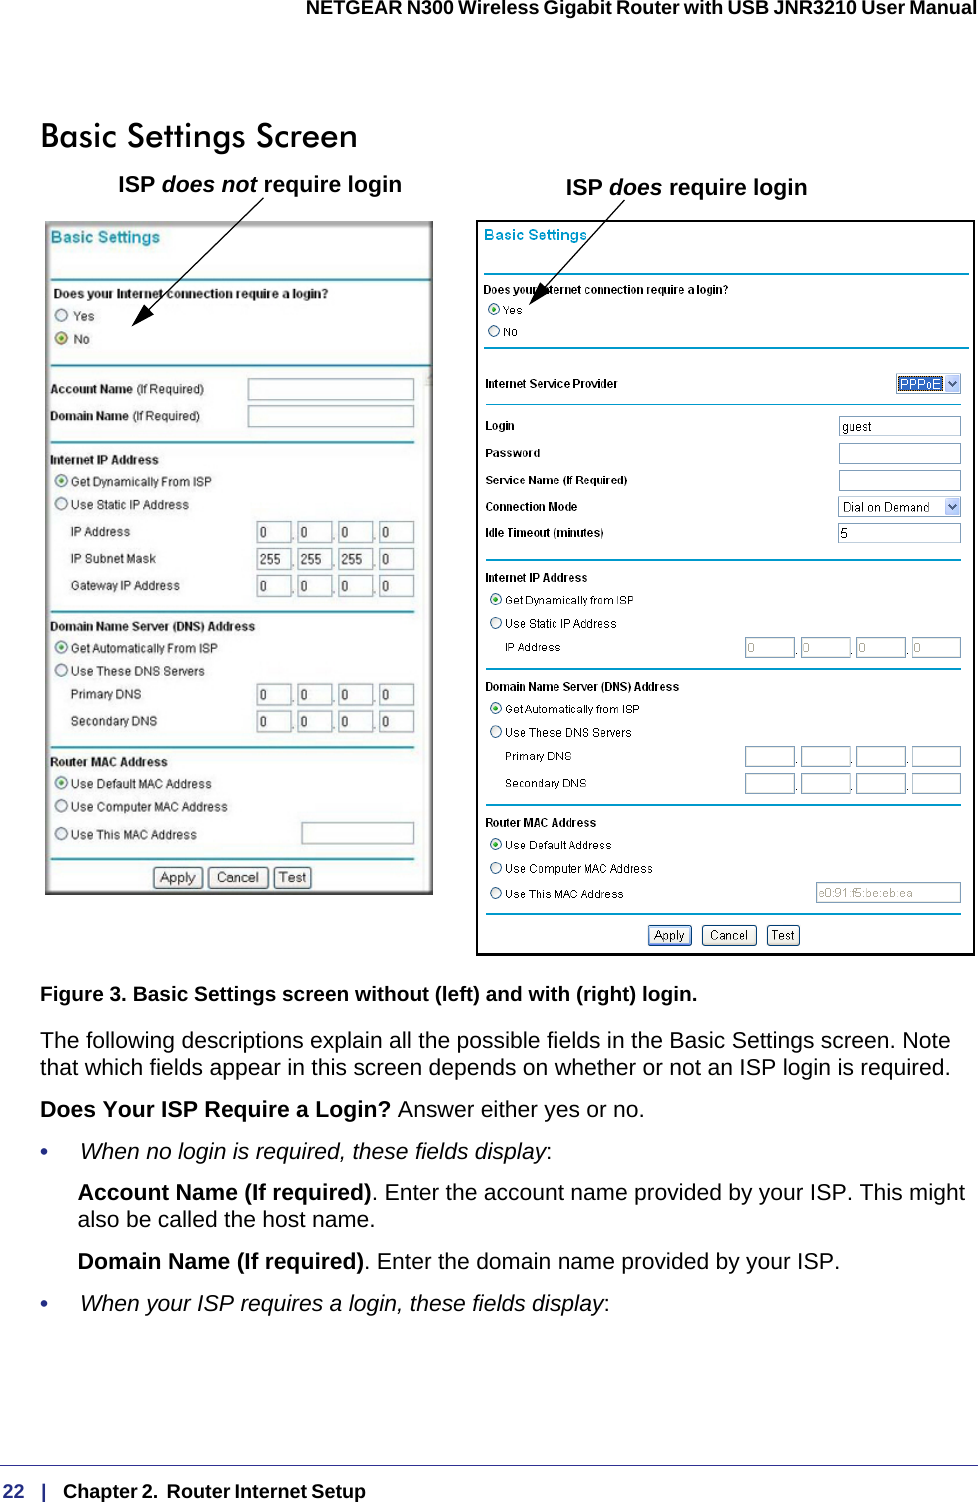
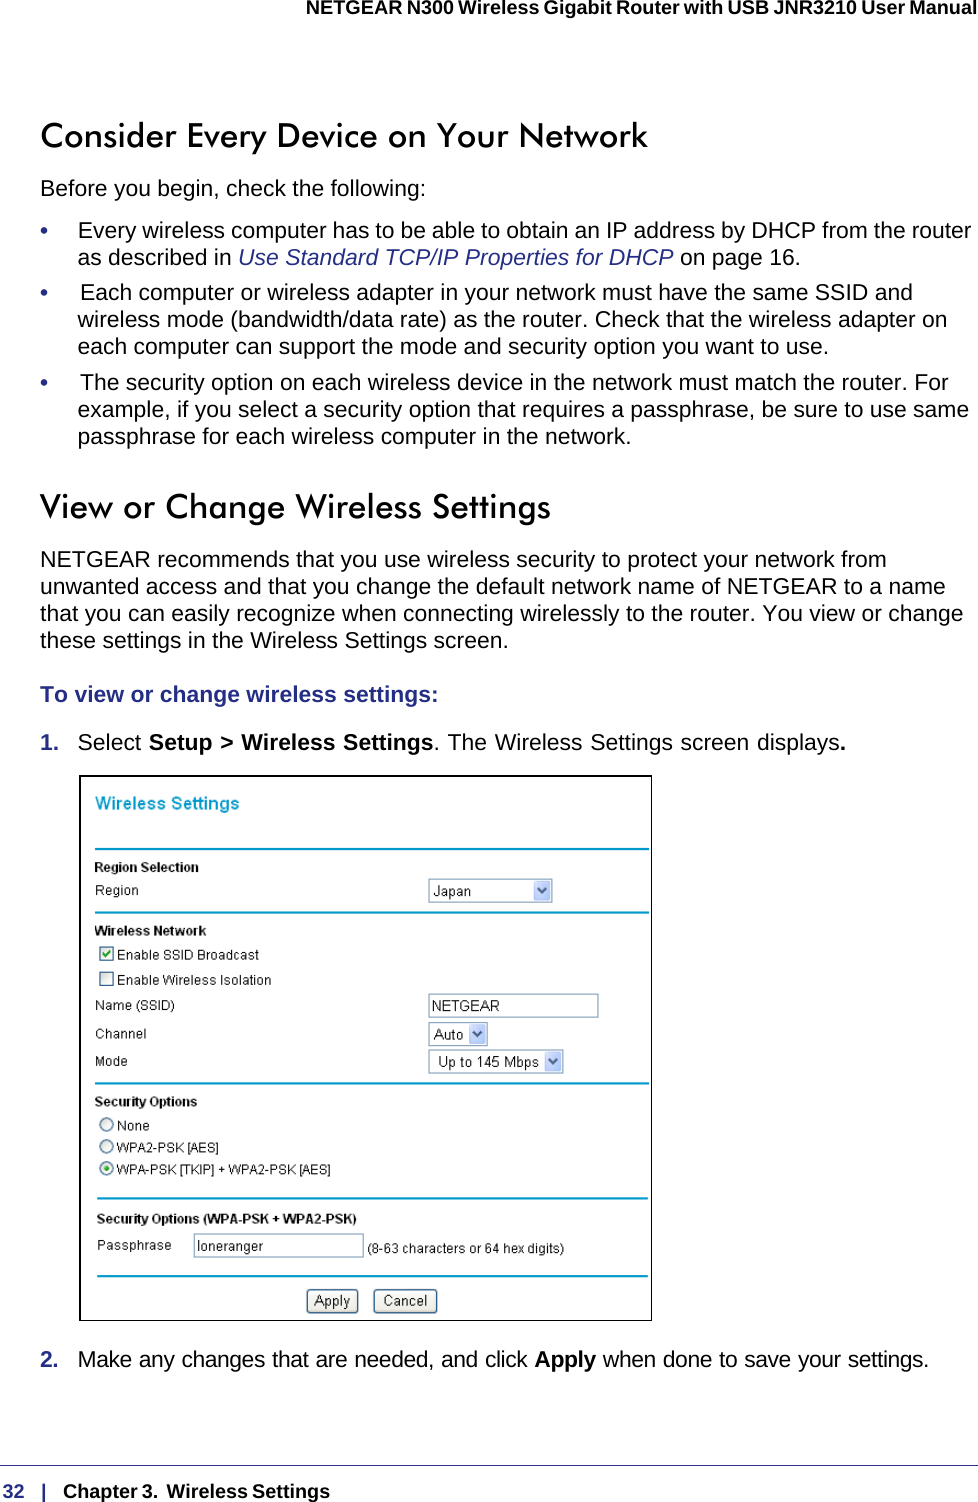
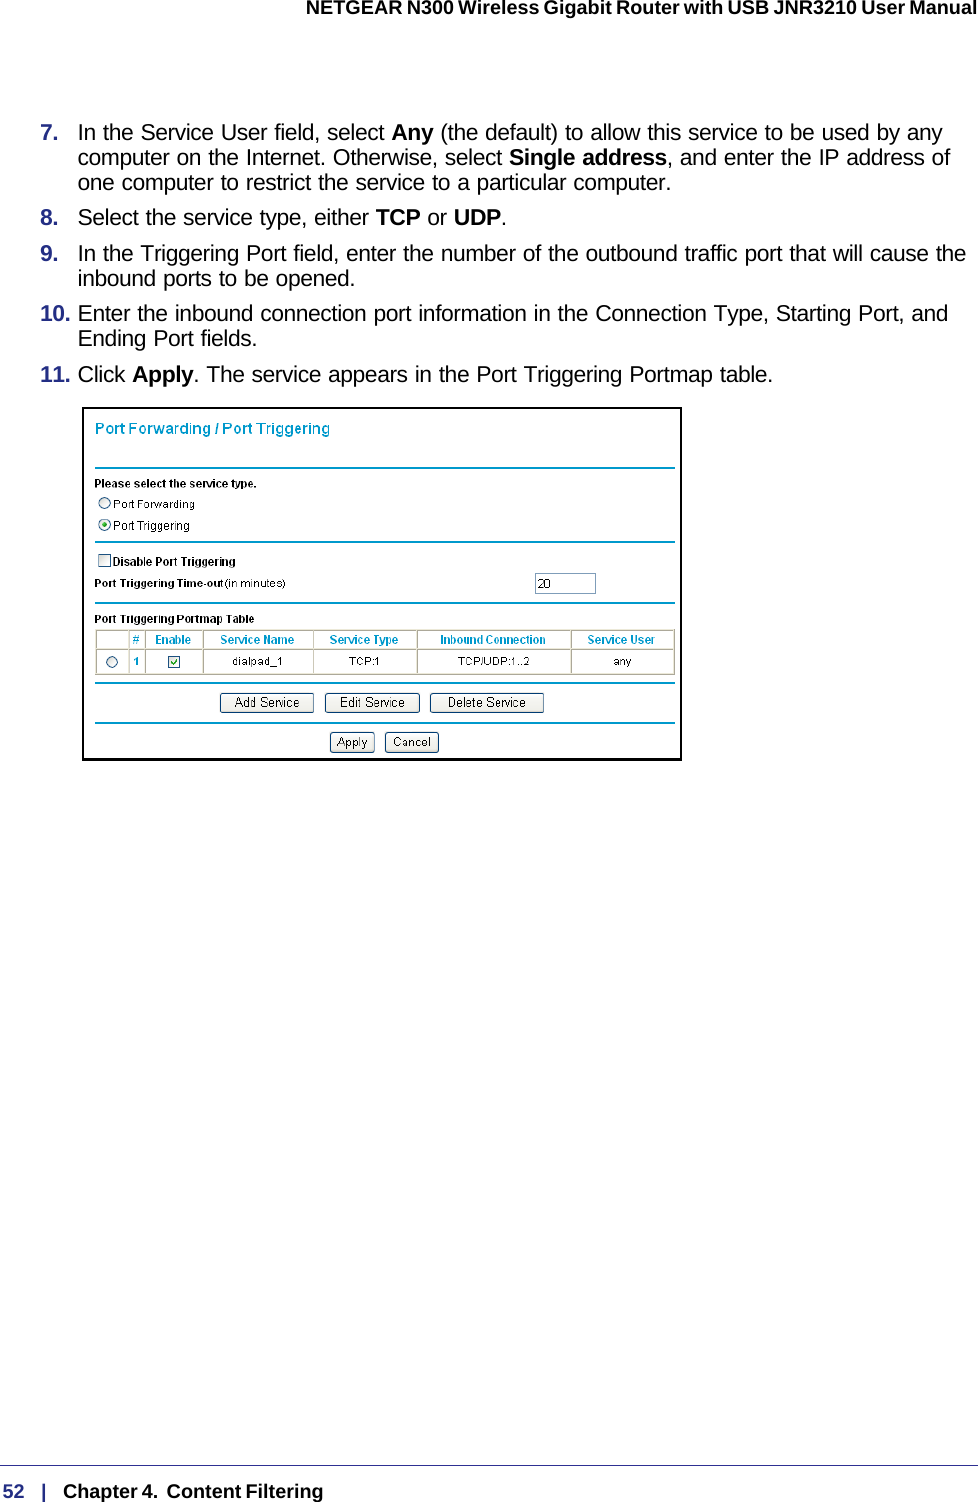
![Chapter 1. Hardware Setup | 13NETGEAR N300 Wireless Gigabit Router with USB JNR3210 User Manual 2. Plug the power adapter into the AC power adapter input (labeled Power), and plug the other end into a power outlet. Press the On/Off button to turn on the router. Wait 2 minutes.Power adapterFigure 7. Connect the power adapter cord and turn on the routerIt takes several minutes for your router to establish a connection with your computer and your Internet provider. Note: For DSL customers, if software logs you in to the Internet, do not run that software. You might need to go to the Internet Explorer Tools menu, Internet Options, Connections tab and select “Never dial a connection.”3. To set up your Internet connection:a. In your browser address field, type http://www.routerlogin.net and click Enter.b. When the Welcome screen opens, click Next. It will detect your type of Internet connection. Follow the prompts to complete your router Internet connection.4. To set up wireless security:a. First, assign a name to your wireless network. Choose a name (SSID) that is easy to remember. You might want to write it down in the area provided on the middle panel. (The default name is NETGEAR.) Click Next.b. Select the Yes option to add security, then select your security method. NETGEAR recommends WPA-PSK [TKIP] + WPA2-PSK [AES].c. Choose a Passphrase (for example, HomeNetwork). You might want to write it down in the area provided on the middle panel. Click Next.Note: Both your network name (SSID and passphrase are case sensitive.](https://usermanual.wiki/Netgear-orporated/11300177/User-Guide-1619869-Page-13.png)


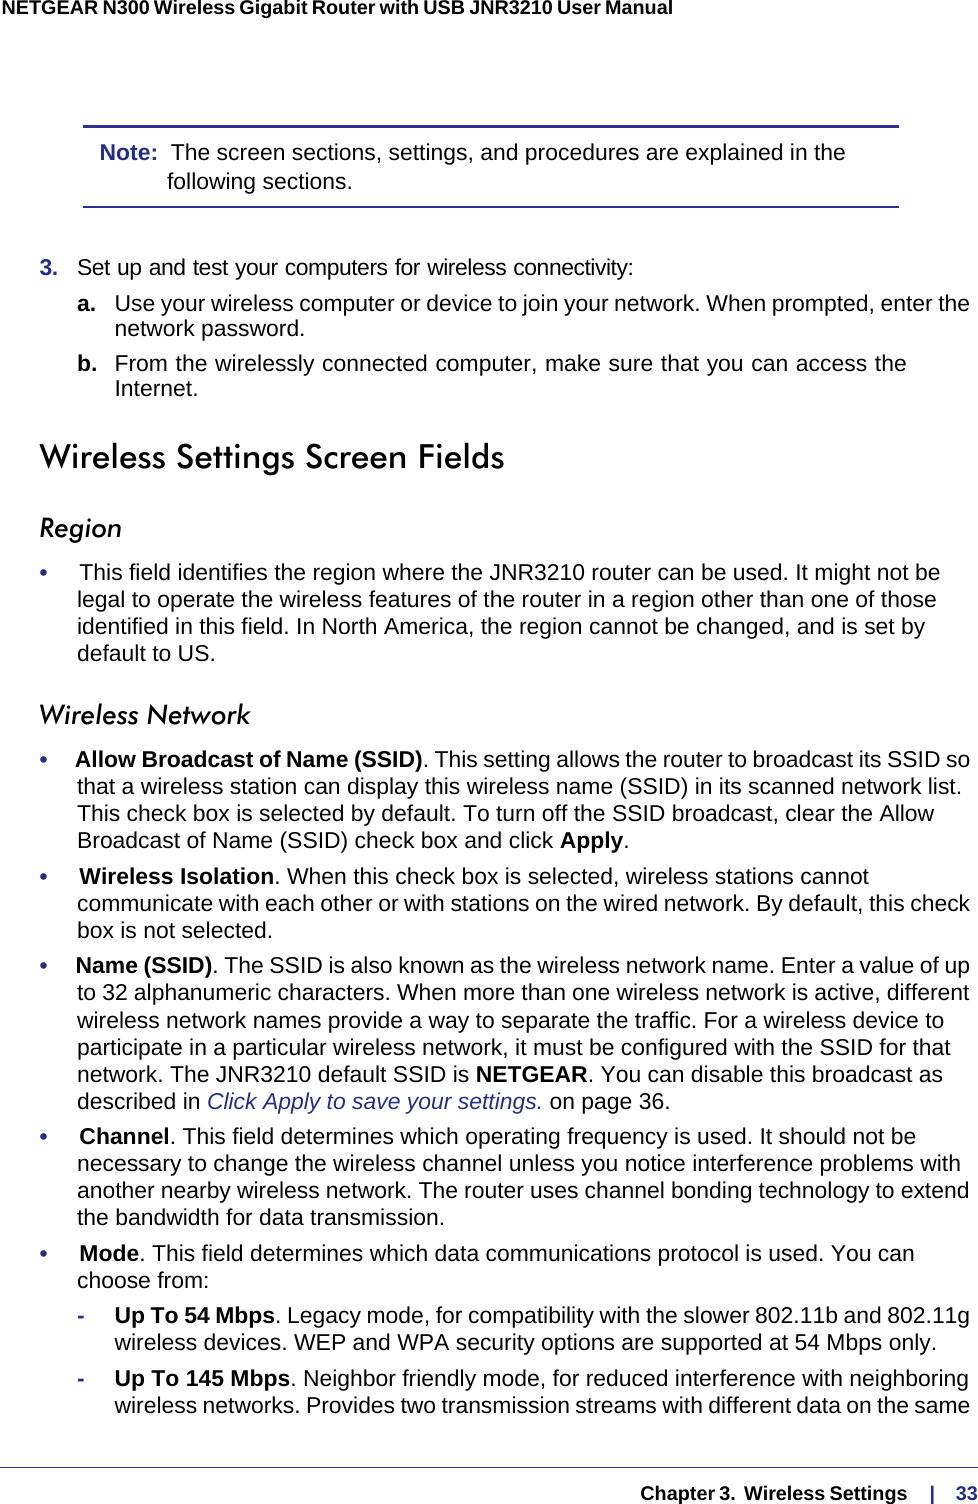
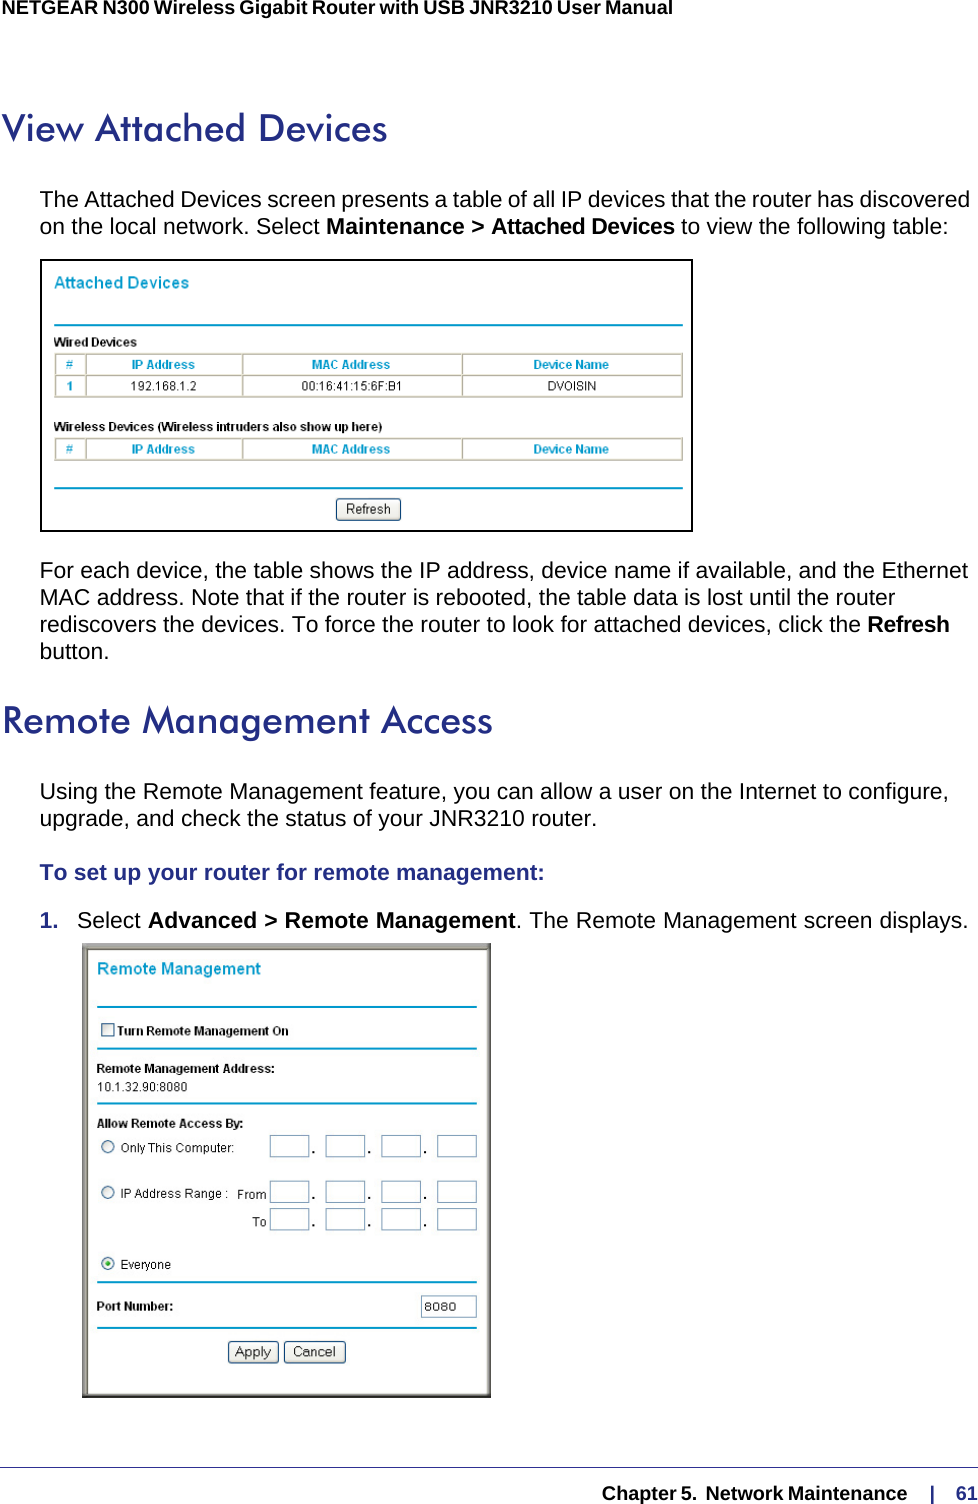
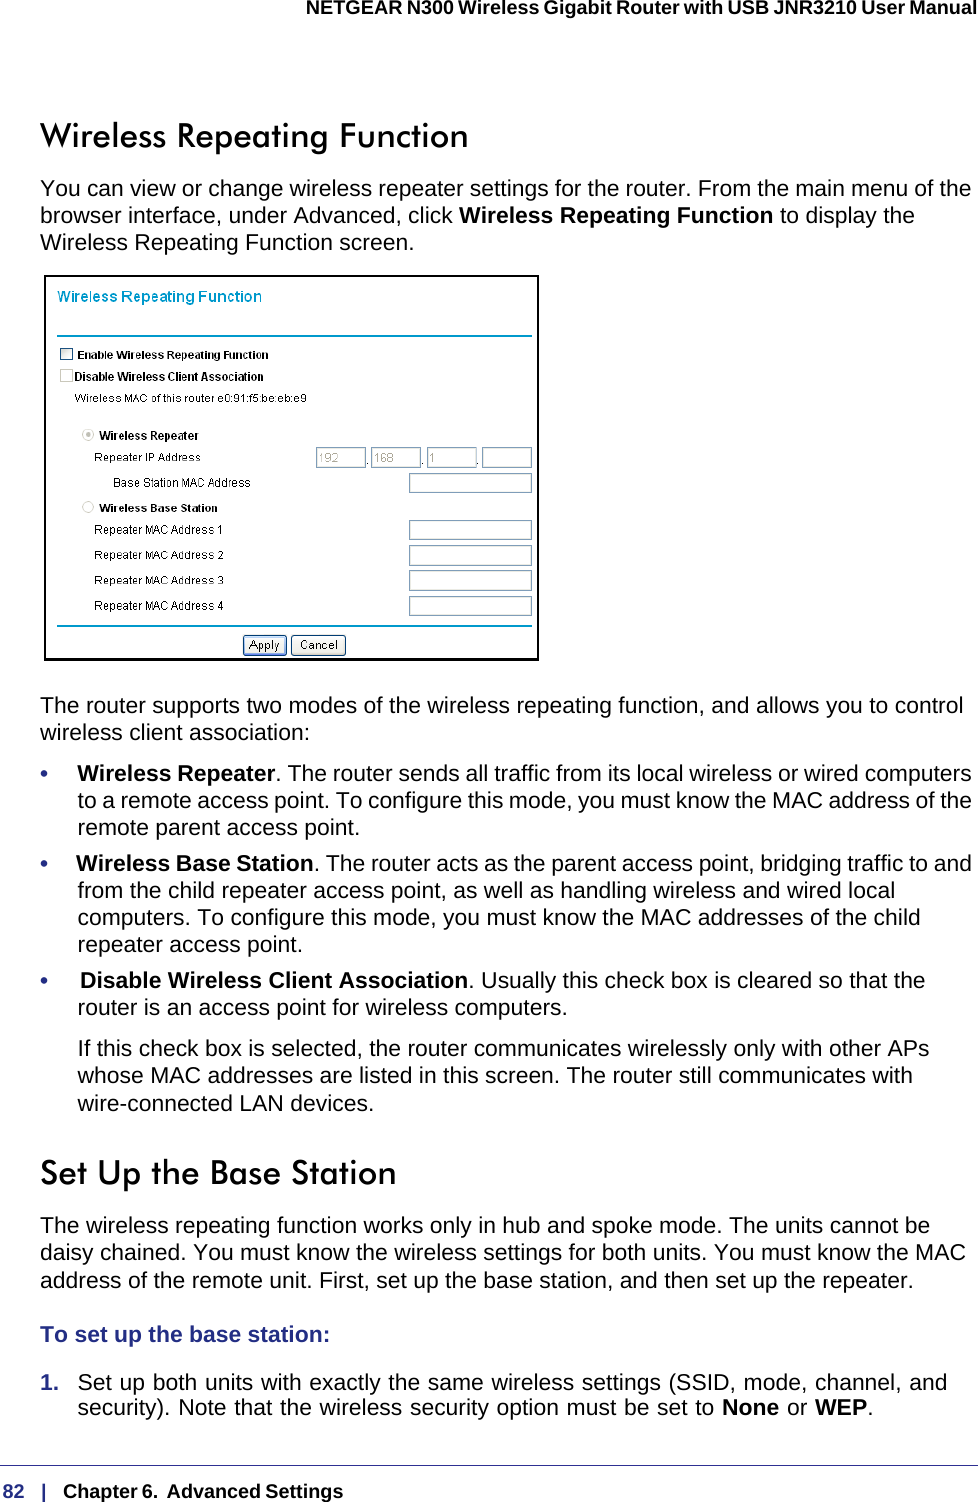
![34 | Chapter 3. Wireless Settings NETGEAR N300 Wireless Gigabit Router with USB JNR3210 User Manual channel at the same time, but also allows 802.11b and 802.11g wireless devices. This is the default mode.-Up To 300 Mbps. Performance mode, using channel expansion to achieve the 300 Mbps data rate. The JNR3210 router uses the channel you selected as the primary channel and expands to the secondary channel (primary channel +4 or –4) to achieve a 40 MHz frame-by-frame bandwidth. The router detects channel usage and disables frame-by-frame expansion if the expansion would result in interference with the data transmission of other access points or clients.Note: The maximum wireless signal rate is derived from the IEEE Standard 802.11 specifications. Actual data throughput can vary. Network conditions and environmental factors, including volume of network traffic, building materials and construction, and network overhead, lower actual data throughput rate.• Security Options. The selection of wireless security options can significantly affect your network performance. The time it takes to establish a wireless connection can vary depending on both your security settings and router placement. Set Up WPA-PSK and WPA2-PSK Wireless SecurityWPA–Pre-Shared Key performs authentication. WPA-PSK uses TKIP (Temporal Key Integrity Protocol) data encryption, and WPA2-PSK uses AES (Advanced Encryption Standard) data encryption. Both methods dynamically change the encryption keys making them nearly impossible to circumvent.Mixed mode allows clients using either WPA-PSK (TKIP) or WPA2-PSK (AES). This provides the most reliable security, and is easiest to implement, but it might not be compatible with older adapters.Note: To display the security options WPA-PSK and WEP, you have to use the legacy mode setting of Up to 54 Mpbs.To set up WPA2 or WPA:1. Select Setup > Wireless Settings. The Wireless Settings screen displays.2. Select a radio button for the security option that you want to use. Mixed mode (WPA-PSK [TKIP] + WP2-PSK [AES]) is the most flexible, since it allows clients using either WPA-PSK or WPA2-PSK.](https://usermanual.wiki/Netgear-orporated/11300177/User-Guide-1619869-Page-34.png)
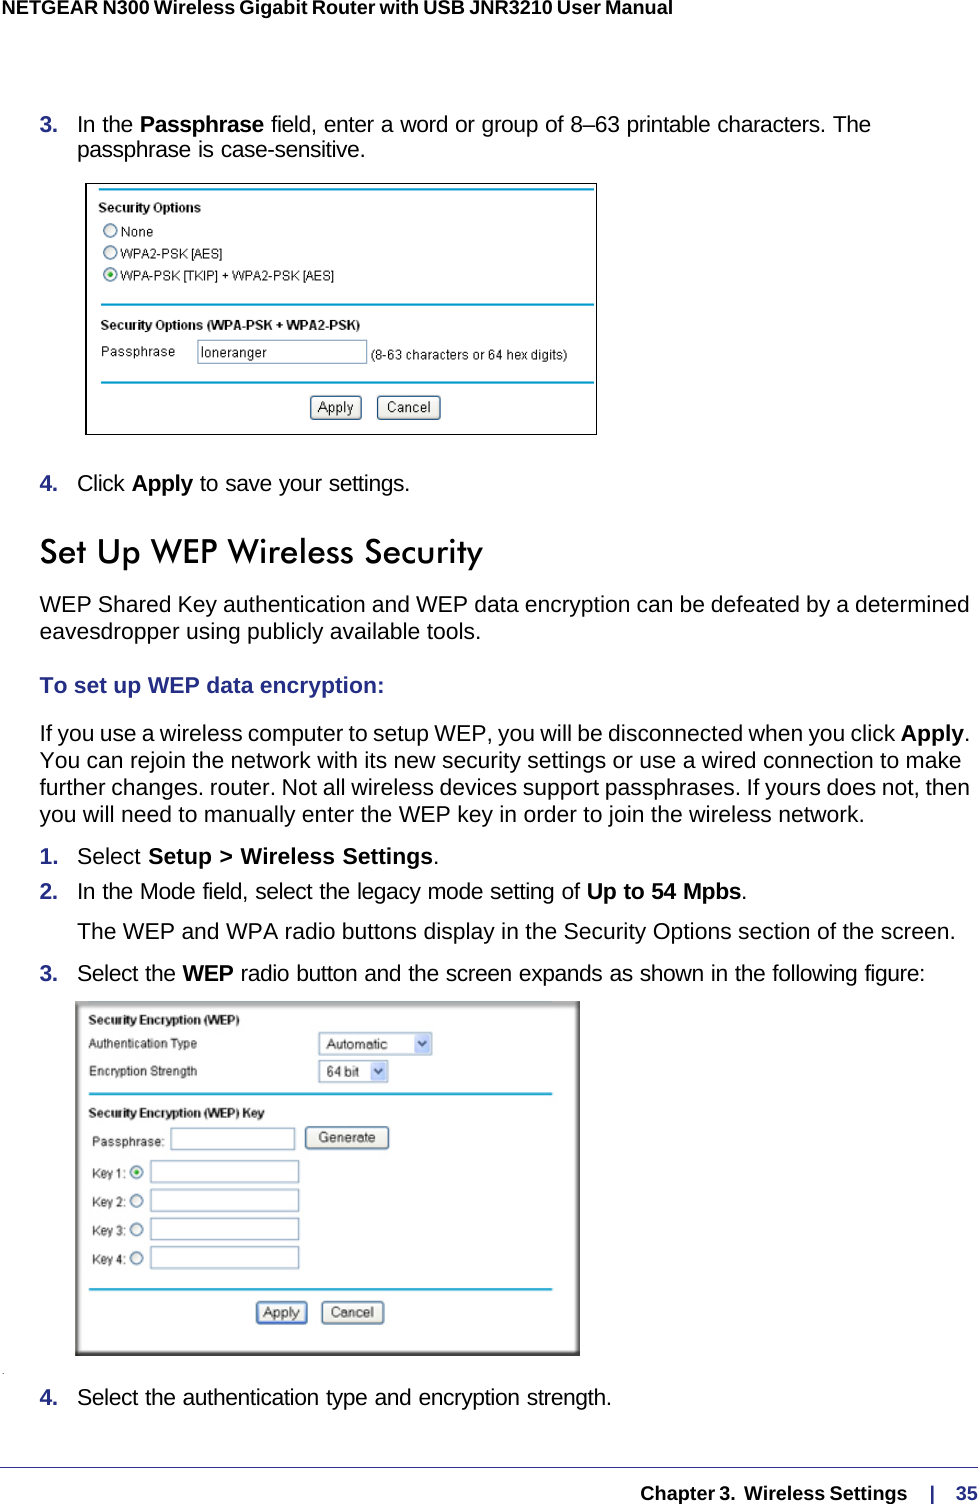


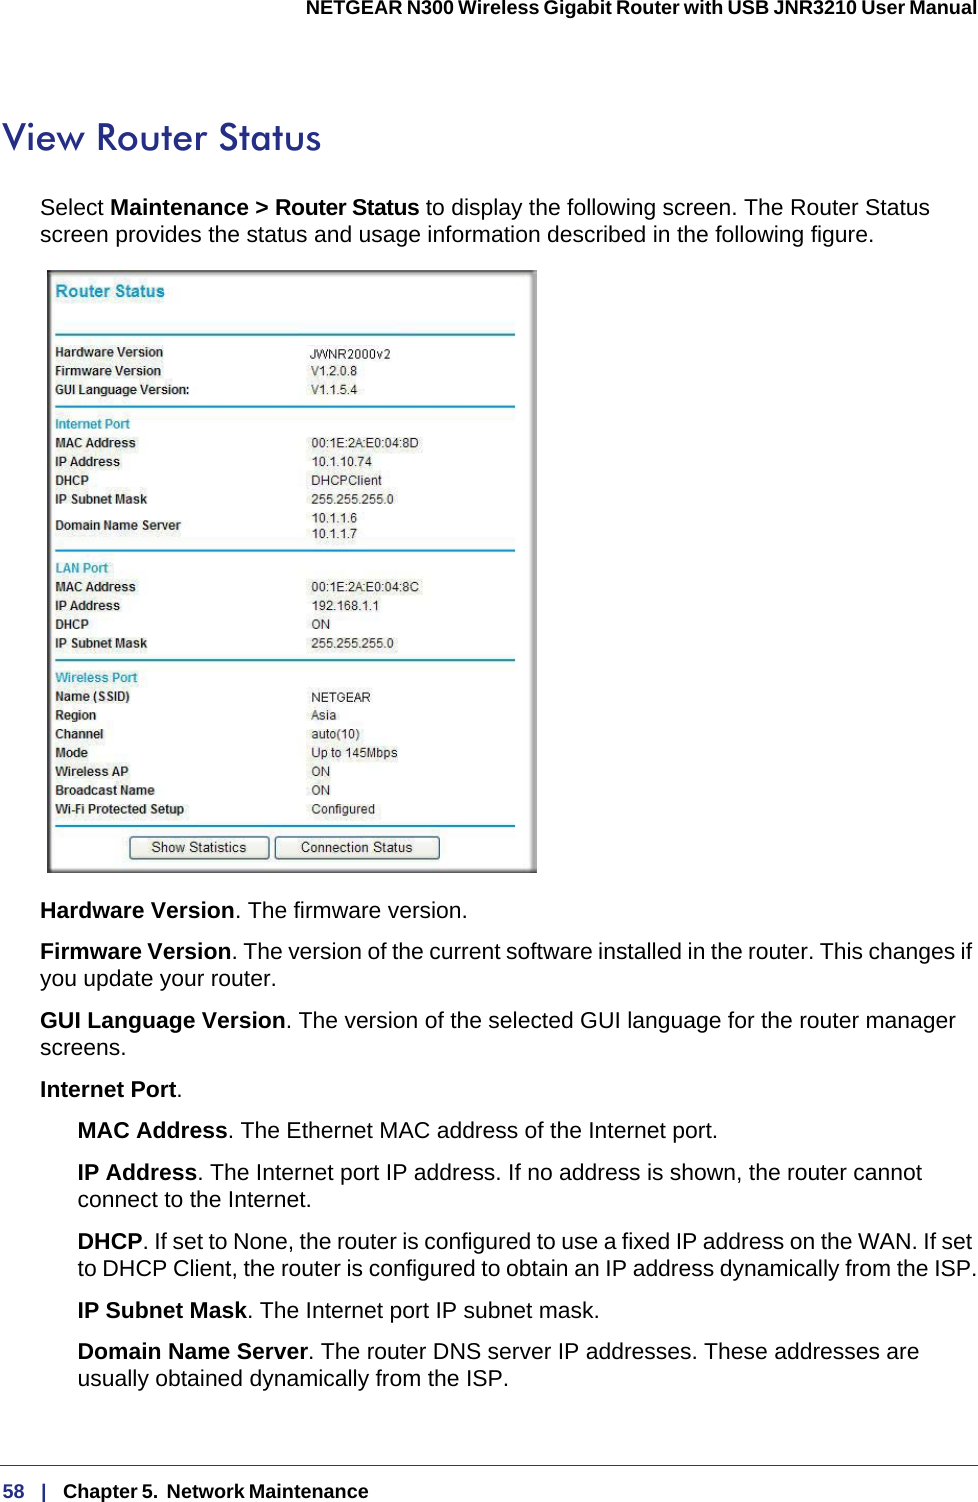
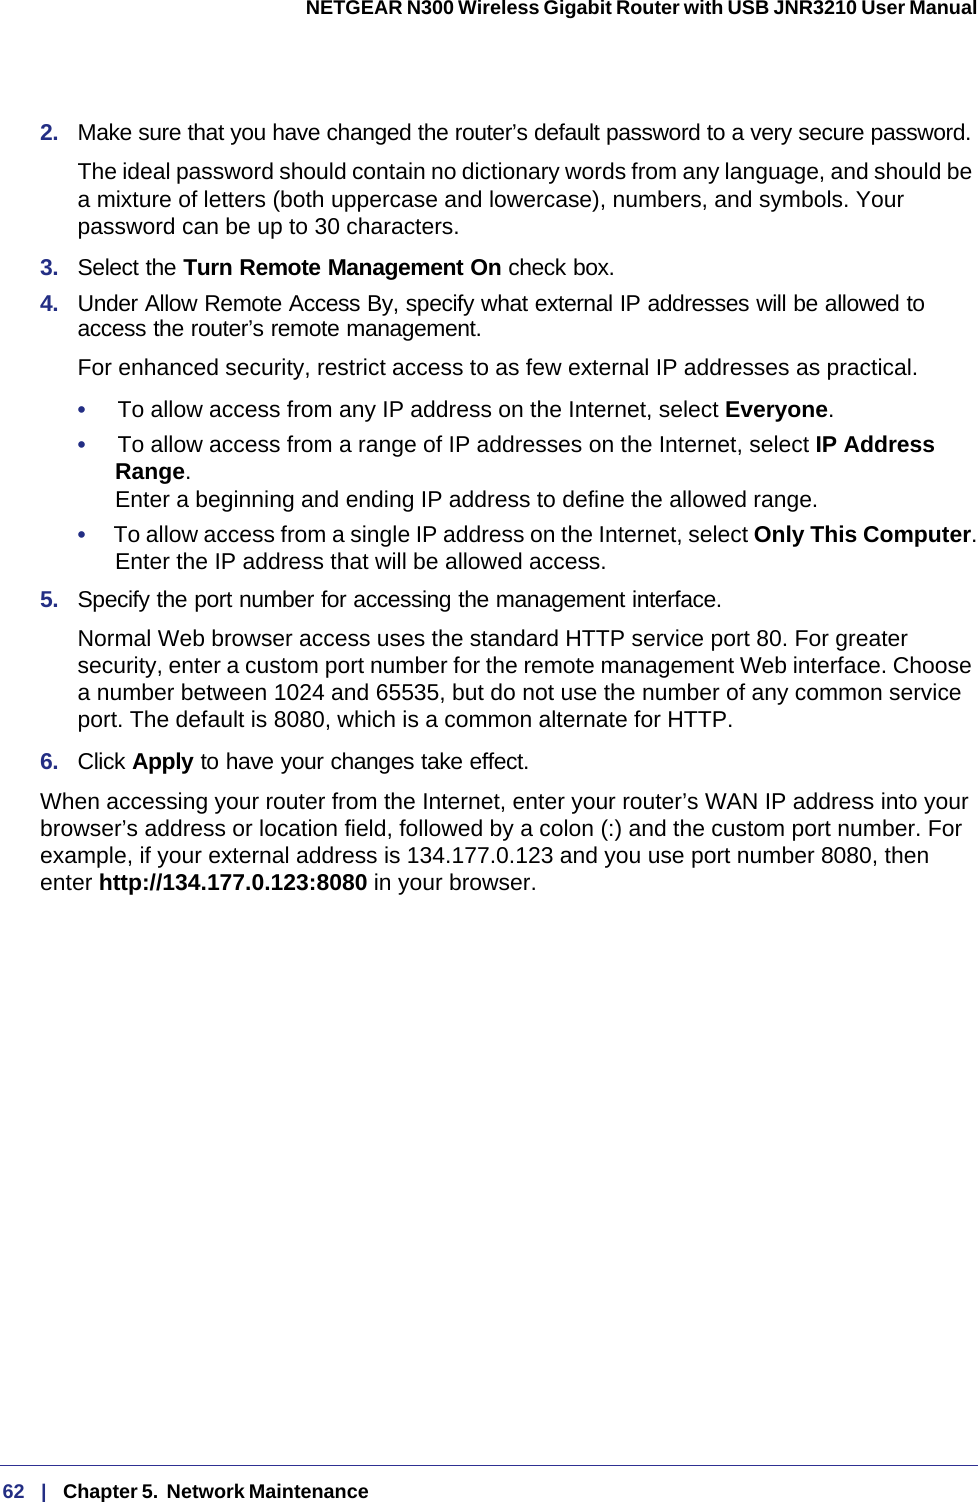
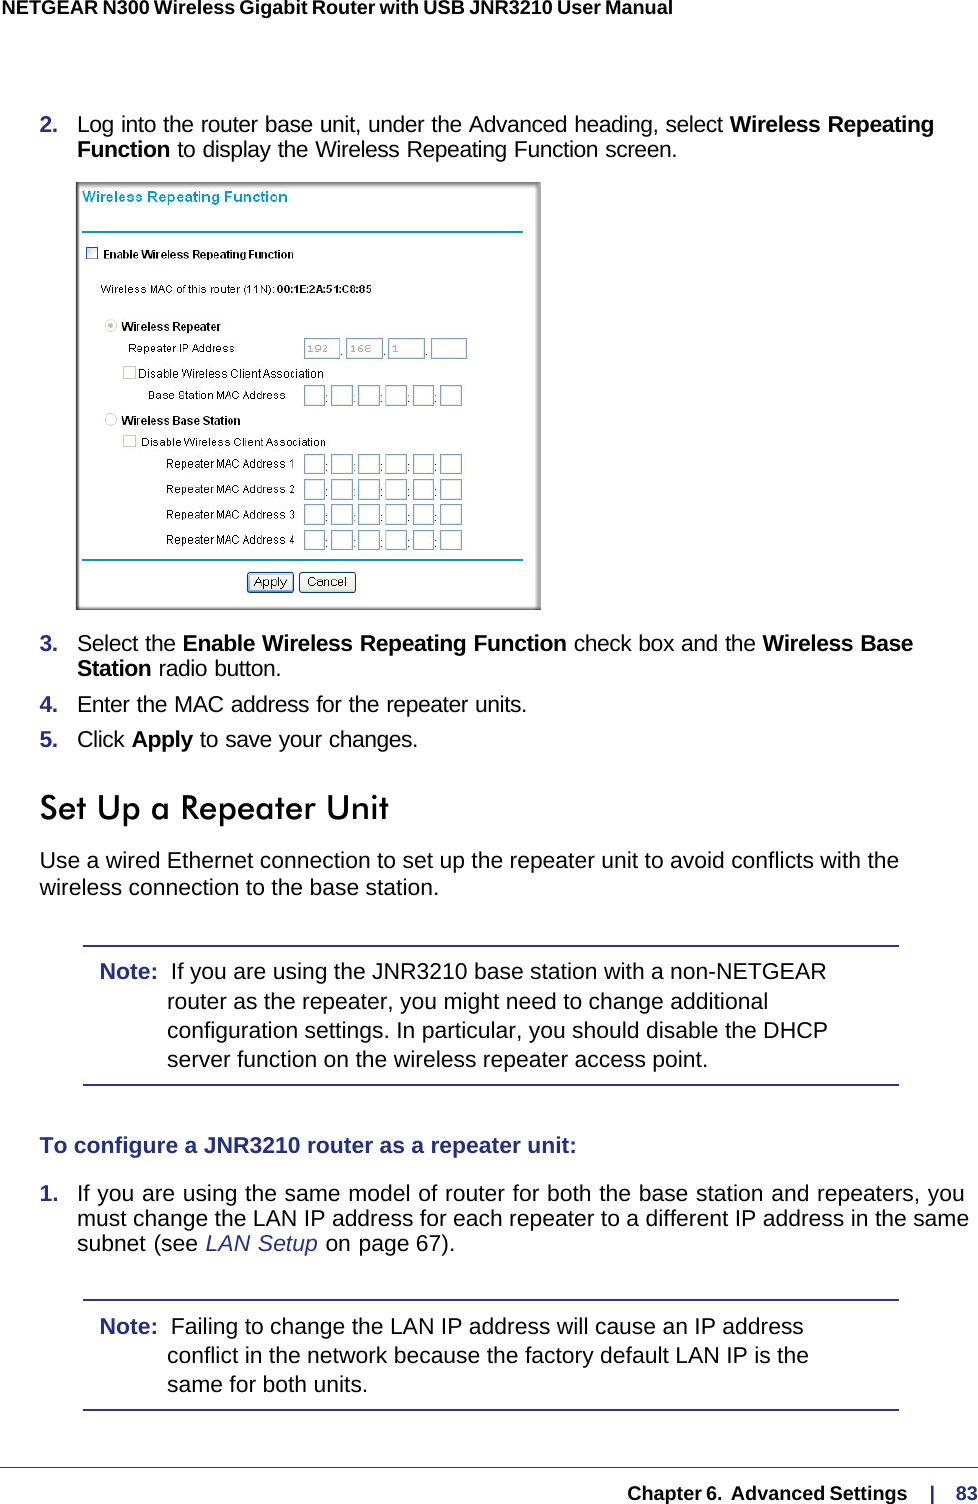
![Chapter 5. Network Maintenance | 59NETGEAR N300 Wireless Gigabit Router with USB JNR3210 User Manual LAN Port (Local Ports).MAC Address. The router LAN port Ethernet MAC address.IP Address. The router LAN port IP address. The default is 192.168.0.1.DHCP. If Off, the router does not assign IP addresses to PCs on the LAN. If On, the router does assign IP addresses to PCs on the LAN.IP Subnet Mask. The IP subnet mask used by the router LAN. The default is 255.255.255.0.Wireless Port. See Wireless Settings on page 31 for more information on these settings.Name (SSID). The Wi-Fi network name (service set ID) for the wireless network.Region. The country where the unit is set up for use.Channel. The current channel, which determines the operating frequency.Mode. Indicates the wireless communication mode: • Up to 54 Mbps.• Up to 145 Mbps.• Up to 300 Mbps (in this mode, there are two channels: a primary channel [P] and a secondary channel [S]).Wireless AP. Indicates if the access point feature is enabled. If disabled, the Wireless LED on the front panel is off.Broadcast Name. Indicates if the router is configured to broadcast its SSID.Wi-Fi Protected Setup. Indicates whether the router’s PIN is enabled and whether the router is configured for Push ‘N’ Connect (Wi-Fi Protected Setup).Show Statistics Button. Click the Show Statistics button on the Router Status screen to display a screen similar to this:• System Up Time. The time elapsed since the router was last restarted.• Port. The statistics for the WAN (Internet) and LAN (Ethernet) ports. For each port, the screen displays the following:](https://usermanual.wiki/Netgear-orporated/11300177/User-Guide-1619869-Page-59.png)