Netgear orporated 12200200 WIFI USB ADAPTER User Manual N900 Wireless Dual Band USB Adapter WNDA4100
Netgear Incorporated WIFI USB ADAPTER N900 Wireless Dual Band USB Adapter WNDA4100
User Manual
350 East Plumeria Drive
San Jose, CA 95134
USA
July 2012
TBD
v1.0
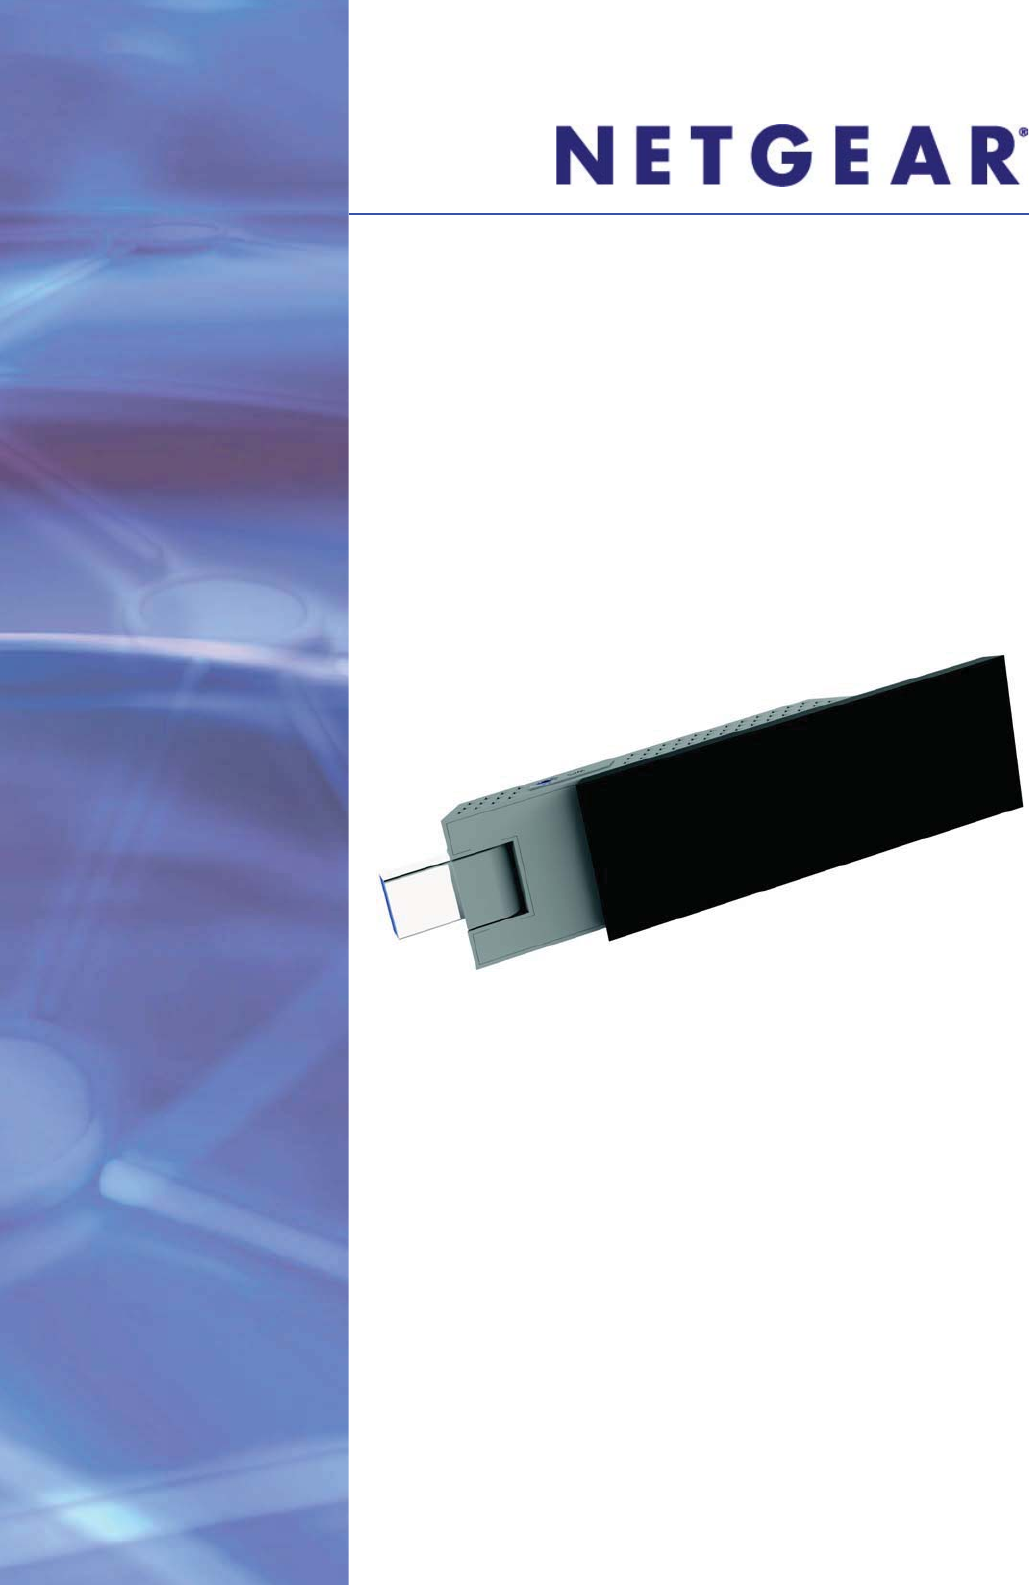
802.11ac USB WiFi Adapter
A6200
User Manual
Note: This document is for certification
purposes only. Some of the procedures,
illustrations, and screen captures might
not exactly match the device.

2
802.11ac USB WiFi Adapter A6200
© 2012 NETGEAR, Inc. All rights reserved
No part of this publication may be reproduced, transmitted, transcribed, stored in a retrieval system, or translated
into any language in any form or by any means without the written permission of NETGEAR, Inc.
Technical Support
Thank you for choosing NETGEAR. To register your product, get the latest product updates, get support online, or
for more information about the topics covered in this manual, visit the Support website at
http://support.netgear.com.
Phone (US & Canada only): 1-888-NETGEAR
Phone (Other Countries): Check the list of phone numbers at
http://support.netgear.com/app/answers/detail/a_id/984.
Trademarks
NETGEAR, the NETGEAR logo, and Connect with Innovation are trademarks and/or registered trademarks of
NETGEAR, Inc. and/or its subsidiaries in the United States and/or other countries. Information is subject to change
without notice. Other brand and product names are registered trademarks or trademarks of their respective
holders. © 2011 NETGEAR, Inc. All rights reserved.
Statement of Conditions
To improve internal design, operational function, and/or reliability, NETGEAR reserves the right to make changes
to the products described in this document without notice. NETGEAR does not assume any liability that may occur
due to the use, or application of, the product(s) or circuit layout(s) described herein.

3
Contents
Chapter 1 Set up Your Wireless Adapter
NETGEAR Genie Desktop Icon . . . . . . . . . . . . . . . . . . . . . . . . . . . . . . . . . . 4
NETGEAR Genie Home. . . . . . . . . . . . . . . . . . . . . . . . . . . . . . . . . . . . . . . . 5
Status Bar. . . . . . . . . . . . . . . . . . . . . . . . . . . . . . . . . . . . . . . . . . . . . . . . . 5
Join a Wireless Network. . . . . . . . . . . . . . . . . . . . . . . . . . . . . . . . . . . . . . . . 6
Network Details . . . . . . . . . . . . . . . . . . . . . . . . . . . . . . . . . . . . . . . . . . . . 7
Join a Network or Connect to a Different Network . . . . . . . . . . . . . . . . . .8
Join a Hidden Network . . . . . . . . . . . . . . . . . . . . . . . . . . . . . . . . . . . . . . 10
Chapter 2 Maintenance
Other Screen . . . . . . . . . . . . . . . . . . . . . . . . . . . . . . . . . . . . . . . . . . . . . . . 13
Remove the Software . . . . . . . . . . . . . . . . . . . . . . . . . . . . . . . . . . . . . . . . . 14
Frequently Asked Questions (FAQs) . . . . . . . . . . . . . . . . . . . . . . . . . . . . . 14
Appendix A Supplemental Information
Technical Specifications. . . . . . . . . . . . . . . . . . . . . . . . . . . . . . . . . . . . . . .18
Factory Default Settings . . . . . . . . . . . . . . . . . . . . . . . . . . . . . . . . . . . . . . . 19
Appendix B Notification of Compliance

4
1
1. Set up Your Wireless Adapter
This chapter includes the following sections:
• NETGEAR Genie Desktop Icon
• NETGEAR Genie Home
• Join a Wireless Network
For help installing your wireless USB Adapter, see the installation guide that came in the
package.
For more information about the topics covered in this manual, visit the support website at
http://support.netgear.com.
Set up Your Wireless Adapter
5
802.11ac USB WiFi Adapter
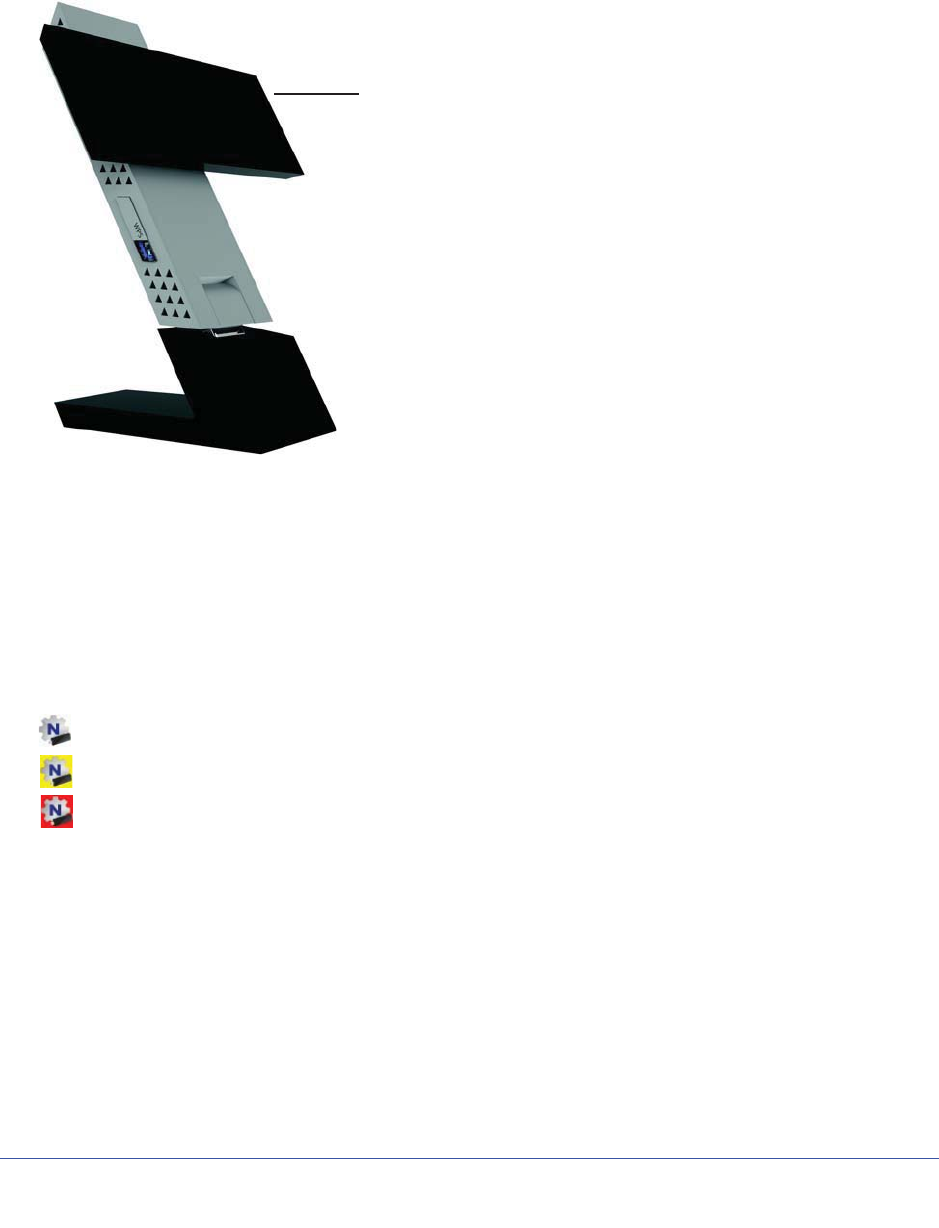
Gain Better Wireless Performance
Rotate the black part that contains the antenna to gain better wireless performance.
Rotate the black part that
hasthe antenna.
Figure 1. Rotate the antenna for better performance
NETGEAR Genie Desktop Icon
When you install your adapter, the NETGEAR Genie icon appears in the Windows system
tray and on the desktop. You can click this icon to open NETGEAR Genie to make changes
or connect to a different wireless network. The color of the icon indicates the strength of your
wireless connection from 0 (zero) to 5 bars.
White: 3 to 5 bars
Yellow: 1 or 2 bars
Red: 0 (zero) bars, indicating no connection
If you remove your adapter, NETGEAR Genie is not available, so the icon is not displayed. if
you insert the adapter again, the icon returns.
Set up Your Wireless Adapter
6
802.11ac USB WiFi Adapter
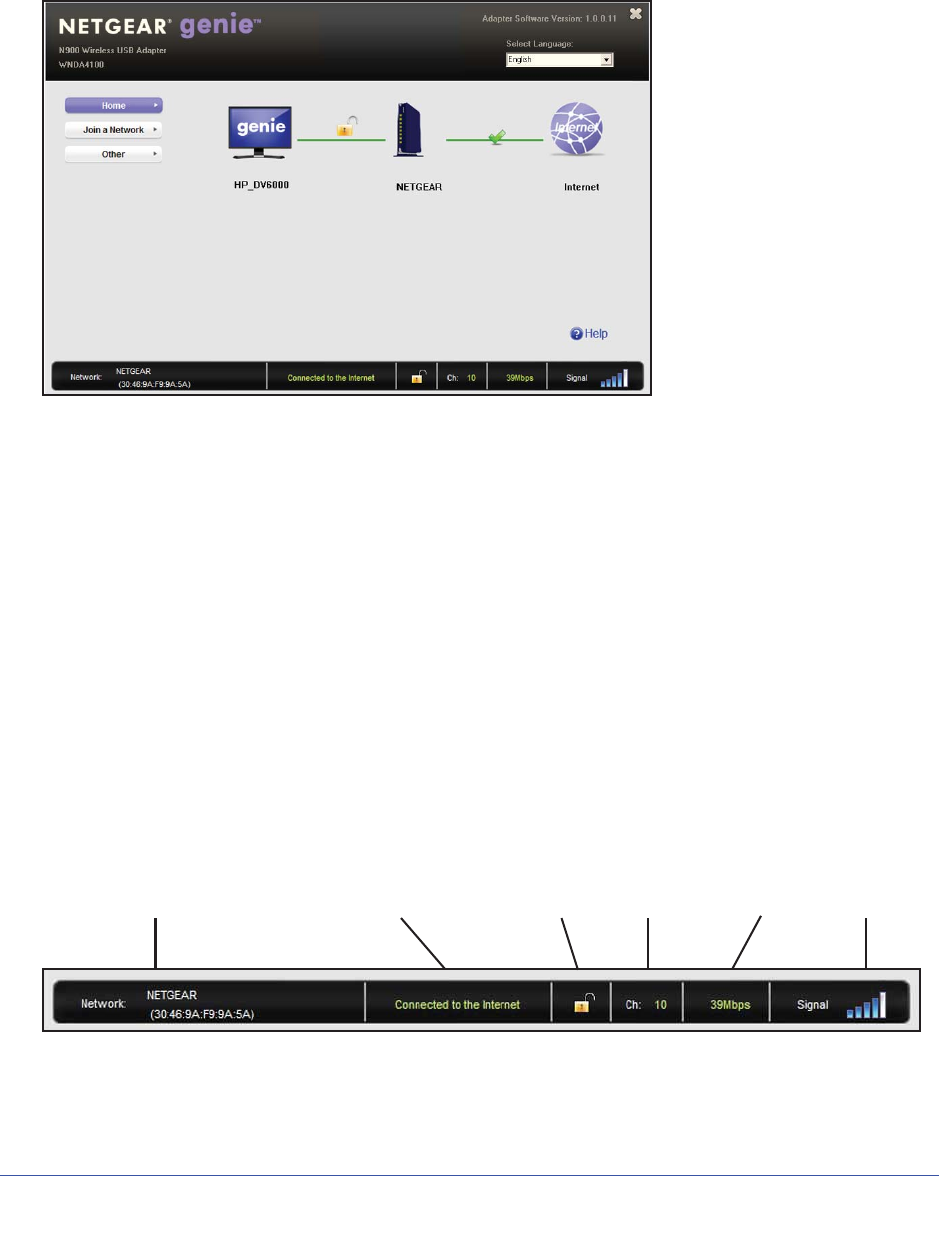
NETGEAR Genie Home
When you launch NETGEAR Genie, the home screen displays.
This screen shows you at a glance if you are connected to a network, and if you have Internet
access. The following options are available:
•Select Language. If more than one language is available, you can select a language
from this drop-down list. NETGEAR Genie screens will be displayed in the language that
you selected.
•Home button. The currently selected Home screen. You can click the Home button to
return here from a different screen.
•Join a Network button. View a list of wireless networks and join a network.
•Other button. View more information or check for software updates.
•Help. Display the help.
Status Bar
The status bar is located at the bottom of the screen:
Network Connection Network Wireless
Physical
Signal
security channel strengthname status rate
Figure 2. Status bar
Set up Your Wireless Adapter
7
802.11ac USB WiFi Adapter
Network name. The network name (SSID) of the wireless network that the adapter is
currently connected to.
Connection status. This shows the status that is also shown in the diagram in the middle of
this screen.
• Connected to the Internet
• Connected to the Router
• No Connection
Network security. The lock symbol shows whether or not the network you are connected to
uses wireless security. An open lock indicates an open network without wireless security,
such as one that you might use in a coffee shop.
Wireless channel. The wireless channel of the network that the adapter is connected to.
Physical rate. The physical transmission rate for wireless communication.
Signal strength. The strength of the wireless signal. Three-to-five bars indicate a good
signal. One or two bars indicate a weak signal.
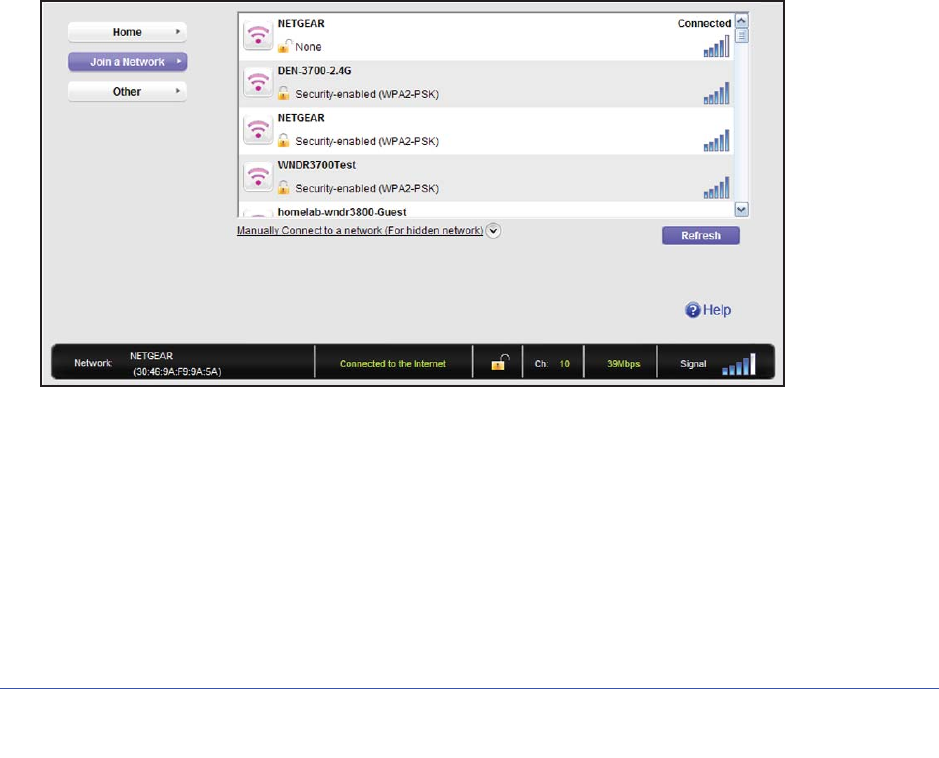
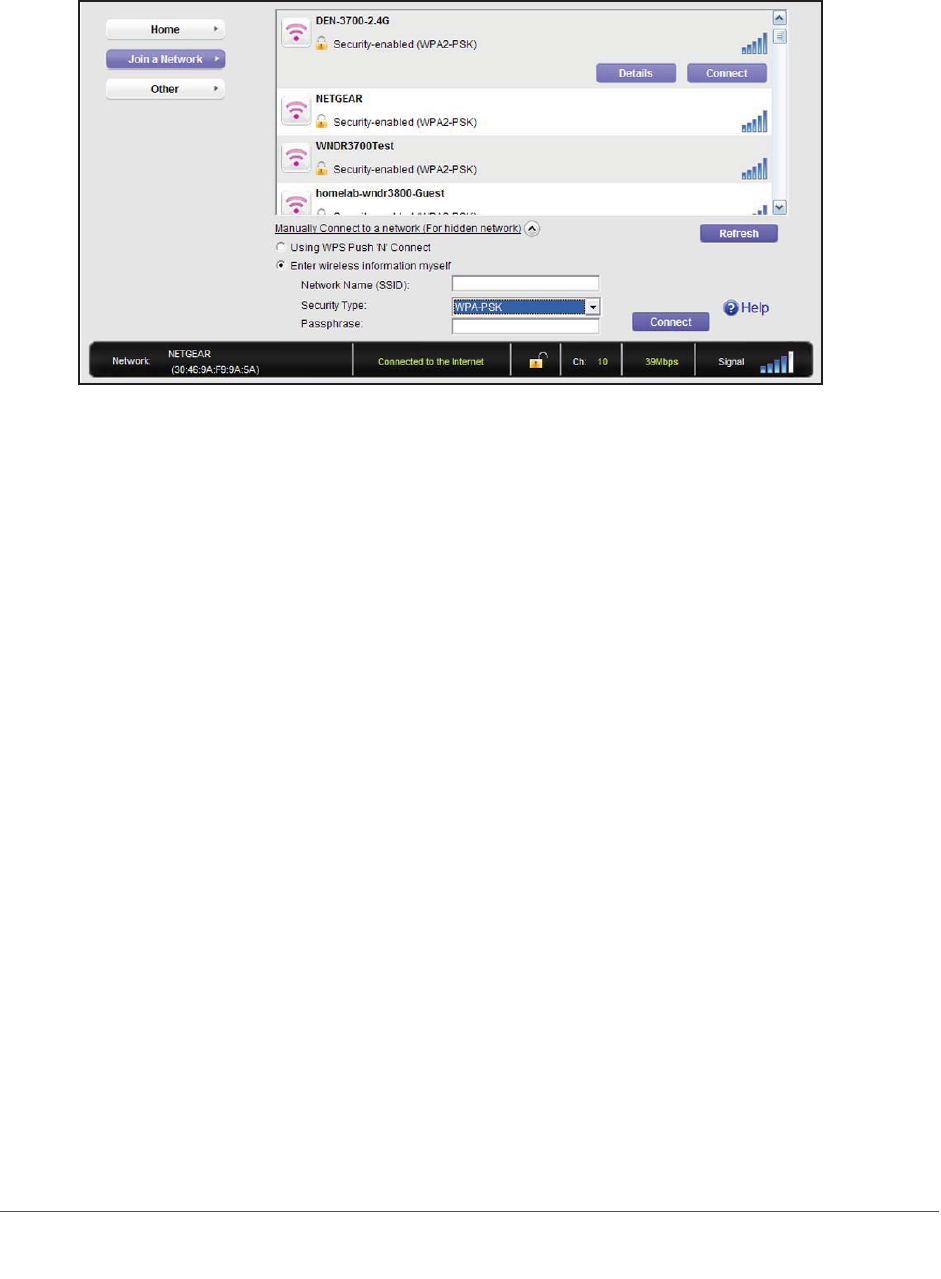
Join a Wireless Network
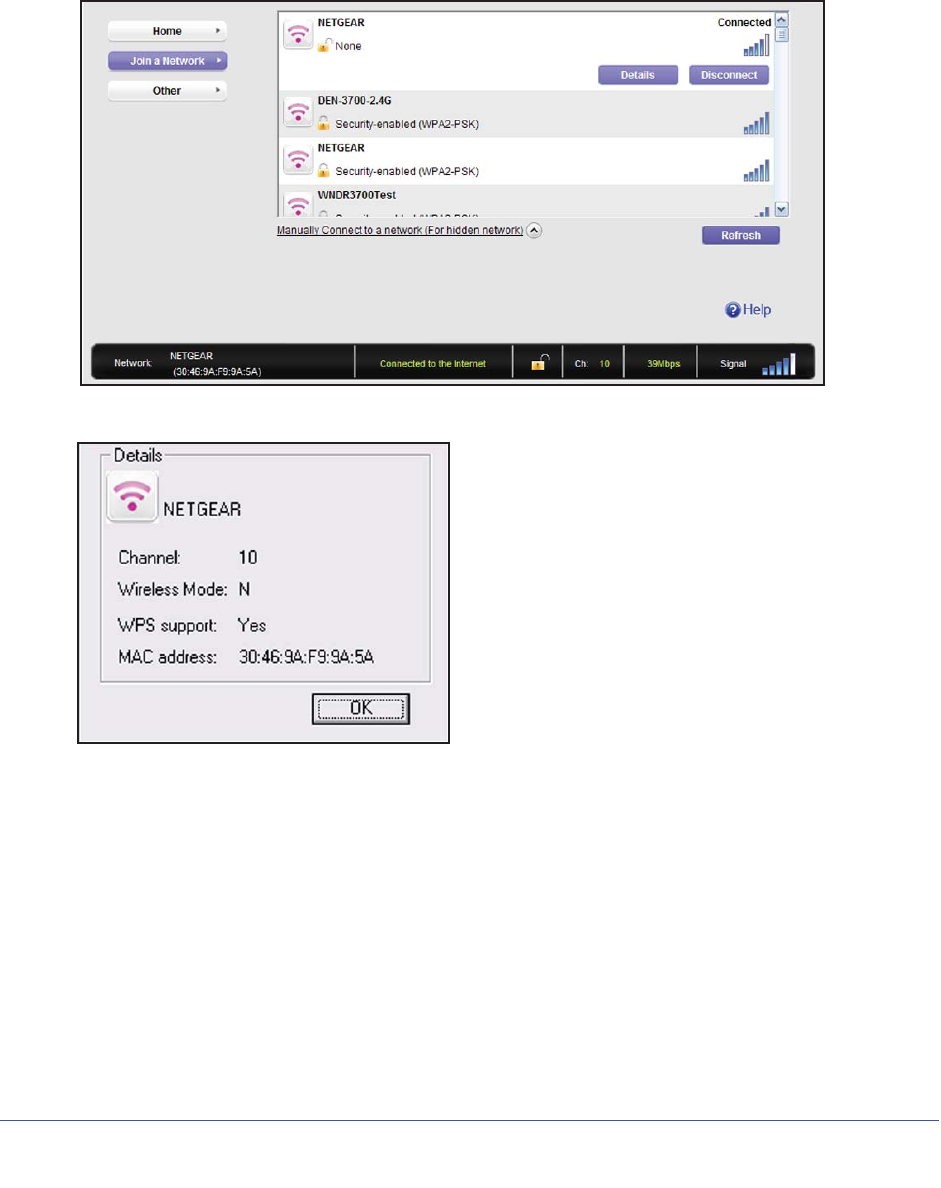
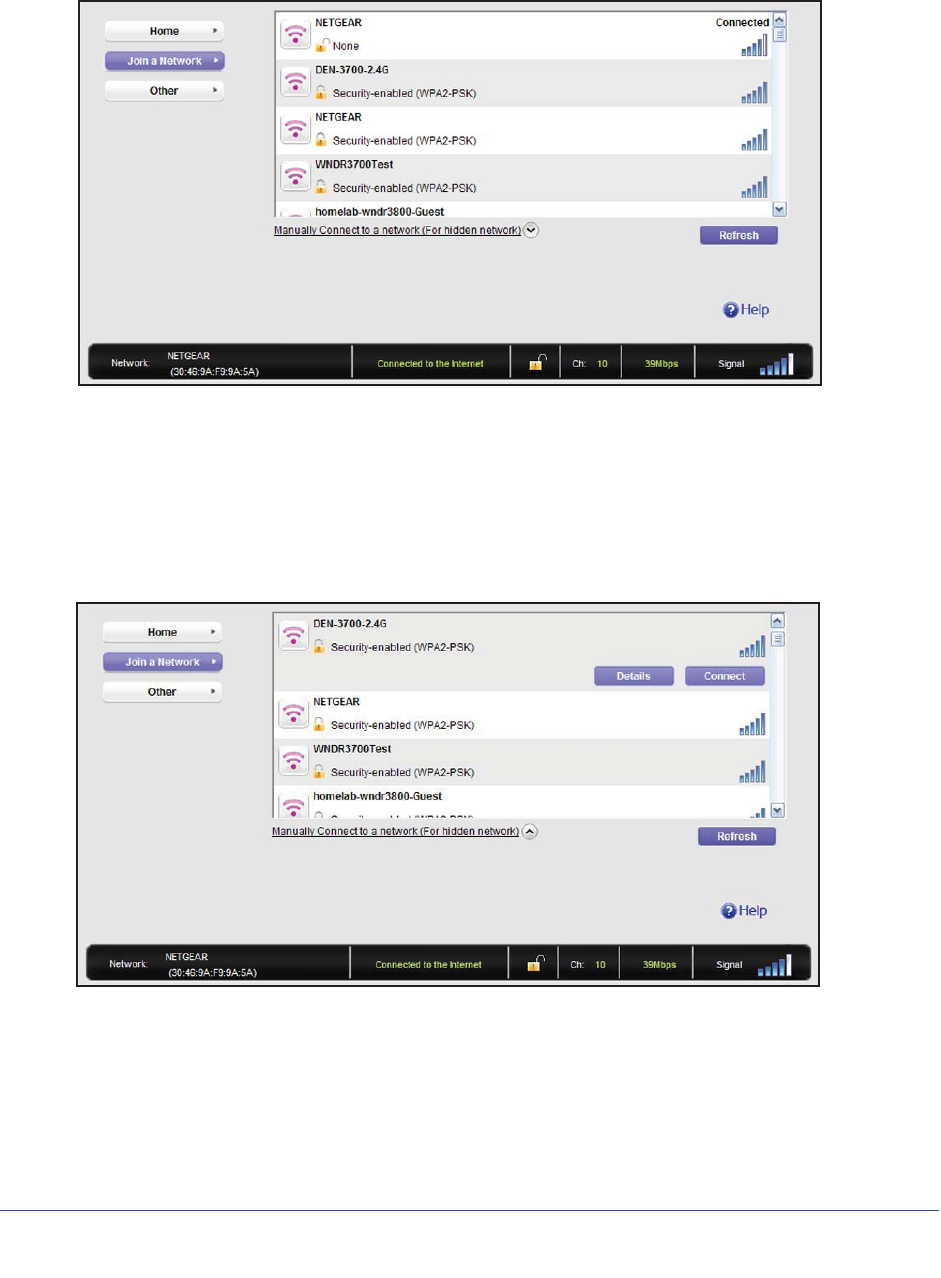
In NETGEAR Genie, click the Join a Network button to display the following screen:
Network list. View the wireless networks in the area. Click a network to select it.
Manual Connect. Click this button to join a network without viewing it on the network list, or
to connect to a hidden network. A hidden network does not broadcast its wireless network
name (SSID).
Refresh. Click this button to scan for available networks in the area.
Set up Your Wireless Adapter
8
802.11ac USB WiFi Adapter
Network Details
From the Join a Network screen, you can view more details about a specific network.
¾
To view network details:
1. In the Join a Network screen, click the network to select it
2. Click the Details button to display a screen similar to the one shown here.
The following information is displayed:
•Network Name (SSID). The name assigned to a wireless network. Note that, as a
security measure, some wireless access points do not broadcast their SSIDs. In such
cases, the network is hidden. The name (SSID) field is blank even though the rest of the
information is displayed.
•Channel. The channel that the wireless network operates on. NETGEAR recommends
that you choose a network that uses a channel that is different from that of neighboring
networks.
•Wireless Mode. The wireless technology used for this router such as 11a, n, g, or b.
Set up Your Wireless Adapter
9
802.11ac USB WiFi Adapter
• WPS Support. Identifies whether the router or access point for this network supports
WPS (Wi-Fi Protected Setup).
• MAC Address. The unique hardware address of the wireless device broadcasting this
information. Typically, this is a wireless router, gateway, or access point.
Join a Network or Connect to a Different Network
You can use WPS to join a wireless network if your wireless network supports it, or you can
join a wireless network from this NETGEAR Genie screen.
• WPS. Press and hold the WPS button on the side of the adapter for 3 seconds. Then
within 2 minutes, press the WPS button on your wireless router or gateway. Your settings
are saved in a profile with –WPS at the end.
• NETGEAR Genie. Click your wireless network to select it from the list, and then click
Connect. If the network is secure, enter its password or network key.
After the adapter joins the network, it automatically saves the network connection information
to a Windows profile. Windows profiles can be used by Genie and the Windows utility. The
next time you launch NETGEAR Genie, it will automatically connect to the network you
previously joined if there's no change in the network information.
¾
To use WPS to join a wireless network:
1. Press and hold the WPS button on the side of the adapter for 2 seconds.
2. Then within 2 minutes, press the WPS button on your wireless router or gateway
The adapter joins the network, which can take a few minutes. Your settings are saved in a
profile.
Set up Your Wireless Adapter
10
802.11ac USB WiFi Adapter
¾
To select and join a wireless network:
1. From NETGEAR Genie, click Join a Network.
2. Look for your network in the list on this screen. If you do not see your network, you might
need to scroll down to view more networks.
If the network name is not displayed, that indicates a hidden network that does not
broadcast its SSID. Use the manual method to connect to a hidden network. See Join a
Hidden Network on page 10.
3. Click the network that you want to join.
4. Click the Connect button.
5. If the wireless network is secure, enter the network password.
The adapter joins the wireless network. This could take a few minutes.
Set up Your Wireless Adapter
11
802.11ac USB WiFi Adapter
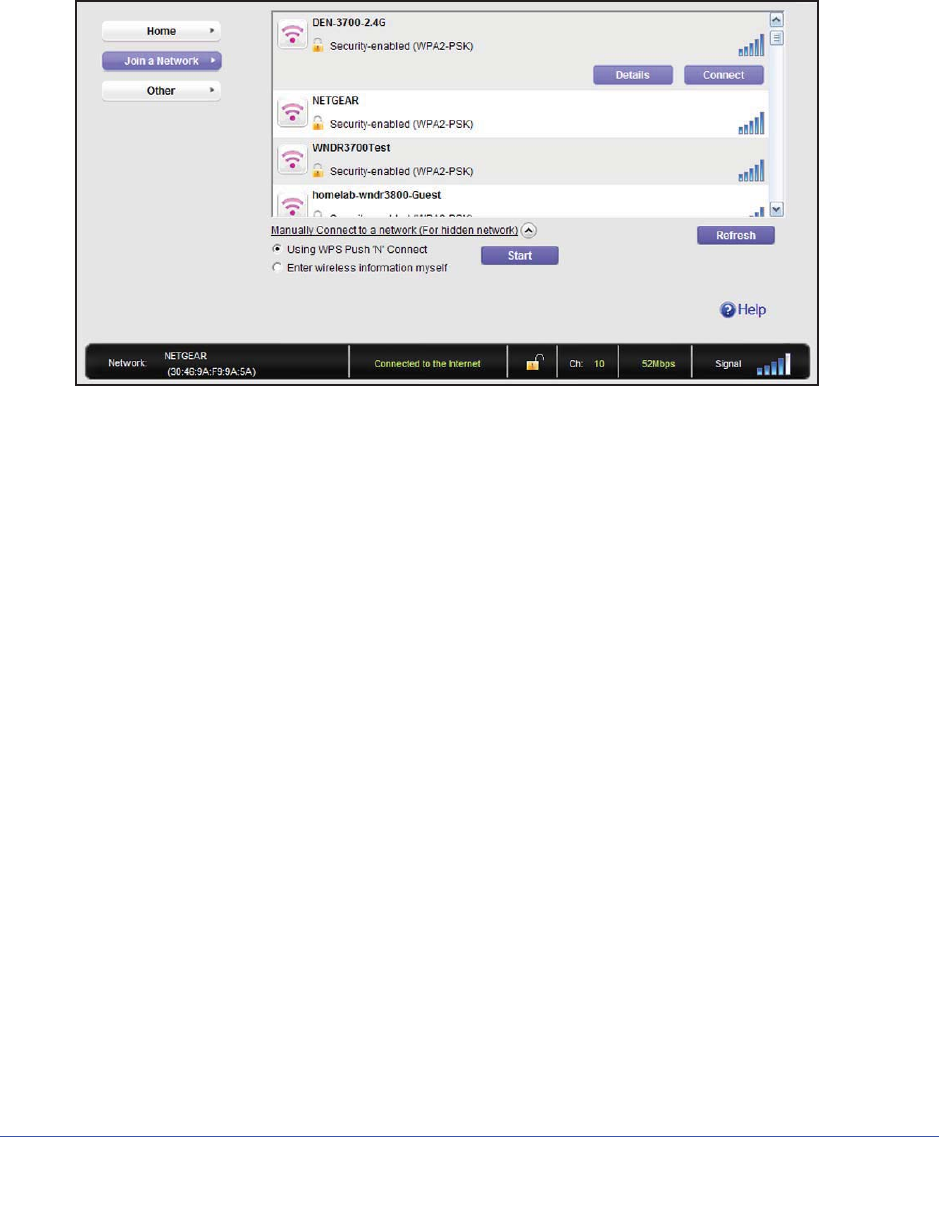
Join a Hidden Network
A hidden network does not broadcast its SSID.
1. From NETGEAR Genie, click Join a Network.
2. Click the Manually Connect to a network (for hidden networks) link.
You can use WPS to connect, or enter the wireless information yourself.
¾
To manually connect using WPS:
1. Click the Start button.
A dialog pop-up displays with WPS instructions telling you to press the WPS button both
on the adapter and the router.
2. As explained in the pop-up screen, press the WPS button on your adapter. Then go to your
wireless router, gateway, or access point and press its WPS button.
Set up Your Wireless Adapter
12
802.11ac USB WiFi Adapter
¾
To manually connect without WPS:
1. Select the Enter wireless information myself radio button.
There are four security types that can be displayed for the network: None, WEP,
WPA-PSK, and WPA2-PSK.
•None. There is no password.
•WEP. The password (key) is a 10 or 26 hexidecimal digit.
•WPA-PSK/WPA2-PSK. The password (passphrase) is between 8 and 63 characters
in length.
2. In the fields provided, type the network name (SSID), select the security type, and type the
passphrase (password).

12
2
2. Maintenance
This chapter includes the following sections:
• Other Screen
• Remove the Software
• Frequently Asked Questions (FAQs)
Maintenance
13
802.11ac USB WiFi Adapter
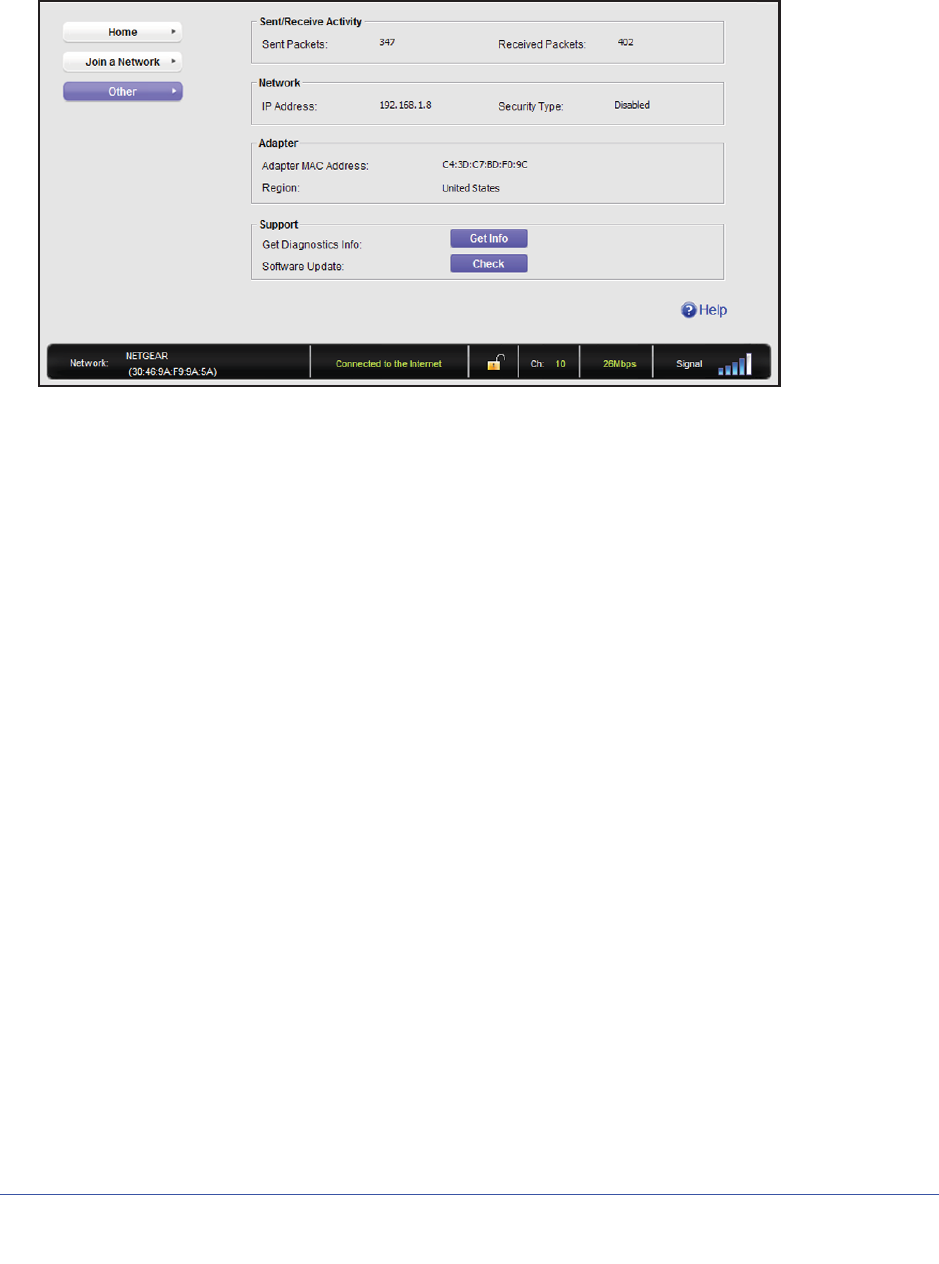
Other Screen
In NETGEAR Genie, click the Other button to display the following screen:
Sent/Receive Activity
Sent Packets. Total number of packets sent while communicating with the wireless network.
Received Packets.Total number of packets received from wireless network communications.
Network
IP Address. The IP address assigned to this adapter. This can change if you disconnect from
the network and rejoin it later.
Security Type. Wireless security used for the adapter to connect to the current wireless
network.
Adapter
Adapter MAC Address. The Media Access Control (MAC) address of this adapter. The MAC
address is a unique 48-bit hardware address assigned to each wireless device. As a security
measure, some wireless networks restrict access based on a list of known MAC addresses. If
you try to join such a network, you have to provide your adapter’s MAC address (shown here)
to the network administrator before you can connect.
Region. This is the region setting for the wireless adapter. Wireless channels in use depend
on the country or region. Your wireless adapter automatically scans approved channels for
your region when it checks to see which networks are available in your area. Governments
regulate the channels used for wireless transmission. Operating the wireless adapter in a
different region might violate local laws.

Maintenance
14
802.11ac USB WiFi Adapter
Support
Get Diagnostics Info. Click the Get Info button if support has directed you to do so. The
Genie displays the system Information screen and starts collecting system information, IP
information, client driver and profile information, and site survey information.
Software Update. You can check for software updates at the NETGEAR website. Click the
Check button, and the Genie displays the Live Check screen and checks for available
software upgrades. If new software is found, the adapter software is automatically updated.
Help. Click the Help button to display help.
Remove the Software
You can remove the wireless adapter software in several different ways:
•Uninstall: In Windows, select Start > All Programs > NETGEAR A6200 Genie >
Uninstall NETGEAR A6200 Software.
•Control Panel: How you do this depends on your Windows operating system:
-Windows 7: Select Start > Control Panel > Programs and Features, and then
select NETGEAR A6200 Genie. Click Uninstall and follow the screen prompts.
-Windows Vista: Select Start > Control Panel > Programs and Features, and then
select tNETGEAR A6200 Genie. Click Uninstall/Change from the top menu and
follow the screen prompts.
-Windows XP: Select Start > Control Panel > Add or Remove Programs, and then
select NETGEAR A6200 Genie.
Frequently Asked Questions (FAQs)
The wireless USB Adapter LED is not lit.
The wireless USB Adapter is not inserted securely in the USB port (or USB cable if used) or
the A6200 software is not installed.
•Remove and reinsert the wireless USB Adapter.
•Check the Windows device manager to see if the wireless USB Adapter is recognized
and enabled. Reinstall the A6200 software, if necessary.
•Insert the wireless USB Adapter in a different USB port on your computer if one is
available.
I do not see the icon.
Check to make sure that your wireless USB Adapter is inserted in the USB port. If it is
removed, then the icon is not displayed. When you insert the wireless USB Adapter into the
USB port, the icon returns to your desktop and the Windows system tray.
Maintenance
15
802.11ac USB WiFi Adapter
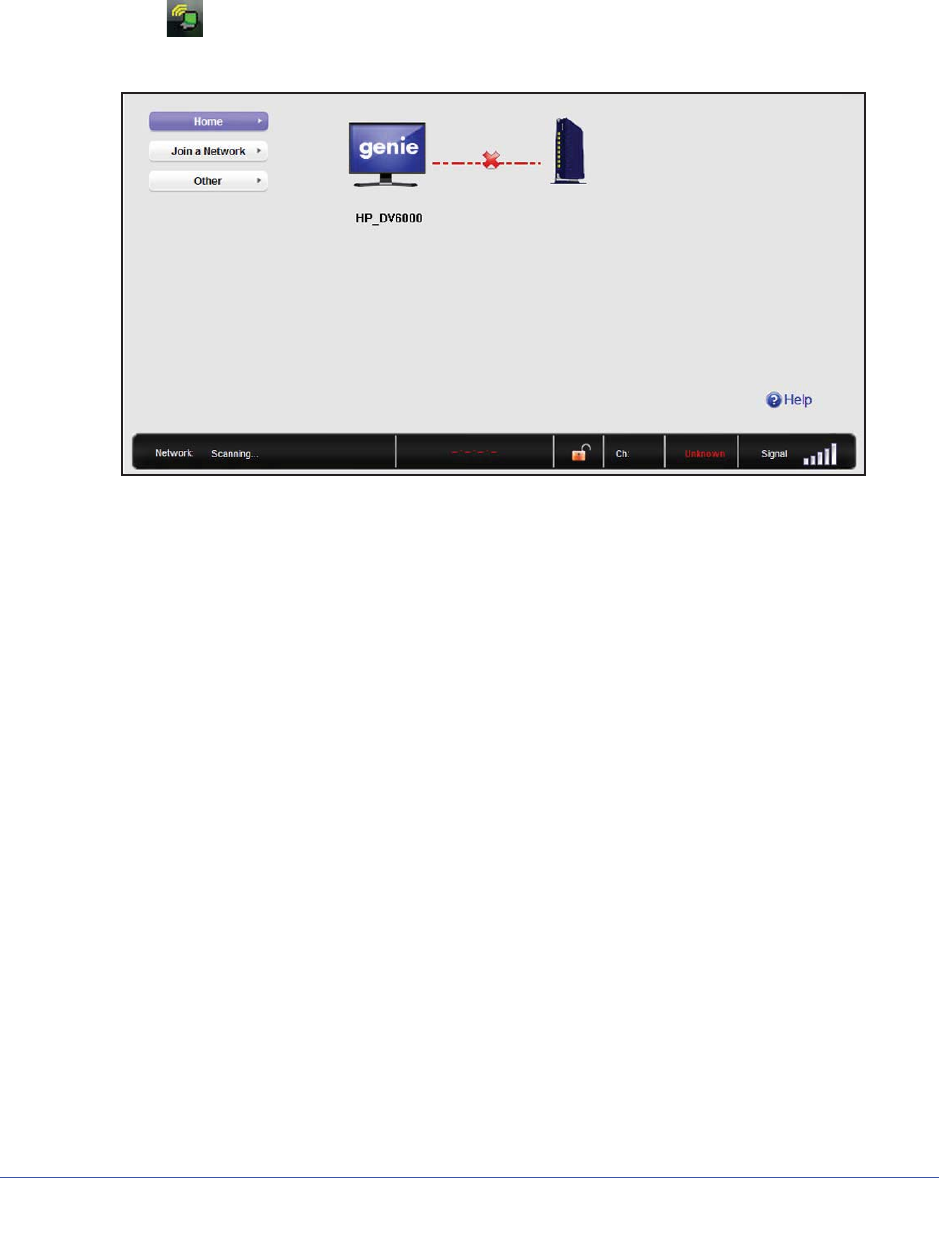
I cannot connect to a wireless network.
• Make sure that your wireless USB Adapter is inserted securely into the USB port on your
computer or the USB cable if you are using it. The wireless USB Adapter LED should light
up or blink (see NETGEAR Genie Desktop Icon on page 4 for details).
• Click the icon to open NETGEAR Genie. The home screen shows the following
screen if the adapter cannot connect to the network that you selected.
• If the network uses wireless security, you need to either know the wireless security
settings or use Push 'N' Connect if the network supports WPS. Some networks also
restrict use to only computers or wireless devices with known MAC addresses. If that is
the case, on the NETGEAR Genie screen, click Other to find the MAC address for your
wireless USB Adapter and provide it to the network administrator.
Maintenance
16
802.11ac USB WiFi Adapter
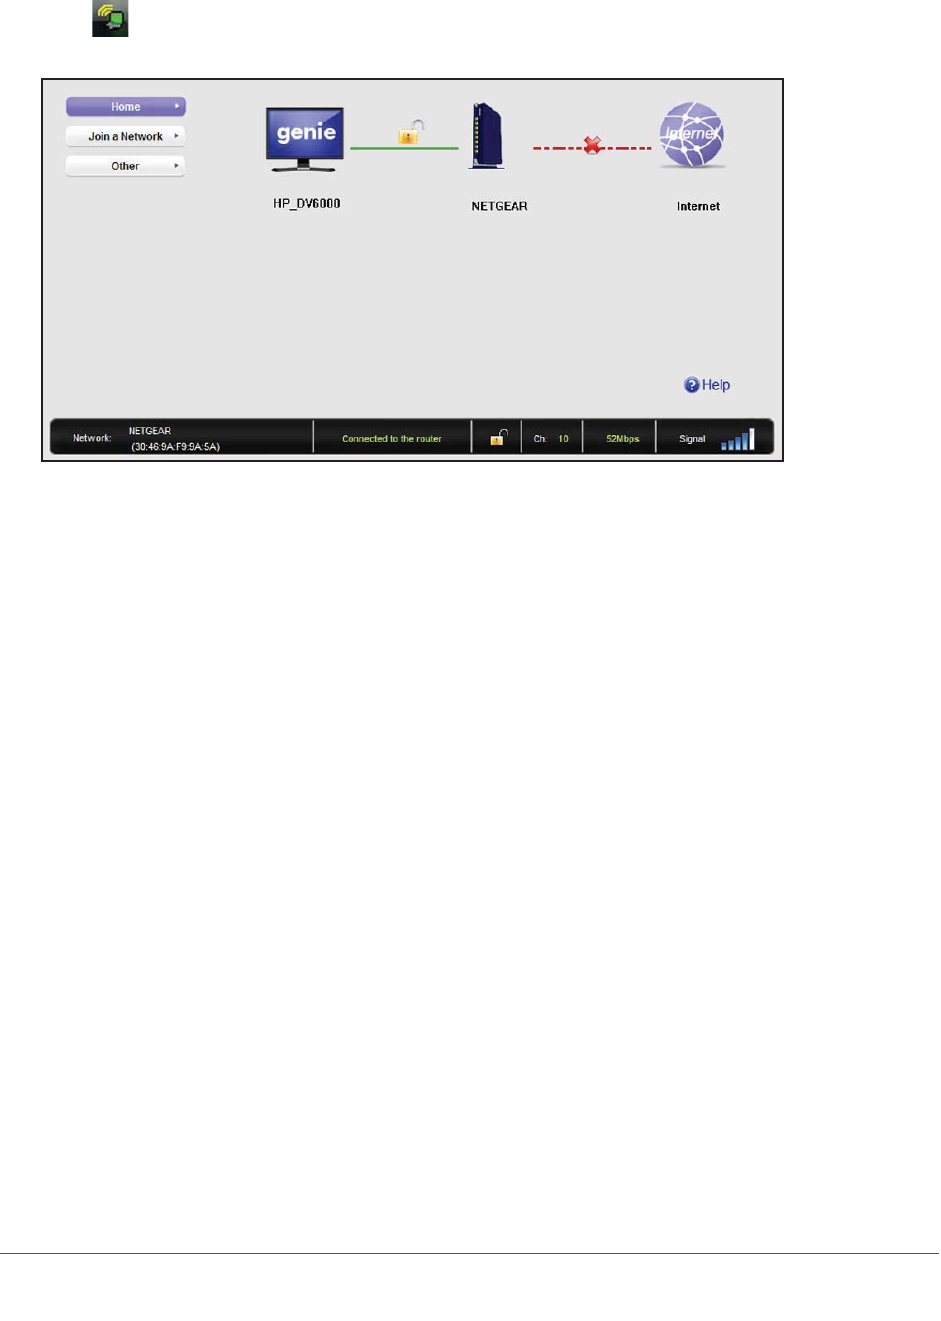
When I connect to the network I cannot access the Internet.
Click to open NETGEAR Genie. The home screen shows the following screen if you are
connected to a network, but cannot access the Internet:
Make sure that you are connected to the right network. If you are, then check to see if the
router’s Internet connection is working. If the router’s Internet connection is not working,
restart the modem, router, and computer.
When I connect to the network I cannot access shared resources such as printers.
•Check to make sure the router or access point is physically connected to the Ethernet
network.
•Make sure that the IP addresses and the Windows networking settings are configured
correctly.
Do the USB ports go into a sleep mode if there is no traffic?
The USB devices do if a USB setting called Selective Suspend is enabled, which it is by
default. If this setting is enabled, and the connected USB devices to go into Selective
Suspend mode, the network disconnects. To prevent this from happening, you can disable
Selective Suspend.
To do disable Selective Suspend mode, go to Start > Control Panel > Hardware and Sound
> Power Options > Edit Plan Settings > Change Advanced Power Settings > USB
Settings, and change the setting for Selective Suspend mode to Disabled.

Maintenance
17
802.11ac USB WiFi Adapter
How can I improve the speed of my wireless connection?
You can use the USB cable and adapter that came in the package to position the wireless
USB Adapter for better wireless communication.
The connection speed can vary depending on the type of USB port on your computer, the
capacity of the router or access point for the wireless network, and the type of Internet
connection. You can view the throughput in the status bar at the bottom of the Smart Wizard
screen.
• If the throughput is 54 Mbps you could be connected to an 802.11g network, or the
wireless-N network could be set with WPA (TKIP) security.
Wi-Fi regulations allow the wireless USB Adapter to connect only at up to 54 Mbps when
WPA (TKIP) security mode is set on the router. For a faster connection, set the security
for the router as WPA2 or WPA + WPA2 mixed wireless security. Then the wireless
adapter can connect in 802.11n mode.
• If you do not have a USB 2.0 port on your computer, the throughput is limited to the 14
Mbps of the older USB 1.1 standard.
How can I view the IP address for the wireless USB Adapter?
Click the icon to open NETGEAR Genie. Then click the Other button to view the IP
address.
No IP address is assigned to the wireless USB Adapter.
This can occur if you upgraded your wireless USB Adapter software and did not reboot your
computer. Either restart your computer, or connect to a different access point.
18
A
A. Supplemental Information
Technical Specifications
The following table provides technical specifications for the wireless USB Adapter.
Feature Description
Antenna 2 LDS antenna
Standards 802.11ac draft 2.0, 802.11n, 802,11g, 802.11a, or 802.11b
Radio data rate Auto Sensing
Frequency 2.4GHz to 2.5GHz CCK and OFDM Mmodulation:5GHz OFDM and
802.11n MCS0-23, MCS32 coding scheme and 802.11ac MCS0-9
coding scheme
Power 5V Bus powered
Emissions FCC, CE
Bus interface USB 2.0
Provided drivers Microsoft Windows 7, Vista, and Windows XP (32/64-bit)
Operating environment Operating temperature: 0 to 40q C
Encryption WPA2-PSK [AES], WPA-PSK [TKIP], and 40-bit (also called 64-bit)
and 128-bit WEP data encryption
Warranty Limited 1-year warranty

Supplemental Information
19
802.11ac USB WiFi Adapter
Factory Default Settings
The following table lists the default settings of your wireless USB Adapter.
Default Settings
Wireless communication Enabled
Country/Region United States (varies by region)
Operating mode 802.11ac Draft 2.0, 802.11n, 802.11a, 802.11g, or 802.11g
Data rate Up to 866 Mbps

Appendix B. Notification of Compliance | 20
B
B. Notification of Compliance
Maximum Wireless Signal Rate Derived from IEEE Standard 802.11 Specifications
Actual data throughput will vary. Network conditions and environmental factors, including volume of network traffic,
building materials and construction, and network overhead, lower actual data throughput rate.
Safety and Regulatory Notices
FCC Statement
This equipment has been tested and found to comply with the limits for a Class B digital device, pursuant to Part 15
of the FCC Rules. These limits are designed to provide reasonable protection against harmful interference in a
residential installation. This equipment generates, uses and can radiate radio frequency energy and, if not installed
and used in accordance with the instructions, may cause harmful interference to radio communications. However,
there is no guarantee that interference will not occur in a particular installation. If this equipment does cause harmful
interference to radio or television reception, which can be determined by turning the equipment off and on, the user
is encouraged to try to correct the interference by one of the following measures:
•Reorient or relocate the receiving antenna
•Increase the separation between the equipment and the receiver.
•Connect the equipment to an outlet on a circuit different from that to which the receiver is connected.
•Consult the dealer or an experienced radio/TV technician for help.
FCC Caution: Any changes or modification not expressly approved by the party responsible for compliance could
void the user’s authority to operate the equipment.
Operations in the 5.15-5.25 GHz band are restricted to indoor usage only.
This device complies with Part 15 of the FCC Rules. Operation is subject to the following two conditions: (1) This
device may not cause harmful interference, and (2) this device must accept any interference received, including
interference that may cause undesired operation.
This transmitter must not be co-located or operated in conjunction with any other antenna or transmitter.
Radiation Exposure Statement:
The product complies with the FCC portable RF exposure limit set forth for an uncontrolled environment and is safe
for intended operation as described in this manual. The further RF exposure reduction can be achieved if the
product can be kept as far as possible from the user’s body or if the device can be set to a lower output power if
such function is available.
The USB dongle transmitter is approved for use in typical laptop computers. To comply with FCC RF exposure
requirements, it should not be used in other devices or certain laptop and tablet computer configurations where the
USB connectors on the host computer are unable to provide or ensure the necessary operating configurations
intended for the device and its users or bystanders to satisfy RF exposure compliance requirements.
Note: The country code selection is for non-US models only and is not available to all US models. Per FCC
regulation, all Wi-Fi products marketed in the US must be fixed to US operation channels only.

802.11ac USB WiFi Adapter A6200
Appendix B. Notification of Compliance 21
FCC RF Radiation Exposure and SAR Statements
For products available in the USA/Canada market, only channel 1~11 can be operated. Selection of other
channels is not possible. This device complies with Part 15 of the FCC Rules. Operation is subject to the
following two conditions: (1) This device may not cause harmful interference, and (2) this device must accept any
interference received, including interference that may cause undesired operation. This device and its antenna(s)
must not be co-located or operated in conjunction with any other antenna or transmitter. This device is going to
be operated in a 5.15~5.25 GHz frequency range; it is restricted to an indoor environment only. Warning of high
power radars as primary users of bands 5725–5850 MHz that could cause interference and/or damage to the
UNII device.Federal Communication Commission (FCC) Radiation Exposure Statement: This EUT is compliance
with SAR for general population/uncontrolled exposure limits in ANSI/IEEE C95.1-1999. This equipment should
be installed and operated with minimum distance 0.5 cm between the radiator & your body.
RF Exposure Information
The radio module has been evaluated under FCC Bulletin OET 65C (01-01) and found to be compliant to the
requirements as set forth in CFR 47 Sections, 2.1093, and 15.247 (b) (4) addressing RF Exposure from radio
frequency devices. This model meets the applicable government requirements for exposure to radio frequency
waves. This EUT is compliant with SAR for general population/uncontrolled exposure limits in ANSI/IEEE
C95.1-1999.
This device meets the government’s requirements for exposure to radio waves. This device is designed and
manufactured not to exceed the emission limits for exposure to radio frequency (RF) energy set by the Federal
Communications Commission of the U.S. Government. The exposure standard for wireless device employs a
unit of measurement known as the Specific Absorption Rate, or SAR. The SAR limit set by the FCC is 1.6W/kg.
*Tests for SAR are conducted using standard operating positions accepted by the FCC with the device
transmitting at its highest certified power level in all tested frequency bands. Although the SAR is determined at
the highest certified power level, the actual SAR level of the device while operating can be well below the
maximum value. This is because the device is designed to operate at multiple power levels so as to use only the
poser required to reach the network. In general, the closer you are to a wireless base station antenna, the lower
the power output. SAR compliance has been established in the host product(s) (laptop computers), tested at
5mm separation distance to the human body, and tested with USB slot configurations including Horizontal-UP,
Horizontal-Down, Vertical-Front, Vertical-Back. This device can be used in host product(s) with substantially
similar physical dimensions, construction, and electrical and RF characteristics.
The highest SAR value, tested per FCC RF exposure guidelines for USB dongle, as described in this user guide,
is 1.18W/kg. The FCC has granted an Equipment Authorization for this device with all reported SAR levels
evaluated as in compliance with the FCC RF exposure guidelines. SAR information on this device is on file with
the FCC and can be found under the Display Grant section of www.fcc.gov/oet/ea/fccid after searching on FCC
ID: PY312200200.
Product label: To view the FCC ID, please rotate the upper part of the device
Canadian Department of Communications Industry Canada (IC) Notice
This equipment should be installed and operated with a minimum distance of 0.5 cm between the radiator and
your body.This Class B digital apparatus complies with Canadian ICES-003 and RSS-210. Cet appareil
numérique de la classe B est conforme à la norme NMB-003 et CNR-210 du Canada.
“To prevent radio interference to the licensed service, this device is intended to be operated indoors and away
from windows to provide maximum shielding. Equipment (or its transmit antenna) that is installed outdoors is
subject to licensing.”
“Pour empêcher que cet appareil cause du brouillage au service faisant l’objet d’une licence, il doit être utilisé à
l’intérieur et devrait être placé loin des fenêtres afin de fournir un écran de blindage maximal. Si le matériel (ou
son antenne d’émission) est installé à l’extérieur, il doit faire l’objet d’une licence.”
Industry Canada Statement:
This device complies with RSS-210 of the Industry Canada Rules. Operation is subject to the following two
conditions: (1) This device may not cause harmful interference, and (2) this device must accept any interference
received, including interference that may cause undesired operation.
Radiation Exposure Statement:
The product complies with the Canada portable RF exposure limit set forth for an uncontrolled environment and
is safe for intended operation as described in this manual. The further RF exposure reduction can be achieved if
the product can be kept as far as possible from the user’s body or the device can be set to a lower output power,
if such function is available.
External Amplifiers
Under Industry Canada regulations, this radio frequency power amplifier (insert Industry Canada certification
number of radio frequency power amplifier) may only be used with the transmitter with which the amplifier has
been certified by Industry Canada. The certification number for the transmitter with which this amplifier is
permitted to operate is IC: SKY85803.
Conformément à la réglementation d'Industrie Canada, le présent amplificateur de puissance radiofréquence
peut être utilisé seulement avec un émetteur avec lequel il a été certifié par Industrie Canada. Le numéro
d'identification d'Industrie Canada pour l'émetteur avec lequel l'amplificateur est autorisé à fonctionner est IC :
SKY85803.

22 | Appendix B. Notification of Compliance
802.11ac USB WiFi Adapter A6200
Caution:
(i) The device when operated in the band 5150-5250 MHz is only for indoor use to reduce the potential for harmful
interference to co-channel mobile satellite systems;
(iii) The maximum antenna gain permitted for devices in the band 5725-5850 MHz shall comply with the e.i.r.p. limits
specified for point-to-point and non point-to-point operation as appropriate.
(iv) Users should also be advised that high-power radars are allocated as primary users (i.e., priority users) of the
bands 5725-5850 MHz and that these radars could cause interference and/or damage to LE-LAN devices.
Ce dispositif est conforme à la norme CNR-210 d'Industrie Canada applicable aux appareils radio exempts de
licence. Son fonctionnement est sujet aux deux conditions suivantes: (1) le dispositif ne doit pas produire de
brouillage préjudiciable, et (2) ce dispositif doit accepter tout brouillage reçu, y compris un brouillage susceptible de
provoquer un fonctionnement indésirable.
Déclaration d'exposition aux radiations:
Le produit est conforme aux limites d'exposition pour les appareils portables RF pour les Etats-Unis et le Canada
établies pour un environnement non contrôlé.
Le produit est sûr pour un fonctionnement tel que décrit dans ce manuel. La réduction aux expositions RF peut être
augmentée si l'appareil peut être conservé aussi loin que possible du corps de l'utilisateur ou que le dispositif est
réglé sur la puissance de sortie la plus faible si une telle fonction est disponible.
Avertissement:
Le guide d’utilisation des dispositifs pour réseaux locaux doit inclure des instructions précises sur les restrictions
susmentionnées, notamment :
(i) les dispositifs fonctionnant dans la bande 5 150-5 250 MHz sont réservés uniquement pour une utilisation à
l’intérieur afin de réduire les risques de brouillage préjudiciable aux systèmes de satellites mobiles utilisant les
mêmes canaux;
(ii) le gain maximal d’antenne permis pour les dispositifs utilisant les bandes 5 250-5 350 MHz et 5 470-5 725 MHz
doit se conformer à la limite de p.i.r.e.;
(iii) le gain maximal d’antenne permis (pour les dispositifs utilisant la bande 5 725-5 825 MHz) doit se conformer à la
limite de p.i.r.e. spécifiée pour l’exploitation point à point et non point à point, selon le cas.
(iv) De plus, les utilisateurs devraient aussi être avisés que les utilisateurs de radars de haute puissance sont
désignés utilisateurs principaux (c.-à-d., qu’ils ont la priorité) pour les bandes 5 250-5 350 MHz et 5 650-5 850 MHz
et que ces radars pourraient causer du brouillage et/ou des dommages aux dispositifs LAN-EL.
Europe - EU Declaration of Conformity
A printed copy of the EU Declaration of Conformity certificate for this product is provided in the A6200 product
package.
Èesky
[Czech]
NETGEAR, Inc. tímto prohlašuje, že tento 802.11ac USB WiFi Adapter je ve shodì se
základními požadavky a dalšími pøíslušnými ustanoveními smìrnice 1999/5/ES.
Dansk
[Danish]
Undertegnede NETGEAR, Inc. erklærer herved, at følgende udstyr 802.11ac USB WiFi
Adapter overholder de væsentlige krav og øvrige relevante krav i direktiv 1999/5/EF.
Deutsch
[German]
Hiermit erklärt NETGEAR, Inc., dass sich das Gerät 802.11ac USB WiFi Adapter in
Übereinstimmung mit den grundlegenden Anforderungen und den übrigen einschlägigen
Bestimmungen der Richtlinie 1999/5/EG befindet.
Appendix B. Notification of Compliance | 23
802.11ac USB WiFi Adapter A6200
Eesti
[Estonian]
Käesolevaga kinnitab NETGEAR, Inc. seadme 802.11ac USB WiFi Adapter vastavust
direktiivi 1999/5/EÜ põhinõuetele ja nimetatud direktiivist tulenevatele teistele
asjakohastele sätetele.
English Hereby, NETGEAR, Inc., declares that this 802.11ac USB WiFi Adapter is in compliance
with the essential requirements and other relevant provisions of Directive 1999/5/EC.
Español
[Spanish]
Por medio de la presente NETGEAR, Inc. declara que el 802.11ac USB WiFi Adapter
cumple con los requisitos esenciales y cualesquiera otras disposiciones aplicables o
exigibles de la Directiva 1999/5/CE.
[Greek]
NETGEAR Inc. 802.11ac USB WiFi Adapter
1999/5/.
Français
[French]
Par la présente NETGEAR, Inc. déclare que l'appareil 802.11ac USB WiFi Adapter est
conforme aux exigences essentielles et aux autres dispositions pertinentes de la directive
1999/5/CE.
Italiano
[Italian]
Con la presente NETGEAR, Inc. dichiara che questo 802.11ac USB WiFi Adapter è
conforme ai requisiti essenziali ed alle altre disposizioni pertinenti stabilite dalla direttiva
1999/5/CE.
Latviski
[Latvian]
Ar šo NETGEAR, Inc. deklarç, ka 802.11ac USB WiFi Adapter atbilst Direktîvas 1999/5/EK
bûtiskajâm prasîbâm un citiem ar to saistîtajiem noteikumiem.
Lietuviø
[Lithuanian]
Šiuo NETGEAR, Inc. deklaruoja, kad šis 802.11ac USB WiFi Adapter atitinka esminius
reikalavimus ir kitas 1999/5/EB Direktyvos nuostatas.
Nederlands
[Dutch]
Hierbij verklaart NETGEAR, Inc. dat het toestel 802.11ac USB WiFi Adapter in
overeenstemming is met de essentiële eisen en de andere relevante bepalingen van
richtlijn 1999/5/EG.
Malti
[Maltese]
Hawnhekk, NETGEAR, Inc., jiddikjara li dan 802.11ac USB WiFi Adapter jikkonforma
mal-tiijiet essenzjali u ma provvedimenti orajn relevanti li hemm fid-Dirrettiva 1999/5/EC.
Magyar
[Hungarian]
Alulírott, NETGEAR, Inc. nyilatkozom, hogy a 802.11ac USB WiFi Adapter megfelel a
vonatkozó alapvetõ követelményeknek és az 1999/5/EC irányelv egyéb elõírásainak.
Polski [Polish] Niniejszym NETGEAR, Inc. oœwiadcza, ¿e 802.11ac USB WiFi Adapter jest zgodny z
zasadniczymi wymogami oraz pozosta³ymi stosownymi postanowieniami Dyrektywy
1999/5/EC.
Português
[Portuguese]
NETGEAR, Inc. declara que este 802.11ac USB WiFi Adapter está conforme com os
requisitos essenciais e outras disposições da Directiva 1999/5/CE.
Slovensko
[Slovenian]
NETGEAR, Inc. izjavlja, da je ta 802.11ac USB WiFi Adapter v skladu z bistvenimi
zahtevami in ostalimi relevantnimi doloèili direktive 1999/5/ES.
Slovensky
[Slovak]
NETGEAR, Inc. týmto vyhlasuje, že 802.11ac USB WiFi Adapter spåòa základné
požiadavky a všetky príslušné ustanovenia Smernice 1999/5/ES.
Suomi
[Finnish]
NETGEAR, Inc. vakuuttaa täten että 802.11ac USB WiFi Adapter tyyppinen laite on
direktiivin 1999/5/EY oleellisten vaatimusten ja sitä koskevien direktiivin muiden ehtojen
mukainen.
Svenska
[Swedish]
Härmed intygar NETGEAR, Inc. att denna [utrustningstyp] står I överensstämmelse med
de väsentliga egenskapskrav och övriga relevanta bestämmelser som framgår av direktiv
1999/5/EG.