Netgear orporated 12300207 N900 Wireless Dual Band Gigabit Router User Manual 2
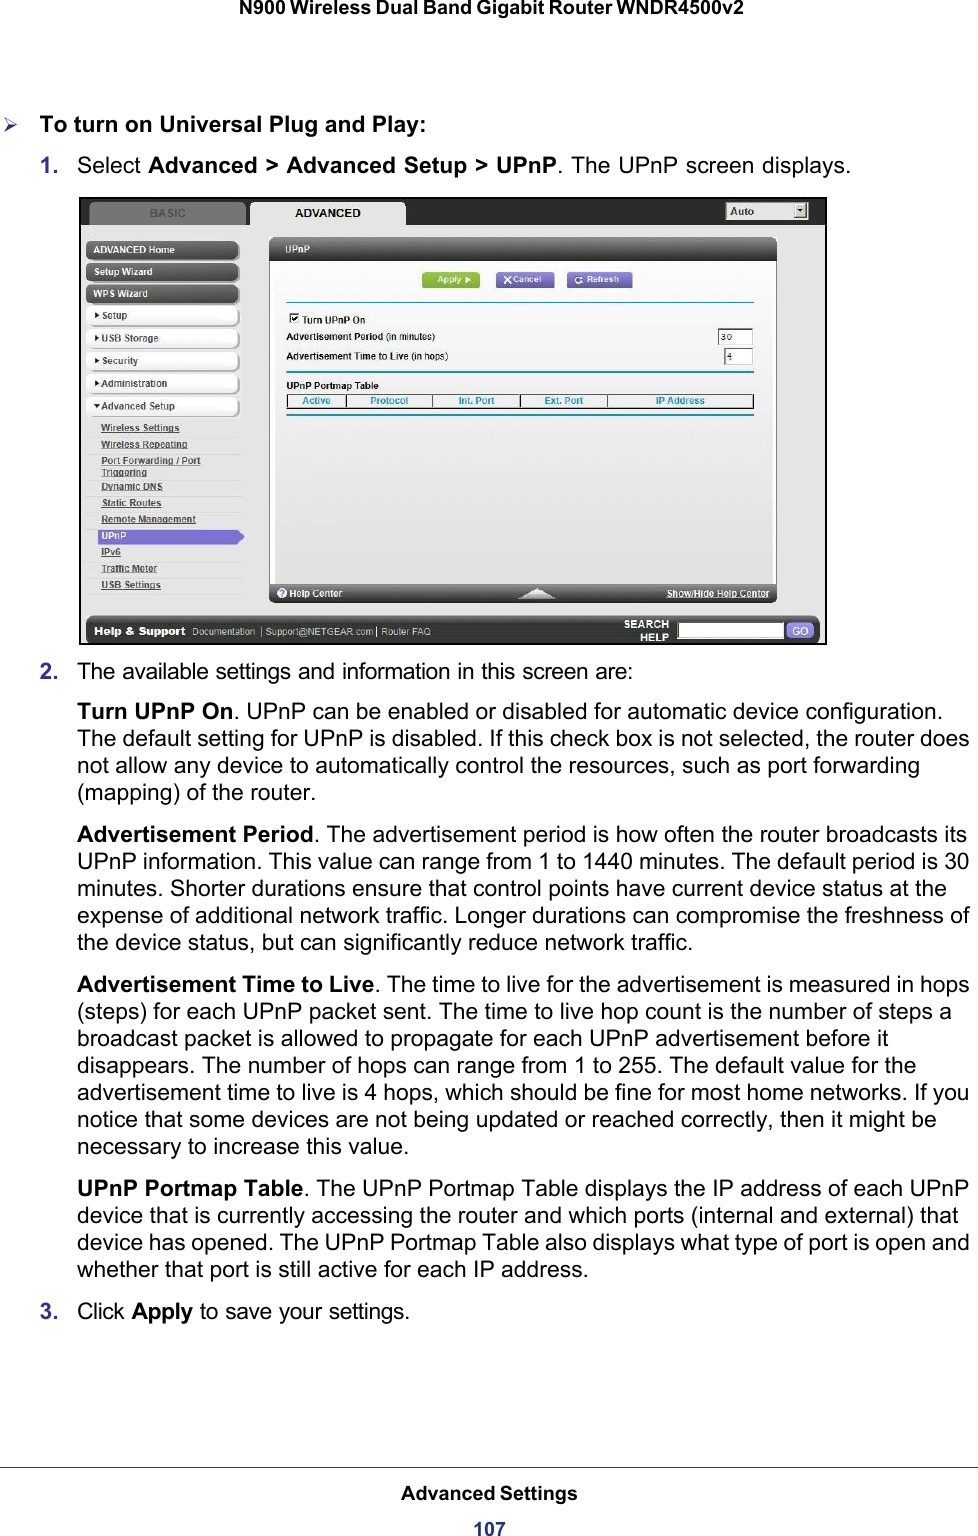
Netgear Incorporated N900 Wireless Dual Band Gigabit Router 2
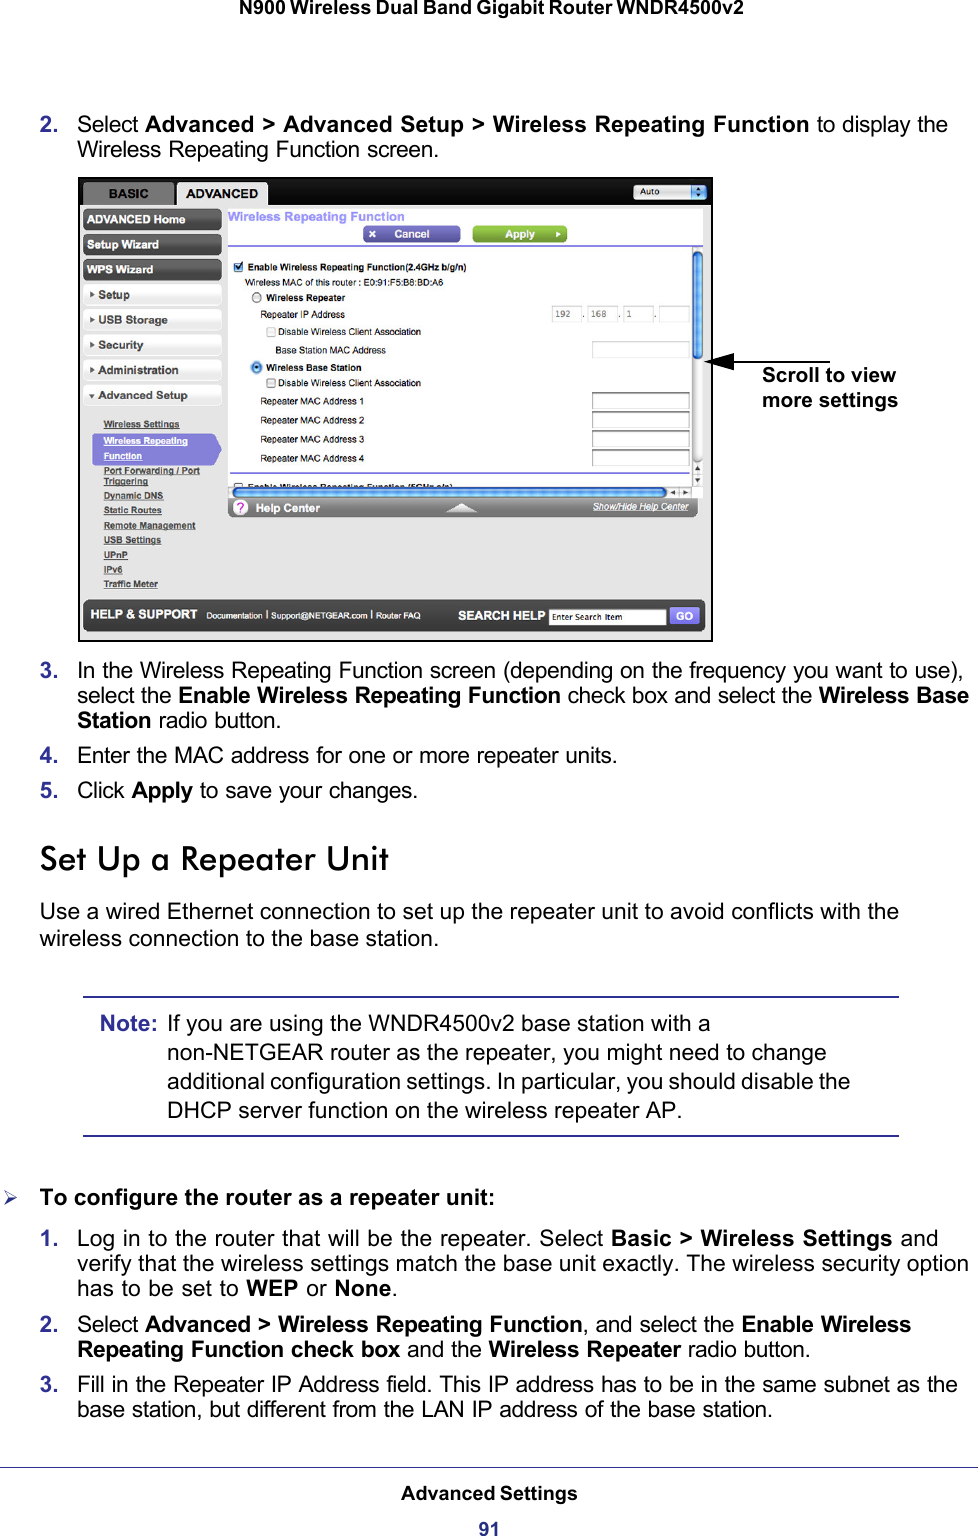
UserManual.wiki
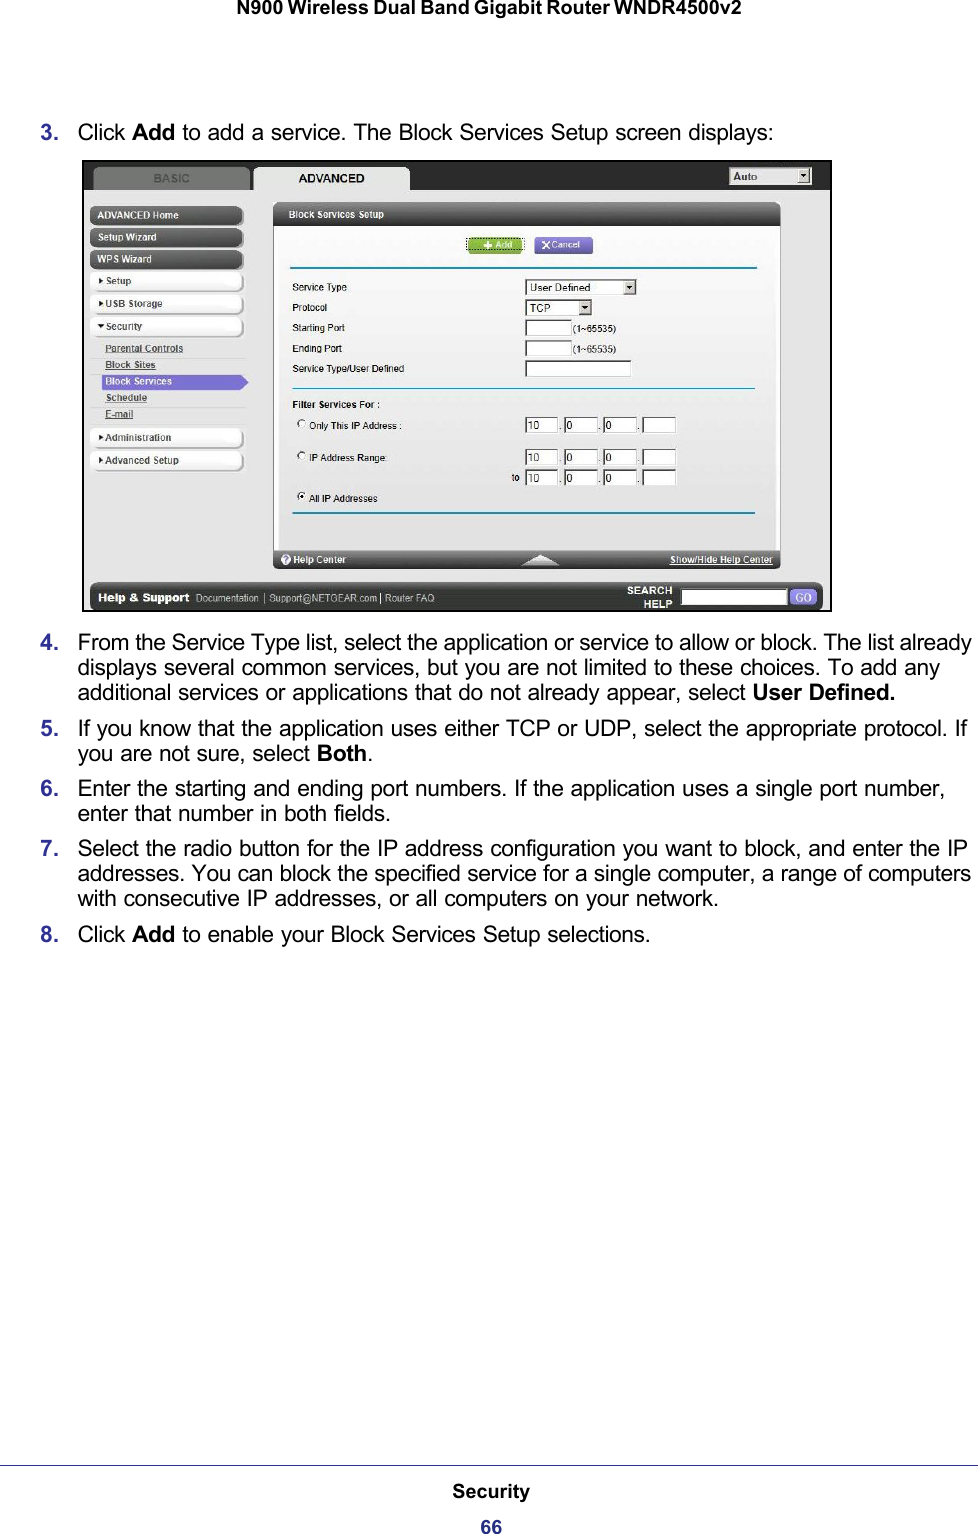
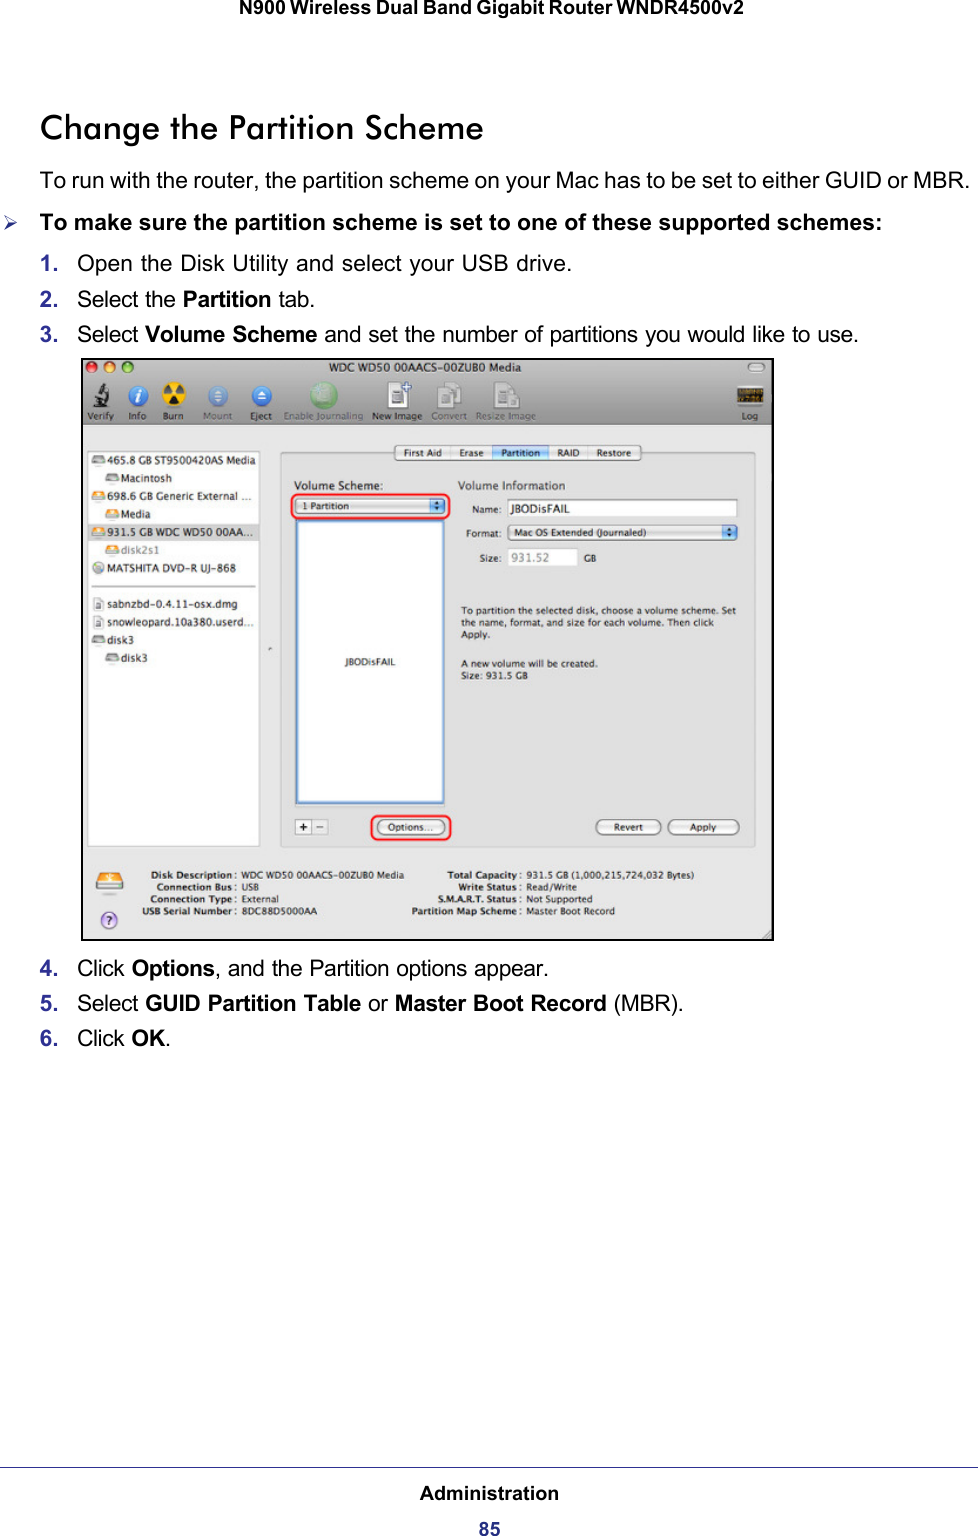
>
Netgear orporated
>
12300207 User Manual
>
User Manual-2
Contents
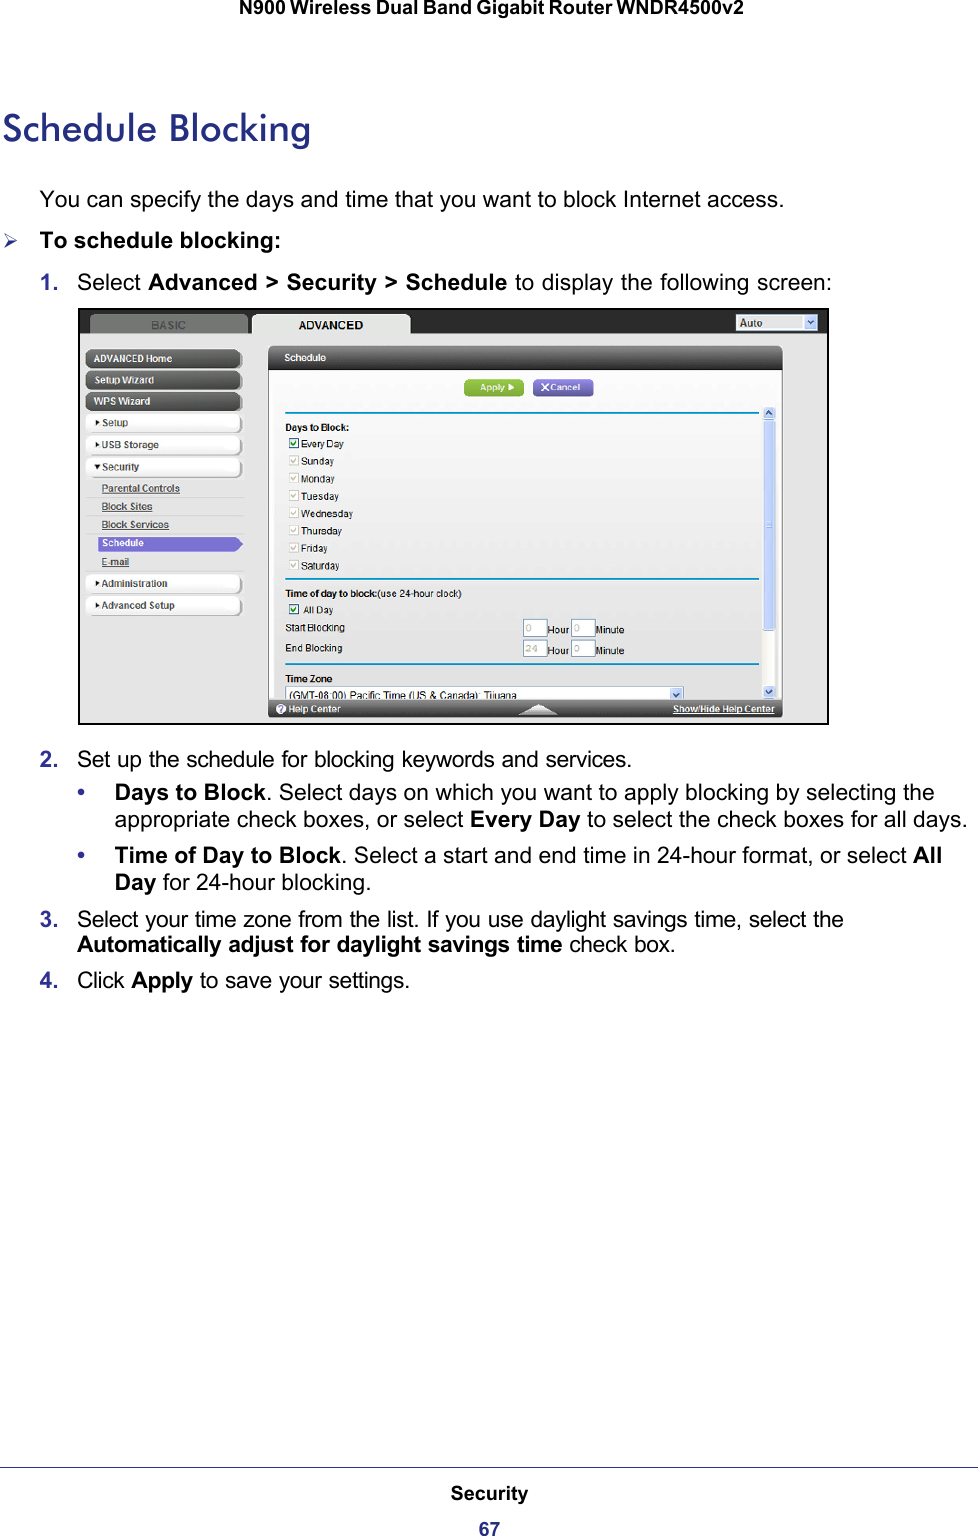
1.
User Manual-1
2.
User Manual-2
User Manual-2
Navigation menu
Upload a User Manual
Namespaces
Wiki Guide
HTML
PDF
Info
Views
User Manual
Discussion / Help
Navigation


![124BB. Notification of ComplianceNETGEAR Dual Band - WirelessRegulatory Compliance InformationThis section includes user requirements for operating this product in accordance with National laws for usage of radio spectrum and operation of radio devices. Failure of the end-user to comply with the applicable requirements may result in unlawful operation and adverse action against the end-user by the applicable National regulatory authority.Note: Note: This product's firmware limits operation to only the channels allowed in a particular Region or Country. Therefore, all options described in this user's guide may not be available in your version of the product.Europe - EU Declaration of ConformityMarking by the above symbol indicates compliance with the Essential Requirements of the R&TTE Directive of the European Union (1999/5/EC). This equipment meets the following conformance standards: EN300 328 (2.4Ghz), EN301 489-17, EN301 893 (5Ghz), EN60950-1For complete DoC, visit the NETGEAR EU Declarations of Conformity website at: http://support.netgear.com/app/answers/detail/a_id/11621/ EDOC in Languages of the European CommunityLanguage StatementCesky [Czech] NETGEAR Inc. tímto prohlašuje, že tento Radiolan je ve shode se základními požadavky a dalšími príslušnými ustanoveními smernice 1999/5/ES.Dansk [Danish] Undertegnede NETGEAR Inc. erklærer herved, at følgende udstyr Radiolan overholder de væsentlige krav og øvrige relevante krav i direktiv 1999/5/EF.Deutsch [German]Hiermit erklärt NETGEAR Inc., dass sich das Gerät Radiolan in Übereinstimmung mit den grundlegenden Anforderungen und den übrigen einschlägigen Bestimmungen der Richtlinie 1999/5/EG befindet.Eesti [Estonian] Käesolevaga kinnitab NETGEAR Inc. seadme Radiolan vastavust direktiivi 1999/5/EÜ põhinõuetele ja nimetatud direktiivist tulenevatele teistele asjakohastele sätetele.English Hereby, NETGEAR Inc., declares that this Radiolan is in compliance with the essential requirements and other relevant provisions of Directive 1999/5/EC.](https://usermanual.wiki/Netgear-orporated/12300207.User-Manual-2/User-Guide-1830918-Page-64.png)
![Notification of Compliance125N900 Wireless Dual Band Gigabit Router WNDR4500v2Español [Spanish] Por medio de la presente NETGEAR Inc. declara que el Radiolan cumple con los requisitos esenciales y cualesquiera otras disposiciones aplicables o exigibles de la Directiva 1999/5/CE.ζζηνδεή [Greek] Μ ΣΗΝ ΠΑΡΟΤΑ NETGEAR Inc. ΗΛΩΝΙ ΟΣΙ Radiolan ΤΜΜΟΡΦΩΝΣΑΙ ΠΡΟ ΣΙ ΟΤΙΩΙ ΑΠΑΙΣΗΙ ΚΑΙ ΣΙ ΛΟΙΠ ΧΣΙΚ ΙΑΣΑΞΙ ΣΗ ΟΗΓΙΑ 1999/5/Κ.Français [French] Par la présente NETGEAR Inc. déclare que l'appareil Radiolan est conforme aux exigences essentielles et aux autres dispositions pertinentes de la directive 1999/5/CE.Italiano [Italian] Con la presente NETGEAR Inc. dichiara che questo Radiolan è conforme ai requisiti essenziali ed alle altre disposizioni pertinenti stabilite dalla direttiva 1999/5/CE.Latviski [Latvian] Ar šo NETGEAR Inc. deklarē, ka Radiolan atbilst Direktīvas 1999/5/EK būtiskajām prasībām un citiem ar to saistītajiem noteikumiem.Lietuvių [Lithuanian] Šiuo NETGEAR Inc. deklaruoja, kad šis Radiolan atitinka esminius reikalavimus ir kitas 1999/5/EB Direktyvos nuostatas.Nederlands [Dutch]Hierbij verklaart NETGEAR Inc. dat het toestel Radiolan in overeenstemming is met de essentiële eisen en de andere relevante bepalingen van richtlijn 1999/5/EG.Malti [Maltese] Hawnhekk, NETGEAR Inc., jiddikjara li dan Radiolan jikkonforma mal-htigijiet essenzjali u ma provvedimenti ohrajn relevanti li hemm fid-Dirrettiva 1999/5/EC.Magyar [Hungarian]Alulírott, NETGEAR Inc. nyilatkozom, hogy a Radiolan megfelel a vonatkozó alapvetõ követelményeknek és az 1999/5/EC irányelv egyéb elõírásainak.Polski [Polish] Niniejszym NETGEAR Inc. oświadcza, że Radiolan jest zgodny z zasadniczymi wymogami oraz pozostałymi stosownymi postanowieniami Dyrektywy 1999/5/EC.Português [Portuguese]NETGEAR Inc. declara que este Radiolan está conforme com os requisitos essenciais e outras disposições da Directiva 1999/5/CE.Slovensko [Slovenian]NETGEAR Inc. izjavlja, da je ta Radiolan v skladu z bistvenimi zahtevami in ostalimi relevantnimi določili direktive 1999/5/ES.Slovensky [Slovak]NETGEAR Inc. týmto vyhlasuje, že Radiolan spĺňa základné požiadavky a všetky príslušné ustanovenia Smernice 1999/5/ES.Suomi [Finnish] NETGEAR Inc. vakuuttaa täten että Radiolan tyyppinen laite on direktiivin 1999/5/EY oleellisten vaatimusten ja sitä koskevien direktiivin muiden ehtojen mukainen.Svenska [Swedish]Härmed intygar NETGEAR Inc. att denna Radiolan står I överensstämmelse med de väsentliga egenskapskrav och övriga relevanta bestämmelser som framgår av direktiv 1999/5/EG.](https://usermanual.wiki/Netgear-orporated/12300207.User-Manual-2/User-Guide-1830918-Page-65.png)
![Notification of Compliance126N900 Wireless Dual Band Gigabit Router WNDR4500v2This device is a 2.4 GHz wideband transmission system (transceiver), intended for use in all EU member states and EFTA countries, except in France and Italy where restrictive use applies.In Italy the end-user should apply for a license at the national spectrum authorities in order to obtain authorization to use the device for setting up outdoor radio links and/or for supplying public access to telecommunications and/or network services.This device may not be used for setting up outdoor radio links in France and in some areas the RF output power may be limited to 10 mW EIRP in the frequency range of 2454 - 2483.5 MHz. For detailed information the end-user should contact the national spectrum authority in France.FCC Requirements for Operation in the United States FCC Information to UserThis product does not contain any user serviceable components and is to be used with approved antennas only. Any product changes or modifications will invalidate all applicable regulatory certifications and approvals.FCC Guidelines for Human ExposureThis equipment complies with FCC radiation exposure limits set forth for an uncontrolled environment. This equipment should be installed and operated with minimum distance of 20 cm between the radiator and your body.This transmitter must not be co-located or operating in conjunction with any other antenna or transmitter. FCC Declaration of ConformityWe, NETGEAR, Inc., 350 East Plumeria Drive, San Jose, CA 95134, declare under our sole responsibility that the N900 Wireless Dual Band Gigabit Router WNDR4500v2 complies with Part 15 Subpart B of FCC CFR47 Rules. Operation is subject to the following two conditions:• This device may not cause harmful interference, and• This device must accept any interference received, including interference that may cause undesired operation.FCC Radio Frequency Interference Warnings & InstructionsThis equipment has been tested and found to comply with the limits for a Class B digital device, pursuant to Part 15 of the FCC Rules. These limits are designed to provide reasonable protection against harmful interference in a residential installation. This equipment uses and can radiate radio frequency energy and, if not installed and used in accordance with the instructions, may cause harmful interference to radio communications. However, there is no guarantee that interference will not occur in a particular installation. If this equipment does cause harmful interference to radio or television reception, which can be determined by turning the equipment off and on, the user is encouraged to try to correct the interference by one or more of the following methods:• Reorient or relocate the receiving antenna.• Increase the separation between the equipment and the receiver.• Connect the equipment into an electrical outlet on a circuit different from that which the radio receiver is connected.• Consult the dealer or an experienced radio/TV technician for help.FCC Caution• Any changes or modifications not expressly approved by the party responsible for compliance could void the user's authority to operate this equipment. • This device complies with Part 15 of the FCC Rules. Operation is subject to the following two conditions: (1) This device may not cause harmful interference, and (2) this device must accept any interference received, including interference that may cause undesired operation. Íslenska [Icelandic]Hér með lýsir NETGEAR Inc. yfir því að Radiolan er í samræmi við grunnkröfur og aðrar kröfur, sem gerðar eru í tilskipun 1999/5/EC.Norsk [Norwegian]NETGEAR Inc. erklærer herved at utstyret Radiolan er i samsvar med de grunnleggende krav og øvrige relevante krav i direktiv 1999/5/EF.](https://usermanual.wiki/Netgear-orporated/12300207.User-Manual-2/User-Guide-1830918-Page-66.png)
![Notification of Compliance127N900 Wireless Dual Band Gigabit Router WNDR4500v2• For product available in the USA market, only channel 1~11 can be operated. Selection of other channels is not possible.• This device and its antenna(s) must not be co-located or operation in conjunction with any other antenna or transmitter.Canadian Department of Communications Radio Interference RegulationsThis digital apparatus (N900 Wireless Dual Band Gigabit Router WNDR4500v2) does not exceed the Class B limits for radio-noise emissions from digital apparatus as set out in the Radio Interference Regulations of the Canadian Department of Communications.This Class [B] digital apparatus complies with Canadian ICES-003.Cet appareil numérique de la classe [B] est conforme à la norme NMB-003 du CanadaIndustry CanadaThis device complies with RSS-210 of the Industry Canada Rules. Operation is subject to the following two conditions: (1) This device may not cause harmful interference, and (2) this device must accept any interference received, including interference that may cause undesired operation.IMPORTANT NOTE: Radiation Exposure Statement:This equipment complies with IC radiation exposure limits set forth for an uncontrolled environment. This equipment should be installed and operated with minimum distance 20cm between the radiator & your body.Caution:The device for the band 5150-5250 MHz is only for indoor usage to reduce po-tential for harmful interference to co-channel mobile satellite systems. High power radars are allocated as primary users (meaning they have priority) of 5250-5350 MHz and 5650-5850 MHz and these radars could cause interference and/or damage to LE-LAN devices. Ce dispositif est conforme à la norme CNR-210 d'Industrie Canada applicable aux appareils radio exempts de licence. Son fonctionnement est sujet aux deux conditions suivantes: (1) le dispositif ne doit pas produire de brouillage préjudiciable, et (2) ce dispositif doit accepter tout brouillage reçu, y compris un brouillage susceptible de provoquer un fonctionnement indésirable.NOTE IMPORTANTE: Déclaration d'exposition aux radiations:Cet équipement est conforme aux limites d'exposition aux rayonnements IC établies pour un environnement non contrôlé. Cet équipement doit être installé et utilisé avec un minimum de 20 cm de distance entre la source de rayonnement et votre corps.Avertissement:Le dispositif fonctionnant dans la bande 5150-5250 MHz est réservé uniquement pour une utili-sation à l'intérieur afin de réduire les risques de brouillage préjudiciable aux systèmes de satellites mobiles utilisant les mêmes canaux.Les utilisateurs de radars de haute puissance sont désignés utilisateurs principaux (c.-à-d., qu'ils ont la priorité) pour les bandes 5250-5350 MHz et 5650-5850 MHz et que ces radars pourraient causer du brouillage et/ou des dommages aux dispositifs LAN-EL.GPL License AgreementGPL may be included in this product; to view the GPL license agreement go to ftp://downloads.netgear.com/files/GPLnotice.pdf. For GNU General Public License (GPL) related information, please visit http://support.netgear.com/app/answers/detail/a_id/2649 .This device is going to be operated in 5.15~5.25GHz frequency range, it is restricted in indoor environment only.For product available in the USA/Canada market, only channel 1~11 can be operated. Selection of other channels is not possible.Pour les produits disponibles aux États-Unis / Canada du marché, seul le canal 1 à 11 peuvent être exploités. Sélection d'autres canaux n'est pas possible.This device and its antenna(s) must not be co-located or operation in conjunction with any other antenna or transmitter. Cet appareil et son antenne (s) ne doit pas être co-localisés ou fonctionnement en association avec une autre antenne ou transmetteur. The device could automatically discontinue transmission in case of absence of information to transmit, or operational failure. Note that this is not intended to prohibit transmission of control or signaling information or the use of repetitive codes where required by the technology.Le dispositif pourrait automatiquement cesser d'émettre en cas d'absence d'informations à transmettre, ou une défaillance opérationnelle. Notez que ce n'est pas l'intention d'interdire la transmission des informations de contrôle ou de signalisation ou l'utilisation de codes répétitifs lorsque requis par la technologie.](https://usermanual.wiki/Netgear-orporated/12300207.User-Manual-2/User-Guide-1830918-Page-67.png)