Netgear orporated 12300212 11n Wireless Router User Manual NETGEAR genie App and genie Mobile App
Netgear Incorporated 11n Wireless Router NETGEAR genie App and genie Mobile App
User Manual

350 East Plumeria Drive
San Jose, CA 95134
USA
June 2012
202-10933-02
v1.0
genie app and genie
mobile app
User Manual

2
genie app and genie mobile app
© 2012 NETGEAR, Inc. All rights reserved
No part of this publication may be reproduced, transmitted, transcribed, stored in a retrieval system, or translated
into any language in any form or by any means without the written permission of NETGEAR, Inc.
Technical Support
Thank you for choosing NETGEAR. To register your product, get the latest product updates, get support online, or
for more information about the topics covered in this manual, visit the Support website at
http://support.netgear.com.
Phone (US & Canada only): 1-888-NETGEAR
Phone (Other Countries): Check the list of phone numbers at
http://support.netgear.com/app/answers/detail/a_id/984.
Trademarks
NETGEAR, the NETGEAR logo, and Connect with Innovation are trademarks and/or registered trademarks of
NETGEAR, Inc. and/or its subsidiaries in the United States and/or other countries. Information is subject to change
without notice. Other brand and product names are registered trademarks or trademarks of their respective
holders. © 2011 NETGEAR, Inc. All rights reserved.
Statement of Conditions
To improve internal design, operational function, and/or reliability, NETGEAR reserves the right to make changes
to the products described in this document without notice. NETGEAR does not assume any liability that may occur
due to the use, or application of, the product(s) or circuit layout(s) described herein.

3
Contents
Chapter 1 Getting Started
Install the NETGEAR genie Mobile App. . . . . . . . . . . . . . . . . . . . . . . . . . . .5
Install the NETGEAR genie App. . . . . . . . . . . . . . . . . . . . . . . . . . . . . . . . . .6
Chapter 2 NETGEAR genie Mobile App
Connect to Your Home Network with your Phone or iPad . . . . . . . . . . . . . .8
NETGEAR genie Mobile App Dashboard (Home Screen) . . . . . . . . . . . . . .9
Information Icon . . . . . . . . . . . . . . . . . . . . . . . . . . . . . . . . . . . . . . . . . . . . .10
Wireless Settings . . . . . . . . . . . . . . . . . . . . . . . . . . . . . . . . . . . . . . . . . . . .11
Guest Access . . . . . . . . . . . . . . . . . . . . . . . . . . . . . . . . . . . . . . . . . . . . . . .12
Network Map . . . . . . . . . . . . . . . . . . . . . . . . . . . . . . . . . . . . . . . . . . . . . . .13
Parental Controls . . . . . . . . . . . . . . . . . . . . . . . . . . . . . . . . . . . . . . . . . . . .14
Traffic Meter . . . . . . . . . . . . . . . . . . . . . . . . . . . . . . . . . . . . . . . . . . . . . . . .15
My Media . . . . . . . . . . . . . . . . . . . . . . . . . . . . . . . . . . . . . . . . . . . . . . . . . .16
Chapter 3 NETGEAR genie App
NETGEAR genie App Dashboard (Home Screen). . . . . . . . . . . . . . . . . . .21
Log in to the Router with the NETGEAR genie App. . . . . . . . . . . . . . . . . .22
Internet . . . . . . . . . . . . . . . . . . . . . . . . . . . . . . . . . . . . . . . . . . . . . . . . . . . .22
Fix an Internet Connection Problem. . . . . . . . . . . . . . . . . . . . . . . . . . . . . .23
WiFi Connection . . . . . . . . . . . . . . . . . . . . . . . . . . . . . . . . . . . . . . . . . . . . .24
WiFi Channel . . . . . . . . . . . . . . . . . . . . . . . . . . . . . . . . . . . . . . . . . . . . .24
Router Settings. . . . . . . . . . . . . . . . . . . . . . . . . . . . . . . . . . . . . . . . . . . . . .25
Wireless Settings . . . . . . . . . . . . . . . . . . . . . . . . . . . . . . . . . . . . . . . . . .26
ReadySHARE. . . . . . . . . . . . . . . . . . . . . . . . . . . . . . . . . . . . . . . . . . . . .27
Guest Access . . . . . . . . . . . . . . . . . . . . . . . . . . . . . . . . . . . . . . . . . . . . .28
Traffic Meter . . . . . . . . . . . . . . . . . . . . . . . . . . . . . . . . . . . . . . . . . . . . . .29
Router Update . . . . . . . . . . . . . . . . . . . . . . . . . . . . . . . . . . . . . . . . . . . .30
Network Map . . . . . . . . . . . . . . . . . . . . . . . . . . . . . . . . . . . . . . . . . . . . . . .30
Parental Controls . . . . . . . . . . . . . . . . . . . . . . . . . . . . . . . . . . . . . . . . . . . .31
ReadySHARE. . . . . . . . . . . . . . . . . . . . . . . . . . . . . . . . . . . . . . . . . . . . . . .33
AirPrint . . . . . . . . . . . . . . . . . . . . . . . . . . . . . . . . . . . . . . . . . . . . . . . . . . . .34
Network Support. . . . . . . . . . . . . . . . . . . . . . . . . . . . . . . . . . . . . . . . . . . . .35
Tools. . . . . . . . . . . . . . . . . . . . . . . . . . . . . . . . . . . . . . . . . . . . . . . . . . . .36
Support. . . . . . . . . . . . . . . . . . . . . . . . . . . . . . . . . . . . . . . . . . . . . . . . . .36

Getting Started
5
genie app and genie mobile app
Install the NETGEAR genie Mobile App
To use this app, you need a Wi-Fi connection from your phone or iPad to your NETGEAR
home network. You can use the genie mobile app to do the following:
• Manage Wi-Fi settings and guest access for your home network.
• View a map of your network.
• Set up or manage Parental Controls.
• Use traffic meter to check your Internet usage.
• With My Media, play media on devices on your network.
For a list of supported NETGEAR routers, visit the NETGEAR website at
www.netgear.com/landing/en-us/netgear-genie-routers.aspx.
To use iTunes to install the app on your iPhone or iPad:
1. Open the App Store and search for NETGEAR genie.
2. Tap the Free App button.
After you log in, the app downloads.
3. Connect your iPhone or iPad.
4. Go back to the home screen. The genie mobile app should be in one of the Home screens.
5. Tap the genie app icon to open the genie mobile app.
To install the Android genie App:
1. Open Google Play and search for NEGEAR genie.
2. Tap the Download button.
3. Tap the Accept & download button to accept any terms.
The app is downloaded and installed.
The genie mobile app is located under Apps in the Home screen.
4. Tap the genie icon to open the genie moblie app.
Getting Started
6
genie app and genie mobile app
Install the NETGEAR genie App
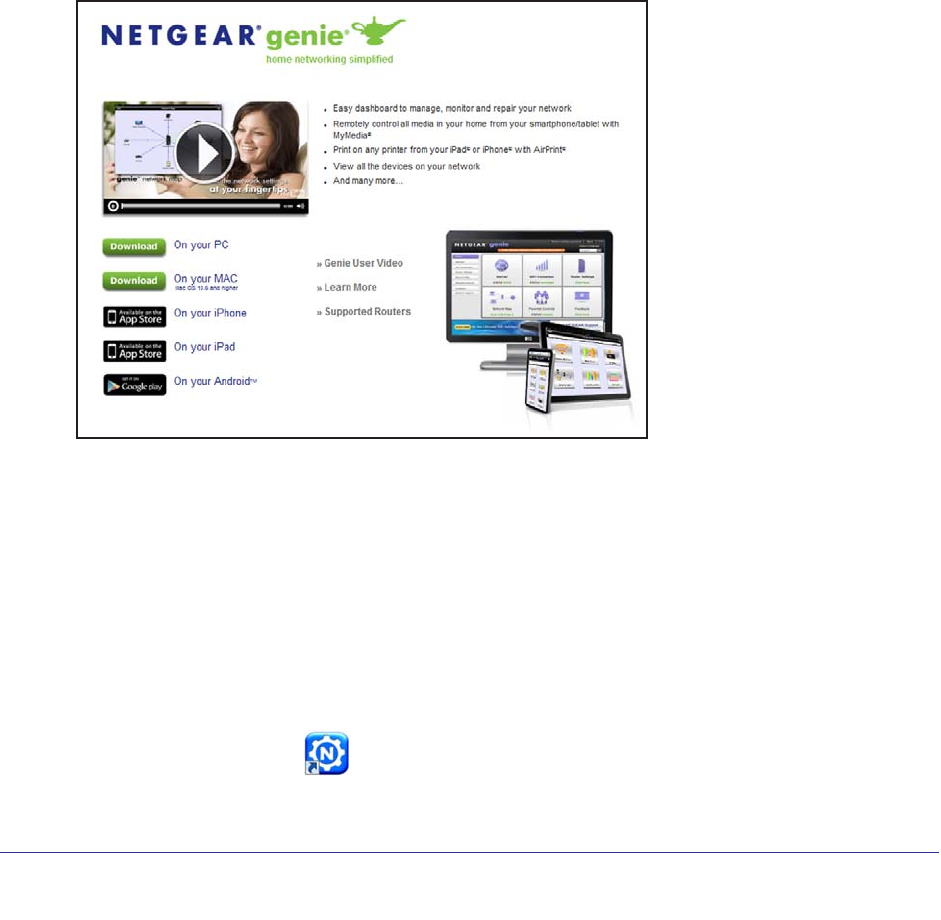
The genie app is the easy dashboard for managing, monitoring, and repairing your home
network.
• Stay connected. genie app can automatically repair common wireless network problems.
• The genie app gives you easy access to router features like Live Parental Controls, guest
access, broadband usage meter, speed test, AirPrint compatibility, and more.
• You can use the network map to see all devices on your home network.
The genie app works with many NETGEAR routers. (You can see the list of compatible routers at
www.NETGEAR.com/genie.) To manage your router settings with the genie app, you might need
to update to new router firmware when it is available.
To download the free genie app:
1. Go to this page at the NETGEAR website: www.NETGEAR.com/genie
2. Click the Download button.
When you download and install the genie app, it starts automatically. If you want to use genie
app later, click the icon on your desktop or in the Windows taskbar.
If you do not want genie to automatically start when the PC reboots, you can right-click the
icon, select Settings, then clear the Enable Autostart check box.
To use genie app to manage a router:
1. Connect a computer to your NETGEAR router with an Ethernet cable (wired) or
wirelessly.
2. Click the genie app icon on your desktop. The genie app screen displays. See Chapter
3, NETGEAR genie App.
NETGEAR genie Mobile App
8
genie app and genie mobile app
Connect to Your Home Network with your Phone or iPad
To use the genie mobile app you need to do the following:
• Use your phone or iPad to join your home network using Wi-Fi.
• Log in to your NETGEAR router.
To join your wireless network and log in from your phone or iPad:
1. With the app you use to manage your wireless connections, locate your home network
and join it.
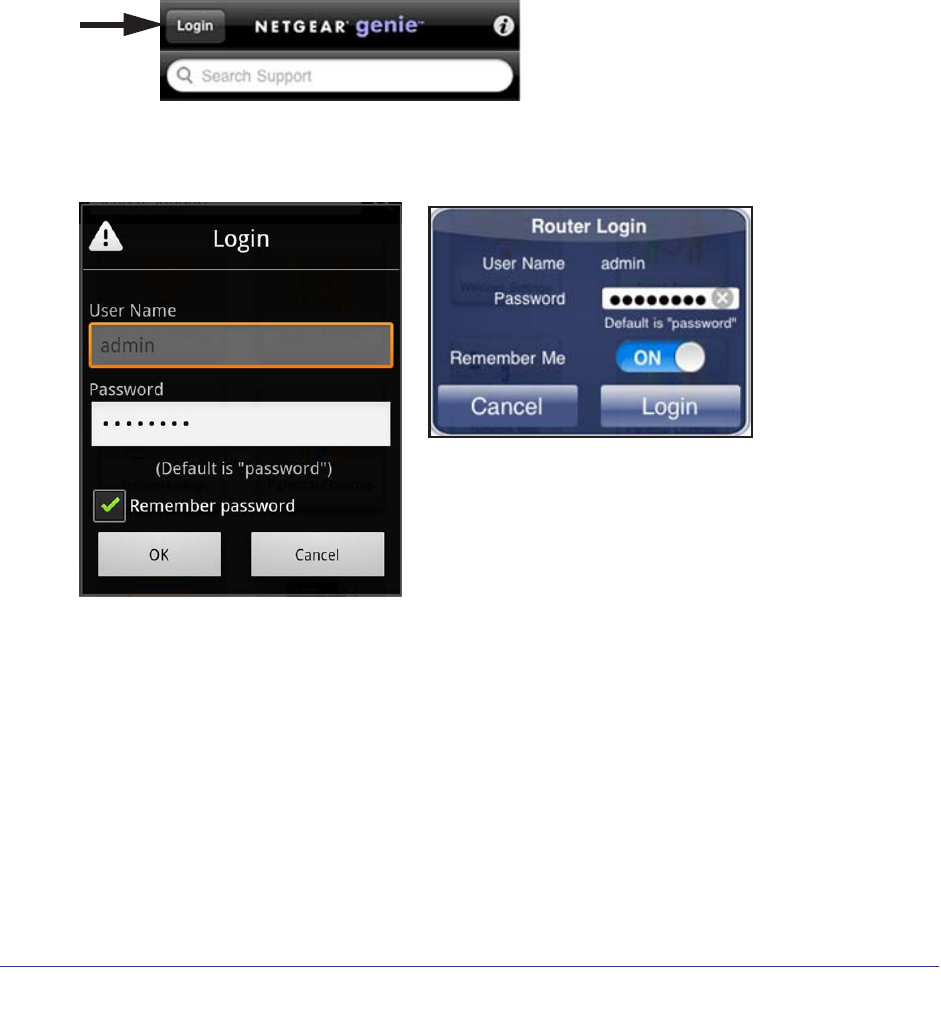
2. Launch the genie mobile app and tap Login.
The router user name is admin.
3. Enter the router password.
Android Router Login screen
iPhone Router Login screen
The router’s default password is password, though you probably changed it to a more
secure password when you installed the router. The router password is case-sensitive.
4. Tap OK for an Android phone or Login for an iPhone or iPad.
The genie mobile app dashboard screen displays. This screen is described in the
following section.
NETGEAR genie Mobile App
9
genie app and genie mobile app
NETGEAR genie Mobile App Dashboard (Home Screen)
Note: To use the genie mobile app, you have to use Wi-Fi to connect to
your home network and then log in to the router.
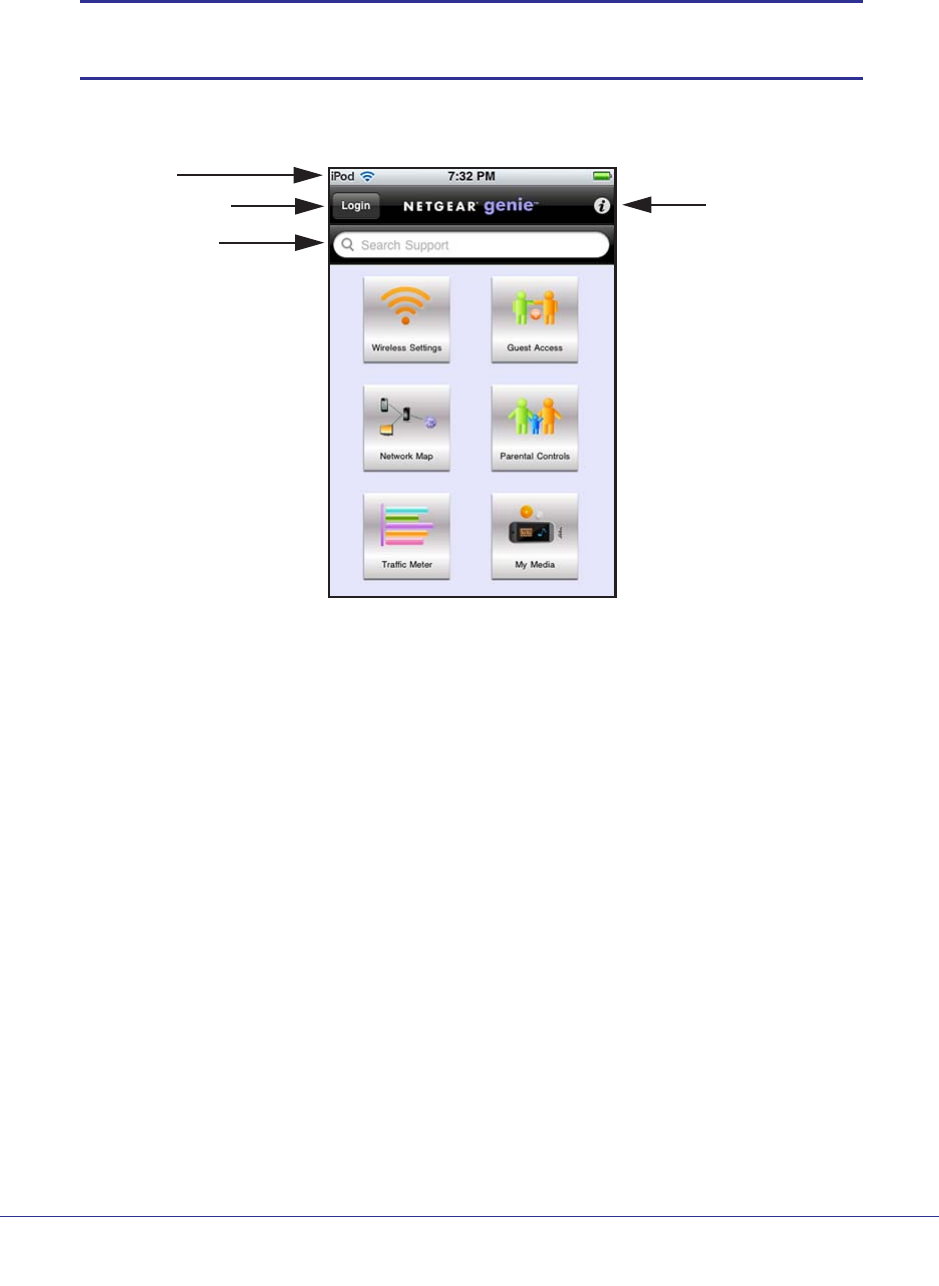
When you launch the genie mobile app, it displays the dashboard screen.
Log in to the router Information about
genie mobile app
Phone status
Search NETGEAR
support and the connected
router
Figure 1. genie mobile app dashboard
You can tap any of the six sections of the dashboard to navigate.
• Wireless Settings. View or change the wireless settings for your router. See Wireless
Settings on page 11.
• Guest Access. View or set up wireless guest access to your home network. See Guest
Access on page 12.
• Network Map. View network devices connected to your network. See Network Map on
page 13.
• Parental Controls. Manage Parental Controls to protect devices in your network from
inappropriate content. See Parental Controls on page 14.
• Traffic Meter. View the Internet traffic or change the traffic meter setting on your home
network. See Traffic Meter on page 15.
• My Media. Play media or share it between your mobile device and other devices on your
home network. See My Media on page 16.
The menu selections are described in more detail in the following sections.
NETGEAR genie Mobile App
10
genie app and genie mobile app
Information Icon
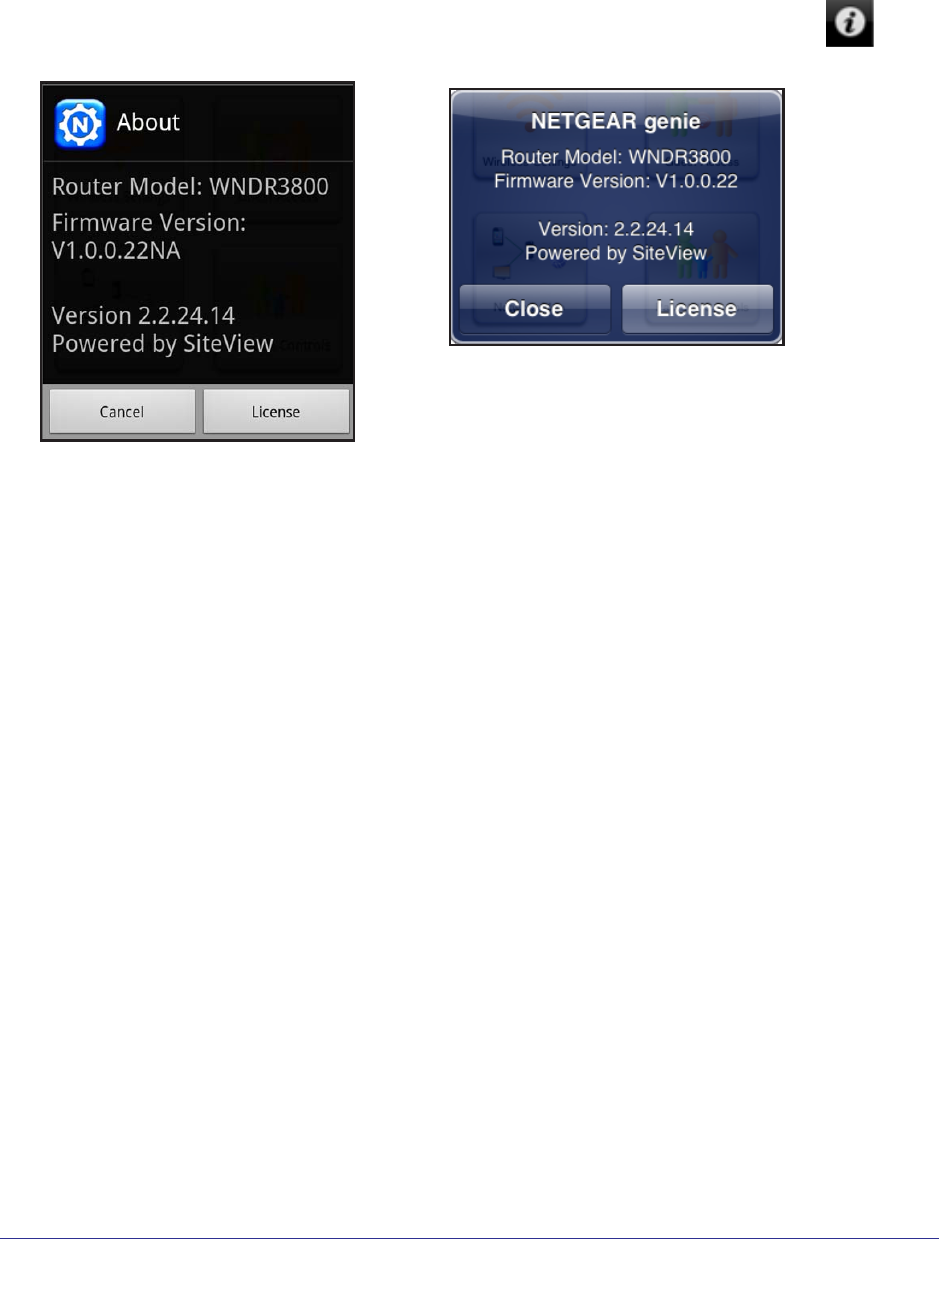
You can view information about the genie mobile app and your router. Select the
Information icon to display the following screen:
Android phone
iPhone
Tapping the License button displays the end user license agreement (EULA).
NETGEAR genie Mobile App
11
genie app and genie mobile app
Wireless Settings
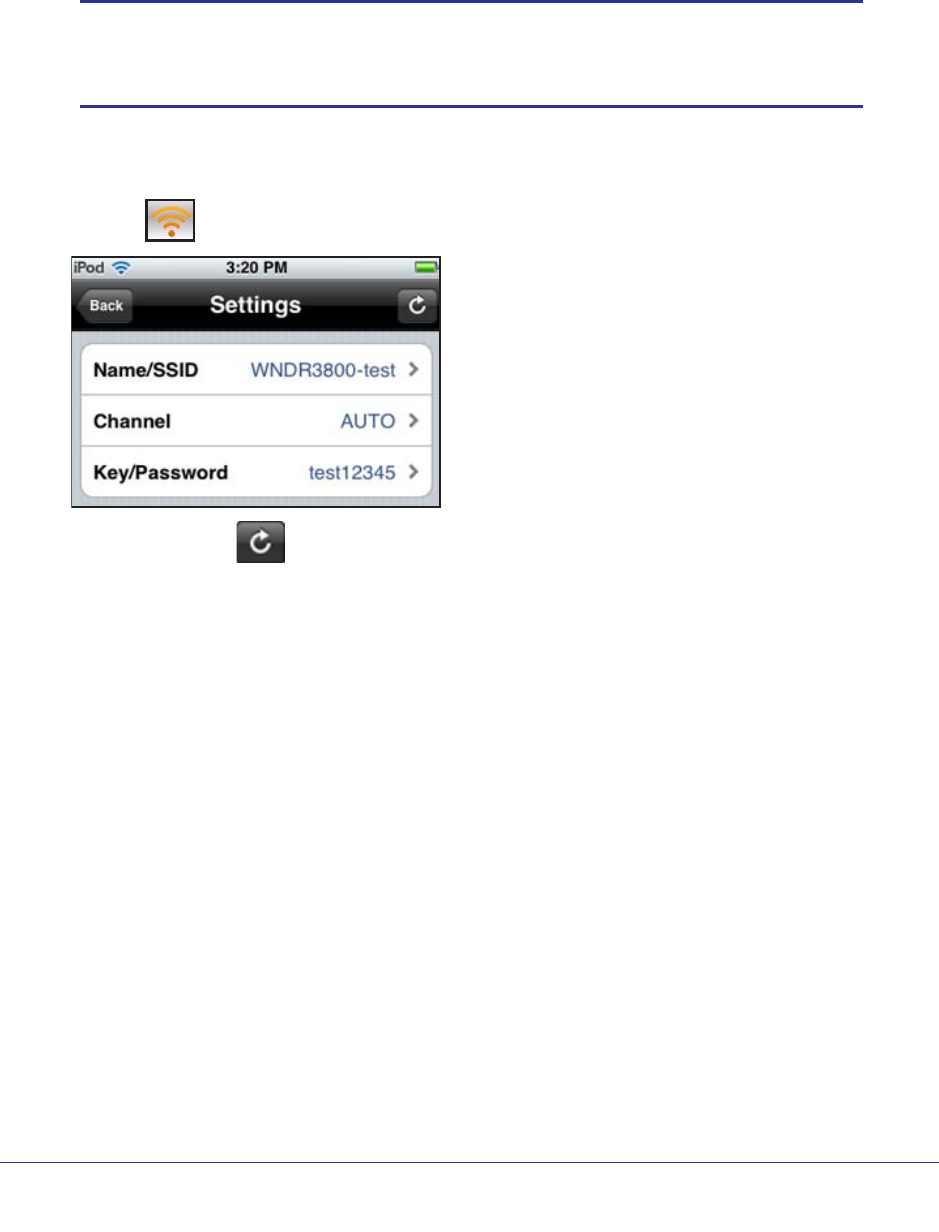
You can use this screen to view or change the wireless settings for your home network.
Note: If you change the wireless settings on your router, you and anyone
else who has joined the wireless network will be automatically
disconnected from the network.
To view or change the wireless settings for your router:
1. Select Wireless to go to the Wireless Settings screen:
You can use the Refresh button to update the screen at any time.
2. Tap the settings that you want to change to go to detail screens.
• Name/SSID. This is the name of the wireless network.
• Channel. Usually, this is set to Auto so that the router automatically selects the best
channel for its wireless signal. You can select a specific channel number if you want.
• Key/Password. Go to the Wireless Security screen and view or change the wireless
security setting for the home network.
3. When you are finished making changes, tap Save.
NETGEAR genie Mobile App
12
genie app and genie mobile app
Guest Access
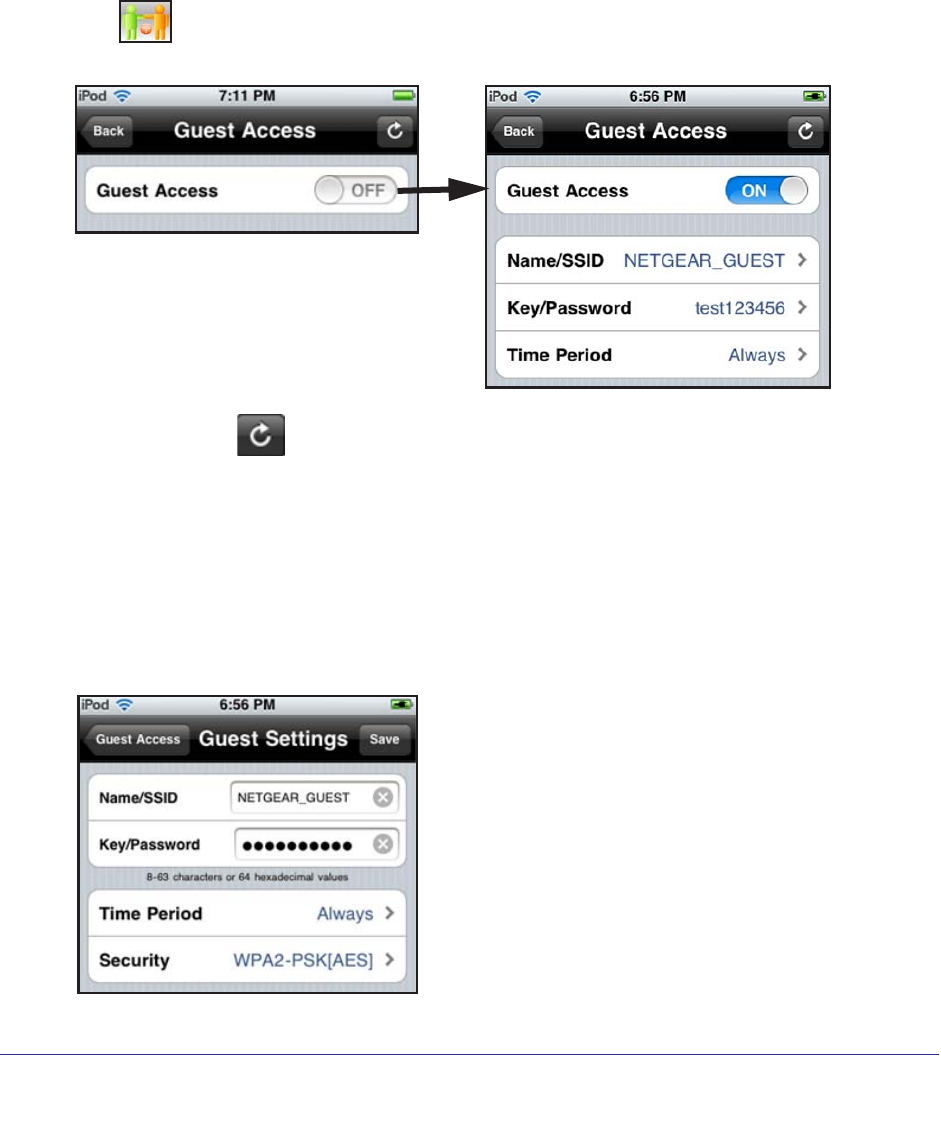
If your router supports a guest wireless network, you can view and change the settings. You
can even allow guest access for a specific length of time. A guest network allows others to
use your wireless router to access the Internet, but not content on other computers or devices
on the same network.
To set up guest access:
1. Tap Guest Access.
2. Tap the ON/OFF button and turn on guest access to display the Guest Access settings.
You can use the Refresh button to update the screen at any time.
3. Tap the guest access settings that you want to change to go to detail screens.
• Name/SSID. This is the name of the wireless guest network.
• Key/Password. Go to the Guest Security screen and view or change the wireless
security setting for the guest network.
• Time Period. Tap the time period for the guest network. You can set it to Always,
choose the number of hours, or set it for 1 Day or 1 Week.
4. When you are finished making changes, tap Save.
NETGEAR genie Mobile App
13
genie app and genie mobile app
Network Map
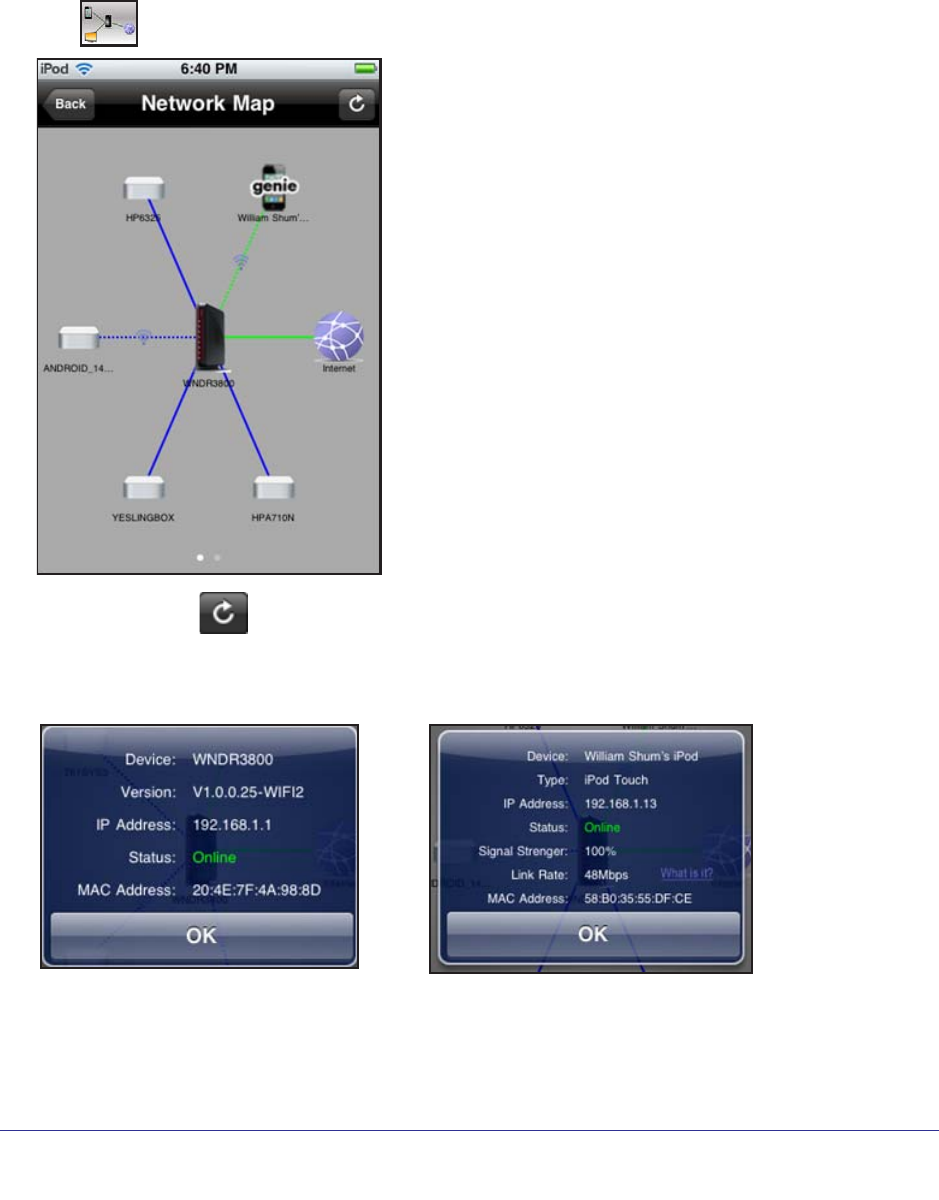
The network map shows the router’s Internet connection, and also displays computers and
devices that are connected to your router. The map shows up to five devices per screen. If
you have more devices on your network, you can go left or right to view more screens.
Tap Network Map to display a screen similar to the following figure:
You can use the Refresh button to update the screen at any time. A good connection is
shown in green. A red line indicates a connection that is not working.
You can tap a device icon to see more detail about the device.
iPod Touch detail
Router detail
If the genie mobile app does not detect the device type, it shows Network Device. From the
detail screen you can tap an Edit button to change the device type or device name.
NETGEAR genie Mobile App
14
genie app and genie mobile app
Parental Controls
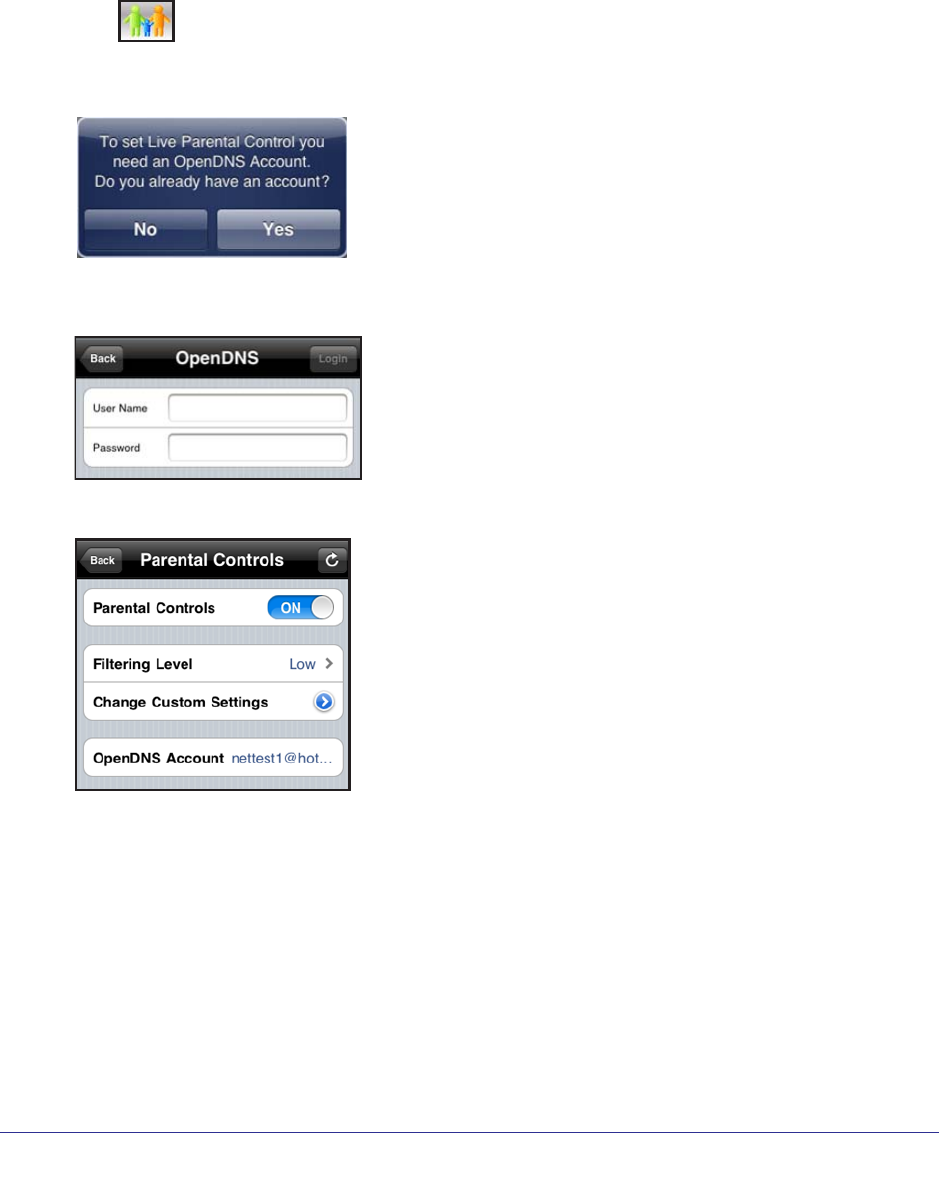
Live Parental Controls allow you to control the Internet content on your home network.
To set up Parental Controls:
1. Tap Parental Controls.
The first time you tap to select Parental Controls, it takes some time to load the page. You
are asked if you already have an account.
2. If you already set up Parental Control on your router, tap Yes and log in. If you haven’t done
that yet, tap No and create an OpenDNS account for Parental Controls
The genie mobile app Parental Controls screen displays:
3. Tap the ON/OFF button to turn Parental Controls on or off.
The genie mobile app sends the command to your router, and then waits for the
response. When Parental Controls is turned on, you can view or change the following
settings:
• Filtering Level. Contains five levels to limit access to Internet content: (1) High, (2)
Moderate, (3) Low, (4) Minimal and (5) None.
• Change Custom Settings. Open a web browser and log in to OpenDNS. Then
choose which categories to block from the category list.
• OpenDNS Account. Display the login name. (This can only be viewed, not changed.)
NETGEAR genie Mobile App
15
genie app and genie mobile app
Traffic Meter
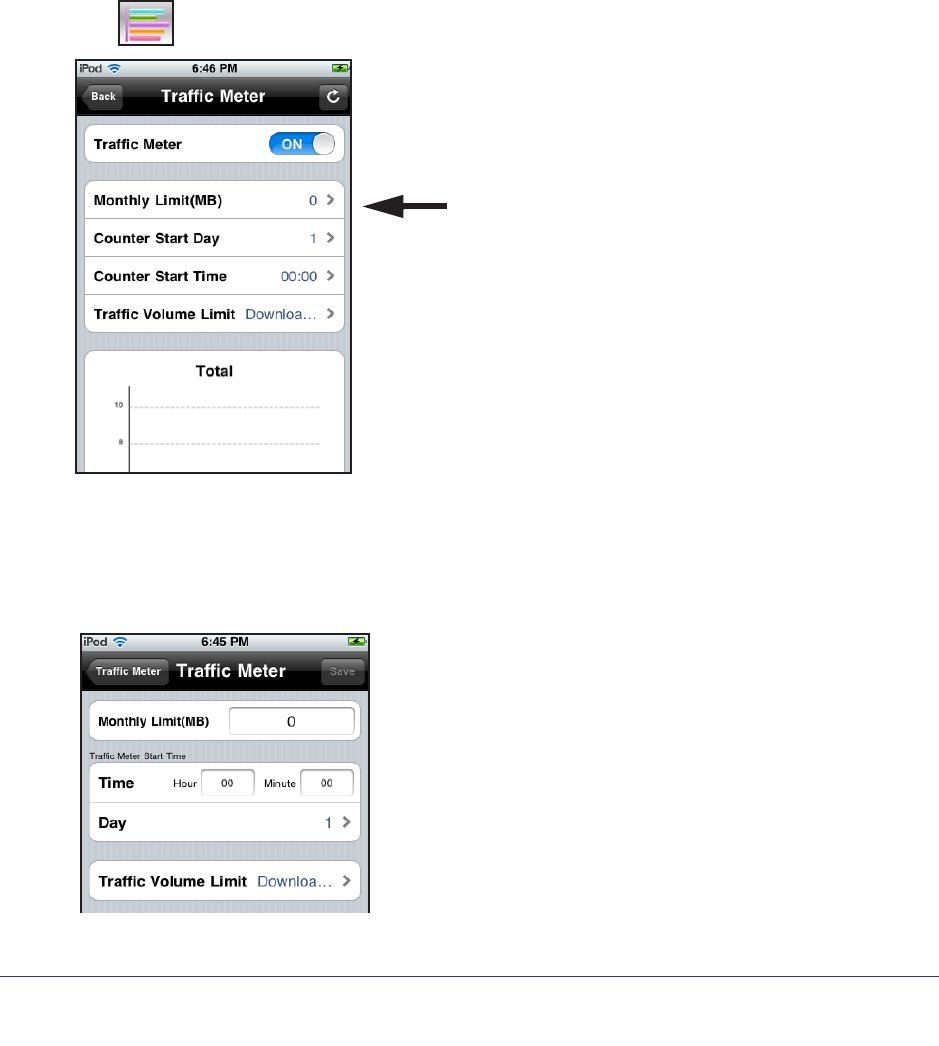
The traffic meter measures Internet traffic on your network. You can view traffic for today,
yesterday, this week, this month, or last month. Each time period includes data for:
• Connection Time
• Upload/Average
• Download/Average
• Total/Average
To set up the traffic meter:
1. Tap Traffic Meter.
When the traffic meter is turned off,
these settings are not shown.
2. If you want to turn the traffic meter on or off, tap the ON or OFF button.
The genie mobile app sends the message to your router, waits for a reply, and then
updates this screen.
3. To change a setting, tap it, and the Traffic Meter screen displays:
NETGEAR genie Mobile App
16
genie app and genie mobile app
4. Adjust these settings as needed:
• Monthly Limit. Traffic limit by MB per month.
• Day. The date to restart the counter. Select a number from 1st to 28. This is because
February might have only 28 days.
• Time. The time to restart the counter.
• Traffic Volume Limit. Select an option: No Limit, Download Only, or
Upload/Download.
5. When you are finished making changes, tap the Save button.
My Media
You can use the My Media feature to play media from devices on your home network on your
mobile device. You can also play media that is located on your phone or iPad on other
devices in your home network. For the genie mobile app to find the network devices, each
device must use Universal Plug and Play (UPnP).
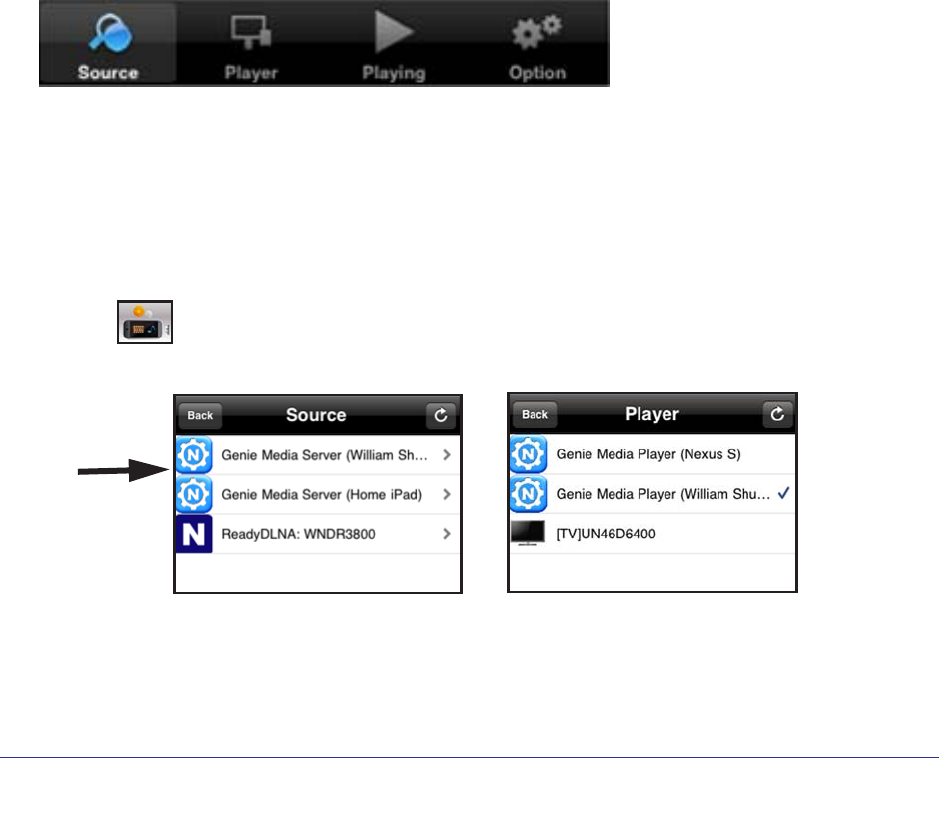
My Media has four different views. The views depend on which item you select at the bottom
of the screen (Source, Player, Playing, Option).
• Source. View a list of devices on your network that are sharing media files.
• Player. View a list of devices that can play media files over the network.
• Playing. View and control media that is currently playing on the selected player.
• Option. Go to the Option screen.
To play media on your mobile device:
1. Tap My Media.
2. Tap the Source button to view the UPnP devices on your network.
3. Tap the device on your home network that is the source for your media files.
NETGEAR genie Mobile App
17
genie app and genie mobile app
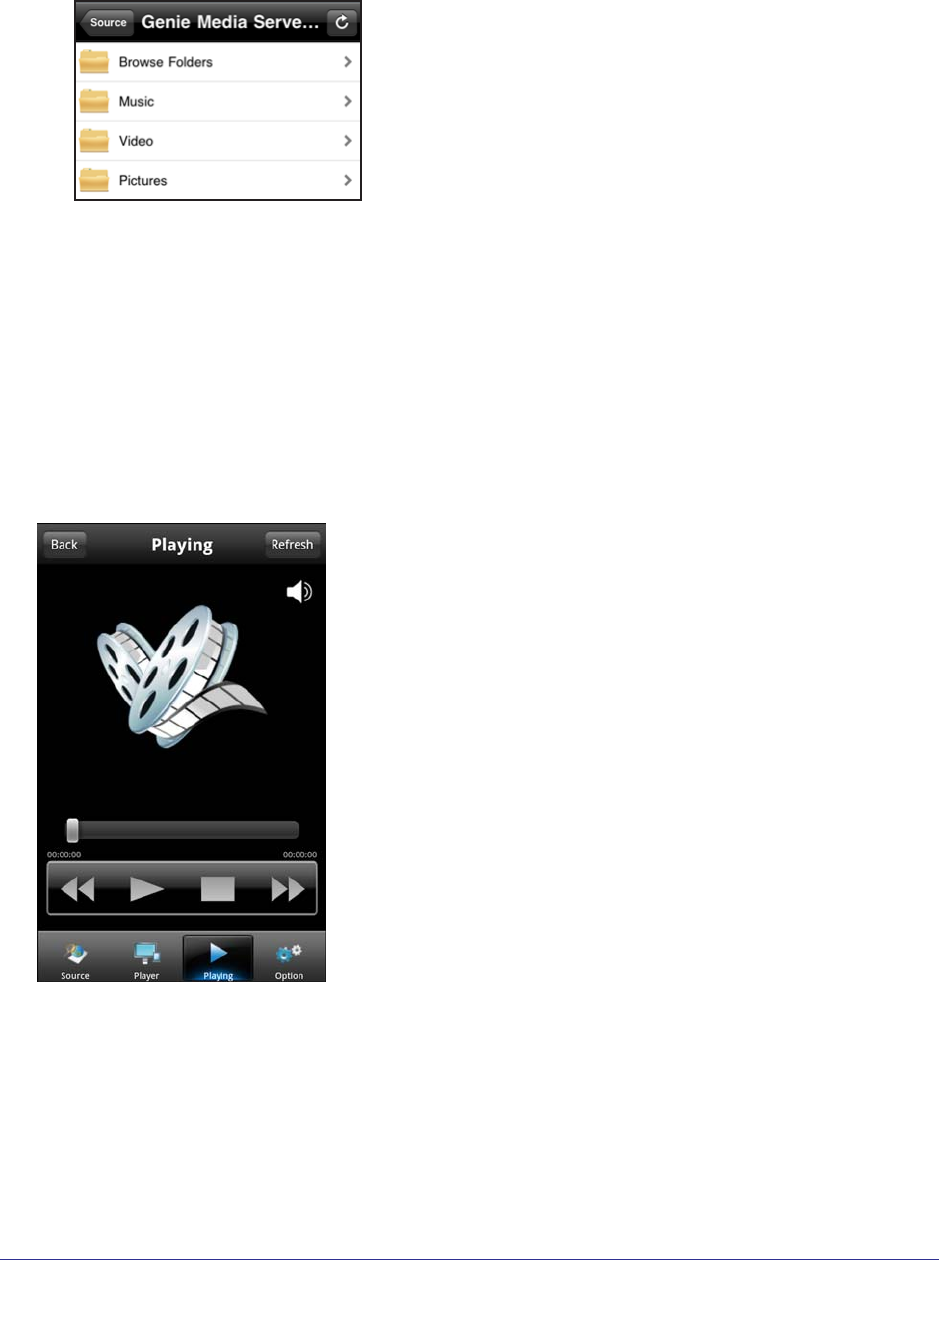
The media folders on that device are displayed.
4. Tap the folder that you want, and the media file within the folder.
The media file plays on the selected player.
Playing and Controlling Media Files Located on Your Mobile Device
When you play media that is located on your mobile device (Android phone, iPhone, or iPad),
how you control that media depends on which device you are using.
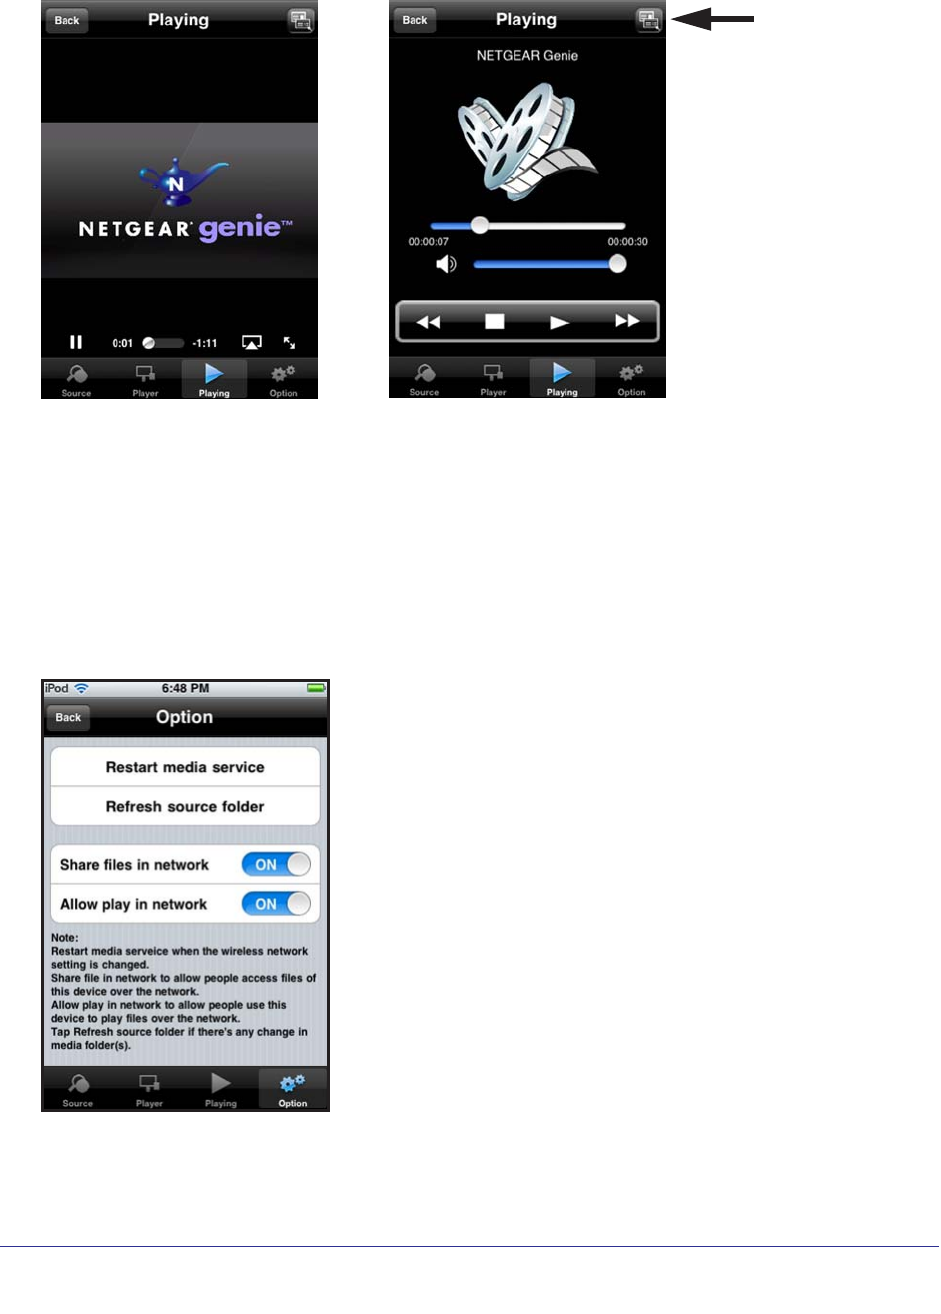
With an Android phone, the media plays in full screen. If you want to control the media, tap
the Back button, which stops the media from playing. The Refresh button updates the
playing progress.
Figure 2. Android phone playing media
NETGEAR genie Mobile App
18
genie app and genie mobile app
iPhones and iPads (iOS devices) use two modes for media: Play mode and Control mode.
Tap to switch
between Play
mode and
Control mode.
Figure 3. iPhone phone, Play mode and Control mode
Tapping the icon at the top right corner switches the mode. In Play mode, you can see the
media playing. If you are playing media files located on a different device on your network,
then Play mode is not available. Control mode is always available, as it shows the playing
media name, play progress, volume, and play controls.
Media Options
To view or change My Media Options, tap the Option icon on the My Media screen.
Figure 4. Media Options
The following settings are available:

NETGEAR genie Mobile App
19
genie app and genie mobile app
• Restart media service. Restart My Media service when a wireless setting is changed or
no player is found.
• Refresh source folder. Scan the source device list when no source device is found.
• Share files in network. This setting is ON by default. This setting lets you use other
devices on your home network to play media on this phone or iPad. If you do not want to
use this option, then you should change the setting to OFF.
For example, you could be using your mobile phone with the genie mobile app at home,
while a guest is using your iPad, which also has the genie mobile app. From your phone,
you could remotely play a song on the iPad, or play a photo slide show on the iPad for
your guest.
• Allow play in network. This setting is ON by default. This means that you play media
that is located on this phone or iPad on other devices on the same network. If you do not
want to allow this, then you should change the setting to OFF.
For instance, let's say you have photos on a computer or other mobile devices on your
home network, and you want to view them on this phone or iPad. You should leave the
Allow play in network check box selected. This setting controls whether or not the
photos from other devices can be viewed on this phone or iPad.
Media Option Tips
• Use Restart media service or Refresh source folder, if you are not able to see all network
UPnP devices.
• To play, the device needs to support the DLNA Player profile. Game consoles (like Xbox
360 or PS3) and DVRs do not support the DLNA Player profile. For this reason, they do
not show up as players in My Media.
• My Media finds only the media types supported by the player. For example, an iPad does
not play Adobe Flash files as this format is not supported.

20
3
3. NETGEAR genie App
This chapter contains the following sections:
• NETGEAR genie App Dashboard (Home Screen)
• Log in to the Router with the NETGEAR genie App
• Internet
• Fix an Internet Connection Problem
• WiFi Connection
• Router Settings
• Network Map
• Parental Controls
• ReadySHARE
• AirPrint
• Network Support
NETGEAR genie App
21
genie app and genie mobile app
NETGEAR genie App Dashboard (Home Screen)
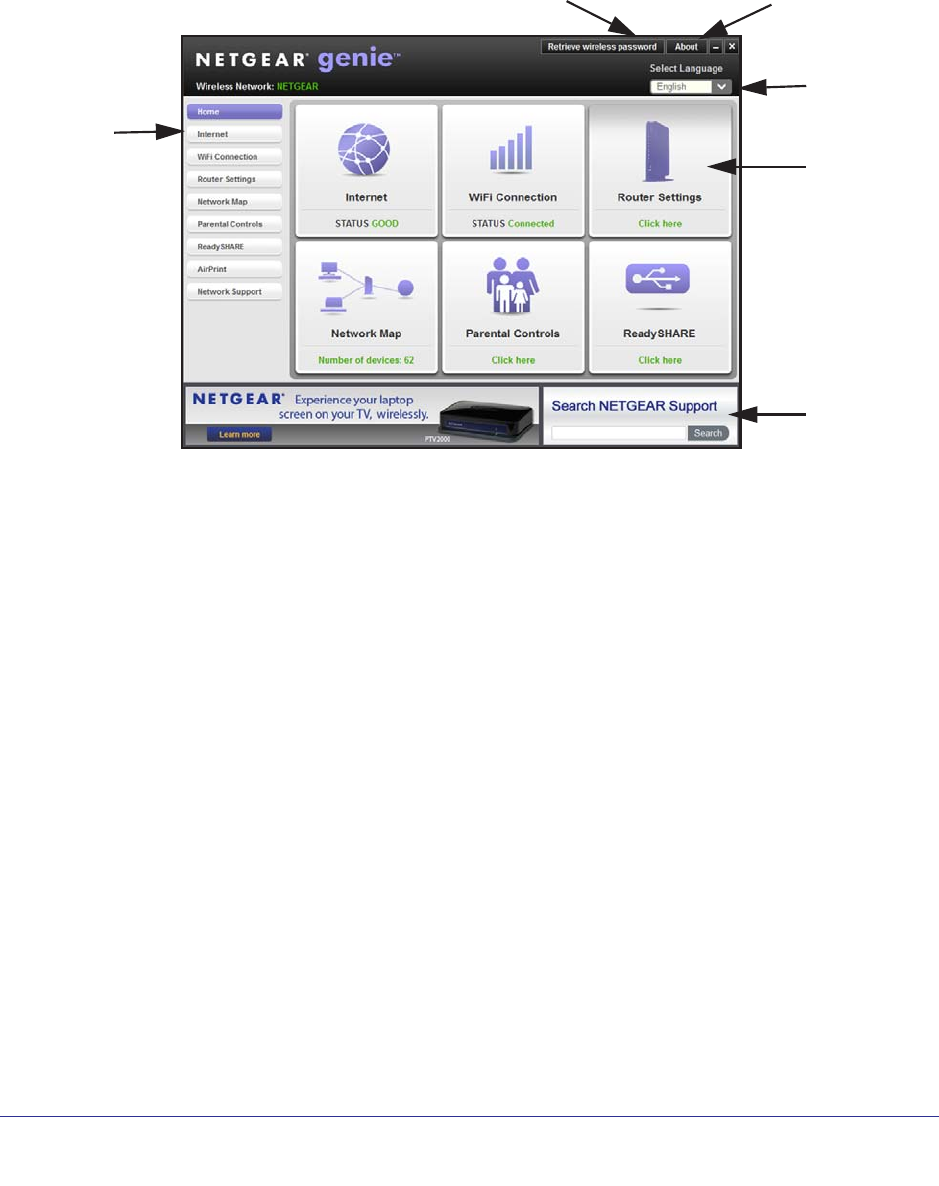
The home screen has a dashboard that lets you see the status of your Internet connection
and network at a glance. You can click any of the six sections of the dashboard to view more
detailed information. The left column has the menu.
Menu
Language
Support
Dashboard
(Click to
view
details)
Retrieve wireless password About the
genie pp
Figure 5. Home screen with dashboard, language, and support
The dashboard screen displays with the following menu items when you launch the genie
app.
• Internet. Monitor and repair Internet connectivity issues, for both wired and wireless
connections.
• WiFi Connection. View or change the wireless settings for your router.
• Router Settings. Log in to your router to view or change its settings.
• Network Map. View network devices connected to your network.
• Parental Controls. Manage Parental Controls to protect devices in your network from
inappropriate contents.
• ReadySHARE. If you connected a USB storage device to the USB port on the router,
then you can access its contents.
• AirPrint. This feature turns your printer into an AirPrint-enabled printer so that your iOS
devices can use printers in the same network.
• Network Support. The support FAQs are available on the computer without an Internet
connection. You can get answers to common router issues here. Some simple network
tools are available to help you debug the network as well.
The menu selections are described in more detail in the following sections in this chapter.
NETGEAR genie App
22
genie app and genie mobile app
Log In to the Router with the NETGEAR genie App
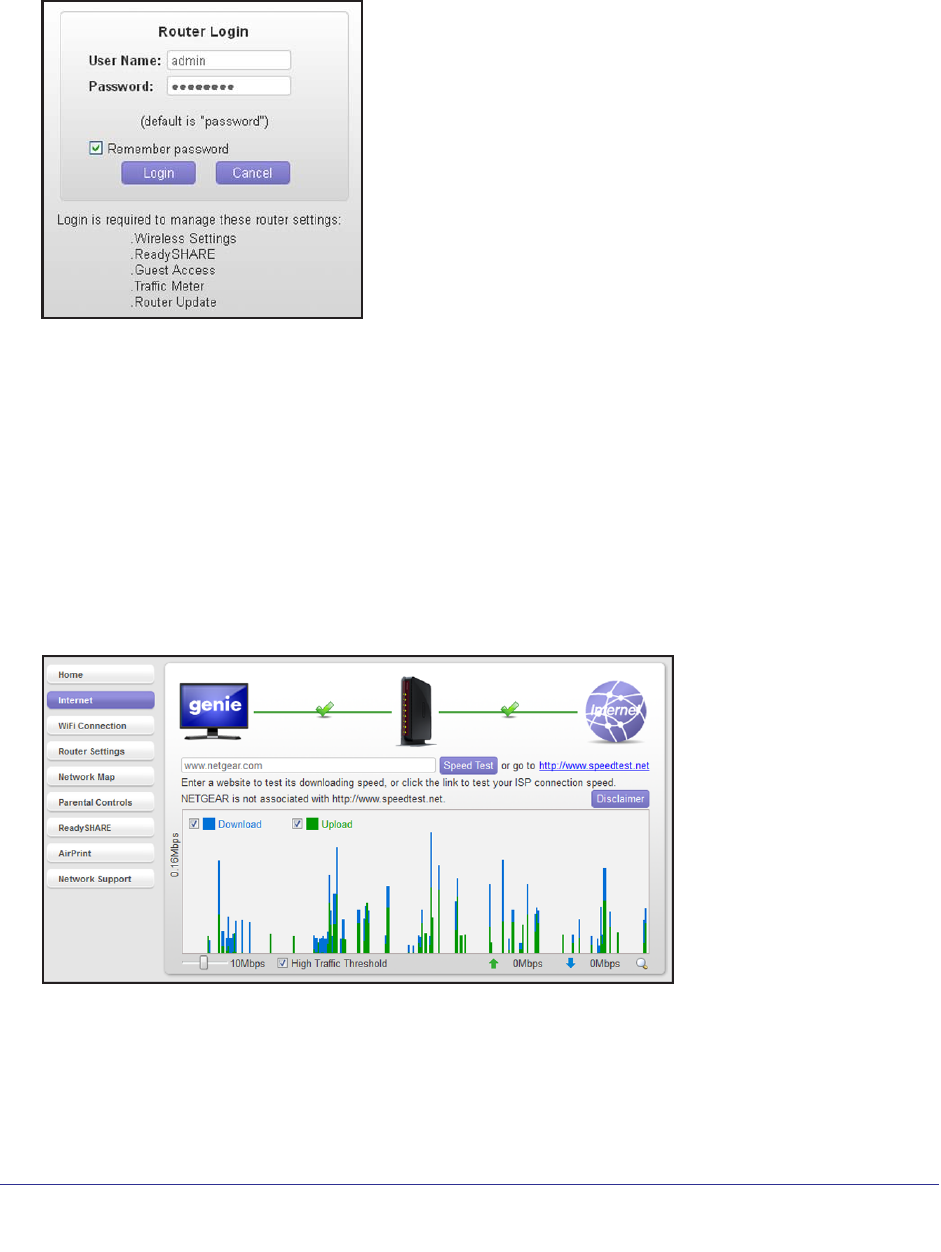
To access some genie app features, you have to log in to your router.
The user name is admin. Enter the router password. The default setting is password in
lower-case letters. The password is case-sensitive.
Note: The user name and password are different from the user name and
password you might get from your Internet service provider (ISP).
Internet
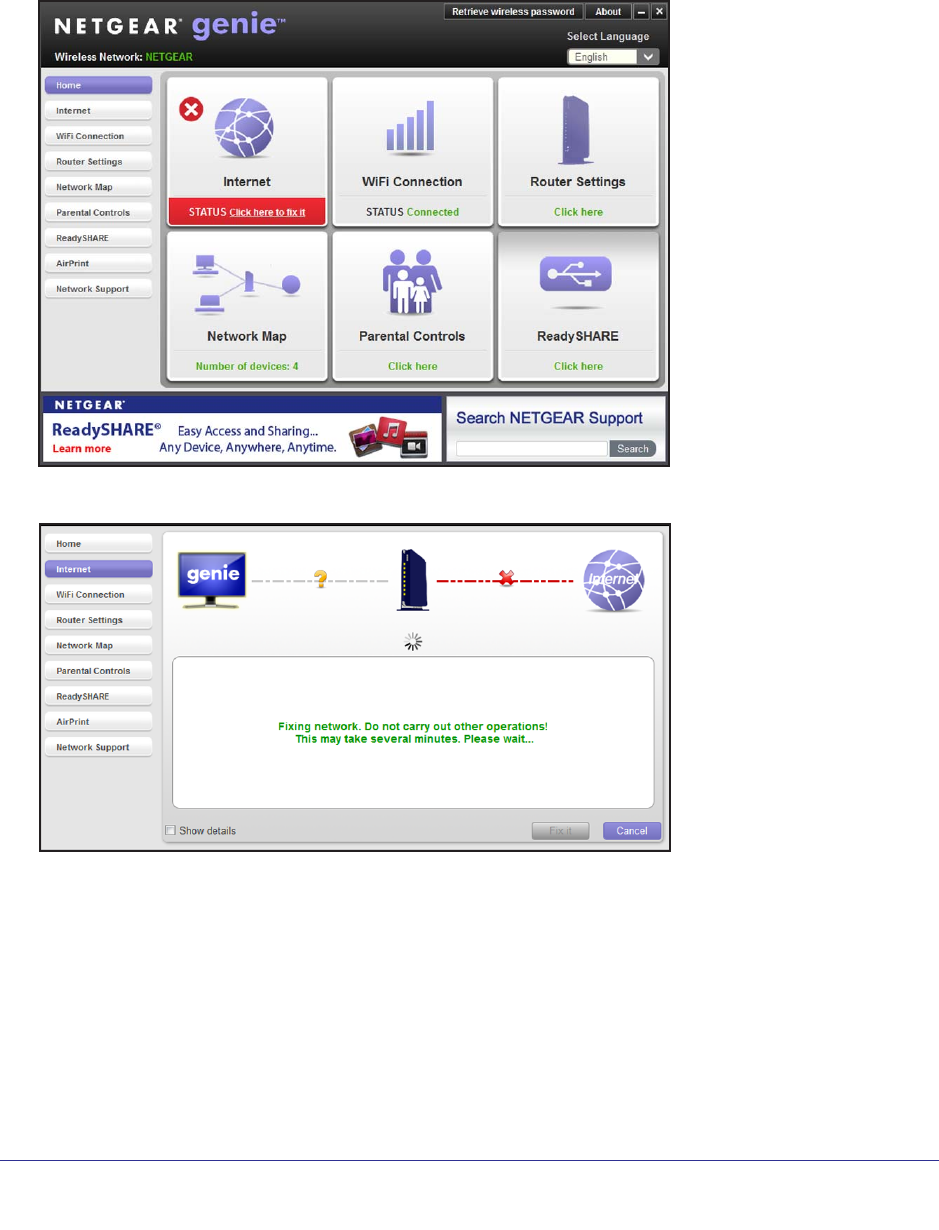
The Internet screen is where you can run Speed Test and monitor Internet traffic. Select
Internet. The following screen displays:
NETGEAR genie App
23
genie app and genie mobile app
Fix an Internet Connection Problem
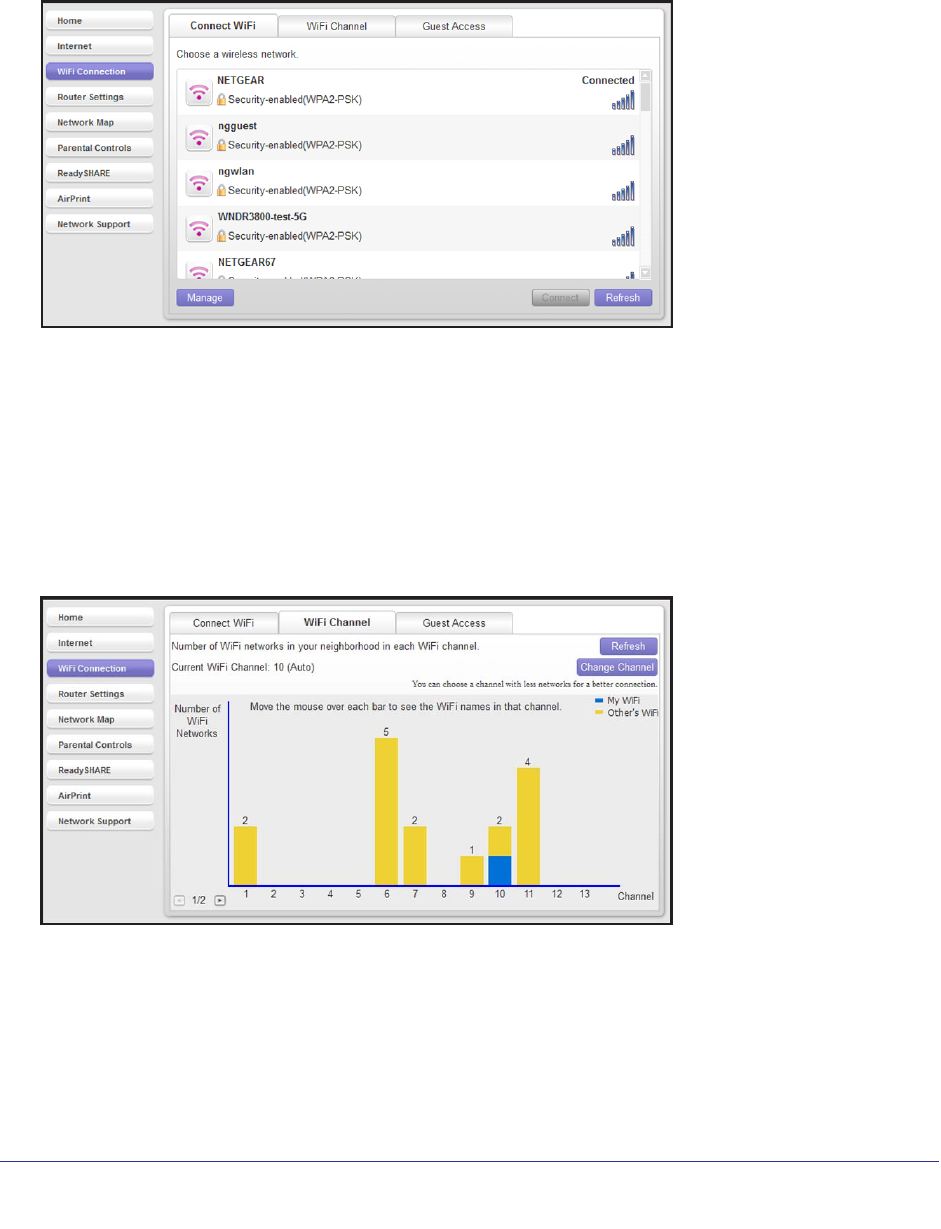
If your Internet connection is not working, the Internet pane on the Home screen is red, as
shown in the following figure:
When you select Internet, the genie app tries to detect the problem:
NETGEAR genie App
24
genie app and genie mobile app
WiFi Connection
You can use this screen to view wireless networks in your area, and to select and join a
wireless network. Click WiFi Connection, and the following screen displays:
From this screen you can also view Wi-Fi channels in use in your area, and view information
about guest access to your network if your router supports a guest network.
Clicking Guest Access takes you to the same screen that is available through the Router
Settings screen. See Guest Access on page 28.
WiFi Channel
Select WiFi Connection > WiFi Channel, and the following screen displays:
Your network is shown in blue. Yellow shows other networks in your area. If many wireless
networks at your location use the same channel as your wireless network, you might
experience interference. You can change the wireless channel of your network here. Note
that many countries and geographic locations have laws or guidelines about which channels
can be used. Depending on your location, some channels might not be available.
NETGEAR genie App
25
genie app and genie mobile app
Router Settings
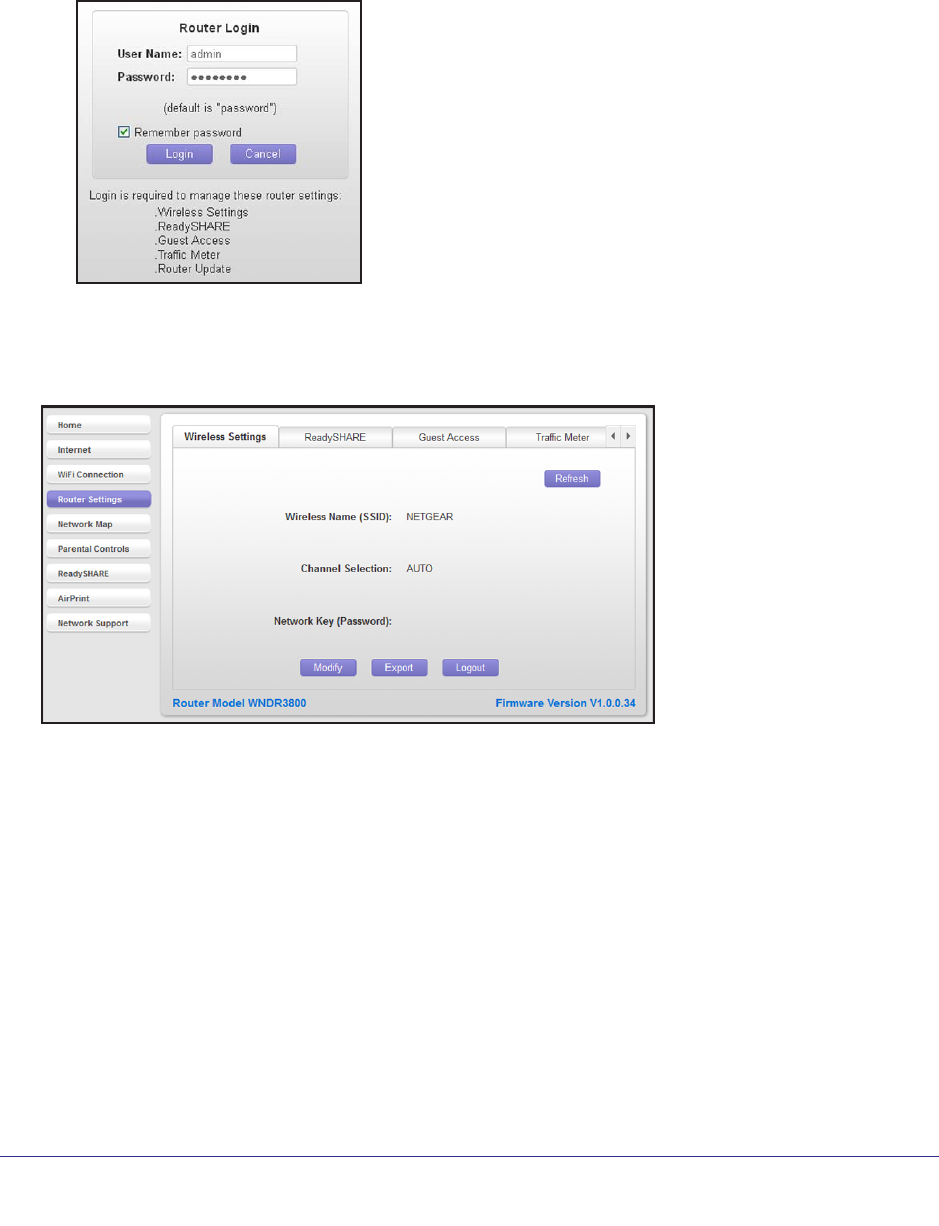
1. Select Router Settings.
If you have not yet logged in to the router, you are prompted to log in:
2. For the router password, enter password if you did not change it, or enter the password that
you set up.
The router password is case-sensitive.
You can click the following tabs on this screen to view or change many of the router settings:
• Wireless Settings
• ReadySHARE
• Guest Access
• Traffic Meter
• Router Update
NETGEAR genie App
26
genie app and genie mobile app
Wireless Settings
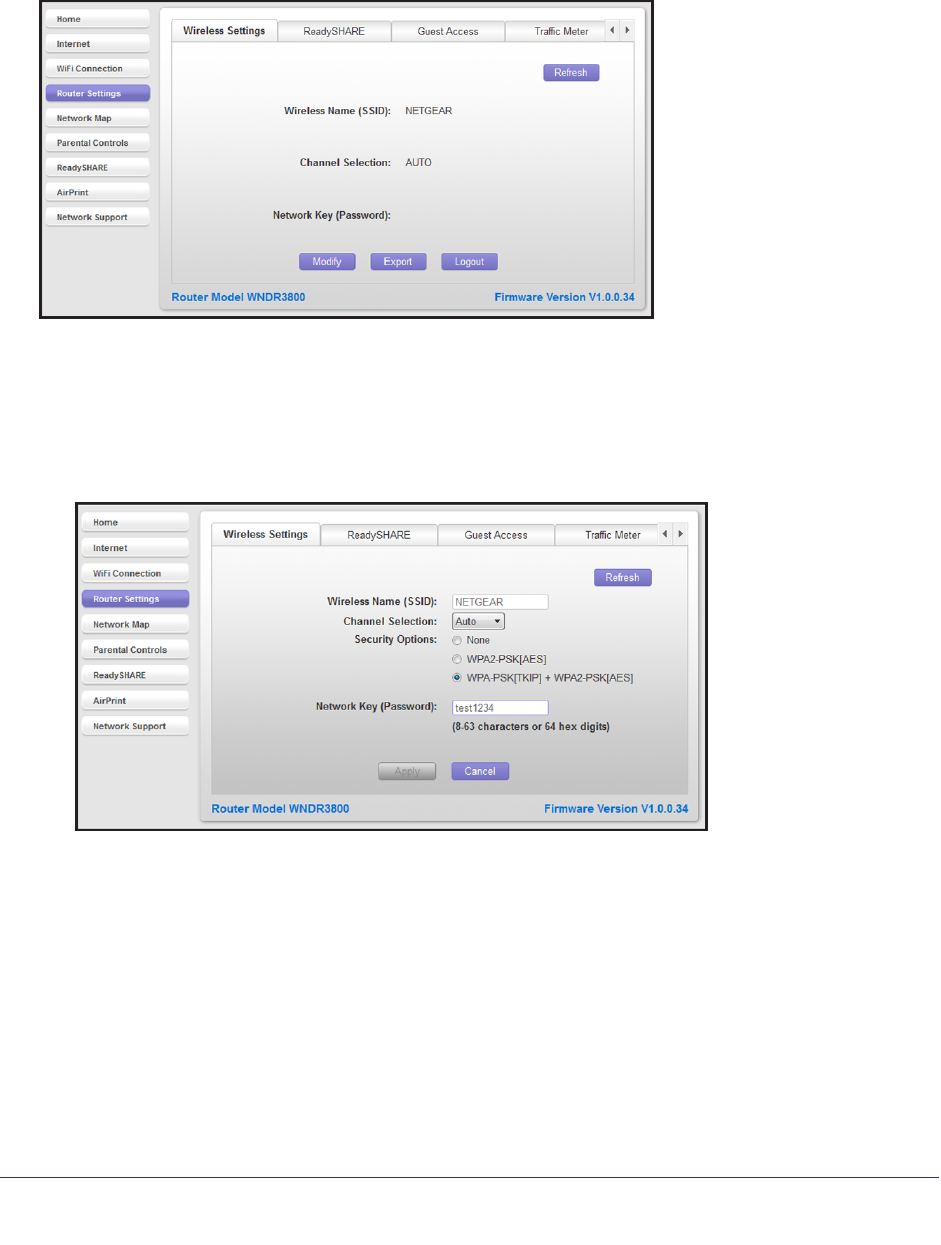
View the current basic wireless settings for your router, including the wireless name (SSID),
the channel selection, and the password if your network uses wireless security.
To modify wireless settings on the router:
If you are wirelessly connected to the router, changing the wireless settings will cause you to
lose your wireless connection. After the changes take effect, you can join the wireless
network with the new settings.
1. Select Router Settings > Wireless Settings, and click Modify.
2. Change the settings and then click Apply so that they take effect.
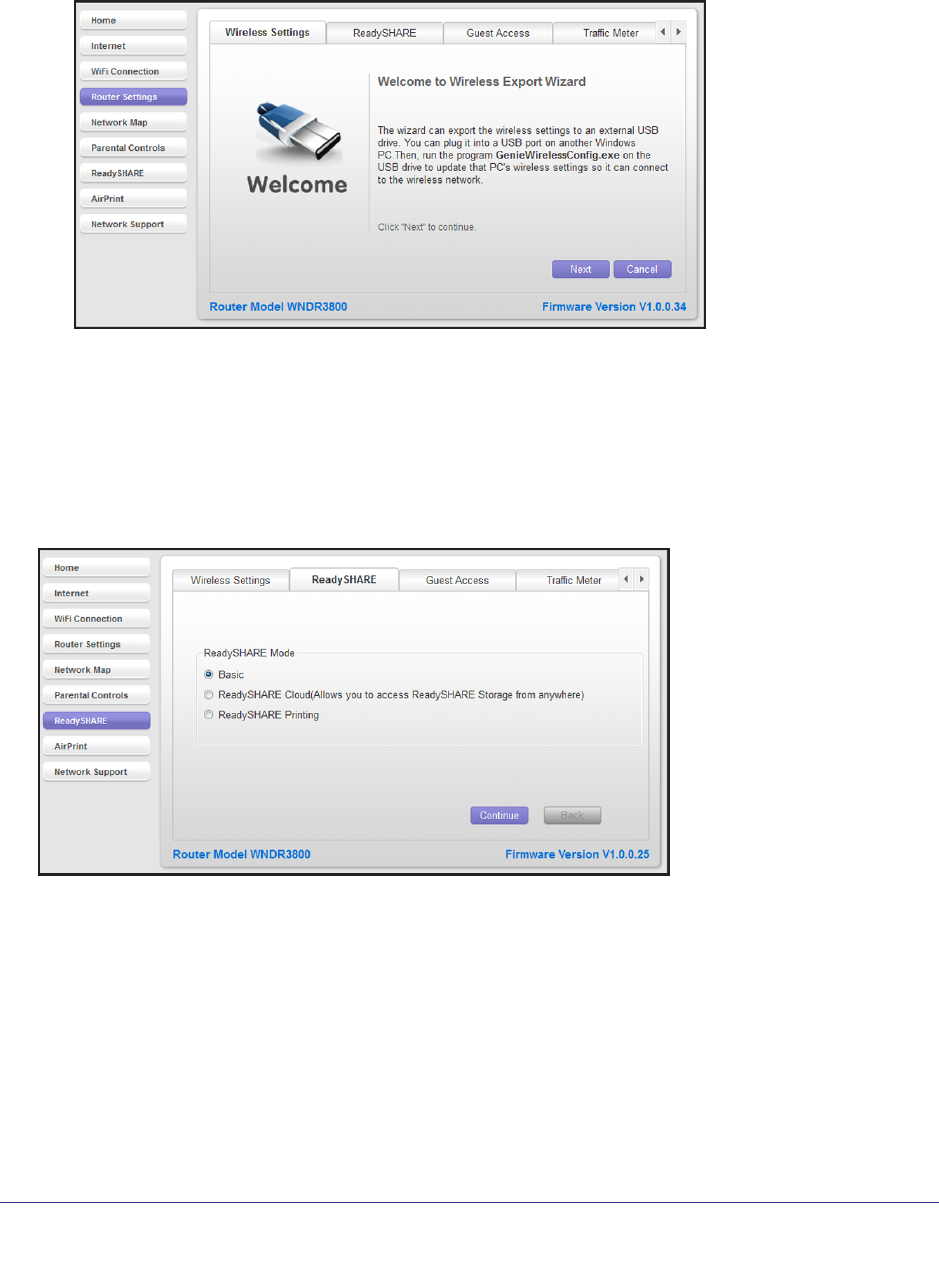
Export Wireless Settings
You can use the Wireless Export Wizard to export the router’s wireless settings to a USB
device such as a flash drive. Then you can connect the USB device to another computer so it
easily connects wirelessly to your home network.
NETGEAR genie App
27
genie app and genie mobile app
To export your wireless settings:
1. Select Router Settings > Wireless Settings, and click Export. The following screen
displays:
2. Click Next, and follow the wizard steps to export your wireless settings to a USB storage
device.
ReadySHARE
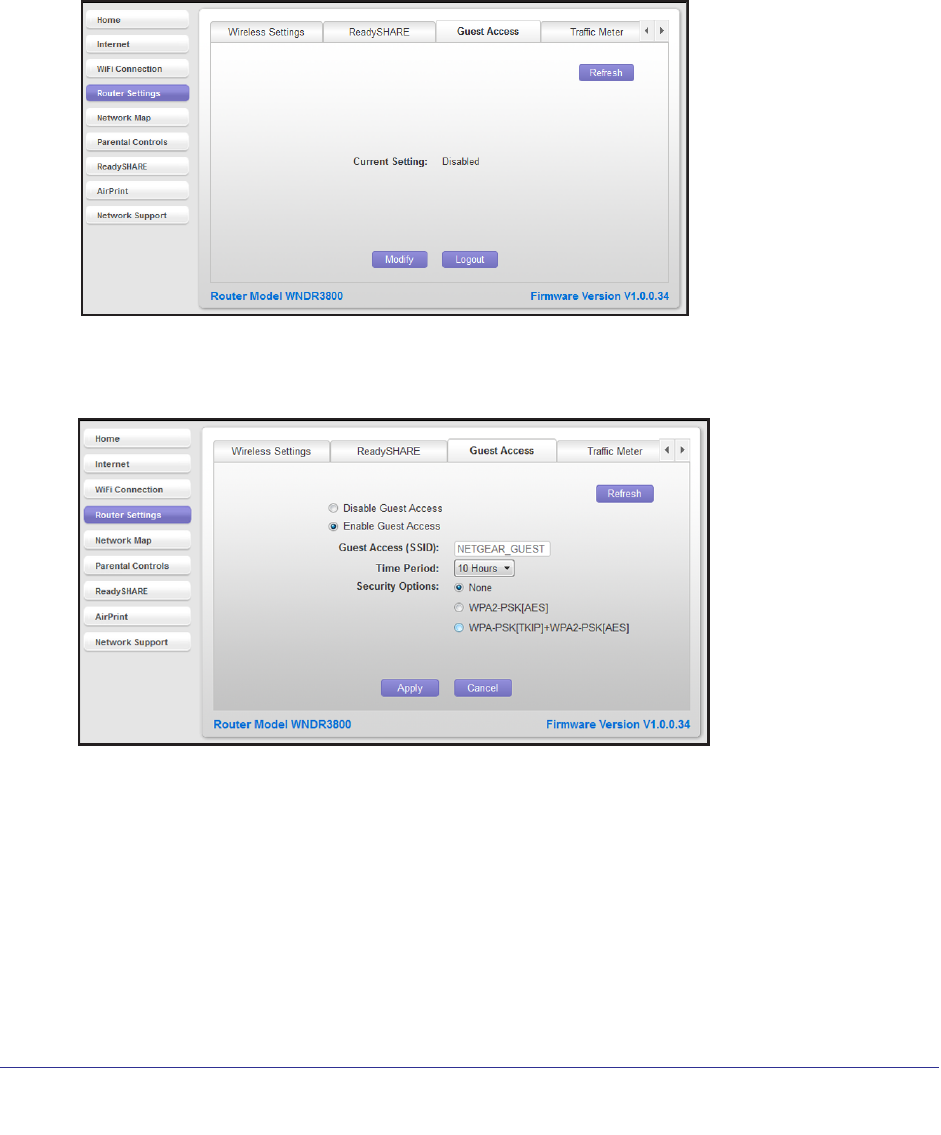
If your router has a USB port that supports ReadySHARE, you can use this screen. Select
Router Settings > ReadySHARE, and the following screen displays:
Some premium router models include extra ReadySHARE features. The router shown in the
previous figure, supports Basic ReadySHARE features.
NETGEAR genie App
28
genie app and genie mobile app
Guest Access
If your router supports a guest wireless network, you can view and change the settings. A
guest network allows others to use your wireless router to access the Internet, but not content
on other computers or devices on the same network.
To set up a guest network:
1. Select Router Settings > Guest Access.
In this example, the guest network is disabled because it hasn’t been set up yet.
2. Click Modify. The following screen displays:
The default guest network settings for your router are displayed. You can change them if
you like.
NETGEAR genie App
29
genie app and genie mobile app
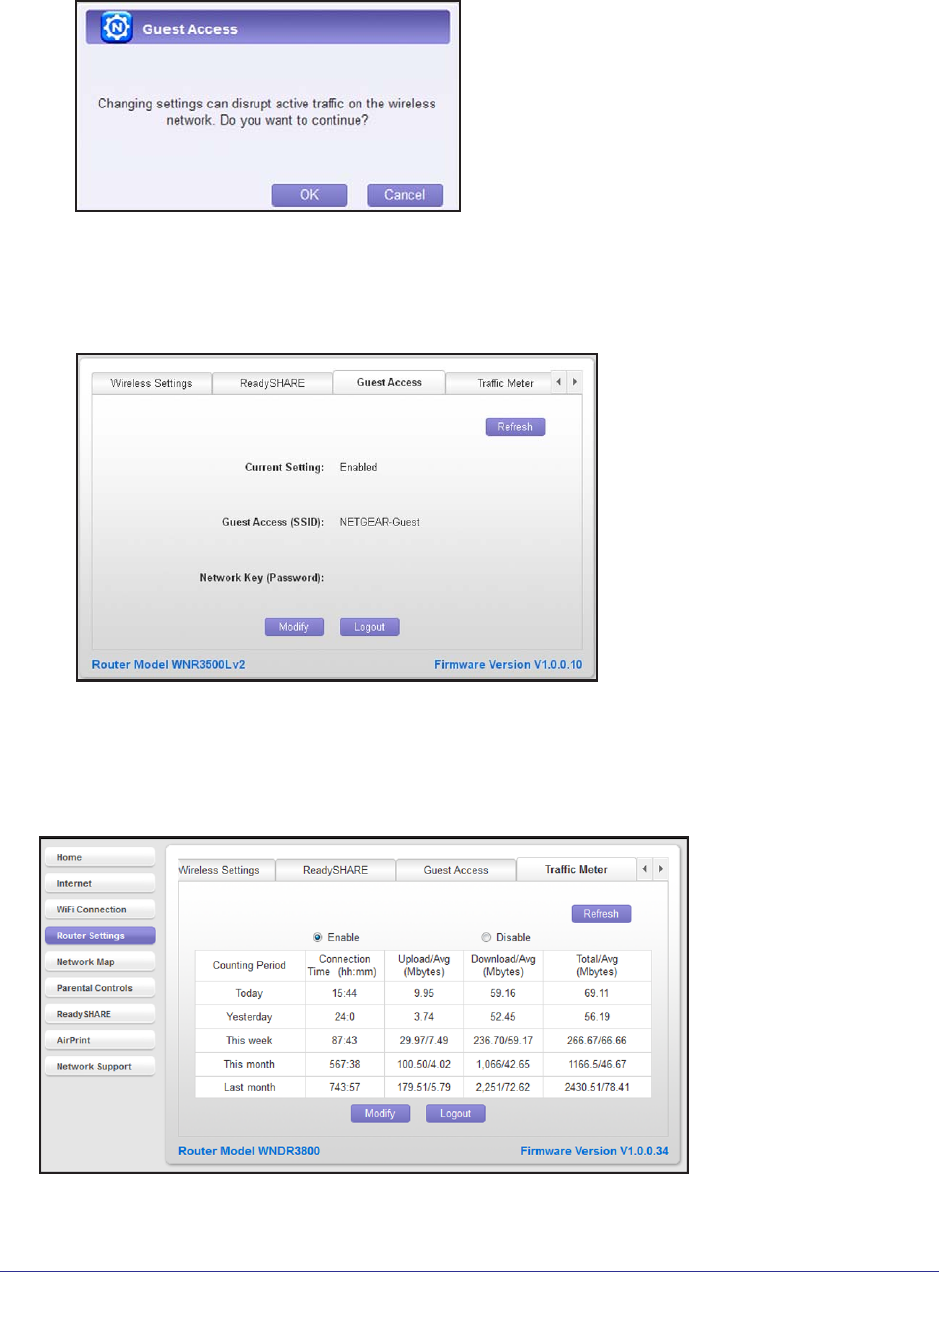
3. When you have filled in the fields with the settings that you want, click Apply.
This message reminds you that changing the wireless settings will disconnect any
computers or devices that are currently connected wirelessly to the network.
4. Click OK to proceed. A message displays asking you to wait while the changes take effect.
Then the following screen displays:
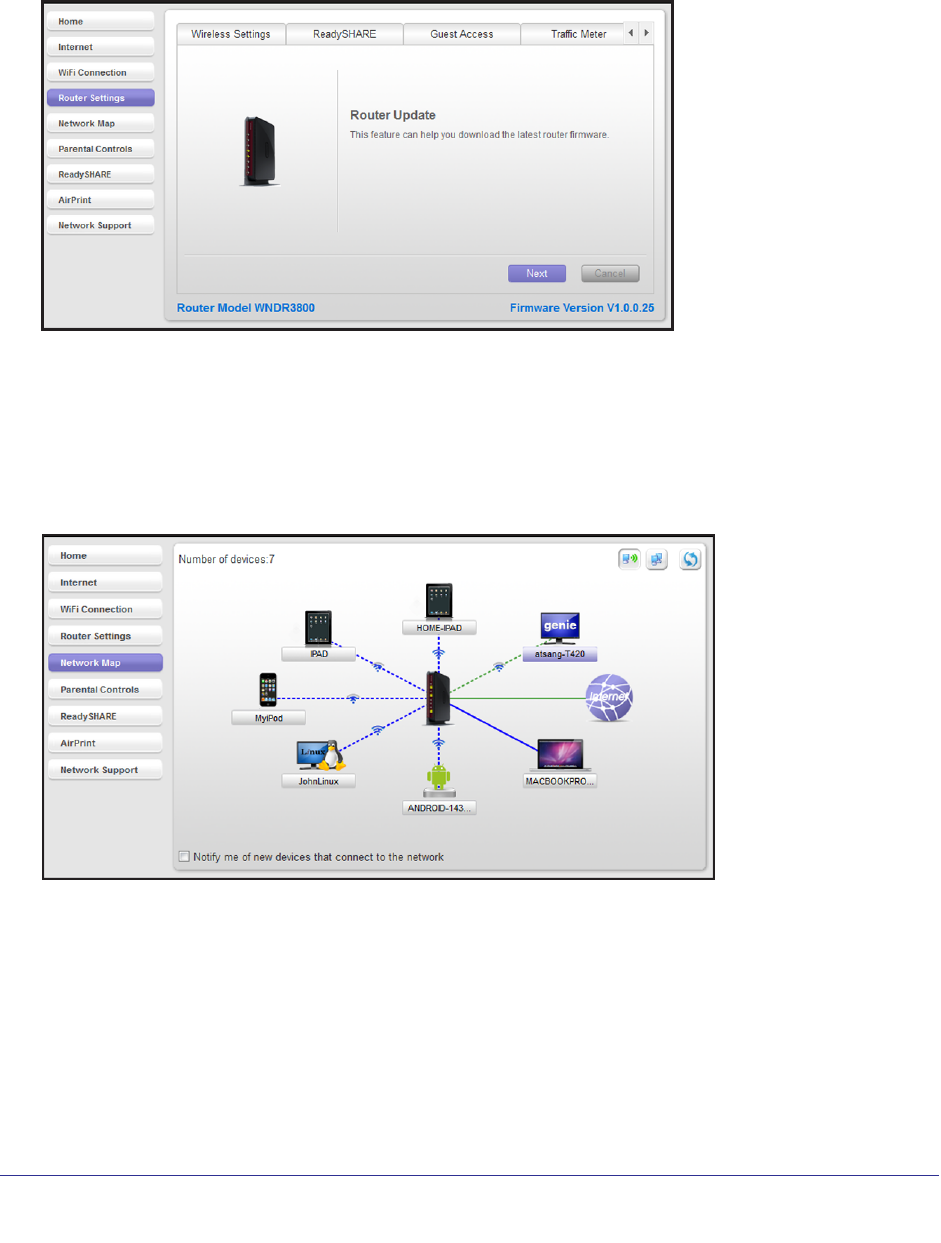
Traffic Meter
The traffic meter measures Internet traffic. If your router includes this feature, select Router
Settings > Traffic Meter to view the following screen:
NETGEAR genie App
30
genie app and genie mobile app
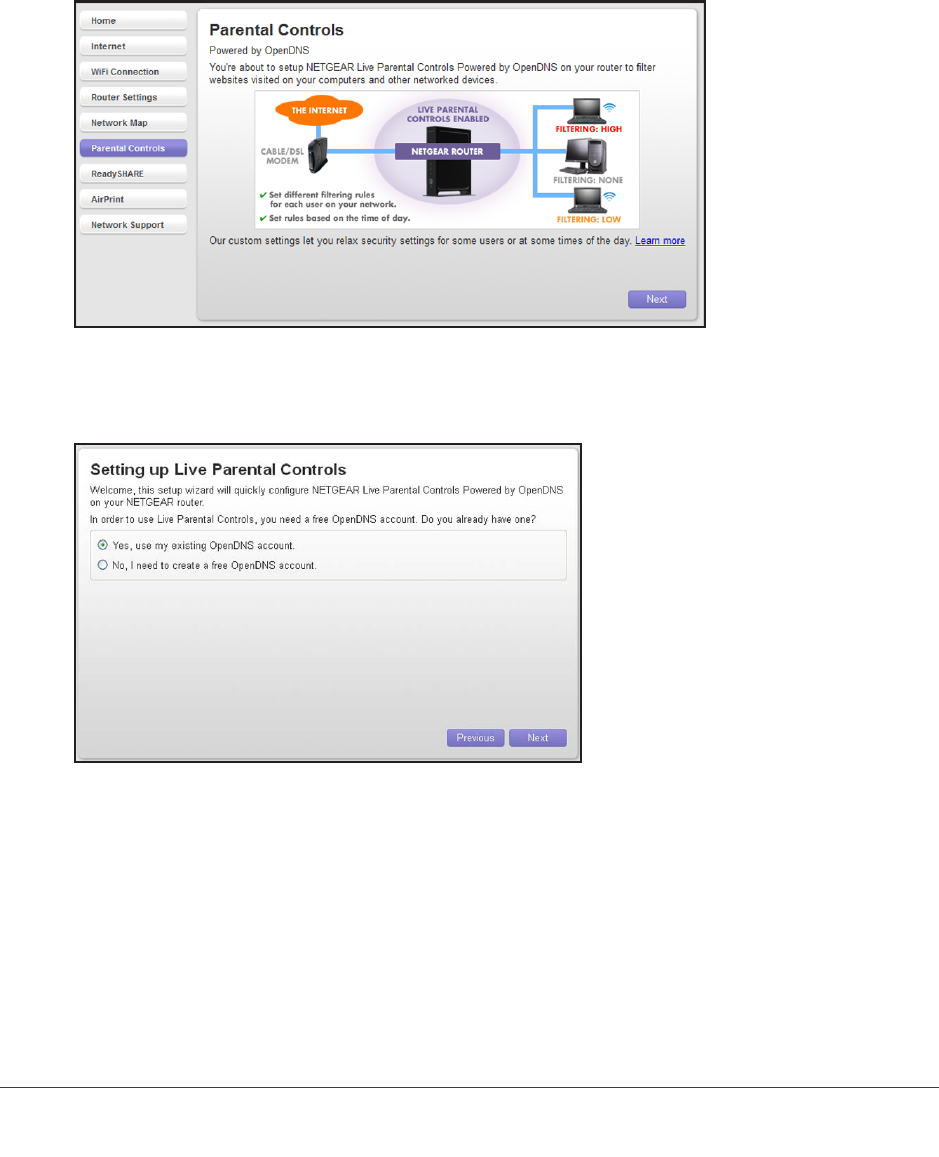
Router Update
You can check for new firmware for your router and update the router to the latest version.
Select Router Settings > Update to display the following screen:
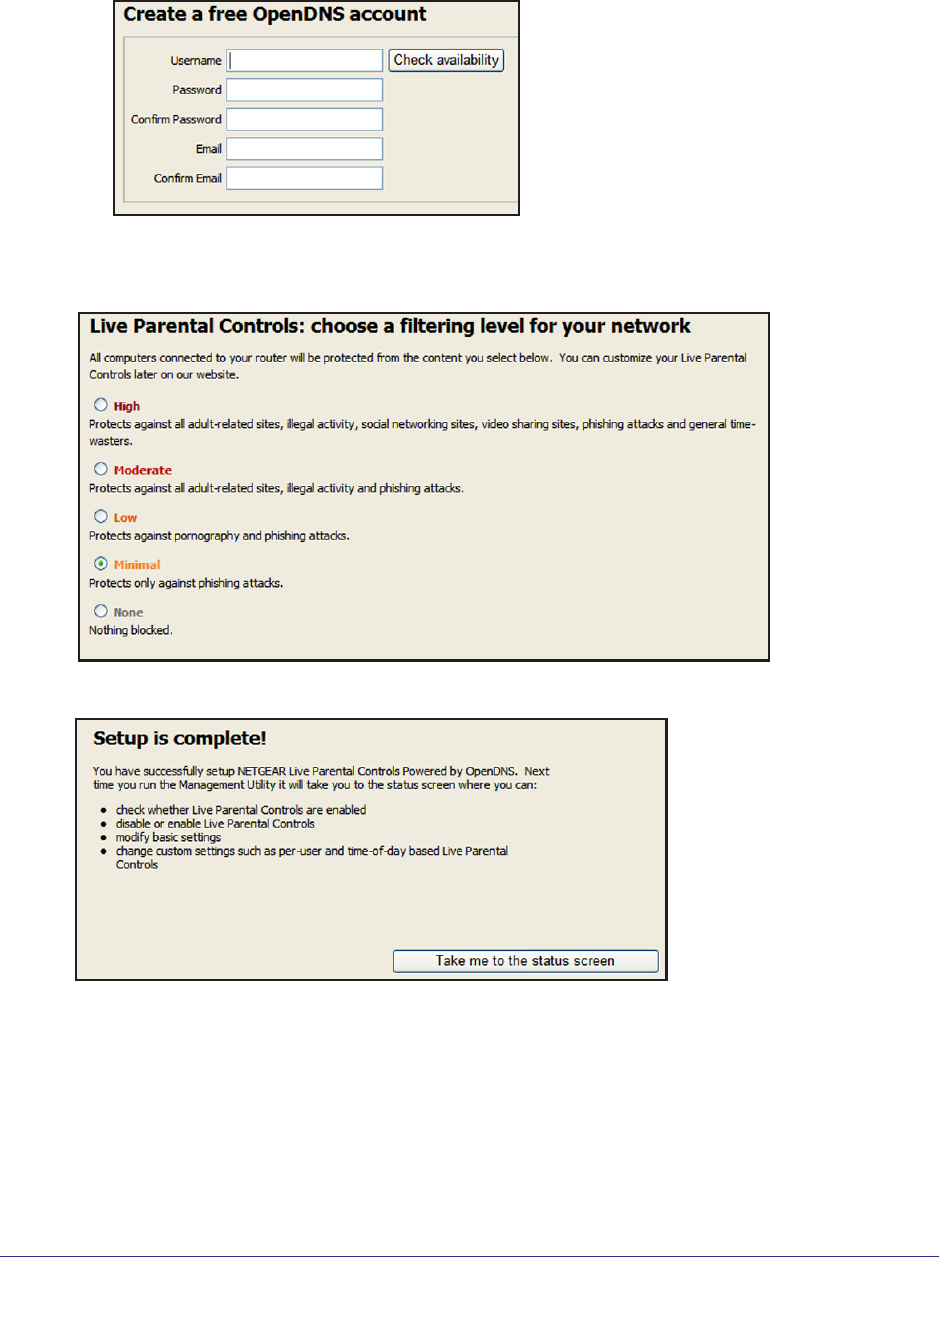
Network Map
The network map shows the router’s Internet connection, and also displays computers and
devices that are connected to your router. A good connection is shown in green. A red line
indicates a connection that is not working.
You can click a device icon to see more information about the device, and can change its
network type if the map itself does not automatically find its type.
If you select the Notify me of new devices that connect to my network check box, then
every time a new device joins your network, you will get a notice on this computer through the
genie app.
NETGEAR genie App
31
genie app and genie mobile app
Parental Controls
The first time you select Parental Controls from the Home screen, the genie app checks to
make sure that your router supports this feature.
To set up Parental Controls:
1. Select Parental Controls, and the following screen displays:
2. Click Next.
Because Live Parental Controls uses free OpenDNS accounts, you are prompted to log
in or create a free account.
3. Select the radio button that applies to you, and click Next.
• If you already have an OpenDNS account, leave the Yes radio button selected.
• If you do not have an OpenDNS account, select the No radio button.
NETGEAR genie App
32
genie app and genie mobile app
If you are creating an account, the following screen displays:
• Fill in the fields and click Next.
After you log on or create your account, the filtering level screen displays:
4. Select the radio button for the filtering level that you want and click Next.
5. Click the Take me to the status screen button.
Parental Controls are now set up for the router. The dashboard shows Parental Controls as
Enabled.
NETGEAR genie App
33
genie app and genie mobile app
ReadySHARE
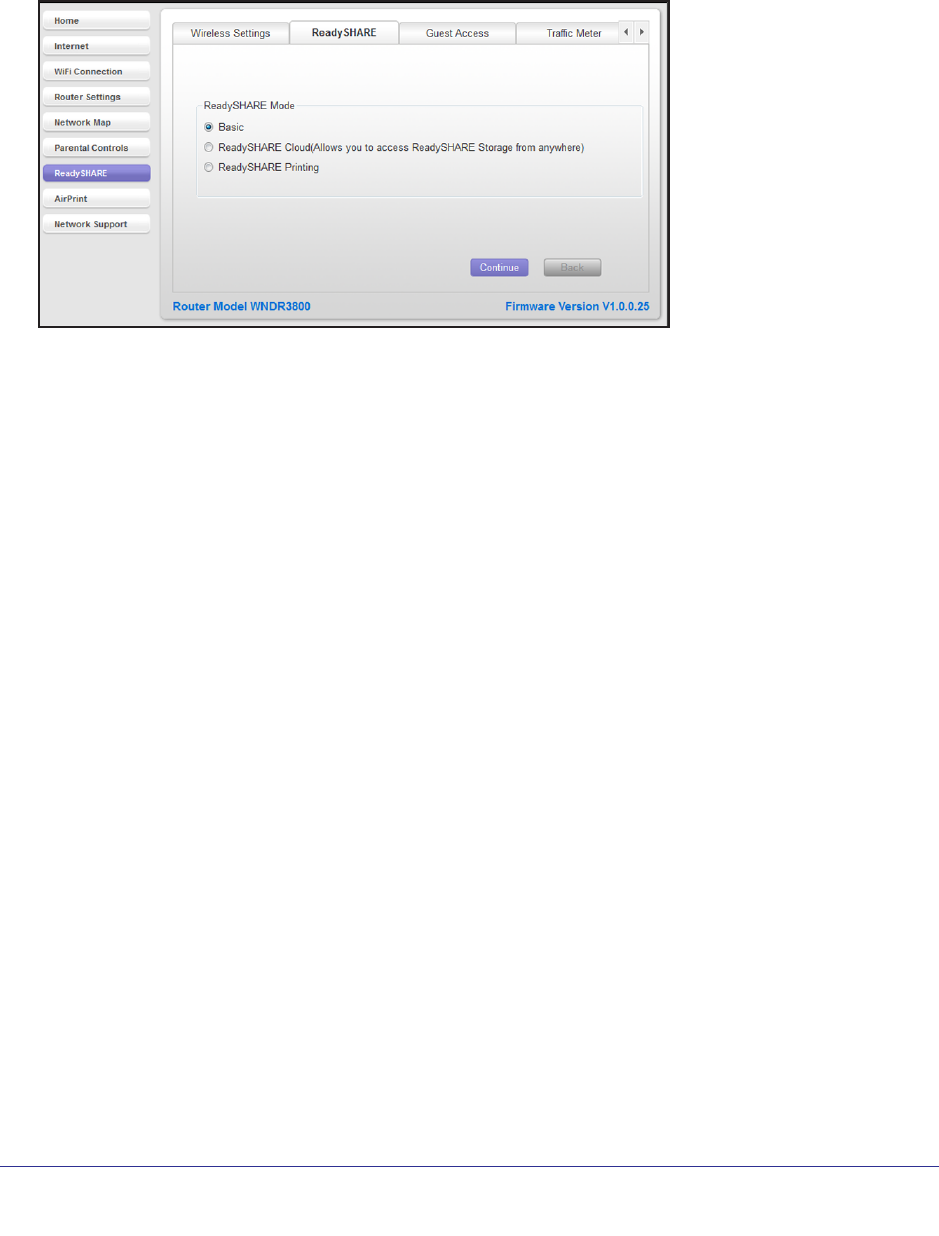
You can view information about a USB storage device or printer that is connected to the
router’s USB port here. Click the ReadyShare button to display the following screen:
The router in this example has Basic ReadySHARE features. Premium routers have more
ReadySHARE features. If your router supports ReadySHARE Cloud or ReadySHARE Print,
you can select the radio button for these options and click Continue.
• Basic USB Sharing. Once you have set up your router, you can connect any USB
storage device and share the contents with other users on your network. You can access
your USB device in any of the following ways:
-On Windows 7, Windows XP, Windows Vista, and Windows 2000 systems, select
Start > Run and enter \\readyshare in the dialog box. Click OK.
-On Windows 7, Windows XP, Windows Vista, and Windows 2000 systems, open
Internet Explorer, and enter \\readyshare in the address bar.
-On Mac OS X (version 10.2 or later), enter smb://readyshare in the address bar.
-In My Network Places, enter \\readyshare in the address bar.
• ReadySHARE Cloud. ReadySHARE Cloud gives you remote access over the Internet to
a USB storage device that is connected to your router’s USB port.
To use ReadySHARE Cloud, you register your router with the ReadySHARE Cloud
server. Using this feature, you can also invite friends and family members to access the
shared contents on the USB device. If your friends and family do not have a
ReadySHARE Cloud account, they will be invited to create one so they can access the
shared contents.
• ReadySHARE Printing. ReadySHARE Printer is compatible with Macs and Windows
PCs. It lets you connect a USB printer to the router’s USB port, and access it wirelessly.
NETGEAR genie App
34
genie app and genie mobile app
AirPrint
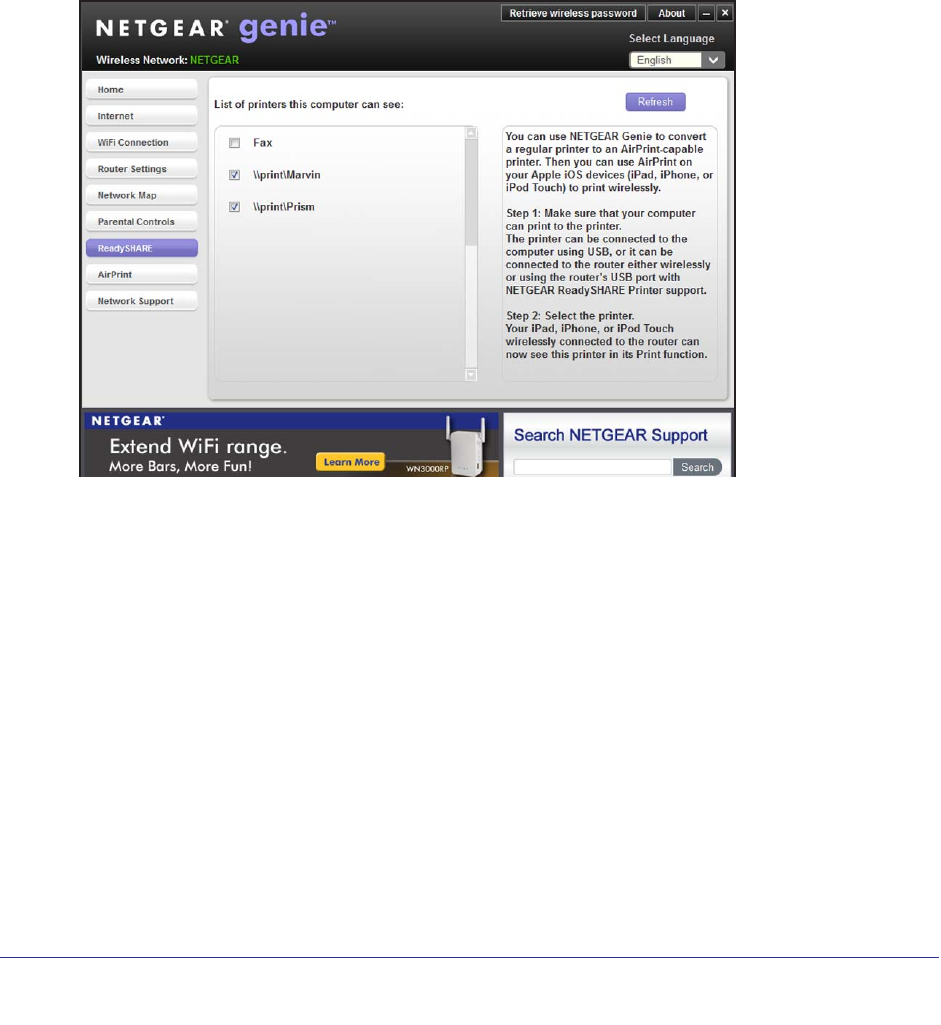
The genie app’s AirPrint feature turns your printer into an AirPrint-enabled printer so that your
iOS devices can use printers in the same network. AirPrint can be accessed from Mail,
Safari, Photos, Notes and other apps with print capability. The AirPrint feature is only
available only in iOS version 4.2 or later.
To set up AirPrint:
1. Make sure the Windows or Mac computer can print successfully to the printer.
2. Open genie app, and select AirPrint.
3. Select the check box for the printer that your iOS device needs to print to.
4. On your iOS device, select Print from the menu option of Mail, Safari, Photos, Notes or
other apps with print capability.
5. Tap Print after the printer is selected.
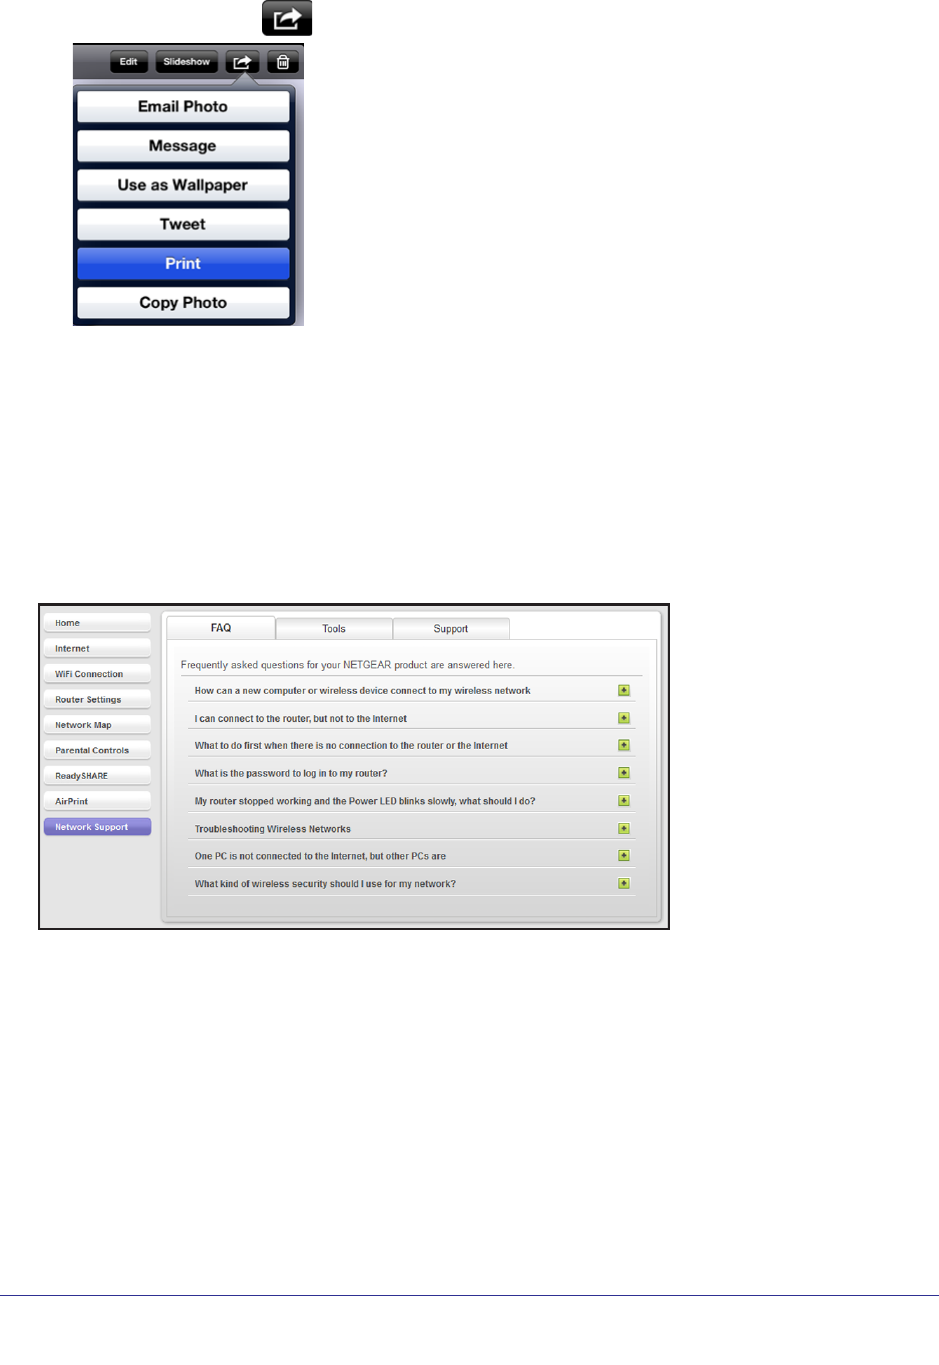
Example: To print a photo in an iOS device through AirPrint:
1. Connect to the wireless network with the printer.
2. Select AirPrint.
NETGEAR genie App
35
genie app and genie mobile app
3. Tap the action icon , and tap Print.
4. Tap Select Printer if there is not a printer assigned yet.
5. In the Printer list, select a printer.
6. Tap Print to print the photo.
Network Support
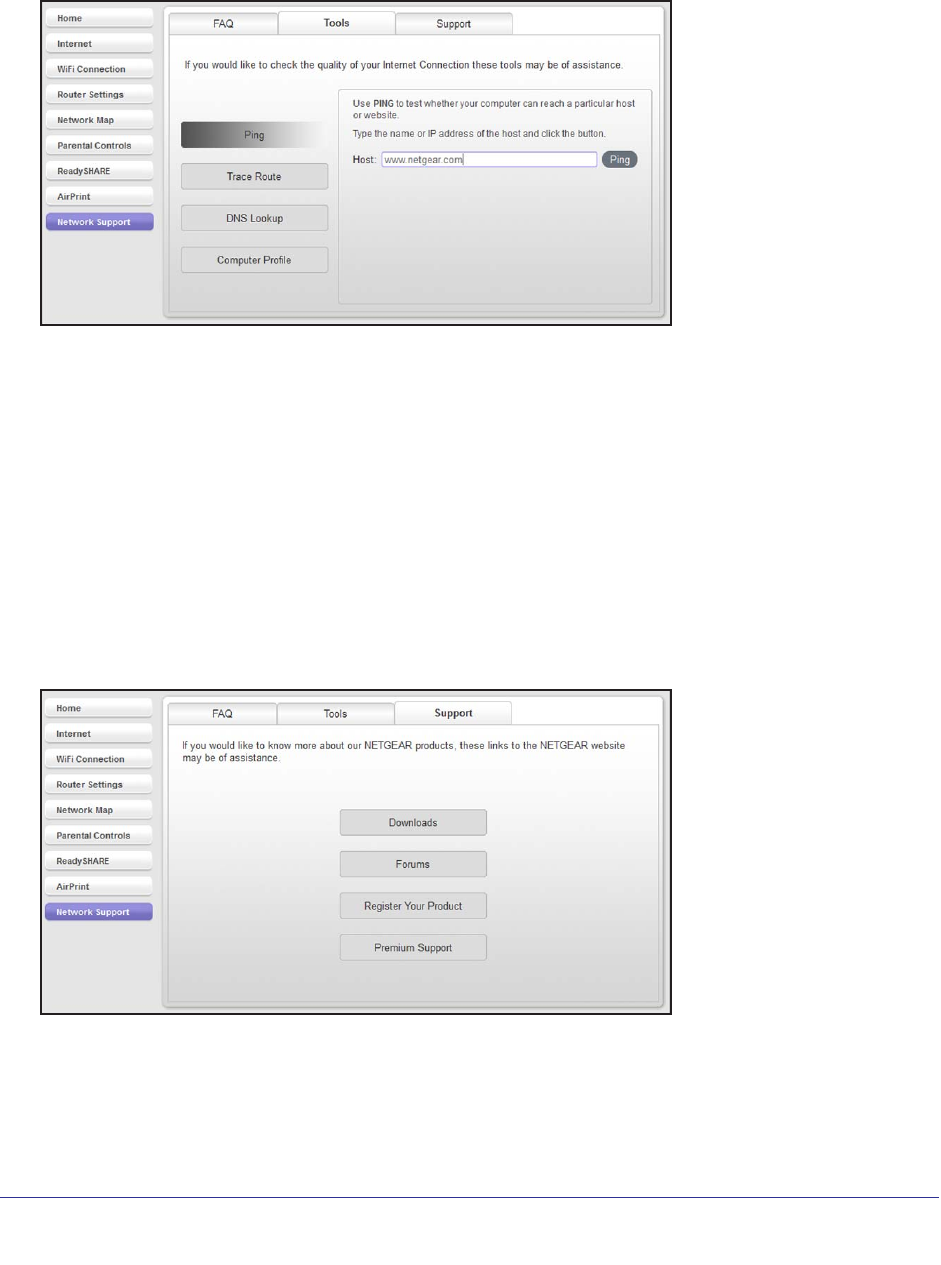
If you need help solving a network problem, or you want to learn more about your network,
select Network Support to display the following screen:
You can read frequently asked questions (FAQs) and answers, or you can use the Tools
screen, and the Support screen.
NETGEAR genie App
36
genie app and genie mobile app
Tools
Select Network Support > Tools to display the following screen:
The following tools are available:
• Ping. Use the ping utility to test a path from your computer to a destination you specify.
• Trace Route. Use trace route to identify the route taken by data packets from your
computer to the host.
• DNS Lookup. Find the IP address of a host name (typically a website).
• Computer Profile. View details about the computer that you are currently using, such as
its current network connections and operating system.
Support
Select Network Support > Support to display the following screen:
• Downloads. See downloads for your product at the NETGEAR website.
• Forums. Visit forums for NETGEAR products.
• Register Your Product. Register your product so that you can use NETGEAR support.
• Premium Support. Learn about premium support options for your product.
Federal Communication Commission Interference Statement
This device complies with Part 15 of the FCC Rules. Operation is subject to
the following two conditions: (1) This device may not cause harmful
interference, and (2) this device must accept any interference received,
including interference that may cause undesired operation.
This equipment has been tested and found to comply with the limits for a
Class B digital device, pursuant to Part 15 of the FCC Rules. These limits
are designed to provide reasonable protection against harmful interference in a
residential installation. This equipment generates, uses and can radiate radio
frequency energy and, if not installed and used in accordance with the
instructions, may cause harmful interference to radio communications.
However, there is no guarantee that interference will not occur in a particular
installation. If this equipment does cause harmful interference to radio or
television reception, which can be determined by turning the equipment off
and on, the user is encouraged to try to correct the interference by one of the
following measures:
- Reorient or relocate the receiving antenna.
- Increase the separation between the equipment and receiver.
- Connect the equipment into an outlet on a circuit different from that
to which the receiver is connected.
- Consult the dealer or an experienced radio/TV technician for help.
FCC Caution: Any changes or modifications not expressly approved by the
party responsible for compliance could void the user's authority to operate this
equipment.
This transmitter must not be co-located or operating in conjunction with any
other antenna or transmitter.
FOR MOBILE DEVICE USAGE (>20cm/low power)
Radiation Exposure Statement:
This equipment complies with FCC radiation exposure limits set forth for an
uncontrolled environment. This equipment should be installed and operated
with minimum distance 20cm between the radiator & your body.
FOR COUNTRY CODE SELECTION USAGE (WLAN DEVICES)
Note: The country code selection is for non-US model only and is not
available to all US model. Per FCC regulation, all WiFi product marketed in
US must fixed to US operation channels only.

