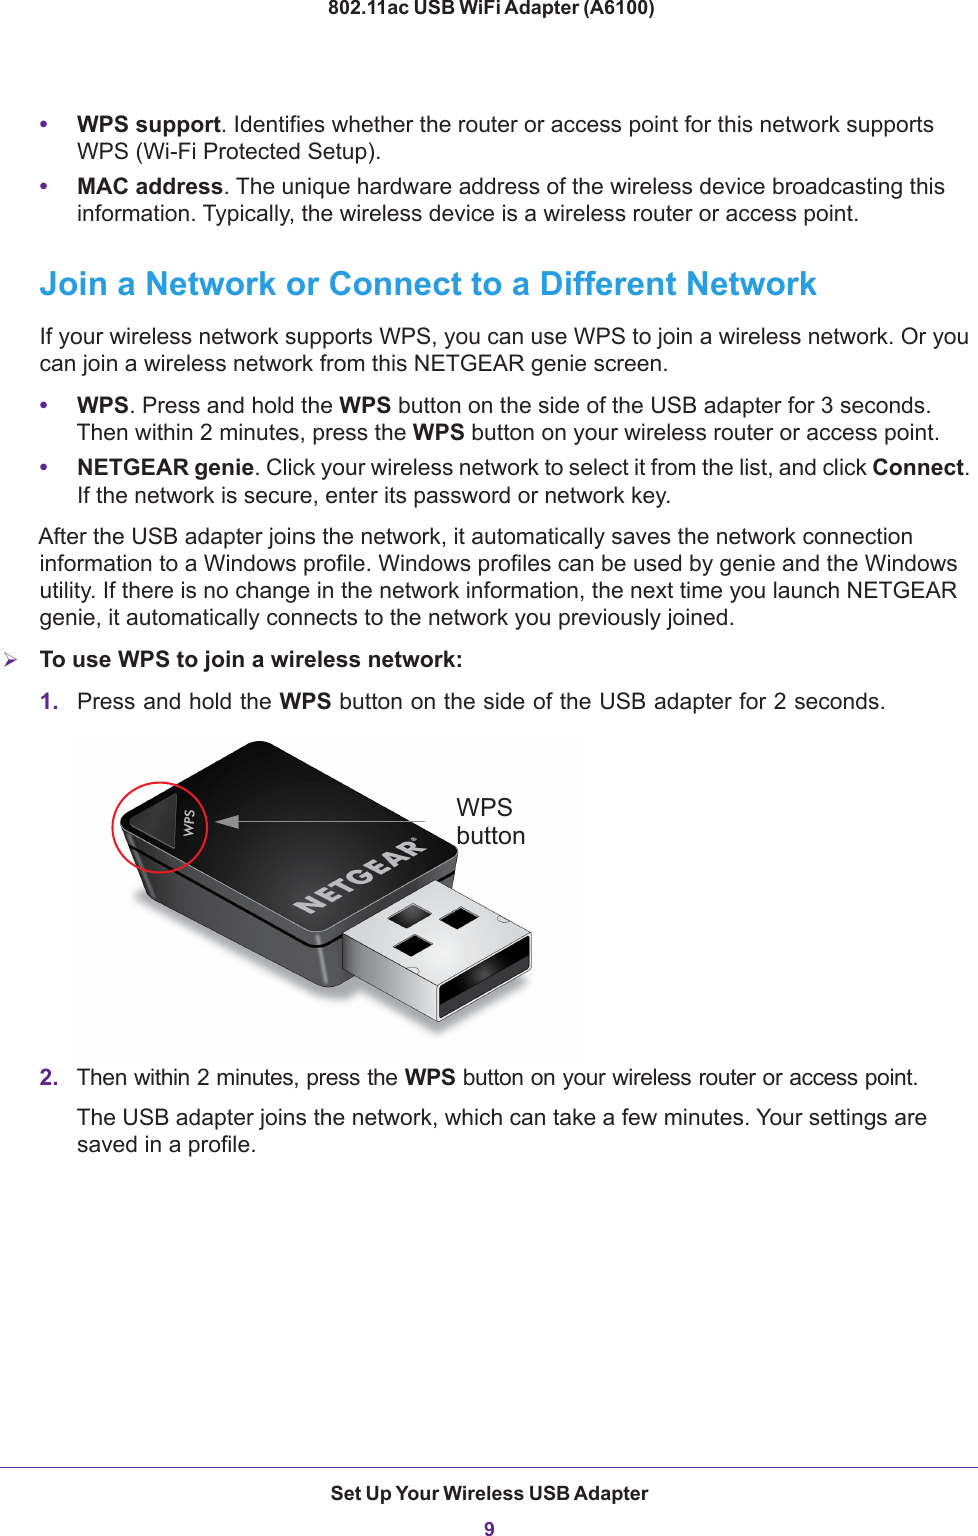
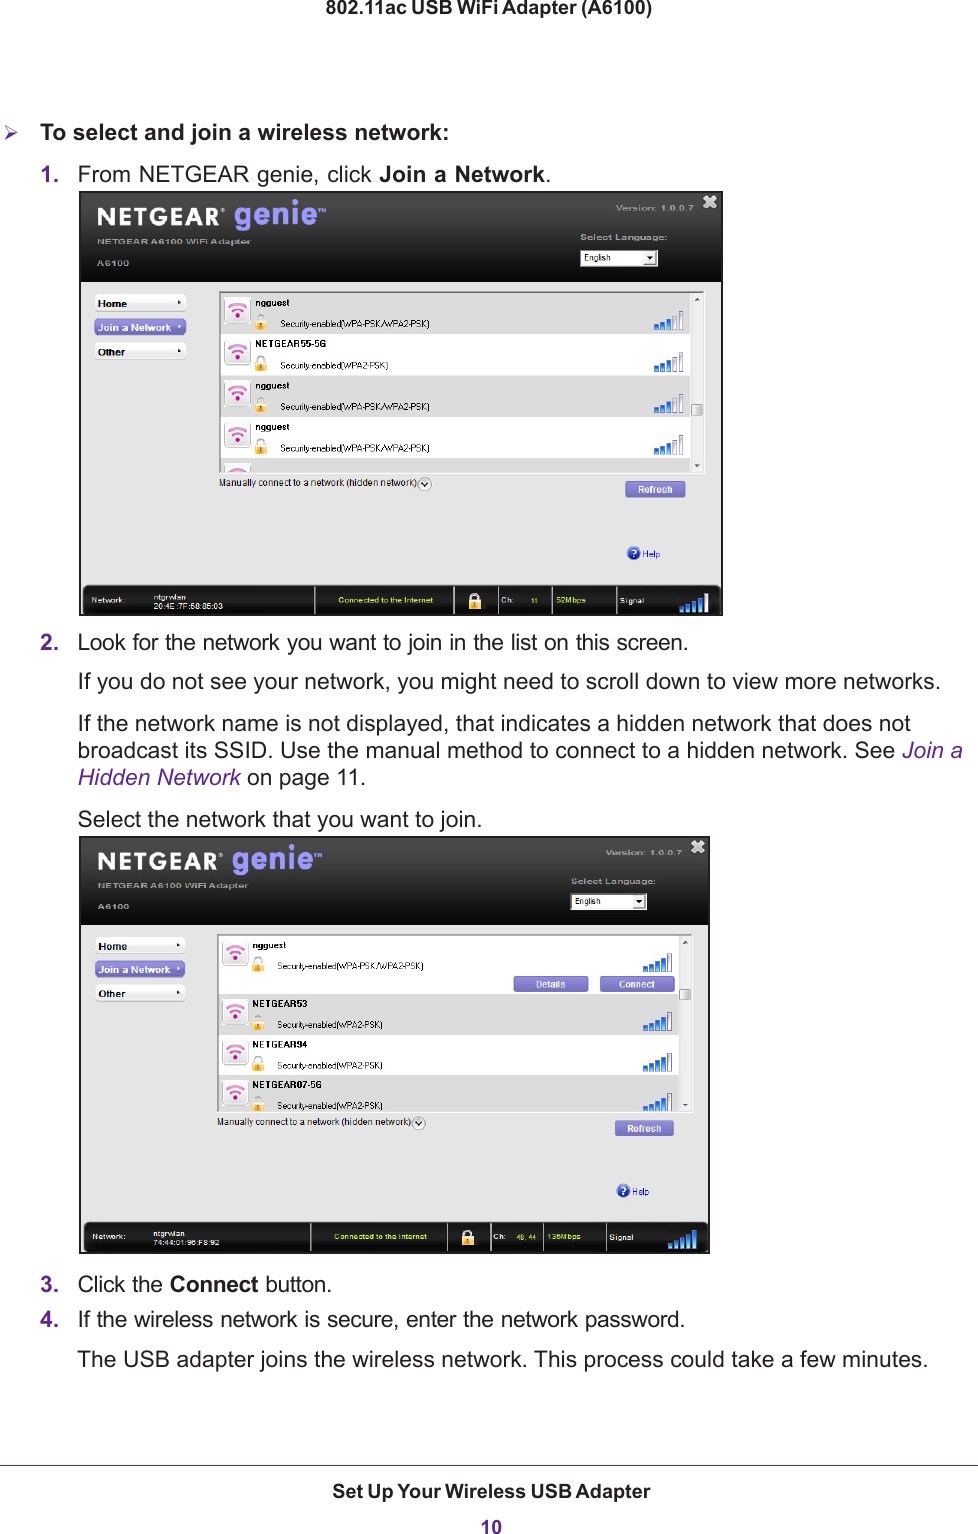
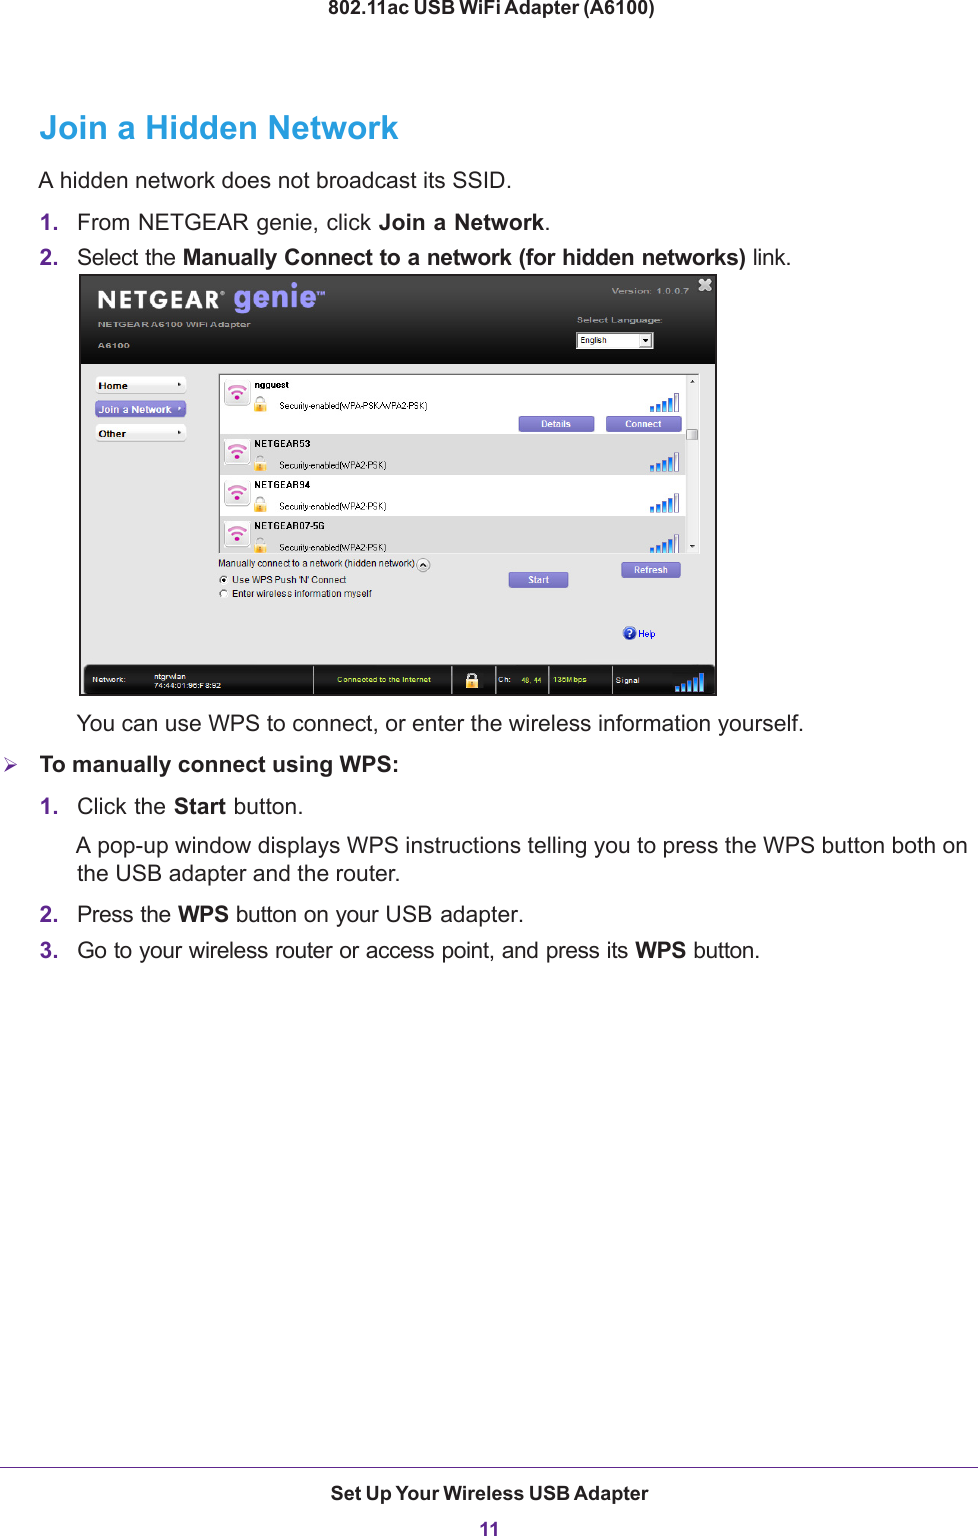
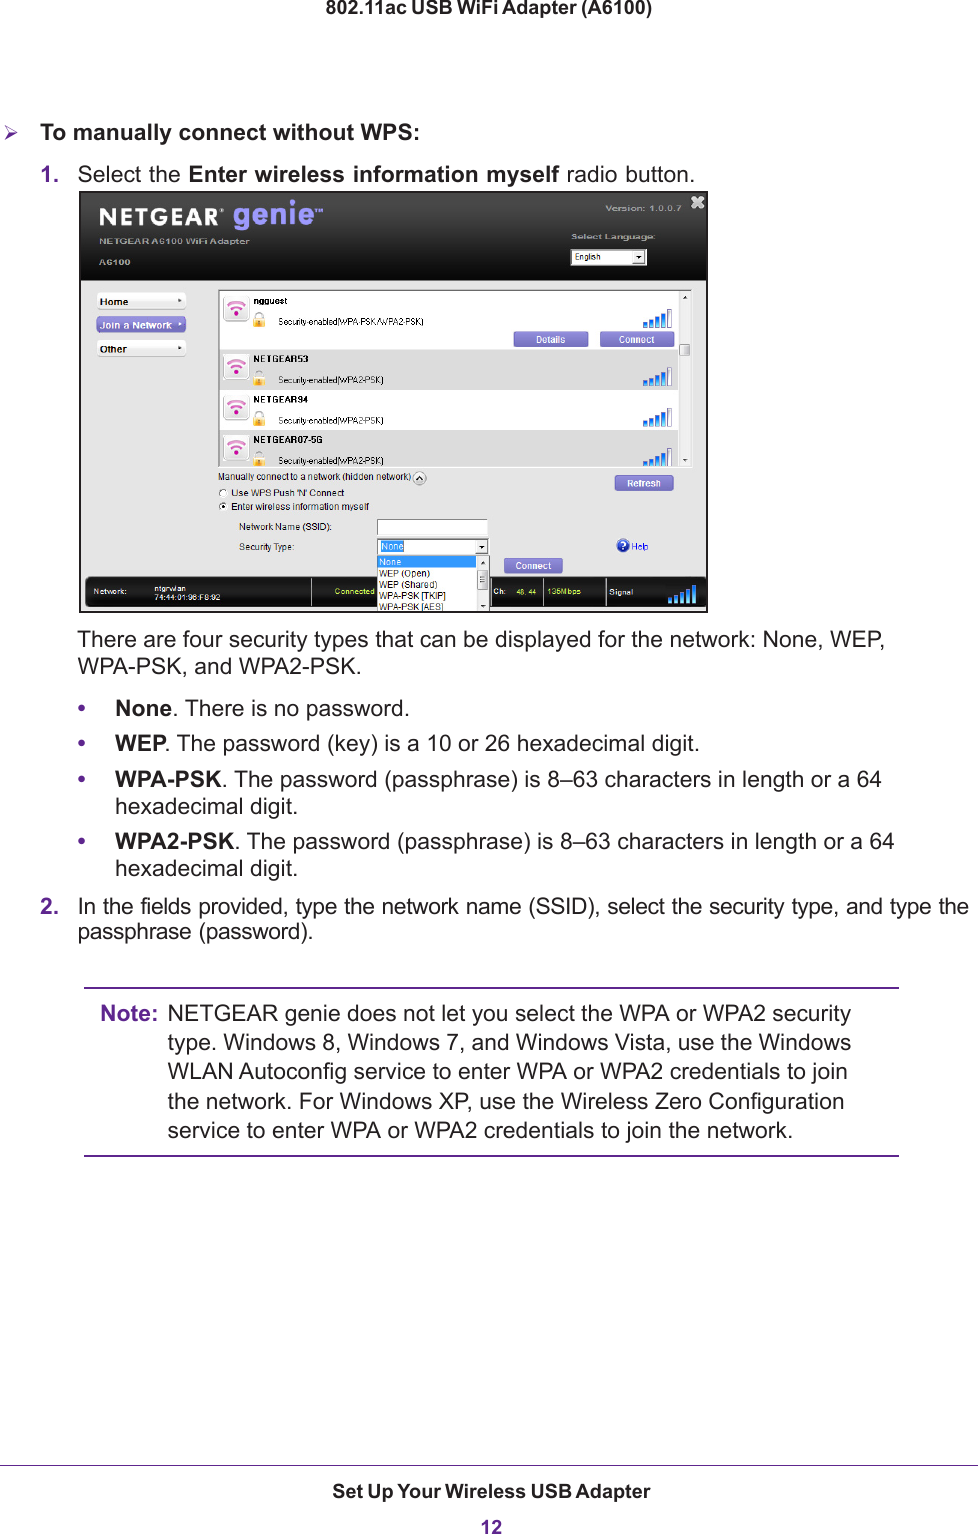
Netgear orporated 13200228 802.11abgn ac Dual Band Wireless-N Adapter User Manual 802 11ac USB WiFI Adapter A6100
Netgear Incorporated 802.11abgn ac Dual Band Wireless-N Adapter 802 11ac USB WiFI Adapter A6100
UserManual.wiki
>
Netgear orporated
>
13200228 User Manual
user manual
Navigation menu
Upload a User Manual
Namespaces
Wiki Guide
HTML
PDF
Info
Views
User Manual
Discussion / Help
Navigation


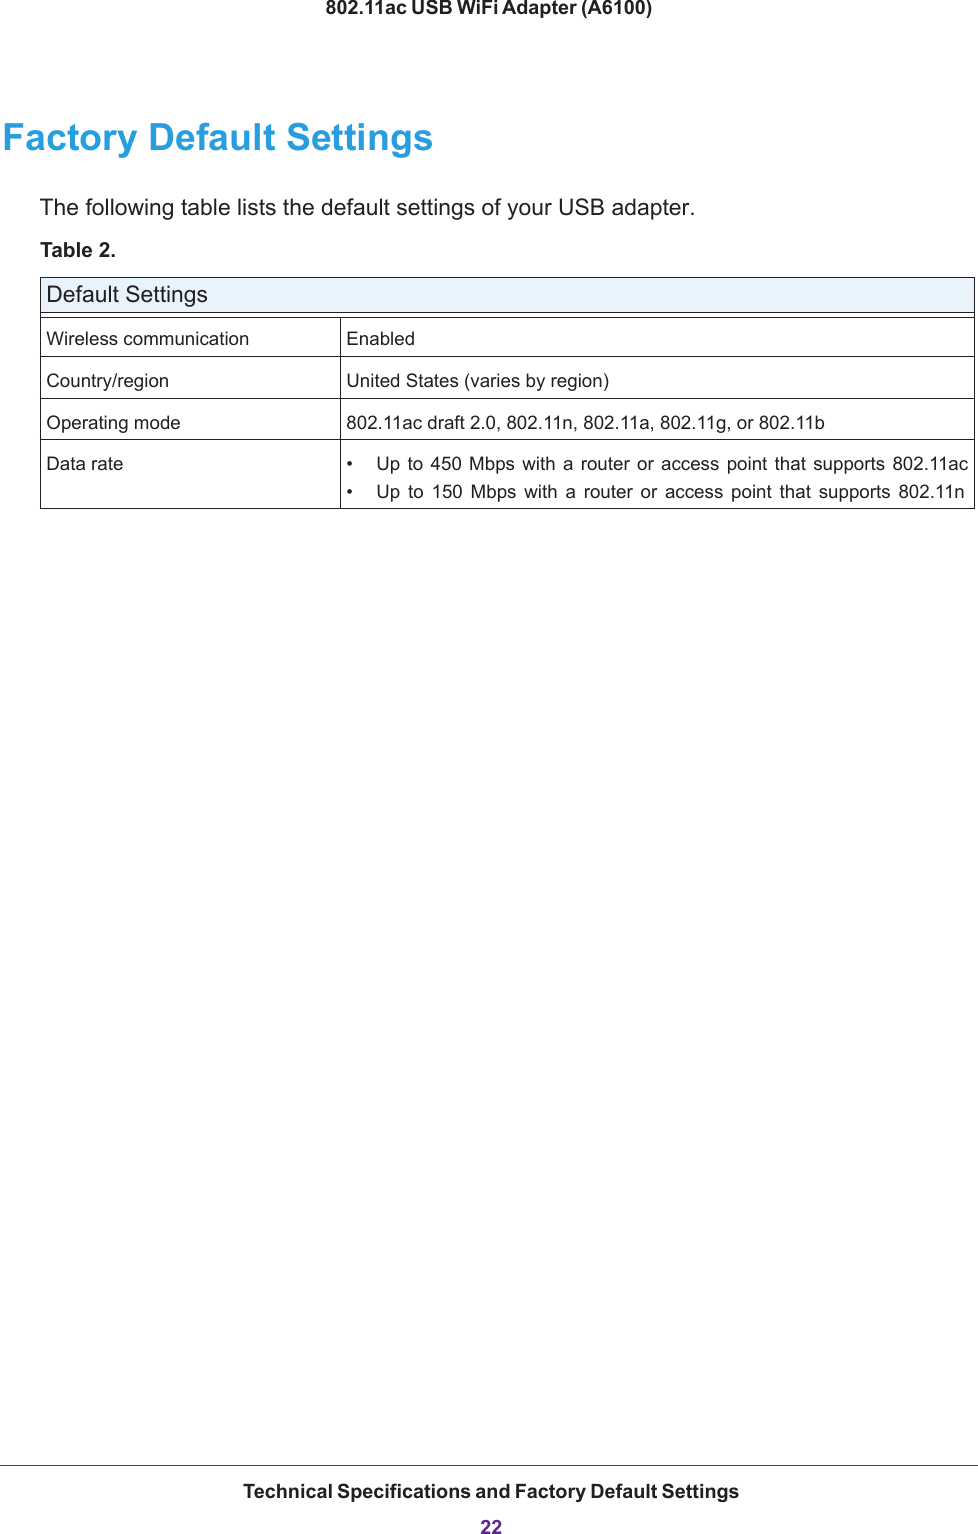
![Technical Specifications and Factory Default Settings21802.11ac USB WiFi Adapter (A6100)Technical SpecificationsThe following table provides technical specifications for the USB adapter. Table 1. Feature DescriptionAntenna 1 PIFA antennaStandards • 802.11ac draft 2.0• 802.11n• 802.11g• 802.11b• 802.11aRadio data rate AutosensingFrequency • 2.4 GHz to 2.5 GHz CCK and OFDM Modulation• 5 GHz OFDM, 802.11n MCS0-7, and 802.11ac MCS0-9 coding schemeEncryption • WPA2-PSK [AES]• WPA-PSK [TKIP]• 40-bit (also called 64-bit) WEP data encryption• 128-bit WEP data encryptionPower 5V bus poweredBus interface USB 2.0, compatible with USB 1.1Provided drivers • Microsoft Windows 8• Microsoft Windows 7• Microsoft Vista• Microsoft Windows XP (32/64-bit)Dimensions 37 x 20 x 8.1 mm (1.46 x 0.79 x.0.32 in.)Weight 5 g (0.18 oz)Operating temperature 0–40C (32–104F)Emissions FCC, CE](https://usermanual.wiki/Netgear-orporated/13200228/User-Guide-2019981-Page-21.png)
![Notification of Compliance24802.11ac USB WiFi Adapter (A6100)frequency devices. This model meets the applicable government requirements for exposure to radio frequency waves. The highest SAR level measured for this device was 1.17 W/kg.This product complies with the US / Canada portable RF exposure limit set forth for an uncontrolled environment and are safe for intended operation as described in this manual. The further RF exposure reduction can be achieved if the product can be kept as far as possible from the user body or set the device to lower output power if such function is available.This transmitter must not be co-located or operating in conjunction with any other antenna or transmitter.SAR compliance has been established in typical laptop computer(s) with USB slot, and product could be used in typical laptop computer with USB slot. Other application like handheld PC or similar device has not been verified and may not compliance with related RF exposure rule and such use shall be prohibited.The USB dongle transmitter is approved for use in typical laptop computers. To comply with FCC RF exposure requirements, it should not be used in other devices or certain laptop and tablet computer configurations where the USB connectors on the host computer are unable to provide or ensure the necessary operating configurations intended for the device and its users or bystanders to satisfy RF exposure compliance requirements. Note: The country code selection is for non-US model only and is not available to all US model. Per FCC regulation, all WiFi product marketed in US must fixed to US operation channels only.FCC Declaration of ConformityWe, NETGEAR, Inc., 350 East Plumeria Drive, San Jose, CA 95134, declare under our sole responsibility that the 802.11ac USB WiFi Adapter (A6100) complies with Part 15 Subpart B of FCC CFR47 Rules. Operation is subject to the following two conditions:• This device may not cause harmful interference, and• This device must accept any interference received, including interference that may cause undesired operation.FCC Radio Frequency Interference Warnings and InstructionsThis equipment has been tested and found to comply with the limits for a Class B digital device, pursuant to Part 15 of the FCC Rules. These limits are designed to provide reasonable protection against harmful interference in a residential installation. This equipment uses and can radiate radio frequency energy and, if not installed and used in accordance with the instructions, may cause harmful interference to radio communications. However, there is no guarantee that interference will not occur in a particular installation. If this equipment does cause harmful interference to radio or television reception, which can be determined by turning the equipment off and on, the user is encouraged to try to correct the interference by one or more of the following methods:• Reorient or relocate the receiving antenna.• Increase the separation between the equipment and the receiver.• Connect the equipment into an electrical outlet on a circuit different from that which the radio receiver is connected.• Consult the dealer or an experienced radio/TV technician for help.Canadian Department of Communications Radio Interference RegulationsThis digital apparatus (802.11ac USB WiFi Adapter (A6100)) does not exceed the Class B limits for radio-noise emissions from digital apparatus as set out in the Radio Interference Regulations of the Canadian Department of Communications.This Class [B] digital apparatus complies with Canadian ICES-003.Cet appareil numérique de la classe [B] est conforme à la norme NMB-003 du CanadaIndustry CanadaThis device complies with Industry Canada licence-exempt RSS standard(s). Operation is subject to the following two conditions: (1) this device may not cause interference, and (2) this device must accept any interference, including interference that may cause undesired operation of the device.Le présent appareil est conforme aux CNR d'Industrie Canada applicables aux appareils radio exempts de licence. L'exploitation est autorisée aux deux conditions suivantes: (1) l'appareil ne doit pas produire de brouillage, et (2) l'utilisateur de l'appareil doit accepter tout brouillage radioélectrique subi, même si le brouillage est susceptible d'en compromettre le fonctionnement.](https://usermanual.wiki/Netgear-orporated/13200228/User-Guide-2019981-Page-24.png)