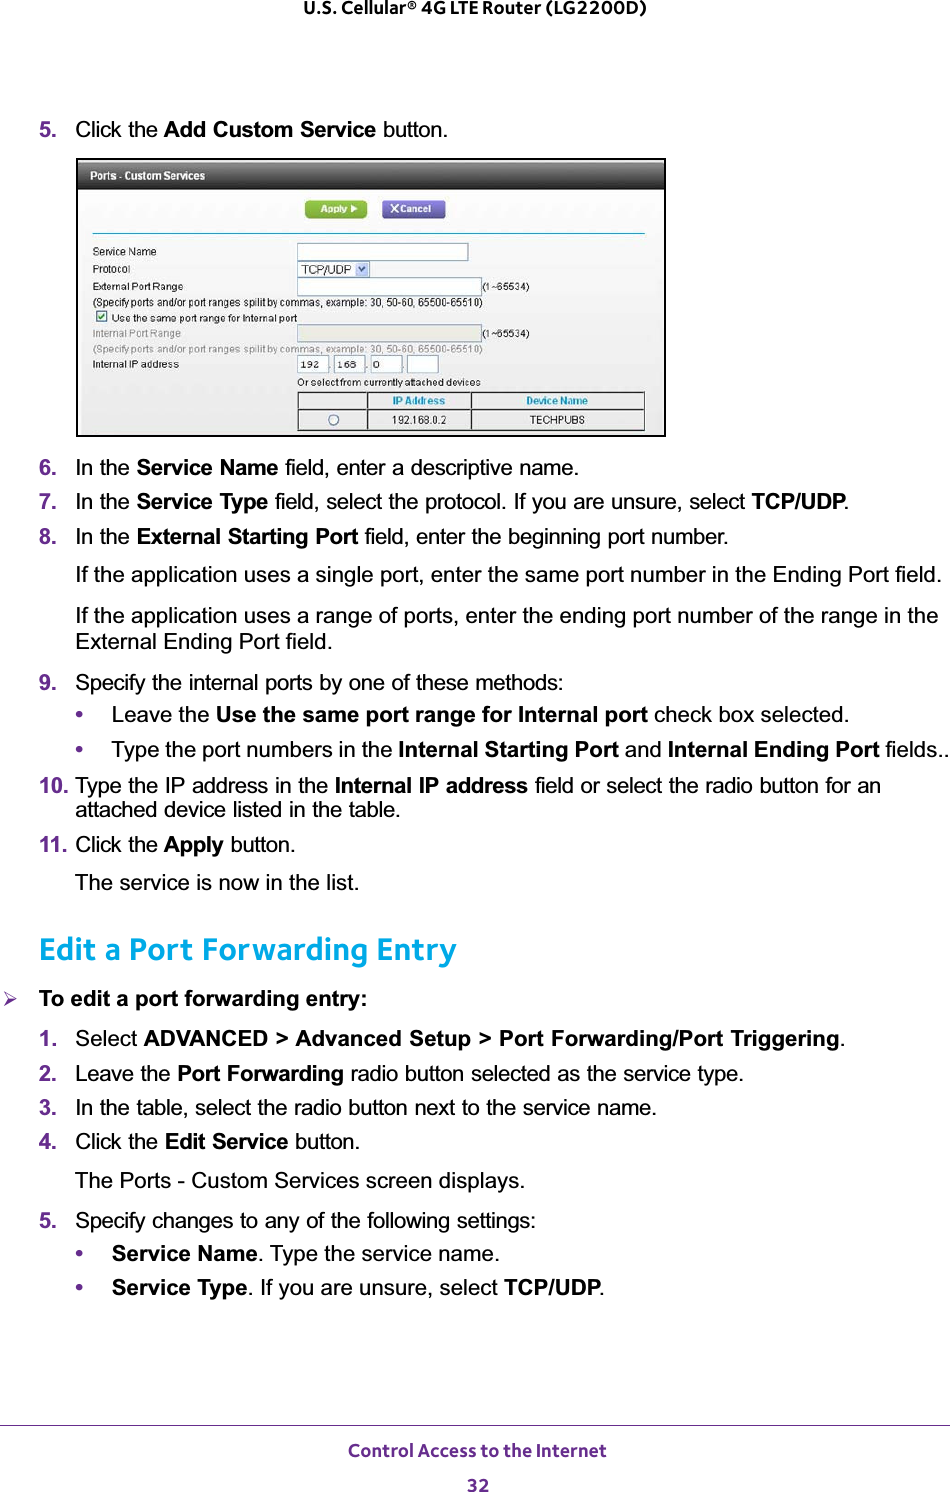
Netgear orporated 13400244 MOBILE LTE BROADBAND 11N WIRELESS ROUTER User Manual LG2200D LTE Gateway
Netgear Incorporated MOBILE LTE BROADBAND 11N WIRELESS ROUTER LG2200D LTE Gateway
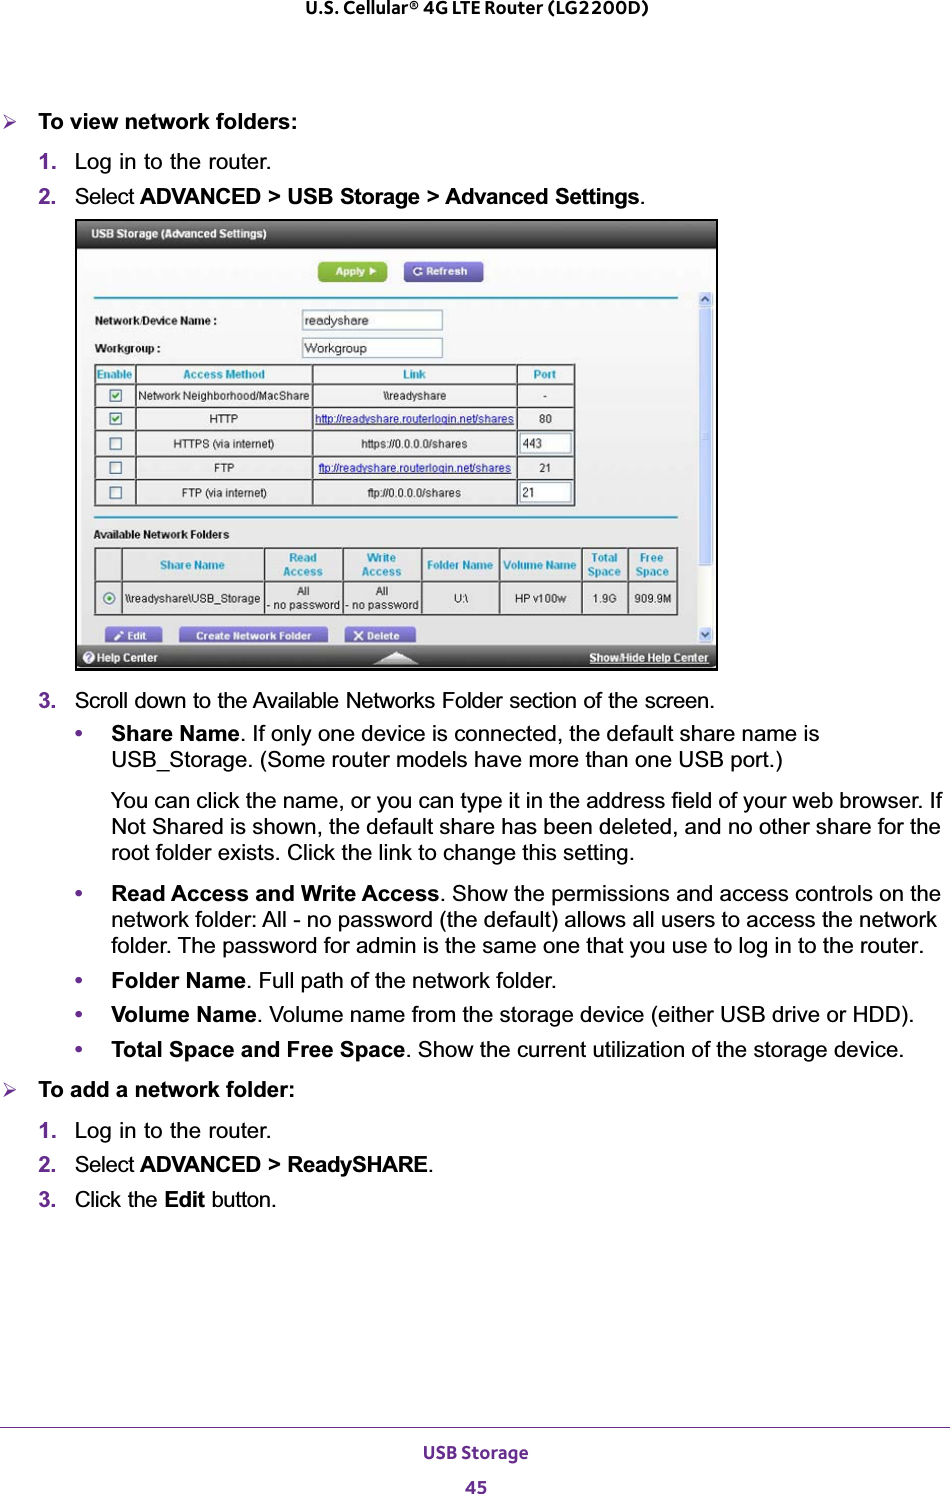
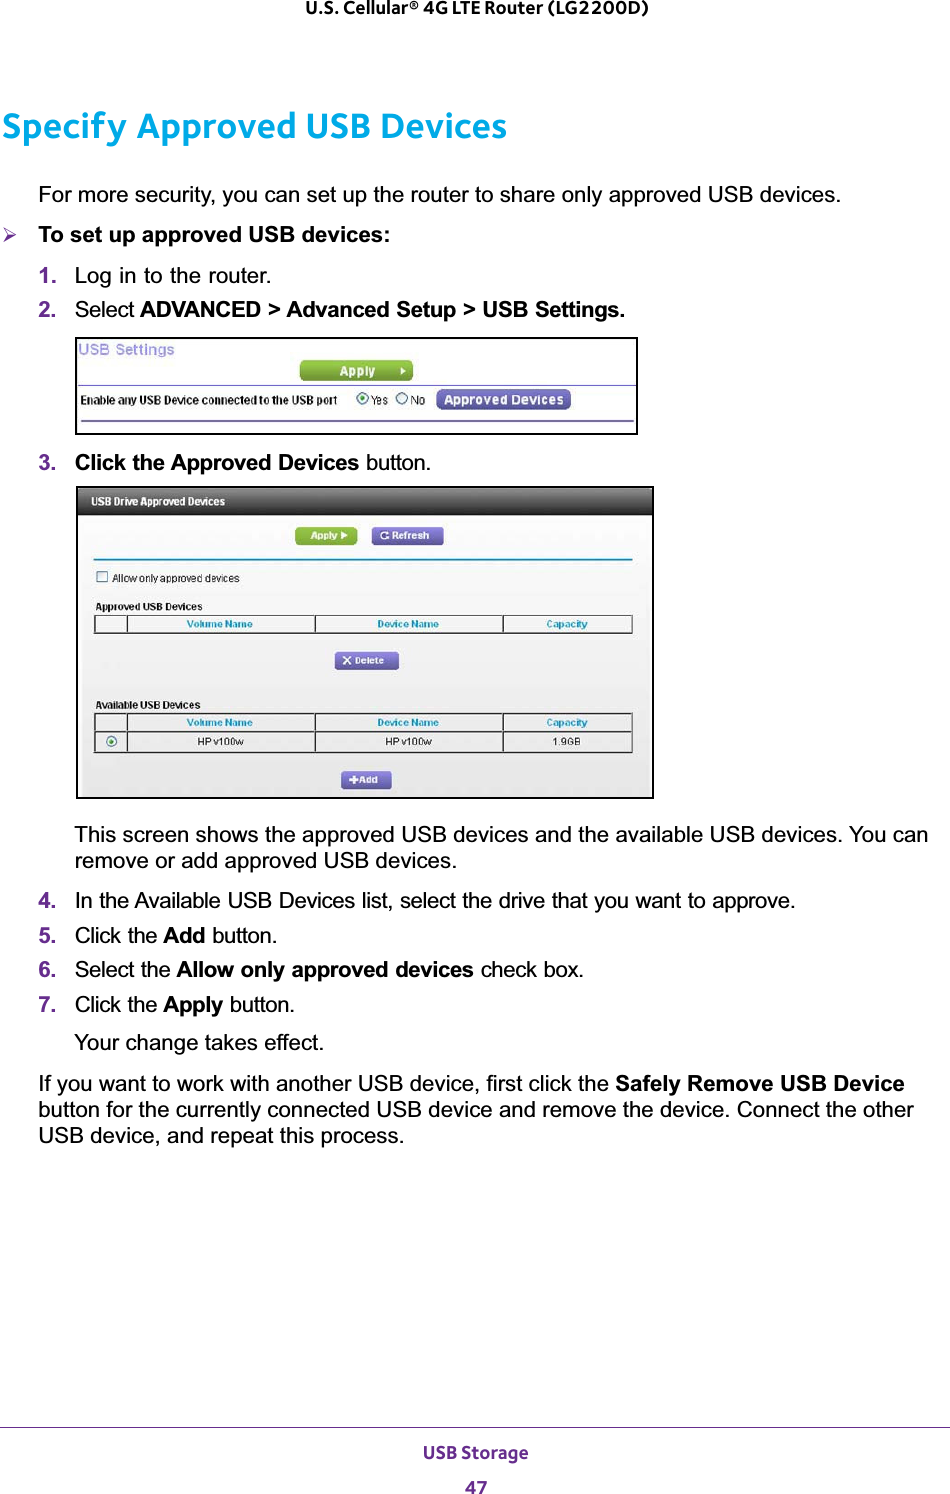
UserManual.wiki
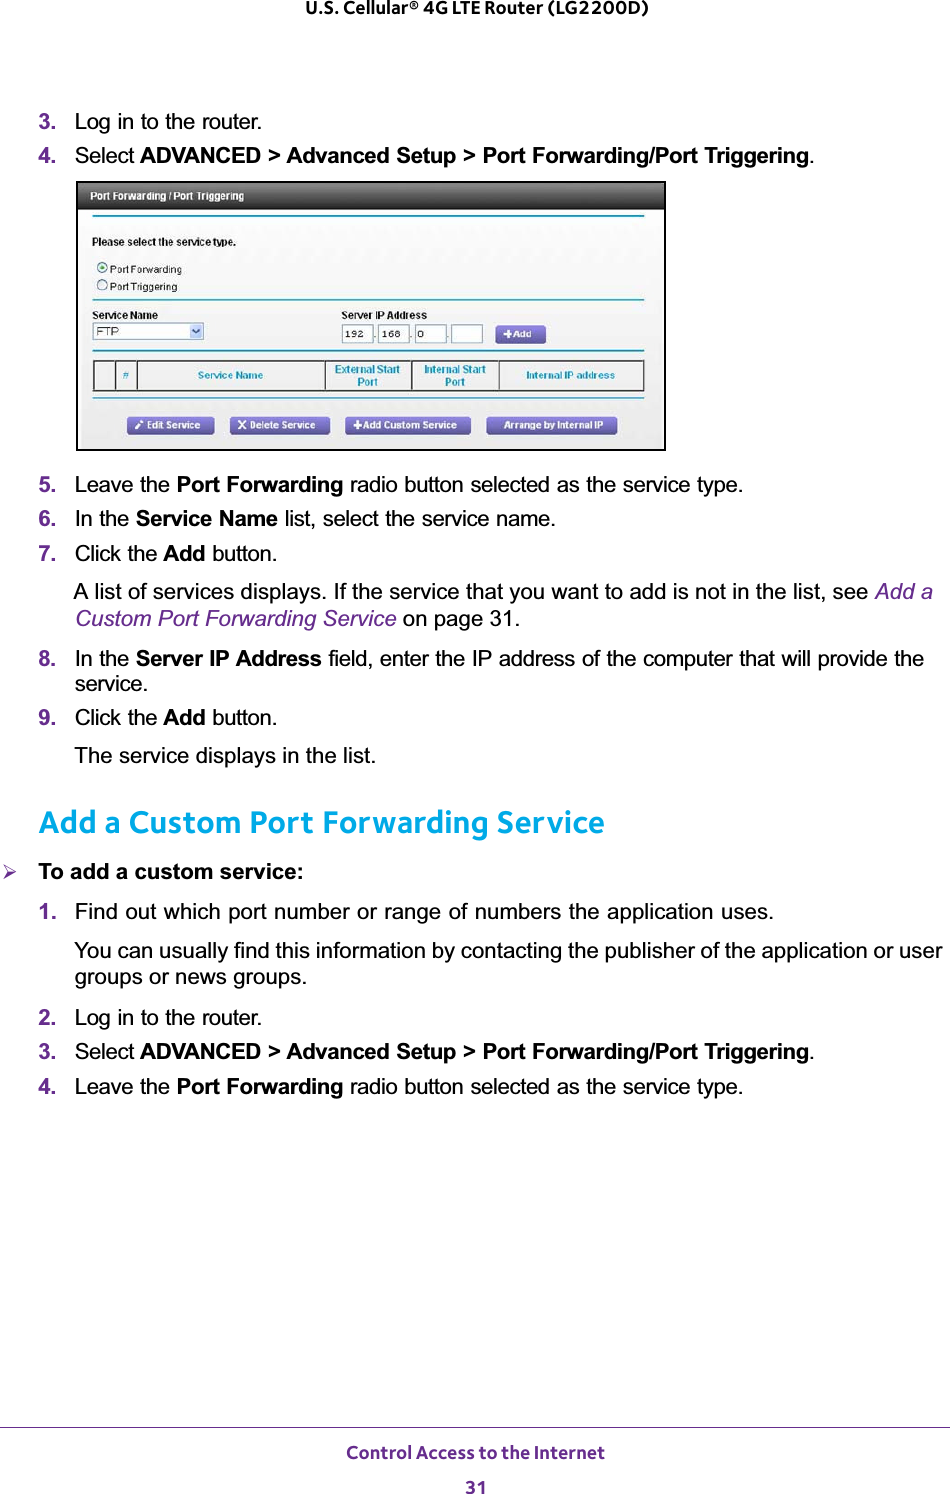
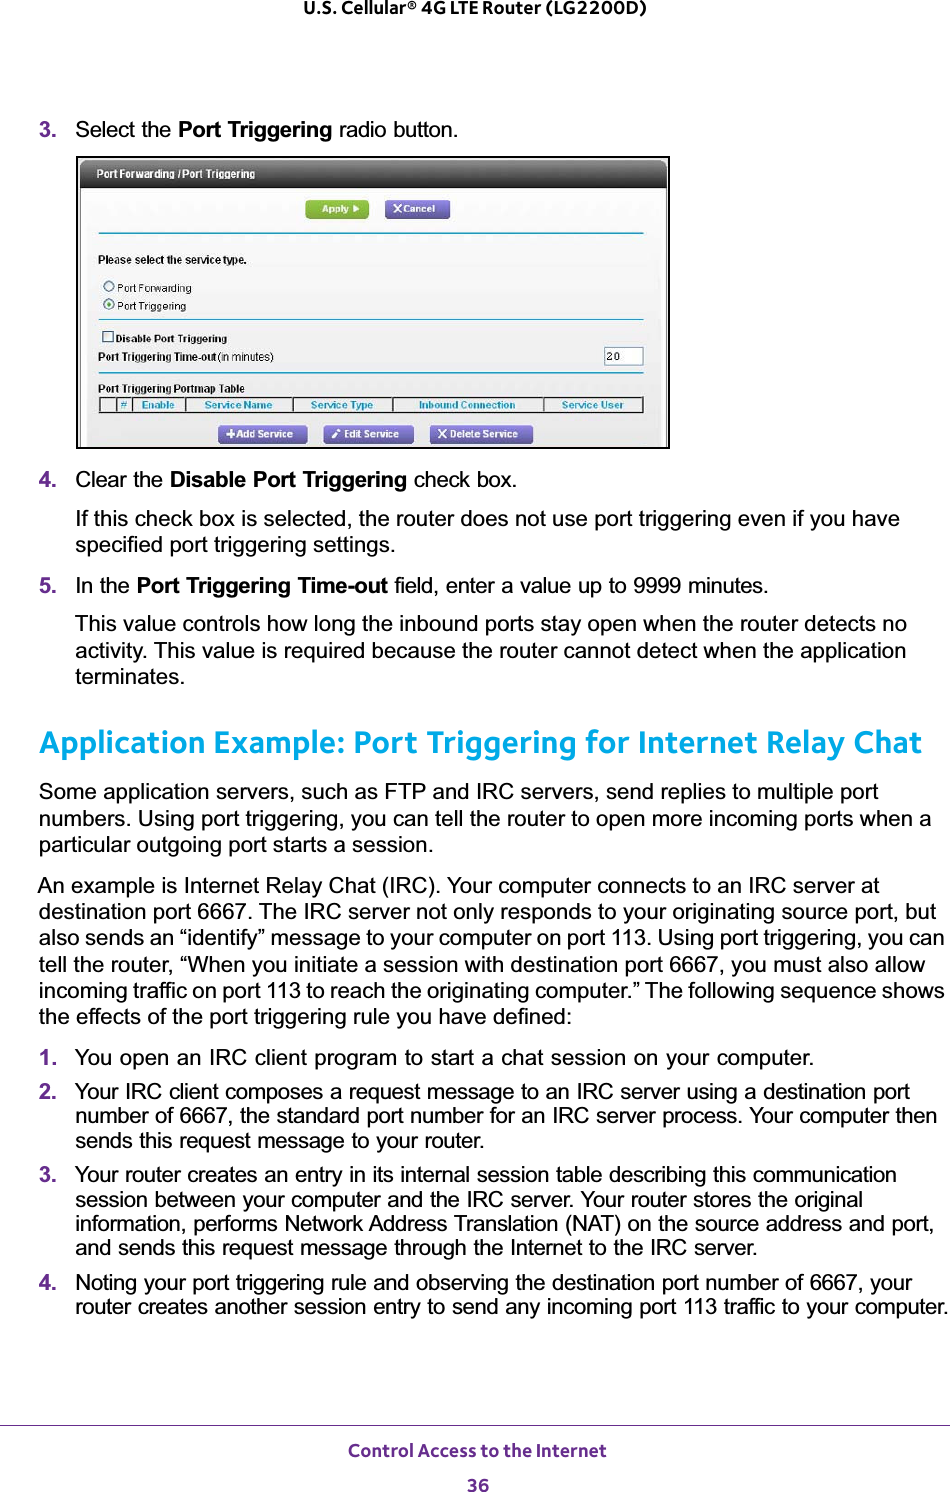
>
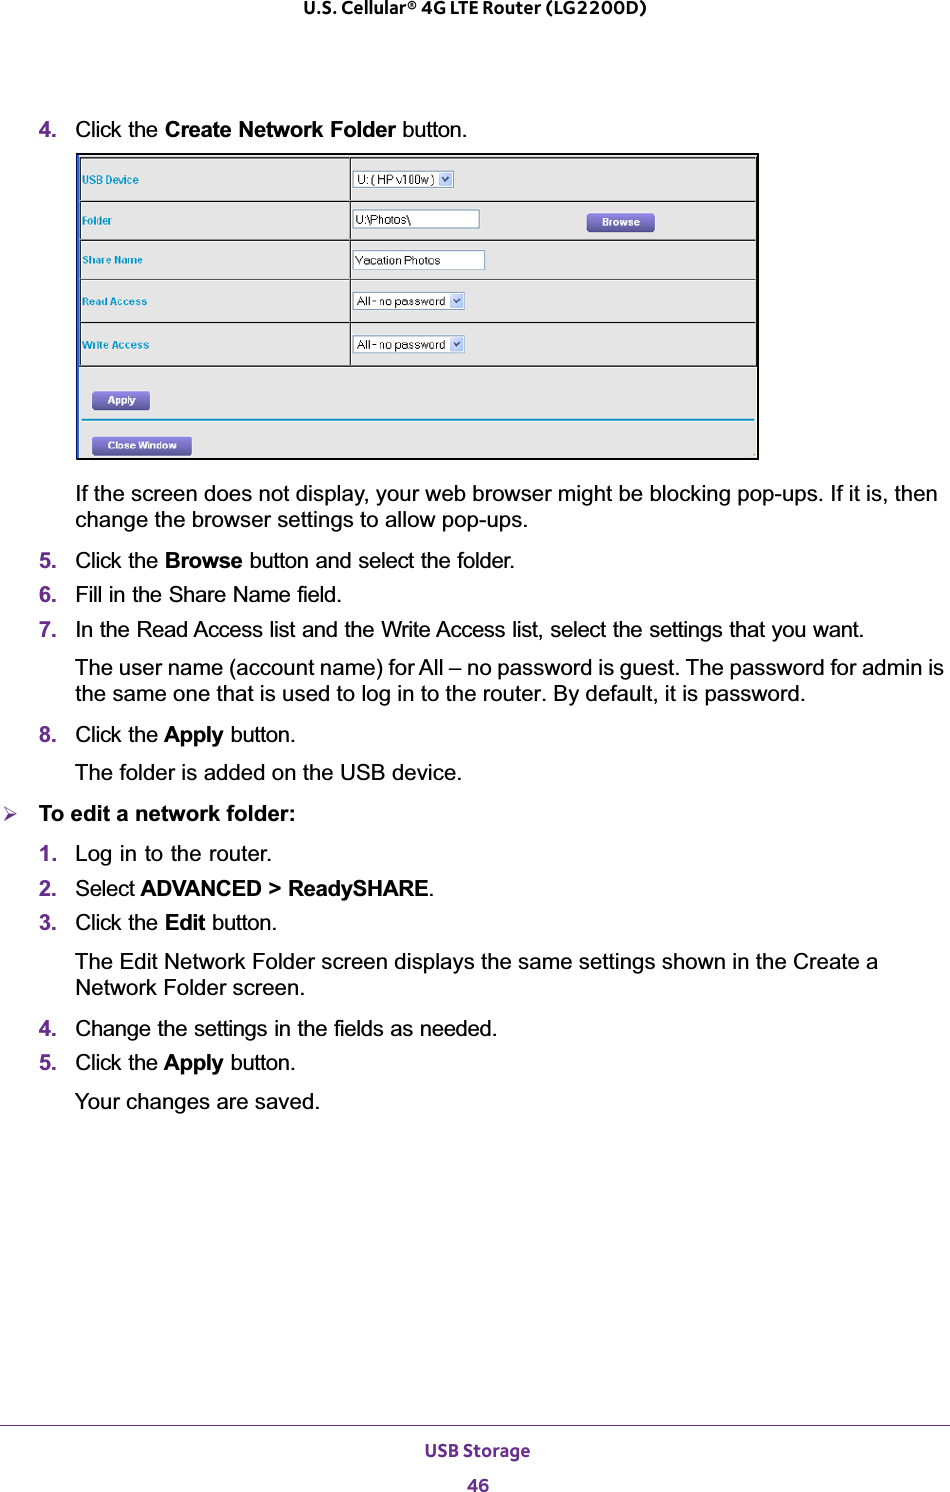
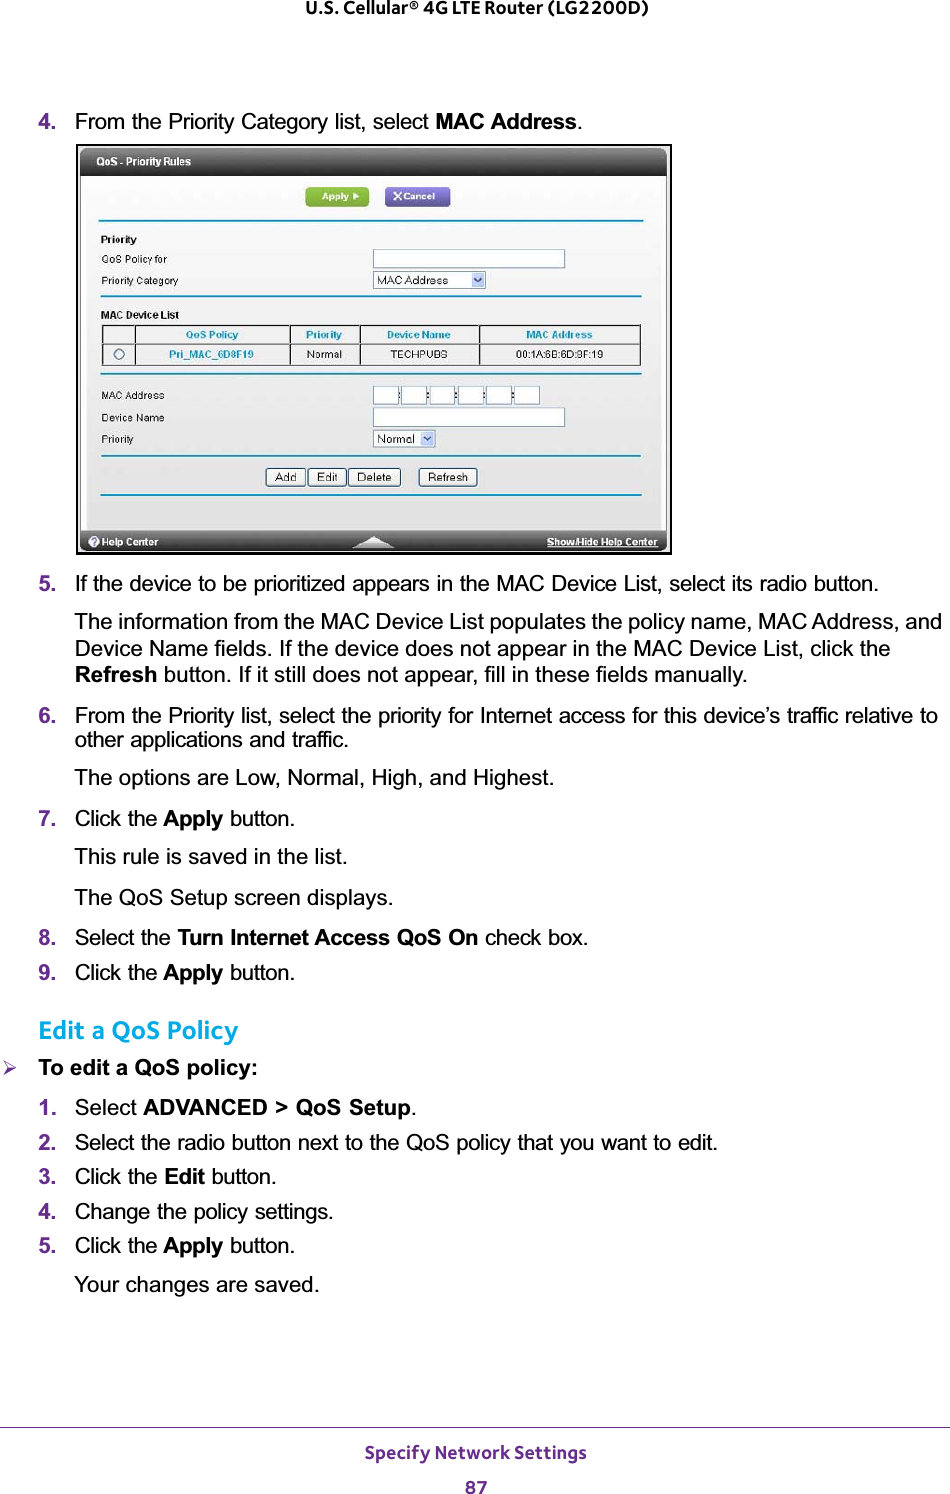
Netgear orporated
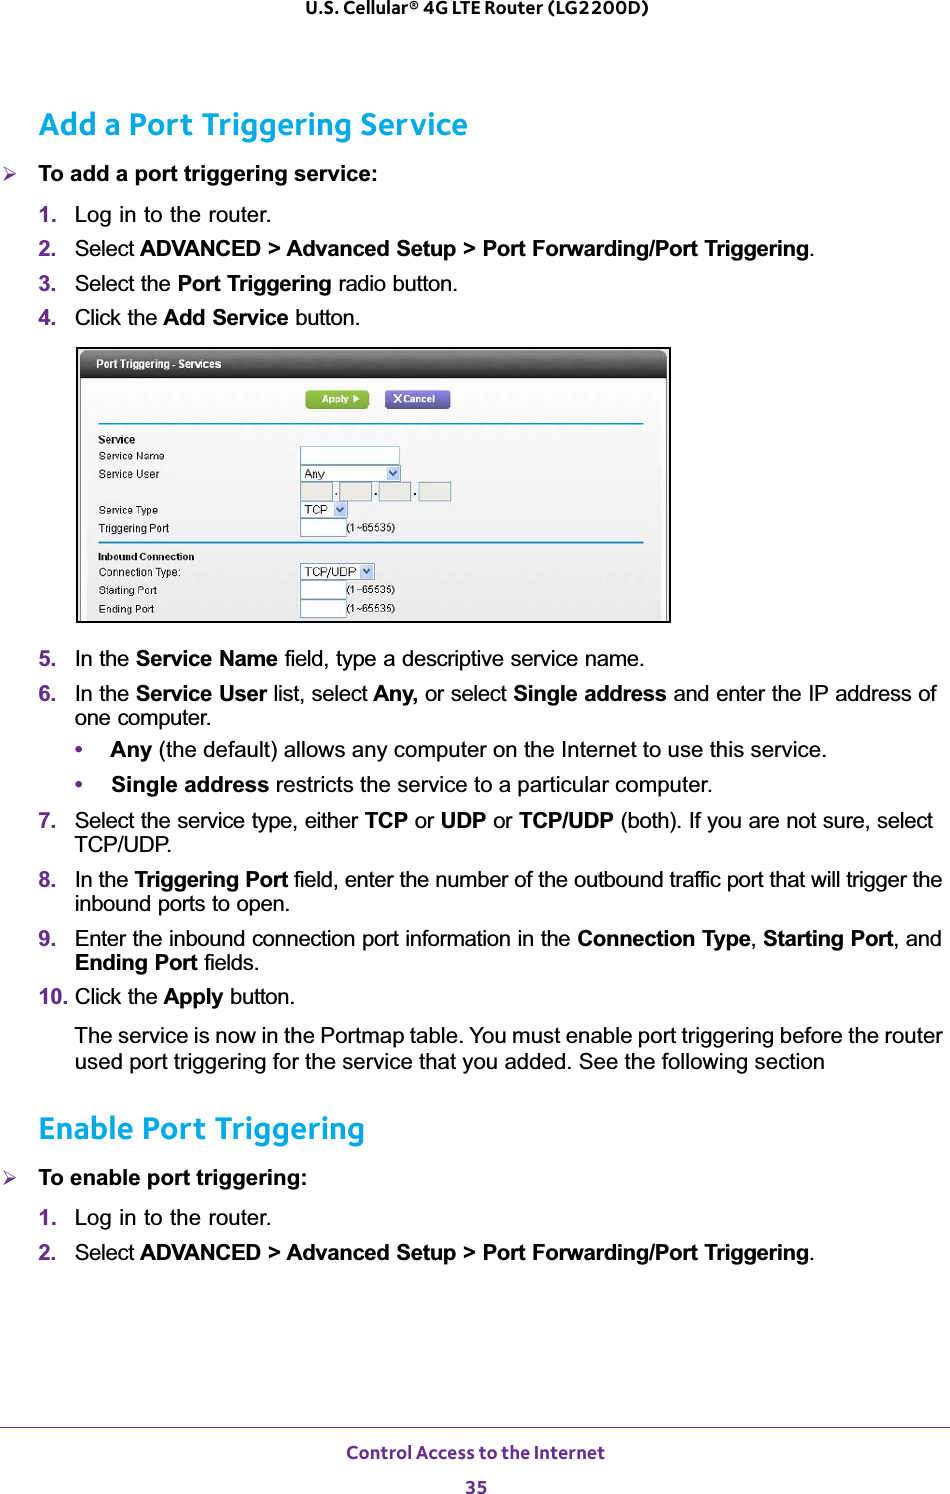
>
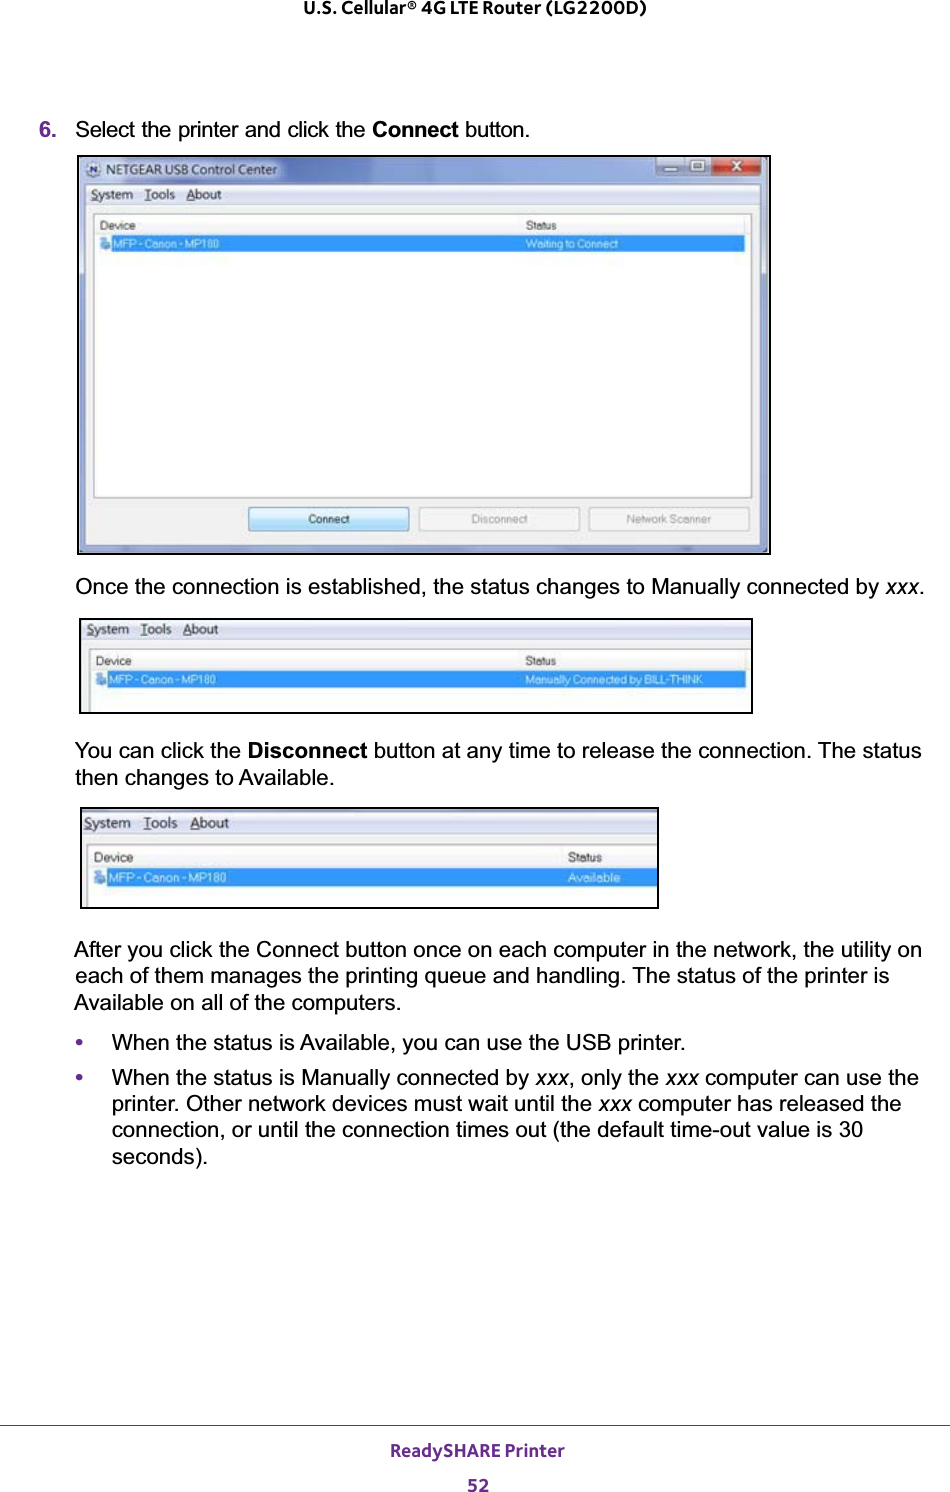
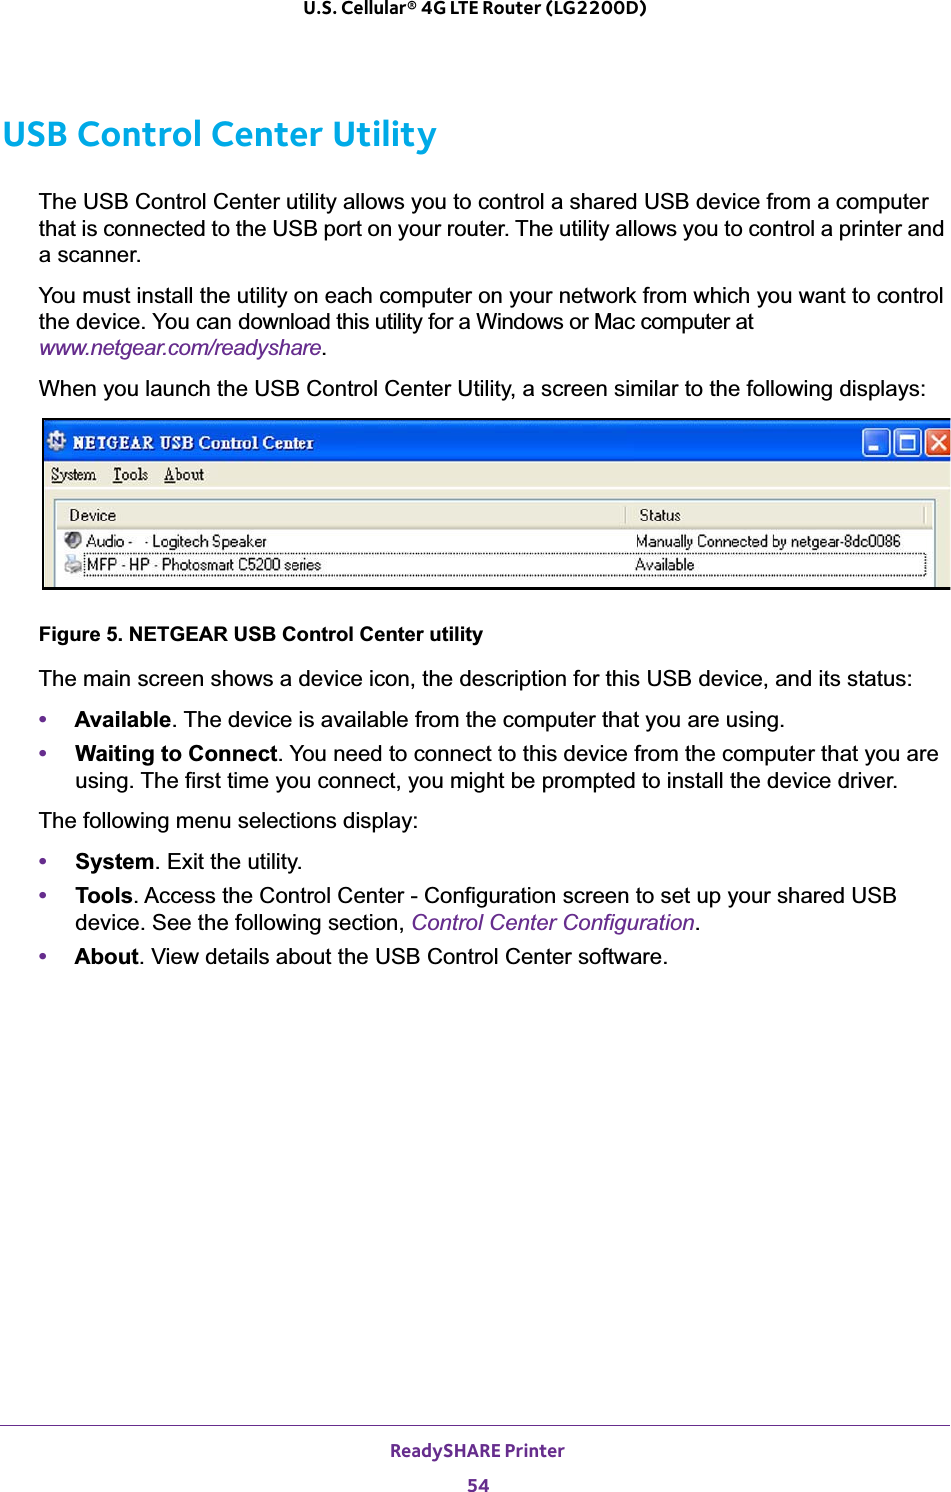
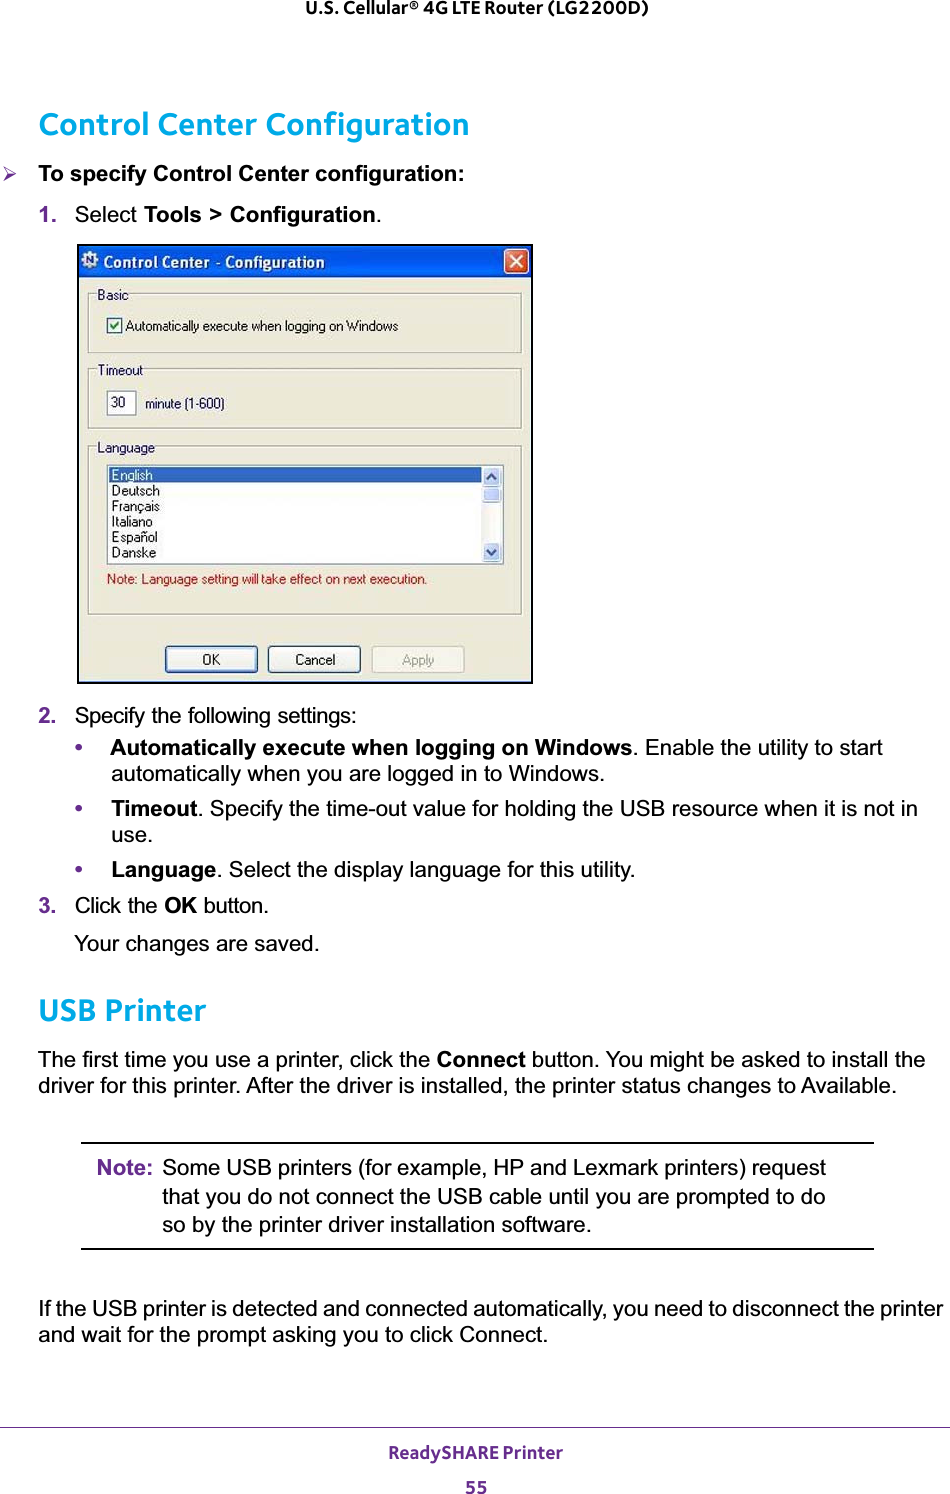
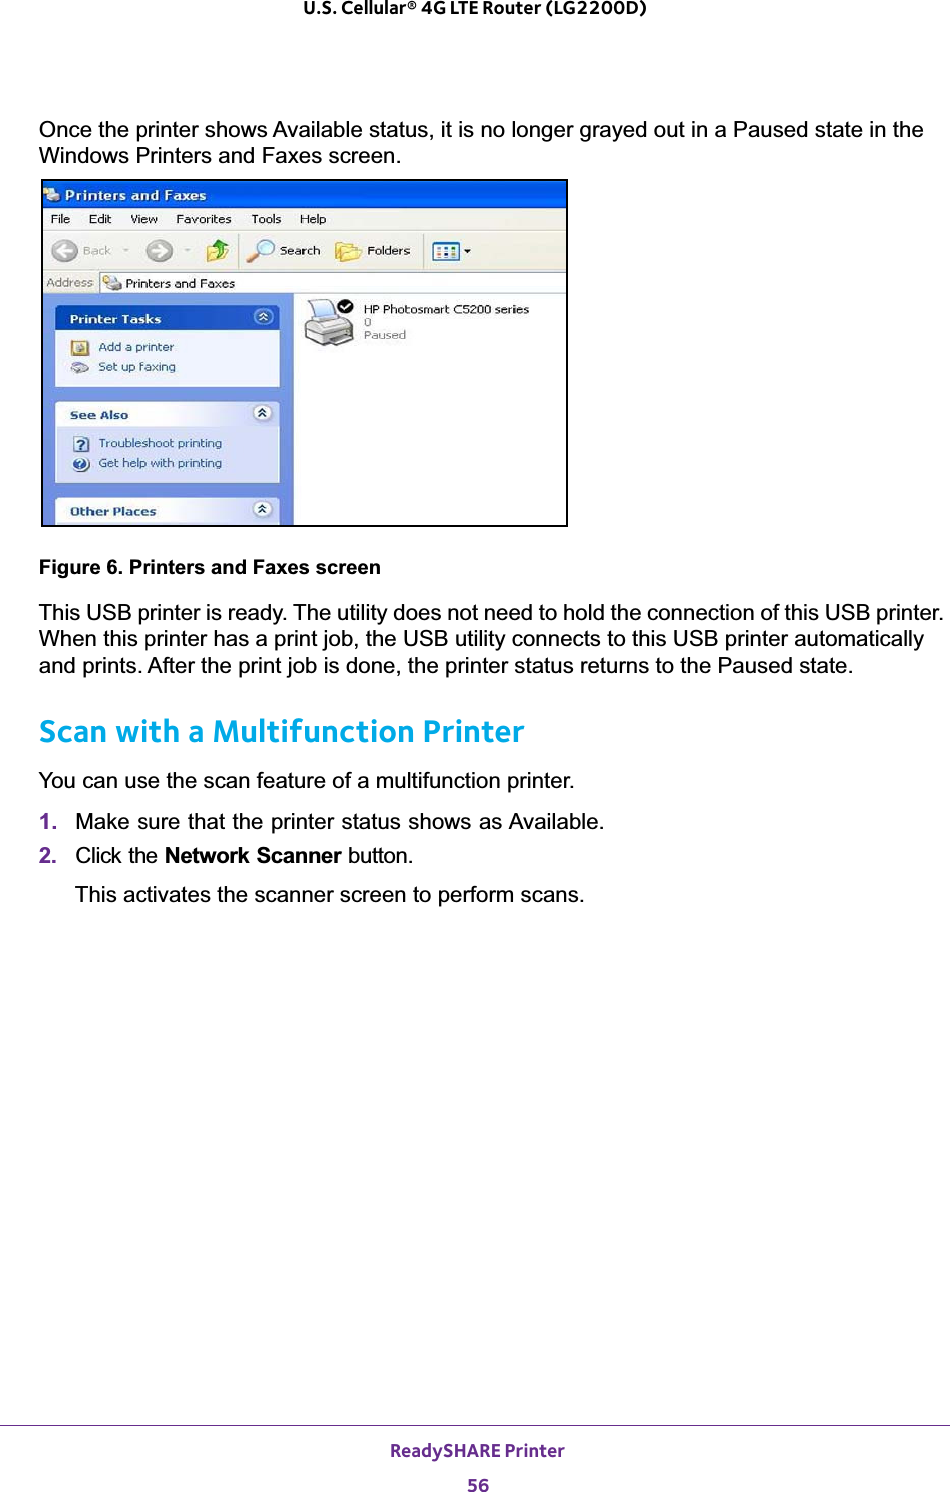
13400244 User Manual
User Manual
Navigation menu
Upload a User Manual
Namespaces
Wiki Guide
HTML
PDF
Info
Views
User Manual
Discussion / Help
Navigation
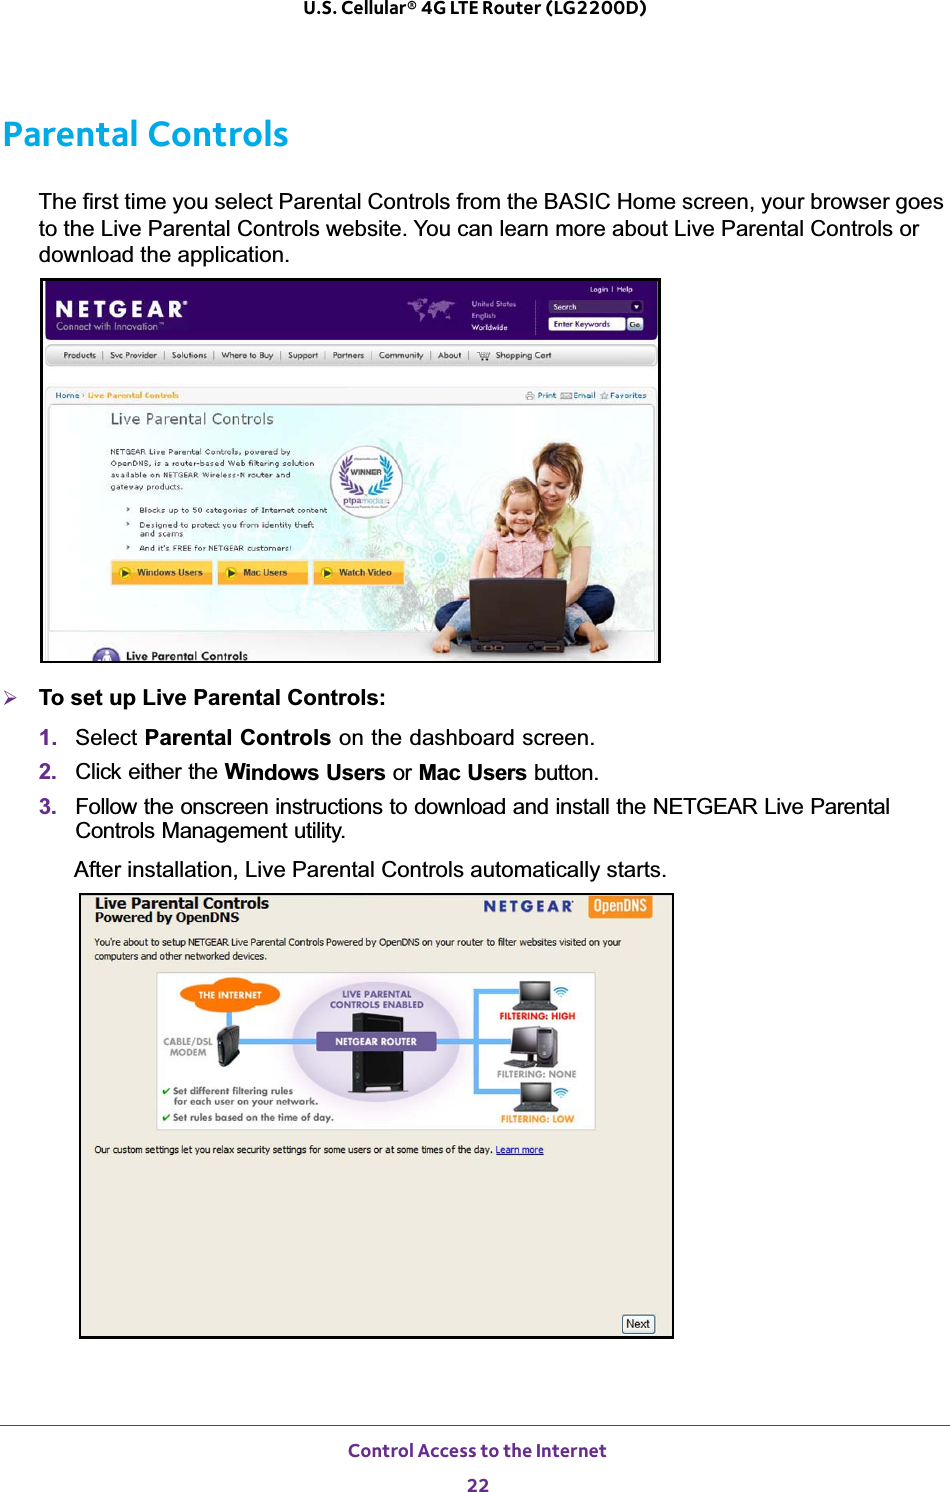
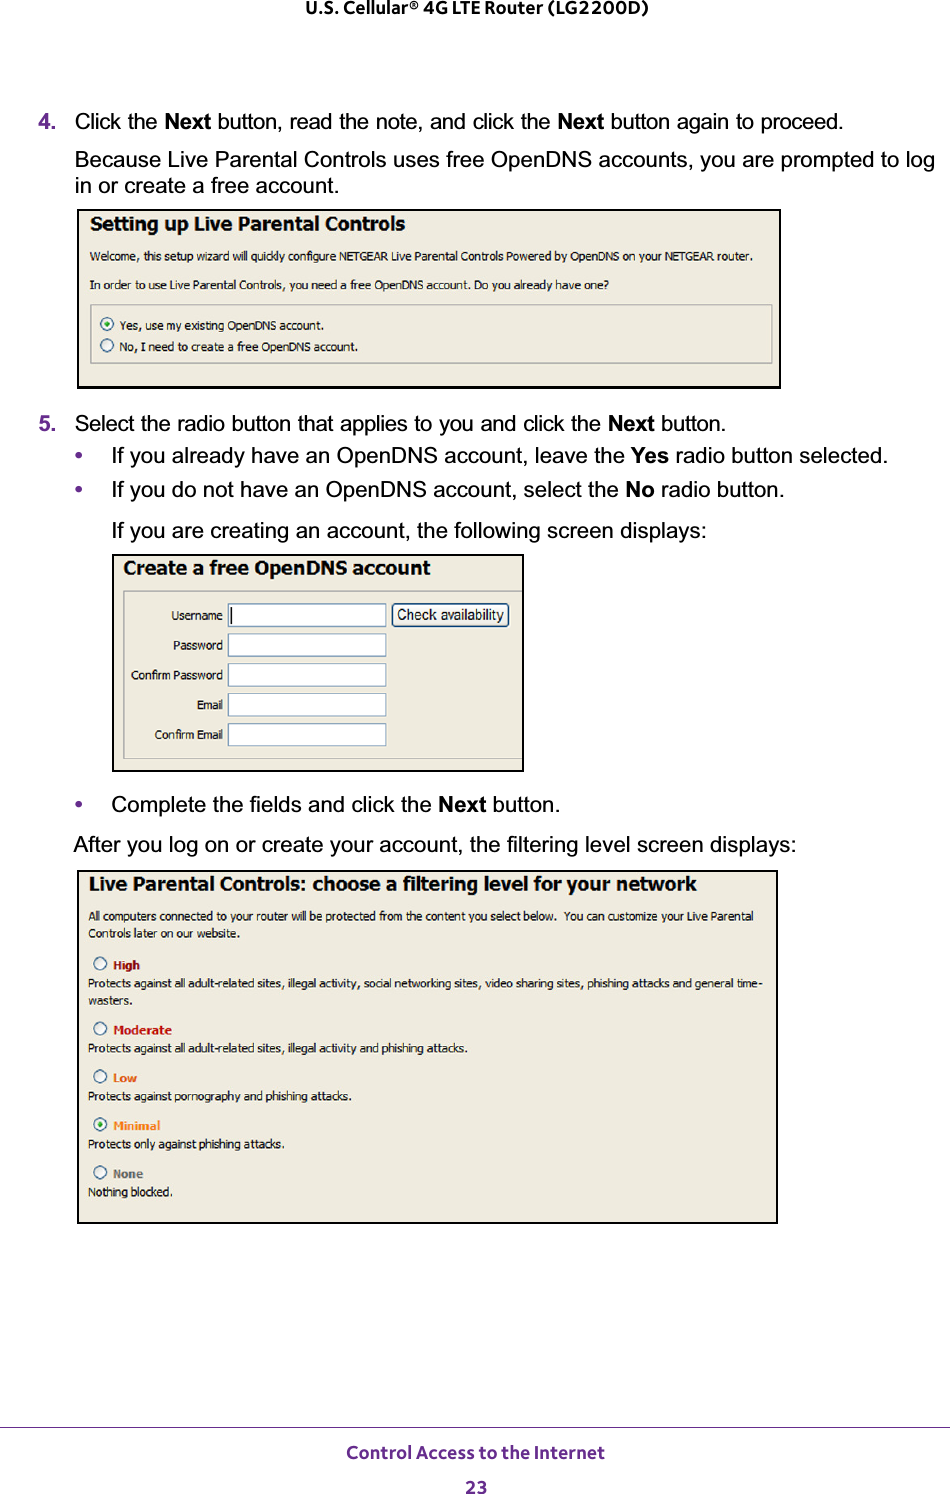

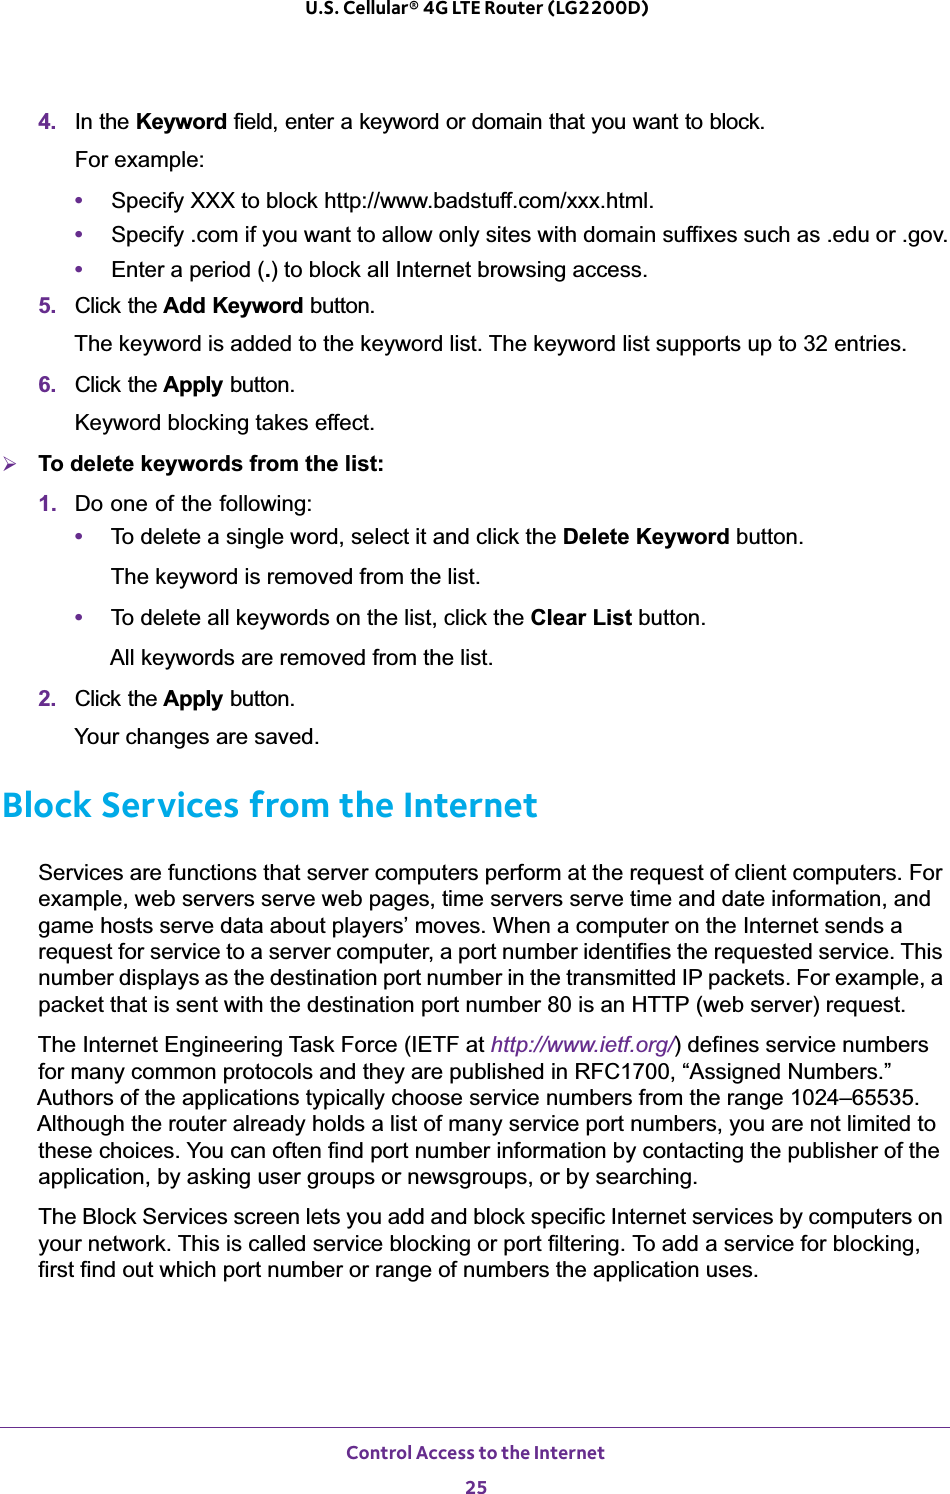


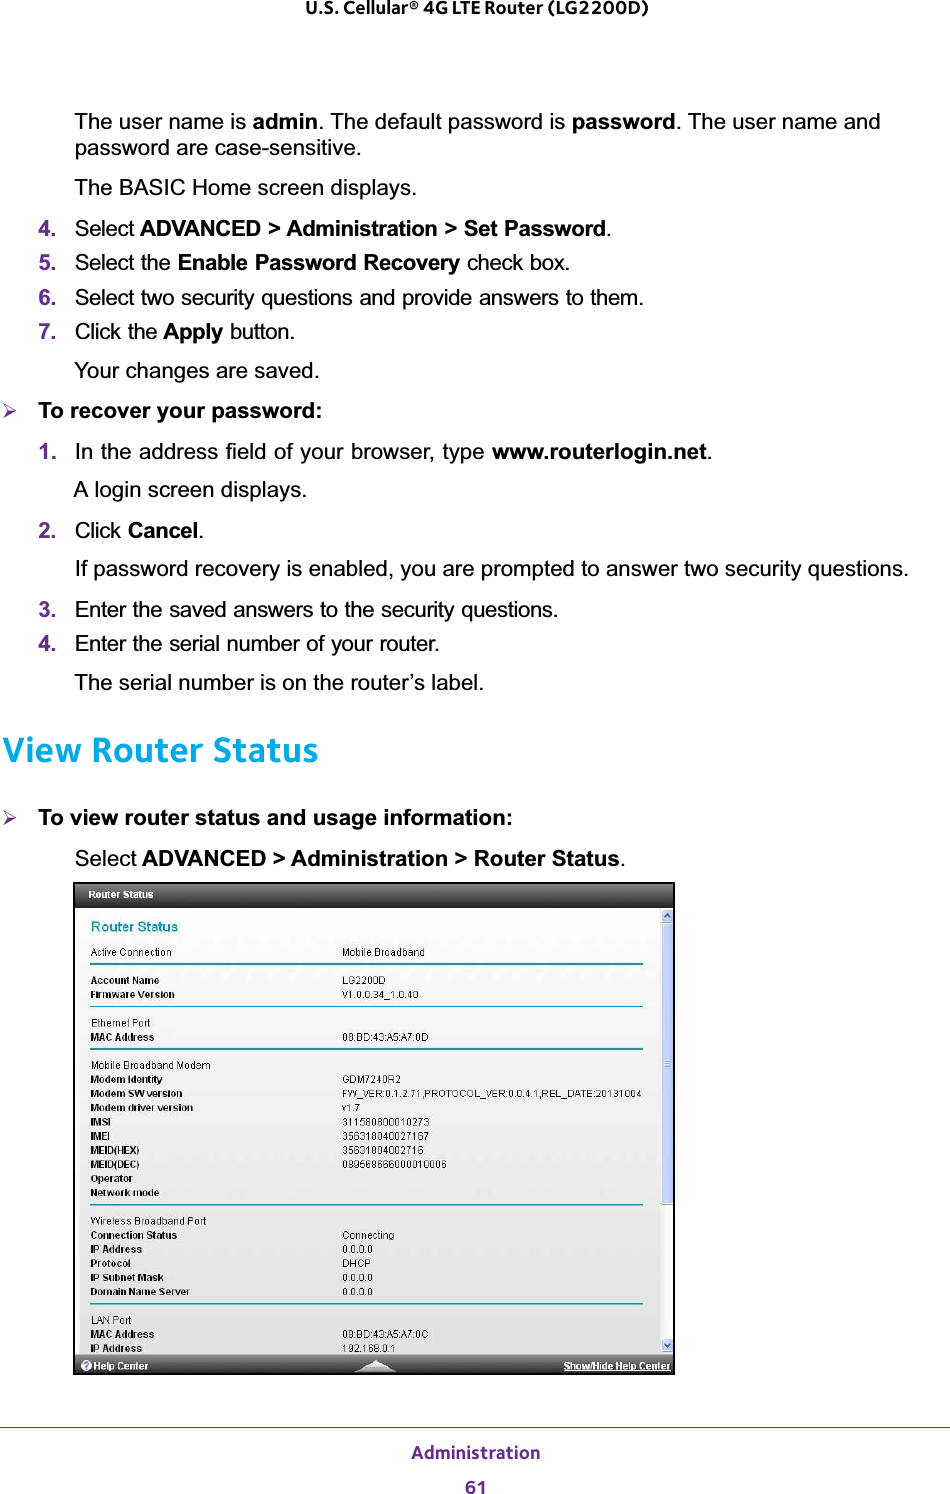

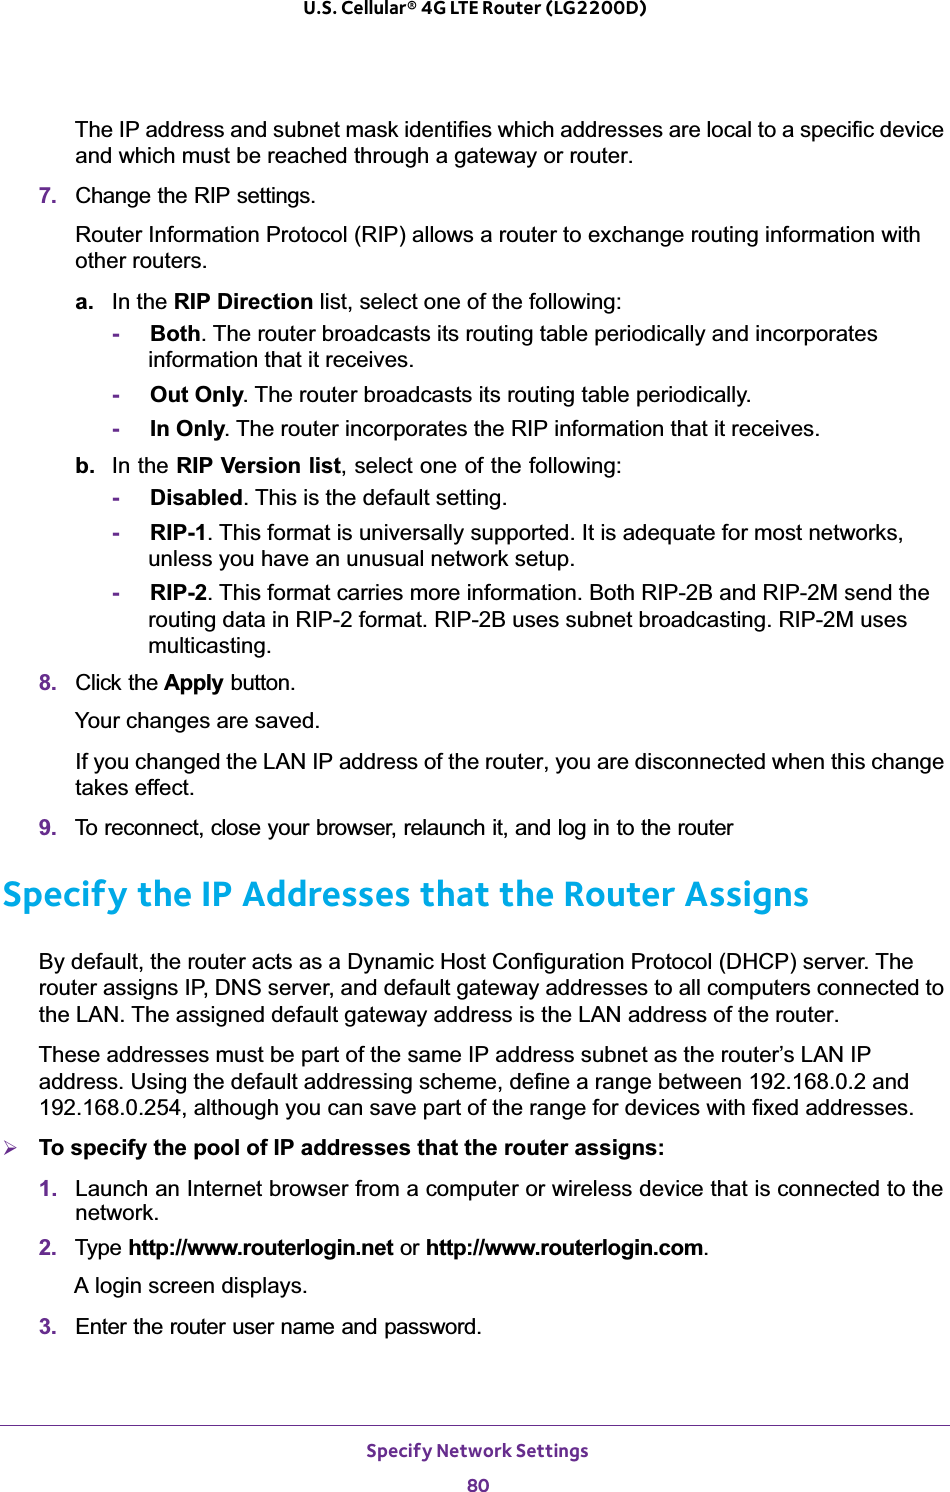

![Specify Network Settings91 U.S. Cellular® 4G LTE Router (LG2200D)recommends that you use the preset security, but you can change them. NETGEAR recommends that you do not disable security.¾To change the WPA settings:1. Launch an Internet browser from a computer or wireless device that is connected to the network.2. Type http://www.routerlogin.net or http://www.routerlogin.com.A login screen displays.3. Enter the router user name and password.The user name is admin. The default password is password. The user name and password are case-sensitive.The BASIC Home screen displays.4. Select Wireless.5. Under Security Options, select a radio button for one of the following WPA options:•WPA2-PSK [AES]. Only computers and wireless devices that support WPA2 can join the WiFi network.•WPA-PSK [TKIP] + WPA2-PSK [AES]. This setting allows computers and wireless devices that support WPA2 or WPA to join the WiFi network.The WPA2 options use the newest standard for the strongest security, but some older computers and wireless devices cannot use WPA2. By default, the WPA-PSK [TKIP] + WPA2-PSK [AES] radio button is selected so that new or old computers and wireless devices can connect to the WiFi network by using either WPA2 or WPA security. The Passphrase field displays.6. In the Passphrase field, enter the network key (password) that you want to use. It is a text string from 8 to 63 characters.7. Write down the new password and keep it in a secure place for future reference.8. Click the Apply button.Control the Wireless RadiosThe router has internal wireless radios that broadcast signals in the 2.4 GHz and 5 GHz range. By default, they are on so that you can connect wirelessly to the router. When the wireless radios are off, you can still use an Ethernet cable for a LAN connection to the router.You can turn the wireless radios on and off with the WiFi On/Off button on the router, or you can log in to the router and enable or disable the wireless radios. If you are close to the router, it might be easier to press its WiFi On/Off button. If you are away from the router or have already logged in it might be easier to enable or disable them.You can also turn the WiFi radios off and on based on a schedule. (See Set Up a Wireless Schedule on page 93).](https://usermanual.wiki/Netgear-orporated/13400244/User-Guide-2193014-Page-91.png)


![Notification of Compliance124FCC Radio Frequency Interference Warnings & InstructionsThis equipment has been tested and found to comply with the limits for a Class B digital device, pursuant to Part 15 of the FCC Rules. These limits are designed to provide reasonable protection against harmful interference in a residential installation. This equipment uses and can radiate radio frequency energy and, if not installed and used in accordance with the instructions, may cause harmful interference to radio communications. However, there is no guarantee that interference will not occur in a particular installation. If this equipment does cause harmful interference to radio or television reception, which can be determined by turning the equipment off and on, the user is encouraged to try to correct the interference by one or more of the following methods:•Reorient or relocate the receiving antenna.•Increase the separation between the equipment and the receiver.•Connect the equipment into an electrical outlet on a circuit different from that which the radio receiver is connected.•Consult the dealer or an experienced radio/TV technician for help.FCC Caution•Any changes or modifications not expressly approved by the party responsible for compliance could void the user’s authority to operate this equipment. •This device complies with Part 15 of the FCC Rules. Operation is subject to the following two conditions: (1) This device may not cause harmful interference, and (2) this device must accept any interference received, including interference that may cause undesired operation. •For product available in the USA market, only channel 1~11 can be operated. Selection of other channels is not possible.•This device and its antenna(s) must not be co-located or operation in conjunction with any other antenna or transmitter.Canadian Department of Communications Radio Interference RegulationsThis digital apparatus does not exceed the Class B limits for radio-noise emissions from digital apparatus as set out in the Radio Interference Regulations of the Canadian Department of Communications.This Class [B] digital apparatus complies with Canadian ICES-003.Cet appareil numérique de la classe [B] est conforme à la norme NMB-003 du CanadaIndustry CanadaThis device complies with RSS-210 of the Industry Canada Rules. Operation is subject to the following two conditions: (1) This device may not cause harmful interference, and (2) this device must accept any interference received, including interference that may cause undesired operation.IMPORTANT NOTE: Radiation Exposure Statement:This equipment complies with IC radiation exposure limits set forth for an uncontrolled environment. This equipment should be installed and operated with minimum distance 20cm between the radiator & your body.Caution:Ce dispositif est conforme à la norme CNR-210 d'Industrie Canada applicable aux appareils radio exempts de licence. Son fonctionnement est sujet aux deux conditions suivantes: (1) le dispositif ne doit pas produire de brouillage préjudiciable, et (2) ce dispositif doit accepter tout brouillage reçu, y compris un brouillage susceptible de provoquer un fonctionnement indésirable.NOTE IMPORTANTE: Déclaration d'exposition aux radiations:Cet équipement est conforme aux limites d'exposition aux rayonnements IC établies pour un environnement non contrôlé. Cet équipement doit être installé et utilisé avec un minimum de 20 cm de distance entre la source de rayonnement et votre corps.U.S. Cellular® 4G LTE Router (LG2200D)](https://usermanual.wiki/Netgear-orporated/13400244/User-Guide-2193014-Page-124.png)