Netgear orporated 15100303 N600 WIFI Cable Modem Router User Manual
Netgear Incorporated N600 WIFI Cable Modem Router
User Manual.pdf
Quick Start
N600 WiFi Dual Band Gigabit Router
Model WNDR3700v5
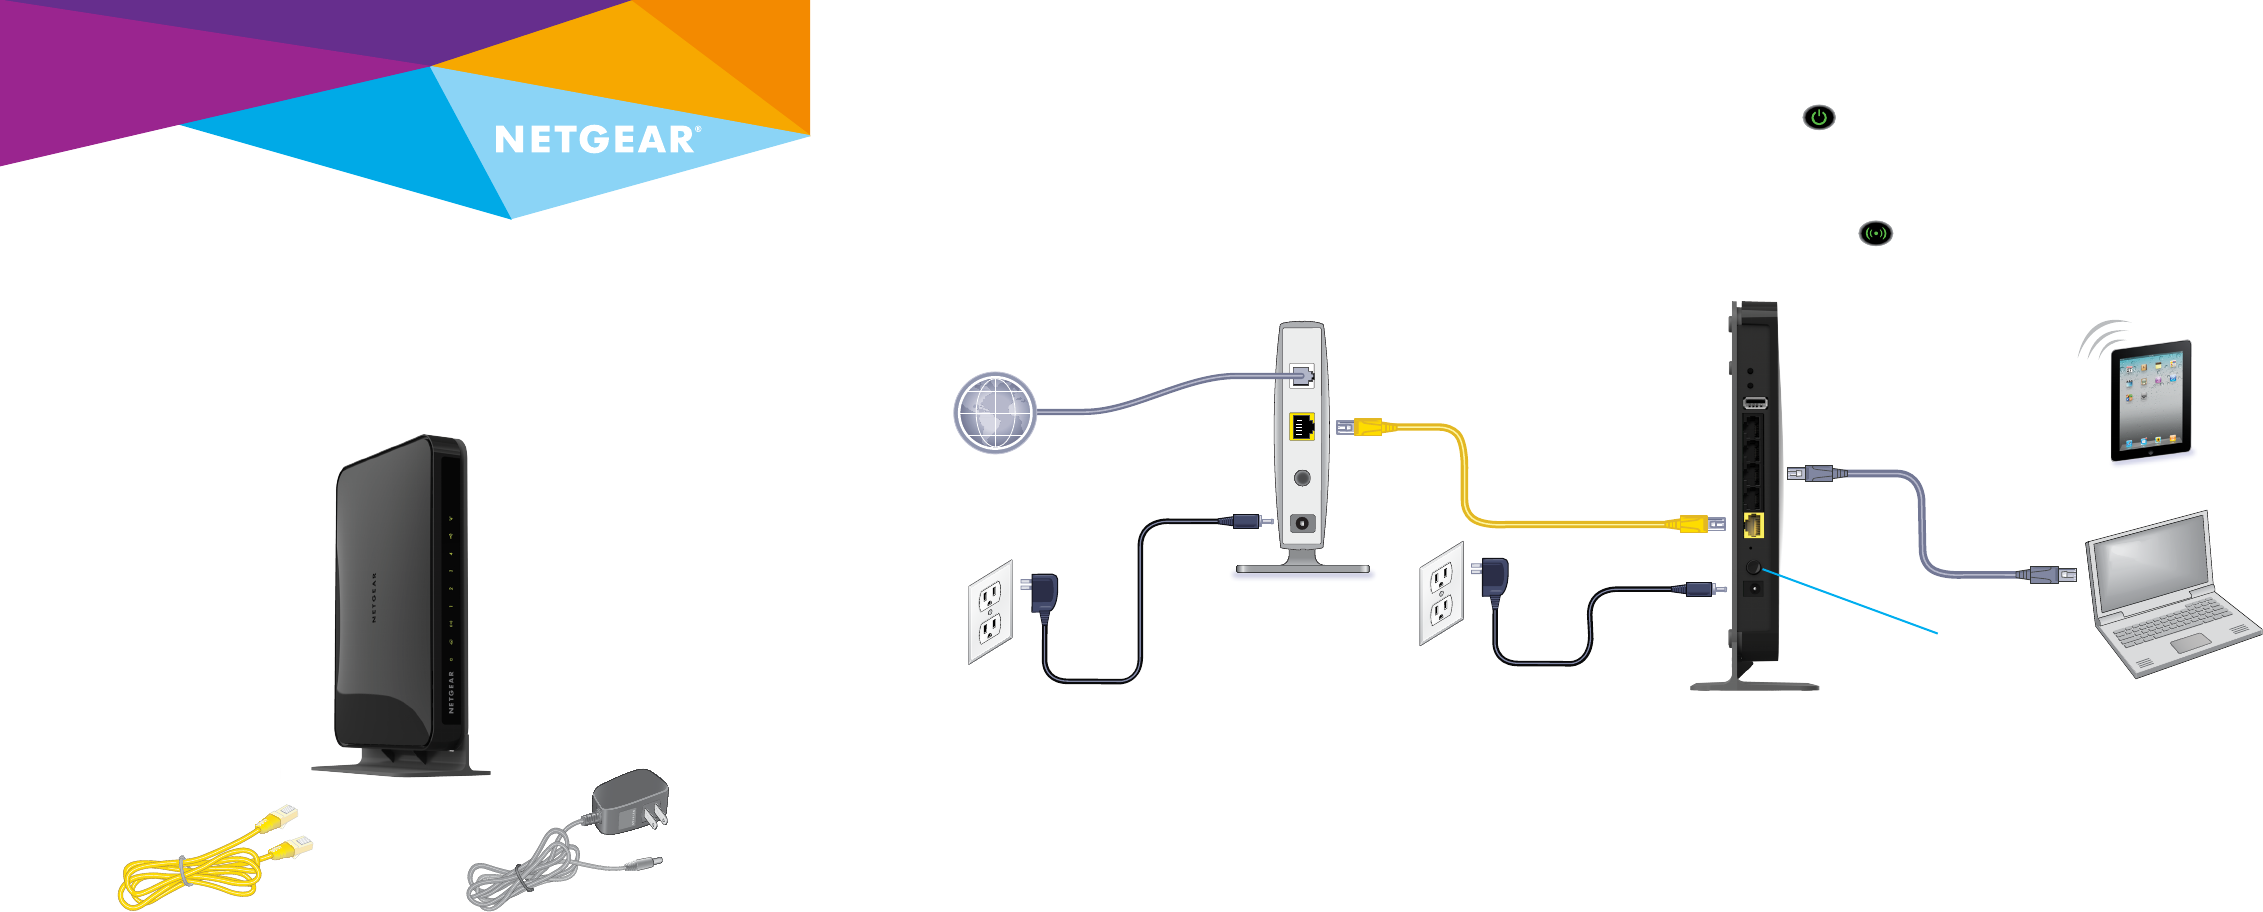
1. Prepare your modem.
Unplug your modem’s power.
Remove the battery, if present.
Package Contents
2. Connect your modem.
Plug in your modem. Put the
battery back in. Then cable the
modem to the router’s yellow
Internet port.
4. Connect a computer.
Use an Ethernet cable to connect
your computer to the Ethernet
port on the router.
You can also use WiFi to connect.
To connect with WiFi, use the
WiFi network name and password
on the product label.
5. Log in to the router.
Launch a web browser.
NETGEAR genie displays.
If you do not see genie, enter
www.routerlogin.net in the address field of the
web browser. When prompted, enter admin for
the user name and password for the password.
Follow the genie steps to connect to the web.
6. Get the genie app.
Download the free genie app from
www.NETGEAR.com/genie.
Easily share media, files, and printers on the
network from your smartphone, tablet, or
laptop.
3. Power on the router.
The Power LED lights solid
green. If the Power LED does not
light, press the Power On/O
button.
Wait for the WiFi LED to light
solid green.
Modem
Internet
Power adapter
(varies by region)
Ethernet cable
Ethernet cable
Router
DSL or cable
Power On/O button
Ethernet cable
(not included)
Router
Power adapter
7. Get the user manual.
You can get the user manual online at
http://downloadcenter.netgear.com or through
a link in the router’s user interface.
August 2014
NETGEAR, Inc.
350 East Plumeria Drive
San Jose, CA 95134, USA
NETGEAR, the NETGEAR logo, and Connect with Innovation are trademarks and/or registered
trademarks of NETGEAR, Inc. and/or its subsidiaries in the United States and/or other countries.
Information is subject to change without notice. © NETGEAR, Inc. All rights reserved.
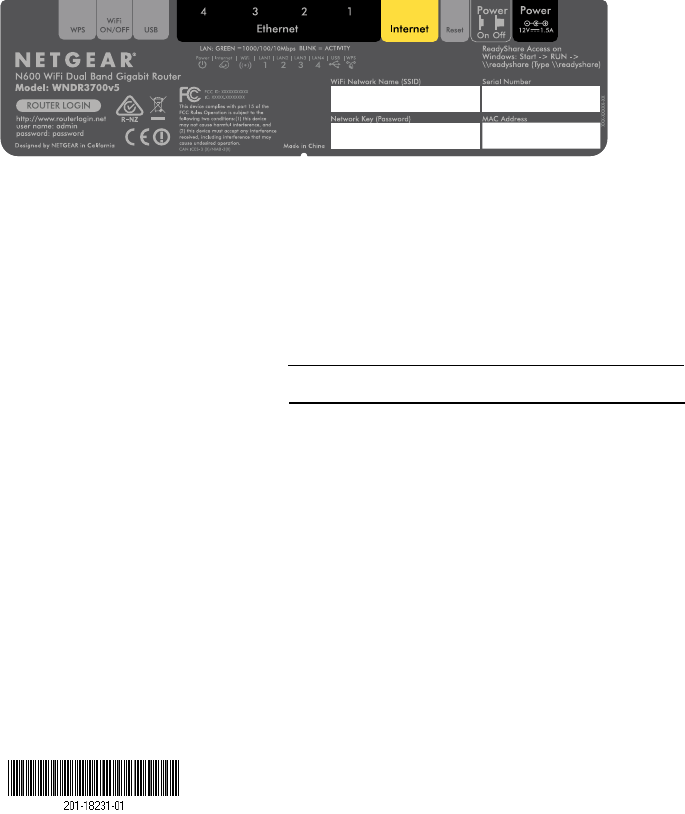
WiFi Network Name and Password
The preset WiFi network name (SSID) and password (network key) are
unique to your router, like a serial number. Because the router automatically
uses WiFi security, you don’t need to set it up. The WiFi settings are on the
label on the product label.
NETGEAR recommends that you use the preset WiFi settings because you
can check the label if you forget them. NETGEAR genie lets you change
these settings. If you do so, write down the new WiFi settings and store
them in a safe place.
Write the WiFi settings here for easy reference:
WiFi network name (SSID)
Network key (password)
Join the WiFi Network
To connect your computer or WiFi device (such as a smartphone or gaming
device) to your router’s WiFi network, you can use either the manual
method or the Wi-Fi Protected Setup (WPS) method.
Manual Method
1. Open the soware utility that manages your WiFi connections on the
computer or WiFi device that you want to connect to your router.
This utility scans for all wireless networks in your area.
2. Find and select your router’s WiFi network name (SSID).
The SSID is on the product label.
3. Enter the router’s password (or your custom password if you changed
it) and click the Connect button.
The password is on the product label.
4. Repeat Step 1 through Step 3 to add other computers or WiFi devices.
WPS Method
If your computer or WiFi device supports WPS, you can use WPS to join
the modem router’s WiFi network. For help with the WPS button on your
computer or WiFi device, check the instructions or online help that came
with that computer or WiFi device. Some older equipment cannot use WPS.
Note: WPS does not support WEP security. If you are using WEP security,
use the manual method.
1. Press the WPS button on the router.
2. Within two minutes, on your computer or WiFi device, press its WPS
button or click its onscreen WPS button.
The computer or WiFi device connects to your router’s WiFi network.
3. Repeat this process to add other computers or WiFi devices to the
network.
Share a USB Device on the WiFi Network
ReadySHARE lets you access and share a USB storage device that’s
connected to the router USB port from a computer that is connected to
your router’s WiFi network.
Access a USB Device from a Windows Computer
1. Insert your USB device into the USB port on the router.
2. Select Start > Run.
3. Enter \\readyshare in the dialog box.
4. Click the OK button.
The USB device displays.
Access a USB Device from a Mac
1. Insert your USB device into the USB port on the router.
2. Select Go > Connect to Server.
3. Enter smb://readyshare as the server address.
4. Click the Connect button.
The USB device displays.
Share a USB Printer on the WiFi Network
The ReadySHARE Printer utility lets you share a USB printer that is connected
to the USB port on your router. You can share this USB printer among the
Windows and Mac computers on your network. To set up ReadySHARE printer,
download the NETGEAR USB Control Center utility from
www.netgear.com/readyshare and install it on your computer.
Support
Thank you for purchasing this NETGEAR product.
Aer installing your device, locate the serial number on the label of your
product and use it to register your product at https://my.netgear.com.
You must register your product before you can use NETGEAR telephone
support. NETGEAR recommends registering your product through the NETGEAR
website. For product updates and web support, visit
http://support.netgear.com.
NETGEAR recommends that you use only the ocial NETGEAR support
resources.
For the current EU Declaration of Conformity, visit
http://support.netgear.com/app/answers/detail/a_id/11621/.
For regulatory compliance information, visit
http://www.netgear.com/about/regulatory/.
See the regulatory compliance document before connecting the power supply.
Federal Communication Commission Interference Statement
This device complies with Part 15 of the FCC Rules. Operation is subject to the
following two conditions: (1) This device may not cause harmful interference, and (2)
this device must accept any interference received, including interference that may
cause undesired operation.
This equipment has been tested and found to comply with the limits for a Class B
digital device, pursuant to Part 15 of the FCC Rules. These limits are designed to
provide reasonable protection against harmful interference in a residential installation.
This equipment generates, uses and can radiate radio frequency energy and, if not
installed and used in accordance with the instructions, may cause harmful interference
to radio communications. However, there is no guarantee that interference will not
occur in a particular installation. If this equipment does cause harmful interference
to radio or television reception, which can be determined by turning the equipment off
and on, the user is encouraged to try to correct the interference by one of the
following measures:
- Reorient or relocate the receiving antenna.
- Increase the separation between the equipment and receiver.
- Connect the equipment into an outlet on a circuit different from that
to which the receiver is connected.
- Consult the dealer or an experienced radio/TV technician for help.
FCC Caution: Any changes or modifications not expressly approved by the party
responsible for compliance could void the user's authority to operate this equipment.
This transmitter must not be co-located or operating in conjunction with any other
antenna or transmitter.
For operation within 5.15 ~ 5.25GHz frequency range, it is restricted to indoor
environment.
Radiation Exposure Statement:
This equipment complies with FCC radiation exposure limits set forth for an
uncontrolled environment. This equipment should be installed and operated with
minimum distance 20cm between the radiator & your body.
Industry Canada statement:
This device complies with RSS-210 of the Industry Canada Rules. Operation is
subject to the following two conditions: (1) This device may not cause harmful
interference, and (2) this device must accept any interference received, including
interference that may cause undesired operation.
Ce dispositif est conforme à la norme CNR-210 d'Industrie Canada applicable aux
appareils radio exempts de licence. Son fonctionnement est sujet aux deux conditions
suivantes: (1) le dispositif ne doit pas produire de brouillage préjudiciable, et (2) ce
dispositif doit accepter tout brouillage reçu, y compris un brouillage susceptible de
provoquer un fonctionnement indésirable.
Caution :
(i) the device for operation in the band 5150-5250 MHz is only for indoor use to
reduce the potential for harmful interference to co-channel mobile satellite systems;
(ii) high-power radars are allocated as primary users (i.e. priority users) of the bands
5250-5350 MHz and 5650-5850 MHz and that these radars could cause interference
and/or damage to LE-LAN devices.
Avertissement:
(i) les dispositifs fonctionnant dans la bande 5 150-5 250 MHz sont réservés
uniquement pour une utilisation à l’intérieur afin de réduire les risques de
brouillage préjudiciable aux systèmes de satellites mobiles utilisant les mêmes
canaux;
(ii) De plus, les utilisateurs devraient aussi être avisés que les utilisateurs de radars de
haute puissance sont désignés utilisateurs principaux (c.-à-d., qu’ils ont la priorité)
pour les bandes 5 250-5 350 MHz et 5 650-5 850 MHz et que ces radars pourraient
causer du brouillage et/ou des dommages aux dispositifs LAN-EL.
Radiation Exposure Statement:
This equipment complies with IC radiation exposure limits set forth for an
uncontrolled environment. This equipment should be installed and operated with
minimum distance 20cm between the radiator & your body.
Déclaration d'exposition aux radiations:
Cet équipement est conforme aux limites d'exposition aux rayonnements IC établies
pour un environnement non contrôlé. Cet équipement doit être installé et utilisé avec
un minimum de 20 cm de distance entre la source de rayonnement et votre corps.