Netgear orporated 15200307 Nighthawk AC1900 DST Router User Manual
Netgear Incorporated Nighthawk AC1900 DST Router
User Manual.pdf
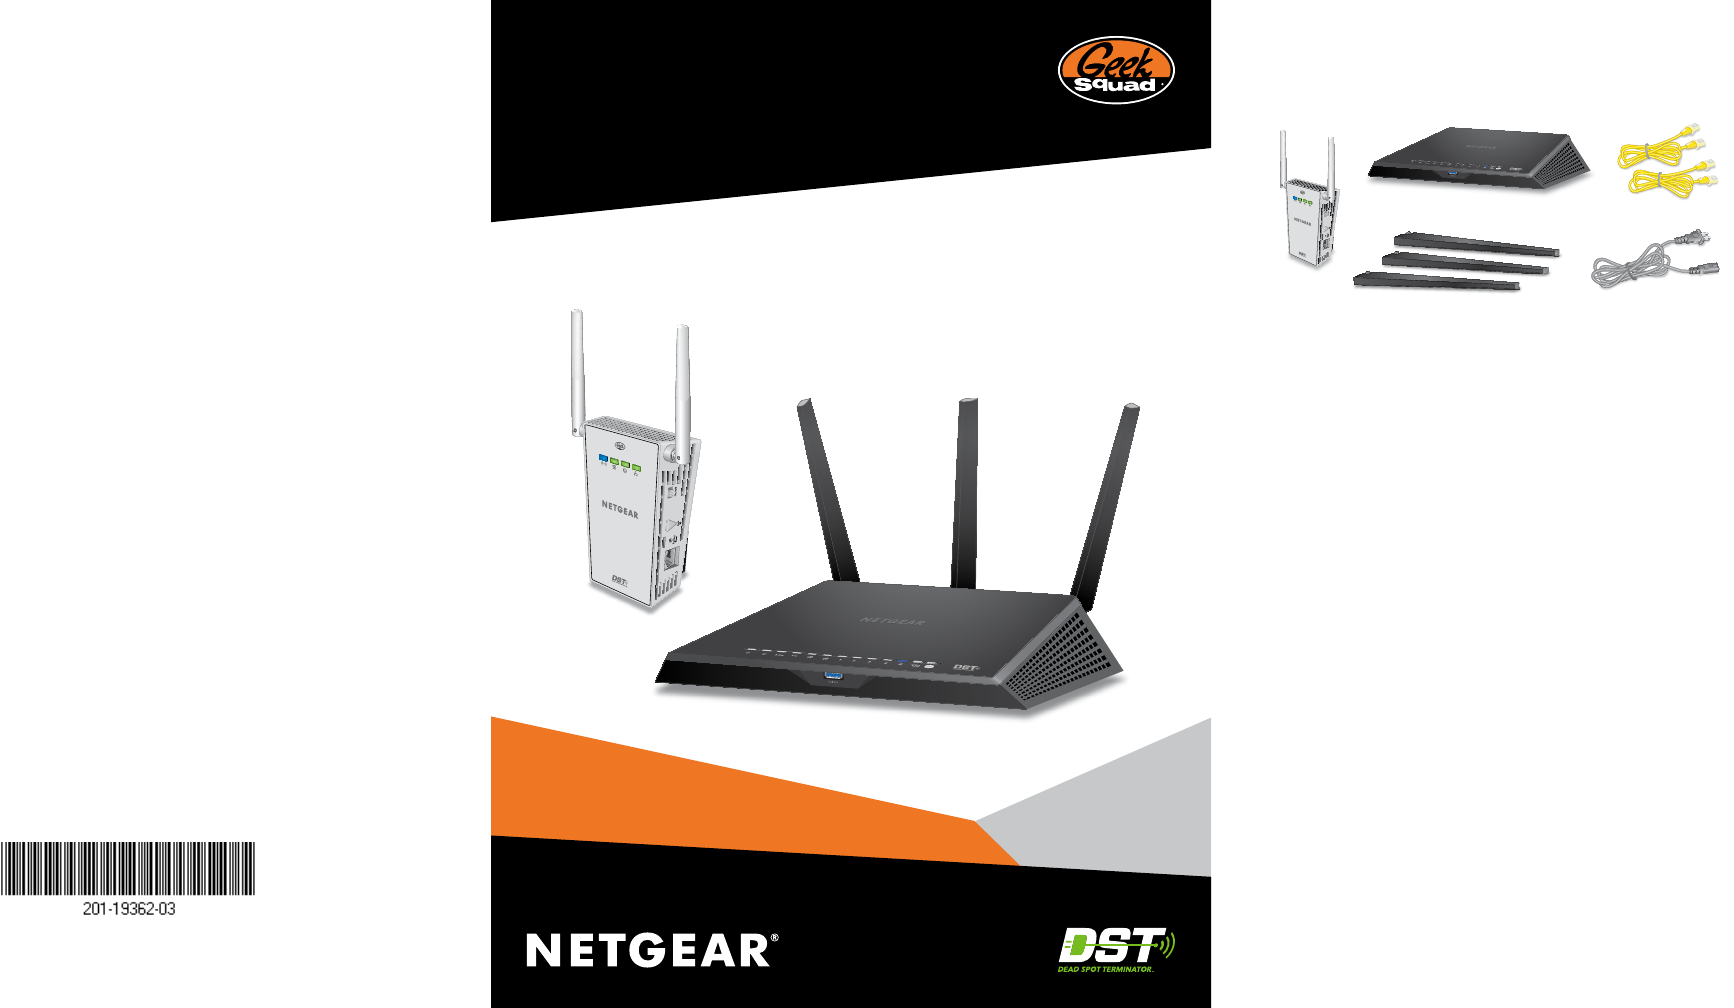
Package Contents
The package contains the following items.
In some regions, a resource CD is included in the package.
Geek Squad Support
The DST router and DST adapter come with setup and support via
phone and web from Geek Squad for one year from the date of
purchase. If needed, agents are available 24/7/365 to help you do the
following:
• Set up your network.
• Connect your wireless devices such as computers, tablets, gaming
consoles, and mobile phones.
• Customize your DST router and DST adapter settings.
• Make sure that your network is secure.
Your Geek Squad support coupon code is GS1337EXB.
For First-Time Setup
Steps 1–8 on the next page walk you through getting your DST router
and DST adapter powered on and connected to the Internet. If you’d
like help setting up or securing your DST router and DST adapter,
contact a Geek Squad agent via online chat or phone.
Visit www.geeksquad.com, click the CHAT WITH AN AGENT link, and
sign in to chat, or call 1-800-GeekSquad. Be sure to reference your
coupon code, which is GS1337EXB, when you are on the phone or
chatting with an agent.
Nighthawk DST
AC1900 DST Router and DST Adapter
Model R7300DST
Support
Thank you for purchasing this NETGEAR product.
Aer installing your device, locate the serial number on the label of your product and use it to
register your product at https://my.netgear.com.
You must register your product before you can use NETGEAR telephone support. NETGEAR
recommends registering your product through the NETGEAR website.
For product updates and web support, visit http://support.netgear.com.
NETGEAR recommends that you use only the ocial NETGEAR support resources.
You can get the user manual online at http://downloadcenter.netgear.com or through a link in the
product’s user interface.
For additional support, visit www.geeksquad.com to chat online or call 1-800-GeekSquad. The
DST router and DST adapter come with setup and support via phone and web from Geek Squad for
one year from the date of purchase.
Your Geek Squad support coupon code is GS1337EXB.
Trademarks
© NETGEAR, Inc., NETGEAR and the NETGEAR Logo are trademarks of NETGEAR, Inc. GEEK
SQUAD, the GEEK SQUAD logo, Dead Spot Terminator and the DST logo are trademarks of Best
Buy and its aliated companies. Any non-NETGEAR trademarks are used for reference purposes
only.
Compliance
For the current EU Declaration of Conformity, visit
http://support.netgear.com/app/answers/detail/a_id/11621/.
For regulatory compliance information, visit
http://www.netgear.com/about/regulatory/.
See the regulatory compliance document before connecting the power supply.
NETGEAR, Inc.
350 East Plumeria Drive
San Jose, CA 95134 USA
July 2015
R7300 DST router
Ethernet
cables (2)
Power cord
(varies by region)
Antennas (3)
DST6501
DST adapter
DST router
Ethernet cable
Cable or
DSL
Internet
Modem
Power cord
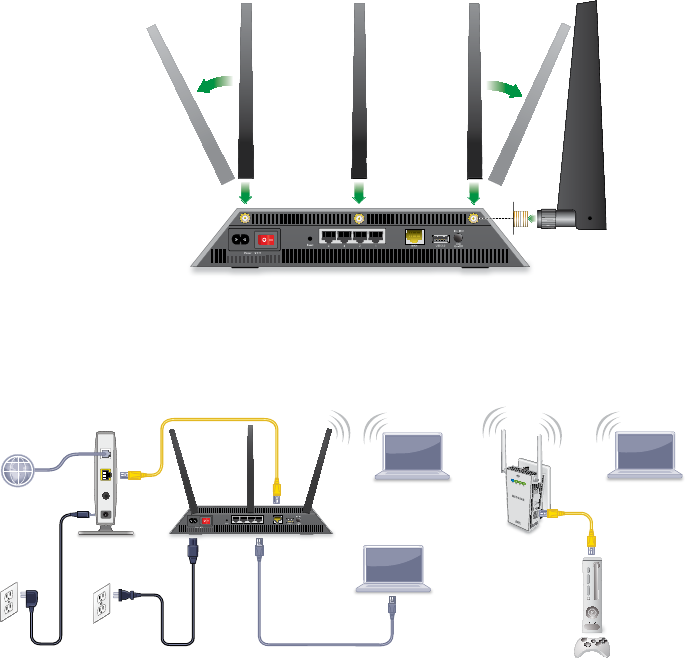
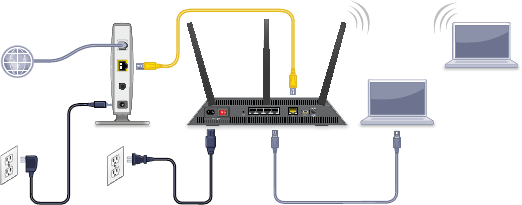
You can use this diagram to connect your DST router or follow the detailed instructions in this booklet.
Ethernet cable
DST
adapter
1. Remove the antenna caps, attach the
antennas, and position them.
NETGEAR recommends that you position
the center antenna vertically and that you
position the others outward at 45-degree
angles as shown.
2. Prepare your modem.
If you use an existing Internet connection,
verify that your modem is ready. Unplug
your modem’s power source. If the modem
uses a battery backup, remove batteries.
Make sure that your modem is turned o
and is connected only to the wall jack for
Internet service.
3. Connect your modem to
the DST router.
Plug in your modem and
put batteries back in. Then
connect the modem to the
yellow Internet port on the
DST router.
4. Power on the DST router.
The Power LED lights amber and then
turns white when the router is ready.
5. Set up the DST adapter.
In the room where you want to improve WiFi coverage or add
Ethernet, plug the DST adapter into an electrical outlet.
Wait for the DST LED on the DST adapter to light solid green or
amber and the DST LED on the DST router to light solid blue.
6. Connect a device to the DST router.
You can use an Ethernet cable or use WiFi
to connect a device to the DST router.
To connect with WiFi, use the WiFi
network name and password on the
product label.
7. Log in to the DST router
Launch a web browser.
NETGEAR genie displays.
NETGEAR genie detects your Internet
connection and helps you update the
firmware, WiFi settings, and encryption
key on your DST adapter.
If you do not see NETGEAR genie,
enter www.routerlogin.net in the
address field of the web browser. When
prompted, enter admin for the user
name and password for the password.
Follow the onscreen steps to complete
the setup.
8. Contact Geek Squad for additional help.
If you need additional help, visit
www.geeksquad.com, click the CHAT WITH
AN AGENT link, and sign in to chat, or call
1-800-GeekSquad. Be sure to reference your
coupon code, which is GS1337EXB, when you
are on the phone or chatting with an agent.
1
DST Router Hardware Features
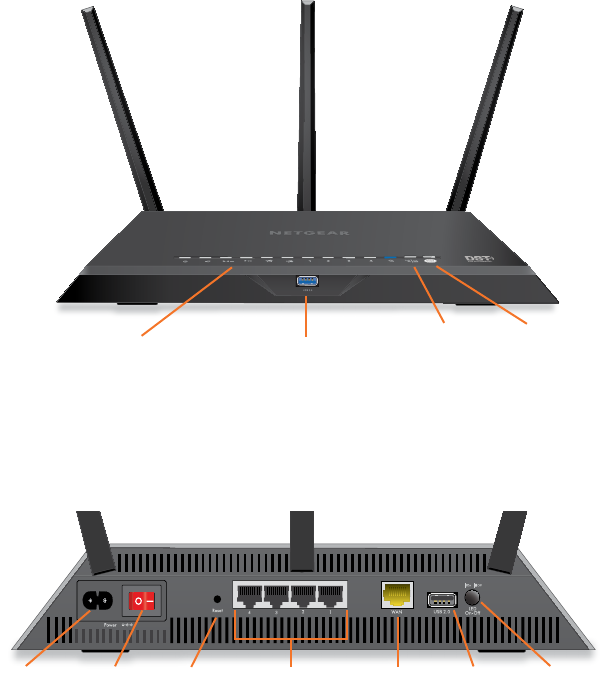
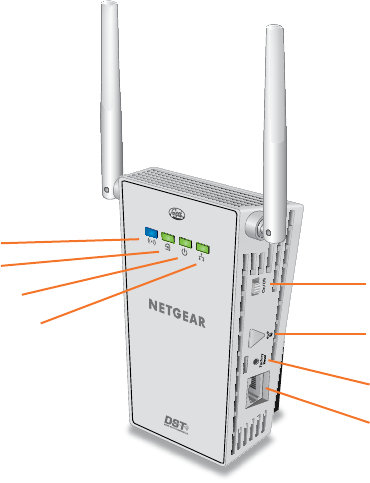
Front Panel
The LEDs, buttons, and USB port are shown in the following figure.
For more information about the LEDs, see DST Router LEDs on page
2.
Rear Panel
The rear panel connections and buttons are shown in the following
figure.
LEDs USB 3.0 port
Reset
button
Ethernet
ports 1–4
WAN
(Internet)
port
Power
On/O
switch
Power
connector
WPS
and DST
Adapter
Sync
button
with LED
Geek Squad
Setup and
Support
button with
LED
USB 2.0
port
LED
On/O
button
2
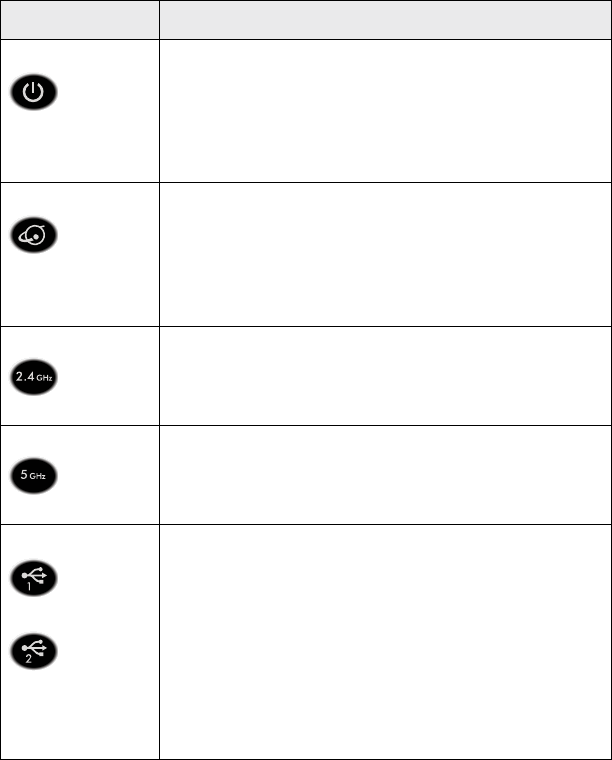
DST Router LEDs
The LEDs on the top of the DST router light to indicate DST router
activity:
LED Description
Power LED • Solid white. The DST router is ready.
• Solid amber. The DST router is starting.
• Blinking amber. The firmware is upgrading, or the
Reset button was pressed.
• Blinking white. The firmware is corrupted.
• O. Power is not supplied to the router.
Internet LED • Solid white. The Internet connection is ready.
• Solid amber. The DST router detected an Ethernet
cable connection to the modem.
• Blinking white. The port is sending or receiving trac.
• O. No Ethernet cable is connected between the
DST router and the modem.
2.4 GHz WiFi LED • Solid white. The 2.4 GHz WiFi radio is operating.
• Blinking white. The DST router is sending or receiving
WiFi trac.
• O. The 2.4 GHz WiFi radio is o.
5 GHz WiFi LED • Solid white. The 5 GHz WiFi radio is operating.
• Blinking white. The DST router is sending or receiving
WiFi trac.
• O. The 5 GHz WiFi radio is o.
USB 1 LED
USB 2 LED
The USB 1 LED is for the blue USB 3.0 USB port. The USB
2 LED is for the USB 2.0 port.
• Solid white. A USB storage device is connected and is
ready.
• Blinking. A USB storage device is plugged in and is
trying to connect.
• O. No USB storage device is connected, or someone
clicked the Safely Remove Hardware button on the
DST router’s web interface and it is now safe to remove
the attached USB storage device.
3
LED Description
Ethernet ports
1–4 LED
The LED color indicates the speed: white for Gigabit
Ethernet connections and amber for 100 Mbps or 10
Mbps Ethernet connections.
• Solid. A powered-on device is connected to the
Ethernet port.
• Blinking. The port is sending or receiving trac.
• O. No device is connected to this Ethernet port.
DST LED • Solid blue. A DST adapter is connected to the
DST router’s network.
• O. The DST router did not find any other compatible
DST adapter using the same encryption key.
WPS and DST
Adapter Sync
button with LED
Pressing this button for two seconds turns on the WPS
function and the DST adapter sync connection. Aer you
press this button, press the WPS or WPS and DST Router
Sync button on your device to connect your device to the
DST router.
• Solid white. A device is connected to the DST router.
• Blinking white. The DST router is ready to sync with a
device.
• O. The WPS and DST adapter sync connection is o.
Geek Squad Setup
and Support
button with LED
Geek Squad support is provided by phone and on the web.
Geek Squad agents use remote access to assist with setup
and support. The Geek Squad Setup and Support button
paired with a Geek Squad support ID (on the bottom of the
router) is used to authenticate the connection for remote
access.
The agent will provide direction regarding the use of the
button and the code. Pressing the button any other time
does not result in a connection with an agent.
The state of the LED indicates the status of the connection
with the Geek Squad agent:
• Solid white. The DST router is connected to Geek
Squad Support.
• Blinking white. The connection is being established.
• O. Geek Squad Support is not connected.

5
DST Adapter LEDs
The LEDs on the DST adapter light to indicate DST adapter activity:
LED Description
WiFi LED Solid blue. The DST adapter is securely paired with a WiFi
device.
Blinking blue. The DST adapter is pairing with a WiFi device.
O. WiFi is disabled.
DST LED This LED indicates when the DST adapter is connected to
the electrical outlet with the strongest link performance,
indicated by the color displayed by the LED:
• Red. Link rate < 50 Mbps (good).
• Amber. Link rate > 50 and < 80 Mbps (better).
• Green. Link rate > 80 Mbps (best).
• O. The DST adapter did not find any other compatible
DST devices using the same encryption key.
Power LED • Solid green. The DST adapter is powered on.
• Blinking green. The DST adapter is pairing with another
DST device.
• O. The DST adapter is powered o.
Ethernet LED • Solid green. A powered-on device is connected to the
Ethernet port.
• O. No device is connected to this Ethernet port.

6
Install Your DST Router and DST Adapter
Make sure that your Internet service is active before you install
your DST router.
¾To install your DST router and DST adapter:
1. Remove the antenna caps, attach the antennas, and position
them.
a. Remove the antenna caps from the threaded antenna posts
on the DST router.
b. Attach the antennas on the threaded antenna posts.
c. Position the antennas for the best WiFi performance.
NETGEAR recommends that you position the center
antenna vertically and that you position the others outward
at 45-degree angles as shown.
2. Prepare your modem:
a. Unplug your modem’s power.
b. If the modem uses a battery backup,
remove its batteries.
c. If your modem was already
connected to another router,
disconnect the cable between your
modem and that router.
Make sure that your modem is turned o and is cabled only to
the wall jack for your Internet service.
Internet
Modem
Cable or
DSL
7
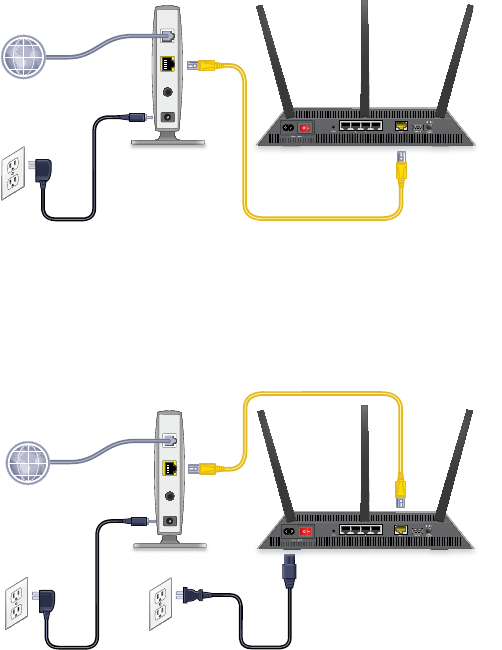
3. Connect your modem.
a. Plug in, then turn on your modem.
b. If you removed the batteries, replace them.
c. With an Ethernet cable, connect your modem to the yellow
WAN (Internet) port on your DST router.
4. Add power to the DST router.
a. Connect the power cord to the DST router and plug the
power cord into an outlet.
Note: Do not plug the power cord into a surge protector.
b. Wait for the Power LED on the front panel to light amber
and turn white.
If no LEDs are lit, press the Power On/O switch on the
rear panel of the DST router to the On position.
Cable or
DSL
Internet
Ethernet cable
Modem
Ethernet cable
Modem
Internet
Cable or
DSL
Power
cord
DST router
DST router
8
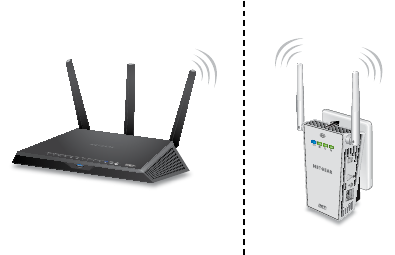
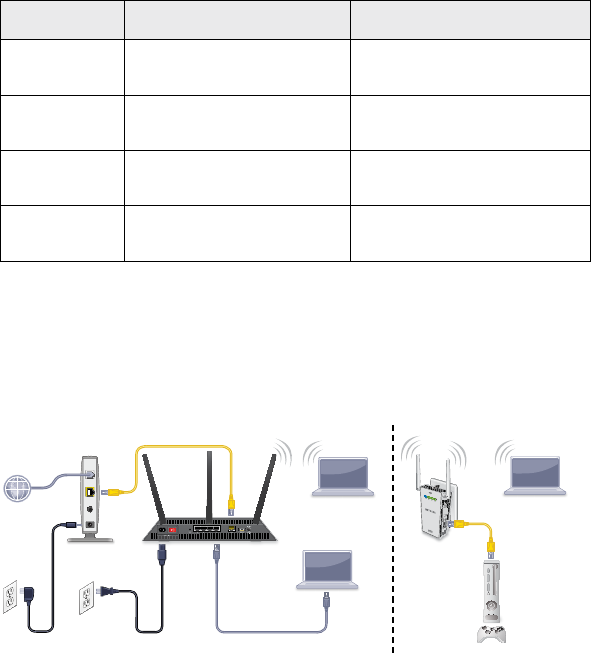
5. In the room where you want to improve WiFi coverage or add
Ethernet, plug your DST adapter into an electrical outlet and
wait for the Power LED to light solid green.
Note: Do not plug the DST adapter into a surge protector.
6. If the Power LED does not light, slide the Power On/O
switch to the On position.
7. Wait for the DST adapter to connect to the DST router.
Once the connection is made, the DST LED on the DST adapter
lights solid green or amber and the DST LED on the DST router
lights solid blue.
This process takes between 5 and 80 seconds.
If the DST LED on the DST adapter is red, the link performance
is weak. You might want to move the DST adapter to another
electrical outlet with a faster connection.
8. If you bought another add-on DST adapter, repeat Steps 5–7.
Room 1 Room 2
DST
router
DST
adapter
9
9. Connect a device to the DST router.
You can use a wired connection to connect a computer to the
DST router, or you can use a WiFi connection to connect a
computer or WiFi device to the DST router:
• To connect using a wired connection, use an Ethernet
cable to connect an Ethernet port on your computer to an
Ethernet port on the DST router.
• To connect using a WiFi connection, use the WiFi network
name and password on the DST router’s product label.
10. Log in to the DST router.
The first time that you log in to your DST router, NETGEAR
genie displays.
If NETGEAR genie does not display, try the following:
• Close and reopen the browser.
• Make sure that your computer is connected to one of the
four Ethernet ports on the DST router, or that you are
connected to your DST router’s WiFi network.
• Make sure that the DST router is receiving power and that
its Power LED is lit.
Ethernet cable
Modem
Cable or
DSL
Ethernet cable
Internet
Power cord
Computer
DST
router
Computer
10
• If your computer is set to a static or fixed IP address (this is
uncommon), change it to obtain an IP address automatically
from the DST router.
If you still do not see NETGEAR genie, do the following:
a. Launch a web browser.
b. Enter www.routerlogin.net in the address field of the
browser.
A login window displays.
c. Enter admin for the user name and password for the
password.
NETGEAR genie displays.
The DST router detects if there are any DST adapters on
your DST network.
11. If the DST router detects one DST adapter on the DST network,
click the Update Now button to update the DST adapter’s
firmware, WiFi settings, and encryption key.
12. If the DST router detects more than one DST adapter on the
DST network, click the Update All buttons to update the DST
adapters’ firmware, WiFi settings, and encryption key.
13. Aer the update is complete, click the Next button.
The setup is complete.
Note: The update must complete before you can click the Next
button.
The DST router and DST adapter, or DST adapters, now use
the same encryption key. The encryption key secures the
connection between the DST router and DST adapter.
11
The DST adapter’s WiFi network name is based on the
DST router’s WiFi network name with _EXT added at the end
of the name. If more than one DST adapter is connected to the
DST router, for every additional DST adapter aer the first, a
number is added before _EXT.
The DST adapter’s WiFi password is the same as the
DST router’s WiFi password.
For example:
Product 2.4 GHz WiFi Settings 5 GHz WiFi Settings
DST router • SSID. NETGEAR4
• Password. Coconut234
• SSID. NETGEAR4-5G
• Password. Coconut234
DST adapter 1 • SSID. NETGEAR4_EXT
• Password. Coconut234
• SSID. NETGEAR4-5G_EXT
• Password. Coconut234
DST adapter 2 • SSID. NETGEAR41_EXT
• Password. Coconut234
• SSID. NETGEAR4-5G1_EXT
• Password. Coconut234
DST adapter 3 • SSID. NETGEAR42_EXT
• Password. Coconut234
• SSID. NETGEAR4-5G2_EXT
• Password. Coconut234
14. Connect devices to the DST adapter.
You can connect devices using a wired Ethernet connection, a
WiFi connection, or a WPS connection.
For more information, see Connect Devices to the DST Adapter
on page 13. Room 1 Room 2
12
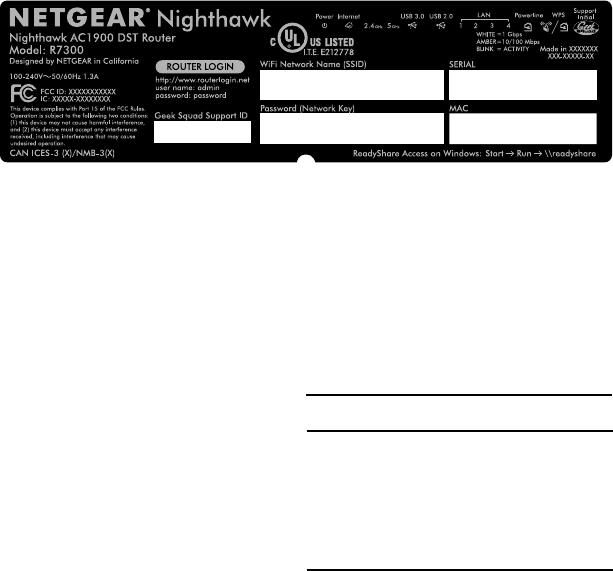
DST Router WiFi Settings and Geek Squad
Support ID
The preset WiFi network name (SSID) and password (network key)
are unique to your DST router, like a serial number. Because the
DST router automatically uses WiFi security, you don’t need to set it
up. The WiFi settings are on the product label.
NETGEAR recommends that you use the preset WiFi settings
because you can check the product label if you forget them. The
DST router’s web interface lets you change these settings. If you do
so, write down the new WiFi settings and store them in a safe place.
You can write the WiFi settings from your product label in this space
for easy reference.
WiFi network name (SSID):
Network key (password):
You can also write the Geek Squad Support ID here for easy
reference. You need the Geek Squad ID when you contact Geek
Squad.
Geek Squad support ID:
13
Connect Devices to the DST Adapter
You can connect devices to the DST adapter using a wired Ethernet
connection, a WPS connection, or a WiFi connection.
Connect to the DST Adapter Using Ethernet
¾To connect devices to the DST adapter using an Ethernet
connection:
Use an Ethernet cable to connect the Ethernet port on your
device to the Ethernet port on the DST adapter.
Connect to the DST Adapter Using WPS
¾To connect devices to the DST adapter using WPS:
1. Press and hold the WPS and DST Router Sync button on the
DST adapter.
The WiFi LED on the DST adapter blinks.
2. Within two minutes, press the WPS button on your WiFi device
(such as a computer, tablet, or smartphone).
When the WiFi LED stops blinking, your WiFi device is
automatically connected to the DST adapter and you can access
the Internet from your WiFi device.
Note: Make sure that your WiFi device is in the same room as
the DST adapter that you are connecting to.

14
Connect to the DST Adapter Using WiFi
Before you can connect to the DST adapter’s WiFi network, you
must update the DST adapter’s WiFi settings. For more information,
see Install Your DST Router and DST Adapter on page 6.
¾To connect devices to the DST adapter using WiFi:
1. Open the soware utility that manages your WiFi connections
on the computer or WiFi device that you want to connect to
your DST adapter.
This utility scans for WiFi networks in your area.
2. Find and select your DST adapter’s WiFi network name (SSID).
The DST adapter’s WiFi network name is based on the
DST router’s WiFi network name with _EXT added at the end
of the name. If more than one DST adapter is connected to the
DST router, for every additional DST adapter aer the first, a
number is added before _EXT.
3. Enter the DST adapter’s password and click the Connect
button.
The DST adapter’s WiFi password is the same as the
DST router’s WiFi password.
For example:
Product 2.4 GHz WiFi Settings 5 GHz WiFi Settings
DST router • SSID. NETGEAR4
• Password. Coconut234
• SSID. NETGEAR4-5G
• Password. Coconut234
DST adapter 1 • SSID. NETGEAR4_EXT
• Password. Coconut234
• SSID. NETGEAR4-5G_EXT
• Password. Coconut234
DST adapter 2 • SSID. NETGEAR41_EXT
• Password. Coconut234
• SSID. NETGEAR4-5G1_EXT
• Password. Coconut234
DST adapter 3 • SSID. NETGEAR42_EXT
• Password. Coconut234
• SSID. NETGEAR4-5G2_EXT
• Password. Coconut234
15
Change the DST Adapter WiFi Settings
You can log in to the DST adapter using a web browser and change
set its WiFi settings.
¾To change the DST adapter’s WiFi settings:
1. With an Ethernet cable, temporarily connect your computer to
the Ethernet port on the DST adapter.
2. Launch a web browser and enter http://www.mywifiext.net
in the address field of the browser.
A login window displays.
3. Enter admin for the user name and password for the
password.
The BASIC Home page displays.
4. Select Setup > Wireless Settings.
The Wireless Settings page displays.
5. Specify the settings for the 2.4 GHz band and for the 5 GHz
band:
a. If you want to change the DST adapter’s WiFi network
name, in the Name (SSID) field, enter a new network
name (SSID).
b. Select a wireless channel and mode from the menus.
You can leave the default settings selected.
c. In the Security Options section, select a radio button.
d. If the Password (Network Key) field displays, enter a
security password or your DST WiFi network.
e. Click the Apply button.
Your changes are saved.
Use the new WiFi settings to connect your WiFi devices to
the DST adapter’s WiFi network.
16
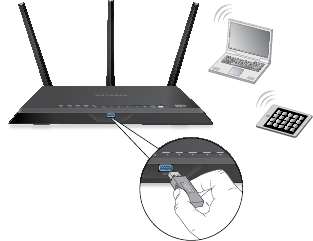
Join the DST Router WiFi Network
To join the DST router WiFi network, you can either use the
DST router’s Wi-Fi Protected Setup (WPS) function or use the
DST router’s or DST adapter’s WiFi network and password. For help
with the WPS button on your computer or WiFi device, check the
instructions or online help that came with that computer or device.
Some older equipment cannot use WPS.
¾To join the DST router network using the WPS:
1. Press the WPS and DST Adapter Sync button on the
DST router for 3–5 seconds.
The WPS and DST Adapter Sync LED on the DST router blinks
white.
2. Within two minutes, on your computer or WiFi device, press its
WPS button or click its onscreen WPS button.
The WPS and DST Adapter Sync LED on the DST router lights
solid white when the computer or WiFi device connects to your
DST router.
¾To select your DST router WiFi network and enter its
password:
1. Open the soware utility that manages your WiFi connections
on the computer or WiFi device that you want to connect to
your DST router.
This utility scans for WiFi networks in your area.
2. Find and select your DST router’s WiFi network name (SSID).
The SSID is on the product label.
3. Enter the DST router’s password (or your custom password if
you changed it) and click the Connect button.
The password is on the product label.
17
View or Change the DST Router or
DST Adapter Settings
Aer you use the genie to set up the DST router, you can log in to
the DST router to view or change its settings and the settings of
any DST adapter connected to the network.
Log In to the DST Router
¾To log in to the DST router:
1. Connect a computer or WiFi device to the DST router.
You can connect using a wired connection or a WiFi connection:
• To connect using a wired connection, use an Ethernet
cable to connect an Ethernet port on your computer to an
Ethernet port on the DST router.
• To connect using a WiFi connection, use the WiFi network
name and password on the product label.
2. Launch a web browser.
3. Enter www.routerlogin.net in the address field of the
browser.
A login window displays.
4. Enter admin for the user name and password for the
password.
The BASIC Home page displays.
5. To change the DST settings for the DST router or the
DST adapter, select ADVANCED > Advanced Setup > DST
Settings.
The DST Settings page displays.
Make any needed changes.
18
Change the DST Router admin Password
¾To change the DST router admin password:
1. Launch a web browser.
2. Enter www.routerlogin.net in the address field of the
browser.
A login window displays.
3. Enter admin for the user name and password for the
password.
The BASIC Home page displays.
4. Select ADVANCED > Administration > Set Password.
5. Type your old password and type the new password twice.
6. To be able to recover the password, select the Enable
Password Recovery check box.
NETGEAR recommends that you enable password recovery.
7. Select two security questions and provide answers to them.
8. Click the Apply button.
Your changes are saved.
Recover a Forgotten DST Router admin
Password
The default password for the admin user name is password. If you
changed the password and enabled the password recovery feature,
you can retrieve this password.
¾To retrieve a forgotten DST router admin password:
1. Launch a web browser.
2. Enter www.routerlogin.net in the address field of the
browser.
A login window displays.
19
3. Click the Cancel button.
If password recovery is enabled, you are prompted to enter the
serial number of the DST router.
4. Enter the serial number of the DST router.
The serial number is on the product label.
5. Click the Continue button.
A page displays requesting the answers to your security
questions.
6. Enter the saved answers to your security questions.
7. Click the Continue button.
A page displays your recovered password.
8. Click the Login again button.
A login window displays.
9. With your recovered password, log in to the DST router.
Find a Forgotten DST Router WiFi Password
The preset WiFi password is on the DST router product label. If
you changed your WiFi password and forgot what it is, log in to the
DST router to view its current WiFi password.
¾To connect to the DST router and view its WiFi password:
1. Launch a web browser.
2. Enter www.routerlogin.net in the address field.
A login window displays.
3. Enter the DST router user name and password.
The default user name is admin and the default password is
password. You can use the default credentials if you did not
change them.
The BASIC Home page displays.
20
4. Select Wireless.
The Security Options section of the page displays your WiFi
password.
Share a USB Device on the WiFi Network
ReadySHARE lets you access and share a USB storage device
connected to the DST router’s USB ports. (If your USB device uses
special drivers, it is not compatible.)
¾To access the USB storage device from a Windows
computer:
1. Connect your USB storage device to a USB port on the
DST router.
NETGEAR recommends that you use the blue USB 3.0 port on
the DST router to get the best USB device access speed.
If your USB storage device uses a power supply, you must
connect its power supply.
When you connect the USB storage device to the DST router’s
USB port, it might take up to two minutes before it is ready for
sharing. By default, the USB storage device is available to all
computers on your local area network (LAN).
21
2. On a Windows computer that is connected to the network,
select Start > Run, enter \\readyshare in the dialog box, and
click the OK button.
A window displays the files and folders on the device.
¾To access the USB storage device from a Mac:
1. Connect your USB storage device to a USB port on the
DST router.
NETGEAR recommends that you use the blue USB 3.0 port on
the DST router to get the best USB device access speed.
If your USB storage device uses a power supply, you must
connect its power supply.
When you connect the USB storage device to the DST router’s
USB port, it might take up to two minutes before it is ready for
sharing. By default, the USB storage device is available to all
computers on your local area network (LAN).
2. On a Mac that is connected to the network, launch Finder and
select Go > Connect to Server.
The Connect to server page displays.
3. Enter the smb://readyshare in the Server Address field and
click the Connect button.
4. When prompted, select the Guest radio button.
If you set up access control on the DST router and you allowed
your Mac to access the network, select the Registered User
radio button and enter admin for the name and password for
the password. For more information about access control, see
the user manual, which is available online at
http://downloadcenter.netgear.com or through a link in the
DST router’s user interface.
5. Click the Connect button.
A window displays the files and folders on the device.
22
NETGEAR genie App
The free NETGEAR genie app lets you easily monitor, connect, and
control your home network from a Windows or Mac computer,
tablet, or smartphone. You can share and stream music or videos,
diagnose and repair network issues, set up parental controls, and
more:
• Access your DST router and change its settings or diagnose and
repair network issues.
• Make a printer AirPrint compatible so that you can print from
an iPad or iPhone.
• Use MyMedia to find and play media files in your network.
• Use Turbo Transfer to quickly send files from your computer or
smartphone to another device on the network.
• Set up parental controls.
• Connect your smartphones and tablets to your home WiFi by
scanning the WiFi QR code from genie.
Download the free genie app from www.NETGEAR.com/genie.
23
DST Adapter Troubleshooting Tips
Power LED is o. Make sure that power is supplied to the electrical
outlet, and that the DST adapter is not plugged into an
extension cord, power strip, or surge protector.
DST LED is o. • If you already set network security, make sure that
all DST adapters are using the same encryption key;
see the user manual for more details.
• Press the Factory Reset button on each
DST adapter for one second to return the
DST adapter to its factory default settings.
DST LED is amber or
red.
Something is interfering with the communication
between the DST adapters or the DST router.
To resolve this issue:
• Move the DST adapter to another outlet.
• Unplug devices that might be causing interference,
such as surge suppressors and items with motors.
Ethernet LED is o. • Make sure that the Ethernet cable is working and
securely plugged into the DST adapter.
• Press the Factory Reset button on the DST adapter
for one second to return the DST adapter to its
factory default settings.
24
Federal Communication Commission Interference Statement
This device complies with Part 15 of the FCC Rules. Operation is subject to
the following two conditions: (1) This device may not cause harmful
interference, and (2) this device must accept any interference received,
including interference that may cause undesired operation.
This equipment has been tested and found to comply with the limits for a
Class B digital device, pursuant to Part 15 of the FCC Rules. These limits are
designed to provide reasonable protection against harmful interference in a
residential installation. This equipment generates, uses and can radiate radio
frequency energy and, if not installed and used in accordance with the
instructions, may cause harmful interference to radio communications.
However, there is no guarantee that interference will not occur in a
particular installation. If this equipment does cause harmful interference to
radio or television reception, which can be determined by turning the
equipment off and on, the user is encouraged to try to correct the
interference by one of the following measures:
- Reorient or relocate the receiving antenna.
- Increase the separation between the equipment and receiver.
- Connect the equipment into an outlet on a circuit different from that
to which the receiver is connected.
- Consult the dealer or an experienced radio/TV technician for help.
FCC Caution: Any changes or modifications not expressly approved by the
party responsible for compliance could void the user's authority to operate
this equipment.
This transmitter must not be co-located or operating in conjunction with any
other antenna or transmitter.
For operation within 5.15 ~ 5.25GHz frequency range, it is restricted to
indoor environment.

Radiation Exposure Statement:
This equipment complies with FCC radiation exposure limits set forth for an
uncontrolled environment. This equipment should be installed and operated
with minimum distance 20cm between the radiator & your body.
Industry Canada statement:
This device complies with RSS-210 of the Industry Canada Rules. Operation is
subject to the following two conditions: (1) This device may not cause
harmful interference, and (2) this device must accept any interference
received, including interference that may cause undesired operation.
Ce dispositif est conforme à la norme CNR-210 d'Industrie Canada applicable
aux appareils radio exempts de licence. Son fonctionnement est sujet aux
deux conditions suivantes: (1) le dispositif ne doit pas produire de brouillage
préjudiciable, et (2) ce dispositif doit accepter tout brouillage reçu, y
compris un brouillage susceptible de provoquer un fonctionnement
indésirable.
Caution :
(i) the device for operation in the band 5150-5250 MHz is only for indoor use
to reduce the potential for harmful interference to co-channel mobile
satellite systems;
(ii) high-power radars are allocated as primary users (i.e. priority users) of
the bands 5250-5350 MHz and 5650-5850 MHz and that these radars could
cause interference and/or damage to LE-LAN devices.
Avertissement:
les dispositifs fonctionnant dans la bande 5 150-5 250 MHz sont réservés
uniquement pour une utilisation à l’intérieur afin de réduire les risques de
brouillage préjudiciable aux systèmes de satellites mobiles utilisant les
mêmes canaux;
(ii) De plus, les utilisateurs devraient aussi être avisés que les utilisateurs de
radars de haute puissance sont désignés utilisateurs principaux (c.-à-d.,
qu’ils ont la priorité) pour les bandes 5 250-5 350 MHz et 5 650-5 850 MHz et
que ces radars pourraient causer du brouillage et/ou des dommages aux
dispositifs LAN-EL.
Radiation Exposure Statement:
This equipment complies with IC radiation exposure limits set forth for an
uncontrolled environment. This equipment should be installed and operated
This equipment complies with FCC radiation exposure limits set forth for an
uncontrolled environment. This equipment should be installed and operated
with minimum distance 30cm between the radiator & your body.

with minimum distance 20cm between the radiator & your body.
Déclaration d'exposition aux radiations:
Cet équipement est conforme aux limites d'exposition aux rayonnements IC
établies pour un environnement non contrôlé. Cet équipement doit être
installé et utilisé avec un minimum de 20 cm de distance entre la source de
rayonnement et votre corps.
30
30
Cet équipement est conforme aux limites d'exposition aux rayonnements IC
établies pour un environnement non contrôlé. Cet équipement doit être
installé et utilisé avec un minimum de 30cm de distance entre la source de
rayonnement et votre corps.
with minimum distance 20cm between the radiator & your body.