Netgear orporated 15200315 AC1600 WiFi VDSL/ADSL Modem Router User Manual
Netgear Incorporated AC1600 WiFi VDSL/ADSL Modem Router
User Manual.pdf

Quick Start
AC1600 WiFi Modem Router
Model D6400
Support
Thank you for purchasing this NETGEAR product.
Aer installing your device, locate the serial number on the label of your product and use it to
register your product at https://my.netgear.com.
You must register your product before you can use NETGEAR telephone support. NETGEAR
recommends registering your product through the NETGEAR website.
For product updates and web support, visit http://support.netgear.com.
NETGEAR recommends that you use only the ocial NETGEAR support resources.
You can get the user manual online at http://downloadcenter.netgear.com or through a link in
the product’s user interface.
Trademarks
© NETGEAR, Inc. NETGEAR and the NETGEAR Logo are trademarks of NETGEAR, Inc.
Any non‑NETGEAR trademarks are used for reference purposes only.
Compliance
For the current EU Declaration of Conformity, visit:
http://support.netgear.com/app/answers/detail/a_id/11621/.
For regulatory compliance information, visit:
http://www.netgear.com/about/regulatory/.
See the regulatory compliance document before connecting the power supply.
Package Contents
The box contains the following items.
In some regions, a resource CD is included in the package.
NETGEAR, Inc.
350 East Plumeria Drive
San Jose, CA 95134 USA
December 2014
Modem router
Ethernet cable
Power adapter
(varies by region)
Phone cable
ADSL microfilter
(varies by region)
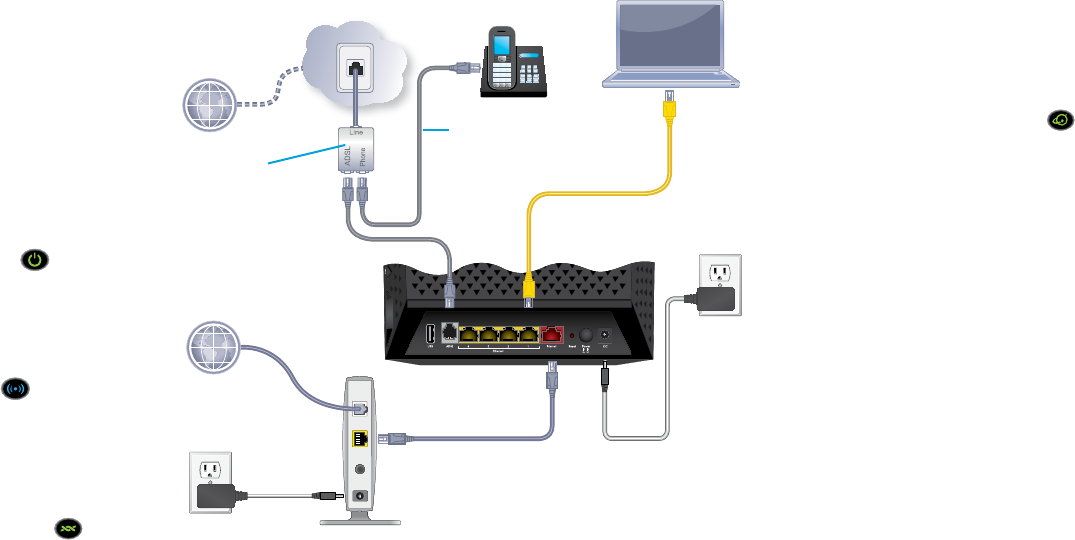
1. Connect the modem router to
a DSL service or a cable or fiber
modem.
To connect to a DSL service (ADSL
or VDSL):
Install an ADSL microfilter or a VDSL
microfilter and connect it to the ADSL
port on the modem router.
To connect to a cable or fiber
modem:
Prepare the cable or fiber modem and
connect it to the red Internet port on
the modem router.
2. Power on the modem router.
Wait for the Power LED to light
green.
If the Power LED does not light, press
the Power On/O button.
Wait for the WiFi LED to light blue.
3. Check the DSL LED.
If the modem router is connected to
a DSL service, the DSL LED lights
green.
4. Connect a computer.
You can use an Ethernet cable or
connect with WiFi.
To connect with WiFi, use the WiFi
network name and password on the
product label.
5. Log in to the modem router.
Launch a web browser.
NETGEAR genie displays.
If you do not see genie, enter
www.routerlogin.net in the address
field of the web browser. When
prompted, enter admin for the user
name and password for the password.
NETGEAR genie determines
your Internet connection. If the
modem router successfully connects to
the Internet, the Internet LED lights
green.
6. Get the genie app.
Download the free genie app from
www.NETGEAR.com/genie.
Easily share media, files, and printers
on the network from your smartphone,
tablet, or laptop.
7. Get the user manual.
You can get the user manual online at
http://downloadcenter.netgear.com
or through a link in the product’s user
interface.
Ethernet cable
ADSL or VDSL
Internet
Cable or fiber modem
Power adapter
You can use this diagram to connect your modem router or follow the detailed instructions in this booklet.
ADSL or VDSL
microfilter
Ethernet cable
(not included)
Phone cable
Modem router
Cable or fiber
Internet

1
Front and Side Panels
The status LEDs and buttons on the router are shown in the
following figure.
Back Panel
The connections and buttons on the rear panel of the router are
shown in the following figure.
WPS button
WiFi button
USB 2.0 port
Power LED
Internet LED
WiFi LED
USB port LED
DSL LED
Internet port
Reset
button Power On/O
button
Power connector
USB 2.0 port
ADSL port
Ethernet ports 1–4
2
Additional Information for DSL Service
Make sure that your DSL service (ADSL or VDSL) is active before
you install the modem router. You need the following information to
install your modem router and connect to the Internet:
• DSL user name and password. This information is included
in the welcome letter your DSL Internet service provider (ISP)
sent you when you signed up for your service.
• Your telephone number or DSL account number. If you do
not use voice service, you can use your DSL account number
instead.
If you do not know or cannot locate your DSL user name and
password, call your DSL ISP.
Note: If your provider says that they do not support NETGEAR
services, tell them that you need only your DSL user name and
password; you do not need support.
3
Install Your Modem Router
Make sure that your Internet service is active before you install
your modem router.
¾To install your modem router:
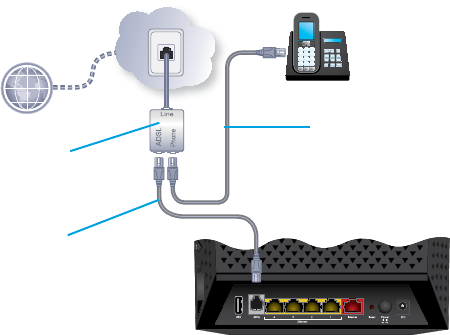
1. Connect the modem router to a DSL service (ADSL or VDSL) or
a cable or fiber modem.
To connect the modem router to a DSL service (ADSL or VDSL):
a. Install an ADSL or VDSL microfilter between your phone line
and a phone.
Note: A VDSL microfilter is not included in the box.
b. Use the phone cable to connect the microfilter to the ADSL
port on the modem router.
ADSL or VDSL
Internet
ADSL or VDSL
microfilter
Phone cable
Modem router
Phone cable
(not included)
4
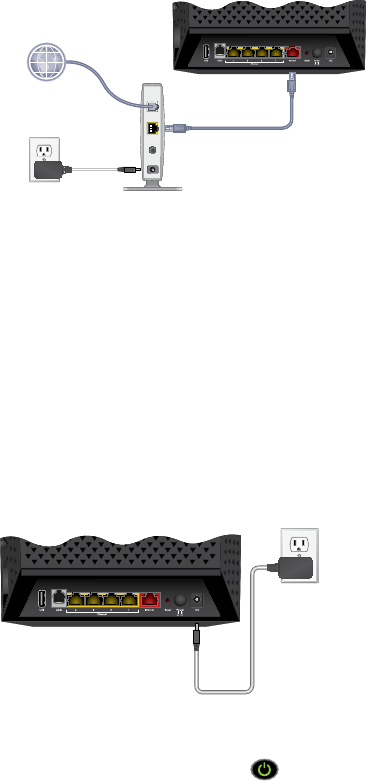
To connect the modem router to a cable or fiber modem:
a. Unplug your modem’s power, leaving the modem connected
to the wall jack for your Internet service.
If your modem uses a battery backup, remove the battery.
b. Plug in and turn on your modem.
If your modem uses a battery backup, put the battery back
in.
c. With an Ethernet cable, connect your modem to the red
Internet port on your modem router.
2. Add power to the modem router:
a. Connect the power adapter to the modem router and plug
the power adapter into an outlet.
b. Wait for the Power LED to light green.
If the Power LED does not light, press the Power On/O
button.
Ethernet cable
(not included)
Modem router
Cable or fiber
Internet
Cable or fiber modem
Power
adapter
Modem router
5
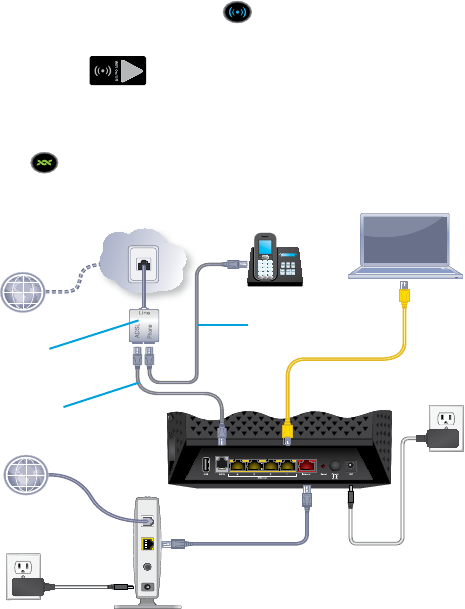
c. Wait for the WiFi LED to light blue.
If the WiFi LED does not light, press the WiFi On/O
button .
3. Check the DSL LED.
If the modem router is connected to a DSL service, the DSL
LED lights green.
4. Connect a computer.
You can use an Ethernet cable or connect with WiFi:
• For a wired connection, use the yellow Ethernet cable that
came with the modem router to connect your computer to
an Ethernet port on your modem router.
• To connect with WiFi, use the WiFi settings on the product
label.
Modem router
Cable or fiber modem
Ethernet cable
(not included)
Power
adapter
ADSL or VDSL
Internet
ADSL or VDSL
microfilter
Phone cable
Phone cable
(not included)

6
5. Launch a web browser.
The first time that you connect to the modem router, the
genie screen displays. Follow the genie steps to connect to the
Internet.
If the genie screen does not display, try the following:
• Close and reopen the browser.
• Make sure that your computer is connected to one of the
four black LAN Ethernet ports on the modem router, or that
you are connected to your WiFi network.
• Make sure that the modem router is receiving full power
and that its Power LED is lit.
• If your computer is set to a static or fixed IP address (this
is uncommon), change it to obtain an IP address from the
modem router automatically.
If you still do not see the genie screen, log in to the
modem router so that genie can detect your Internet
connection.
¾To log in to the modem router:
1. Launch a web browser.
2. Enter www.routerlogin.net in the address field of the
browser.
A login screen displays.
3. Enter admin for the user name and password for the
password.
The BASIC Home screen displays. If your Internet connection
is not set up yet, genie automatically detects your Internet
connection.

7
WiFi Network Name and Password
The preset WiFi network name (SSID) and password (network key)
are unique to your modem router, like a serial number. Because the
modem router automatically uses WiFi security, you don’t need to
set it up. The WiFi settings are on the product label.
NETGEAR recommends that you use the preset WiFi settings
because you can check the product label if you forget them.
NETGEAR genie lets you change these settings. If you do so, write
down the new WiFi settings and store them in a safe place.
You can write the WiFi settings from your product label in this space
for easy reference.
WiFi network name (SSID):
Network key (password):
If you change the WiFi settings, write the new settings here for
easy reference and store this booklet in a safe place.
WiFi network name (SSID):
Network key (password):
8
Join the WiFi Network
You can either use Wi‑Fi Protected Setup (WPS) or select your WiFi
network and type its password. For help with the WPS button on
your computer or WiFi device, check the instructions or online help
that came with that computer or device. Some older equipment
cannot use WPS.
¾To join the network using WPS:
1. Press the WPS button on the modem router for 3–5 seconds.
The WPS LED on the modem router blinks white.
2. Within two minutes, on your computer or WiFi device, press its
WPS button or click its onscreen WPS button.
The WPS LED on the modem router lights solid white when the
computer or WiFi device connects to your modem router.
3. Repeat this process to add other computers or WiFi devices.
¾To select your network and enter its password:
1. Open the soware utility that manages your WiFi connections
on the computer or WiFi device that you want to connect to
your modem router.
This utility scans for WiFi networks in your area.
2. Find and select your modem router’s WiFi network name (SSID).
The SSID is on the product label.
3. Enter the modem router’s password (or your custom password
if you changed it) and click the Connect button.
The password is on the product label.
4. Repeat Step 1 through Step 3 to add other computers or WiFi
devices.
9
View or Change the Modem Router
Settings
Aer you use genie to set up the modem router, you can log in to
the modem router to view or change its settings.
Log In to the Modem Router
¾To log in to the modem router:
1. Connect a computer or WiFi device to the modem router.
You can use an Ethernet cable or connect with WiFi:
• For a wired connection, use an Ethernet cable (not included)
to connect your computer to an Ethernet port on your
modem router.
• To connect with WiFi, select and join your WiFi network.
2. Launch a web browser.
3. Enter www.routerlogin.net in the address field of the
browser.
A login screen displays.
4. Enter admin for the user name and password for the
password.
The BASIC Home screen displays.
Change the admin Password
¾To change the admin password:
1. Launch a web browser.
2. Enter www.routerlogin.net in the address field of the
browser.
A login screen displays.
10
3. Enter admin for the user name and password for the
password.
The BASIC Home screen displays.
4. Select ADVANCED > Administration > Set Password.
5. Type your old password and type the new password twice.
6. To be able to recover the password, select the Enable
Password Recovery check box.
NETGEAR recommends that you enable password recovery.
7. Select two security questions and provide answers to them.
8. Click the Apply button.
Your changes are saved.
Recover a Forgotten admin Password
The default password for the admin user name is password. If you
changed the password and enabled the password recovery feature,
you can retrieve this password.
¾To retrieve a forgotten admin password:
1. Launch a web browser.
2. Enter www.routerlogin.net in the address field of the
browser.
A login screen displays.
3. Click the Cancel button.
If password recovery is enabled, you are prompted to enter the
serial number of the modem router. The serial number is on the
product label.
4. Enter the serial number of the modem router.
The serial number is on the product label.
5. Click the Continue button.
11
A screen displays requesting the answers to your security
questions.
6. Enter the saved answers to your security questions.
7. Click the Continue button.
A screen displays your recovered password.
8. Click the Login again button.
A login screen displays.
9. With your recovered password, log in to the modem router.
Find a Forgotten WiFi Security Password
The preset WiFi password is on the product label. If you
changed your WiFi password and forgot what it is, log in to the
modem router to view its current WiFi password.
¾To connect to the modem router and view its WiFi
password:
1. Use an Ethernet cable to connect your computer to a black
Ethernet port on the modem router.
2. Launch a web browser.
3. Enter www.routerlogin.net in the address field.
A login screen displays.
4. Enter the modem router user name and password.
The default user name is admin and the default password is
password. You can use the default credentials if you did not
change them.
The BASIC Home screen displays.
5. Select Wireless Settings.
The Security Options section of the screen displays your WiFi
password.
12
Share USB Devices on the Network
ReadySHARE lets you access and share USB devices connected to
the modem router. (If your storage device uses special drivers, it is
not compatible.)
¾To access the USB device from a Windows computer:
1. Connect a USB device to a USB port on the modem router.
If your USB device uses a power supply, you must use it when
you connect the device to the modem router.
When you connect the USB device to the modem router’s port,
it might take up to two minutes before it is ready for sharing.
By default, the device is available to all computers on your local
area network (LAN).
2. Select Start > Run.
3. Enter \\readyshare in the dialog box.
4. Click the OK button.
A window automatically opens and displays the files and folders
on the device.
13
¾To access the USB device from a Mac:
1. Connect a USB device to a USB port on the modem router.
If your USB device uses a power supply, you must use it when
you connect the device to the modem router.
When you connect the USB device to the modem router’s port,
it might take up to two minutes before it is ready for sharing.
By default, the device is available to all computers on your local
area network (LAN).
2. On a Mac that is connected to the network, launch Finder and
select Go > Connect to Server.
3. Enter the smb://readyshare in the Server Address field.
4. Click the Connect button.
5. When prompted, select the Guest radio button.
If you set up access control on the modem router and you
allowed your Mac to access the network, select the Registered
User radio button and enter admin for the name and
password for the password. For more information about access
control, see the user manual, which is available online at
http://downloadcenter.netgear.com or through a link in the
modem router’s user interface.
6. Click the Connect button.
A window automatically opens and displays the files and folders
on the device.
14
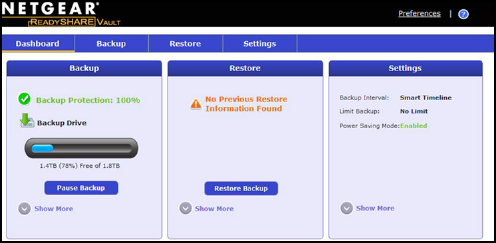
ReadySHARE Vault Backup App
Your modem router comes with free backup soware for all the
Windows computers in your home. Connect a USB hard disk drive
(HDD) to the modem router for centralized, continuous, and
automatic backup.
Note: The following operating systems support ReadySHARE Vault:
• Windows XP SP3
• Windows 7
• Windows 8
• Windows 8.1
¾To back up your Windows computer:
1. Connect a USB HDD to the appropriate port on the
modem router.
2. Download ReadySHARE Vault from
www.netgear.com/readyshare and install it on each Windows
computer.
3. Launch ReadySHARE Vault.
4. Use the dashboard or the Backup tab to set up and run your
backup.
15
Share a USB Printer
The ReadySHARE Printer utility lets you share a USB printer that
is connected to a USB port on your modem router. You can share
this USB printer among the Windows and Mac computers on your
network and print wirelessly.
¾To set up ReadySHARE Printer:
1. Connect the USB printer to a USB port on the modem router
with a USB printer cable.
2. On each computer that will share the printer, do the following:
a. Install the current USB printer driver soware (available
from the printer manufacturer).
b. Download ReadySHARE Printer from
www.netgear.com/readyshare.
c. In the ReadySHARE Printer pane, click the PC Utility or
Mac Utility link.
3. Double‑click the ReadySHARE Printer utility setup file that you
downloaded.
The utility displays as NETGEAR USB Control Center on your
computer.
The InstallShield wizard displays.
4. Follow the wizard instructions to install NETGEAR USB Control
Center.
16
NETGEAR genie App
The free NETGEAR genie app lets you easily monitor, connect, and
control your home network from a Windows or Mac computer,
tablet, or smartphone. You can share and stream music or videos,
diagnose and repair network issues, set up parental controls, and
more:
• Access your modem router and change its settings or diagnose
and repair network issues.
• Make a printer AirPrint compatible so that you can print from
an iPad or iPhone.
• Use MyMedia to find and play media files in your network.
• Use Turbo Transfer to quickly send files from your computer or
smartphone to another device on the network.
• Set up parental controls.
• Connect your smartphones and tablets to your home WiFi by
scanning the WiFi QR code from genie.
Download the free genie app from www.NETGEAR.com/genie.
Federal Communication Commission Interference Statement
This device complies with Part 15 of the FCC Rules. Operation is subject to
the following two conditions: (1) This device may not cause harmful
interference, and (2) this device must accept any interference received,
including interference that may cause undesired operation.
This equipment has been tested and found to comply with the limits for a
Class B digital device, pursuant to Part 15 of the FCC Rules. These limits are
designed to provide reasonable protection against harmful interference in a
residential installation. This equipment generates, uses and can radiate radio
frequency energy and, if not installed and used in accordance with the
instructions, may cause harmful interference to radio communications.
However, there is no guarantee that interference will not occur in a
particular installation. If this equipment does cause harmful interference to
radio or television reception, which can be determined by turning the
equipment off and on, the user is encouraged to try to correct the
interference by one of the following measures:
- Reorient or relocate the receiving antenna.
- Increase the separation between the equipment and receiver.
- Connect the equipment into an outlet on a circuit different from that
to which the receiver is connected.
- Consult the dealer or an experienced radio/TV technician for help.
FCC Caution: Any changes or modifications not expressly approved by the
party responsible for compliance could void the user's authority to operate
this equipment.
This transmitter must not be co-located or operating in conjunction with any
other antenna or transmitter.
For operation within 5.15 ~ 5.25GHz frequency range, it is restricted to
indoor environment.

Radiation Exposure Statement:
This equipment complies with FCC radiation exposure limits set forth for an
uncontrolled environment. This equipment should be installed and operated
with minimum distance 20cm between the radiator & your body.
FCC REQUIREMENTS
This equipment complies with Part 68 of the FCC rules and the requirements
adopted by the ACTA. On the bottom is a label that contains, among other
information, a product identifier in the format US: 5NHDL01B00315. If
requested, this number must be provided to the telephone company.
Applicable connector jack Universal Service Order Codes (“USOC”) for the
Equipment is RJ11C.
A plug and jack used to connect this equipment to the premises wiring and
telephone network must comply with the applicable FCC Part 68 rules and
requirements adopted by the ACTA. A compliant telephone cord and
modular plug is provided with this product. It is designed to be connected
to a compatible modular jack that is also compliant. See installation
instructions for details.
The REN is used to determine the number of devices that may be connected
to a telephone line. Excessive RENs on a telephone line may result in the
devices not ringing in response to an incoming call. In most but not all areas,
the sum of RENs should not exceed five (5.0). To be certain of the number of
devices that may be connected to a line, as determined by the total RENs,
contact the local telephone company. For products approved after July 23,
2001, the REN for this product is part of the product identifier that has the
format US: 5NHDL01B00315 The digits represented by 01 are the REN without
a decimal point .
If this equipment causes harm to the telephone network, the telephone
company will notify you in advance that temporary discontinuance of service
may be required. But if advance notice isn't practical, the telephone
company will notify the customer as soon as possible. Also, you will be
advised of your right to file a complaint with the FCC if you believe it is
necessary.
The telephone company may make changes in its facilities, equipment,
operations or procedures that could affect the operation of the equipment.
If this happens the telephone company will provide advance notice in
order for you to make necessary modifications to maintain uninterrupted
service.
If trouble is experienced with this equipment, for repair or warranty
information, please contact as below.
COMPANY: Netgear Inc.
ADDRESS: 350 East Plumeria Drive San Jose, CA 95134 U.S.A
TEL NO.: +44(0)1344 458217
If the equipment is causing harm to the telephone network, the telephone
company may request that you disconnect the equipment until the problem is
resolved.
Connection to party line service is subject to state tariffs. Contact the
state public utility commission, public service commission or corporation
commission for information.
If your home has specially wired alarm equipment connected to the
telephone line, ensure the installation of this equipment does not disable
your alarm equipment. If you have questions about what will disable alarm
equipment, consult your telephone company or a qualified installer.
WHEN PROGRAMMING EMERGENCY NUMBERS AND(OR) MAKING TEST CALLS TO
EMERGENCY NUMBERS:
1) Remain on the line and briefly explain to the dispatcher the reason for the
call.
2) Perform such activities in the off-peak hours, such as early morning or late
evenings.