Netgear orporated 17100369 AC1200 WiFi Range Extender User Manual AC1200 WiFi Range Extender Quick Start Guide
Netgear Incorporated AC1200 WiFi Range Extender AC1200 WiFi Range Extender Quick Start Guide
User Manual.pdf
Quick Start
July 2017
AC1200 WiFi Range Extender
Model EX6110
Connect the Extender to Your
WiFi Network
You can connect with WPS or you can use the NETGEAR
installation assistant from a web browser.
Connect With WPS
Wi-Fi Protected Setup (WPS) lets you join a secure WiFi
network without typing the network name and password.
Note: WPS does not support WEP network security. If you
are using WEP security, follow the instructions in Connect
With the NETGEAR Installation Assistant on the other side of
this quick start guide.
1. Press the WPS button on the extender until the WPS
LED blinks.
2. Within two minutes, press the WPS button on your
router or access point.
When the extender connects to your existing WiFi
network, the WPS LED on the extender lights solid green
and the Router LED lights.
If the Router LED does not light, try again. If it still does
not light, see Connect With the NETGEAR Installation
Assistant on the other side of this quick start guide.
3. If your WiFi router supports the 5 GHz band, repeat
Steps 1 and 2 to connect the extender to the 5 GHz
band.
4. Unplug the extender and move it to a new location that
is about halfway between your router and the area with
a poor router WiFi signal.
The location that you choose must be within the range
of your existing WiFi router network.
5. Plug the extender into an electrical outlet and wait for
the Power LED to light green.
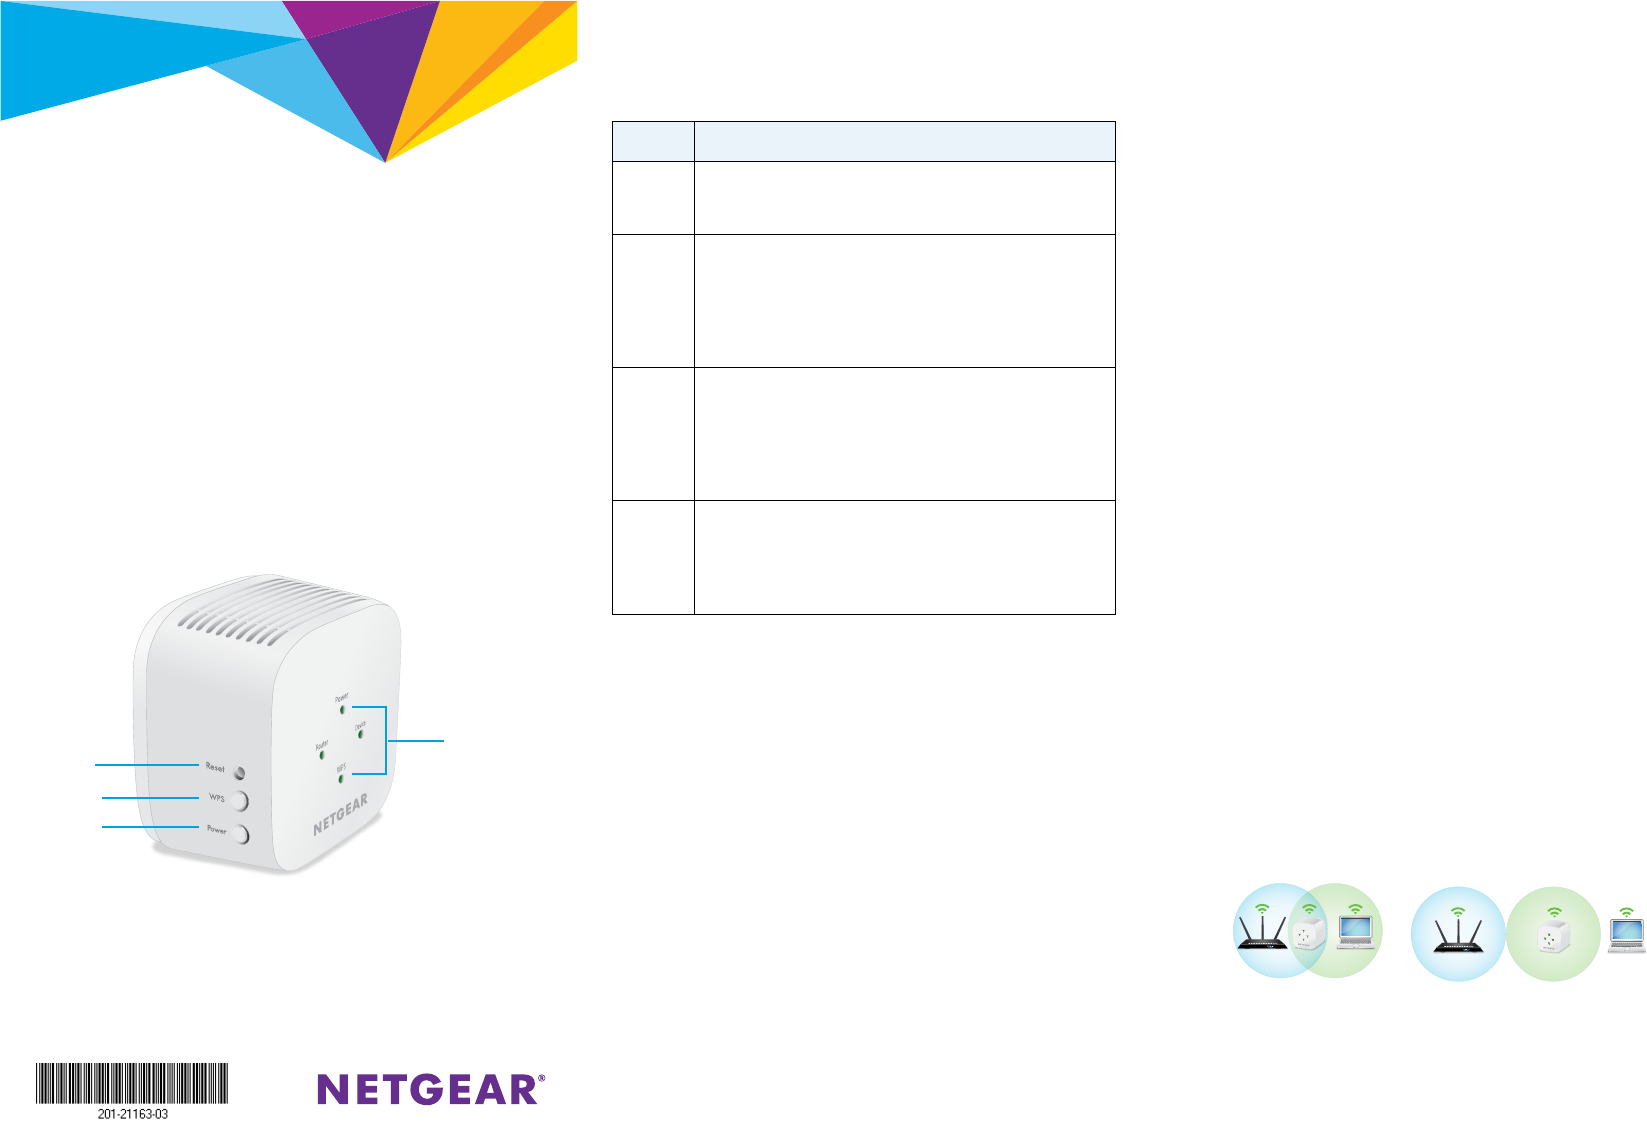
LED Descriptions
LED Description
Power • Solid amber. The extender is booting.
• Solid green. The extender is powered on.
• O. The extender is powered o.
Router This LED indicates the network connection between
the extender and the router or access point.
• Solid green. Best connection.
• Solid amber. Good connection.
• Solid red. Poor connection.
• O. No connection.
Device This LED indicates the network connection between
the extender and a computer or mobile device.
• Solid green. Best connection.
• Solid amber. Good connection.
• Solid red. Poor connection.
• O. No connection.
WPS • Solid green. WiFi security is enabled (WPA or
WPA2).
• Blinking green. A WPS connection is being
established.
• O. WiFi security is not enabled.
Place the Extender and Supply
Power
1. Place your extender in the same room as your WiFi
router.
Proximity to the WiFi router is required only during the
initial setup process.
2. Plug the extender into an electrical outlet.
Wait for the Power LED to light green. If the Power LED
does not light, press the Power On/Off button on the
side of the extender.
6. Use the Router LED to help you choose a spot where the
extender-to-router connection is optimal.
7. If the Router LED doesn’t light amber or green, plug the
extender into an outlet closer to the router and try again.
Keep moving the extender to outlets closer to the router
until the Router LED lights amber or green.
8. On your computer or mobile device, find and connect to
a new extender WiFi network.
The extender creates two new extender WiFi networks.
The extender’s new WiFi network names are based on
your existing WiFi network name, with _2GEXT and
_5GEXT at the end of the name.
For example:
• Existing WiFi network name. MyNetworkName
• New extender WiFi network
names. MyNetworkName_2GEXT and
MyNetworkName_5GEXT
Use the same WiFi password that you use for your WiFi
router.
9. Test the new extender WiFi range by moving your
computer or mobile device to the area with a poor router
WiFi signal:
a. Leave your computer or mobile device in the area
with a poor router WiFi signal and return to the
extender.
b. Check the Device LED on the extender:
• If the Device LED is solid green or amber, your
new extender WiFi network reaches the area
with a poor router WiFi signal and your network
setup is complete.
• If the Device LED is red, your new extender WiFi
network does not reach the area with a poor
router WiFi signal.
You must move your computer or mobile device
closer to the extender until the Device LED
turns solid green or amber.
LEDs
Power
Router
Device
WPS
Reset
WPS
Power
On/Off
DO DON’T
Connect With the NETGEAR Installation
Assistant
1. On a computer or mobile device, open the WiFi
connection manager and find and connect to the
extender network called NETGEAR_EXT.
When you are connected to the extender, the Device
LED lights.
2. Launch a web browser.
3. Visit www.mywifiext.net.
The NETGEAR installation assistant displays.
4. Follow the prompts to connect your extender to your
existing WiFi network.
5. Unplug the extender and move it to a new location about
halfway between your router and the area with a poor
WiFi signal.
The location that you choose must be within the range
of your existing WiFi router network.
6. Plug the extender into an electrical outlet and wait for
the Power LED to light green.
7. Use the Router LED to help you choose a spot where the
extender-to-router connection is optimal.
8. If the Router LED doesn’t light amber or green, plug the
extender into an outlet closer to the router and try again.
Keep moving the extender to outlets closer to the router
until the Router LED lights amber or green.
9. Reconnect your computer or mobile device to the new
extender WiFi network.
10. Test the new extended WiFi range by moving your
computer or mobile device to the area with a poor router
WiFi signal:
a. Leave your computer or mobile device in the area
with a poor router WiFi signal and return to the
extender.
b. Check the Device LED on the extender:
• If the Device LED is solid green or amber, your
new extender WiFi network reaches the area
with a poor router WiFi signal and your network
setup is complete.
• If the Device LED is red, your new extender WiFi
network does not reach the area with a poor
router WiFi signal.
You must move your computer or mobile device
closer to the extender until the Device LED
turns solid green or amber.
11. Plug the extender into an electrical outlet and wait for
the Power LED to light green.
If the Power LED does not light, press the
Power On/Off button.
Access Extender Settings
After installation, you can log in to the extender to view or
change the extender’s settings.
1. Launch a web browser from a computer or mobile device
that is connected to your extender network.
When you are connected to the extender, the Device
Link LED lights.
2. Log in to your extender:
• If your extender and router use dierent WiFi
network names (SSIDs), visit www.mywifiext.net.
• If your extender and router use the same WiFi
network name (SSID), enter http://<extender’s IP
address> (for example, http://192.168.1.3).
To find your extender’s IP address, do the following:
a. Log in to your router.
b. Find the page in your router web interface that
lists the devices connected to your router.
c. Find your extender in the list and note your
extender’s IP address.
d. Enter your extender’s IP address in the address
field of your web browser.
A login page displays.
3. Enter your admin email and password and click the
LOG IN button.
The Status page displays.
Support
Thank you for purchasing this NETGEAR product. You can
visit www.netgear.com/support to register your product, get
help, access the latest downloads and user manuals, and join
our community. We recommend that you use only official
NETGEAR support resources.
Si ce produit est vendu au Canada, vous pouvez accéder à ce
document en français canadien à
http://downloadcenter.netgear.com/other/.
(If this product is sold in Canada, you can access this
document in Canadian French at
http://downloadcenter.netgear.com/other/.)
For the current EU Declaration of Conformity, visit
http://kb.netgear.com/11621.
For regulatory compliance information, visit
http://www.netgear.com/about/regulatory/.
See the regulatory compliance document before connecting
the power supply.
NETGEAR INTL LTD
Building 3, University Technology Centre
Curraheen Road, Cork, Ireland
© NETGEAR, Inc., NETGEAR and the NETGEAR
Logo are trademarks of NETGEAR, Inc. Any
non-NETGEAR trademarks are used for
reference purposes only.
NETGEAR, Inc.
350 East Plumeria Drive
San Jose, CA 95134, USA
DO DON’T
Federal Communication Commission Interference Statement
This device complies with Part 15 of the FCC Rules. Operation is subject to
the following two conditions: (1) This device may not cause harmful
interference, and (2) this device must accept any interference received,
including interference that may cause undesired operation.
This equipment has been tested and found to comply with the limits for a
Class B digital device, pursuant to Part 15 of the FCC Rules. These limits are
designed to provide reasonable protection against harmful interference in a
residential installation. This equipment generates, uses and can radiate radio
frequency energy and, if not installed and used in accordance with the
instructions, may cause harmful interference to radio communications.
However, there is no guarantee that interference will not occur in a
particular installation. If this equipment does cause harmful interference to
radio or television reception, which can be determined by turning the
equipment off and on, the user is encouraged to try to correct the
interference by one of the following measures:
- Reorient or relocate the receiving antenna.
- Increase the separation between the equipment and receiver.
- Connect the equipment into an outlet on a circuit different from that
to which the receiver is connected.
- Consult the dealer or an experienced radio/TV technician for help.
FCC Caution: Any changes or modifications not expressly approved by the
party responsible for compliance could void the user's authority to operate
this equipment.
This transmitter must not be co-located or operating in conjunction with any
other antenna or transmitter.
For operation within 5.15 ~ 5.25GHz frequency range, it is restricted to
indoor environment.
Radiation Exposure Statement:
This equipment complies with FCC radiation exposure limits set forth for an
uncontrolled environment. This equipment should be installed and operated
with minimum distance 20cm between the radiator & your body.