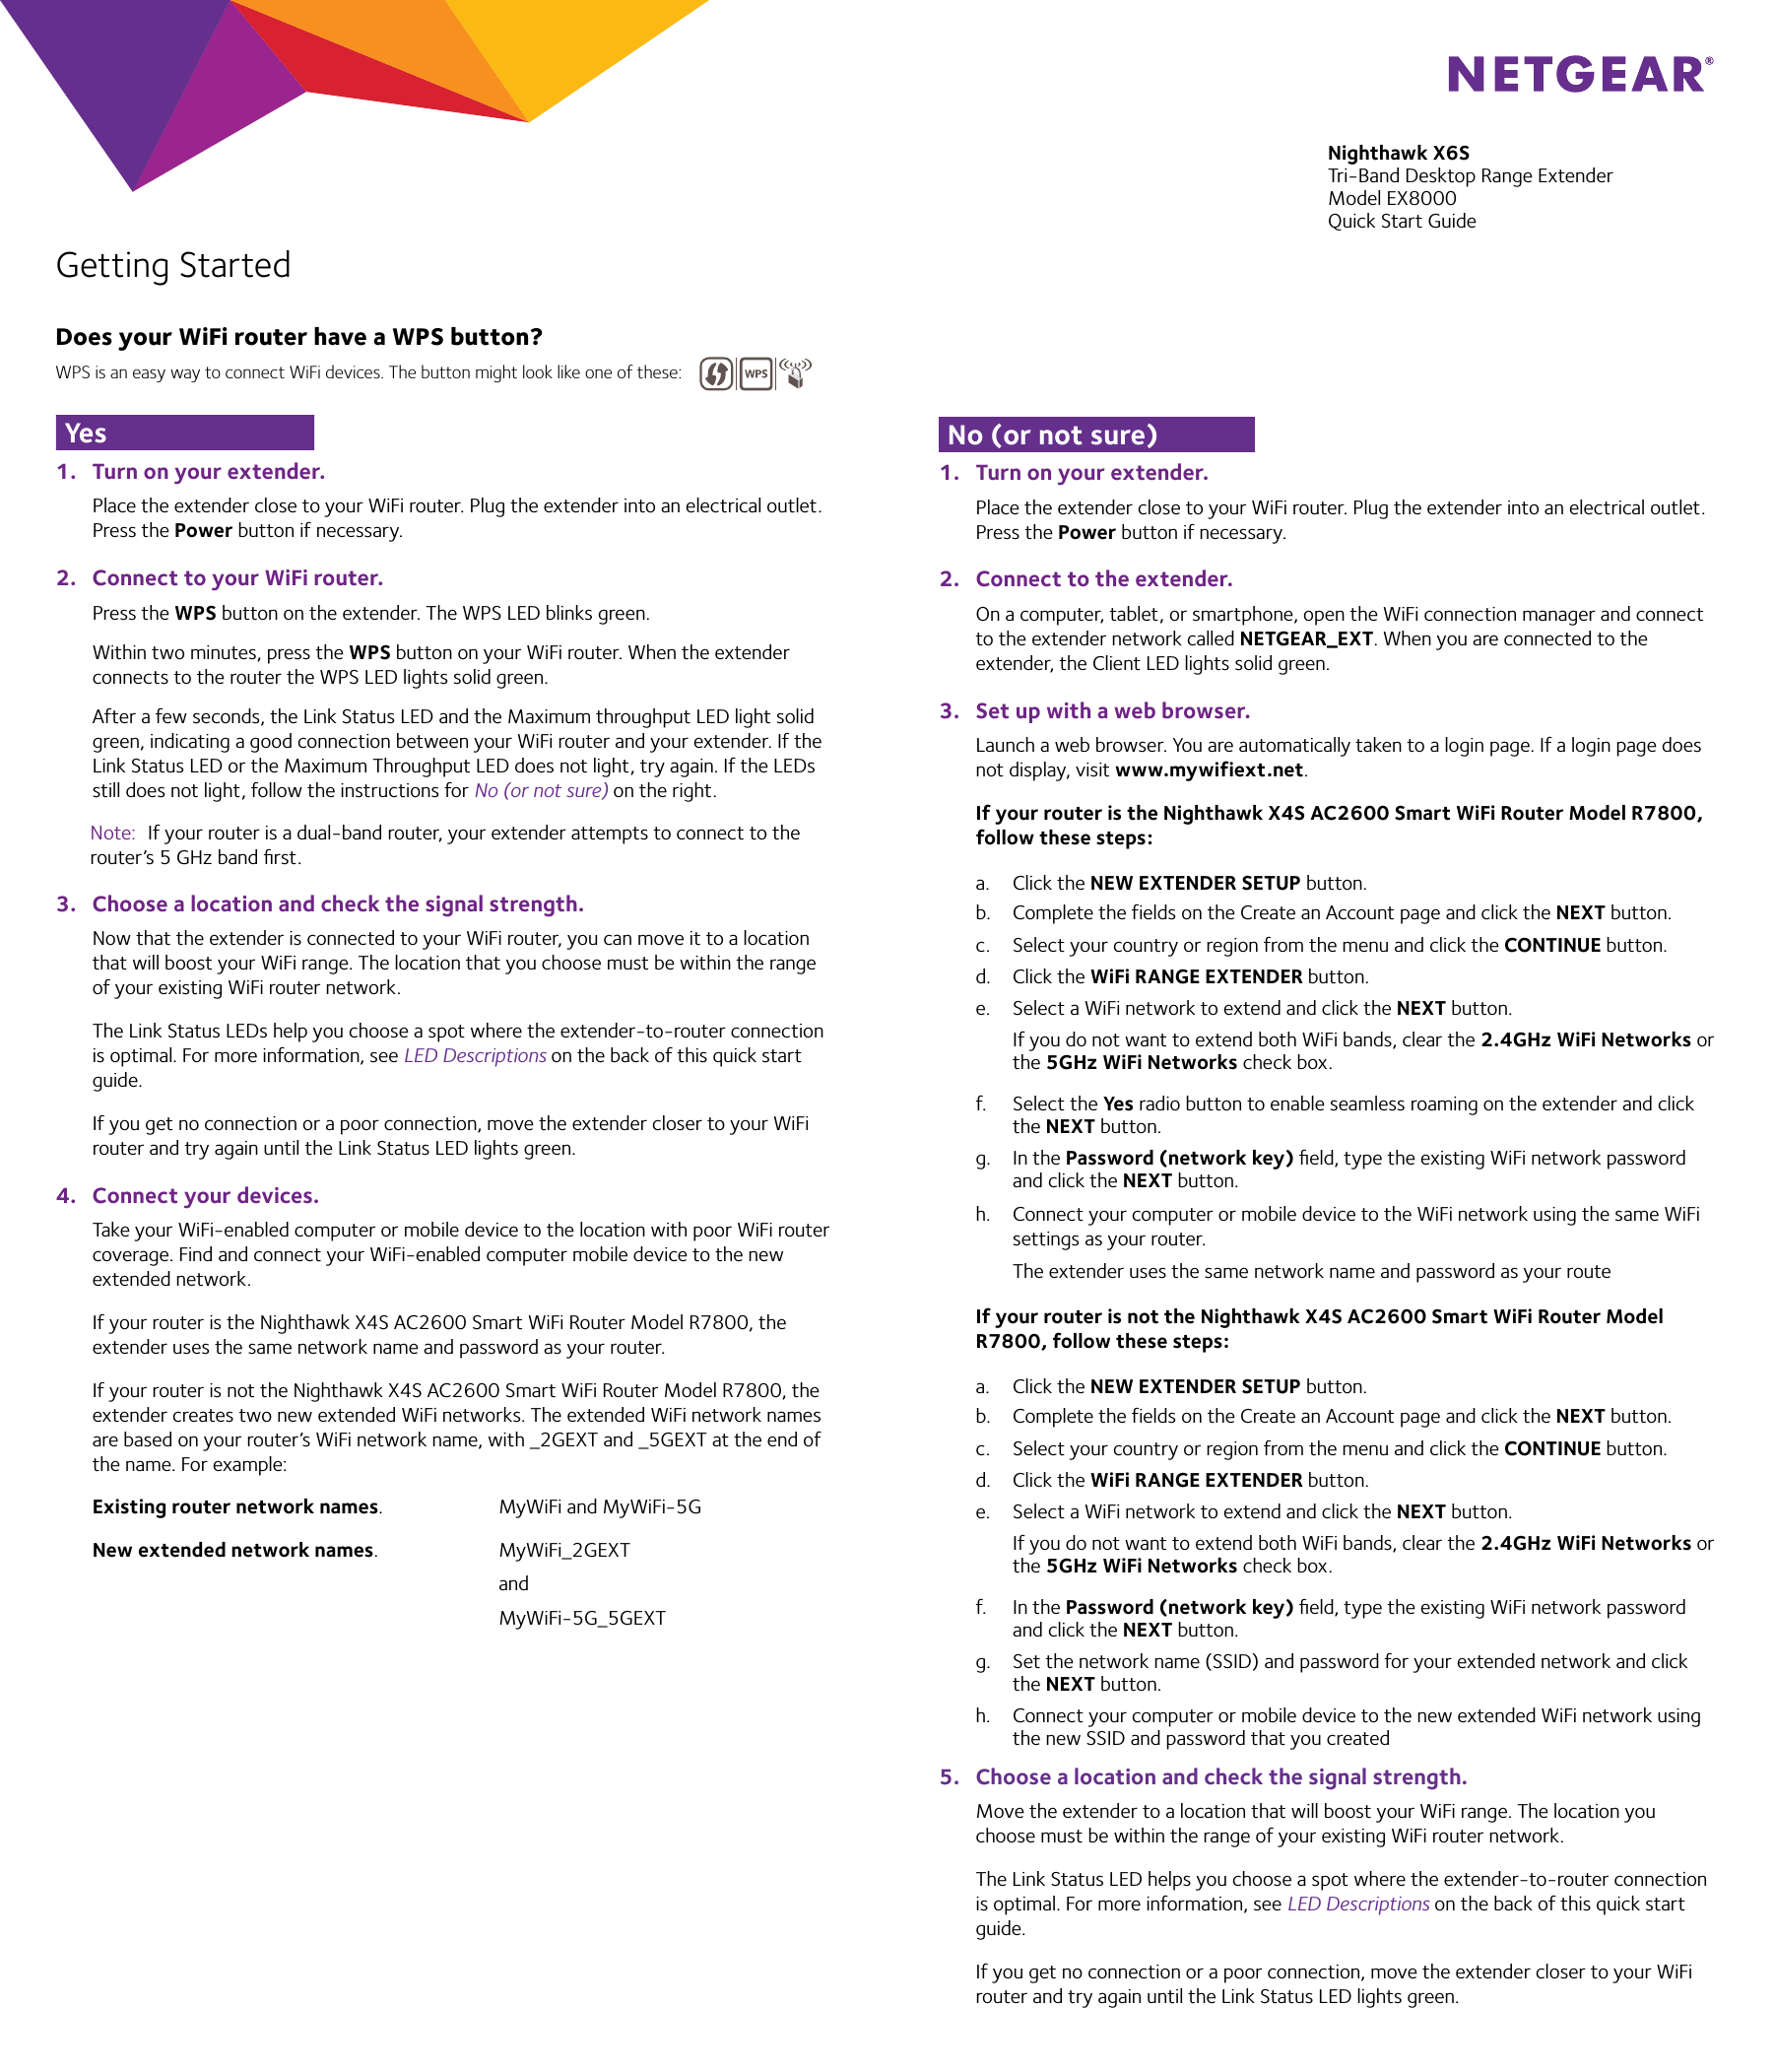
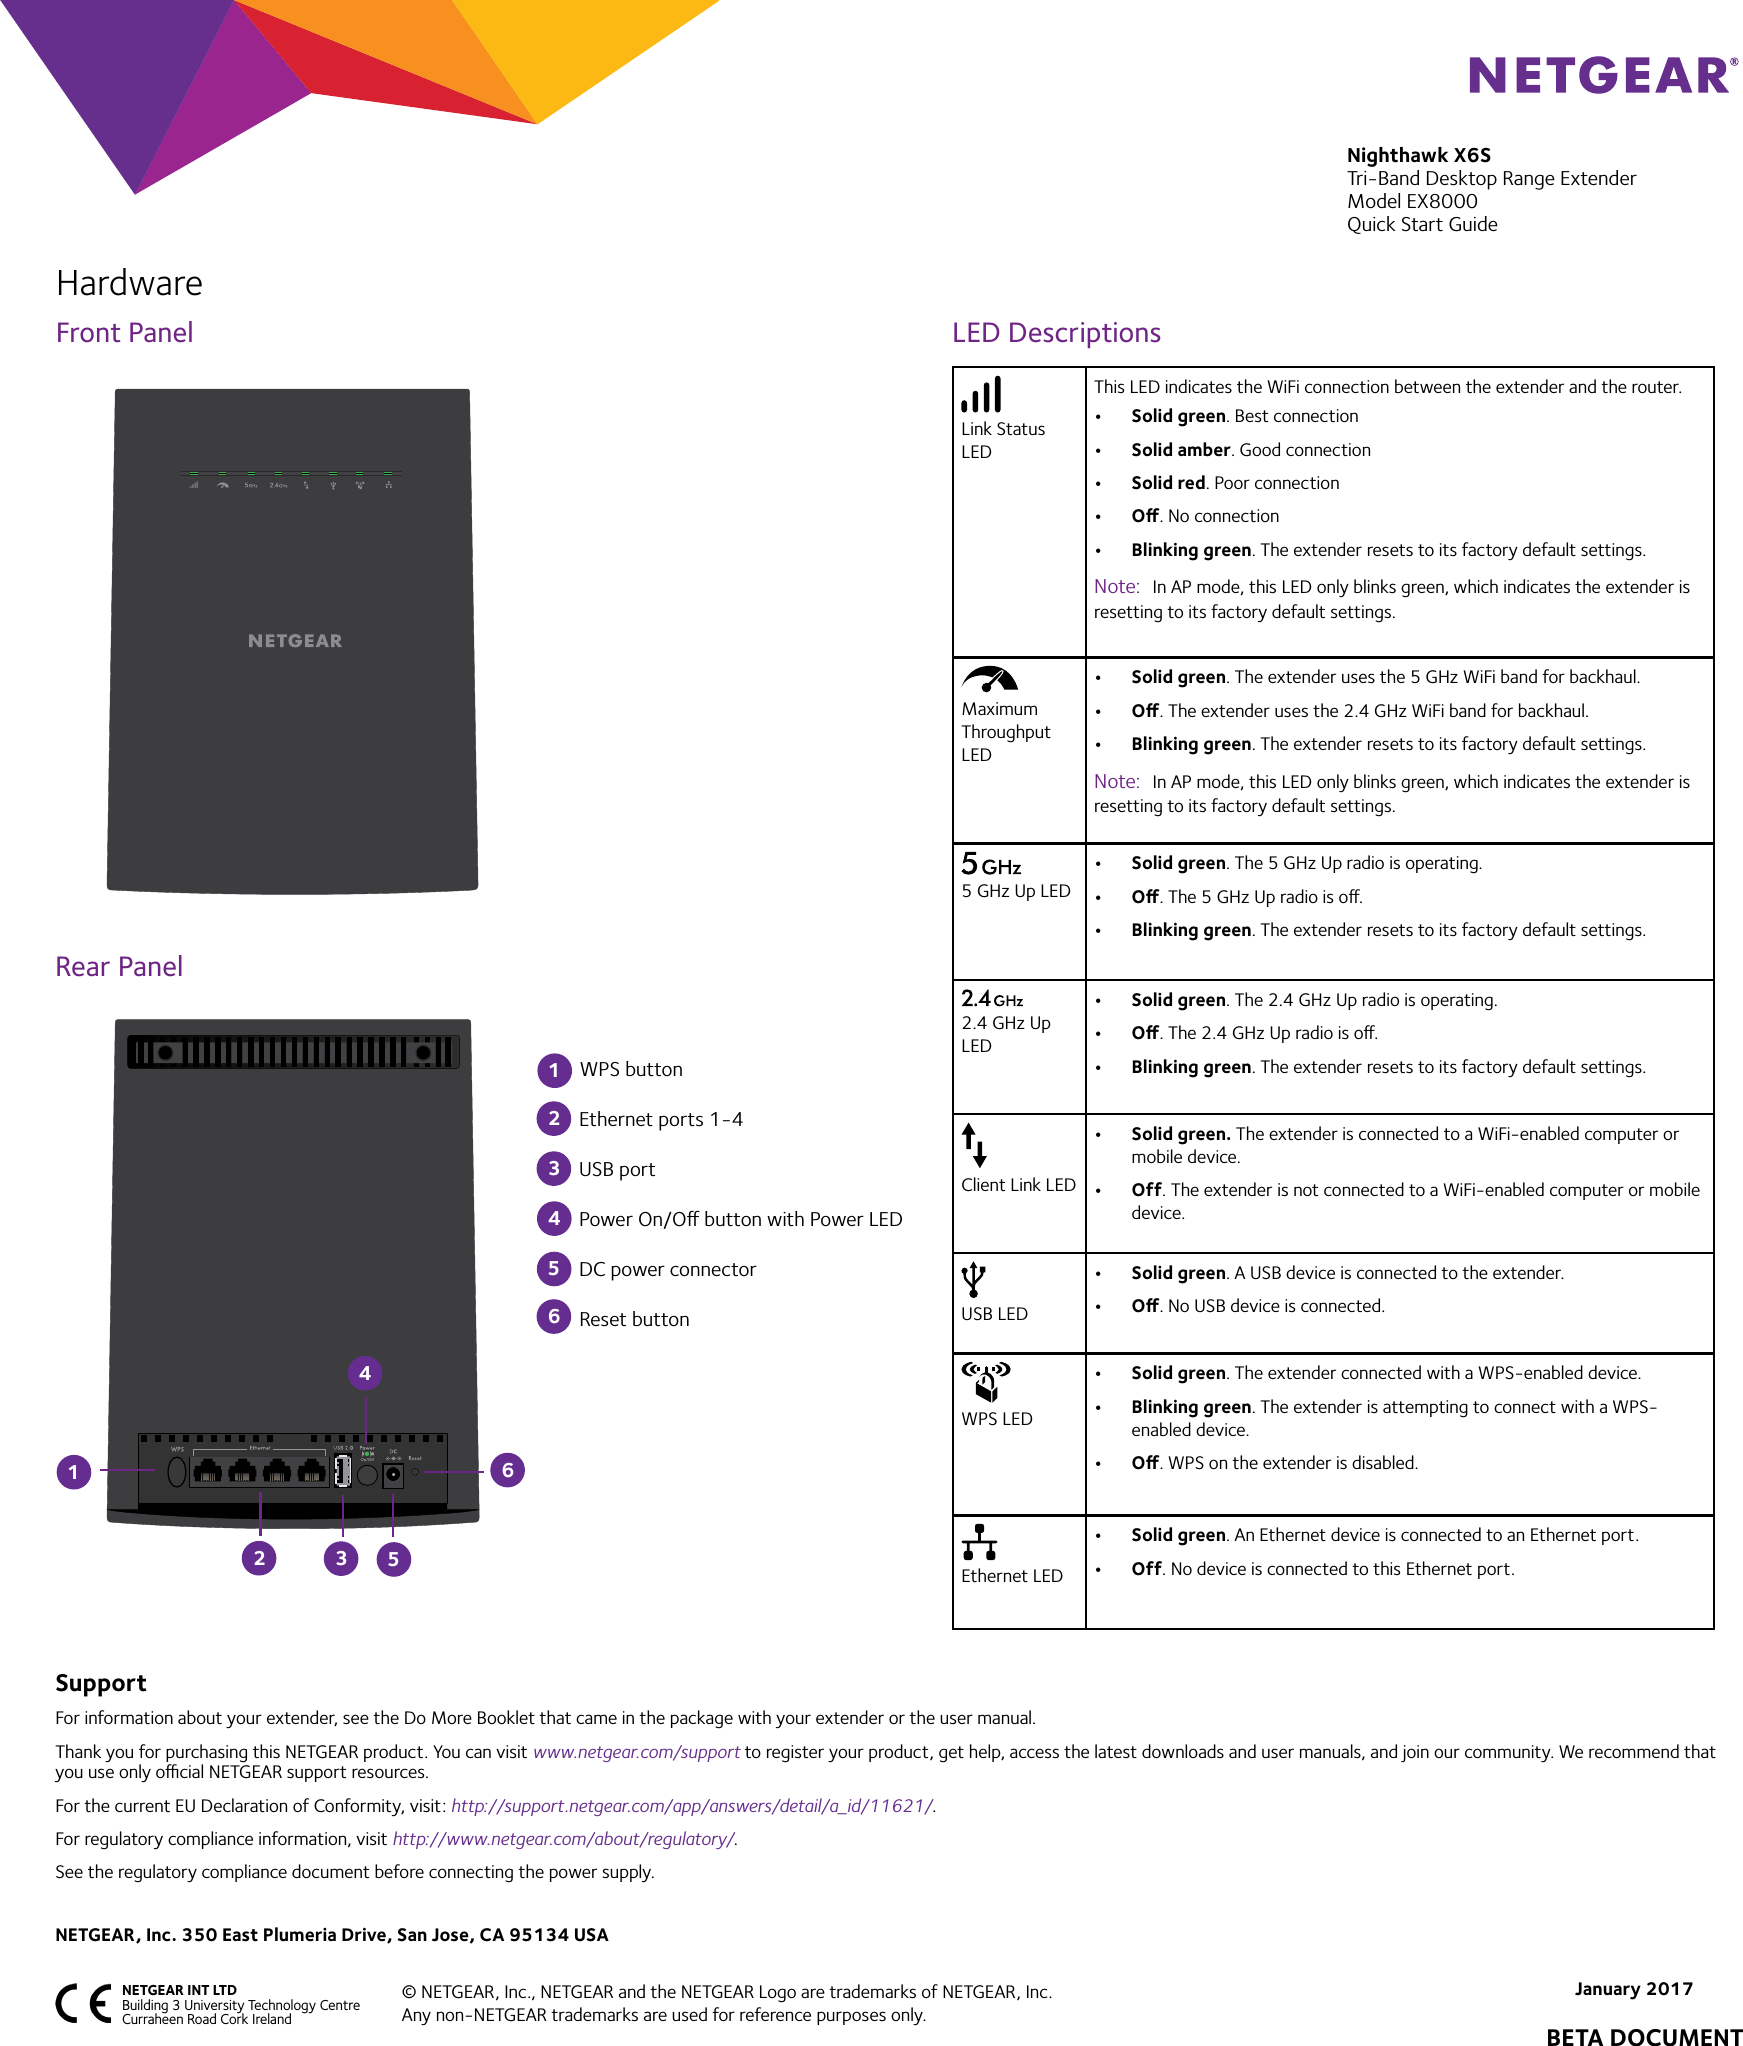
Netgear orporated 17100372 Nighthawk X6S AC3000 Tri-Band WiFi Range Extender User Manual

Netgear Incorporated Nighthawk X6S AC3000 Tri-Band WiFi Range Extender

Contents

User Manual

Nighthawk X6STri-Band Desktop Range Extender Model EX8000Quick Start Guide1.  Turn on your extender.Place the extender close to your WiFi router. Plug the extender into an electrical outlet. Press the Power button if necessary.2.  Connect to your WiFi router.Press the WPS button on the extender. The WPS LED blinks green. Within two minutes, press the WPS button on your WiFi router. When the extender connects to the router the WPS LED lights solid green.After a few seconds, the Link Status LED and the Maximum throughput LED light solid green, indicating a good connection between your WiFi router and your extender. If the Link Status LED or the Maximum Throughput LED does not light, try again. If the LEDs still does not light, follow the instructions for No (or not sure) on the right.Note:  If your router is a dual-band router, your extender attempts to connect to the router’s 5 GHz band first.3.  Choose a location and check the signal strength.Now that the extender is connected to your WiFi router, you can move it to a location that will boost your WiFi range. The location that you choose must be within the range of your existing WiFi router network. The Link Status LEDs help you choose a spot where the extender-to-router connection is optimal. For more information, see LED Descriptions on the back of this quick start guide.If you get no connection or a poor connection, move the extender closer to your WiFi router and try again until the Link Status LED lights green.4.  Connect your devices.Take your WiFi-enabled computer or mobile device to the location with poor WiFi router coverage. Find and connect your WiFi-enabled computer mobile device to the new extended network. If your router is the Nighthawk X4S AC2600 Smart WiFi Router Model R7800, the extender uses the same network name and password as your router. If your router is not the Nighthawk X4S AC2600 Smart WiFi Router Model R7800, the extender creates two new extended WiFi networks. The extended WiFi network names are based on your router’s WiFi network name, with _2GEXT and _5GEXT at the end of the name. For example:Existing router network names.    MyWiFi and MyWiFi-5GNew extended network names.     MyWiFi_2GEXT      and      MyWiFi-5G_5GEXT1.  Turn on your extender.Place the extender close to your WiFi router. Plug the extender into an electrical outlet. Press the Power button if necessary.2.  Connect to the extender.On a computer, tablet, or smartphone, open the WiFi connection manager and connect to the extender network called NETGEAR_EXT. When you are connected to the extender, the Client LED lights solid green.3.  Set up with a web browser.Launch a web browser. You are automatically taken to a login page. If a login page does not display, visit www.mywifiext.net. If your router is the Nighthawk X4S AC2600 Smart WiFi Router Model R7800, follow these steps:a.  Click the NEW EXTENDER SETUP button.b.  Complete the fields on the Create an Account page and click the NEXT button.c.  Select your country or region from the menu and click the CONTINUE button.d.  Click the WiFi RANGE EXTENDER button.e.  Select a WiFi network to extend and click the NEXT button.If you do not want to extend both WiFi bands, clear the 2.4GHz WiFi Networks or the 5GHz WiFi Networks check box.f.  Select the Yes radio button to enable seamless roaming on the extender and click the NEXT button.g.  In the Password (network key) field, type the existing WiFi network password and click the NEXT button.h.  Connect your computer or mobile device to the WiFi network using the same WiFi settings as your router.The extender uses the same network name and password as your routeIf your router is not the Nighthawk X4S AC2600 Smart WiFi Router Model R7800, follow these steps:a.  Click the NEW EXTENDER SETUP button.b.  Complete the fields on the Create an Account page and click the NEXT button.c.  Select your country or region from the menu and click the CONTINUE button.d.  Click the WiFi RANGE EXTENDER button.e.  Select a WiFi network to extend and click the NEXT button.If you do not want to extend both WiFi bands, clear the 2.4GHz WiFi Networks or the 5GHz WiFi Networks check box.f.  In the Password (network key) field, type the existing WiFi network password and click the NEXT button.g.  Set the network name (SSID) and password for your extended network and click the NEXT button.h.  Connect your computer or mobile device to the new extended WiFi network using the new SSID and password that you created5.  Choose a location and check the signal strength.Move the extender to a location that will boost your WiFi range. The location you choose must be within the range of your existing WiFi router network. The Link Status LED helps you choose a spot where the extender-to-router connection is optimal. For more information, see LED Descriptions on the back of this quick start guide. If you get no connection or a poor connection, move the extender closer to your WiFi router and try again until the Link Status LED lights green.Getting StartedDoes your WiFi router have a WPS button?Yes No (or not sure)WPS is an easy way to connect WiFi devices. The button might look like one of these:
SupportFor information about your extender, see the Do More Booklet that came in the package with your extender or the user manual.Thank you for purchasing this NETGEAR product. You can visit www.netgear.com/support to register your product, get help, access the latest downloads and user manuals, and join our community. We recommend that you use only ocial NETGEAR support resources.For the current EU Declaration of Conformity, visit: http://support.netgear.com/app/answers/detail/a_id/11621/. For regulatory compliance information, visit http://www.netgear.com/about/regulatory/. See the regulatory compliance document before connecting the power supply.NETGEAR, Inc. 350 East Plumeria Drive, San Jose, CA 95134 USA NETGEAR INT LTD  Building 3 University Technology Centre  Curraheen Road Cork Ireland © NETGEAR, Inc., NETGEAR and the NETGEAR Logo are trademarks of NETGEAR, Inc. Any non-NETGEAR trademarks are used for reference purposes only.January 2017Nighthawk X6STri-Band Desktop Range ExtenderModel EX8000Quick Start GuideBETA DOCUMENTLink Status LEDThis LED indicates the WiFi connection between the extender and the router.•  Solid green. Best connection•  Solid amber. Good connection•  Solid red. Poor connection•  O. No connection•  Blinking green. The extender resets to its factory default settings.Note:  In AP mode, this LED only blinks green, which indicates the extender is resetting to its factory default settings.Maximum Throughput LED•  Solid green. The extender uses the 5 GHz WiFi band for backhaul.•  O. The extender uses the 2.4 GHz WiFi band for backhaul.•  Blinking green. The extender resets to its factory default settings.Note:  In AP mode, this LED only blinks green, which indicates the extender is resetting to its factory default settings.5 GHz Up LED•  Solid green. The 5 GHz Up radio is operating.•  O. The 5 GHz Up radio is o.•  Blinking green. The extender resets to its factory default settings.2.4 GHz Up LED•  Solid green. The 2.4 GHz Up radio is operating.•  O. The 2.4 GHz Up radio is o.•  Blinking green. The extender resets to its factory default settings.Client Link LED•  Solid green. The extender is connected to a WiFi-enabled computer or mobile device.•  Off. The extender is not connected to a WiFi-enabled computer or mobile device.USB LED•  Solid green. A USB device is connected to the extender.•  O. No USB device is connected.WPS LED•  Solid green. The extender connected with a WPS-enabled device.•  Blinking green. The extender is attempting to connect with a WPS-enabled device.•  O. WPS on the extender is disabled.Ethernet LED•  Solid green. An Ethernet device is connected to an Ethernet port.•  Off. No device is connected to this Ethernet port.HardwareLED DescriptionsRear PanelFront Panel1 WPS button2 Ethernet ports 1-43 USB port4 Power On/O button with Power LED5 DC power connector6 Reset button123456

Navigation menu